In this Jasper report tutorial, we are going to introduce how to create a new jasper report template
and generate the same report in multiple formats with JasperSoft Studio.
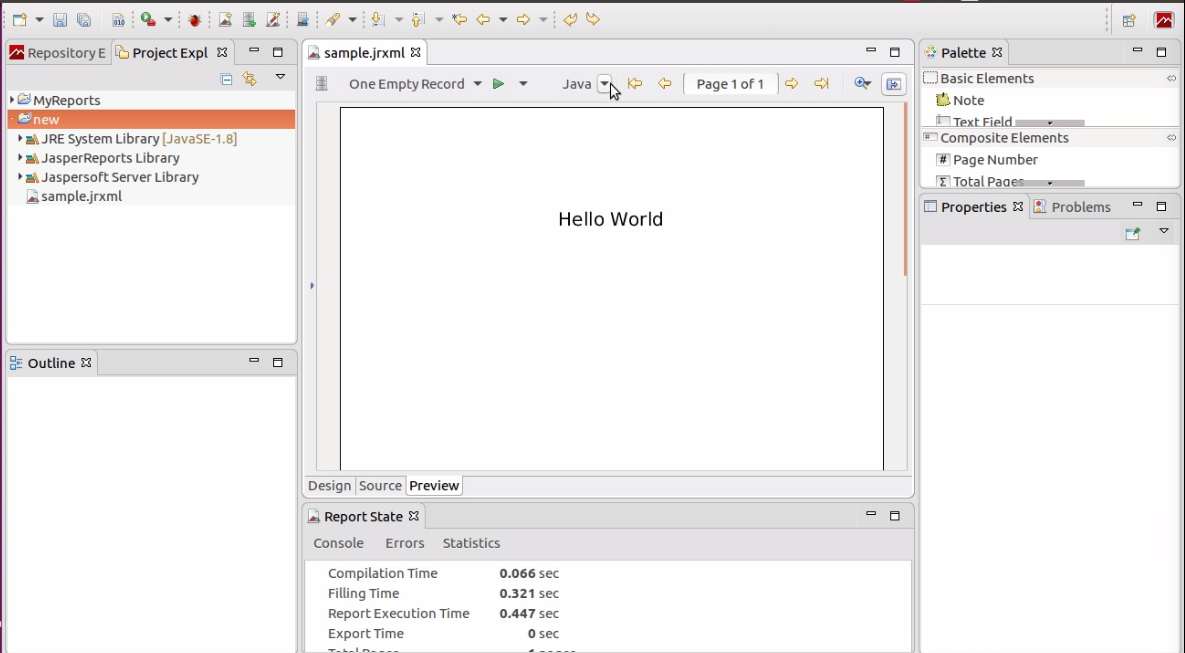
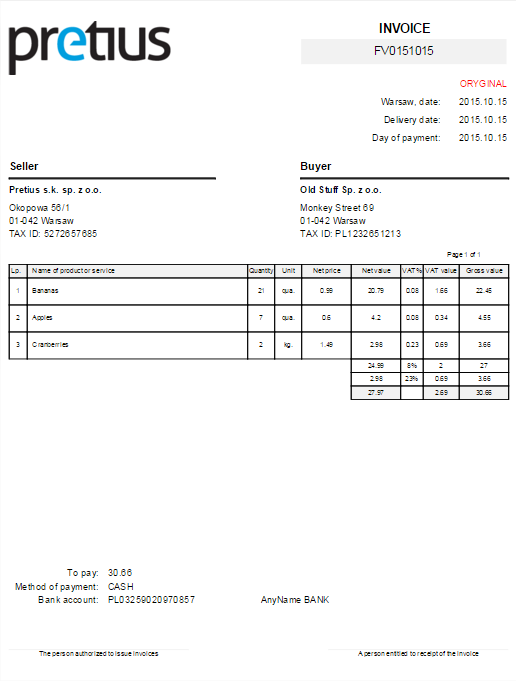
The output of the final Jasper report (Hellow World Jasper Report)
Let’s start learning Jasper Report with JasperSoft Studio.
Create a new Jasper report project
Right-click on the Project Explorer palette and go to New > Project or click on File > New > Project.
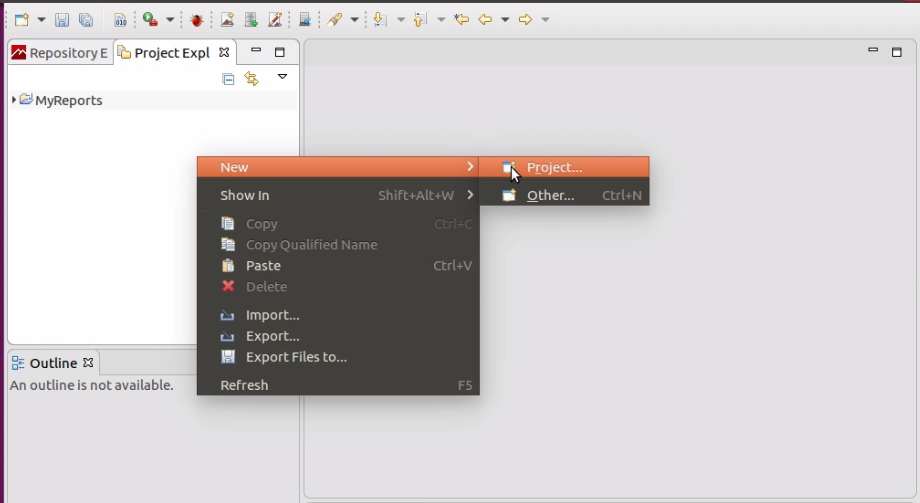
Select the JasperReports project and click on Next.
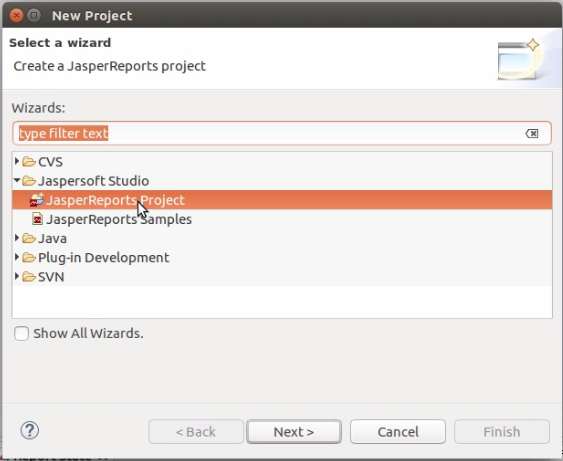
Type a name for the JasperReports project and click on Finish.

We have created our first Jasper Report project.
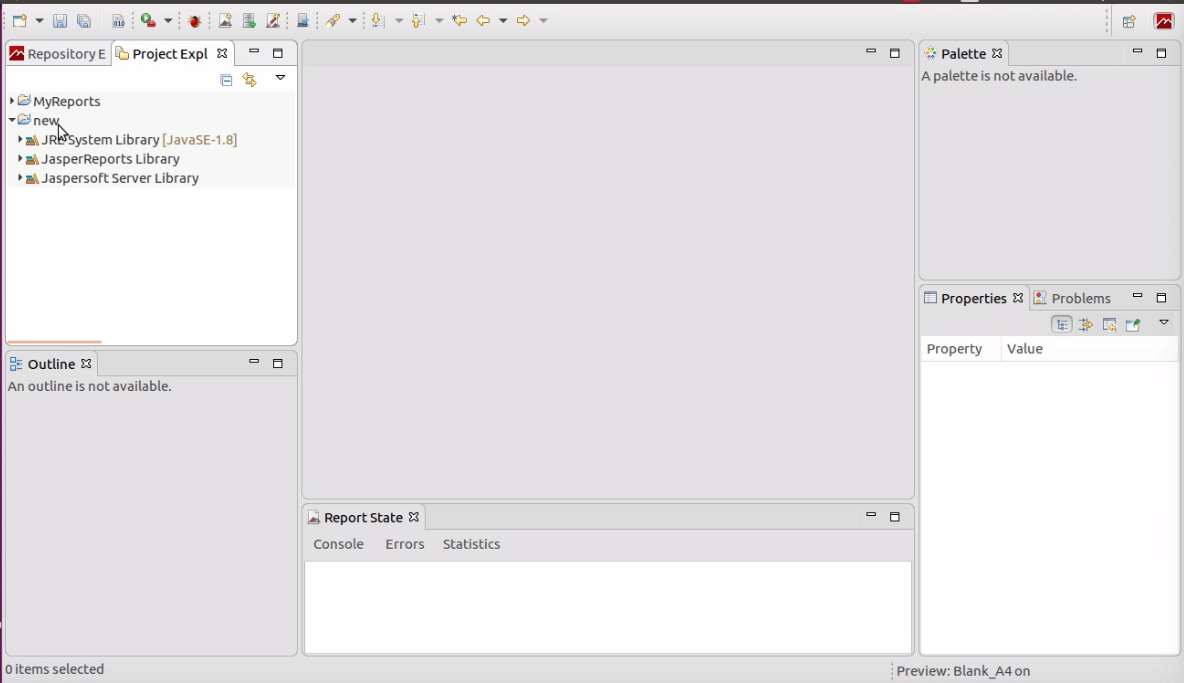
Let’s create our first Jasper Report.
Create a new Jasper report
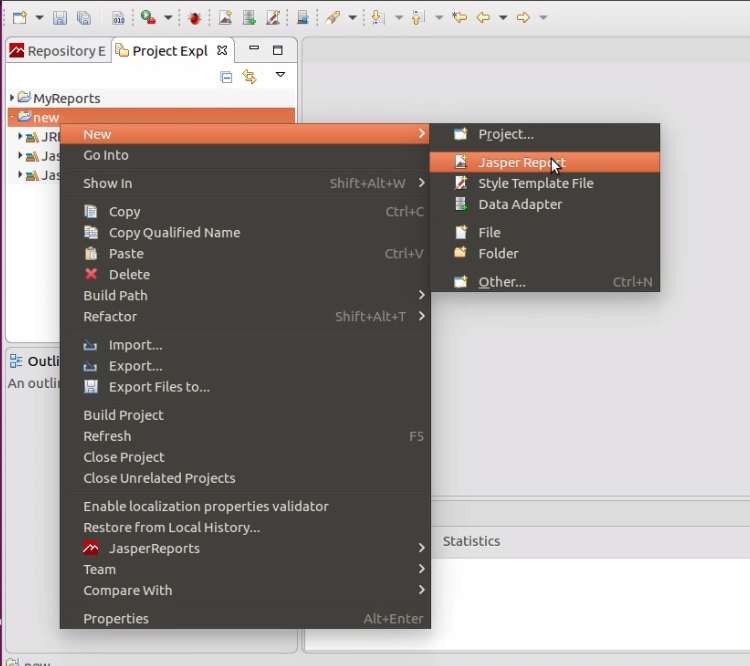
Right-click on the Project go to New > Jasper Report.
Create a new Jasper report
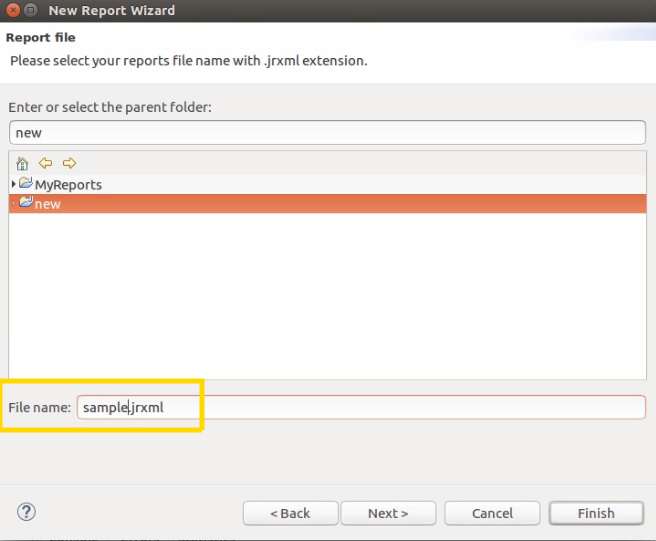
You can find lots of sample templates to start a Jasper report. I will start with a Blank A4.

I am going to name my report template to sample.jrxml
For this tutorial, we are not going to use a data source so I will select «One Empty Record-Empty rows as a Data Adaptor»

Click Next and Finish. We have created our first jasper report template.

Hellow World Jasper Report
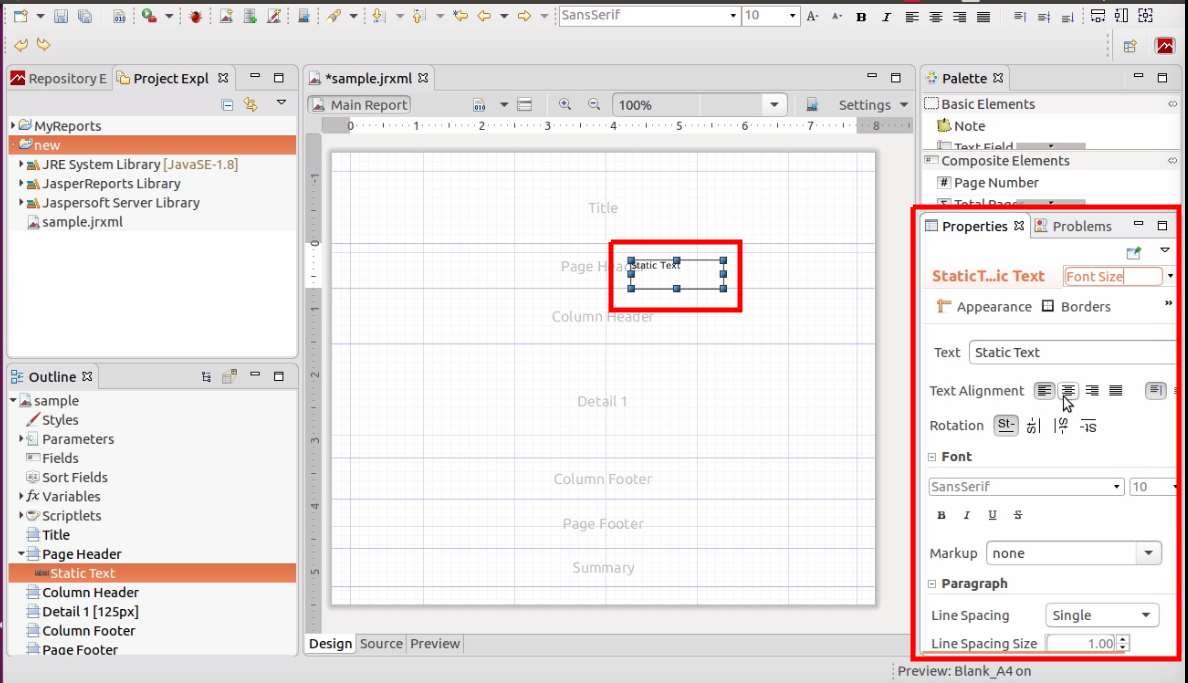
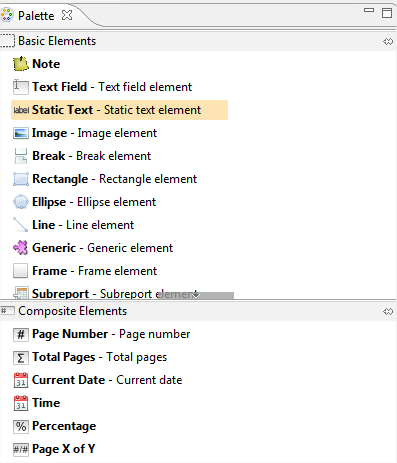
Drag and drop the Static Text element under the Basik Elements from the Pallette.

You can modify the Properties of the Static Text (Font Size, Font style etc) field from the Properties Palette.
If you cannot find it on the screen, right-click on the report template and click on the Properties.
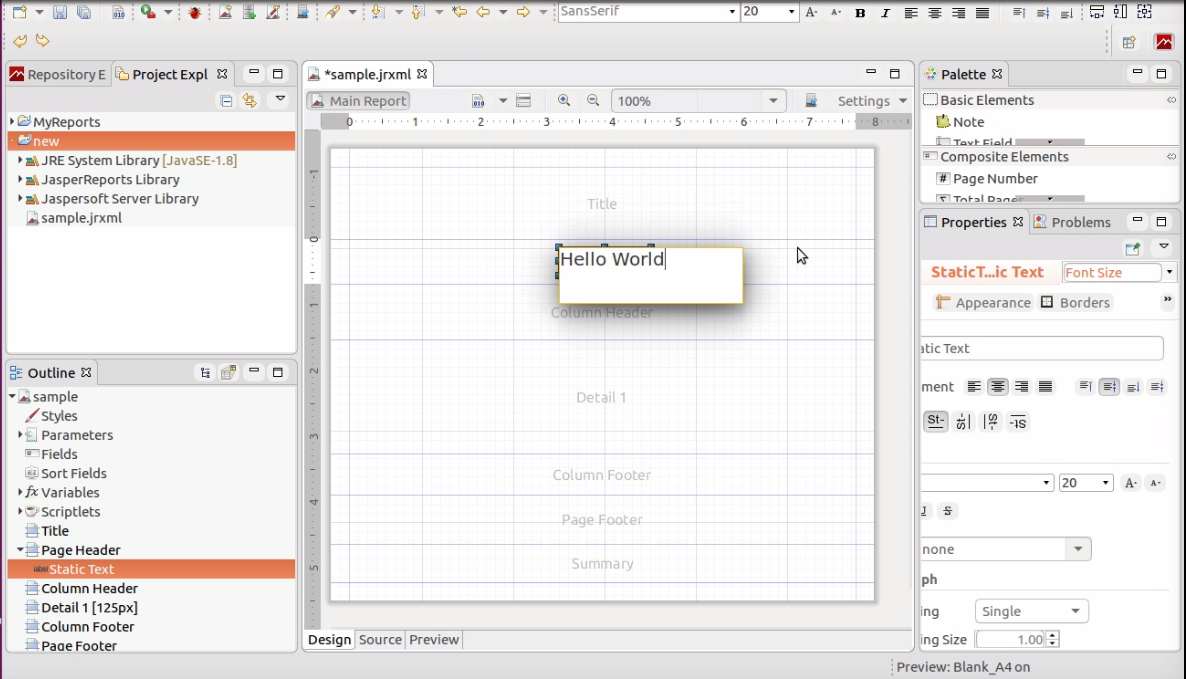
Double click on the Static Text to edit the text that you want to display.
To preview the generated report click on the Preview tab which was at the bottom of the template design.
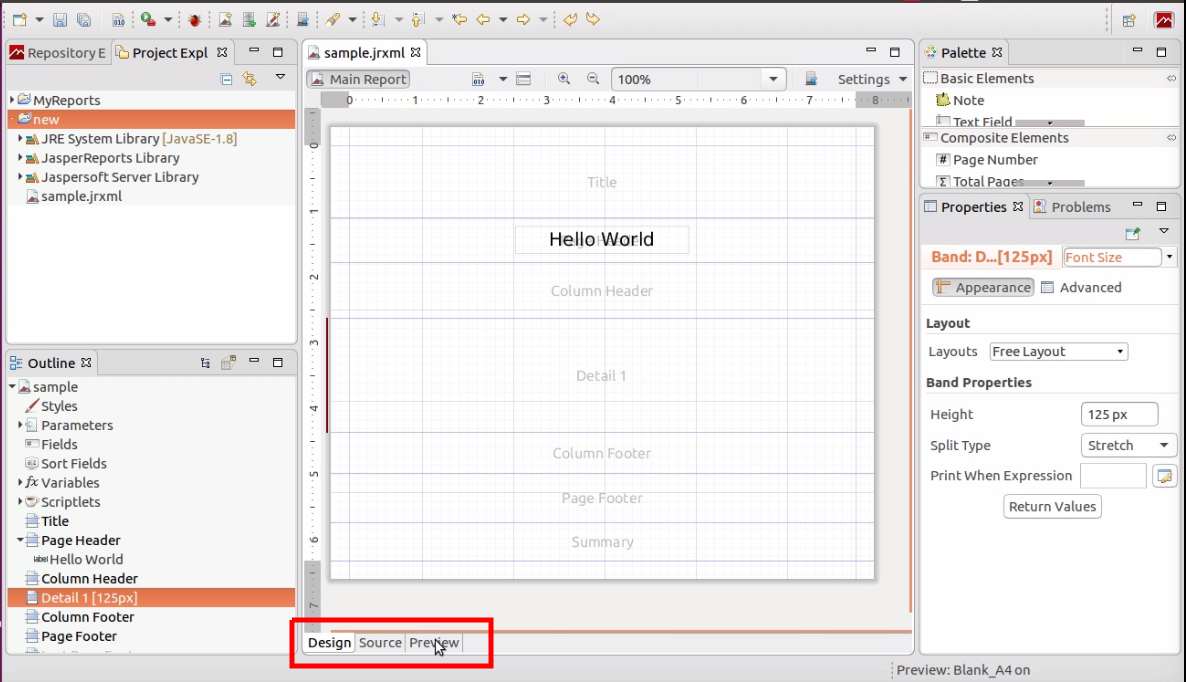
Finally, we have able to preview our first jasper report template.
Export Jasper Report into different formats(PDF, Excel, CSV etc.)
Click on the export format selection. Default it will be displayed as Java. You can find the list of available formats from there.

Your PDF will be open with your default PDF viewer application.

For more information, check out our video.
Thank you for checking out our tutorial. Hope you will enjoy this tutorial and learn a lot from this.
Sometimes you need software that makes a certain process a bit easier – more streamlined. One example of such circumstances is printing documents to various formats, such as PDF, XLSs, and DOCx. Thankfully, there’s an easy to use, and free set of tools made by TIBCO Jaspersoft, that’ll help you do just that.
While executing an internal project using Oracle APEX technology, we were looking for a solution to streamline the processes of creating a document template and printing it to PDF, XLSx, DOCx formats. The goal was to get out of the currently used technology which, while great, only supports printing to the PDF format. The solution? The pl-jrxml2pdf packet that’s based on the work of Jaspersoft. The company has a history of creating free tools for designing and generating documents in various data formats.
Jaspersoft’s products proved to be the right choice. The experience gained in iReport Designer helped with the template design in Jaspersoft Studio, and the reporting process was assigned to the print server – JasperReports Server. Following this path, the task was accomplished and the user was able to print documents to the format of their choice.
JasperReports Server – introduction
JasperReports Server is a free and self-contained server that enables you to deliver key business information to your users in real-time, in a fixed data format, and in a variety of file formats. Reports can be executed and viewed within the application, exported to the desired output format, or scheduled for execution at a later time. JRS allows you to export files in popular formats such as PDF, CSV, DOCx, XLSx, RTF, ODT, PPTx.
JasperReports free server is a tool created for business analysts and IT professionals. It’s easy to install and configure, which is one of the reasons why you should get to know this solution better. In this part of the article, I will try to introduce the tool to all user groups. My purpose here is to discuss the possibilities offered by implementing this type of server in your company. The article was written based on version 6.1.0 of the software. It’s worth noting that the product is available under the AGPL license.
Jaspersoft and TIBCO – a little bit of history
The origins of Jaspersoft Corporation date back to 2001. The demand for reporting sparked the creation of the company’s first product, JasperReports Library – a library written in Java for integrating applications into this environment. The next step was to create a visual editor for creating report templates, so in 2002 Jaspersoft iReport Designer, a graphical editor for JasperReports Library was released. This product greatly simplified reporting.
In the meantime, the business intelligence market was growing, primarily due to the increasing availability of open-source tools. The company created JasperReports Server, a new product line that combined the advantages of JasperReports Library and iReport. Jaspersoft’s next step was to develop the Jaspersoft OLAP product, which led to the Jasper Business Intelligence Suite, integrating all previous Jaspersoft products.
Currently, the company offers tools for the Business Intelligence sector, but the brand is also involved in the OpenSource market, where it provides its solutions for free, under the name Community. In 2014, the company was bought by TIBCO for $185million and has since existed under the name TIBCO Jaspersoft.
What does the tool contain
JasperReports Server Community requires a Java application server and a database to create a repository in order to work properly. After downloading JRS, the installation process can install Tomcat server and PostgreSQL database automatically for us and the services will run depending on the Jasper server. It’s also possible to connect JRS to services already installed on the server. Moreover, while the free version supports the MySQL server, with the paid version you can also use commercial databases, for example, ORACLE Database, as a data repository.
JasperReports Server – what else is useful
The free version of JRS does not have a document template editor. For this purpose, you can use another Jaspersoft tool – Jaspersoft Studio.
Business information center
JasperReports Server allows integration with multiple data sources simultaneously. Data sources can be text files, relational and non-relational database environments, Java applications connected via JavaBean Datasource. JRS can be a centralized business information repository aggregating data from many other internal and external systems. In practice, a single JRS server connected to multiple data sources is sufficient. The retrieved information can be presented in a way that is readable by a regular user.
The server administrator can create accounts for users and assign them to selected groups – roles, granting rights to view, create and execute selected reports. There should also be no problem with the configuration of authentication via LDAP.
According to the producer, the commercial version of JRS additionally enables the user to create report templates by dragging and dropping from a web browser, just like in Jaspersoft Studio. Moreover, it gives you the options to create and view dashboards, and virtualize data from many remote systems to a single metadata string. That, in turn, allows for complex analyses without ETL or big data warehouses. With JRS you can create interactive table transformations (pivot), charts, and real-time recalculations.
Detailed version comparison can be found here.
Where to use JasperReports Server
JRS allows you to connect to multiple data sources simultaneously within a single server instance. The server administrator can create connection sources to databases such as PostgreSQL, MySQL, Oracle DB, Microsoft SQL Server, Sybase, or IMB DB2. The commercial version additionally allows the use of Hadoop, Hibernate and much more.
Datasets available from the JasperReports server can be used to create user-readable reports prepared in a form that is clear to the user. Bar charts, column charts, grid charts, tables, lists, images and more can be used for such a presentation. One of the features is also a print server. Thanks to the support for REST Web Service API, JRS allows you to integrate the server with other applications. With this solution, the developer can use the service as a print server for documents and reports, printed to PDF or Excel files, for example.
Report template design
JasperReports Server can be a centralized repository of company information or a print server for more or less complex reports. As mentioned earlier, the commercial version of JRS allows you to design graphical documents directly in the web browser. In the free version, nothing is stopping you from using another free tool – Jaspersoft Studio. It offers an advantage of intuitive interface, which allows you to quickly create templates by using the drag and drop method. Users familiar with Jaspersoft products probably remember the previous generation of the tool called Jaspersoft iReport Designer, nowever that software’s official support ended in December 2015.
Integration with other applications – REST Web Service API
Both in the free and in the commercial version of JRS there is a web services layer. It allows you to easily connect any application to the JasperReports server, using a simple API. Web services are implemented using the REST (Representational State Transfer) Web Services API, which significantly extends the functionality of the server. As mentioned earlier, this allows integration with other applications. Developers with access to the server are able to create a document template (like a VAT invoice, for example), export such a template to JRS and connect it to their application using the available API. You can find more information on this functionality in the Jaspersoft documentation. Also, part of this article is devoted to the topic of integrating JasperReports Server with an Oracle APEX application.
Jaspersoft Studio tutorial – How to make your own VAT invoice template
Every enterprise needs documents and reports. In this part of the article, you can find information on how to use Jaspersoft Studio, a free program from TIBCO Jaspersoft, which is made available under the Eclipse license. It’s a tool that effectively simplifies the process of creating templates. In the downloadable content is a ready-to-import VAT invoice template, made available under the MIT license.
Prepare the required tools
Before we start working on the VAT invoice template, like any self-respecting craftsman, we’ll need some tools. First of all, you’ll need to download the free program Jaspersoft Studio. In the Release tab, you can find the current version – 6.17.0 (the article was written based on version 6.1.1.). The product is available for the most popular system environments – macOS, Linux, Windows.
In the next step, we need data. I provide a script for the Oracle Express Edition database (I worked with version 11g, the current one is 21c), which should be run according to the instructions included in the file. When you are done, you should have access to the data we will be working on later in the material. If you do not have the Oracle database on your computer, I encourage you to download and install the file from the Oracle website.
Connect JasperStudio to Oracle Database
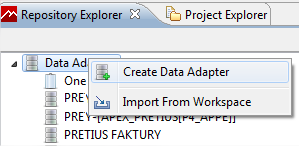
If Jaspersoft Studio is installed and the Oracle database is configured, you can now create a connection to it in Jasper. To do this, start the program and go to the Repository Explorer tab, where you right-click on Data Adapters. From the cascade menu, choose Create Data Adapter.
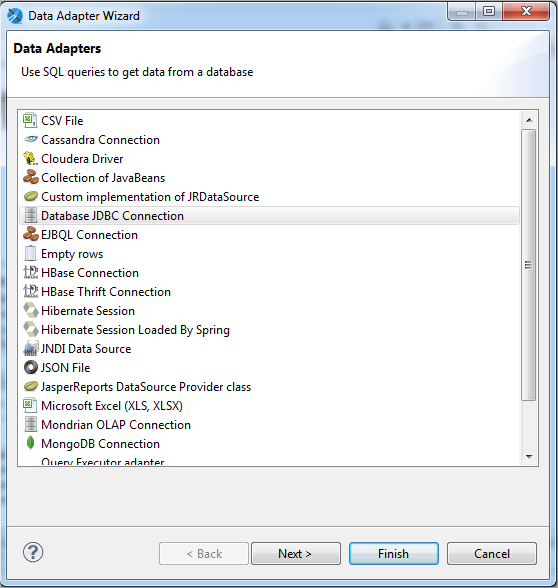
In the new Data Adapter Wizard window, search for and click Database JDBC Connection, and proceed.
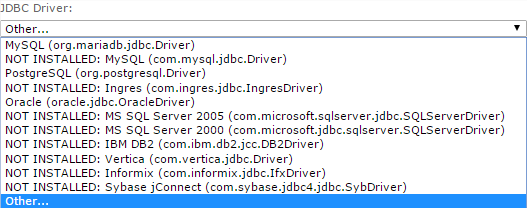
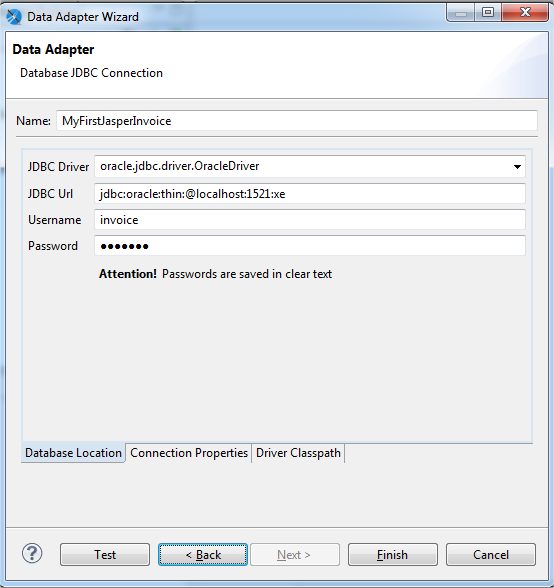
In the new window, complete the form as follows:
- Name: MyFirstJasperInvoice,
- JDBC Driver: oracle.jdbc.driver.OracleDriver,
- JDBC Url: jdbc:oracle:thin:@localhost:1521:xe, where after the “@” is the name or IP of the Oracle server, then the port and database SID,
- Username: invoice,
- Password: invoice.
In the next step, you need to provide the path to the JDBC driver for the Oracle database you currently use. To do this, go to the Driver Classpath tab and select the driver, which can be downloaded from the Oracle website.
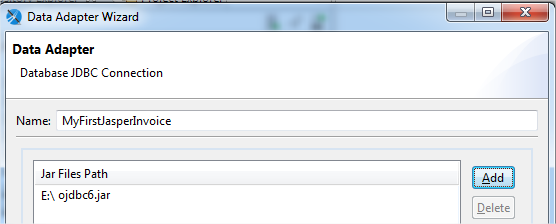
After filling out the form you can test the connection by clicking the Test button. If you get a positive message, you can save the settings using the Finish button.
Do you need custom software solutions for your company?
Learn your tools
After the first successes, it’s time to get better acquainted with the tool we work with. Jaspersoft Studio is a document template editor. The program runs on the Eclipse engine and is made available under the license of the same name. Officially, Jaspersoft Studio has become the successor of iReport Designer and is recommended for further work on documents. It is worth noting here that the latest update of the tool is not backward compatible and attempting to compile reports created in iReport Designer may fail. The same in the other direction.
The program should not cause major problems, especially for users who previously worked in Eclipse IDE. On the left side of the program, we have the already known Repository Explorer where we can create a connection to our data sources. Below, in the same window (Servers section), we can establish a connection to JasperReports Server, which was discussed in the previous section of the article. On the same page, in the next tab should be the Project Explorer. There you will find our new project, which we will create in a moment. On the right side of the application is Pallete and Composite Elements, a collection of useful components that we will be able to drag into our templates.
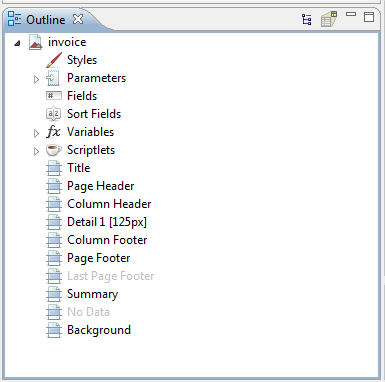
At the bottom of the application, you should see the Outline window, where you can find all the components that are on the template.
This should be enough to get you started. Please note that the application window configuration may differ from what the reader sees on his screen. If any of the windows in question are not visible, you can enable them in the Window -> Show view menu.
Create a template for your own VAT invoice
If you have correctly configured the connection to the Oracle database, just download the provided VAT invoice template and run the preview to see the sample. Additionally, I recommend reviewing the data structures that should already be installed on the Oracle database. The tables contain the invoice data that we are about to see on the PDF document.
Open and execute
You need to import the VAT invoice template design into Jaspersoft Studio. Just download the file, no need to unzip it. In Jaspersoft Studio, create a new project, and then from the cascade menu on it, select Import. In the new window, expand General and select Archive File.
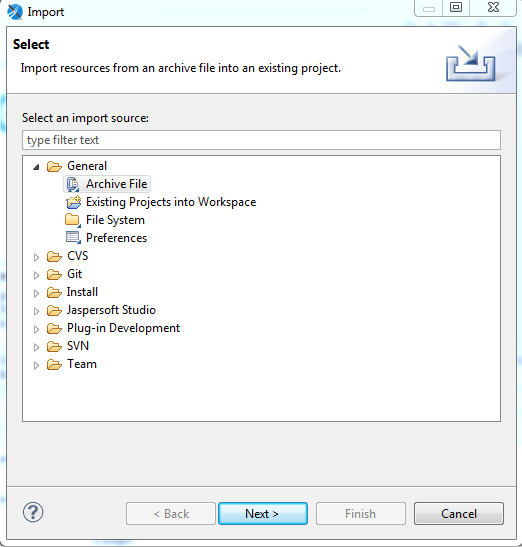
In the new window select the downloaded JasperInvoice.zip file and then the project to which you want to import the files. Then just click Finish. If the package has been imported correctly, the new project files should appear in Project Explorer:
- invoice.jrxml,
- pretius_logo_basic_rgb.png.
You can view the document by clicking Preview from the tabs under the report.
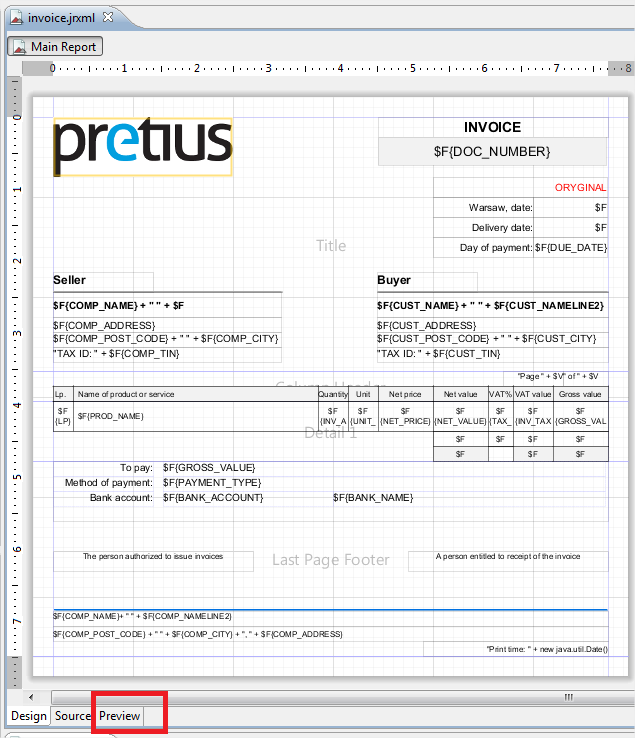
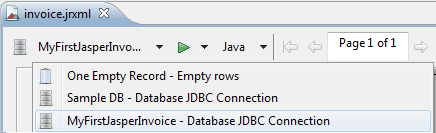
In the Preview window, select the appropriate data source by choosing the created connection from the drop-down list. See the screenshot below for details. When the program asks for the invoice_id parameter, enter the number “1” (if you have installed the Oracle database script provided in this article).
In the same window, Jaspersoft Studio allows us to preview our template in several versions. After expanding the list (see the screen above) we have access to many data formats such as HTML, PDF, DOCx, XLS, and many more. Just select one and the program will generate an invoice in the appropriate format. From the list below, you can select and preview a sample export to different types:
- PDF,
- Excel (XLSx),
- Word (DOCx).
Sample invoice can be downloaded here -> invoice.pdf.
Jaspersoft Studio software gives you the ability to dynamically and quickly create document templates. Just create a template once and then use it to generate many different documents. All template edits can be implemented instantly and the time saved can be invested in other tasks.
Downloads:
- Invoice data – ora-schema-invoice.zip
- JasperInvoice project (invoice template) – JasperInvoice.zip
Integrating Jaspersoft Studio with JasperReports Server
We have already become familiar with Jaspersoft Studio, we have a document template ready and we can import the result of our work to the JasperReports Server. Now the questions arise: how to do this? Is there a way to do it easily? The answer is yes. The tool which we used to build the template has one more interesting feature – it allows to export files to the repository server.
Getting ready
In this part of the article, the reader will learn the easiest way to integrate your Jaspersoft Studio report with JasperReports Server.
To work, you need JasperReports Server and Jaspersoft Studio. I assume that the server, as well as the application, are installed on the same computer you are working on (localhost). If you haven’t already done so, I encourage you to click on the links, download and install the tools.
Connecting JasperReports Server
If you have already read the previous part of the article, you know how to make a simple invoice template, and you should have no problem finding the Repository Explorer tab. With a standard installation of Jaspersoft Studio, the tab is located on the left side.
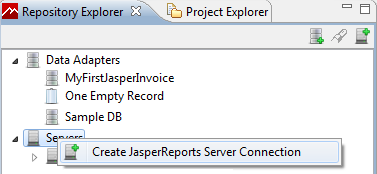
In that tab click on Servers and select Create JasperReports Server Connection from the cascading menu.
In the new window, complete the form according to the scheme:
- Name: localhost JasperServer,
- URL: http://localhost:port/jasperserver/, where we replace the port with our own port on which JasperReports Server listens,
- User: jasperadmin (the default value),
- Password: jasperadmin (the default value).
And click Finish to proceed.
After adding the server and expanding its details, we get a set of folders just like in the JasperReports Server application. You can expand each folder to learn more about it.
Integration – publication
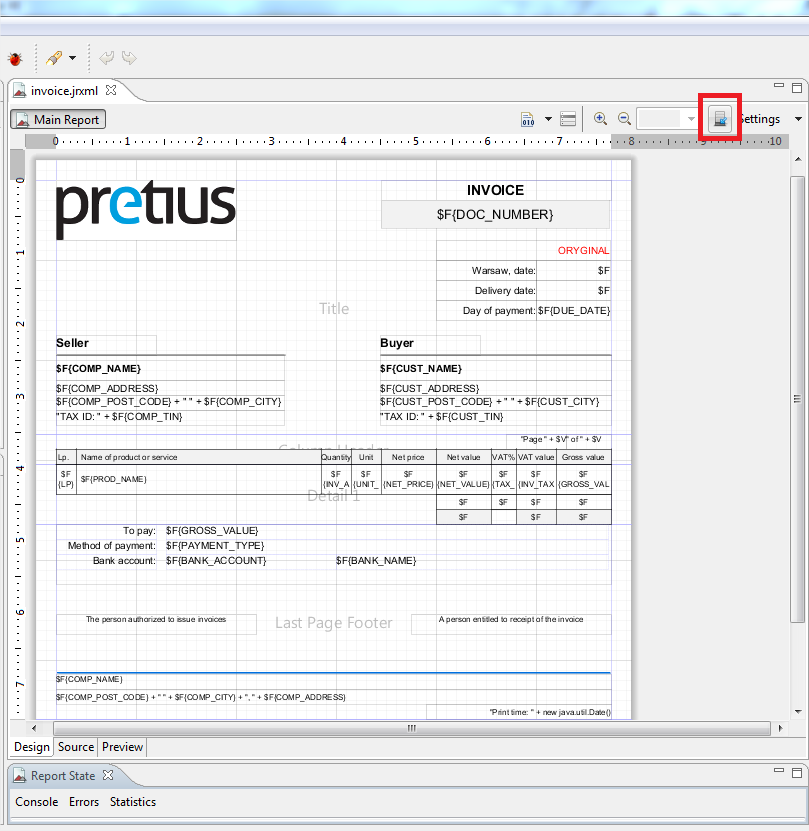
Go to the Project Explorer tab and click on the invoice template, the same one you can download from the previous part of the article. Now we find the button highlighted on the screen below.
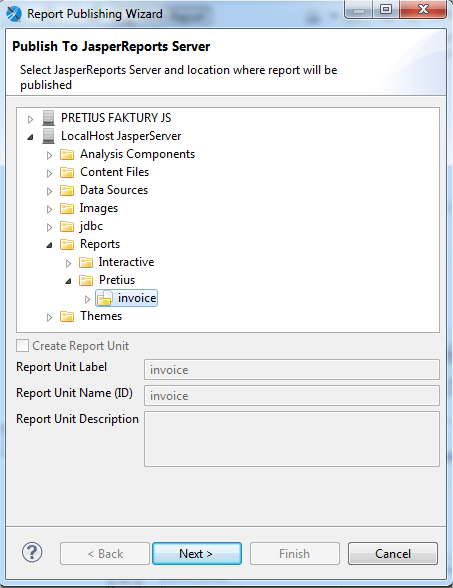
In the new window, click Reports or another directory where you want to store the invoice template. If you need a different or new directory, you can create one in JasperReports Server at http://localhost:port/jasperserver.
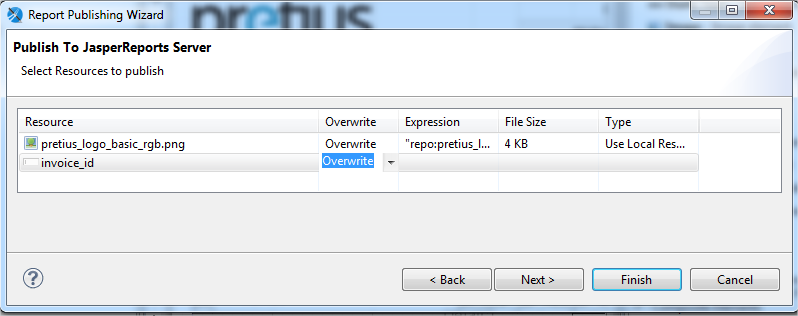
We move on by clicking Next. In the next window, we upload template resources – that is, files such as the invoice logo or the invoice input parameter, which is also a resource.
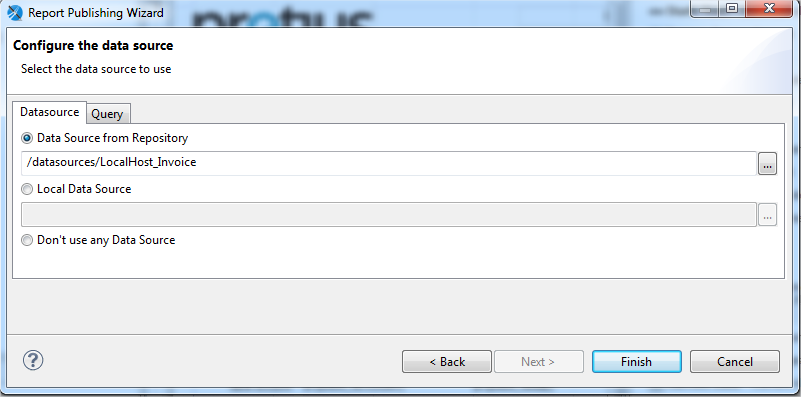
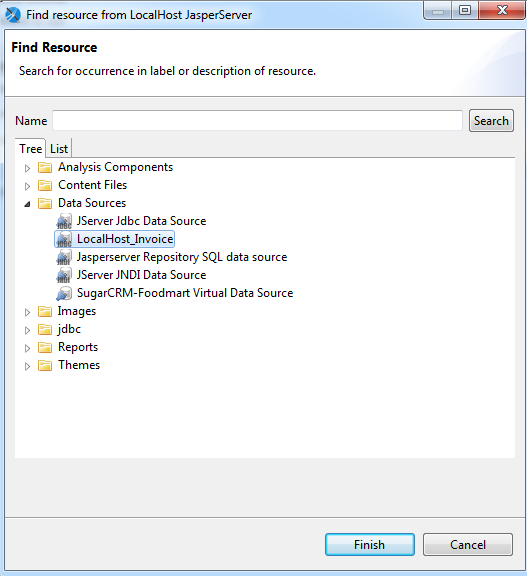
In the next step, we click Next yet again, and we select the data source (Select Data Source from Repository and expand Data Sources). Select the connection to the Oracle database server. Note, if you do not have a connection to the Oracle database configured in your JasperReports Server application, you should do so now and return to publish the template again. If you need information on how to create a new connection in JasperReports Server, I encourage you to check out the article on the Jaspersoft website.
After selecting the appropriate server, you can complete the process by clicking Finish.
Testing
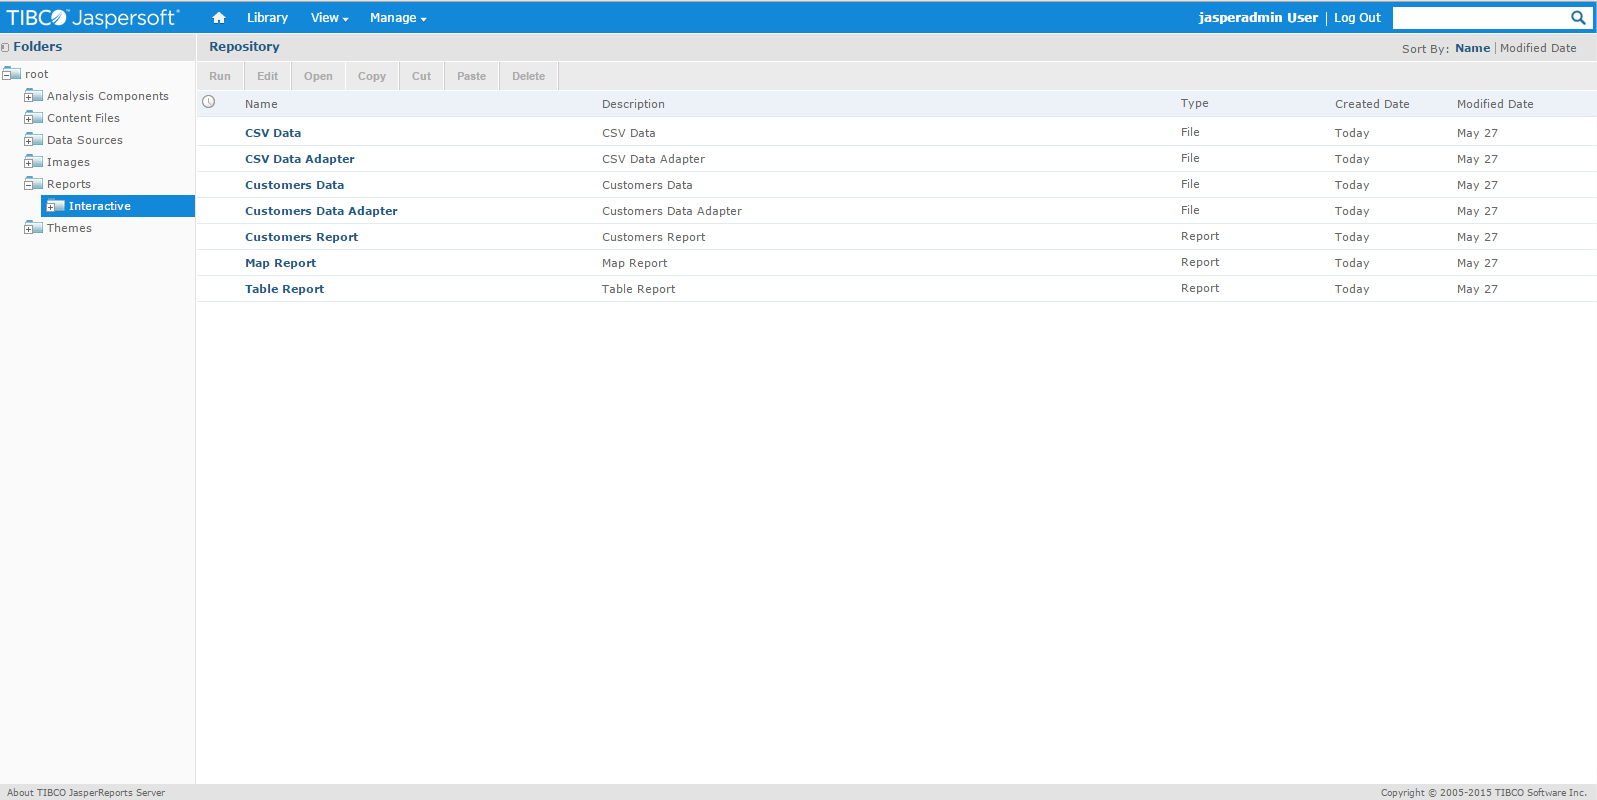
The invoice template has been uploaded to the repository. Now you can test the report in the JasperReports Server application. In this case, we go to http://localhost:port/jasperserver/, log in as jasperadmin (password: jasperadmin), expand Reports (or another previously indicated directory), and click on the template name (in my case invoice).
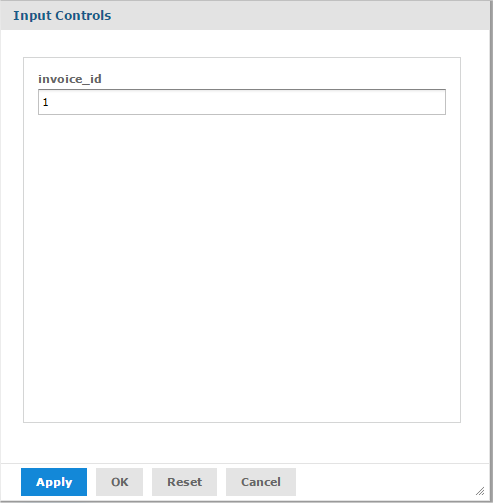
In the window that appears, as a parameter invoice_id put the number “1” and click OK. As a result, you will see on the screen an HTML document for the invoice with ID#1.
As you can see, the process of publishing a new or modified document template is simple and intuitive. For the most part, publishing a template should not cause you any problems. Except for publishing projects that contain subreports that Jaspersoft Studio does not want to send. In this situation, we can use the List element, which has its own data source. Another solution is to edit the template on the JasperReports Server page.
Conclusion
As you can see, Jaspersoft’s software is a powerful set of tools you can use to create document templates, and print them to various popular formats. You can use these solutions with Oracle DB technology, and applications based on Oracle APEX (I’ll cover the latter topic in the second part of the article). You can also download Jaspersoft’s programs for free, and that choice doesn’t require a compromise in terms of security or stability. What more can you reasonably expect from software for this specific purpose? Not much, honestly – it’s a very good alternative to commercial solutions. For more information on the technology you can also check out my other article: TIBCO Jaspersoft software tutorial: Integrating JasperReports Server with an application in Oracle APEX.
Are you looking for Jaspersoft experts?
Jaspersoft Studio is just a tip of the iceberg – Pretius knows many different technologies inside and out. We have a great deal of experience with big projects for companies operating in different industries. If you need software developers, drop us a line at hello@pretius.com (or use the contact form below). We’ll get back to you in 48 hours and tell you how we can help.
1. Введение в JasperStudio
Jaspersoft Studio — это конструктор отчетов на основе Eclipse для библиотеки JasperReports и сервера JasperReports, его можно использовать как подключаемый модуль Eclipse или автономное приложение. Jaspersoft Studio позволяет создавать сложные макеты, содержащие диаграммы, изображения, вложенные отчеты, кросс-таблицы и т. Д. Вы можете получить доступ к данным из различных источников, включая JDBC, TableModel, JavaBeans, XML, Hibernate, большие данные (например, Hive), CSV, XML / A и пользовательские источники, затем PDF, RTF, XML, XLS, CSV, HTML. , XHTML, текст, DOCX или OpenOffice.
2. Руководство по установке JasperStudio
Официальный сайт, просто скачайте и установите:
http://community.jaspersoft.com/project/jaspersoft-studio
Примечание. Официальный веб-сайт может загружаться медленно, его также можно загрузить по следующему адресу: TIB_js-studiocomm_6.6.0_windows_x86_64.exe
Адрес:https://download.csdn.net/download/u013456370/10581937
3. Новый проект отчета (JasperStudio)
File–>newProject: 
Имя проекта ввода: отчет, результат показан ниже.
4. Новый отчет отчета (Jasper report)
Щелкните правой кнопкой мыши по выбранному элементу new–> Jasper report: Примечание. Существует множество шаблонов, выбирайте сами!

Выберите источник данных: вот выбранный пример базы данных:
Выберите поля, которые будут использоваться в наборе результатов:
Пропустить выбор поля группы:
Результат стиля шаблона:
Результат предварительного просмотра после заполнения данных:
5. Настройте адаптер данных (DataAdapter)
Примечание. Существует много адаптеров данных конфигурации, здесь только представлено подключение к базе данных JDBC, в качестве примера используется база данных MySql.
Вы можете выбрать создание адаптера данных при создании нового JasperReport. Вы также можете создать адаптер данных вручную после создания проекта, как показано ниже.
А. Новый адаптер данных


B. Используйте адаптер источника данных
Щелкните правой кнопкой мыши на JasperReport
Выберите только что созданный источник данных:
Следующее использование аналогично использованию предоставленного адаптера демонстрационных данных:
6. Отчет о вкладке «Дизайн»
А. Детали группы

Б. Создать группу (Group)
При создании нового отчета вы можете настроить группировку после выбора набора данных или создать группу после создания JasperReport. Ниже описана операция по созданию группы после создания JasperReport:
Выберите поля для группировки:
C. Создание или изменение набора данных (DataSet)
1. Установите основной набор данных (набор данных): (выберите корень JasperReport, выбранный в представлении OutLine)
2. Создайте новый набор данных (Subdataset)
Местоположение вновь созданного набора данных:
7. Поле (Параметр) Переменная (Переменная)
Щелкните правой кнопкой мыши -> новый (Поле / Параметр / Переменная), чтобы создать соответствующие данные.
Field
Поле можно добавлять и использовать непосредственно из базы данных или вручную.
Parameter
        Предопределенные параметры отчета
                 Имя параметра Описание
                 REPORT_PARAMETERS_MAP содержит все пользовательские и встроенные карты параметров
                 REPORT_CONNECTION Это указывает на java.sql.Connection, предоставленный пользователем для источника данных JDBC
                 REPORT_DATA_SOURCE Это встроенный тип источника данных или определенный пользователем в экземпляре, предоставленном JRDataSource от имени любого пользователя.
                 REPORT_MAX_COUNT Это значение java.lang.Integer, позволяющее пользователям ограничивать записи из источника данных.
                 REPORT_SCRIPTLET Это указывает на net.sf.jasperreports.engine.JRAbstractScriptlet и скриптлет, содержащий отчет, пример, предоставленный пользователем
                 REPORT_LOCALE Это экземпляр java.util.Locale, содержит локаль, необходимую для пакета ресурсов.
                 REPORT_RESOURCE_BUNDLE Это указывает на объект java.util.ResourceBundle и содержит локализованные сообщения
                 REPORT_TIME_ZONE Это экземпляр java.util.TimeZone для формата даты
                 REPORT_VIRTUALIZER Это экземпляр net.sf.jasperreports.engine.JRVirtualizerobject, который используется для виртуализации веб-страниц (оптимизировать потребление памяти).
                 REPORT_CLASS_LOADER Это пример ресурса java.lang.ClassLoader, используемого в процессе заполнения отчета, такого как изображения, шрифты и ресурсы шаблона вложенного отчета.
                 IS_IGNORE_PAGINATION Если установлено значение java.lang.Boolean.TRUE, отчет будет создаваться на очень длинной веб-странице, и разрывы страниц не произойдут
- При использовании программы JasperReport Studio вам необходимо ввести фактическое значение параметра:


Variable
Встроенные переменные:
Имя переменной Описание
 PAGE_NUMBER Значением этой переменной является номер текущей страницы. Его можно использовать для одновременного отображения количества текущих страниц и общего количества страниц, используя специальную функцию элемента текстового поля JasperReports, атрибутvaluationTime.
 COLUMN_NUMBER Эта переменная содержит номер текущего столбца
 REPORT_COUNT Общее количество записей обработки, содержащихся в этой переменной отчета.
 PAGE_COUNT Эта переменная содержит количество записей, обработанных при создании текущей страницы.
 COLUMN_COUNT Эта переменная содержит количество записей, обработанных при создании текущего столбца.
 GroupName_COUNT Имя этой переменной происходит от имени соответствующей группы с суффиксом _COUNT последовательности. Эта переменная содержит количество записей в текущей группе.
Переменное выражение:
Функция, используемая для определения значения переменной. Она может состоять из нескольких полей и переменных.
8. Введение в интерфейс настроек управления
После выбора элемента управления в режиме «Дизайн» параметр свойства элемента управления появится справа:
Если он похож на CrossTab, элемент управления существует на странице наследования (то есть свойство, унаследованное от свойства Report 

9. Добавить элемент (Элемент)
А. Общий обзор элементов (базовый элемент)

JasperReports — это технология и соответствующая Java-библиотека построения отчётов, которые могут быть использованы для создания отчётов в Платформе НЕЙРОСС. Средства JasperReports позволяют получать данные из различных источников (в том числе реляционных СУБД), фильтровать их, преобразовывать и формировать на выходе документы в форматах PDF, HTML, Microsoft Excel и многих других. Генерация отчёта осуществляется на основе одного или нескольких XML-шаблонов, в которых можно определить все аспекты формирования документа — от запроса к источнику данных до структуры и внешнего вида конечного документа.
JasperReports относится к классу свободного программного обеспечения и распространяется под свободной лицензией GNU Lesser General Public License, что позволяет свободно использовать JasperReports в коммерческих продуктах.
Редактирование и отладку шаблонов JasperReports можно осуществлять в бесплатной программе Jaspersoft Studio. Программа позволяет редактировать, настраивать и тестировать шаблон в визуальном редакторе. На текущий момент для разработки шаблонов для Платформы НЕЙРОСС мы рекомендуем использовать Jaspersoft Studio версии 6.9.0. Все версии Jaspersoft Studio доступны для загрузки на официальном сайте.
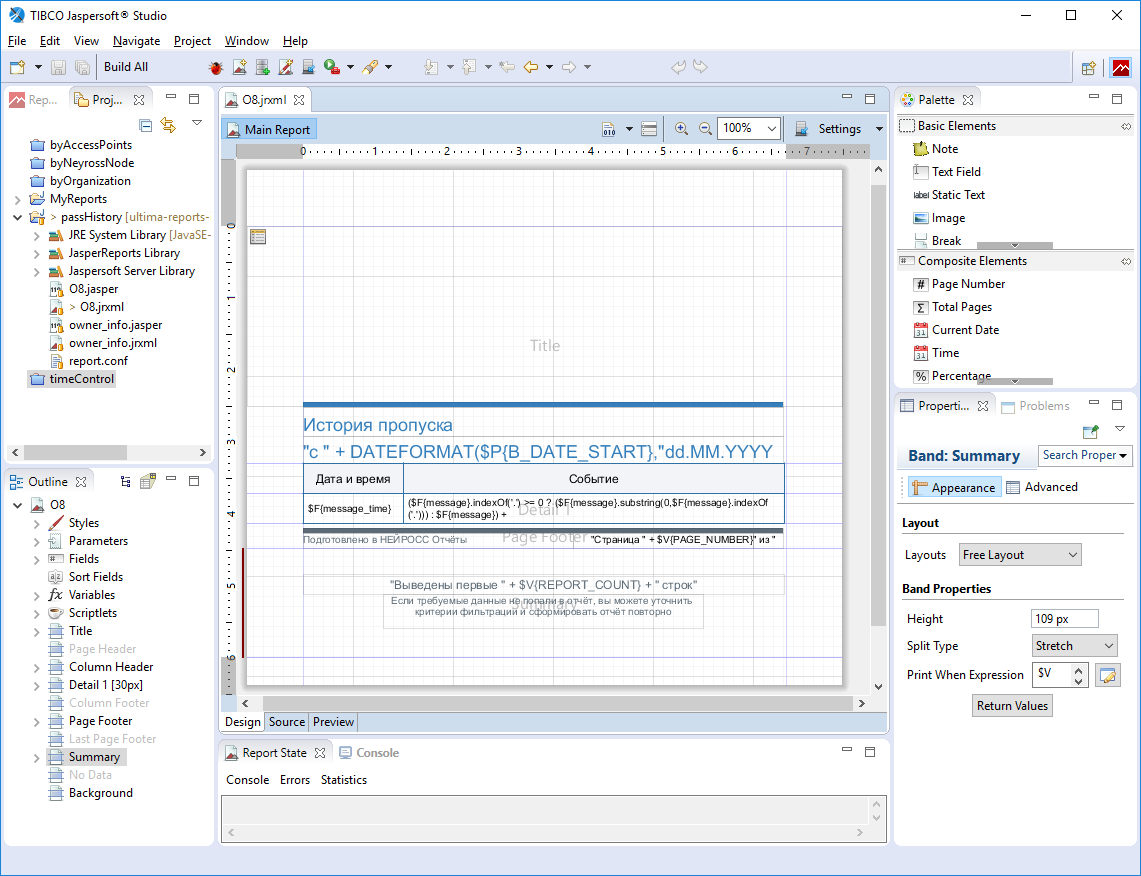
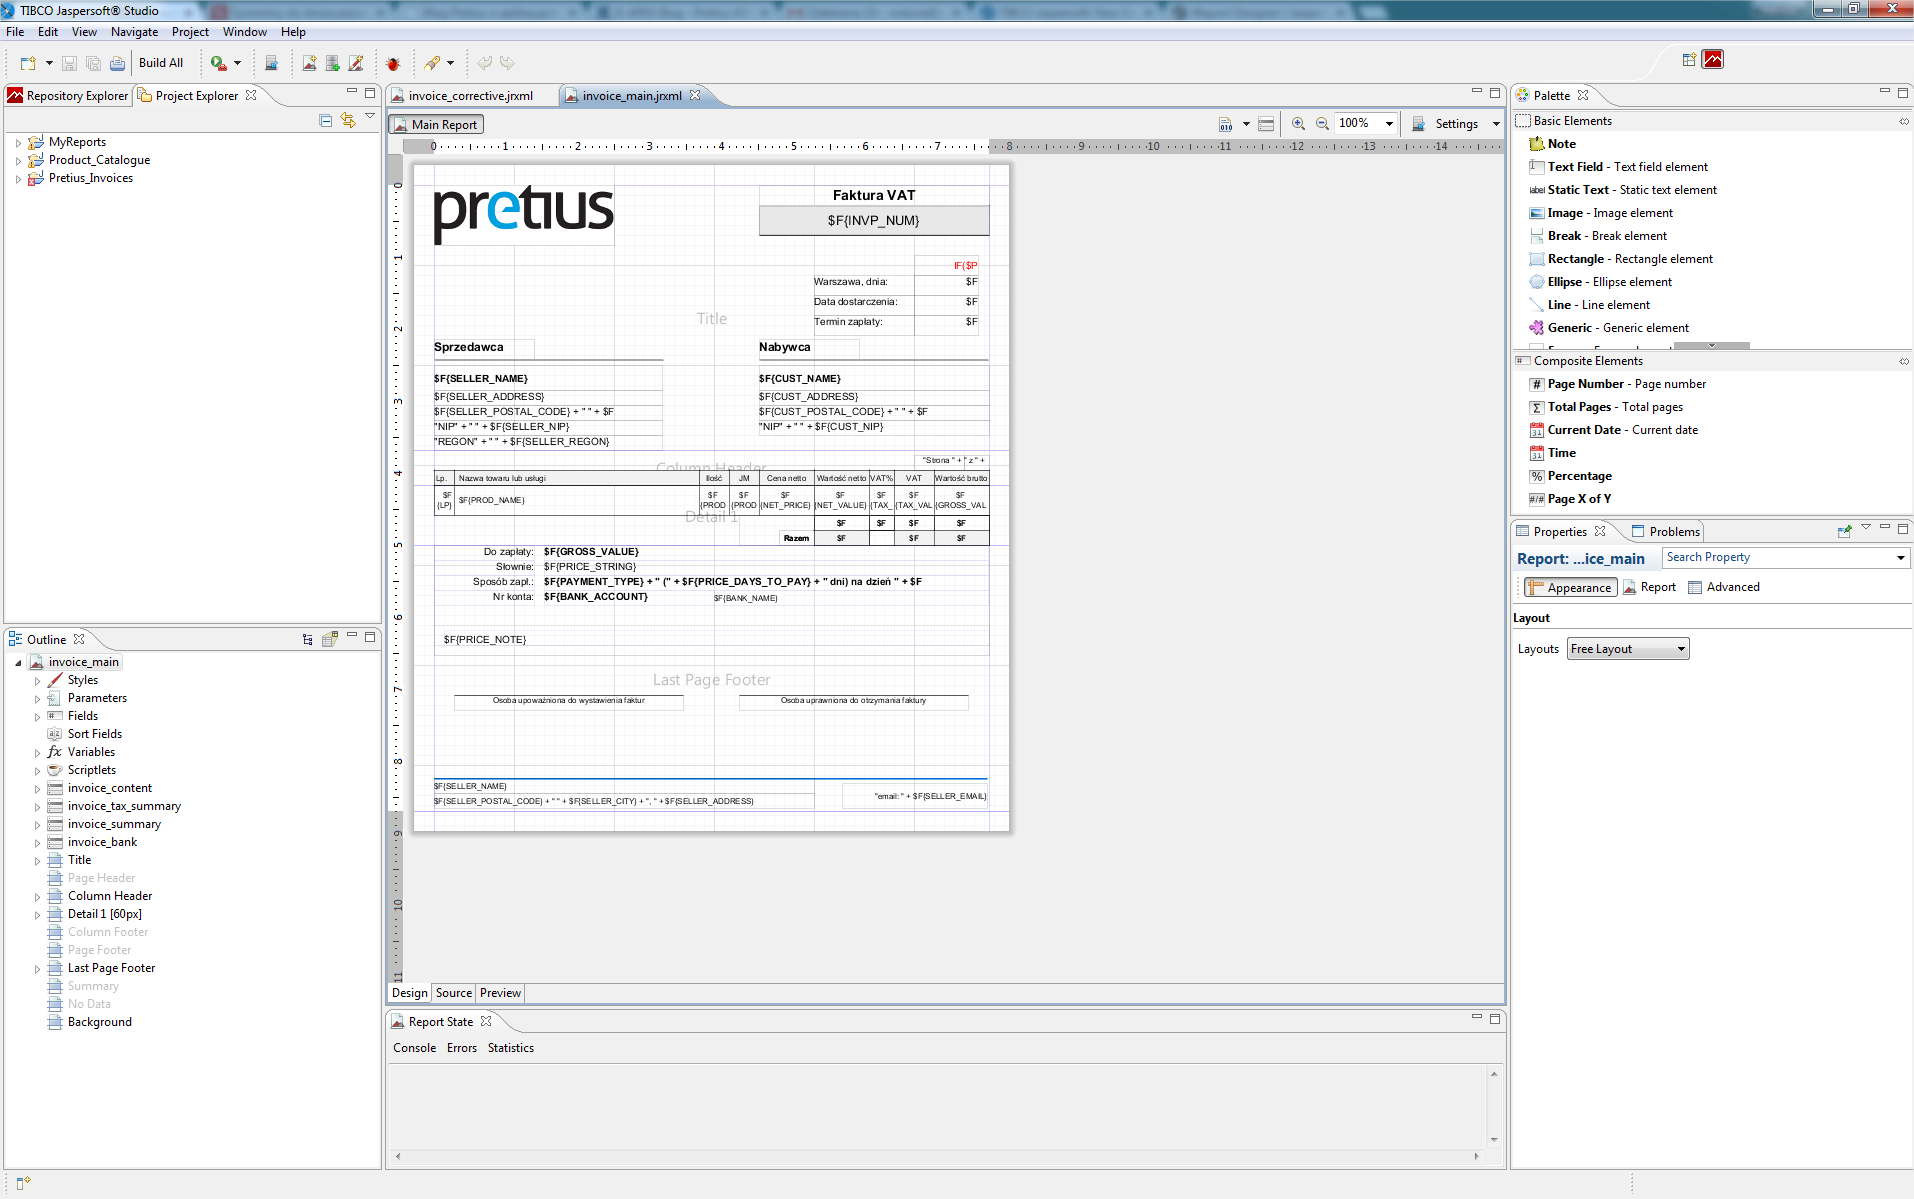
Внешний вид визуального редактора Jaspersoft Studio.
Основные сведения
Шаблон отчёта в JasperReports — это файл .jrxml в XML-формате, в котором хранится структура отчёта, его дизайн и логика.
Входные данные отчёта — это параметры и источник данных.
Параметры — это входные аргументы. Их значения неизменны во всём отчёте. Например, при формировании отчёта по записям в базе данных за некоторое время, дата / время начала и конца данного временного интервала могут быть переданы в шаблон в форме параметров.
Источник данных — это подключение к реляционной базе, XML-файл или другой источник, из которого в соответствии с заданными критериями формируется набор данных. В случае реляционной базы набор данных выбирается из базы данных в соответствии с SQL-запросом, определённом в шаблоне отчёта.
Набор данных — это коллекция записей, каждая из которых представляет собой набор полей. Например, в случае реляционной базы записи и поля — это строки и значения колонок таблиц базы данных, выбираемые в соответствии с SQL-запросом.
Поле — это именованное значение из набора данных. В случае реляционной базы данных соответствует значению некоторой колонки. Список используемых из набора данных полей также определяется в шаблоне в разделе Fields.
Если нужно вывести в отчёте номер страницы, номер записи, количество записей и т.д., можно использовать переменные.
Переменная — это вычисляемое в процессе формирования отчёта значение. Доступно большое количество стандартных переменных, таких как номер страницы, но разработчик шаблона также может создать свои переменные.
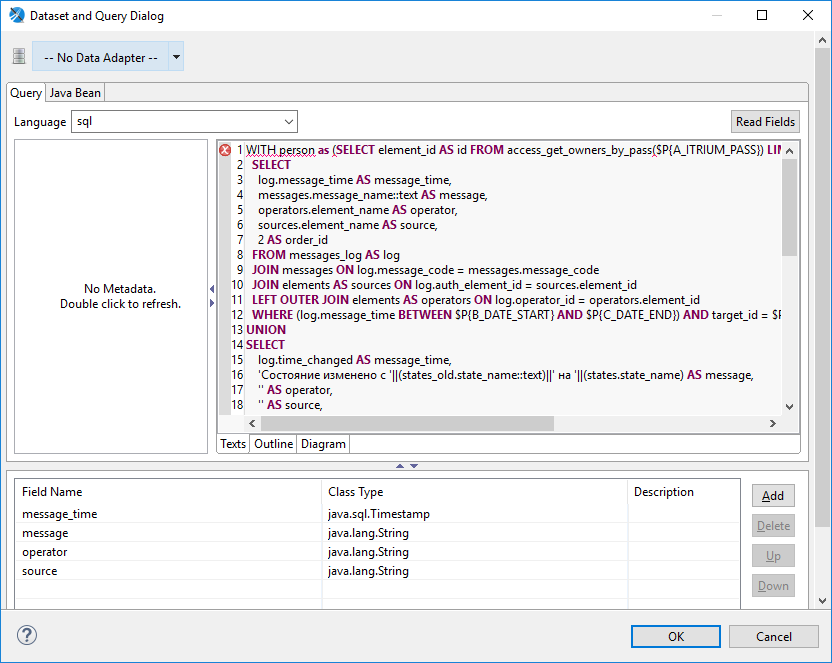
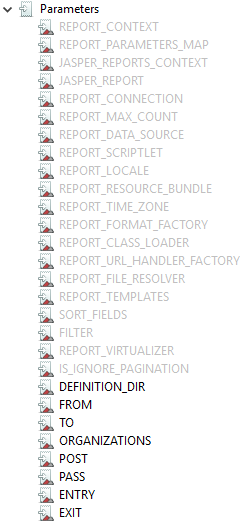
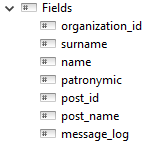
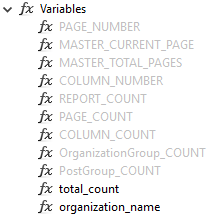
На изображениях выше показан редактор SQL-запроса для формирования набора данных и списки параметров, полей и переменных.
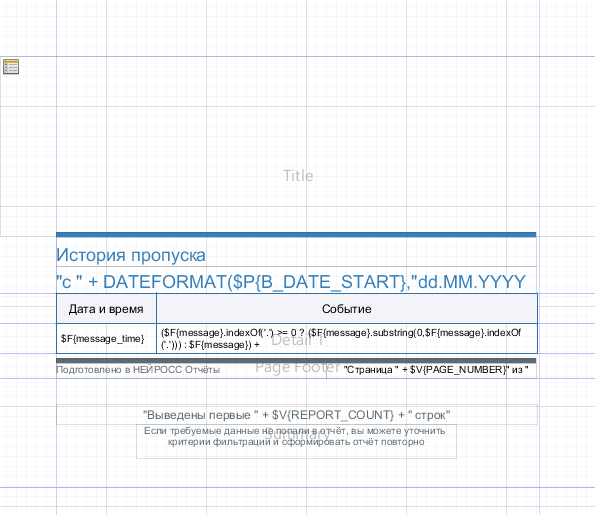
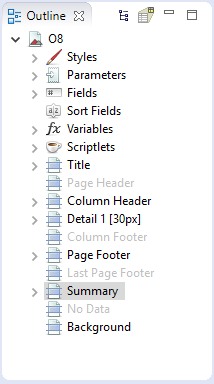
Отчёты состоят из секций, которые также называются bands (полосы). Секции следуют одна за другой строго по вертикали. Каждая секция принадлежит к определённому типу, который влияет на её отображение в отчёте:
| Секция | Описание и назначение |
|---|---|
| Title | Присутствует только в начале отчёта |
| Page Header | Выводится вверху каждой страницы |
| Column Header | Выводится в начале столбца отчёта (секции Detail могут выводиться на странице в несколько столбцов) |
| Detail | Выводится для каждой записи в источнике данных |
| Column Footer | Выводится в конце столбца отчёта |
| Page Footer | Выводится внизу каждой страницы |
| Last Page Footer | Присутствует только внизу последней страницы (вместо Page Footer) |
| Summary | Присутствует только в самом конце отчёта |
| No Data | Выводится вместо всех остальных секций, если источник данных не содержит записей |
| Background | Выводится на заднем плане каждой страницы |
Кроме того, записи в наборе данных делить на группы в соответствии с заданными критериями. Тогда перед и после каждой группы можно выводить дополнительные секции:
| Секция | Описание и назначение |
|---|---|
| Group Header | Выводится перед каждой новой группой |
| Group Footer | Выводится после каждой группы |
Не все секции необходимо использовать в шаблоне. Ненужные секции можно удалить (отключить) — тогда они не будут участвовать в формировании документа.
Секции подписаны и разделяются серыми горизонтальными линиями на листе отчёта. Список секций также выводится в панели Outline (серым цветом подписаны удалённые секции).
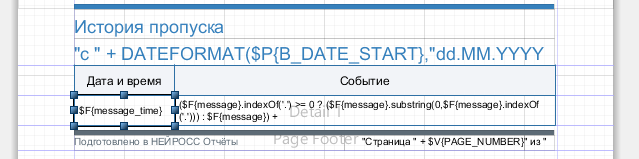
Для вывода текста в отчётах используются два основных компонента: Text Field (динамическое поле) и Static Text (статическое поле). Динамическое поле используется для вывода значений параметров или полей набора данных, а статическое — для вывода постоянного текста (например, заголовков колонок).
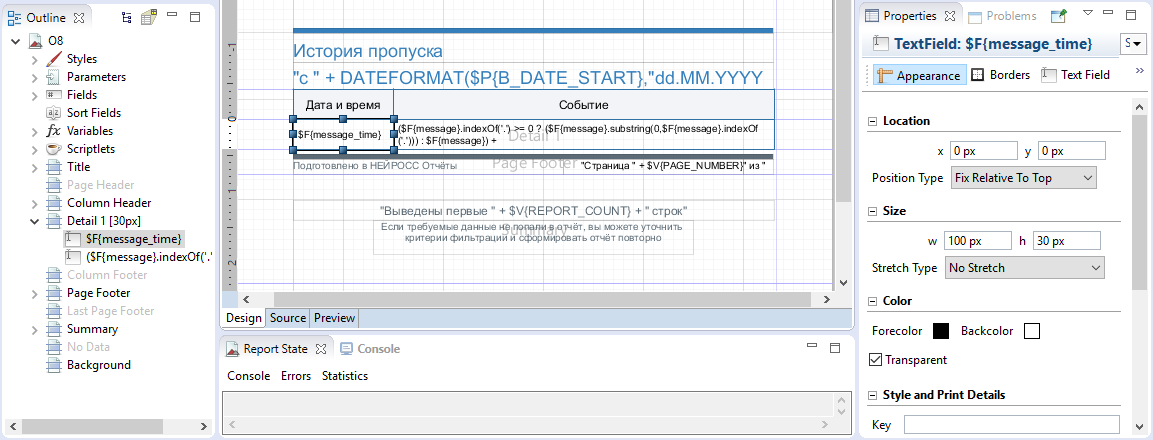
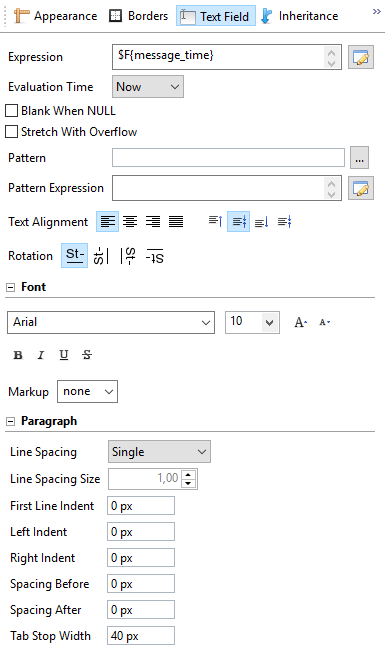
На изображении выше выбран элемент Text Field, в котором в секции Details выводится значение поля message_time (время события) для строк из базы данных.
В элементах типа Text Field можно выводить результаты сложных выражений, написанных на языке Java. Так, для вывода текста события в примере выше события используется следующее выражение:
($F{message}.indexOf('.') >= 0 ? ($F{message}.substring(0,$F{message}.indexOf('.'))) : $F{message}) +
((($F{operator} != null) && !$F{operator}.isEmpty()) ? (" (" + $F{operator} + "; " + $F{source} + ")") : "")
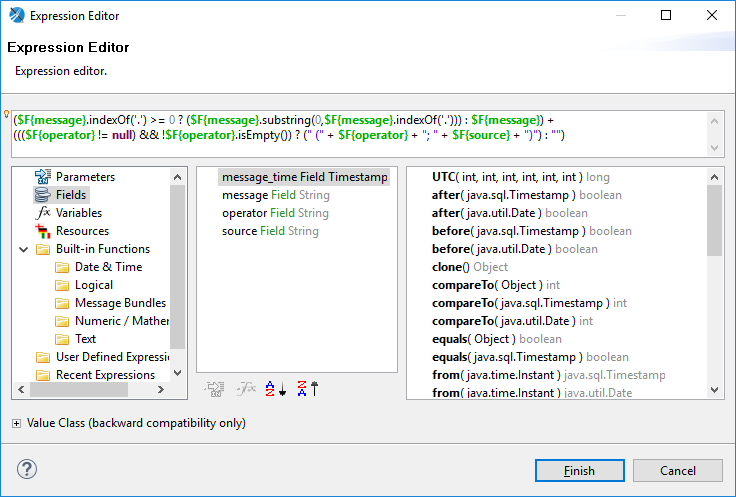
При формировании выражений можно использовать все возможности Java, значения параметров, полей и переменных.
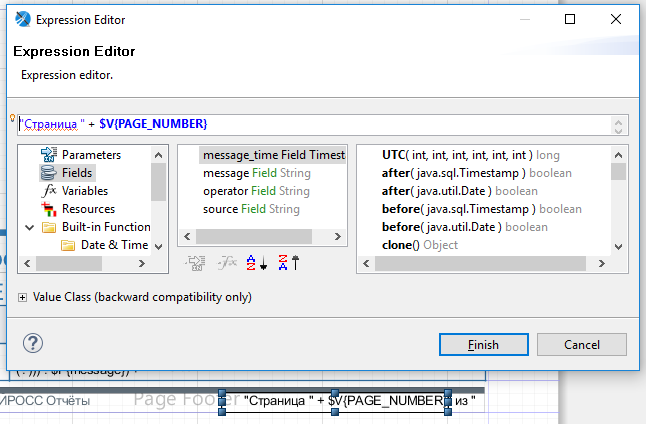
На рисунке выше переменная PAGE_NUMBER используется для вывода номера текущей страницы.
Возможности оформления
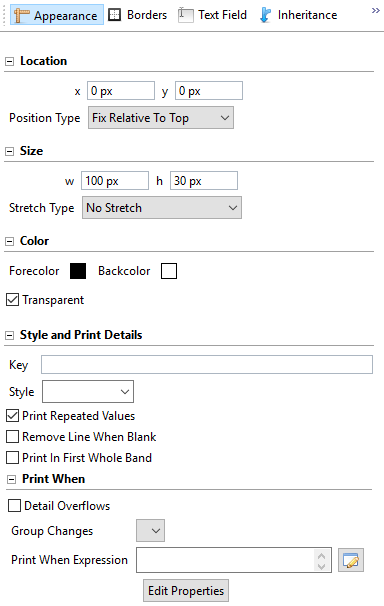
Итак, вёрстка шаблона отчёта заключается в расположении различных элементов — полей вывода текста, геометрических фигур, изображений и др. — в соответствующих секциях. Помимо непосредственного позиционирования таких элементов на листе и наполнения их данными разработчик шаблона может достаточно гибко настраивать внешний вид этих элементов. Рассмотрим возможности по изменения внешнего вида на примере текстового поля (Text Field).
Настройка элементов осуществляется в панели Properties:

На вкладке Apperance можно настроить точное местоположение и размер элемента, задать основной цвет элемента и цвет фона, указать когда выводить / скрывать элемент и другие параметры.
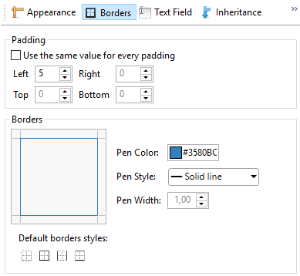
Для большинства элементов также можно задать стиль оформления границ элемента (какие границы отображать, их цвет, толщина линии) и размер полей (отступов) вокруг элемента.
Для текста, выводимого в отчёте с помощью элементов Text Field и Static Text, можно задавать цвет, размер, начертание (жирное, курсив, с подчеркиванием), шрифт, выравнивание текста в блоке по горизонтали и вертикали, а также всевозможные отступы. Более того, текст можно выводить с поворотом на 90, 180 и 270 градусов.
Если размер элемента заранее неизвестен (например, размер текстового поля должен зависеть от объёма текста, полученного из источника данных), то можно настроить относительное позиционирование элементов в секции:
а) либо с помощью выбора правила расположения (layout): элементы располагаются последовательно по вертикали / по горизонтали / в форме таблицы X на Y: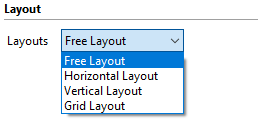
б) либо с помощью привязки элемента к границам секции / границам других элементов: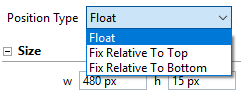
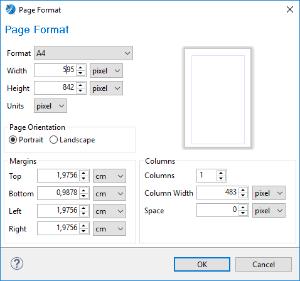
Наконец, для того, чтобы документ отчёта соответствовал требуемому формату бумаги, например, А4, можно настраивать размер, ориентацию и поля страницы отчёта:
Подотчёты
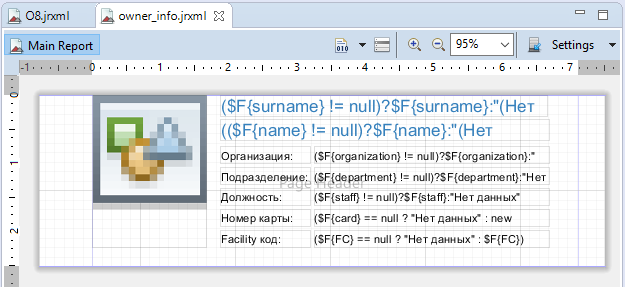
Достаточно часто нет возможности получить все необходимые данные из источника с помощью одного запроса. Или бывает так, что в отчёт необходимо включить данные из нескольких наборов. Например, в отчёт типа «Досье по пропуску» в самом начале отчёта требуется вывести подробную информацию о владельце пропуска, а далее в основной части отчёта отобразить таблицу событий доступа, связанных с данным пропуском.
В таких ситуациях на помощь приходит элемент Subreport, который позволяет встраивать один отчёт (подотчёт) в другой.
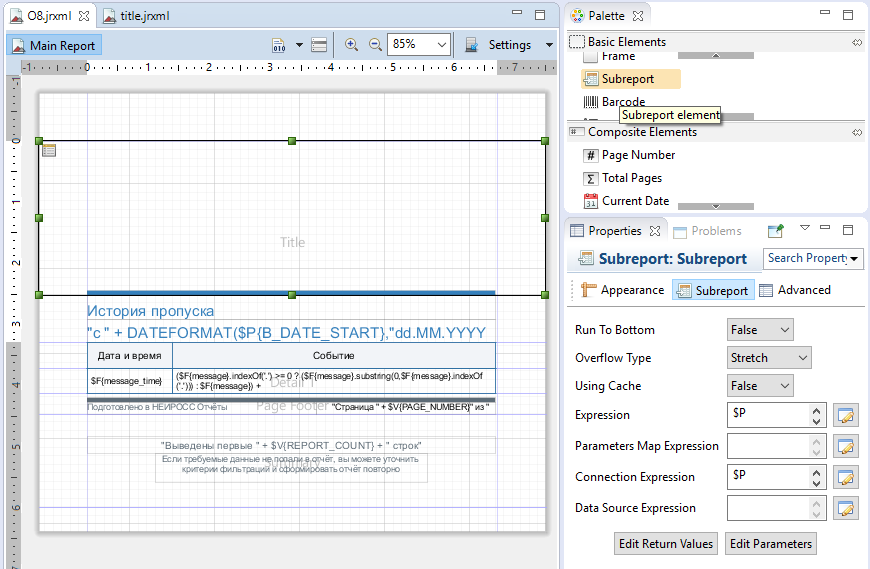
В общем случае подотчёт может использовать любой источник данных, но обычно он просто формирует другой запрос к источнику данных родительского отчёта.
Подотчёт — это ещё один отчёт, который точно также можно редактировать и настраивать:
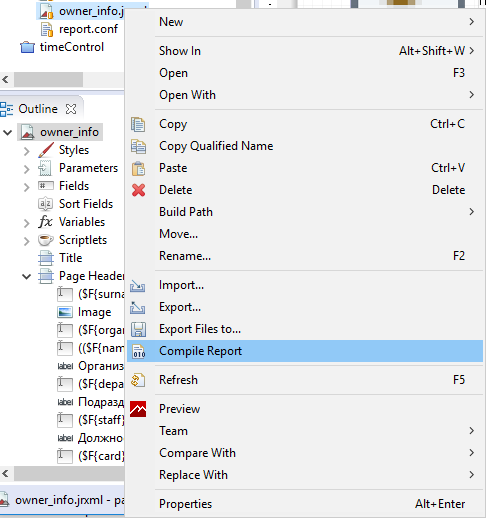
Компиляция и предпросмотр
JasperReports для генерации отчёта использует не *.jrxml XML-файлы с определением шаблонов, а скомпилированные из них *.jasper-файлы. В Jaspersoft Studio для компиляции шаблона необходимо вызвать соответствующую команду по кнопке на панели или в контекстном меню на *.jrxml-файле:

Компиляция шаблона также выполняется автоматически при попытке предпросмотра отчёта:
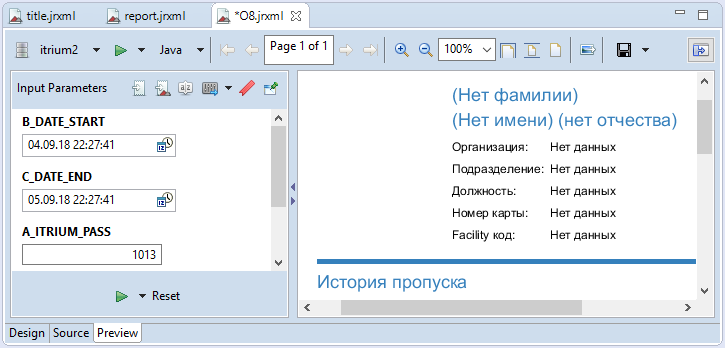
Механизм предпросмотра позволяет проверить корректность составления шаблона отчёта, запроса к источнику данных и оценить получившийся внешний вид отчёта.
В окне предпросмотра формирование отчёта осуществляется по выбранному источнику данных. Разработчик может добавить нужный ему источник данных (например, подключение к реляционной базе данных) в соответствующем разделе:
Заключение
На этом краткое руководство кончается.
Дополнительную информацию по использованию JasperReports и Jaspersoft Studio можно почерпнуть в разделе документации на официальном сайте сообщества.
This guide explains how to use JasperSoft Studio to create complex reports and print-outs for use by the JasperReports engine embedded in iDempiere. This is an alternative to using the standard built-in reports described here.
Introduction
The standard reporting mechanism is suitable for simple reports, but creating complex reports with sophisticated layouts can be difficult and time-consuming using the built-in Print Format tools, so rather use JasperSoft Studio to do the design of sophisticated reports and print-outs with professionally designed layouts, fonts, colours and logos, then load the JRXML report definition into iDempiere for execution by the JasperReports engine.
The guide is based on this video by Evenos.
How to do it
JasperSoft Studio
If you have not already done so, install JasperSoft Studio:
- Download and install the Community Edition of JasperSoft Studio from the download page (note: don’t download the older iReport Designer as this has been deprecated in favour of JasperSoft Studio);
- Follow the installation instructions here. JasperSoft Studio is built on the same framework as the Eclipse IDE so the installation and usage is the same.
Create a report
Database Adapter
The first step is to create a database adapter to connect JasperSoft Studio to your instance of the iDempiere database server:
- Start up JasperSoft Studio
- Delete the two unnecessary Data Adapters (called One Empty Record and Sample DB)
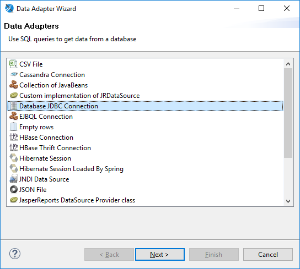
- Create a new Data Adapter to connect to the iDempiere database: Create Data Adapter > Database JDBC Connection > Next >
- Name: iDempiere Data Adapter
- JDBC Driver: org.postgresql.Driver
- JDBC URL: jdbc:postgresql://localhost:5432/idempiere (use localhost if the database is on the same machine as JasperSoft Studio, otherwise replace localhost with the name of the database server)
- Username: adempiere (the same username that was used when iDempiere was installed)
- Password: *********
- Click on Test to test the connection parameters
- Click Finish if all is well
This only has to be done once. Thereafter you will use the same adapter to develop your reports.
Design the report
Now you can create the JasperReport:
- Click on the New JasperReport icon
- Select a Report Template (e.g. Blank Format A4)
- Parent directory: MyReports (in the JaspersoftWorkspace), or create a new JasperReports Project
- File name: Invoice.jrxml (JRXML is the XML format used by JasperReports)
- Open the adempiere (CURRENT) schema to see all the tables and views that can be used in the report (note that you can also create additional database views in the schema for your own reports)
- In the Texts box (to the right of the schemas), write a SQL SELECT statement to assemble the items for the report, for example:
SELECT a.documentno, a.docstatus, b.name, b.logo_id FROM adempiere.c_invoice a, adempiere.c_bpartner b WHERE a.c_bpartner_id=b.c_bpartner_id
- The SELECT can be as detailed and as complex as you require
- Click Next > to choose the fields from the SELECT that you want to see in the report
- Click Next > and add any GROUP BY clauses if required
- Click Finish to generate the basic report definition
- Use the Preview tab to run the report, then Save it regularly while you work on it.
Follow the video to complete the design of the report, and see the JasperSoft Studio documentation for more details.
Compile the report
When you are done, compile the report for use by iDempiere:
- Select the Design Tab
- Click on the Compile Report button (above the report design)
This will generate the report binary file Invoice.jasper from the resource Invoice.jrxml. This is the file that you will upload to iDempiere (see below). Note that you can upload either the binary .jasper or the XML description .JRXML because iDempiere understands both, but the binary may be more efficient, and it may avoid version inconsistencies between the JasperReports compiler in iDempiere and the one in JasperSoft Studio.
Installing the report
Once you are happy with the report, you can install it in iDempiere as follows:
- Login as System/System
- Select Report & Process and create a new entry:
- Search Key: InvoiceJasperReport
- Name: InvoiceJasperReport
- Data Access Level: Client+Organisation (it is not useful to the System user)
- Report: check the box for completeness
- Class Name: org.compiere.report.ReportStarter (note that this is case sensitive)
- Jasper Report: attachment:Invoice.jasper (this is the binary that was created above)
- Save the record
- Now click on the Attachment icon (the paperclip on the toolbar) and load the binary from the JaspersoftWorkspace. This ensures that the binary is stored in the database with the Report Process record and will get backed up with the database.
To try out the report:
- Logout of System and into the client (e.g. GardenWorld Admin)
- Select Invoice and find an invoice that will use the new report format
- Click on the Print button (or Alt-P)
- When the preview opens, click on Customize Report to open the Print Format Window
- Find the field Jasper Report and use the dropdown to select the Report that you created above
- Save the updated Print Format and reprint the document with the new report layout.
References
- Creating reports using JasperReports
- Evenos video about JasperSoft Studio
- JasperSoft Studio Guide
- Making fonts available to your JasperReports
Cookies help us deliver our services. By using our services, you agree to our use of cookies.