-
Contents
-
Table of Contents
-
Troubleshooting
-
Bookmarks
Quick Links
D01244120C
DR-70D
Linear PCM Recorder for DSLR
Reference Manual
Related Manuals for Tascam DR-70D
Summary of Contents for Tascam DR-70D
-
Page 1
D01244120C DR-70D Linear PCM Recorder for DSLR Reference Manual… -
Page 2: Table Of Contents
Using the top panel accessory shoe ……17 Searching backward and forward ……31 4 – Recording ……….18 Selecting files for playback (skipping) …….31 Playing files created with dual recording ….31 Recording formats …………18 Setting where to save files ……….18 TASCAM DR-70D…
-
Page 3
9 – Using the REMOTE jack ……36 Using a footswitch (TASCAM RC-3F)……36 Making footswitch settings ……..36 Footswitch uses …………36 Using a remote control (TASCAM RC-10) ….36 Making remote control settings ……36 Remote control uses ……….36 10 – Messages ……….37 11 – Troubleshooting ……..38 12 –… -
Page 4: Introduction
• 3.5mm (1/8”) line/headphones output jack • 128×64 dot-matrix LCD with backlight • Micro-B USB 2.0 port • Operates on 4 AA batteries, an AC adapter (TASCAM PS-P515U sold separately), external battery pack (TASCAM BP-6AA sold separately) or USB bus power •…
-
Page 5: About Sd Cards
Please access to a product page of this product from the TEAC Global Site (http://teac-global.com) to find the list or contact the TASCAM customer support service. Precautions for use SD cards are delicate media. In order to avoid damaging a card or the card slot, please take the following precautions when handling them.
-
Page 6: Names And Functions Of Parts
Press and hold this dial when stopped to switch the signal The 4/R PEAK indicator lights when the input level is about monitored. to cause distortion. This also lights if distortion occurs in the analog circuitry during mic input. This will not light, TASCAM DR-70D…
-
Page 7: Left Side Panel
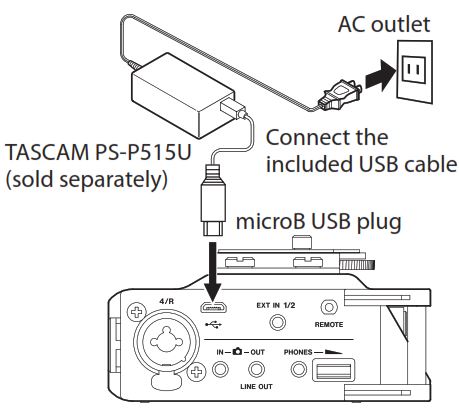
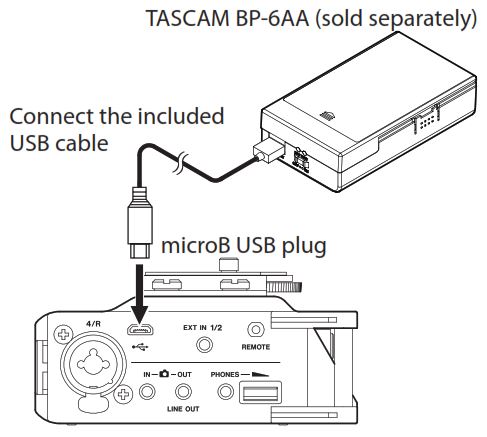
Slide this switch (toward the arrow) and hold it down to turn Power can be supplied through the USB cable provided the unit on/off. with the unit or an AC adapter (TASCAM PS-P515U sold Set it in the up position to activate the hold function. All separately).
-
Page 8: Top Panel
2 – Names and Functions of Parts REMOTE connector (2.5mm TRS jack) Connect a TASCAM RC-3F footswitch or TASCAM RC-10 wired remote control (both sold separately) here to enable remote starting and stopping of playback and other functions. A remote control can be used to start, stop and otherwise operate the unit.
-
Page 9: Home Screen
(enter standby). This icon shows whether the auto tone function is on or off. When using a TASCAM PS-P515U AC adapter (sold (See “Using the auto tone function” on page 26.) separately) or USB bus power, appears.
-
Page 10: Menu Item List
Make date and time DATE/TIME see page 14 settings Make settings for the TASCAM RC-3F footswitch see page 36 REMOTE and TASCAM RC-10 wired see page 36 remote control (both sold separately) CAUTION screen will not appear when recording. MENU TASCAM DR-70D…
-
Page 11: Using Menus
8. Press the MENU button to return to the screen (or MENU screen). OTHERS Press the 1/8 button to return to the Home Screen. NOTE When the screen is open, press the BASIC INPUT MENU button again to return to the Home Screen. TASCAM DR-70D…
-
Page 12: Preparation
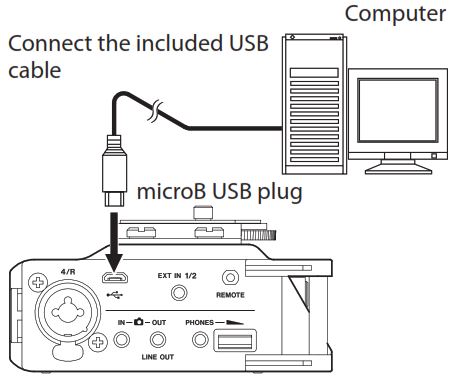
USB cable rechargeable or alkaline dry cell), the operation time will be shortened. If you need to operate the unit for a long time, use a TASCAM PS-P515U AC adapter or TASCAM BP-6AA external battery microB USB plug box (both sold separately) to power the unit.
-
Page 13: Using Usb Bus Power
When on, slide the HOLD/ switch toward until to a computer by USB cable. In this case, use a TASCAM appears on the display. LINEAR PCM RECORDER PS-P515U AC adapter (sold separately) or batteries.
-
Page 14: Setting The Date And Time
The date and time setting can only be maintained for a few minutes if the battery power becomes low and the unit CAUTION is not powered by a TASCAM PS-P515U AC adapter (sold • Do not remove the SD card from the unit during recording, separately) or USB bus power.
-
Page 15: Sd Card Write Protection Switches
4. Turn the DATA dial to select the sound to monitor, and press When formatting a card, the unit should be operating on the DATA dial. AC power supplied by a TASCAM PS-P515U adapter (sold separately), USB bus power from a computer or batteries with sufficient remaining power.
-
Page 16: Setting The Output Gain
OUTPUT GAIN screen to and then adjust MONITOR SETTING LINE the volume. 7. To mount the camera on this unit, use the camera attachment screw on the top of the unit. TASCAM DR-70D…
-
Page 17: Setting The Inputs
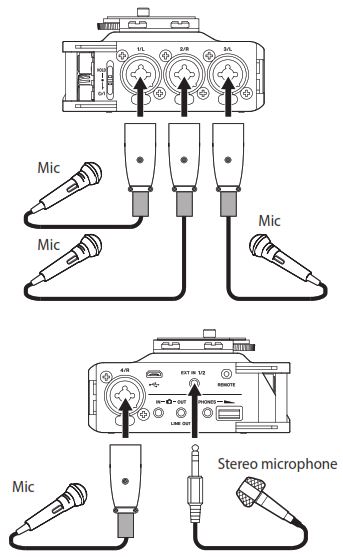
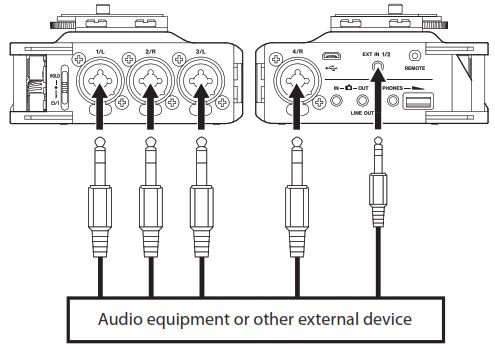
Using the top panel accessory shoe To use the accessory shoe on the top panel, remove the DSLR attachment bracket. Stereo microphone You can attach the included camera attachment bracket screw hole covers to the screw holes. TASCAM DR-70D…
-
Page 18: Recording
Options: LEFT 12 − CENTER − RIGHT 12 6. Repeat steps 3 to 5 as necessary to set the input balance for each channel. 7. When finished adjusting, press the MENU button to return to the Home Screen. TASCAM DR-70D…
-
Page 19: Adjusting The Input Level
INPUT screen and set it to If the level is still too low, set the GAIN to HIGH and then adjust the level. HI+PLUS 6. When finished adjusting, press the MENU button to return to the Home Screen. TASCAM DR-70D…
-
Page 20: Setting The Recording Input Source
This turns plug-in power on. A different setting item can all the way down before changing it. now be selected. 6. When finished, press the MENU button to return to the Home Screen. TASCAM DR-70D…
-
Page 21: Using Phantom Power
• When using USB bus power, the unit might not be able to supply phantom power depending on the computer. In this case, use a TASCAM PS-P515U AC adapter (sold separately). • Some condenser microphones will not operate when phantom power is set to 24V.
-
Page 22: Using The Limiter
Pop-up message when changing between MONO LINK • When set to , the limiter only affects the channel that MONO has excessive input. When set to , the limiter affects LINK both channels in the pair when either has excessive input. TASCAM DR-70D…
-
Page 23: Compensating For Mic Distances
Options: 44.1k (default), 48k, 96k to the Home Screen. 9. Press the DATA dial or 4/. button to move the cursor back to the setting item. 10. When finished, press the 1/8 button to return to the Home Screen. TASCAM DR-70D…
-
Page 24: Recording (Mono/Stereo/2Mix)
When stereo recording, a file will be made for the 1/2 or 3/4 channel pair. The file names will be as follows. TASCAM̲0002S12.WAV : Set with the item on the screen WORD FILE NAME : Recording file project number : Source file : Assigned channels TASCAM DR-70D…
-
Page 25: Simultaneously Recording Two Files At Different Input Levels (Dual Rec)
(for example, CH1 and CH3). 5. Press the DATA dial or 4/. button to enable selection of other items. 6. When finished, press the 1/8 button to return to the Home Screen. TASCAM DR-70D…
-
Page 26: Using The Auto Tone Function
, and press TONE VOLUME the DATA dial. 4. Turn the DATA dial to set the tone volume. Options: –12dB (default), –18dB, –24dB, –30dB, –36dB 5. When finished, press the 1/8 button to return to the Home Screen. TASCAM DR-70D…
-
Page 27: Using Mid-Side Microphones
6. When finished, press the 1/8 button to return to the Home Screen. 7. When set to , the decoded signal will be recorded. When set to , the signal will be decoded as it is played PLAY back. TASCAM DR-70D…
-
Page 28: Recording Duration
• The recording times shown above are not continuous recording times, but rather they are the total possible recording times for the SD/SDHC/SDXC card. • When using MONO (single channel) recording, the maximum recording times will be about twice the figures above. • When using 4-channel recording, the maximum recording time will be about half the figures above. TASCAM DR-70D…
-
Page 29: Working With Files And Folders (Browse Screen)
Press the DATA dial to delete the file or the 1/8 button to cancel deletion. CAUTION In addition to the currently selected file, this will delete other files with the same base number. CANCEL Cancel deletion of the selected file and close the pop-up menu. TASCAM DR-70D…
-
Page 30: Folder Operations
This folder also becomes the playback area. cancel deletion. NOTE You cannot delete read-only files and files that are not recognized by this unit. CANCEL Cancel the operation with the selected folder and close the pop-up menu. TASCAM DR-70D…
-
Page 31: Playback
Play the normally recorded file and press 3// to switch to playback of the file recorded at a lower input level. NOTE Press and hold the 4/. or 3// button to accelerate the search speed. TASCAM DR-70D…
-
Page 32: Connecting With A Computer
SD card in the unit to a computer, as well as transfer audio files on the computer to the 1. Click the “DR-70D” drive on the computer screen to show the card. “MUSIC” and “UTILITY” folders.
-
Page 33: Settings And Information
Shows the audio file type. Shows the system firmware version. For WAV/BWF files, bit depth, stereo/mono and sampling frequency (Hz) are shown. TITLE Shows the project name. DATE Shows the date of file creation. SIZE Shows the file size. TASCAM DR-70D…
-
Page 34: System Settings
The following settings can be made for the items on the When formatting a card, the unit should be operating on AC screen. power supplied through a TASCAM PS-P515U adapter (sold SYSTEM separately), USB bus power supplied from a computer or Use the 4/.
-
Page 35: Setting The File Name Format
! # $ % & ’ ( ) + , — . ; = @ [] ^ _ ` { } ~ Initializing the count You can select the COUNT INIT item and press the DATA dial to reset the incremental numbers, which appear after the WORD characters or date, so that they start from “0001” again. TASCAM DR-70D…
-
Page 36: Using The Remote Jack
9 – Using the REMOTE jack This unit has a REMOTE jack. Footswitch uses You can connect a TASCAM RC-3F footswitch or TASCAM RC-10 Press the pedals on the footswitch to conduct the operations wired remote control (both sold separately) to it and use the assigned on the screen.
-
Page 37: 10 — Messages
Meaning and response Refer to this list if one of these pop-up messages appears on The setting cannot be changed. Not Possible the DR-70D and you want to check the meaning or determine a Change the setting to FILE TYPE proper response.
-
Page 38: 11 — Troubleshooting
If you are having trouble with the operation of this unit, please try the following before seeking repair. If these measures do not solve the problem, please contact the store where you purchased this unit or TASCAM customer support service.
-
Page 39: 12 — Specifications
Note: based on JEITA CP-2150 LOW: +3 dB MID: +11 dB HIGH: +26 dB HI+PLUS: +38 dB IN connector Connector: 3.5mm (1/8”) stereo mini jack Input impedance: 10 kΩ Nominal input level: −10 dBV Maximum input level: +6 dBV TASCAM DR-70D…
-
Page 40: Requirements For Connected Computers
(phantom power USB bus power from a computer files not used) AC adapter (TASCAM PS-P515U, sold separately) When XLR/TRS Recording 2ch Using an external battery pack (TASCAM BP-6AA, sold input selected 44.1kHz/16-bit WAV About 7:30 separately) (phantom power files used)
-
Page 41: Dimensional Drawings
Operating temperature range 0°C – 40°C (32°F – 104°F) Dimensional drawings 169mm 106.5mm • Illustrations in this manual might differ in part from the actual product. • Specifications and external appearance might be changed without notification to improve the product. TASCAM DR-70D…
-
Page 42
TEAC CORPORATION https://tascam.jp/jp/ Phone: +81-42-356-9143 1-47 Ochiai, Tama-shi, Tokyo 206-8530 Japan TEAC AMERICA, INC. https://tascam.com/us/ Phone: +1-323-726-0303 10410 Pioneer Blvd. Suite #1 and #4, Santa Fe Springs, California 90670, U.S.A. TEAC UK Ltd. https://tascam.eu/ Phone: +44-1923-797205 Meridien House, 69-71 Clarendon Road, Watford, Herts, WD17 1DS, United Kingdom TEAC EUROPE GmbH https://tascam.de/…
Краткое руководство пользователя
Важные указания по технике безопасности
Ознакомьтесь с данной инструкцией.
Сохраните данную инструкцию.
Примите во внимание все предостережения.
Следуйте всем указаниям.
Не используйте данное устройство вблизи воды.
Выполняйте очистку устройства только с помощью сухой ткани.
Не закрывайте вентиляционные отверстия. Выполните установку в соответствии с
инструкциями производителя.
Не выполняйте установку устройства вблизи тепловых источников, таких как батареи,
отопительные регистры, кухонные плиты и другие устройства (включая усилители),
производящие тепло.
Не пренебрегайте защитными свойствами полярной либо заземлённой вилки. Полярная вилка
содержит два плоских контакта, один из которых шире другого. На вилке с заземлением
находятся два плоских контакта и заземляющий штырь. Широкий контакт и штырь заземления
предназначены для обеспечения вашей безопасности. Если вилка не подходит для вашей
розетки, обратитесь к электрику для замены устаревшей розетки.
Обеспечьте защиту сетевого шнура, чтобы кто-нибудь случайно не наступил на него или не
защемил. В особенности следует обезопасить участки возле вилки, розетки и гнезда, где
провод входит в устройство.
Используйте только рекомендованные производителем комплектующие/вспомогательные
приспособления.
Используйте только те стойки на колёсах, подставки, штативы, кронштейны и столы, которые
рекомендованы производителем или входят в комплект. Будьте осторожны при перемещении
стойки на колёсах вместе с устройством, чтобы избежать получения травм в результате
падения конструкции.
Отключайте устройство во время грозы или в случае, если вы не собираетесь им пользоваться
в течение длительного времени.
При необходимости технического обслуживания обратитесь к специалистам. Техническое
обслуживание требуется в случае, если аппарат подвергся каким-либо повреждениям,
например, повредился сетевой шнур или вилка, на устройство была пролита жидкость или
упали предметы, прибор намок вследствие попадания под дождь или по иным причинам, упал
или не функционирует должным образом.
Не допускайте попадания на данное устройство капель и брызг.
Не размещайте на устройстве какие-либо предметы, наполненные жидкостью, например,
вазы.
Не помещайте данное устройство в закрытое пространство, например, в книжный шкаф либо
иные закрытые зоны.
К устройству поступает номинальное вспомогательное питание от электрической розетки при
переключателе питания либо резервного режима/активации, находящемся не в положении
«Вкл.»
Устройство должно быть размещено достаточно близко к розетке, чтобы вы могли в любой
момент с лёгкостью дотянуться до вилки шнура питания.
Перед вами файл pdf, где представлена инструкция (руководство) на русском для TASCAM DR-70D. Вы можете скачать ее либо изучить в онлайн режиме.
Подробные сведения об инструкции:
Устройство из раздела: портативный рекордер
Бренд-производитель: TASCAM
Наименование модели: TASCAM DR-70D
Язык: Руководство на русском языке
Файл: pdf
Размер файла: 654,46 kB

Скачать инструкцию к HARPER HDT2-1110
ЗАГРУЗИТЬ
Просмотр инструкции онлайн
-
Page 1
D01244120C DR-70D Linear PCM Recorder for DSLR Reference Manual… -
Page 2: Table Of Contents
Using the top panel accessory shoe ……17 Searching backward and forward ……31 4 – Recording ……….18 Selecting files for playback (skipping) …….31 Playing files created with dual recording ….31 Recording formats …………18 Setting where to save files ……….18 TASCAM DR-70D…
-
Page 3
9 – Using the REMOTE jack ……36 Using a footswitch (TASCAM RC-3F)……36 Making footswitch settings ……..36 Footswitch uses …………36 Using a remote control (TASCAM RC-10) ….36 Making remote control settings ……36 Remote control uses ……….36 10 – Messages ……….37 11 – Troubleshooting ……..38 12 –… -
Page 4: Introduction
• 3.5mm (1/8”) line/headphones output jack • 128×64 dot-matrix LCD with backlight • Micro-B USB 2.0 port • Operates on 4 AA batteries, an AC adapter (TASCAM PS-P515U sold separately), external battery pack (TASCAM BP-6AA sold separately) or USB bus power •…
-
Page 5: About Sd Cards
Please access to a product page of this product from the TEAC Global Site (http://teac-global.com) to find the list or contact the TASCAM customer support service. Precautions for use SD cards are delicate media. In order to avoid damaging a card or the card slot, please take the following precautions when handling them.
-
Page 6: Names And Functions Of Parts
Press and hold this dial when stopped to switch the signal The 4/R PEAK indicator lights when the input level is about monitored. to cause distortion. This also lights if distortion occurs in the analog circuitry during mic input. This will not light, TASCAM DR-70D…
-
Page 7: Left Side Panel
Slide this switch (toward the arrow) and hold it down to turn Power can be supplied through the USB cable provided the unit on/off. with the unit or an AC adapter (TASCAM PS-P515U sold Set it in the up position to activate the hold function. All separately).
-
Page 8: Top Panel
2 – Names and Functions of Parts REMOTE connector (2.5mm TRS jack) Connect a TASCAM RC-3F footswitch or TASCAM RC-10 wired remote control (both sold separately) here to enable remote starting and stopping of playback and other functions. A remote control can be used to start, stop and otherwise operate the unit.
-
Page 9: Home Screen
(enter standby). This icon shows whether the auto tone function is on or off. When using a TASCAM PS-P515U AC adapter (sold (See “Using the auto tone function” on page 26.) separately) or USB bus power, appears.
-
Page 10: Menu Item List
Make date and time DATE/TIME see page 14 settings Make settings for the TASCAM RC-3F footswitch see page 36 REMOTE and TASCAM RC-10 wired see page 36 remote control (both sold separately) CAUTION screen will not appear when recording. MENU TASCAM DR-70D…
-
Page 11: Using Menus
8. Press the MENU button to return to the screen (or MENU screen). OTHERS Press the 1/8 button to return to the Home Screen. NOTE When the screen is open, press the BASIC INPUT MENU button again to return to the Home Screen. TASCAM DR-70D…
-
Page 12: Preparation
USB cable rechargeable or alkaline dry cell), the operation time will be shortened. If you need to operate the unit for a long time, use a TASCAM PS-P515U AC adapter or TASCAM BP-6AA external battery microB USB plug box (both sold separately) to power the unit.
-
Page 13: Using Usb Bus Power
When on, slide the HOLD/ switch toward until to a computer by USB cable. In this case, use a TASCAM appears on the display. LINEAR PCM RECORDER PS-P515U AC adapter (sold separately) or batteries.
-
Page 14: Setting The Date And Time
The date and time setting can only be maintained for a few minutes if the battery power becomes low and the unit CAUTION is not powered by a TASCAM PS-P515U AC adapter (sold • Do not remove the SD card from the unit during recording, separately) or USB bus power.
-
Page 15: Sd Card Write Protection Switches
4. Turn the DATA dial to select the sound to monitor, and press When formatting a card, the unit should be operating on the DATA dial. AC power supplied by a TASCAM PS-P515U adapter (sold separately), USB bus power from a computer or batteries with sufficient remaining power.
-
Page 16: Setting The Output Gain
OUTPUT GAIN screen to and then adjust MONITOR SETTING LINE the volume. 7. To mount the camera on this unit, use the camera attachment screw on the top of the unit. TASCAM DR-70D…
-
Page 17: Setting The Inputs
Using the top panel accessory shoe To use the accessory shoe on the top panel, remove the DSLR attachment bracket. Stereo microphone You can attach the included camera attachment bracket screw hole covers to the screw holes. TASCAM DR-70D…
-
Page 18: Recording
Options: LEFT 12 − CENTER − RIGHT 12 6. Repeat steps 3 to 5 as necessary to set the input balance for each channel. 7. When finished adjusting, press the MENU button to return to the Home Screen. TASCAM DR-70D…
-
Page 19: Adjusting The Input Level
INPUT screen and set it to If the level is still too low, set the GAIN to HIGH and then adjust the level. HI+PLUS 6. When finished adjusting, press the MENU button to return to the Home Screen. TASCAM DR-70D…
-
Page 20: Setting The Recording Input Source
This turns plug-in power on. A different setting item can all the way down before changing it. now be selected. 6. When finished, press the MENU button to return to the Home Screen. TASCAM DR-70D…
-
Page 21: Using Phantom Power
• When using USB bus power, the unit might not be able to supply phantom power depending on the computer. In this case, use a TASCAM PS-P515U AC adapter (sold separately). • Some condenser microphones will not operate when phantom power is set to 24V.
-
Page 22: Using The Limiter
Pop-up message when changing between MONO LINK • When set to , the limiter only affects the channel that MONO has excessive input. When set to , the limiter affects LINK both channels in the pair when either has excessive input. TASCAM DR-70D…
-
Page 23: Compensating For Mic Distances
Options: 44.1k (default), 48k, 96k to the Home Screen. 9. Press the DATA dial or 4/. button to move the cursor back to the setting item. 10. When finished, press the 1/8 button to return to the Home Screen. TASCAM DR-70D…
-
Page 24: Recording (Mono/Stereo/2Mix)
When stereo recording, a file will be made for the 1/2 or 3/4 channel pair. The file names will be as follows. TASCAM̲0002S12.WAV : Set with the item on the screen WORD FILE NAME : Recording file project number : Source file : Assigned channels TASCAM DR-70D…
-
Page 25: Simultaneously Recording Two Files At Different Input Levels (Dual Rec)
(for example, CH1 and CH3). 5. Press the DATA dial or 4/. button to enable selection of other items. 6. When finished, press the 1/8 button to return to the Home Screen. TASCAM DR-70D…
-
Page 26: Using The Auto Tone Function
, and press TONE VOLUME the DATA dial. 4. Turn the DATA dial to set the tone volume. Options: –12dB (default), –18dB, –24dB, –30dB, –36dB 5. When finished, press the 1/8 button to return to the Home Screen. TASCAM DR-70D…
-
Page 27: Using Mid-Side Microphones
6. When finished, press the 1/8 button to return to the Home Screen. 7. When set to , the decoded signal will be recorded. When set to , the signal will be decoded as it is played PLAY back. TASCAM DR-70D…
-
Page 28: Recording Duration
• The recording times shown above are not continuous recording times, but rather they are the total possible recording times for the SD/SDHC/SDXC card. • When using MONO (single channel) recording, the maximum recording times will be about twice the figures above. • When using 4-channel recording, the maximum recording time will be about half the figures above. TASCAM DR-70D…
-
Page 29: Working With Files And Folders (Browse Screen)
Press the DATA dial to delete the file or the 1/8 button to cancel deletion. CAUTION In addition to the currently selected file, this will delete other files with the same base number. CANCEL Cancel deletion of the selected file and close the pop-up menu. TASCAM DR-70D…
-
Page 30: Folder Operations
This folder also becomes the playback area. cancel deletion. NOTE You cannot delete read-only files and files that are not recognized by this unit. CANCEL Cancel the operation with the selected folder and close the pop-up menu. TASCAM DR-70D…
-
Page 31: Playback
Play the normally recorded file and press 3// to switch to playback of the file recorded at a lower input level. NOTE Press and hold the 4/. or 3// button to accelerate the search speed. TASCAM DR-70D…
-
Page 32: Connecting With A Computer
SD card in the unit to a computer, as well as transfer audio files on the computer to the 1. Click the “DR-70D” drive on the computer screen to show the card. “MUSIC” and “UTILITY” folders.
-
Page 33: Settings And Information
Shows the audio file type. Shows the system firmware version. For WAV/BWF files, bit depth, stereo/mono and sampling frequency (Hz) are shown. TITLE Shows the project name. DATE Shows the date of file creation. SIZE Shows the file size. TASCAM DR-70D…
-
Page 34: System Settings
The following settings can be made for the items on the When formatting a card, the unit should be operating on AC screen. power supplied through a TASCAM PS-P515U adapter (sold SYSTEM separately), USB bus power supplied from a computer or Use the 4/.
-
Page 35: Setting The File Name Format
! # $ % & ’ ( ) + , — . ; = @ [] ^ _ ` { } ~ Initializing the count You can select the COUNT INIT item and press the DATA dial to reset the incremental numbers, which appear after the WORD characters or date, so that they start from “0001” again. TASCAM DR-70D…
-
Page 36: Using The Remote Jack
9 – Using the REMOTE jack This unit has a REMOTE jack. Footswitch uses You can connect a TASCAM RC-3F footswitch or TASCAM RC-10 Press the pedals on the footswitch to conduct the operations wired remote control (both sold separately) to it and use the assigned on the screen.
-
Page 37: 10 — Messages
Meaning and response Refer to this list if one of these pop-up messages appears on The setting cannot be changed. Not Possible the DR-70D and you want to check the meaning or determine a Change the setting to FILE TYPE proper response.
-
Page 38: 11 — Troubleshooting
If you are having trouble with the operation of this unit, please try the following before seeking repair. If these measures do not solve the problem, please contact the store where you purchased this unit or TASCAM customer support service.
-
Page 39: 12 — Specifications
Note: based on JEITA CP-2150 LOW: +3 dB MID: +11 dB HIGH: +26 dB HI+PLUS: +38 dB IN connector Connector: 3.5mm (1/8”) stereo mini jack Input impedance: 10 kΩ Nominal input level: −10 dBV Maximum input level: +6 dBV TASCAM DR-70D…
-
Page 40: Requirements For Connected Computers
(phantom power USB bus power from a computer files not used) AC adapter (TASCAM PS-P515U, sold separately) When XLR/TRS Recording 2ch Using an external battery pack (TASCAM BP-6AA, sold input selected 44.1kHz/16-bit WAV About 7:30 separately) (phantom power files used)
-
Page 41: Dimensional Drawings
Operating temperature range 0°C – 40°C (32°F – 104°F) Dimensional drawings 169mm 106.5mm • Illustrations in this manual might differ in part from the actual product. • Specifications and external appearance might be changed without notification to improve the product. TASCAM DR-70D…
-
Page 42
TEAC CORPORATION https://tascam.jp/jp/ Phone: +81-42-356-9143 1-47 Ochiai, Tama-shi, Tokyo 206-8530 Japan TEAC AMERICA, INC. https://tascam.com/us/ Phone: +1-323-726-0303 10410 Pioneer Blvd. Suite #1 and #4, Santa Fe Springs, California 90670, U.S.A. TEAC UK Ltd. https://tascam.eu/ Phone: +44-1923-797205 Meridien House, 69-71 Clarendon Road, Watford, Herts, WD17 1DS, United Kingdom TEAC EUROPE GmbH https://tascam.de/…
DR-70D – это портативный и многофункциональный аудио рекордер производства американской компании TASCAM, которая известна на рынке профессиональной аудиоаппаратуры уже более 30 лет. Эго основное функциональное предназначение – это запись звука с цифровых DSLR видеокамер, которые используются профессиональными режиссерами, продюсерами и документалистами. Он оборудован 2-мя качественными конденсаторными микрофонами всенаправленного действия и 4-мя комбинированными XLR/TRS разъемами для подключения внешних микрофонов. Это позволяет вести одновременную запись до 4-х аудио каналов на съемный SD/SDHC/SDXC носитель емкостью до 128 Гб в WAV/BWF формате с максимальным качеством 24-бит/96 кГц. За регулировку панорамы, уровня и соло отвечает встроенный 4-х канальный микшер, регуляторы которого размещены на лицевой панели управления. Также там находятся другие органы управления, в частности по выбору функций, и небольшой ЖК-дисплей, отображающий текущее состояние настроек. Питание DR-70D осуществляется от сменных элементов типа АА, по USB или от внешнего адаптера.
Коммутационная панель DR-70D имеет все необходимые коннекторы чтобы обеспечить интеграцию с внешним оборудованием:
- 4х комбинированных XLR/TRS с фантомным питанием (+24/+48 В) для подключения микрофонов;
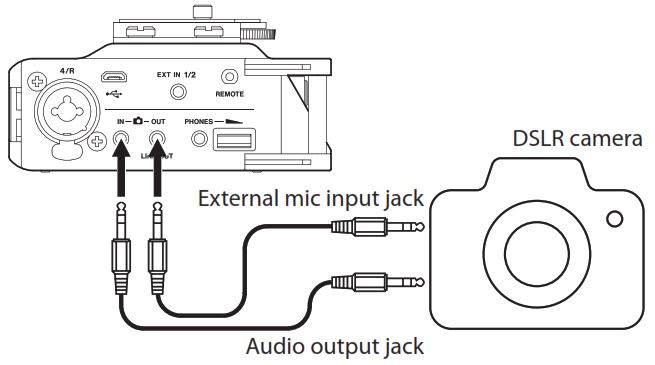
- 3.5 мм TRS Jack (in/out) для подключения камеры;
- 1х линейный выход на 3.5 мм TRS Jack разъеме;
- 1х выход для наушников на 3.5 мм TRS Jack разъеме;
- 1х EXT IN ½ дополнительный вход на 3.5 мм TRS Jack разъеме;
- 1х порт USB 2.0 для коммутации с компьютером;
- 1х REMOTE jack на 2.5 мм TRS Jack разъеме для управляющий устройств.
Основные особенности:
- профессиональный портативный аудио рекордер для DSLR видеокамер;
- 2 встроенных микрофона с предусилителями HDDA;
- запись на съемные носители SD/SDHC/SDXC форматов, емкостью до 128 Гб;
- выбор формата и качества записи;
- до 4-х каналов одновременной записи, плюс запись стерео;
- одновременная запись в нескольких форматах;
- встроенный лимитер и фильтр низких частот;
- 4-х канальный микшер и эквалайзер;
- функция сохранения настроек записи;
- функция редактирования записи и переименования записанных файлов;
- встроенный ЖК-дисплей;
- мультиязычное меню;
- встроенный адаптер для установки на штатив;
- держатель для крепления к DSLR камере;
- различные варианты питания (от сменных АА батарей, от внешнего блока, от USB);
- прочный корпус из алюминия;
- опциональное подключение дополнительных аксессуаров TASCAM.
Подробное описание
Схемы подключения TASCAM DR-70D
Питание:
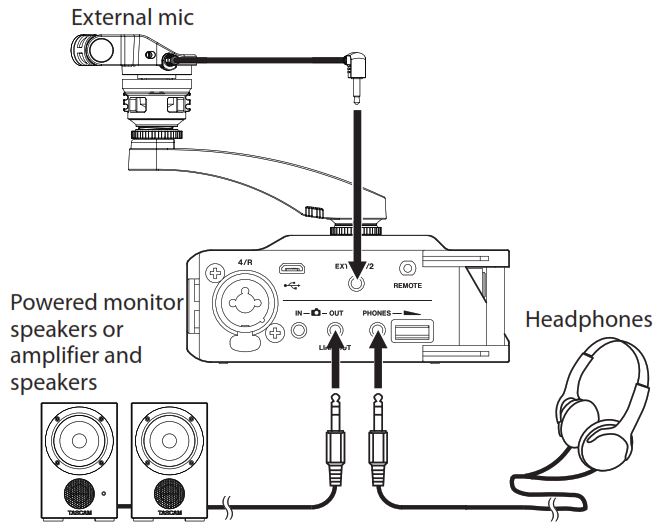
Микрофоны:
Запись внешних устройств:
Подключение камеры и ПК:
Подключение мониторов:
<< свернуть
| Тип: | портативный рекордер для DSLR видеокамер |
| Карта памяти: | SD (64 MB−2 GB), SDHC (4−32 GB), SDXC (48–128 GB) |
| Запись аудио: | WAV: 44.1/48/96 кГц, 16/24 — бит; BWF: 44.1/48/96, 16/24 — бит |
| Количество входных каналов: | 4 максимум (2 стерео) |
| HDMI: | — |
| USB-порт: | разъем USB типа Mini-B, формат USB 2.0 HIGH SPEED |
| Поддерживаемые операционные системы: | Windows XP, Windows Vista, Windows 7, Windows 8 (включая 8.1), Mac OS X 10.2 или новее |
| Разъем REMOTE: | 2.5-мм разъем (для педального переключателя RC-3F) |
| TIME CODE IN: | — |
| Частотная характеристика: | 20 Гц — 20 кГц, +0.5 дБ / -2 дБ (44/48 кГц), 20 Гц — 20 кГц, +0.5 дБ / -3 дБ (96 кГц) |
| Полное гармоническое искажение: | ≤0.02 % |
| Отношение сигнал / шум: | ≥92 дБ |
| Эквивалентный входной шум (EIN): | ≤–120 дБу |
| Дисплей: | ЖК-дисплей с подсветкой |
| Микшер: | 4 канальный (панорамы, уровня и соло) |
| Встроенные микрофоны: | 2 шт |
| Питание: | 4 батареи AA (щелочные NiMH); питание от USB; адаптер переменного тока (Tascam PS-P515U, продается отдельно); аккумулятор (Tascam BP-6AA, продается отдельно) |
| Потребление: | 5 Вт |
| Время работы: | — |
| Температурный диапазон эксплуатации: | от 0°C до +40°C |
| Габариты (ШхВхГ): | 169х55х107 мм |
| Вес: | 625 кг (с батареями) |
| MIC/LINE IN: | 4х XLR/TRS |
| EXT IN 1/2: | 3.5-мм стерео mini jack |
| Camera input: | 3.5-мм стерео mini jack |
| Выход для наушников: | 3.5-мм стерео mini jack |
| LINE OUT: | 3.5-мм стерео mini jack |
Распечатать информацию о товаре
Дополнительно
DR-701D TASCAM Портативный рекордер
Портативный рекордер для DSLR видеокамер, 6 каналов одновременной записи, 2 микрофона, формат записи:WAV(BWF), SD/SDHC/SDXC до 128 Гб, USB 2.0, HDMI, выбор формата и качества записи, 4-х канальный микшер, функция тайм-код, ЖК-дисплей, разъемы: (XLR/TRS, 3.5 мм TRS Jack), питание: (сменные АА элементы, адаптер, USB), 169х57х114 мм, 654 г.


