|
|
|---|
1.Установите SQL Server 2016 или выше. В зависимости от размеров базы данных и необходимых функций можно использовать различные редакции.
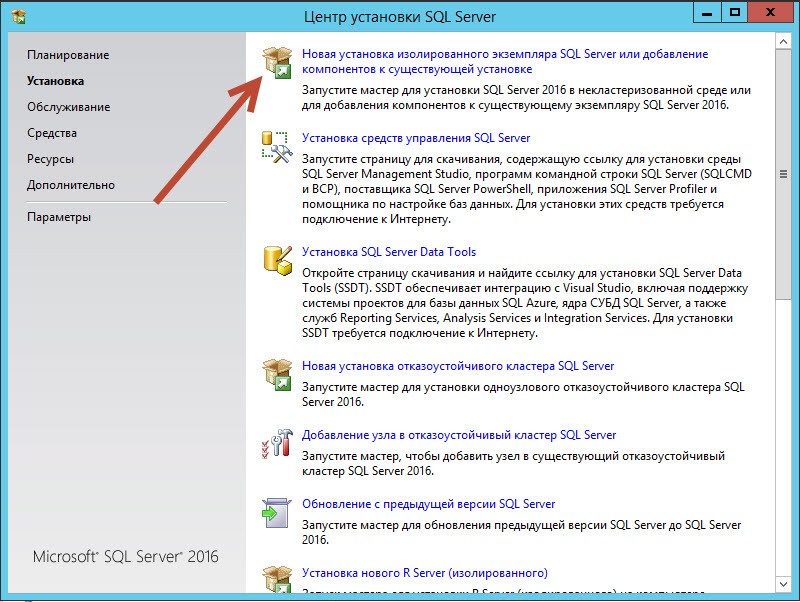
Выберите пункт Новая установка
Выбор варианта установки SQL Server.
2.Некоторые информационные окна с проверками компонентов системы в данном описании пропущены, описаны лишь существенные моменты установки необходимых компонентов. Обязательно необходимы компоненты управления и службы полнотекстового поиска:
Обязательные компоненты.
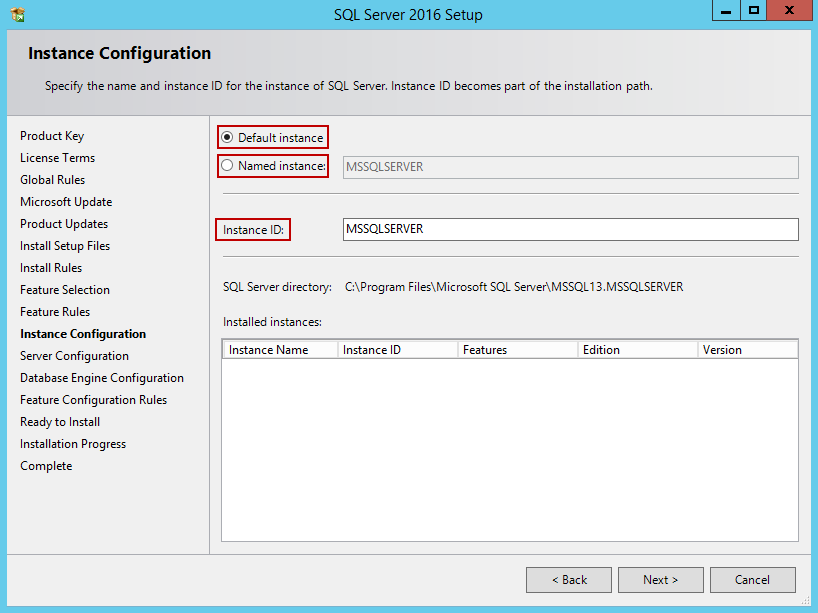
3.Выберите экземпляр по умолчанию, т.к. это будет единственный экземпляр сервера:
Настройка экземпляра.
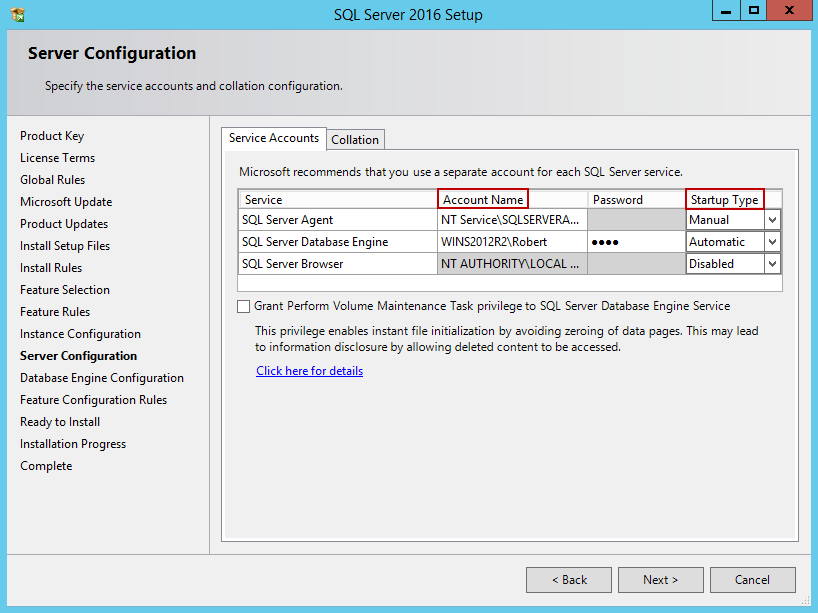
4.Настройте запуск от имени системы:
Настройка параметров запуска.
5.Важно проверить, чтобы была установлена сортировка Cyrillic_General_CI_AS для Database Engine, т.к. она задается только при установке и для ее изменения в дальнейшем потребуется переустанавливать сервер.
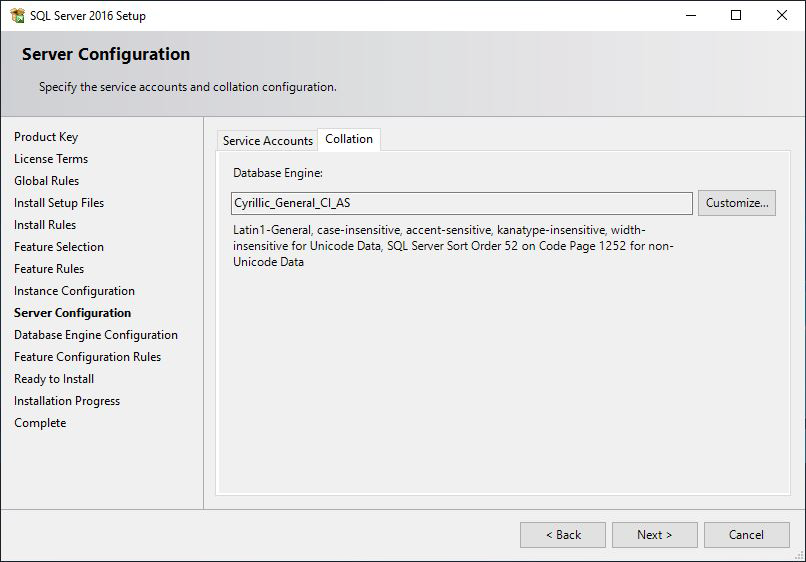
Установка поддержки локальных языковых стандартов.
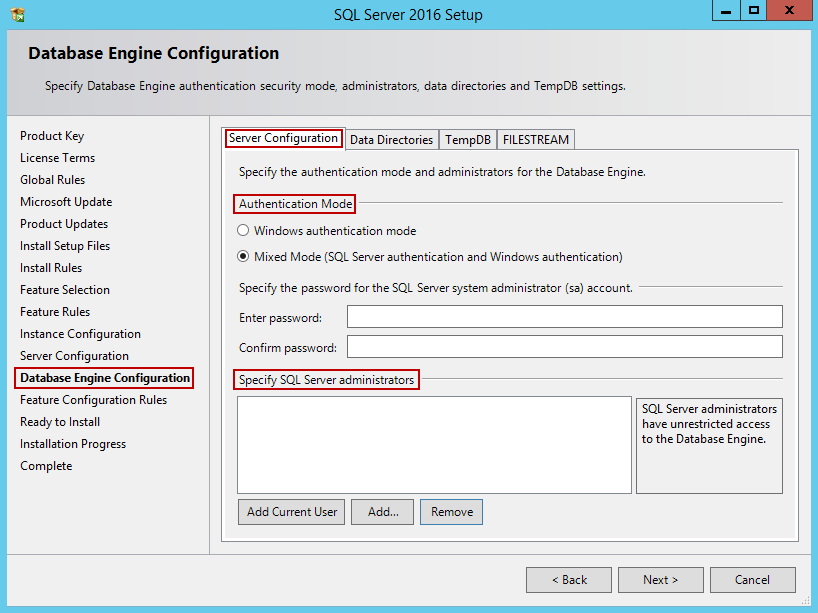
6.Установите авторизацию в смешанный режим. Добавьте текущего пользователя в администраторы SQL сервера. На данном шаге можно также заполнить вкладку TempDB, указав количество баз, чтобы позже не настраивать это вручную.
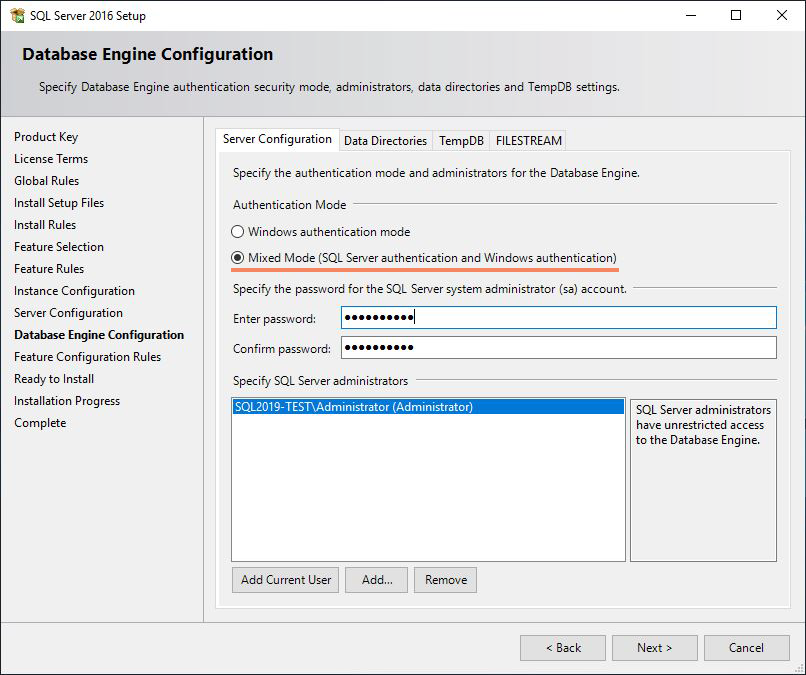
Выбор режима авторизации и добавление администратора.
7.В поле Корневой каталог данных укажите путь к папке, где будут размещаться файлы баз данных (рекомендуется использовать отдельный от ОС физический диск).
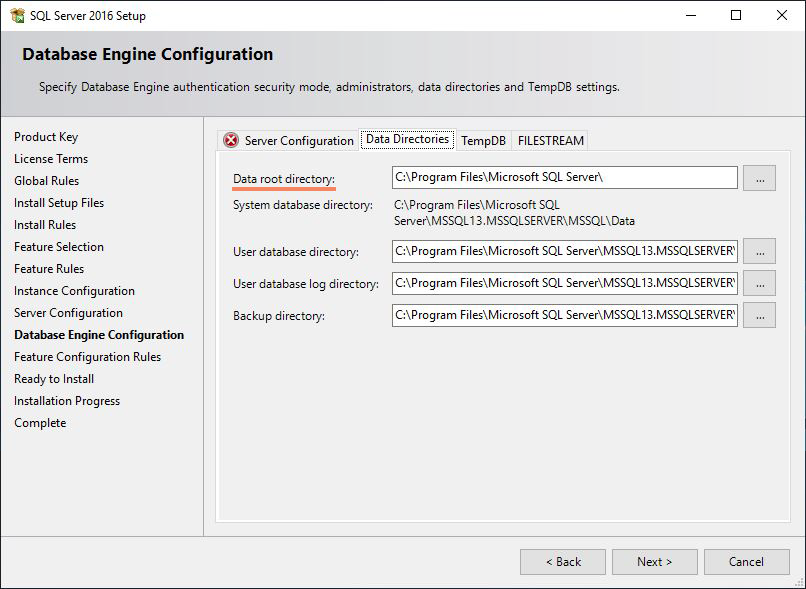
Выбор каталога.
8.Дождитесь завершения установки.
9. Откройте SQL Management Studio и в свойствах сервера измените значение параметра Максимальная степень параллелизма на 4. Этот параметр регулирует работу с процессорными ядрами, которые сервер может привлекать на обработку запроса. В параметре Оптимизировать для нерегламентированной рабочей нагрузки установите True.
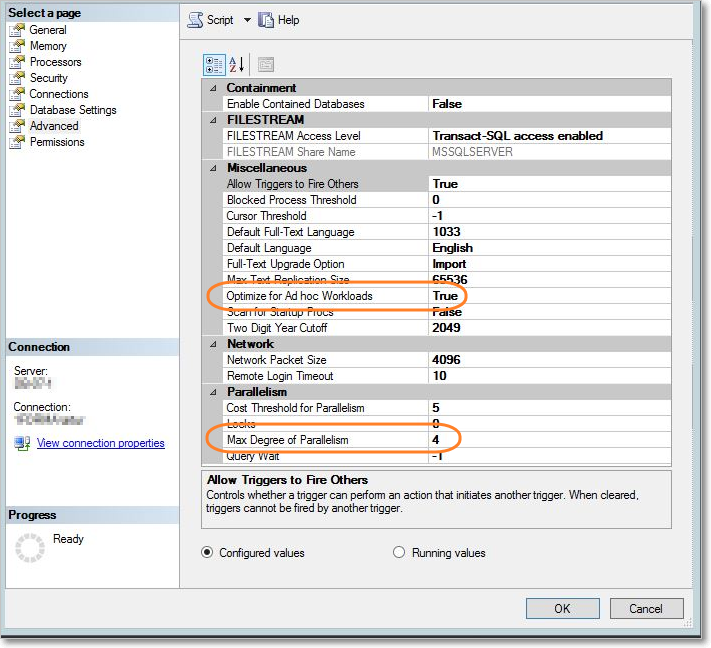
Установка параметров SQL MS.
10.По умолчанию удаленный доступ к серверу может быть закрыт, поэтому нужно разрешить подключение.
Запустите утилиту Диспетчер конфигурации SQL Server (Пуск — Все программы — Microsoft SQL Server 2016 — Средства настройки — Диспетчер конфигурации SQL Server).
В разделе Сетевая конфигурация SQL Server — Протоколы для … для строки TCP/IP вызовите контекстное меню (правой кнопкой мыши) и выберите пункт Свойства.
На вкладке Протокол установите параметр Включено в значение Да, а на закладке IP-адреса в ветке IPAll установите параметр TCP-порт в значение 1433. Затем нажмите ОК.
Аналогичным способом настоятельно рекомендуем отключить все остальные протоколы, кроме TCP/IP.
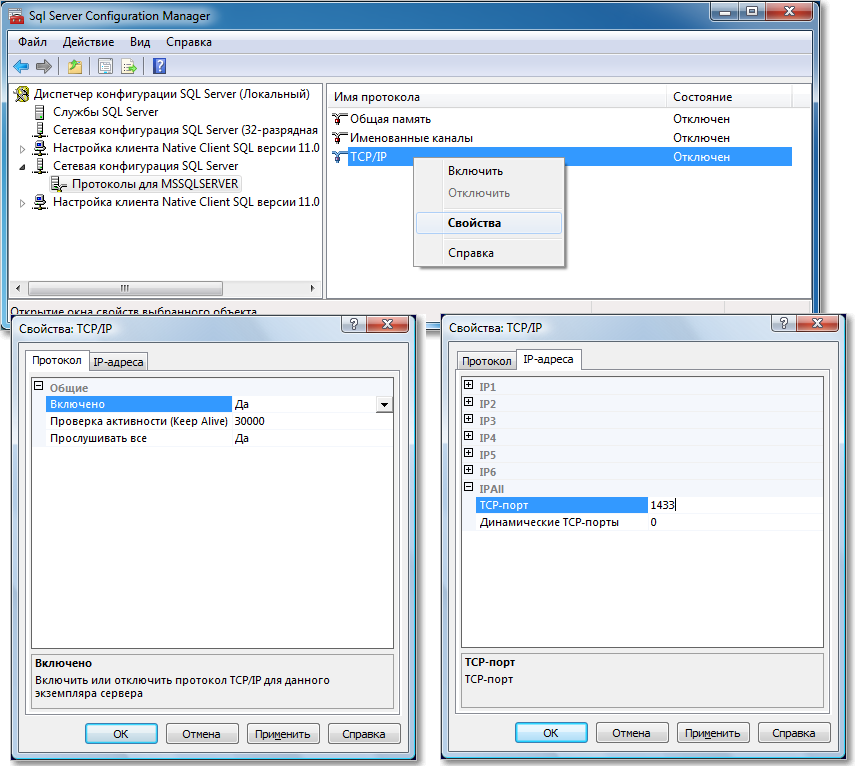
Настройка сетевых протоколов.
11.В разделе Службы SQL Server для строки SQL Server (…) вызовите контекстное меню (правой кнопкой мыши) и выберите пункт Перезапустить (этот пункт можно пропустить, если Вы перезагрузите компьютер после завершения остальных настроек):
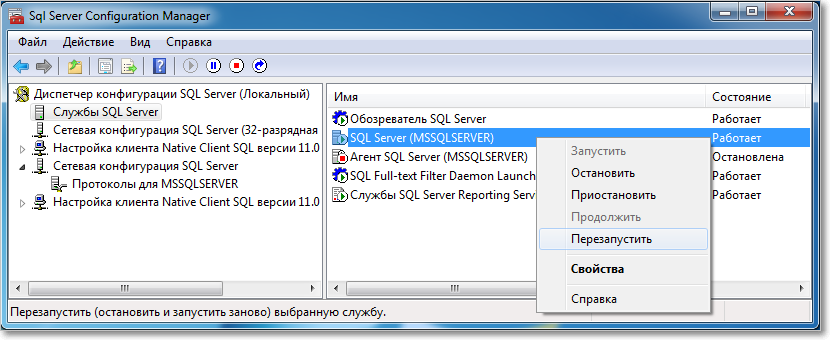
Перезапуск сервера.
12.Если вы устанавливаете SQL Server на НЕ русскоязычную ОС Windows, после окончания установки на сервере откройте панель управления (Control Panel), перейдите в раздел Time & Language, затем в раздел Language и нажмите на ссылку Administrative language settings. Нажмите кнопку Change system locale, для Language for non-Unicode programs выберите язык Russian и снова перезагрузите компьютер:
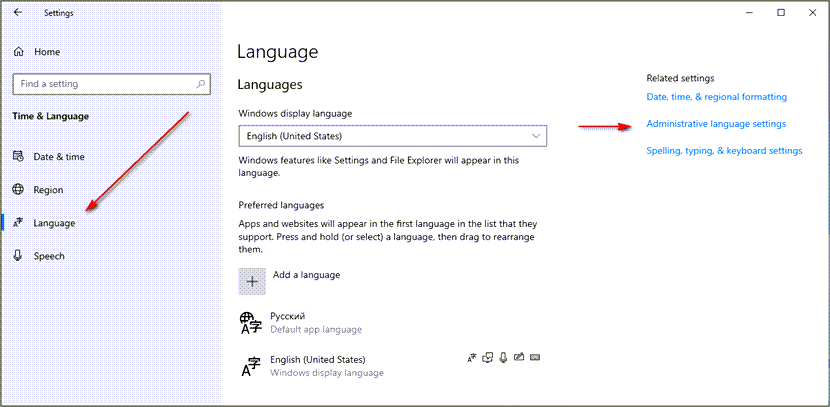
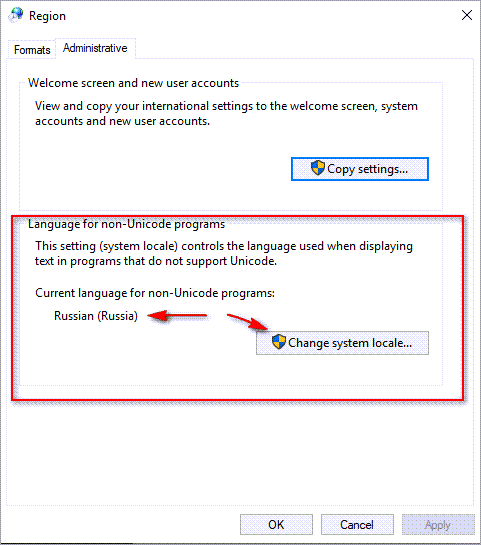
Выбор языка.
На этом подготовка SQL Server к установке «Первой Формы» завершена.
Table of Contents
- Introduction
- Install SQL 2016
- Resource and More Information
- See Also
Introduction
SQL 2016 is a database system developed by Microsoft. Its application is diverse and is present in various business applications. The innovations of this version are that it was designed to work in the cloud with Microsoft Azure more can also be used in
the On-premise mode. The characteristics product go through features such as AE — Always Encrypted to protect data, better organization of insights for a very efficient analysis of the devices, platform for hybrid cloud and hyper-scale.
Install SQL 2016
This article presents the form of installation SQL 2016.
From a media or * .iso run the installation file.

Locate the Setup file and run.

Yes, confirm the beginning of the installation process.

Start New SQL Server stand-alone installation or add features to an existing installation.

Wait for the start of the installation.

The next step aims to define authenticity and product licensing — Next.

Enable option — «I accept the license terms» and Next.

Wait for the installation requirements — Next.

You can choose to use the update to check security. Enable according to their way of working.

Wait for the installation process.

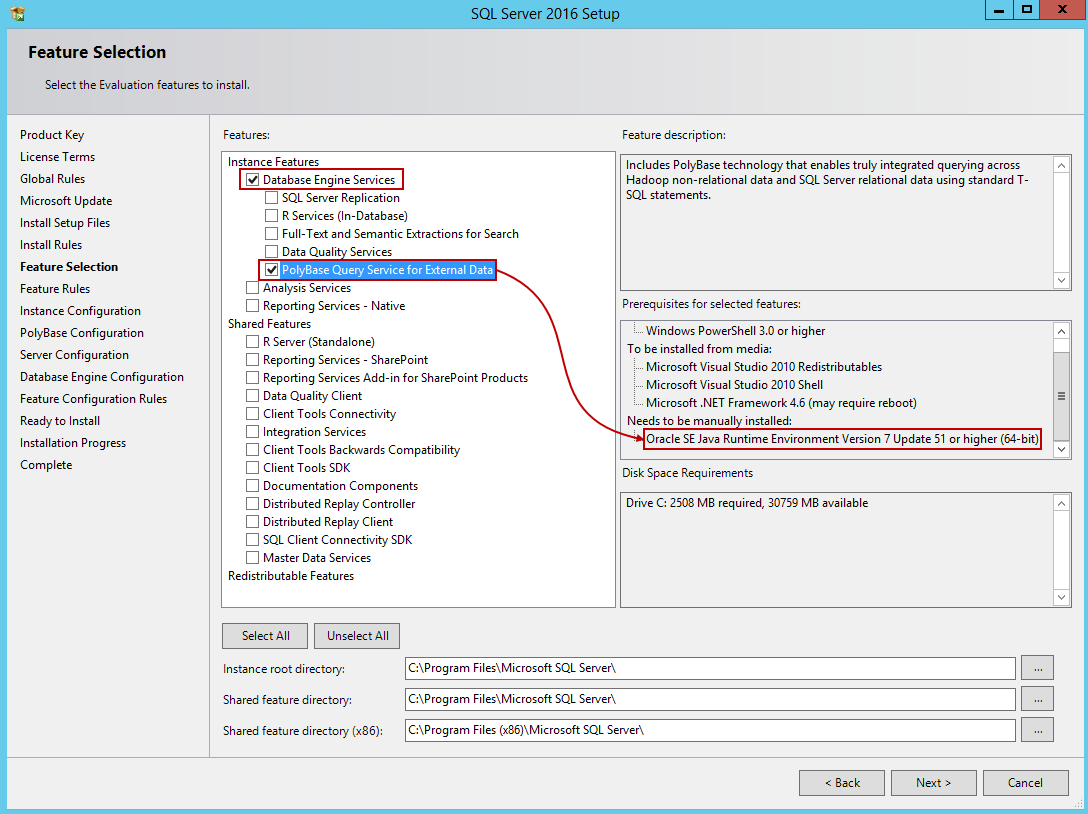
Select the features that will be used.

If a problem occurs in the requirements it will be informed during the installation

Clicking on the link Failed detailed information is displayed.

In this example, it lacked the requirement.

So it is recommended to abort the installation go to the manufacturer’s website, download Java and perform the requisite installation.
After this process start SQL 2016 installation again.

Set the type of instance to be used. You use the default instance name.

Or an instance according to your need.

Wait for the installation process.

At this stage, the recommendation is to separate the functions of the service by the service account.
Set the accounts in their respective services to the defined security privileges. Next.

Add the Active Directory domain accounts to administrators Database.

Or if you want you can also set the password for the sa account SQL2016.

If you use the Data Mining Analysis Services service account set and the tabular format.
If you are an experienced user mode the way that is necessary for carrying out their work.

Reporting Service allows you to set up a dedicated server for your use or use it in an integrated format to SharePoint.

Insert account Distributed Replay Controller — Next.

Specify controller machine and Next.

The Next button is disabled while the Accept button is not marked.

Enable Accept button and Next activate.

Run Next.

Make sure the rules were properly installed and go to Next.

Ready to install SQL Server 2016.

Wait for the Setting Feature install state.

Wait for the installation process.

The next is the end of the installation where you can check all installation status, the log directory.

Resource and More Information
- Management Studio 2016 installation procedure
- Overview SQL 2016 detailed data can be found at
https://www.microsoft.com/pt-br/server-cloud/products/sql-server-2016/ - Link download Java correction requirements:
http://www.oracle.com/technetwork/java/javase/downloads/index.html - Link to download SQL Server 2016:
https://www.microsoft.com/pt-br/evalcenter/evaluate-sql-server-2016 - Hardware and Software requirements SQL Server 2016
- SQL Server 2016 Technical Documentation
- Upgrade to SQL Server 2016
- What’s New in SQL Server 2016
- SQL Server 2016 Resources
- SQL Server R Services
- SQL 2016 Fórum MSDN
See Also
- Installing SQL Server 2014 Step by Step Tutorial
- SSQL Server 2014 Portal
SQL Server 2016 is the newest Version of the Microsoft SQL Relational Database Management System. In this article I will explain how to install MS SQL Server on Windows Server 2016.
You can also use Following guide to Install Microsoft SQL Server on Windows 10.
Download SQL Server 2016
First, download the SQL Server download setup from the following URL www.microsoft.com/en-us/evalcenter/evaluate-sql-server-2016
Once you run the download setup, you have options to perform a basic Installation, Custom Installation or you can download the SQL Server ISO Image to Your Computer.
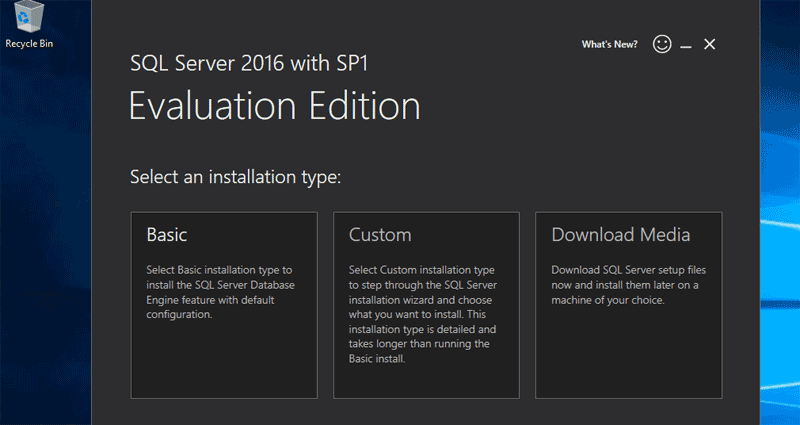
It is better to Download ISO image so we can use it to Install SQL Server whenever we want. You can burn ISO Image to a DVD or mount the ISO image to the Windows Server if you are running a Virtual Machine.
Install SQL Server 2016 on Windows Server 2016
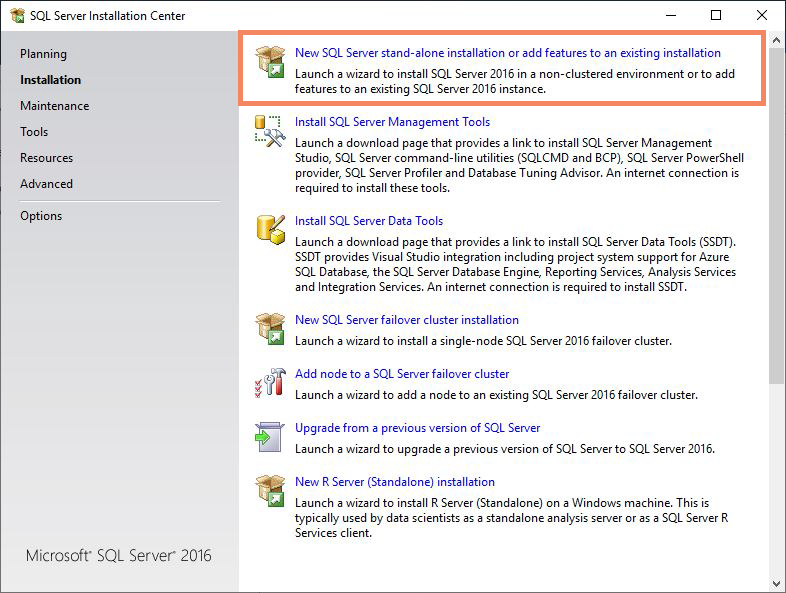
Once you run the SQL Server Installer, It will launch the SQL Server Installation Center.
From the Installation Center, Select installation and click on “New SQL Server stand-alone installation or add features to an existing installation” Link to start install SQL Server 2016.

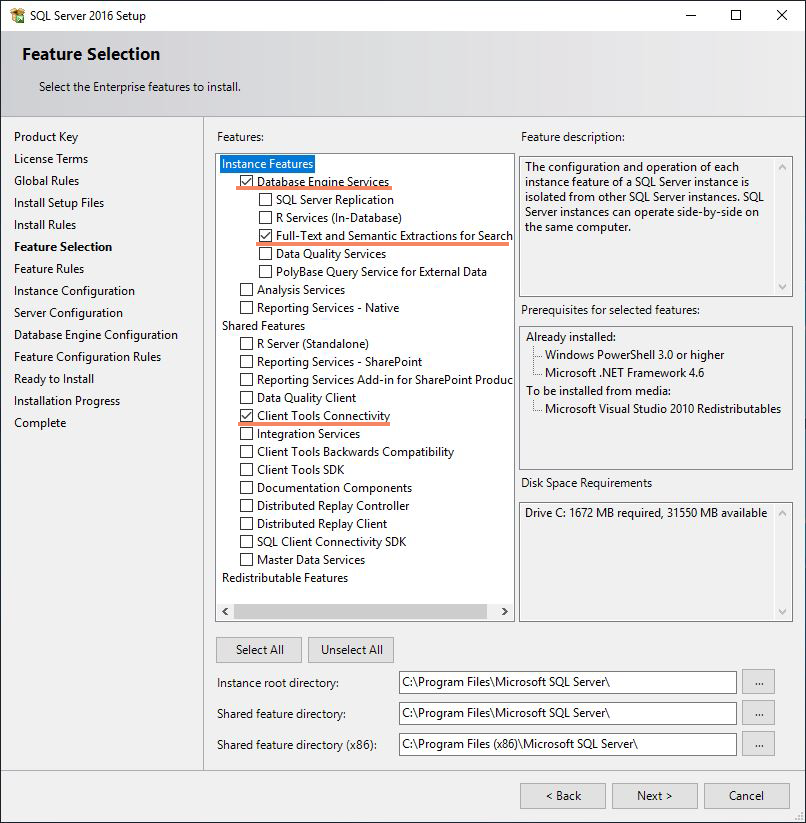
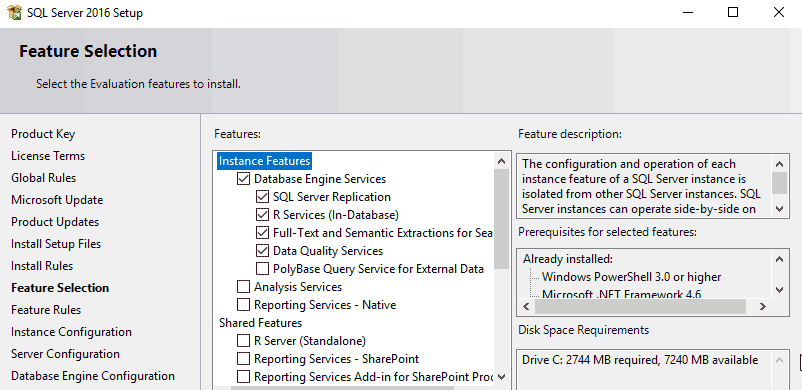
Feature Selection
In the Feature Section, you need to select what features you need to install. Make sure to select Database Engine Services as below screenshot shows. Also select “Client Tool Connectivity” From the Shared features Section.
Authentication Mode
Select Mixed Mode as the Authentication Mode and Set Password for the “sa” user. Also click on “Add Current User” button to add yourself as a SQL Server Administrator.

At the end of the SQL Server 2016 Setup, Click on the Install Button to Install Microsoft SQL Server on Windows Server 2016.
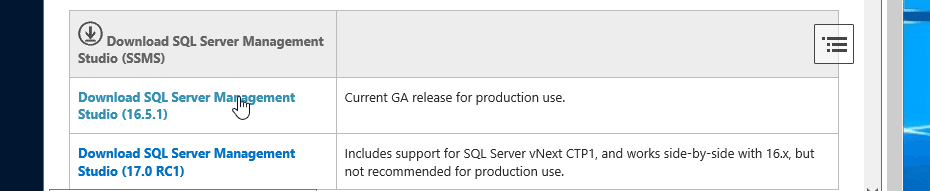
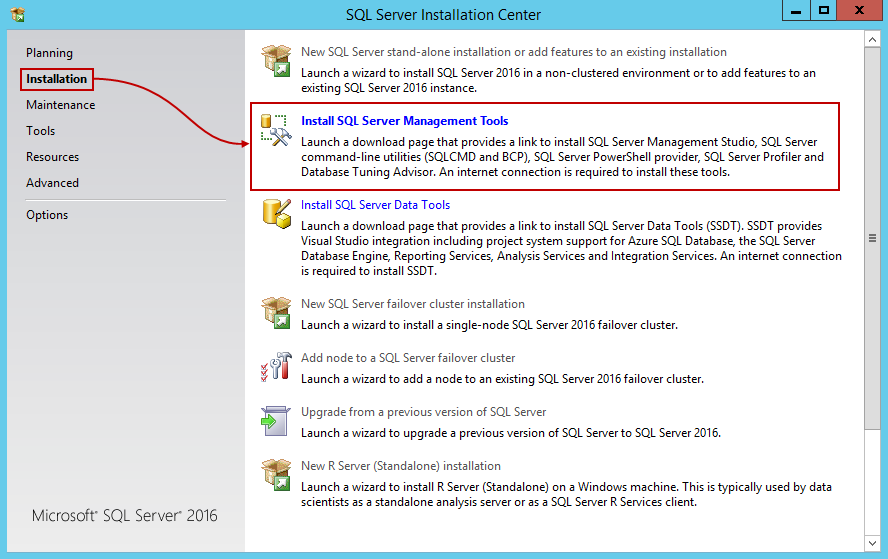
Install SQL Server Management Studio
SQL Server Management Studio provides the Graphical User Interface (GUI) to manage MS SQL Server 2016.
You can download Server Management Studio Installation setup From the Following URL https://msdn.microsoft.com/en-us/library/mt238290.aspx (Also Available in the SQL Server Installation Center).
Connect to the MS SQL Database Server
Now we can use Server Management Studio to connect to the our MS SQL Database server.
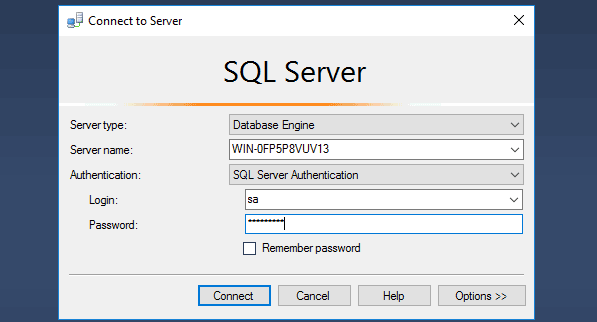
We can use either sa user account or windows user account to authenticate to the Microsoft SQL Server 2016.
Установка MS SQL server 2016 SP1 для 1С.
Решил создать небольшую пошаговую инструкцию по установке MS SQL server 2016.
(Если нужно больше, тогда вот подробный курс: Администратор 1С)
Год назад писал видео о том, как установить MS SQL server 2016 (версию для тестирования, на тот момент).
Теперь в установке есть небольшие отличия, поэтому считаю, что инструкция будет не лишняя.
Устанавливать эту СУБД мы будем на Windows server 2012 R2.
Первым делом на сайте Microsoft нужно скачать веб установщик «сиквела» я брал версию «Evaluation» тестового периода в 180 дней будет более чем достаточно, чтоб оценить версию, и позаботится о лицензировании. Лицензирование довольно простое!
Чтоб получить версию, к примеру, Standard нужно будет всего лишь ввести ключ продукта соответствующей версии MS SQL.
И так установка.
Если Веб установщик уже скачали тогда двойным кликом по этому приложению, запускаем его.
Веб установщик MS SQL server 2016

Microsoft SQL Server 2016 SP1 (evaluation)
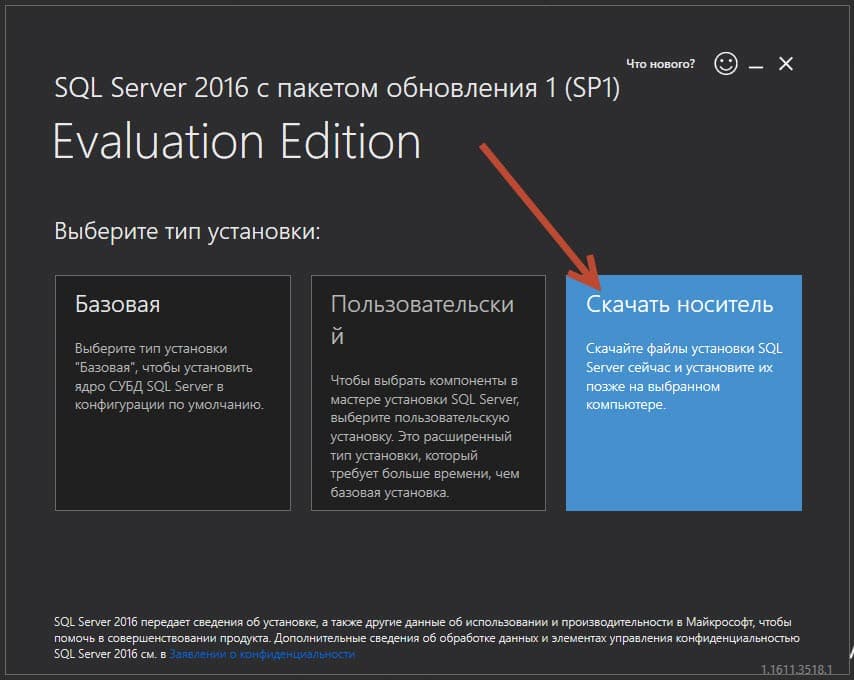
Затем нужно выбрать тип установки:
У нас есть три варианта, рекомендую выбрать третий : «Скачать носитель»!
1C и MS SQL server 2016
Так мы скачаем образ ISO и сможем его установить позже, например, после физической подготовки сервера под СУБД.
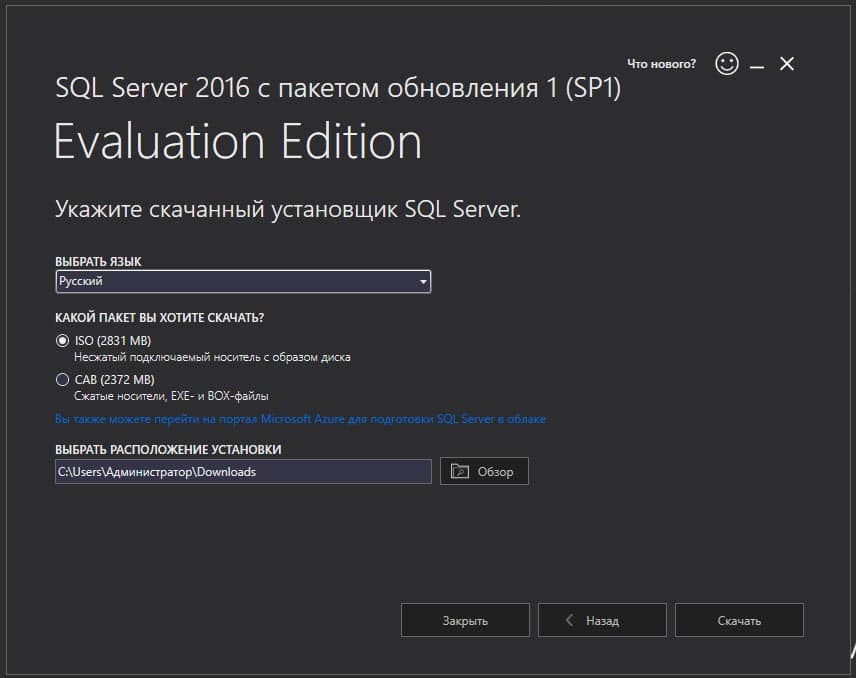
Выбираем язык «Русский», Пакет ISO 2372 MB и укажем расположение файла пакета установки.
MS SQL server 2016 SP1 для 1С
И затем кликаем по кнопке «Скачать».
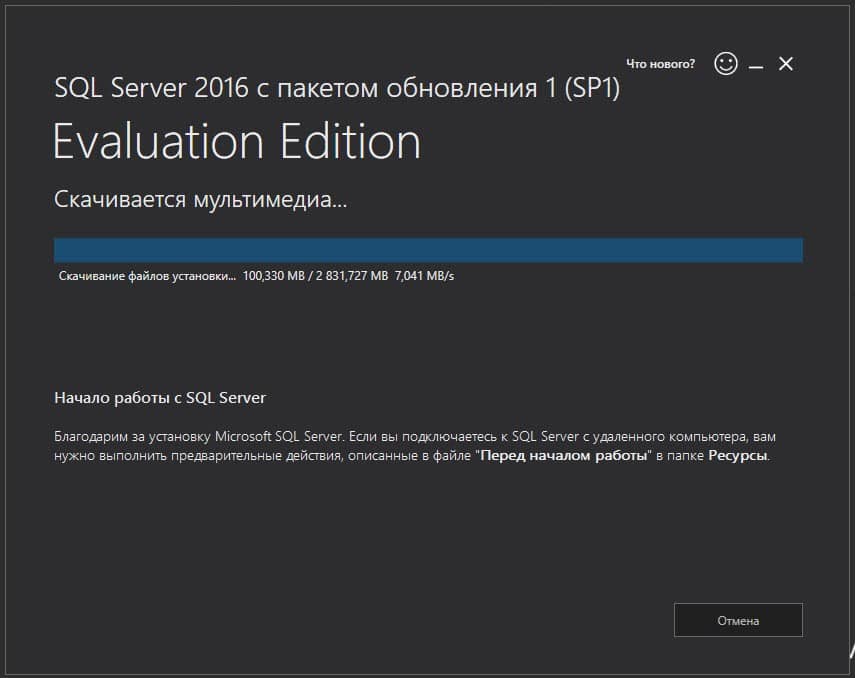
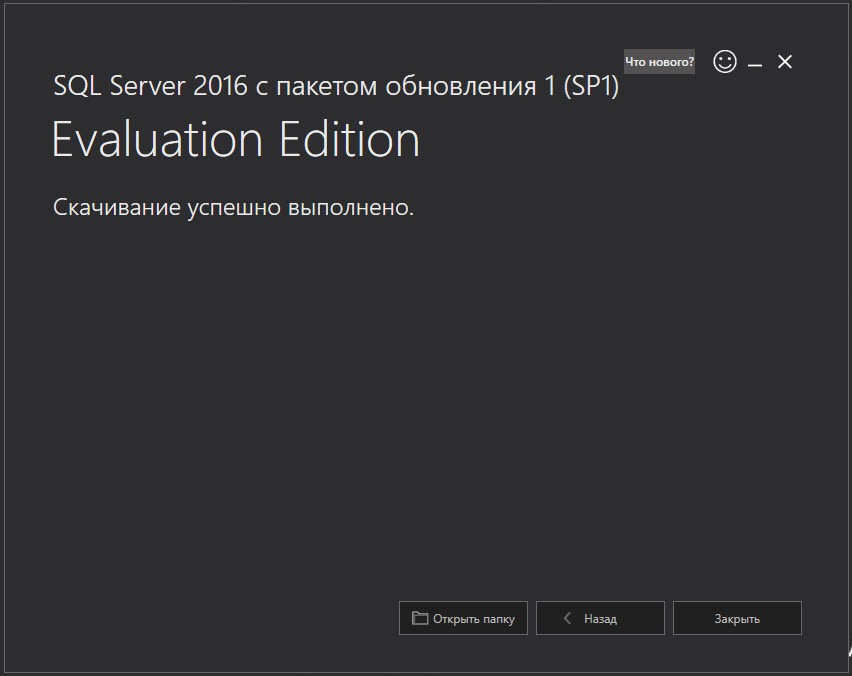
После чего произойдет скачивание пакета установки из интернета. Собственно подключение к интернету у вас должно быть. Скорость скачивания можно сказать «приличная» во многом зависит от скорости вашего провайдера.
MS SQL server 2016 SP1 для 1С
Если видим картинку «Скачивание успешно завершено», тогда кликаем по кнопке «Открыть папку» там вы найдете образ ISO пакета установки.
Теперь можно приступить к распаковке образа ISO (Или можете его записать на диск).
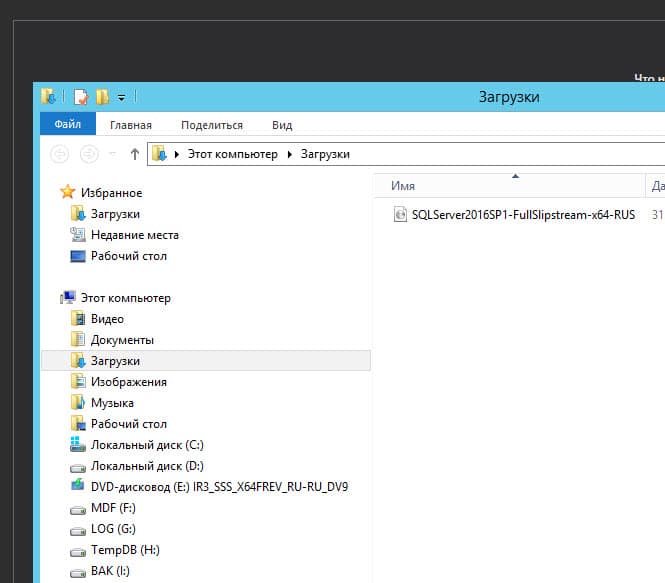
Распаковка ISO MS SQL server 2016
Правый клик мышкой по файлу и распакуем его.
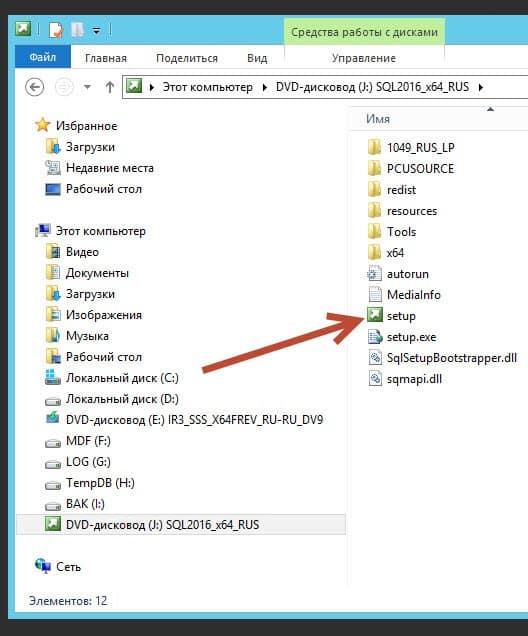
После распаковки ищем setup (иконка зеленого цвета).
Двойной клик и приступаем к установке MS SQL server 2016.
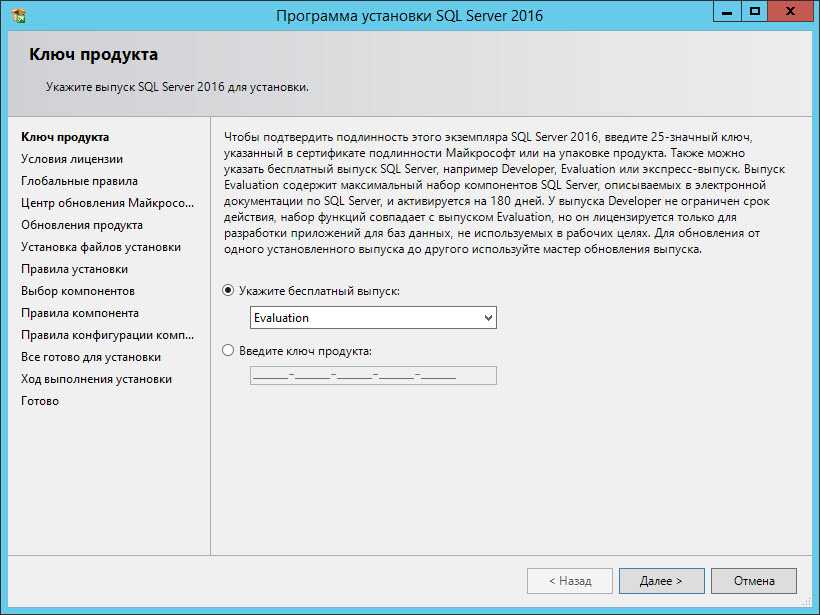
Выбираем вверху «Новая установка изолированного экземпляра SQL server.
Далее я выбрал бесплатный выпуск «Evaluation» его можно использовать 180 дней пока Вы не купили, например версию standard ее будет почти всегда достаточно для работы в 1С Предприятии.
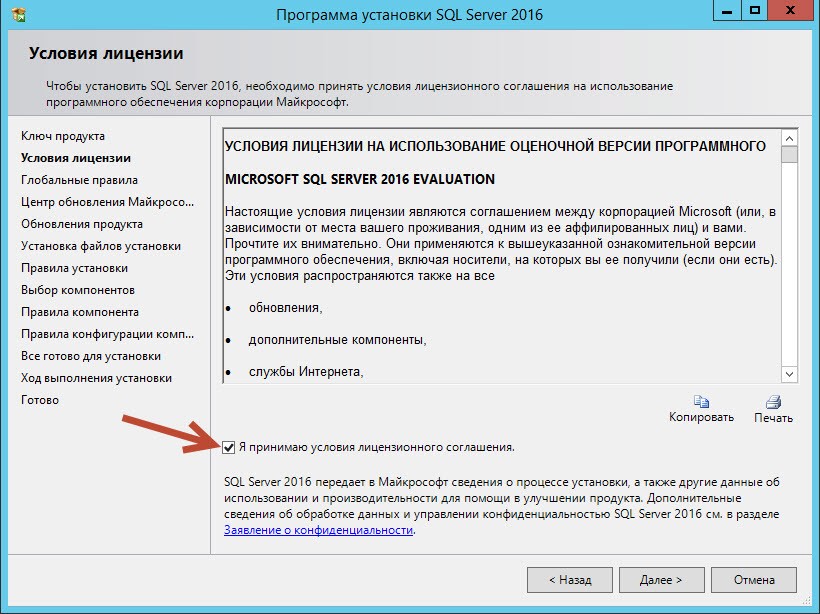
Затем на следующим шаге принимаем условия лицензионного соглашения, поставив птичку возле: «Я принимаю условия лицензионного соглашения».
На следующем шаге ставим птичку возле «Использовать центр обновления..» .
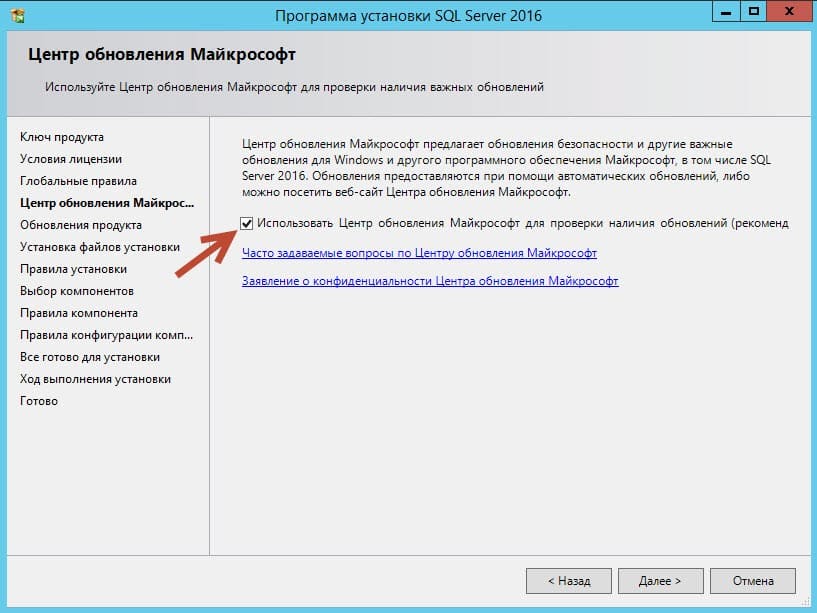
MS SQL server нужно держать в актуальном состоянии, поэтому стоит устанавливать все обновления которые выходят.
Далее на следующий вкладке установщик проверяет конфигурацию сервера на предмет ошибок, которые не позволят нам установить СУБД . Если у вас как на «скрине» ниже все птички зеленого цвета тогда все отлично и можно продолжать установку, иначе нужно читать и разбираться с проблемами.
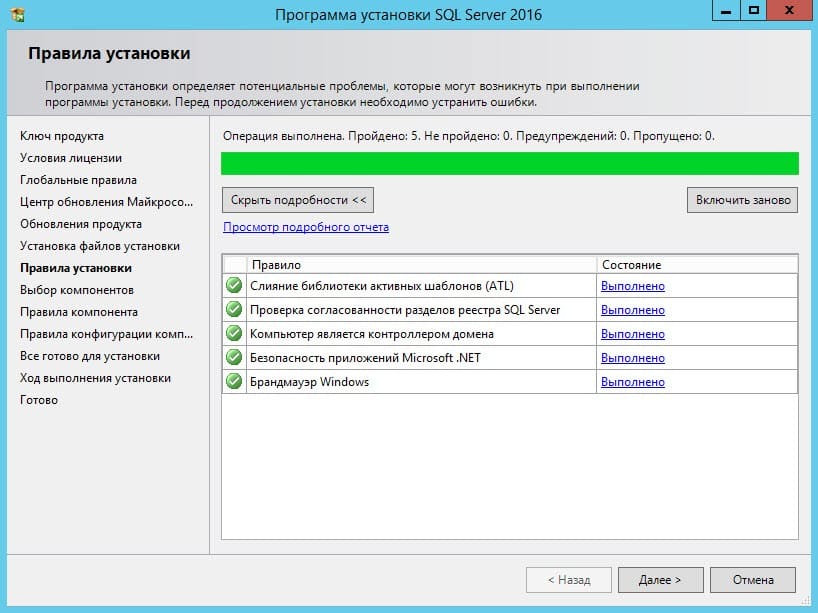
Из возможных основных проблем:
1. Не установлен .NET Framework.
2. Включен брандмауэр.
Затем на следующей вкладке нам нужно поставить только одну птичку вверху.
«Службы ядра СУБД».
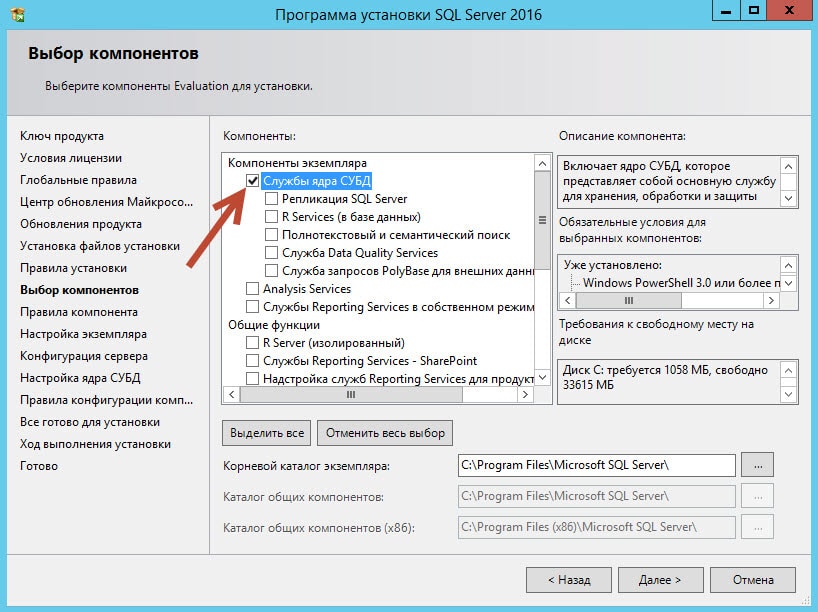
Ядро СУБД
Все остальные компоненты устанавливать не стоит, во всяком случаи, если Вы планируете использовать СУБД для работы только в 1С Предприятии.
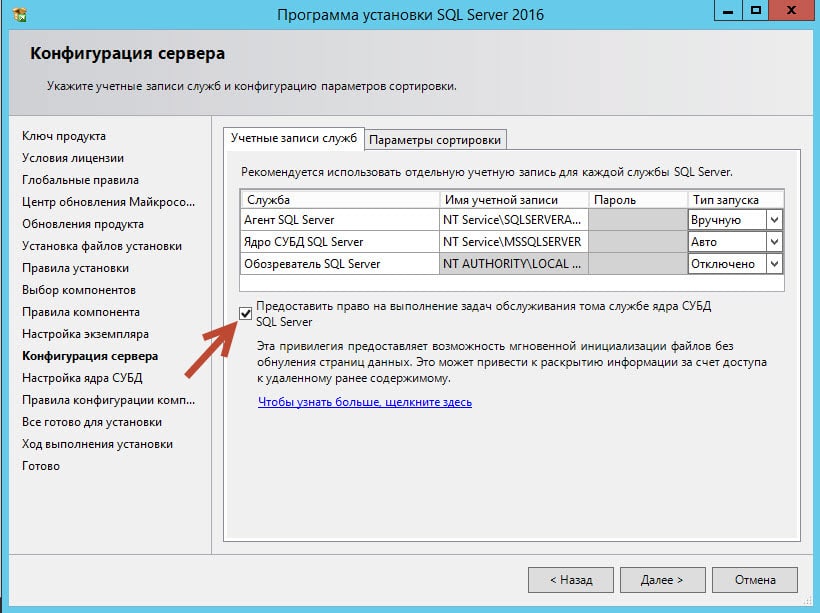
На следующей вкладке ставим птичку: «Предоставить право на выполнение задач обслуживания тома службе ядра СУБД».
На следующей вкладке сперва установим переключатель возле «Смешанный режим (Проверка подлинности SQL server и Windows)».
")
Смешанный режим (Проверка подлинности SQL server и Windows)
И создадим пароль для нашего рута SA:
Если Вы хотите больше узнать о технической стороне 1С, тогда регистрируйтесь на первый бесплатный модуль курса: Администратор 1С >>>

Introduction
Microsoft SQL Server 2016 provides faster transactions and queries, deeper insights on any device, advanced analytics, new security technology, and new hybrid cloud scenarios. Along with these features, comes the new installation setup. Although it is similar to the installation of SQL Server 2014 and other older versions, there are few notable differences:
-
System requirements have changed
-
SQL Server Management Studio has its own installation process, separated from installation of other services
-
New features have been added, with their respective setup options
System Requirements
There are several hardware and software requirements that should be taken into consideration before installing new SQL Server 2016:
-
64 bit processor, with at least 1.4 GHz clock speed. Older 32 bit processors are not supported by the SQL Server 2016.
-
At least 512 MB of system memory is required, but be aware that some of the features require much more.
-
As for the hard drive – at least 6 GB of free space is required, and it heavily depends on additional features that could be installed. Detailed information on disk space requirements for each feature could be found here.
-
FAT32 filesystem is supported, but it is strongly recommended to avoid it, and use an NTFS formatted drives instead. FAT32 filesystems proved to be less secure then NTFS systems when using SQL Server 2016.
-
Setup cannot be performed on Read-only, mapped or compressed drives.
-
Installing SQL Server 2016 on domain controllers is not recommended, since it can cause security conflicts.
Component Requirements Minimal Recommended Processor Speed 1.4 GHz on x64 Processor 2 GHz or faster System Memory (RAM) 512 MB 1024 MB Hard Disk Space 6 GB 8 GB or more Operating System Windows 8, Windows Server 2012 Windows 8 or later
Systems that are currently supported for SQL Server 2016 installation are:
-
Windows 8 and 8.1 (All 64 bit editions)
-
Windows 10 (All 64 bit editions)
-
Windows Server 2012 and 2012 R2
Older systems like Windows 7 and Windows Server 2008 are not supported by SQL Server 2016.
Installation types
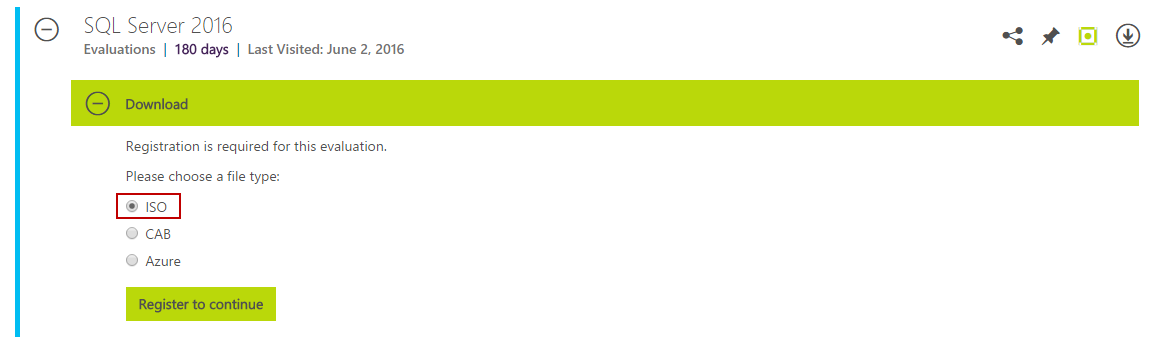
There are four ways to install Microsoft SQL Server 2016. The easiest way to perform it is to use the installation wizard. There is also an option to install the program using Command Prompt, Configuration File or SysPrep. No matter which installation type is chosen, the installation files need to be downloaded from Microsoft’s website first. In order to get the download link, either create new Microsoft account, or sign in with the existing one. Choose the file type that will be used for the installation: ISO, CAB, or Azure file. For this demonstration, the ISO file will be used.
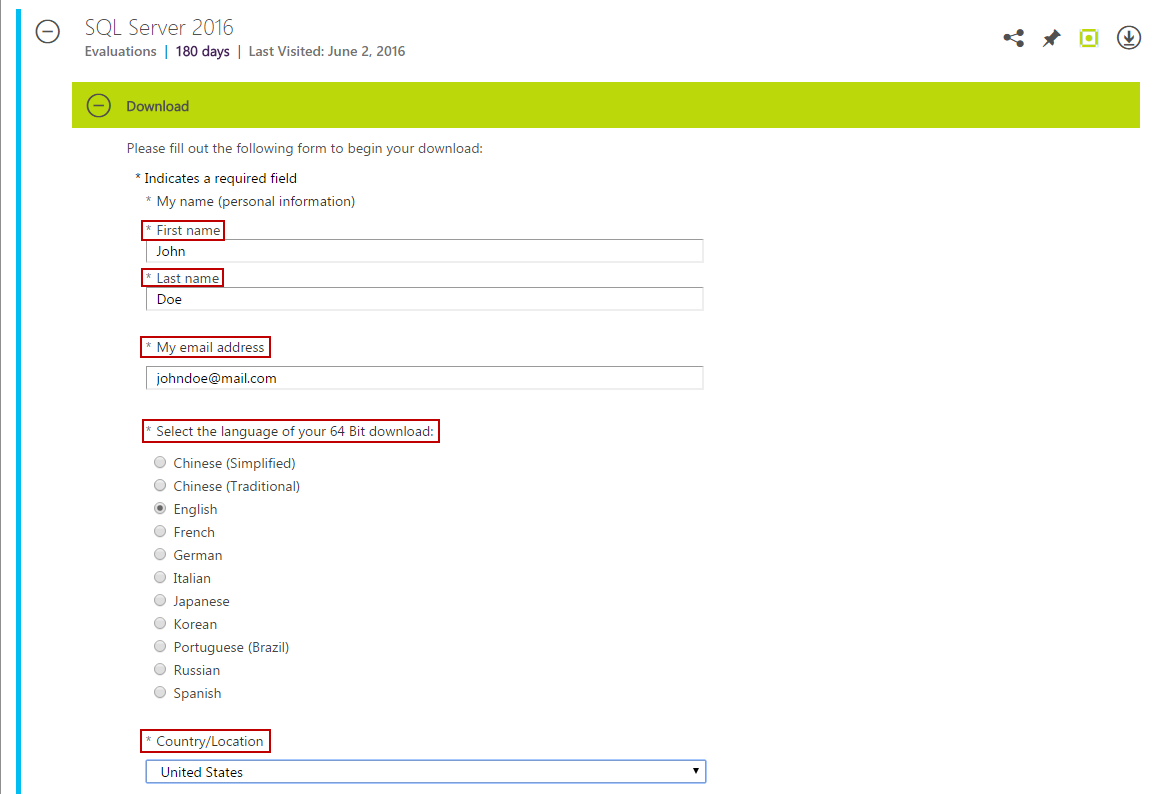
After clicking on “Register to continue” button, additional information is required: name, email address, language, and country. There are some more fields that can be filled, but only the fields marked with * are necessary in order to access the download link. Click the Continue button, and download the file to the hard drive.
Installation process
Burn or mount the downloaded ISO image (SQLServer2016-x64-ENU.iso), and start the installation process.
-
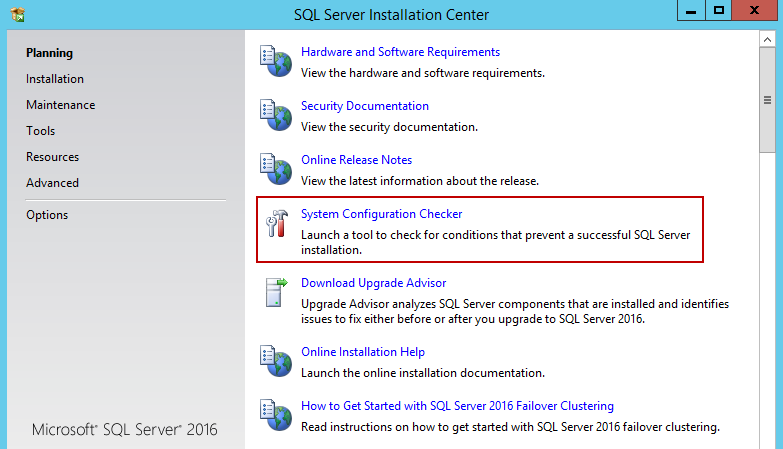
Starting the Autorun, or running the Setup.exe will initiate the SQL Server Installation Center. First tab that opens by default is Planning. Many useful links that are found here, lead to pages with more info on the product and installation instructions.
-
It is always a good idea to run System Configuration Checker. It only takes a minute or two to complete, and can save you from possible issues in the future. If the system passes all the tests in System Configuration Checker, proceed to the next step.

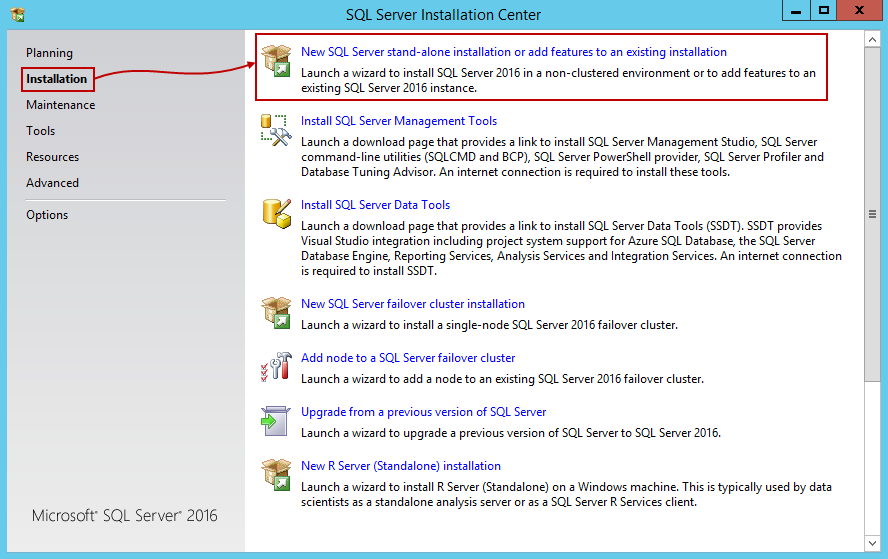
-
Clicking on the Installation tab in the upper left corner displays the standard installation options. It is noticeable that the options for SQL Server Services and SQL Server Management Tools stand separated, which was not the case in previous versions of SQL Server. To start the installation, click on New SQL Server Stand-alone installation or add features to an existing installation.
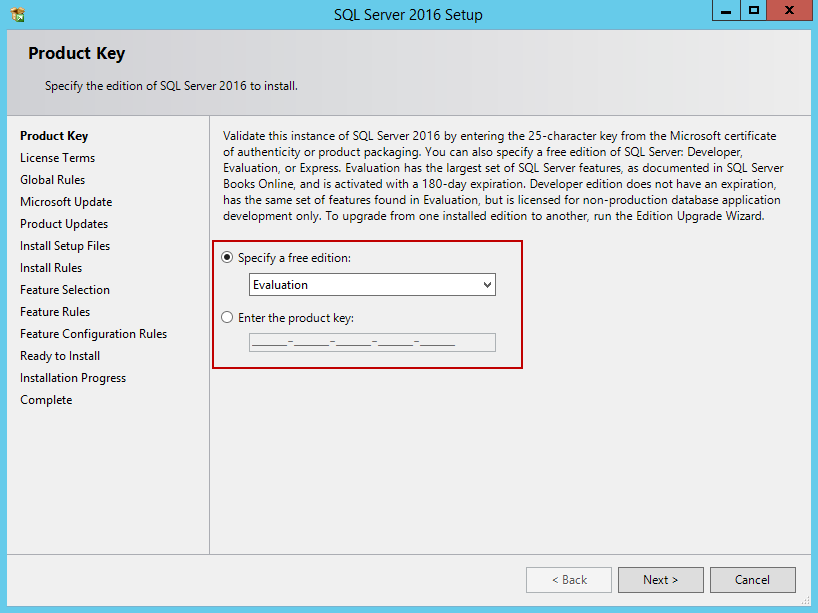
-
Choose which SQL Server 2016 version to install. The Evaluation version gives access to all of the SQL Server 2016 features, as well as trial license limited to 180 days. Other versions can be chosen as well – but they require the activation key to be entered in the field beneath. In this example, the Evaluation version is used. Click Next to proceed.
-
Read and accept License Terms. Check the box in front of I accept the license terms, and click Next.
-
In this step, set the options for Microsoft Automatic Updates. Check the box to enable automatic updates, or leave it unchecked if you prefer to install them manually. Click Next.
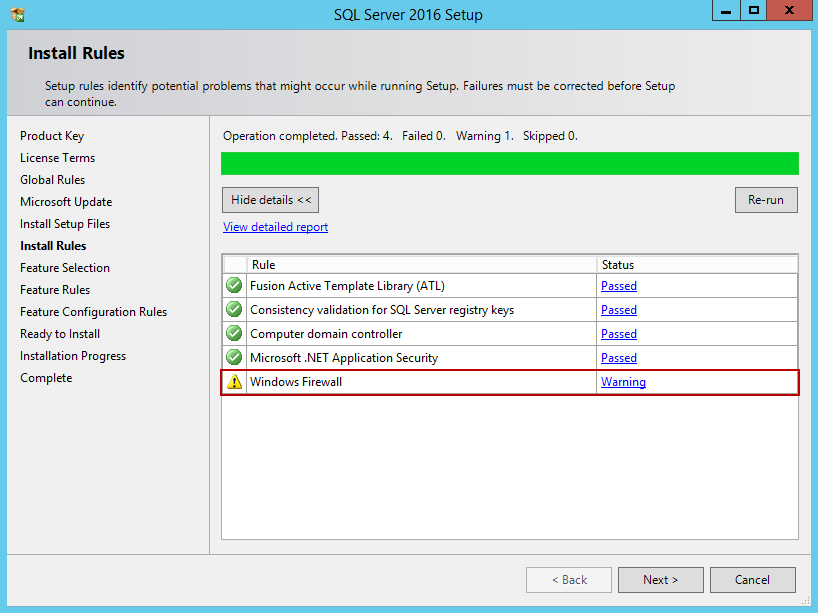
-
Wait for the Install Setup File and Install Rules to complete. It is possible to get the Windows Firewall warning after Install Rules check is completed. The warning occurs if port 1433 is closed by the Windows Firewall. The warning can be ignored at the moment, but the 1433 port will have to be configured later. There is also an option to specify another port(s) that will be used by SQL Server instance. Detailed instructions on how to configure Windows Firewall to enable Database Engine Access can be found here.
-
On a Setup Role, choose to install All Features with defaults, or perform custom installation with features that you specify. In this example, the custom installation is chosen.
-
In the Feature Selection step, select the features of the SQL Server that need to be installed. You can check the description for each feature on the upper right, as well as prerequisites for all selected features in the box bellow. On the lower right, the Disk Space Requirements are displayed. In comparison to older versions of SQL Server, it is noticeable that Management Tools feature (which installs SQL Server Management Studio) is missing, but it can be installed separately later. For the instance to work, it is only necessary to install Database Engine Services. The latest SQL Server 2016 feature, PolyBase Query Service for External Data, can also be installed, but be aware of additional requirements. At least 4 GB of RAM is required to use this feature, and the installation of Java Runtime Environment 7 Update 51 in the next step will be required. If needed, set Instant root directory and Shared feature directory paths manually on the bottom of the menu. When finished with the selection, click Next.
-
If PolyBase Query Service is chosen in the previous step, the wizard will display the warning about failed test for Java Runtime Environment. Just click on the failed link on the right, and it should open the JRE download page.
-
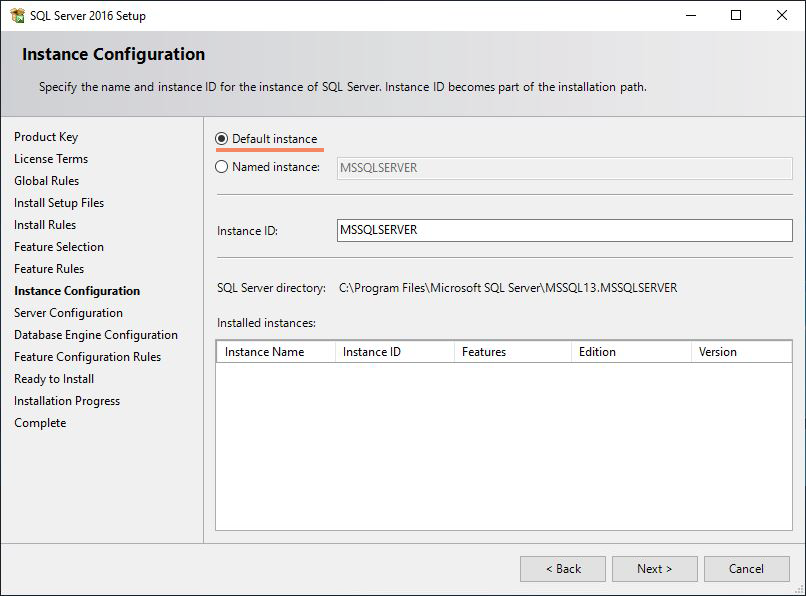
In the Instance Configuration step, choose the default, or named instance, and specify the Instance ID. Click Next to proceed.
-
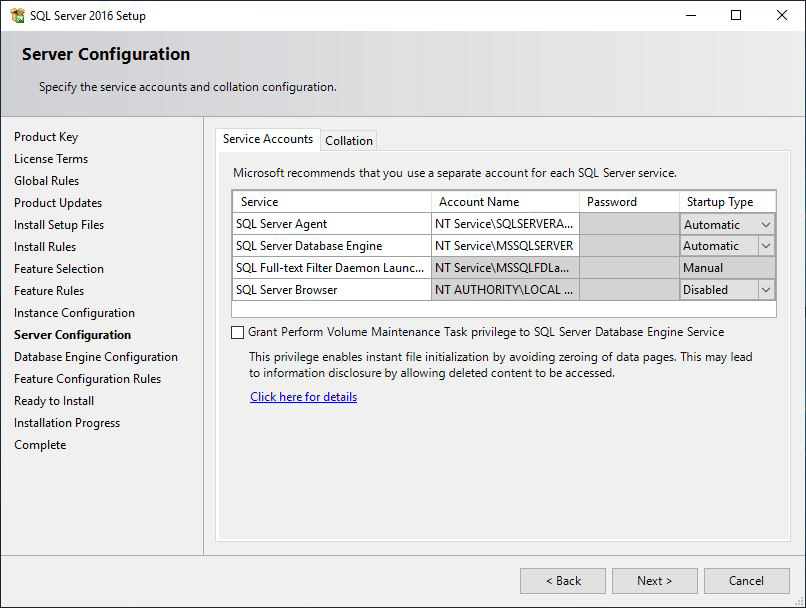
In Server configuration step, specify the accounts that can start SQL Server services. Set the startup options for any of these services to Manual, Automatic, or Disabled. Click Next when done.
-
In Database Engine Configuration, under Server Configuration tab, specify the authentication mode and Administrator account(s) for the server. As in earlier versions, Windows Authentication mode and Mixed Authentication mode are available.
-
After checking Feature Configuration Rules, the wizard proceeds to Ready to Install step. All of the settings that are specified earlier, can be reviewed here. Check the settings one last time, and click Install to start the installation.
-
Wait for the installation to finish. The process may take some time, depending on hardware specifications.
-
Optionally, install SQL Server Management Studio, so you could easily manage your databases. Start the autorun or setup.exe again, and under the settings tab, choose Install SQL Server Management Tools. This will open the download page for the latest version of SSMS. Click on the download link, and save the installation to the hard drive.
-
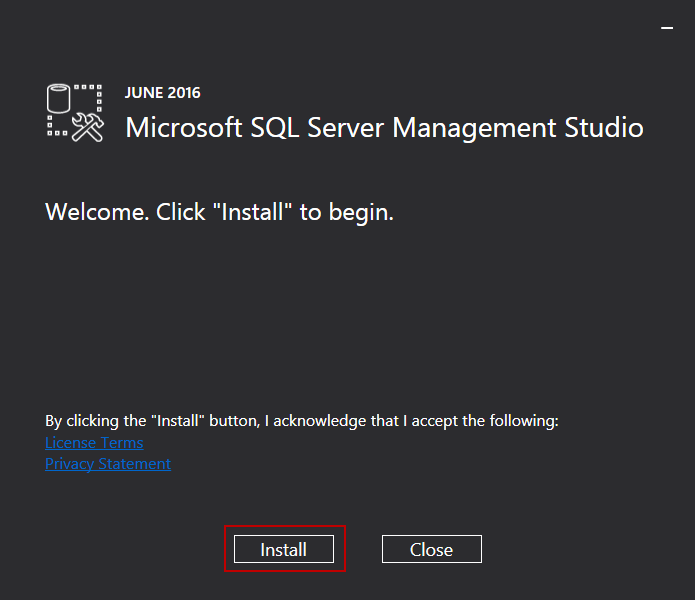
Once the download completes, run the file to start SSMS setup. Just click on the Install button, and the installation should complete without any further setup options. Depending on the system, the computer restart might be required.
- Author
- Recent Posts

Robert is a SQL Server and IT enthusiast with many years of experience as a computer repair technician.
He has a great passion for new technologies, science, video games, and medieval history. He also likes reading, writing, and learning new languages.
Robert is currently working for ApexSQL LLC as Software Sales Engineer where he specializes database backups and indexes.
View all posts by Robert Seles