В сфере защиты санузла от проникновения неприятных ароматов и газов из коллектора большое значение имеет правильная установка сифона на ванну. Это своеобразный буфер между емкостью для купания и канализацией.
Его покупке должен предшествовать анализ основных критериев, влияющих на грамотный выбор. В этом материале мы расскажем о популярных разновидностях сифонов, разберемся как правильно выбрать это устройство. А также поведаем несколько секретов монтажа этих сантехнических устройств.
Содержание статьи:
- Виды сифонов для ванн
- Плюсы и минусы гофрированного сифона
- Сифон трубчатого типа
- Сифон с колбой или бутылочный
- Современный плоский сифон
- Классификация сифонов по конструкции слива
- Как собрать и подключить сифон?
- Особенности сборки полуавтоматического сифона
- Проверка надежности соединений
- Несколько полезных советов по монтажу
- Выводы и полезное видео по теме
Виды сифонов для ванн
Среди современных сифонов наиболее часто встречается 4 их вида: гофрированный, коленный или трубчатый, с колбой, плоский. Правильно подобранный как по конструктивному исполнению, так и по материалу, из которого он изготовлен, сифон обеспечит надежную и длительную эксплуатацию.
Галерея изображений
Фото из
Расположение сифона для ванны
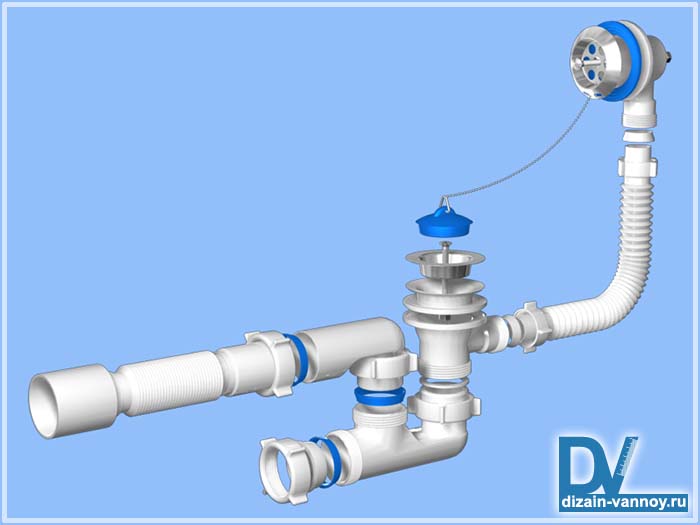
Составная часть системы слива-перелива
Устройство, предупреждающее засорение канализации
Формирование гидрозатвора против запахов
Разбирающийся принцип устройства
Прочистка сифона под чашей ванны
Распространенная форма сифона под ванну
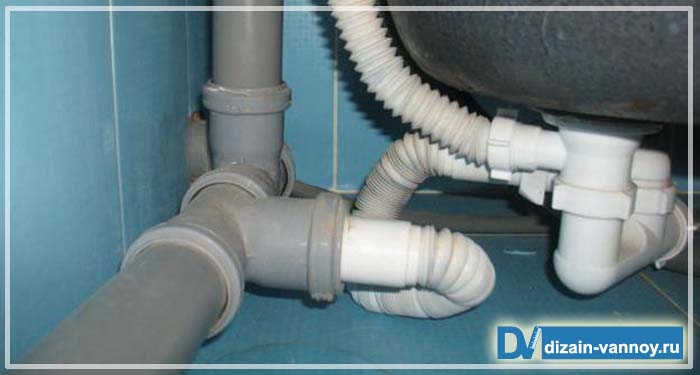
Подсоединение сифона к канализационному выпуску
Плюсы и минусы гофрированного сифона
Среди перечисленных видов конструкция гофрированного сифона самая простая. Состоит он из 2 основных узлов — немного изогнутого выпуска и трубы с каркасом.
Простота монтажа и является главным преимуществом устройства. Гофрированную трубу можно поместить в любой плоскости. Недостаток ее в том, что если, в случае засорения, придется прочищать такой сифон, то делать это нужно будет вручную, предварительно демонтировав конструкцию.
Самостоятельно формируют и гидрозатвор. Используют такой тип в случае, если канализация имеет нестандартное исполнение.
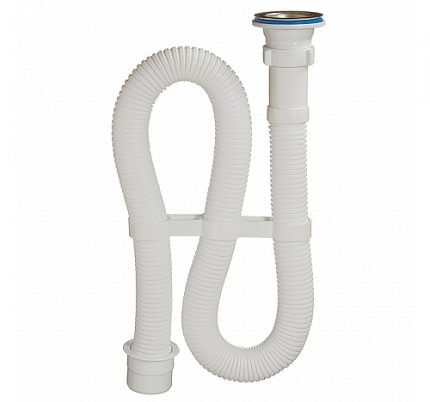
Монтаж гофрированного сифона отличается простотой. К ванной подсоединяют выпуск, а спуск предназначен для монтажа в канализацию
В «чистом виде» гофрированный сифон, формирующий гидрозатвор путем простейшего изгиба трубы, под ванной не устанавливается. Подобное решение угрожало бы частым образованием заторов и не радовало бы сложностью прочистки:
Галерея изображений
Фото из
Гофрированные трубы в конструкции сифона
Преимущества гофры в обустройстве ванны
Размещение сантехники в удобном месте
Подключение гофрированной трубы к выпуску в канализацию
Сифон трубчатого типа
По форме негибкая конструкция напоминает подкову или букву S в горизонтальном расположении. Барьером на пути распространения неприятных запахов из канализации служит вода, которая постоянно присутствует в изгибе трубы.
У качественных сифонов внизу колена предусмотрена пробка для облегчения прочистки. Если такой детали нет — освободить систему от скопившегося мусора сложно.
Металлические сифоны являются частью дорогой сантехники. В таких системах дизайнеры никогда не применяют пластик. Их выполняют из латуни, бронзы или нержавейки. Первые 2 материала окисляются, если их не покрыли специальным составом.
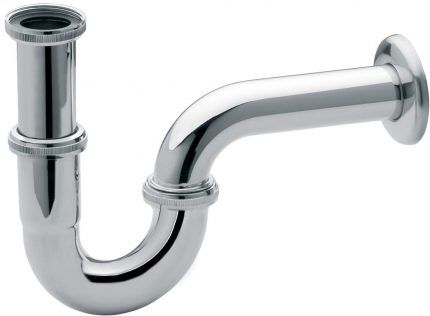
Сифоны трубчатого вида могут быть как цельными, так и разборными. Изготавливают их из металла или пластика
Сифон с колбой или бутылочный
Сифоны с колбой используют наиболее часто для установки под раковиной и реже под ванной. Свое название получил из-за наличия своеобразной бутылки для накопления воды. Устанавливают колбу строго напротив сливного отверстия, соединив посредством жесткой или гофрированной трубки.
Если сливная труба гибкая, бутылочный сифон используют независимо от расположения входа в канализацию. Жесткий слив подходит для установки в ванной под умывальник.
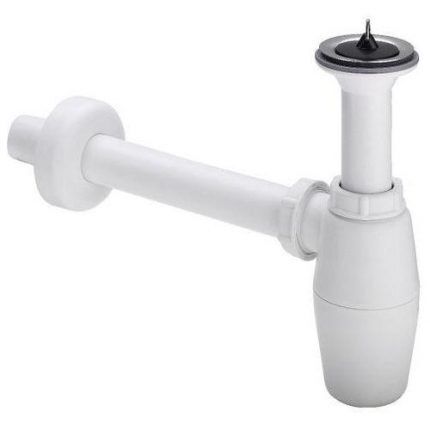
Сток находится выше колбы. «Бутылочник» просто разобрать и очистить. Крупный мусор не попадает в канализацию, а задерживается в емкости
Современный плоский сифон
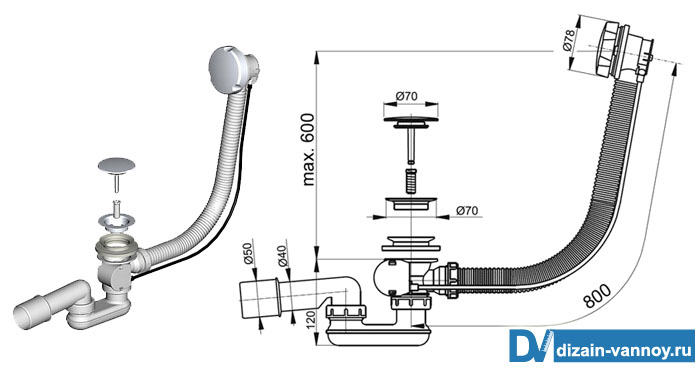
Этот тип сифонов имеет сходство с коленными или трубными приборами. Отличие — в присутствии гидрозатвора и горизонтального плоского отвода, предназначенного для накопления мусора.
Перед тем как установить такой сифон под ванной, нужно учесть, что применить его можно только тогда, когда подводка коллектора расположена горизонтально.
Преимуществом является быстрый монтаж и возможность удобной прочистки труб. Отдельно к такому сифону можно приобрести специальную сеточку для слива. Это дополнительно защитит систему от попадания в нее мелкого мусора.
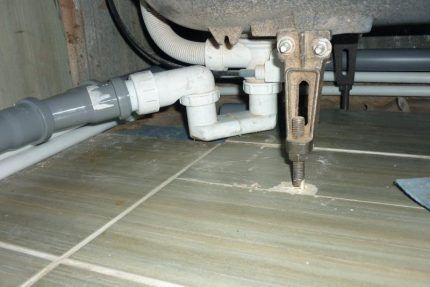
Плоский трап состоит из собственно сифона, накладки, фланца с 3 фиксирующими при повороте болтами, соединительной системы, объединяющей устройство с канализационной трубой
Классификация сифонов по конструкции слива
По конструктивному исполнению все сифоны можно разделить на следующие виды:
- Механические. Они имеют пластиковую или резиновую пробку для возможности перекрытия сливного канала. Здесь все манипуляции выполняются без применения любых рычагов и автоматики — вручную. Устройство очень простое, поэтому обладает длительным сроком эксплуатации.
- Полуавтоматические. Это сложная конструкция, имеющая запорный клапан, управление которым происходит посредством тросового или рычажного механизмов. Размещают такую регулировку, как правило, на отверстии для перелива выше уровня воды. Надежность такого вида обвязки несколько ниже из-за присутствия ряда подвижных деталей и узлов.
- Автоматические. В этом случае сифон входит в одну систему с наливным устройством. Руководит всем встроенный микропроцессор. В систему включен легко управляемый клапан типа Click-clack.
Автоматика позволяет выполнить наполнение ванны водой с заданной температурой и ее поддержанием. При уменьшении температуры происходит слив воды и пополнение ванной теплой водой до установленного объема.
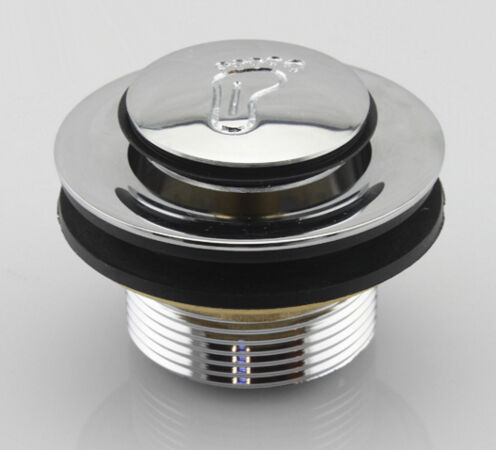
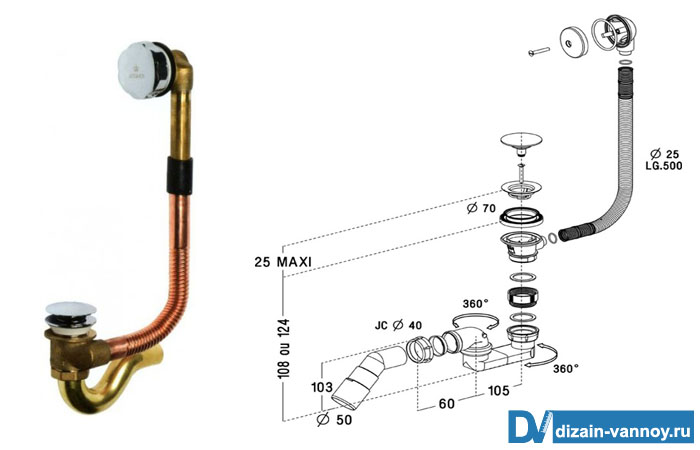
Так выглядит донный клапан для установки на любую ванну. Открытие и закрытие происходит путем нажатия. Модель изготовлена из латуни и имеет гальваническое покрытие
Конструкция «клик-клак» включает запорную крышку, зафиксированную на штыре. Она поднимается, когда на нее давит определенный водяной столб и образовывает зазор, через который вытекают излишки воды. Изготавливают автоматические сифоны из сплавов цветных металлов.
Полуавтоматические сифоны выпускают в 3 исполнениях. В первом переливное отверстие открывают нажатием на сливную пробку. Для удаления использованной воды простым нажатием на крышку активируют пробку перелива.
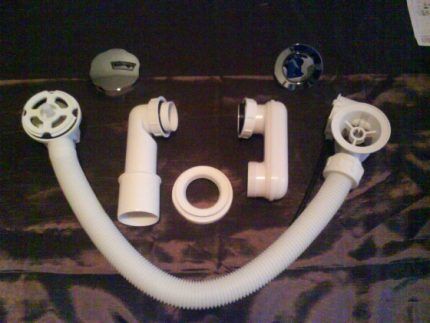
Такой вид имеет прямоточный сифон без автоматики. Покупая устройство, следует выяснить, из какого металла изготовлены такие детали, как решетки для переливного и сливного отверстий, стяжной винт. Лучший вариант — нержавейка. Чтобы убедиться, что это так используйте магнит — обычная сталь с покрытием магнитится, а нержавеющая нет
В конструкцию полуавтоматического сифона включают специальную ручку с функцией пробки для переливного отверстия. Для открытия или закрытия его меняют положение рукоятки. Пробку оборудуют специальным механизмом, нажав на который можно как открыть, так и закрыть слив. Со временем качество работы снижается из-за образования известкового слоя.
Если в ванной установлена стиральная машина, то для ее подключения сифон должен быть металлическим, т.к. пластмасса может не выдержать высокой температуры. Рекомендуем также прочесть нюансы установки сифона для стиралки.
При выборе сифона не стоит исходить из дизайна изделия. Первое, что должен обеспечить сифон, это бесперебойная работа, направленная на качественный слив стоков в коллектор.
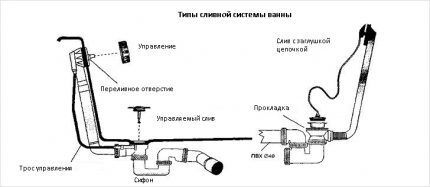
Конструктивно автоматический сифон отличается от полуавтоматического устройством привода пробки для слива и системой поступления воды в ванну
Как собрать и подключить сифон?
Для соединения с канализацией ванной, как и в случае с любым другим сантехническим прибором, необходимо выполнить сборку сифона. В продажу устройства поступают в комплектах, где все детали разбросаны.
Установка простейшего типа сифона для чаши ванны включает ряд стандартных шагов:
Галерея изображений
Фото из
Шаг 1: Сборка сифона для установки под ванну
Шаг 2: Подготовка и установка сливной решетки
Шаг 3: Фиксация сливной решетки
Шаг 4: Подключение сифона к сливной решетке
Чтобы знать, как собрать любую модель сифона для ванны, нужно изучить схему сборки. Она для всех типов идентична.
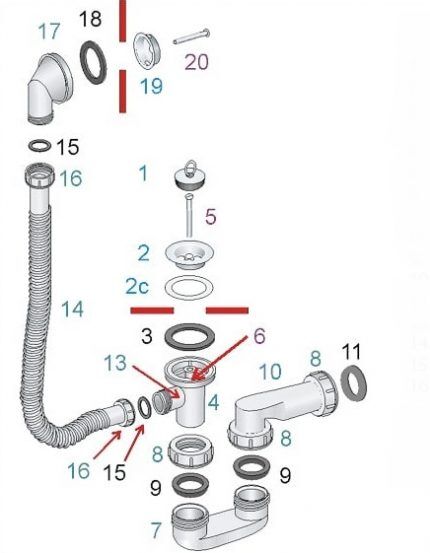
Сифон состоит из таких деталей: пробка перелива (1), защитная решетка (2), прокладка (3), отводной патрубок (4), соединительный винт (5), гайка (6), съемное кольцо (7), стяжная гайка (8), конусная прокладка (9), переходник (10), плоская прокладка (11), отвод для перелива (13), шланг гофрированный (14), прокладка (15), гайка стяжная (16), патрубок перелива (17), прокладка (18)
Технология сборки следующая:
- Новый сифон следует распаковать и проверить качество резьбовых соединений. Сколы и заусенцы недопустимы. Перед сборкой нужно разложить детали в том порядке, в каком они будут соединены в последующем.
- К накладке перелива крепят пробку посредством цепочки.
- Монтируют защитную решетку и гибкую прокладку из резины на сливное отверстие.
- В верхнюю часть отводного патрубка вставляют прокладку, затем патрубок с усилием прижимают к корпусу ванной, чтобы прокладка заняла нужное положение и легла как можно плотнее.
- Другой рукой вставляют соединительный винт в решетку и фиксируют его гайкой с применением широкой отвертки.
- На патрубок надевают стяжную гайку из пластика. Под нее устанавливают конусное резиновое уплотнение, повернув более широкой стороной к гайке.
- Вставляют патрубок в колено и закручивают до упора гайку.
- В стяжную гайку вставляют конусную прокладку и соединяют колено с переходником. При помощи переходника высоту сифона можно будет регулировать.
- Вставляют прокладку в противоположную гайку переходника и соединяют последний с отводом канализации.
- К отводу для перелива прикрепляют гофру через плоскую или конусообразную прокладку и стяжную гайку.
- Стыкуют гофру с патрубком перелива посредством другой гайки с прокладкой через корпус ванной.
- К верху переливного патрубка фиксируют прокладку.
Ни одной лишней детали в комплект не закладывают. Когда после сборки что-то осталось, это указывает на то, что какой-то момент упущен. Если соединения сифона негерметичны, могут появиться протечки. Чтобы предупредить это, промазывают стыки герметиком.
В процессе подключения полуавтоматического сифона производится установка барашка, с помощью которого производится управление пробкой слива. Барашек ставят на переливное отверстие, подключив к нему предварительно гофрированный патрубок с тыльной стороны чаши:
Галерея изображений
Фото из
Шаг 1: Вывод штока в переливное отверстие
Шаг 2: Подготовка барашка управления штоком
Шаг 3: Фиксация барашка и штока
Шаг 4: Закручивание крепежного болта
Усилить резьбовое соединение можно при помощи намотки пакли или силиконовой ленты. Поверх обмотки наносят пасту и подтягивают детали.

На фото наглядно изображено, как запрессовывают прокладки. После того как монтаж окончен, нужно оставить систему часов на 5, чтобы герметик полностью высох
В одном соединении должна быть только 1 уплотнение. Перестраховка путем установки двух прокладок приводит к обратному эффекту — герметичность стыков нарушается. Накладные гайки и прокладки нельзя недотягивать, но и максимальное зажатие может повредить детали. Закручивать гайки лучше не при помощи ключа, а вручную.
Также на нашем сайте есть другие статьи, в которых подробно описан процесс подключения сифонов к различной сантехнике:
- Сифон для умывальника: виды, критерии выбора + правила сборки
- Установка сифона на кухне: как собрать и установить устройство + схемы и пример монтажа
- Сифон для поддона душевой кабины: конструкция, назначение, особенности монтажа
- Сифон для мойки: конструкция, назначение, особенности монтажа своими руками
- Сифон для душевой кабины с низким поддоном: виды, правила выбора, сборка и установка
Особенности сборки полуавтоматического сифона
Сборка полуавтоматического сифона усложняется наличием дополнительных деталей. Вверху трубчатой конструкции находится стержень управления из нержавейки. Крепят его при помощи 3 шурупов из того же материала. Здесь же находится и аэратор.
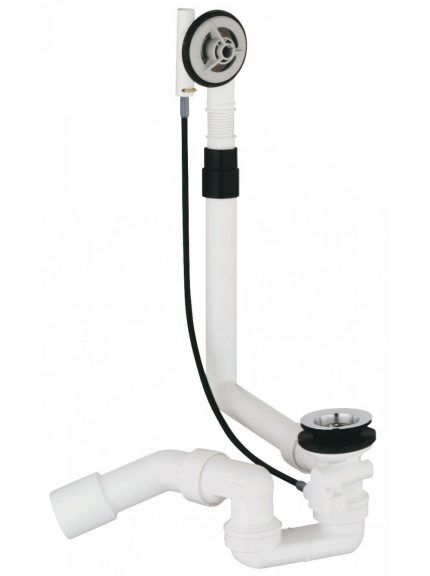
У сифона для ванной всегда присутствует 2 перелива. На фото вид центрального или проходного и запорного перелива. Первый устанавливают в слив ванны, а второй — в ее торец. Сливную трубу монтируют на боковой перелив, а канализационную — присоединяют к коллектору
Для его установки требуется минимум пространства. Сверху видна только головка сифона. Воду подводят сбоку при помощи резьбового соединения.
Трубчатый полуавтоматический сифон имеет хорошую пропускную способность, надежный гидрозатвор. Качественный прибор устроен таким образом, что вода по стенке ванной никогда не стекает.
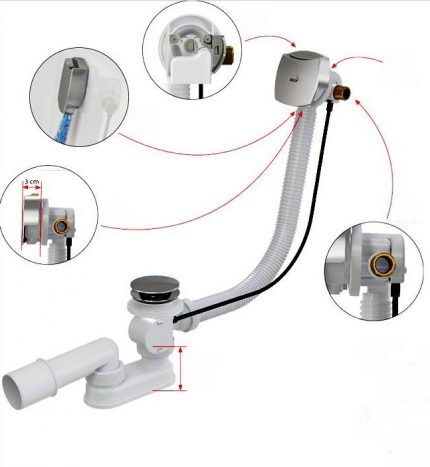
Составляющие полуавтоматического сифона — 2 перелива, связанных тросом и трубой, патрубок, фильтры, уплотнительные прокладки. При помощи патрубка прибор подключают к коллектору
Сборку выполняют по следующей схеме:
- Патрубок для коллектора стыкуют с центральным переливом, просунув трубу до упора. Прокладка на стыке уже установлена, поэтому дополнительно вставлять ничего не нужно.
- На перелив монтируют и металлический фильтр, предварительно установив на слив двойной уплотнитель.
- К подвижному регулировочному тросу подключают металлические крышки плоской формы, а затем крепят их к сливному отверстию. Сборку подсоединяют к переливу посредством болтового соединения.
Стыки обязательно снабжают соответствующими прокладками — боковые обыкновенным тонким уплотнителем, а центральный — прокладкой «бабочка».
Проверка надежности соединений
Установив сифон, необходимо выполнить контрольную проверку всех стыков. Для этого ванну наполняют водой, чтобы убедиться, что сливная горловина присоединена правильно. Если в этом месте отсутствует течь, то ошибок при монтаже не допущено.
Остальные соединения проверяют на надежность, вынув пробку из слива. Если в какой-то точке обнаружится просачивание жидкости, ванну освобождают от воды полностью. После этого сочленение разбирают и делают сборку заново, обращая особое внимание на положение прокладок и гаек.
По мнению профессионалов, причиной течи чаще всего является перекос гаечного соединения или его недостаточная затяжка.
Несколько полезных советов по монтажу
Перед сборкой и установкой сливного приспособления нужно проконтролировать уровень ванной, диаметр и положение сливного патрубка. Затем следует прочитать инструкцию, чтобы учесть все возможные нюансы.
При установке прибора на старую металлическую или современную акриловую ванну проверяют сливные отверстия. При обнаружении на них шероховатостей, их ликвидируют при помощи наждачной шкурки.
При шероховатом сливе, нельзя обеспечить плотность прилегания к ним сифона. Перед окончательной затяжкой прибора следует проверить правильность сборки, особенного внимания требуют прокладки. Часто они сдвигаются, поэтому лучше нанести на них специальный герметик.
Нормальную работу слива обеспечивает и правильный уклон трубы. Сливной трубопровод должен направляться непосредственно к коллектору. Если сифон оснащен несколькими подводами для разветвления слива в коллектор, но их не предполагают использовать, следует заглушить их специальной гайкой.
При покупке сифона важной его характеристикой является качество материала, а если это пластик, то здесь главное — толщина стенок и технология обработки. Чем плотнее стенки сливного приспособления, тем лучше он будет сопротивляться нагрузкам.
На чугунном сливе недопустимо наличие трещин, даже замаскированных. В случае обнаружения таких дефектов он подлежит замене. Поверхность латунного сифона должна быть абсолютно гладкой, иначе его придется часто очищать.
Во избежание протечек, уплотнители на сливе меняют в среднем 1 раз в полгода, а те, что установлены между патрубками — каждые 3 месяца. Чтобы на стенках не откладывалась накипь, через каждые несколько месяцев желательно промывать прибор горячей водой с добавкой в виде лимонной кислоты.
Если для материала не противопоказаны химические очистители, то можно использовать «Мистер Мускул», «Ерш», «Флокс» и им подобные.
Выводы и полезное видео по теме
Авторский мастер-класс по установке сифона:
Сэкономит время, потраченное на обвязку ванной, просмотр этого материала:
Правильно смонтированный сифон — гарантия комфорта и спокойствия. Спешка при самостоятельном его монтаже неуместна. Если даже после ознакомления с подробной инструкцией, остались неясные моменты, лучше обратиться к профессиональным сантехникам.
Если у вас есть личный опыт установки сифона для ванной, поделитесь, пожалуйста, своими знаниями с нашими читателями. Может у вас тоже есть свои секреты монтажа? Пишите свои комментарии, задавайте вопросы в блоке под статьей.
Необходимость установки сифона на ванну возникает в случае ремонта или замены оборудования, проведения профилактических работ или попросту чистки возникшего засора. Прежде чем приступить к установке сифона на ванную необходимо определиться с его конструкцией и размерами. Показанная на видео установка сифона на ванну не содержит сложных операций, но требует внимательного отношения к мелочам и элементарной аккуратности. Ведь так легко сломать нежную пластиковую конструкцию чрезмерным усилием затяжки перекошенной гайки.
Перед тем как поменять слив в ванной, приобретаем новый сантехнический прибор. Лучше всего взять верхнюю часть стоявшего оборудования за образец и по его подобию подобрать новый сифон. Если старого сифона нет, то необходимо замерить диаметр сливного и переливного отверстий в ванной и расстояние от пола до нижней части, установленной на свое место ванны. Следует обратить внимание и на материал, из которого сделана ванна, чтобы не ошибиться в выборе оборудования.
Выполнив необходимые измерения можно приступать к выбору подходящего сифона из имеющихся моделей в торговой сети. Самые простые и дешевые модели можно найти в любой близлежащей торговой точке, а модели сложнее и дороже лучше искать в крупных специализированных магазинах или в их интернет отделах.
- Порядок сборки сифона
- Установка некоторых моделей пластиковых сифонов
- Монтаж неразборного латунного сифона
- Установка полуавтоматического оборудования
- Заключение
Порядок сборки сифона
Внешний вид пластикового сифона
- Итак, коробка, или пакет с оборудованием благополучно доставлены к месту установки, но вместо качественно собранной конструкции в упаковке находится некоторое количество каких-то деталей, прокладок и винтиков. В случае с дорогим оборудованием в коробке (а это будет именно жесткая картонная коробка с привлекательными наклейками) будет вложена инструкция, как собрать сифон для ванны, в которой с помощью удобных пиктограмм показано, как правильно выполнить все необходимые операции.
Важно! В инструкции обращайте внимание на то, все ли детали устанавливаются при сборке. Бывают случаи, когда окончательное соединение осуществляется после установки части сифона на ванну или в канализационную трубу.
- Разобравшись с деталями и необходимо проверить отсутствие механических повреждений, целостность прокладок и резьбовых соединений.
- Убедившись, что все в порядке, можно собирать сифон и готовить его к установке. Прилагаемая схема сборки сифона для ванны подскажет, какие детали устанавливаются в первую очередь и про какие промежуточные уплотняющие элементы не следует забывать при сборке.
Обратите внимание: Не следует полностью затягивать резьбовые соединения, потому что может потребоваться дополнительная регулировка частей сифона, что называется «по месту».
- Когда все необходимые операции выполнены, можно считать, что сборка сифона для ванны закончена, и можно приступать к его установке.
Дорогостоящие модели с полуавтоматическим или автоматическим управлением поставляются в полностью собранном виде, а конструкция сифона позволяет некоторые незначительные изменения размеров с помощью гофрированных элементов.
Установка некоторых моделей пластиковых сифонов
Установка пластикового сифона
Перед тем как установить слив в ванной проверяется герметичность канализационных труб, надежность их крепления и состояние резиновых уплотнительных элементов. При высыхании или повреждении прокладок они меняются на новые.
- Установка сифона под ванну начинается с крепления защитной решетки и приемной трубы сифона. Перед выполнением этой операции проверяется чистота сопрягаемых поверхностей и при необходимости производится их обработка химическим или механическим способом.
- На чистую поверхность фланца приемной трубы наносится небольшой слой сантехнического герметика и укладывается толстая прокладка для сифона из резины средней мягкости, которая имеется в комплекте. На верхнюю часть прокладки наносится тонкий слой герметика и, не дожидаясь его высыхания, производится монтаж приемной трубы на нижнюю часть ванны.
Важно! Не следует прилагать большие усилия при затяжке резьбового соединения. Это может привести к необратимым деформациям или поломке приемной трубы. Усилия затяжки должно быть достаточно для плотного прижимания резиновой прокладки к посадочному месту и обеспечения герметичности стыка.
- В отверстие для соединения трубы перелива и приемной части сифона вставляется предварительно собранная гофрированная труба с установленными уплотнительными шайбами и фиксирующими гайками. Особое внимание на этой стадии работ уделяется правильному положению конусных прокладок. Они должны устанавливаться строго по схеме, иначе соединение будет негерметичным. Если имеется некоторый запас времени, можно отложить подключение сифона к ванной до высыхания герметика.
- Принимая во внимание раздел инструкции о том, как подключить сифон к ванной можно выполнить соединение оставшейся части сифона к канализационной трубе. Для этого сопрягаемые части смазываются специальной смазкой для монтажа пластиковых безнапорных водопроводов или намыливаются мыльной пеной.
- После высыхания герметика, или с соблюдением мер предосторожности в случае дефицита времени, можно выполнить окончательный монтаж сифона для ванны с затяжкой резьбовых соединений.
После окончания монтажных работ проверяется герметичность стыка ванны и сифона и отсутствие протечек в местах установки конусных прокладок.
Монтаж неразборного латунного сифона
Монтаж сливной системы из латуни
- Перед тем как установить сифон в ванной проверяется соответствие линии сопряжения сифона и магистралей. Труба сифона должна входить в приемную часть канализационной системы под минимальным углом и на расстояние не менее 50 мм. В противном случае резиновая прокладка не обеспечит необходимой герметичности стыка и протечки будут неизбежны. Применение герметиков в таких соединениях не дает желаемого результата и через короткое время теряет герметичность. В случае значительного несоответствия сопрягаемых плоскостей может потребоваться замена части фасонных деталей канализации для получения необходимого качества стыка.
- Выполнив подготовительные операции, не забываем, перед тем как поставить сифон на ванну установить оборудование перелива на свое место без закрепления и смазать герметиком линию стыка дна ванны и сифона.
- После того как все детали окажутся на своих местах, выполняется постепенная затяжка резьбовых соединений для окончательного закрепления сифона и герметизации разборных соединений.
Установка полуавтоматического оборудования
Полуавтоматическая конструкция для ванной
При необходимости установки полуавтоматического сифона на ванну, принимается во внимание, неразборная конструкция и некоторые сложности при сопряжении сифона и канализации.
- Перед тем как установить сифон на ванну, полуавтомат проверяется на отсутствие заедания тяги управления и плотное прилегание пробки к седлу.
- Установив сифон с механизмом управления и переливом на ванну, производится соединение отводящей трубы сифона и приемной части канализации.
- Убедившись, что все части находятся на своих местах и не требуют для выравнивания значительных усилий, соединяются резьбовые соединения сифона и отводящей трубы через плоскую или конусную резиновую прокладку. При правильной установке прокладки применение герметика необязательно.
Установка сифона в ванной, снабженного автоматической электронной системой управления, должна выполняться сервисной службой изготовителя или продавца такого изделия, которые правильно смонтируют и проверят оборудование, установив гарантийный срок эксплуатации.
Заключение
Работы по установке сифона на ванну не содержат сложных операций и при должном внимании могут быть выполнены самостоятельно даже без многолетнего практического опыта. Главное, точно следовать инструкции по сборке и установке конкретной модели оборудования.
-
Page 1
User’s Guide NPD5362-00 EN… -
Page 2
Neither Seiko Epson Corporation nor its affiliates shall be liable to the purchaser of this product or third parties for damages, losses, costs, or expenses incurred by the purchaser or third parties as a result of accident, misuse, or abuse of this product or unauthorized modifications, repairs, or alterations to this product, or (excluding the U.S.) -
Page 3
EPSON EXCEED YOUR VISION or EXCEED YOUR VISION is a trademark of Seiko Epson Corporation. ❏ PRINT Image Matching™ and the PRINT Image Matching logo are trademarks of Seiko Epson Corporation. Copyright © 2001 Seiko Epson Corporation. All rights reserved. -
Page 4: About This Manual
About This Manual About This Manual Introduction to the Manuals The following manuals are supplied with your Epson printer. As well as the manuals, see the help included in the various Epson software applications. ❏ Start Here (paper manual) Provides you with information on setting up the printer, installing the software, using the printer, solving problems, and so on.
-
Page 5: Operating System References
User’s Guide About This Manual Descriptions Used in this Manual ❏ Screenshots of the printer driver screens are from Windows 8.1 or Mac OS X v10.10.x. The content displayed on the screens varies depending on the model and situation. ❏ Illustrations of the printer used in this manual are examples only. Although there may be slight differences depending on the model, the method of operation is the same.
-
Page 6: Safety Instructions
User’s Guide Important Instructions Important Instructions Safety Instructions Read and follow these instructions to ensure safe use of this printer. Make sure you keep this manual for future reference. Also, be sure to follow all warnings and instructions marked on the printer. ❏…
-
Page 7
User’s Guide Important Instructions ❏ Avoid using outlets on the same circuit as photocopiers or air control systems that regularly switch on and off. ❏ Avoid electrical outlets controlled by wall switches or automatic timers. ❏ Keep the entire computer system away from potential sources of electromagnetic interference, such as loudspeakers or the base units of cordless telephones. -
Page 8: Protecting Your Personal Information
User’s Guide Important Instructions ❏ Radio waves from this printer may negatively affect the operation of automatically controlled devices such as automatic doors or fire alarms, and could lead to accidents due to malfunction. When using this printer near automatically controlled devices, follow all posted warnings and directions on these devices. Protecting Your Personal Information When you give the printer to someone else or dispose of it, erase the network settings stored in the printer’s memory by turning on the printer while holding down the…
-
Page 9: Printer Basics
User’s Guide Printer Basics Printer Basics Part Names and Functions Edge guide Feeds the paper straight into the printer. Slide to the edges of the paper. Rear paper feed Loads paper. Paper support Supports loaded paper. Control panel Operates the printer. Front cover Open whenever printing.
-
Page 10
User’s Guide Printer Basics Printer cover Open when removing jammed paper inside the printer. Ink tube Supplies ink to the print head. Ink tank unit Contains the ink tanks. Ink reservoir tanks (Ink tanks) Supplies ink to the ink tubes. Print head Fires ink. -
Page 11: Buttons And Lights
User’s Guide Printer Basics Buttons and Lights Buttons Turns the printer on or off. Do not turn off while the power light is flashing (while the printer is operating or processing data). Unplug the power cord when the power light is off. Hold this button down for more than three seconds to make Wi-Fi auto setup by using a WPS button on your access point.
-
Page 12
User’s Guide Printer Basics On when the printer is waiting to start initial charging. On when the printer is out of paper, multiple sheets of paper are fed at a time, or the CD/DVD tray is not loaded correctly. Flashes when paper or the CD/DVD tray is jammed, or when the output tray is in an incorrect position. -
Page 13: Loading Paper
User’s Guide Loading Paper Loading Paper Paper Handling Precautions ❏ Read the instruction sheets supplied with the paper. ❏ Fan and align the edges of the paper before loading. Do not fan or curl photo paper. Doing so may damage the printable side.
-
Page 14: Available Paper And Capacities
Transfer Paper For manual 2-sided printing, you can load up to 30 sheets for paper with one side already printed. Note: The availability of paper varies by location. For the latest information on paper available in your area, contact Epson support.
-
Page 15: List Of Paper Types
Envelope Envelope For smart devices, these media types can be selected when printing using Epson iPrint. These paper types are compatible with Exif Print and PRINT Image Matching when printed by the printer driver. For more information, see the documentation that came with the Exif Print or PRINT Image Matching compatible digital camera.
-
Page 16: Loading Paper In The Rear Paper Feed
User’s Guide Loading Paper Loading Paper in the Rear Paper Feed 1. Open the paper support, and then slide out the extension. 2. Slide the edge guide to the left. 3. Load paper vertically along the right side of the rear paper feed with the printable side facing up. Important: Do not load more than the maximum number of sheets specified for the paper.
-
Page 17
User’s Guide Loading Paper Envelopes 4. Slide the edge guide to the edge of the paper. 5. Open the front cover, and then slide out the output tray. Note: Return the remaining paper to its package. If you leave it in the printer, the paper may curl or the print quality may decline. -
Page 18
User’s Guide Loading Paper Related Information “Paper Handling Precautions” on page 13 & “Available Paper and Capacities” on page 14 &… -
Page 19
❏ Depending on the CD/DVD type or printing data, smearing may occur. Try making a test print on a spare CD/ DVD. Check the printed surface after waiting for one full day. ❏ Compared to printing on genuine Epson paper, the print density is lowered to prevent ink from smearing on the CD/DVD. Adjust the print density as necessary. -
Page 20
User’s Guide Loading a CD/DVD for Printing 1. Open the front cover. 2. Lift the output tray up with both hands, then pull it out. 3. Insert the output tray into the CD/DVD position by angling it down as shown in the illustration below. -
Page 21
User’s Guide Loading a CD/DVD for Printing 4. Place a CD/DVD on the CD/DVD tray with the printable side facing up. ❏ When printing on a 12-cm CD/DVD, set it directly onto the CD/DVD tray, without the adapter. ❏ When printing on an 8-cm CD/DVD, fit the adapter into the CD/DVD tray, and then set an 8-cm CD/DVD inside the adapter. -
Page 22
“CD/DVD Handling Precautions” on page 19 & “Cleaning the Paper Path” on page 53 & “Printing a CD/DVD Label with Epson Print CD” on page 40 & Removing a CD/DVD Important: Do not turn the printer on or off while the CD/DVD tray is inserted in the printer. This may damage the printer. -
Page 23
User’s Guide Loading a CD/DVD for Printing 3. Insert the output tray into the paper position by angling it down as shown in the illustration below. Related Information “CD/DVD Handling Precautions” on page 19 &… -
Page 24: Printing From A Computer
User’s Guide Printing Printing Printing from a Computer Printing Basics — Windows Note: ❏ See the online help for explanations of the setting items. Right-click an item, and then click Help. ❏ Operations differ depending on the application. See the application’s help for details. 1.
-
Page 25
User’s Guide Printing ❏ Document Size: Select the paper size you loaded in the printer. ❏ Borderless: Select to print with no margins around the image. In borderless printing, the print data is enlarged slightly more than the paper size so that no margins are printed around the edges of the paper. -
Page 26
User’s Guide Printing 3. Select Print from the File menu or another command to access the print dialog. If necessary, click Show Details or to expand the print window. 4. Make the following settings. ❏ Printer: Select your printer. ❏ Presets: Select when you want to use the registered settings. ❏… -
Page 27
Printing 5. Select Print Settings from the pop-up menu. Note: On Mac OS X v10.8.x or later, if the Print Settings menu is not displayed, the Epson printer driver has not been installed correctly. Select System Preferences from the menu > Printers & Scanners (or Print & Scan, Print & Fax), remove the printer, and then add the printer again. -
Page 28
❏ Depending on the paper and the data, ink may bleed through to the other side of the paper. ❏ If EPSON Status Monitor 3 is disabled, access the printer driver, click Extended Settings on the Maintenance tab, and then select Enable EPSON Status Monitor 3. -
Page 29: Printing Several Pages On One Sheet
User’s Guide Printing “Printing Basics — Windows” on page 24 & Printing Several Pages on One Sheet You can print two or four pages of data on a single sheet of paper. Printing Several Pages on One Sheet — Windows Note: This feature is not available for borderless printing.
-
Page 30: Printing To Fit The Paper Size
User’s Guide Printing 3. Access the print dialog. 4. Select Layout from the pop-up menu. 5. Set the number of pages in Pages per Sheet, the Layout Direction (page order), and Border. 6. Set the other items as necessary. 7. Click Print. Related Information “Loading Paper in the Rear Paper Feed”…
-
Page 31
User’s Guide Printing 6. Click Print. Related Information “Loading Paper in the Rear Paper Feed” on page 16 & “Printing Basics — Windows” on page 24 & Printing to Fit the Paper Size — Mac OS X 1. Load paper in the printer. 2. -
Page 32
User’s Guide Printing 4. Select Job Arranger Lite on the Main tab. 5. Click OK to close the printer driver window. 6. Click Print. The Job Arranger Lite window is displayed and the print job is added to the Print Project. 7. -
Page 33
User’s Guide Printing 5. Click Settings, make the appropriate settings, and then click OK. Note: Print Cutting Guides allows you to print a cutting guide. 6. Set the other items on the Main and More Options tabs as necessary, and then click OK. 7. -
Page 34
User’s Guide Printing 1. Prepare Sheet 1 and Sheet 2. Cut off the margins of Sheet 1 along the vertical blue line through the center of the top and bottom cross marks. 2. Place the edge of Sheet 1 on top of Sheet 2 and align the cross marks, then temporarily tape the two sheets together from the back. -
Page 35
User’s Guide Printing 3. Cut the taped sheets in two along the vertical red line through the alignment markers (this time, the line to the left of the cross marks). 4. Tape the sheets together from the back. 5. Repeat steps 1 to 4 to tape Sheet 3 and Sheet 4 together. -
Page 36
User’s Guide Printing 6. Cut off the margins of Sheet 1 and Sheet 2 along the horizontal blue line through the center of the left and right side cross marks. 7. Place the edge of Sheet 1 and Sheet 2 on top of Sheet 3 and Sheet 4 and align the cross marks, and then temporarily tape them together from the back. -
Page 37
User’s Guide Printing 8. Cut the taped sheets in two along the horizontal red line through the alignment markers (this time, the line above the cross marks). 9. Tape the sheets together from the back. -
Page 38: Printing Using Advanced Features
User’s Guide Printing 10. Cut off the remaining margins along the outer guide. Printing Using Advanced Features This section introduces a variety of additional layout and printing features available on the printer driver. Related Information “Windows Printer Driver” on page 58 &…
-
Page 39: Printing A Reduced Or Enlarged Document
User’s Guide Printing Windows To add your own preset, set items such as the Document Size and Paper Type on the Main or More Options tab, and then click Add/Remove Presets in Printing Presets. Note: To delete an added preset, click Add/Remove Presets, select the preset name you want to delete from the list, and then delete Mac OS X Access the print dialog.
-
Page 40: Printing Photos Using Epson Easy Photo Print
Click Watermark Features in the More Options tab, and then select Header/Footer. Click Settings and select necessary items from the drop-down list. Printing Photos Using Epson Easy Photo Print Epson Easy Photo Print lets you lay out and print photos easily on various types of paper. See the application’s help for details. Note: ❏…
-
Page 41: Printing From Smart Devices
❏ For Mac OS X, select A4 (CD/DVD) as the Paper Size setting. Select portrait as the printing direction, and then select CD/DVD as the Media Type on the Print Settings menu. ❏ On some applications, you may need to specify the tray type. Select Epson Tray Type 2. The setting name may vary slightly depending on the application.
-
Page 42: Canceling Printing
Displays photos and documents you selected. Starts printing. Note: To print from the document menu using iPhone, iPad, and iPod touch running iOS, start Epson iPrint after transferring the document you want to print using the file sharing function in iTunes. Canceling Printing Note: ❏…
-
Page 43
User’s Guide Printing Canceling Printing — Printer Button Press the button to cancel the print job in progress. Canceling Printing — Windows 1. Access the printer driver window. 2. Select the Maintenance tab. 3. Click Print Queue. 4. Right-click on the job you want to cancel and then select Cancel. Related Information “Windows Printer Driver”… -
Page 44: Refilling Ink
LM (Light Ma- genta) Important: Use of genuine Epson ink other than the specified ink could cause damage that is not covered by Epson’s warranties. Note: For users in Europe, visit the following website for information on Epson’s ink bottle yields.
-
Page 45: Refilling The Ink Tanks
❏ Store ink bottles at normal room temperature and keep them away from direct sunlight. ❏ Epson recommends using the ink bottle before the date printed on the package. ❏ Store the ink bottles in the same environment as the printer.
-
Page 46
User’s Guide Refilling Ink 1. Unhook the ink tank unit from the printer and lay it down. Important: Do not pull the tubes. 2. Open the ink tank unit cover, and then remove the cap of the ink tank. Important: ❏… -
Page 47
User’s Guide Refilling Ink 3. Snap off the top of the cap, remove the cap of the ink bottle, remove the seal from the bottle, and then install the cap. Important: Close the ink bottle cap tightly; otherwise ink may leak. Note: Do not dispose of the top of the cap. -
Page 48
User’s Guide Refilling Ink Note: If any ink remains in the ink bottle after filling the ink tank up to the upper line, install the cap securely and store the ink bottle upright for later use. 5. Close the cap onto the ink tank securely. 6. -
Page 49
User’s Guide Refilling Ink 7. Hook the ink tank unit onto the printer. Related Information “Ink Bottle Codes” on page 44 & “Ink Bottle Handling Precautions” on page 44 &… -
Page 50: Maintaining The Printer
We recommend to turn off the printer. If print quality has still not improved, contact Epson support. ❏ To prevent the print head from drying out, do not unplug the printer while the power is on.
-
Page 51: Replacing Ink Inside The Ink Tubes
User’s Guide Maintaining the Printer 6. When the power light stops flashing, print a nozzle check pattern again. Repeat cleaning and printing the pattern until all lines are printed completely. Related Information “Loading Paper in the Rear Paper Feed” on page 16 &…
-
Page 52: Replacing Ink Inside Ink Tubes
❏ This feature effects the service life of the ink pad. Ink pad reaches its capacity earlier by running this feature. Contact Epson or an authorised Epson service provider to request replacement before the end of its service life. It is not a user-serviceable part.
-
Page 53: Cleaning The Paper Path
User’s Guide Maintaining the Printer Related Information “Loading Paper in the Rear Paper Feed” on page 16 & “Windows Printer Driver” on page 58 & Aligning the Print Head — Mac OS X 1. Load A4-size plain paper in the printer. 2.
-
Page 54: Printer Buttons
User’s Guide Maintaining the Printer Checking the Total Number of Pages Fed Through the Printer — Printer Buttons The information is printed together with the nozzle check pattern. 1. Load A4-size plain paper in the printer. 2. Press the button to turn off the printer. 3.
-
Page 55
User’s Guide Maintaining the Printer Saving Power — Mac OS X 1. Select System Preferences from the menu > Printers & Scanners (or Print & Scan, Print & Fax), and then select the printer. 2. Click Options & Supplies > Utility > Open Printer Utility. 3. -
Page 56: Epson Connect Service
CD. Epson Connect Service By using Epson Connect service available on the Internet, you can print from your smartphone, tablet PC, or laptop, anytime and practically anywhere. The features available on the Internet are as follows.
-
Page 57: Running Web Config On Windows
IPv6: http://[the printer’s IP address]/ Examples: IPv4: http://192.168.100.201/ IPv6: http://[2001:db8::1000:1]/ Note: Using the smart device, you can also run Web Config from the maintenance screen of Epson iPrint. Related Information “Using Epson iPrint” on page 41 & Running Web Config on Windows When connecting a computer to the printer using WSD, follow the steps below to run Web Config.
-
Page 58: Windows Printer Driver
User’s Guide Network Service and Software Information Windows Printer Driver The printer driver controls the printer according to the commands from an application. Making settings on the printer driver provides the best printing results. You can also check the status of the printer or keep it in top operating condition using the printer driver utility.
-
Page 59
User’s Guide Network Service and Software Information You can also make settings for printing both sides of the paper or printing multiple pages on one sheet. -
Page 60
User’s Guide Network Service and Software Information More Options Tab You can select additional layout and printing options such as changing the size of a printout or making color corrections. -
Page 61
Network Service and Software Information Maintenance Tab You can run maintenance features such as nozzle check and print head cleaning, and by starting EPSON Status Monitor 3, you can check printer status and error information. Making Operation Settings for the Windows Printer Driver You can make settings such as enabling EPSON Status Monitor 3. -
Page 62: Mac Os X Printer Driver
User’s Guide Network Service and Software Information Mac OS X Printer Driver The printer driver controls the printer according to the commands from an application. Making settings on the printer driver provides the best printing results. You can also check the status of the printer or keep it in top operating condition using the printer driver utility.
-
Page 63
Note: On Mac OS X v10.8.x or later, if Print Settings menu is not displayed, Epson printer driver has not been installed correctly. Select System Preferences from the menu > Printers & Scanners (or Print & Scan, Print & Fax), remove the printer, and then add the printer again. -
Page 64: Epson Easy Photo Print
Epson Print CD Epson Print CD is an application that allows you to design a CD/DVD label to be printed directly onto a CD/DVD. You can also print a CD/DVD jacket for CD/DVD case. See the application’s help for details.
-
Page 65: Epson Software Updater
Click the start button, and select All Programs or Programs > Epson Software > EPSON Software Updater. Note: You can also start EPSON Software Updater by clicking the printer icon on the task bar on the desktop, and then selecting Software Update.
-
Page 66
6. Select the application you want to uninstall, and then click Uninstall. Important: The Uninstaller removes all drivers for Epson inkjet printers on the computer. If you use multiple Epson inkjet printers and you only want to delete some drivers, delete all of them first, and then install the necessary printer driver again. -
Page 67: Installing Applications
Do not turn off the computer or the printer while updating. Note: If you cannot find the application you want to update in the list, you cannot update using the EPSON Software Updater. Check for the latest versions of the applications from your local Epson website.
-
Page 68: Solving Problems
The ink pads need to be replaced. end of its service life. Contact Epson or an authorised Epson service provider to replace the ink pad*. It is not a user-serviceable part. When a message saying that you can continue printing is…
-
Page 69
Monitoring Preferences on the Maintenance tab, and then select Register the shortcut icon to the taskbar. ❏ If EPSON Status Monitor 3 is disabled, click Extended Settings on the Maintenance tab, and then select Enable EPSON Status Monitor 3. -
Page 70: Removing Jammed Paper
2. Click Options & Supplies > Utility > Open Printer Utility. 3. Click EPSON Status Monitor. Removing Jammed Paper Check the error displayed on the control panel and follow the instructions to remove the jammed paper including any torn pieces.
-
Page 71
User’s Guide Solving Problems Removing Jammed Paper from Inside the Printer Caution: Never touch the buttons on the control panel while your hand is inside the printer. If the printer starts operating, it could cause an injury. Be careful not to touch the protruding parts to avoid injury. 1. -
Page 72
User’s Guide Solving Problems Important: Do not touch the white flat cable, translucent part, and ink tubes inside the printer. Doing so may cause a malfunction. 3. Close the printer cover. -
Page 73: Paper Does Not Feed Correctly
User’s Guide Solving Problems Removing Jammed Paper from the Output Tray Remove the jammed paper. Paper Does Not Feed Correctly Check the following points, and then take the appropriate actions to solve the problem. ❏ Place the printer on a flat surface and operate in the recommended environmental conditions. ❏…
-
Page 74: Power And Control Panel Problems
❏ If you have the cleaning sheet that came with Epson genuine paper, use it to clean the roller inside the printer. ❏ Do not use paper with binder holes.
-
Page 75: Printout Problems
User’s Guide Solving Problems ❏ If you cannot print over a network, see the Network Guide. ❏ If you are printing a large data size image, the computer may run out of memory. Print the image at a lower resolution or a smaller size. ❏…
-
Page 76
Epson paper. ❏ Try to use genuine Epson ink bottles. This product is designed to adjust colors based on the use of genuine Epson ink bottles. The use of non-genuine ink bottles may cause print quality to decline. -
Page 77
User’s Guide Solving Problems Related Information “List of Paper Types” on page 15 & Printed Photos are Sticky You may be printing on the wrong side of the photo paper. Make sure you are printing on the printable side. Images or Photos are Printed in Unexpected Colors Adjust the color and then print again. -
Page 78: Paper Is Smeared Or Scuffed
User’s Guide Solving Problems ❏ Mac OS X Change the Expansion setting from the print dialog’s Print Settings menu. Paper Is Smeared or Scuffed ❏ When horizontal banding appears or the top or bottom of the paper is smeared, load paper in the correct direction and slide the edge guides to the edges of the paper.
-
Page 79: The Printout Problem Could Not Be Cleared
User’s Guide Solving Problems The Printout Problem Could Not be Cleared If you have tried all of the solutions and have not solved the problem, try uninstalling and then reinstalling the printer driver. Related Information “Uninstalling Applications” on page 65 &…
-
Page 80: Other Problems
User’s Guide Solving Problems Related Information “Web Config” on page 56 & Other Problems Slight Electric Shock when Touching the Printer If many peripherals are connected to the computer, you may feel a slight electric shock when touching the printer. Install a ground wire to the computer that is connected to the printer.
-
Page 81: Technical Specifications
User’s Guide Appendix Appendix Technical Specifications Printer Specifications Print Head Nozzle Placement Black ink nozzles: 90 Color ink nozzles: 90 for each color Weight of Paper Plain Paper 64 to 90 g/m2(17 to 24lb) Envelopes Envelope #10, DL, C6: 75 to 90 g/m2 (20 to 24 lb) Printable Area Printable Area for Single Sheets Print quality may decline in the shaded areas due to the printer’s mechanism.
-
Page 82: Interface Specifications
User’s Guide Appendix 3.0 mm (0.12 in.) 5.0 mm (0.20 in.) 18.0 mm (0.71 in.) 36.0 mm (1.42 in.) Printable Area for CD/DVD Print quality may decline in the shaded areas due to the printer’s mechanism. CD/DVD size 12 cm 8 cm 18 mm (0.71 in.) 43 mm (1.69 in.)
-
Page 83: Electrical Specifications
User’s Guide Appendix Dimensions Dimensions Storage ❏ Width: 547 mm (21.5 in.) ❏ Depth: 289 mm (11.4 in.) ❏ Height: 187 mm (7.4 in.) Printing ❏ Width: 547 mm (21.5 in.) ❏ Depth: 571 mm (22.5 in.) ❏ Height: 288 mm (11.3 in.) Approx.
-
Page 84: System Requirements
EN301 489-17 EN60950-1 For European users We, Seiko Epson Corporation, hereby declare that the following equipment Model is in compliance with the essential requirements and other relevant provisions of Directive 1999/5/EC: B412C For use only in Ireland, UK, Austria, Germany, Liechtenstein, Switzerland, France, Belgium, Luxemburg, Netherlands, Italy, Portugal, Spain, Denmark, Finland, Norway, Sweden, Iceland, Croatia, Cyprus, Greece, Slovenia, Malta, Bulgaria, Czech, Estonia, Hungary, Latvia, Lithuania, Poland, Romania, and Slovakia.
-
Page 85: Restrictions On Copying
User’s Guide Appendix Restrictions on Copying Observe the following restrictions to ensure the responsible and legal use of the printer. Copying of the following items is prohibited by law: ❏ Bank bills, coins, government-issued marketable securities, government bond securities, and municipal securities ❏…
-
Page 86
User’s Guide Appendix 3. Disconnect all cables such as the power cord and USB cable. 4. Remove all of the paper from the printer. 5. Open the printer cover. Secure the print head to the case with tape. 6. Close the printer cover. -
Page 87
User’s Guide Appendix 7. Prepare to pack the printer as shown below. 8. Unhook the ink tank unit from the printer and lay it down, and then make sure to install the cap onto the ink tank securely. 9. Hook the ink tank unit onto the printer. 10. -
Page 88: Where To Get Help
Depending on the product, network settings may be stored in the product’s memory. Due to breakdown or repair of a product, settings may be lost. Epson shall not be responsible for the loss of any data, for backing up or recovering settings even during a warranty period.
-
Page 89: Help For Users In Singapore
1F., No.113, Shengli Rd., Pingtung City, Pingtung County 900, Taiwan Help for Users in Singapore Sources of information, support, and services available from Epson Singapore are: World Wide Web http://www.epson.com.sg Information on product specifications, drivers for download, Frequently Asked Questions (FAQ), Sales Enquiries, and Technical Support via e-mail are available.
-
Page 90: Help For Users In Thailand
Information on product specifications, drivers for download, Frequently Asked Questions (FAQ), and e-mail are available. Epson Hotline (Phone: (66) 2685-9899) Our Hotline team can help you with the following over the phone: ❏ Sales enquiries and product information ❏ Product usage questions or problems ❏…
-
Page 91: Help For Users In Hong Kong
To obtain technical support as well as other after-sales services, users are welcome to contact Epson Hong Kong Limited. Internet Home Page Epson Hong Kong has established a local home page in both Chinese and English on the Internet to provide users with the following information: ❏ Product information ❏…
-
Page 92: Help For Users In Malaysia
Help for Users in India Contacts for information, support, and services are: World Wide Web http://www.epson.co.in Information on product specifications, drivers for download, and products enquiry are available. Epson India Head Office — Bangalore Phone: 080-30515000 Fax: 30515005 Epson India Regional Offices: Location…
-
Page 93: Help For Users In The Philippines
For Service (CDMA & Mobile Users) — 3900 1600 (9AM — 6PM) Prefix local STD code Help for Users in the Philippines To obtain technical support as well as other after sales services, users are welcome to contact the Epson Philippines Corporation at the telephone and fax numbers and e-mail address below:…
- Manuals
- Brands
- Epson Manuals
- Printer
- l805
- User manual
-
Contents
-
Table of Contents
-
Bookmarks
Quick Links
User’s Guide
NPD5362-00 EN
Related Manuals for Epson l805
Summary of Contents for Epson l805
-
Page 1
User’s Guide NPD5362-00 EN… -
Page 2
Neither Seiko Epson Corporation nor its affiliates shall be liable to the purchaser of this product or third parties for damages, losses, costs, or expenses incurred by the purchaser or third parties as a result of accident, misuse, or abuse of this product or unauthorized modifications, repairs, or alterations to this product, or (excluding the U.S.) -
Page 3
EPSON EXCEED YOUR VISION or EXCEED YOUR VISION is a trademark of Seiko Epson Corporation. ❏ PRINT Image Matching™ and the PRINT Image Matching logo are trademarks of Seiko Epson Corporation. Copyright © 2001 Seiko Epson Corporation. All rights reserved. -
Page 4: About This Manual
About This Manual About This Manual Introduction to the Manuals The following manuals are supplied with your Epson printer. As well as the manuals, see the help included in the various Epson software applications. ❏ Start Here (paper manual) Provides you with information on setting up the printer, installing the software, using the printer, solving problems, and so on.
-
Page 5: Operating System References
User’s Guide About This Manual Descriptions Used in this Manual ❏ Screenshots of the printer driver screens are from Windows 8.1 or Mac OS X v10.10.x. The content displayed on the screens varies depending on the model and situation. ❏ Illustrations of the printer used in this manual are examples only. Although there may be slight differences depending on the model, the method of operation is the same.
-
Page 6: Safety Instructions
User’s Guide Important Instructions Important Instructions Safety Instructions Read and follow these instructions to ensure safe use of this printer. Make sure you keep this manual for future reference. Also, be sure to follow all warnings and instructions marked on the printer. ❏…
-
Page 7
User’s Guide Important Instructions ❏ Avoid using outlets on the same circuit as photocopiers or air control systems that regularly switch on and off. ❏ Avoid electrical outlets controlled by wall switches or automatic timers. ❏ Keep the entire computer system away from potential sources of electromagnetic interference, such as loudspeakers or the base units of cordless telephones. -
Page 8: Protecting Your Personal Information
User’s Guide Important Instructions ❏ Radio waves from this printer may negatively affect the operation of automatically controlled devices such as automatic doors or fire alarms, and could lead to accidents due to malfunction. When using this printer near automatically controlled devices, follow all posted warnings and directions on these devices. Protecting Your Personal Information When you give the printer to someone else or dispose of it, erase the network settings stored in the printer’s memory by turning on the printer while holding down the…
-
Page 9: Printer Basics
User’s Guide Printer Basics Printer Basics Part Names and Functions Edge guide Feeds the paper straight into the printer. Slide to the edges of the paper. Rear paper feed Loads paper. Paper support Supports loaded paper. Control panel Operates the printer. Front cover Open whenever printing.
-
Page 10
User’s Guide Printer Basics Printer cover Open when removing jammed paper inside the printer. Ink tube Supplies ink to the print head. Ink tank unit Contains the ink tanks. Ink reservoir tanks (Ink tanks) Supplies ink to the ink tubes. Print head Fires ink. -
Page 11: Buttons And Lights
User’s Guide Printer Basics Buttons and Lights Buttons Turns the printer on or off. Do not turn off while the power light is flashing (while the printer is operating or processing data). Unplug the power cord when the power light is off. Hold this button down for more than three seconds to make Wi-Fi auto setup by using a WPS button on your access point.
-
Page 12
User’s Guide Printer Basics On when the printer is waiting to start initial charging. On when the printer is out of paper, multiple sheets of paper are fed at a time, or the CD/DVD tray is not loaded correctly. Flashes when paper or the CD/DVD tray is jammed, or when the output tray is in an incorrect position. -
Page 13: Loading Paper
User’s Guide Loading Paper Loading Paper Paper Handling Precautions ❏ Read the instruction sheets supplied with the paper. ❏ Fan and align the edges of the paper before loading. Do not fan or curl photo paper. Doing so may damage the printable side.
-
Page 14: Available Paper And Capacities
Transfer Paper For manual 2-sided printing, you can load up to 30 sheets for paper with one side already printed. Note: The availability of paper varies by location. For the latest information on paper available in your area, contact Epson support.
-
Page 15: List Of Paper Types
Envelope Envelope For smart devices, these media types can be selected when printing using Epson iPrint. These paper types are compatible with Exif Print and PRINT Image Matching when printed by the printer driver. For more information, see the documentation that came with the Exif Print or PRINT Image Matching compatible digital camera.
-
Page 16: Loading Paper In The Rear Paper Feed
User’s Guide Loading Paper Loading Paper in the Rear Paper Feed 1. Open the paper support, and then slide out the extension. 2. Slide the edge guide to the left. 3. Load paper vertically along the right side of the rear paper feed with the printable side facing up. Important: Do not load more than the maximum number of sheets specified for the paper.
-
Page 17
User’s Guide Loading Paper Envelopes 4. Slide the edge guide to the edge of the paper. 5. Open the front cover, and then slide out the output tray. Note: Return the remaining paper to its package. If you leave it in the printer, the paper may curl or the print quality may decline. -
Page 18
User’s Guide Loading Paper Related Information “Paper Handling Precautions” on page 13 & “Available Paper and Capacities” on page 14 &… -
Page 19
❏ Depending on the CD/DVD type or printing data, smearing may occur. Try making a test print on a spare CD/ DVD. Check the printed surface after waiting for one full day. ❏ Compared to printing on genuine Epson paper, the print density is lowered to prevent ink from smearing on the CD/DVD. Adjust the print density as necessary. -
Page 20
User’s Guide Loading a CD/DVD for Printing 1. Open the front cover. 2. Lift the output tray up with both hands, then pull it out. 3. Insert the output tray into the CD/DVD position by angling it down as shown in the illustration below. -
Page 21
User’s Guide Loading a CD/DVD for Printing 4. Place a CD/DVD on the CD/DVD tray with the printable side facing up. ❏ When printing on a 12-cm CD/DVD, set it directly onto the CD/DVD tray, without the adapter. ❏ When printing on an 8-cm CD/DVD, fit the adapter into the CD/DVD tray, and then set an 8-cm CD/DVD inside the adapter. -
Page 22
“CD/DVD Handling Precautions” on page 19 & “Cleaning the Paper Path” on page 53 & “Printing a CD/DVD Label with Epson Print CD” on page 40 & Removing a CD/DVD Important: Do not turn the printer on or off while the CD/DVD tray is inserted in the printer. This may damage the printer. -
Page 23
User’s Guide Loading a CD/DVD for Printing 3. Insert the output tray into the paper position by angling it down as shown in the illustration below. Related Information “CD/DVD Handling Precautions” on page 19 &… -
Page 24: Printing From A Computer
User’s Guide Printing Printing Printing from a Computer Printing Basics — Windows Note: ❏ See the online help for explanations of the setting items. Right-click an item, and then click Help. ❏ Operations differ depending on the application. See the application’s help for details. 1.
-
Page 25
User’s Guide Printing ❏ Document Size: Select the paper size you loaded in the printer. ❏ Borderless: Select to print with no margins around the image. In borderless printing, the print data is enlarged slightly more than the paper size so that no margins are printed around the edges of the paper. -
Page 26
User’s Guide Printing 3. Select Print from the File menu or another command to access the print dialog. If necessary, click Show Details or to expand the print window. 4. Make the following settings. ❏ Printer: Select your printer. ❏ Presets: Select when you want to use the registered settings. ❏… -
Page 27
Printing 5. Select Print Settings from the pop-up menu. Note: On Mac OS X v10.8.x or later, if the Print Settings menu is not displayed, the Epson printer driver has not been installed correctly. Select System Preferences from the menu > Printers & Scanners (or Print & Scan, Print & Fax), remove the printer, and then add the printer again. -
Page 28
❏ Depending on the paper and the data, ink may bleed through to the other side of the paper. ❏ If EPSON Status Monitor 3 is disabled, access the printer driver, click Extended Settings on the Maintenance tab, and then select Enable EPSON Status Monitor 3. -
Page 29: Printing Several Pages On One Sheet
User’s Guide Printing “Printing Basics — Windows” on page 24 & Printing Several Pages on One Sheet You can print two or four pages of data on a single sheet of paper. Printing Several Pages on One Sheet — Windows Note: This feature is not available for borderless printing.
-
Page 30: Printing To Fit The Paper Size
User’s Guide Printing 3. Access the print dialog. 4. Select Layout from the pop-up menu. 5. Set the number of pages in Pages per Sheet, the Layout Direction (page order), and Border. 6. Set the other items as necessary. 7. Click Print. Related Information “Loading Paper in the Rear Paper Feed”…
-
Page 31
User’s Guide Printing 6. Click Print. Related Information “Loading Paper in the Rear Paper Feed” on page 16 & “Printing Basics — Windows” on page 24 & Printing to Fit the Paper Size — Mac OS X 1. Load paper in the printer. 2. -
Page 32
User’s Guide Printing 4. Select Job Arranger Lite on the Main tab. 5. Click OK to close the printer driver window. 6. Click Print. The Job Arranger Lite window is displayed and the print job is added to the Print Project. 7. -
Page 33
User’s Guide Printing 5. Click Settings, make the appropriate settings, and then click OK. Note: Print Cutting Guides allows you to print a cutting guide. 6. Set the other items on the Main and More Options tabs as necessary, and then click OK. 7. -
Page 34
User’s Guide Printing 1. Prepare Sheet 1 and Sheet 2. Cut off the margins of Sheet 1 along the vertical blue line through the center of the top and bottom cross marks. 2. Place the edge of Sheet 1 on top of Sheet 2 and align the cross marks, then temporarily tape the two sheets together from the back. -
Page 35
User’s Guide Printing 3. Cut the taped sheets in two along the vertical red line through the alignment markers (this time, the line to the left of the cross marks). 4. Tape the sheets together from the back. 5. Repeat steps 1 to 4 to tape Sheet 3 and Sheet 4 together. -
Page 36
User’s Guide Printing 6. Cut off the margins of Sheet 1 and Sheet 2 along the horizontal blue line through the center of the left and right side cross marks. 7. Place the edge of Sheet 1 and Sheet 2 on top of Sheet 3 and Sheet 4 and align the cross marks, and then temporarily tape them together from the back. -
Page 37
User’s Guide Printing 8. Cut the taped sheets in two along the horizontal red line through the alignment markers (this time, the line above the cross marks). 9. Tape the sheets together from the back. -
Page 38: Printing Using Advanced Features
User’s Guide Printing 10. Cut off the remaining margins along the outer guide. Printing Using Advanced Features This section introduces a variety of additional layout and printing features available on the printer driver. Related Information “Windows Printer Driver” on page 58 &…
-
Page 39: Printing A Reduced Or Enlarged Document
User’s Guide Printing Windows To add your own preset, set items such as the Document Size and Paper Type on the Main or More Options tab, and then click Add/Remove Presets in Printing Presets. Note: To delete an added preset, click Add/Remove Presets, select the preset name you want to delete from the list, and then delete Mac OS X Access the print dialog.
-
Page 40: Printing Photos Using Epson Easy Photo Print
Click Watermark Features in the More Options tab, and then select Header/Footer. Click Settings and select necessary items from the drop-down list. Printing Photos Using Epson Easy Photo Print Epson Easy Photo Print lets you lay out and print photos easily on various types of paper. See the application’s help for details. Note: ❏…
-
Page 41: Printing From Smart Devices
❏ For Mac OS X, select A4 (CD/DVD) as the Paper Size setting. Select portrait as the printing direction, and then select CD/DVD as the Media Type on the Print Settings menu. ❏ On some applications, you may need to specify the tray type. Select Epson Tray Type 2. The setting name may vary slightly depending on the application.
-
Page 42: Canceling Printing
Displays photos and documents you selected. Starts printing. Note: To print from the document menu using iPhone, iPad, and iPod touch running iOS, start Epson iPrint after transferring the document you want to print using the file sharing function in iTunes. Canceling Printing Note: ❏…
-
Page 43
User’s Guide Printing Canceling Printing — Printer Button Press the button to cancel the print job in progress. Canceling Printing — Windows 1. Access the printer driver window. 2. Select the Maintenance tab. 3. Click Print Queue. 4. Right-click on the job you want to cancel and then select Cancel. Related Information “Windows Printer Driver”… -
Page 44: Refilling Ink
LM (Light Ma- genta) Important: Use of genuine Epson ink other than the specified ink could cause damage that is not covered by Epson’s warranties. Note: For users in Europe, visit the following website for information on Epson’s ink bottle yields.
-
Page 45: Refilling The Ink Tanks
❏ Store ink bottles at normal room temperature and keep them away from direct sunlight. ❏ Epson recommends using the ink bottle before the date printed on the package. ❏ Store the ink bottles in the same environment as the printer.
-
Page 46
User’s Guide Refilling Ink 1. Unhook the ink tank unit from the printer and lay it down. Important: Do not pull the tubes. 2. Open the ink tank unit cover, and then remove the cap of the ink tank. Important: ❏… -
Page 47
User’s Guide Refilling Ink 3. Snap off the top of the cap, remove the cap of the ink bottle, remove the seal from the bottle, and then install the cap. Important: Close the ink bottle cap tightly; otherwise ink may leak. Note: Do not dispose of the top of the cap. -
Page 48
User’s Guide Refilling Ink Note: If any ink remains in the ink bottle after filling the ink tank up to the upper line, install the cap securely and store the ink bottle upright for later use. 5. Close the cap onto the ink tank securely. 6. -
Page 49
User’s Guide Refilling Ink 7. Hook the ink tank unit onto the printer. Related Information “Ink Bottle Codes” on page 44 & “Ink Bottle Handling Precautions” on page 44 &… -
Page 50: Maintaining The Printer
We recommend to turn off the printer. If print quality has still not improved, contact Epson support. ❏ To prevent the print head from drying out, do not unplug the printer while the power is on.
-
Page 51: Replacing Ink Inside The Ink Tubes
User’s Guide Maintaining the Printer 6. When the power light stops flashing, print a nozzle check pattern again. Repeat cleaning and printing the pattern until all lines are printed completely. Related Information “Loading Paper in the Rear Paper Feed” on page 16 &…
-
Page 52: Replacing Ink Inside Ink Tubes
❏ This feature effects the service life of the ink pad. Ink pad reaches its capacity earlier by running this feature. Contact Epson or an authorised Epson service provider to request replacement before the end of its service life. It is not a user-serviceable part.
-
Page 53: Cleaning The Paper Path
User’s Guide Maintaining the Printer Related Information “Loading Paper in the Rear Paper Feed” on page 16 & “Windows Printer Driver” on page 58 & Aligning the Print Head — Mac OS X 1. Load A4-size plain paper in the printer. 2.
-
Page 54: Printer Buttons
User’s Guide Maintaining the Printer Checking the Total Number of Pages Fed Through the Printer — Printer Buttons The information is printed together with the nozzle check pattern. 1. Load A4-size plain paper in the printer. 2. Press the button to turn off the printer. 3.
-
Page 55
User’s Guide Maintaining the Printer Saving Power — Mac OS X 1. Select System Preferences from the menu > Printers & Scanners (or Print & Scan, Print & Fax), and then select the printer. 2. Click Options & Supplies > Utility > Open Printer Utility. 3. -
Page 56: Epson Connect Service
CD. Epson Connect Service By using Epson Connect service available on the Internet, you can print from your smartphone, tablet PC, or laptop, anytime and practically anywhere. The features available on the Internet are as follows.
-
Page 57: Running Web Config On Windows
IPv6: http://[the printer’s IP address]/ Examples: IPv4: http://192.168.100.201/ IPv6: http://[2001:db8::1000:1]/ Note: Using the smart device, you can also run Web Config from the maintenance screen of Epson iPrint. Related Information “Using Epson iPrint” on page 41 & Running Web Config on Windows When connecting a computer to the printer using WSD, follow the steps below to run Web Config.
-
Page 58: Windows Printer Driver
User’s Guide Network Service and Software Information Windows Printer Driver The printer driver controls the printer according to the commands from an application. Making settings on the printer driver provides the best printing results. You can also check the status of the printer or keep it in top operating condition using the printer driver utility.
-
Page 59
User’s Guide Network Service and Software Information You can also make settings for printing both sides of the paper or printing multiple pages on one sheet. -
Page 60
User’s Guide Network Service and Software Information More Options Tab You can select additional layout and printing options such as changing the size of a printout or making color corrections. -
Page 61
Network Service and Software Information Maintenance Tab You can run maintenance features such as nozzle check and print head cleaning, and by starting EPSON Status Monitor 3, you can check printer status and error information. Making Operation Settings for the Windows Printer Driver You can make settings such as enabling EPSON Status Monitor 3. -
Page 62: Mac Os X Printer Driver
User’s Guide Network Service and Software Information Mac OS X Printer Driver The printer driver controls the printer according to the commands from an application. Making settings on the printer driver provides the best printing results. You can also check the status of the printer or keep it in top operating condition using the printer driver utility.
-
Page 63
Note: On Mac OS X v10.8.x or later, if Print Settings menu is not displayed, Epson printer driver has not been installed correctly. Select System Preferences from the menu > Printers & Scanners (or Print & Scan, Print & Fax), remove the printer, and then add the printer again. -
Page 64: Epson Easy Photo Print
Epson Print CD Epson Print CD is an application that allows you to design a CD/DVD label to be printed directly onto a CD/DVD. You can also print a CD/DVD jacket for CD/DVD case. See the application’s help for details.
-
Page 65: Epson Software Updater
Click the start button, and select All Programs or Programs > Epson Software > EPSON Software Updater. Note: You can also start EPSON Software Updater by clicking the printer icon on the task bar on the desktop, and then selecting Software Update.
-
Page 66
6. Select the application you want to uninstall, and then click Uninstall. Important: The Uninstaller removes all drivers for Epson inkjet printers on the computer. If you use multiple Epson inkjet printers and you only want to delete some drivers, delete all of them first, and then install the necessary printer driver again. -
Page 67: Installing Applications
Do not turn off the computer or the printer while updating. Note: If you cannot find the application you want to update in the list, you cannot update using the EPSON Software Updater. Check for the latest versions of the applications from your local Epson website.
-
Page 68: Solving Problems
The ink pads need to be replaced. end of its service life. Contact Epson or an authorised Epson service provider to replace the ink pad*. It is not a user-serviceable part. When a message saying that you can continue printing is…
-
Page 69
Monitoring Preferences on the Maintenance tab, and then select Register the shortcut icon to the taskbar. ❏ If EPSON Status Monitor 3 is disabled, click Extended Settings on the Maintenance tab, and then select Enable EPSON Status Monitor 3. -
Page 70: Removing Jammed Paper
2. Click Options & Supplies > Utility > Open Printer Utility. 3. Click EPSON Status Monitor. Removing Jammed Paper Check the error displayed on the control panel and follow the instructions to remove the jammed paper including any torn pieces.
-
Page 71
User’s Guide Solving Problems Removing Jammed Paper from Inside the Printer Caution: Never touch the buttons on the control panel while your hand is inside the printer. If the printer starts operating, it could cause an injury. Be careful not to touch the protruding parts to avoid injury. 1. -
Page 72
User’s Guide Solving Problems Important: Do not touch the white flat cable, translucent part, and ink tubes inside the printer. Doing so may cause a malfunction. 3. Close the printer cover. -
Page 73: Paper Does Not Feed Correctly
User’s Guide Solving Problems Removing Jammed Paper from the Output Tray Remove the jammed paper. Paper Does Not Feed Correctly Check the following points, and then take the appropriate actions to solve the problem. ❏ Place the printer on a flat surface and operate in the recommended environmental conditions. ❏…
-
Page 74: Power And Control Panel Problems
❏ If you have the cleaning sheet that came with Epson genuine paper, use it to clean the roller inside the printer. ❏ Do not use paper with binder holes.
-
Page 75: Printout Problems
User’s Guide Solving Problems ❏ If you cannot print over a network, see the Network Guide. ❏ If you are printing a large data size image, the computer may run out of memory. Print the image at a lower resolution or a smaller size. ❏…
-
Page 76
Epson paper. ❏ Try to use genuine Epson ink bottles. This product is designed to adjust colors based on the use of genuine Epson ink bottles. The use of non-genuine ink bottles may cause print quality to decline. -
Page 77
User’s Guide Solving Problems Related Information “List of Paper Types” on page 15 & Printed Photos are Sticky You may be printing on the wrong side of the photo paper. Make sure you are printing on the printable side. Images or Photos are Printed in Unexpected Colors Adjust the color and then print again. -
Page 78: Paper Is Smeared Or Scuffed
User’s Guide Solving Problems ❏ Mac OS X Change the Expansion setting from the print dialog’s Print Settings menu. Paper Is Smeared or Scuffed ❏ When horizontal banding appears or the top or bottom of the paper is smeared, load paper in the correct direction and slide the edge guides to the edges of the paper.
-
Page 79: The Printout Problem Could Not Be Cleared
User’s Guide Solving Problems The Printout Problem Could Not be Cleared If you have tried all of the solutions and have not solved the problem, try uninstalling and then reinstalling the printer driver. Related Information “Uninstalling Applications” on page 65 &…
-
Page 80: Other Problems
User’s Guide Solving Problems Related Information “Web Config” on page 56 & Other Problems Slight Electric Shock when Touching the Printer If many peripherals are connected to the computer, you may feel a slight electric shock when touching the printer. Install a ground wire to the computer that is connected to the printer.
-
Page 81: Technical Specifications
User’s Guide Appendix Appendix Technical Specifications Printer Specifications Print Head Nozzle Placement Black ink nozzles: 90 Color ink nozzles: 90 for each color Weight of Paper Plain Paper 64 to 90 g/m2(17 to 24lb) Envelopes Envelope #10, DL, C6: 75 to 90 g/m2 (20 to 24 lb) Printable Area Printable Area for Single Sheets Print quality may decline in the shaded areas due to the printer’s mechanism.
-
Page 82: Interface Specifications
User’s Guide Appendix 3.0 mm (0.12 in.) 5.0 mm (0.20 in.) 18.0 mm (0.71 in.) 36.0 mm (1.42 in.) Printable Area for CD/DVD Print quality may decline in the shaded areas due to the printer’s mechanism. CD/DVD size 12 cm 8 cm 18 mm (0.71 in.) 43 mm (1.69 in.)
-
Page 83: Electrical Specifications
User’s Guide Appendix Dimensions Dimensions Storage ❏ Width: 547 mm (21.5 in.) ❏ Depth: 289 mm (11.4 in.) ❏ Height: 187 mm (7.4 in.) Printing ❏ Width: 547 mm (21.5 in.) ❏ Depth: 571 mm (22.5 in.) ❏ Height: 288 mm (11.3 in.) Approx.
-
Page 84: System Requirements
EN301 489-17 EN60950-1 For European users We, Seiko Epson Corporation, hereby declare that the following equipment Model is in compliance with the essential requirements and other relevant provisions of Directive 1999/5/EC: B412C For use only in Ireland, UK, Austria, Germany, Liechtenstein, Switzerland, France, Belgium, Luxemburg, Netherlands, Italy, Portugal, Spain, Denmark, Finland, Norway, Sweden, Iceland, Croatia, Cyprus, Greece, Slovenia, Malta, Bulgaria, Czech, Estonia, Hungary, Latvia, Lithuania, Poland, Romania, and Slovakia.
-
Page 85: Restrictions On Copying
User’s Guide Appendix Restrictions on Copying Observe the following restrictions to ensure the responsible and legal use of the printer. Copying of the following items is prohibited by law: ❏ Bank bills, coins, government-issued marketable securities, government bond securities, and municipal securities ❏…
-
Page 86
User’s Guide Appendix 3. Disconnect all cables such as the power cord and USB cable. 4. Remove all of the paper from the printer. 5. Open the printer cover. Secure the print head to the case with tape. 6. Close the printer cover. -
Page 87
User’s Guide Appendix 7. Prepare to pack the printer as shown below. 8. Unhook the ink tank unit from the printer and lay it down, and then make sure to install the cap onto the ink tank securely. 9. Hook the ink tank unit onto the printer. 10. -
Page 88: Where To Get Help
Depending on the product, network settings may be stored in the product’s memory. Due to breakdown or repair of a product, settings may be lost. Epson shall not be responsible for the loss of any data, for backing up or recovering settings even during a warranty period.
-
Page 89: Help For Users In Singapore
1F., No.113, Shengli Rd., Pingtung City, Pingtung County 900, Taiwan Help for Users in Singapore Sources of information, support, and services available from Epson Singapore are: World Wide Web http://www.epson.com.sg Information on product specifications, drivers for download, Frequently Asked Questions (FAQ), Sales Enquiries, and Technical Support via e-mail are available.
-
Page 90: Help For Users In Thailand
Information on product specifications, drivers for download, Frequently Asked Questions (FAQ), and e-mail are available. Epson Hotline (Phone: (66) 2685-9899) Our Hotline team can help you with the following over the phone: ❏ Sales enquiries and product information ❏ Product usage questions or problems ❏…
-
Page 91: Help For Users In Hong Kong
To obtain technical support as well as other after-sales services, users are welcome to contact Epson Hong Kong Limited. Internet Home Page Epson Hong Kong has established a local home page in both Chinese and English on the Internet to provide users with the following information: ❏ Product information ❏…
-
Page 92: Help For Users In Malaysia
Help for Users in India Contacts for information, support, and services are: World Wide Web http://www.epson.co.in Information on product specifications, drivers for download, and products enquiry are available. Epson India Head Office — Bangalore Phone: 080-30515000 Fax: 30515005 Epson India Regional Offices: Location…
-
Page 93: Help For Users In The Philippines
For Service (CDMA & Mobile Users) — 3900 1600 (9AM — 6PM) Prefix local STD code Help for Users in the Philippines To obtain technical support as well as other after sales services, users are welcome to contact the Epson Philippines Corporation at the telephone and fax numbers and e-mail address below:…
-
Драйверы
2
-
Инструкции по эксплуатации
1
Epson L805 инструкция по эксплуатации
(164 страницы)
- Языки:Русский
-
Тип:
PDF -
Размер:
6.81 MB -
Описание:
Принтер
Просмотр
На NoDevice можно скачать инструкцию по эксплуатации для Epson L805. Руководство пользователя необходимо для ознакомления с правилами установки и эксплуатации Epson L805. Инструкции по использованию помогут правильно настроить Epson L805, исправить ошибки и выявить неполадки.

