Всем доброго дня! Надеюсь модераторы не удалят мою тему,так как нашёл похожую тему ,но без конкретики,а нужны именно недорогие подголовники.
Скачать руководство по эксплуатации automobile headrest dvd player — 8.2/10, голосов: 42, Больше всего скачиваний инструкции по.
Информация о файле: Скачать automobile headrest dvd player инструкция
Выложил: progress
Дата: 2014-04-14
Проверил: ROCCKY
Каким антивирусом: IE black list (SmartScreen Filter)
Дата проверки: 2014-04-16
Тип файла: .bzip Архив Bzip
Размер файла: 45Mb
Скачали раз: 771
Сказали спасибо: maloi, sserg, kolyapa63mailru, zhuzhkov1971
Рейтинг файла: гипер высокий
Скачать файл: Automobile headrest dvd player инструкция

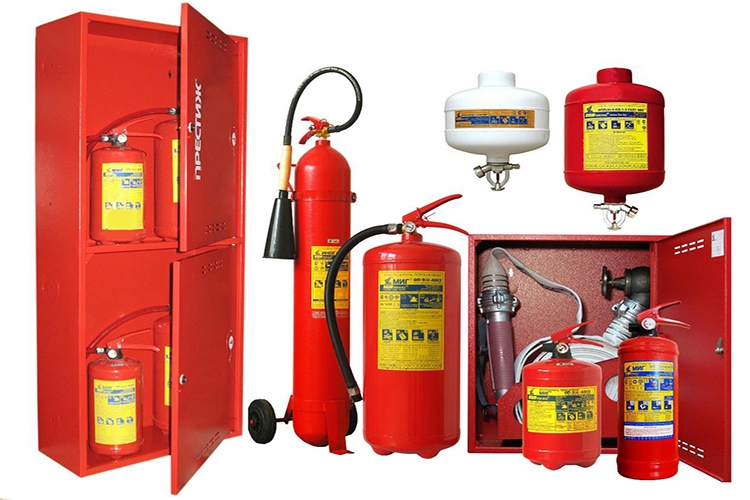
Настоящая инструкция разработана специально для безопасной эксплуатации первичных средств пожаротушения.
1. ОБЩИЕ ТРЕБОВАНИЯ ОХРАНЫ ТРУДА
1.1. Все объекты должны быть обеспечены первичными средствами пожаротушения.
1.2. На объектах должны быть перечни закрепленного за ними пожарного инвентаря и оборудования и правила пользования ими.
1.3. Первичные средства пожаротушения следует размещать вблизи мест наиболее вероятно¬го их применения, на виду, с обеспечением к ним свободного доступа.
1.4. Первичные средства пожаротушения на территории объекта (вне помещения) следует группировать на специальных пожарных пунктах, предохраняя их от действия атмосферных осадков устройством козырьков и смазкой металлических частей минеральным маслом.
1.5. Пункты для первичных средств пожаротушения следует располагать по согласованию с пожарной охраной с учетом обслуживания ими группы объектов.
1.6. Ответственность за приобретение, изготовление и своевременный ремонт пожарного оборудования, инвентаря и средств пожаротушения, расположенных на отдельных объектах, возлагается на руководителей объектов.
1.7. Контроль за наличием, исправностью и правильным использованием средств пожаротушения на скважинах, компрессорных станциях, нефтенасосных, складах и др. осуществляет лицо, ответственное за пожарную безопасность или начальник добровольной пожарной дружины объекта.
1.8. Использование первичных средств пожаротушения для хозяйственных и прочих нужд, не связанных с тушением пожара, не допускается.
1.9. Списание средств пожаротушения и оборудования, пришедших в негодность, производится на общих основаниях.
1.10. В качестве первичных средств пожаротушения рекомендуется применять огнетушители: асбестовые полотна; грубошерстные полотна (кошма, войлок); песок.
1.11. Огнетушители, ящики для песка, бочка для воды, ведра, щиты или шкафы для инвентаря, ручки для лопат и топоров, футляры для кошмы должны быть окрашены в соответствии с требованиями ГОСТ.
1.12. Гидравлические испытания на прочность корпусов пенных огнетушителей необходимо производить в следующие сроки:
— через год после начала эксплуатации — 25% огнетушителей;
— через 2 года после начала эксплуатации — 50% огнетушителей;
— через 3 года после начала эксплуатации — 100 % огнетушителей.
1.13. Для обеспечения сохранности и безопасности действия пенных огнетушителей в зимних условиях необходимо зарядку огнетушителей производить зимним зарядом, приготовленным на месте с применением этиленгликоля или др.
1.14. При температуре ниже 10С огнетушители необходимо перенести в отапливаемое помещение и вывесить табличку «Здесь находятся огнетушители».
1.15. Огнетушители следует располагать таким образом, чтобы они были защищены от воз¬действия прямых солнечных лучей, тепловых потоков, механических воздействий и других неблагоприятных факторов (вибрация, агрессивная среда, повышенная влажность и т.д.). Они должны быть хорошо видны и легкодоступны в случае пожара. Предпочтительно размещать огнетушители вблизи мест наиболее вероятного возникновения пожара, вдоль путей прохода, а также — около выхода из помещения. Огнетушители не должны препятствовать эвакуации людей во время пожара.
1.16. Для размещения первичных средств пожаротушения в производственных и складских помещениях, а также на территории защищаемых объектов должны быть оборудованы пожарные щиты (пункты).
1.17. В помещениях, насыщенным производственным или другим оборудованием, заслоняющим огнетушители, должны быть установлены указатели их местоположения. Расстояние от возможного очага пожара до места размещения огнетушителя не должно превышать 20 метров для общественных зданий и сооружений, 30 метров для помещений категории А, Б и В, 40 метров для помещений категорий В и Г, 70 метров для помещений категории Д.
1.18. Рекомендуется переносные огнетушители устанавливать на подвесных кронштейнах или в специальных шкафах. Огнетушители должны располагаться так. чтобы основные надписи и пиктограммы, показывающие порядок приведения их в действие. были хорошо видны и обращены наружу или в сторону наиболее вероятного подхода к ним.
1.19. Запорно-пусковое устройство огнетушителей и дверцы шкафа (в случае их размещения в шкафу) должны быть опломбированы.
1.20. Огнетушители, имеющие полную массу менее 15 кг должны быть установлены таким образом, чтобы их верх располагался на высоте не более 1,5 м от пола; переносимые огнетушители, имеющие полную массу 15 кг и более, должны устанавливаться так, чтобы верх огнетушителя располагался на высоте не более 1,0 м. Они могут устанавливаться на полу с фиксацией возможного падения при случайном воздействии.
1.21. Расстояние от двери до огнетушителя должно быть таким, чтобы не мешать ее полному открыванию. Огнетушители не должны устанавливаться в таких местах, где значения температуры выходят за температурный диапазон, указанный на огнетушителях.
1.22. Каждому огнетушителю, поступившему в эксплуатацию необходимо присвоить порядковый номер, обозначенный краской на корпусе огнетушителя, завести на него паспорт. В паспорте на огнетушитель указывают порядковый номер, тип, год выпуска, наименование завода-изготовителя, время приобретения, дату первой зарядки и вид зарядки, даты и результатов всех основных проверок и испытаний на гидравлическое давление.
1.23. Огнетушители, не имеющие паспорта с указанием года их изготовления или даты испытания, перед зарядкой до начала эксплуатации испытывают. Корпуса огнетушителей, не выдержавшие при испытании гидравлического давления, к дальнейшей эксплуатации не допускаются.
1.24. На объектах используются следующие огнетушители:
— огнетушители углекислотные с зарядом двуокиси углерода ОУ — 2, ОУ — 5, ОУ — 8;
— огнетушители порошковые с зарядом огнетушащего порошка ОП — 10; ОП — 50; ОП -100 ОП-10Г; ОПУ-2;
— огнетушители с газовым баллоном — ОП-100.
1.25. Приведение огнетушителей в действие производится в следующем порядке:
Углекислотный огнетушитель (ОУ), взяв левой рукой за ручку поднести его как можно ближе к огню, направив раструб в очаг пожара, и открыть вентиль, поворачивая его против часовой стрелки. С помощью раструба струю выходящего газа нужно последовательно переводить с одного горящего места на другое. Раструб нельзя держать голой рукой, так как он имеет низкую температуру. Наибольший эффект тушения горящего нефтепродукта углекислотными огнетушителями достигается в том случае, если расстояние до очага пожара будет минимальным.
После ликвидации пожара поворотом маховичка необходимо перекрыть вентиль огнетушителя.
Приведение в действие других огнетушителей производится в порядке, изложенном на их корпусе или приклеенных к корпусу табличках.
1.26. Для успешного применения ручных огнетушителей необходимо:
— приводить огнетушители в действие недалеко от места горения, чтобы не терять огнегасящие вещества;
— действовать огнетушителем быстро, так как работа огнетушителя кратковременна (пенных 60 — 70 сек., углекислотных 30 — 40 сек., порошковых от 6 до 60 сек.);
— при тушении твердых веществ и предметов пенными огнетушителями направить струю пены в места наиболее интенсивного горения, постепенно сбивая огонь сверху вниз;
— при горении разлитой жидкости следует начинать тушение с краев постепенно покрывая пеной всю горящую поверхность.
1.27. После тушения пожара углекислотными и бромэтиловыми огнетушителями в закрытых помещениях последние следует немедленно проветрить во избежания удушья и отравления; непосредственное действие снегообразной массы углекислоты на тело человека приводит к обмораживанию.
1.28. Запрещается тушить порошковыми огнетушителями электрооборудование, находящееся под напряжением 1000 В. Не следует использовать порошковые огнетушители для защиты оборудования, которое может выйти из строя при попадании порошка (электронно-вычислительные машины, электронное оборудование, электрические машины коллекторного типа).
1.29. Запрещается применять водные огнетушители для ликвидации пожаров оборудования, находящегося под электрическим напряжением, для тушения сильно нагретых или расплавленных веществ, а также веществ, вступающих с водой в химическую реакцию, которая сопровождается интенсивным выделением тепла и разбрызгиванием горючего.
1.30. Допускается помещения, оборудованные автоматическими установками пожаротушения, обеспечивать огнетушителями на 50% исходя из расчетного количества. Общественные и промышленные здания и сооружения должны иметь на каждом этаже не менее двух переносных огнетушителей.
1.31. Асбестовое полотно, войлок (кошму) рекомендуется хранить в металлических футлярах с крышками, периодически (один раз в 3 месяца), просушивать и очищать от пыли.
1.32. Рукава внутренних пожарных кранов должны быть всегда сухими, хорошо скатанными, один конец рукава должен быть примкнут к стволу, другой к пожарному крану. Пожарный кран и рукав должны размещаться в шкафчике и быть опломбированы.
1.33. Два раза в год следует проверять давление во внутренних пожарных кранах с помощью контрольного устройства, состоящего из патрубка, соединительной головки, спускного крана и манометра.
1.34. Ящики для песка должны быть рассчитаны на хранение 0,5 м3 песка, а на складах горючих жидкостей — до 1 мЗ, окрашены в красный цвет, иметь плотно закрывающиеся крышки и надписи белой краской «Песок для тушения пожара».
1.35. Песок перед засыпкой в ящик необходимо просушить и просеять во избежание его комкования. Наружные ящики с песком следует устанавливать на подставках, а крышки деревянных ящиков обивать только рубероидом. У каждого ящика должна быть лопата сокового типа.
1.36. Бочки с водой должны быть емкостью не менее 250 литров, иметь крышки, окрашенные в красный цвет, и надпись «Пожарная вода».
Скачать Инструкцию
ВНИМАНИЕ: Вы смотрите текстовую часть содержания конспекта, материал доступен по кнопке Скачать.
Ознакомление с назначением первичных средств пожаротушения
Первичные средства пожаротушения предназначены для тушения пожаров и загораний в начальной стадии их возникновения.
Первичные средства пожаротушения предназначены для использования работниками организаций, личным составом подразделений пожарной охраны и иными лицами в целях борьбы с пожарами и подразделяются на следующие типы:
1) переносные и передвижные огнетушители;
2) пожарные краны и средства обеспечения их использования;
3) пожарный инвентарь;
4) покрывала для изоляции очага возгорания.
Здания, сооружения и строения должны быть обеспечены первичными средствами пожаротушения лицами, уполномоченными владеть, пользоваться или распоряжаться зданиями, сооружениями и строениями.
Номенклатура, количество и места размещения первичных средств пожаротушения устанавливаются в зависимости от вида горючего материала, объемно-планировочных решений здания, сооружения или строения, параметров окружающей среды и мест размещения обслуживающего персонала.
В условиях завода (ПТЭ и ПЭЭ РП РЗ) используются два типа огнетушителей:
- углекислотные;
- порошковые.
Углекислотные огнетушители предназначены для тушения небольших очагов горения различных веществ и электроустановок под напряжением до 1000В, за исключением веществ, горение которых происходит без доступа кислорода.
В качестве огнетушащего средства используют двуокись углерода СО2 – бесцветный газ с едва ощутимым запахом, обладает диэлектрическими свойствами, при нормальной температуре переходит в жидкое состояние.
Порошковые огнетушители предназначены для тушения загораний тлеющих материалов, горючих жидкостей, газов и электроустановок под напряжением до 1000 В. Эти огнетушители не предназначены для тушения загораний щелочных и щелочно-земельных металлов, горение которых может происходить без доступа воздуха.
Каждый огнетушитель, установленный на объекте, должен иметь порядковый номер, нанесенный на корпус белой краской. На него заводят паспорт, в котором указывают название огнетушителя, номер, год выпуска, дату введения в эксплуатацию, результаты испытаний и осмотра.
Огнетушители должны всегда содержаться в исправном состоянии, периодически осматриваться, проверяться и своевременно перезаряжаться. Располагают огнетушители на видных местах вблизи от выходов из помещений на высоте не более 1,5 м.
Также для тушения пожаров предусматривают пожарные краны, которые запитываются от производственного или противопожарного водовода. Каждый кран оборудуется пожарным рукавом длиной 20м и пожарным стволом.
При применении ПК следует сорвать пломбу на дверце шкафа, открыть ее и раскатать рукав в направлении очага горения, открыть до отказа вентиль крана и пустить воду.
Пожарные краны располагаются на видных местах, окрашиваются по ГОСТу. На дверце шкафа ПК выполняется надпись «ПК №… При пожаре звонить 01». ПК проверяют два раза в год с пуском воды и замером давления в сети водоснабжения. Для обеспечения быстрой подачи воды к месту горения рукав должен быть присоединен к крану и стволу, сложен и смотан. Для тушения электроустановок пожарный ствол должен быть заземлен.
Для тушения пожаров разлившихся горючих жидкостей и электроустановок применяется песок. Песок хранится в металлических ящиках емкостью 0,5; 1,0 и 3,0 куб.м. и комплектоваться совковой лопатой. Для помещений и наружных технологических установок категории А, Б и В по взрывопожарной и пожарной опасности запас песка в ящиках должен быть не менее 0,5 м3 на каждые 500 м2 защищаемой площади, а для помещений и наружных технологических установок категории Г и Д не менее 0,5 м3 на каждую 1000 м2 защищаемой площади.
Переносные и передвижные огнетушители должны обеспечивать тушение пожара одним человеком на площади, указанной в технической документации организации-изготовителя.
Технические характеристики переносных и передвижных огнетушителей должны обеспечивать безопасность человека при тушении пожара.
Прочностные характеристики конструктивных элементов переносных и передвижных огнетушителей должны обеспечивать безопасность их применения при тушении пожара.
Практическое ознакомление и работа с первичными средствами пожаротушения на модельном очаге пожара
Правила применения огнетушителей нанесены на корпус огнетушителей. Перед применением огнетушителей следует ознакомиться с краткой инструкцией.
Необходимо помнить, что:
- При применении углекислотных огнетушителей, при выходе огнетушащего газа, происходит остывание поверхности раструба до -40. Меры предосторожности – при направлении раструба на очаг пожара, нужно использовать рукавицы.
- При применении порошкового огнетушителя происходит распыление большого количества огнетушащего порошка. Меры предосторожности – исключать возможность попадания облака огнетушащего порошка в органы дыхания.
- При применении воздушно-пенного огнетушителя и внутреннего противопожарного водопровода, запрещается направлять огнетушащее вещество на электроустановки, находящиеся под напряжением, т.к. возможно поражение электрическим током. Меры предосторожности – обесточить электроустановки, использовать заземляющие устройства.
Конструкция пожарных кранов должна обеспечивать возможность открывания запорного устройства одним человеком и подачи воды с интенсивностью, обеспечивающей тушение пожара.
Конструкция соединительных головок пожарных кранов должна позволять подсоединять к ним пожарные рукава, используемые в подразделениях пожарной охраны.
Ознакомление с системами противопожарной защиты
На предприятии (ПТЭ и ПЭЭ РП РЗ) имеются автоматические системы противопожарной защиты, это пожарная сигнализация и установки тушения пожаров.
По виду огнетушащего средства в условиях завода используются установки водяного газового и порошкового пожаротушения.
Изучение наглядно возможно осуществить на примере объекта 120/3 отм. +29,5 ПТЭ и ПЭЭ РП РЗ. На щите управления расположены приёмно-контрольные приборы пожарной сигнализации ППК-2 .
Правила использования первичных средств пожаротушения
Просмотров 4.6k. Опубликовано
Обновлено
Соблюдение правил применения первичных средств пожаротушения способствует быстрой локализации огня и повышает процент положительного исхода проведения операции по ликвидации возгораний. Перечень ПСПТ и порядок их эксплуатации зависит от типа и категории объекта.
Содержание
- Виды первичных средств пожаротушения
- Порядок применения огнетушителей
- Правила использования пожарного крана
Виды первичных средств пожаротушения
По правилам пожарной безопасности использование первичных средств пожаротушения обязательно для предприятий и организаций всех форм собственности. Согласно ст. 43 Федерального закона № 123-ФЗ к ПСПТ относятся:
- переносные и передвижные огнетушители;
- пожарные краны;
- пожарный инвентарь;
- средства для изоляции очагов возгорания.
Тип первичных средств тушения пожара, их количество и места размещения в помещении зависит от вида строительных материалов, планировки здания, а также от параметров окружающей среды.
Элементарно в каждом здании должен находиться щит с ручным пожарным инструментом для разборки конструкций и проведения АСР, ящик с песком и резервуар с водой. Также в специальном шкафу размещают асбестовое полотно размером минимум 1×1 м. Внутри зданий еще на стадии проектирования прокладывают противопожарный водопровод с подключаемым к нему рукавом длиной от 20 м. Скатанный рукав хранят в подсоединенном к крану и стволу состоянии.
Выбор огнетушителя зависит от типа объекта и характеристик используемых при его строительстве материалов, а также от специфики технологических процессов на производстве с применением горючих веществ. Это могут быть ручные резервуары объемом до 10 литров или передвижные баллоны до 25 л. По типу огнетушащего вещества используют жидкостные, углекислотные, химические пенные, воздушно-пенные, хладоновые, порошковые и комбинированные огнетушители.
Порядок применения огнетушителей
Этот тип первичных средств пожаротушения независимо от используемого заправочного вещества представляет собой баллон с соплом, из которого выходит струя ОТВ. Общие правила пользования этим типом первичных средств тушения пожара состоят в следующем:
- сорвать пломбу и выдернуть чеку;
- тушение проводить с наветренной стороны;
- минимальное расстояние от огня – 3 метра;
- струю ОТВ направлять на основание очага;
- в направлении сверху вниз работать только при возгораниях в нишах;
- по окончании работы провести перезарядку.
В качестве первичного средства пожаротушения при возгораниях твердых материалов и горючих жидкостей допустимо применение резервуаров пенного и воздушно-пенного типа. Это оборудование категорически запрещено для работы по ликвидации последствий горения электропроводов, так как пенные составы обладают токопроводящими свойствами. Также не допускается использование пенных и воздушно-пенных огнетушителей для щелочных и щелочноземельных металлов, которые при реакции с водой выделяют водород, способствующий усилению пламени.

Порядок пользования первичными средствами пожаротушения воздушно-пенного типа предполагает выполнение последовательности действий:
- сорвать пломбу, повернуть рукоятку на 180°;
- повернуть баллон вверх дном, запустив механизм образования пены;
- направить сопло на пламя и снять трубку;
- нажать на рычаг и выпустить струю ОТВ.
Универсальными с точки зрения использования первичных средств пожаротушения для хозяйственных нужд считаются огнетушители порошкового типа, исключением для которых становятся материалы, горящие без воздуха. Плюсом такого оборудования считается:
- возможность использования непосредственно в момент возгорания без риска влияния ОТВ на здоровье людей;
- отсутствие необходимости применения СИЗОД во время тушения.
Правилами пожаротушения допускается установка самосрабатывающих порошковых огнетушителей в лифтах и мусоросборниках с высоким риском непроизвольного возгорания. Такое оборудование активируется под воздействием повышенных температур.
Схема использования порошковых резервуаров:
- при обнаружении возгорания сопло баллона направить на очаг пожара;
- сорвать пломбу и выдавить чеку;
- нажать на рычаг и приступить к тушению.
Углекислотное оборудование эффективно при горении веществ и материалов, потребляющих кислород. При срабатывании прибора диоксид углерода трансформируется в газ, увеличиваясь в 400-500 раз. Порядок использования первичного средства пожаротушения углекислотного типа во многом сходен с общими правилами для огнетушителей, однако имеет и свои особенности:
- раструб баллона должен находиться на расстоянии не менее метра от очага возгорания;
- работать допустимо только в хорошо вентилируемом помещении, если во время тушения это невозможно, то по окончании работы следует хорошо проветрить здание, чтобы не получить отравление парами;
- при работе с углекислотным оборудованием запрещено касаться голыми руками металлических частей, чтобы не получить обморожение — из этих же соображений углекислота не используется для тушения одежды.
Правила использования пожарного крана
Пожарный кран – первичное средство тушения пожара, которое обязательно должно быть в зданиях массового скопления людей, а также на объектах жилого фонда высотой более 12 этажей. Назначение ПК – подача ОТВ по внутренней противопожарной системе. Составляющие этого оборудования:
- запорно-пусковое устройство;
- рукав со стволом;
- зажимы.
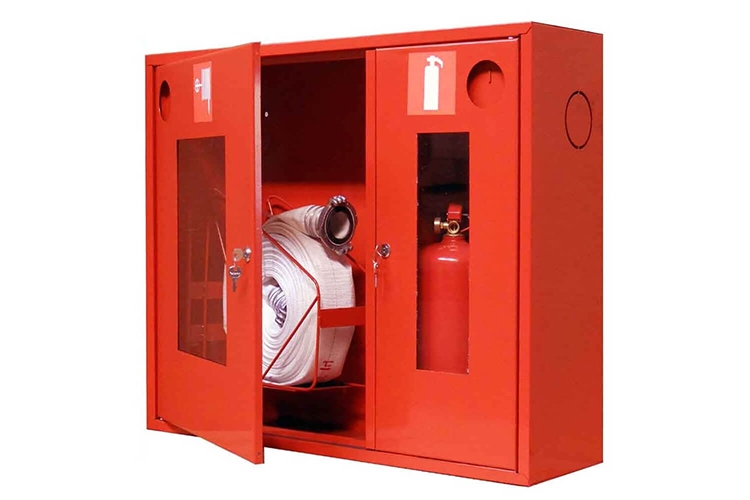
Порядок применения ПК:
- сорвать пломбу со шкафа, где хранится ПК;
- открыть дверцу, при ее блокировке разбить защитное стекло;
- подсоединить рукав к крану и пожарному стволу;
- провести размотку двойной скатки броском в сторону очага пожара;
- при горении вблизи шкафа размотка проводится на свободной площади с удержанием ствола возле очага;
- открыть кран, поворачивая маховик против часовой стрелки в максимальное положение;
- при наличии насоса-повысителя это оборудование активируется нажатием кнопки, расположенной в ПШ.

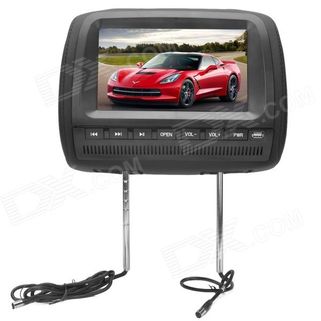
USER’S MANUAL
AUTOMOBILE HEADREST DVD PLAYER
4

Contents
A Precautions、
5
03
04
04
05
06
07
08
09
09
10
11
11
11
11
11
12
12
12
12
12
13
13
13
13
15
12
12
14
15
02
01
14
15
15
15
B Notice before operation、
C Accessories、
D Features、
G Key parts in front of the player、
H Key parts at the player……….、
I Battery installation for remote controller、
J Precautions for remote controller、
K Application of remote controller、
L Description for pressing-keys of remote controller、
M Basic operations、
F System connection and installation、
E Video disk type、
Power ON/OFF
Load Disk
Remove Disk
USB and card reading
N Function of keys、
POWER
Eject key
PLAY/PAUSE
GOTO
Fast forward/fast backward
SCREEN
SUBTITLE
TITLE
STOP/RETURN
SLOW
PROGRAM
REPEAT
ROOT MENU/PBC
DISPLAY
MUTE
ZOOM
PREV /NIOUS EXT

16
16
16
16
17
17
17
17
18
18
18
19
20
21
21
22
19
35
16
25
29
27
21
26
Contents
VOLUME UP/DOWN
MENU SETUP
DIRECTION KEY
MEDIA
CHANNEL/Language
Number key and 10+ key
Video switch key
Image function key
FM emitting
O Menu operation、
SYSTEM SETUP
1.TV SYSTEM
2. ……………Aspect Ratio
3.PASSWORD and RATING ……
4.DEFAULT
LANGUAGE SETUP …………
1.DISPLAY LANGUAGE ……..
2.Audio/Subtitle/menu language
AUDIO SETUP
P.Description for playing of disks
Playing Mp3 & JPEG disks…….
Disks available for this player
MPEG4 decoding technology……
Q.Operation for game function….
R.Troubleshooting
S.Technical specifications…..
TV unction operationF Instruction.. 23
24
28
25
TONE ………………… 22
IR A B KEY/ 17
Electronic Album……………25

Thank you to buy our product, please read the operation instruction carefully prior to operationso as to use the player correctly, and please keep it appropriately for future reference.
01
V I D E OUSER’S MANUAL OF AUTOMOBILE HEADREST DVD PLAYER
A. Precautions
Warning For the sake of your safety, do not watch the video image or open the display.when driving
Without the approval of authorized organization, any changing or rebuilding for theplayer shall cause troubles for user.
Caution The product has dangerous high voltage inside,non-professional personnel shall be notallow to dismantle it and repair.If any trouble is found,please turn to the professionalpersonnel or our authorized maintenance center.
ed
The player is equipped with TFT color LCD,it is frangible,be careful in delivering andinstalling.Do not clean the device by corrosive chemical detergent, soft cloth is recommended.The operating voltage is DC 12V(+-2V),the player shall work abnormally or bedamaged if the voltage higher or lower than the allowed range.is
The player is equipped with radium emitting system,please read the instructions caref-ully for right operation and keep it well for future reference.If maintenance is needed,please contact the professionals,do remember to operate it according the correct oper-ating procedure to avoid the harmful light beam,in order to prevent the direct radiumlight beam,do not open the enclosure without permission.
to
In using ,the LCD might has few bright spot on its screen,which is a very normal phen-omenon in the active matrix display technology,and it doesn’t mean the product hasany fault or trouble.
aSpecial Tips

02
�������
V I D E OUSER’S MANUAL OF PLAYERAUTOMOBILE HEADREST
B. Notice before operation
Safety
Before operating the product,please check the voltage of your car and it should be consistent with the workingvoltage of the player.Do grasp the power plug firmly in connecting or disconnecting to the power,do not pull the power line by force.The radium emitting light beam used by the product is harmful to eyes,do not dismantle the enclosure withoutpermission and only the professional technicians are allowed to conduct the repair or maintenance.
Please operate the product in proper temperature,the storage temperature should be -30 C to 75 C, and theworking temperature should be -10 C to 55 C.To prevent dust falling on the laser head,it shall affect the playing effect if the head is dusted,please usethe laser head cleaning disk to clean.Refer to the instructions of purchased cleaning dish for detailed operation.It should be damp-proof,crash-proof and pressure-proof.
Placement
Dew
In the ,moisture shall form on the lens(dew formation):Carry the player from the cold place to warm place;In the condition of big temperature difference such as at the moment ofopening the heating device;If the dew is formed,it shall affect the normal work of the player,andplease remove out the disk,lay the player on table for one hour underthe condition of connecting to power so as to vapor the mois ure.
following circumstance
t
Precautions for disk
In order to keep the disk clean,please take the edge of disk and do not touch its surface;Do not adhibit any paster or tape on the disk;Keep the disk away from direct sunshine or heat source;Please place the disk in the disk box after being used;Before playing the disk,if the disk is dirt ed,please clean it with soft cloth from the center to edge;Do not use vo atile oil and thinner to clean the disk.
il

03
V I D E OUSER’S MANUAL OF DVD PLAYERAUTOMOBILE HEADREST
C. Accessories
Please check the following accessories after opening the package.
Remote controller USER’S MANUAL
User’s
Manu
al
Av input&output line wireless game handles
USB connection line Game disk
Note: it is equipped on thesePlayers having game function
Game handles
Note: it is equipped on thesePlayers having game function
Note: it is equipped on thesePlayers having USB function
Antenna ties
Hardware accessories
According to your requirement

04
V I D E OUSER’S MANUAL OF DVD PLAYERAUTOMOBILE HEADREST
D. FeatureEasy to install and it will not damage the car and the user might install it by himself;No additional player is needed for the integration of display and player;Built-in FM stereo emitting function,it could be connected wirelessly with the original carFM radio part and enjoy the sound box effect through the loudspeaker of radio;The input ports of audio and video are provided for the connection with GPS navigation system;Audio and video output function and they are installed at the two side of car by pair to supportthe synchronous e joyment of video image;With USB and card reading function,the user might use USB disk or SD/MS/MMC card to downloadMP3/MP4/WMA to play.
n
through PC
DVD
VCD 12cm/8cm
CD
Mp3
Mp4
12cm/8cm
12cm/8cm
12cm/8cm
12cm/8cm
WMA
JPEG
12cm/8cm
12cm/8cm
WMA
VIDEO CD
4
J P G
500 LINES
240 LINES
MPEG2
MPEG1
MPEG4
TYPE DISK SYMBOLRECORDFORMAT
HORIZONTALDEFINITION RECORD CONTENT DISK SIZE
240 LINES
500 LINES
Digital
Digital
Digital
Picture
Audio
Audio+Video
Audio
Audio
Audio+Video
Audio+Video
E. Video disk type

AV-OUTUSBSD/MS/MMCGAME1GAME2
CH+CH-
FMTX IR A/B
OPENMENU POWER
MUTE/
05
V I D E OUSER’S MANUAL OF DVD PLAYERAUTOMOBILE HEADREST
F. System connection and installationCheck whether the shape and installation size is suitable,please select and employ suitable accessories and tool indisassembling and assembling.
Note: the shape and installation size are not suitable for all cars, please select the suitable shapeand installation size.
The install method:Take down the original installation head rest, select and match the steel pipe according to the original
installation pole diameter for the head rest that having the DVD monitor,then adjust head rest steel pipespacing, pass the power source and the audio frequency lines through the chair steel pipe, and connect on thepower source, the sound and video frequency system with the vehicle. simultaneously the head rest willbe fixed,and , around size based on the front seat personnel request.the height will be freely adjusted
The Antenna (connect the main engine radio antenna with the automobile,Enhance the effects of the frequency modulation launches)
130-190mm
4
Red +12VBlack grounding
Yellow videoRed right channel
White left channel
INPUT PORT
Fuse box
The spare steel pipe
OUTPUT PORT
Yellow videoRed right channelWhite left channel

DVD
MUTE/
POWERMENU OPEN
IR A/BFMTX
USBSD/MS/MMCGAME1GAME2 AV-OUT
CH- CH+
06
V I D E OUSER’S MANUAL OF DVD PLAYERAUTOMOBILE HEADREST
TFT LCD
Switch key of IR A/BStop key
Power key
G. Key parts in front of the player
Play/Pause keyNext track keyFast forward key
Audio out
Video out
Eject key (Open the TFT-lcd,load disk)
Card readingport
USB port
Interface for game handle 2
Interface for game handle 1
TFT MENUMUTE/FM emitting key
Volume — keyVolume + key
Previous track keyFast backward key
the note 1: Directly pressed the volume up\down key the volume, press the [MENU] single bond,make an adjustment to the brightness,the contrast gradient to the display monitor,
color, the clarity and so on, and may make the function adjustment by the volume addition andsubtraction key also.
the note 2: The two games handles connection,and USB, SD/MS/MMC card connections on the kneading boardthe reserves connection, our partial machines possibly do not have these connections.
to adjustto
are
Infraredray
Transmit
Remote control receive

07
V I D E OUSER’S MANUAL OF DVD PLAYERAUTOMOBILE HEADREST
H. Key parts at the player
Laser head lensThe laying positionof the small disk
The enable turned TFT screen
notice: Please carefully turn on the display monitor when vehicles start , please closethe display monitor after well the small dish as soon as possible, in order toavoid damage to the display monitor.
putting

08
1
2
3
CR2025
V I D E OUSER’S MANUAL OF DVD PLAYERAUTOMOBILE HEADREST
I. Battery installation of remote controller
Take the positions A and B by fingers(see the figure), press A per the arrowheaddirection and then take out the battery holder.
Take out the used battery and load thenew battery with anode upwards.
Battery (Cr2025)
Place the battery holder back toits original position
Cautions:
In order to prevent the batteryleakage,if the remote controllershall be not used for long time(longer than one month),please takeout the battery, if there is liquidflowing out, wipe away carefully andthen reload the new battery.
a
Don’t expose the batteries to extreme heat.

09
。。
V I D E OUSER’S MANUAL OF DVD PLAYERAUTOMOBILE HEADREST
J. Precautions for remote controller
For the first use, please first pull off the PVC sheet so as to electrify the remote controller;Take notice to protect the remote controller to avoid damaging;If there exists barrier between the player and the controller, the remote controller might beout of use;Do not place the remote controller under the strong light, or it might cause the unavailabilityof the device;Please operate the remote controller within the effective distance.
K. Application of remote controller
Application of remote controller:1.Horizontal: 302.Vertical: 303.Straight line: 5 meters
Caution:The most functions could be operated bythe remote controller and few functionsonly could be operated on the player.
< 5 meters
4
DVD
MUTE/
POWERMENU OPEN
IR A/BFMTX
USBSD/MS/MMCGAME1GAME2 AV-OUT
CH- CH+

SCREEN
IR A/BFMTX
MEDIA
7
321
5
9
6
4
8
10/0 10+
POWER
VOL-
ENTER
SETUP ZOOM
MUTEMENUPBC
GOTO
RETURN
PROGRAMSLOWSUBTITLE
AUDIO REPEAT
DISPLAY
MENU VOL+
DVD/AV
TITLE
2
1 3
4
6
9
10
14
13
16
20
5
7
8
11
12
15
18
19
21
22
23
24
25
27
26
28
17
10
V I D E OUSER’S MANUAL OF DVD PLAYERAUTOMOBILE HEADREST
L. Description for the pressing-keys of remote controller
Key Function1. Root menu/PBC
Press the key to return to the root menu in playing DVD disk,and open/close the PBC menu in playing VCD2.0 and SVCD.
2. Power
11. Title menu
Power ON/OFF
Press the key to return to the title menu in playing DVD disk.
4. Mute Open/close the sound
5. Number key Number selection
6. GOTO Select desired time to play
7. Display Display the disk information and playing time
8. SubtitleSubtitle switching, used for SVCD, DVD and Mp4disks with multiple subtitles only
9. Program Track programming play
10. Slow Slow play
12.LanguageChannel/
1 . Repeat Multiple modes of repeat play shall be available4
15. Setup Open/close DVD setup menu
16. Play/Pause Play or pause
17. Zoom Zoom in/out, multiple modes
18. Enter Confirmation19. Direction key Direction selecting key
20. Stop/Return Stop key, press the key to return in playing
21. Vol+/- Adjust the volume22. Fast forward/
backwardPlay
23. Previous/Next Select the previous or next track24. Menu Switching the menu of LCD brightness, contrast,
, .definition color and tint
IR channel key25. /IR A B key
2 . DVD/AV key Switching DVD andAV input
7
2 . FM key FM emitting key6
3. Media Function:You can switch between USB/SD/DISK
13 Return.
2 . mode8 SCREEN key Power-saving
Channel and language switching keys
Back to the root directory
Fast forward or backward

11
V I D E OUSER’S MANUAL OF DVD PLAYERAUTOMOBILE HEADREST
M. Basic operationsThe player may be used after being connected to the system.
1. Power ON/OFF(1) Press the panel or the Power key at the top left angle of the remote controller, the power indicator shall be
turned off and the boot image shall be displayed, the player will read the disk, if no disk inside, the LCDshall tell No Disk.
(2) In Power ON state, further press Power key to power off the player and the indicator shall be turned on.
2. Load disk(1)Press Eject key to open the disk door;(2)Load the disk (with the label side upwards).(3)Close the disk door.(4)The player shall play the disk automatically.
3. Remove disk(1)Press Stop key to stop playing;(2)Press Eject key to eject the door;(3)Take out the disk;(4)Put the disk back to the package bag or box for storage.
Caution: Be careful to take the disk, wrong operation shall damage the player;Do not damage disk or the player shall be damaged;Please keep the side with label upward if it’s a single-side disk;Be careful in playing two-side DVD disk for the two sides of the disk are available for playing;Do not scratch the surface in taking the disk.
use
4. USB and card reading
(1)The external USB memorizer (USB disk) might be connected by the attached USB connection line. In the state of PowerOFF and no disk is loaded inside, connect the external memorizer to the corresponding USB port, and then pressPower key to power on the player, the device shall detect the signal source automatically (including video, audioand image),and the player shall play automatically if the signal source format that complies with the player, isdetected.
(2)In the state of Power OFF and no disk is loaded inside, connect the external memorizing card (MS/SD/MMC card) tothe corresponding port, and then press Power key to power on the player, the device shall detect the signal sourceautomatically (including video, audio and image), and the player shall play in order automatically if the signalsource format that complies with the player, is detected.
(3)The contents of Mp3, WMA, Mp4 and JPEG formats could be downloaded from the internet through PC and be saved inthe USB disk or external memorizing card to play.
Caution: Do not pull off the external memorizer when the player is connected with power, otherwise theexternal memorizer or the player shall be damaged;All signal sources that comply with the player might be played through the external memorizer;
MP3 player couldn’t play through USB device.A few
DVD
4

�������
V I D E O
12
USER’S MANUAL OF DVD PLAYERAUTOMOBILE HEADREST
N. Functions of keys
KEY Basic description
Power key Open/close the power.
Eject key Open the disk door.
In normal playing state, press the key to pause to play image/sound. Furtherpress the key to resume to play normally.Play/Pause
Press Fast backward key, the image shall be played backward quickly, at the time,no sound shall be output, press the key successively, the player shall playthe disk repeatedly as per the following method;Press Fast forward key, the image shall be played forward quickly, at the time,no sound shall be output,press the key successively, the player shall playthe disk repeatedly as per the following method;
Fast forward (backward) X2 X4 X8 X20
Play
Press the Previous key to select the previous track to play.Press the Next key to select the next track to play.
In playing VCD and CD disk, press» » (Stop/Return) key to display pre-stopstate, at the time, press Play key to resume to play; further press Stop key tostop playing and return to the boot interface state. In playing DVD or VCD2.0disk, it plays the role of returning menu, and of stopping playing in playingmenu. In playing game, press the key to return to the main menu of game.Note: MP4 and DVD the function of pre-stop.don’t have
Stop/Return
PreviousNext
Fast backward
Fast forward

V I D E O
Slow 1/2 Slow 1/3 Slow 1/4 Slow 1/ 5 Slow 1/6 Slow 1 7/
Play
PBCMENU
13
USER’S MANUAL OF DVD PLAYERAUTOMOBILE HEADREST
KEY Basic description
Slow
Play by the lower speed, press the key successively to make the player playrepeatedly, press » » (Play/Pause) key to resume to play normally.In playing DVD disk:
Program
Setup of programming play: arrange the playing order of disk and then the playershall play the disks as per the arranged order.
Note: the program key shall not be available unless PBC is closed, program is notallowed for MP3 disks; DVD disk should be programmed for its track time and VCDdisks should be programmed for its track number. Finally, select Play key and theplayer shall play the disks automatically as per the arranged order, at the time,the number keys are not available, only the previous/next key could be used. Ifyou want to cancel the programming function, press Program key to enter the menuinterface and select Clear key and then press Enter key to confirm.
Repeat
Repeat playRepeatedly play the selected title/chapter (DVD) or track/album (VCD/CD disk).In playing DVD disk, press the key successively to select the title or chapter ofDVD to play.
For other types of disks, press Repeat key successively to select one track orthe album to play repeatedly.
In playing VCD2.0 or SVCD disk, the PBC menu function could be achieved by pressPBC key,the disks could only be played in order if PBC is closed. In playing DVDdisk, press the key to stop playing and return to the root menu of disk, pressdirection key or number key to select your desired contents and press Enter keyto confirm, the player shall start to play as per the title or contents you set up.
Note: PBC is not available in playing Mp3, CD or VCD 1.1 disks.
ing

14
V I D E O
Title Chapter1/1 1/29 00 00 12: :
2CH2 3English/
TRACK 2/15 00 00 12: :VCD PBC X
USER’S MANUAL OF DVD PLAYERAUTOMOBILE HEADREST
KEY Basic description
Display
Press Display key for the first time, the LCD shall display: (DVD state)1) Disk format, current title number and total title number;2) The Current chapter and total title number;3) The playing of current title .and playing time
Further press the key to display:Display the current language and the language number supported, channel type,subtitle display language and angle type.
OFF NO
Press the key for the third time to display nothing.The display (OSD) in playing VCD disk is as follows:
Display the disk format, current track and total track number, mute mode,PBC mode, and the track number of repeat mode, and the track playing time.The OSD of MP3 and CD disk is same with VCD except that VCD disk has PBC option.
Mute Firstly press the Mute key, the player shall play the image without sound output,further press the key to cancel the mute function and resume to play normally.

ZOOM 2 ZOOM 3 ZOOM4 ZOOM 1/2 ZOOM 1/3 ZOOM 1/4 ZOOM:OFF
15
V I D E O
TITLE 1/1 1/29CHAPTER 00 00 12: :
USER’S MANUAL OF DVD PLAYERAUTOMOBILE HEADREST
Zoom
KEY Basic description
Press Zoom key to zoom in the image.In playing, press Zoom key, the zoom mode shall be cycled as per the following order:
In Image Zoom state, press direction key» » to move the image.
GOTO
GOTO: start to play from the selected time.Press GOTO key on the remote controller a time selection dialog box shall be skipped out,move the cursor to the time number and input the time you want to select and then the playershall start to play from the selected time.
then
Note: the setup of VCD disk is same with DVD disk, the input time couldn’t exceed the longesttime of the disk.
the
Open/close the subtitle, select the subtitle on DVD disk and it’s displayed on the TV screen,which is related to the format of disk.Subtitle is available only in the condition of the disk having subtitle function, the subtitlefunction is achieved by the Subtitle key on the remote controller, press the key successivelyto select different subtitles.
Subtitle
Title Press Title key to stop playing and return to the title menu of disk, press direction key toselect your desired title and press Enter key to confirm to enter the chapter menu.
Power-saving modeSCREEN

Stereo Left Channel Right Channel
16
V I D E OUSER’S MANUAL OF DVD PLAYERAUTOMOBILE HEADREST
KEY Basic description
Vol+Vol-
Volume adjustment keyAdjust the volume by the Vol+ and Vol- key on the remote controller
Press the key to enter the setup menu to set up system, language, audio, video,loudspeaker and dolby digit, in setup menu, press the key to exit the menu interface.Setup
Up/Down/Left/Right keyPress the keys to select the disk content to be played and item to be set up aswell as to select the image part to be zoomed.
Direction key
Channel/Language
2.In playing VCD or individual MP4 disk, press Channel key to change the channelmode:Changing the channel mode might eliminate the original singer’s sound ofOK disk and convert the dialogue language of some disks.
Note:Channel function is not available for MP3, CD, WMA, JPG and individual MP4 disk.
MEDIA
DISCCARDUSBFunction:You can switch between USB/SD/DISK
1a
.DVD disk supports eight languages at most, repeatedly press Language key to select thedifferent language to play.If the disk h s the language menu, the user may also changethe language by menu.
Note: language function is only used for these DVD and super VCD disks that have multiplelanguages for selection.

17
V I D E OUSER’S MANUAL OF DVD PLAYERAUTOMOBILE HEADREST
IR A B/
FMTX
Infrared launch A / B channel switch

18
V I D E OUSER’S MANUAL OF DVD PLAYERAUTOMOBILE HEADREST
O. Menu operation
Note:
The system of TV set should be same with the system of
DVD player.
1. TV system(see figure 2)
Press setup key and the LCD will display the picture as
figure1, press direction key to move the white bar to the
designated position, press enter to confirm to display its
submenu.
Special tips:
For the company has many counterpart products, the figure
is for reference only, all is subject the real product!
The setup methods described in this instruction are for their
common parts, other functions are recommended to use the
default setup.
(1) Press setup key and the screen will display the system
setup picture, select TV system and press enter key to
confirm, then the screen will display the picture as figure 2.
(2) Enter the submenu at the right of screen. If you want to
set the system to be PAL, first move the white bar on PAL
column and then press enter key to confirm, press setup
key to exit the system setup.

V I D E OUSER’S MANUAL OF DVD PLAYERAUTOMOBILE HEADREST
19
2. Aspect Ratio(see figure 3)
(1) 4 3PS panoramic scanning applicable for general
screen, when playing wide screen image, the image shall
be played on the whole screen and the left and right edges
shall be cut off.
(2) 4: 3LB(mailbox): for these screen with general sizes,
please select this option. In playing wide screen image,
the top and bottom of the screen shall have black frame.
(3) 16: 9(wide screen): when the player is connected to the
wide screen, please select this option. If the option is
selected but it’s not connected to the wide screen, the
image might be distorted for the vertical compression.
: ( ):
Caution:
the aspect ratio is related to the disk recording format, some
disks might be not played in the aspect ratio you select;
if 4:3 disk is played on wide screen TV set, the left and right
sides of the screen shall have black bars;
Before playing, please select the suitable aspect ratio
according to the actual TV set.
(1) Input the initial password(0000 or 8888,the effective
password comprises of four numbers) (see figure 4)
after pressing password option to enter, press enter
key to unlock the function and then exit the option.
In playing these disks with lock function the setup
method for limiting the grade is described as follows:
,
3. Password and Grade(see figure 4 and 5)
Figure 4

20
V I D E OUSER’S MANUAL OF DVD PLAYERAUTOMOBILE HEADREST
V I D E OV I D E O
( )
( )
2 Select your desired grade option after pressing grade key
to enter, and then press enter key to confirm and exit the
option(see figure 5).
3 Further select password option and then input the initial
password(0000 or 8888, the effective password comprises
of four numbers)(see figure 5)after pressing password
option to enter, press enter key to lock the function and then
exit the option.
4 Default Value see figure 6. ( )
If the user doesn t want to save the setup set by
himself for the functions please select reset option
and the DVD player shall reset to the ex factory
parameters
‘
,
—
.
Figure 5
Figure 6

21
V I D E OUSER’S MANUAL OF DVD PLAYERAUTOMOBILE HEADREST
1.Image display language see figure 7)
7
(
Press setup key and the screen will display the
system setup picture, select language setup and
then select image display language option, select
English, Chinese, German, Spanish, French
Portuguese, Russian. Press enter key to confirm,
the screen shall display the image as figure
,
2.Audio language, subtitle language and menu
language(see figure 
Select your desired audio, subtitle or menu language
option, the available languages include English,
Chinese, Russian, Italian, German, Spanish, French,
Portuguese. Press enter key to confirm and then press
setup key to exit menu setup.
Figure 7
Figure 8

22
V I D E OUSER’S MANUAL OF DVD PLAYERAUTOMOBILE HEADREST
Tone see figure )( 9
(1) Press setup key and the screen will display the
system setup image, select audio setup option and
then select tone option, press enter key to confirm
and the screen shall display the image as figure 9.
(2) If the user wants to adjust the tone, press Direction
key to adjust and then press enter key to confirm,
press setup key to exit the system setup.
Figure 9

,
V I D E OUSER’S MANUAL OF DVD PLAYERAUTOMOBILE HEADREST
23
This function only fit for with TV funtionmodel
TV function operation instruction:
. / ,(1) Press DVD AV key of the remote controller the player willstate, then can operate the TV function.
(2). Press MENU key on panel or remote controller , thewill display the following menu.
(3). Select system of the menu by direction key up/down,then can select TVby direction key left/right.
(4).The program key of the menu mean the playing channel, you can select thechannel by direction key up/down.
(5). Select fine on menu by direction key up/down,then press direction left andright. You can make a little adjustment to the present channel to arrive thebest effect.
(6). Select auto on menu, then press direction key right. The player can select thechannel auto and save auto.
(7). If the skip on menu is on, it can lock the present channel, it will skip the presentchannel when select the channel up and down, you can skip the channel you
like or the signal is not good by this key, it will skip the present channelselect the channel up and down.
(8). You can select the channel by direction key or by number key. If you needselect the number is more than 10, please press 10+ key first, then press othernumber key to select.
switch intoTV
twice continuouslyplayer
systems
don’tdirectly when
PRESET
SYSTEM PAL 1PROGRAM 50FINE 00AUTO OFFSKIP OFF

24
V I D E OUSER’S MANUAL OF DVD PLAYERAUTOMOBILE HEADREST
P.Description for playing MP4/MP3/WMA/JPEG disks

25
V I D E OUSER’S MANUAL OF DVD PLAYERAUTOMOBILE HEADREST

26
V I D E OUSER’S MANUAL OF DVD PLAYERAUTOMOBILE HEADREST

V I D E O
27
USER’S MANUAL OF DVD PLAYERAUTOMOBILE HEADREST
Q. Operation for Game Function
1 Operation for game handle 8 bit game. ( ):
Note In playing the game press Stop Return key or press SELECT and START key at the sametime to return to the main directory menu
: , /.
2 Operation for wireless game handle 32 bit game. ( ):
1 The operation same as the wire game handle2 Press UP or DOWN key to select the catalog of the game Press A or B key enter to the game
name which you select then select and play the game which you like or enter into How to play toknow the way of the game
3 Game function keys direction key UP DOWN LEFT RIGHT ,Play Pause key Stop key RETURNkey A B key
) .) ,
, ,.
) : ( / / / ) / , ,, / .
1 Press Eject key to open the disk door and load the attached game disk, then the main game menu shall bedisplayed. Note: individual game disk might not be played on this player for the inconsistent format.
2 use the remote control to choose which game you will play and press SELECT key to choose one mode ortwo mode according to the content or you demand..
3 Press START key on handle to start to play or pause to play the game.
4 Press the direction key on handle to select upward ,downward ,leftward ,rightward and press A B C D key tooperate the functions according to yourself.
5
)
)
))
)The sockets of GAME1 and GAME2 are provided at the side of the device which indicate the socketsof main handle and assistant handle
,.
Note:1.There are 10 page games and each page has 10 games .totally 300 wonderful games in 8 bit game,2 For 8 bit game, You can only use wire game handle to play..3 For different games each function keys may be different customer can try serval times to know.. , .

28
V I D E OUSER’S MANUAL OF DVD PLAYERAUTOMOBILE HEADREST
R. Troubleshooting

29
V I D E OUSER’S MANUAL OF DVD PLAYERAUTOMOBILE HEADREST
AUTOMOBILE NEADREST DVD PLAYER
Approx. . KG2 98
(L)200mm X (W)270mm X (d)120mm
Audio: stereoVideo: complex video signal output (AV)Game port(for spare)USB port (for spare)MS/MMC/SD CARD PORT (for spare)
S. Technical specifications and parameters
DC:12V/1.5A
About:12W
7 inch color TFT 16 9- ( : )