- Manuals
- Brands
- Husqvarna Manuals
- Snow Blower
- ST 224
- Operator’s manual
-
Contents
Table of Contents -
Troubleshooting
-
Bookmarks
Quick Links
www.husqvarna.com
Original instructions
Instrucciones originales
Instructions d’origine
1159957-49
2018-06-29
ST 224, ST 227P, ST 230P, ST 224P
Default Operator’s manual
ES-MX Manual del usuario
FR-CA Manuel d’utilisation
2-25
26-51
52-77
Related Manuals for Husqvarna ST 224
Summary of Contents for Husqvarna ST 224
-
Page 1
ST 224, ST 227P, ST 230P, ST 224P www.husqvarna.com Default Operator’s manual 2-25 ES-MX Manual del usuario 26-51 FR-CA Manuel d’utilisation 52-77 Original instructions Instrucciones originales Instructions d’origine 1159957-49 2018-06-29… -
Page 2: Table Of Contents
C C ontents Introduction…………..3 Maintenance…………..15 Safety…………….5 Troubleshooting…………22 Assembly……………. 8 Transportation, storage and disposal……24 Operation…………..11 Technical data………….. 25 694 — 002 — 694 — 002 — 7 7 9…
-
Page 3: Introduction
I I ntroduction Product overview 1. Auger engagement 3. Drive speed control lever 2. Discharge chute control lever 4. Deflector remote control lever 7 7 8 694 — 002 — 694 — 002 -…
-
Page 4
ON/OFF key. Insert to start and run. 25. Connection, electric start Données techniques 26. Oil fill (ST 224, ST 224P), Dipstick (ST 224, ST uniquement, et elles peuvent être modifiées sans 230P, ST 224P) préavis en raison d’améliorations apportées au produit. -
Page 5
P P roblème Cause possible Solution Perte de traction/ralen- La courroie glisse. Régler le câble. Régler la courroie. Remove spark plug cable before tissement de la vitesse maintenance. La courroie est usée. Vérifier/remplacer la courroie. Régler d’entraînement la poulie. Perte de décharge ou ra- La courroie est sortie de la poulie. -
Page 6
G G eneral safety instructions • The product can eject objects and cause injuries. P P roblème Cause possible Solution Obey the safety instructions to decrease the risk of • Use the product correctly. Injury or death is a injury or death. Puissance réduite Le fil de la bougie d’allumage n’est pas con- Connecter le fil à… -
Page 7
Personal protective equipment • Never operate the product at high transport speeds on slippery surfaces. Look behind and use care D D épannage Always use the correct personal protective equipment when operating in reverse. when you operate the product. This includes, at •… -
Page 8
Pour nettoyer l’outil • Do not start the product if there is fuel or engine oil • Do not put warm objects near the fuel or the engine. 2. Enlever la roue de l’arbre (C). on the product. Remove the unwanted fuel/oil and let •… -
Page 9
Ajustement du câble de commande de 5. Installer les boulons de 5/16 po (A), (C) et les serrer (8 à 12 lb/po2 / 11 à 16 Nm). la tarière Multi-wrench (1) Nylon washer (1) Remarque : Si vous ne vous sentez pas à l’aise de faire ce réglage vous-même, veuillez communiquer avec un centre d’entretien autorisé. -
Page 10
rainure de la poulie d’entraînement avant d’abaisser Retrait de la courroie de tarière 2. Adjust the handle position to one of the mounting 2. Put the chute rotator head (A) on the chute bracket holes (B) and tighten the handle knobs (C) with the (B). -
Page 11
2. Desserrer le contre-écrou (A) qui fixe la tête du 2. Déposer le ressort du tendeur (A) fixé sur le levier du 2. Install the remote cable eyelet (E) to the chute 4. Attach the lever control knobs (N) by pressing them rotateur de goulotte (B) au support de montage (C) tendeur de courroie d’entraînement (B). -
Page 12
Remplacement de la barre de racleur 2. To adjust the snow throwing distance of the chute 4. Installer un contre-écrou ¼-20 (D) sur la goupille de CAUTION Do not release the grip deflector, move the deflector remote control lever (B) tonte et serrer. -
Page 13
V V érification de la bougie d’allumage 3. Aligner le trou du moyeu de la tarière (B) avec le trou 9. If the choke was used to start the engine, release the 1. To engage the auger blades, push the auger dans l’arbre de la tarière (C) et installer une nouvelle electric start button and slowly move the choke (D) engagement (A) to the handle to engage the auger… -
Page 14
To use the choke control 5. If the product has power steering, hold the left E E ntretien Quotidien 20 heures 50 heures 100 heures steering trigger (D) to turn left. Hold the right steering trigger to turn right. • Turn the choke (A) to open or close the choke valve. -
Page 15: Maintenance
P P révention du gel après utilisation Pour obtenir un bon résultat 2. Remove snow and loose ice from the product. • It is easier and more efficient to remove snow immediately after it falls. 3. Remove snow and loose ice from the base of the •…
-
Page 16
U U tilisation de la commande Utilisation de la commande du volet de • Apply a small amount of lithium grease to the N N ote It is not necessary to add grease or to do other interlock bosses (C) at the beginning of each season maintenance to the gearbox. -
Page 17
U U tilisation de la machine 3. Abaisser le levier de commande de vitesse • If the spark plug is dirty, clean it and make sure that 4. Install a ¼-20 locknut (D) and tighten. d’entraînement de la position centrale afin que le the electrode gap is correct, see Technical data on produit puisse se déplacer vers l’arrière lorsque… -
Page 18
To replace the scraper bar 4. Install a ¼-20 locknut (D) on the shear pin and 3. Déplacer la commande d’accélération (B) à la 4. Mettre l’interrupteur de marche/arrêt (C) à la position tighten. position FAST (rapide). ON (marche). 1. Put the scraper bar (A) in a reversed position when it 4. -
Page 19
2. Loosen the lock nut (A) that secures the chute 2. Remove the tensioner spring (A) attached to the rotator head (B) to the mounting bracket (C) to drive belt tensioner arm (B). F F onctionnement remove the discharge chute. Avant de démarrer le produit Réglage de la goulotte d’éjection et du déflecteur de goulotte… -
Page 20
To remove the auger belt 4. Put the drive belt in the grove of the engine pulley 2. Placer la tête du rotateur de goulotte (A) sur le 2. Installer l’œillet du câble de télécommande (E) sur le (G) before installing on the engine shaft. support de la goulotte (B). -
Page 21
To adjust the auger control cable 2. Régler la position de la poignée à l’un des trous de 5. Install the 5/16» bolts (A), (C) and tighten (8-12 montage (B) et serrer les boutons de poignées (C) Ft.Lbs / 11-16 Nm). avec les boulons de carrosserie (D). -
Page 22: Troubleshooting
To clean the product C C onsignes de sécurité pour la 2. Remove the wheel from the axle (C). • Les accessoires et les modifications apportées au produit qui ne sont pas approuvés par le fabricant maintenance • Clean plastic parts with a clean and dry cloth. peuvent causer des blessures graves, voire mortelles.
-
Page 23
D D ispositifs de sécurité sur l’outil • Si du carburant se déverse sur les vêtements, P P roblem Possible cause Solution changer immédiatement de vêtement. • Faire régulièrement l’entretien sur le produit. Decreased power The spark plug cable is not connected. Connect the cable to the spark plug. -
Page 24: Transportation, Storage And Disposal
et toutes les pièces en mouvement s’arrêtent. plastique. Toujours placer les contenants sur le P P roblem Possible cause Solution Débrancher le fil de la bougie et tenir le fil à l’écart sol loin d’un véhicule avant le remplissage. de la bougie pour éviter tout démarrage accidentel. Loss of traction drive/ The belt slips.
-
Page 25: Technical Data
• When the product is no longer in use, send it to a l’implant avant d’utiliser l’outil. Husqvarna dealer or discard it at a recycling M M ISE EN GARDE : Dommages causés à • Obey the local recycling requirements and applicable location.
-
Page 26
C C ontenido Ne pas retirer de protection lorsque le Introducción…………..27 Mantenimiento………….. 40 moteur tourne. Seguridad…………..29 Solución de problemas……….48 Montaje…………….. 33 Transporte, almacenamiento y eliminación de Déconnecter le câble de la bougie avant de Éjection de la neige. residuos……………. -
Page 27
227P) Protection d’oreilles recommandée 24. Bouton de démarrage électrique 25. Connexion, démarrage électrique 26. Remplissage d’huile (ST 224, ST 224P), jauge (ST Clé ON/OFF (marche/arrêt) Insérer la clé 224, ST 230P, ST 224P) pour démarrer et faire tourner le moteur. -
Page 28
24. Botón de arranque eléctrico 25. Conexión, arranque eléctrico Llave para encender/apagar la máquina. 26. Llenado del aceite (ST 224, ST 224P), varilla de Colóquela para encender la máquina y nivel (ST 224, ST 230P, ST 224P) ponerla en marcha. -
Page 29
T T able des matières No retire las protecciones mientras el motor Introduction…………..53 Entretien…………… 66 se encuentre funcionando. Sécurité……………..55 Dépannage…………..74 Montage…………….59 Transport, entreposage et mise au rebut……77 Retire el cable de la bujía antes del Descarga de nieve. Fonctionnement………… -
Page 30
Cuando el producto se deja de utilizar, envíelo a un Instrucciones generales de seguridad el producto. Debe haber un adulto responsable en distribuidor de Husqvarna o deséchelo en un sitio de • Mantenga el producto en un área cerrada para evitar todo momento. -
Page 31
los barrenos y todas las piezas móviles se plástico. Siempre coloque los recipientes en el P P roblema Causa posible Solución detuvieron. Desconecte el cable de la bujía y suelo, alejados del vehículo, antes de rellenar. manténgalo lejos de la bujía para evitar que alguien Pérdida de tracción o ra- La correa patina. -
Page 32
D D ispositivos de seguridad en el producto • Si derrama combustible en su ropa, cámbiese la P P roblema Causa posible Solución ropa inmediatamente. • Asegúrese de realizar el mantenimiento del producto Potencia reducida El cable de la bujía no está conectado. Conecte el cable a la bujía. -
Page 33
I I nstrucciones de seguridad para el • Accesorios y modificaciones en el producto que no estén aprobados por el fabricante pueden causar S S olución de problemas mantenimiento lesiones graves o la muerte. No modifique el producto. Siempre utilice accesorios aprobados por ADVERTENCIA: Lea atentamente las el fabricante. -
Page 34
Para instalar la empuñadura P P ara quitar las ruedas Para limpiar el producto 1. Levante la empuñadura superior hasta la posición 1. Extraiga el pasador de la rueda (A) y el pasador de • Limpie las piezas de plástico con un paño limpio y de funcionamiento. -
Page 35
5. Instale los pernos de 5/16» (A), (C) y apriételos (8 a 3. Ajuste hasta que el cable del deflector del conducto 3. Instale más tornillos (D) y perillas de la empuñadura 4. Fije una contratuerca (G) en el espárrago roscado y 12 pies-libras/11 a 16 Nm). -
Page 36
de la polea de transmisión antes de bajar la placa Para quitar la correa del barreno 3. Instale el muelle (L) entre la tuerca hexagonal (M) en 4. Coloque las perillas de control de la palanca (N) el cabezal del rotador del conducto y el orificio en el presionándolas contra las palancas de control (O). -
Page 37
exceso, espere unos minutos antes 2. Retire el muelle tensor (A) fijado al brazo del tensor 2. Para ajustar la distancia del quitanieves del deflector T T enga en cuenta: Se recomienda reemplazar la correa de la correa de transmisión (B). del conducto, mueva la palanca de control remoto de intentar arrancarlo y no presione de transmisión y la correa del barreno a la vez. -
Page 38
6. Conecte el cable de extensión al conector del motor 1. Libere el acoplamiento del barreno y de la Tenga en cuenta: Cuando se conectan tanto el A A VISO: Utilice únicamente los pasadores (G). transmisión al mismo tiempo. acoplamiento de la transmisión como el del barreno, el fusibles originales que se suministran con el 7. -
Page 39
S S ilenciador Para utilizar el interruptor de 3. Si los bordes de los barrenos están desgastados, 5. Si el producto cuenta con dirección asistida, comuníquese con un centro de servicio autorizado sostenga el gatillo de dirección izquierdo (D) para combustible El silenciador mantiene los niveles de ruido al mínimo y para reemplazarlos. -
Page 40
3. Apriete la contratuerca (B). 6. Si el producto no tiene arranque eléctrico, tire la M M antenimiento Diario 20 horas 50 horas 100 horas empuñadura del cordón de arranque varias veces para quitar el hielo y el agua. Asegúrese de que no haya fugas de com- 7.
Сайт
- Каталог товаров
- Услуги
- Сервис
- Примеры работ
- Прайс-лист
- Аренда
- База знаний
![]()
Оказываем полный спектр услуг и поддержку в любом вопросе потому что любим своего клиента
Данный сайт носит исключительно информационный характер. Все представленные предложения не являются офертой, определяемой статьей 437 ГК РФ.
Для получения подробной информации свяжитесь с нашим менеджером. Copyright © Прокатись.ру, info@prokatis.ru
Спасибо, Ваш запрос звонка успешно отправлен.
Наш менеджер позвонит Вам в указанное время и ответит на все интересующие вопросы.
Вы в любой момент можете позвонить сами по номеру
8 495 646-88-68
назвать номер запроса (№ )
и задать интересующие вопросы.
ОК
Спасибо, Ваш запрос успешно отправлен.
Наш менеджер позвонит Вам в указанное время и ответит на все интересующие вопросы.
Вы в любой момент можете позвонить сами по номеру
8 495 646-88-68
назвать номер запроса (№ )
и задать интересующие вопросы.
ОК
Выберите подарки
Подарков на сумму
0 p
0 p
Выбрать
Нет аккаунта? Зарегистрируйтесь, это займёт несколько минут.
Регистрация
Нет аккаунта? Регистрация
Уже зарегистрированы? Вход
Спасибо, Ваш запрос успешно отправлен.
Наш менеджер позвонит Вам и ответит на все интересующие вопросы.
Вы в любой момент можете позвонить сами по номеру
8 495 646-88-68
и задать интересующие вопросы.
ОК
% Акции %
Содержание
Описание
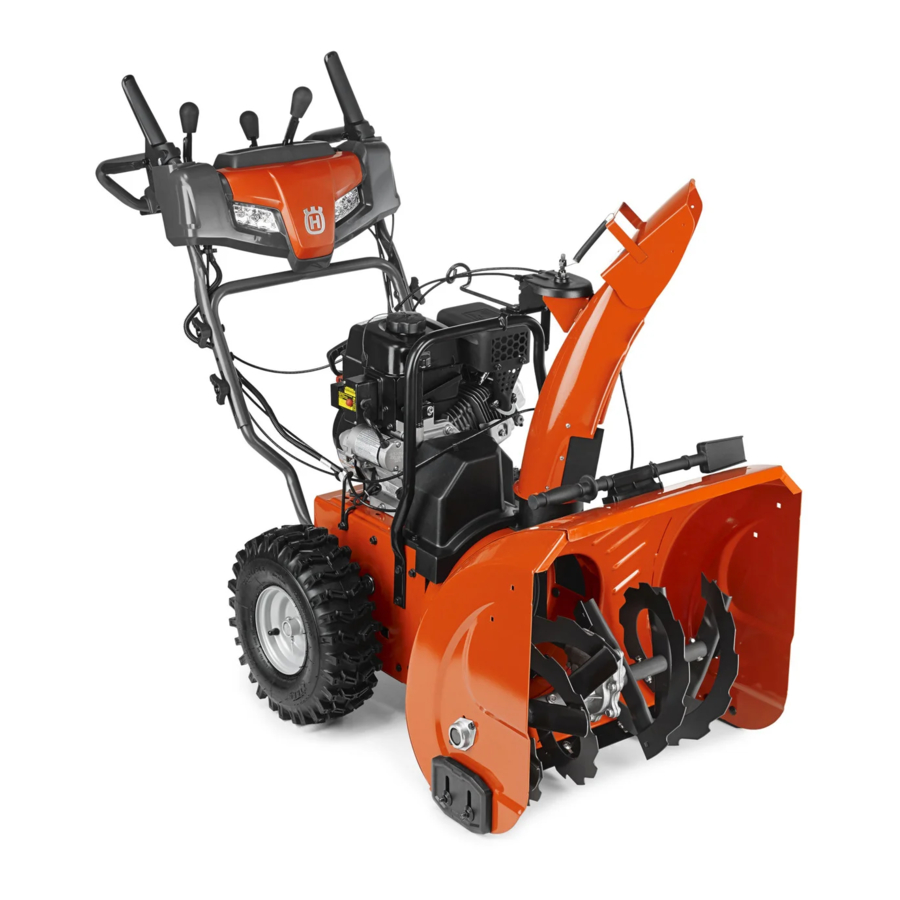
Снегоуборщик Husqvarna ST 224 – легкий и удобный самоходный снегоотбрасыватель для быстрой уборки снега толщиной до 30 см. Рабочая ширина 61 см.
Снегоуборочная техника шведской компании Husqvarna всегда славилась своей надёжностью и высоким КПД. Снегоочиститель Husqvarna ST 224 не стал исключением. Машина работает безотказно, несмотря на высоту слоя снега.

Снегоотбрасыватель Husqvarna ST 224
Эта снегоуборочная машина может убирать снег высотою до тридцати сантиметров. Помогает ей в этом двухступенчатая система, она измельчает и отбрасывает снег. Для повышения эффективности выброса установлен шнек с лентой, перемешивающий снег с воздухом.
На снегоотбрасывателе Husqvarna ST 224 установлен регулируемый дефлектор. Благодаря рычагу можно регулировать вертикальный угол отбрасывания. Дальность выброса снега доходит до пятнадцати метров, что обеспечивается высокоскоростной крыльчаткой.
Снегоуборщик husqvarna st 224 может работать вне зависимости от температуры воздуха вокруг. Тут используется электрический статер, то есть двигатель легко заведется от нажатия одной кнопки.
Захват снега происходит на ширине до шестидесяти сантиметров.
Отельного упоминания заслуживает рукоять.
Петлеобразная рукоять с регулируемой высотой – не все удобства этого снегоуборочного мотоблока, на них также присутствует подогрев.
Двигатель от LCT имеет 6.3 лошадиных сил и рабочий объём 208 сантиметров кубических. Объём топливного бака – 2.6 литров. Установлена трансмиссия с семью передачами, шесть из них для движения вперёд и одна назад.
Схема сборки

Снегоотбрасыватель Husqvarna ST 224
А. Рычаг управления приводом хода
В. Рычаг управления приводом шнека
С. Переключатель Вкл/Выкл
D. Ключ безопаного запуска
Е. Управление воздушной заслонкой
F. Кран выключения подачи топлива
G. Рычаг управления выбросом
H. Раструб
L. Инструмент для прочистки
J. Дефлектор раструба
K. Рычаг управления дефлектором
L. Рачаг управления дефлектором
N. Опорные пластины
О. Фары
Р. Кожух
Q. Крышка масляного бака со щупом
R. Крышка топливного бака
S. Разъем подсоединения кабеля
T. Праймер
U. Кнопка электрического запуска
V. Ручка стартера
Y. Глушитель
CC. Управление дроссельной заслонкой
DD. Защитное приспособление раструба
Характеристики
| Дальность выброса снега | до 10 метров |
| Тип двигателя | Бензиновый |
| Производитель двигателя | LCT |
| Рабочий объем цилиндра, см3 | 208 |
| Номинальная мощность на рабочих оборотах, кВт | 4,7 (3600 об/мин) |
| Полный крутящий момент | 9,5 фунтов*фут |
| Объем топливного бака, л | 2,6 |
| Тип системы очистки | Двухступенчатая |
| Рабочая ширина кожуха шнека, см | 61 |
| Рабочая высота кожуха шнека, см | 58,5 |
| Диаметр шнека, см | 30,5 |
| Кол-во лопастей крыльчатки | 3 |
| Тип перемещения | Колесный, самоходный |
| Тип трансмиссии | Фрикционный диск |
| Кол-во передач движение вперед/назад | 6/1 |
| Диаметр колес, мм | 380 |
| Регулировка рукоятки по высоте | 4 положения |
| Габариты (ДхШхВ), см | 148,59х60,96х102,87 |
| Вес, кг | 90,08 |
| Звуковое давление возле уха оператора, дБ(А) | 88,4 |
| Гарантированная мощность звука, дБ(А) | 105 |
| Вибрация на рукоятках, м/с2 | 5,74 |
Особенности
- Подогрев рукояток
- Электрозапуск от сети 220В
- Блокировка дифференциала для создания хорошей тяги и использования обоих ведущих колес
- Грубые протекторы X-trac 380/15” – обеспечивают крепкое сцепление с дорогой
- Двухступенчатая система – поглощение и выбрасывание снега, дальности последнего можно регулировать;
- Раструб управляемый рычагом с панели оператора
- Дефлектор управляемый рычагом с панели оператора
- Светодиодные LED фонари 2 шт
Видео обзор
Отзывы владельцев
На форумах встречаются такие отзывы:
![]() Алексей (Пенза) пишет:
Алексей (Пенза) пишет:
«Прекрасная машина, но не для слабых. Женщины не смогут ею пользоваться. Прекрасен при обработке дорожек, отмостки и парковки. Хотя площадь парковки 60 м2, со своей задачей справился прекрасно. Даже слежавшийся снег высотой 25 сантиметров не проблема. С талым работать сложнее, поэтому лучше убирать свежий. Единственным недостатком я считаю отсутствие разблокировки дифференциала, поэтому приходится “рулить” руками и на ходу, а это очень тяжело»
![]() А вот что говрит Виталий (Киев):
А вот что говрит Виталий (Киев):
«Husqvara st 224 прекрасный аппарат, радует электростатер. Покупали это чудо для работы, нужно чистить территорию около базы. С лёгкостью разрубает снежный наст, двухступенчатая система очень удобна»
Лайк?:
