-
Contents
-
Table of Contents
-
Troubleshooting
-
Bookmarks
Quick Links
Janome 204D Instruction Manual
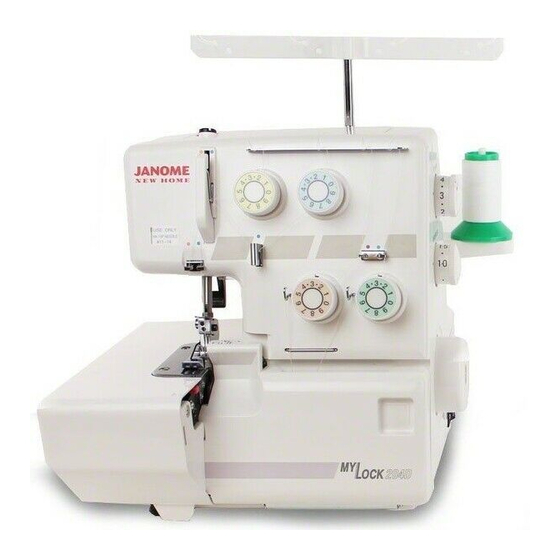
Janome 204D serger
Janome 204D
Instruction Manual
MODEL 204D
www.aaasewing.com
204D Owners Manual/ User Guide
Related Manuals for Janome 204D
Summary of Contents for Janome 204D
-
Page 1
Janome 204D Instruction Manual Janome 204D serger Janome 204D Instruction Manual MODEL 204D www.aaasewing.com 204D Owners Manual/ User Guide… -
Page 2: Important Safety Instructions
15. Always unplug the sewing machine from the electrical outlet when removing covers, lubricating, or when making any other adjustments mentioned in the instruction manual. SAVE THESE INSTRUCTIONS www.aaasewing.com 204D Owners Manual/ User Guide…
-
Page 3
If it still does not fit, contact a qualified electrician to install the proper outlet. Do not modify the plug in any way. Foot Controller YC-482J or TJC-150 for use with Sewing Machine MyLock 204D (for U. S. A. market only) www.aaasewing.com 204D Owners Manual/ User Guide… -
Page 4
6. When using your sewing machine for the first time, place a piece of waste fabric under the presser foot and run the machine without thread for a few minutes. Wipe away any oil which may have appeared. www.aaasewing.com 204D Owners Manual/ User Guide… -
Page 5: Table Of Contents
How to use Guide Lines ……..24 Securing Ends ……….25 Thread Tension (4 threads) ……. 26-27 Threading the Machine (3 threads) ….28 Thread Tension (3 threads) ……29 Thread and Needle Chart ……30-31 www.aaasewing.com 204D Owners Manual/ User Guide…
-
Page 6: Preparation
Needle plate setting knob Thread cutter Presser foot lifter Needle plate Upper knife release knob Cutting width adjusting dial Upper looper Lower looper Upper knife Lower knife Standard Accessories Screwdrivers Tweezers Set of needles www.aaasewing.com 204D Owners Manual/ User Guide…
-
Page 7: Connecting The Machine To The Power Supply
* when leaving the machine unattended. * when attaching or removing parts. * when threading or cleaning the machine. * Do not place anything on the speed controller, except when the machine is in use. www.aaasewing.com 204D Owners Manual/ User Guide…
-
Page 8: How To Turn The Handwheel
Lift the looper cover and push it against the machine. The looper cover snaps into its position automatically. Looper cover Note: Always close both side cover and looper cover when the machine is in use. www.aaasewing.com 204D Owners Manual/ User Guide…
-
Page 9: The Position Of Thread Guide Bar
[2] If the thread slips down from the spool during threading and/or sewing, put a net on the spool as illustrated to prevent jamming. * The spool holder cap and net are optional accessories. Spool pin www.aaasewing.com 204D Owners Manual/ User Guide…
-
Page 10: Changing Needle
* While in operation, keep the presser foot lowered except when threading the machine or test- running without threads. Thread tension will not be released unless the presser foot lifter is raised. Presser foot Presser foot lifter www.aaasewing.com 204D Owners Manual/ User Guide…
-
Page 11: Removing The Presser Foot
* For normal sewing, set the adjusting screw so that its head comes out above the top of the machine by 2 mm. See the illustration. To decrease To increase Adjusting screw Top of the machine www.aaasewing.com 204D Owners Manual/ User Guide…
-
Page 12: Adjustment Of Stitch Length
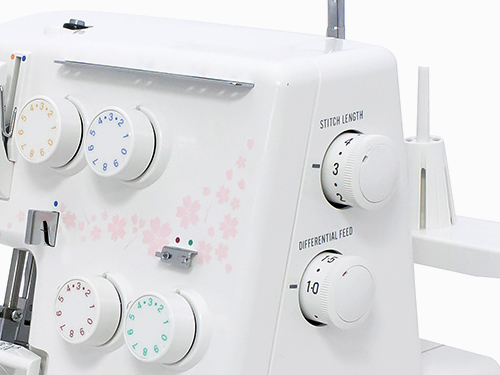
When the stitch length dial is set between 1 to 4, the maximum effective differential feed ratio is 2.2. When the stitch length dial is set between 4 and 5, the maximum differential feed ratio will automatically be set between 2.2 and 1.8. www.aaasewing.com 204D Owners Manual/ User Guide…
-
Page 13: To Deactivate The Upper Knife
[4] Close the looper cover and side cover. Upper knife release knob Stopper pin www.aaasewing.com 204D Owners Manual/ User Guide…
-
Page 14: Adjustment Of Cutting Width
When cutting width is too wide. Turn the cutting width adjusting dial counterclockwise. Lower knife will move to left. [5] Set the upper knife to up position. [6] Close the looper cover and side cover. www.aaasewing.com 204D Owners Manual/ User Guide…
-
Page 15: Adjustment Of Needle Plate Setting Knob
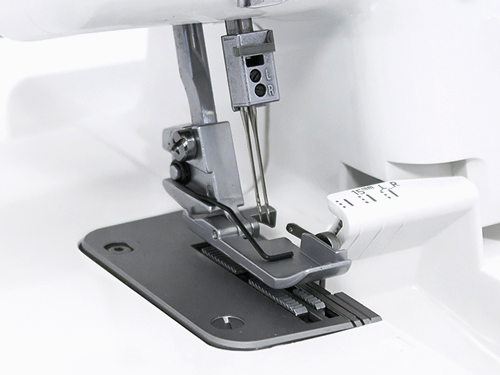
* The edge of the fabric will be rolled hemming, picot edging, narrow hemming sewing, when the chaining finger is pulled out toward you to the “R” position under the needle plate as shown in diagram (B) . www.aaasewing.com 204D Owners Manual/ User Guide…
-
Page 16: Threading The Machine
Draw out 10 cm (4”) away from the presser foot. (Draw the needle thread in the direction of A) Needle Needle thread Needle plate www.aaasewing.com 204D Owners Manual/ User Guide…
-
Page 17: Threading The Lower Looper
Thread guide plate [3] Pass the thread through the right side of the looper thread guide, sliding the thread from left to right. Looper thread guide www.aaasewing.com 204D Owners Manual/ User Guide…
-
Page 18
Then, turn the handwheel towards you to move the lower looper to the right position. Lower looper thread guide (5) (1) Lower looper thread (2) Looper threader www.aaasewing.com 204D Owners Manual/ User Guide… -
Page 19
NOTE: How to thread woolly nylon/polyester thread. * The illustration at left shows one of the easiest ways to pass woolly nylon/polyester thread through the lower looper. Lower looper Ordinary thread Woolly nylon/polyester thread www.aaasewing.com 204D Owners Manual/ User Guide… -
Page 20: Threading The Upper Looper
Thread guide plate [3] Pass the thread through the left side of looper thread guide sliding the thread from right to left. Looper thread guide www.aaasewing.com 204D Owners Manual/ User Guide…
-
Page 21: How To Thread Only The Upper Looper
Thread the upper looper. When you thread the upper looper only, to avoid tangled threads pull out both threads over the needle plate and under the presser foot. Lower looper thread Upper looper www.aaasewing.com 204D Owners Manual/ User Guide…
-
Page 22: Threading The Needle On The Right
Thread guide [2] Pass the thread through the holes in the second row from the left of the thread guide plate as illustrated. Thread guide plate www.aaasewing.com 204D Owners Manual/ User Guide…
-
Page 23
[7] Thread the right needle from front to back and pull the thread about 10 cm (4”) from the eye of the needle to the back. Needle thread guide Needle bar thread guide Right needle [5, 6, 7] www.aaasewing.com 204D Owners Manual/ User Guide… -
Page 24: Threading The Needle On The Left
* If the thread is coming out from the thread guide groove, pass the thread through the thread guide hole again as shown. Thread guide [2] Pass the thread through the holes on the left of thread guide plate as illustrated. Thread guide plate www.aaasewing.com 204D Owners Manual/ User Guide…
-
Page 25
— Run threads under the presser foot and lower the presser foot. — Close side cover and looper cover. — Turn handwheel toward you to chain off three or four stitches. The sewing preparation is now complete. www.aaasewing.com 204D Owners Manual/ User Guide… -
Page 26: Test Stitching
Please use them as sewing guides. Mark L indicates the distance from the left needle. Mark R indicates the distance from the right needle. The distance between center of guide line and needle position is 5/8 inch. www.aaasewing.com 204D Owners Manual/ User Guide…
-
Page 27: Securing Ends
2. Raise the needle and presser foot, and gently pull the threads off the chaining finger. 3. Turn the fabric over so that the under side is up. 4. Serge about 2.5 cm (1”) over stitching and angle off the fabric. www.aaasewing.com 204D Owners Manual/ User Guide…
-
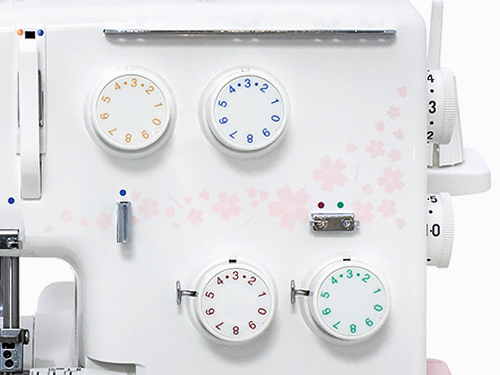
Page 28: Thread Tension (4 Threads)
Left needle thread tension dial Right needle thread tension is too loose The illustration shows sewing results when the right needle thread tension is too loose. Remedy: Tighten the right needle thread tension. Right needle thread tension dial www.aaasewing.com 204D Owners Manual/ User Guide…
-
Page 29
Remedy: Loosen upper looper thread tension and/or tighten lower looper thread tension. Upper looper thread tension dial Lower looper thread tension dial www.aaasewing.com 204D Owners Manual/ User Guide… -
Page 30: Threading The Machine (3 Threads)
Then tighten the needle clamp screw on the other side slightly to prevent losing the screw. www.aaasewing.com 204D Owners Manual/ User Guide…
-
Page 31: Thread Tension (3 Threads)
Remedy: Loosen upper looper thread tension and/or tighten lower looper thread tension. Upper looper thread tension dial Lower looper thread tension dial www.aaasewing.com 204D Owners Manual/ User Guide…
-
Page 32: Thread And Needle Chart
Woolly nylon (For looper thread) Woolly polyester (For looper thread) * Refer to page 16 for adjusting the stitch length and differential feed ratio. NOTE: Your overlock uses standard sewing needles (HA-1 SP, No.11, No.14). www.aaasewing.com 204D Owners Manual/ User Guide…
-
Page 33
0.5 — 1.0 HA-1 SP No. 11 2.5 — 3.5 HA-1 SP No. 11 Ð 14 3.0 — 5.0 HA-1 SP No. 14 2.5 — 4.0 1.0 — 2.2 HA-1 SP No. 11 — 14 www.aaasewing.com 204D Owners Manual/ User Guide… -
Page 34: Rolled Hemming, Picot Edging And Narrow Hemming
Lower looper Correct thread thread thread Thread Upper Tension Upper Upper looper looper Right side Right side looper Right side thread thread of fabric of fabric thread of fabric Needle thread Needle thread Needle thread www.aaasewing.com 204D Owners Manual/ User Guide…
-
Page 35: Thread Tension
Remedy: Loosen upper looper thread tension and/or tighten lower looper thread tension. Upper looper thread tension dial Lower looper thread tension dial www.aaasewing.com 204D Owners Manual/ User Guide…
-
Page 36: For Better Results
The illustration at left shows sewing results with correct tension settings. Wrong side of fabric Right side of fabric Right needle thread Upper looper thread Lower looper thread * Refer to pages 26 ~ 27 for the adjustment. www.aaasewing.com 204D Owners Manual/ User Guide…
-
Page 37: Decorative Overedging
Needle threads Silk : No. 50~80 Medium Woven Upper looper thread Synthetic : No. 60~80 Silk : No. 50~80 Fabric Lower looper thread Machine Setting Needle plate setting knob HA-1 SP No. 11 or 14 www.aaasewing.com 204D Owners Manual/ User Guide…
-
Page 38: Pin Tucking Thread And Fabric
Deactivate the upper knife. Sew the folded edge while guiding along the guide line. Guide line Open the fold flat and press the pin tucks to one side. * Activate the upper knife. www.aaasewing.com 204D Owners Manual/ User Guide…
-
Page 39: Care Of Your Machine
* The lower knife will last over one year in normal use. However, if you run over a pin or a hard object, it may be required to replace both upper and lower knives at the same time. www.aaasewing.com 204D Owners Manual/ User Guide…
-
Page 40: Replacing The Light Bulb
[5] Brush out the lint around the feed dogs to the front by using the lint brush or use a vacuum cleaner. [6] Reattach the needle plate, presser foot and needles. Close the looper cover and side cover. Feed dog [5, 6] www.aaasewing.com 204D Owners Manual/ User Guide…
-
Page 41: Oiling The Machine
* Open the side cover and apply oil. * Open the looper cover and apply oil. Carrying the Machine Put your fingers into the hole of the rear arm as illustrated. www.aaasewing.com 204D Owners Manual/ User Guide…
-
Page 42: Troubleshooting
The fabric is not 1. The position of the upper knife is not adjusted cut neatly. properly. See page 37. 2. The upper knife is dull. Replace the upper knife. (See page 37.) www.aaasewing.com 204D Owners Manual/ User Guide…
-
Page 43: Optional Parts
Piping foot (3/16”) or strengthen. Needle threader For easy threading and changing needle. Gathering foot Use to sew sleeves, yokes, frills, etc. 200-203-104 200-204-208 200-207-108 200-208-109 200-214-108 200-217-101 200-218-102 200-216-100 200-219-103 200-220-107 200-254-605 200-248-101 www.aaasewing.com 204D Owners Manual/ User Guide…

Производитель: Janome
1 обзор:
5.0 (Отличный товар)
4-x (3-x) — ниточный оверлок Джаноме 204Д
Оверлок Janome 204D может выполнять все самые необходимые виды швов с использованием 3-х или 4-х нитей. В его дизайне присутствует принт в виде цветов сакуры, напиманающий о Японии — родине компании Janome. Данная модель отличается внешней заправкой нитей. Имеет высокую мощность, что положительно влияет на скорость шитья и позволяет справляться с большинством видов тканей.
Особенности:
Шитье 4-мя и 3-мя нитями
Оверлок позволяет шить 4 и 3 нитями на самых различных материалах. Имеет внешнюю заправку нитей и цветную маркировку для удобства заправки.
7 строчек
Этот оверлок отлично выполняет самые необходимые типы швов, как широкие, так и узкие: обметочные швы, Flatlock, ролевый шов.
Настройка
Оверлок позволяет регулировать натяжение нити, длину стежка, ширину обрезки, дифференциал транспортера и давление лапки. Эти параметры помогут оптимально настроить машину и выполнить идеальный шов.
Инструкции для Janome 204D:
![]() Инструкция по эксплуатации Janome 204D (PDF, рус)
Инструкция по эксплуатации Janome 204D (PDF, рус)
Характеристики Janome 204D:
- Максимальная длина стежка

- 4 мм
- Количество строчек
- 7
- Высота подъема лапки (нормальная/максимальная)
- 4/7
- Электронный стабилизатор усилия прокола
- нет
- Нитевдеватель
- нет
- Регулятор давления лапки
- есть
- Потребляемая мощность
- 105 Вт
- Тип освещения
- Светодиодное
- Мусоросборник
- нет
- Чехол
- нет
- Дифференциальный транспортер ткани
- есть
- Облегчённая заправка петлителей
- нет
- Рукавная платформа
- нет
- Стандарт игл
- HAx1SP
- Страна разработки
- Япония
- Страна производства
- Тайвань
- Гарантия
- 1 год
- Вес без упаковки
- 7 кг
- Вес с упаковкой
- 8 кг
Строчки Janome 204D:
Комплектация
- Педаль
- Отвертка большая
- Отвертка малая
- Пинцет
- Набор игл
Популярные аксессуары для Janome 204D

Наличие:
есть

Наличие:
есть

Наличие:
есть

Наличие:
есть

Наличие:
есть
Обратите внимание!
«Швейный Мир» является официальным дистрибьютором швейных машин фирмы Janome. Покупая Janome в наших магазинах, Вы получите качественную машину, обеспеченную гарантийным и сервисным обслуживанием.
Отзывы о товаре Janome 204D
-
Ситников Николай Николаевич
-
Отличный товар
Покупал этот оверлок жене. Так вот она в восторге. Великолепный функционал и простота в обслуживании. Отличный товар. Ещё немаловажный фактор: быстрая обработка заказа и очень быстрая доставка.

Отзывы о товаре могут оставлять только зарегистрированные покупатели.
Посмотреть инструкция для Janome MyLock 204D бесплатно. Руководство относится к категории швейные машины, 1 человек(а) дали ему среднюю оценку 8.8. Руководство доступно на следующих языках: английский. У вас есть вопрос о Janome MyLock 204D или вам нужна помощь? Задайте свой вопрос здесь
Не можете найти ответ на свой вопрос в руководстве? Вы можете найти ответ на свой вопрос ниже, в разделе часто задаваемых вопросов о Janome MyLock 204D.
Какой размер иглы лучше всего использовать?
Наиболее подходящий размер иглы зависит от используемой толщины ткани. С плотной тканью следует использовать толстую иглу. Подходящие типы тканей указываются на упаковке с иглами.
Какой срок службы у швейной иглы?
Как правило, срок службы швейной иглы составляет от 7 до 9 часов.
Что может повредить иглу при шитье?
Причин повреждения иглы может быть несколько: — Использование неподходящей иглы для определенного типа ткани — Установка иглы слишком низко — Неправильное расположение ткани — Неправильно установленный шпульный колпачок
Инструкция Janome MyLock 204D доступно в русский?
К сожалению, у нас нет руководства для Janome MyLock 204D, доступного в русский. Это руководство доступно в английский.
Не нашли свой вопрос? Задайте свой вопрос здесь