- Manuals
- Brands
- Mazda Manuals
- Automobile
- 2008 CX-9
- Owner’s manual
-
Contents
-
Table of Contents
-
Troubleshooting
-
Bookmarks
Quick Links
Chapters
-
Table of Contents
5 -
2 Essential Safety Equipment
13 -
3 Knowing Your Mazda
83 -
4 Before Driving Your Mazda
143 -
5 Driving Your Mazda
163 -
6 Interior Comfort
231 -
7 In Case Of An Emergency
363 -
8 Maintenance and Care
387 -
Customer Information and Reporting 9
445 -
Before Driving Your Mazda/
510
Related Manuals for Mazda 2008 CX-9
Summary of Contents for Mazda 2008 CX-9
-
Page 3
Mazda product. Important Notes About This Manual Keep this manual in the glove box as a handy reference for the safe and enjoyable use of your Mazda. Should you resell the vehicle, leave this manual with it for the next owner. -
Page 4: How To Use This Manual
Illustrations complement the words of the manual to best explain how to enjoy your Mazda. By reading your manual, you can find out about the features, important safety information, and driving under various road conditions.
-
Page 5: Table Of Contents
Your Vehicle at a Glance Interior, exterior views and part identification of your Mazda. Essential Safety Equipment Use of safety equipment, including seats, seat belt system, child-restraint systems and SRS air bags. Knowing Your Mazda Explanation of basic operations and controls; opening/closing and adjustment of various parts.
-
Page 7: Your Vehicle At A Glance
Your Vehicle at a Glance Interior, exterior views and part identification of your Mazda. Interior Overview … 1-2 Interior Equipment (View A) … 1-2 Interior Equipment (View B) … 1-3 Interior Equipment (View C) … 1-4 Exterior Overview … 1-5 Front …
-
Page 8: Interior Overview
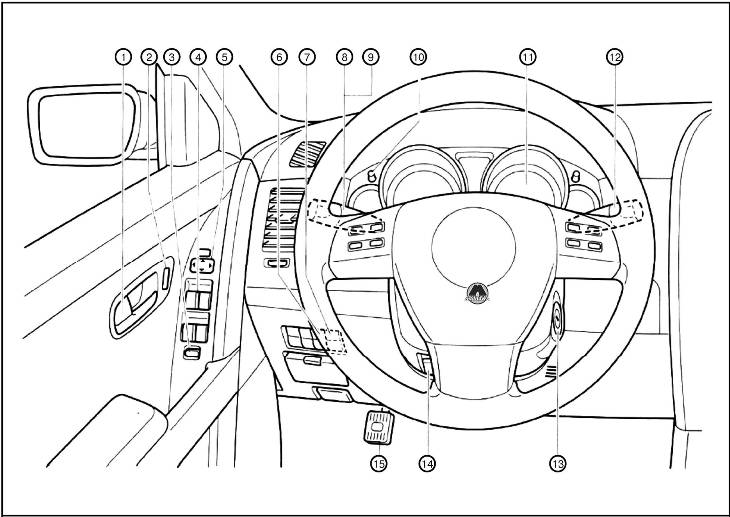
Your Vehicle at a Glance Interior Overview Interior Equipment (View A) Door-lock knob … page 3-26 Power door lock switch … page 3-27 Power window lock switch … page 3-39 Power window switches … page 3-35 Outside mirror switch … page 3-57 Headlight leveling switch …
-
Page 9: Interior Equipment (View B)
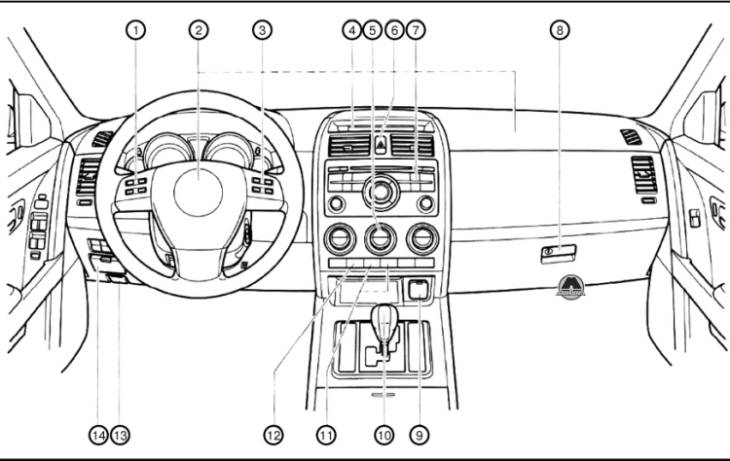
Your Vehicle at a Glance Interior Overview Interior Equipment (View B) Audio control switches … page 6-46 SRS air bags … page 2-50 Cruise control switches … page 5-19 Information display … page 6-123 Climate control system … page 6-2 Hazard warning flasher switch …
-
Page 10: Interior Equipment (View C)
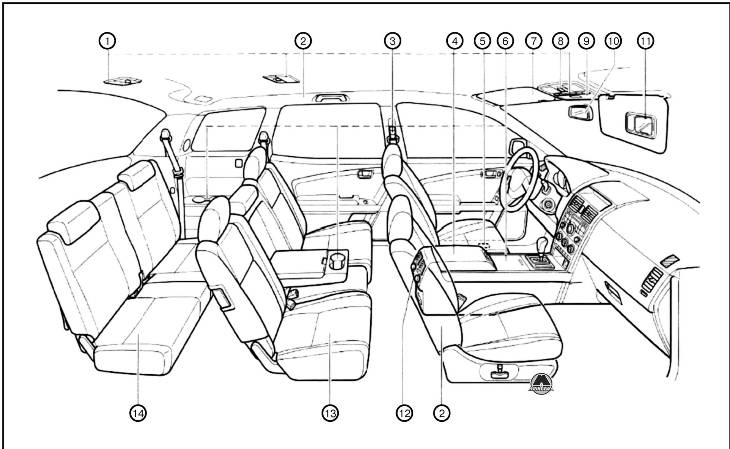
Your Vehicle at a Glance Interior Overview Interior Equipment (View C) Overhead lights … page 6-121 SRS air bags … page 2-50 Seat belt … page 2-18 Rear entertainment system … page 6-51 Center console … page 6-128 Remote fuel-filler lid release … page 3-42 Cup holders …
-
Page 11: Exterior Overview
Your Vehicle at a Glance Exterior Overview Front Hood … page 3-43 Windshield wiper blades … page 8-27 Moonroof … page 3-44 Door lock … page 3-26 Fuel-filler lid … page 3-42 Tires … page 8-33 Light bulbs … page 8-37 The equipment and installation position varies by vehicle…
-
Page 12: Rear
Your Vehicle at a Glance Exterior Overview Liftgate … page 3-28 Rear wiper blade … page 8-29 Rear window antenna … page 6-17 Child safety lock … page 3-28 Outside mirror … page 3-57 Tires … page 8-33 Navigation System (if equipped) … Refer to the separate manual Light bulbs …
-
Page 13: Essential Safety Equipment
Essential Safety Equipment Use of safety equipment, including seats, seat belt system, child-restraint systems and SRS air bags. Seats … 2-2 Front Seats (Manually Operated Seats) … 2-2 Front Seats (Electrically Operated Seats) … 2-5 Second-Row Seats … 2-11 Third-Row Seat … 2-16 Seat Belt Systems …
-
Page 14: Front Seats
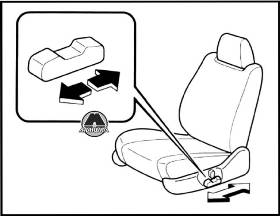
Such modifications could damage the supplemental restraint system and result in serious injury. Consult an Authorized Mazda Dealer if there is any need to remove or reinstall the front seats. Do not drive with damaged front seats: Driving with damaged front seats is dangerous.
-
Page 15
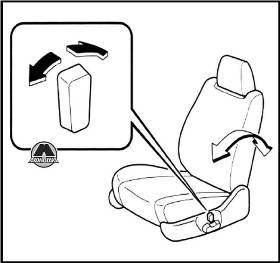
qSeat Recline WARNING Do not drive with the seats reclined: Sitting in a reclined position while the vehicle is moving is dangerous because you don’t get the full protection from seat belts. During sudden braking or a collision, you can slide under the lap belt and suffer serious internal injuries. -
Page 16
Essential Safety Equipment Seats CAUTION When returning a rear-reclined seatback to its upright position, make sure you hold onto the seatback with your other hand while operating the lever. If the seatback is not supported, it will flip forward suddenly and could cause injury. qHeight Adjustment (Driver’s Seat) By moving the seat lever up or down, the seat bottom height can be adjusted. -
Page 17
Such modifications could damage the supplemental restraint system and result in serious injury. Consult an Authorized Mazda Dealer if there is any need to remove or reinstall the front seats. Do not drive with damaged front seats: Driving with damaged front seats is dangerous. -
Page 18
Essential Safety Equipment Seats qSeat Recline WARNING Do not drive with the seats reclined: Sitting in a reclined position while the vehicle is moving is dangerous because you don’t get the full protection from seat belts. During sudden braking or a collision, you can slide under the lap belt and suffer serious internal injuries. -
Page 19
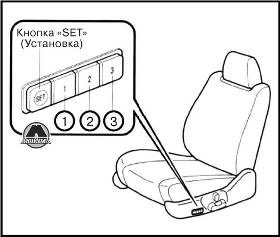
qSeat Position Memory (Driver’s í Seat) One-touch seat position programming and call up is available on the driver’s seat. CAUTION When calling up the seat position, do not place your hands or fingers around the seat bottom. The seat moves to the desired position automatically, and if your hands or fingers are placed around the seat bottom, it could cause injury. -
Page 20
Essential Safety Equipment Seats NOTE Seat positions can also be called up with the ignition switch in the ON position or the door closed by pressing and holding the programming button been programmed to the desired seat position. If any of the following occurs, the seat position call up function cancels: A seat adjustment switch is operated. -
Page 21
NOTE Memory will also be erased if any of the following operations are performed: The advanced key/retractable type key code has been changed. Refer to Immobilizer System (with Advanced Key) on page 3-50. Refer to Immobilizer System (without Advanced Key) on page 3-52. Refer to Immobilizer System on page 3-52. -
Page 22
Essential Safety Equipment Seats To raise a head restraint, pull it up to the desired position. To lower the head restraint, press the stop- catch release, then push the head restraint down. Adjust the head restraint so that the top is even with the top of the passenger’s ears, never the passenger’s neck to prevent injury. -
Page 23
Second-Row Seats WARNING Do not stack cargo higher than the seatback: Stacking luggage or other cargo higher than the seatback is dangerous. During a sudden stop or collision, objects can fly around and become projectiles that could hit and injure passengers. Make sure luggage and cargo is secured before driving: Not securing cargo while driving is… -
Page 24
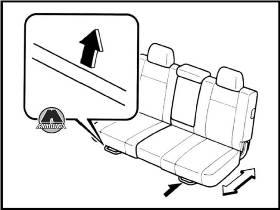
Essential Safety Equipment Seats qSeat Slide To move the seat forward or backward, raise the bar and slide the seat to the desired position and release the bar. Make sure the bar returns to its original position and the seat is locked in place by attempting to push it forward and backward. -
Page 25
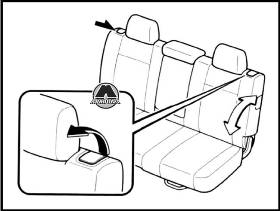
CAUTION When returning a rear-reclined seatback to its upright position, make sure you hold onto the seatback with your other hand while operating the lever. If the seatback is not supported, it will flip forward suddenly and could cause injury. qHead Restraint Rear outboard seat WARNING… -
Page 26
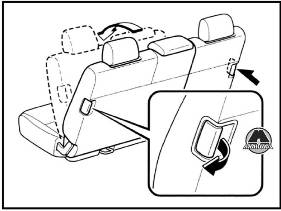
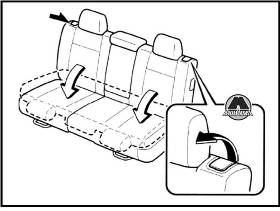
Essential Safety Equipment Seats qArmrest The armrest can be used (no occupant in the center seat) or placed upright. qThird-Row Seat Access After folding the second-row seat seatback and sliding the seat forward, you can access the third-row seat easily. Entering/exiting the third-row seat area Raise the lever on the side of the second- row seat to fold the seatback forward and… -
Page 27
2. Slide the seat all the way back toward the rear of the vehicle. 3. Lower the head restraints all the way down (page 2-13). 4. Pull the lever and fold the seatback forward. CAUTION When folding a seatback, always hold onto the seatback with your other hand while operating the lever. -
Page 28
Essential Safety Equipment Seats Third-Row Seat WARNING Do not stack cargo higher than the seatbacks: Stacking luggage or other cargo higher than the seatbacks is dangerous. During a sudden stop or collision, objects can fly around and become projectiles that could hit and injure passengers. -
Page 29
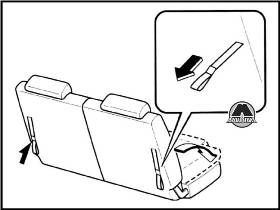
To use a head restraint, pull it up to the locked position. To lower the head restraint, press the stop- catch release, then push the head restraint down. qSplit-Folding the Third-Row Seat To create a flat luggage compartment space, fold the seatbacks forward. To fold third-row seat 1. -
Page 30: Seat Belt Systems
Seat Belt Precautions Seat belts help to decrease the possibility of severe injury during accidents and sudden stops. Mazda recommends that the driver and all passengers always wear seat belts. Your vehicle has the following types of seat belts. Seating Position…
-
Page 31
Using a damaged seat belt is dangerous. An accident could damage the belt webbing of the seat belt in use. A damaged seat belt cannot provide adequate protection in a collision. Have an Authorized Mazda Dealer inspect all seat belt systems in use during an accident before they are used again. -
Page 32
Essential Safety Equipment Seat Belt Systems CAUTION Belt retraction may become difficult if the belts and rings are soiled, so try to keep them clean. For more details about cleaning the seat belts, refer to “Cleaning the Lap/Shoulder Belt Webbing” (page 8-58). qPregnant Women and Persons with Serious Medical Conditions Pregnant women should always wear seat belts. -
Page 33
Essential Safety Equipment Seat Belt Systems qAutomatic Locking Mode Always use the automatic locking mode to keep the child-restraint system from shifting to an unsafe position in the event of an accident. To enable seat belt automatic locking mode, pull it all the way out and connect it as instructed on the child-restraint system. It will retract down to the child-restraint system and stay locked on it. -
Page 34
Essential Safety Equipment Seat Belt Systems 3-Point Type Seat Belt NOTE When using the center-rear seat belt, refer to Center-Rear Position Seat Belt (page 2-27). qFastening the Seat Belt 1. Grasp the tongue. 2. Slowly pull out the lap/shoulder belt. 3. -
Page 35
If a belt does not fully retract, inspect it for kinks and twists. If it is still not retracting properly, have it inspected at an Authorized Mazda Dealer. To secure the outboard-third seat belts when not in use, insert the belts in their seat belt retainers. -
Page 36
Even if the pretensioners have not fired, the load limiting function must be checked by an Authorized Mazda Dealer. 2-24 WARNING Wear seat belts only as recommended in this owner’s manual:… -
Page 37
If the seat belt pretensioners are not replaced, the risk of injury in a collision will increase. Always have an Authorized Mazda Dealer inspect the seat belt pretensioners and air bags after any collision. Expended seat belt pretensioners and air bags must be replaced after any collision which caused them to deploy. -
Page 38
ON position. If any of these occur, consult an Authorized Mazda Dealer as soon as possible. The system may not work in an accident. -
Page 39
Center-Rear Position Seat Belt (Second-Row Seats) Before using the center-rear lap/shoulder belt make sure tongue (A) and anchor buckle (B) are fastened. Essential Safety Equipment Seat Belt Systems WARNING Using the Seat Belt Guide: Not using the seat belt guide is dangerous. -
Page 40
Then make sure it remains untwisted as it retracts. NOTE If a belt does not fully retract, inspect it for kinks and twists. If it is still not retracting properly, have it inspected at an Authorized Mazda Dealer. Button… -
Page 41
qUnfastening the Lap Portion of the Seat Belt Insert a small object such as a key in the anchor buckle (B) slot. CAUTION Always unfasten the lap portion of the belt before folding the left-rear seatback. Leaving the lap portion of the belt fastened could cause damage to the seat belt, buckle and seatback. -
Page 42
When ordering an extender, only order one that provides the necessary additional length to fasten the seat belt properly. Please contact your Authorized Mazda Dealer for more information. -
Page 43
WARNING Do not use a seat belt extender unless it is necessary: Using a seat belt extender when not necessary is dangerous. The seat belt will be too long and not fit properly. In an accident, the seat belt will not provide adequate protection and you could be seriously injured. -
Page 44
Minder NOTE The belt minder can be deactivated. Consult an Authorized Mazda Dealer to deactivate and restore the seat belt minder. 2-32 Driver seated/Front passenger not seated The belt minder is a supplemental warning to the seat belt warning function. -
Page 45
Driver seated/Front passenger seated The seat belt warning function reminds the front passenger to fasten the seat belt according to the chart below. Vehicle speed Between 0 Condition km/h 12 mph) Seat belt (Driver) Seat belt (Passenger) Indicator Beep : Fastened : Unfastened : Illuminated : Flashing… -
Page 46: Child Restraint
Even if the front passenger air bag is shut off, Mazda strongly recommends that children be properly restrained and child-restraint systems of all kinds are properly secured on the rear seats which are the best place for children.
-
Page 47
WARNING Use the correct size child-restraint system: For effective protection in vehicle accidents and sudden stops, a child must be properly restrained using a seat belt or child-restraint system depending on age and size. If not, the child could be seriously injured or even killed in an accident. Follow the manufacturer’s instructions and always keep the child-restraint system buckled down: An unsecured child-restraint system is dangerous. -
Page 48
Essential Safety Equipment Child Restraint Do not install a front-facing child-restraint system on the front passenger seat unless it is unavoidable: In a collision, the force of a deploying air bag could cause serious injury or death to the child. If installing a front-facing child-restraint system on the front passenger seat is unavoidable, move the front passenger seat as back as possible. -
Page 49
NOTE Your Mazda is equipped with LATCH lower anchors for attachment of specially designed LATCH child-restraint systems in the rear seats. When using these anchors to secure a child-restraint system, refer to LATCH Child-Restraint Systems (page 2-45). -
Page 50
Some child-restraint systems now come with tethers and therefore must be installed on the seats that take tethers to be effective. In your Mazda, tethered child-restraint systems can only be accommodated in the three positions on the second-row seats. -
Page 51
4. To get the retractor into the automatic locking mode, pull the shoulder belt portion of the seat belt until the entire length of the belt is out of the retractor. 5. Push the child-restraint system firmly into the vehicle seat. Be sure the belt retracts as snugly as possible. -
Page 52
Essential Safety Equipment Child Restraint WARNING Use the tether and tether anchor only for a child-restraint system: Using the tether or tether anchor to secure anything but a child-restraint system is dangerous. This could weaken or damage the tether or tether anchor and result in injury. -
Page 53: For Children
2. To get the retractor into the automatic locking mode, pull the shoulder belt portion of the seat belt until the entire length of the belt is out of the retractor. 3. Push the child-restraint system firmly into the vehicle seat. Be sure the belt retracts as snugly as possible.
-
Page 54
NOTE To check if your front seats have side air bags: Mazda vehicles equipped with side air bag will have a SRS AIRBAG tag on the outboard shoulder of the front seats. To check if your vehicle has curtain air… -
Page 55
qFront Passenger’s Seat Child- Restraint System Installation 1. Slide the seat as far back as possible. 2. Secure the child-restraint system with the lap portion of the lap/shoulder belt. See the manufacturer’s instructions on the child-restraint system for belt routing instructions. 3. -
Page 56
If the indicator light does not illuminate after seating a child in a child-restraint system on the front passenger seat, seat a child in a child-restraint system on the rear seat and consult an Authorized Mazda Dealer as soon as possible. 2-44… -
Page 57
LATCH Child-Restraint Systems Your Mazda is equipped with LATCH lower anchors for attachment of specially designed LATCH child-restraint systems the second-row seats. Both anchors must be used, otherwise the seat will bounce around and put the child in danger. Most LATCH child- restraint systems must also be used in conjunction with a tether to be effective. -
Page 58
Essential Safety Equipment Child Restraint qLATCH Child-Restraint System Installation Procedure (Second- Row Outboard Seats) 1. Slide the second-row seat as far back as possible. 2. Make sure the seatback is securely latched by pushing it back until it is fully locked. 3. -
Page 59
WARNING Use the tether and tether anchor only for a child-restraint system: Using the tether or tether anchor to secure anything but a child-restraint system is dangerous. This could weaken or damage the tether or tether anchor and result in injury. Always route the tether strap between the head restraint and the seatback: Routing the tether strap on top of the… -
Page 60
Essential Safety Equipment Child Restraint WARNING Use the tether and tether anchor only for a child-restraint system: Using the tether or tether anchor to secure anything but a child-restraint system is dangerous. This could weaken or damage the tether or tether anchor and result in injury. -
Page 61
Essential Safety Equipment Child Restraint Anchor bracket position Tether strap position Tether strap Forward 2-49… -
Page 62
Essential Safety Equipment SRS Air Bags Supplemental Restraint System (SRS) Precautions The front and side supplemental restraint systems (SRS) include up to 6 air bags. Please verify which kinds of air bags are equipped on your vehicle by locating the SRS AIRBAG location indicators. -
Page 63
WARNING Seat belts must be worn in air bag equipped vehicles: Depending only on the air bags for protection during an accident is dangerous. Alone, air bags may not prevent serious injuries. The appropriate air bags can be expected to inflate only in the first accident, such as frontal, near frontal, side collisions or roll-over accident that are at least moderate. -
Page 64: Front Seats (Manually Operated Seats)
Essential Safety Equipment SRS Air Bags Sit in the center of the seat and wear seat belts properly: Sitting too close to the side air bag modules or placing hands on them and sleeping up against the door or hanging out the windows is extremely dangerous. The side and curtain air bags inflate with great force and speed directly expand along the door on the side the car is hit.
-
Page 65
Do not use tires or wheels other than those specified for your Mazda: Use of any tire or wheel other than those specified for your Mazda (page 10-6) is dangerous. Use of such wheels will prevent the vehicle’s accident detections system from accurately detecting a collision or roll-over accident resulting in incorrect or unexpected air bag deployment and the possibility of serious injuries. -
Page 66
Should you sell your Mazda, we urge you to tell the new owner of its air bag systems and that familiarization with all instructions about them, from the Owner’s Manual, is important. -
Page 67: Supplemental Restraint System Components
Supplemental Restraint System Components (1) Driver seat slide position sensor (page 2-63) (2) Side and curtain inflators and air bags (3) Driver/Front passenger dual stage inflators and air bags (4) Air bag/front seat belt pretensioner system warning light (page 2-59) (5) Crash and roll-over sensors, and diagnostic module (SAS unit) (6) Front passenger air bag deactivation indicator light (page 2-63) (7) Front air bag sensor…
-
Page 68: How The Srs Air Bags Work
SRS Air Bags How the SRS Air Bags Work Your Mazda is equipped with the following types of SRS air bags. SRS air bags are designed to work together with the seat belts to help to reduce injuries during an accident.
-
Page 69
Essential Safety Equipment SRS Air Bags qFront Passenger Air Bag The front passenger air bag is mounted in the front passenger dashboard. The inflation mechanism for the front passenger air bag is the same as the driver’s air bag, as mentioned above. In addition, the front passenger air bag is designed to only deploy in accordance with the total seated weight on the front passenger seat. -
Page 70
Essential Safety Equipment SRS Air Bags qCurtain Air Bags The curtain air bags are mounted in the front and rear window pillars, and the roof edge along both sides. When the air bag crash sensors detect a side impact of greater than moderate force, the curtain air bag inflates quickly and helps to reduce injury mainly to the rear outboard passenger’s head caused by directly hitting interior parts such as a door or window. -
Page 71
A system malfunction is indicated if the warning light constantly flashes, constantly illuminates or does not illuminate at all when the ignition switch is turned to the ON position. If any of these occur, consult an Authorized Mazda Dealer as soon as possible. The system may not work in an accident. -
Page 72: Srs Air Bag Deployment Criteria
Essential Safety Equipment SRS Air Bags SRS Air Bag Deployment Criteria This chart indicates the applicable SRS equipment that will deploy depending on the type of collision. (The illustrations are the representative case of collisions.) A severe frontal/near frontal collision equipment Front seat belt…
-
Page 73: Limitations To Srs Air Bag
Limitations to SRS Air Bag In severe collisions or roll-overs such as those described previously in SRS Air Bag Deployment Criteria , the applicable SRS air bag equipment will deploy. However, in some accidents, the equipment may not deploy depending on the type of collision and its severity.
-
Page 74
Essential Safety Equipment SRS Air Bags Limitations to roll-over detection: The following illustrations are examples of accidents that may not be detected as a roll- over accident. Therefore, the front seat belt pretensioners and curtain air bags may not deploy. Pitch end over end 2-62… -
Page 75: Driver And Front Passenger Occupant Classification System
Driver and Front Passenger Occupant Classification System First, please read Supplemental Restraint System (SRS) Precautions (page 2-50) carefully. qDriver Seat Slide Position Sensor Your vehicle is equipped with a driver seat slide position sensor as a part of the supplemental restraint system. The sensor is located under the driver seat. The sensor determines whether the driver seat is fore or aft of a reference position and sends the seat position to the diagnostic module (SAS unit).
-
Page 76
ON position and does not illuminate as indicated in the above chart, do not allow a child to sit in the front passenger seat and consult an Authorized Mazda Dealer as soon as possible. The system may not work properly in an accident. -
Page 77
WARNING Do not decrease the total seated weight on the front passenger seat: When an adult or large child sits on the front passenger seat, decreasing the total seated weight on the front passenger seat from the total seated weight of approximately 42 kg (93 lb) required for air bag deployment is dangerous. -
Page 78
Essential Safety Equipment SRS Air Bags Do not increase the total seated weight on the front passenger seat: When an infant or small child sits on the front passenger seat, increasing the total seated weight on the front passenger seat from the total seated weight of approximately 30 kg (66 lb) is dangerous. -
Page 79
If the front passenger air bag deactivation indicator light does not illuminate after installing a child-restraint system on the front passenger seat, install the child-restraint system on the rear seat and consult an Authorized Mazda Dealer as soon as possible. qDriver and Front Passenger Buckle Switches The buckle switches on the front seat belts detect whether or not the front seat belts are securely fastened and further control the deployment of the air bags. -
Page 80: Monitoring And Maintenance
The air bag systems do not require regular maintenance. But if any of the following occurs, take your vehicle to an Authorized Mazda Dealer as soon as possible: The air bag system warning light flashes. The air bag system warning light remains illuminated.
-
Page 81
Improper disposal of an air bag or a vehicle with live air bags in it can be extremely dangerous. Unless all safety procedures are followed, injury can result. Ask an Authorized Mazda Dealer how to safely dispose of an air bag or how to scrap an air bag equipped vehicle. -
Page 82
2-70… -
Page 83
Knowing Your Mazda Explanation of basic operations and controls; opening/closing and adjustment of various parts. Advanced Keyless Entry and Start System … 3-2 í Advanced Keys Operation Using Advanced Keyless Functions … 3-7 Operation Using Advanced Key Functions … 3-13 Advanced Key Suspend Function … -
Page 84: Knowing Your Mazda
Knowing Your Mazda Advanced Keyless Entry and Start System The advanced keyless functions (advanced keyless entry and start system) enables the following operations while the advanced key is being carried (page 3-7). Locking/unlocking the doors and the liftgate without operating the key.
-
Page 85
Also write down the code number and keep it in another safe and handy place, but not in the vehicle. If your key is lost, consult your Authorized Mazda Dealer with the code number ready. Advanced Keyless Entry and Start System… -
Page 86
Battery life is about one year. Replace the battery when the KEY indicator light (green) flashes in the instrument cluster. Refer to Advanced Key Battery Dead Warning on page 3-17. Additional advanced keys can be obtained at an Authorized Mazda Dealer. Up to 6 advanced keys can be used with the advanced keyless functions per vehicle. -
Page 87
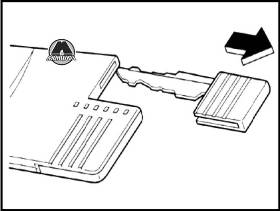
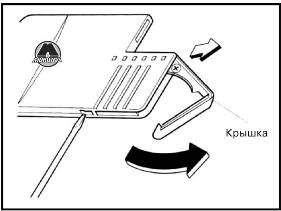
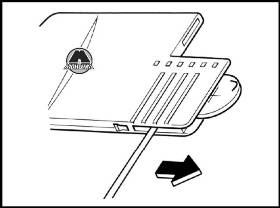
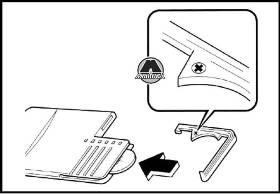
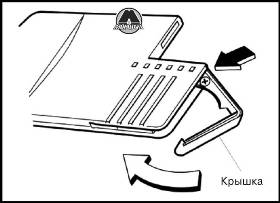
The system’s operational range is reduced. Advanced Keyless Entry and Start System Replacing the battery at an Authorized Mazda Dealer is recommended to prevent damage to the advanced key. If replacing the battery by yourself, follow the instruction below. Replacing the advanced key battery 1. -
Page 88
Authorized Mazda Dealer. If your advanced key is lost or stolen, bring all remaining advanced keys to an Authorized Mazda Dealer as soon as possible for a replacement and to make the lost or stolen advanced key inoperative. -
Page 89: Operation Using Advanced Keyless Functions
If the advanced key is detected within operational range, the operation indicator light located in the instrument cluster flashes momentarily. Knowing Your Mazda Interior transmitter Operational range Around the dashboard In the storage compartments such as the…
-
Page 90
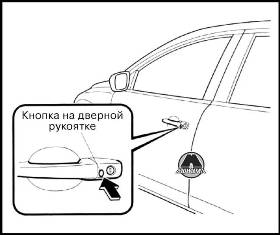
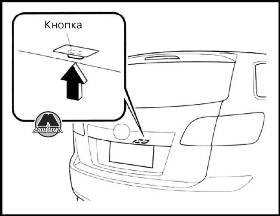
Knowing Your Mazda Advanced Keyless Entry and Start System qLocking, Unlocking with Request Switch All doors and the liftgate can be locked/ unlocked by pressing the request switch on the front doors or the liftgate while the advanced key is being carried. -
Page 91
The ignition switch can be turned to the ACC position when the KEY indicator light (green) illuminates in the instrument cluster. Knowing Your Mazda A door or the liftgate is opened. The auxiliary key is inserted into the ignition switch. -
Page 92
Knowing Your Mazda Advanced Keyless Entry and Start System WARNING Before leaving the driver’s seat, always put the key or start knob to LOCK position, set the parking brake and make sure the shift lever is in P: Intentionally placing the key or start… -
Page 93
If the engine stalls or fails to start, wait 10 seconds before trying again. Otherwise, you may damage the starter and drain the battery. 10. After starting the engine, let it idle for about 10 seconds. Knowing Your Mazda 3-11… -
Page 94
Knowing Your Mazda Advanced Keyless Entry and Start System NOTE In extremely cold weather, below _ 18° C (0° F), or after the vehicle has not been driven in several days, let the engine warm up without operating the accelerator. -
Page 95: Operation Using Advanced Key Functions
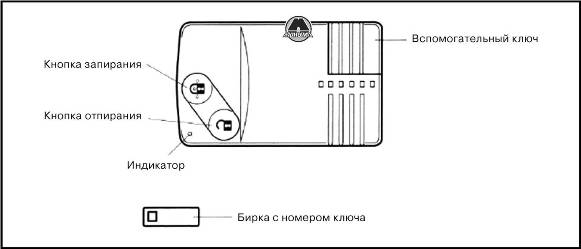
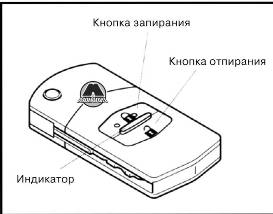
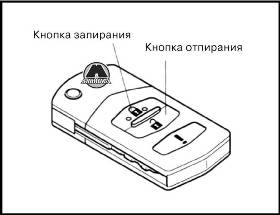
To install a new battery, refer to Maintenance (page 3-5). Advanced Keyless Entry and Start System Transmitter with power liftgate Lock button Unlock button without power liftgate Lock button Unlock button Knowing Your Mazda Panic button Power liftgate button Panic button 3-13…
-
Page 96
Knowing Your Mazda Advanced Keyless Entry and Start System NOTE (U.S.A.) This device complies with Part 15 of the FCC Rules. Operation is subject to the following two conditions: (1) this device may not cause harmful interference, and (2) this device must accept any interference received, including interference that may cause undesired operation. -
Page 97
30 seconds. Power liftgate button If your Mazda has a power liftgate (page 3-30), the transmitter can open/close the liftgate. Panic button… -
Page 98: Advanced Key Suspend Function
Park the vehicle in a safe place and use the auxiliary key to continue driving the vehicle. Have the vehicle inspected at an Authorized Mazda Dealer as soon as possible. Refer to Ignition Switch (page 5-2). qStart Knob Not in LOCK Warning Beep…
-
Page 99
Under the following conditions, the KEY warning light (red) flashes to inform the driver that the start knob will not rotate to the ACC position even if it is pushed in from the LOCK position. The advanced key battery is dead. Knowing Your Mazda 3-17… -
Page 100
Knowing Your Mazda Advanced Keyless Entry and Start System The advanced key is not within operational range. The advanced key is placed in areas where it is difficult for the system to detect the signal (page 3-7). A key from another manufacturer similar to the advanced key is in the operational range. -
Page 101: Setting Change (Function Customization)
Setting Change (Function Customization) The following function settings are possible. These settings can only be changed by an Authorized Mazda Dealer. Setting Advanced key battery KEY indicator light (green) flashes to indicate dead indicator that the advanced key battery power is low.
-
Page 102: When Warning Indicator/Beep Is Activated
Refer to Advanced Key Maintenance on page 3-5. The advanced key is malfunctioning. Park the vehicle in a safe place, and use the auxiliary key to continue driving the vehicle. Have the vehicle inspected at an Authorized Mazda Dealer as soon as possible.
-
Page 103: Doors And Locks
Write down the code number and keep it in a separate safe and convenient place, but not in the vehicle. If your key is lost, consult your Authorized Mazda Dealer and have your code number ready. Key extend/retract method (Retractable type key) To extend the key, press the release button.
-
Page 104: Keyless Entry System Í
To install a new battery, refer to Maintenance (page 3-24). Additional transmitters can be obtained at an Authorized Mazda Dealer. Up to 3 transmitters can be used with the keyless entry system per vehicle. Bring all transmitters to an Authorized Mazda Dealer when additional transmitters are required.
-
Page 105
Pressing the panic button once will trigger the alarm for about 2 minutes and 30 seconds, and the following will occur: The horn sounds intermittently. The hazard warning lights flash. Turning off the alarm Press any button on the transmitter. Knowing Your Mazda 3-23… -
Page 106
Knowing Your Mazda Doors and Locks qTransmitter Maintenance If the buttons on the transmitter are inoperable and the operation indicator light does not flash, the battery may be dead. Replace with a new battery before the transmitter becomes unusable. CAUTION Ø… -
Page 107: Door Locks
Authorized Mazda Dealer. If your transmitter is lost or stolen, bring all remaining transmitters to an Authorized Mazda Dealer as soon as possible for a replacement and to make the lost or stolen transmitter inoperative. CAUTION Radio equipment like this is governed by laws in the United States.
-
Page 108
Knowing Your Mazda Doors and Locks qLocking, Unlocking with Key The driver’s door can be locked/unlocked with the key. Turn the key toward the front to unlock, toward the back to lock. Unlock Lock qLocking, Unlocking with Request Switch (with Advanced Key) -
Page 109
Advanced Keyless Functions (page 3-7). Locking, unlocking with transmitter (with advanced key) All doors and the liftgate can be locked/ unlocked by operating the keyless entry system transmitter, refer to Keyless Entry System (page 3-13). Knowing Your Mazda Unlock Lock 3-27… -
Page 110: Liftgate
Knowing Your Mazda Doors and Locks Locking, unlocking with transmitter (with retractable type key) All doors and the liftgate can be locked/ unlocked by operating the keyless entry system transmitter, refer to Keyless Entry System (page 3-22). qRear Door Child Safety Locks…
-
Page 111
1. Remove the cap on the interior surface of the liftgate with a flathead screwdriver. Knowing Your Mazda 3-29… -
Page 112
Lever After performing this emergency measure, have the vehicle inspected at an Authorized Mazda Dealer as soon as possible. Manually closing the liftgate Use both hands to push the liftgate down until the lock snaps shut. Do not slam it. -
Page 113
5 Press the power liftgate switch or the power liftgate button on the keyless entry system transmitter again to fully close the liftgate. Knowing Your Mazda 3-31… -
Page 114
Knowing Your Mazda Doors and Locks Opening/Closing the power liftgate If the vehicle has satisfied all the following operation conditions, the power liftgate can be opened using the power function. Operation conditions (1) The power liftgate is unlocked. (2) The shift lever is in park (P) when the ignition switch is in the ON position. -
Page 115
When the power liftgate is moving in the open/close direction and an obstruction is detected, the beep sound will be heard and the liftgate moves in the opposite direction. Knowing Your Mazda 3-33… -
Page 116
Knowing Your Mazda Doors and Locks NOTE If the system repeatedly detects an object obstructing the power liftgate in the open/close direction several times, the beep sound will be heard and the system changes to manual operation. Power liftgate drop prevention… -
Page 117: Power Windows
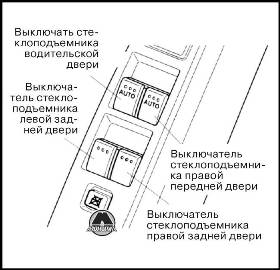
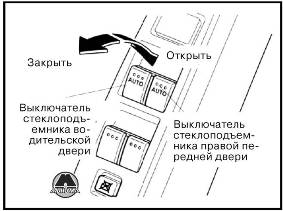
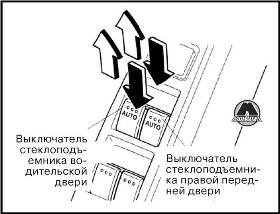
Right rear window The following functions can be performed for the front power windows using the power window master control switches on the driver’s door or front passenger’s door switch. Manual opening/closing Auto-opening/closing Two-step down function Knowing Your Mazda 3-35…
-
Page 118
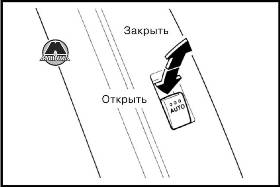
Knowing Your Mazda Doors and Locks Manual opening/closing To open a power window to the desired position, lightly hold down the switch. To close the power window to the desired position, lightly pull up the switch. Owner master control switch… -
Page 119
LOCK position and proceed from the beginning. If you are unable to cancel the function despite carrying out the cancellation procedure, consult an Authorized Mazda Dealer. Restoring the two-step down function With the two-step down function in the canceled state, repeat the previous procedure for canceling the function on each door switch and it will be restored. -
Page 120
Knowing Your Mazda Doors and Locks NOTE Depending on driving conditions, a closing power window could stop and start opening when the window feels a shock that is similar to something blocking it. In the event the jam-safe function activates… -
Page 121
A door or the liftgate is opened. The key is inserted into the ignition switch. (With advanced key) The start knob is in any position except LOCK. Knowing Your Mazda 3-39… -
Page 122
Doors and Locks Opening Because nobody likes getting into a very hot car, Mazda has introduced a way to open the two front windows and the moonroof as you approach the vehicle to get the air moving before you get in. -
Page 123
1. If the doors and the liftgate are locked, unlock them. 2. Press and hold the request switch on the driver’s door. After the doors and the liftgate are locked, the windows close as long as the request switch is pressed. Request switch Knowing Your Mazda 3-41… -
Page 124: Fuel-Filler Lid And Cap
CAUTION Always use only a genuine Mazda fuel cap or an approved equivalent, available at an Authorized Mazda Dealer. The wrong cap can result in a serious malfunction of the fuel and emission control systems.
-
Page 125: Hood
If the light remains on even after you have tightened the cap securely, this may indicate a different problem. Contact an Authorized Mazda Dealer as soon as possible. Doors and Locks Hood WARNING…
-
Page 126: Moonroof Í
NOTE After washing your Mazda or after it rains, wipe the water off the moonroof before operating it to avoid water penetration which could cause rust and water damage to your headliner.
-
Page 127
(partially open) it closes before the rear tilts opens. 3. Repeat the procedure in Step 2. The rear of the moonroof tilts open to the fully open position, then closes a little. Knowing Your Mazda Doors and Locks Open Tilt down (Close) -
Page 128
The start knob is pushed into the ignition switch. Opening Because nobody likes getting into a very hot car, Mazda has introduced a way to open the two front windows and the moonroof as you approach the vehicle to get the air moving before you get in. -
Page 129
When leaving the vehicle, close the moonroof using the tilt or slide switch inside the vehicle, the key, or a request switch. With key 1. Insert the key in the driver’s door key cylinder. Knowing Your Mazda 3-47… -
Page 130
Knowing Your Mazda Doors and Locks 2. Turn the key toward the back and hold it. After the doors and the liftgate are locked, the moonroof closes as long as the key is turned. Close With request switch on the driver’s door (Advanced key) 1. -
Page 131
Ø The sunshade does not tilt. To avoid damaging the sunshade, do not push up on it. Ø Do not close the sunshade while the moonroof is opening. Trying to force the sunshade closed could damage it. Sunshade Knowing Your Mazda Doors and Locks 3-49… -
Page 132: Security System
Knowing Your Mazda Security System Immobilizer System (with Advanced Key) The immobilizer system allows the engine to start only with an advanced key the system recognizes. If someone attempts to start the engine with an unrecognized key, the engine will not start, thereby helping to prevent the theft of your vehicle.
-
Page 133
If the security indicator light flashes continuously while you are driving, don’t shut off the engine. Go to an Authorized Mazda Dealer and have it checked. If the engine is shut off while the indicator light is flashing, you won’t be able to restart it. -
Page 134: Immobilizer System (Without Advanced Key)
Authorized Mazda Dealer. Always keep a spare advanced key in case one is lost. If an advanced key is lost, consult an Authorized Mazda Dealer as soon as possible. If you lose an advanced key (including auxiliary key), an Authorized Mazda Dealer…
-
Page 135
Disarming The system is disarmed when the ignition switch is turned to the ON position with the correct ignition key. The security indicator light illuminates for about 3 seconds and goes out. Knowing Your Mazda 3-53… -
Page 136
If the security indicator light flashes continuously while you are driving, don’t shut off the engine. Go to an Authorized Mazda Dealer and have it checked. If you shut off the engine while the light is flashing you won’t be able to restart it. -
Page 137: Theft-Deterrent System Í
Turn the start knob to the ON position. The hazard warning lights will flash twice to indicate that the system is turned off. Knowing Your Mazda Security System once. Close all doors. í 3-55 Some models.
-
Page 138
Authorized Mazda Dealer. qTheft-Deterrent Labels A label indicating that your vehicle is equipped with a Theft-Deterrent System is in the glove box. Mazda recommends that you affix it to the lower rear corner of a front door window. 3-56… -
Page 139: Steering Wheel And Mirrors
Power mirror The ignition switch must be in the ACC or ON position. To adjust: 1. Press the left or right side of the selector switch to choose the left or right side mirror. Knowing Your Mazda 3-57…
-
Page 140
Knowing Your Mazda Steering Wheel and Mirrors 2. Depress the mirror switch in the appropriate direction. Outside mirror Mirror switch After adjusting the mirror, lock the control by placing the selector switch in the middle position. Folding the mirror Fold the outside mirror rearward until it is flush with the vehicle. -
Page 141
Do not stack cargo or objects higher than the seatbacks: Cargo stacked higher than the seatbacks is dangerous. It can block your view in the rearview mirror, which might cause you to hit another car when changing lanes. Knowing Your Mazda Steering Wheel and Mirrors 3-59… -
Page 142
3-60… -
Page 143
Before Driving Your Mazda Important information about driving your Mazda. Fuel and Engine Exhaust Precautions … 4-2 Fuel Requirements … 4-2 Emission Control System … 4-3 Engine Exhaust (Carbon Monoxide) … 4-4 Before Starting the Engine … 4-5 Before Getting In … 4-5 After Getting In … -
Page 144: Fuel And Engine Exhaust Precautions
Ø Never add fuel system additives. Never add cleaning agents other than those specified by Mazda. Other cleaning agents and additives may damage the system. Consult an Authorized Mazda Dealer. Gasoline blended with oxygenates such as alcohol or ether compounds are generally referred to as oxygenated fuels.
-
Page 145: Emission Control System
Ø USE ONLY UNLEADED FUEL. Ø Don’t drive your Mazda with any sign of engine malfunction. Ø Don’t coast with the ignition switch turned off. Ø Don’t descend steep grades in gear with the ignition switch turned off.
-
Page 146: Engine Exhaust (Carbon Monoxide)
When inhaled, it can cause loss of consciousness and death. If you smell exhaust gas inside your vehicle, keep all windows fully open and contact an Authorized Mazda Dealer immediately. Do not run the engine when inside an enclosed area: Running the engine inside an enclosed area, such as a garage, is dangerous.
-
Page 147: Before Starting The Engine
NOTE Engine oil, engine coolant, brake fluid, washer fluid, and other fluid levels should be inspected. See Maintenance, Section 8. Before Driving Your Mazda Before Starting the Engine After Getting In Are all doors closed and locked? Is the seat adjusted properly?
-
Page 148: Driving Tips
No special break-in is necessary, but a few precautions in the first 1,000 km (600 miles) may add to the performance, economy, and life of your Mazda. Don’t race the engine. Don’t maintain one constant speed, either slow or fast, for a long period of time.
-
Page 149: Hazardous Driving
(such as from a paved road to gravel) because the reaction of the vehicle against the driving operation changes. Before Driving Your Mazda Driving Tips For more traction in starting on slippery surfaces such as ice or packed…
-
Page 150
Before Driving Your Mazda Driving Tips qRoll-over WARNING Avoid sharp turns, excessive speed and abrupt maneuvers when driving this vehicle: Sharp turns, excessive speed and abrupt maneuvering of this vehicle is dangerous as it could result in the increased risk of loss of vehicle control, vehicle roll-over, personal injury or death. -
Page 151: Rocking The Vehicle
Carry emergency gear, including tire chains, window scraper, flares, a small shovel, jumper cables, and a small bag of sand or salt. Ask an Authorized Mazda Dealer to perform the following precautions: Have the proper ratio of antifreeze in the radiator.
-
Page 152
245/50R20 specification tires could cause interference with the vehicle body and scratching. If tire chains are to be used, replace both front and rear tires with P245/60 R18 tires. Please consult an Authorized Mazda Dealer. 4-10 NOTE If your vehicle is equipped with the tire pressure monitoring system, the system may not function correctly when using tire chains. -
Page 153: Driving In Flooded Area
If the vehicle has been immersed in water, consult an Authorized Mazda Dealer. Before Driving Your Mazda Driving Tips Overloading WARNING Be careful not to overload your vehicle:…
-
Page 154: Towing
Never overload vehicle or trailer. Consult an Authorized Mazda Dealer if you need further details. CAUTION Don’t tow a trailer during the first 1,000 km (600 miles) of your new Mazda. If you do, you may damage the engine, transaxle, differential, wheel bearings, and other power train components.
-
Page 155
GCWR: Gross Combination Weight Rating (sum of TTW, vehicle weights and 2 passengers) GAWR: Gross Axle Weight Rating GVWR: Gross Vehicle Weight Rating *1 2WD *2 AWD Item Front Rear Front Rear Before Driving Your Mazda Towing Model Without Towing With Towing Package Package 2.97 m (32 ft 4.65 m… -
Page 156
Before Driving Your Mazda Towing WARNING Always keep tow loads within specified limits as indicated in the Trailer Towing-Load Table: Attempting to tow loads greater than those specified is dangerous as it may cause serious handling and performance problems that could result in personal injury or vehicle damage, or both. -
Page 157
Never use the temporary spare tire when towing: Using the temporary spare tire on your vehicle when towing a trailer is dangerous as it could result in tire failure, loss of control, and injury to vehicle occupants. Before Driving Your Mazda Towing 4-15… -
Page 158
CAUTION Don’t connect a trailer lighting system directly to the lighting system of your Mazda. This may damage your vehicle’s electrical system and lighting systems. Have a recreational vehicle dealer or trailer rental agency connect the system, and inspect the brake lights and turn signals yourself before each trip. -
Page 159
Stop and re-inspect all lights and connections after driving a short distance. Driving Your Mazda will handle differently with a trailer in tow, so practice turning, backing, and stopping in a traffic-free area. Take time to get accustomed to the extra weight and length. -
Page 160
Before Driving Your Mazda Towing Ascending a hill Shift into a lower gear to reduce the possibility of overloading or overheating the engine, or both. Descending a hill Shift into a lower gear and use engine compression as a braking effect. -
Page 161
Before Driving Your Mazda Towing 3. Release the parking brake (also the foot brake) and pull away from the wheel blocks. Stop; apply the parking brake and shift into P. 4. Have a helper retrieve the wheel blocks. Fuel consumption Trailer towing causes higher fuel consumption. -
Page 162
4-20… -
Page 163: Driving Your Mazda
Driving Your Mazda Explanation of instruments and controls. Starting and Driving … 5-2 Ignition Switch … 5-2 Starting the Engine … 5-4 Brake System … 5-5 Automatic Transaxle Controls … 5-10 Power Steering … 5-16 All-Wheel Drive (AWD) Operation Cruise Control … 5-19 Traction Control System (TCS) …
-
Page 164: Starting And Driving
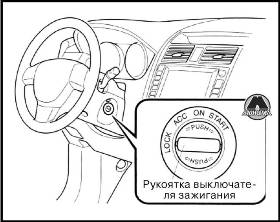
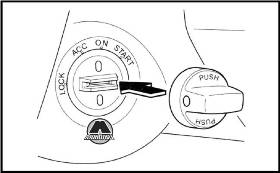
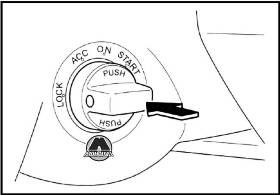
Driving Your Mazda Starting and Driving Ignition Switch Auxiliary key (with advanced key) NOTE When starting the engine using the advanced key, refer to Starting the Engine (page 3-9). When starting the engine with the auxiliary key, perform the following procedure.
-
Page 165
(page 5-41). qIgnition Key Reminder If the ignition switch is in the LOCK or ACC position with the key inserted, a continuous beep sound will be heard when the driver’s door is opened. Driving Your Mazda… -
Page 166: Starting The Engine
Driving Your Mazda Starting and Driving Starting the Engine NOTE Engine-starting is controlled by the spark ignition system. This system meets all Canadian Interference- Causing Equipment Standard requirements regulating the impulse electrical field strength of radio noise. 1. Occupants should fasten their seat belts.
-
Page 167: Brake System
Brake System qFoot Brake Your Mazda has power-assisted brakes that adjust automatically through normal use. Should power-assist fail, you can stop by applying greater force than normal to the brake pedal. But the distance required to stop will be greater than usual.
-
Page 168
If the warning light remains on, or if the brakes do not operate properly, do not drive the vehicle. Have it towed to an Authorized Mazda Dealer. Even if the light goes out have your brake system inspected as soon as possible by an Authorized Mazda Dealer. -
Page 169
NOTE Having to add brake fluid is sometimes an indicator of leakage. Consult an Authorized Mazda Dealer as soon as possible even if the brake light is no longer illuminated. WARNING Do not drive with the brake system warning light illuminated. Contact an… -
Page 170
ABS. Should this happen, consult an Authorized Mazda Dealer as soon as possible. NOTE When the engine is jump-started to charge the battery, uneven rpm occurs and the ABS warning light comes on. -
Page 171
This causes a screeching noise to warn that the pads should be replaced. When you hear this noise, consult an Authorized Mazda Dealer as soon as possible. WARNING Do not drive with worn disc pads: Driving with worn disc pads is dangerous. -
Page 172: Automatic Transaxle Controls
Driving Your Mazda Starting and Driving Automatic Transaxle Controls Various Lockouts: Indicates that you must depress the brake pedal to shift (The ignition switch must be in the ACC or ON position). Indicates the shift lever can be shifted freely into any position.
-
Page 173
6-gear sequence. M (Manual) M is the manual shift mode position. Gears can be shifted up or down by operating the shift lever. Refer to Manual Shift Mode (page 5-12). Driving Your Mazda 5-11… -
Page 174
Driving Your Mazda Starting and Driving qActive Adaptive Shift (AAS) Active Adaptive Shift (AAS) automatically controls the transaxle shift points to best suit the road conditions and driver input. This optimizes engine performance and improves driving comfort. When cornering the vehicle,… -
Page 175
However, this does not indicate an abnormality. When depressing the accelerator fully, the transaxle will shift to a lower gear, depending on vehicle speed. Driving Your Mazda 5-13… -
Page 176
Driving Your Mazda Starting and Driving Manually Shifting down (M6→M5→M4→M3→M2→M1) To shift down to a lower gear, tap the shift lever forward ( ) once. WARNING Do not use engine braking on slippery road surfaces or at high speeds: Shifting down while driving on wet,… -
Page 177
3. Release the brake pedal while gradually accelerating. Descending steep grades When descending a steep grade, shift to lower gears, depending on load weight and grade steepness. Descend slowly, using the brakes only occasionally to prevent them from overheating. Driving Your Mazda 5-15… -
Page 178: Power Steering
Driving Your Mazda Starting and Driving Power Steering Power steering is only operable when the engine is running. If the engine is off or if the power steering system is inoperable, you can still steer, but it requires more physical effort.
-
Page 179
If the AWD warning light illuminates: If the AWD warning light illuminates, contact an Authorized Mazda Dealer. If the AWD warning light flashes: Park the vehicle in a safe place. After a few moments; if the warning light stops flashing, you can resume driving. -
Page 180
Driving Your Mazda Starting and Driving WARNING Never spin a wheel that is off the ground: Spinning a wheel that is off the ground as a result of the vehicle being stuck or in a ditch is dangerous. The drive assembly could… -
Page 181: Cruise Control
Set Speed 1. Activate the cruise control system by momentarily pressing up the ON/OFF switch. 2. Accelerate to the desired speed, which must be more than 30 km/h (19 mph). Driving Your Mazda 5-19…
-
Page 182
Driving Your Mazda Starting and Driving 3. Press down or press up on the cruise control SET +/SET — switch and release it at the speed you want. Release the accelerator at the same time. Cruise control switch NOTE Release the cruise control switch at the… -
Page 183
30 km/h (19 mph) and press the RESUME button. qTo Cancel To cancel the system, use one of these methods: Pull down the ON/OFF switch. Slightly depress the brake pedal. Driving Your Mazda 5-21… -
Page 184: Traction Control System (Tcs)
Driving Your Mazda Starting and Driving Press the CANCEL button. The system is off when the ignition is off. NOTE Cruise control will cancel at about 15 km/h (9 mph) below the preset speed (such as may happen when climbing a long, steep grade) or below 30 km/h (19 mph).
-
Page 185
TCS is switched off. Refer to TCS OFF Switch on page 5-24. If the light remains illuminated and the TCS is not switched off, take your vehicle to an Authorized Mazda Dealer. The dynamic stability control may have a malfunction. NOTE… -
Page 186
Driving Your Mazda Starting and Driving qTCS OFF Switch If the vehicle speed is less than 15 km/h (9 mph), press the TCS OFF switch to turn off the TCS. The TCS OFF indicator light will illuminate. Press the switch again to turn the TCS back on. -
Page 187: Dynamic Stability Control (Dsc)/Roll Stability Control (Rsc)
When driving under bad road conditions, lower the vehicle speed and drive carefully: Reckless driving and excessive speed under any road conditions is dangerous as it reduces vehicle stability and operability which could result in an accident. Driving Your Mazda 5-25…
-
Page 188
Ø The DSC/RSC may not operate correctly unless the following are observed: Ø Use tires of the correct size specified for your Mazda on all four wheels. Ø Use tires of the same manufacturer, brand and tread pattern on all four wheels. -
Page 189: Tire Pressure Monitoring System Í
Driving Your Mazda Starting and Driving í Tire Pressure Monitoring System The tire pressure monitoring system (TPMS) monitors the pressure for each tire. If tire pressure is too low in one or more tires, the system will inform the driver via the warning light in the instrument panel and by the warning beep sound.
-
Page 190
Driving Your Mazda Starting and Driving CAUTION Ø Each tire, including the spare (if provided), should be checked monthly when cold and inflated to the inflation pressure recommended by the vehicle manufacturer on the vehicle placard or tire inflation pressure label. (If your vehicle has tires of a… -
Page 191
Authorized Mazda Dealer or a tire repair station. Do not ignore the TPMS Warning Light: Ignoring the TPMS warning light is dangerous, even if you know why it is illuminated. -
Page 192
Leaks need to be addressed by more than simply refilling the trouble tire as leaks are dangerous — take it to an Authorized Mazda Dealer which has all the equipment to fix tires, TPMS systems and order the best replacement tire for your… -
Page 193
The signal code must be registered with the TPMS before it can work. The easiest way to do it is to have an Authorized Mazda Dealer change your tire and complete ID signal code registration. When having tires changed at an… -
Page 194
Replacing tires and wheels CAUTION Ø When replacing/repairing the tires or wheels or both, have the work done by an Authorized Mazda Dealer, or the tire pressure sensors may be damaged. Ø The wheels equipped on your Mazda are specially designed for installation of the tire pressure sensors. -
Page 195: Blind Spot Monitoring (Bsm) System Í
The radar sensors do not detect human, animal, or static objects such as fences. In addition, the system pauses when the selector lever is shifted to the R position. (The system resumes automatically when the selector lever is shifted from the R position.) Starting and Driving í Detection areas í Some models. Driving Your Mazda 5-33…
-
Page 196
Vehicles with lower body height such as sports cars. Have the radar sensors inspected at an Authorized Mazda Dealer if any shock is applied to the rear bumper, even in a minor accident. If the vehicle is driven with a damaged radar sensor, the system may not operate properly resulting in an accident. -
Page 197
NOTE The system can be customized so that the BSM warning beep does not operate. Consult an Authorized Mazda Dealer. qBSM OFF Indicator Light This indicator light illuminates for a few seconds when the ignition switch is turned to the ON position. -
Page 198
If the light remains flashing after cleaning the bumper surface near the radar sensor area, consult an Authorized Mazda Dealer. For repairs or paintwork around the radar sensors, or replacement of the bumper, consult an Authorized Mazda Dealer. -
Page 199: Instrument Cluster And Indicators
Driving Your Mazda Instrument Cluster and Indicators Meters and Gauges When the ignition switch is in the ON position, the dashboard gauges illuminate. Speedometer … page 5-38 Odometer, Trip Meter and Trip Meter Selector … page 5-38 Tachometer … page 5-39 Engine Coolant Temperature Gauge …
-
Page 200
Driving Your Mazda Instrument Cluster and Indicators qSpeedometer The speedometer indicates the speed of the vehicle. qOdometer, Trip Meter and Trip Meter Selector The display mode can be changed between trip meter A and trip meter B by pressing the selector while one of them is displayed. -
Page 201
The engine coolant temperature gauge shows the temperature of the engine coolant. If the needle is near H, it indicates overheating. CAUTION Driving with an overheated engine can cause serious engine damage (page 7-14). Red zone Driving Your Mazda 5-39… -
Page 202
Driving Your Mazda Instrument Cluster and Indicators qFuel Gauge The fuel gauge shows approximately how much fuel is in the tank. We recommend keeping the tank over 1/4 full. When the low fuel warning light illuminates or when the needle is near E, refuel as soon as possible. -
Page 203: Warning/Indicator Lights And Beep Sounds
Check Engine Light Powertrain Malfunction/Reduced Power Warning Light ABS Warning Light Air Bag/Front Seat Belt Pretensioner System Warning Light Warning/Indicator lights will appear in any of the highlighted areas Warning/Indicator Lights Driving Your Mazda Page 5-43 5-45 5-45 5-45 5-46…
-
Page 204
Driving Your Mazda Warning/Indicator Lights and Beep Sounds Signal Low Fuel Warning Light Check Fuel Cap Warning Light Seat Belt Warning Light/Beep Door-Ajar Warning Light Low Washer Fluid Level Warning Light Automatic Transaxle Warning Light AWD Warning Light Tire Pressure Monitoring System Warning Light… -
Page 205
NOTE Having to add brake fluid is sometimes an indicator of leakage. Consult an Authorized Mazda Dealer as soon as possible even if the brake light is no longer illuminated. Do not drive with the brake system warning light illuminated. Contact an… -
Page 206
ABS. Should this happen, consult an Authorized Mazda Dealer as soon as possible. NOTE When the engine is jump-started to charge the battery, uneven rpm occurs and the ABS warning light comes on. -
Page 207
If the light remains illuminated even after you add oil, stop the engine immediately and have your vehicle towed to an Authorized Mazda Dealer. qCheck Engine Light This indicator light illuminates when the ignition switch is turned to the ON position and goes off when the engine is started. -
Page 208
The fuel-filler cap is missing or not tightened securely. If the check engine light remains on or flashes continuously, do not drive at high speeds and consult an Authorized Mazda Dealer as soon as possible. qPowertrain Malfunction/Reduced Power Warning Light… -
Page 209
ON position. Belt minder NOTE The belt minder can be deactivated. Consult an Authorized Mazda Dealer to deactivate and restore the seat belt minder. Driving Your Mazda Condition Result The warning light… -
Page 210
Driving Your Mazda Warning/Indicator Lights and Beep Sounds Driver seated/Front passenger not seated The belt minder is a supplemental warning to the seat belt warning function. If the driver’s seat belt is not fastened when the ignition switch is turned to the… -
Page 211
Driving Your Mazda CAUTION If the automatic transaxle warning light illuminates, the transaxle has an electrical problem. Continuing to drive your Mazda in this condition could cause damage to your transaxle. Consult an Authorized Mazda Dealer as soon as possible. í… -
Page 212
Authorized Mazda Dealer or a tire repair station. Do not ignore the TPMS Warning Light: Ignoring the TPMS warning light is dangerous, even if you know why it is illuminated. -
Page 213
Leaks need to be addressed by more than simply refilling the trouble tire as leaks are dangerous — take it to an Authorized Mazda Dealer which has all the equipment to fix tires, TPMS systems and order the best replacement tire for your vehicle. -
Page 214
Park the vehicle in a safe place and use the auxiliary key to continue driving the vehicle. Have the vehicle inspected at an Authorized Mazda Dealer as soon as possible. When flashing Under the following conditions, the… -
Page 215
3 seconds and then goes out. If the engine doesn’t start with the correct ignition key, and the security indicator light keeps illuminating or flashing, the system may have a malfunction. Consult an Authorized Mazda Dealer. Driving Your Mazda 5-53… -
Page 216
Driving Your Mazda Warning/Indicator Lights and Beep Sounds qHeadlight High-Beam Indicator Light This light indicates one of two things: The high-beam headlights are on. The turn signal lever is in the flash-to- pass position. qShift Position Indicator Light This indicates the selected shift position when the ignition switch is in the ON position. -
Page 217
TCS is switched off. Refer to TCS OFF Switch on page 5-24. If the light remains illuminated and the TCS is not switched off, take your vehicle to an Authorized Mazda Dealer. The dynamic stability control may have a malfunction. NOTE… -
Page 218: Beep Sounds
1 minute. After that, the one-minute beep will be repeated every 30 minutes. Have your vehicle inspected at an Authorized Mazda Dealer as soon as possible. WARNING Do not drive the vehicle with the air…
-
Page 219
Driving Your Mazda Warning/Indicator Lights and Beep Sounds qIgnition Key Reminder If the ignition switch is in the LOCK or ACC position with the key inserted, a continuous beep sound will be heard when the driver’s door is opened. qLights-On Reminder… -
Page 220: Switches And Controls
Driving Your Mazda Switches and Controls Lighting Control qHeadlights Type A (Without AUTO position) Turn the headlight switch to turn the headlights, other exterior lights and dashboard illumination on or off. Switch Position Headlights Taillights Parking lights License lights Side-marker lights…
-
Page 221
The timing for turning on the headlights, other exterior lights and dashboard illumination can be delayed by adjusting the sensitivity of the light sensor. Consult an Authorized Mazda Dealer regarding sensor adjustment. Xenon fusion headlight bulbs The low-beam bulbs of the headlights have xenon fusion bulbs that produce a bright white beam over a wide area. -
Page 222
Driving Your Mazda Switches and Controls qLights-On Reminder If lights are on and the key is removed from the ignition switch, a continuous beep sound will be heard when the driver’s door is opened. NOTE When the advanced keyless function is used… -
Page 223: Turn And Lane-Change Signals
NOTE If an indicator light stays on without flashing or if it flashes abnormally, one of the turn signal bulbs may be burned out. Driving Your Mazda Switches and Controls Right turn Right lane change until the and hold it there.
-
Page 224: Fog Lights Í
After 5 minutes, turn on the switch and the blades should operate normally. If they don’t resume functioning, consult an Authorized Mazda Dealer as soon as possible. Drive to the side of the road and park off the right-of- way. Wait until the weather clears before trying to drive with the wipers inoperative.
-
Page 225
AUTO (Auto-wiper control) When the wiper lever is in the AUTO position, the rain sensor senses the amount of rainfall on the windshield and turns the wiper on or off automatically (off intermittent low speed high speed). Driving Your Mazda 5-63… -
Page 226
Driving Your Mazda Switches and Controls The sensitivity of the rain sensor can be adjusted by turning the switch on the wiper lever. From the center position (normal), turn the switch towards (+) for higher sensitivity (faster response) or turn the switch towards ( _ ) for less sensitivity (slower response). -
Page 227
With the wiper lever in the OFF or INT position, the wipers will operate continuously until the lever is released. If the washer doesn’t work, inspect the fluid level (page 8-26). If it’s OK, consult an Authorized Mazda Dealer. Driving Your Mazda Washer 5-65… -
Page 228: Rear Window Wiper And Washer
Driving Your Mazda Switches and Controls Rear Window Wiper and Washer The ignition switch must be in the ON position. qRear Window Wiper Turn the wiper on by turning the rear wiper/washer switch. Normal Intermittent qRear Window Washer To spray washer fluid, turn the rear wiper/ washer switch to the position.
-
Page 229: Horn
This defroster is not designed for melting snow. If there is an accumulation of snow on the rear window, remove it before using the defroster. Switches and Controls Horn To sound the horn, press the the steering wheel. Driving Your Mazda mark on 5-67…
-
Page 230: Hazard Warning Flasher
Driving Your Mazda Switches and Controls Hazard Warning Flasher The hazard warning lights should always be used when you stop on or near a roadway in an emergency. The hazard warning lights warn other drivers that your vehicle is a traffic hazard and that they must take extreme caution when near it.
-
Page 231: Interior Comfort
Interior Comfort Use of various features for drive comfort, including air-conditioning and audio system. Climate Control System … 6-2 Operating Tips … 6-2 Vent Operation (Front) … 6-4 Fully Automatic Type … 6-6 Vent Operation (Rear) … 6-12 Control Panel (Rear) … 6-14 Audio System …
-
Page 232
Have the air conditioner checked before the weather gets hot. Lack of refrigerant may make the air conditioner less efficient. Consult an Authorized Mazda Dealer for refrigerant inspection. The air conditioner is filled with HFC134a (R134a), a refrigerant that will not damage the ozone layer. -
Page 233: Climate Control System
qSunlight/Temperature Sensor The fully automatic air conditioner function measures inside and outside temperatures, and the intensity of direct sunlight. It then sets temperatures inside the passenger compartment accordingly. CAUTION Do not obstruct either sensor, otherwise the automatic air conditioner will not operate properly. Sunlight sensor Interior temperature sensor Interior Comfort…
-
Page 234: Vent Operation (Front)
Interior Comfort Climate Control System Vent Operation (Front) Open Close qAdjusting the Vents Directing airflow You can direct air flow by moving the adjustment knob. Opening/closing vents The two outside vents can be opened and closed with wheel. NOTE When using the air conditioner, mist may come out from the vents. This is not a sign of trouble but a result of humid air being suddenly cooled.
-
Page 235
Interior Comfort Climate Control System qSelecting the Airflow Mode Dashboard Vents Defroster and Floor Vents Defroster Vents Dashboard and Floor Vents Floor Vents… -
Page 236: Fully Automatic Type
Interior Comfort Climate Control System Climate control information is displayed on the information display. Information display Air intake display AUTO DUAL Airflow display Mode selector display Temperature setting display (driver) Driver temperature control dial A/C switch Mode selector switch Windshield defroster switch Fully Automatic Type Fan control dial Front passenger temperature control dial…
-
Page 237
qControl Switches AUTO switch By pressing the AUTO switch the following functions will be automatically controlled in accordance with the set temperature: Airflow temperature Amount of airflow Selection of airflow mode Outside/Recirculated air selection Air conditioner operation NOTE AUTO switch indicator light When on, it indicates AUTO operation, and the system will function automatically. -
Page 238
Interior Comfort Climate Control System Mode selector switch The desired airflow mode can be selected (page 6-5). NOTE With the airflow mode set to the position and the temperature control dial set at a medium temperature, heated air is directed to the feet and a comparably lower air temperature will flow through the central, left and right vents. -
Page 239
OUTSIDE (Ambient Temperature) switch Press the OUTSIDE switch to display the ambient temperature. NOTE The displayed ambient temperature may vary from the actual ambient temperature depending on the surrounding area and vehicle conditions. Press the OUTSIDE switch 3 seconds or more to switch the display from Fahrenheit to Centigrade or vice versa. -
Page 240
Interior Comfort Climate Control System qOperation of Automatic Air Conditioning 1. Press the AUTO switch. Selection of the airflow mode, air intake selector and amount of airflow will be automatically controlled. 2. Use the temperature control dial to select a desired temperature. Press the DUAL switch or turn the front passenger temperature control dial to control the set temperature… -
Page 241
NOTE Press the windshield defroster switch to change the mode to the interconnection mode automatically. The system does not change to the individual operation mode by pressing the DUAL switch or turning the front passenger temperature control dial. Use the temperature control dial to increase the air flow temperature and defog the windshield more quickly. -
Page 242: Vent Operation (Rear)
Interior Comfort Climate Control System Vent Operation (Rear) qAdjusting the Vents Directing airflow You can direct air flow by moving the adjustment knob. NOTE When using the air conditioner, mist may come out from the vents. This is not a sign of trouble but a result of humid air being suddenly cooled.
-
Page 243
qSelecting the Airflow Mode For vehicles with rear full-auto air conditioning, the airflow mode can be selected according to the purpose of use. Instrument panel Vents Instrument panel and Floor Vents Climate Control System Floor Vents Interior Comfort 6-13… -
Page 244: Control Panel (Rear)
Interior Comfort Climate Control System Front Rear Fan control dial 6-14 Control Panel (Rear) AUTO switch REAR CONTROL switch Temperature control dial…
-
Page 245
qControl Switches Rear air conditioning on switch Press the REAR CONTROL switch to operate the rear air conditioning from the rear seats. Fan and temperature adjustment from the rear control panel is possible only when CONTROL ON in the rear control panel is illuminated. -
Page 246
Interior Comfort Climate Control System NOTE Setting the temperature to the maximum high or low will not provide the desired temperature at a faster rate. When selecting heat, the system will restrict airflow until it has warmed to prevent cold air from blowing out of the vents. -
Page 247: Audio System
Antenna qRear Window Antenna The rear window antenna receives both AM and FM signals. Rear window antenna CAUTION When washing the inside rear window, use a soft cloth dampened in lukewarm water, gently wiping the antenna lines. Use of glass cleaning products could damage the antenna.
-
Page 248
Interior Comfort Audio System qRadio Reception AM characteristics AM signals bend around such things as buildings or mountains and bounce off the ionosphere. Therefore, they can reach longer distances than FM signals. Because of this, two stations may sometimes be picked up on the same frequency at the same time. -
Page 249
Flutter/Skip noise Signals from an FM transmitter move in straight lines and become weak in valleys between tall buildings, mountains, and other obstacles. When a vehicle passes through such an area, the reception conditions may change suddenly, resulting in annoying noise. Weak signal noise In suburban areas, broadcast signals become weak because of distance from… -
Page 250
Interior Comfort Audio System qOperating Tips for CD Player/In- Dash CD Changer Condensation phenomenon Immediately after turning on the heater when the vehicle is cold, the CD or optical components (prism and lens) in the CD player/In-dash CD changer may become clouded with condensation. -
Page 251
A new CD may have rough edges on its inner and outer perimeters. If a disc with rough edges is used, proper setting will not be possible and the CD player/In-dash CD changer will not play the CD. In addition, the disc may not eject resulting in a malfunction. -
Page 252
Interior Comfort Audio System Do not use record sprays, antistatic agents, or household spray cleaners. Volatile chemicals such as benzine and thinner can also damage the surface of the CD and must not be used. Anything that can damage, warp, or fog plastic should never be used to clean CDs. -
Page 253
qOperating tips for MP3 NOTE Supply of this product only conveys a license for private, non-commercial use and does not convey a license nor imply any right to use this product in any commercial (i.e. revenue- generating) real time broadcasting (terrestrial, satellite, cable and/or any other media), broadcasting/streaming via the Internet, intranets and/or other networks or in other… -
Page 254
Interior Comfort Audio System About folders and files The order of hierarchy for MP3 files and folders during playback or other functions is from shallow to deep. The arrangement and playing order of a recorded disc containing MP3 files is as follows: File number A numerical file number is assigned… -
Page 255
About ID3 Tag display This unit can only display ID3 Tag album, track and artist names that have been input using Ver.1.0/1.1/2.2/2.3 formats. Any other data that may have been input cannot be displayed. This unit can only display English (including numerals) one-byte characters. -
Page 256
MEMO 6-26… -
Page 257: Audio Set
Audio information is displayed on the information display. There are two types of In-dash CD changers. Check which In-dash CD changer your vehicle is equipped with. CD Player Power/Volume/Sound Controls … page 6-28 Operating the Radio … page 6-34 Operating the Compact Disc (CD) Player … page 6-38 Operating the In-Dash CD Changer …
-
Page 258
Interior Comfort Audio System qPower/Volume/Sound Controls Power ON/OFF Turn the ignition switch to the ACC or ON position. Press the power/volume dial to turn the audio system on. Press the power/volume dial again to turn the audio system off. NOTE To prevent the battery from being discharged, do not leave the audio system on for a long period of time when the engine is not running. -
Page 259
Bose Sound System- equipped model Depending on the mode selected, the indication changes. 2. Turn the audio control dial to adjust the selected functions as follows: Standard audio-equipped model Indication Turn Left Turn Right Decrease bass Decrease treble Shift the sound to the front Shift the… -
Page 260
Interior Comfort Audio System (5.1-channel sound mode) Indication Turn Left Turn Right Decrease bass Decrease treble Shift the sound to the front Shift the sound to the left 12Hr (Flashing) The display switches to the 5.1-channel sound mode when the following conditions are met: The vehicle is Rear Entertainment System equipped. -
Page 261
® ® AudioPilot (Bose Sound System- equipped model) AudioPilot automatically adjusts audio volume and sound quality in accordance with the level of noise entering the vehicle interior while driving. When AudioPilot is turned ON, the system automatically calculates the conditions for optimum hearing of sound which may be difficult to hear depending on exterior noise. -
Page 262
Interior Comfort Audio System Surround When the rear seat-optimized function is operating, the surround effect can be enjoyed at five separate levels. Indication Volume change Minimum Medium High Maximum Turn the audio control dial to select Surround MIN-MAX mode. The selected mode will be indicated. -
Page 263
MEMO 6-33… -
Page 264
Interior Comfort Audio System qOperating the Radio Manual tuning dial/Auto memory Seek tuning button/Electric serial number buttons Radio ON Press a band selector button ( turn the radio on. Band selection Successively pressing the band selector button ( ) switches the bands as follows: FM1→FM2→AM. -
Page 265
NOTE If you continue to press and hold the button, the frequency will continue changing without stopping. Scan tuning Press the scan button ( automatically sample strong stations. Scanning stops at each station for about 5 seconds. To hold a station, press the scan button ( ) again during this interval. -
Page 266
Interior Comfort Audio System 1221 Avenue Of The Americas New York, NY 10020 Attention: Customer Care Include your Sirius Radio ESN (Electronic Serial Number) when subscribing or requesting technical assistance. See the Satellite Radio Kit manual accompanying the SIRIUS unit for complete satellite radio activation procedures and information on how to display the ESN#. -
Page 267
MEMO 6-37… -
Page 268
Interior Comfort Audio System qOperating the Compact Disc (CD) Player Repeat button Load button Track up button Track down button Type Playable data Music CD player · Music data (CD-DA) (non-MP3 compatible) Inserting the CD Insert the CD into the slot, label-side up. The auto-loading mechanism will set the CD and begin play. -
Page 269
CD malfunction. Check the CD for damage, dirt, or smudges, and then properly reinsert. If the message appears again, take the unit to an Authorized Mazda Dealer for service. ) during ) again to ) during… -
Page 270
Interior Comfort Audio System qOperating the In-Dash CD Changer Music CD player (non-MP3 compatible) Music CD/MP3 CD player (MP3 compatible) Load button Track up button Track down button Display button Display feed dial Repeat button There are two types of In-dash CD changers. -
Page 271
Normal insertion 1. Press the load button ( 2. When IN is displayed, insert the CD. Inserting CDs into desired tray number 1. Press and hold the load button ( for about 2 seconds until a beep sound is heard. 2. -
Page 272
Interior Comfort Audio System NOTE CDs will be ejected starting with the one with the lowest number. All CDs in the tray will be ejected continuously. CDs can be ejected when the ignition switch is off. Press and hold the CD eject button ( ) for about 2 seconds and all CDs will eject. -
Page 273
(Folder repeat) 1. Press the repeat button ( playback, and then press the button again within 3 seconds to play the tracks in the current folder repeatedly. RPT is displayed. 2. Press the button again to cancel the repeat playback. Random playback Tracks are randomly selected and played. -
Page 274
CD for damage, dirt, or smudges, and then properly reinsert. If the message appears again, take the unit to an Authorized Mazda Dealer for service. qOperating the Auxiliary jack You can connect portable audio units or similar products on the market to the… -
Page 275
Indications If you see an error indication on the display, find the cause in the chart. If you cannot clear the error indication, take the vehicle to an Authorized Mazda Dealer. Indication CD is inserted upside down CHECK CD… -
Page 276: Audio Control Switch Operation (Steering Wheel)
Seek switch NOTE The VOICE switch is operable with the audio unit turned off. Mazda has installed this system to prevent distraction while driving the vehicle and using audio controls on the dashboard. Always make safe driving your first priority.
-
Page 277
qChanging the Source Press the mode switch ( the audio source (FM1 radio> FM2 radio> AM radio> CD player or CD changer> SIRIUS1> SIRIUS2> SIRIUS3> RSES or AUX> cyclical). NOTE CD, CD changer, RSES, and SIRIUS digital satellite radio modes cannot be selected in the following cases: CD, CD changer, RSES, or SIRIUS digital satellite radio unit is not equipped on the… -
Page 278: Auxiliary Input (Aux Mode)
Interior Comfort Audio System 6-48 Auxiliary Input (AUX mode) You can connect portable audio units or similar products on the market to the auxiliary jack to listen to music or audio over the vehicle’s speakers. Auxiliary jack WARNING Do not adjust the portable audio unit or a similar product while driving the vehicle: Adjusting the portable audio unit or…
-
Page 279
NOTE Before using the auxiliary jack, read the manufacturer’s instructions for the product being connected. Use a commercially-available, non- impedance (3.5 ) stereo mini plug for connecting the portable audio unit to the auxiliary jack. Before using the auxiliary jack, read the manufacture’s instructions for connecting a portable audio unit to the auxiliary jack. -
Page 280: Safety Certification
Ø This CD player should not be adjusted or repaired by anyone except qualified service personnel. If servicing is required, contact an Authorized Mazda Dealer. Ø Use of controls or adjustments or performance of procedures other than those specified herein may result in hazardous laser exposure. Never operate the CD player with the top case of the unit removed.
-
Page 281: Rear Entertainment System
If any problem occurs, such as a foreign material penetration, spilled liquid, smoking from internal burning, or other abnormal smells, stop operation immediately and consult an Authorized Mazda Dealer. If operation is continued, it may cause an accident, fire, or electrical shock.
-
Page 282
Interior Comfort Rear Entertainment System qOperating Tips for Disc Playable discs DVD video , DVD audio , video CD, audio CD, CD-R, CD-RW, DVD-R, DVD-RW and dts CD can be played. NOTE It may not be possible to play DVD video, DVD audio, video CD, audio CD, and MP3/WMA CD according to the procedures indicated in these instructions if the playback conditions have been restricted by the producer. -
Page 283
DVD video DVD videos bearing the following logo can be played. DVD audio DVD audio bearing the following logo can be played. DVD-R and DVD-RW DVD-Rs and DVD-RWs bearing each of the following logos can be played. Video CD, audio CD, CD-R, and CD-RW Video CDs, audio CDs, CD-Rs, and CD-RWs bearing each of the following logos can be played. -
Page 284
Interior Comfort Rear Entertainment System DVD-ROM, DVD-RAM, DVD+RW, CD-ROM, CDV, CD-G, CVD, VSD, SVCD, SACD, photo CDs, non-conventional discs (e.g. heart-shaped), and partially transparent discs. Discs recorded in CD-TEXT format. HD DVD and Blu-ray discs Handling of discs Do not use non-conventional discs such as heart-shaped, octagonal discs, or discs with a memory portion that is transparent or translucent. -
Page 285
Interior Comfort Rear Entertainment System Disc cleaning Do not use record sprays, antistatic agents, or household spray cleaners. Volatile chemicals such as benzine and thinner can also damage the surface of the disc and must not be used. Anything that can damage, warp or fog plastic should never be used to clean discs. Condensation Immediately after turning on the heater when the vehicle is cold, the disc or optical components (prism and lens) in the unit may become clouded with condensation. -
Page 286
Interior Comfort Rear Entertainment System Playable DISC specification CD-R and CD-RW including MP3/WMA files can be played with this unit. Discs which conform to the following formats can be played. Name ISO9660 CD-R, CD-RW format ISO9660 extension Multi-session Supported Maximum hierarchy 8 hierarchies (Including root) number Maximum folder… -
Page 287
This unit corresponds to multi-session recorded disc playback at a maximum of 49 sessions. Some data on multi-session recorded discs cannot be played. Playback of discs with added sessions is possible. Packet Write recorded discs cannot be played. This unit does not correspond to MP3i (MP3 interactive), MP3 PRO, and RIFF-style MP3 formats. -
Page 288
Interior Comfort Rear Entertainment System Playable WMA file specification CD-R and CD-RW including WMA files can be played with this unit. Discs which conform to the following formats can be played. Playable WMA files are as follows: Item Specification Sampling frequency Bit rate VBR (Variable Bit Rate) Channel mode… -
Page 289: Specifications
Operating tips for dts DTS and DTS Digital Surround are registered trademarks of Digital Theater Systems, Inc. qOperation Tips for Headphones To listen to audio other than from the speakers of the Rear Entertainment System, it is necessary to use the wireless headphones that are included. Specification Item Transmission system…
-
Page 290: Part Names
Interior Comfort Rear Entertainment System qRear Entertainment System Main Unit DISC IN indicator light Wireless headphone signal transmitter/Remote control signal receiver 6-60 Part Names Monitor screen release knob Disc slot Eject button Monitor screen…
-
Page 291
qRemote Controller Name RETURN button MENU button ENTER/Select button STOP button PAUSE button Fast-forward button Rewind button PREVIOUS (Track down) button NEXT (Track up) button DISPLAY button Rear Entertainment System Name PLAY button Slow playback button POWER button SOURCE button Picture adjust mode button Picture adjust button SET UP button… -
Page 292
Interior Comfort Rear Entertainment System qHeadphone Power button Volume dial Power indicator L (left) side R (right) side Infrared receiver 6-62… -
Page 293: Before Operation
qDisplay Opening/Closing CAUTION Ø Close the display while the Rear Entertainment System is not in use. If the display is left open, a passenger could be injured by hitting the display, or the display could be damaged. Ø Do not press the monitor screen while opening the display.
-
Page 294
Interior Comfort Rear Entertainment System Inserting the disc Insert the disc into the disc slot with the label-side up. Disc slot CAUTION Insert the disc with its label-side (decorated side) facing upward. If the disc is inserted upside-down, it may cause a malfunction. -
Page 295
Picture adjust button ( ): Darken Adjusting the color adjustment 1. Press the picture adjustment mode button (PICTURE) and select the TINT mode. 2. Press the picture adjust button ( ) or ( ) to adjust. Picture adjust button ( ): Green Picture adjust button ( ): Red Adjusting the color density 1. -
Page 296
Interior Comfort Rear Entertainment System Full screen Image is displayed on the full screen. * A 16:9 screen ratio image is shown in the above figure. Normal screen A 4:3 screen ratio image is the standard display, and black bands appear on each side of the screen. -
Page 297
qRemote Controller Operate the Rear Entertainment System with the remote controller except for disc insertion/ejection. CAUTION Do not apply excessive force to the remote controller or get it wet. Also, do not leave the remote controller in a place exposed to direct sunlight or high temperature. -
Page 298
NOTE If the remote controller is inoperable even after the batteries are replaced, consult an Authorized Mazda Dealer. 6-68 CAUTION Ø Install the battery with the correct pole pointing in the correct direction. -
Page 299: Sound Output
qSound Output from Vehicle Speakers Vehicles with audio system Change the audio system to the Rear Entertainment System mode. Sound/Music being played by the Rear Entertainment System can be heard from the vehicle speakers. For audio operation, refer to Audio System (page 6-17). Press the MEDIA button ( audio control switch.
-
Page 300
Interior Comfort Rear Entertainment System NOTE To listen to audio other than from the speakers of the rear entertainment system, it is necessary to use the wireless headphones that are included. For headphone specification, refer to Operation Tips for Headphones (page 6-59). When the headphones are not in use, turn them off. -
Page 301
When the wireless headphone receiver does not point to the Rear Entertainment System transmitter. When the signal is blocked by an obstruction such as the seat. Replacing the battery 1. Remove the screw using a coin or equivalent, and remove the cover. Remove the batteries. -
Page 302
Interior Comfort Rear Entertainment System CAUTION Ø If the battery power is depleted the headphones will not operate properly. If any of the following occurs, replace the batteries. Ø The power indicator does not illuminate even when the power is turned on. Ø… -
Page 303: Rear Entertainment System Functions
Rear Entertainment System Functions qMode The Rear Entertainment System has Disc and AUX modes. Mode Disc mode AUX (Auxiliary) mode * Auxiliary terminals in which AV equipment can be connected are equipped. Refer to Auxiliary terminals and accessory socket on page 6-88. Mode change Press the SOURCE button.
-
Page 304: Dvd Video, Dvd Audio, Video Cd, Audio Cd And Mp3/Wma Cd Playback (Disc Mode)
Interior Comfort Rear Entertainment System DVD video, DVD audio, Video CD, Audio CD and MP3/WMA CD Playback (Disc Mode) DVD video, DVD audio, Video CD, Audio CD, and MP3/WMA CD can be played in the Disc mode. CAUTION For safe driving, adjust the volume while driving so that ambient sound can be heard.
-
Page 305
2. Insert the disc into the disc slot. After the disc is inserted, the playback starts. CAUTION Insert the disc with its label-side (decorated side) facing upward. If the disc is inserted upside-down, it may cause a malfunction. When a disc has been inserted 1. -
Page 306
Interior Comfort Rear Entertainment System Fast-forward skip Press the NEXT button ( the next chapter/track. Reverse skip Press the PREV button ( the beginning of the current chapter/track. NOTE To return to the beginning of the previous chapter/track, press the PREV button ( again within 2 seconds after the button is pressed. -
Page 307
2. Press the ENTER button to change the display to the password input screen, then enter the password. For the password, see the instruction manual attached to the disc. * Bonus group means the ‘Bonus tracks’ originally recorded in the disc. qAssist Functions (DVD video, DVD audio, video CD and audio CD) Top menu and disc menu… -
Page 308
Interior Comfort Rear Entertainment System DVD audio function menu Video CD/audio CD function menu NOTE In the function menu, the title/group number, chapter/track number, and playback elapsed time cannot be selected/ changed. Settings set in the function menu are available only for the current disc. Settings set in the initial setting function menu are available for the Rear Entertainment System unit itself so that the settings remain… -
Page 309
2. Move the cursor to the subtitle ON/ OFF mode by operating the select button to the left or right. 3. Select ON to display the subtitles, or OFF to hide them by operating the select button up or down. 4. -
Page 310
Interior Comfort Rear Entertainment System 3. Set the sound output to the desired balance by operating the select button up or down. Press the button and the settings changes in the order of L+R →L →R. The sound balance changes according to the setting. -
Page 311
For example, the folder numbers for folders (1), (3), and (5) in the figure are not displayed because they do not contain MP3/WMA files. Folders and files in a hierarchy are played in the order that they are recorded on the disc by the writing software. -
Page 312
Interior Comfort Rear Entertainment System 2. Change the display mode by operating the select button up or down. Display Playback mode All files are played repeatedly. The current file is played repeatedly. All files are played once and the playback stops. All files in the current folder are played repeatedly. -
Page 313
qInitial Setting Function The settings set in the initial setting function remain after the unit is turned off or the disc is changed. The following items can be set in the initial setting. Lang: Sound and subtitle setting Rating: Parental lock setting Mark: On-Screen Mark, Angle Mark and Mode Priority settings Audio: Audio DRC setting… -
Page 314
Interior Comfort Rear Entertainment System 5. Press the ENTER button. The highlighted color returns to the previous color to indicate that the selected item is set. 6. To finish the function menu on the monitor display, press the SET UP, MENU, or STOP button. -
Page 315
Viewing can be restricted by setting the parent lock level. For example, if the level is set to 6, level 7 or higher viewing is locked and cannot be played. NOTE Parent lock is not available depending on the disc. The initial password setting (when purchased) is 0000 . -
Page 316
Interior Comfort Rear Entertainment System Country change NOTE It is necessary to set the country code because the parent lock level is different depending on the country. When using the unit in U.S.A., set the country code to 3018 . The parent lock function is disabled without the country code setting (page 6-94). -
Page 317
3. Enter the new password by pressing the number keys (0 to 9) or operating the select button up or down. 4. Press the ENTER button to set the new password. Rear Entertainment System Mark The DVD video playback status and angle display on/off, and priority of the inserted discs can be set. -
Page 318: Auxiliary Input (Aux Mode)
Interior Comfort Rear Entertainment System NOTE The display angle change is not available for discs other than multi-angle recorded DVD discs. Refer to the instruction manual accompanying the disc for details. The screen size and angle can be changed when On-Screen Mark and Angle Mark is off.
-
Page 319
Auxiliary terminals The auxiliary terminals consist of one image input terminal and two sound input terminals (for left and right). Image input terminal: Yellow Sound input (Right) terminal: Red Sound input (Left) terminal: White To use, open the cover. CAUTION Close the cover when the terminals are not in use. -
Page 320
Interior Comfort Rear Entertainment System 2. Lightly insert the plug and turn the outlet 90 degrees, then insert it fully. POWER OUTLET Unplug 1. Pull the plug out. 2. Close the cover. 6-90 NOTE The following electrical appliances may not operate even if their electrical capacity is 100 W or less. -
Page 321
1. Turn the ignition switch to the LOCK position. 2. If a power supply is necessary, connect the outlet to the power outlet. Refer to Power outlet on page 6-88. 3. Connect the image cable and sound cables to the input terminals. Accessory socket (DC12 V, 10 A) Auxiliary… -
Page 322: Language Code List
Interior Comfort Rear Entertainment System Language Abkhazian Afar Afrekaans Albanian Amharic Arabic Armenian Assamase Aymara Azerbaijani Bashkir Basque Bengali Bhutani Bihari Bislama Breton Bulgarian Burmese Byelorussian Cambodian Catalan Chinese Corsican Croatian Czech Danish Dutch English Esperanto Estonian Faroese Fiji Finnish French Friesian Galician…
-
Page 323
Language Nauru Nepali Norwegian Occtian Oriya Oromo Panjabi Pashto, Pushto Persian Polish Portuguese Quechua Rhaeto-Romance Romanian Russian Samoan Sangho SanSkrit Scots-Gaelic Serbian Serbo-Croatian Sesotho Setswana Shona Sindhi Singhalese Siswaiti Slovak Slovenian Somali Spanish Sundanese Swahili Swedish Tagalog Tajik Tamil Tatar Telugu Thai Tibetan… -
Page 324: Country Code List
Interior Comfort Rear Entertainment System Country Afghanistan Albania Algeria American Samoa Andorra Angola Anguilla Antarctica Antigua and Barbuda Argentina Armenia Aruba Australia Austria Azerbaijan Bahamas Bahrain Bangladesh Barbados Belarus Belgium Belize Benin Bermuda Bhutan Bolivia Bosnia and Herzegovina Botswana Bouvet Island Brazil British Indian Ocean Territory…
-
Page 325
Country French Southern Territories Gabon Gambia Georgia Germany Ghana Gibraltar Greece Greenland Grenada Guadeloupe Guam Guatemala Guinea Guinea-Bissau Guyana Haiti Heard and McDonald Islands Holy See (Vatican City State) Honduras Hong Kong Hungary Iceland India Indonesia Iran, Islamic Republic of Iraq Ireland Israel… -
Page 326
Interior Comfort Rear Entertainment System Country Nigeria Niue Norfolk Island Northern Mariana Islands Norway Oman Pakistan Palau Palestinian Territory, Occupied Panama Papua New Guinea Paraguay Peru Philippines Pitcairn Poland Portugal Puerto Rico Qatar Reunion Romania Russian Federation Rwanda Saint Helena Saint Kitts and Saint Lucia Saint Pierre and Miquelon… -
Page 327
Country Wallis and Futuna Islands Western Sahara Yemen Yugoslavia Zaire See Congo, The Democratic Republic of the Zambia Zimbabwe Rear Entertainment System Code 3205 1407 3404 3420 3517 3512 3522 Interior Comfort 6-97… -
Page 328: Error Message
Interior Comfort Rear Entertainment System qMessage Disc mode error message Use of Non-supported Disc An error message is displayed if a non- supported DVD-ROM disc, a non- supported disc format or a disc (PAL, other) with a different image signal encoding is read.
-
Page 329
Interior Comfort Rear Entertainment System System errors (Common to each mode) Power malfunction An error message is displayed if the power supply to the rear entertainment system drops (About 9.5 V or less), and the power is turned off. The power is restored when the power supply to the rear entertainment system is 10 V or more. -
Page 330: Symptoms And Actions
If any malfunction is suspected, verify the following before requesting a repair. If the problem cannot be solved after performing the procedure, have the system inspected at an Authorized Mazda Dealer. Some functions are not available depending on the disc. Read the instruction manual attached to the disc before operating.
-
Page 331
Symptom Cause Audio output from DTS format language is selected and vehicle played back. speakers but (The wireless headphones cannot play- not from back DTS format language) headphones The disc is dirty. Image and/or sound The disc has a scratch. is distorted. -
Page 332
Interior Comfort Rear Entertainment System Symptom Cause headphones’ optical The headphones’ batteries are weak. reception range is too narrow. There is excessive noise in the The headphones’ batteries are weak. headphone audio 6-102 Action Replace the batteries with new ones. Replace the batteries with new ones. -
Page 333: Bluetooth Hands-Free
Bluetooth Hands-Free qWhat is a Bluetooth Hands-Free? Bluetooth Hands-Free Outline By connecting a Bluetooth equipped mobile telephone to the hands-free unit equipped on the vehicle, making and receiving calls are possible using the phone button located on the steering wheel and voice commands. Bluetooth equipped mobile telephone A Bluetooth equipped mobile telephone communicates with the hands-free unit…
-
Page 334
Interior Comfort Bluetooth Hands-Free Information display Telephone numbers, Bluetooth Hands- Free messages, and operation status are displayed. Microphone The microphone is used for inputting voice commands or exchanging conversation. Audio unit/Navigation system The audio unit or navigation system is used for adjusting the volume. 6-104 If the Bluetooth Hands-Free is operated, information such as radio wave reception… -
Page 335
Close the windows and/or the moonroof to shut out loud noises from outside the vehicle, or turn down the airflow of the climate control system while the Bluetooth Hands-Free is being used. Voice recognition may not function correctly or voice quality may deteriorate under the following conditions. -
Page 336: Basic Bluetooth Hands-Free Operation
Interior Comfort Bluetooth Hands-Free Basic Bluetooth Hands- Free Operation qBluetooth Hands-Free preparation Language setting 1. Press the phone button (Short press). 2. Say: [Beep] Setup 3. Prompt: Select one of the following: Pairing options, confirmation prompts, select phone, language, or passcode, or say cancel to return to the main menu.
-
Page 337
(Peripheral device). NOTE For the operation of the mobile telephone, refer to its instruction manual. 15. Select Mazda from the device list searched by the mobile phone. 16. Input the 4-digit pairing code set in Step 9 to the mobile telephone. -
Page 338
Interior Comfort Bluetooth Hands-Free 7. When Yes is called out, the call is made. When No is called out, the procedure returns to Step 3. qReceiving an incoming call 1. Prompt: Incoming call, press the phone button to answer. 2. To accept the call, press the phone button (Short press). -
Page 339: Convenient Use Of The Hands-Free System
Convenient Use of the Hands-Free System qPhone book usage Phone book registration Phone numbers can be registered to the Bluetooth Hands-Free phone book. 1. Press the phone button (Short press). 2. Say: [Beep] Phone book 3. Prompt: Select one of the following: new entry, edit, list names, delete or erase all…, or say cancel to return to main menu.
-
Page 340
Interior Comfort Bluetooth Hands-Free qRedialing function Redialing the number of the person previously dialed is possible. 1. Press the phone button (Short press). 2. Say: [Beep] Redial 3. Prompt: Dialing qEmergency calls A call can be made to the emergency phone number (911) using the voice input command. -
Page 341
Ending the current call Press the phone button during the call (Long press). qVoice guidance interrupt operation Voice guidance can be stopped by pressing the phone button (Short press) while it is being heard. A new voice input command can then be called out by the user. -
Page 342
Interior Comfort Bluetooth Hands-Free 5. Prompt: Please say the name of the entry you would like to delete, or say List names …, or say cancel to return to main menu. 6. Say: [Beep] XXXXX… (Ex. John’s phone ) (Say the registered voice tag to be deleted from the phone book.) 7. -
Page 343: Hands-Free Telephone Setting
7. Say: [Beep] No 8. Prompt: Returning to main menu. Bluetooth Hands-Free Hands-Free Telephone Setting qMobile phone Mobile phone registration For the registration of a Bluetooth equipped mobile telephone to the Bluetooth Hands-Free system, refer to Bluetooth Hands-Free preparation (page 6-106).
-
Page 344
Interior Comfort Bluetooth Hands-Free Continue : Continues the voice guidance. Delete : Deletes the registered mobile phone. Previous : Returns to the previous mobile phone. 8. Prompt: End of list, would you like to start from the beginning? 9. Say: [Beep] No 10. -
Page 345
10. Say: [Beep] Yes 11. Prompt: Deleted qLanguage setting English, Spanish, and Canadian French are available. If the language setting is changed, all of the voice guidance and voice input commands are done in the selected language. Method 1 Refer to Bluetooth Hands-Free preparation on page 6-106. -
Page 346
Interior Comfort Bluetooth Hands-Free 3. Prompt: Select one of the following: pairing options, confirmation prompts, select phone, language, or passcode…, or say cancel to return to main menu. 4. Say: [Beep] Passcode 5. Prompt: Passcode is enabled. Would you like to disable it? 6. -
Page 347
3. Prompt: This operation must be performed in a quiet environment while the vehicle is stopped. See the owner’s manual for the list of required training phrases. Press and release the phone button when you are ready to begin. Press and hold the phone button to cancel at any time. -
Page 348: When The Bluetooth Hands-Free Cannot Be Used
Interior Comfort Bluetooth Hands-Free Explanation Command Retrain Setup Confirmation Prompts Setup Language Setup Pairing Options Pair A Phone Transfer Call NOTE After user voice registration is completed, voice guidance Speaker enrollment is complete, returning to main menu is announced. qDTMF (dial tone multi-frequency signal) transmission This function is used when transmitting DTMF via the user’s voice.
-
Page 349: Safety Certification
Safety Certification FCC ID: CB2MBLUEC07 IC:279B- MBLUEC07 This device complies with Part 15 of the FCC Rules and with RSS-210 of Industry Canada. Operation is subject to the following two conditions: (1) This device may not cause harmful interference, and (2) This device must accept any interference received, including interference that may cause undesired…
-
Page 350: Interior Equipment
Interior Comfort Interior Equipment Sunvisors When you need a sunvisor, lower it for use in front or swing it to the side. Sunvisor qSide Extention Sunvisors The visor extender extends the sunvisor’s range of sun shading. To use, pull it out. CAUTION When moving the sunvisor, reinsert the visor extender, otherwise the…
-
Page 351: Interior Lights
Interior Lights qIlluminated Entry System When the illuminated entry system operates, the overhead light (switch is in the DOOR position) and the courtesy lights turn on for: About 30 seconds after the driver’s door is unlocked and the ignition switch is in the LOCK position (with the ignition key removed).
-
Page 352
Interior Comfort Interior Equipment Center/Rear Switch Overhead Lights Position Light off Light on or off in accordance with the operation of front overhead light switch Light on qMap Lights The map lights are switched on or off by pressing the switches. 6-122 qLuggage Compartment Light Switch… -
Page 353: Information Display
Climate control display (Driver) Without navigation system qInformation Display Functions The information display has the following functions: í Clock Ambient Temperature Display (Outside Temperature Display) Climate Control Display Audio Display Information Display Clock Audio display Interior Comfort Interior Equipment Climate control display (Front passenger)/ Ambient temperature display í…
-
Page 354
Interior Comfort Interior Equipment qClock NOTE When the trip computer is displayed, press the CLOCK button to change the display to the time. When the ignition switch is in the ACC or ON position, the time is displayed. Without navigation system Time setting 1. -
Page 355: Cup Holder
qClimate Control Display The climate control system status is displayed. To operate the climate control system, refer to Climate Control System (page 6-2). qAudio Display The audio system status is displayed. To operate the audio system, refer to Audio System (page 6-17). Interior Equipment Cup Holder WARNING…
-
Page 356
Interior Comfort Interior Equipment qFront To use the cup holder, push the release button. qRear Second-row seat Cup holders are located in the armrest. Third-row seat Cup holders are located in the third-row seat side trims. í 6-126 Some models. Right-side í… -
Page 357: Bottle Holder
Bottle Holder Bottle holders are on the inside of the doors. Bottle holder CAUTION Do not use the bottle holders for containers without caps. The contents may spill when the door is opened or closed. Interior Equipment Storage Compartments WARNING Keep storage boxes closed when driving: Driving with the storage boxes open…
-
Page 358
Interior Comfort Interior Equipment qCoin Box To open, press the release catch down and pull the lid downward. qGlove Box To open the glove box, pull the latch toward you. Insert the key (auxiliary key clockwise to lock, counterclockwise to unlock. -
Page 359
Use the loops in the luggage compartment to secure cargo with a rope or net. The tensile strength of the loops is 196 N (20 kgf, 44 lbf). Do not apply excessive force to the loops as it will damage them. qCargo Sub-Compartment Center cargo sub-compartment 1. -
Page 360
Interior Comfort Interior Equipment Shopping bag hook (tensile strength:3 kg (6.6 lb)) qLuggage Compartment Golf bags can be carried in the luggage compartment. To carry two golf bags, use the following procedure: 1. Put one golf bag in the luggage compartment with its top pointing to the left. -
Page 361: Accessory Sockets
Accessory Sockets Only use genuine Mazda accessories or the equivalent requiring no greater than 120 W (DC 12 V, 10 A). Front The ignition switch must be in the ACC or ON position. Center/Rear The accessory sockets can be used regardless of the position of the ignition switch.
-
Page 362: Power Outlet Í
Interior Comfort Interior Equipment í Power Outlet The power outlet is positioned as shown in the figure. For more details, refer to Auxiliary terminals and power outlet (page 6-88). í 6-132 Some models.
-
Page 363
In Case of an Emergency Helpful information on what to do in an emergency. Parking in an Emergency … 7-2 Parking in an Emergency … 7-2 Flat Tire … 7-3 Spare Tire and Tool Storage … 7-3 Changing a Flat Tire … 7-8 Overheating … -
Page 364: Parking In An Emergency
In Case of an Emergency Parking in an Emergency Parking in an Emergency The hazard warning lights should always be used when you stop on or near a roadway in an emergency. The hazard warning lights warn other drivers that your vehicle is a traffic hazard and that they must take extreme caution when near it.
-
Page 365: Flat Tire
In Case of an Emergency Flat Tire Spare Tire and Tool Storage Spare tire and tools are stored in the locations illustrated in the diagram. Spare tire carrier bolt socket Flat tire belt Tiedown eyelet Jack lever Lug wrench Jack…
-
Page 366
If the jack is not completely secured, it could rattle while driving. Make sure the jack screw is sufficiently tightened. qSpare Tire Your Mazda has a temporary spare tire. Jack screw The temporary spare tire is lighter and smaller than a conventional tire, and is… -
Page 367
Ø Do not use your temporary spare tire on any other vehicle; it has been designed only for your Mazda. Ø Use only one temporary spare tire on your vehicle at the same time. In Case of an Emergency… -
Page 368
In Case of an Emergency Flat Tire 5. Slowly turn the lug wrench counterclockwise until the spare tire reaches the ground and the cable becomes loose. Spare tire CAUTION Do not loosen the cable too much as this may cause damage to the spare tire carrier. -
Page 369
If you hear rattling from the spare tire carrier while the vehicle is moving, the spare tire carrier cable may be cut. Have it repaired at an Authorized Mazda Dealer as soon as possible. In Case of an Emergency Flat Tire… -
Page 370: Changing A Flat Tire
CAUTION (With Tire Pressure Monitoring System) The wheels equipped on your Mazda are specially designed for installation of the tire pressure sensors. Do not use non-genuine wheels, otherwise it may not be possible to install the tire pressure sensors.
-
Page 371
Use only the jack provided with your Mazda: Using a jack that is not designed for your Mazda is dangerous. The vehicle could slip off the jack and seriously injure someone. Never place objects under the jack: Jacking the vehicle with an object under the jack is dangerous. -
Page 372
Before removing the lug nuts, make sure your Mazda is firmly in position and that it cannot slip or move. 5. Remove the lug nuts by turning them counterclockwise;… -
Page 373
To install the nut 1. Place the key on top of the nut, and be sure to hold the key square to it. If you hold the key at an angle, you may damage both key and nut. Don’t use a power impact wrench. -
Page 374
Because the wheel studs and lug nuts on your Mazda have metric threads, using a non-metric nut is dangerous. On a metric stud, it would not secure the wheel and would damage the stud, which could cause the wheel to slip off and cause an accident. -
Page 375
NOTE Attach location *1 of the belt to the attachment loop on the right. Buckle Belt clips 12. Pull the belt end to secure the flat tire. In Case of an Emergency 13. Check the tire inflation pressure. Refer to the specification charts on page 10-6. -
Page 376: Overheating
If the cooling fan does not operate while the engine is running, the engine temperature will increase. Stop the engine and call an Authorized Mazda Dealer. 6. Make sure the cooling fan is operating, then turn off the engine after the temperature has decreased.
-
Page 377
Carefully add coolant as required (page 8-21). CAUTION If the engine continues to overheat or frequently overheats, have the cooling system inspected. The engine could be seriously damaged unless repairs are made. Consult an Authorized Mazda Dealer. In Case of an Emergency Overheating 7-15… -
Page 378: Emergency Starting
4. If the engine fails to start, crank it without depressing the accelerator for up to 10 seconds. If the engine still does not start using the above procedure, have your vehicle inspected by an Authorized Mazda Dealer. 7-16…
-
Page 379: Jump-Starting
Jump-starting is dangerous if done incorrectly. So follow the procedure carefully. If you feel unsure about jump-starting, we strongly recommend that you have a competent service technician do the work. WARNING Follow These Precautions Carefully: To ensure safe and correct handling of the battery, read the following precautions carefully before using the battery or inspecting it.
-
Page 380
In Case of an Emergency Emergency Starting Keep all flames, including cigarettes, and sparks away from open battery cells: Flames and sparks near open battery cells are dangerous. Hydrogen gas, produced during normal battery operation, could ignite and cause the battery to explode. An exploding battery can cause serious burns and injuries. -
Page 381: Push-Starting
5. When finished, carefully disconnect the cables in the reverse order described in the illustration. In Case of an Emergency Emergency Starting Push-Starting Do not push-start your Mazda. NOTE You can’t start a vehicle with an automatic transaxle by pushing it. 7-19…
-
Page 382: Emergency Towing
In Case of an Emergency Emergency Towing Towing Description We recommend that towing be done only by an Authorized Mazda Dealer or a commercial tow-truck service. Proper lifting and towing are necessary to prevent damage to the vehicle. Particularly when towing a AWD vehicle,…
-
Page 383: Tiedown Hooks
WARNING Always tow a AWD vehicle with all four wheels off the ground: Towing a AWD vehicle with either the front or rear wheels on the ground is dangerous as the drive train could be damaged, or the vehicle could trail away from the tow truck and cause an accident.
-
Page 384
In Case of an Emergency Emergency Towing CAUTION The cap cannot be completely removed. Do not use excessive force as it may damage the cap or scratch the painted bumper surface. 3. Securely install the tiedown eyelet using the lug wrench. Lug wrench Lug wrench 7-22… -
Page 385: Recreational Towing
Recreational Towing An example of recreational towing is towing your vehicle behind a motorhome. The transaxle is not designed for towing this vehicle on all 4 wheels. When doing recreational towing refer to Towing Description (page 7-20) and Tiedown Hooks (page 7-21) and carefully follow the instructions.
-
Page 386
7-24… -
Page 387
Maintenance and Care How to keep your Mazda in top condition. Introduction … 8-2 Introduction … 8-2 Scheduled Maintenance … 8-3 Scheduled Maintenance (USA, Canada, and Puerto Rico) … 8-3 Scheduled Maintenance (Mexico) … 8-9 Owner Maintenance … 8-16 Owner Maintenance Schedule … 8-16 Owner Maintenance Precautions … -
Page 388: Introduction
Claims against the warranty resulting from lack of maintenance, as opposed to defective materials or authorized Mazda workmanship, will not be honored. Any auto repair shop using parts equivalent to your Mazda’s original equipment may perform maintenance. But we recommend that it always be done by an Authorized…
-
Page 389: Scheduled Maintenance
Scheduled Maintenance (USA, Canada, and Puerto Rico) Follow Schedule 1 if the vehicle is operated mainly where none of the following conditions apply. Repeated short-distance driving Driving in dusty conditions Driving with extended use of brakes Driving in areas where salt or other corrosive materials are being used Driving on rough or muddy roads Extended periods of idling or low-speed operation Driving for long periods in cold temperatures or extremely humid climates…
-
Page 390: Scheduled Maintenance (Mexico)
Maintenance and Care Scheduled Maintenance qSchedule 1 Maintenance Interval ENGINE Drive belts Engine oil Engine oil filter COOLING SYSTEM Engine coolant FUEL SYSTEM Air filter Fuel lines and hoses Hoses and tubes for emission IGNITION SYSTEM Spark plugs CHASSIS and BODY Brake lines, hoses and connections Disc brakes Tire (Rotation)
-
Page 391
*2 According to state/provincial and federal regulations, failure to perform maintenance on these items will not void your emissions warranties. However, Mazda recommends that all maintenance services be performed at the recommended time or mileage/kilometer period to ensure long-term reliability. -
Page 392
Maintenance and Care Scheduled Maintenance qSchedule 2 Maintenance Interval ENGINE Drive belts Engine oil Engine oil filter COOLING SYSTEM Engine coolant Engine coolant level FUEL SYSTEM Air filter Fuel lines and hoses Hoses and tubes for emission IGNITION SYSTEM Spark plugs ELECTRICAL SYSTEM Function of all lights Number of months or kilometers (miles), whichever comes first… -
Page 393
Maintenance Interval CHASSIS and BODY Brake lines, hoses and connections Brake fluid level Disc brakes Tire (Rotation) Tire inflation pressure and tire wear Steering operation and linkages Power steering fluid level Front and rear suspension, ball joints and wheel bearing axial play Rear differential oil (AWD) Driveshaft dust boots Bolts and nuts on chassis and body… -
Page 394
*2 According to state/provincial and federal regulations, failure to perform maintenance on these items will not void your emissions warranties. However, Mazda recommends that all maintenance services be performed at the recommended time or mileage/kilometer period to ensure long-term reliability. -
Page 395
Scheduled Maintenance (Mexico) Follow Schedule 1 if the vehicle is operated mainly where none of the following conditions apply. Repeated short-distance driving Driving in dusty conditions Driving with extended use of brakes Driving in areas where salt or other corrosive materials are being used Driving on rough or muddy roads Extended periods of idling or low-speed operation Driving for long periods in cold temperatures or extremely humid climates… -
Page 396
Maintenance and Care Scheduled Maintenance qSchedule 1 Maintenance Interval ENGINE Drive belts Engine oil Engine oil filter COOLING SYSTEM Cooling system Engine coolant FUEL SYSTEM Air filter Fuel lines and hoses Hoses and tubes for emission Fuel filter IGNITION SYSTEM Spark plugs CHASSIS and BODY Brake lines, hoses and connections… -
Page 397
*2 According to state/provincial and federal regulations, failure to perform maintenance on these items will not void your emissions warranties. However, Mazda recommends that all maintenance services be performed at the recommended time or kilometer period to ensure long-term reliability. -
Page 398
Maintenance and Care Scheduled Maintenance qSchedule 2 Maintenance Interval ENGINE Drive belts Engine oil Engine oil filter COOLING SYSTEM Cooling system Engine coolant Engine coolant level FUEL SYSTEM Air filter Fuel lines and hoses Hoses and tubes for emission Fuel filter IGNITION SYSTEM Spark plugs ELECTRICAL SYSTEM… -
Page 399
*2 According to state/provincial and federal regulations, failure to perform maintenance on these items will not void your emissions warranties. However, Mazda recommends that all maintenance services be performed at the recommended time or kilometer period to ensure long-term reliability. -
Page 400
Maintenance and Care Scheduled Maintenance (Cont.) Maintenance Interval ENGINE Drive belts Engine oil Engine oil filter COOLING SYSTEM Cooling system Engine coolant Engine coolant level FUEL SYSTEM Air filter Fuel lines and hoses Hoses and tubes for emission Fuel filter IGNITION SYSTEM Spark plugs ELECTRICAL SYSTEM… -
Page 401
*2 According to state/provincial and federal regulations, failure to perform maintenance on these items will not void your emissions warranties. However, Mazda recommends that all maintenance services be performed at the recommended time or kilometer period to ensure long-term reliability. -
Page 402: Owner Maintenance
The owner or a qualified service technician should make these vehicle inspections at the indicated intervals to ensure safe and dependable operation. Bring any problem to the attention of an Authorized Mazda Dealer or qualified service technician as soon as possible.
-
Page 403: Owner Maintenance Precautions
Improper owner maintenance during the warranty period may affect warranty coverage. For details, read the separate Mazda Warranty statement provided with the vehicle. If you’re unsure about any servicing or maintenance procedure, have it done by an Authorized Mazda Dealer.
-
Page 404: Engine Compartment Overview
Maintenance and Care Owner Maintenance Engine Compartment Overview Engine coolant reservoir Power steering fluid reservoir Windscreen washer fluid reservoir Engine oil-filler cap 8-18 Brake fluid reservoir Automatic transaxle fluid-level dipstick Relay box Engine oil dipstick Battery Fuse block…
-
Page 405: Engine Oil
Engine Oil NOTE Changing the engine oil should be done by an Authorized Mazda Dealer. qRecommended Oil Use SAE 5W-20 engine oil. Oil container labels provide important information. A chief contribution this type of oil makes to fuel economy is reducing the amount of fuel necessary to overcome engine friction.
-
Page 406
Maintenance and Care Owner Maintenance The quality designation SM, or ILSAC must be on the label. –30 –10 –20 –20 5W-20 qInspecting Engine Oil Level 1. Be sure the vehicle is on a level surface. 2. Warm up the engine to normal operating temperature. -
Page 407: Engine Coolant
NOTE Changing the coolant should be done by an Authorized Mazda Dealer. Maintenance and Care Owner Maintenance Inspect the antifreeze protection and coolant level in the coolant reservoir at…
-
Page 408
If engine coolant other than FL22 type is used, the engine coolant must be replaced earlier than the specified replacement interval indicated in the scheduled maintenance (page 8-3). If the coolant reservoir is empty or new coolant is required frequently, consult an Authorized Mazda Dealer. -
Page 409: Brake Fluid
It should be kept at MAX. The level normally drops with accumulated distance, a condition associated with wear of brake linings. If it is excessively low, have the brake system inspected by an Authorized Mazda Dealer. Maintenance and Care Owner Maintenance qAdding Brake Fluid…
-
Page 410: Power Steering Fluid
The level must be kept between MAX and MIN. Visually examine the lines and hoses for leaks and damage. If new fluid is required frequently, consult an Authorized Mazda Dealer. 8-24 Automatic Transaxle Fluid (ATF) qInspecting Automatic Transaxle Fluid Level The automatic transaxle fluid level should be inspected regularly.
-
Page 411
5. Pull it out again. The proper fluid level is marked on the dipstick as follows. Full Full Fluid hot scale A When the vehicle has been driven and the fluid is at normal operating temperature, about 65°C (150°F), the level must be between Full and Low. -
Page 412: Washer Fluid
Maintenance and Care Owner Maintenance Washer Fluid qInspecting Washer Fluid Level WARNING Use only windshield washer fluid or plain water in the reservoir: Using radiator antifreeze as washer fluid is dangerous. If sprayed on the windshield, it will dirty the windshield, affect your visibility, and could result in an accident.
-
Page 413: Body Lubrication
Body Lubrication All moving points of the body, such as door and hood hinges and locks, should be lubricated each time the engine oil is changed. Use a nonfreezing lubricant on locks during cold weather. Make sure the hood’s secondary latch keeps the hood from opening when the primary latch is released.
-
Page 414
Maintenance and Care Owner Maintenance 2. Open the clip and slide the blade assembly in the direction of the arrow. 3. Wrap a flathead screwdriver or similar tool with a soft cloth to prevent damage to the clip. NOTE Using a soft cloth-wrapped flathead screwdriver. -
Page 415
CAUTION Ø Don’t bend or discard the stiffeners. You need to use them again. Ø If the metal stiffeners are switched, the blade’s wiping efficiency could be reduced. So don’t use the driver’s side metal stiffeners on the passenger’s side, or vice versa. -
Page 416
Maintenance and Care Owner Maintenance 3. Pull down the blade rubber and slide it out of the blade holder. 4. Remove the metal stiffeners from each blade rubber and install them in the new blade. CAUTION Don’t bend or discard the stiffeners. You need to use them again. -
Page 417: Battery
WARNING Wash hands after handling the battery and related accessories: Battery posts, terminals and related accessories contain lead and lead compounds, chemicals known to the State of California to cause cancer and reproductive harm. Read the following precautions carefully before using the battery or inspecting to ensure safe and correct handling: Always wear eye protection when working near the battery: Working without eye protection is dangerous.
-
Page 418
Maintenance and Care Owner Maintenance Keep all flames, including cigarettes, and sparks away from open battery cells: Flames and sparks near open battery cells are dangerous. Hydrogen gas, produced during normal battery operation, could ignite and cause the battery to explode. An exploding battery can cause serious burns and injuries. -
Page 419: Tires
(radial, bias-belted, bias-type) on all four wheels. Using Wrong-Sized Tires: Using any other tire size than what is specified for your Mazda (page 10-6) is dangerous. It could seriously affect ride, handling, ground clearance, tire clearance, and speedometer calibration.
-
Page 420
Maintenance and Care Owner Maintenance NOTE Always check tire pressure when tires are cold. Warm tires normally exceed recommended pressures. Don’t release air from warm tires to adjust the pressure. Underinflation can cause reduced fuel economy, uneven and accelerated tire wear, and poor sealing of the tire bead, which will deform the wheel and cause separation of tire from rim. -
Page 421
CAUTION (With Tire Pressure Monitoring System) When replacing/repairing the tires or wheels or both, have the work done by an Authorized Mazda Dealer, or the tire pressure sensors may be damaged. NOTE (With Tire Pressure Monitoring System) When tires with steel wire reinforcement in… -
Page 422
Ø (With Tire Pressure Monitoring System) Ø When replacing/repairing the tires or wheels or both, have the work done by an Authorized Mazda Dealer, or the tire pressure sensors may be damaged. Ø The wheels equipped on your Mazda are specially designed for installation of the tire pressure sensors. -
Page 423: Light Bulbs
Overhead light (Center) Overhead light/Map lights (Front) Vanity mirror lights Headlights (High beam) Fog lights High-mount brake light Luggage compartment light License plate lights Reverse lights Rear turn signal lights Owner Maintenance Light Bulbs Front side marker lights Front turn signal lights Headlights (Low beam) Taillights Rear side marker lights…
-
Page 424
Consult an Authorized Mazda Dealer when the replacement is necessary. Never touch the glass portion of a halogen bulb with your bare hands and… -
Page 425
(Xenon fusion bulb) You cannot replace the low beam bulbs by yourself. The bulbs must be replaced at an Authorized Mazda Dealer. (Halogen bulbs) 1. Make sure the headlight switch is off. 2. Lift the hood. 3. Remove the attachment bolts and the coolant reservoir before replacing the light bulb. -
Page 426
Maintenance and Care Owner Maintenance 8. Install the coolant reservoir. If you are unsure of how tight the bolts should be, have them inspected at an Authorized Mazda Dealer. Bolt tightening torque N·m (kgf·m, ft·lbf) (0.7 1.2, 5.1 8.7) NOTE To replace the bulb, contact an Authorized Mazda Dealer. -
Page 427
Taillights (Rear combination light side), High-mount brake light Due to the complexity and difficulty of the procedure, the LED bulbs should be replaced by an Authorized Mazda Dealer. NOTE LED bulb replacement is not possible. The rear combination component must be replaced. -
Page 428
4. Install the new bulb in the reverse order of removal. NOTE To replace the bulb, contact an Authorized Mazda Dealer. License plate lights 1. Wrap a flathead screwdriver with a soft cloth to prevent damage to the lens and… -
Page 429
2. Disconnect the bulb by pulling it out. 3. Install the new bulb in the reverse order of removal. qReplacing Interior Light Bulbs Overhead light/Map lights (Front), Overhead light (Center, Rear), Luggage compartment light, Courtesy lights, Vanity mirror lights 1. Wrap a small flathead screwdriver with a soft cloth to prevent damage to the lens and remove the lens by carefully prying on the edge of the lens with the… -
Page 430: Fuses
If a fuse has blown, the inside element will be melted. If the same fuse blows again, avoid using that system and consult an Authorized Mazda Dealer as soon as possible. qFuse Replacement Replacing fuses located behind the glove compartment…
-
Page 431
If it does not fit tightly, have an expert install it. We recommend an Authorized Mazda Dealer. If you have no spare fuses, borrow one of the same rating from a circuit not essential to vehicle operation, such as the ROOM circuit. -
Page 432
Normal WARNING Do not replace the main fuse by yourself. Have an Authorized Mazda Dealer perform the replacement: Replacing the fuse by yourself is dangerous because the MAIN fuse is a high current fuse. Incorrect… -
Page 433
qFuse Panel Description Fuse block (Engine compartment) DESCRIPTION MAIN ENGINE R HEATER P.SEAT R HEATER IGKEY2 FAN1 P.SEAT L DEFOG FUEL PUMP IGKEY1 ABS (SOL) ROOM FUSE PROTECTED COMPONENT RATING 150A For protection of all circuits Transaxle control system Heater í… -
Page 434
Maintenance and Care Owner Maintenance DESCRIPTION OUTLET CTR OUTLET RR AC PWR S.WARM A/C MAG BOSE FAN2 IG COIL H/L LOW L H/L LOW R H/L HIGH HAZARD ENG +B HORN STOP EGI INJ ENG BAR ENG BAR 2 í 8-48 Some models. -
Page 435
Maintenance and Care Owner Maintenance í Relay box (Engine compartment) FUSE DESCRIPTION PROTECTED COMPONENT RATING 7.5A Injectors í 8-49 Some models. -
Page 436
Maintenance and Care Owner Maintenance Fuse block (Glove box) DESCRIPTION OUTLET FR MIRROR METER ENG.IGA R.WIPER P.LIFT GATE SUNROOF AUDIO M.DEF TAIL ILLUMI í 8-50 Some models. FUSE PROTECTED COMPONENT RATING Accessory Socket (Front) 7.5A Power control mirror Instrument cluster 7.5A ABS, Air bag 7.5A… -
Page 437
DESCRIPTION OUTLET CTR OUTLET RR WIPER P.WIND FUSE PROTECTED COMPONENT RATING Windshield wiper and washer Power windows Maintenance and Care Owner Maintenance 8-51… -
Page 438: Appearance Care
Prevention It is necessary to have your Mazda washed and waxed to preserve its finish according to the instructions in this section. This should be done as soon as possible.
-
Page 439
This increases the chance of paint chipping. Chipped paint can lead to rust forming on your Mazda. Before this happens, repair the damage by using Mazda touch-up paint according to the instructions in this section. Failure to repair the affected area could lead to serious rusting and expensive repairs. -
Page 440: Exterior Care
Cleansers or wax containing abrasives are used. NOTE Mazda is not responsible for scratches caused by automatic car washes or improper washing. Scratches are more noticeable on vehicles with darker paint finishes.
-
Page 441
Exposed metal quickly rusts and can lead to major repairs. CAUTION If your Mazda is damaged and needs metal parts repaired or replaced, make sure the body shop applies anti-corrosion materials to all parts, both repaired and new. This will prevent them from rusting. -
Page 442
We recommend that you consult an Authorized Mazda Dealer concerning this additional precaution. qBright-Metal Maintenance Use tar remover to remove road tar and insects. -
Page 443: Interior Care
This coating is liable to be damaged with time. Check this coating periodically. An Authorized Mazda Dealer are well informed on how repairs should be made. Consult an Authorized Mazda Dealer. qAluminum Wheel Maintenance A protective coating is provided over the aluminum wheels.
-
Page 444
í 8-58 Some models. WARNING Have an Authorized Mazda Dealer replace damaged seat belts immediately: Using damaged seat belts is dangerous. In a collision, damaged belts cannot provide adequate protection. -
Page 445
Mazda Importer/Distributors … 9-10 Importer/Distributor … 9-10 Distributor in Each Area … 9-10 Warranty … 9-12 Warranties for Your Mazda … 9-12 Outside the United States and Canada … 9-13 Outside the United States … 9-14 Outside Canada … 9-15… -
Page 446: Customer Assistance
Authorized Mazda Dealer. qSTEP 1: Contact Your Mazda Dealer Discuss the matter with an Authorized Mazda Dealer. This is the quickest and best way to address the issue. If your concern has not been resolved by the CUSTOMER RELATIONS, SALES, SERVICE, or PARTS MANAGER, then please contact the GENERAL MANAGER of the dealership or the OWNER.
-
Page 447: Customer Assistance (Puerto Rico)
3. Vehicle Identification Number (17 digits, noted on your registration or title or located on the upper driver’s side corner of the dash) 4. Purchase date and current mileage 5. Your dealer’s name and location 6. Your question(s) If you live outside the U.S.A., please contact your nearest Mazda Distributor.
-
Page 448: Customer Assistance (Mexico)
Your complete and permanent satisfaction is of primary concern to Mazda. All Authorized Mazda Dealers have both the knowledge and tools to keep your Mazda in top condition. In our experience, any questions, problems, or complaints regarding the operation of your Mazda or any other general service transactions are most effectively resolved by your dealer.
-
Page 449
If a specific item of concern arises, where a solution cannot be reached between an owner, Mazda, and/or one of it’s dealers (that all parties cannot agree upon), the owner may wish to use the services offered by the Canadian Motor Vehicle Arbitration Plan (CAMVAP). -
Page 450
Provincial Administrators may be reached locally as listed below: Province/Territory British Columbia & Yukon Territories Alberta & Northwest Territories Saskatchewan Atlantic Canada qRegional Offices REGIONAL OFFICES MAZDA CANADA INC. WESTERN REGION 8171 ACKROYD ROAD SUITE 2000 RICHMOND B.C. V6X 3K1 (604) 303-5670 MAZDA CANADA INC. -
Page 451
1 Discuss the matter with an Authorized Mazda Dealer. This is the quickest and best way to address the issue. If your concern has not been resolved by the CUSTOMER RELATIONS, SALES, SERVICE, or PARTS MANAGER, then please contact the GENERAL MANAGER of the dealership or the OWNER. -
Page 452
1: Contact Your Mazda Dealer Discuss the matter with an Authorized Mazda Dealer. This is the quickest and best way to address the issue. If your concern has not been resolved by the CUSTOMER RELATIONS, SALES, SERVICE, or PARTS MANAGER, then please contact the GENERAL MANAGER of the dealership or the OWNER. -
Page 453
Customer Information and Reporting Safety Defects Customer Assistance In order to serve you efficiently and effectively, please help us by providing the following information: 1. Your name, address, and telephone number 2. Year and model of vehicle 3. Vehicle Identification Number (17 digits, noted on your registration or title or located on the upper driver’s side corner of the dash) 4. -
Page 454: Mazda Importer/Distributors
55 Vogell Road, Richmond Hill, Ontario, L4B 3K5 Canada TEL: 1 (800) 263-4680 (in Canada) (905) 787-7000 (outside Canada) qPUERTO RICO/U.S. Virgin Island Plaza Motors Corp. (Mazda de Puerto Rico) P.O. Box 362722, San Juan, Puerto Rico 00936-2722 TEL: (787) 641-9300…
-
Page 455
Customer Information and Reporting Safety Defects Mazda Importer/Distributors Triple J Saipan, Inc. (d.b.a. Triple J Motors) P.O. Box 500487 Saipan, MP 96950-0487 TEL: (670) 234-7133/3051 9-11… -
Page 456: Warranty
Federal Emission Control Warranty (U.S.A. only) Emission Defect Warranty Emission Performance Warranty California Emission Control Warranty (U.S.A. only) Emission Control Warranty (Canada only) Replacement Parts and Accessories Limited Warranty Tire Warranty NOTE Detailed warranty information is provided with your Mazda. 9-12…
-
Page 457: Outside The United States And Canada
Proper repair facilities, tools, testing equipment, and replacement parts may not be available. The Mazda warranty applies only to Mazda vehicles registered and normally operated in the United States, its territories, and Canada. Customer Information and Reporting Safety Defects…
-
Page 458: Outside The United States
We strongly recommend that you NOT take your Mazda outside the United States. However, in the event that you are moving to Canada permanently, Mazda vehicles built for use in the United States could be eligible for exportation to Canada with specific vehicle modifications to comply with the Canadian Motor Vehicle Safety requirements (CMVSS).
-
Page 459: Outside Canada
We strongly recommend that you NOT take your Mazda outside Canada. However, in the event that you are moving to the United States permanently, Mazda vehicles built for use in Canada could be eligible for exportation to the United States with specific vehicle modifications to comply with the United States Federal Motor Vehicle Safety Standards (FMVSS).
-
Page 460: Registering Your Vehicle In A Foreign Country (Except United States And Canada)
Parts, servicing techniques, and tools necessary to maintain and repair your vehicle may be unavailable. There might not be an Authorized Mazda Dealer in the country you plan to take your vehicle. The Mazda warranty is valid only in certain countries.
-
Page 461: Add-On Non-Genuine Parts And Accessories
Non-genuine parts and accessories for Mazda vehicles can be found in stores. These may fit your vehicle, but they are not approved by Mazda for use with Mazda vehicles. When you install non-genuine parts or accessories, they could affect your vehicle’s performance or safety systems;…
-
Page 462: Cell Phones
Customer Information and Reporting Safety Defects Cell Phones WARNING Please comply with the legal regulations concerning the use of communication equipment in vehicles in your country: Use of any electrical devices such as cell phones, computers, portable radios, vehicle navigation or other devices by the driver while the vehicle is moving is dangerous. Dialing a number on a cell phone while driving also ties-up the driver’s hands.
-
Page 463: Type Approval Of Equipment
Customer Information and Reporting Safety Defects Type Approval of Equipment Type Approval of Equipment (Mexico) Immobilizer system 9-19…
-
Page 464
Customer Information and Reporting Safety Defects Type Approval of Equipment Keyless entry system 9-20… -
Page 465: Uniform Tire Quality Grading System (Utqgs)
Uniform Tire Quality Grading System (UTQGS) Uniform Tire Quality Grading System (UTQGS) This information relates to the tire grading system developed by the U.S. National Highway Traffic Safety Administration for grading tires by tread wear, traction, and temperature performance. qTread Wear The tread wear grade is a comparative rating based on the wear rate of the tire when tested under controlled conditions on a specified government test course.
-
Page 466
These grades will be added to the sidewalls of passenger vehicle tires over the next several years according to a schedule established by the NHTSA and the tire manufacturers. The grade of tires available as standard or optional equipment on Mazda vehicles may vary with respect to grade. -
Page 467: Tire Information (Except Canada)
Customer Information and Reporting Safety Defects Tire Information (except Canada) Tire Labeling Federal law requires tire manufacturers to place standardized information on the sidewall of all tires. This information identifies and describes the fundamental characteristics of the tire and also provides a tire identification number for safety standard certification and in case of a recall.
-
Page 468
Customer Information and Reporting Safety Defects Tire Information (except Canada) 11. Tread wear, traction and temperature grades 12. Max. permissible inflation pressure 13. SAFETY WARNING P215/65R15 95H is an example of a tire size and load index rating. Here is an explanation of the various components of that tire size and load index rating. -
Page 469
H is the speed rating. The speed rating denotes the maximum speed for which the use of the tire is rated. Letter Rating * For tires with a maximum speed capability over 149 mph, tire manufacturers sometimes use the letters ZR. For tires with a maximum speed capability over 186 mph, tire manufacturers always use the letters ZR. -
Page 470
Customer Information and Reporting Safety Defects Tire Information (except Canada) Tread Wear, Traction and Temperature Grades Tread wear: The tread wear grade is a comparative rating based on the wear rate of the tire when tested under controlled conditions on a specified government test course. For example, a tire graded 150 would wear one and one-half (1 1/2) times as well on the government course as a tire graded 100. -
Page 471
Customer Information and Reporting Safety Defects Tire Information (except Canada) qInformation on Temporary Tires Please refer to the diagram below. 1. Temporary tires 2. Nominal width of tire in millimeters 3. Ratio of height to width (aspect ratio) 4. Diagonal 5. -
Page 472
Customer Information and Reporting Safety Defects Tire Information (except Canada) 70 is the aspect ratio. This two-digit number indicates the tire’s ratio of height to width. D is the tire construction symbol. D indicates diagonal ply construction . 16 is the wheel rim diameter in inches. 90 is the Load Index. -
Page 473: Location Of The Tire Label (Placard)
Customer Information and Reporting Safety Defects Tire Information (except Canada) Location of the Tire Label (Placard) You will find the tire label containing tire inflation pressure by tire size and other important information on the driver’s side B-pillar or on the edge of the driver’s door frame. SAMPLE qRecommended Tire Inflation Pressure On the tire label you will find the recommended tire inflation pressure in both kPa and psi…
-
Page 474
Customer Information and Reporting Safety Defects Tire Information (except Canada) WARNING Always check the tire inflation pressures on a regular basis according to the recommended tire inflation pressure on the tire label and in conjunction with the information in this owner’s manual: Driving your vehicle with under-inflated tires is dangerous. -
Page 475
Customer Information and Reporting Safety Defects Tire Information (except Canada) qGlossary of Terms Tire Placard: A label indicating the OE tire sizes, recommended inflation pressure, and the maximum weight the vehicle can carry. Tire Identification Number (TIN): A number on the sidewall of each tire providing information about the tire brand and manufacturing plant, tire size, and date of manufacture. -
Page 476: Tire Maintenance
Customer Information and Reporting Safety Defects Tire Information (except Canada) Improper or inadequate vehicle maintenance can cause tires to wear abnormally. Here are some important maintenance points: qTire Inflation Pressure Inspect all tire pressure monthly (including the spare) when the tires are cold. Maintain recommended pressures for the best ride, top handling, and minimum tire wear.
-
Page 477
qReplacing a Tire WARNING Always use tires that are in good condition: Driving with worn tires is dangerous. Reduced braking, steering, and traction could result in an accident. If a tire wears evenly, a wear indicator will appear as a solid band across the tread. Replace the tire when this happens. -
Page 478
Customer Information and Reporting Safety Defects Tire Information (except Canada) CAUTION If you feel a sudden vibration or ride disturbance while driving or you suspect your tire or vehicle has been damaged, immediately reduce your speed. Drive with caution until you can safely pull off the road. Stop and inspect the tire for damage. If the tire is under-inflated or damaged, deflate it, remove the tire and rim and replace it with your spare tire. -
Page 479: Vehicle Loading
This section will guide you in the proper loading of your vehicle and/or trailer, to keep your loaded vehicle weight within its design rating capability, with or without a trailer. Properly loading your vehicle will provide maximum return of vehicle design performance. Before loading your vehicle, familiarize yourself with the following terms for determining your vehicle’s weight ratings, with or without a trailer, from the vehicle’s Safety Certification Label and Tire and Load Information Label:…
-
Page 480
Customer Information and Reporting Safety Defects Tire Information (except Canada) Payload is the combination weight of cargo and passengers that the vehicle is designed to carry. The maximum payload for your vehicle can be found on the Tire and Load Information label on the driver’s door frame or door pillar. -
Page 481
Customer Information and Reporting Safety Defects Tire Information (except Canada) CARGO Cargo Weight includes all weight added to the Base Curb Weight, including cargo and optional equipment. When towing, trailer tongue load or king pin weight is also part of cargo weight. -
Page 482
Customer Information and Reporting Safety Defects Tire Information (except Canada) GAWR (Gross Axle Weight Rating) is the maximum allowable weight that can be carried by a single axle (front or rear). These numbers are shown on the Safety Compliance Certification Label located on the driver’s door frame or door pillar. The total load on each axle must never exceed its GAWR. -
Page 483
SAMPLE WARNING Exceeding Axle Weight Rating Limits: Exceeding the Safety Certification Label axle weight rating limits is dangerous and could result in death or serious injury as a result of substandard vehicle handling, performance, engine, transmission and/or structural damage, serious damage to the vehicle, or loss of control. -
Page 484
Customer Information and Reporting Safety Defects Tire Information (except Canada) GCW (Gross Combination Weight) is the weight of the loaded vehicle (GVW) plus the weight of the fully loaded trailer. GCWR (Gross Combination Weight Rating) is the maximum allowable weight of the vehicle and the loaded trailer — including all cargo and passengers — that the vehicle can handle without risking damage. -
Page 485
Customer Information and Reporting Safety Defects Tire Information (except Canada) WARNING Exceeding GVWR or GAWR Specifications: Exceeding the GVWR or the GAWR specified on the certification label is dangerous. Exceeding any vehicle rating limitation could result in a serious accident, injury, or damage to the vehicle. -
Page 486: Steps For Determining The Correct Load Limit
Customer Information and Reporting Safety Defects Tire Information (except Canada) Steps for Determining the Correct Load Limit: Steps for Determining Correct Load Limit: (1) Locate the statement The combined weight of occupants and cargo should never exceed XXX kg or XXX lbs on your vehicle’s placard. (2) Determine the combined weight of the driver and passengers that will be riding in your vehicle.
-
Page 487: Reporting Safety Defects
7755 Irvine Center Drive Irvine, California 92618-2922 P.O. Box 19734 Irvine, CA 92623-9734 Customer Assistance Center or toll free at 1 (800) 222-5500 If you live outside of the U.S.A., please contact the nearest Mazda Distributor shown (page 9-10) in this booklet. 9-43…
-
Page 488: Reporting Safety Defects (Canada)
Customer Information and Reporting Safety Defects Reporting Safety Defects Reporting Safety Defects (Canada) Canadian customers who wish to report a safety-related defect to Transport Canada, Defect Investigations and Recalls, may telephone the toll free hotline 1-800-333-0510, or contact Transport Canada by mail at: Transport Canada, ASFAD, Place de Ville Tower C, 330 Sparks Street, Ottawa ON K1A 0N5.
-
Page 489: Service Publications
Factory-authorized Mazda service publications are available for owners who wish to do some of their own maintenance and repair. When requesting any of our publications through an Authorized Mazda Dealer, refer to the chart below. If they don’t have what you need in stock, they can order it for you.
-
Page 490
Customer Information and Reporting Safety Defects Service Publications qSERVICE HIGHLIGHTS: Provides description and operation of the many systems of your Mazda. qNAVIGATION SYSTEM OWNER’S MANUAL: This booklet contains information regarding the proper operation and use of the navigation system. This is not a technician’s manual. -
Page 491
Specifications Technical information about your Mazda. Identification Numbers … 10-2 Vehicle Information Labels … 10-2 Specifications … 10-4 Specifications … 10-4 10-1… -
Page 492: Identification Numbers
Identification Numbers Vehicle Information Labels qVehicle Identification Number The vehicle identification number legally identifies your vehicle. The number is on a plate attached to the cowl panel located on the left corner of the dashboard. This plate can easily be seen through the windshield.
-
Page 493
Identification Numbers qEngine Number Forward 10-3… -
Page 494
Specifications qEngine Item Type Bore×Stroke Displacement Compression ratio qElectrical System Item Battery Spark-plug number Spark-plug gap *1 ex factory CAUTION When cleaning the platinum plugs, do not use a wire brush. The fine particulate coating on the iridium alloy and platinum tips could be damaged. qLubricant Quality Lubricant Engine oil… -
Page 495
qCapacities (Approximate Quantities) Item With oil filter replacement Engine oil Without oil filter replacement With Towing Package Coolant Without Towing Package Automatic transaxle fluid Transfer case oil Rear differential oil Washer fluid Fuel tank Check oil and fluid levels with dipsticks or reservoir gauges. qDimensions Item Overall length… -
Page 496
NOTE The tires have been optimally matched with the chassis of your vehicle. When replacing tires, Mazda recommends that you replace tires of the same type originally fitted to your vehicle. For details, contact an Authorized Mazda Dealer. í… -
Page 497
Check the tire pressure label for tire size and inflation pressure. Refer to Tire Inflation Pressure on page 8-33. Standard tire Tire size P245/60R18 104H P245/50R20 102V Temporary spare tire (Except Mexico) Tire size T155/90D18 103M (Mexico) Tire size 195/80R17 99M qFuses Refer to the fuse rating on page 8-44. -
Page 498
10-8… -
Page 499: Index
Index 11-1…
-
Page 500
Index Accessory Socket … 6-131 Add-On Non-Genuine Parts and Accessories … 9-17 Advanced Key … 3-2 Advanced key maintenance … 3-5 Advanced key suspend function … 3-16 Auxiliary key … 3-15 Locking, unlocking with request switch … 3-8 Operational range … 3-7 Remote control function … -
Page 501
Bluetooth Hands-Free … 6-103 Basic Bluetooth Hands-Free Operation … 6-106 Convenient Use of the Hands-Free System … 6-109 Hands-Free Telephone Setting … 6-113 Safety certification … 6-119 When the Bluetooth Hands-Free cannot be used … 6-118 Body Lubrication … 8-27 Bottle Holder … -
Page 502
Index Emergency Starting … 7-16 Flooded engine … 7-16 Jump-starting … 7-17 Push-starting … 7-19 Emergency Towing … 7-20 Emission Control System (Gasoline Engine) … 4-3 Engine Coolant … 8-21 Exhaust gas … 4-4 Hood release … 3-43 Oil … 8-19 Overheating … -
Page 503
Indicator Lights … 5-41 BSM OFF … 5-55 Cruise … 5-55 Headlight high-beam … 5-54 Security … 5-53 Shift position … 5-54 TCS OFF … 5-55 TCS/DSC … 5-54 Turn-signal/hazard warning … 5-56 Information Display … 6-123 Ambient temperature display … 6-124 Audio display … -
Page 504
Index Rear Door Child Safety Locks … 3-28 Rear Entertainment System … 6-51 Before operation … 6-63 Country code list … 6-94 Language code list … 6-92 Sound output … 6-69 Rear Window Defroster … 5-66 Rear Window Washer … 5-66 Rear Window Wiper … -
Page 505
Tire Pressure Monitoring System … 5-27 System error activation … 5-31 Tire pressure monitoring system warning light … 5-29 Tires and wheels … 5-31 Tires Flat Tire … 7-3 Inflation pressure … 8-33 Replacement … 8-34 Rotation … 8-34 Snow tires … 4-9 Spare tire and tool storage … -
Page 506
11-8… -
Page 507: Before Use
Audio System See page for specific information. Rear View Monitor See page for specific information. Bluetooth Hands-Free See page for specific information. ©2007 Mazda Motor Corporation Printed in Japan July 2007(Print1) Before Use Getting started Routing Address Book Voice Recognition…
-
Page 508: Accessories
Accessories Please contact an Authorized Mazda Dealer if you are missing the following accessory. lMap Disc CAUTION: THIS PRODUCT IS A CLASS I LASER PRODUCT. HOWEVER THIS PRODUCT USES A VISIBLE/ INVISIBLE LASER BEAM WHICH COULD CAUSE HAZARDOUS RADIATION EXPOSURE IF DIRECTED.
-
Page 509
MEMO… -
Page 510: Before Driving Your Mazda
Contents … 4 Safety Information … 6 Introduction … 8 (Product Use Safety), (Navigation System), (Beep sound and voice guidance restrictions while using Bluetooth Hands-Free (Mazda CX-9 only)), (Screens) Names and Functions … 9 Immediate use Getting started Activation… 12 (Removing the Map Disc), (On-screen Buttons) Set Clock…
-
Page 511
Advanced use Address Book Address Book … 46 (Memory Point Storage), (Memory Point Confirmation and Modification), (Preset Destinations or Home Storage), (Memory Point Deletion), (All Memory Point Deletion), (Displays Icons at Memory Points), (Avoid Area Storage), (Avoid Area Confirmation and Modification), (Avoid Area Deletion), (All Avoid Area Deletion), (Category Name Modification),(Previous Destination Deletion), (All Preset Destination Deletion) -
Page 512: Safety Information
Read this owner’s manual for your Navigation System carefully before using the system. It contains instructions about how to use the system in a safe and effective manner. Mazda assumes no responsibility for any problems resulting from failure to observe the instructions given in this manual.
-
Page 513
This navigation system is designed exclusively for use in automobiles. This navigation system should only be installed in an automobile. Do not install it in a ship, aircraft, or any other vehicles except an automobile. Do not use it detached from the vehicle. -
Page 514: Introduction
If the system does not operate thereafter, consult an authorized dealer, we recommend an Authorized Mazda Dealer. This navigation system utilizes GPS* satellite signals, a speed sensor and gyrosensor to track and display your vehicle’s current position, and to guide you from your starting point to your…
-
Page 515: Names And Functions
Names and Functions The navigation system can be operated by pressing a button on the panel (panel button) or selecting a button displayed on the screen (on-screen button). Mazda CX-9 Panel button Mazda CX-7 Panel button On-screen button Panel button…
-
Page 516
1. FM/AM button: 2. SAT button: 3. CD button: 4. MEDIA button: 5. LOAD/EJECT button: 6. NAVI button 7. MENU button 8. RTN button 9. DISP button: 10.POWER/VOLUME button: The volume can be adjusted by turning the dial. Turn the audio 11.TUNE/SEEK button: 12.SCAN button: 13.AUDIO button:… -
Page 517
MEMO… -
Page 518: Activation
Wipe the condensation off the map disc with a soft cloth. If the unit does not operate correctly after 1 hour, consult an Authorized Mazda Dealer. Note lWhen the ignition switch is in the ACC or ON position, the screen changes as follows to activate the navigation system.
-
Page 519
CAUTION screen remains on the display unless you select the button. (Mazda CX-9) If the mobile telephone is programmed to the hands-free unit for use with the Bluetooth hands-free telephone, the Bluetooth hands-free information is displayed on the screen momentarily. -
Page 520: Set Clock
Set Clock The current time is set using this function. Since time notification is provided by a GPS satellite. Before Steps Open the [SET CLOCK] screen Note Minutes and seconds are adjusted by the GPS, however, it is necessary to adjust hours under the following conditions: lDriving across different time zones lDaylight saving time start and end…
-
Page 521: Navigation Set Up
Navigation Set Up lYou can alter the map display conditions, the route guidance conditions and show the system information. Stop your vehicle before the following operations. Do not change the settings and destination locations while driving. Minimize the time spent viewing the monitor screen and listening to the voice guidance while driving. Warning Operating the system will distract the driver from looking ahead of the vehicle and may cause an accident.
-
Page 522
Navigation Set Up Language You can change the language of the menu and the voice guidance. select MENU Before Steps select Open the [LANGUAGE] screen Select your preferred language from the list. -
Page 523
MEMO… -
Page 524
Navigation Set Up This function allows you to correct any error in the position or direction of your vehicle display. Before Steps MENU Adjusting Current Position and Direction select Open the [Calibrate Position] screen Distance This function automatically corrects any error in the display of the current position that might occur after tire replacement. -
Page 525
select Map Version The map and software version numbers can be confirmed using this function. select Map and software versions are now displayed. -
Page 526: User Settings
Navigation Set Up MENU Before Steps Open the [USER SETTINGS] screen select select Map Color Select a screen color from Map Mode Auto : The display will automatically switch between Day and Night illumination mode when the headlights are turned off and on respectively. Day : The display will be presented in Day illumination mode regardless of whether the headlights are on or off.
-
Page 527
Navigation Set Up MENU Before Steps select Open the [USER SETTINGS] screen select Arrival Time The time which is displayed until reaching the destination or a way point can be set as an estimated arrival time or the remaining time. Select to display the estimated arrival time, or display the remaining time. -
Page 528: Quick Poi Selection
Navigation Set Up This function allows you set the categories on the area displayed when the (Point of Interest) menu is selected on the map. Quick POI enables you store up to six different kinds of categories which you use most regularly. select MENU Select…
-
Page 529
Navigation Set Up This function replaces all the settings in the mobile navigation system with the initial default settings. MENU Before Steps select Open the [SYSTEM DEFAULTS] screen If you execute Restore System Defaults, all of your stored setting data will be deleted. [Default List] Item Menu names… -
Page 530
Navigation Set Up MENU Before Steps Open the [MAP CONFIGURATION] screen select select Map Screen Select single or dual map display. Single map Turn Guidance Turn Arrow (on first screen) Turn List Turn Arrow (on second screen) Note Before a fork in the road, an enlarged diagram of the junction automatically appears in a second screen.This is to make route guidance even clearer. -
Page 531: Screen Names And Functions
Screen Names and Functions Screens Before Setting Route (1) Map Orientation control page 29) (2) GPS (Global Positioning System) marker page 54) (3) Clock Clock will be displayed when you set up Clock on Navigation Set Up On. (4) Vehicle marker Shows the current position and direction of your vehicle.
-
Page 532: Screens During Route Guidance
(1) Distance and Time to Destination display Displays the time* and distance to the destination or way point. Selecting this will display the next and further information on the way point or time and distance to the destination. (* Either required time or estimated time arrival) (2) Route display Shows the provided route as a thick…
-
Page 533
Screen adjustments, beep alert and other settings Display menu screen will be shown when you press the (DISP) button. Press the (DISP) button to display the display menu. Adjusting the screen quality lScreen brightness Press the on-screen button to brighten the screen, or lScreen contrast Press the on-screen button to increase contrast,… -
Page 534
Returning to the navigation screen from the audio unit screen lSelect the on-screen button to set the function to return to the navigation screen from the audio unit screen by operation of the button only. lSelect the on-screen button to set the function to return to the navigation screen from the audio unit screen automatically after 20 seconds. -
Page 535: Screen Change
Screen change Do not keep your eyes fixed on the monitor screen or operate the system while driving Do not change the settings and destination locations while driving. Minimize the time Warning spent viewing the monitor screen and listening to the voice guidance while driving. Operating the system will distract the driver from looking ahead of the vehicle and may cause an accident.
-
Page 536: Destination Entry And Route Search
Destination Entry and Route Search lYou can set the destination using various methods provided by the system. Before Steps MENU Open the [DESTINATION ENTRY] Menu Change (Change Search Area) Open the [DESTINATION ENTRY] Menu Address select Select Select When narrowing down to city name Select When narrowing…
-
Page 537
Do not keep your eyes fixed on the monitor screen or operate the system while driving. Do not change the settings and destination locations while driving. Minimize the time spent viewing the monitor screen and listening to the voice guidance while driving. Operating the system Warnings will distract the driver from looking ahead of the vehicle and may cause an accident. -
Page 538
Destination Entry and Route Search Open the [DESTINATION ENTRY] Menu Point of interest When entering Select the destination point directly Select When narrowing down to city name Select When narrowing down to category name Select When narrowing down to the nearest facility Select When narrowing… -
Page 539
Cancel the city selection. Select the city name Displays list of from the 5 city names list nearest the current position. Enter the Select the city name city name Displays the and select from the city name list input screen. Select the category name from… -
Page 540
Destination Entry and Route Search Select When stopped Displays the police station select screen. Displays the hospital select screen. Emergency When driving Sets the destination to the nearest police station automatically. Sets the destination to the nearest hospital automatically. -
Page 541
Select the sort methods : Sorts the police station or the hospital by Distance. : Sorts the police station or the hospital by name. Select the Select name from the list… -
Page 542
Destination Entry and Route Search Before Steps MENU Open the [DESTINATION Memory Point ENTRY] Menu Home Preset Destination Previous Destination Intersection Freeway On/ Off Ramp Coordinates Select from select Select Select Select Select Select Select Select Select… -
Page 543
Select the desired Memory Point : Display up to five previous suggestions. : Display the five previous suggestions. : The order of the displayed list can be changed. Select the desired Preset Destination. Select the Previous Destination. Select the 2nd street Select the 1st name street name… -
Page 544: Quick Poi
Quick POI lYou can select one of the Six Categories on the menu or List Categories and then select the POI(s) to be displayed on the map. Select Before Steps Open the [QUICK POI] Displaying POI(s) on a Local Search Deleting Markers Displaying POI(s) on a Map (…
-
Page 545: Character Entry
Character Entry Select the first several characters on the screen. (Step 1) Select Street name, city name, and other input : Move the cursor to the previous position and delete a character. : The list appears. Examples Street: CANAL Enter by selecting characters: Street: MAIN STREET Enter by selecting characters: M A I N…
-
Page 546: Direct Destination Input
Direct Destination Input Direct Destination Input Operate after Step 3 of [Direct Destination Input] Selecting Route Touch the map to set the cursor to the desired destination.The map scrolls faster the further away the touched location is from the cursor. Scroll the map and change the map scale if necessary.
-
Page 547: Poi Icons On Maps / Delete Destination
Continental Fast Food French Italian Japanese Mexican Seafood Thai Other Restaurants Shopping Grocery Store Shopping Mall Automotive Automobile Club Gas Station Parking Auto Service & Maintenance Delete MENU destination Travel Bus Station Ferry Terminal Hotel Rental Car Agency Rest Area…
-
Page 548: Route Options
Route Options Before Steps MENU Open the [ROUTE OPTIONS] Menu Route Preferences Modification of Destination or Way Point Positions Deletion of Destination or Way Points Detour Turn List lDuring route guidance you can change the route options, stop or check the route. select Select Select…
-
Page 549
Do not keep your eyes fixed on the monitor screen or operate the system while driving Do not change the settings and destination locations while driving. Minimize the time spent viewing the monitor screen and listening to the voice guidance while driving. Operating the system Warning will distract the driver from looking ahead of the vehicle and may cause an accident. -
Page 550
Route Options Before Steps MENU Open the [ROUTE OPTIONS] Menu Display Preview Route Preview select Select Select… -
Page 551
Use the buttons displayed on-screen to carry out a simulation run. : Move to the start point. : Carry out a simulation run in the direction of the start point. When the Simulation starts the button will be displayed as , and when selected, it will cause the Simulation to advance quickly. -
Page 552: Address Book
Address Book Before Steps MENU Open the Memory Point [ADDRESS Storage BOOK] Memory Point Confirmation Modification Preset Destinations or Home Storage Memory Point Deletion All Memory Point Deletion Displays Icons at Memory Points lYou can, edit, or delete any marked point. select Select Show all…
-
Page 553
Set a memory point using your preferred method. Select a memory point to be modified Select a memory Allows the storage point to be stored category to be in Preset changed. Select the button corresponding Destinations or to the new category. Home. -
Page 554: (Category Name Modification),(Previous Destination Deletion)
Address Book Before Steps MENU Open the Avoid Area [ADDRESS Storage BOOK] Avoid Area Confirmation Modification Avoid Area Deletion All Avoid Area Deletion Category Name Modification Previous Destination Deletion All Preset Destination Deletion select Select Select…
-
Page 555
Select an avoid area using your preferred method. Select an avoid area to be modified. Select an avoid area to be deleted. Cancel the deletion. Select a destination to be deleted. : The order of the displayed list can be changed. -
Page 556: Voice Recognition
Voice Recognition l Microphone surface Mazda CX-9 Voice Recognition Structure l VOICE switch on the steering wheel switch Set up the language in advance. Language Select To return to current position screen, press Basic Usage Pattern Cancel Voice Recognition lVoice control can be carried out by simply…
-
Page 557
Please be aware that the voice recognition may error or not function despite following the above points. Note VOICE switch cannot be used while a Bluetooth Hands-Free is being used. (Mazda CX-9 only) Voice Recognition Command The following voice commands can be used with voice control. -
Page 558: Volume Adjustment
Volume Adjustment You can adjust the volume control for the voice guidance. Before Steps Open the [VOLUME] screen select MENU Select the appropriate button to set the volume to between (maximum). :Sound output will be muted. Press the (NAVI) button to return to the current vehicle position screen.
-
Page 559: Precautions/System Performance
Precautions/System Performance The navigation system is just a support system for the driver. The driver should always pay attention to the traffic situation to safely make decisions. You may be unable at times to arrive at your destination due to out-of-date information Warnings on a map disc.
-
Page 560: Map Matching
lIf you are using the system for the first time, or if you have not used it for some time, it takes about 5 minutes (or about 2 minutes in open areas) to calculate your vehicle’s position. GPS signal reception is poor in the following places In tunnels lThe GPS satellites are controlled by the U.S.
-
Page 561
Precautions/System Performance In the following situations, your vehicle position may not be displayed correctly on the map. But, as you keep driving, your vehicle position will be automatically corrected utilizing map matching and GPS data. Running on an Making a turn after elevated road driving on a long straight road… -
Page 562
The navigation system is just a support system for the driver. The driver should always pay attention to the traffic situation to safely make decisions. You may be unable to arrive at your destination due to out-of-date information on a map disc. You should be especially careful Warning when selecting an urgent destination such as a hospital or a police station. -
Page 563: Troubleshooting
There may be some problems due to operational errors or mistakes. Please read this manual again and verify that there really is a problem before calling an Expert Dealer, we recommend an Authorized Mazda Dealer to ask for repair services. Symptom No picture lCheck if a fuse has blown.
-
Page 564
Symptom No GPS symbols are displayed The vehicle position is not displayed No voice guidance Buttons on the remote control do not beep Check point lGPS signals may not be received because of obstructions. After moving the vehicle away from obstructions, the GPS signals can be received. -
Page 565
Troubleshooting Error message lThe disc is not installed. Please insert a MAP DVD. MAP DVD-Read Error lThe disc is wet, dirty, scratched, or upside down, or the disc The disc installed is not a MAP DVD. Solution Check if the disk is installed. If installed, check if the installed disk is correct. -
Page 566: Maintenance
Never use solvents such as benzene and thinners, they could mar the surface of the unit. Map disc If you require the latest map disc, consult an Expert Dealer, we recommend an Authorized Mazda Dealer. How to hold the disc lDo not touch the underside of the disc.
-
Page 567
(Operating tips for MP3), (CD-TEXT) Operating Tips for Display … 68 Beep sound and voice guidance restrictions while using Bluetooth Hands-Free (Mazda CX-9 only)… 68 Power/Volume/Sound Controls… 69 (Power ON/OFF), (Volume adjustment), (Audio sound adjustment), (Sound quality adjustment), (Volume balance adjustment), (AudioPilot™), (Centerpoint®), (Rear seat-optimized (With Rear Entertainment System) -
Page 568: Audio Operation
Audio Operation Radio Reception AM characteristics AM signals bend around such things as buildings or mountains and bounce off the ionosphere. Therefore, they can reach longer distances than FM signals. Because of this, two stations may sometimes be picked up on the same frequency at the same time.
-
Page 569
Flutter/Skip noise Signals from an FM transmitter move in straight lines and become weak in valleys between tall buildings, mountains, and other obstacles. When a vehicle passes through such an area, the reception conditions may change suddenly, resulting in annoying noise. -
Page 570
Operating Tips for In-Dash CD Changer Condensation phenomenon Immediately after turning on the heater when the vehicle is cold, the CD or optical components (prism and lens) in the In-dash CD changer may become clouded with condensation. At this time, the CD will eject immediately when placed in the unit. -
Page 571
lUse discs that have been legitimately produced. If illegally-copied discs such as pirated discs are used, the system may not operate properly. lBe sure never to touch the signal surface when handling the CDs. Pick up a CD by grasping the outer edge or the edge of the hole and the outer edge. -
Page 572: (Operating Tips For Mp3), (Cd-Text)
Operating tips for MP3 NOTE Supply of this product only conveys a license for private, non-commercial use and does not convey a license nor imply any right to use this product in any commercial (i.e. revenue-generating) real time broadcasting (terrestrial, satellite, cable and/or any other media), broadcasting/streaming via the Internet, intranets and/or other networks or in other…
-
Page 573
CD-TEXT Music CDs are available in which separate music data including album/title names, music name, artist name, and other textual information can be recorded. The data stan- dard for recording textual information to these kinds of music CDs is termed CD- TEXT. -
Page 574: Operating Tips For Display
If the liquid crystal display still does not move, contact an Authorized Mazda Dealer. Beep sound and voice guidance restrictions while using Bluetooth Hands-Free (Mazda CX-9 only) The beep sound and voice guidance related to the audio operation are not heard while a Bluetooth Hands-Free is being used.
-
Page 575: Power/Volume/Sound Controls
Power/Volume/Sound Controls Mazda CX-9 AUDIO button Mazda CX-7 Power ON/OFF Turn the ignition switch to the ACC or ON position. Press the power/volume dial to turn the audio system on. Press the power/volume dial again to turn the audio system off.
-
Page 576
Audio sound adjustment (Mazda CX-9) 1.Press the desired button corresponding to one of the following modes. • Audio button (AUDIO): • CD button (CD): • MEDIA button (MEDIA): Image and Sound playback is possible using a portable video The external input terminal is not equipped on your vehicle because it is not standard equipment. -
Page 577
CD or a DVD is inserted in the Rear Entertainment System main unit and selected as an audio source, and the CD or DVD audio is 5.1 DolbyDigital/DTS audio, Centerpoint cannot be selected. (Mazda CX-9 only) ® Centerpoint is a registered trademark of Bose Corporation. -
Page 578
Rear seat-optimized (With Rear Entertainment System) (Mazda CX-9 only) The rear seat-optimized function allows passengers to optimize the audio output to the rear for a more pleasurable acoustic field. Select the REAR SEAT-OPTIMIZED on-screen the rear seat. Select the REAR SEAT-OPTIMIZED on-screen round effect to all seats. -
Page 579: Operating The Radio
Mazda CX-9 Scan button Mazda CX-7 Band selector button Satellite button Channel preset on-screen button Radio ON Press a band selector button (FM/AM) to turn the radio on. Band selection Successively pressing the band selector button (FM/AM) switches the bands as follows: The selected mode will be indicated.
-
Page 580
Tuning The radio has the following tuning methods: Manual, Seek, Scan, Preset channel, and Auto memory tuning. The easiest way to tune stations is to set them on preset channels. Note lIf the FM broadcast signal becomes weak, reception automatically changes from STEREO to MONO for reduced noise, and the STEREO indicator will go out. -
Page 581
Auto memory tuning This is especially useful when driving in an area where the local stations are not known. Addi- tional AM/FM stations can be stored without disturbing the previously set channels. Select and hold the on-screen button for about 2 seconds until a beep sound is heard; the system will automatically scan and temporarily store up to 8 stations with the strongest frequencies in each selected band in that area. -
Page 582: Operating The In-Dash Cd Changer
Operating the In-Dash CD Changer Mazda CX-9 Folder search on-screen button Scan button Mazda CX-7 Disc on-screen button Folder search on-screen button Inserting the CD The display must be open (lowered) to insert the CD. The CD must be label-side up when inserting. The auto-loading mechanism will set the CD and begin play.
-
Page 583
During MP3 CD playback The album title, the track title, the folder name, the file number, and the artist name will be dis- played. Note The CD will begin playback automatically after insertion. A CD cannot be inserted while the display reads «WAIT». -
Page 584
Multiple insertion 1.Press the (LOAD/EJECT) button. 2.Press the The display opens and «WAIT» is displayed. 3.Lightly insert the CD after «IN» is displayed. 4.When «IN» is displayed again, insert the next CD. Repeat this procedure for the number of CDs to be inserted (maximum of 6 including the CD in the tray). -
Page 585
Multiple ejection 1.Press the (LOAD/EJECT) button. 2.Press the on-screen button for 1.5 seconds or more. The CD ejects after the display is opened and the desired tray number flashes 3.Pull out the CD. 4.The next CD will be ejected automatically. This operation repeats until all the CDs are taken out. -
Page 586
Note l»——-» will be displayed for files without a file, track or other name input. lThis unit can read English (including numerals), French, and Spanish one-byte characters. lThe displayable number of characters on each title is a maximum of 64. (Music CDs) lAlthough textual information (Track/artist information) recorded to each track appears in the display, textual information (Album/artist information) recorded for the entire CD does not… -
Page 587
Repeat play During music CD playback 1.Select the on-screen button during playback to play the current track repeatedly. 2.Select the button again to cancel the repeat play. During MP3 CD playback (Track repeat) 1.Select the on-screen button during playback to play the current track repeatedly. 2.To cancel the repeat play, select the button again after 3 seconds. -
Page 588
Adjusting the Volume To increase the volume, pull up the volume switch. To decrease the volume, press down the volume switch. Changing the Source Press the mode switch (MODE) to change the audio source (FM1 radio > FM2 radio > AM radio >… -
Page 589
This CD player should not be adjusted or repaired by anyone except qualified service personnel. Cautions If servicing is required, contact an Authorized Mazda Dealer. Use of controls or adjustments or performance of procedures other than those specified herein may result in hazardous laser exposure. Never operate the CD player with the top case of the unit removed. -
Page 590
MEMO… -
Page 591
Rear View Monitor Rear View Monitor Rear View Monitor Cautions… 86 Rear View Parking Camera Location … 86 Switching to the Rear View Monitor Display… 87 Displayable Range on the Screen … 87 Rear View Monitor Operation … 88 Variance Between Actual Road Conditions and Displayed Image 89 Contents… -
Page 592: Rear View Monitor Rear View Monitor Cautions
Rear View Parking Camera Location Mazda CX-9 Rear View Parking Camera Mazda CX-7 Rear View Parking Camera…
-
Page 593: Switching To The Rear View Monitor Display
(light line) may appear on the display. (Smear phenomenon) Both bumper ends are not displayed. Object The figure is an example showing Mazda CX-9.
-
Page 594: Rear View Monitor Operation
(2) Confirming the surrounding conditions, reverse the vehicle. (Screen display) (Actual view) The figure is an example showing Mazda CX-9. (3) When the shift lever is shifted from R to another shift lever position, the screen returns to the previous display.
-
Page 595: Variance Between Actual Road Conditions And Displayed Image
Object on screen A: Distance between the vehicle and object displayed on the screen. B: Actual distance between the vehicle and object. Object Variance The figure is an example showing Mazda CX-9. Appears farther than actual distance Object on screen The figure is an example showing Mazda CX-9.
-
Page 596
MEMO… -
Page 597
Contents Bluetooth Hands-Free Bluetooth Hands-Free (Mazda CX-9 only) Screen display of Bluetooth Hands-Free information … 92… -
Page 598
Bluetooth Hands-Free Screen display of Bluetooth Hands-Free information If the Bluetooth Hands-Free is operated, information such as radio wave reception conditions of the Bluetooth Hands-Free are displayed on the screen. For details, refer to the «Bluetooth Hands-Free» in the owner’s manual. Bluetooth Hands-Free information…
ВНУТРЕННЕЕ ПРОСТРАНСТВО АВТОМОБИЛЯ
1. Внутренняя кнопка блокировки дверного замка, 2. Выключатель центрального электрического замка (блокировка и отпирание замков всех дверей), 3. Выключатель блокировки электрических стеклоподъемников, 4. Панель управления электрическими стеклоподъемниками, 5. Выключатель электрической регулировки зеркал заднего вида, 6. Выключатель противобуксовочной системы («TCS-OFF»), 7. Выключатель электропривода подъема-опускания задней подъемной двери, 8. Центральный выключатель освещения, 9. Рычаг управления указателями поворота, 10. Регулятор подсветки приборной панели, 11. Приборная панель, 12. Рычаг управления стеклоочистителями и омывателями, 13. Выключатель зажигания, 14. Рычаг фиксатора рулевой колонки, 15. Педаль стояночного тормоза
1. Органы управления аудиосистемой, расположенные на рулевом колесе, 2. Расположение фронтальных подушек безопасности (водителя и переднего пассажира), 3. Органы управления системой круиз-контроля, 4. Информационный дисплей, 5. Панель управления микроклиматом, 6. Выключатель аварийной световой сигнализации, 7. Панель управления аудиосистемой, 8. Крышка перчаточного ящика, 9. Электрическая розетка, 10. Рычаг переключения диапазонов автоматической трансмиссии, 11. Выключатели электрических подогревателей сидений, 12. Выключатель электрического обогревателя заднего стекла и наружных зеркал, 13. Рукоятка отпирания замка капота, 14. Отделение для монет
1. Верхние плафоны освещения салона, 2. Расположение боковых подушек безопасности (водителя и переднего пассажира) и надувных боковых шторок, 3. Ремень безопасности, 4. Центральный подлокотник, вещевой бокс в центральной консоли, 5. Рукоятка дистанционного отпирания лючка заправочной горловины, 6. Подстаканники, 7. Противосолнечный козырек, 8. Выключатели электропривода вентиляционного люка в крыше, 9. Верхнее вещевое отделение, 10. Зеркало заднего вида, 11. Туалетное зеркало, 12. Панель управления микроклиматом в задней части салона, 13. Задние сиденья второго ряда (два места), 14. Задние сиденья третьего ряда (два места)
СИСТЕМА ДОСТУПА В АВТОМОБИЛЬ И ПУСКА ДВИГАТЕЛЯ БЕЗ КЛЮЧА «ADVANCED KEYLESS»
Система «Advanced Keyless» доступа в автомобиль и пуска двигателя без ключа обеспечивает возможность выполнения следующих операций (при условии, что носимая карта «Advanced Key» находится у вас при себе):
— запирание/отпирание дверей и задней подъемной двери без использования ключа;
— пуск двигателя автомобиля без использования ключа.
Для использования дополнительных служебных функций системы служат кнопки, расположенные на носимой карте «Advanced Key».
Операции, которые могут выполняться дистанционно с помощью пульта дистанционного управления, встроенного в носимую карту «Advanced Key» (с использованием кнопок «3апереть»/«0тпереть»/«3адняя подъемная дверь»):
— запирание/отпирание дверей и задней подъемной двери;
— открытие/закрытие задней подъемной двери с электроприводом;
— управление функциями охранной сигнализации;
— запирание/отпирание дверей и пуск двигателя с помощью вспомогательного ключа, встроенного в носимую карту.
ВНИМАНИЕ
Не оставляйте ключи в автомобиле, если в салоне находятся малолетние дети. Держите ключи от автомобиля в местах, недоступных для детей. Не давайте детям играть с ключами от автомобиля.
Радиоволны, излучаемые носимой картой «Advanced Key» могут нарушать нормальное функционирование различных медицинских аппаратов, например, кардиостимуляторов. Поэтому обязательно проконсультируйтесь у представителя изготовителя медицинского оборудования или у лечащего врача относительно безопасности использования носимой карты «Advanced Key» в непосредственной близости от людей, использующих подобные медицинские аппараты.
АВТОМОБИЛИ, ОСНАЩЕННЫЕ ЭЛЕКТРИЧЕСКИМ ПРИВОДОМ ЗАДНЕЙ ПОДЪЕМНОЙ ДВЕРИ
АВТОМОБИЛИ БЕЗ ЭЛЕКТРИЧЕСКОГО ПРИВОДА ЗАДНЕЙ ПОДЪЕМНОЙ ДВЕРИ
Кодовый номер ключа отштампован на бирке, получаемой владельцем автомобиля вместе с комплектом носимых карт. Отсоедините эту бирку и храните ее в надежно защищенном месте (не в автомобиле) на случай, если потребуется изготовить ключ на замену. Кроме того, запишите кодовый номер и храните запись в другом безопасном и удобном месте (но не в автомобиле). При потере ключа обратитесь на сервисную станцию официального дилера Mazda и сообщите кодовый номер ключа от вашего автомобиля.
Примечание:
Срок службы элемента питания составляет примерно один год. Необходимо безотлагательно при первой же возможности заменить элемент питания, как только вы заметили, что зеленый индикатор «KEY» на приборной панели мигает в течение 30 секунд после выключения зажигания.
Если своевременно не заменить элемент питания, то он может полностью разрядиться. В этом случае вы не сможете запустить двигатель автомобиля с помощью носимой карты «Advanced Key».
ТЕХНИЧЕСКОЕ ОБСЛУЖИВАНИЕ НОСИМОЙ КАРТЫ «ADVANCED KEY»
ВНИМАНИЕ
Проверьте, чтобы элемент питания был правильно ориентирован своими электрическими полюсами относительно корпуса карты. При неправильной установке элемента питания (нарушении полярности подключения) возможна течь электролита.
При замене элемента питания будьте осторожны, чтобы не погнуть электрические контакты, а также оберегайте электрические контакты от загрязнения маслом. Следите за тем, чтобы в корпус карты не попала грязь. Это может вывести носимую карту из строя.
Если замена элемента питания произведена неправильно, то существует опасность взрыва элемента питания.
При замене используйте только элементы питания такого же типа, как были установлены на заводе-изготовителе (С R2025 или полностью эквивалентные элементы).
Изолируйте положительный и отрицательный полюса элемента питания с помощью целлофана или изоленты.
ЗАМЕНА ЭЛЕМЕНТА ПИТАНИЯ НОСИМОЙ КАРТЫ «ADVANCED KEY»
1. Выньте из карты вспомогательный ключ.
2. С помощью плоской отвертки освободите крышку элемента питания. Затем поверните и снимите крышку.
ВНИМАНИЕ
Не поворачивайте крышку на слишком большой угол. Это может привести к повреждению крышки.
3. Вставьте наконечник плоской отвертки в прорезь и выдвиньте элемент питания наружу.
4. Вставьте новый элемент питания, так чтобы положительный полюс элемента (+) располагался на той же стороне, что и маркировка (+), нанесенная на крышке.
5. Поверните и закройте крышку.
6. Вставьте на место вспомогательный ключ.
ЗАПИРАНИЕ/ОТПИРАНИЕ ДВЕРЕЙ И ЗАДНЕЙ ПОДЪЕМНОЙ ДВЕРИ
Дальность действия системы при запирании/ отпирании замков дверей ограничена радиусом 80 см от середины дверных рукояток передних дверей. Дальность действия системы при запирании/ отпирании замка задней подъемной двери ограничена радиусом 80 см от середины задней подъемной двери.
Примечание:
Система может не работать, если вы находитесь слишком близко к окнам, наружным рукояткам дверей или к задней подъемной двери.
Запирание и отпирание замков дверей с помощью кнопок в наружных рукоятках
Если носимая карта «Advanced Key» находится при вас, то вы можете запереть/отпереть все двери/заднюю подъемную дверь, нажав на кнопку, встроенную в рукоятку одной из передних дверей или расположенную на задней подъемной двери (справа, под хромированной планкой).
Для того чтобы запереть все двери (включая заднюю подъемную дверь), нажмите на кнопку, расположенную на дверной рукоятке одной из передних дверей или на задней подъемной двери. При этом фонари указателей поворота мигнут один раз.
Для того, чтобы отпереть все двери (включая заднюю подъемную дверь), нажмите на кнопку, расположенную на дверной рукоятке одной из передних дверей или на задней подъемной двери. При этом фонари указателей поворота мигнут дважды.
Примечание:
Убедитесь в том, что все двери/задняя подъемная дверь надежно заперты.
Боковые двери и задняя подъемная дверь не запираются, если открыта любая из дверей автомобиля или задняя подъемная дверь.
Если ваш автомобиль оснащен охранной сигнализацией, то указатели поворота мигают только при постановке сигнализации в режим охраны и снятии с режима охраны.
При запирании и отпирании дверей/ задней подъемной двери с помощью кнопок, расположенных на наружных дверных рукоятках или на задней подъемной двери, раздается подтверждающий звуковой сигнал. По желанию, подтверждающий звуковой сигнал может быть отключен.
Настройку системы можно соответствующим образом изменить так, чтобы двери и задняя подъемная дверь запирались автоматически без нажатия на кнопки, расположенные на наружных дверных рукоятках или на задней подъемной двери.
Функция автоматического запирания дверных замков
Спустя три секунды после того, как все двери/задняя подъемная дверь будут закрыты и носимая карта окажется вне зоны действия системы, происходит автоматическое запирание замков всех дверей/ задней подъемной двери. При этом фонари указателей поворота мигнут один раз. (Даже если водитель с носимой картой будет находиться в зоне действия системы, замки всех дверей/задней подъемной двери будут автоматически заперты примерно через 30 секунд.)
Если вы, имея при себе носимую карту, выйдете из зоны действия системы, до того как все двери/задняя подъемная дверь будут закрыты, то функция автоматического запирания замков действовать не будет. Функция автоматического запирания замков также не действует, если водитель с носимой картой выйдет из зоны действия системы, когда в автомобиле оставлена другая носимая карта. Перед тем как оставлять автомобиль, обязательно убедитесь в том, что все двери/задняя подъемная дверь закрыты и заперты.
Функция повторного автоматического запирания замков
После отпирания замков с помощью кнопок запирания/отпирания, расположенных в рукоятках передних дверей и на задней подъемной двери, все двери/задняя подъемная дверь будут автоматически заперты снова, если в течение 30 секунд не произойдет ни одного из перечисленных ниже действий. Если автомобиль оснащен охранной сигнализацией, то при запирании дверей указатели поворота мигнут один раз.
— дверь или задняя подъемная дверь открыта;
— в замок зажигания вставлен вспомогательный ключ;
— нажата и утоплена рукоятка выключателя зажигания.
ПУСК И ГЛУШЕНИЕ ДВИГАТЕЛЯ
Зона действия системы при пуске двигателя охватывает практически весь салон автомобиля, кроме багажного отделения.
Положения выключателя зажигания
Использование выключателя зажигания без традиционного ключа зажигания имеет некоторые особенности.
1. Положение «LOCK» (Блокировка) рукоятка выключателя зажигания отпущена. Рулевой вал механически заблокирован с целью предотвращения угона автомобиля.
2. Положение «LOCK» (Блокировка) рукоятка выключателя зажигания нажата и утоплена. Выключатель зажигания можно повернуть в положение «АСС» (Вспомогательные потребители электроэнергии), если на приборной панели горит зеленый индикатор «KEY» (Ключ).
Примечание:
Если рукоятка выключателя зажигания поворачивается с трудом, покачайте немного рулевое колесо влево или вправо, чтобы снять нагрузку с запирающего элемента.
Выключатель зажигания невозможно повернуть из положения «АСС» (Вспомогательные потребители электроэнергии) в положение «LOCK» (Блокировка), если рычаг переключателя диапазонов не находится в положении «Р» ( Стоянка).
3. Положение «АСС» (Вспомогательные потребители электроэнергии). В этом положении выключателя зажигания рулевой вал не заперт, и обеспечивается электрическое питание вспомогательных приборов.
Примечание:
Система доступа в автомобиль и пуска двигателя без ключа («Advanced Keyless») не функционирует, если выключатель зажигания находится в положении «АСС». Замки дверей не запираются и не отпираются при нажатии на кнопки дистанционного управления на носимой карте или на кнопки, расположенные на рукоятках дверей/на задней подъемной двери, даже при удалении носимой карты «Advanced Key» из автомобиля.
4. Положение «ON» (Зажигание включено). В этом положении выключатель зажигания находится после пуска двигателя. Перед пуском двигателя необходимо обязательно проверить состояние сигнализаторов.
Примечание:
При повороте выключателя зажигания в положение «ON» (Зажигание включено) можно услышать шум работающего топливного насоса, исходящий из зоны расположения топливного бака. Это является нормальным явлением и не свидетельствует о неисправности автомобиля.
5. Положение «START» (Стартер). В этом положении включается стартер двигателя. Стартер продолжает работать до тех пор, пока вы удерживаете рукоятку выключателя зажигания в положении «START». После отпускания рукоятки выключатель зажигания возвращается в положение «ON» (Зажигание включено). После пуска двигателя необходимо проверить состояние сигнализатора неисправности тормозной системы.
Примечание:
Носимая карта «Advanced Key» должна находиться при водителе, поскольку в нее встроена электронная микросхема иммобилайзера, который может обмениваться с блоком управления двигателем закодированными сигналами только с достаточно короткого расстояния.
Перед тем как повернуть рукоятку выключателя зажигания и включить стартер для пуска двигателя, проверьте, чтобы рукоятка была надежно закреплена на держателе. Если рукоятка снялась с держателя выключателя зажигания, закрепите ее снова. Для этого наденьте рукоятку на держатель и нажмите на рукоятку.
— убедитесь в том, что носимая карта «Advanced Key» находится при вас;
— водитель и все пассажиры, находящиеся в автомобиле, должны пристегнуть соответствующие ремни безопасности;
— проверьте, чтобы стояночный тормоз был включен;
— нажмите на тормозную педаль;
— переведите рычаг переключателя диапазонов в положение «Р» (Стоянка). Если необходимо запустить двигатель на ходу автомобиля, переведите рычаг переключателя диапазонов в положение «N» (Нейтраль);
Примечание:
Включение стартера заблокировано, если рычаг переключателя диапазонов не находится в положении «Р» (Стоянка) или «N» (Нейтраль).
— медленно нажмите на рукоятку выключателя зажигания (см. рис.) и утопите ее до упора;
— поверните выключатель зажигания из положения «АСС» в положение «START» (Стартер) и удерживайте рукоятку в этом положении до пуска двигателя (но не дольше 10 секунд). Если двигатель не запустился сразу, то не следует выключать стартер ранее 10 секунд. Это может затруднить пуск двигателя при низкой температуре окружающего воздуха;
— после пуска дайте двигателю поработать на холостом ходу примерно 10 секунд.
1. Переведите рычаг переключателя диапазонов в положение «Р» (Стоянка).
2. Поверните выключатель зажигания из положения «ON» (Зажигание включено) в положение «АСС» (Вспомогательные потребители электроэнергии).
3. Нажмите и утопите рукоятку выключателя зажигания, находящуюся в положении «АСС» (Вспомогательные потребители электроэнергии), затем поверните ее в положение «LOCK» (Блокировка).
ВНИМАНИЕ
Оставляя автомобиль на стоянке, всегда проверяйте, чтобы выключатель зажигания был повернут в положение «LOCK» (Блокировка).
СИСТЕМА ДИСТАНЦИОННОГО УПРАВЛЕНИЯ ЗАМКАМИ АВТОМОБИЛЯ
Система дистанционного управления позволяет запирать и отпирать замки дверей/ задней подъемной двери. Если автомобиль оснащен охранной сигнализацией, то с помощью пульта дистанционного управления замками можно также управлять служебными функциями охранной сигнализации. Нажимайте на кнопки дистанционного управления четко и осторожно.
Примечание:
Система дистанционного управления замками автомобиля рассчитана на нормальное функционирование на расстоянии до автомобиля не более 1 метра. Однако дальность действия пульта дистанционного управления может изменяться в зависимости от местных условий непосредственно около автомобиля.
Система дистанционного управления не функционирует, если ключ вставлен в цилиндр замка зажигания.
Если открыта любая боковая дверь или задняя подъемная дверь, то невозможно запереть автомобиль с помощью нажатия на кнопку запирания на пульте дистанционного управления. При этом фонари указателей поворота также не мигают.
Если при нажатии на кнопку пульта дистанционного управления система не реагирует на это воздействие или дальность действия пульта стала слишком малой, это может свидетельствовать о разряде элемента питания пульта.
ПУЛЬТ ДИСТАНЦИОННОГО УПРАВЛЕНИЯ СО СКЛАДНЫМ КЛЮЧОМ
Примечание:
Если ваш автомобиль оснащен охранной сигнализацией, то указатели поворота мигают только при постановке сигнализации в режим охраны и снятии с режима охраны.
При нажатии на любую кнопку на пульте дистанционного управления загорается индикатор, встроенный в пульт.
Для того, чтобы запереть все двери (включая заднюю подъемную дверь), нажмите на кнопку запирания. При этом фонари указателей поворота мигнут один раз.
Примечание:
Боковые двери и задняя подъемная дверь не запираются, если открыта любая из дверей автомобиля или задняя подъемная дверь.
После нажатия на кнопку запирания убедитесь в том, что все двери/ задняя подъемная дверь заперты.
Для того чтобы отпереть водительскую дверь, нажмите на кнопку отпирания. При этом фонари указателей поворота мигнут дважды. Для того, чтобы отпереть все двери и заднюю подъемную дверь, еще раз нажмите на кнопку отпирания в течение пяти секунд после первого нажатия.
Примечание:
Если в течение 30 секунд после отпирания дверей с помощью пульта дистанционного управления ни одна из дверей/задняя подъемная дверь не была открыта, то замки дверей автоматически заблокируются снова. Если автомобиль оснащен охранной сигнализацией, то при запирании дверей указатели поворота мигнут один раз.
ВНИМАНИЕ
Запрещается вносить любые изменения в конструкцию или заменять передние сиденья. Замена передних сидений или внесение любых изменений в конструкцию передних сидений, включая замену обивки, отпускание или отвертывание крепежных болтов представляет собой опасность. В передние сиденья встроены элементы системы надувных подушек безопасности, которая играет существенную роль в обеспечении пассивной безопасности водителя и пассажиров. Любое вмешательство в конструкцию или крепление передних сидений может привести к повреждению системы надувных подушек безопасности, следствием чего может быть серьезное травмирование людей. Если потребуется демонтировать или установить на автомобиль передние сиденья, обратитесь на сервисную станцию официального дилера Mazda.
Запрещается эксплуатировать автомобиль при неисправных передних сиденьях. Передние сиденья со встроенными элементами системы подушек безопасности могут получить повреждения даже в результате незначительного дорожно-транспортного происшествия, когда срабатывание подушек безопасности заводом-изготовителем не предусмотрено. Из-за этого при следующем более серьезном дорожно-транспортном происшествии подушки безопасности могут не сработать, что приведет к травмированию водителя и пассажира. Поэтому, если автомобиль побывал в дорожно-транспортном происшествии, обратитесь на сервисную станцию официального дилера Mazda для проверки технического состояния передних сидений, пиротехнических преднатяжителей ремней безопасности и системы подушек безопасности.
Во избежание выхода электрических двигателей из строя запрещается длительная непрерывная работа электроприводов регулировки сиденья.
Во избежание разряда аккумуляторной батареи не следует производить регулировку сидений при неработающем двигателе автомобиля. Электрические приводы регулировки сидений потребляет значительную электрическую мощность.
Запрещается производить регулировку сиденья одновременно по нескольким направлениям (например, одновременно регулировать продольное положение и выполнять регулировку сиденья по высоте).
Регулировка продольного положения сидений
Для того чтобы отрегулировать продольное положение сиденья, сдвиньте горизонтальную рукоятку регулятора, расположенную на основании сиденья (со стороны проема двери), вперед или назад — в зависимости от направления требуемого перемещения сиденья. Удерживайте рукоятку регулятора в процессе перемещения сиденья до требуемого положения. Как только сиденье придет в требуемое положение, отпустите рукоятку регулятора.
Регулировка наклона спинки сиденья
ВНИМАНИЕ
Для наибольшей безопасности не наклоняйте сильно спинку сиденья. Сидите прямо, плотно опираясь поясницей и спиной на спинку сиденья.
Спинка сиденья должна находиться в положении, близком к вертикальному. Ноги пассажира должны находиться на полу. В подушку переднего пассажирского сиденья встроен датчик веса. Если на ходу автомобиля пассажир, расположенный на переднем сиденье, сидит в неправильном положении или занимает неправильную позу, или спинка сиденья сильно наклонена назад, то это представляет опасность, поскольку может привести к разгрузке датчика веса. В результате этого система может ошибочно определить, что пассажир на переднем сиденье отсутствует. Вследствие этого при дорожно-транспортном происшествии подушки безопасности и преднатяжитель ремня безопасности переднего пассажира не сработают, что лишит пассажира дополнительной защиты от гибели или увечий.
Для того чтобы отрегулировать наклон спинки сиденья, нажмите в соответствующую сторону на вертикальную рукоятку регулятора спинки. Как только спинка сиденья придет в требуемое положение, отпустите рукоятку регулятора.
Запоминающее устройство водительского сиденья
Водительское сиденье оснащено программируемым устройством для запоминания индивидуальных вариантов регулировки сиденья. Программирование и автоматическая установка сиденья в запрограммированное положение осуществляется одним нажатием на соответствующую кнопку.
ВНИМАНИЕ
При включении автоматической установки сиденья в запрограммированное положение не держите руки или пальцы в зоне около основания сиденья. Поскольку сиденье перемещается в запрограммированное положение автоматически, оно может травмировать ваши руки или пальцы.
Программирование положений водительского сиденья может выполняться двумя способами:
1. С помощью кнопок 1, 2, 3 и кнопки «SET» (Установка), расположенных на сиденье.
2. С использованием носимой карты «Advanced Key» или пульта дистанционного управления, объединенного со складным ключом.
Автоматическая установка сиденья в предварительно запрограммированное положение может осуществляться двумя способами:
1. С помощью кнопок 1, 2, 3, расположенных на сиденье.
Примечание:
Три кнопки, расположенные сбоку на основании водительского сиденья, позволяют запрограммировать три варианта индивидуальной настройки водительского сиденья. Кроме того, вы можете дополнительно запрограммировать по одному положению сиденья для каждой носимой карты или складного ключа, используемого для вашего автомобиля.
ИСПОЛЬЗОВАНИЕ КНОПОК НА СИДЕНЬЕ
Программирование вариантов регулировки сиденья
Прежде чем приступать к программированию водительского сиденья, остановите автомобиль в безопасном месте. Автомобиль должен быть полностью неподвижен.
1. Установите сиденье и спинку сиденья в требуемое положение.
2. Нажмите на кнопку «SET» (Установка) и, не отпуская ее, нажмите на одну из кнопок 1 — 3 и удерживайте ее нажатой до короткого звукового сигнала. Звуковой сигнал означает окончание программирования запоминающего устройства сиденья (для нажатой кнопки). Программирование сиденья для двух других кнопок осуществляется аналогично.
Примечание:
Отключение аккумуляторной батареи от бортовой сети автомобиля (например, при техническом обслуживании или по другим причинам) приводит к очистке запоминающего устройства сиденья и утрате запрограммированных вариантов настройки сиденья. В подобных случаях необходимо перепрограммировать запоминающее устройство водительского сиденья.
Автоматическая установка сиденья в запрограммированное положение
Вы можете воспользоваться двумя способами установки сиденья в предварительно запрограммированное положение. Например, способ А может применяться до посадки водителя на сиденье и при открытой водительской двери, а способ Б — после посадки на водительское сиденье, когда водительская дверь закрыта.
Выключатель зажигания находится в положении «LOCK» (Блокировка), водительская дверь открыта. Нажмите на одну из кнопок 1 — 3, с помощью которой было запрограммировано требуемое положения сиденья. Сиденье автоматически перейдет в запрограммированное положение.
Примечание:
Функция автоматической установки сиденья в запрограммированное положение выключается в следующих случаях:
— при нажатии на любую рукоятку регулировки сиденья;
— при нажатии на кнопку «SET» (Установка);
— при повторном нажатии на одну из кнопок 1 — 3;
— при трогании автомобиля с места;
— при запирании/отпирании дверных замков с помощью пульта дистанционного управления;
— при запирании/отпирании дверных замков с помощью кнопки, встроенной в наружную дверную рукоятку (носимая карта «Advanced key» находится при водителе).
Выключатель зажигания находится в положении «ON» (Зажигание включено) и водительская дверь закрыта. Нажмите и удерживайте в нажатом положении одну из кнопок 1 — 3, с помощью которой было запрограммировано требуемое положения сиденья. Сиденье автоматически перейдет в запрограммированное положение.
Примечание:
Функция автоматической установки сиденья в за программированное положение выключается в следующих случаях:
— при нажатии на любую рукоятку регулировки сиденья;
— при нажатии на кнопку «SET» (Установка);
— при трогании автомобиля с места;
ИСПОЛЬЗОВАНИЕ ПУЛЬТА ДИСТАНЦИОННОГО УПРАВЛЕНИЯ ЦЕНТРАЛЬНЫМ ЗАМКОМ (С НОСИМОЙ КАРТОЙ «ADVANCED КЕУ» ИЛИ СКЛАДНЫМ КЛЮЧОМ)
Автомобили с носимой картой «Advanced Key»
Автомобили со складным ключом
Каждая носимая карта «Advanced Key» складной ключ позволяет запрограммировать один вариант индивидуальной настройки сиденья. После выполнения приведенных ниже условий установите сиденье в требуемое положение и запрограммируйте запоминающее устройство сиденья с помощью носимой карты «Advanced Key» или пульта дистанционного управления со складным ключом.
— выключатель зажигания находится в положении «LOCK» (Блокировка). При этом вспомогательный ключ носимой карты/складной ключ должен быть вынут из замка выключателя зажигания;
— водительская дверь открыта.
2. Нажмите на кнопку «SET» (Установка) и, не отпуская ее, нажмите на кнопку отпирания замков, расположенную на носимой карте «Advanced Key»/ складном ключе и удерживайте ее нажатой до короткого звукового сигнала. Звуковой сигнал означает, что программирование запоминающего устройства водительского сиденья завершено.
Выключатель зажигания должен находиться в положении «LOCK» (Блокировка). Отоприте дверные замки одним из двух способов, указанных ниже, и не позже 40 секунд после этого откройте водительскую дверь. Водительское сиденье автоматически придет в запрограммированное положение.
Для отпирания дверных замков:
— нажмите на кнопку отпирания, расположенную на носимой карте/ складном ключе;
— имея при себе носимую карту «Advanced Key», нажмите на кнопку, встроенную в рукоятку передней двери, или на кнопку, расположенную на задней подъемной двери.
Примечание:
функция автоматической установки сиденья в запрограммированное положение выключается в следующих случаях:
— при нажатии на кнопку запирания/отпирания, если ключ зажигания не был вставлен в замок зажигания;
— при нажатии на любую рукоятку регулировки сиденья;
— при движении автомобиля или при трогании автомобиля с места;
— при повторном нажатии на ту же кнопку программирования (1-3) или на кнопку «SET» (Установка);
— при нажатии на кнопку, встроенную в рукоятку передней двери, или на кнопку, расположенную на задней подъемной двери (при этом носимая карта «Advanced Key» находится при водителе);
— при нажатии на кнопку « SET « (Установка).
Очистка памяти запоминающего устройства сиденья
После выполнения приведенных ниже условий нажмите на кнопку «SET» (Установка) и, не отпуская ее, нажмите на кнопку запирания замков, расположенную на носимой карте «Advanced Кеу»/складном ключе и удерживайте ее нажатой до короткого звукового сигнала.
Примечание:
Очистка памяти запоминающего устройства водительского сиденья происходит также в следующих случаях:
— при изменении кода носимой карты «Advanced Кеу»/складного ключа;
— при отключении аккумуляторной батареи от бортовой сети автомобиля (во время технического обслуживания или по другим причинам).
Регулировка поясничной опоры в спинке сиденья (водительское сиденье)
Для того, чтобы отрегулировать поясничную опору в спинке сиденья, нажмите на передний или задний край клавиши выключателя. Если вы желаете усилить поясничную опору и сделать спинку более жесткой, то нажмите на передний край клавиши и удерживайте ее в нажатом положении, пока поясничная опора не придет в требуемое положение. Затем отпустите клавишу. Если вы желаете ослабить поясничную опору и сделать спинку более менее жесткой, то нажмите на задний край клавиши и удерживайте ее в нажатом положении, пока поясничная опора не придет в требуемое положение. Затем отпустите клавишу.
ВНИМАНИЕ
Запрещается размещать багаж выше спинок сидений. Перед поездкой проверьте надежность крепления перевозимого багажа и других грузов.
Проверьте надежность фиксации подвижных регулируемых элементов сидений. Для этого попытайтесь сдвинуть сиденье в продольном направлении вперед-назад и покачайте спинку сиденья вперед-назад.
Запрещается двигаться на автомобиле, если спинка сиденья не зафиксирована. После регулировки наклона спинки сиденья всегда проверяйте надежность ее фиксации, даже если в данный момент сиденье свободно.
Для того чтобы переместить сиденье вперед или назад, приподнимите скобу фиксатора и сдвиньте сиденье в требуемое положение. Затем отпустите скобу, чтобы зафиксировать сиденье на месте. Проверьте, чтобы скоба фиксатора вернулась в исходное нижнее положение, и сиденье было надежно зафиксировано на месте. Для этого попытайтесь сдвинуть сиденье вперед и назад.
ВНИМАНИЕ
Запрещается двигаться на автомобиле, если спинки сидений сильно наклонены назад.
Запрещается наклонять спинки сидений второго ряда, если на сиденьях третьего ряда располагаются пассажиры.
Для того, чтобы отрегулировать наклон спинки сиденья, наклонитесь немного вперед (для разгрузки спинки от веса тела) и поднимите рукоятку фиксатора вверх. Удерживая рукоятку в приподнятом положении, отклонитесь назад и приведите спинку в требуемое положение. После этого отпустите рукоятку фиксатора.
Проверьте, чтобы рукоятка фиксатора вернулась в исходное положение, и спинка сиденья была надежно зафиксирована на месте. Для этого покачайте спинку вперед-назад.
ВНИМАНИЕ
Возвращая наклоненную назад спинку сиденья в вертикальное положение, придерживайте ее другой рукой, когда нажимаете на рукоятку фиксатора. Если не придержать спинку сиденья, она может резко наклониться вперед и нанести травму.
Доступ пассажиров на сиденья третьего ряда
Доступ пассажиров на задние сиденья третьего ряда обеспечивается после складывания спинок и перемещения вперед сидений второго ряда.
Потяните за боковую рукоятку на спинке, для того чтобы сложить спинку и сдвинуть сиденье второго ряда вперед.
После посадки/выхода пассажиров с сидений третьего ряда верните спинку сиденья второго ряда в вертикальное положение и сдвиньте сиденье назад. Проверьте надежность фиксации спинки и сиденья, попытавшись сдвинуть их вперед-назад.
Складывание задних сидений второго ряда
Для того, чтобы получить ровный пол багажного отделения, сложите спинки сидений в горизонтальное положение.
1. Сдвиньте полностью сиденья назад.
2. Полностью опустите подголовники.
3. Потяните за рукоятку фиксатора и сложите спинку сиденья вперед.
Складывание задних сидений третьего ряда
Для того чтобы получить ровный пол багажного отделения, сложите спинки сидений в горизонтальное положение.
Для того чтобы сложить задние сиденья третьего ряда, выполните следующее:
1. Полностью опустите подголовники.
2. Потяните за лямку фиксатора и сложите спинку сиденья вперед.
3. Закрепите лямку фиксатора в исходном положении.
Возвращение сидений третьего ряда в исходное вертикальное положение
1. Потяните за лямку фиксатора и поднимите спинку в исходное вертикальное положение. Проверьте надежность фиксации спинки.
2. Закрепите лямку фиксатора в исходном положении.
ЭЛЕКТРИЧЕСКИЕ ПОДОГРЕВАТЕЛИ СИДЕНИЙ
Передние сиденья оснащены электрическими подогревателями. Электрические подогреватели могут работать, только если выключатель зажигания находится в положении «ON» (Зажигание включено).
Для того чтобы включить или выключить электрический подогреватель сиденья, нажмите на соответствующую клавишу выключателя. При включении электрического подогревателя сиденья загорается встроенный в клавишу индикатор.
ВНИМАНИЕ
Запрещается пользоваться электрическими подогревателями, если сиденья накрыты вещами, способными удерживать много влаги (например, одеялом или подушкой). Сиденья могут нагреться до слишком высокой температуры и вызвать локальный перегрев тела.
Запрещается класть на сиденья тяжелые предметы с острыми выступающими краями и частям, а также втыкать в сиденья иголки и булавки. Это может привести к повреждению подогревателя, перегреву сиденья, тела и местным ожогам кожи.
Включайте электрические подогреватели сидений при работающем двигателе.
Не следует пользоваться электрическими подогревателями сидений непрерывно в течение продолжительного времени.
Примечание:
Температура сидений поддерживается автоматически с помощью термостата. Регулировка интенсивности подогрева сидений не предусмотрена: электрический подогреватель может находиться только в одном из двух состояний — включенном или выключенном.
СИСТЕМА ПАССИВНОЙ БЕЗОПАСНОСТИ
Ваш шестиместный автомобиль оборудован шестью ремнями безопасности на всех местах, предусмотренных для размещения водителя и пяти пассажиров: два ремня на передних сиденьях, два ремня на задних сиденьях второго ряда, два ремня на задних сиденьях третьего ряда. Запрещается размещать пассажира между левым и правым сиденьями второго ряда, поскольку эта зона не предназначена для размещения людей и, соответственно, не оборудована ремнем безопасности.
ВНИМАНИЕ
Задние сиденья второго ряда рассчитаны на размещение только двух пассажиров. В соответствии с указанным количеством посадочных мест сиденья второго ряда оснащены двумя ремнями безопасности. Задние сиденья третьего ряда рассчитаны также на размещение двух пассажиров. В соответствии с указанным количеством посадочных мест задние сиденья третьего ряда оснащены двумя ремнями безопасности.
Инструкции по использованию ремней безопасности
1. Ремни безопасности должны лежать на тех частях тела, где располагаются прочные кости скелета. Ремень должен проходить над тазовой костью, грудной клеткой и плечом. Необходимо избегать расположения поясной лямки ремня безопасности на животе.
2. Необходимо отрегулировать ремень безопасности так, чтобы он максимально плотно прилегал к телу, и при этом сохранялось удобство посадки. Только в этом случае ремень безопасности сможет эффективно выполнить свою защитную функцию, ради которой он установлен на автомобиль. Провисающий ремень безопасности значительно снижает эффективность пассивной защиты водителя или пассажиров.
3. Предохраняйте лямки ремней безопасности от попадания на них полироли, масла, агрессивных химических веществ и, особенно, электролита аккумуляторной батареи. Для чистки лямок ремней безопасности применяйте водный раствор нейтрального мыла. Необходимо заменить ремень безопасности, если лямка изношена, загрязнена или имеет следы повреждений.
4. Необходимо обязательно заменить ремень безопасности в сборе, если он использовался водителем или пассажиром при сильном столкновении автомобиля, даже если отсутствуют видимые признаки повреждения ремня безопасности.
5. Запрещается использовать ремень безопасности, если лямка перекручена.
6. Каждый ремень безопасности должен использоваться только одним пассажиром одновременно. Опасно пристегивать одним ремнем безопасности пассажира и ребенка, сидящего у него на коленях. В случае столкновения автомобиля или резкого торможения это может привести к гибели или увечью ребенка.
7. Запрещаются любые изменения конструкции ремней безопасности, которые нарушают нормальную работу втягивающего устройства инерционной катушки и могут затруднить автоматический выбор слабины ремня, а также могут препятствовать регулировке ремня с целью устранения его провисания.
Описание принципа работы надувных подушек безопасности и шторок
Если датчики удара, являющиеся элементами системы подушек безопасности, обнаруживают воздействие на автомобиль сильного фронтального или бокового удара, сила которого превышает определенный заданный уровень, то они подают электрический сигнал для включения газогенераторов соответствующих надувных подушек и шторок.
Газогенератор обеспечивает практически мгновенное раскрытие и надувание оболочки подушки или шторки газом, после чего подушка или шторка сдувается контролируемым образом. Если сила удара автомобиля не превышает определенный заданный уровень, то подушки безопасности/шторки не срабатывают. Это предусмотрено для предохранения водителя и пассажиров от травм, которые им могут нанести сами подушки безопасности в случае незначительного или средней силы тяжести дорожно-транспортного происшествия.
Надувные подушки безопасности и шторки являются одноразовыми устройствами и не подлежат повторному использованию. После приведения в действие подушки безопасности и шторки становятся неработоспособными и должны быть заменены.
Для замены подушек безопасности, шторок и других элементов системы обращайтесь только на сервисную станцию официального дилера Mazda.
ЭЛЕКТРИЧЕСКИЕ СТЕКЛОПОДЪЕМНИКИ
Электрические стеклоподъемники могут функционировать, только если выключатель зажигания находится в положении «ON» (Зажигание включено).
ВНИМАНИЕ
Опасно оставлять выключатели электрических стеклоподъемников незаблокированными, если в автомобиле находятся дети. Если не заблокировать выключатели электрических стеклоподъемников с помощью кнопки блокировки, то дети могут непреднамеренно включить стеклоподъемник и получить серьезные травмы, если стекло зажмет руки, голову или шею ребенка.
Во избежание перегорания электрического плавкого предохранителя и повреждения системы электрических стеклоподъемников запрещается включать одновременно более трех стеклоподъемников.
УПРАВЛЕНИЕ ЭЛЕКТРИЧЕСКИМИ СТЕКЛОПОДЪЕМНИКАМИ ПЕРЕДНИХ ДВЕРЕЙ
1. Электрический стеклоподъемник каждой пассажирской двери может управляться соответствующим выключателем, расположенным на подлокотнике двери. Для этого необходимо, чтобы кнопка блокировки стеклоподъемников, расположенная на панели управления стеклоподъемниками на водительской двери, не была нажата. Кроме того, окна пассажирских дверей могут быть открыты или закрыты с помощью соответствующих главных выключателей, установленных на панели управления стеклоподъемниками на подлокотнике водительской двери.
2. Главные выключатели, расположенные на панели управления свеклоподъемниками на водительской двери, а также выключатель, расположенный на передней пассажирской двери, позволяют выполнять следующие функции:
— управление подъемом/опусканием стекол в ручном режиме;
— подъем и опускание стекол в автоматическом режиме;
— двухступенчатое опускание стекол.
Управление подъемом/опусканием стекол в ручном режиме
Для того, чтобы опустить стекло в требуемое положение, слегка нажмите на клавишу выключателя вниз и удерживайте ее в процессе опускания стекла. Для того, чтобы поднять стекло в требуемое положение, слегка нажмите на клавишу выключателя вверх и удерживайте ее в процессе подъема стекла.
Панель главных выключателей электростеклоподъемников
Выключатель стеклоподъемника правой передней двери
Подъем и опускание стекол в автоматическом режиме
Для того, чтобы полностью открыть окно в автоматическом режиме, нажмите на клавишу выключателя до упора вниз и затем отпустите. Для того чтобы полностью закрыть окно в автоматическом режиме, поднимите клавишу выключателя до упора вверх и затем отпустите. Вы можете остановить стекло в любом промежуточном положении в процессе автоматического подъема или опускания. Для этого кратковременно нажмите на клавишу выключателя соответственно вниз или вверх.
Функция двухступенчатого опускания стекла
При полностью закрытом окне слегка нажмите на клавишу выключателя — при этом стекло опустится примерно на 3 см и остановится. Если вы будете продолжать нажимать и удерживать клавишу в нажатом положении, стекло продолжит опускаться вниз.
Примечание:
Краткое нажатие на клавишу выключателя электростеклоподъемника при полностью закрытом окне обеспечивает автоматическое опускание стекла примерно на 3 см и достаточную вентиляцию салона автомобиля.
Отключение функции двухступенчатого опускания стекла
Для того, чтобы отключить функцию двухступенчатого опускания стекла на каждой передней двери, выполните следующие операции, используя главные выключатели электрических стеклоподъемников (расположенные на подлокотнике водительской двери).
1. Поверните выключатель зажигания в положение «ON» (Зажигание включено) и в течение пяти секунд выполните следующее. Нажмите на клавишу два раза до упора вниз, затем два раза до упора вверх.
2. Поверните выключатель зажигания в положение «LOCK» (Блокировка).
3. В течение 40 секунд после этого поверните выключатель зажигания в положении «ON» (Зажигание включено). Затем в пределах пяти секунд выполните следующие действия. Нажмите на клавишу выключателя стеклоподъемника два раза до упора вниз, затем два раза до упора вверх.
Примечание:
Функция двухступенчатого опускания стекла не отключится, если все описанные выше операции не были завершены в установленное время или последовательность операций была изменена по ходу выполнения. Для того чтобы повторить процедуру отключения этой функции заново, сначала поверните выключатель зажигания в положение «LOCK» (Блокировка) и затем начните с самого начала.
Если вам не удается самостоятельно отключить функцию, несмотря на правильное выполнение всех действий, обратитесь на сервисную станцию официального дилера Mazda.
Восстановление функции двухступенчатого опускания стекла
Для того чтобы снова активировать данную функцию, необходимо для стеклоподъемника каждой двери выполнить еще раз все операции, которые предусмотрены для отключения функции двухступенчатого опускания стекла.
Функция защиты от защемления стеклом
Если в процессе подъема (в автоматическом режиме или при управлении стеклоподъемником вручную) стекло защемит руку или голову пассажира или любой другой предмет, то стекло остановится и частично опустится вниз.
Функционирование электрических стеклоподъемников после выключения зажигания
Электрические стеклоподъемники могут работать еще примерно в течение 40 секунд после поворота выключателя зажигания из положения «ON» (Зажигание включено) в положение «АСС» (Вспомогательные потребители электроэнергии) или «LOCK» (Блокировка). При этом все двери автомобиля должны быть закрыты. Если открыть любую дверь, то электрические стеклоподъемники не будут работать после выключения зажигания.
Примечание:
Для того чтобы закрыть окно при выключенном зажигании, необходимо нажать на клавишу выключателя стеклоподъемника вверх до упора и удерживать ее в процессе подъема стекла, поскольку автоматический режим электрического стеклоподъемника при выключенном зажигании не действует. При выключенном зажигании функция двухступенчатого опускания стекла не действует.
УПРАВЛЕНИЕ ЭЛЕКТРИЧЕСКИМИ СТЕКЛОПОДЪЕМНИКАМИ ЗАДНИХ ДВЕРЕЙ
Управление электрическими стеклоподъемниками задних пассажирских дверей возможно, только если выключатель блокировки электростеклоподъемников, расположенный на подлокотнике водительской двери, не нажат.
Окна задних пассажирских дверей могут также открываться и закрываться водителем с помощью соответствующих главных выключателей, установленных на панели управления стеклоподъемниками на подлокотнике водительской двери.
Для того, чтобы опустить стекло в требуемое положение, нажмите на клавишу выключателя вниз и удерживайте ее в процессе опускания стекла. Для того, чтобы поднять стекло в требуемое положение, нажмите на клавишу выключателя вверх и удерживайте ее в процессе подъема стекла.
Электрические стеклоподъемники могут работать еще примерно в течение 40 секунд после поворота выключателя зажигания из положения «ON» (Зажигание включено) в положение «АСС» (Вспомогательные потребители электроэнергии) или «LOCK» (Блокировка). При этом все двери автомобиля должны быть закрыты. Если открыть любую дверь, то электрические стеклоподъемники не будут работать после выключения зажигания.
ВЫКЛЮЧАТЕЛЬ БЛОКИРОВКИ ЭЛЕКТРИЧЕСКИХ СТЕКЛОПОДЪЕМНИКОВ
Если выключатель блокировки электрических стеклоподъемников не нажат, то электрические стеклоподъемники могут управляться с помощью главных выключателей (расположенных на подлокотнике водительской двери) и выключателей на подлокотнике соответствующей двери. Если выключатель блокировки стеклоподъемников нажат и утоплен, то возможно управление только электрическим стеклоподъемником водительской двери.
ВНИМАНИЕ
Постоянно держите выключатель блокировки стеклоподъемников в нажатом положении (управление стеклоподъемниками заблокировано). Разблокируйте стеклоподъемники, только если кто-либо из пассажиров желает поднять или опустить стекло. Случайное непреднамеренное включение электрического стеклоподъемника представляет опасность.Примечание:
При нажатой кнопке блокировки электрических стеклоподъемников точечная подсветка клавиш выключателей стеклоподъемников не работает (остается включенной только подсветка выключателя стеклоподъемника водительской двери). Точечную подсветку клавиш может быть трудно заметить при ярком окружающем освещении.
Руководство на английском языке по техническому обслуживанию и ремонту Mazda CX-9 2007 года выпуска.
- Автор: —
- Издательство: Mazda Motor Corporation
- Год издания: —
- Страниц: —
- Формат: PDF
- Размер: 16,4 Mb
Руководство на английском языке по техническому обслуживанию и ремонту Mazda CX-9 2008 года выпуска.
- Автор: —
- Издательство: Mazda Motor Corporation
- Год издания: —
- Страниц: —
- Формат: PDF
- Размер: 40,6 Mb
Руководство по эксплуатации и ремонту Mazda CX-9 с 2008 года выпуска с бензиновыми двигателями объемом 3,5/3,7 л.
- Автор: —
- Издательство: Монолит
- Год издания: —
- Страниц: 272
- Формат: —
- Размер: —

Руководство по эксплуатации и ремонту Mazda CX-9 с 2008 года выпуска с бензиновыми двигателями объемом 3,5/3,7 л.
- Автор: —
- Издательство: Монолит
- Год издания: —
- Страниц: 280
- Формат: —
- Размер: —
These workshop and owner’s manuals describes the operation and repair of the Mazda CX-9 cars, manufactured since 2007. The manuals describes the repair of cars with gasoline engines of 3.5 and 3.7D liters.
See also: Mazda workshop manuals
| Title | File Size | Download Link |
| Mazda CX-9 2007 Wiring Diagram.pdf | 57.5Mb | Download |
| Mazda CX-9 2007 Workshop Manual.rar | 16.4Mb | Download |
| Mazda CX-9 2008 Workshop Manual.rar | 40.6Mb | Download |
| Mazda CX-9 2007 Owner Manual.pdf | 7.9Mb | Download |
| Mazda CX-9 2008 Owner Manual.pdf | 9.5Mb | Download |
| Mazda CX-9 2009 Owner Manual.pdf | 10.1Mb | Download |
| Mazda CX-9 2010 Owner Manual.pdf | 11.1Mb | Download |
| Mazda CX-9 2011 Owner Manual.pdf | 11.4Mb | Download |
| Mazda CX-9 2012 Owner Manual.pdf | 11.3Mb | Download |
| Mazda CX-9 2013 Owner Manual.pdf | 11.7Mb | Download |
| Mazda CX-9 2014 Owner Manual.pdf | 7.2Mb | Download |
| Mazda CX-9 2015 Owner Manual.pdf | 7.2Mb | Download |
| Mazda CX-9 2016 Owner Manual.pdf | 8.4Mb | Download |
| Mazda CX-9 2017 Owner Manual.pdf | 66.5Mb | Download |
| Mazda CX-9 2018 Owner Manual.pdf | 72.8Mb | Download |
| Mazda CX-9 2019 Owner Manual.pdf | 88.9Mb | Download |
Content of Mazda CX 9 workshop manuals:
- Emergency response
- Daily checks and troubleshooting
- User’s manual
- Warnings and safety regulations when working on a car
- Basic tools, instrumentation and methods of working with them
- Engine
- Supply system
- Lubrication system
- Cooling system
- Intake and exhaust system
- Transmission
- Drive shafts
- Chassis
- Brake system
- Steering
- Body
- Heating, ventilation and air conditioning
- Passive safety
- Electrical equipment
- Electrical Wiring diagrams
- Diagnostic Trouble codes
- Fault codes
Mazda CX-9 – the largest car in the model range of the automaker. The premiere took place in 2007, and already in 2008, the crossover won the title of “SUV of the Year in North America.”
Mazda CX-9
The main competitors of the CX-9 claimed mastodon car market such as the Audi Q7, Mercedes-Benz GL-class or Chevrolet Tahoe. Inside – excellent quality materials combined with increased acoustic comfort. According to the manufacturer, engineers worked on acoustic comfort very carefully.
The basic stability system Stability Control, which helps prevent wheel locking and slipping on slippery surfaces, skidding, gives you the opportunity to maintain directional stability and avoid tipping. If the accident could not be avoided, frontal, side airbags, inflatable curtains, and active front head restraints will come to the aid of the driver and passengers.
Basic equipment includes climate control, power windows, door locks with servo drives, cruise control, 18-inch alloy wheels, and electric tailgate with remote control.
Attention! Clicking on the link “download” you agree, after reading, delete the downloaded file from your computer. All content on the site Carmanualsclub.com is taken from free sources and is also freely distributed. If you are the author of this material, then please contact us in order to provide users with a pleasant and convenient alternative, after reading, buying a quality “original” directly from the publisher. The site administration does not bear any responsibility for illegal actions, and any damage incurred by the copyright holders.
инструкцияMazda 2008 CX-9

©2008 Mazda Motor Corporation
Printed in Japan Jan. 2008(Print3)
Before Use
Getting
started
Routing
Address
Book
Voice
Recognition
Rear View
Monitor
Volume
Adjustment
Preparation
NAVIGATION
SYSTEM
See page for specific information.
See page for specific information.
See page for specific information.
Immediate use
Advanced use
See page for specific information.
Rear View Monitor
If
necessary
See page for specific information.
If necessary
Audio
System
See page for specific information.
Audio System
Bluetooth
Hands-Free
See page for specific information.
Bluetooth Hands-Free
5
4
4
5
61
85
91
‘<C)%FSSO4EKI;IHRIWHE]2SZIQFIV41
Посмотреть инструкция для Mazda 2008 CX-9 бесплатно. Руководство относится к категории автомобили, 1 человек(а) дали ему среднюю оценку 8.8. Руководство доступно на следующих языках: английский. У вас есть вопрос о Mazda 2008 CX-9 или вам нужна помощь? Задайте свой вопрос здесь

Главная
Не можете найти ответ на свой вопрос в руководстве? Вы можете найти ответ на свой вопрос ниже, в разделе часто задаваемых вопросов о Mazda 2008 CX-9.
Как перевести мили в километры?
1 миля равна 1,609344 километрам, а 1 километр — 0,62137119 милям.
Где я могу узнать идентификационный номер транспортного средства Mazda?
Место размещения идентификационного номера транспортного средства зависит от марки и типа транспортного средства. Номер может быть выбит на раме транспортного средства или указан на номерном знаке. Чтобы узнать место расположения идентификационного номера транспортного средства лучше всего ознакомиться с руководством по эксплуатации Mazda 2008 CX-9.
Что такое идентификационный номер транспортного средства (VIN)?
Идентификационный номер транспортного средства — уникальный для каждого транспортного средства идентификационный номер. Аббревиатура VIN расшифровывается как «Vehicle Identification Number» (Идентификационный номер транспортного средства).
Когда транспортному средству Mazda требуется техническое обслуживание?
Регулярное техническое обслуживание необходимо всем транспортным средствам. С информацией о том, как часто необходимо проходить техническое обслуживание и чему именно стоит уделять особое внимание можно ознакомиться в инструкции по техническому обслуживанию. Как правило, транспортное средство требует технического обслуживания каждые 2 года или 30 000 километров пробега.
Когда следует заменять тормозную жидкость на Mazda?
Тормозную жидкость рекомендуется менять каждые два года.
В чем разница между топливом E10 и E5?
В топливе E10 содержится до десяти процентов этанола, в то время как в E5 содержится менее пяти процентов. Соответственно, топливо E10 менее вредит окружающей среде.
Одна или несколько дверей не открываются изнутри. Что мне делать?
Скорее всего, замок оснащен защитой от детей и поэтому не может быть открыт изнутри. Процедура открытия замка с защитой от детей зависит от марки и типа замка.
Автомобильный радиоприемник не включается, что делать?
Если автомобильный радиоприемник не включен, на него не будет подаваться питание. Убедитесь, что красный провод подключен к контактному источнику питания, а желтый провод — к источнику питания постоянной мощности.
Инструкция Mazda 2008 CX-9 доступно в русский?
К сожалению, у нас нет руководства для Mazda 2008 CX-9, доступного в русский. Это руководство доступно в английский.
Не нашли свой вопрос? Задайте свой вопрос здесь


