(Ocr-Read Summary of Contents of some pages of the Hyundai Creta 2019 Document (Main Content), UPD: 05 April 2023)
-
180, 3-95 Convenient features of your vehicle 3 Defroster To prevent damage to the conduc- tors bonded to the inside surface of the rear window, never use sharp instruments or window cleaners containing abrasives to clean the window. If you want to defrost and defog the front windshield, refer to “Windshield defrosting and defog- ging” in this section. Rear window defroster (if equipped) In case of the Right-hand drive vehicle…
-
51, 2-31 Safety system of your vehicle 2 Children always in the rear Children under age 13 must always ride in the rear seats and must always be properly restrained to min- imize the risk of injury in an accident, sudden stop or sudden maneuver. According to accident statistics, chil- dren are safer when properly restrained in the rear seats than in the front seat. Children too large for a Child Restraint Sy…
-
50, 2-30 Safety system of your vehicle Care of seat belts Seat belt systems should never be disassembled or modified. In addi- tion, care should be taken to assure that seat belts and belt hardware are not damaged by seat hinges, doors or other abuse. Periodic inspection All seat belts should be inspected periodically for wear or damage of any kind. Any damaged parts should be replaced as soon as possible. Keep belts clean and dry Seat belts should be kept clean and dry. If belts become …
-
161, 3-76 Convenient features of your vehicle Average Fuel Economy (2) • The average fuel economy is calcu- lated by the total driving distance and fuel consumption since the last average fuel economy reset. • The average fuel economy can be reset both manually and automati- cally. Manual reset To clear the average fuel economy manually, press the OK button (or RESET button) on the steering wheel for more than 1 se…
-
449, 7-92 Maintenance Moisture breeds corrosion Moisture creates the conditions in which corrosion is most likely to occur. For example, corrosion is accelerated by high humidity, partic- ularly when temperatures are just above freezing. In such conditions, the corrosive material is kept in con- tact with the vehicle’s surface by moisture that slowly evaporates. Mud is particularly corrosive because it dries slowly …
-
440, 7-83 7 Maintenance Parking (Position light) If the light does not operate, we rec- ommend that the vehicle be checked by an authorized HYUNDAI dealer. Side repeater lamp bulb replacement (if equipped) If the light bulb does not operate, we recommend that you checked an authorized HYUNDAI dealer. Rear combination light bulb replacement (1) Stop/Tail light (2) Tail light (3) Rear turn signal light (4) Back-up l…
-
152, 3-67 Convenient features of your vehicle 3 Low Fuel This warning message is displayed if the fuel tank is almost out of fuel. When this message is displayed, the vehicle range is approximately 50 km. When this message is displayed, the low fuel level warning light in the cluster will come on. It is recommended to look for the nearest fueling station and refuel as soon as possible. Engine has overheated • This warning mes…
-
284, 5-9 Driving your vehicle 5 Starting and stopping the engine for turbocharger intercooler 1. Do not race or accelerate the engine immediately after starting the engine. If the engine is cold, idle for sever- al seconds before sufficient lubri- cation is ensured in the turbo charger unit. 2. After high speed or extended driv- ing that requires heavy engine load, idle the engine about one minute before turning the engine off. This idle time will allow …
-
433, 7-76 Maintenance Item Name Symbol Fuse Rating Circuit Protected FUSE IG2 40A W/o Button Start : Start Relay, Start Solenoid, Ignition SW With Button Start : Start Relay, Start Solenoid, PDM Relay Block B+3 30A Instrument Panel Fuse Block Fuse: FS04, IPS-4, IPS-5 B+2 50A Instrument Panel Fuse Block Fuse: FS03, P/window Relay, P/Outlet Relay INJECTOR INJECTOR 15A G4FC: Injector(#1,#2,#3,#4) BACK UP LAMP B/UP LAMP 10A Back up switch(MT Only), Rear Co…
-
469, I-5 If the engine overheats ……………………………………………6-8 If the engine will not start ……………………………………….6-4 If the engine doesn’t turn over or turns over …………..6-4 If the engine turns over normally but doesn’t start……6-4 If you have a flat tire …………………………………………….6-16 Changing tires …………………………………..…
-
322, To turn Cruise Control off • Press the CRUISE button (the / CRUISE light will go off). • Turn the engine OFF. 5-47 Driving your vehicle 5 OGS046161
… -
103, 3-18 Convenient features of your vehicle This system helps to protect your vehicle and valuables. The horn will sound and the hazard warning lights will blink continuously if any of the following occurs: — A door is opened without using the remote key or smart key. — The tailgate is opened without using the remote key or smart key. — The engine hood is opened. The alarm continues for 30 seconds, then the …
-
287, Hyundai Creta 2019 5-12 Driving your vehicle Button Position Action Notice ON • Press the Engine Start/Stop button while it is in the ACC position without depressing the clutch pedal. • The warning lights can be checked before the engine is started. Do not leave the Engine Start/Stop button in the ON position when the engine is not run- ning to prevent the battery from discharging. Blue indicator START To start the engine, depress the clutch and brake pedals and press the Engin…
-
4, F4 FOREWORD Thank you for choosing HYUNDAI. We are pleased to welcome you to the growing number of discriminating people who drive HYUNDAI. The advanced engineering and high-quality construction of each HYUNDAI we build is something of which we’re very proud. Your Owner’s Manual will introduce you to the features and operation of your new HYUNDAI. It is suggested that you read it carefully be…
-
414, Hyundai Creta 2019 7-57 7 Maintenance Tire traction Tire traction can be reduced if you drive on worn tires, tires that are improperly inflated or on slippery road surfaces. Tires should be replaced when tread wear indicators appear. Slow down whenever there is rain, snow or ice on the road, to reduce the possibility of losing con- trol of the vehicle. Tire maintenance In addition to proper inflation, correct wheel alignment helps decrease tire wear. If you find a tire worn unevenly, have your dealer check …
-
185, Hyundai Creta 2019 3-100 Convenient features of your vehicle Recirculated air position With the recirculated air position selected, air from the passenger compart- ment will be drawn through the heating sys- tem and heated or cooled according to the function selected. Outside (fresh) air position With the outside (fresh) air position selected, air enters the vehicle from outside and is heated or cooled according to the function selected. Information It should be noted that prol…
-
122, 3-37 Convenient features of your vehicle 3 Tilt steering Pull down the lock-release lever (1) on the steering wheel column and adjust the steering wheel angle (2). Move the steering wheel, so it points toward your chest, not toward your face. Make sure you can see the instru- ment panel warning lights and gauges. After adjusting, pull up the lock- release lever (3) to lock the steering wheel in place. Push the steering wheel both up and down to be cer- tain it is locked in position. A…
Автосервис АвтоМиг в Коптево
Автосервис САО — МЦД Красный Балтиец:
Ближайшие для подъезда улицы – Космонавта Волкова, Приорова, Новая Ипатовка, Большая Академическая.
Автосервис АвтоМиг в Лефортово
Автосервис ЮВАО, ВАО — метро Авиамоторная:
Ближайшие станции метро — Авиамоторная, Площадь Ильича, Шоссе Энтузиастов, Чкаловская, Бауманская, Семеновская. Ближайшие для подъезда улицы — третье транспортное кольцо (ТТК), проезд завода Серп и Молот, Лефортовский вал, Красноказарменная улица.
Автосервис АвтоМиг в Щукино
Автосервис СЗАО, САО — метро Октябрьское поле, станция Зорге МЦК (район Щукино, Хорошёво—Мнёвники)
Ближайшие станции метро — Октябрьское поле, Полежаевская. Станция Московского Центрального Кольца — Зорге. Ближайшие для подъезда улицы — Маршала Бирюзова, Берзарина, Народного ополчения, Зорге, Куусинена, Расплетина.
Автосервис АвтоМиг в Измайлово
Автосервис ВАО — метро Соколиная гора (район Измайлово)
Ближайшие станции метро — Соколиная гора, Партизанская, Измайлово, Шоссе Энтузиастов, Черкизовская. Ближайшие для подъезда улицы — Вернисажная, Шоссе Энтузиастов, проспект Будённого, Северо-Восточная хорда, Щербаковская улица, Большая Черкизовская улица.
Автосервис АвтоМиг в Гольяново
Автосервис ВАО — метро Щелковская (район Гольяново)
Ближайшие станции метро — Щелковская, Черкизовская, Бульвар Рокоссовского, Первомайская, Партизанская, Измайловская. Ближайшие для подъезда улицы — Щелковское шоссе, Амурская, Сиреневый бульвар, Монтажная улица, Байкальская улица, Открытое шоссе.
AUTO-TEXCENTER.RU
Франшиза автосервиса, Вакансии автосервиса, Инструкции к корейским авто, Инструкции к китайским авто
Ремонт (сервис) корейских автомобилей. Специализированный техцентр (автосервис) в Москве. Copyright © 2000-2023. Все права сохранены. Обращаем Ваше внимание на то, что данный сайт носит исключительно информационный характер и ни при каких условиях не является публичной офертой, определяемой положениями Статьи 437 (2) Гражданского кодекса Российской Федерации.
Компания «АвтоМиг» является НЕОФИЦИАЛЬНЫМ техническим центром по обслуживанию и ремонту автомобилей марок KIA и HYUNDAI. Никакого отношения ни к официальным представителям (дилерам), ни к самим производителям транспортных средств автосервис не имеет! Все упоминания торговых знаков (марок автомобилей) на данном сайте носят исключительно ИДЕНТИФИЦИРУЮЩИЙ характер (используются не в качестве средства индивидуализации), указывают, какие именно автомобили обслуживает техцентр (в соответствии со ст. 1474, 1487 Гражданского Кодекса РФ).
Need a manual for your Hyundai Creta (2019)? Below you can view and download the PDF manual for free. There are also frequently asked questions, a product rating and feedback from users to enable you to optimally use your product. If this is not the manual you want, please contact us.
Is your product defective and the manual offers no solution? Go to a Repair Café for free repair services.
Manual

Rating
Let us know what you think about the Hyundai Creta (2019) by leaving a product rating. Want to share your experiences with this product or ask a question? Please leave a comment at the bottom of the page.
Are you satisfied with this Hyundai product?
Yes No
Be the first to rate this product
0 votes
Frequently Asked Questions
Our support team searches for useful product information and answers to frequently asked questions. If you find an inaccuracy in our frequently asked questions, please let us know by using our contact form.
My car has a timing chain, what is the replacement interval for it? Verified
With normal use, a timing chain should last the entire lifespan of the car and does not need to be replaced.
This was helpful (2408)
I can’t open one or more of the doors from the inside, why is that? Verified
The child safety lock is probably activated. This can often be deactivated with a mechanism in the door.
This was helpful (760)
How often should I change my oil? Verified
Almost every car has its own exact guideline, but in general it’s wise to change your oil every 10.000 to 15.000 kilometers or once every year. Polluted oil can cause serious damage to the engine over time.
This was helpful (642)
When should the airbag on the side of the passenger seat be switched off? Verified
When driving with a child in a car seat on the passenger seat, the airbag on that side should be switched off. This is also advisable for children up to 12 years old that take place in the passenger seat. This is to prevent injuries in case of an accident.
This was helpful (581)
The car keys won’t unlock the car from a distance anymore, why is that? Verified
Car keys that can unlock from a distance generally work with a battery. When it runs out, the key won’t work anymore. Replace the battery and try again.
This was helpful (573)
Will a lower tire pressure result in more grip when driving in the snow? Verified
No, although the tires will have more surface in contact with the road with a lower pressure, it will nevertheless result in less stability. Always drive with the correct tire pressure!
This was helpful (329)
I filled my car with the wrong fuel, what should I do? Verified
Do not drive! It does not matter wether you put diesel in a gasoline car or gasoline in a diesel car. In both cases it can cause damage to the enige and/or other parts of the car. Contact roadside assistance.
This was helpful (218)
Where can I find the VIN number of my car? Verified
This can vary between brands and models, but on many cars the VIN number can be found on the door jamb, under the hood or on the metal flooring at the front seat.
This was helpful (182)
How often should I replace the blades on my windscreen wipers? Verified
It’s advisable to replace the wiper blades at least once a year. Signs that the blades need to be replaced are streaking, leaving a haze, making noise or the rubber coming off.
This was helpful (160)
How many miles is one kilometer? Verified
One kilometer equals 0,621 mile. Ten kilometers makes 6,21 miles. One mile equals 1,609 kilometer. Ten miles makes 16,09 kilometers.
This was helpful (137)
What is the VIN number? Verified
VIN stands for Vehicle Identification Number and is a unique number that every car has. This makes the car indentifyable after for example a crash or in the case of a recall. It also allows a car to be identified in the case the number plates are missing.
This was helpful (135)
Can I use the windscreen wipers while there is ice on the windscreen? Verified
No, this is not advisable. Ice is sharp and can damage the rubber on the wiper blades.
This was helpful (132)
![]()
OWNER’S MANUAL
Operation
Maintenance
Specifications
All information in this Owner’s Manual is current at the time of publication. However, HYUNDAI reserves the right to make changes at any time so that our policy of continual product improvement may be carried out.
This manual applies to all models of this vehicle and includes descriptions and explanations of optional as well as standard equipment.
As a result, you may find material in this manual that does not apply to your specific vehicle.

CAUTION: MODIFICATIONS TO YOUR HYUNDAI
Your HYUNDAI should not be modified in any way. Such modifications may adversely affect the performance, safety or durability of your HYUNDAI and may, in addition, violate conditions of the limited warranties covering the vehicle. Certain modifications may also be in violation of regulations established by the Department of Transportation and other government agencies in your country.
TWO-WAY RADIO OR CELLULAR TELEPHONE INSTALLATION
Your vehicle is equipped with electronic fuel injection and other electronic components. It is possible for an improperly installed/adjusted two-way radio or cellular telephone to adversely affect electronic systems. For this reason, we recommend that you carefully follow the radio manufacturer’s instructions or consult your HYUNDAI dealer for precautionary measures or special instructions if you choose to install one of these devices.
F2
SAFETY AND VEHICLE DAMAGE WARNING
This manual includes information titled as DANGER, WARNING, CAUTION and NOTICE. These titles indicate the following:
 DANGER
DANGER indicates a hazardous situation which, if not avoided, will result in death or serious injury.
 CAUTION
CAUTION indicates a hazardous situation which, if not avoided, could result in minor or moderate injury.
 WARNING
WARNING indicates a hazardous situation which, if not avoided, could result in death or serious injury.
NOTICE
NOTICE indicates a situation which, if not avoided, could result in vehicle damage.
F3

FOREWORD
Thank you for choosing HYUNDAI. We are pleased to welcome you to the growing number of discriminating people who drive HYUNDAI. The advanced engineering and high-quality construction of each HYUNDAI we build is something of which we’re very proud.
Your Owner’s Manual will introduce you to the features and operation of your new HYUNDAI. It is suggested that you read it carefully because the information it contains can contribute greatly to the satisfaction you receive from your new car.
The manufacturer also recommends that service and maintenance on your vehicle be performed by an authorized HYUNDAI dealer.
HYUNDAI MOTOR COMPANY
Note : Because future owners will also need the information included in this manual, if you sell this HYUNDAI, please leave the manual in the vehicle for their use. Thank you.
 CAUTION
Severe engine and transaxle damage may result from the use of poor quality fuels and lubricants that do not meet HYUNDAI specifications. You must always use high quality fuels and lubricants that meet the specifications listed on Page 8-5 in the Vehicle Specifications section of the Owner’s Manual.
Copyright 2018 HYUNDAI Motor Company. All rights reserved. No part of this publication may be reproduced, stored in any retrieval system or transmitted in any form or by any means without the prior written permission of HYUNDAI Motor Company.
F4

HOW TO USE THIS MANUAL
We want to help you get the greatest possible driving pleasure from your vehicle. Your Owner’s Manual can assist you in many ways. We strongly recommend that you read the entire manual. In order to minimize the chance of death or injury, you must read the DANGER, WARNING and CAUTION sections in the manual.
Illustrations complement the words in this manual to best explain how to enjoy your vehicle. By reading your manual, you will learn about features, important safety information, and driving tips under various road conditions.
The general layout of the manual is provided in the Table of Contents. Use the index when looking for a specific area or subject; it has an alphabetical listing of all information in your manual.
Sections: This manual has eight chapters plus an index. Each section begins with a brief list of contents so you can tell at a glance if that section has the information you want.
Your safety, and the safety of others, is very important. This Owner’s Manual provides you with many safety precautions and operating procedures. This information alerts you to potential hazards that may hurt you or others, as well as damage to your vehicle.
Safety messages found on vehicle labels and in this manual describe these hazards and what to do to avoid or reduce the risks.
Warnings and instructions contained in this manual are for your safety. Failure to follow safety warnings and instructions can lead to serious injury or death.
Introduction
Throughout this manual DANGER, WARNING, CAUTION, NOTICE and the SAFETY ALERT SYMBOL will be used.
This is the safety alert symbol. It is used to alert you to potential physical injury hazards. Obey all safety messages that follow this symbol to avoid possible injury or death. The safety alert symbol precedes the signal words DANGER, WARNING and CAUTION.
 DANGER
DANGER indicates a hazardous situation which, if not avoided, will result in death or serious injury.
 WARNING
WARNING indicates a hazardous situation which, if not avoided, could result in death or serious injury.
F5
Introduction
 CAUTION
CAUTION indicates a hazardous situation which, if not avoided, could result in minor or moderate injury.
NOTICE
NOTICE indicates a situation which, if not avoided, could result in vehicle damage.
FUEL REQUIREMENTS
Gasoline engine
Unleaded
Your new vehicle is designed to use only unleaded fuel having an Octane Rating of RON (Research Octane Number) 91 / AKI (Anti-Knock Index) 87 or higher.
Your new vehicle is designed to obtain maximum performance with UNLEADED FUEL, as well as minimize exhaust emissions and spark plug fouling.
 CAUTION
NEVER USE LEADED FUEL. The use of leaded fuel is detrimental to the catalytic converter and will damage the engine control system’s oxygen sensor and affect emission control.
Never add any fuel system cleaning agents to the fuel tank other than what has been specified (We recommend that you consult an authorized HYUNDAI dealer for details.)
 WARNING
•Do not «top off» after the nozzle automatically shuts off when refueling.
•Always check that the fuel cap is installed securely to prevent fuel spillage in the event of an accident.
Leaded (if equipped)
For some countries, your vehicle is designed to use leaded gasoline.
When you are going to use leaded gasoline, we recommend that you ask an authorized HYUNDAI dealer whether leaded gasoline in your vehicle is available or not.
Octane Rating of leaded gasoline is same with unleaded one.
F6
Gasoline containing alcohol and methanol
Gasohol, a mixture of gasoline and ethanol (also known as grain alcohol), and gasoline or gasohol containing methanol (also known as wood alcohol) are being marketed along with or instead of leaded or unleaded gasoline.
Do not use gasohol containing more than 10% ethanol, and do not use gasoline or gasohol containing any methanol. Either of these fuels may cause drivability problems and damage to the fuel system, engine control system and emission control system.
Discontinue using gasohol of any kind if drivability problems occur.
Vehicle damage or driveability problems may not be covered by the manufacturer’s warranty if they result from the use of:
1.Gasohol containing more than 10% ethanol.
2.Gasoline or gasohol containing methanol.
3.Leaded fuel or leaded gasohol.
 CAUTION
Never use gasohol which contains methanol. Discontinue use of any gasohol product which impairs drivability.
Introduction
Other fuels
Using fuels such as
—Silicone (Si) contained fuel,
—MMT (Manganese, Mn) contained fuel,
—Ferrocene (Fe) contained fuel, and
—Other metalic additives contained fuels,
may cause vehicle and engine damage or cause plugging, misfiring, poor acceleration, engine stalling, catalyst melting, abnormal corrosion, life cycle reduction, etc.
Also, the Malfunction Indicator Lamp (MIL) may illuminate.
NOTICE
Damage to the fuel system or performance problem caused by the use of these fuels may not be covered by your New Vehicle Limited Warranty.
F7

Introduction
Use of MTBE
HYUNDAI recommends avoiding fuels containing MTBE (Methyl Tertiary Butyl Ether) over 15.0% vol. (Oxygen Content 2.7% weight) in your vehicle.
Fuel containing MTBE over 15.0% vol. (Oxygen Content 2.7% weight) may reduce vehicle performance and produce vapor lock or hard starting.
 CAUTION
Your New Vehicle Limited Warranty may not cover damage to the fuel system and any performance problems that are caused by the use of fuels containing methanol or fuels containing MTBE (Methyl Tertiary Butyl Ether) over 15.0% vol. (Oxygen Content 2.7% weight.)
Do not use methanol
Fuels containing methanol (wood alcohol) should not be used in your vehicle. This type of fuel can reduce vehicle performance and damage components of the fuel system, engine control system and emission control system.
Fuel Additives
HYUNDAI recommends that you use unleaded gasoline which has an octane rating of RON (Research Octane Number) 95 / AKI (Anti Knock Index) 91 or higher (for Europe) or Octane Rating of RON (Research Octane Number) 91 / AKI (Anti-Knock Index) 87 or higher (except Europe).
For customers who do not use good quality gasolines including fuel additives regularly, and have problems starting or the engine does not run smoothly, one bottle of additives added to the fuel tank at every 5,000 km.
Additives are available from your authorized HYUNDAI dealer along with information on how to use them. Do not mix other additives.
Operation in foreign countries
If you are going to drive your vehicle in another country, be sure to:
•Observe all regulations regarding registration and insurance.
•Determine that acceptable fuel is available.
F8
Introduction
Diesel engine
Diesel fuel
Diesel engine must be operated only on commercially available diesel fuel that complies with EN 590 or comparable standard. (EN stands for «European Norm»). Do not use marine diesel fuel, heating oils, or non-approved fuel additives, as this will increase wear and cause damage to the engine and fuel system. The use of non-approved fuels and / or fuel additives will result in a limitation of your warranty rights.
Diesel fuel of above cetane 51 is used in your vehicle. If two types of diesel fuel are available, use summer or winter fuel properly according to the following temperature conditions.
•Above -5°C (23°F) … Summer type diesel fuel.
•Below -5°C (23°F) … Winter type diesel fuel.
Watch the fuel level in the tank very carefully : If the engine stops through fuel failure, the circuits must be completely purged to permit restarting.
NOTICE
Do not let any gasoline or water enter the tank. This would make it necessary to drain it out and to bleed the lines to avoid jamming the injection pump and damaging the engine.
NOTICE
—Diesel Fuel
(if equipped with DPF)
It is recommended to use the regulated automotive diesel fuel for diesel vehicle equipped with the DPF system.
If you use diesel fuel including high sulfur (more than 50 ppm sulfur) and unspecified additives, it can cause the DPF system to be damaged and white smoke can be emitted.
Biodiesel
Commercially supplied Diesel blends of no more than 7% biodiesel, commonly known as «B7 Diesel» may be used in your vehicle if Biodiesel meets EN 14214 or equivalent specifications. (EN stands for «European Norm»). The use of biofuels exceeding 7% made from rapeseed methyl ester (RME), fatty acid methyl ester (FAME), vegetable oil methyl ester (VME) etc. or mixing diesel exceeding 7% with biodiesel will cause increased wear or damage to the engine and fuel system. Repair or replacement of worn or damaged components due to the use of non approved fuels will not be covered by the manufactures warranty.
NOTICE
•Never use any fuel, whether diesel, B7 biodiesel or otherwise, that fails to meet the latest petroleum industry specification.
•Never use any fuel additives or treatments that are not recommended or approved by the vehicle manufacturer.
F9

Introduction
VEHICLE BREAK-IN
PROCESS
No special break-in period is needed. By following a few simple precautions for the first 1,000 km (600 miles) you may add to the performance, economy and life of your vehicle:
•Do not race the engine.
•While driving, keep your engine speed (rpm, or revolutions per minute) between 2,000 rpm and 4,000 rpm.
•Do not maintain a single speed for long periods of time, either fast or slow.
Varying engine speed is needed to properly break-in the engine.
•Avoid hard stops, except in emergencies, to allow the brakes to seat properly.
•Don’t tow a trailer during the first 2,000 km (1,200 miles) of operation.
F10
![]()
|
Your vehicle at a glance |
1 |
|||||
|
Safety system of your vehicle |
2 |
|||||
|
Convenient features of your vehicle |
3 |
|||||
|
Multimedia System |
4 |
|||||
|
TABLE OF CONTENTS |
||||||
|
Driving your vehicle |
5 |
|||||
|
What to do in an emergency |
6 |
|||||
|
Maintenance |
7 |
|||||
|
Specifications & Consumer information |
8 |
|||||
|
Index |
I |
|||||

Your vehicle at a glance
|
Exterior overview (I) ……………………………………… |
1-2 |
|
Exterior overview (II) …………………………………….. |
1-3 |
|
Interior overview (I) ………………………………………. |
1-4 |
|
Interior overview (II) ……………………………………… |
1-5 |
|
Instrument panel overview (I)………………………… |
1-6 |
|
Instrument panel overview (II)……………………….. |
1-7 |
|
Engine compartment (I) …………………………………. |
1-8 |
|
Engine compartment (II) ………………………………… |
1-9 |
1
glance a at vehicle Your
Your vehicle at a glance
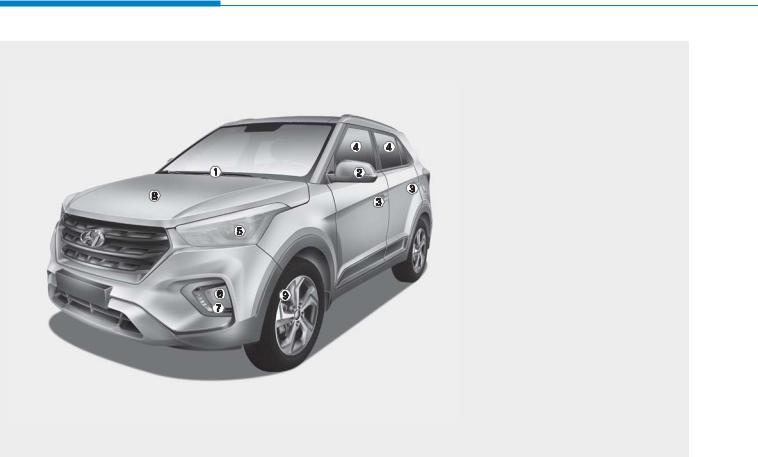
EXTERIOR OVERVIEW (I)
■ Front view
|
1. |
Front windshield wiper blades |
……………7-45 |
|
2. |
Outside rearview mirror……………………. |
3-40 |
|
3. Door………………………………………………. |
3-13 |
|
|
4. Windows ………………………………………… |
3-19 |
|
|
5. |
Head light ………………………………………. |
7-79 |
|
6. |
Front fog light* ………………………………… |
7-80 |
|
7. |
Daytime running light* ……………………… |
7-79 |
|
8. Hood……………………………………………… |
3-28 |
|
|
9. Tires and wheels …………………………….. |
7-51 |
|
|
* : if equipped |
The actual shape may differ from the illustration.
OGS018001L
1-2
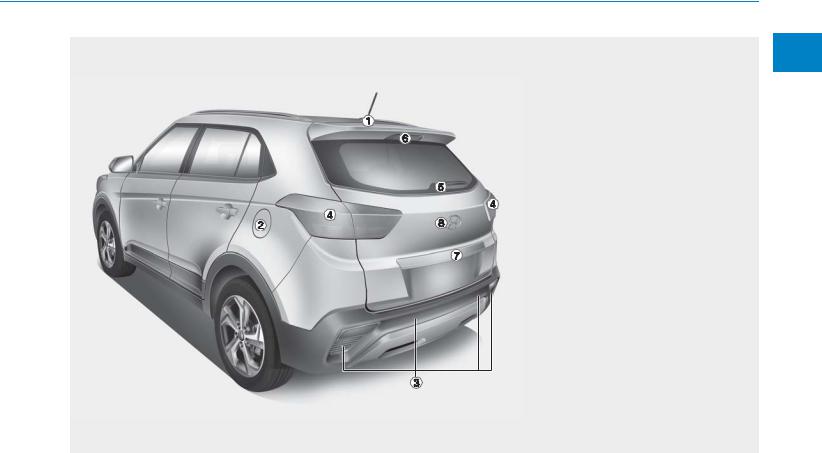
EXTERIOR OVERVIEW (II)
■ Rear view
|
1. Antenna …………………………………………… |
4-3 |
|
|
2. |
Fuel filler lid ……………………………………. |
3-30 |
|
3. |
Rear parking assist system* …………….. |
3-92 |
|
4. Rear combination lamp ……………………. |
7-83 |
|
|
5. Rear window wiper blade …………………. |
7-45 |
|
|
6. High mounted stop lamp ………………….. |
7-85 |
|
|
7. Rearview camera*…………………………… |
3-91 |
|
|
8. Tailgate ………………………………………….. |
3-33 |
|
|
* : if equipped |
The actual shape may differ from the illustration.
OGS018002L
1
glance a at vehicle Your
1-3
Your vehicle at a glance
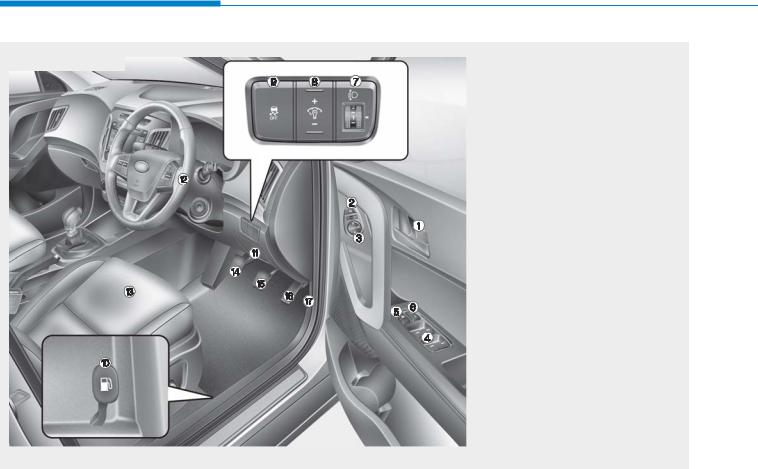
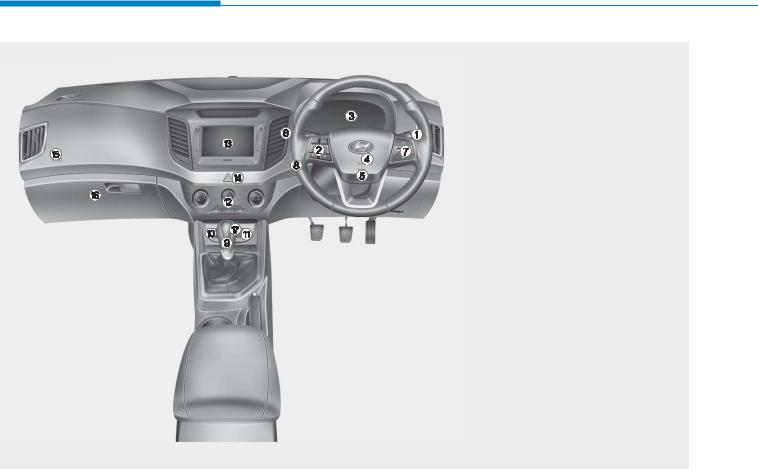
INTERIOR OVERVIEW (I)
■ Right Hand Drive
The actual shape may differ from the illustration.
|
1. |
Door lock/unlock button ……………….. |
3-15 |
|
|
2. |
Outside rearview mirror folding |
||
|
switch* ………………………………………. |
3-42 |
||
|
3. |
Outside rearview mirror control |
||
|
switch* ………………………………………. |
3-41 |
||
|
4. Power window switches* ……………… |
3-19 |
||
|
5. Power window lock switch*……………. |
3-22 |
||
|
6. |
Central door lock switch ……………….. |
3-15 |
|
|
7. |
Headlight leveling device* ……………. |
3-85 |
|
|
8. |
Instrument panel illumination |
||
|
control switch* ……………………………. |
3-44 |
||
|
9. ESC OFF switch * ………………………. |
5-36 |
||
|
10. |
Fuel filler door opener ……………….. |
3-30 |
|
|
11. Fuse box…………………………………… |
7-64 |
||
|
12. |
Steering wheel ………………………….. |
3-36 |
|
|
13. |
Seat ………………………………………….. |
2-2 |
|
|
14. |
Clutch pedal* ……………………………. |
5-20 |
|
|
15. Brake pedal ……………………………… |
5-30 |
||
|
16. |
Accelerator pedal |
||
|
17. |
Hood release lever …………………….. |
3-28 |
* : if equipped
OGS015002
1-4

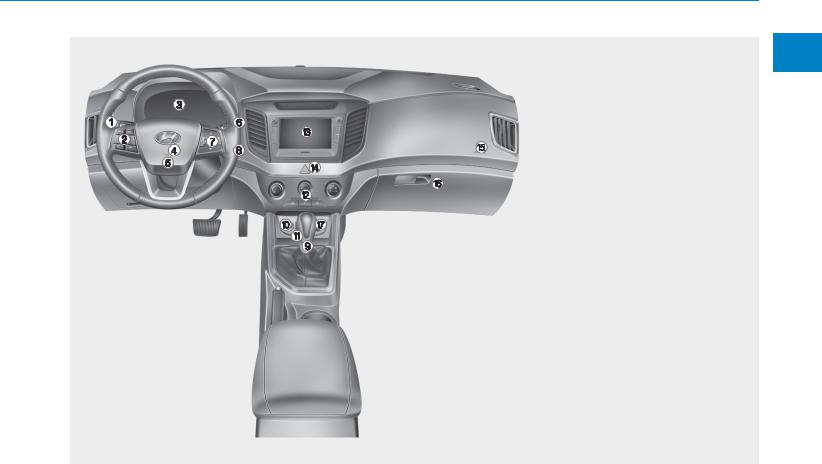
INTERIOR OVERVIEW (II)
■ Left Hand Drive
The actual shape may differ from the illustration.
|
1. |
Door lock/unlock button ……………….. |
3-15 |
|
|
2. |
Outside rearview mirror folding |
||
|
switch* ………………………………………. |
3-42 |
||
|
3. |
Outside rearview mirror control |
||
|
switch* ………………………………………. |
3-41 |
||
|
4. Power window switches* ……………… |
3-19 |
||
|
5. Power window lock switch*……………. |
3-22 |
||
|
6. |
Central door lock switch ……………….. |
3-15 |
|
|
7. |
Headlight leveling device* ……………. |
3-85 |
|
|
8. |
Instrument panel illumination |
||
|
control switch* ……………………………. |
3-44 |
||
|
9. ESC OFF switch * ………………………. |
5-36 |
||
|
10. |
Fuel filler door opener ……………….. |
3-30 |
|
|
11. Fuse box…………………………………… |
7-64 |
||
|
12. |
Steering wheel ………………………….. |
3-36 |
|
|
13. |
Seat ………………………………………….. |
2-2 |
|
|
14. Brake pedal ……………………………… |
5-30 |
||
|
15. |
Accelerator pedal |
||
|
16. |
Hood release lever …………………….. |
3-28 |
* : if equipped
OGS015002L
1
glance a at vehicle Your
1-5
Your vehicle at a glance
INSTRUMENT PANEL OVERVIEW (I)
|
■ Right Hand Drive |
|||
|
1. |
Light control/Turn signals ……………… |
3-78 |
|
|
2. |
Steering wheel audio controls* |
…………4-4 |
|
|
3. |
Instrument cluster………………………… |
3-43 |
|
|
4. Horn ………………………………………….. |
3-37 |
||
|
5. |
Driver’s front air bag* …………………… |
2-49 |
|
|
6. Wiper/Washer ……………………………… |
3-88 |
||
|
7. Trip mode switch*/Cruise control switch* |
|||
|
………………………………………… |
3-67, 5-43 |
||
|
8. |
Engine Start/Stop button / |
||
|
Key ignition switch…………………… |
5-5, 5-9 |
||
|
9. Transaxle Gear Shift lever ……………. |
5-19 |
||
|
10. Power outlet / USB charger ………. |
3-125 |
||
|
11. Cigarette lighter ………………………. |
3-122 |
||
|
12. Climate control system …….. |
3-96, 3-105 |
||
|
13. Audio system*……………………………. |
4-18 |
||
|
14. Hazard switch ……………………………… |
6-2 |
||
|
15. Passenger’s front air bag* ………….. |
2-50 |
||
|
16. Glove box ……………………………….. |
3-121 |
||
|
17. USB and iPod® port …………………….. |
4-2 |
||
|
* : if equipped |
The actual shape may differ from the illustration.
OGS018003
1-6
INSTRUMENT PANEL OVERVIEW (II)
■ Left Hand Drive
|
1. |
Light control/Turn signals ……………… |
3-78 |
|
|
2. |
Steering wheel audio controls* |
…………4-4 |
|
|
3. |
Instrument cluster………………………… |
3-43 |
|
|
4. Horn ………………………………………….. |
3-37 |
||
|
5. |
Driver’s front air bag* …………………… |
2-49 |
|
|
6. Wiper/Washer ……………………………… |
3-88 |
||
|
7. Trip mode switch*/Cruise control switch* |
|||
|
………………………………………… |
3-67, 5-43 |
||
|
8. |
Engine Start/Stop button / |
||
|
Key ignition switch…………………… |
5-5, 5-9 |
||
|
9. Transaxle Gear Shift lever ……………. |
5-19 |
||
|
10. Cigarette lighter ………………………. |
3-122 |
||
|
11. USB and iPod® port* …………………… |
4-2 |
||
|
12. Climate control system …….. |
3-96, 3-105 |
||
|
13. Audio system*……………………………. |
4-18 |
||
|
14. Hazard switch ……………………………… |
6-2 |
||
|
15. Passenger’s front air bag* ………….. |
2-50 |
||
|
16. Glove box ……………………………….. |
3-121 |
||
|
17. Power outlet / USB charger ………. |
3-125 |
||
|
* : if equipped |
The actual shape may differ from the illustration.
OGS018003L
1
glance a at vehicle Your
1-7
Your vehicle at a glance
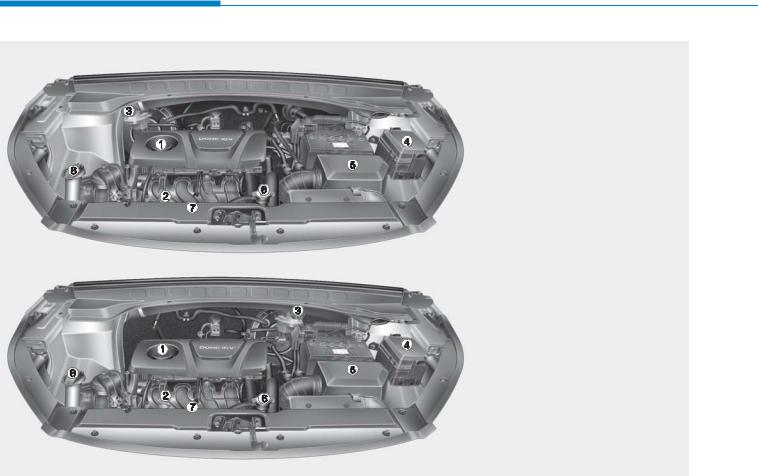
ENGINE COMPARTMENT (I)
■Gasoline Engine (Gamma 1.6 MPI)
—Right Hand Drive
— Left Hand Drive
The actual engine room in the vehicle may differ from the illustration.
|
1. |
Engine oil filler cap……………………… |
7-33 |
|
2. |
Engine oil dipstick ………………………. |
7-32 |
|
3. |
Brake/clutch* fluid reservoir …………. |
7-37 |
|
4. Fuse box …………………………………… |
7-66 |
|
|
5. |
Air cleaner …………………………………. |
7-41 |
|
6. |
Radiator cap………………………………. |
7-34 |
|
7. |
Engine coolant reservoir ……………… |
7-35 |
|
8. Windshield washer fluid reservoir …. |
7-39 |
|
|
* : if equipped |
OGS076102/OGS076102L
1-8
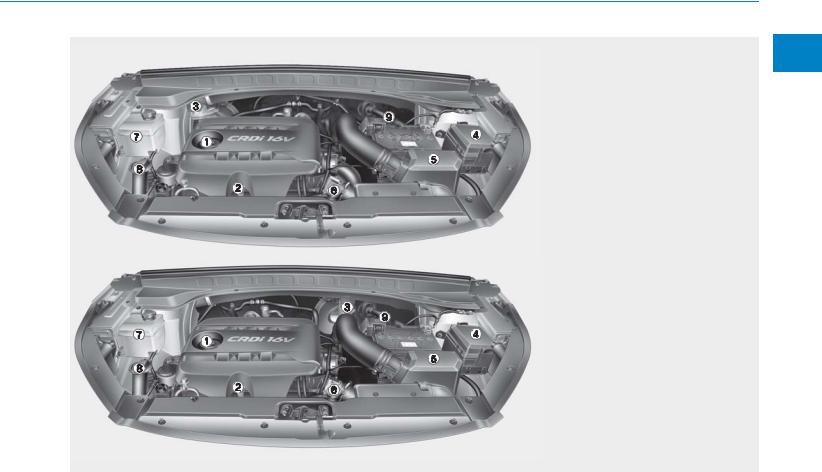
ENGINE COMPARTMENT (II)
■Diesel Engine (U2 1.4/1.6 TCI)
—Right Hand Drive
— Left Hand Drive
The actual engine room in the vehicle may differ from the illustration.
|
1. |
Engine oil filler cap……………………… |
7-32 |
|
2. |
Engine oil dipstick ………………………. |
7-32 |
|
3. |
Brake/clutch* fluid reservoir …………. |
7-37 |
|
4. Fuse box …………………………………… |
7-66 |
|
|
5. |
Air cleaner …………………………………. |
7-41 |
|
6. |
Radiator cap………………………………. |
7-34 |
|
7. |
Engine coolant reservoir ……………… |
7-35 |
|
8. Windshield washer fluid reservoir …. |
7-39 |
|
|
9. |
Fuel filter …………………………………… |
7-40 |
|
* : if equipped |
OGS075001/OGS075001L
1
glance a at vehicle Your
1-9
![]()
Safety system of your vehicle
|
Seats …………………………………………………………….. |
2-2 |
|
Front seats …………………………………………………………….. |
2-7 |
|
Rear seats ……………………………………………………………… |
2-14 |
|
Seat belts …………………………………………………….. |
2-19 |
|
Pre-tensioner seat belt ………………………………………… |
2-25 |
|
Additional seat belt safety precautions ………………. |
2-27 |
|
Care of seat belts ………………………………………………….. |
2-30 |
|
Child restraint system ………………………………….. |
2-31 |
|
Children always in the rear ………………………………….. |
2-31 |
|
Installing a Child Restraint System (CRS)……………… |
2-33 |
|
Air bag-supplemental restraint system(SRS).. |
2-43 |
|
How does the air bag system operate ………………… |
2-45 |
|
Do not install a child restraint on the |
|
|
front passenger’s seat…………………………………………… |
2-47 |
|
Air bag warning and indicator………………………………. |
2-48 |
|
SRS components and functions ……………………………. |
2-48 |
|
Driver’s and passenger’s front air bag ……………….. |
2-52 |
|
Side impact air bag ……………………………………………….. |
2-55 |
|
Curtain air bag ………………………………………………………. |
2-56 |
|
SRS Care…………………………………………………………………. |
2-63 |
|
Air bag warning label ……………………………………………. |
2-65 |
2
vehicle your of system Safety
Safety system of your vehicle
SEATS
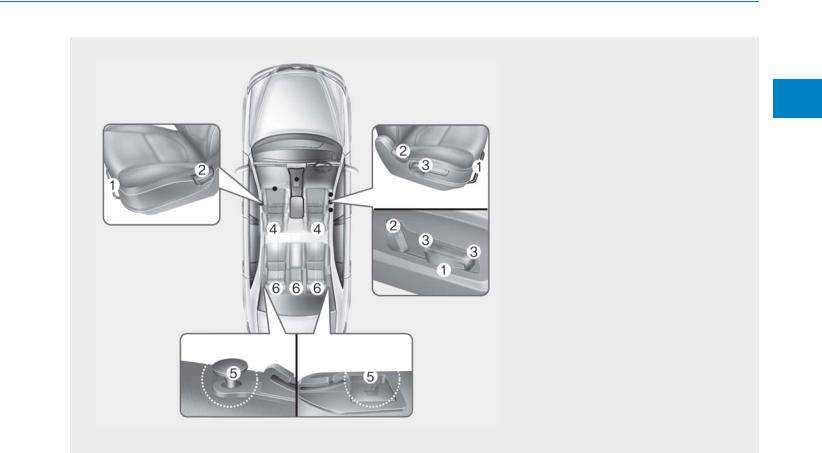
■ Left-hand drive
Front seats
1. Seat adjustment, forward/rearward
2. Seatback angle
3. Seat adjustment, height*
4. Headrest adjustment
Rear seats
5. Seat folding*
6. Headrest adjustment* * : if equipped
The actual feature in the vehicle may differ from the illustration.
OGS035001L
2-2
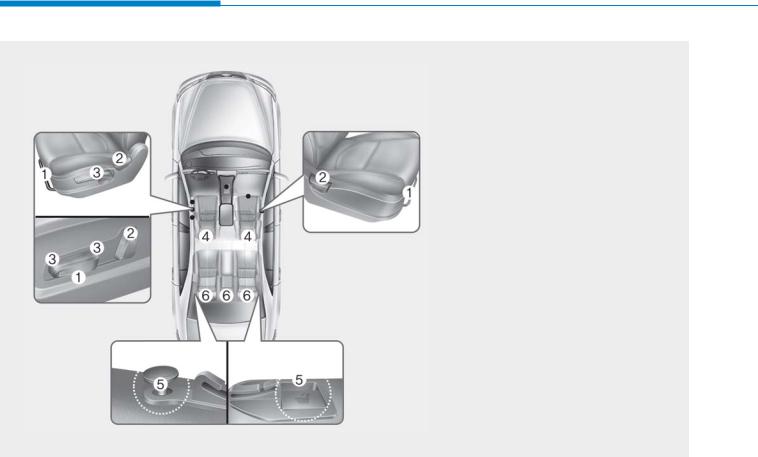
■ Right-hand drive
Front seats
1. Seat adjustment, forward/rearward
2. Seatback angle
3. Seat adjustment, height*
4. Headrest adjustment
Rear seats
5. Seat folding*
6. Headrest adjustment* * : if equipped
The actual feature in the vehicle may differ from the illustration.
OGS035001
2-3
2
vehicle your of system Safety

Safety system of your vehicle
 WARNING
Loose objects
Loose objects in the driver’s foot area could interfere with the operation of the foot pedals, possibly causing an accident. Do not place anything under the front seats.
 WARNING
Uprighting seat
When you return the seatback to its upright position, hold the seatback and return it slowly and be sure there are no other occupants around the seat. If the seatback is returned without being held and controlled, the back of the seat could move forward or backward resulting in accidental injury to a person struck by the seatback.
 WARNING
Driver responsibility for passengers
Riding in a vehicle with seatback reclined could lead to serious or fatal injury in an accident. If a seat is reclined during an accident, the occupant’s hips may slide under the lap portion of the seat belt applying great force to the unprotected abdomen. The protection of your restraint system (seat belt and air bags) is greatly reduced by reclining your seat. Serious or fatal internal injuries could result. The driver must advise the passenger to keep the seatback in an upright position whenever the vehicle is in motion.
 WARNING
Do not use a sitting cushion that reduces friction between the seat and passenger. The passenger’s hips may slide under the lap portion of the seat belt during an accident or a sudden stop. Serious or fatal internal injuries could result because the seat belt can’t operate normally.
2-4
 WARNING
Driver’s seat
•Never attempt to adjust seat while the vehicle is moving. This could result in loss of control, and an accident causing death, serious injury, or property damage.
•Do not allow anything to interfere with the normal position of the seatback. Storing items against a seatback or in any other way interfering with proper locking of a seatback could result in serious or fatal injury in a sudden stop or collision.
•Always drive and ride with your seatback upright and the lap portion of the seat belt snug and low across the hips. This is the best position to protect you in case of an accident.
(Continued)
(Continued)
•In order to avoid unnecessary and perhaps severe air bag injuries, always sit as far back as possible from the steering wheel while maintaining comfortable control of the vehicle.
 WARNING
Rear seatbacks
•The rear seatback must be securely latched. If not, passengers and objects could be thrown forward resulting in serious injury or death in the event of a sudden stop or collision.
•Luggage and other cargo should be laid flat in the cargo area. If objects are large, heavy, or must be piled, they must be secured. Under no circumstances should cargo be piled higher than the seatbacks. Failure to follow these warnings could result in serious injury or death in the event of a sudden stop, collision or rollover.
•No passenger should ride in the cargo area or sit or lie on folded seatbacks while the vehicle is moving. All passengers must be properly seated in seats and restrained properly while riding.
(Continued)
2-5
2
vehicle your of system Safety
Safety system of your vehicle
(Continued)
•When resetting the seatback to the upright position, make sure it is securely latched by pushing it forward and backwards.
•To avoid the possibility of burns, do not remove the carpet in the cargo area. Emission control devices beneath this floor generate high temperatures.
 WARNING
After adjusting the seat, always check that it is securely locked into place by attempting to move the seat forward or backward without using the lock release lever. Sudden or unexpected movement of the driver’s seat could cause you to lose control of the vehicle resulting in an accident.
 WARNING
•Do not adjust the seat while wearing seat belts. Moving the seat cushion forward may cause strong pressure on the abdomen.
•Use extreme caution so that hands or other objects are not caught in the seat mechanisms while the seat is moving.
•Do not put a cigarette lighter on the floor or seat. When you operate the seat, gas may gush out of the lighter and cause fire.
•If there are occupants in the rear seats, be careful while adjusting the front seat position.
2-6
Front seats
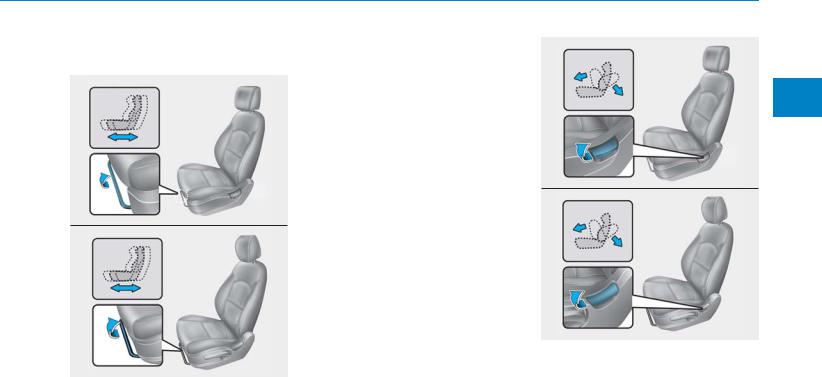
Manual adjustment
■ Type A
OGS038002L
■ Type B
OGS038003L
Forward and rearward
To move the seat forward or rearward:
1.Pull the seat slide adjustment lever up and hold it.
2.Slide the seat to the position you desire.
3.Release the lever and make sure the seat is locked in place.
Adjust the seat before driving, and make sure the seat is locked securely by trying to move forward and rearward without using the lever. If the seat moves, it is not locked properly.
■ Type A
OGS038022L
■ Type B
OGS038004L
Seatback angle
To recline the seatback:
1.Lean forward slightly and lift up on the seatback recline lever.
2.Carefully lean back on the seat and adjust the seatback of the seat to the position you desire.
2
vehicle your of system Safety
2-7
Safety system of your vehicle
3.Release the lever and make sure the seatback is locked in place. (The lever MUST return to its original position for the seatback to lock.)
OGS038005L
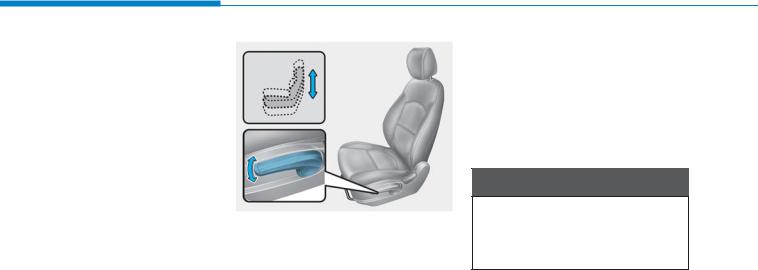
Seat cushion height
(for driver’s seat, if equipped)
To change the height of the seat cushion, move the lever upwards or downwards.
•To lower the seat cushion, push the lever down several times.
•To raise the seat cushion, pull the lever up several times.
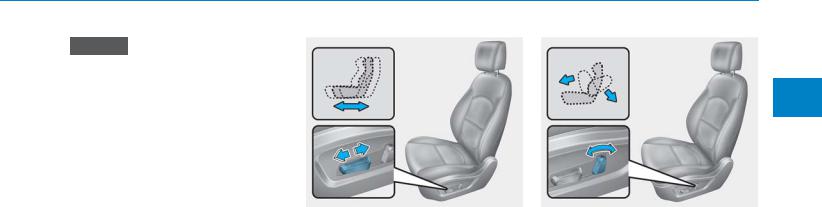
Power adjustment
The driver’s seat can be adjusted by using the control knob located on the outside of the seat cushion. Before driving, adjust the seat to the proper position so as to easily control the steering wheel, pedals and switches on the instrument panel.
 WARNING
NEVER allow children in the vehicle unattended. The power seats are operable when the engine is turned off.
2-8
NOTICE
To prevent damage to the seats:
•Always stop adjusting the seats when the seat has been adjusted as far forward or rearward as possible.
•Do not adjust the seats longer than necessary when the engine is turned off. This may result in unnecessary battery drain.
•Do not operate two or more seats at the same time. This may result in an electrical malfunction.
OGS038006L
Forward and rearward
Push the control switch forward or backward to move the seat to the desired position. Release the switch once the seat reaches the desired position.
OGS038007L
Seatback angle
Push the control switch forward or backward to move the seatback to the desired angle. Release the switch once the seat reaches the desired position.
2-9
2
vehicle your of system Safety
Safety system of your vehicle
OGS038008L
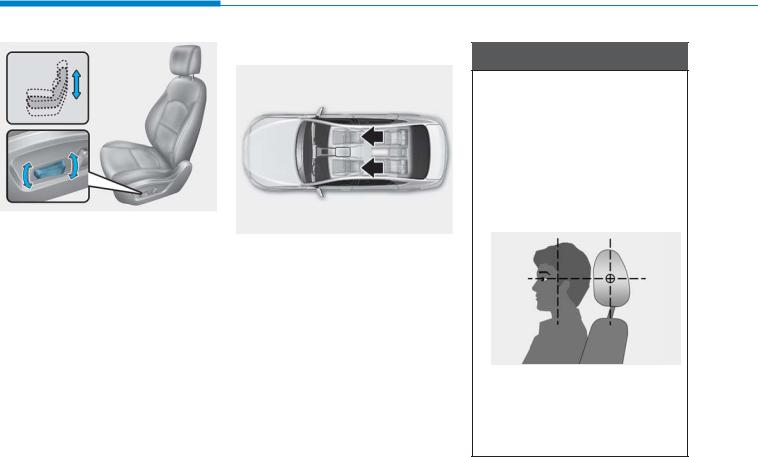
Seat cushion height
(for driver’s seat, if equipped)
Pull the front portion of the control switch up to raise or down to lower the front part of the seat cushion. Pull the rear portion of the control switch up to raise or down to lower the seat. Release the switch once the seat reaches the desired position.
Headrest
ODH033105L
The driver’s and front passenger’s seats are equipped with a headrest for the occupant’s safety and comfort.
The headrest not only provides comfort for the driver and front passenger, but also helps to protect the head and neck in the event of a collision.
 WARNING
To reduce the risk of serious injury or death in an accident, take the following precautions when adjusting your headrests:
•Always properly adjust the headrests for all passengers BEFORE starting the vehicle.
•NEVER let anyone ride in a seat with the headrests removed.
•
OLF034072N
Adjust the headrests so the middle of the headrests is at the same height as the height of the top of the eyes.
(Continued)
2-10
![]()
(Continued)
•NEVER adjust the headrest position of the driver’s seat when the vehicle is in motion.
•Adjust the headrest as close to the passenger’s head as possible. Do not use a seat cushion that holds the body away from the seatback.
•Make sure the headrest locks into position after adjusting it.
NOTICE
To prevent damage, NEVER hit or pull on the headrests.
OLF034015
NOTICE
If you recline the seatback towards the front with the head restraint and seat cushion raised, the head restraint may come in contact with the sunvisor or other parts of the vehicle.
OGS038049L
Forward and rearward adjustment (if equipped)
The headrest may be adjusted forward to 3 different positions by pulling the headrest forward to the desired detent. To adjust the headrest to it’s furthest rearwards position, pull it fully forward to the farthest position and release it.
2-11
2
vehicle your of system Safety

Safety system of your vehicle
OGS035023
Adjusting the height up and down
To raise the headrest, pull it up to the desired position (1). To lower the headrest, push and hold the release button (2) on the headrest support and lower the headrest to the desired position (3).
■ Type A
OGS038011L
■ Type B
OGS038009L
Removal/Reinstall
To remove the headrest:
1.Recline the seatback (2) with the recline lever (1).
2.Raise headrest as far as it can go.
3.Press the headrest release button
(3) while pulling the headrest up (4).
 WARNING
NEVER allow anyone to ride in a seat with the headrest removed.
2-12

■ Type A
OGS038010L
■ Type B
OGS038012L
To reinstall the headrest :
1.Put the headrest poles (2) into the holes while pressing the release button (1).
2.Recline the seatback (4) with the recline lever (3).
3.Adjust the headrest to the appropriate height.
 WARNING
Always make sure the headrest locks into position after reinstalling and adjusting it properly.
Seatback pocket (if equipped)
OGC034023
 WARNING
Seatback pockets
Do not put heavy or sharp objects in the seatback pockets. In an accident they could come loose from the pocket and injure vehicle occupants.
2
vehicle your of system Safety
2-13

Safety system of your vehicle
Rear seats
Headrest
OGS035036
The rear seats are equipped with headrests in all the seating positions for the occupant’s safety and comfort.
The headrest not only provides comfort for passengers, but also helps to protect the head and neck in the event of a collision.
 WARNING
To reduce the risk of serious injury or death in an accident, take the following precautions when adjusting your headrests:
•Always properly adjust the headrests for all passengers BEFORE starting the vehicle.
•NEVER let anyone ride in a seat with the headrests removed.
•
OLF034072N
Adjust the headrests so the middle of the headrests is at the same height as the height of the top of the eyes.
(Continued)
(Continued)
•NEVER adjust the headrest position of the driver’s seat when the vehicle is in motion.
•Adjust the headrest as close to the passenger’s head as possible. Do not use a seat cushion that holds the body away from the seatback.
•Make sure the headrest locks into position after adjusting it.
NOTICE
To prevent damage, NEVER hit or pull on the headrests.
2-14

OGC034018
Adjusting the height up and down (if equipped)
To raise the headrest, pull it up (1). To lower the headrest, push and hold the release button (2) on the headrest support and lower the headrest
(3).
OGC034019
Removal (if equipped)
To remove the headrest, raise it as far as it can go then press the release button (1) while pulling upward (2).
To reinstall the headrest, put the headrest poles (3) into the holes while pressing the release button (1). Then adjust it to the appropriate height.
 WARNING
Make sure the headrest locks in position after adjusting it to properly protect the occupants.
 WARNING
•For maximum effectiveness in case of an accident, the headrest should be adjusted so the middle of the headrest is at the same height as the center of gravity of an occupant’s head.
•Do not operate the vehicle with the headrests removed. Severe injury to an occupant may occur in the event of an accident. Headrests may provide protection against severe neck injuries when properly adjusted.
2
vehicle your of system Safety
2-15

Safety system of your vehicle
Folding the rear seat
The rear seatbacks (or cushions) may be folded to facilitate carrying long items or to increase the luggage capacity of the vehicle.
 WARNING
•Never allow passengers to sit on top of the folded down seatback while the vehicle is moving as this is not a proper seating position and no seat belts are available for use. This could result in serious injury or death in case of an accident or sudden stop.
•Objects carried on the folded down seatback should not extend higher than the top of the front seats. This could allow cargo to slide forward and cause injury or damage during sudden stops.
OGS035031
Type A
1.Set the front seatback to the upright position and if necessary, slide the front seat forward.
2.Insert the rear lap/shoulder belt plate into the holder on the seat and side trim. It will prevent the lap/shoulder belt from interfering with the seatback when folding.
OGS035013
OGS035014
3.Pull up both sides of the seatback lever and fold the seatback toward the front of the vehicle.
To use the rear seat, lift and push up the seatback backward. Push the seatback firmly until it clicks into place. Make sure the seatback is locked in place.
2-16

When returning the rear seatbacks to the upright position, remember to return the rear shoulder belts to their proper position.
OGC034006
Type B
1.Insert the rear seat belt webbing in the guide to prevent the seat belt from being damaged.
2.Set the front seatback to the upright position and if necessary, slide the front seat forward.
3.Lower the rear headrests to the lowest position.
OGS035037
4.Pull up the seatback lever, then fold the seat toward the front of the vehicle.
OGC034009
5.To use the rear seat, lift and push up the seatback backward. Push the seatback firmly until it clicks into place. Make sure the seatback is locked in place.
When returning the rear seatbacks to the upright position, remember to return the rear shoulder belts to their proper position.
2
vehicle your of system Safety
2-17

Safety system of your vehicle
 WARNING
When you return the rear seatback to its upright position after being folded down:
Be careful not to damage the seat belt webbing or buckle. Do not allow the seat belt webbing or buckle to get caught or pinched in the rear seat. Ensure that the seatback is completely locked into its upright position by pushing on the top of the seatback. Otherwise, in an accident or sudden stop, the seat could fold down and allow cargo to enter the passenger compartment, which could result in serious injury or death.
NOTICE
•When returning the rear seatbacks to the upright position, remember to return the rear shoulder belts to their proper position.
•Routing the seat belt webbing through the rear seat belt guides will help keep the seat belts from being trapped behind or under the seats.
 WARNING
Cargo
Cargo should always be secured to prevent it from being thrown about the vehicle in a collision and causing injury to the vehicle occupants. Do not place objects in the rear seats, since they cannot be properly secured and may hit the front seat occupants in a collision.
 WARNING
Cargo loading
Make sure the engine is off, the manual transaxle is in R (Reverse) or 1st, and the parking brake is securely applied whenever loading or unloading cargo. Failure to take these steps may allow the vehicle to move if the shift lever is inadvertently moved to another position.
2-18

SEAT BELTS
 WARNING
•For maximum restraint system protection, the seat belts must always be used whenever the car is moving.
•Seat belts are most effective when seatbacks are in the upright position.
•Children age 12 and under must always be properly restrained in the rear seat. Never allow children to ride in the front passenger seat. If a child over 12 must be seated in the front seat, he/she must be properly belted and the seat should be moved as far back as possible.
(Continued)
(Continued)
•Never wear the shoulder belt under your arm or behind your back. An improperly positioned shoulder belt can cause serious injuries in a crash. The shoulder belt should be positioned midway over your shoulder across your collarbone.
•Never wear a seat belt over fragile objects. If there is a sudden stop or impact, the seat belt can damage it.
•Avoid wearing twisted seat belts. A twisted belt can’t do its job as well. In a collision, it could even cut into you. Be sure the belt webbing is straight and not twisted.
•Be careful not to damage the belt webbing or hardware. If the belt webbing or hardware is damaged, replace it.
 WARNING
Seat belts are designed to bear upon the bony structure of the body, and should be worn low across the front of the pelvis or the pelvis, chest and shoulders, as applicable; wearing the lap section of the belt across the abdominal area must be avoided.
Seat belts should be adjusted as firmly as possible, consistent with comfort, to provide the protection for which they have been designed.
A slack belt will greatly reduce the protection afforded to the wearer.
Care should be taken to avoid contamination of the webbing with polishes, oils and chemicals, and particularly battery acid. Cleaning may safely be carried out using mild soap and water. The belt should be replaced if webbing becomes frayed, contaminated or damaged.
(Continued)
2
vehicle your of system Safety
2-19

Safety system of your vehicle
(Continued)
It is essential to replace the entire assembly after it has been worn in a severe impact even if damage to the assembly is not obvious. Belts should not be worn with straps twisted. Each belt assembly must only be used by one occupant; it is dangerous to put a belt around a child being carried on the occupant’s lap.
 WARNING
•No modifications or additions should be made by the user which will either prevent the seat belt adjusting devices from operating to remove slack, or prevent the seat belt assembly from being adjusted to remove slack.
•When you fasten the seat belt, be careful not to latch the seat belt in buckles of other seat. It’s very dangerous and you may not be protected by the seat belt properly.
•Do not unfasten the seat belt and do not fasten and unfasten the seat belt repeatedly while driving. This could result in loss of control, and an accident causing death, serious injury, or property damage.
(Continued)
(Continued)
•When fastening the seat belt, make sure that the seat belt does not pass over objects that are hard or can break easily.
•Make sure there is nothing in the buckle. The seat belt may not be fastened securely.
2-20
![]()
Seat belt warning
OGC034042
As a reminder to the driver’s seat belt warning light and passenger’s seat belt warning light (if equipped) will illuminate for approximately 6 seconds each time you turn the ignition switch ON regardless of belt fastening.
If the driver’s seat belt or the front passenger’s seat belt is not fastened when the ignition switch is turned ON or if it is disconnected after the ignition switch is turned ON, the seat belt warning light will illuminate until the belt is fastened.
If you continue not to fasten the seat belt and you drive over 9 km/h, the illuminated warning light will start to blink until you drive under 6 km/h.
If you continue not to fasten the seat belt and you drive over 20 km/h (12 mph) the seat belt warning chime will sound for approximately 100 seconds and the corresponding warning light will blink.
iInformation
•You can find the front passenger’s seat belt warning light on the cluster. (if equipped)
•Although the front passenger seat is not occupied, the seat belt warning light will blink or illuminate for 6 seconds. (if equipped)
•The front passenger’s seat belt warning may operate when luggage is placed on the front passenger seat. (if equipped)
Lap/shoulder belt
ODH033055
To fasten your seat belt:
To fasten your seat belt, pull it out of the retractor and insert the metal tab
(1) into the buckle (2). There will be an audible «click» when the tab locks into the buckle.
2
vehicle your of system Safety
2-21

Safety system of your vehicle
ODH033053
You should place the lap belt (1) portion across your hips and the shoulder belt (2) portion across your chest.
The seat belt automatically adjusts to the proper length only after the lap belt portion is adjusted manually so that it fits snugly around your hips. If you lean forward in a slow, easy motion, the belt will extend and let you move around. If there is a sudden stop or impact, however, the belt will lock into position. It will also lock if you try to lean forward too quickly.
i Information
If you are not able to pull out the safety belt from the retractor, firmly pull the belt out and release it. After release, you will be able to pull the belt out smoothly.
■ Front seat
OGC034026
Height adjustment (if equipped)
You can adjust the height of the shoulder belt anchor to one of 3 positions for maximum comfort and safety.
The height of the adjusting seat belt should not be too close to your neck. You will not be getting the most effective protection. The shoulder portion should be adjusted so that it lies across your chest and midway over your shoulder near the door and not your neck.
2-22

To adjust the height of the seat belt anchor, lower or raise the height adjuster into an appropriate position.
To raise the height adjuster, pull it up
(1). To lower it, push it down (3) while pressing the height adjuster button
(2).
Release the button to lock the anchor into position. Try sliding the height adjuster to make sure that it has locked into position.
ODH033056
 WARNING
Improperly positioned seat belts may increase the risk of serious injury in an accident. Take the following precautions when adjusting the seat belt:
• Position the lap portion of the seat belt as low as possible across your hips, not on your waist, so that it fits snugly. This allows your strong pelvic bones to absorb the force of the crash, reducing the chance of internal injuries.
(Continued)
(Continued)
•Position one arm under the shoulder belt and the other over the belt, as shown in the illustration.
•Always position the shoulder belt anchor into the locked position at the appropriate height.
•Never position the shoulder belt across your neck or face.
2
vehicle your of system Safety
2-23

Safety system of your vehicle
Lap belt (if equipped)
Too high
OLMB033088
To release the seat belt:
The seat belt is released by pressing the release button (1) in the locking buckle. When it is released, the belt should automatically draw back into the retractor.
If this does not happen, check the belt to be sure it is not twisted, then try again.
OLMB033089
To fasten your seat belt:
To fasten a 2-point static type belt, insert the metal tab into the locking buckle. There will be an audible «click» when the tab locks into the buckle. Check to make sure the belt is properly locked and that the belt is not twisted.
Shorten Correct
OLMB033090
With a 2-point static type seat belt, the length must be adjusted manually so it fits snugly around your body. Fasten the belt and pull on the loose end to tighten. The belt should be placed as low as possible on your hips, not on your waist. If the belt is too high, it could increase the possibility of your being injured in an accident.
2-24

OGS035045
When using the rear center seat belt, the buckle with the “CENTER” mark must be used.
OLMB03309
To release the seat belt:
When you want to release the seat belt, press the button (1) in the locking buckle.
 WARNING
The center lap belt latching mechanism is different from those for the rear seat shoulder belts. When fastening the rear seat shoulder belts or the center lap belt, make sure they are inserted into the correct buckles to obtain maximum protection from the seat belt system and assure proper operation.
Pre-tensioner seat belt (if equipped)
OGS035044
Your vehicle is equipped with driver’s and front passenger’s pre-tensioner seat belts. The purpose of the pretensioner is to make sure that the seat belts fit tightly against the occupant’s body in certain frontal collisions. The pre-tensioner seat belts may be activated in crashes where the frontal collision is severe enough.
2
vehicle your of system Safety
2-25

Safety system of your vehicle
When the vehicle stops suddenly, or if the occupant tries to lean forward too quickly, the seat belt retractor will lock into position. In certain frontal collisions, the pre-tensioner will activate and pull the seat belt into tighter contact against the occupant’s body.
 WARNING
•Always wear your seat belt and sit properly in your seat.
•Do not use the seat belt if it is loose or twisted. A loose or twisted seat belt will not protect you properly in an accident.
•Do not place anything near the buckle. This may adversely affect the buckle and cause it to function improperly.
•Always replace your pre-ten- sioners after activation or an accident.
•NEVER inspect, service, repair or replace the pre-tensioners yourself. This must be done by an authorized HYUNDAI dealer.
(Continued)
(Continued)
•Do not hit the seat belt assem blies.
 WARNING
Do not touch the pre-tensioner seat belt assemblies for several minutes after they have been activated. When the pre-ten sioner seat belt mechanism deploys during a collision, the pre-tensioner can become hot and can burn you.
 CAUTION
Body work on the front area of the vehicle may damage the pre-tensioner seat belt system. Therefore, we recommend that the system be serviced by an authorized HYUNDAI dealer.
OLMB033040/Q
The seat belt pre-tensioner system consists mainly of the following components. Their locations are shown in the illustration:
(1)SRS air bag warning light
(2)Retractor pre-tensioner assembly
(3)SRS control module
2-26

NOTICE
The sensor that activates the SRS air bag is connected with the pre–tensioner seat belts. The SRS air bag warning light on the instrument panel will illuminate for approximately 6 seconds after the ignition switch is placed to the ON position, and then it should turn off.
If the pre-tensioner is not working properly, the warning light will illuminate even if the SRS air bag is not malfunctioning. If the warning light does not illuminate, stays illuminated or illuminates when the vehicle is being driven, we recommend the pre-tensioner seat belts and/or SRS air bags be inspected by an authorized HYUNDAI dealer as soon as possible.
iInformation
•Both the driver’s and front passenger’s pre-tensioner seat belts may be activated in certain frontal or side collisions.
•The pre-tensioners will be activated even if the seat belts are not worn at the time of the collision.
•When the pre-tensioner seat belts are activated, a loud noise may be heard and fine dust, which may appear to be smoke, may be visible in the passenger compartment. These are normal operating conditions and are not hazardous.
•Although it is non-toxic, the fine dust may cause skin irritation and should not be breathed for prolonged periods. Wash all exposed skin areas thoroughly after an accident in which the pre-tensioner seat belts were activated.
Additional seat belt safety precautions
Seat belt use during pregnancy
The seat belt should always be used during pregnancy. The best way to protect your unborn child is to protect yourself by always wearing the seat belt.
Pregnant women should always wear a lap-shoulder seat belt. Place the shoulder belt across your chest, routed between your breasts and away from your neck. Place the lap belt below your belly so that it fits SNUGLY across your hips and pelvic bone, under the rounded part of the belly.
 WARNING
To reduce the risk of serious injury or death to an unborn child during an accident, pregnant women should NEVER place the lap portion of the seat belt above or over the area of the abdomen where the unborn child is located.
2
vehicle your of system Safety
2-27

Safety system of your vehicle
Seat belt use and children
Infant and small children
Most countries have Child Restraint System laws which require children to travel in approved Child Restraint System devices, including booster seats. The age at which seat belts can be used instead of Child Restraint System differs among countries, so you should be aware of the specific requirements in your country, and where you are travelling. Infant and Child Restraint System must be properly placed and installed in a rear seat. For more information refer to the “Child Restraint Systems” in this chapter.
 WARNING
ALWAYS properly restrain infants and small children in a Child Restraint System appropriate for the child’s height and weight.
To reduce the risk of serious injury or death to a child and other passengers, NEVER hold a child in your lap or arms when the vehicle is moving. The violent forces created during an accident will tear the child from your arms and throw the child against the interior of the vehicle.
Small children are best protected from injury in an accident when properly restrained in the rear seat by a Child Restraint System that meets the requirements of the Safety Standards of your country. Before buying any Child Restraint System, make sure that it has a label certifying that it meets Safety Standard of your country. The restraint must be appropriate for your child’s height and weight. Check the label on the Child Restraint System for this information. Refer to “Child Restraint Systems” in this chapter.
Larger children
Children under age 13 and who are too large for a booster seat must always occupy the rear seat and use the available lap/shoulder belts. A seat belt should lie across the upper thighs and be snug across the shoulder and chest to restrain the child safely. Check belt fit periodically. A child’s squirming could put the belt out of position. Children are afforded the most safety in the event of an accident when they are restrained by a proper restraint system and/or seat belts in the rear seat.
If a larger child over age 13 must be seated in the front seat, the child must be securely restrained by the available lap/shoulder belt and the seat should be placed in the rearmost position.
If the shoulder belt portion slightly touches the child’s neck or face, try placing the child closer to the center of the vehicle. If the shoulder belt still touches their face or neck, they need to be returned to an appropriate booster seat in the rear seat.
2-28

 WARNING
•Always make sure larger children’s seat belts are worn and properly adjusted.
•NEVER allow the shoulder belt to contact the child’s neck or face.
•Do not allow more than one child to use a single seat belt.
Seat belt use and injured people
A seat belt should be used when an injured person is being transported. Consult a physician for specific recommendations.
One person per belt
Two people (including children) should never attempt to use a single seat belt. This could increase the severity of injuries in case of an accident.
Do not lie down
Sitting in a reclined position when the vehicle is in motion can be dangerous. Even when buckled up, the protections of your restraint system (seat belts and/or air bags) is greatly reduced by reclining your seatback.
Seat belts must be snug against your hips and chest to work properly. During an accident, you could be thrown into the seat belt, causing neck or other injuries.
The more the seatback is reclined, the greater chance the passenger’s hips will slide under the lap belt or the passenger’s neck will strike the shoulder belt.
 WARNING
•NEVER ride with a reclined seatback when the vehicle is moving.
•Riding with a reclined seatback increases your chance of serious or fatal injuries in the event of a collision or sudden stop.
•Driver and passengers should always sit well back in their seats, properly belted, and with the seatbacks upright.
2
vehicle your of system Safety
2-29

Safety system of your vehicle
Care of seat belts
Seat belt systems should never be disassembled or modified. In addition, care should be taken to assure that seat belts and belt hardware are not damaged by seat hinges, doors or other abuse.
 WARNING
When you return the rear seatback to its upright position after the rear seatback has been folded down, be careful not to damage the seat belt webbing or buckle. Be sure that the webbing or buckle does not get caught or pinched in the rear seat. A seat belt with damaged webbing or buckle could possibly fail during a collision or sudden stop, resulting in serious injury. If the webbing or buckles are damaged, get them replaced immediately.
Periodic inspection
All seat belts should be inspected periodically for wear or damage of any kind. Any damaged parts should be replaced as soon as possible.
Keep belts clean and dry
Seat belts should be kept clean and dry. If belts become dirty, they should be cleaned by using a mild soap solution and warm water. Bleach, dye, strong detergents or abrasives should not be used because they may damage and weaken the fabric.
When to replace seat belts
The entire in-use seat belt assembly or assemblies should be replaced if the vehicle has been involved in an accident. This should be done even if no damage is visible. If you have additional questions regarding seat belt operation, we recommend that you consult an authorized HYUNDAI dealer.
2-30
 Loading…

————————————————————————————————————————————————————- 
————————————————————————————————————————————————————- 
————————————————————————————————————————————————————- 
————————————————————————————————————————————————————-

————————————————————————————————————————————————————- 
————————————————————————————————————————————————————- 
————————————————————————————————————————————————————- 
————————————————————————————————————————————————————-

————————————————————————————————————————————————————- 
————————————————————————————————————————————————————- 
————————————————————————————————————————————————————- 
————————————————————————————————————————————————————-

————————————————————————————————————————————————————- 
————————————————————————————————————————————————————- 
————————————————————————————————————————————————————- 
————————————————————————————————————————————————————-