FORDTRANSITРуководствопользователя

Информация, содержащаяся в этой публикации, являлась верной на момент сдачи в печать. В интересах непрерывного развития компания оставляет за собой право в любой момент вносить изменения в технические характеристики, конструкцию или комплектацию своей продукции без предварительного уведомления и без каких-либо обязательств. Ни одна из частей данной публикациинеможетбытьвоспроизведена,переданаилисохраненавинформационно-поисковых системах, а также переведена на тот или иной язык в любой форме и любыми средствами без письменного согласия компании. Ошибки и пропуски информации исключены.
© Ford Motor Company 2013
Все права защищены.
Номер по каталогу: CG3527ru 07/2012 20130121150325

Содержание
|
Введение |
Сигнализация |
|||
|
О данном руководстве………………………….. |
7 |
Принципы работы………………………………… |
29 |
|
|
Словарь символов………………………………….. |
7 |
Активация сигнализации………………….. |
30 |
|
|
Рекомендация о замене деталей………. |
8 |
Отключение сигнализации……………….. |
30 |
|
|
Особые примечания………………………………. |
9 |
Рулевое колесо |
||
|
Быстрый обзор |
||||
|
Управление аудиосистемой……………….. |
31 |
|||
|
Быстрый обзор………………………………………. |
10 |
Голосовое управление………………………… |
32 |
|
|
Защита людей, |
Стеклоочистителиистекло- |
|||
|
находящихся в |
омыватели |
|||
|
автомобиле |
Очистители ветрового стекла………….. |
33 |
||
|
Принципы работы………………………………….. |
17 |
Автоматические |
||
|
Пристегивание ремней |
стеклоочистители…………………………….. |
33 |
||
|
безопасности……………………………………… |
19 |
Омыватели ветрового стекла…………… |
34 |
|
|
Регулировкавысотыкрепленияремня |
Очиститель и омыватели заднего |
34 |
||
|
безопасности…………………………………….. |
20 |
стекла…………………………………………………… |
||
|
Использованиеремнейбезопасности |
Проверка щеток |
35 |
||
|
во время беременности………………….. |
20 |
стеклоочистителей………………………….. |
||
|
Отключение подушки безопасности |
21 |
Замена щеток |
35 |
|
|
пассажира……………………………………………. |
стеклоочистителей………………………….. |
|||
|
Ключи и пульты дистанци- |
Осветительное |
|||
|
онного управления |
оборудование |
|||
|
Общая информация о |
22 |
Органы управления осветительным |
37 |
|
|
радиочастотах…………………………………… |
оборудованием………………………………….. |
|||
|
Программирование пульта |
22 |
Световое оборудование дневного |
38 |
|
|
дистанционного управления………… |
времени……………………………………………….. |
|||
|
Замки |
Автоматическое управление |
|||
|
включением внешнего |
38 |
|||
|
Блокировка и разблокировка |
освещения………………………………………….. |
|||
|
23 |
Передние противотуманные |
|||
|
замков………………………………………………….. |
39 |
|||
|
фары……………………………………………………. |
||||
|
Иммобилайзер двигателя |
Задние противотуманные |
39 |
||
|
Принципы работы |
28 |
фонари………………………………………………… |
||
|
Коррекция наклона световых пучков |
||||
|
Запрограммированные ключи |
28 |
|||
|
фар……………………………………………………….. |
39 |
|||
|
Активация иммобилайзера |
28 |
Аварийная световая |
40 |
|
|
двигателя……………………………………………. |
сигнализация……………………………………. |
|||
|
Отключение иммобилайзера |
Указатели поворота……………………………. |
40 |
||
|
двигателя……………………………………………. |
28 |
Плафоны внутреннего |
40 |
|
|
освещения…………………………………………. |
||||
|
1 |
Transit (TT9) Vehicles Built From: 26-09-2011, Vehicles Built Up To: 31-12-2013

Содержание
|
Плафоны освещения ниши для |
|
|
ног…………………………………………………………. |
42 |
|
Замена ламп…………………………………………… |
42 |
|
Таблица технических характеристик |
|
|
ламп………………………………………………………. |
51 |
|
Окна и зеркала |
|
|
Электрические |
|
|
стеклоподъемники…………………………… |
53 |
|
Наружные зеркала заднего вида……. |
53 |
|
Наружные зеркала заднего вида с |
|
|
электроприводом…………………………….. |
54 |
|
Опускные стекла…………………………………… |
54 |
|
Заднее окно боковины кузова………….. |
54 |
|
Щиток приборов |
|
|
Указатели……………………………………………….. |
56 |
|
Сигнализаторы и индикаторы…………. |
59 |
|
Звуковые предупреждения и |
|
|
индикаторы………………………………………… |
63 |
|
Информационные |
|
|
дисплеи |
|
|
Общая информация…………………………… |
64 |
|
Информационные сообщения………… |
66 |
|
Персональные настройки…………………. |
69 |
|
Органы управления |
|
|
микроклиматом |
|
|
Принципы работы…………………………………. |
72 |
|
Вентиляционные дефлекторы…………. |
72 |
|
Ручной режим управления |
|
|
микроклиматом…………………………………. |
73 |
|
Окна и зеркала с обогревом……………… |
75 |
|
Вспомогательный отопитель……………. |
76 |
|
Сиденья |
|
|
Сидение в правильном |
|
|
положении…………………………………………… |
81 |
|
Передние сиденья………………………………… |
81 |
|
Задние сиденья……………………………………. |
83 |
2
|
Подголовники……………………………………….. |
85 |
|
Сиденья с обогревом………………………….. |
85 |
|
Функции обеспечения |
|
|
комфорта |
|
|
Часы………………………………………………………….. |
87 |
|
Держатели для билетов…………………….. |
87 |
|
Прикуриватель……………………………………… |
87 |
|
Пепельница…………………………………………… |
88 |
|
Дополнительные электрические |
|
|
розетки………………………………………………… |
88 |
|
Подставки для стаканов……………………. |
89 |
|
Места для хранения вещей………………. |
89 |
|
Держатель для бутылок……………………. |
90 |
|
Напольные коврики…………………………….. |
90 |
|
Дополнительный разъем………………….. |
90 |
|
USB-порт………………………………………………… |
90 |
|
Запуск и остановка |
|
|
двигателя |
|
|
Общая информация……………………………. |
91 |
|
Выключатель зажигания……………………. |
91 |
|
Пуск бензинового двигателя…………….. |
91 |
|
Пуск дизельного двигателя……………… |
93 |
|
Фильтр твердых частиц…………………….. |
93 |
|
Выключение двигателя……………………… |
94 |
|
Пуск-остановка |
|
|
Принципы работы………………………………… |
95 |
|
Использование цикла |
|
|
«Пуск-остановка»……………………………. |
95 |
|
Топливо и заправка |
|
|
Меры предосторожности………………….. |
98 |
|
Качество топлива — Бензиновый…….. |
98 |
|
Качество топлива — Дизельный………. |
98 |
|
Каталитический нейтрализатор……… |
99 |
|
Крышка лючка заливной |
|
|
горловины………………………………………….. |
99 |
|
Заправка топливом……………………………. |
100 |
Transit (TT9) Vehicles Built From: 26-09-2011, Vehicles Built Up To: 31-12-2013

Содержание
|
Расход топлива…………………………………… |
100 |
Управление скоростью |
|
|
Технические характеристики…………… |
101 |
Принципы работы………………………………… |
121 |
|
Коробка передач |
Использование системы |
121 |
|
|
круиз-контроля…………………………………. |
|||
|
Механическая коробка передач……. |
108 |
Автоматический ограни- |
|
|
Полный привод…………………………………… |
108 |
||
|
Тормоза |
читель скорости (ASL) |
||
|
Принципы работы……………………………….. |
124 |
||
|
Принципы работы………………………………. |
109 |
Перевозка груза |
|
|
Советы по управлению автомобилем |
125 |
||
|
с антиблокировочной системой |
Общая информация………………………….. |
||
|
тормозов……………………………………………. |
109 |
Приспособления для фиксации |
125 |
|
Стояночный тормоз…………………………… |
109 |
груза……………………………………………………. |
|
|
Система динамической |
Верхние багажники крыши и |
||
|
кронштейны для различных |
|||
|
стабилизации |
грузов………………………………………………….. |
127 |
|
|
Принципы работы……………………………….. |
110 |
Буксировка |
|
|
Использование системы |
111 |
128 |
|
|
динамической стабилизации………… |
Буксировка прицепа…………………………… |
||
|
Контроль тягового усилия |
Советы по вождению |
||
|
Принципы работы………………………………… |
112 |
Обкатка………………………………………………….. |
129 |
|
Использование контроля тягового |
112 |
Ухудшенные характеристики |
129 |
|
усилия………………………………………………….. |
двигателя………………………………………….. |
||
|
Система помощи при |
Меры предосторожности при |
||
|
движении в холодную погоду……… |
130 |
||
|
трогании на подъеме |
Аварийные принад- |
||
|
Принципы работы………………………………… |
113 |
||
|
Использование системы помощи при |
лежности |
131 |
|
|
трогании на подъеме………………………. |
113 |
Аптечка……………………………………………………. |
|
|
Системы помощи при |
Знак аварийной остановки……………….. |
131 |
|
|
Аварийный выход………………………………… |
131 |
||
|
парковке |
Состояние после |
||
|
Принципы работы………………………………… |
115 |
||
|
Система помощи при парковке……….. |
115 |
столкновения |
|
|
Камера заднего обзора |
Выключение подачи топлива………….. |
132 |
|
|
Плавкие предохранители |
|||
|
Принципы работы………………………………… |
117 |
||
|
Камера заднего вида………………………….. |
117 |
Расположение блоков плавких |
133 |
|
предохранителей…………………………….. |
|||
|
3 |
Transit (TT9) Vehicles Built From: 26-09-2011, Vehicles Built Up To: 31-12-2013

Содержание
|
Замена плавкого |
135 |
Слив конденсата из топливного |
158 |
|
предохранителя………………………………. |
фильтра…………………………………………….. |
||
|
Таблица характеристик плавких |
Проверка омывающей жидкости…… |
158 |
|
|
предохранителей……………………………. |
136 |
Технические характеристики………….. |
159 |
|
Эвакуация автомобиля |
|
|
Точки крепления буксировочного |
|
|
оборудования………………………………….. |
146 |
|
Буксировка автомобиля с опорой на |
|
|
четыре колеса………………………………….. |
146 |
|
Буксировка автомобиля с опорой на |
|
|
четыре колеса — В комплектацию |
|
|
автомобиля входит: AWD……………… |
147 |
|
Обслуживание |
|
|
Общая информация…………………………. |
148 |
|
Открывание и закрывание |
|
|
капота…………………………………………………. |
149 |
|
Общий вид моторного отсека — 2.3L |
|
|
Duratec-HE (MI4)……………………………… |
150 |
|
Общий вид моторного отсека — 2.2L |
|
|
Duratorq-TDCi (Puma) Дизель………. |
151 |
|
Общий вид моторного отсека — 2.2L |
|
|
Duratorq-TDCi (Puma) Дизель/2.4L |
|
|
Duratorq-TDCi (Puma) Дизель/3.2L |
|
|
Duratorq-TDCi (Puma) Дизель……… |
153 |
|
Щуп для проверки моторного масла |
|
|
— 2.3L Duratec-HE (MI4)…………………… |
154 |
|
Щуп для проверки моторного масла |
|
|
— 2.2L Duratorq-TDCi (Puma) |
|
|
Дизель……………………………………………….. |
154 |
|
Щуп для проверки моторного масла |
|
|
— 2.4L Duratorq-TDCi (Puma) |
|
|
Дизель/3.2L Duratorq-TDCi (Puma) |
|
|
Дизель………………………………………………… |
155 |
|
Проверка моторного масла……………… |
155 |
|
Проверка охлаждающей жидкости |
|
|
двигателя………………………………………….. |
156 |
|
Проверка уровня тормозной |
|
|
жидкости и рабочей жидкости |
|
|
гидропривода сцепления…………….. |
157 |
|
Проверка рабочей жидкости |
|
|
усилителя рулевого |
|
|
управления………………………………………… |
157 |
4
|
Уход за автомобилем |
|
|
Очистка автомобиля снаружи………… |
163 |
|
Очистка салона…………………………………… |
164 |
|
Устранение мелких повреждений |
|
|
лакокрасочного покрытия……………. |
165 |
|
Аккумуляторная батарея |
|
|
автомобиля |
|
|
Запуск автомобиля от внешнего |
|
|
источника электропитания………….. |
166 |
|
Обслуживание аккумуляторной |
|
|
батареи………………………………………………. |
167 |
|
Замена аккумуляторной батареи 12 В |
|
|
……………………………………………………………… |
168 |
|
Точки подключения аккумуляторной |
|
|
батареи………………………………………………. |
168 |
|
Безопасность детей |
|
|
Детские сиденья…………………………………. |
169 |
|
Установка детского сиденья…………… |
170 |
|
Детские автокресла-подушки………… |
173 |
|
Места расположения креплений |
|
|
ISOFIX………………………………………………….. |
174 |
|
Замки с функцией блокировки от |
|
|
отпирания детьми…………………………… |
174 |
|
Колеса и шины |
|
|
Общая информация………………………….. |
176 |
|
Замена колеса……………………………………… |
176 |
|
Комплект для ремонта шин…………….. |
183 |
|
Обслуживание шин……………………………. |
188 |
|
Использование зимних шин……………. |
188 |
|
Использование цепей |
|
|
противоскольжения………………………. |
188 |
|
Технические характеристики………….. |
189 |
Transit (TT9) Vehicles Built From: 26-09-2011, Vehicles Built Up To: 31-12-2013

Содержание
|
Идентификация |
Кнопка выбора частотного |
|||
|
автомобиля |
диапазона………………………………………… |
224 |
||
|
Табличка с идентификационным |
Автоматическое запоминание частот |
|||
|
радиостанций |
224 |
|||
|
номером автомобиля |
201 |
|||
|
Настройка приема транспортных |
||||
|
Идентификационный номер |
||||
|
сообщений |
225 |
|||
|
автомобиля |
201 |
|||
|
Кнопкинастройкирадиостанций |
226 |
|||
|
Заправочные объемы и |
||||
|
Меню аудиоблока |
||||
|
технические характе- |
||||
|
ристики |
Автоматическая регулировка уровня |
|||
|
Технические характеристики |
202 |
Цифровая………………………………………………………………обработка сигнала |
229 |
|
|
229 |
||||
|
Введение |
(DSP)………………………………………………….. |
|||
|
Уменьшение звуковых помех |
||||
|
Важная информация об |
229 |
|||
|
211 |
(CLIP)………………………………………………….. |
|||
|
аудиосистеме…………………………………….. |
Альтернативные частоты |
230 |
||
|
Краткое описание |
Режим передачи региональных |
231 |
||
|
новостей (REG)………………………………… |
||||
|
аудиоблока |
212 |
Выпуски новостей……………………………….. |
231 |
|
|
Краткое описание аудиоблока……….. |
Проигрыватель компакт- |
|||
|
Функции безопасности |
||||
|
дисков |
||||
|
Защитный код………………………………………. |
217 |
Загрузка компакт-диска…………………… |
233 |
|
|
Если защитный код утерян………………. |
217 |
Выбор дорожки…………………………………… |
234 |
|
|
Ввод защитного кода………………………… |
217 |
Воспроизведение |
||
|
Есливведеннеправильныйзащитный |
компакт-дисков………………………………. |
234 |
||
|
код………………………………………………………… |
217 |
Выбор компакт-диска……………………….. |
234 |
|
|
Индикация времени и |
Ускоренный переход |
235 |
||
|
вперед/назад………………………………….. |
||||
|
даты |
Воспроизведение в случайном |
|||
|
Установка часов аудиосистемы и |
219 |
порядке……………………………………………… |
235 |
|
|
ввод даты………………………………………….. |
Сжатие дорожки компакт-диска…… |
236 |
||
|
Использование |
Сканирование дорожки |
|||
|
компакт-диска…………………………………. |
236 |
|||
|
аудиосистемы |
Извлечение компакт-диска…………….. |
236 |
||
|
Включение/Выключение…………………… |
221 |
Повторноевоспроизведениедорожек |
||
|
Регулятор низких/высоких |
компакт-диска…………………………………. |
237 |
||
|
221 |
Воспроизведениезаписейвформате |
|||
|
частот………………………………………………….. |
||||
|
Регулятор баланса звука |
MP3……………………………………………………… |
237 |
||
|
221 |
Показ сопроводительной |
|||
|
слева/справа / спереди/сзади……. |
238 |
|||
|
Меню аудиосистемы |
222 |
информации из файла MP3……….. |
||
|
Прекращение воспроизведения |
||||
|
Кнопки настройки частот |
||||
|
компакт-диска |
238 |
|||
|
радиостанций |
224 |
|||
|
5 |
Transit (TT9) Vehicles Built From: 26-09-2011, Vehicles Built Up To: 31-12-2013

Содержание
|
Извлечение нескольких |
Использование iPod …………………………. |
276 |
|
компакт-дисков ……………………………… |
239 |
|
Дополнительное гнездо |
Приложения |
|||
|
Одобрения типа…………………………………. |
280 |
|||
|
входа (AUX IN) |
Электромагнитная |
|||
|
Дополнительное гнездо входа (AUX |
280 |
|||
|
совместимость……………………………….. |
||||
|
IN)……………………………………………………….. |
240 |
|||
|
Устранение неполадок в |
||||
|
работе аудиосистемы |
||||
|
Устранение неполадок в работе |
241 |
|||
|
аудиосистемы…………………………………… |
||||
|
Телефон |
||||
|
Общая информация…………………………. |
243 |
|||
|
Настройка телефона ……………………….. |
243 |
|||
|
Настройка Bluetooth …………………………. |
244 |
|||
|
Управление телефоном…………………… |
245 |
|||
|
Использование телефона — В |
||||
|
комплектацию автомобиля не |
||||
|
входит: Навигационная |
245 |
|||
|
система……………………………………………… |
||||
|
Использование телефона — В |
||||
|
комплектацию автомобиля входит: |
||||
|
Навигационная система………………. |
249 |
|||
|
Голосовое управление |
||||
|
Принципы работы………………………………. |
252 |
|||
|
Использование голосовых |
253 |
|||
|
команд……………………………………………….. |
||||
|
Команды аудиоблока………………………… |
253 |
|||
|
Команды управления |
264 |
|||
|
телефоном………………………………………. |
||||
|
Возможности обеспечения |
||||
|
связи |
||||
|
Общая информация…………………………. |
270 |
|||
|
Подключение внешнего |
271 |
|||
|
устройства…………………………………………. |
||||
|
Подключение внешнего устройства |
||||
|
— В комплектацию автомобиля |
272 |
|||
|
входит: Система Bluetooth …………… |
||||
|
Использование USB-устройства…… |
272 |
|||
|
6 |
Transit (TT9) Vehicles Built From: 26-09-2011, Vehicles Built Up To: 31-12-2013
Введение
О ДАННОМ РУКОВОДСТВЕ
Благодарим вас за то, что вы остановили свой выбор на автомобиле Ford. Рекомендуем уделить время и лучше ознакомиться с возможностями вашего автомобиля с помощью данного руководства. Чем лучше вы знаете автомобиль, тем безопаснее и приятнее будет вождение.
ПРЕДУПРЕЖДЕНИЕ
Управляяавтомобилем,пользуясь его системами и органами управления,проявляйтевнимание
и осторожность.
Примечание: В руководстве описаны особенности и дополнительное оборудование всего модельного ряда автомобилей, часть из которого еще не установлено на все модели. В нем также могут упоминаться устройства, которые не установлены в вашем автомобиле.
Примечание: Некоторые иллюстрации изданногоруководствамогутотноситься к другим моделям, отличаясь от того, что установлено на вашем автомобиле.
Однако значимая информация, показаннаянаиллюстрациях, неизменно верна.
Примечание: Строго соблюдайте все действующие правила и законы при пользовании автомобилем.
Примечание: В случае продажи автомобиля данное руководство необходимо передать новому владельцу. Оно является неотъемлемой принадлежностью автомобиля.
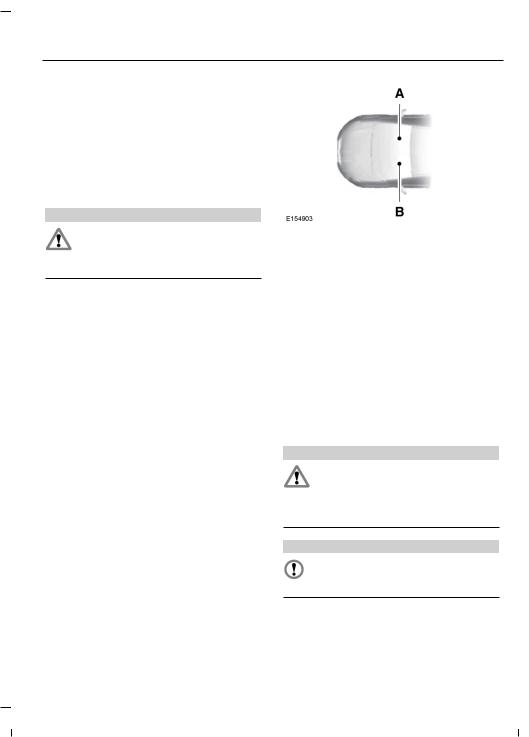
В данном руководстве некоторые элементы конструкции могут иметь определение «левый» и «правый». Сторона определяется из положения сидя на сиденье «лицом вперед».
7
A С правой стороны
BС левой стороны
Защита окружающей среды
Вы должны участвовать в охране окружающей среды. Правильное использованиеавтомобиляиудаление отходов, чистящих и смазочных материалов — важные шаги на пути к этой цели.
СЛОВАРЬ СИМВОЛОВ
Символы используемые в руководстве
ПРЕДУПРЕЖДЕНИЕ
Нарушение инструкций, которые отмечены знаком предупреждения,можетпривести
к смерти или увечьям для вас или окружающих.
ПРЕДОСТЕРЕЖЕНИЕ
Знак особого внимания отмечает инструкции, нарушение которых ведет к повреждению автомобиля.
Transit (TT9) Vehicles Built From: 26-09-2011, Vehicles Built Up To: 31-12-2013

Введение
Символы наносимые на узлы автомобиля
Если вы видите один из этих символов, прочтите соответствующий раздел руководства прежде, чем прикасаться к узлу или пытаться регулировать что-либо.
РЕКОМЕНДАЦИЯ О ЗАМЕНЕ ДЕТАЛЕЙ
Ваш автомобиль изготовлен в соответствии с самыми высокими стандартами с использованием деталей высокого качества. При прохождении планового технического обслуживания или ремонта мы рекомендуемтребоватьиспользование только оригинальных запасных частей
Ford и Motorcraft. Оригинальные запасные части Ford и Motorcraft легко распознать по изображению торговых марок Ford, FoMoCo или Motorcraft как на самих запасных частях, так и на их упаковке.
Плановое техническое обслуживание и ремонты механической части
Одним из самых оптимальных вариантов поддержания вашего автомобиля в исправном состоянии — техническое обслуживание в соответствии с нашими рекомендациями с использованием запасных частей, соответствующих
8
техническим требованиям, указанным в руководстве по эксплуатации. Оригинальные запасные части Ford и Motorcraft соответствуют или превосходят эти технические требования.
Послеаварийные ремонты
Мы надеемся, вам удастся избежать аварий, однако они все же случаются. ОригинальныезапасныечастиFord для послеаварийных ремонтов соответствуют самым строгим требованиям по размерам, лакокрасочному покрытию, прочности, коррозионной стойкости и сопротивлению вдавливанию. При создании наших автомобилей мы закладываем такой уровень качества этих деталей, который обеспечивает предусмотренный уровень защиты автомобиля как единой системы. Оптимальный способ обеспечения такогоуровнязащиты—использование оригинальных запасных частей Ford для послеаварийных ремонтов.
Гарантия на запасные части
ГарантияFord распространяетсятолько на оригинальные запасные части Ford и Motorcraft. Гарантия Ford может не распространяться на повреждения вашего автомобиля вследствие неисправности неоригинальной запасной части. Дополнительная информация приведена в условиях гарантии Ford.
Transit (TT9) Vehicles Built From: 26-09-2011, Vehicles Built Up To: 31-12-2013

Введение
ОСОБЫЕ ПРИМЕЧАНИЯ
При переоборудовании или модификации автомобиля Transit с изменением стандартных технических характеристик см. руководство по кузовным работам и установке оборудования (BEMM) на веб-сайте www.etis.ford.com/fordservice
9
Transit (TT9) Vehicles Built From: 26-09-2011, Vehicles Built Up To: 31-12-2013
Быстрый обзор
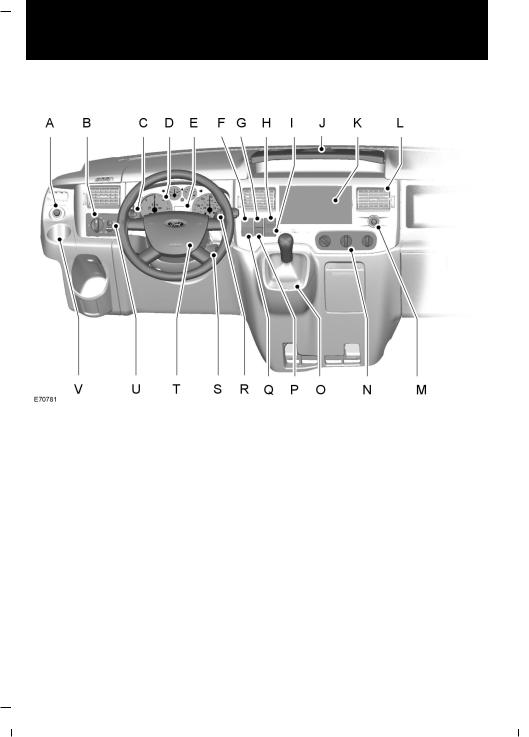
Обзор панели приборов — вариант с левосторонним управлением
10
Transit (TT9) Vehicles Built From: 26-09-2011, Vehicles Built Up To: 31-12-2013
Быстрый обзор
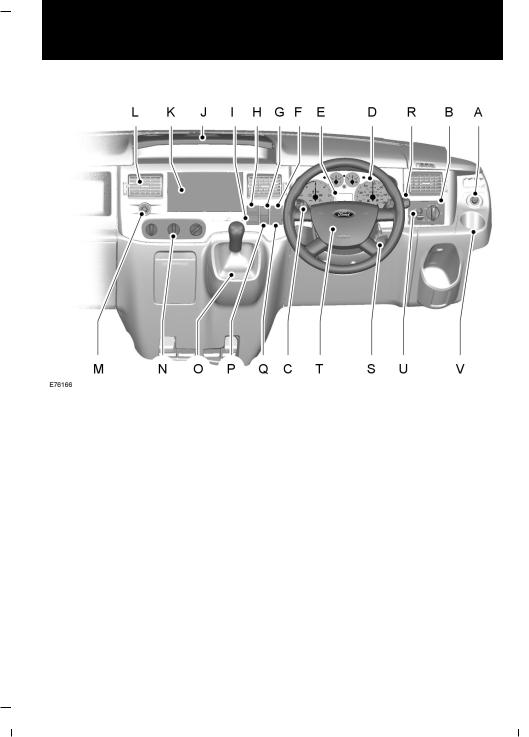
Обзор панели приборов — вариант с правосторонним управлением
AВыключатель электропривода внешних зеркал заднего вида См.
Наружные зеркала заднего вида с электроприводом (стр. 54).
BВыключатель осветительных приборов См. Органы управления осветительным оборудованием (стр. 37).
CМногофункциональный переключатель См. Указатели поворота (стр. 40). См. Органы управления осветительным оборудованием (стр. 37).
DПанель приборов См. Указатели (стр. 56).
EИнформационный дисплей См. Указатели (стр. 56).
FВыключатель ECO. См. Пуск-остановка (стр. 95). См. Автоматический ограничитель скорости (ASL) (стр. 124).
GКнопка аварийной световой сигнализации См. Аварийная световая сигнализация (стр. 40).
HВыключатель электрообогрева ветрового стекла. См. Окна и зеркала с обогревом (стр. 75).
11
Transit (TT9) Vehicles Built From: 26-09-2011, Vehicles Built Up To: 31-12-2013

Быстрый обзор
IВыключатель электрообогрева заднего стекла Выключатель обогрева наружных зеркал, См. Окна и зеркала с обогревом (стр. 75).
J Лоток с подстаканниками См. Подставки для стаканов (стр. 89).
K Аудиоблок. См. «Руководство по аудиоаппаратуре».
LОтверстия системы вентиляции См. Вентиляционные дефлекторы
(стр. 72).
MПрикуриватель См. Прикуриватель (стр. 87).
NОрганы управления микроклиматом. См. Органы управления микроклиматом (стр. 72).
OРычагпереключенияпередач См. Механическаякоробкапередач(стр. 108).
PСигнализатор отключения подушки безопасности пассажира См.
Отключение подушки безопасности пассажира (стр. 21).
QПереключатель полного привода (AWD). См. Полныйпривод (стр. 108). Выключатель системы динамической стабилизации (ESP). См. Система динамической стабилизации (стр. 110).
RПодрулевой переключатель очистителей и омывателей стекол См.
Стеклоочистители и стеклоомыватели (стр. 33).
S Замок (выключатель) зажигания
TЗвуковой сигнал
UРегулятор наклона световых пучков фар См. Коррекция наклона световых пучков фар (стр. 39).
VПодстаканник. См. Подставки для стаканов (стр. 89).
12
Transit (TT9) Vehicles Built From: 26-09-2011, Vehicles Built Up To: 31-12-2013
Быстрый обзор
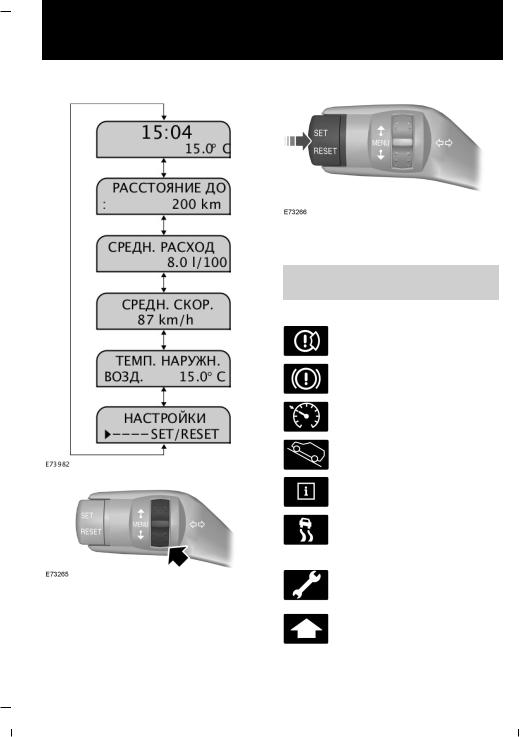
Информационные дисплеи
Используйте вращающийся регулятор для перехода к другим позициям меню.
13
Используйте кнопки SET и RESET для выбора позиции меню или параметра настройки.
См.Информационныедисплеи(стр. 64).
Сигнализаторы и индикаторы
Индикатор износа тормозных накладок
Сигнализатор индикатор тормозной системы
Индикатор системы круиз-контроля
Индикатор системы помощи при троганьи на подъеме
Индикатор сообщения
Сигнализатор системы динамической стабилизации (ESP) и противобуксовочной
системы
Индикатор технического обслуживания (автомобили с дизельными двигателями)
Индикатор переключения передач
Transit (TT9) Vehicles Built From: 26-09-2011, Vehicles Built Up To: 31-12-2013
Быстрый обзор
|
Индикатор наличия воды в |
Сдвижная дверь |
|
топливном фильтре |
|
|
(автомобили с дизельными |
|
|
двигателями) |
|
|
См. Сигнализаторы и индикаторы |
|
|
(стр. 59). |
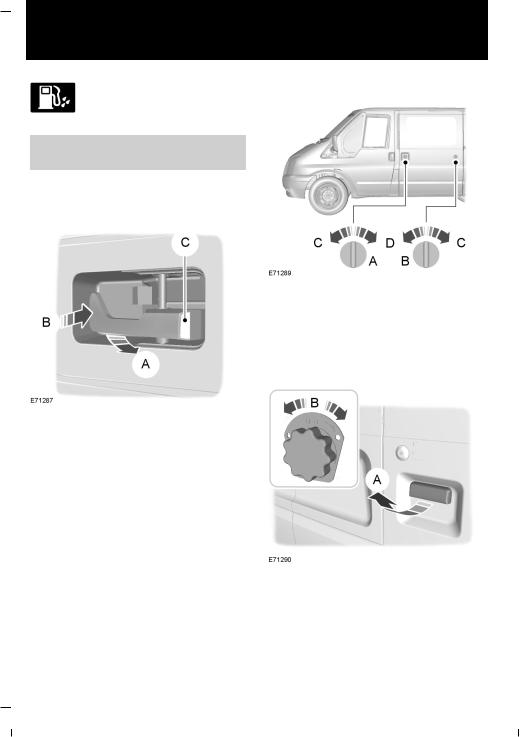
Блокировка и разблокировка замков
Задние двери
A Фургон и комби
B Микроавтобус
C Заблокировать
D Разблокировать
Распашные задние двери
AРазблокировать или открыть
BЗаблокировать
CЕсли белый флажок виден, то замок заблокирован
A Снаружи
B Изнутри
14
Transit (TT9) Vehicles Built From: 26-09-2011, Vehicles Built Up To: 31-12-2013

Быстрый обзор
Откидная задняя дверь
A Снаружи
BИзнутри
Работа системы блокировки
Конфигурация системы блокировки замков на вашем автомобиле может предусматривать проведение блокировки тремя различными способами.
См. Блокировка и разблокировка замков (стр. 23).
Дополнительные гнезда электропитания
ПРЕДУПРЕЖДЕНИЕ
Использование при неработающем двигателе приводит к разрядке
аккумуляторной батареи. Напряжение аккумуляторной батареи может быть недостаточнымдлязапускадвигателя.
См. Дополнительные электрические розетки (стр. 88).
Частота холостого хода двигателя после пуска
Послезапусканепрогретогодвигателя частота холостого хода может быть выше штатной.
См. Запуск и остановка двигателя
(стр. 91).
Механическаякоробкапередач
Включение передачи заднего хода
На некоторых автомобилях при выборе передачи заднего хода необходимо поднять стопорное кольцо.
15
Transit (TT9) Vehicles Built From: 26-09-2011, Vehicles Built Up To: 31-12-2013

Быстрый обзор
См. Механическаякоробкапередач
(стр. 108).
Фильтр твёрдых частиц (DPF)
ПРЕДУПРЕЖДЕНИЕ
Не допускается парковать автомобиль или оставлять его с работающим двигателем на
участке, покрытом сухими листьями, сухой травой или иными возгораемыми материалами. Процесс регенерации DPF создает очень высокую температуру отработавших газов, при этом детали выпускной системы излучаютзначительныйобъемтеплоты во время и после регенерации DPF, а также после выключения двигателя. Это создает потенциальную опасность возгорания.
См. Фильтр твердых частиц (стр. 93).
16
Transit (TT9) Vehicles Built From: 26-09-2011, Vehicles Built Up To: 31-12-2013
Защита людей, находящихся в автомобиле
ПРИНЦИПЫ РАБОТЫ
Надувные подушки безопасности
ПРЕДУПРЕЖДЕНИЯ
Не вносите никакие изменения в конструкциюпередкаавтомобиля. Это может ухудшить
эффективностьсрабатыванияподушек безопасности.
Оригинальный текст в соответствии с правилом ECE R94.01: Очень опасно! Если
напротив сиденья установлена фронтальная подушка безопасности, не используйте на этом сиденье устройства детской безопасности, в которых ребенок сидит лицом против хода движения!
Пристегивайтесь ремнем безопасности и поддерживайте безопасное расстояние между
вами и рулевым колесом. Только правильно пристегнутый ремень безопасности может удержать ваше туловище в том положении, в котором достигается оптимальный эффект срабатывания подушки безопасности.
См. Сидение в правильном положении (стр. 81).
Ремонт рулевого колеса, рулевой колонки, сидений, подушек и ремней безопасности должен
проводиться только квалифицированным механиком.
Не закрывайте область перед подушкой безопасности какими-либо предметами. Не
прикрепляйте никакие предметы к крышке подушки безопасности.
17
ПРЕДУПРЕЖДЕНИЯ
Не втыкайте острые предметы в панели салона в тех зонах, где установлены подушки
безопасности. Это может привести к повреждению и ухудшить эффективностьсрабатыванияподушек безопасности.
Используйте чехлы, предназначенные для сидений, оборудованных боковыми
подушками безопасности. Установка чехлов должна проводиться квалифицированным механиком.
Примечание: При раскрытии подушки безопасности вы услышите громкий хлопок и увидите облако безвредного порошка. Это нормальное явление, на которое можно не обращать внимания.
Примечание: Действие передней пассажирской подушки безопасности распространяется на оба посадочных места сдвоенного сиденья.
Примечание: Протирайте крышки модулей подушки безопасности только влажной тряпкой.
Фронтальные подушки безопасностиводителяипереднего пассажира
Transit (TT9) Vehicles Built From: 26-09-2011, Vehicles Built Up To: 31-12-2013
Защита людей, находящихся в автомобиле
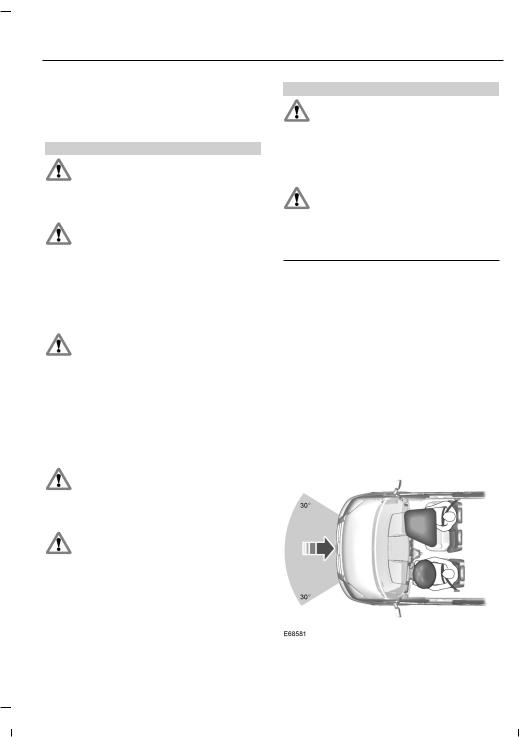
Фронтальные подушки безопасности водителя и переднего пассажира срабатывают при сильном лобовом ударе или столкновении, произошедшим под углом до 30 градусов слева или справа. Подушка надувается за несколько тысячных долей секунды и сдувается при контактеспассажирамииливодителем, амортизируя таким образом движение тела вперед. При слабых лобовых столкновениях,опрокидывании,задних ибоковыхстолкновенияхфронтальные подушки безопасности водителя и переднего пассажира не срабатывают.
Боковые подушки безопасности
Боковые подушки безопасности установлены в спинках передних сидений. О наличии боковых подушек безопасности в автомобиле свидетельствует табличка, установленная в салоне.
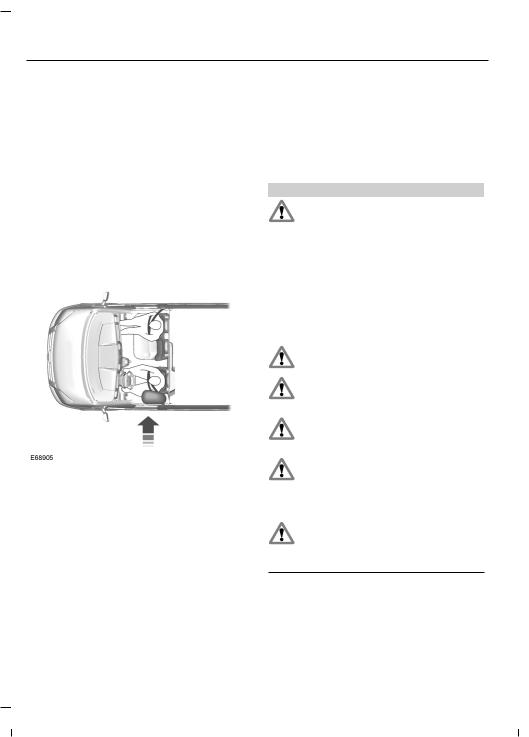
Боковые подушки безопасности срабатывают при сильном боковом столкновении. Раскрывается только подушка безопасности со стороны столкновения. Подушкинадуваютсяза несколько тысячных долей секунды и сдуваютсяприконтактеспассажирами
18
или водителем, обеспечивая защиту головы и грудной клетки. При слабых боковых столкновениях, переворотах, фронтальных и задних столкновениях боковые подушки безопасности не срабатывают.
Ремни безопасности
ПРЕДУПРЕЖДЕНИЯ
Пристегивайтесь ремнем безопасности и поддерживайте безопасное расстояние между
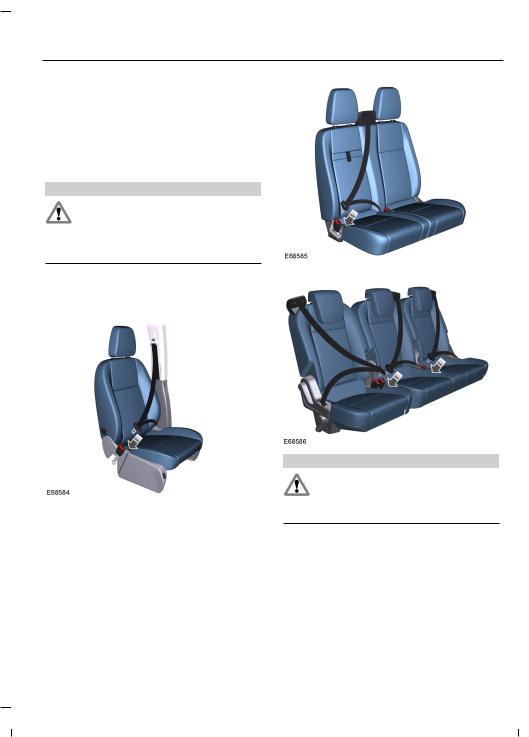
вами и рулевым колесом. Только в том случае, если ремень безопасности пристегнут правильно, он способен удерживать тело человека в положении, обеспечивающем максимальную эффективность действия подушки безопасности. См.
Сидение в правильном положении
(стр. 81).
Не пристегивайте одним ремнем безопасностинесколькихчеловек.
Пристегивайте ремни безопасностиксоответствующим замкам.
Не применяйте ослабшие или перекрученные ремни безопасности.
Не надевайте толстую одежду. Для достижения оптимального эффекта ремень безопасности должен плотно прилегать к вашему
туловищу.
Наплечная лента ремня безопасностидолжнапересекать центр плеча, набедренная лента
должна плотно облегать бедра.
Transit (TT9) Vehicles Built From: 26-09-2011, Vehicles Built Up To: 31-12-2013
Защита людей, находящихся в автомобиле
Преднатяжителиремнейбезопасности имеют более низкий порог срабатывания, чем подушки безопасности. При незначительном столкновении может сработать только преднатяжитель ремня безопасности.
Состояние после столкновения
ПРЕДУПРЕЖДЕНИЕ
Ремни, которые при аварии подверглись натяжению, следует заменить; крепления ремней
должны быть проверены профессиональным специалистом.
ПРИСТЕГИВАНИЕ РЕМНЕЙ БЕЗОПАСНОСТИ
ПРЕДУПРЕЖДЕНИЕ
Вставляйте язычок в замок до характерного щелчка. Если ремень безопасности пристегнут
неправильно, вы не услышите щелчок.
Плавно вытяните ленту ремня. Если вы резко потянете за ленту ремня, или автомобиль стоит на наклонной плоскости, ремень может заклинить.
Нажмите на красную кнопку на замке, чтобыотстегнутьременьбезопасности. Лента ремня должна плавно, до конца втянуться в катушку.
19
Transit (TT9) Vehicles Built From: 26-09-2011, Vehicles Built Up To: 31-12-2013

Защита людей, находящихся в автомобиле
РЕГУЛИРОВКА ВЫСОТЫ КРЕПЛЕНИЯ РЕМНЯ БЕЗОПАСНОСТИ
Переднийременьбезопасности
Задний ремень безопасности
20
ПРЕДУПРЕЖДЕНИЕ
Проследите за плавностью протяжки ленты ремня безопасности через
направляющую.
ИСПОЛЬЗОВАНИЕ РЕМНЕЙ БЕЗОПАСНОСТИ ВО ВРЕМЯ БЕРЕМЕННОСТИ
ПРЕДУПРЕЖДЕНИЕ
Ради собственной безопасности и безопасности еще не рожденногомалышаразмещайте
ремень безопасности надлежащим образом. Нельзя пользоваться только плечевым или только поясным ремнем.
Разместите поясной ремень на бедрах ниже живота беременной женщины. Плечевой ремень должен проходить междугрудямивышеисбокуотживота.
Transit (TT9) Vehicles Built From: 26-09-2011, Vehicles Built Up To: 31-12-2013
Защита людей, находящихся в автомобиле
|
ОТКЛЮЧЕНИЕ ПОДУШКИ |
Отключение фронтальной |
|
БЕЗОПАСНОСТИ |
подушки безопасности |
|
ПАССАЖИРА |
переднего пассажира |
ПРЕДУПРЕЖДЕНИЕ
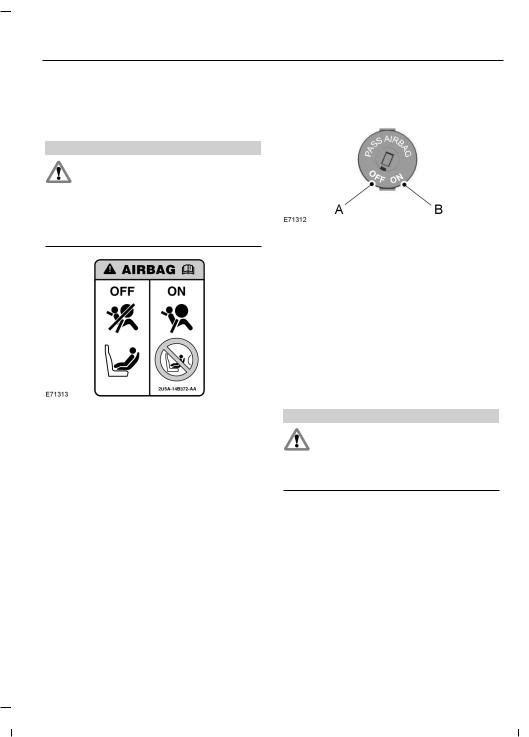
Чтобыисключитьрискгибелиили серьезной травмы ребенка, НЕ ДОПУСКАЕТСЯ использовать
детскоесиденье,закрепляемоеспинкой вперед, на переднем сиденье автомобиля, если подушка безопасности НЕ ОТКЛЮЧЕНА.
Устанавливая на переднее пассажирское сиденье устройство детской безопасности, убедитесь, что выключатель переведен в положение A (Подушка безопасности отключена).
Убедитесь, что после включения зажигания загорается сигнализатор отключения подушки безопасности переднего пассажира. См. Быстрый обзор (стр. 10).
Включение фронтальной подушки безопасности переднего пассажира
Выключатель подушки безопасности и контрольная лампа отключения подушки безопасности расположены на панели приборов.
Если сигнализатор неисправности системы подушек безопасности, расположенный на приборной панели, светится с перерывами, это указывает на неисправность в системе. Снимите устройство детской безопасности с переднего сиденья автомобиля. С целью обеспечения вашей безопасности поручите квалифицированному специалисту проверить данную систему. См.
Сигнализаторы и индикаторы (стр. 59).
ПРЕДУПРЕЖДЕНИЕ
Для корректной работы дополнительной системы безопасностивобычныхусловиях
убедитесь, что подушка безопасности
ВКЛЮЧЕНА.
После снятия устройства детской безопасности с переднего сиденья автомобиля убедитесь в том, что выключатель подушки безопасности, управляемый ключом зажигания, переведен в положение B.
21
Transit (TT9) Vehicles Built From: 26-09-2011, Vehicles Built Up To: 31-12-2013

Ключи и пульты дистанционного управления
ОБЩАЯ ИНФОРМАЦИЯ О ПРОГРАММИРОВАНИЕ РАДИОЧАСТОТАХ ПУЛЬТА ДИСТАНЦИОННОГО
УПРАВЛЕНИЯ
ПРЕДОСТЕРЕЖЕНИЯ
Радиочастота, используемая для дистанционной разблокировки и блокировки замков, может также
использоваться для работы других маломощных радиоустройств (например, любительских радиоприемников и передатчиков, медицинского оборудования, беспроводных наушников, пультов дистанционного управления, систем сигнализацииидругихприборов). Если частота недоступна из-за помех, вы не сможете воспользоваться пультом дистанционного управления блокировкой замков. Для открывания изапираниядверейпонадобитсяключ.
Проверьте, заперт ли автомобиль, прежде чем оставлять его без присмотра. Это защитит ваш
автомобиль от возможного злонамеренногоблокированиячастоты.
Примечание: Двери могут разблокироваться из-за случайного нажатия на кнопки дистанционного пульта.
Расстояние, на котором действует дистанционная блокировка может отличаться в зависимости от окружающей обстановки.
22
Вы можете запрограммировать восемь пультов дистанционного управления для использования на вашем автомобиле (включая поставляемые вместе с автомобилем). За расъяснениями и инструкциями обращайтесь в официальный дилерский центр.
Transit (TT9) Vehicles Built From: 26-09-2011, Vehicles Built Up To: 31-12-2013
Замки
БЛОКИРОВКА И РАЗБЛОКИРОВКА ЗАМКОВ
Функция двойной блокировки
ПРЕДУПРЕЖДЕНИЕ
Не задействуйте двойную блокировку, когда люди или животные находятся в салоне автомобиля.Последвойнойблокировки
разблокировать замки дверей со стороны салона невозможно.
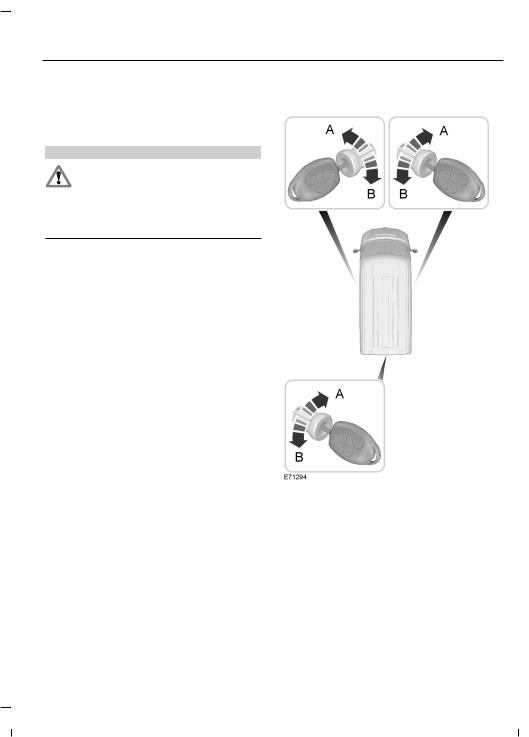
Двойная блокировка — это мера противоугонной защиты, не позволяющая открыть двери изнутри. Заблокировать замки дверей двойной блокировкой можно только в том случае, если все двери закрыты. Если вы попытаетесь выполнить двойную блокировку, когда одна из дверей остается открытой, возможно, раздастся короткий звуковой сигнал и произойдетциклическоесрабатывание замков. Замки дверей возвратятся в предыдущее состояние.
Если двойная блокировка замков дверей выполнена успешно, дважды мигнут указатели поворота. Если работают лампы аварийной световой сигнализации, указатели поворота выдают две долгие вспышки.
Блокировка и разблокировка дверей с помощью ключа
AРазблокировать
BЗаблокировать
Двойная блокировка дверей с помощью ключа
Для двойной блокировки замков дверей поверните ключ в положение отпирание, затем – в положение запирания.
23
Transit (TT9) Vehicles Built From: 26-09-2011, Vehicles Built Up To: 31-12-2013

Замки
|
Блокировка и разблокировка |
Блокировка и разблокировка |
|
дверей с помощью |
дверей с помощью рукояток |
|
дистанционного управления |
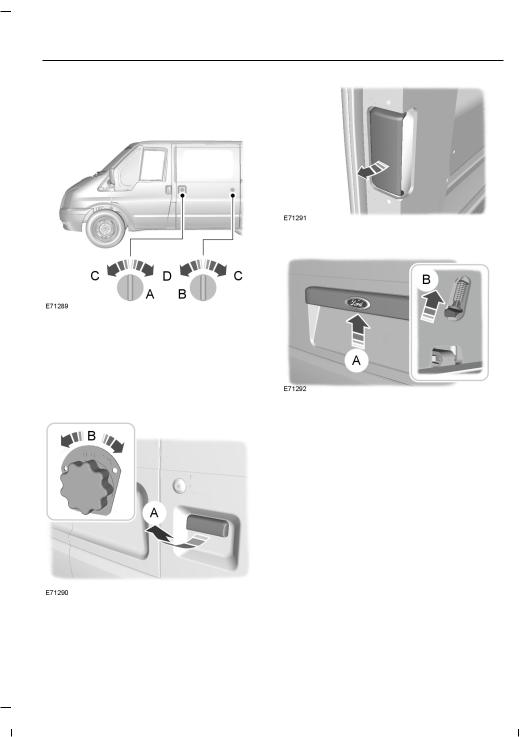
Передние двери |
AЗаблокировать
BРазблокировать
CРазблокировать двери грузового отсека
Нажмите на соответствующую кнопку
один раз.
Двойная блокировка дверей с помощью дистанционного управления
Два раза нажмите на кнопку блокировки.
AБелая маркировка
B Заблокировать
CРазблокировать
Если видна белая маркировка, дверь заперта.
Задние двери
AРазблокировать или открыть
BЗаблокировать
CБелая маркировка
24
Transit (TT9) Vehicles Built From: 26-09-2011, Vehicles Built Up To: 31-12-2013
Замки
Если видна белая маркировка, дверь заперта.
Сдвижная дверь
Поднимаемая задняя дверь
AФургон и комби
BАвтобус
C Заблокировать
DРазблокировать
Двустворчатые задние двери
AСнаружи
BИзнутри
Для доступа к кнопке разблокировки служит отверстие в нижней части задней двери.
Запирание захлопыванием
Примечание: Не оставляйте ключи в автомобиле.
Примечание: Если вы попытаетесь заблокировать замки дверей, когда одна из дверей остается открытой, возможно, раздастся короткий звуковой сигнал.
Transit (TT9) Vehicles Built From: 26-09-2011, Vehicles Built Up To: 31-12-2013

Замки
С помощью захлопывания можно запереть открытую дверь ключом или пультом дистанционного управления. Замок двери будет заперт в момент ее закрывания.
Автоматическая блокировка
В вашем автомобиле предусмотрена возможность автоматического запираниязамковдверейприскорости движения более 8 км/ч. При необходимости обслуживающий вас дилер активирует или отключит эту функцию. Если эта функция активирована, для отпирания задней или боковых грузовых дверей необходимо выключить зажигание и воспользоваться ключом или пультом дистанционного управления.
Автоматическая повторная блокировка
Если вы не открываете ни одну из дверей в течение 45 секунд после разблокировки замков дверей с помощьюдистанционногоуправления, замки дверей автоматически заблокируются снова. Двери заблокируются и сигнализация вернется к предыдущему состоянию.
Одноэтапная разблокировка замков
Примечание: При разблокировке замков дверей указатели поворота мигают один раз.
Когда этот режим активен, доступны следующие функции:
26
Замки всех дверей разблокируются, когда вы:
•Потянете за одну из ручек со стороны салона (если не была использована двойная блокировка замков).
•Повернете ключ в одном из замков дверей.
•Один раз нажмете на кнопку разблокировки на пульте дистанционного управления.
•Один раз нажмете на кнопку разблокировки грузовых дверей на пультедистанционногоуправления (в варианте с кузовом типа шасси).
Замкизаднихдверейилиподнимаемой двери грузового отсека и сдвижной двери разблокируются, если вы один раз нажмете на кнопку разблокировки грузовых дверей.
Двухэтапная разблокировка замков
Примечание: При разблокировке замков дверей указатели поворота мигают один раз.
Замки передних дверей разблокируются, когда вы:
•Потянете за одну из ручек со стороны салона (если не была использована двойная блокировка замков).
•Повернете ключ в одном из замков дверей.
•Один раз нажмете на кнопку разблокировки на пульте дистанционного управления (в фургоне, автобусе и комби).
Transit (TT9) Vehicles Built From: 26-09-2011, Vehicles Built Up To: 31-12-2013

Замки
Замокдвериводителяразблокируется, когда вы:
•Один раз нажмете на кнопку разблокировки на пульте дистанционного управления (в варианте с кузовом типа шасси).
Передниедвери, задниедвериидвери грузовогоотсекаотпираются, когдавы:
•Два раза с интервалом не более трех секунд повернете ключ в замке одной из передних дверей.
•Два раза с интервалом не более трех секунд нажмете на кнопку разблокировки на пульте дистанционного управления.
Вфургонах замки задних дверей или поднимаемой двери грузового отсека и сдвижной двери разблокируются, если вы один раз нажмете на кнопку разблокировки грузовых дверей.
Вавтомобилях с кузовом типа шасси замок пассажирской двери разблокируется, если вы один раз нажмете на кнопку разблокировки грузовых дверей.
Зональная повторная блокировка
Замки в вариантах фургон, автобус и комби разделены на две зоны — кабина и грузовой отсек В варианте с кузовом типашассипредусмотренатолькозона кабины.
•Выйдите из автомобиля и нажмите на кнопку блокировки.
•Для отпирания замков в соответствующей зоне нажмите один раз на кнопку разблокировки или на кнопку разблокировки грузовых дверей.
Если после этого вы откроете дверь в разблокированной зоне, замки остальных дверей в этой зоне автоматически заблокируются.
Конфигурируемая
разблокировка
Конфигурируемая разблокировка настраиваетсяприпокупкеавтомобиля; вы можете выбрать, какие двери будут отперты при однократном или двукратном нажатии на кнопки разблокировки и разблокировки грузовых дверей на пульте дистанционного управления. Если эта функция дезактивирована, ее невозможно активировать повторно. Обратитесь за дополнительной информацией к обслуживающему вас дилеру.
27
Transit (TT9) Vehicles Built From: 26-09-2011, Vehicles Built Up To: 31-12-2013

Иммобилайзер двигателя
ПРИНЦИПЫ РАБОТЫ
Иммобилайзердвигателяэтосистема противоугонной защиты, которая не позволяет запустить двигатель неправильно запрограммированным ключом.
ЗАПРОГРАММИРОВАННЫЕ
КЛЮЧИ
Примечание: Не допускайте экранировки ключей металлическими предметами. Это может нарушить процесс распознавания ключа приемником.
Примечание: Если вы потеряете ключ, остальные ключи будет необходимо стереть из памяти и перепрограммировать. За дополнительной информацией обращайтесь к обслуживающему вас дилеру. Сменные ключи необходимо перекодировать вместе с имеющимися ключами.
Если вы потеряли ключ, сменный ключ можнополучитьуобслуживающеговас дилераFord.Повозможностисообщите дилеру номер ключа, указанный на ярлыке, которым были снабжены оригинальные ключи. Кроме этого, вы можете получить у обслуживающего вас дилера Ford дополнительные ключи.
Мигающий индикатор на щитке приборов подтверждает работу системы.
ОТКЛЮЧЕНИЕ
ИММОБИЛАЙЗЕРА
ДВИГАТЕЛЯ
Иммобилайзердвигателяотключается автоматически после включения зажигания правильно кодированным ключом.
Приэтомнапанелиприборовпримерно на три секунды включается соответствующий индикатор. Если индикатор остается включенным или мигаетвтечениеоднойминуты, азатем включается через неодинаковые интервалы времени, то это свидетельствует о том, что ключ не распознан системой. Извлеките ключ из замка зажигания и вставьте его еще раз.
Если запустить двигатель с помощью правильно кодированного ключа не удалось, это говорит о неисправности системы. Иммобилайзер должен быть незамедлительно проверен.
АКТИВАЦИЯ
ИММОБИЛАЙЗЕРА
ДВИГАТЕЛЯ
Иммобилайзер двигателя включается автоматически через некоторое время после выключения зажигания.
28
Transit (TT9) Vehicles Built From: 26-09-2011, Vehicles Built Up To: 31-12-2013

Сигнализация
ПРИНЦИПЫ РАБОТЫ |
Охранная система для защиты |
|
Все автомобили |
только автомобиля |
Включение сигнализации будет сопровождаться работой сирены в течение30 секундимиганиемфонарей аварийнойсигнализациивтечениепяти минут. После устранения причины срабатываниясигнализации, охранная система перейдет в обычный режим работы. Еслипричинасрабатыванияне будет устранена, то цикл работы сигнализации повторится снова.
Автомобили с охранной сигнализацией по периметру
Сигнализация по периметру является защитнымсредствомотпроникновения посторонних лиц в ваш автомобиль через двери и капот. Она также охватывает блок аудиосистемы и прицеп (если установлен специальный комплект Ford) В системе предусмотрены режимы частичной и полной постановки на охрану. При выборе режима частичной постановки на охрану действие системы не распространяется на прицеп/трейлер.
Охранная сигнализация по периметру сработает, если кто-нибудь:
•откроет дверь,
•откроет капот,
•попытается запустить двигатель неправильно закодированным ключом,
•попытается снять аудиоблок,
•попытается отключить разъем электропроводки прицепа (при условии, что разъем был включен в момент постановки на охрану)
29
Примечание: Ложное срабатывание сигнализации может также произойти из-за дополнительного отопителя. См.
Вспомогательныйотопитель (стр. 76).
Если применяется дополнительный отопитель, направьте воздушный поток в пространство для ног.
Данная система дополняет охранную сигнализацию по периметру. Ультразвуковой датчик движения защищает автомобиль от несанкционированногопроникновения в салон или грузовое отделение. В системе предусмотрены режимы частичной и полной постановки на охрану. При выборе режима частичной постановкинаохранудействиесистемы не распространяется на прицеп/трейлер, а датчик движения отключается. Датчик движения также неработает, еслипостановканаохрану произошла при открытой двери автомобиля.
Данная охранная система работает только при полностью закрытых окнах. Не загораживайте зону перед датчиками движения посторонними предметами.
Transit (TT9) Vehicles Built From: 26-09-2011, Vehicles Built Up To: 31-12-2013

Сигнализация
Охранная система автомобиля сработает:
•обнаруженодвижениевсалонеили грузовом отделении,
•если кто-нибудь попытается проникнуть в грузовое отделение через задние двери или окно.
АКТИВАЦИЯ
СИГНАЛИЗАЦИИ
Охранная сигнализация по периметру
Сигнализация включается через 20 секунд после запирания дверей. Эта задержка дает вам возможность закрытьнезакрытуюдверьиликрышку капотабезсрабатываниясигнализации.
Частичная постановка на сигнализацию
Заприте двери ключом. См.
Блокировкаиразблокировказамков
(стр. 23).
Полная активация
Заприте двери с помощью пульта дистанционного управления или выполнитедвойнуюблокировкузамков дверей с помощью ключа или дистанционного управления. См.
Блокировкаиразблокировказамков
(стр. 23).
Сигнализация категории один
Частичная постановка на сигнализацию
Заприте двери ключом. См.
Блокировкаиразблокировказамков
(стр. 23).
30
Полная активация
Примечание: Не активируйте сигнализацию полностью, если в салоне остаются люди или животные.
Заприте двери с помощью пульта дистанционного управления или выполнитедвойнуюблокировкузамков дверей с помощью ключа или дистанционного управления. См.
Блокировкаиразблокировказамков
(стр. 23).
ОТКЛЮЧЕНИЕ
СИГНАЛИЗАЦИИ
Охранная сигнализация по периметру
Для отключения сигнализации и выключения сирены разблокируйте замки дверей ключом, включите зажиганиеправильнозакодированным ключом или разблокируйте замки дверей с помощью дистанционного управления. См. Блокировка и разблокировка замков (стр. 23).
Сигнализация категории один
Для отключения сигнализации и выключения сирены разблокируйте замки дверей, повернув ключ в двери водителя, и включите зажигание правильно закодированным ключом в течение ближайших 12 секунд или разблокируйте замки дверей с помощьюдистанционногоуправления.
См. Блокировка и разблокировка замков (стр. 23).
Transit (TT9) Vehicles Built From: 26-09-2011, Vehicles Built Up To: 31-12-2013

Рулевое колесо
УПРАВЛЕНИЕ
АУДИОСИСТЕМОЙ
При помощи панели управления аудиосистемойвыберитережимработы аудиосистемы: радиоприемник, воспроизведение CD-дисков или компакт-кассет.
Система дистанционного управления позволяет управлять следующими функциями:
Регулировка громкости
Для увеличения громкости нажмите верхнююкнопкуназаднейчастирычага дистанционного управления.
Для уменьшения громкости нажмите нижнююкнопкуназаднейчастирычага дистанционного управления.
Поиск
Переместите рычаг вверх или вниз:
•В режимерадиоприемникабудет выполнен поиск ближайшей радиостанции с меньшей или большей частотой вещания в данном диапазоне.
•В режиме воспроизведения компакт-дисков произойдет переход к последующей или предыдущей записи на диске.
31
Transit (TT9) Vehicles Built From: 26-09-2011, Vehicles Built Up To: 31-12-2013

Рулевое колесо
|
Настройка (кнопка «Mode») |
ГОЛОСОВОЕ УПРАВЛЕНИЕ |
Коротко нажмите и отпустите кнопку, расположенную сбоку.
•В режимерадиоприемникабудет выполнен поиск ближайшей предварительно настроенной радиостанции.
•В режиме CD произойдет выбор следующего диска, если на автомобиле установлен CD-чейнджер.
•Во всех режимах будет прерван прием транслируемой по радио дорожной информации.
Нажмите и удерживайте кнопку, расположенную сбоку:
•В режиме радиоприемника
произойдет смена частотного диапазона принимаемых радиосигналов.
32
Чтобы включить или выключить голосовоеуправление, нажмитекнопку, расположенную сверху.
Дополнительная информация: См.
Голосовое управление (стр. 252).
Transit (TT9) Vehicles Built From: 26-09-2011, Vehicles Built Up To: 31-12-2013

Стеклоочистители и стеклоомыватели
ОЧИСТИТЕЛИ ВЕТРОВОГО СТЕКЛА
AОднократная очистка
BПрерывистый режим работы
CНормальный режим работы стеклоочистителей
DРежим ускоренной очистки
Прерывистый режим работы
AДлинные интервалы между взмахами щеток
BПрерывистый режим работы
CКороткие интервалы между взмахами щеток
АВТОМАТИЧЕСКИЕ
СТЕКЛООЧИСТИТЕЛИ
Автоматическийрежимработы стеклоочистителя
ПРЕДОСТЕРЕЖЕНИЯ
Не включайте автоматический режим работы в сухую погоду. Датчик дождя очень
чувствительный, поэтому стеклоочистителимогутсработатьпри попадании на ветровое стекло грязи, влаги или насекомых.
Если щетки стеклоочистителя начали оставлять полосы воды и разводы, их следует заменить. В
противном случае датчик дождя будет продолжатьопределятьналичиеводы наветровомстекле.истеклоочистители будутсрабатывать,дажееслибольшая часть ветрового стекла сухая.
Перед включением автоматического режима при обледенении ветрового стекла
полностью разморозьте его.
Выключайте автоматический режим работы стеклоочистителей перед мойкой автомобиля.
33
Transit (TT9) Vehicles Built From: 26-09-2011, Vehicles Built Up To: 31-12-2013

Стеклоочистители и стеклоомыватели
Если вы включаете автоматический режимработыстеклоочистителяпосле включения зажигания, щетки сработают один раз, независимо от наличиявлагинастекле. Датчикдождя будетнепрерывноизмерятьколичество влаги на ветровом стекле и автоматически изменять скорость работы стеклоочистителей.
Если автоматический режим работы стеклоочистителя был включен до включения зажигания, щетки срабатывают, только когда датчик дождя выявляет наличие влаги на стекле.
A Низкая чувствительность
BВысокая чувствительность
Отрегулируйте чувствительность датчика дождя с помощью маховичка-регулятора. При установке низкой чувствительности стеклоочистители будут срабатывать, если датчик определит, что на ветровом стекле находится большое количество воды. При установке высокой чувствительности стеклоочистители будут срабатывать, если датчик определит, что на ветровомстекленаходитсянебольшое количество воды.
ОМЫВАТЕЛИ ВЕТРОВОГО СТЕКЛА
ПРЕДУПРЕЖДЕНИЕ
Не включайте омыватели ветрового стекла более чем на 10 секунд, илиеслибачокомывателя
пустой.
ОЧИСТИТЕЛЬИОМЫВАТЕЛИ ЗАДНЕГО СТЕКЛА
Прерывистый режим работы
Очиститель заднего стекла работает с тем же интервалом, что и очиститель ветрового стекла.
34
Transit (TT9) Vehicles Built From: 26-09-2011, Vehicles Built Up To: 31-12-2013

Стеклоочистители и стеклоомыватели
Очистка стекол при включении передачи заднего хода
Стеклоочиститель заднего стекла включается автоматически, если включена передача заднего хода и рычаг переключателя очистителей и омывателей находится в положении A,
B, C или D..
Омыватель заднего стекла
ПРЕДУПРЕЖДЕНИЕ
Невключайтеомывательзаднего стеклаболеечемна10 секунд, или если бачок омывателя пустой.
ПРОВЕРКА ЩЕТОК СТЕКЛООЧИСТИТЕЛЕЙ
Проведите подушечками пальцев по кромке щетки стеклоочистителя.
Очищайте рабочие кромки щеток стеклоочистителей при помощи воды и мягкой губки.
ЗАМЕНА ЩЕТОК СТЕКЛООЧИСТИТЕЛЕЙ
35
Transit (TT9) Vehicles Built From: 26-09-2011, Vehicles Built Up To: 31-12-2013

Стеклоочистители и стеклоомыватели
Установка выполняется в обратной последовательности.
36
Transit (TT9) Vehicles Built From: 26-09-2011, Vehicles Built Up To: 31-12-2013

Осветительное оборудование
ОРГАНЫ УПРАВЛЕНИЯ ОСВЕТИТЕЛЬНЫМ ОБОРУДОВАНИЕМ
Положения переключателя приборовнаружногоосвещения
Обе стороны
Нажмите на переключатель приборов наружного освещения и поверните его в положение F.
Одна сторона
AС правой стороны
BС левой стороны
AОсвещение выключено
BПередние и задние габаритные фонари
CФары
DПередние противотуманные фары
EЗадние противотуманные фонари
FСтояночные фонари
Лампы для дневного времени
Фары загораются при включении зажигания и тогда, когда орган управления фарами в положении A. Для переключения на дальний свет органуправленияосвещениемсначала должен находиться в положении C.
Стояночные фонари
Сначала выключите зажигание.
37
Дальний и ближний свет фар
Для переключения между ближним и дальним светом фар потяните рычаг подрулевого переключателя до упора по направлению к рулевому колесу.
Сигнализация дальним светом фар
Слегка потяните рычаг в сторону рулевого колеса.
Transit (TT9) Vehicles Built From: 26-09-2011, Vehicles Built Up To: 31-12-2013

Осветительное оборудование
Освещение для безопасного подхода к дому (после окончания поездки)
Выключите зажигание и включите фары, потянув рычаг указателей поворота в сторону рулевого колеса (до упора). Раздастся короткий звуковой сигнал. Фары автоматически выключатся через три минуты (если открыта хотя бы одна дверь) или через 30 секундпослезакрыванияпоследней двери.
Если после того, как была закрыта последняя дверь, в течение 30 секунд открыть любую дверь, то включиться таймер трехминутной задержки выключения осветительных приборов.
Функция задержки выключения осветительных приборов может быть отключена либо повторным нажатием рычага указателей поворота в сторону рулевого колеса, либо включением зажигания.
СВЕТОВОЕ ОБОРУДОВАНИЕ ДНЕВНОГО ВРЕМЕНИ
Данные лампы загораются, только когда включено зажигание.
АВТОМАТИЧЕСКОЕ УПРАВЛЕНИЕВКЛЮЧЕНИЕМ ВНЕШНЕГО ОСВЕЩЕНИЯ
ПРЕДУПРЕЖДЕНИЕ
При сложных погодных условиях может потребоваться ручное включение фар автомобиля.
38
Примечание: При включении автоматическогоуправленияприборами наружного освещения, если система включила фары, вы можете включить только дальний свет.
Автомобили без светового оборудования дневного времени
Фары включаются и выключаются автоматическивзависимостиотуровня наружного освещения.
Автомобили со световым оборудованием дневного времени
Фары не выключаются. См. Световое
оборудование дневного времени
(стр. 38).
Transit (TT9) Vehicles Built From: 26-09-2011, Vehicles Built Up To: 31-12-2013

Осветительное оборудование
ПЕРЕДНИЕ ПРОТИВОТУМАННЫЕФАРЫ
ПРЕДУПРЕЖДЕНИЕ
ПРЕДУПРЕЖДЕНИЕ
Не используйте задние противотуманные фонари в условиях дождя или снегопада
когда расстояние видимости превышает 50 метров.
Примечание: Если включено автоматическое управление приборами наружного освещения, вы не можете включить задние противотуманные фонари.
КОРРЕКЦИЯ НАКЛОНА СВЕТОВЫХ ПУЧКОВ ФАР
Используйте передние противотуманные фары, только если видимость значительно
ограничена из-за тумана, снега или дождя.
Примечание: Если включено автоматическое управление приборами наружного освещения, вы не можете включить передние противотуманные фары.
Вы можете отрегулировать наклон световых пучков фар в соответствии с загрузкой автомобиля.
ЗАДНИЕ
ПРОТИВОТУМАННЫЕ
ФОНАРИ
A Увеличение наклона
B Уменьшение наклона
На порожнем автомобиле регулятор наклона световых пучков фар должен быть установлен на «ноль». На частичном или полностью груженном автомобиле установите регулятор таким образом, чтобы обеспечить радиус освещенности в диапазоне от
35 до 100 м.
39
Transit (TT9) Vehicles Built From: 26-09-2011, Vehicles Built Up To: 31-12-2013

Осветительное оборудование
|
АВАРИЙНАЯ СВЕТОВАЯ |
ПЛАФОНЫ ВНУТРЕННЕГО |
|
СИГНАЛИЗАЦИЯ |
ОСВЕЩЕНИЯ |
За сведениями о расположении элементов: См. Быстрый обзор (стр. 10).
Освещениесалона(автомобили без датчиков проникновения в салон)
Тип 1
УКАЗАТЕЛИ ПОВОРОТА
Примечание: Слегка нажмите на рычаг вверх или вниз, чтобы индикаторы поворота мигнули три раза.
40
AВключено
BВыключено
CДействиеотконтактовдверей
Плафоны освещения салона, которые не оснащены переключателем, загораются, только если переключатель на переднем плафоне установлен в положение C, и вы открываете дверь.
Transit (TT9) Vehicles Built From: 26-09-2011, Vehicles Built Up To: 31-12-2013

Осветительное оборудование
Тип 2
AВкл. (лампа освещения передней секции)
BВыкл. (лампа освещения передней секции)
CДействиеотконтактовдверей
DВыкл. (лампа освещения задней секции)
EВкл. (лампа освещения задней секции)
Лампы освещения задней секции включаются в момент открывания одной из дверей, независимо от положения переключателя.
Автомобили с двойной блокировкой замков
Если вы установили переключатель в положение C, плафоны освещения салона горят в течение короткого времени после закрывания дверей. Лампы тотчас же погаснут, если вы включите зажигание.
Плафоны освещения салона включаются после выключения зажигания. Через короткое время лампы автоматически гаснут.
Если вы оставили одну из дверей открытой, лампы освещения салона погаснутавтоматическичерез30 минут. Для того чтобы снова включить лампы, включитенакороткоевремязажигание.
Освещениесалона(автомобили с датчиками проникновения в салон)
AВыключено
BДействиеотконтактовдверей
CВключено
Если переключатель находится в положении B, то лампа центрального плафона освещения салона загорится при открывании или разблокировании замка боковой двери или двери багажногоотделения. Есливыоставите дверь открытой, то во избежание разрядки аккумуляторной батареи черезнекотороевремялампапогаснет. Чтобы включить плафон, на короткое время включите зажигание.
Также плафон освещения салона включится, когда вы выключите зажигание. Она автоматически погаснет через некоторое время или когда вы запустите двигатель.
41
Transit (TT9) Vehicles Built From: 26-09-2011, Vehicles Built Up To: 31-12-2013

Осветительное оборудование
Лампа освещения салона загорится, если вы установите переключатель в положение C. Через некоторое время она погаснет, чтобы предотвратить разрядку аккумуляторной батареи. Чтобы включить плафон, на короткое время включите зажигание.
Плафоны местного освещения (для чтения)
Если вы выключите зажигание, то, во избежание разрядки аккумуляторной батареи, через некоторое время плафоны для чтения погаснут. Для того чтобы снова включить лампы, включитенакороткоевремязажигание.
ПЛАФОНЫ ОСВЕЩЕНИЯ НИШИ ДЛЯ НОГ
Эти лампы включаются автоматически при открывании и закрывании дверей. Подсветка порогов также включится, если замки дверей будут разблокированы с помощью пульта дистанционного управления. Лампы подсветки порогов автоматически отключатсячерезкороткоевремяпосле включения.
ПРЕДУПРЕЖДЕНИЯ
Перед снятием лампы подождите некоторое время, чтобы она остыла.
ПРЕДОСТЕРЕЖЕНИЯ
Не прикасайтесь к стеклянной колбе лампы.
Устанавливайте только подходящие по техническим требованиям лампы. См. Таблица
технических характеристик ламп
(стр. 51).
Примечание: Мы рекомендуем вам обращаться для замены ламп к дилеру, если автомобиль оснащен системой кондиционирования воздуха. Доступ к некоторым лампам затруднен.
Примечание: Для замены ламп фар, габаритных фонарей и передних указателей поворота вам потребуется снять модуль фары.
Примечание: Далее приведены инструкции, описывающие правильное снятие ламп. Установка производится в последовательности, обратной снятию, если нет дополнительных указаний.
ЗАМЕНА ЛАМП
ПРЕДУПРЕЖДЕНИЯ
Выключитеприборыосвещенияи зажигание.
42
Transit (TT9) Vehicles Built From: 26-09-2011, Vehicles Built Up To: 31-12-2013

Осветительное оборудование
Снятие модуля фары
1.Откройтекапот. См.Обслуживание
(стр. 148).
2.Выверните винты.
3.Отсоедините штекерный разъем.
4.Снимите модуль фары.
Дальний и ближний свет фар
ПРЕДОСТЕРЕЖЕНИЕ
Не прикасайтесь к стеклянной колбе лампы.
1. Снимите модуль фары.
2. Освободите зажимы.
3. Снимите панель.
4. Отсоедините штекерный разъем.
5. Освободитезажимиснимителампу.
43
Transit (TT9) Vehicles Built From: 26-09-2011, Vehicles Built Up To: 31-12-2013

Осветительное оборудование
|
Габаритные фонари |
Передние противотуманные |
|
фары |
|
1. |
Снимите модуль фары. |
|
|
2. |
Снимите панель. |
|
|
3. |
Снимите лампу и патрон лампы. |
Примечание: Лампу невозможно |
|
4. |
Извлеките лампу. |
|
|
Передние указатели поворота |
отсоединить от патрона. |
|
|
1. Отсоедините штекерный разъем. |
2. Поверните против часовой стрелки и снимите патрон лампы.
Боковые повторители указателей поворота
Тип 1
1.Снимите модуль фары.
2.Поверните против часовой стрелки
иснимите патрон лампы.
3.Осторожновдавителампувпатрон, поверните против часовой стрелки
иизвлеките лампу наружу.
44
Transit (TT9) Vehicles Built From: 26-09-2011, Vehicles Built Up To: 31-12-2013

Осветительное оборудование
|
1. |
Аккуратно снимите боковой |
1. |
Отсоедините штекерный разъем. |
|
2. |
повторитель указателя поворота. |
2. |
Поверните против часовой стрелки |
|
Удерживая патрон лампы, |
и снимите патрон лампы. |
||
|
поверните против часовой стрелки |
3. |
Извлеките лампу. |
|
|
и снимите корпус. |
Фургон «Jumbo» |
||
|
3. |
Извлеките лампу. |
Тип 2
|
1. |
Поверните в любом направлении и |
|
|
снимите рассеиватель. |
||
|
1. Поверните по часовой стрелке и |
2. |
Извлеките лампу. |
снимите рассеиватель.
2.Осторожновдавителампувпатрон, поверните против часовой стрелки и извлеките лампу наружу.
Боковые габаритные фонари
Вариант с кузовом типа шасси и грузовиксбезбортовойплатформой с удлиненной рамой
45
Transit (TT9) Vehicles Built From: 26-09-2011, Vehicles Built Up To: 31-12-2013

Осветительное оборудование
Задние фонари
Автобус и комби
A Заднийфонарьистоп-сигнал
B Рычаг указателей поворота
С Фонарь заднего хода
D Противотуманный фонарь
1. Выверните барашковые гайки.
2. Снимитезаднийфонарьиоткрепите патрон лампы.
3. Осторожновдавителампувпатрон, поверните против часовой стрелки и извлеките лампу наружу.
46
Transit (TT9) Vehicles Built From: 26-09-2011, Vehicles Built Up To: 31-12-2013

Осветительное оборудование
|
Вариант с кузовом типа шасси и |
Тип 2 |
|
грузовиксбезбортовойплатформой |
|
|
Тип 1 |
AРычаг указателей поворота
|
B |
Стоп-сигнал |
A |
Заднийфонарьистоп-сигнал |
|
|
С |
Задний фонарь |
|||
|
B |
Индикатор включения |
|||
|
D |
Фонарь заднего хода |
указателей поворота |
||
|
E |
Противотуманный фонарь |
С |
Фонарь заднего хода |
|
1. |
Освободите зажим крепления и |
D |
Противотуманный фонарь |
||
|
сдвиньте пластиковую рамку вбок. |
1. |
Отверните гайку. |
|||
|
2. |
Снимите рассеиватель. |
||||
|
2. |
Отсоедините штекерный разъем. |
||||
|
3. |
Осторожновдавителампувпатрон, |
||||
|
3. |
Выверните винт. |
||||
|
поверните против часовой стрелки |
|||||
и извлеките лампу наружу.
47
Transit (TT9) Vehicles Built From: 26-09-2011, Vehicles Built Up To: 31-12-2013

Осветительное оборудование
|
Задние габаритные фонари |
Габаритные фонари на крыше |
Грузовик с безбортовой платформой
|
1. |
Осторожно отсоедините |
1. |
Выверните винты. |
|
|
рассеиватель от патрона. |
||||
|
2. |
Снимите рассеиватель. |
|||
|
2. |
Осторожновдавителампувпатрон, |
|||
|
3. |
Осторожновдавителампувпатрон, |
|||
|
поверните против часовой стрелки |
||||
|
и извлеките лампу наружу. |
поверните против часовой стрелки |
|||
|
и извлеките лампу наружу. |
Дополнительный стоп-сигнал
Фонарь подсветки регистрационного знака
Автомобили с двустворчатыми задними дверьми
1.Выверните винты.
2.Снимите модуль лампы.
3.Извлеките лампу.
1. Снимите рассеиватель.
2. Извлеките лампу.
48
Transit (TT9) Vehicles Built From: 26-09-2011, Vehicles Built Up To: 31-12-2013

- Manuals
- Brands
- Ford Manuals
- Automobile
- TRANSIT CUSTOM
- Owner’s manual
-
Contents
-
Table of Contents
-
Troubleshooting
-
Bookmarks
Quick Links
FORD TRANSIT CUSTOM Owner’s Manual
Related Manuals for Ford TRANSIT CUSTOM
Summary of Contents for Ford TRANSIT CUSTOM
-
Page 1
FORD TRANSIT CUSTOM Owner’s Manual… -
Page 2
No part of this publication may be reproduced, transmitted, stored in a retrieval system or translated into any language in any form by any means without our written permission. Errors and omissions excepted. © Ford Motor Company 2012 All rights reserved. Part Number: CG3577en 09/2012 20120918161016… -
Page 3: Table Of Contents
Table of Contents Introduction Security About This Manual………..5 Passive Anti-Theft System……31 Symbols Glossary……….5 Anti-Theft Alarm……….31 Replacement Parts Recommendation………7 Steering Wheel Special Notices……….7 Adjusting the Steering Wheel….32 Mobile Communications Audio Control………..32 Equipment…………8 Voice Control…………33 Cruise Control……….33 At a Glance Information Display Control…….34 At a Glance…………9 Wipers and Washers Child Safety…
-
Page 4
Table of Contents Glasses Holder……….77 Instrument Cluster Gauges……………48 Starting and Stopping the Warning Lamps and Indicators….49 Engine Audible Warnings and Indicators…..52 General Information……..78 Ignition Switch……….78 Information Displays Steering Wheel Lock……..78 General Information……..53 Starting a Diesel Engine…….79 Clock…………..55 Diesel Particulate Filter……..79 Trip Computer……….55 Switching Off the Engine……80 Personalised Settings……..56… -
Page 5
Table of Contents First Aid Kit…………115 Stability Control Warning Triangle……….115 Principle of Operation……..93 Jump-Starting the Vehicle……115 Parking Aids Fuses Principle of Operation……..94 Fuse Box Locations……..117 Parking Aid…………94 Fuse Specification Chart……118 Rear View Camera………96 Changing a Fuse……….127 Cruise Control Maintenance Principle of Operation……..99 General Information……..128 Using Cruise Control……..99 Opening and Closing the Bonnet…128… -
Page 6
Table of Contents Cleaning the Alloy Wheels……146 SYNC Troubleshooting……209 Wheels and Tyres Appendices General Information……..147 Electromagnetic compatibility….215 Temporary Mobility Kit……..147 End User Licence Agreement….216 Tyre Care…………150 Using Winter Tyres……..151 Using Snow Chains……..151 Changing a Road Wheel……151 Technical Specifications……157 Capacities and Specific- ations Vehicle Identification Plate…….159 Vehicle Identification Number….160… -
Page 7: Introduction
Introduction ABOUT THIS MANUAL Thank you for choosing Ford. We recommend that you take some time to get to know your vehicle by reading this manual. The more that you know about it, the greater the safety and pleasure you will get from driving it.
-
Page 8
Introduction Battery acid Explosive gas Brake fluid — non petroleum Fan warning based Fasten seat belt Brake system Front airbag Cabin air filter Front fog lamps Check fuel cap Fuel pump reset Child safety door lock or unlock Fuse compartment Child seat lower anchor Hazard warning flashers Child seat tether anchor… -
Page 9: Replacement Parts Recommendation
Windscreen wash and wipe benefit from a Ford Warranty. Damage caused to your vehicle as a result of the failure of non-Ford parts may not be covered by the Ford Warranty. For REPLACEMENT PARTS additional information, refer to the terms and conditions of the Ford Warranty.
-
Page 10: Mobile Communications Equipment
Introduction MOBILE COMMUNICATIONS EQUIPMENT Using mobile communications equipment is becoming increasingly important in the conduct of business and personal affairs. However, you must not compromise your own or others’ safety when using such equipment. Mobile communications can enhance personal safety and security when appropriately used, particularly in emergency situations.
-
Page 11: At A Glance
At a Glance Front Exterior Overview See Maintenance (page 128). See Changing the Wiper Blades (page 135). See Driving Aids (page 101). See Locking and Unlocking (page 27). See Changing a Road Wheel (page 151). Tyre pressures. See Technical Specifications (page 157). See Changing a Bulb (page 136).
-
Page 12
At a Glance Vehicle Interior Overview See Transmission (page 90). See Locking and Unlocking (page 27). See Power Windows (page 45). See Fastening the Seat Belts (page 21). See Head Restraints (page 65). See Seats (page 65). See Parking Brake (page 91). -
Page 13
At a Glance Instrument Panel Overview Left-Hand Drive… -
Page 14
At a Glance Right-Hand Drive Air vents. See Air Vents (page 61). Parking aid switch. See Parking Aid (page 94). Start-stop switch. See Start-Stop (page 82). Direction indicators. See Direction Indicators (page 43). Main beam. See Lighting Control (page 38). Left-hand drive vehicles — Instrument cluster display control. -
Page 15
At a Glance Right-hand drive vehicles — Instrument cluster display control. See Information Displays (page 53). Wiper lever. See Wipers and Washers (page 35). Heated rear window switch. Heated windscreen switch. See Heated Windows and Mirrors (page 64). Information and entertainment display. Audio unit. -
Page 16: Child Safety
Child Safety INSTALLING CHILD SEATS WARNINGS If your vehicle has been involved in a collision, have the child seats checked by an authorised dealer. Only child seats certified to ECE-R44.03 (or later) have been tested and approved for use in your vehicle. A choice of these are available from an authorised dealer.
-
Page 17: Child Safety
Child Safety Child Safety Seat WARNINGS You must reinstall the head restraint following the removal of the child seat. See Head Restraints (page 65). Secure children that weigh more than 33 lb (15 kg) but are less than 60 in (150 cm) tall in a booster seat or a booster cushion.
-
Page 18
Child Safety Booster Cushion (Group 3) The ISOFIX system has two rigid attachment arms on the child seat that attach to anchor points on the second row seats, where the cushion and backrest meet. Tether anchor points are fitted to the underside or rear of the second row seats for child seats with a top tether. -
Page 19: Child Seat Positioning
Child Safety Double Cab Van WARNINGS Extreme Hazard! Do not use a rearward facing child seat on a seat protected by an air bag in front of it! When using a child seat with a support leg, the support leg must rest securely on the floor.
-
Page 20
Child Safety Mass group categories Seating positions Up to 22 Up to 29 20 — 40 lbs 33 — 55 lbs 46 — 79 lbs lbs (10 kg) lbs (13 kg) (9 — 18 kg) (15 — 25 kg) (22 — 36 kg) Front passenger’s seat UF¹… -
Page 21
Child Safety ISOFIX Child Seats Mass group categories Up to 22 lbs (10 Up to 29 lbs (13 20 — 40 lbs (9 — Seating positions 18 kg) Child safety Baby safety seat seat Rear ISOFIX second row C, D, E A, B, B1, C, D ISOFIX size class — second row Rear ISOFIX third row… -
Page 22: Child Safety Locks
Child Safety CHILD SAFETY LOCKS WARNING You cannot open the doors from inside if you have put the child safety locks on. The childproof locks are located on the rear edge of each rear door and must be set separately for each door. Left-Hand Side Turn anticlockwise to lock and clockwise to unlock.
-
Page 23: Seat Belts
Seat Belts FASTENING THE SEAT BELTS WARNINGS Insert the tongue into the buckle until you hear a distinct click. You have not fastened the seat belt correctly if you do not hear a distinct click. Make sure that your seat belt is securely stored away and is not outside your vehicle when closing the door.
-
Page 24: Seat Belt Height Adjustment
Seat Belts Pregnant women should always wear their SEAT BELT MINDER seat belt. The lap belt portion of a combination lap and shoulder seat belt WARNING should be positioned low across the hips The system will only provide below the belly and worn as tight as protection when you use the seat comfort will allow.
-
Page 25: Supplementary Restraints System
Supplementary Restraints System PRINCIPLE OF OPERATION DRIVER AIRBAG WARNINGS Extreme Hazard! Do not use a rearward facing child restraint on a seat protected by an airbag in front of it! Do not modify the front of your vehicle in any way. This could adversely affect deployment of the airbags.
-
Page 26: Supplementary Restraints System
Supplementary Restraints System The airbag will deploy during significant frontal collisions or collisions that are up to 30 degrees from the left or the right. The airbag will inflate within a few thousandths of a second and deflate on contact with the occupant, thus cushioning forward body movement.
-
Page 27: Side Airbags
Supplementary Restraints System Turn the switch to position B. SIDE CURTAIN AIRBAGS SIDE AIRBAGS WARNING Use seat covers designed for seats with side airbags. Have these fitted by an authorised dealer. The airbags are located over the front side windows. There are moulded badges in the headlining above the windows to indicate this.
-
Page 28: Keys And Remote Controls
Keys and Remote Controls GENERAL INFORMATION ON REPLACING A LOST KEY OR RADIO FREQUENCIES REMOTE CONTROL Note: Changes or modifications not Replacement keys or remote controls can expressly approved by the party responsible be purchased from an authorised dealer. for compliance could void the user s Authorised dealers can program remote authority to operate the equipment.
-
Page 29: Locks
Locks Unlocking LOCKING AND UNLOCKING Unlocking with the Key Note: Check your vehicle is locked before leaving it unattended. Turn the top of the key toward the rear of your vehicle. Note: Do not leave your keys in your vehicle. Unlocking with the Remote Control Locking Press the button.
-
Page 30
Locks Locking and Unlocking the Doors Opening the Double Rear Doors From Inside Lock Unlock You can see the door lock status in the instrument cluster. For item location: See At a Glance (page 9). The lamp will illuminate when you lock your vehicle. Opening the Sliding Door Slam Locking Slam locking allows you to lock a door with… -
Page 31: Automatic Locking
Locks Automatic Locking You will unlock the front doors, rear doors and luggage compartment doors when Your vehicle has the capability for the you: doors to lock automatically when you • Turn the key in either of the front door exceed 5 mph (8 km/h).
-
Page 32: Manual Liftgate
Locks Press the button located in the top of the MANUAL LIFTGATE liftgate pull cup handle to unlatch the liftgate, then pull on the outside handle. WARNINGS It is extremely dangerous to ride in Opening with the Remote Control the cargo area, inside or outside of Press the button twice within your vehicle.
-
Page 33: Security
Security PASSIVE ANTI-THEFT ANTI-THEFT ALARM SYSTEM The system will warn you of an unauthorised entry to your vehicle. It will Principle of Operation be triggered if any door, the luggage compartment or the bonnet is opened The system prevents someone from without using the key or the remote starting the engine with an incorrectly control.
-
Page 34: Steering Wheel
Steering Wheel ADJUSTING THE STEERING WHEEL WARNING Do not adjust the steering wheel when your vehicle is moving. Note: Make sure that you are sitting in the correct position. See Sitting in the Correct Position (page 65). 3. Lock the steering column. AUDIO CONTROL Select the required source on the audio unit.
-
Page 35: Voice Control
Steering Wheel Type 2 VOICE CONTROL Volume up Pull the control to select or deselect voice control. See SYNC (page 187). Seek up or next Volume down CRUISE CONTROL Seek down or previous Seek, Next or Previous Press the seek button to: •…
-
Page 36: Information Display Control
Steering Wheel INFORMATION DISPLAY CONTROL See Information Displays (page 53).
-
Page 37: Wipers And Washers
Wipers and Washers Intermittent Wipe WINDSCREEN WIPERS Note: Fully defrost the windscreen before switching on the windscreen wipers. Note: Make sure the windscreen wipers are switched off before entering a car wash. Note: Clean the windscreen and wiper blades if they begin to leave streaks or smears.
-
Page 38: Windscreen Washers
Wipers and Washers Note: Wet road conditions can cause Keep the outside of the windscreen clean. unexpected wiping or smearing. Sensor performance will be affected if the area around the interior mirror is dirty. The To reduce smearing we recommend the rain sensor is very sensitive and the wipers following: may operate if dirt, mist or flies hit the…
-
Page 39: Rear Window Wiper And Washers
Wipers and Washers Rear Window Washer REAR WINDOW WIPER AND WASHERS Rear Window Wiper The washer will spray for as long as you push the lever away from you. When you release the lever, the wiper will operate for a short time. Intermittent wipe Low speed wipe Press the button at the end of the lever to…
-
Page 40: Lighting
Lighting GENERAL INFORMATION LIGHTING CONTROL Condensation in Lamp Assemblies Lighting Control Positions Exterior lamps have vents to accommodate normal changes in air pressure. Condensation can be a natural by-product of this design. When moist air enters the lamp assembly through the vents, there is a possibility that condensation can occur when the temperature is cold.
-
Page 41: Autolamps
Lighting Headlamp Flasher One Side Pull the lever toward you slightly and release it to flash the headlamps. Right-hand side AUTOLAMPS Left-hand side Note: It may be necessary to switch your headlamps on manually in severe weather Main Beams conditions. Note: If you have autolamps on, you can only switch the main beam on once autolamps has switched the headlamps on.
-
Page 42: Instrument Lighting Dimmer
Lighting The headlamps will switch on and off HEADLAMP EXIT DELAY automatically in low light situations or during inclement weather. After you switch the ignition off, you can switch the headlamps on by pulling the The headlamps will remain on for a period direction indicator lever toward you.
-
Page 43: Rear Fog Lamps
Lighting WARNINGS Do not use the rear fog lamps when it is raining or snowing and visibility is more than 164 feet (50 metres). Press the control to switch the fog lamps on or off. You can switch the fog lamps on when either the front fog lamps or dipped beam headlamps are on.
-
Page 44: Cornering Lamps
Lighting CORNERING LAMPS Headlamp beam Cornering lamp beam The cornering lamps illuminate the inside of a corner when you are turning.
-
Page 45: Direction Indicators
Lighting DIRECTION INDICATORS INTERIOR LAMPS Courtesy Lamp Door contact Push the lever up or down to use the direction indicators. If you set the switch to position B, the Note: Tap the lever up or down to make the courtesy lamp will illuminate when you direction indicators flash three times to unlock or open a door or the liftgate.
-
Page 46
Lighting Reading Lamps If you switch the ignition off, the reading lamps will go off automatically after some time to prevent your vehicle battery from discharging. To switch them back on, switch the ignition on for a short time. -
Page 47: Windows And Mirrors
Windows and Mirrors Driver’s Side One-Touch Up POWER WINDOWS Lift the switch fully and release it. Press or WARNINGS lift it again to stop the window. Do not leave children unattended in Bounce-Back your vehicle and do not let them play with the power windows.
-
Page 48: Exterior Mirrors
Windows and Mirrors 5. Release the switch. Tilt the controller to adjust the mirror. 6. Lift and hold the switch until the Electric Folding Mirrors window is fully closed. Folding and Unfolding Open the window and then try to close it automatically.
-
Page 49: Sun Shades
Windows and Mirrors Note: Do not clean the housing or glass of Pull the blind up and attach it to the hooks any mirror with harsh abrasives, fuel or other petroleum or ammonia-based cleaning products. You can adjust the interior mirror to your preference.
-
Page 50: Instrument Cluster
Instrument Cluster GAUGES Information display. See Information Displays (page 53). Speedometer Engine coolant temperature gauge Tripmeter reset button Fuel gauge Tachometer Trip Computer Information Display See Trip Computer (page 55). Odometer Vehicle Settings and Personalisation Located in the bottom of the information display.
-
Page 51: Warning Lamps And Indicators
Instrument Cluster Brake Pad Wear Warning Lamp At normal operating temperature, the needle will remain in the centre section. It will illuminate when the brake Note: Do not restart the engine until the pads have worn down to a cause of overheating has been resolved. predetermined limit.
-
Page 52: Instrument Cluster
Instrument Cluster Door Ajar Warning Lamp Front Airbag Warning Lamp Illuminates when you switch the If it fails to illuminate when you ignition on and remains on if any start your vehicle, continues to door or the bonnet is not closed flash or remains on, it indicates properly.
-
Page 53
Instrument Cluster Hill Start Assist Indicator If it stays on after starting or illuminates when driving, this While driving, it illuminates indicates a malfunction. Stop during activation of the system. your vehicle as soon as it is safe to do so After switching on the ignition, if and switch the engine off. -
Page 54: Audible Warnings And Indicators
Instrument Cluster Water In Fuel Indicator Vehicles with a Diesel Engine It will illuminate if there is excess water in the fuel filter. Drain off the water immediately. See Draining the Fuel Filter Water Trap (page 132). If it illuminates after draining the water, this indicates a fuel filter service is required.
-
Page 55: Information Displays
You can access the menu using the information display control. Note: Some options may appear slightly different or not at all if the items are optional. Trip Trip Odometer Distance to E Inst Fuel Econ Average Fuel Ford EcoMode Gear shifting Anticipation Speed…
-
Page 56: Information Displays
Information Displays Trip Ford EcoMode Average Speed Outside Temp. All Values See Trip Computer (page 55). See Eco Mode (page 105). Settings Driver Assist Traction Ctrl On or Off Driver alert On or Off Hill Start Assist On or Off…
-
Page 57: Clock
Information Displays Settings Reduced Ask on Exit Locks Autolock Autounlock Global Unlock Custom Lock System Reset Press and hold OK to reset the system to factory default Trip Odometer System Check Registers the distance travelled of All active warnings will display first if individual journeys.
-
Page 58: Personalised Settings
Information Displays Press the OK button to acknowledge and PERSONALISED SETTINGS remove some messages from the information display. Other messages will Measure Units be removed automatically after a short To swap between imperial and metric time. units, scroll to this display and press the Certain messages need to be confirmed OK button.
-
Page 59
Information Displays Alarm Message Message Action Indicator Alarm activated Amber Displays when the alarm has been triggered Check Vehicle due to unauthorised entry. See Anti-Theft Alarm (page 31). Alarm fault Have your vehicle checked by an authorised Service required dealer as soon as possible. Battery and Charging System Message Message… -
Page 60
Information Displays Message Message Action Indicator Rear load compartment Vehicle is moving. Stop your vehicle as soon as door ajar safely possible and close. Emergency rear door ajar Vehicle is moving. Stop your vehicle as soon as safely possible and close. Driver door ajar Vehicle not moving. -
Page 61
Information Displays Lighting Message Message Action Indicator Brake lamp Bulb fault Displays when the brake lamp bulb has burned out. See Lighting (page 38). . Dipped beam Bulb fault Displays when the dipped beam headlamp bulb has burned out. See Lighting (page 38). Headlamp fault Amber Displays when an electrical system problem… -
Page 62
Information Displays Parking Brake Message Message Action Indicator Park brake applied Displays when the parking brake is set, the engine is running and your vehicle speed is above 3 mph (5 km/h). If the warning stays on after the parking brake is released, have your vehicle checked by an authorised dealer as soon as possible. -
Page 63: Climate Control
Climate Control Warming the Interior PRINCIPLE OF OPERATION Direct the air toward your feet. In cold or Outside Air humid weather conditions, direct some of the air toward the windscreen and the door Keep the air intakes in front of the windows.
-
Page 64: Manual Climate Control
Climate Control MANUAL CLIMATE CONTROL Fan speed control: Controls the volume of air circulated in your vehicle. Adjust to select the desired fan speed or switch off. If you switch the fan off, the windscreen may fog up. Recirculated air: Press the button to switch between outside air and recirculated air.
-
Page 65: Hints On Controlling The Interior Climate
Climate Control Recommended Settings for Select to distribute air through Heating the windscreen air vents. You can also use this setting to defog • Adjust the fan speed to the second and clear the windscreen of a thin covering speed setting. of ice.
-
Page 66: Heated Windows And Mirrors
Climate Control Side Window Defogging in Cold Press the button to clear the window of Weather thin ice and fog. It switches off automatically after a short time. • Adjust the air distribution control to the instrument panel and footwell air vents Heated Rear Window positions.
-
Page 67: Seats
Seats • Adjust the head restraint so that the SITTING IN THE CORRECT top of it is level with the top of your POSITION head and as far forward as possible. Make sure that you remain WARNINGS comfortable. Do not recline the seatback too far •…
-
Page 68: Front Seats
Seats Adjusting the Head Restraint WARNING Raise the rear head restraint when the rear seat is occupied by a passenger or a child restraint. Adjust the head restraint so that the top of it is level with the top of your head. Removing the Head Restraint Press the locking buttons and remove the MANUAL SEATS…
-
Page 69
Seats Adjusting the Height of the WARNINGS Driver’s Seat The driver’s seat has removable stop bolts on the track to enable access to the vehicle battery. See Changing the 12V Battery (page 133). Moving the Seat Backward and Forward Seat Cushion Adjustment Adjusting the Lumbar Support… -
Page 70: Power Seats
Seats Recline Adjustment Adjusting the Armrest POWER SEATS WARNINGS Do not adjust the driver’s seat or seatback when your vehicle is moving. Do not place cargo or any objects behind the seatback before returning it to the original position. The driver’s seat has removable stop bolts on the track to enable access to the vehicle battery.
-
Page 71: Rear Seats
Seats Power Lumbar REAR SEATS WARNINGS Do not use the bench seats as a bed when your vehicle is moving. Make sure that the seats and the seatbacks are secure and fully latched in their catches. When folding the seatbacks up, make sure that the belts are visible to an occupant and not caught behind the seat.
-
Page 72
Seats Recline Adjustment WARNINGS Do not sit in a rear row seat if any seat in the row in front has not been returned to the fully upright position. Do not place loads on the seatbacks when they are in the fold flat position. -
Page 73
Seats 2. Push the seatback to the upright position after releasing the handle and pull strap. Removing the Seats Folding the Seats Forward WARNING The seats weigh up to 126 lb (57 kilograms). Do not attempt to lift or carry them on your own. Note: Store the seat in a dry and secure place. -
Page 74: Accessing The Third Row Seats
Seats Note: Make sure you align the front legs 2. Fold and remove the third row seats and floor catches correctly when locking the you want to move. seats to the floor. Drop the front seat legs 3. Install the front legs of the third row gently from a vertical position into the floor seats to the rear floor catches of the catches.
-
Page 75: Heated Seats
Seats HEATED SEATS WARNING People who are unable to feel pain to their skin because of advanced age, chronic illness, diabetes, spinal cord injury, medication, alcohol use, exhaustion or other physical conditions, must exercise care when using the heated seat. The heated seat may cause burns even at low temperatures, especially if used for long periods of time.
-
Page 76: Auxiliary Power Points
Auxiliary Power Points Locations WARNINGS If used when the engine is not running, the battery will lose charge. There may be insufficient power to restart the engine. Do not plug optional electrical accessories into the cigar lighter socket. Incorrect use of the lighter can cause damage not covered by your warranty, and can result in fire or serious injury.
-
Page 77: Cigar Lighter
150 watt limit is exceeded. It of 30 minutes. can also switch to a fault mode when it is Note: Use only Ford accessory connectors overloaded, overheated, or shorted. Unplug or connectors specified for use with SAE your device and switch the ignition off then standard sockets.
-
Page 78: Storage Compartments
Storage Compartments CUP HOLDERS ASHTRAY WARNINGS Do not place hot drinks in the cup holders when your vehicle is moving. Make sure that cups placed in the holders do not obstruct your vision while driving. OVERHEAD CONSOLE Overhead Storage Compartment WARNING Do not place heavy objects in the compartment.
-
Page 79: Glasses Holder
Storage Compartments GLASSES HOLDER…
-
Page 80: Starting And Stopping The Engine
Starting and Stopping the Engine GENERAL INFORMATION IGNITION SWITCH If you disconnect the battery, your vehicle may exhibit some unusual driving characteristics for approximately 5 miles (8 kilometres) after you reconnect it. This is because the engine management system must realign itself with the engine. You can disregard any unusual driving characteristics during this period.
-
Page 81: Starting A Diesel Engine
Starting and Stopping the Engine To unlock the steering wheel: DIESEL PARTICULATE FILTER Insert the key in the ignition switch. The filter forms part of the emissions 2. Turn the key to position I. reduction system on your vehicle. It filters Note: You may need to rotate the steering harmful diesel particulates (soot) from the wheel slightly to assist unlocking if there is…
-
Page 82: Switching Off The Engine
Starting and Stopping the Engine You must carry out occasional trips with Note: The heater is most effective when the following conditions to assist the outdoor temperatures are below 0°F regeneration process: (-18°C). • Drive your vehicle in more favourable The heater acts as a starting aid by conditions, which you will find at higher warming the engine coolant.
-
Page 83: Starting And Stopping The Engine
Starting and Stopping the Engine • Make sure the system is unplugged and properly stowed before driving your vehicle. Make sure the protective cover seals the prongs of the block heater cord plug when not in use. • Make sure the heater system is checked for proper operation before winter.
-
Page 84: Unique Driving Characteristics
Unique Driving Characteristics Note: The system only operates when the START-STOP engine is warm and the outside temperature is less than 104°F (40°C). ECO System Note: If you stall the engine and then Note: For vehicles with start-stop the depress the clutch pedal within five battery requirement is different.
-
Page 85: Unique Driving Characteristics
Unique Driving Characteristics 3. Release the clutch pedal. 4. Release the accelerator pedal. The system may not shut down the engine under certain conditions, for example: • Low battery charge. • The outside temperature is too low or too high. •…
-
Page 86: Fuel And Refuelling
Fuel and Refuelling • Automotive fuels can be harmful or SAFETY PRECAUTIONS fatal if swallowed. Fuel such as petrol is highly toxic and if swallowed can WARNINGS cause death or permanent injury. If fuel Do not overfill the fuel tank. The is swallowed, call a doctor pressure in an overfilled tank may immediately, even if no symptoms are…
-
Page 87: Fuel Quality
Fuel and Refuelling If you have run out of fuel: FUEL QUALITY • You may need to cycle the ignition from off to on several times after refuelling WARNINGS to allow the fuel system to pump the Do not mix diesel with oil, petrol or fuel from the tank to the engine.
-
Page 88: Catalytic Converter
Fuel and Refuelling Driving with a Catalytic Converter WARNINGS Avoid running out of fuel. Do not crank the engine for long periods. Do not run the engine when a spark plug lead is disconnected. Do not push-start or tow-start your vehicle.
-
Page 89: Fuel And Refuelling
Fuel and Refuelling WARNINGS Do not remove the nozzle from its fully inserted position during the entire refuelling process. Note: Your vehicle does not have a fuel filler cap. Note: Your vehicle must be unlocked, with the door open before opening and closing the fuel filler flap.
-
Page 90: Fuel Consumption
Fuel and Refuelling They are intended as a comparison between makes and models of vehicles. They are not intended to represent the real world fuel consumption you may get from your vehicle. Real world fuel consumption is governed by many factors including: driving style, high speed driving, stop-start driving, air conditioning usage, the accessories fitted, payload, towing, etc.
-
Page 91: Technical Specifications
Fuel and Refuelling 3. After at least three to five tank fill ups, Keep a record for at least one month and fill the fuel tank and record the current record the type of driving (city or odometer reading. motorway). This provides an accurate estimate of your vehicle’s fuel economy 4.
-
Page 92: Transmission
Transmission When the system is active, your vehicle will MANUAL TRANSMISSION remain stationary on the slope for two to three seconds after you release the brake Selecting Reverse Gear pedal. This allows you time to move your Do not engage reverse gear when your foot from the brake to the accelerator vehicle is moving.
-
Page 93: Brakes
Brakes Anti-lock Brake System GENERAL INFORMATION This system helps you maintain steering WARNING control and vehicle stability during emergency stops by keeping the brakes The system does not relieve you of from locking. your responsibility to drive with due care and attention. HINTS ON DRIVING WITH Note: Occasional brake noise is normal.
-
Page 94: Traction Control
Traction Control PRINCIPLE OF OPERATION The traction control system helps avoid drive wheel spin and loss of traction. If your vehicle begins to slide, the system applies the brakes to individual wheels and, when needed, reduces engine power at the same time. If the wheels spin when accelerating on slippery or loose surfaces, the system reduces engine power in order to increase traction.
-
Page 95: Stability Control
Stability Control Stability Control Warning Lamp PRINCIPLE OF OPERATION While driving, it flashes when the system Electronic Stability Program is operating. See Warning Lamps and Indicators (page 49). WARNING The system does not relieve you of your responsibility to drive with due care and attention.
-
Page 96: Parking Aids
Parking Aids Note: The outer sensors may detect the PRINCIPLE OF OPERATION side walls of a garage. If the distance between the outer sensor and the side wall WARNINGS remains constant for three seconds, the The system does not relieve you of tone will switch off.
-
Page 97: Parking Aids
Parking Aids Note: If your vehicle sustains damage to The system sounds an audible warning the bumper or fascia, leaving it misaligned when obstacles are near either bumper in or bent, the sensing zone may be altered the following manner: causing inaccurate measurement of •…
-
Page 98: Rear View Camera
Parking Aids Press the button to switch the system off. Liftgate It will remain off for the entire ignition cycle. For item location See At a Glance (page 9). REAR VIEW CAMERA WARNINGS The operation of the camera may vary depending on the ambient temperature, vehicle and road conditions.
-
Page 99
Parking Aids WARNINGS Marks are for general guidance only, and are calculated for vehicles in minimum load conditions on an even road surface. The lines show a projected vehicle path (based on the current steering wheel angle) and the distance from the exterior mirrors and rear bumper. -
Page 100: Switching The Rear View Camera Off
Parking Aids Green — 24 — 35 inches (0.6 — 0.9 metre) Black — centre line of the projected vehicle path Note: The green line is extended from 35 inches (0.9 metre) up to a distance of 126 inches (3.2 metres). Note: When reversing with a trailer, the lines on the screen are not shown.
-
Page 101: Cruise Control
Cruise Control Press and release ON. PRINCIPLE OF OPERATION Setting a Speed WARNING Press and release SET+. The system does not relieve you of your responsibility to drive with due The indicator will display in the care and attention. instrument cluster. Cruise control allows you to control your Changing the Set Speed speed using the switches on the steering…
-
Page 102
Cruise Control Switching Off Cruise Control Note: The set speed is erased when you switch off cruise control. Press and release OFF or switch off the ignition. -
Page 103: Driving Aids
Driving Aids Vehicle Speed Limiter — Adjustable SPEED LIMITER WARNING Engine Speed Limiter When you are going downhill, your Engine speed is limited to protect the speed may increase above the set engine. speed. The system will not apply the brakes but a warning will be given.
-
Page 104: Driver Alert
Driving Aids Setting the Speed Limit WARNINGS Take regular rest breaks as required Press switch A or switch C to select your and do not wait for the system to desired speed limit. The speed is displayed warn you if you feel tired. in the information display and stored as the set speed.
-
Page 105: Using Driver Alert
Driving Aids The system is designed to alert you if it detects that you are becoming drowsy or if your driving deteriorates. Using Driver Alert Switching the System On and Off Note: The system will remain on or off depending on how it was last set. Alertness level is fine, no rest required.
-
Page 106: Lane Keeping System
Driving Aids Note: The system may assist you when LANE KEEPING SYSTEM driving on fast main roads and motorways. Lane Keeping Alert Note: The system may not operate during hard braking or acceleration and when you Principle of Operation are intentionally steering your vehicle. WARNINGS Note: The system will operate with a minimum of one tracked lane marking.
-
Page 107: Eco Mode
Driving Aids Press the button twice to turn the system The lane markings are colour coded as on. Press the button once to turn the follows: system off. • Green: The system is ready to warn you of any unintentional lane departure. Setting the Steering Wheel Vibration •…
-
Page 108: Driving Aids
Driving Aids The value of these characteristics is Efficient speed represented by petals shown in the display, Reduce your cruising speed on open roads with five petals being the most efficient. to improve economy. Higher speeds use The more efficiently you drive, the better more fuel.
-
Page 109: General Information
Load Carrying GENERAL INFORMATION ROOF RACKS AND LOAD CARRIERS WARNINGS Use load securing straps to an WARNINGS approved standard, e.g. DIN. You should evenly distribute the load when loading the roof rail crossbars, Make sure that you secure all loose as well as maintain a low centre of items properly.
-
Page 110: Load Carrying
Load Carrying Securing Cargo All Vehicles except Kombi…
-
Page 111
Load Carrying Kombi Vehicles… -
Page 112: Towing
Towing Steep Gradients TOWING A TRAILER WARNING WARNINGS The anti-lock braking system does Do not exceed 62 mph (100 km/h). not control the overrun brake on the trailer. The rear tyre pressures must be increased by 3 psi (0.2 bar) above Use a low gear when descending a steep specification.
-
Page 113: Towing The Vehicle On Four Wheels
Towing Front Towing Eye Rear Towing Hook Note: If your vehicle has a tow bar, use this Remove the cover and install the towing to tow other vehicles instead of the towing eye. hook. TOWING THE VEHICLE ON FOUR WHEELS WARNINGS You must switch the ignition on when your vehicle is being towed.
-
Page 114: Driving Hints
Driving Hints You must only drive your vehicle for a short RUNNING-IN distance if the engine overheats. The distance you can travel depends on Tyres ambient temperature, vehicle load and terrain. The engine will continue to operate WARNING with limited power for a short time. New tyres need to be run-in for If the engine temperature continues to rise, approximately 300 miles (500…
-
Page 115: Floor Mats
Driving Hints In an emergency, you can drive your vehicle WARNINGS through water to a maximum depth of 8 Pedals that cannot move freely can inches (200 millimetres) and at a cause loss of vehicle control and maximum speed of 6 mph (10 km/h). You increase the risk of serious personal must take extra care when driving through injury.
-
Page 116: Driving Hints
Driving Hints WARNINGS To remove the floor mat, reverse the installation procedure.
-
Page 117: Roadside Emergencies
Roadside Emergencies To Connect the Booster Cables HAZARD WARNING FLASHERS Note: Depending on applicable laws and regulations in the country for which your vehicle was originally built, your brake lamps may flash during heavy braking. Following this your hazard warning flashers may also flash once your vehicle comes to a stop.
-
Page 118: Roadside Emergencies
Roadside Emergencies 3. Lift up the battery positive connection WARNING point cover. For item location, refer to Do not switch the headlamps on the appropriate under bonnet overview. when disconnecting the cables. The See Maintenance (page 128). peak voltage could blow the bulbs. 4.
-
Page 119: Fuses
Fuses This is located behind the removable trim FUSE BOX LOCATIONS panel. Engine Compartment Fuse Box Pre-fuse Box This is located under the driver’s seat. Body Control Module Fuse Box For item location: See Under Bonnet Overview (page 129). Passenger Compartment Fuse Box This is located behind the removable trim panel.
-
Page 120: Fuse Specification Chart
Fuses FUSE SPECIFICATION CHART Engine Compartment Fuse Box Fuse Fuse rating Circuits protected Not used Not used Not used Not used…
-
Page 121
Fuses Fuse Fuse rating Circuits protected Diesel particulate filter vaporiser, glow plug monitor Anti-lock braking system, electronic stability program, ignition 7.5 A Powertrain control module ignition Not used 30 A Front wiper left-hand 30 A Front wiper right-hand 10 A Air conditioning clutch 20 A Diesel particulate filter vaporiser, glow plug… -
Page 122
Fuses Fuse Fuse rating Circuits protected Not used 60 A Engine coolant fan (single fan) Not used 60 A Dual front wiper motors Not used Not used 15 A Powertrain control system 7.5 A Powertrain control system 7.5 A Powertrain control system 7.5 A Air conditioning clutch 15 A… -
Page 123
Fuses Relay Circuits switched Low speed cooling fan Not used Powertrain control module High speed cooling fan Passenger’s Compartment Fuse Box Fuse Fuse rating Circuits protected 10 A Airbag module Anti-lock braking system 10 A Heated mirrors Not used 20 A Fuel fired heater Tachograph Not used… -
Page 124
Fuses Fuse Fuse rating Circuits protected Not used Power seat movement — 30 A driver’s Power seat movement — 30 A passenger’s Not used Not used Powertrain control module battery positive Powertrain control module 40 A power relay Power supply for 40 A passenger’s junction box Not used… -
Page 125
Fuses Fuse Fuse rating Circuits protected 20 A Cornering lamp Not used Not used Not used 20 A Rear wiper Power mirrors 20 A Horn 7.5 A Audio SYNC module Front blower, Wiper, horn relay Remote keyless entry, battery, power window log, 7.5 A rear heating ventilation air conditioning… -
Page 126
Fuses Fuse Fuse rating Circuits protected 60 A Ignition relay 2 Heated windscreen left- 40 A hand Heated windscreen right- 40 A hand Relay Circuits switched Fuel fired heater Power points Not used Ignition 2 Not used Ignition 1 Horn Not used Heater blower Rear heater blower… -
Page 127
Fuses Pre-fuse Box Fuse Fuse rating Circuits protected 470 A Starter, alternator, feed engine junction box Power supply for passenger’s compartment fuse box and 100 A body control module fuse box. 40 A Not used 200 A Passenger’s fuse box non start related feed 1 100 A Passenger’s fuse box non start related feed 3 80 A… -
Page 128
Fuses Body Control Module Fuse Box Fuse Fuse rating Circuits protected 15 A Central locking 1 15 A Central locking 2 15 A Ignition switch supply Parking aid module Rain sensing module 15 A Washer pump supply 7.5 A Mirror supply… -
Page 129: Changing A Fuse
Fuses Fuse Fuse rating Circuits protected 15 A Fog lamp supply 10 A Main beam right supply 10 A Main beam left supply 25 A Exterior lamp right 20 A Battery backup sounder supply, security horn 15 A On board diagnostics 2 supply, battery saver supply Direction indicator supply, rear fog lamp supply, daytime 25 A running lamp supply…
-
Page 130: Maintenance
Have your vehicle serviced regularly to help • Tyre pressures (when cold). See maintain its roadworthiness and resale Technical Specifications (page 150). value. There is a large network of Ford • Tyre condition. See Wheels and Tyres authorised repairers that are there to help (page 147).
-
Page 131: Under Bonnet Overview — 2.2L Duratorq-Tdci (114Kw/155Ps) — Puma/2.2L Duratorq-Tdci (74Kw/100Ps) — Puma/2.2L Duratorq-Tdci (92Kw/125Ps) — Puma
Maintenance Open the bonnet and support it with the bonnet strut. Closing the Bonnet Note: You must secure the bonnet prop correctly after use. Note: Make sure that you have closed the bonnet correctly. Lower the bonnet and allow it to drop from under its own weight for the last 8 — 11 inches (20 –…
-
Page 132: (114Kw/155Ps) — Puma/2.2L
Maintenance Washer fluid reservoir. See Washer Fluid Check (page 132). Brake and clutch fluid reservoir (right-hand drive). See Brake and Clutch Fluid Check (page 132). Brake and clutch fluid reservoir (left-hand drive). See Brake and Clutch Fluid Check (page 132). Engine junction box.
-
Page 133: Engine Coolant Check
Undiluted coolant is flammable and 2. Remove the engine oil filler cap. may ignite if spilt on a hot exhaust. 3. Add engine oil that meets Ford specifications. See Technical Note: In an emergency, you can add just Specifications (page 143).
-
Page 134: Brake And Clutch Fluid Check
Do not add fluid further than the MAX mark. WARNINGS Use of any fluid other than the Add fluid that meets the Ford specification. recommended brake fluid may See Technical Specifications (page 143). reduce brake efficiency and not meet Ford’s performance standards.
-
Page 135: Changing The 12V Battery
Remove the cover on both sides. approximately two seconds. 2. Remove the seat runner bolts on both Note: Only add fuel that meets the Ford sides. Slide the seat fully forward, specification. See Fuel and Refuelling making sure the arm rest is folded up.
-
Page 136: Checking The Wiper Blades
Maintenance 3. Remove the cover trim by pulling up 5. Remove the battery clamp bolts. the tabs with your fingers. 6. Remove the battery clamp and cover. WARNING Make sure the seat runner bolts are securely fastened before installing the covers. Install in the reverse order.
-
Page 137: Changing The Wiper Blades
Maintenance CHANGING THE WIPER BLADES Windscreen Wiper Blades Note: The windscreen wiper blades are different in length. See Technical Specifications (page 143). If you install wiper blades of the wrong length, the rain sensor may not work correctly. Changing the Windscreen Wiper Blades Lift the wiper arms.
-
Page 138: Removing A Headlamp
Maintenance 6. Remove the wiper blade. Install in the reverse order. Note: Make sure that the wiper blade locks 5. Disconnect the electrical connector. into place. Note: When fitting the headlamp, make sure that you reconnect the electrical REMOVING A HEADLAMP connector correctly.
-
Page 139
Maintenance Headlamp 4. Release the clip and remove the bulb. Note: Remove the covers to gain access to Direction Indicator the bulbs. Remove the headlamp. See Removing a Headlamp (page 136). Cornering lamp 2. Turn the bulb holder anticlockwise and remove it. -
Page 140
Maintenance Front Fog Lamps Headlamp Dipped Beam Remove the headlamp. See Removing a Headlamp (page 136). Note: You cannot separate the bulb from 2. Remove the cover. the bulb holder. 3. Disconnect the electrical connector. Disconnect the electrical connector. 4. Release the clip and remove the bulb. 2. -
Page 141
Maintenance Rear Lamps Rear and brake lamp Direction indicator Reversing lamp Fog lamp Remove the nut. 2. Remove the rear lamp and unclip the bulb holder. 3. Gently press the bulb into the bulb holder, turn it anticlockwise and remove it. -
Page 142
Maintenance Central High Mounted Brake Lamp Interior Lamp Entrance Lamps Carefully remove the lamp. 2. Remove the bulb. Licence Plate Lamp Carefully remove the lamp assembly. 2. Remove the bulbs. Vehicles with Interior Sensors Remove the lens. 2. Remove the bulb. Carefully remove the lens. -
Page 143
Maintenance 2. Remove the bulb. Carefully remove the lamp. 2. Turn the bulb holder anticlockwise and Reading Lamps remove it. Vehicles without Interior Sensors 3. Remove the bulb. Carefully remove the lamp. Sun Visor Mirror Lamp 2. Turn the bulb holder anticlockwise and remove it. -
Page 144: Bulb Specification Chart
Maintenance BULB SPECIFICATION CHART Lamp Specification Power (watt) Front direction indicator PY21W Headlamp main beam — high series Headlamp main beam — low series Headlamp dipped beam Front fog lamp Side repeater WY5W Approach lamp Rear direction indicator PY21W Brake and rear lamp P21/5W 21/5 Rear fog lamp…
-
Page 145: Technical Specifications
ISO 4925 Class 6 Brake Fluid Your engine has been designed to be used with Castrol and Ford Engine Oil, which gives a fuel economy benefit while maintaining the durability of your engine. Adding oil: If you are unable to find an oil that meets the specification defined by WSS-M2C913-D, you must use SAE 5W-30 that meets the specification defined by ACEA A5/B5.
-
Page 146
Maintenance Variant Item Capacity in gallons (litres) Increased capacity Fuel tank 20.9 (95) Engine lubrication system — including the 1.4 (6.2) oil filter Engine lubrication system — excluding the 1.3 (6) oil filter Engine Oil Adding Capacities Capacity in Engine gallons (litres) 2.2L Duratorq-TDCi 0.3 (1.5) -
Page 147: Vehicle Care
Vehicle Care Cleaning the Chrome Trim CLEANING THE EXTERIOR WARNINGS WARNINGS Do not use abrasives or chemical If you use a car wash with a waxing solvents. Use soapy water. cycle, make sure that you remove the wax from the windscreen. Do not apply cleaning product to hot surfaces and do not leave cleaning Prior to using a car wash facility…
-
Page 148: Repairing Minor Paint Damage
Remove particles such as bird droppings, We recommend that you use Ford service tree sap, insect deposits, tar spots, road wheel cleaner. Make sure that you read salt and industrial fallout before repairing and follow the manufacturer’s instructions.
-
Page 149: Wheels And Tyres Appendices
Wheels and Tyres General Information GENERAL INFORMATION WARNINGS A decal with tyre pressure data is located Depending on the type and extent of in the driver’s door opening. tyre damage, some tyres can only be Check and set the tyre pressure at the partially sealed or not sealed at all.
-
Page 150
Wheels and Tyres WARNINGS WARNINGS Never leave the kit unattended while Watch the sidewall of the tyre. If any in use. cracks, bumps or similar damage appears, switch off the compressor Do not keep the compressor and let the air out by means of the pressure operating for more than 10 minutes. -
Page 151
Wheels and Tyres 5. Remove the valve cap from the damaged tyre. 6. Remove the protective cap A from the sealant bottle hose and screw the hose firmly onto the valve of the damaged tyre. Make sure that the compressor switch F is in position 0. -
Page 152: Tyre Care
Wheels and Tyres Note: When pumping in the sealant through Once you have inflated the tyre to its the tyre valve, the pressure may rise up to correct tyre pressure, move the 87 psi (6 bar) but will drop again after about compressor switch F to position 0, 30 seconds.
-
Page 153: Using Winter Tyres
Wheels and Tyres To make sure the front and rear tyres of WARNINGS your vehicle wear evenly and last longer, Only fit snow chains to specified we recommend that you swap the tyres tyres. See Technical from front to rear and vice versa at regular Specifications (page 157).
-
Page 154
Wheels and Tyres If the spare wheel is exactly the same type and size as the other fitted road wheels, you can replace the existing road wheel with the spare wheel and continue to drive in the normal manner. If the spare wheel is different to the other road wheels, it will carry a yellow label with the appropriate speed limit. -
Page 155
Wheels and Tyres Vehicle Jack WARNINGS The vehicle jack supplied with your vehicle should only be used when changing a wheel in emergency situations. Before using the vehicle jack, check that it is not damaged or deformed and that the thread is lubricated and free from foreign matter. -
Page 156
Wheels and Tyres • Insert the hook of the handle into the ring on the jack. Insert the wheel brace into the other end of the handle and rotate clockwise. Front Jacking Points WARNINGS Use only the specified jacking points. If you use other positions, you may damage the body, steering, suspension, engine, braking system or the… -
Page 157
Wheels and Tyres All Front-wheel Drive Vehicles WARNINGS Set up a warning triangle. Make sure that your vehicle is on firm, level ground with the wheels pointing straight ahead. Switch the ignition off and apply the parking brake. If your vehicle has a manual transmission, move the transmission selector lever to first or reverse gear. -
Page 158
Wheels and Tyres 4. Jack up your vehicle until the tyre is 4. Partially tighten the wheel nuts in the clear of the ground. sequence shown. 5. Remove the wheel nuts and the wheel. 5. Lower your vehicle and remove the jack. -
Page 159: Technical Specifications
Wheels and Tyres TECHNICAL SPECIFICATIONS Wheel Nut Torque Wheel type Ib-ft (Nm) 147.5 (200) Tyre Pressures (Cold Tyres) Full Load Half Load Front Rear Front Rear Variant Tyre size lbf/in² lbf/in² lbf/in² lbf/in² (bar) (bar) (bar) (bar) 300S 215/65 R 15 C 49.3 (3.4) 47.9 (3.3) 49.3 (3.4)
-
Page 160
Wheels and Tyres Standard Economy Front Rear Front Rear Variant Tyre size lbf/in² lbf/in² lbf/in² lbf/in² (bar) (bar) (bar) (bar) 290L 215/65 R 16 C 55.1 (3.8) 52.2 (3.6) 68.0 (4.7) 68.0 (4.7) 300S 215/65 R 15 C 49.3 (3.4) 47.9 (3.3) 54.0 (3.7) 54.0 (3.7) -
Page 161: Capacities And Specifications
Capacities and Specifications Note: Your vehicle identification plate VEHICLE IDENTIFICATION design may vary to that shown. PLATE Note: The information shown on your vehicle identification plate is dependant upon market requirements. Model Variant Engine designation Emission level Vehicle identification number Gross vehicle weight Gross train weight Maximum front axle weight…
-
Page 162: Vehicle Identification Number
Capacities and Specifications The vehicle identification number is VEHICLE IDENTIFICATION located on the left hand side of the NUMBER instrument panel. You will also find it stamped into the right-hand front wheel arch. TECHNICAL SPECIFICATIONS Vehicle Dimensions Short Wheelbase Dimension description Dimension in inches (mm) Maximum length 195.8 (4972)
-
Page 163: Capacities And Specifications
Capacities and Specifications Long Wheelbase Dimension description Dimension in inches (mm) Maximum length 210.2 (5339) Overall width including exterior mirrors 89.5 (2272) Overall height 77.9 — 93.9 (1979 — 2385) Wheelbase 129.9 (3300) Front track 68.7 (1745) Rear track 67.6 (1718)
-
Page 164
Capacities and Specifications Towing Equipment Dimensions Item Dimension description Dimension in inches (mm) Wheel centre — end of tow ball 46.3 (1176) Centre of tow ball — side member 16.6 (421) Inner side of side member 33.2 (842) Centre of tow ball — centre 1.attachment point 18.7 (476) Centre of tow ball — centre 2.attachment point 21.7 (551) -
Page 165: Audio System
WMA disc playback: MP3 and may not function correctly when used in WMA track mode (system default) and Ford CD players. MP3 and WMA folder mode. Note: CDs with homemade paper • MP3 and WMA track mode ignores any…
-
Page 166: Audio Unit — Vehicles With: Am/Fm/Cd
Audio System • MP3 and WMA folder mode represents In track mode, the system displays and a folder structure consisting of one plays the structure as if it were only one level of folders. The CD player numbers level deep (all .mp3 and WMA files are all MP3 and WMA tracks on the disc played, regardless of being in a specific (noted by the .mp3 or .
-
Page 167
Audio System CD slot: Where you insert a CD. Eject: Press the button to eject a CD. Passenger airbag information: Informs you when the airbag is either on or off. INFO: Press the button to access radio, CD, USB and IPod information. TA: Press the button to turn traffic announcements on or off and cancels announcements during an active announcement. -
Page 168
Audio System On, Off and Volume: Press the button to switch the audio system on or off. Turn the dial to adjust the volume. Seek down: Press the button to go to the next station down the radio frequency band or the previous track on a CD. MENU: Press the button to access different audio system features. -
Page 169
Audio System 4. Press OK to continue listening to a Turning Traffic Announcements On and station. Before you can receive traffic Station Preset Buttons announcements, you must press either the This feature allows you to store your TA or TRAFFIC button. A TA display will favourite stations, they can be recalled by appear to show the feature is switched on. -
Page 170
Audio System Alternative Frequencies Ending Traffic Announcements The audio unit will return to normal The majority of programs that broadcast operation at the end of each traffic on the FM waveband have a program announcement. To end the announcement identification code, it can be recognised by prematurely, press TA or TRAFFIC during audio units. -
Page 171: Audio Unit — Vehicles With: Am/Fm/Cd/Digital Audio Broadcast (Dab) Radio/Sync
Audio System Regional Mode 3. Scroll to RDS REGIONAL and turn on or off with the OK button. Regional mode controls the behaviour of 4. Press the MENU button to return. alternative frequencies switching between regionally related networks of a parent broadcaster.
-
Page 172
Audio System CD slot: Where you insert a CD. Eject: Press the button to eject a CD. Passenger airbag information: Informs you when the airbag is either on or off. INFO: Press the button to access radio, CD, USB and IPod information. TA: Press the button to turn traffic announcements on or off and cancels announcements during an active announcement. -
Page 173
Audio System Seek up: Press the button to go to the next station up the radio frequency band or the next track on a CD. Function button 4: Press the button to select different functions of the audio system depending on which mode (i.e. radio or CD) you are in. Function button 3: Press the button to select different functions of the audio system depending on which mode (i.e. -
Page 174
Audio System Station Tuning Control Note: When you drive to another part of the country, stations that broadcast on Seek Tuning alternative frequencies, and are stored on preset buttons, may be updated with the Select a waveband and briefly press one correct frequency and station name for that of the seek buttons. -
Page 175
Audio System Note: If traffic announcement is on and you 5. Press the MENU button to return. select a preset or manual tune to a non News Broadcasts traffic announcement station no traffic announcement will be heard. Your audio unit may interrupt normal Note: When you are listening to a non reception to broadcast news bulletins from traffic announcement station and turn… -
Page 176: Audio Unit — Vehicles With: Digital Audio Broadcast (Dab) Radio/Navigation System/Sync
Audio System It will restore radio reception when it finds Regional mode off: This allows a larger one or if one is not found, the unit will coverage area if neighbouring regional return to the original stored frequency. networks are carrying the same programming, but can cause random When selected, AF will be shown in the alternative frequency switches if they are…
-
Page 177
Audio System CD slot: Where you insert a CD. Eject: Press the button to eject a CD. Passenger airbag information: Informs you when the airbag is either on or off. INFO: Press the button to access radio, CD, USB and IPod information. MAP: Press the button to access map features. -
Page 178
Audio System TA: Press the button to turn traffic announcements on or off and cancels announcements during an active announcement. Function button 4: Press the button to select different functions of the audio system depending on which mode (i.e. radio or CD) you are in. Function button 3: Press the button to select different functions of the audio system depending on which mode (i.e. -
Page 179
Audio System Station Tuning Control Station Preset Buttons This feature allows you to store your DAB Service Linking favourite stations, they can be recalled by Note: This feature does not automatically selecting the appropriate waveband and turn on every time you switch the ignition pressing one of the preset buttons. -
Page 180
Audio System Turning Traffic Announcements On and Ending Traffic Announcements The audio unit will return to normal Before you can receive traffic operation at the end of each traffic announcements, you must press either the announcement. To end the announcement TA or TRAFFIC button. -
Page 181: Regional Mode
Audio System 3. Scroll to the required digital signal When selected, the unit continually processing function. evaluates signal strength and, if a better signal becomes available, the unit will 4. Use the up and down arrow buttons to switch to that alternative. It mutes while select the required setting.
-
Page 182: Digital Audio Broadcasting
Audio System 2. Select AUDIO or AUDIO SETTINGS. Station Tuning Control 3. Scroll to RDS REGIONAL and turn on Note: When you reach the first or last or off with the OK button. station within an ensemble, further tuning will skip to the next ensemble. There may 4.
-
Page 183: Auxiliary Input Socket
Audio System Select a station. If you leave the coverage area of a frequency, this feature allows the system 2. Press function button 3. to switch automatically to a corresponding 3. Press a seek button to begin the scan. frequency, e.g. from Digital to FM. 4.
-
Page 184: Audio Troubleshooting
Audio System The auxiliary input jack allows you to 3. Switch the radio on. Select either a connect and play music from your portable tuned FM station or a CD. music player through your vehicle speakers. 4. Adjust the volume as desired. You can use any portable music player 5.
-
Page 185: Navigation
It loss of vehicle control, accident and is always your responsibility to injury. Ford strongly recommends control your vehicle, supervise any system that drivers use extreme caution when and obey the correct speed limit.
-
Page 186
Navigation • Fastest: Uses the fastest moving roads Note: This feature can be useful in avoiding possible. delays or hold ups on journeys. • Shortest: Uses the shortest distance Motorway possible. When switched on the system will look for • Eco (EcoRoute): Uses the most fuel motorways on your route and efficient route. -
Page 187
Navigation When You Select You Can Route preferences · Avoid motorways, toll roads, ferries and car trains when planning your route. · Have the system always select the shortest distance, fastest time or most economical route. Destination input · This feature allows you to enter your destination details (for example enter city names, enter street names or pick a place from a map). -
Page 188
Navigation When You Select You Can Assistance options · This feature allows you to customise display information for your journey (for example signs, lanes and speed limits). Personal data · This feature allows you to edit and delete personal data (for example your home address). -
Page 189: General Information
For further support see an authorised • use emergency assistance dealer. For more information visit the • access phonebook contacts and music regional Ford website. using voice commands • stream music from your connected mobile phone • select pre-defined text messages…
-
Page 190
SYNC Safety Information Privacy Information When a mobile phone is connected to WARNING SYNC, the system creates a profile that is Driving while distracted can result in linked to that mobile phone. The system loss of vehicle control, collision and creates the profile to offer you more mobile injury. -
Page 191: Using Voice Recognition
SYNC Before giving a voice command, wait for USING VOICE RECOGNITION the system announcement to finish followed by a single beep. Any command This system helps you control many spoken prior to this does not register with features using voice commands. This the system.
-
Page 192
SYNC When You Say The System Provides less audible interaction and more «Interaction Mode Advanced» tone prompts. Provides more detailed interaction and «Interaction Mode Standard» guidance. The system defaults to the standard interaction mode. Press the voice button to change the Confirmation prompts are short questions confirmation prompt setting. -
Page 193: Using Sync With Your Phone
To check your mobile phone’s the information and entertainment display. compatibility, refer to your mobile phone’s Press the MENU button. manual or visit the regional Ford website. 2. Select SYNC-Settings. Pairing a Mobile Phone For the 3. Select Voice Settings.
-
Page 194
SYNC 4. When prompted on your mobile Make sure the Bluetooth feature on phone’s display, enter the six-digit PIN your mobile phone is switched on provided by the system in the audio before starting the search. Refer to your display. The display indicates when the mobile phone’s manual if necessary. -
Page 195
SYNC «Phone» «Connections» «Phonebook <name> on other» «Dial» You do not need to say «phone» prior to these commands. These commands are not available until your mobile phone information has completely downloaded using Bluetooth. See Dial table. See Menu table. Phonebook Commands When you ask the system to access a phonebook name, number, etc., the… -
Page 196: Receiving A Call
SYNC «Menu» «(Phone) connections» «(Phone) settings (message) notification off» «(Phone) settings (message) notification on» «(Phone) settings (set) phone ringer» «(Phone) settings (set) ringer 1» «(Phone) settings (set) ringer 2» «(Phone) settings (set) ringer 3» «(Phone) settings (set) ringer off» «Phone name» «Text message inbox»…
-
Page 197
SYNC When You Select You Can Mic. off Turn your vehicle’s microphone off. To turn the microphone on, select the option again. Privacy Switch a call from an active hands-free environment to your mobile phone for a more private conversation. When selected, the audio display will indicate the call is private. -
Page 198
SYNC Accessing Features Through the Press the PHONE button to enter the Mobile Phone Menu mobile phone menu. 2. Select one of the options available. You can access your call history, phonebook, sent text messages as well as access mobile phone and system settings. You can also access advanced features such as emergency assistance. -
Page 199: Text Messaging
SYNC Text Messaging • Press the voice button and say «Read text message». Note: This is a mobile phone dependent • Select the more option and use the feature. arrow buttons to scroll through further The system allows you to receive, send, options.
-
Page 200
SYNC • Delete allows you to delete current Note: You can send text messages either text messages from the system (not by choosing a contact from the phonebook your mobile phone). The audio display and selecting the text option from the audio indicates when all your text messages display or by replying to a received message have been deleted. -
Page 201
SYNC When You Select You Can If your mobile phone supports in-band ringing, your mobile phone’s ringtone sounds when you choose the mobile phone ringtone option. Text msg notify Have the option of hearing an audible tone to notify you when a text message arrives. -
Page 202
SYNC When You Select You Can Pair extra mobile phones to the system. 1. Select the option to add to start the pairing process. 2. When a message to begin pairing appears in the audio display, search for SYNC on your mobile phone. Refer to your mobile phone’s manual if necessary. -
Page 203
SYNC System Settings 2. Select the SYNC settings option, then press the OK button. Press the MENU button. When You Select You Can Bluetooth on Check or uncheck this option to turn the Bluetooth inter- face of the system on or off. Select this option then press the OK button to change the option’s status. -
Page 204: Sync Applications And Services
Ford website. call which could delay the response time, Setting Emergency Assistance On potentially increasing the risk of serious injury or death.
-
Page 205: In The Event Of A Collision
Note: This feature will only work in a European country or region where SYNC emergency assistance can call the local emergency services. Visit the regional Ford website for details.
-
Page 206
Herzegovina, Macedonia, Netherlands, information immediately. Ukraine, Moldova and Russia. Note: While information is being provided Visit the regional Ford website for latest to the emergency operator, the system will details. play a message letting you know it is sending important information. It will then… -
Page 207: Using Sync With Your Media Player
SYNC 2. Press the AUX button until an USING SYNC WITH YOUR initialising message appears in the top MEDIA PLAYER left corner of the display. 3. Depending on how many media files You can access and play music from your are on your connected device, an media player through your vehicle’s indexing message may appear in the…
-
Page 208
SYNC «USB» «Play artist <name>» «Search artist <name>» «Play genre <name>» «Search genre <name>» «Play next folder» «Search song <name>» «Play next track» «Search track <name>» «Shuffle off» «Play playlist <name>» «Shuffle on» «Play previous folder» «Play previous track» «Similar music» «What’s playing?»… -
Page 209
SYNC «Bluetooth Audio» «Connections» «Pause» «Play» «Play next track» «Play previous track» Press AUX to select USB playback and Media Menu Features then Options to enter the Media menu. The media menu allows you to select how 2. Scroll to cycle through: to play your music (by artist, genre, shuffle, repeat, etc.) and to find similar music or reset the index of your USB devices. -
Page 210: Accessing Your Usb Song Library
SYNC Accessing Your USB Song Library 2. Press AUX to select USB playback and then Browse. This menu allows you to select and play If there are no media files to access, the your media files by artist, album, genre, display indicates there is no media.
-
Page 211: Sync Troubleshooting
See Using SYNC With tables below. Your Phone (page 191). To check your mobile phone’s compatibility, visit the regional Ford website. Mobile Phone Issues Issue Possible Cause Possible Solution A lot of back-…
-
Page 212
SYNC Mobile Phone Issues Issue Possible Cause Possible Solution The system Limitations on your Try pushing your phonebook contacts to says «Phone- mobile phone’s capab- SYNC by selecting the option to add. book down- ility. If the missing contacts are stored on your loaded»… -
Page 213
SYNC USB and Media Issues Issue Possible Cause Possible Solution I am having Possible device malfunc- Try turning the device off, resetting it or trouble tion. removing the battery, then trying again. connecting my Make sure you are using the manufacturer’s device. -
Page 214
SYNC Voice Command Issues Issue Possible Cause Possible Solution SYNC does not You may be using the Review the mobile phone voice commands understand wrong voice commands. and the media voice commands at the what I am You may be speaking too beginning of their respective sections. -
Page 215
SYNC Voice Command Issues Issue Possible Cause Possible Solution You can also use the mobile phone and media suggestion lists to get a list of possible suggestions when the system cannot fully understand you. See Using Voice Recognition (page 189). The SYNC voice Foreign names are SYNC applies the phonetic pronunciation… -
Page 216
SYNC Voice Command Issues Issue Possible Cause Possible Solution SYNC offers several new voice control features for a wide range of languages. Dialling a contact name directly from the phonebook without pre-recording (for example, “call John Smith”) or selecting a track, artist, album, genre or playlist directly from your media player (for example,»… -
Page 217: Electromagnetic Compatibility
Appendices ELECTROMAGNETIC WARNINGS Do not mount any transceiver, COMPATIBILITY microphones, speakers, or any other item in the deployment path of the WARNINGS airbag system. Your vehicle has been tested and Do not fasten antenna cables to certified to legislation relating to original vehicle wiring, fuel pipes and electromagnetic compatibility brake pipes.
-
Page 218: End User Licence Agreement
• You have acquired a device («DEVICE») • with the engine running that includes software licenced by FORD MOTOR COMPANY from an • during a road test at various speeds. affiliate of Microsoft Corporation Check that electromagnetic fields («MS») . Those installed software…
-
Page 219
«online» or electronic FORD MOTOR COMPANY or its third documentation («FORD SOFTWARE») party software and service providers. are protected by international intellectual property laws and treaties. -
Page 220
(e.g., in the user • Consent to Use of Data: You agree documentation and in the software). that MS, Microsoft Corporation, FORD Even if you receive multiple EULAs, you MOTOR COMPANY, third party are licenced to use only one (1) copy software and systems suppliers, their of the SOFTWARE. -
Page 221
SOFTWARE («Supplemental endorsement of the third party site by Components»). MS, Microsoft Corporation, their affiliates and/or their designated If FORD MOTOR COMPANY or third party agent. software and services suppliers provide or make available to you Supplemental • Obligation to Drive Responsibly:… -
Page 222
Appendices UPGRADES AND RECOVERY MEDIA: INTELLECTUAL PROPERTY RIGHTS: If the SOFTWARE is provided by FORD All title and intellectual property rights in MOTOR COMPANY separate from the and to the SOFTWARE (including but not DEVICE on media such as a ROM chip, CD… -
Page 223
TRADEMARKS: This EULA does not grant End User Notice you any rights in connection with any Microsoft® Windows® Mobile for trademarks or service marks of FORD Automotive Important Safety MOTOR COMPANY, MS, Microsoft Information Corporation, third party software or service providers, their affiliates or suppliers. -
Page 224
Appendices Use of Speech Recognition Functions: WARNING Speech recognition software is inherently Operating certain parts of this a statistical process which is subject to system while driving can distract errors. It is your responsibility to monitor your attention away from the road, any speech recognition functions included and possibly cause an accident or other in the system and address any errors. -
Page 225
Appendices 1. Safe and Lawful Use Potential Map Inaccuracy: Maps used by this system may be inaccurate because You acknowledge that devoting attention of changes in roads, traffic controls or to the TeleNav Software may pose a risk driving conditions. Always use good of injury or death to you and others in judgment and common sense when situations that otherwise require your… -
Page 226
Appendices 3. Software Licence 3.1 Licence Limitations Subject to your compliance with the terms You agree not to do any of the following: of this Agreement, TeleNav hereby grants (a) reverse engineer, decompile, to you a personal, non-exclusive, disassemble, translate, modify, alter or non-transferable licence (except as otherwise change the TeleNav Software expressly permitted below in connection… -
Page 227
Appendices 4. Disclaimers 5. Limitation of Liability To the fullest extent permissible pursuant TO THE EXTENT PERMITTED UNDER to applicable law, in no event will TeleNav, APPLICABLE LAW, UNDER NO its licensors and suppliers, or agents or CIRCUMSTANCES SHALL TELENAV OR employees of any of the foregoing, be ITS LICENSORS AND SUPPLIERS BE liable for any decision made or action… -
Page 228
Appendices 6. Arbitration and Governing Law 7. Assignment You agree that any dispute, claim or You may not resell, assign, or transfer this controversy arising out of or relating to this Agreement or any of your rights or Agreement or the TeleNav Software shall obligations, except in totality, in connection be settled by independent arbitration with your permanent transfer of the… -
Page 229
Appendices 9. Other Vendors Terms and Conditions By using the TeleNav Software, you The TeleNav Software utilizes map and consent to receive from TeleNav all other data licenced to TeleNav by third communications, including notices, party vendors for the benefit of you and agreements, legally required disclosures other end users. -
Page 230
Appendices NT holds a nonexclusive licence from the Additional Licence Limitations: Except United States Postal Service ® to publish where you have been specifically licenced and sell ZIP+4 ® information. to do so by NT in a separate written agreement, and without limiting the ©… -
Page 231
Appendices Disclaimer of Warranty: NT AND ITS Export Control: You agree not to export LICENSORS (INCLUDING THEIR from anywhere any part of the Data or any LICENSORS AND SUPPLIERS) DISCLAIM direct product thereof except in ANY WARRANTIES, EXPRESS OR IMPLIED, compliance with, and with all licences and OF QUALITY, PERFORMANCE, approvals required under, applicable… -
Page 232
Appendices Government End Users: If the Data is Gracenote® Copyright being acquired by or on behalf of the CD and music-related data from United States government or any other Gracenote, Inc., copyright© 2000-2007 entity seeking or applying rights similar to Gracenote. -
Page 233
Appendices You agree that you will use the content THE GRACENOTE SOFTWARE, EACH ITEM from Gracenote («Gracenote Content») , OF GRACENOTE DATA AND THE Gracenote Data, the Gracenote Software, GRACENOTE CONTENT ARE LICENCED and Gracenote Servers for your own TO YOU «AS IS». NEITHER GRACENOTE personal, non-commercial use only. -
Page 234
Appendices FCC ID: KMHSYNCG2 IC: 1422A-SYNCG2 This device complies with Part 15 of the FCC Rules and with RSS-210 of Industry Canada. Operation is subject to the following two conditions: (1) This device may not cause harmful interference, and (2) this device must accept any interference received, including interference that may cause undesired operation. -
Page 235
Index Audio unit — Vehicles With: AM/FM/CD/Digital Audio Broadcast (DAB) Radio/SYNC……..169 Alternative Frequencies……..173 See: Climate Control……….61 Automatic Volume Control……173 About This Manual………..5 Autostore Control……….172 Protecting the Environment…….5 News Broadcasts……….173 Regional Mode………….174 See: Brakes…………..91 Sound Button…………171 ABS driving hints Station Preset Buttons……..172 See: Hints on Driving With Anti-Lock Station Tuning Control……..172 Brakes…………..91… -
Page 236
Index Cigar Lighter………….75 Cleaning the Alloy Wheels……146 Cleaning the Exterior……..145 Bonnet Lock Body Paintwork Preservation……145 See: Opening and Closing the Bonnet..128 Cleaning the Chrome Trim……145 Bottle Holder…………76 Cleaning the Headlamps………145 Brake and Clutch Fluid Check….132 Cleaning the Rear Window……145 Brakes…………..91 Cleaning the Interior……..145 General Information……….91 Instrument Cluster Screens, LCD Screens… -
Page 237
Index Fuel Consumption………88 See: Daytime Running Lamps……40 Calculating Fuel Economy…….88 Filling the Tank…………88 Fuel Consumption See: Technical Specifications……89 Eco Mode…………105 Fuel Quality…………85 Resetting Eco Mode……….106 Long-Term Storage……….85 Fuse Box Locations……..117 Type 1…………..106 Type 2 and 3…………106 Body Control Module Fuse Box……117 Electromagnetic compatibility….215 Engine Compartment Fuse Box…..117 End User Licence Agreement….216… -
Page 238
Index Hill Start Assist……….90 Switching the System On and Off….90 Using Hill Start Assist……..90 Jump-Starting the Vehicle……115 Hints on Controlling the Interior To Connect the Booster Cables…..115 Climate…………63 To Start the Engine……….116 Cooling the Interior Quickly……63 General Hints…………63 Heating the Interior Quickly……63 Maximum Cooling Performance in Keys and Remote Controls……26 Instrument Panel or Instrument Panel… -
Page 239
Index Maintenance……….128 Parking Aid…………94 Parking Aids………….94 General Information……….128 Technical Specifications……..143 Principle of Operation……..94 Manual Climate Control……62 Parking Brake…………91 Manual Liftgate……….30 Passenger Airbag……….23 Opening and Closing the Liftgate….30 Switching the Passenger Airbag Off…..24 Manual Seats……….66 Switching the Passenger Airbag On….24 Passive Anti-Theft System……31 Adjusting the Armrest……..68 Adjusting the Height of the Driver’s Arming the Engine Immobiliser……31… -
Page 240
Index Rear View Camera………96 Special Notices……….7 Speed Control Switching the Rear View Camera Off..98 Switching the Rear View Camera On…96 See: Cruise Control……….99 Speed Limiter……….101 Using the Display……….96 Vehicles with Parking Aid………98 Engine Speed Limiter………101 Rear View Camera Vehicle Speed Limiter — Adjustable….101 See: Rear View Camera……..96 Vehicle Speed Limiter — Fixed……101 Rear Window Wiper and Washers…37… -
Page 241
Index Temporary Mobility Kit……..147 Using SYNC With Your Media Player…………205 Checking the Tyre Pressure……150 General Information………..147 Accessing Your USB Song Library….208 Inflating the Tyre……….148 Bluetooth Devices and System Using the Kit…………147 Settings…………209 Towing a Trailer……….110 Connecting Your Media Player to the USB Steep Gradients………..110 Port…………..205 Towing Points……….110… -
Page 242
Index Warning Lamps and Indicators….49 Anti-Lock Braking System Warning Lamp…………..49 Brake Pad Wear Warning Lamp…..49 Brake System Warning Lamp……49 Cruise Control Indicator……..49 Direction Indicator……….49 Door Ajar Warning Lamp……..50 Engine Warning Lamps……..50 Front Airbag Warning Lamp……50 Front Fog Lamp Indicator………50 Frost Warning Lamp………..50 Glow Plug Indicator……….50 Headlamp Indicator……….50 Hill Start Assist Indicator……..51… -
Page 244
CG3577en…
1965
Other Manuals
12 Pages
Ford — Transit — Workshop Manual — 1965 — 2020
View pdf
£9.99
Get your hands on the complete Ford factory workshop software
Download now
Other Manuals
48 Pages
Ford — Transit — Parts Catalogue — 1965 — 2020
View pdf
Brochure
2 Pages
Ford — Transit — Brochure — 1965 — 2020
View pdf
1970
Other Manuals
466 Pages
Ford — Transit — Workshop Manual — 1970 — 1970
View pdf
£9.99
Get your hands on the complete Ford factory workshop software
Download now
1978
Other Manuals
75 Pages
Ford — Transit — Workshop Manual — 1978 — 1978
View pdf
£9.99
Get your hands on the complete Ford factory workshop software
Download now
1986
Other Manuals
100 Pages
Ford Transit Diesel Engine A0407 1986-1995 Manual PDF
View pdf
£9.99
Get your hands on the complete Ford factory workshop software
Download now
2000
Other Manuals
801 Pages
Ford Transit 2000.5 01.2000-05.2006 Workshop Manual ((01.2000-05.2006))
View pdf
£9.99
Get your hands on the complete Ford factory workshop software
Download now
Other Manuals
20 Pages
Ford — Transit — Parts Catalogue — 2000 — 2006
View pdf
Other Manuals
1 Pages
Ford — Transit — Miscellaneous Document — 2000 — 2006
View pdf
2002
Other Manuals
1 Pages
Ford — Transit Connect — Workshop Manual — 2002 — 2020
View pdf
£9.99
Get your hands on the complete Ford factory workshop software
Download now
Other Manuals
147 Pages
Ford Ford Transit Connect 2002 2007 Ford Transit Connect Owners Manual
View pdf
Other Manuals
10 Pages
Ford — Transit Connect — Parts Catalogue — 2002 — 2020 (2)
View pdf
Other Manuals
1 Pages
Ford — Transit — Miscellaneous Document — 2002 — 2002
View pdf
Best iPad Holder For Car
Find out more
Other Manuals
9 Pages
Ford — Transit Connect — Parts Catalogue — 2002 — 2020
View pdf
2006
Other Manuals
834 Pages
Ford Transit 2006.5 04.2006 Workshop Manual ((04.2006-))
View pdf
£9.99
Get your hands on the complete Ford factory workshop software
Download now
Other Manuals
81 Pages
Ford Ford Transit Ford Transit 2006 Workshop Manual Technical Service Training
View pdf
Other Manuals
208 Pages
Ford Ford Transit 2006 Ford Transit Owners Manual
View pdf
Other Manuals
6 Pages
Ford — Transit — Parts Catalogue — 2006 — 2006
View pdf
Best iPad Holder For Car
Find out more
2007
Other Manuals
222 Pages
Ford Ford Transit 2007 Ford Transit Owners Manual
View pdf
£9.99
Get your hands on the complete Ford factory workshop software
Download now
Brochure
20 Pages
Ford — Transit Custom — Brochure — 2007 — 2016
View pdf
Other Manuals
46 Pages
Ford — Transit — Owners Manual — 2007 — 2007
View pdf
2008
Other Manuals
172 Pages
Ford Ford Transit Connect 2008 Ford Transit Connect Owners Manual
View pdf
£9.99
Get your hands on the complete Ford factory workshop software
Download now
Brochure
31 Pages
Ford — Transit — Brochure — 2008 — 2008
View pdf
Other Manuals
208 Pages
Ford Ford Transit 2008 Ford Transit Owners Manual
View pdf
2009
Other Manuals
194 Pages
Ford Ford Transit 2009 Ford Transit Owners Manual
View pdf
£9.99
Get your hands on the complete Ford factory workshop software
Download now
Brochure
29 Pages
Ford — Transit — Brochure — 2009 — 2009
View pdf
Other Manuals
168 Pages
Ford Ford Transit Connect 2009 Ford Transit Connect Owners Manual
View pdf
Other Manuals
1 Pages
Ford — Transit Connect — Parts Catalogue — 2009 — 2009
View pdf
Best iPad Holder For Car
Find out more
2010
Other Manuals
6762 Pages
Ford Transit Connect Workshop Manual (L4-2.0L (2010))
View pdf
£9.99
Get your hands on the complete Ford factory workshop software
Download now
Other Manuals
53 Pages
Ford — Transit Connect — Workshop Manual — 2010 — 2010
View pdf
Other Manuals
210 Pages
Ford Ford Transit 2010 Ford Transit Owners Manual
View pdf
Brochure
92 Pages
Ford — Transit — Brochure — 2010 — 2010
View pdf
Best iPad Holder For Car
Find out more
Other Manuals
5 Pages
Ford — Transit — Parts Catalogue — 2010 — 2010
View pdf
Other Manuals
67 Pages
Ford — Transit — Owners Manual — 2010 — 2010
View pdf
Other Manuals
3 Pages
Ford — Transit Connect — Parts Catalogue — 2010 — 2010
View pdf
Best Back Seat Organizer
Find out more
Brochure
15 Pages
Ford Ford Transit Connect Ford Transit Connect 2010 Misc Documents Brochure
View pdf
Other Manuals
12 Pages
Ford Ford Transit Ford Transit 2010 Misc Documents Electronic Cruise Kit
View pdf
£9.99
Get your hands on the complete Ford factory workshop software
Download now
Other Manuals
259 Pages
Cars & Automotive Accessories — Ford — Transit Connect 2010
View pdf
Best Car Creepers
Find out more
Brochure
15 Pages
Ford — Transit Connect — Brochure — 2010 — 2010 (2)
View pdf
Brochure
15 Pages
Ford — Transit Connect — Brochure — 2010 — 2010
View pdf
2011
Brochure
7 Pages
Ford — Transit — Brochure — 2011 — 2011 (3)
View pdf
£9.99
Get your hands on the complete Ford factory workshop software
Download now
Other Manuals
224 Pages
Ford Ford Transit 2011 Ford Transit Owners Manual
View pdf
Brochure
29 Pages
Ford — Transit — Brochure — 2011 — 2011
View pdf
Other Manuals
294 Pages
Ford Ford Transit Connect 2011 Ford Transit Connect Owners Manual
View pdf
Best iPad Holder For Car
Find out more
Other Manuals
294 Pages
Cars & Automotive Accessories — Ford — Transit Connect 2011
View pdf
Other Manuals
178 Pages
Ford — Transit Connect — Owners Manual — 2011 — 2011
View pdf
Brochure
37 Pages
Ford — Transit — Brochure — 2011 — 2011_5d8a7f6b3858d7a55705070
View pdf
Best Back Seat Organizer
Find out more
Brochure
17 Pages
Ford — Transit — Brochure — 2011 — 2011 (2)
View pdf
Brochure
31 Pages
Ford — Transit Van — Brochure — 2011 — 2011
View pdf
£9.99
Get your hands on the complete Ford factory workshop software
Download now
Brochure
14 Pages
Ford — Transit Connect — Brochure — 2011 — 2011
View pdf
Best Car Creepers
Find out more
Brochure
15 Pages
Ford — Transit Connect — Brochure — 2011 — 2011 (3)
View pdf
Brochure
13 Pages
Ford Ford Transit Connect Ford Transit Connect 2011 Misc Documents Brochure
View pdf
Brochure
9 Pages
Ford — Transit Connect — Brochure — 2011 — 2011 (2)
View pdf
Best Tesla Model 3 Floor Mats
Find out more
Brochure
27 Pages
Ford — Transit Van — Brochure — 2011 — 2011
View pdf
2012
Other Manuals
44 Pages
Ford — Transit — Workshop Manual — 2012 — 2012
View pdf
£9.99
Get your hands on the complete Ford factory workshop software
Download now
Other Manuals
6 Pages
Ford — Transit Custom — Parts Catalogue — 2012 — 2020 (4)
View pdf
Other Manuals
4 Pages
Ford — Transit Custom — Parts Catalogue — 2012 — 2020 (2)
View pdf
Brochure
19 Pages
Ford — Transit — Brochure — 2012 — 2012
View pdf
Best iPad Holder For Car
Find out more
Brochure
30 Pages
Ford — Transit Custom — Brochure — 2012 — 2012
View pdf
Other Manuals
297 Pages
Ford Ford Transit Connect 2012 Ford Transit Connect Owners Manual
View pdf
Other Manuals
4 Pages
Ford — Transit — Owners Manual — 2012 — 2012
View pdf
Best Back Seat Organizer
Find out more
Brochure
11 Pages
Ford — Transit Custom — Brochure — 2012 — 2020
View pdf
Other Manuals
1 Pages
Ford — Transit Custom — Parts Catalogue — 2012 — 2020
View pdf
£9.99
Get your hands on the complete Ford factory workshop software
Download now
Other Manuals
24 Pages
Ford — Transit Custom — Miscellaneous Document — 2012 — 2012
View pdf
Best Car Creepers
Find out more
Other Manuals
299 Pages
Cars & Automotive Accessories — Ford — Transit Connect 2012
View pdf
Other Manuals
2 Pages
Ford — Transit Connect — Parts Catalogue — 2012 — 2012
View pdf
Brochure
17 Pages
Ford — Transit Connect — Brochure — 2012 — 2012
View pdf
Best Tesla Model 3 Floor Mats
Find out more
Brochure
16 Pages
Ford Ford Transit Connect Ford Transit Connect 2012 Misc Documents Brochure
View pdf
Other Manuals
1 Pages
Ford — Transit Custom — Miscellaneous Document — 2012 — 2020 (2)
View pdf
Brochure
21 Pages
Ford — Transit Van — Brochure — 2012 — 2012
View pdf
Best Bug Remover For Cars
Find out more
Other Manuals
3 Pages
Ford — Transit Custom — Parts Catalogue — 2012 — 2020 (3)
View pdf
£9.99
Get your hands on the complete Ford factory workshop software
Download now
Other Manuals
65 Pages
Ford — Transit — Parts Catalogue — 2012 — 2012
View pdf
Brochure
15 Pages
Ford — Transit Connect — Brochure — 2012 — 2012 (2)
View pdf
Best Rear view Mirror In 2021 – Reviews and Buying Guide
Find out more
Other Manuals
9 Pages
Ford — Transit Custom — Miscellaneous Document — 2012 — 2020
View pdf
Brochure
31 Pages
Ford — Transit — Brochure — 2012 — 2012 (2)
View pdf
Brochure
31 Pages
Ford — Transit — Brochure — 2012 — 2012 (2)
View pdf
Best Car Tissue Holder
Find out more
Brochure
23 Pages
Ford — Transit — Brochure — 2012 — 2012
View pdf
Brochure
31 Pages
Ford — TRANSIT VAN — Brochure — 2012 — 2012
View pdf
2013
Other Manuals
316 Pages
Ford Ford Transit Connect 2013 Ford Transit Connect Owners Manual
View pdf
£9.99
Get your hands on the complete Ford factory workshop software
Download now
Brochure
3 Pages
Ford — Transit Van — Brochure — 2013 — 2013
View pdf
Other Manuals
1 Pages
Ford — Transit — Parts Catalogue — 2013 — 2013
View pdf
Brochure
17 Pages
Ford — Transit Connect — Brochure — 2013 — 2013
View pdf
Best iPad Holder For Car
Find out more
Brochure
16 Pages
Ford — Transit Connect — Brochure — 2013 — 2013 (3)
View pdf
Other Manuals
321 Pages
Ford — Transit Connect — Owners Manual — 2013 — 2013
View pdf
Brochure
32 Pages
Ford — Transit Custom — Brochure — 2013 — 2013
View pdf
Best Back Seat Organizer
Find out more
Brochure
22 Pages
Ford — Transit — Brochure — 2013 — 2013 (2)
View pdf
Brochure
16 Pages
Ford Ford Transit Connect Ford Transit Connect 2013 Misc Documents Brochure
View pdf
£9.99
Get your hands on the complete Ford factory workshop software
Download now
Other Manuals
296 Pages
Ford — Transit Connect — Owners Manual — 2013 — 2013 (2)
View pdf
Best Car Creepers
Find out more
Other Manuals
317 Pages
Cars & Automotive Accessories — Ford — Transit Connect 2013
View pdf
Other Manuals
1 Pages
Ford — Transit — Parts Catalogue — 2013 — 2013 (2)
View pdf
Other Manuals
20 Pages
Ford — Transit Connect — Parts Catalogue — 2013 — 2013
View pdf
Best Tesla Model 3 Floor Mats
Find out more
Brochure
18 Pages
Ford — Transit Connect — Brochure — 2013 — 2013 (2)
View pdf
Brochure
22 Pages
Ford — Transit — Brochure — 2013 — 2013
View pdf
Brochure
26 Pages
Ford — Transit — Brochure — 2013 — 2013
View pdf
Best Bug Remover For Cars
Find out more
2014
Other Manuals
107 Pages
Ford — Transit — Workshop Manual — 2014 — 2014
View pdf
£9.99
Get your hands on the complete Ford factory workshop software
Download now
Other Manuals
52 Pages
Ford — Transit — Parts Catalogue — 2014 — 2015
View pdf
Other Manuals
399 Pages
Ford Ford Transit Connect 2014 Ford Transit Connect Owners Manual
View pdf
Other Manuals
401 Pages
Cars & Automotive Accessories — Ford — Transit Connect 2014
View pdf
Best iPad Holder For Car
Find out more
Other Manuals
8 Pages
Ford — Transit Connect — Parts Catalogue — 2014 — 2014 (2)
View pdf
Brochure
25 Pages
Ford — Transit Connect Van — Brochure — 2014 — 2014
View pdf
Brochure
22 Pages
Ford — Transit — Brochure — 2014 — 2014
View pdf
Best Back Seat Organizer
Find out more
Other Manuals
8 Pages
Ford — Transit Connect — Parts Catalogue — 2014 — 2020
View pdf
Other Manuals
17 Pages
Ford — Transit Custom — Miscellaneous Document — 2014 — 2014
View pdf
£9.99
Get your hands on the complete Ford factory workshop software
Download now
Brochure
22 Pages
Ford — Transit — Brochure — 2014 — 2014 (4)
View pdf
Best Car Creepers
Find out more
Other Manuals
2 Pages
Ford — Transit — Miscellaneous Document — 2014 — 2014
View pdf
Other Manuals
2 Pages
Ford — Transit — Parts Catalogue — 2014 — 2014 (3)
View pdf
Other Manuals
60 Pages
Ford — Transit Connect — Miscellaneous Document — 2014 — 2014
View pdf
Best Tesla Model 3 Floor Mats
Find out more
Other Manuals
8 Pages
Ford — Transit Connect — Parts Catalogue — 2014 — 2014
View pdf
Other Manuals
411 Pages
Ford — Transit Connect — Owners Manual — 2014 — 2014
View pdf
Brochure
2 Pages
Ford — Transit — Brochure — 2014 — 2014 (2)
View pdf
Best Bug Remover For Cars
Find out more
Other Manuals
1 Pages
Ford — Transit — Parts Catalogue — 2014 — 2014
View pdf
£9.99
Get your hands on the complete Ford factory workshop software
Download now
Other Manuals
14 Pages
Ford — Transit Connect — Parts Catalogue — 2014 — 2014 (3)
View pdf
Other Manuals
5 Pages
Ford — Transit — Parts Catalogue — 2014 — 2014 (2)
View pdf
Best Rear view Mirror In 2021 – Reviews and Buying Guide
Find out more
Brochure
26 Pages
Ford — Transit — Brochure — 2014 — 2014 (5)
View pdf
Brochure
30 Pages
Ford — Transit — Brochure — 2014 — 2014 (3)
View pdf
Brochure
24 Pages
Ford — Transit Connect — Brochure — 2014 — 2014
View pdf
Best Car Tissue Holder
Find out more
Brochure
24 Pages
Ford Ford Transit Connect Ford Transit Connect 2014 Misc Documents Brochure
View pdf
Brochure
36 Pages
Ford — Transit Connect — Brochure — 2014 — 2014
View pdf
2015
Other Manuals
36 Pages
Ford — Transit — Workshop Manual — 2015 — 2015
View pdf
£9.99
Get your hands on the complete Ford factory workshop software
Download now
Brochure
10 Pages
Ford — Transit Custom — Brochure — 2015 — 2015 (2)
View pdf
Other Manuals
4 Pages
Ford — Transit Connect — Parts Catalogue — 2015 — 2015
View pdf
Other Manuals
178 Pages
Ford — Transit — Parts Catalogue — 2015 — 2015
View pdf
Best iPad Holder For Car
Find out more
Other Manuals
461 Pages
Ford Ford Transit 2015 Ford Transit Owners Manual
View pdf
Other Manuals
7 Pages
Ford — Transit — Workshop Manual — 2015 — 2015 (2)
View pdf
Other Manuals
322 Pages
Ford Ford Transit Connect 2015 Ford Transit Connect Owners Manual
View pdf
Best Back Seat Organizer
Find out more
Other Manuals
5 Pages
Ford — Transit Van — Parts Catalogue — 2015 — 2020
View pdf
Brochure
62 Pages
Ford — Transit Custom — Brochure — 2015 — 2015
View pdf
£9.99
Get your hands on the complete Ford factory workshop software
Download now
Brochure
4 Pages
Ford — Transit — Brochure — 2015 — 2015 (7)
View pdf
Best Car Creepers
Find out more
Other Manuals
428 Pages
Cars & Automotive Accessories — Ford — Transit Connect 2015
View pdf
Brochure
11 Pages
Ford — Transit — Brochure — 2015 — 2016 (2)
View pdf
Other Manuals
461 Pages
Cars & Automotive Accessories — Ford — Transit 2015
View pdf
Best Tesla Model 3 Floor Mats
Find out more
Brochure
28 Pages
Ford — Transit — Brochure — 2015 — 2015 (5)
View pdf
Brochure
34 Pages
Ford — Transit — Brochure — 2015 — 2015 (2)
View pdf
Other Manuals
9 Pages
Ford — Transit — Parts Catalogue — 2015 — 2015 (2)
View pdf
Best Bug Remover For Cars
Find out more
Other Manuals
24 Pages
Ford — Transit Van — Parts Catalogue — 2015 — 2015
View pdf
£9.99
Get your hands on the complete Ford factory workshop software
Download now
Other Manuals
3 Pages
Ford — Transit — Miscellaneous Document — 2015 — 2015
View pdf
Brochure
24 Pages
Ford — Transit Van — Brochure — 2015 — 2015
View pdf
Best Rear view Mirror In 2021 – Reviews and Buying Guide
Find out more
Brochure
5 Pages
Ford — Transit — Brochure — 2015 — 2016
View pdf
Brochure
34 Pages
Ford — Transit — Brochure — 2015 — 2015 (3)
View pdf
Brochure
18 Pages
Ford — Transit Connect — Brochure — 2015 — 2015_5d8a7f653a9af8a02674848
View pdf
Best Car Tissue Holder
Find out more
Brochure
31 Pages
Ford Ford Transit Ford Transit 2015 Misc Documents Brochure
View pdf
Brochure
33 Pages
Ford — Transit — Brochure — 2015 — 2015 (6)
View pdf
Brochure
17 Pages
Ford — Transit Connect — Brochure — 2015 — 2015
View pdf
Best Windshield Repair Kit
Find out more
Other Manuals
1 Pages
Ford — Transit — Parts Catalogue — 2015 — 2015 (3)
View pdf
Other Manuals
1 Pages
Ford — Transit — Miscellaneous Document — 2015 — 2015 (2)
View pdf
Other Manuals
5 Pages
Ford — Transit — Parts Catalogue — 2015 — 2015
View pdf
Best Flip Out Car Stereo
Find out more
Brochure
17 Pages
Ford Ford Transit Connect Ford Transit Connect 2015 Misc Documents Brochure
View pdf
Brochure
17 Pages
Ford — Transit Connect — Brochure — 2015 — 2015 (3)
View pdf
Brochure
26 Pages
Ford — Transit — Brochure — 2015 — 2015
View pdf
Best Car Cover For Snow
Find out more
Other Manuals
318 Pages
Ford — Transit — Owners Manual — 2015 — 2015
View pdf
Other Manuals
26 Pages
Ford — Transit — Owners Manual — 2015 — 2015
View pdf
£9.99
Get your hands on the complete Ford factory workshop software
Download now
Brochure
34 Pages
Ford — Transit — Brochure — 2015 — 2015
View pdf
Best Car Battery Tester
Find out more
Other Manuals
444 Pages
Ford — TRANSIT CUSTOM — Owners Manual — 2015 — 2015
View pdf
2016
Other Manuals
36 Pages
Ford — Transit — Workshop Manual — 2016 — 2016
View pdf
£9.99
Get your hands on the complete Ford factory workshop software
Download now
Other Manuals
12 Pages
Ford — Transit Custom — Miscellaneous Document — 2016 — 2016
View pdf
Other Manuals
300 Pages
Ford Ford Transit Custom Ford Transit Custom 2016 Owners Mannual
View pdf
Brochure
60 Pages
Ford — Transit Van — Brochure — 2016 — 2016
View pdf
Best iPad Holder For Car
Find out more
Other Manuals
439 Pages
Cars & Automotive Accessories — Ford — Transit Connect 2016
View pdf
Brochure
11 Pages
Ford — Transit Custom — Brochure — 2016 — 2016 (2)
View pdf
Other Manuals
6 Pages
Ford — Transit Van — Parts Catalogue — 2016 — 2016
View pdf
Best Back Seat Organizer
Find out more
Brochure
34 Pages
Ford — Transit — Brochure — 2016 — 2016
View pdf
Other Manuals
411 Pages
Cars & Automotive Accessories — Ford — Transit 2016
View pdf
£9.99
Get your hands on the complete Ford factory workshop software
Download now
Brochure
32 Pages
Ford — Transit Custom — Brochure — 2016 — 2016
View pdf
Best Car Creepers
Find out more
Other Manuals
13 Pages
Ford — Transit Connect — Parts Catalogue — 2016 — 2016
View pdf
Brochure
30 Pages
Ford — Transit — Brochure — 2016 — 2016 (6)
View pdf
Brochure
66 Pages
Ford — Transit — Brochure — 2016 — 2016 (2)
View pdf
Best Tesla Model 3 Floor Mats
Find out more
Brochure
26 Pages
Ford — Transit — Brochure — 2016 — 2016 (4)
View pdf
Brochure
12 Pages
Ford — Transit — Brochure — 2016 — 2017
View pdf
Brochure
30 Pages
Ford — Transit — Brochure — 2016 — 2016 (5)
View pdf
Best Bug Remover For Cars
Find out more
Brochure
11 Pages
Ford — Transit Connect — Brochure — 2016 — 2016 (2)
View pdf
£9.99
Get your hands on the complete Ford factory workshop software
Download now
Brochure
20 Pages
Ford — Transit Connect — Brochure — 2016 — 2016 (3)
View pdf
Brochure
27 Pages
Ford — Transit — Brochure — 2016 — 2016_5d8a7fb0b6d6a6a31510123
View pdf
Best Rear view Mirror In 2021 – Reviews and Buying Guide
Find out more
Brochure
26 Pages
Ford — Transit — Brochure — 2016 — 2016 (3)
View pdf
Brochure
17 Pages
Ford — Transit Connect — Brochure — 2016 — 2016
View pdf
Brochure
17 Pages
Ford — Transit Connect — Brochure — 2016 — 2016
View pdf
Best Car Tissue Holder
Find out more
2017
Other Manuals
36 Pages
Ford — Transit — Workshop Manual — 2017 — 2017
View pdf
£9.99
Get your hands on the complete Ford factory workshop software
Download now
Brochure
11 Pages
Ford — Transit — Brochure — 2017 — 2017_5d8a7f74360ce9a75661776
View pdf
Other Manuals
2 Pages
Ford — Transit — Parts Catalogue — 2017 — 2017
View pdf
Other Manuals
484 Pages
Ford — Transit — Owners Manual — 2017 — 2017
View pdf
Best iPad Holder For Car
Find out more
Brochure
38 Pages
Ford — Transit — Brochure — 2017 — 2017 (3)
View pdf
Brochure
33 Pages
Ford — Transit — Brochure — 2017 — 2017
View pdf
Brochure
25 Pages
Ford — Transit — Brochure — 2017 — 2017 (4)
View pdf
Best Back Seat Organizer
Find out more
Other Manuals
2 Pages
Ford — Transit — Parts Catalogue — 2017 — 2017 (2)
View pdf
Brochure
32 Pages
Ford — Transit — Brochure — 2017 — 2017 (2)
View pdf
£9.99
Get your hands on the complete Ford factory workshop software
Download now
Brochure
14 Pages
Ford — Transit Connect — Brochure — 2017 — 2017
View pdf
Best Car Creepers
Find out more
Brochure
32 Pages
Ford — Transit Van — Brochure — 2017 — 2017
View pdf
Other Manuals
8 Pages
Cars & Automotive Accessories — Ford — Transit 2017
View pdf
Brochure
17 Pages
Ford — Transit Connect — Brochure — 2017 — 2017 (2)
View pdf
Best Tesla Model 3 Floor Mats
Find out more
Brochure
21 Pages
Ford — Transit Connect — Brochure — 2017 — 2017 (3)
View pdf
Other Manuals
21 Pages
Ford — Transit — Miscellaneous Document — 2017 — 2017
View pdf
Other Manuals
9 Pages
Ford — Transit — Miscellaneous Document — 2017 — 2017 (2)
View pdf
Best Bug Remover For Cars
Find out more
Other Manuals
2 Pages
Ford — Transit Van — Miscellaneous Document — 2017 — 2017
View pdf
£9.99
Get your hands on the complete Ford factory workshop software
Download now
Brochure
16 Pages
Ford — Transit Cargo — Brochure — 2017 — 2017
View pdf
Brochure
19 Pages
Ford — Transit Range — Brochure — 2017 — 2017
View pdf
Best Rear view Mirror In 2021 – Reviews and Buying Guide
Find out more
Other Manuals
3 Pages
Ford — Transit Custom — Miscellaneous Document — 2017 — 2017
View pdf
Brochure
32 Pages
Ford — Transit Cargo — Brochure — 2017 — 2017 (2)
View pdf
Brochure
29 Pages
Ford — Transit Van — Brochure — 2017 — 2017 (2)
View pdf
Best Car Tissue Holder
Find out more
Brochure
11 Pages
Ford — Transit Connect — Brochure — 2017 — 2017 (4)
View pdf
Brochure
10 Pages
Ford — Transit Custom — Brochure — 2017 — 2017
View pdf
Brochure
32 Pages
Ford — Transit Custom — Brochure — 2017 — 2017
View pdf
Best Windshield Repair Kit
Find out more
Brochure
35 Pages
Ford — Transit Custom — Brochure — 2017 — 2017
View pdf
2018
Other Manuals
512 Pages
Ford — Transit — Owners Manual — 2018 — 2018
View pdf
£9.99
Get your hands on the complete Ford factory workshop software
Download now
Other Manuals
4 Pages
Ford — Transit — Miscellaneous Document — 2018 — 2018
View pdf
Brochure
17 Pages
Ford — Transit Connect — Brochure — 2018 — 2018
View pdf
2020
Other Manuals
416 Pages
Ford — Transit — Owners Manual — 2020 — 2020
View pdf
£9.99
Get your hands on the complete Ford factory workshop software
Download now
Brochure
5 Pages
Ford — Transit Custom Van LWB — Brochure — 2020 — 2020
View pdf
Brochure
26 Pages
Ford — TRANSIT CUSTOM — Brochure — 2020 — 2020
View pdf
2021
Brochure
25 Pages
Ford — Transit Custom Van — Brochure — 2021 — 2021
View pdf
£9.99
Get your hands on the complete Ford factory workshop software
Download now
Brochure
23 Pages
Ford — Transit Custom — Brochure — 2021 — 2021
View pdf
Руководство на английском языке по техническому обслуживанию и ремонту Ford Transit 1978-1986 года выпуска.
- Автор: —
- Издательство: Ford Motor Company
- Год издания: 1979
- Страниц: 1127
- Формат: PDF
- Размер: 257,3 Mb
Руководство по эксплуатации, техническому обслуживанию и ремонту Ford Transit 1986-2000 годов выпуска с дизельными двигателями объемом 2,5 л.
- Автор: —
- Издательство: ДОН-ПРЕСС
- Год издания: 2006
- Страниц: 296
- Формат: DjVu
- Размер: 22,5 Mb
Руководство по эксплуатации, техническому обслуживанию и ремонту Ford Transit с 2000 года выпуска с бензиновыми и дизельными двигателями.
- Автор: В.М. Декет
- Издательство: Delta Publishing
- Год издания: 2005
- Страниц: 262
- Формат: DjVu
- Размер: 24,2 Mb
Руководство по эксплуатации и ремонту Ford Transit с 2006 года выпуска с бензиновыми и дизельными двигателями.
- Автор: —
- Издательство: Третий Рим
- Год издания: —
- Страниц: 304
- Формат: —
- Размер: —
Руководство по эксплуатации, техническому обслуживанию и ремонту Ford Transit 1986-1999 годов выпуска с дизельными двигателями.
- Автор: —
- Издательство: Haynes Publishing
- Год издания: —
- Страниц: 312
- Формат: —
- Размер: —
Руководство по техническому обслуживанию и ремонту Ford Transit 1986-1998 годов выпуска с дизельными двигателями объемом 2,5 л.
- Автор: —
- Издательство: Машсервис
- Год издания: 2002
- Страниц: 271
- Формат: DjVu
- Размер: 20,5 Mb
Руководство по эксплуатации и ремонту Ford Transit с 2000 года выпуска с бензиновыми и дизельными двигателями.
- Автор: —
- Издательство: Авторесурс
- Год издания: —
- Страниц: 238
- Формат: —
- Размер: —
Руководство для станций технического обслуживания Ford Transit 2001 года выпуска.
- Автор: —
- Издательство: Ford Motor Company
- Год издания: 2001
- Страниц: —
- Формат: PDF
- Размер: 70,6 Mb
Руководство на французском языке по техническому обслуживанию и ремонту Ford Transit с 1986 года выпуска с дизельными двигателями.
- Автор: —
- Издательство: E.T.A.I.
- Год издания: —
- Страниц: 100
- Формат: PDF
- Размер: 57,5 Mb
Руководство по эксплуатации, техническому обслуживанию и ремонту + каталог расходных запчастей автомобиля Ford Transit 2000-2006 годов выпуска с дизельными двигателями объемом 2,0/2,4 л.
- Автор: —
- Издательство: Легион-Автодата
- Год издания: —
- Страниц: 330
- Формат: —
- Размер: —
Руководство по эксплуатации и ремонту Ford Transit с 1986 года выпуска с дизельными двигателями объемом 2,5 л.
- Автор: —
- Издательство: Монолит
- Год издания: —
- Страниц: 168
- Формат: —
- Размер: —
Руководство по эксплуатации и ремонту Ford Transit, Ford Transit Tourneo/Cargo/Kombi/Van с 2006 года выпуска с бензиновыми и дизельными двигателями.
- Автор: —
- Издательство: Монолит
- Год издания: —
- Страниц: 472
- Формат: —
- Размер: —

Руководство по эксплуатации и ремонту Ford Transit, Ford Transit Tourneo/Cargo/Kombi/Van с 2006 года выпуска с бензиновыми и дизельными двигателями.
- Автор: —
- Издательство: Монолит
- Год издания: —
- Страниц: 472
- Формат: —
- Размер: —
Руководство по эксплуатации и ремонту Ford Transit и Ford Tourneo Сustom с 2014 года выпуска с дизельным двигателем объемом 2,2 л.
- Автор: —
- Издательство: Монолит
- Год издания: —
- Страниц: 440
- Формат: —
- Размер: —

Руководство по эксплуатации и ремонту автомобилей Ford Transit и Ford Tourneo Сustom с 2014 года выпуска с дизельным двигателем объемом 2,2 л.
- Автор: —
- Издательство: Монолит
- Год издания: —
- Страниц: 440
- Формат: —
- Размер: —
Руководство по эксплуатации Ford Transit 2003 года выпуска.
- Автор: —
- Издательство: Ford Motor Company
- Год издания: 2003
- Страниц: 255
- Формат: PDF
- Размер: 2,9 Mb
Руководство по эксплуатации, техническому обслуживанию и ремонту Ford Transit и Ford Transit Tourneo 2000-2006 годов выпуска с бензиновыми и дизельными двигателями.
- Автор: —
- Издательство: Арго-Авто
- Год издания: —
- Страниц: 576
- Формат: —
- Размер: —
Руководство по эксплуатации, техническому обслуживанию и ремонту Ford Transit и Ford Transit Tourneo с 2006 года выпуска с дизельными двигателями.
- Автор: —
- Издательство: АНТА-ЭКО
- Год издания: 2009
- Страниц: 761
- Формат: —
- Размер: —
Руководство по эксплуатации, техническому обслуживанию и ремонту Ford Transit с 2000 года выпуска с дизельными двигателями объемом 2,0/2,4 л.
- Автор: —
- Издательство: Авто Клуб
- Год издания: —
- Страниц: 310
- Формат: —
- Размер: —
Подборка руководств по эксплуатации Ford Transit 2006-2013 годов выпуска.
- Автор: —
- Издательство: Ford Motor Company
- Год издания: 2006/2007/2008/2009/2013
- Страниц: 232/248/226/228/298
- Формат: PDF
- Размер: 71,7 Mb

Руководство по эксплуатации Ford Transit 2014 года выпуска.
- Автор: —
- Издательство: Ford Motor Company
- Год издания: 2014
- Страниц: 382
- Формат: PDF
- Размер: 13,9 Mb


