Руководство по эксплуатации автомобиля Renault Megane 2
Главная Megane Меган 2 (2002-2009, бензин)
Введение в руководство
Описание автомобиля Рено Меган 2
Технические характеристики двигателей
Идентификационные данные автомобиля
Давление воздуха в шинах
Заправочные емкости и рекомендуемые эксплуатационные материалы
Карта Рено для доступа в автомобиль
Весь список статей этого раздела »
Органы управления и приборы
Органы управления и контрольно-измерительные приборы
Комбинация приборов
Регулировка рулевой колонки по высоте и по углу наклона
Звуковой сигнал
Наружные зеркала заднего вида
Внутреннее зеркало заднего вида
Весь список статей этого раздела »
Оборудование салона
Передние сиденья — регулировка
Подголовники задних сидений
Подголовники передних сидений
Ремни безопасности
Подушки безопасности
Подушка безопасности водителя и переднего пассажира
Весь список статей этого раздела »
Эксплуатация и вождение
Запуск двигателя
Остановка двигателя
Управление механической коробкой передач
Стояночный тормоз
Автоматическая коробка передач
Усилитель рулевого управления
Весь список статей этого раздела »
Техобслуживание и уход
Открывание и закрывание капота
Аккумуляторная батарея
Запасное колесо
Комплект автомобильного инструмента
Декоративный колпак и декоративная заглушка
Замена колеса
Весь список статей этого раздела »
Этот раздел доступен на: английском, болгарском, белорусском, украинском, сербском, хорватском, румынском, польском, словацком, венгерском
Поделитесь с друзьями:
Апгрейд ноутбука
Ссылка на этот раздел в разных форматах
TEXTHTMLBB Code
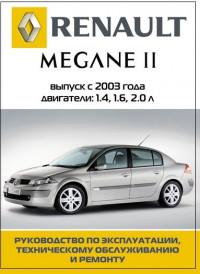
RENAULT MEGANE II 2003-2008., Руководство по ремонту в цветных фотографиях
 Renault Megane II с 2003 по 2008 г., бензин/ турбодизель. Цветное руководство в фотографиях. Серия Ремонт без проблем
Предлагаем вашему вниманию руководство по ремонту и эксплуатации автомобиля Renault Megane II (выпуск с 2003 по 2008 г.) с кузовами седан, хэтчбек и универсал, с бензиновыми двигателями объемом 1,4; 1,6; 2,0 л и турбодизелем объемом 1,5 л.
Книги |
Просмотров: 59259 |
Загрузок: 19790 |
Добавил: Admin |
Дата: 11.05.2014
| Комментарии (0)
Руководство по техническому обслуживанию и ремонту автомобилей Renault Megane и Renault Scenic 1999-2002 годов выпуска с бензиновыми и дизельными двигателями.
- Автор: —
- Издательство: Алфамер Паблишинг
- Год издания: 2007
- Страниц: 410
- Формат: —
- Размер: —
Руководство по техническому обслуживанию и ремонту автомобиля Renault Megane 2002-2005 годов выпуска с бензиновыми и дизельными двигателями.
- Автор: —
- Издательство: Алфамер
- Год издания: —
- Страниц: 400
- Формат: —
- Размер: —
Сборник руководств по техническому обслуживанию и ремонту автомобиля Renault Megane второго поколения.
- Автор: —
- Издательство: Renault
- Год издания: 2002/2003
- Страниц: —
- Формат: PDF
- Размер: 26,1 Mb
Руководство на итальянском языке по техническому обслуживанию и ремонту автомобиля Renault Megane второго поколения с дизельными двигателями объемом 1,4/1,9 л.
- Автор: —
- Издательство: —
- Год издания: —
- Страниц: 192
- Формат: PDF
- Размер: 47,1 Mb
Сборник руководств на английском языке по техническому обслуживанию и ремонту автомобиля Renault Megane первого поколения.
- Автор: —
- Издательство: Renault
- Год издания: —
- Страниц: 1995/1997
- Формат: PDF
- Размер: 27,8 Mb
Руководство по ремонту автомобиля Renault Megane с 2004 года выпуска с бензиновыми двигателями объемом 1,4/1,6/2,0 л.
- Автор: —
- Издательство: МодЭкс плюс
- Год издания: —
- Страниц: 432
- Формат: —
- Размер: —
Руководство по эксплуатации и ремонту автомобилей Renault Megane и Renault Scenic 1999-2003 годов выпуска с бензиновыми и дизельными двигателями.
- Автор: —
- Издательство: Гуси-лебеди
- Год издания: 2007
- Страниц: 264
- Формат: PDF
- Размер: 43,4 Mb
Руководство по эксплуатации и ремонту автомобиля Renault Megane с 2008 года выпуска с бензиновыми и дизельными двигателями.
- Автор: —
- Издательство: Монолит
- Год издания: —
- Страниц: 372
- Формат: —
- Размер: —
Руководство по эксплуатации и ремонту автомобиля Renault Megane с 2008 года выпуска с бензиновыми и дизельными двигателями.
- Автор: —
- Издательство: Монолит
- Год издания: —
- Страниц: 378
- Формат: —
- Размер: —
Руководство по эксплуатации и ремонту автомобиля Renault Megane с 2002 года выпуска с бензиновыми и дизельными двигателями.
- Автор: —
- Издательство: Монолит
- Год издания: —
- Страниц: 400
- Формат: —
- Размер: —
Руководство по техническому обслужеванию и ремонту автомобиля Renault Megane с 1996 года выпуска с бензиновыми и дизельными двигателями.
- Автор: Пауль Хольцапфель
- Издательство: Астрель
- Год издания: 2004
- Страниц: 241
- Формат: PDF
- Размер: 25,8 Mb
Руководство по эксплуатации и техническому обслуживанию автомобиля Renault Megane второго поколения.
- Автор: —
- Издательство: Renault
- Год издания: 2005
- Страниц: 228
- Формат: PDF
- Размер: 5,1 Mb
Сборник руководств по эксплуатации и техническому обслуживанию автомобиля Renault Megane третьего поколения.
- Автор: —
- Издательство: Renault
- Год издания: 2009-2013
- Страниц: —
- Формат: PDF
- Размер: 53,4 Mb
Мультимедийное руководство по эксплуатации, техническому обслуживанию и ремонту автомобиля Renault Megane с 2003 года выпуска с двигателями объемом 1,4/1,6/2,0 л.
- Автор: —
- Издательство: —
- Год издания: —
- Страниц: —
- Формат: ISO
- Размер: 166,2 Mb
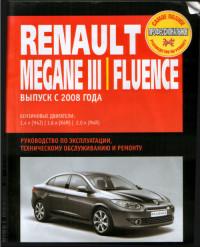
Руководство по эксплуатации, техническому обслуживанию и ремонту автомобилей Renault Fluence и Renault Megane с 2008 года выпуска с бензиновыми двигателями объемом 1,4/1,6/2,0 л.
- Автор: —
- Издательство: Ротор
- Год издания: 2010
- Страниц: 385
- Формат: PDF
- Размер: 557,3 Mb
Мультимедийное руководство по техническому обслуживанию и ремонту автомобилей Renault Megane и Renault Scenic с 1996 года выпуска.
- Автор: —
- Издательство: —
- Год издания: —
- Страниц: —
- Формат: —
- Размер: 203,9 Mb
Руководство по техническому обслуживанию и ремонту автомобиля Renault Megane с 2008 года выпуска с бензиновыми двигателями объемом 1,6/2,0 л.
- Автор: —
- Издательство: Автонавигатор
- Год издания: —
- Страниц: 400
- Формат: —
- Размер: —
Руководство по эксплуатации, техническому обслуживанию и ремонту автомобилей Renault Fluence и Renault Megane III с 2009 года выпуска с двигателями объемом 1,6/2,0 л.
- Автор: —
- Издательство: Мир Автокниг
- Год издания: —
- Страниц: 414
- Формат: —
- Размер: —
Сборник мультимедийных схем на нескольких языках (в том числе русском) электрооборудования автомобиля Renault Megane второго поколения.
- Автор: —
- Издательство: Renault
- Год издания: —
- Страниц: —
- Формат: ISO
- Размер: 1,7 Gb

Схемы электрооборудования автомобиля Renault Megane второго поколения.
- Автор: —
- Издательство: —
- Год издания: —
- Страниц: —
- Формат: JPG/DOC
- Размер: 3,6 Mb
Мультимедийные схемы на нескольких языках (в том числе русском) электрооборудования автомобиля Renault Megane 2008 года выпуска.
- Автор: —
- Издательство: Renault
- Год издания: —
- Страниц: —
- Формат: ISO
- Размер: 70,1 Mb

2. Эксплуатация автомобиля
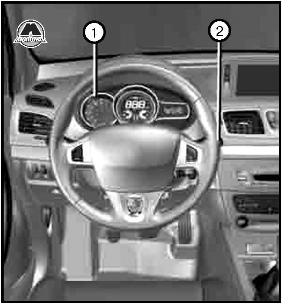
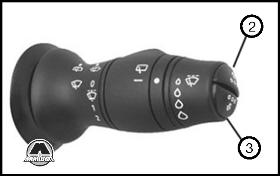
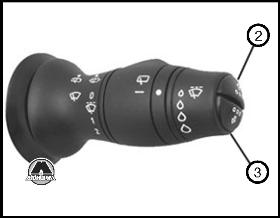
1. Тахометр. 2. Подрулевой переключатель.
1. При запуске двигателя на дисплее 3 загорается сигнальная лампа в случае, если достигнут максимальный уровень масла.
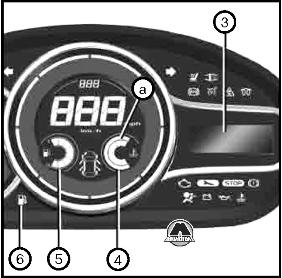
2. При первом загорании сигнальной лампы ее можно отключить, нажав на одну из кнопок рычага подрулевого переключателя 2.
3. Следующие сигнальные лампы автоматически погаснут по истечении 30 секунд.
4. Под номером 5 обозначен указатель уровня топлива. Если уровень минимален, загорается сигнальная лампа 6 и раздается короткий звуковой сигнал. Необходимо срочно долить в бак топливо. С момента первого загорания сигнальной лампы можно проехать еще 50 км.
5. В нормальных условиях эксплуатации указатель температуры охлаждающей жидкости 4 должен находиться перед зоной а. В условиях интенсивной эксплуатации указатель может приблизиться к этой зоне. Тревогу должно вызвать только включение сигнальной лампы одновременно с появлением сообщения на щитке приборов и звуковым сигналом.
6. Под цифрой 7 обозначен спидометр (км или мили в час).
7. В зависимости от комплектации автомобиля и страны реализации при превышении скорости 120 км/час каждые 40 секунд раздается звуковой сигнал длительностью примерно 10 секунд.
8. Если показания выводятся в милях: — при включенном зажигании нажать на одну из кнопок 9 или 10 на торце рычага 2 и на кнопку запуска двигателя 8;
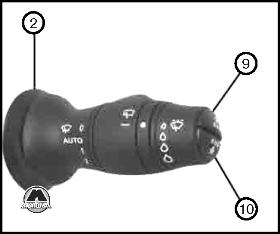
— указатель единиц измерения скорости мигает в течение десяти секунд, затем появляется новая единица измерения: отпустить кнопку 9 или 10, как только единица измерения перестанет мигать.

1. Тахометр. 2. Указатель температуры охлаждающей жидкости. 4. Спидометр. 5. Сигнальная лампа минимального уровня топлива. 6. Указатель уровня топлива. 7. Многофункциональный дисплей.
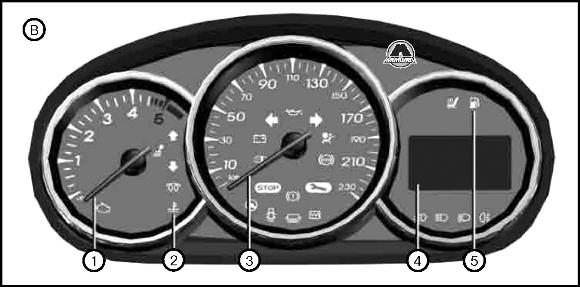
1. Тахометр. 2. Сигнализатор температуры охлаждающей жидкости. 3. Спидометр. 4. Многофункциональный дисплей. 5. Сигнальная лампа минимального уровня топлива. 6. Указатель температуры охлаждающей жидкости. 7. Указатель уровня топлива.
6. Указатель температуры охлаждающей жидкости. 7. Указатель уровня топлива.
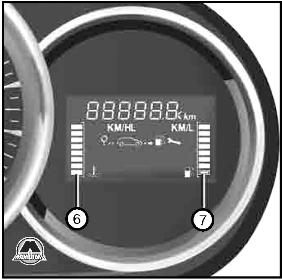
В зависимости от комплектации автомобиля, бортовой компьютер 1 отображает следующие показания:
— пройденный путь;
— данные о поездке;
— информационные сообщения;
— сообщения о неисправностях (одновременно с включением сигнальной лампы);
— предупреждающие сообщения (одновременно с включением сигнальной лампы);
— меню индивидуальных настроек автомобиля.
Подробное описание перечисленных функций см. далее.
Можно прокрутить следующую информацию последовательными короткими нажатиями на кнопки: вверх (кнопка 2) или вниз (кнопка 3).
Индикация зависит от оборудования автомобиля и страны.
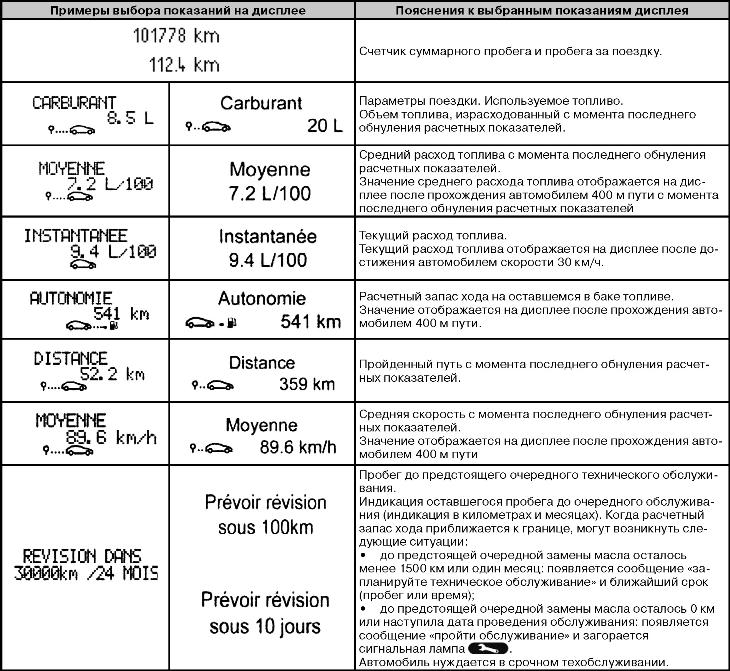
1. Счетчик общего пробега и пробега за поездку.
2. Данные о поездке:
— используемое топливо;
— средний расход топлива;
— текущий расход топлива;
— предполагаемый запас хода;
— средняя скорость.
3. Пробег до предстоящего очередного технического обслуживания.
4. Меню индивидуальных настроек автомобиля.
5. Бортовой журнал, последовательный вывод информационных сообщений и сообщений о неисправностях.
Обнуление счетчика пробега за поездку
Включив индикацию «счетчик пробега за поездку», удерживать нажатой одну из кнопок 2 или 3 до обнуления показаний.
Обнуление данных о поездке (кнопка обнуления показаний)
Включив индикацию одного из параметров поездки, удерживать нажатой одну из кнопок 2 или 3 до обнуления показаний.
Объяснение некоторых данных, отображаемых на дисплее после обнуления расчетных показателей
1. Чем больше расстояние, пройденное с момента последней операции обнуления, тем стабильнее и достовернее будут показания средней скорости, среднего расхода топлива и запаса хода на оставшемся в баке топливе.
2. Средний расход топлива может уменьшаться в следующих случаях:
— автомобиль закончил разгон;
— температура двигателя достигла нормы (а обнуление расчетных показателей было произведено при холодном двигателе);
— выезд из города на автостраду.
Автоматическое обнуление данных о поездке
При превышении емкости памяти одного из запоминающих устройств обнуление происходит автоматически.
Примечание:
Индикация нижеперечисленной информации на щитке приборов зависит от комплектации автомобиля и страны поставки.

- Manuals
- Brands
- Renault Manuals
- Automobile
- Megane 1.4 l 16V
- Manual
-
Contents
-
Table of Contents
-
Bookmarks
Related Manuals for Renault Megane 1.4 l 16V
Summary of Contents for Renault Megane 1.4 l 16V
-
Page 2
API : GL5 RENAULTMATIC D3 SYN AUTOMATIC GEARBOX All types DEXRON III RENAULTMATIC D2 POWER STEERING All types DEXRON II FRELUB 650 BRAKE FLUID All types DOT 4 ELF recommends its lubricants as approved by RENAULT. For more information, go to www.elf-lub.com… -
Page 3
Brief overview • Tyre pressures ………………….0.04 • Adjusting the seats and the driving position ……..1.11 1.18 • Child restraints ………………1.29 1.35 • Instrument panel lights …………….1.40 1.52 • De-icing/demisting ………………. 1.57 1.60 • Horn and lights ………………… 1.61 •… -
Page 4
Sections Getting to know your car …………..Driving ………………….. Your comfort ………………..Maintenance ………………..Practical advice ………………. Technical specifications ……………. Alphabetical index ………………0.03… -
Page 5
TYRE INFLATION PRESSURES WHEN COLD (in bar or kg/cm² when cold) 1.9 l dTi Versions 1.4 l 16V 1.6 l 16V 1.8 l 16V 2.0 l 16V 1.9 l dCi Types B/L/KAOD B/L/KAOB B/L/KA1R B/L/K/SAO5 LA1L (see vehicle identification plate) B/L/KA1H B/L/KA1J B/L/KA1A… -
Page 6: Table Of Contents
Section 1: Getting to know your car Keys — Remote control ……………………. 1.02 1.04 Doors …………………………1.05 1.08 Engine immobiliser system ……………………1.09 — 1.10 Head restraints — Seats ……………………. 1.11 1.15 Steering wheel …………………………1.16 Seat belts — Methods of restraint in addition to the side seat belts ……….1.17 1.28 Child safety ……………………….
-
Page 7: Keys — Remote Control
KEYS / REMOTE CONTROL 1 Radio frequency remote control 2 Ignition key, key for doors, locking unit, ignition key, key for luggage compartment and fuel doors, luggage compartment and filler cap. fuel filler flap. If there is a child (or animal) in the car, never leave it unattended with the key in the ignition.
-
Page 8
RADIO FREQUENCY REMOTE CONTROL DOOR LOCKING Locking/unlocking the doors The range within which the remote control will operate Press remote control approximately one second to lock or This varies according unlock the doors. (Light 2 will light environment: therefore take care up.) when handling the remote control that you do not inadvertently lock… -
Page 9
Dealer. frequency as the remote control). • It will be necessary to take the vehicle to your Renault Dealer if you need to replace a key because both the vehicle and all the keys are needed to initialise the system. -
Page 10
OPENING THE DOORS Opening the doors from the Opening the doors manually Childproof locks outside from inside the car These make it impossible for the rear doors to be opened from the Front: Use the key to unlock one of Move handle 3. -
Page 11
LOCKING/UNLOCKING THE DOORS Manual locking Operating incident If outside, use the key. In the event of an electrical failure, the doors can be locked manually. Front: Using the key. Electric central locking Rear: With the door open, turn the This enables all four doors, the screw 2 (using a tool such as a flat luggage compartment… -
Page 12
LOCKING/UNLOCKING THE DOORS (continued) km/h Door status indicator light 3 The switch indicator light 3 shows If one of the four doors is open, the closure status of the doors: indicator light 5 switches on and — when doors locked, the four doors in picture 4 are open indicator light 3 is on;… -
Page 13
However, if they are closed correctly, consult Note: If a rear door is opened, this If you decide to keep the your Renault Dealer. will be locked again automatically doors locked when you when the vehicle attains a speed of are driving, remember approximately 4 mph (6 km/h). -
Page 14: Engine Immobiliser System
(computer, wiring, etc.) If the vehicle does not recognise the may be dangerous. It must code of the ignition key, indicator be carried out by trained Renault light 1 flashes continuously and the network personnel. engine cannot be started. 1.09…
-
Page 15
ENGINE IMMOBILISER (continued) In all cases, it is essential to consult a Renault Dealer as only he is qualified to repair the engine immobiliser. If your coded ignition key is faulty, use the second key (given to you when the vehicle is delivered). If… -
Page 16: Head Restraints — Seats
HEAD RESTRAINTS To refit the head restraint Insert the rods into the sleeves with the notches facing the front. Lower the head restraint until it locks in position. To adjust the height To adjust the angle of the head restraint Pull the head restraint forwards A and slide it up or down at the same On certain vehicles the angle of the…
-
Page 17
REAR HEAD RESTRAINTS Side C and centre D head Stowing position of centre head restraints restraint To adjust the height: Press the tabs 2 on the head restraint guides and lower the head restraint Simply slide it up. completely. To remove it: When the head restraint has been Press tab 1 on head restraint guides. -
Page 18
FRONT SEATS To move forwards or backwards: To incline the seatback: To adjust the lumbar support of the driver’s seat Lift lever 1 to unlock the seat. Turn tumblewheel 4 and tilt the Release the lever in the required seatback to the desired position. Turn tumblewheel 3. -
Page 19
FRONT SEATS Central armrest We would advise you not to You can set the height to one of recline seatbacks three different positions by raising excessively to ensure that it slightly: the effectiveness of the seat Raised position A belts is not reduced. Used to access the adjustment Make sure the seatback is locked in stalk 4. -
Page 20
HEATED SEATS With the ignition on, press switch 1. A indicator light will illuminate on the instrument panel. If the indicator light is illuminated, the system is not necessarily activated. system thermostat and only operates when passenger compartment temperature is less than 12°C (with a tolerance of plus or minus 4°C). -
Page 21: Steering Wheel
STEERING WHEEL On certain vehicles, the position of the steering wheel is adjustable. Adjustment Lift lever 1 and put the steering wheel in the required position; lower the lever to lock the steering wheel in place. When power assisted steering is fitted, never leave the steering wheel on full lock when the vehicle is parked as this may…
-
Page 22
SEAT BELTS Always wear your seat belt when Adjusting your driving position travelling in your car. You must also • Sit with your back firmly against comply with the local legislation in the seatback. This is essential to the particular country you are in. ensure that your lumbar vertebrae are in the correct position. -
Page 23
— Then allow the belt to rewind automatically. — Unwind it again. — If the problem persists, consult your Renault Dealer. To release Press button 5 on the catch 6 and the seat belt will be returned by the Adjusting the front seat belt To fasten inertia reel. -
Page 24
REAR SEAT BELTS EXCEPT FOR ESTATE VERSIONS Rear side seat belts The belts are fastened, released and adjusted in the same way as the front belts. Rear centre belt Depending version, release Insert the last sliding buckle 1 into buckle 1 from its housing A. catch 6. -
Page 25
REAR SEAT BELTS EXCEPT FOR ESTATE VERSIONS (continued) Special note for vehicles with split folding rear bench seats If you have to fold down the section • Lower seatback 8 while holding behind the front left-hand seat: catch 6 so that it remains visible when the seatback is folded down •… -
Page 26
REAR CENTRE BELTS ON ESTATE VERSIONS Unwind the belt slowly from its Insert black buckle 2 until it locks Insert the last sliding buckle 4 until housing 1. into black catch 3. it locks into red catch 5. 1.21… -
Page 27
• No modifications may be made to the component parts of the restraint system (belts and seats and their mountings) fitted originally. For special applications (e.g. fitting child seats) consult your Renault Dealer. • Do not use any devices which give any play in the belts (clothes pegs, clips, for example). A seat belt that is worn too loosely may cause injuries in the event of an accident. -
Page 28
• When the vehicle is scrapped, frontal impact, piston travelling in your car. contact your Renault Dealer for immediately retracts the seat belt disposal of the gas generator. buckle pulling the seat belt tight Side air bags against the body and thereby Provided to operate in the event improving its efficiency. -
Page 29
Renault together with a label on the sun Dealer. visor on the passenger side indicate The seat belt pretensioners and that the vehicle is equipped with air the air bag operate together. -
Page 30
30 millisecond(s), cushioning the there is a fault in the system. impact of the driver’s head against Consult your Renault Dealer as soon the steering wheel and the front as possible. Your protection will be passenger’s… -
Page 31
• As a safety precaution, have the air bag system checked if your vehicle has been involved in an accident, is stolen or broken into. • When selling or lending the vehicle, inform the user of these points and hand over this handbook with the vehicle. • When scrapping your vehicle, contact your Renault Dealer for disposal of the gas generator(s). 1.26… -
Page 32
• The steering wheel must not be removed (except by qualified personnel within the Renault network). • Do not sit too close to the steering wheel. If you sit with your arms slightly bent (see information on “Adjusting your driving position” in section 1), it will ensure that there is sufficient space for the air bag to inflate properly and to be fully effective. -
Page 33
• Fitting seat covers: Seats equipped with an air bag require special covers specifically designed for your vehicle. Consult your Renault Dealer to find out if these covers may be purchased from Renault outlets. The use of any covers other than those designed for your vehicle (and including those designed for another vehicle) may affect the operation of these air bags and reduce your protection. -
Page 34: Child Safety
CHILD SAFETY In all countries there are regulations Child restraints for which type governing the use of restraints for approval was obtained after 1992 children and babies. provide a level of security greater than restraints with type In Europe, children under 12 years approval before that date.
-
Page 35
2) or seats with harnesses. To avoid any risk to your safety, we recommend that you use RENAULT approved accessories because they are suitable for your car and are the only accessories for which RENAULT will provide a warranty. 1.30… -
Page 36
CHILD SAFETY (continued) Category 3 For children aged over 7, a booster seat with belt guides recommended to ensure that the vehicle’s three-point seat belt will be worn flat over the child’s thighs. booster seat with height-adjustable seatback and a belt guide is recommended as this will allow the belt to be worn as close to the base of the neck as… -
Page 37
CHILD SAFETY (continued) DANGER A rear-facing child seat must not be fitted to the front passenger seat if the vehicle is fitted with a passenger air bag. The child may suffer very serious injuries if the air bag inflates. Label 5 (on the dashboard) and label 6 (on the passenger side sun visor) remind you of these instructions. -
Page 38
CHILD SAFETY (continued) CHILD SAFETY • No modifications may be made to the component parts of the restraint system (belts and seats and their mountings) fitted originally. • The fitting instructions provided by the manufacturer of the restraint system should be followed carefully. •… -
Page 39
• Two anchoring rings per seat located between the seat the seatback; • A special Renault child seat fitted with two catches which hook onto the two rings. Only the specific Renault seat is type approved for this vehicle. -
Page 40
CHILD SAFETY (continued) Fitting a child seat Isofix seat installed in the rear-facing position • Before fitting and using the seat, • Latch the hooks onto the rings read the instructions provided and make sure it is locked in The front seat must not be moved carefully. -
Page 41
DRIVER’S LAYOUT, LEFT-HAND DRIVE 27 26 25 24 23 22 21 20 16 15 1.36… -
Page 42
DRIVER’S LAYOUT, LEFT HAND DRIVE (continued) The equipment fitted, described below, depends on the version, option and country. 1 Demister outlet for left-hand 9 Time, radio, temperature, 20 Location for radio side window navigation system display storage compartment, depending on the vehicle 21 Ignition switch 2 Stalk for: •… -
Page 43
DRIVER’S LAYOUT, RIGHT-HAND DRIVE 17 16 15 14 13 22 21 20 1.38… -
Page 44
DRIVER’S LAYOUT, RIGHT-HAND DRIVE (continued) The equipment fitted, described below, depends on the version, option and country. 1 Demister outlet side 9 Position of driver’s air bag 16 Fuse box window 17 Ignition switch 10 Radio remote control 2 Storage compartment 18 Horn 11 •… -
Page 45
INSTRUMENT PANEL The presence and operation of the warning lights, described below, depend on the vehicle equipment and country. 4a 4 If these warning lights illuminate, you must stop as soon as traffic conditions allow. 1.40… -
Page 46
Under severe system. Consult your Renault conditions, the needle may Dealer as soon as possible. enter this area but this is not Windscreen demisting indicator light… -
Page 47
INSTRUMENT PANEL The presence and operation of the warning lights, described below, depend on the vehicle equipment and country. If these warning lights illuminate, you must stop as soon as traffic conditions allow. 1.42… -
Page 48
INSTRUMENT PANEL (continued) The presence and operation of the warning lights, described below, depend on the vehicle equipment and country. 7 Multifunction display 8 Multifunction key The squares which appear on the display indicate the level. • Oil level indicator Keep pressing the key to select number squares… -
Page 49
INSTRUMENT PANEL The presence and operation of the warning lights, described below, depend on the vehicle equipment and country. If these warning lights illuminate, you must stop as soon as traffic conditions allow. 1.44… -
Page 50
If it illuminates when the vehicle is being driven, it is • Warning light for serious If it illuminates when you are advisable to stop at a Renault injection incident driving, it may indicate one of Dealer soon. two problems:… -
Page 51
INSTRUMENT PANEL The presence and operation of the warning lights, described below, depend on the vehicle equipment and country. If these warning lights illuminate, you must stop as soon as traffic conditions allow. 1.46… -
Page 52
Refer to the information on the If it comes on when you are circuit checked. proactive automatic gearbox in driving, there is an electrical section 2. or electronic fault. Consult your Renault Dealer as soon Not used as possible. 1.47… -
Page 53
INSTRUMENT PANEL The presence and operation of the warning lights, described below, depend on the vehicle equipment and country. If these warning lights illuminate, you must stop as soon as traffic conditions allow. 1.48… -
Page 54
Renault Dealer normally, without the anti-lock as soon as possible. system. • If it flashes, reduce the Consult your Renault Dealer as engine speed until the light soon as possible. stops flashing. Consult your Renault Dealer as soon as possible. -
Page 55
Display flashing Therefore, if the average fuel consumption decreases, the range Consult a Renault Dealer if the will increase. display flashes. • You may also notice that the 1 Display Interpreting… -
Page 56
ON-BOARD COMPUTER (continued) Examples of displays selected successive presses Interpreting the display button 3 a) Total mileage recorder. b) Trip mileage recorder. c) Fuel used (in litres or gallons) since the last reset. d) Average consumption (in mpg or l/100 km) since the last reset. The value is displayed after covering 400 metres taking into account the distance covered and the fuel used since the last reset. -
Page 57
ON-BOARD COMPUTER (continued) Examples of displays selected successive presses Interpreting the display button 3 e) Current consumption (in mpg or litres/100 km) The value is displayed after reaching a speed of 15 mph (25 km/h). f) Estimated range with remaining fuel (in miles or km) This function uses the average consumption since the last general reset. -
Page 58: Clock And External Temperature
CLOCK AND EXTERNAL TEMPERATURE Setting the clock Press the multifunction button 2 to select total mileage recorder and clock. Keep the multifunction button 4 pressed: the two dots in the middle will flash for 3 seconds and then the hours will scroll through. The minutes scroll through the same way when the same button is pressed briefly.
-
Page 59
CLOCK AND EXTERNAL TEMPERATURE (continued) External temperature indicator This information must If the electrical supply is cut never be used as a detector (battery disconnected, feed wire for ice. Ice formation is actually broken, etc.), the clock must be related exposure, local reset. -
Page 60: Rear-View Mirrors
REAR VIEW MIRRORS External rear view mirrors with External rear view mirrors with manual adjustment electrical adjustment To adjust the mirror, move lever 1. With the ignition on, turn knob 2: — Position C to adjust the left-hand The external wing mirror rear view mirror on the driver’s side has two — Position E to adjust the right-hand…
-
Page 61
REAR VIEW MIRRORS (continued) Interior rear view mirror This is adjustable. When driving at night, to avoid being blinded by the headlights of the vehicle behind, lower the small lever 3 located behind the rear view mirror. 1.56… -
Page 62
HORN AND WARNING LIGHTS Horn “Hazard” warning lights Direction indicators Press buttons 1 or 2 on the steering Press switch 4. Move stalk 3 parallel to the steering wheel boss A. wheel and in the direction you are This switch illuminates all four going to turn. -
Page 63
EXTERNAL LIGHTING AND SIGNALS “Lights on” warning buzzer A warning buzzer will sound when a front door is opened and the lights are left switched on after the ignition has been switched off (to prevent discharge of the battery). Side lights Headlight main beams Turn the end of stalk 1 to With stalk 1 in the dipped… -
Page 64
EXTERNAL LIGHTING AND SIGNALS (continued) When the external vehicle lights are extinguished, the rear fog light is extinguished or the equipment returns to the front lights position (if they are fitted). Front fog lights Rear fog light Move the central ring of Move the central ring 4 stalk 4 to align with mark 5 opposite of the stalk to align with mark 5… -
Page 65
ELECTRIC HEADLIGHT BEAM ADJUSTMENT Tumblewheel adjustment positions 1 Hatchback/Estate Hatchback/Estate Versions (except utility Saloon (utility versions) versions) The tumblewheel 1 allows the height of the beams to be adjusted in – relation to the load. Turn the tumblewheel 1 down to lower the headlights and up to raise them. -
Page 66
DEMISTING/DE-ICING Electric windscreen Demisting the windscreen de-icing Move control 1: With the engine running, press Set it at position button (indicator light illuminates instrument Close the dashboard air outlets for panel.) greater efficiency. There are two ways of switching it This directs the entire flow of air to off: demisting… -
Page 67
WINDSCREEN WIPER/WASHER Vehicles with automatic Windscreen washer, selection of wiping speed headlight washers If a wiping speed is selected when With the ignition on, pull the stalk 1 driving, wiping speed towards you. reduced to a lower speed when the Pressing briefly triggers one sweep vehicle stops: cycle of the wiper, while pressing… -
Page 68
REAR SCREEN WASH/WIPE In frosty weather, make sure the wiper blades are not stuck by ice (risk of motors overheating). Change the wiper blades as soon as they become less efficient (approximately every year). Rear screen wiper with Special note timer The rear screen is wiped once if reverse gear is selected when the… -
Page 69: Fuel Tank (Filling With Fuel)
Useful capacity of fuel tank: new cap is of the same type. Approx. 13.2 gallons (60 litres). Consult your Renault Dealer. There is a cap holder 1 on the filler Never handle the cap near a source flap for holding the cap when filling of heat or a flame.
-
Page 70
FUEL TANK (continued) Fuel grade Petrol version Special points relating to the 1.9 litre dCi version Use the fuel which corresponds to the grade defined by the standards Use diesel engine fuel (DERV) only. of the country you are in. Make sure that no water enters the fuel tank accidentally during filling. -
Page 71
•not operate on or restart the vehicle allows the nozzle for unleaded before it has been inspected by petrol to be used (at the petrol qualified staff from the Renault pump). network. — Insert the nozzle as far as it will go so as to open the valve. -
Page 72
Section 2: Driving (Advice on use relating to fuel economy and the environment) Running in / Ignition switch ……………………… 2.02 Starting the engine / Stopping the engine ………………… 2.03 Special features of petrol versions ……………………2.04 Special features of diesel versions ……………………2.05 Gear lever/Handbrake/Power assisted steering ……………….. -
Page 73: Running In / Ignition Switch
RUNNING IN IGNITION SWITCH Petrol version “Ignition on” position M For the first 625 miles (1000 km) do The ignition is switched on: not exceed 70 mph (130 km/h) • Petrol version: The engine may be in the highest gear or 3000 to started.
-
Page 74: Starting The Engine / Stopping The Engine
STARTING/STOPPING THE ENGINE Starting the engine In the case of an automatic gearbox Diesel injection Refer information Cold or warm engine Hot engine automatic gearboxes in section 2. Turn the ignition key to the on Turn the key immediately to the position M and hold it in this “Starter”…
-
Page 75
These incidents may be avoided by • Driving for a long time with the taking your vehicle regularly to low fuel level warning light your Renault Dealer at the intervals illuminated; specified in your servicing booklet. • Faulty ignition, running out of… -
Page 76
(high pressure) (cold engine), down to –5°C. engine. However, if after a few seconds and several attempts the engine fails to start, contact a Renault Dealer. 2.05… -
Page 77: Gear Lever/Handbrake/Power Assisted Steering
GEAR LEVER HANDBRAKE POWER STEERING To release: When power assisted steering is fitted, never leave the steering Pull the lever up slightly, press wheel on full lock when the vehicle button 2 and then lower the lever to is parked as this may damage the the floor.
-
Page 78
Have your vehicle checked and engine. Consult your Renault correctly, use it carefully and watch adjusted by your Renault Dealer in Dealer for this information. your driving style. accordance with the instructions in • Idling speed: This does not the vehicle’s servicing booklet. -
Page 79: Advice On Anti-Pollution And How To Economise On Fuel
— If it illuminates continuously, Keep your foot in the same • Drive carefully for the first few consult your Renault Dealer as position on the accelerator pedal. miles until the engine reaches its soon as possible.
-
Page 80
ADVICE ON ANTI-POLLUTION AND HOW TO ECONOMISE ON FUEL (continued) • For vehicles with conditioning, extra fuel consumed in urban cycle can be as high as 2 litres per 100 km: switch the system off when it is not needed. •… -
Page 81: Environment
ENVIRONMENT Your vehicle has been designed In addition to this, your vehicle with the aim of caring for the meets the requirements laid down environment. in European legislation relating to environmental protection. • The majority of versions are equipped with a depollution Make your contribution towards system including…
-
Page 82
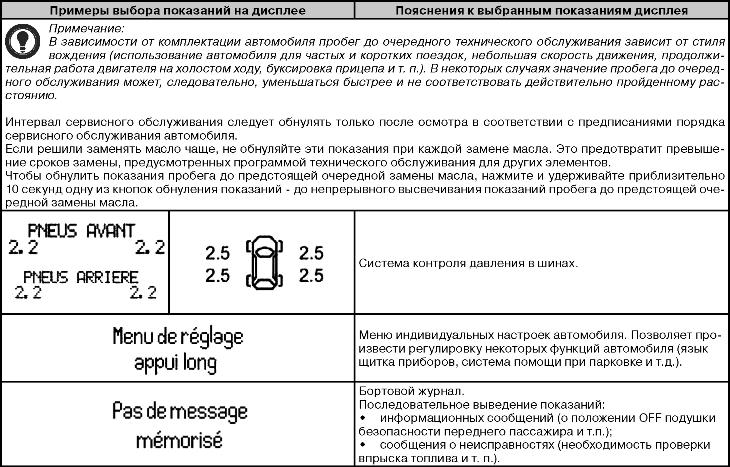
TYRE PRESSURE MONITOR This system continuously monitors the tyre pressures. Tyre pressures should be adjusted when the tyres are cold If tyre pressures cannot be checked when the tyres are cold, assume an increase of 0.2 to 0.3 bar. Never deflate a hot tyre. Operating principle Each wheel (except the emergency The driver is constantly informed of… -
Page 83
Fitting tyres (replacing tyres or fitting winter tyres) As there are special precautions to be taken when replacing tyres, we advise you to consult your Renault Dealer. Non-interchangeability of wheels To mark the correct position of the Tyre repair aerosols… -
Page 84
(wheels, hubcaps, etc.). lights on the instrument panel B through the following warning inform possible faults lights: Consult your Renault Dealer to find (deflated tyre, punctured tyre, which accessories system out of service, etc): compatible with the system and •… -
Page 85
+ lit up + faulty wheel(s) flashing Meaning: puncture, replace the wheel concerned or call your Renault Dealer. lit up + no faulty wheel(s) lit up Meaning: system fault (if, for example, the emergency spare wheel is fitted or winter tyres are fitted). It is activated a certain time after installation. -
Page 86
ANTI-LOCK BRAKING SYSTEM (ABS) When braking sharply, the two Also, this system allows you to When system been essential aims are to reduce the optimise stopping distances when activated, you will feel a certain stopping distance and keep your the adhesion of one or more wheels degree of pulsation at the brake vehicle under control. -
Page 87
Contact your Renault Dealer as a matter of urgency. 2 — The orange warning light and the red brake circuit fault warning light illuminated on the fault panel. -
Page 88: Emergency Brake Assistance
EMERGENCY BRAKING ASSISTANCE This is a system in addition to ABS which helps reduce the vehicle stopping distances. Operating principle The system detects an emergency braking situation by means of a sensor which measures the speed with which the brake pedal is depressed.
-
Page 89: Electronic Stability Program: E.s.p
ELECTRONIC STABILITY PROGRAMME: ESP This system helps you to keep When the function is in operation, control of the vehicle in «critical» indicator light 1 flashes. driving conditions (avoiding an obstacle, loss of grip in a bend…). This function additional aid in the event of critical driving conditions to allow the behaviour of the vehicle to be…
-
Page 90
3 illuminate. Correct this as soon as possible by This action also deactivates the Consult your Renault Dealer. pressing switch 2 again. traction control mechanism: refer to the information on the traction automatically control system in section 2. -
Page 91: Traction Control System
TRACTION CONTROL SYSTEM This system helps to limit skidding The system also adjusts the engine on drive wheels and to control the speed to the grip available under the vehicle when pulling away or wheels, independently of the force accelerating. applied to the accelerator pedal.
-
Page 92
3 light up. system may reduce the engine ESP (electronic stability program) in Consult your Renault Dealer. power to limit skidding. It is section 2. possible to deactivate the function Correct this as soon as possible by by pressing switch 2 if this is not pressing switch 2 again. -
Page 93
PROACTIVE AUTOMATIC GEARBOX For safety reasons, certain positions may not be selected until the mechanism unlocked: press button A. Only engage D or R when the vehicle is stationary, with your foot on the brake and the accelerator pedal released. Driving With the gear lever in position P or N, switch on the ignition. -
Page 94
PROACTIVE AUTOMATIC GEARBOX (continued) Moving off forwards • In hilly or mountainous country: If you cannot remain in 4th gear Select position D. In the majority of because of the road surface and traffic conditions, you will not have the number of bends, we would to touch your gear selector lever advise you to move the selector to again: gear changing will take place… -
Page 95
• this indicator light illuminates when driving, it indicates a fault. Consult your Renault Dealer as How to drive as economically as soon as possible. possible • If a vehicle with an automatic Leave the selector in position D gearbox breaks down, see the (drive) on the open road. -
Page 96
Section 3: Your comfort Air vents …………………………3.02 — 3.03 Heating and climate control ………………….. 3.04 3.10 Ashtrays/Cigarette lighter ……………………..3.11 Interior lights ……………………….3.12 — 3.13 Electric windows ……………………… 3.13 — 3.14 Windscreen — Sun visor ………………………. 3.15 Sunroof …………………………..3.16 Storage compartments ……………………. -
Page 97: Air Vents
AIR VENTS (air outlets) 1 — Left-hand front window demister 5 — Heating/ventilation control unit 6 — Right-hand side air vent 2 — Left-hand side air vent 7 — Right-hand front window demister 3 — Windscreen demisting vents 8 — Footwell heater outlets for front 4 — Central air vents and rear passengers 3.02…
-
Page 98
AIR VENTS Front central air vents and Side air vents on driver’s side passenger side air vents Air flow: Air flow: Move tumblewheel 1 (beyond the Move tumblewheel 4 (beyond the point where a certain resistance is point where a certain resistance is felt). -
Page 99
HEATING — VENTILATION WITH TEMPORARY ISOLATION OF THE PASSENGER COMPARTMENT • Position The air flow is distributed between dashboard vents footwells. • Position The air flow is distributed between all the vents, the front side window demisting vents, the windscreen demisting vents and the footwells. -
Page 100
HEATING — VENTILATION WITH TEMPORARY ISOLATION OF THE PASSENGER COMPARTMENT (continued) Adjusting the amount of air supplied passenger compartment Normal use Move control C from (position 1) to 4. Ventilation in the passenger compartment is by “blown air”. The ventilation fan determines the amount of inlet air. -
Page 101
AIR CONDITIONING Controls Adjustments for heat setting A Heat setting adjustment Move control A. B Distribution To the right: Maximum possible passenger compartment temperature C Switching on the air conditioning To the left: Minimum possible temperature D Air conditioning operation indicator light E Adjusting the amount of air supplied… -
Page 102
AIR CONDITIONING (continued) • Position Close the dashboard vents for more effective demisting. All the air is directed to the windscreen and front side window demisting vents. this position, conditioning is switched on at the same time demisting may be more effective. -
Page 103
AIR CONDITIONING (continued) Note: The air conditioning may be used in all conditions but does not operate when external temperature is low. • Button C not activated (indicator light D extinguished) The air conditioning is not operational. Heating ventilation therefore identical to that of a vehicle without air conditioning. -
Page 104
If both these points are correct, switch off the system (warning light D extinguished) and consult a Renault Dealer. In very hot weather or when the When conditioning vehicle has been parked in the sun,… -
Page 105
AIR CONDITIONING (continued) Adjusting the amount of air supplied passenger compartment Normal use Move control E from (position 1) to 4. Ventilation in the passenger compartment is by “blown air”. The ventilation fan determines the amount of inlet air. The vehicle speed has a slight effect on this. -
Page 106
ASHTRAYS — CIGAR LIGHTER Ashtray in front console Ashtray in rear console To open, pull cover 2. To open, lift cover 3. To empty the ashtray, pull out the To empty, pull ashtray towards you cover completely towards you and and it will be released from its the ashtray will be released from its housing. -
Page 107: Interior Lights
INTERIOR LIGHTING Map reading light 3 or 7 To turn on or off, operate switch 2 or 6. Adjust map reading light 7 as you wish. Vehicles with automatic Light 1 Interior light 4 operation of interior lights When switch 2 is operated: When switch 5 is operated: •…
-
Page 108
INTERIOR LIGHTING WINDOW RISERS (continued) Automatic operation (This is in addition to the driver’s window riser described above.) With the engine running, press switch 1 briefly to raise or lower the window completely. Pressing switch 1 during this operation will stop the window moving. -
Page 109: Electric Windows
ELECTRIC WINDOWS (continued) Rear electric windows Manual window risers With the ignition on, press switch 3 Operate winder 6. or 4. Child safety Switch 5 overrides the operation of the rear windows. Never leave the vehicle unattended with the key in the ignition if there is a child (or animal) in the vehicle.
-
Page 110
WINDSCREEN SUN VISORS Windscreen with reflective layers This windscreen reflects the sun and, particular, limits infrared rays entering the passenger compartment. There is a zone, level with the interior rear-view mirror, which allow passes to be affixed to the windscreen (e.g.: motorway permits, car park season tickets,… -
Page 111: Sunroof
Renault’s possible to operate the sunroof Technical Department. and there is a risk that the child • Do not open the sunroof may be seriously injured (by…
-
Page 112
GLOVE BOX — STORAGE COMPARTMENTS Passenger side glove box Centre console storage compartment 2 To open, press 1. Inside the compartment there are two glass holders spectacle holder. 3.17… -
Page 113
GLOVE BOX — STORAGE COMPARTMENTS (continued) Storage compartment in front Front seat pocket 4 doors 3 objects should placed on the floor (area in front of driver) as such objects may slide under pedal during braking manoeuvres, thus obstructing its use. -
Page 114: Storage Compartments
STORAGE COMPARTMENTS (continued) Spectacles holder 5 Ensure that spectacles holder cover is firmly closed before starting up. 3.19…
-
Page 115
REAR SEAT (operation) Rear central armrest 3 The seat and the seatback may be • To fold down the rear bench folded down in one or two parts to seatback allow bulky objects to be carried. Remove the rear head restraints. Press button 2 and lower the •… -
Page 116: Luggage Compartment
LUGGAGE COMPARTMENT — HATCHBACK VERSION Fittings luggage The tailgate is locked and unlocked To open at the same time as the doors. compartment Press button 1 and lift the tailgate. There is a storage space on each side To close 3 for accessories (such as oil/petrol Lower the tailgate using handle 2 can, kits, etc.) and an elastic…
-
Page 117: Rear Parcel Shelf
LUGGAGE COMPARTMENT — HATCHBACK VERSION (continued) Rear parcel shelf To remove, unhook the two straps 1 Lift the rear parcel shelf slightly and from the tailgate. pull it towards you. Proceed in reverse order to refit the shelf. Do not place any objects, in particular heavy or hard objects, on the rear parcel shelf.
-
Page 118
LUGGAGE COMPARTMENT — SALOON VERSION Fittings luggage The boot lid is locked and unlocked at the same time as the doors. compartment An accessory storage space 2 can be Storage compartment To open used for a petrol can, tool kit, accommodate items such as the fuse Press button 1 and lift the boot lid. -
Page 119
LUGGAGE COMPARTMENT — ESTATE VERSION The tailgate is locked and unlocked To open at the same time as the doors. Press button 1 and lift the tailgate. To close Lower the tailgate using handle 2 inside the tailgate to help you. When the tailgate has been lowered to shoulder height, release handle 2 and finish closing the tailgate by… -
Page 120
LUGGAGE COVER — ESTATE VERSIONS This consists of a rigid section 1 To roll up the flexible part, pull it, To remove the luggage compartment with a roller and a flexible part 2 lifting it slightly, and allow the cover which can be moved. -
Page 121: Transporting Items In The Luggage Compartment
TRANSPORTING ITEMS IN THE LUGGAGE COMPARTMENT Always position objects transported so that the largest surface is against: — The rear seatback for normal loads (example A). — The folded down seat maximum loads (example B). Always put the heaviest items directly onto the floor.
-
Page 122
ROOF BARS EXCEPT ESTATE VERSION Access to the mounting points For vehicles with trim strips on the roof, each trim strip has two flaps. Press cover 1 and then slide it in the These flaps cover the mounting direction of the arrows 2 which are points for the roof rack bars. -
Page 123
ROOF BARS — ESTATE VERSION Access to mounting points A, For vehicles with trim strips on the roof, each trim strip has three flaps. B, C These flaps cover the mounting Press cover 1 and then slide it in the points for the roof rack bars. -
Page 124
Section 4: Maintenance Bonnet …………………………4.02 — 4.03 Engine oil level / Oil change ………………….4.04 4.07 Levels: Power-assisted steering pump ………………….4.08 Coolant …………………………4.09 Brake fluid ……………………….4.10 Windscreen / headlight washer reservoirs ………………4.11 Filters …………………………..4.12 Battery ………………………….. -
Page 125: Bonnet
BONNET Bonnet security lock To open the bonnet, pull handle 1. To unlock, lift catch 2. Take care when working in the engine compartment as the engine cooling fan may cut in at any moment without warning. 4.02…
-
Page 126
(except for qualified staff from the Renault network) due to the safety risks it may entail. Lift the bonnet, release stay 4 from To close the bonnet, refit stay 4 in its… -
Page 127
2. However, consult your Renault Dealer if more than 0.5 litre is being To move to onboard computer Message 2 consumed… -
Page 128
ENGINE OIL LEVEL (continued) Consult your RENAULT Dealer at once if you notice an abnormal or repeated drop in any of the fluid levels. Reading the level using the dipstick — Take out the dipstick. — Wipe the dipstick using a clean, lint-free cloth. -
Page 129: Engine Oil Level / Oil Change
ENGINE OIL LEVEL / OIL CHANGE (continued) 1.4 l 16V — 1.6 l 16V — 1.8 l 16V 1.9 l dTi — 1.9 l dCi 2.0 l 16V Topping up/filling — Unscrew the fuel filler cap 1. — Top level. (For The car must be parked on level information,…
-
Page 130
Take care when working in the engine compartment as Consult your Renault Dealer at the engine cooling fan may once if you notice an abnormal or cut in at any moment repeated drop in any of the fluid without warning. -
Page 131
LEVELS Consult your Renault Dealer at once if you notice an abnormal or repeated drop in any of the fluid Power assisted steering pump levels. The appearance and position of the Level reservoir depends on the version The correct level when cold should and equipment level of the vehicle. -
Page 132: Coolant
Top this level up when cold before it reaches the MIN mark. When the engine is hot, do not touch the cooling system. Consult your Renault Dealer at Danger of burns. once if you notice an abnormal or repeated drop in any of the fluid levels.
-
Page 133: Brake Fluid
(continued) Topping up After operation hydraulic circuit, a specialist must replace the brake fluid. Only use Renault-approved fluids taken from a sealed container. Intervals between fluid changes Refer to the servicing booklet for your vehicle. Brake fluid level This should be checked frequently, especially if you notice even the slightest loss in braking efficiency.
-
Page 134
Liquid Liquid Water + special windscreen washer Water + special windscreen washer fluid (anti-freeze product in winter) fluid (anti-freeze product in winter) approved by Renault’s Technical approved by Renault’s Technical Department. Department. Jets Jets Tilt each small sphere with a pin to… -
Page 135: Filters
Keep all flames, red-hot objects and sparks away from the battery as there is a risk of explosion. Consult your Renault Dealer at once if you notice an abnormal or repeated drop in any of the fluid levels. 4.12…
-
Page 136: Bodywork Maintenance
• Corrosives in the atmosphere on products not approved by accumulate. — Atmospheric pollution (built-up Renault’s Technical Department and industrial areas). as this could give rise to corrosion • Allow rust to form following — Saline atmosphere (near the sea, or incorrect operation.
-
Page 137
Consult peel off: the vehicle must be products approved by Renault’s anti-corrosion booklet. washed immediately to remove Technical Department. these marks since •… -
Page 138
MAINTAINING INTERIOR TRIM Whatever type of stain is on the • Seat belts What to avoid: trim, use soapy water (if necessary, These must be kept clean. It is highly inadvisable to use a high with warm water) based on: pressure cleaning jet or spray jet Use products selected by our •… -
Page 139
4.16… -
Page 140
Section 5: Practical advice Spare wheel ……………………….5.02 5.04 Tool kit (wheelbrace, jack etc.) ……………………5.05 Hubcaps …………………………..5.06 Changing a wheel ……………………….. 5.07 Tyres (tyre safety, wheels, winter use) ………………..5.08 5.10 Lights and headlights (changing bulbs) ………………… 5.11 5.13 Rear lights (changing bulbs) ………………….. -
Page 141: Spare Wheel
EMERGENCY SPARE WHEEL — HATCHBACK VERSION Using the emergency spare wheel The yre pressure monitor function does not monitor the emergency spare wheel (the wheel replaced by emergency spare wheel disappears from the display and/or the information display). Refer to the information on the tyre pressure monitor in section 2.
-
Page 142
EMERGENCY SPARE WHEEL — SALOON VERSION Emergency spare wheel 4 This is located in the luggage compartment. To access the emergency spare • Hold it open using the hook 3. wheel: • Unscrew the centre nut 5. • Open the luggage compartment •… -
Page 143
EMERGENCY SPARE WHEEL — ESTATE VERSION Emergency spare wheel 4 This is located in the luggage compartment. • Unscrew nut 5. To gain access to the emergency spare wheel: • Take out the tools 3. • Open the tailgate. • Take out the emergency spare •… -
Page 144
TOOLS Jack 2 The tools are under the emergency spare wheel When refitting the jack, fold it completely and replace it in its location. Wheelbrace 1 Embellisher key 3 It is used to unclip the wheel embellishers. The jack is designed for Towing ring 4 wheel changing purposes only… -
Page 145
EMBELLISHERS — WHEELS Wheel embellisher with masked Centre embellisher 3 Centre embellisher 4 wheel bolts Masked wheel bolts Masked wheel bolts (example: embellisher 1) Unclip the embellisher using the Remove using wheel key A (stored with the tools). embellisher key A (stored with the Remove using wheel… -
Page 146: Changing A Wheel
CHANGING A WHEEL • Screw up the jack by hand at first to align the base plate (which should inclined further inwards than the jack head). Use a piece of wood under the base plate if on soft ground. • Insert the end of the wheelbrace 4 into the jack 3 and turn a few times to lift the wheel off the ground.
-
Page 147: Tyres (Tyre Safety, Wheels, Winter Use)
When fitting tyres to the car, they should either be identical to those fitted originally conform to those recommended by your Renault Dealer. 5.08…
-
Page 148
TYRES (safety) Tyre inflation pressures Replacing tyres Inflation pressures should checked when the tyres are cold; Tyre inflation pressures must be ignore higher pressures which may adhered to. (Remember to check the be reached in hot weather or emergency spare wheel at the same For safety reasons, this following a fast journey. -
Page 149
If you wish to use chains, you must use special equipment. In all cases, we would recommend Consult your Renault Dealer. that you consult your Renault Dealer who will be able to advise you on the choice of equipment which is most suitable for your vehicle. -
Page 150
Release spring 3 and take out the H4 type bulbs approved bulb. Direction indicator by Renault’s Technical Turn bulb holder 4 a quarter turn Department must be used. Type of halogen bulb: H4 anti U.V. and remove the bulb. -
Page 151
Direction indicator the bulb. H1 and H7 type bulbs Turn the bulb holder 3 a quarter of a approved by Renault’s Type of halogen bulb: 6 turn and remove the bulb. Technical Department must be used. anti U.V. (see box). -
Page 152
If you wish to fit fog lights or long range headlights to your car, consult a Renault Dealer. Front fog lights Changing a bulb and adjusting the beam: Consult your Renault Dealer. Any operation on (or modification electrical system must be performed by a Renault Dealer… -
Page 153
REAR LIGHTS — HATCHBACK VERSION (changing the bulbs) Remove screw 1 and cover 2. Unclip bulb holder 3 by pressing 4 Fog light the two tabs. Pear-shaped bulb, bayonet type P21 W. 5 Side light Bulb 5 W. 6 Tail and stop light Pear-shaped bulb, bayonet type with two filaments P21/5 W. -
Page 154
REAR LIGHTS — SALOON VERSION (changing the bulbs) Direction indicator, tail lights and hazard warning lights Unclip luggage Unclip the bulb holder by pressing 4 Tail and stop light compartment to release cover 2. two tabs 3. Pear-shaped bulb, bayonet type with two filaments P21/5W. -
Page 155
REAR LIGHTS — SALOON VERSION (changing the bulbs) Fog light and reversing light Unclip luggage Unclip the bulb holder by pressing 4 Reversing light compartment lid to release cover 2. the two tabs 3. Pear-shaped bulb, bayonet type P21W. 5 Fog light Pear-shaped bulb, bayonet type P21W. -
Page 156
REAR LIGHTS — ESTATE VERSION (changing the bulbs) Remove screw 1, release the rear Disconnect wire 3 and unclip the 5 Tail and stop lights light unit 2 and lift it out towards bulb holder by pressing the tabs 4. Pear-shaped bulb, bayonet type the exterior. -
Page 157
THIRD STOP LIGHT — HATCHBACK VERSION (changing the bulbs) Unclip cover 1 in the tailgate, Remove the bulb holder by pressing applying pressure tabs 3. points 2. Type of bulbs: W 5 W. 5.18… -
Page 158
THIRD STOP LIGHT — SALOON VERSION (changing the bulbs) (continued) Unclip cover 1 in the passenger Unclip the bulb holders by pressing compartment by applying pressure the two tabs 3. to points 2 at each side of the cover. Type of bulbs: W 5 W. 5.19… -
Page 159
THIRD STOP LIGHT — ESTATE VERSION (changing the bulbs) (continued) Unclip cover 1 by applying pressure Unclip the bulb holder by pressing to points 2 at each side of the cover. the two tabs 3. Type of bulbs: W 5 W. 5.20… -
Page 160
REAR LIGHTS AND SIDE MOUNTED INDICATORS (changing the bulbs) Number plate light Number plate light Side mounted indicators Hatchback and estate versions Saloon version Unclip side mounted indicator 5 (using a tool such as a flat Unclip the light 1 by pressing tab 2. Use a tool such as a flat screwdriver screwdriver). -
Page 161
INTERIOR LIGHTS (changing the bulbs) Interior light A Unclip cover 1 (using a tool such as Release bulb 2 or 3. a flat screwdriver) Type of bulb: W 7 W. 5.22… -
Page 162
INTERIOR LIGHTS (changing the bulbs) (continued) Interior light B Unclip at notch 4 or 5 (using a tool Turn bulb holder 6 or 7 a quarter of a such as a flat screwdriver). turn. Type of bulb: W 5 W. 5.23… -
Page 163: Rear Lights (Changing Bulbs)
INTERIOR LIGHTS (changing the bulbs) Rear lights Glove box lamp Unclip light 8 to gain access to the Unclip (using a tool such as a bulb (using a tool such as a flat flat-bladed screwdriver) the light 9. screwdriver). Disconnect the light. Type of bulb: Bayonet type 5 W.
-
Page 164
LUGGAGE COMPARTMENT LIGHTS (changing the bulb) Using a tool such as a flat Press tab 3 to release the bulb holder screwdriver, unclip light 1 or 2 by and gain access to the bulb 4. pressing the tabs at each side of the light. -
Page 165: Fuses
(risk of fire) in the event of an item of A wise precaution: equipment using an excessive amount of current. Obtain a box of spare bulbs and fuses from your Renault Dealer. 5.26…
-
Page 166
FUSES (continued) Allocation of fuses (depending on the equipment level) Symbol Allocation Symbol Allocation Symbol Allocation Rear window demisting Radio/cigar Sunroof lighter/instrument illumination/clock Horn Electric windows Anti-lock braking (ABS) Windscreen wiper Not used Left-hand side lights/ “lights on” buzzer/ Heated seats instrument panel/ number plate light Heating/air conditioning… -
Page 167: Battery
BATTERY (breakdown) In the event of an incident Isolate the battery by unscrewing one of the terminals. To avoid all risk of sparks — Ensure “accessories” disconnected before disconnecting or reconnecting the battery. — When charging, stop the charger before connecting or disconnecting the battery.
-
Page 168
• especially if you use your vehicle Consult your RENAULT Dealer. for short journeys or for frequent driving in town. Specific procedures may be required to charge some batteries. -
Page 169
Start the engine as you would Obtain suitable jump leads (with a normally. As soon as it starts, large cross section) from a Renault disconnect cables A and B in Dealer or, if you already have jump reverse order (4-3-2-1). -
Page 170
3 extinguishes. The batteries can be obtained from your Renault Dealer. • Release the plip and then press it twice in succession. These batteries should last about two years. There is a delay of… -
Page 171
• The specifications supports and wires (available as a Renault parts accessory) vary depending on equipment level of your vehicle and the type of radio. To find out their reference, consult your Renault Dealer. -
Page 172
Unscrew the four bolts then remove the protective card to reach the speaker wires. Rear tweeter woofer speakers We would advise you to consult your Renault Dealer about the installation of speakers for the rear seats. 5.33… -
Page 173
Also, for your own safety, we which RENAULT will provide a would advise you always to take warranty. account of traffic conditions and not to use this type of equipment Electrical or electronic accessories when you are driving. -
Page 174
SCREEN WIPERS To refit To refit the wiper blade, proceed in reverse order to removal. Make sure the blade is correctly locked in position. Replacing windscreen wiper Rear screen wiper blade blades 1 • Lift the wiper arm 6. • Lift the windscreen wiper arm 3. •… -
Page 175: Towing
Screw in the towing ring 2 (found in country in which you are driving: the tools unit) as far as it will go. do not exceed the towing weight for your vehicle. Consult your Renault Dealer. 5.36…
-
Page 176
TOWING (breakdown) (continued) Towing vehicle with automatic transmission: special points Engine switched off: transmission longer lubricated. It is preferable to tow this type of vehicle on a trailer or tow it with the front wheels off the ground. Exceptional circumstances You may tow the vehicle with all four wheels on the ground using the towing point under the following… -
Page 177
TOWING (attachments) Permissible nose weight when towing a trailer, max. towing weight, braked and unbraked: Refer to the information on Weights in section 6. Refer manufacturer’s instructions for information on how to fit and operate the towing attachment. Note: Please keep these instructions with the rest of the… -
Page 178
Following an impact, the system can be enabled but only after it has been inspected by a qualified person from the Renault network who must ensure that: • the vehicle can be driven; • there is no smell of fuel;… -
Page 179: Operating Incidents
OPERATING INCIDENTS Your car should not be affected by incidents likely to keep it off the road for long if you have followed the Renault Servicing Programme regularly. The following hints will enable you to get going again quickly, albeit temporarily. For reasons of safety you should always consult a Renault Dealer as soon as you can.
-
Page 180
Starting procedure incorrect See “starting engine” section. Poor fuel supply or ignition fault. If the vehicle will not start, do not keep trying to start it. Consult a Renault Dealer. System for cutting off fuel supply Consult Renault Dealer (see… -
Page 181
— on idling Oil pressure too low. Consult the nearest Renault Dealer. — is slow to extinguish or remains Loss of oil pressure. Stop: call for assistance from Renault illuminated on acceleration. Dealer. • Engine loses power. Clogged air filter. -
Page 182
Reminder: only products approved by Renault’s Technical Department may be used for this purpose. -
Page 183
— Feed wire disconnected or connector Reconnect wire. out of position. — Faulty earth connection. Find earth wire and remake a good clean wire-to-earth connection. On both sides: — Fuse blown. Replace fuse. — Flasher unit defective. Replace: consult a Renault Dealer. 5.44… -
Page 184
OPERATING INCIDENTS (continued) Electrical equipment CAUSES REMEDIAL ACTION • Headlights One: — Bulb blown. Replace bulb. not working. — Wire disconnected or connector out Check reconnect wire of position. connector. — Faulty earth connection. See above. Both: — If the circuit is fused: Check fuse and change if necessary. -
Page 185
5.46… -
Page 186
Section 6: Technical specifications Identification plates ……………………..6.02 — 6.03 Dimensions ……………………….6.04 6.06 Engine specifications ……………………….6.07 Towing weights ………………………. 6.08 6.11 Weights …………………………6.08 6.11 Replacement parts ……………………….6.12 6.01… -
Page 187
VEHICLE IDENTIFICATION PLATES Quote the information on the Vehicle identification plate A identification plate (right-hand 1 Vehicle type and chassis number 6 Technical specifications side) when writing or ordering vehicle 2 Maximum permissible all-up parts. weight 7 Vehicle paint reference 3 Maximum permissible total train 8 Equipment level weight… -
Page 188
IDENTIFICATION PLATES (continued) 1.4 l 16V — 1.6 l 16V — 1.8 l 16V 1.9 l dTi — 1.9 l dCi 2.0 l 16V Quote the information on the vehicle identification plate and engine plate when writing or ordering parts. Engine plate or engine label B 1 Engine type 2 Engine suffix… -
Page 189
DIMENSIONS — HATCHBACK VERSION (in metres) 4,164 1,450 1,698 Turning circle • Between walls: 11.30 • Between kerbs: 10.80 1,420* 1,432 * Unladen 6.04… -
Page 190
DIMENSIONS — SALOON VERSION (in metres) 4,436 1,450 1,698 Turning circle • Between walls: 11.30 • Between kerbs: 10.80 1,420* 1,432 * Unladen 6.05… -
Page 191
DIMENSIONS — ESTATE VERSION (in metres) 4,437 1,450 1,698 Turning circle • Between walls: 11.40 • Between kerbs: 10.80 1,420* 1,440 * Unladen 6.06… -
Page 192
Their type is shown on a label in the engine compartment, – otherwise consult your Renault Dealer. Fitting spark plugs which are not to specification may damage the engine. * If not available, unleaded fuel with an octane rating of 91 can be used. -
Page 193
— It is important to comply with the towing weights, governed by local legislation in each country and, in particular, laid down in the Road Traffic Regulations. Consult your Renault Dealer about any attachments. Under no circumstances may the total train weight (= max. -
Page 194
— It is important to comply with the towing weights, governed by local legislation in each country and, in particular, laid down in the Road Traffic Regulations. Consult your Renault Dealer about any attachments. Under no circumstances may the total train weight (= max. -
Page 195
— It is important to comply with the towing weights, governed by local legislation in each country and, in particular, laid down in the Road Traffic Regulations. Consult your Renault Dealer about any attachments. Under no circumstances may the total train weight (= max. -
Page 196
— It is important to comply with the towing weights, governed by local legislation in each country and, in particular, laid down in the Road Traffic Regulations. Consult your Renault Dealer about any attachments. Under no circumstances may the total train weight (= max. -
Page 197
If you always fit Renault genuine parts to your vehicle, you will ensure that it performs well. Repairs carried out by the Renault network using original parts are guaranteed for one year. -
Page 198
ALPHABETICAL INDEX A Accessories …………..5.34 D Dashboard …………. 1.36 1.39 Additional driving lights ……… 5.13 De-icing rear screen ……….1.61 Adjusting your driving position ……1.17 De-icing windscreen ……….1.61 Adjustment: Handbrake ……….. 2.06 Demisting: Windscreen ……….1.61 Adjustment: ………….. 1.60 Dimensions ……….. -
Page 199
ALPHABETICAL INDEX F Fuel cut-off system ……….. 5.39 J Jack …………….5.05 Fuel cut-off system in the event of a severe impact …………. 5.39 Fuel economy ……….2.07 2.09 Fuel filler flap …………1.64 Fuel level …………1.40 1.52 K Keys ………….. 1.02 1.04 Fuel tank (capacity) …….. -
Page 200
ALPHABETICAL INDEX O Oil change ………… 4.04 4.07 T Technical specifications ……6.02 6.12 Operating incidents ……..5.40 5.45 Tool kit (wheelbrace, jack) ……..5.05 Towing (attachments) ……….5.38 Towing (breakdown) ……..5.36 — 5.37 Towing (caravan) ……… 6.08 6.11 P Paintwork (maintenance) …… -
Page 203
C R É A T E U R D ‘ A U T O M O B I L E S The driver’s handbook — 82 00 202 823 — NU 671-1 — June 2001 — Edition Anglaise…