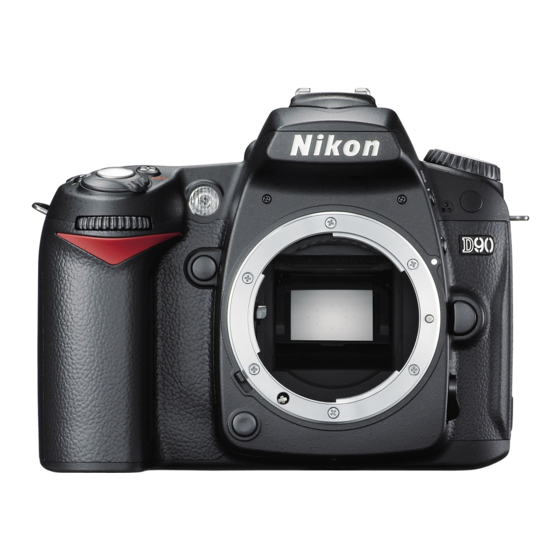
 Модель: Зеркальная фотокамера Nikon D90
Год выпуска: 2008
Количество страниц: 300
Язык: русский
Формат: pdf
Размер: 14.2 Mb
Описание:
Мощная цифровая зеркальная фотокамера Nikon D90 c матрицей формата DX с разрешением 12,3 мегапикселей, системой обработки изображений EXPEED, расширяемым диапазоном чувствительности от 200 до 3200 единиц ISO, функцией D-Movie для записи видеороликов высокого разрешения, режимом Live View, системой распознавания сюжетов и набором режимов управления снимками. Все необходимое, чтобы разжечь страсть к фотосъемке.
Содержание
- Вопросы и ответы.
- Меры безопасности.
- Уведомления.
- Введение.
- Общие сведения.
- Знакомство с фотокамерой.
- Корпус фотокамеры.
- Диск переключения режимов.
- Панель управления.
- Видоискатель.
- Экран информации о съемке.
- Диски управления.
- Присоединение ремня AN-DC1 к фотокамере.
- Крышка ЖК монитора BM-10.
- Крышка окуляра видоискателя DK-21.
- Меню фотокамеры.
- Использование меню фотокамеры.
- Справка.
- Начало работы.
- Зарядка батареи.
- Установка батареи.
- Присоединение объектива.
- Основные настройки.
- Установка карт памяти.
- Настройка фокуса видоискателя.
- Съемка и просмотр снимков.
- Съёмка «Наведи и снимай» (Режимы «авто» или «авто с выключенной вспышкой»).
- Шаг 1: Включение фотокамеры.
- Шаг 2: Выберите режим съёмки и фокусировки.
- Шаг 3: Проверьте настройки фотокамеры.
- Шаг 4: Скомпонуйте кадр.
- Шаг 5: Фокусировка.
- Шаг 6: Снимайте.
- Творческая съёмка (режимы сюжетов).
- Портрет.
- Пейзаж.
- Макро.
- Спорт.
- Ночной портрет.
- Компоновка кадров на мониторе (режим Live view).
- Основной просмотр.
- Удаление ненужных снимков.
- Запись и просмотр видеороликов (режим Live View).
- Съёмка «Наведи и снимай» (Режимы «авто» или «авто с выключенной вспышкой»).
- Дополнительные сведения о фотографировании (все режимы).
- Фокусировка.
- Автофокусировка.
- Выбор точки фокусировки.
- Блокировка фокусa.
- Ручная фокусировка.
- Качество и размер изображения.
- Качество изображения.
- Размер изображения.
- Режим спуска затвора.
- Непрерывный режим.
- Режим автоспуска.
- Использование дополнительного пульта дистанционного управления.
- Использование встроенной вспышки.
- Режим вспышки.
- Чувствительность ISO.
- Двухкнопочный сброс.
- Фокусировка.
- Режимы P, S, A, и M.
- Выдержка и диафрагма.
- Режим P (Программный авто).
- Режим S (Автом. с приор. выдержки).
- Режим A (Авто с приор. диафрагмы).
- Режим M (Ручной).
- Экспозиция.
- Замер экспозиции.
- Блокировка автоэкспозиции (только в режимах P, S, и A).
- Поправка экспозиции.
- Поправка мощности вспышки.
- Брекетинг экспозиции и вспышки.
- Баланс белого.
- Тонкая настройка баланса белого.
- Выбор цветовой температуры.
- Ручная настройка.
- Режимы управления снимками.
- Выбор режимов управления снимками Nikon.
- Изменение существующих режимов управления снимками.
- Создание пользовательских режимов управления снимками.
- Совместное использование пользовательских режимов управления снимками.
- Управление пользовательскими режимами управления снимками.
- Активный D-Lighting.
- Мультиэкспозиция.
- Устройство GP-1 GPS.
- Дополнительные сведения о просмотре снимков.
- Полнокадровый просмотр.
- Информация о снимке.
- Просмотр миниатюр.
- Календарный просмотр.
- Просмотр крупным планом: увеличение при просмотре.
- Защита снимков от удаления.
- Удаление отдельных снимков.
- Pictmotion.
- Слайд-шоу.
- Полнокадровый просмотр.
- Подключения.
- Просмотр снимков на экране телевизора.
- Устройства стандартной четкости.
- Устройства высокой четкости.
- Подключение к компьютеру.
- Перед подключением фотокамеры.
- Подключение фотокамеры.
- Печать снимков.
- Просмотр снимков на экране телевизора.
- Сведения о параметрах меню.
- Меню режима просмотра: Управление снимками.
- Выбор нескольких снимков.
- Удалить.
- Папка просмотра.
- Скрыть снимок.
- Режим дисплея.
- Просмотр снимка.
- Повернуть вертикально.
- Pictmotion.
- Слайд-шоу.
- Задание печати (DPOF).
- Меню режима съемки: Параметры режима съёмки.
- Режим управл. снимками.
- Работа с реж. упр. снимками.
- Кач-во изображения.
- Размер изображения.
- Баланс белого.
- Настройки чувствит. ISO.
- Активный D-Lighting.
- Цветовое простр.
- Под. шума для длинн. выдер. (Подавление шума для длинных выдержек).
- Под. шума для выс. ISO.
- Активная папка.
- Мультиэкспозиция.
- Настройки видео.
- Пользовательские настройки: Точные настройки фотокамеры.
- Сброс польз. настр.
- a: Автофокусировка.
- a1: Режим зоны АФ.
- a2: Центр. точка фокусировки.
- a3: Встроенная подсветка АФ.
- a4: Подсветка точки АФ.
- a5: Закольц. точки фокусир.
- a6: Кн. AE-L/AF-L на MB-D80.
- a7: Автофокусировка Live view.
- b: Замер/экспозиция.
- b1: Шаг EV контроля экспоз.
- b2: Простая поправка экспоз.
- b3: Зона центр.-взвеш. замера.
- b4: Точная настр. оптим. эксп.
- c: Фиксация таймеров/АЭ.
- c1: Фикс. АЭ спусков. кнопкой.
- c2: Задержка автовыкл. зам.
- c3: Автоспуск.
- c4: Задержка выкл. монитора.
- c5: Время ожид.дист.упр.
- d: Съемка/дисплей.
- d1: Сигнал.
- d2: Показ сетки в видоискат.
- d3: Отобр. и регулировка ISO.
- d4: Предупрежд. в видоиск.
- d5: Подсказки.
- d6: Скорость съемки в реж. CL.
- d7: Посл. нумерации файлов.
- d8: Отобр. данных о съемке.
- d9: Подсветка ЖКИ.
- d10: Задерж. сраб. затв.
- d11: Предупр. вспышки.
- d12: Тип батареи MB-D80.
- e: Брекетинг/вспышка.
- e1: Выдержка вспышки.
- e2: Управлен. встр. вспышкой.
- e3: Моделирующая вспышка.
- e4: Установка авт. брекетинга.
- e5: Авто FP.
- e6: Порядок брекетинга.
- f: Управление.
- f1: Переключатель.
- f2: Кнопка «OK» (реж. съемки).
- f3: Кнопка FUNC.
- f4: Функция кнопки AE-L/AF-L.
- f5: Настр. дисков управления.
- f6: Нет карты памяти?
- f7: Инвертировать индик-ры.
- Меню режима просмотра: Управление снимками.
- Меню режима настройки: настройка фотокамеры.
- Форматировать карту памяти.
- Яркость ЖКИ.
- Очистка матрицы.
- Подъем зеркала для чистки.
- Видеостандарт.
- HDMI.
- Мировое время.
- Язык (Language).
- Комментарий.
- Авт. поворот изображения.
- Образец снимка для уд. пыли.
- Информ. о батарее.
- GPS.
- Загрузка Eye-Fi.
- Версия прошивки.
- Меню обработки: Создание обработанных копий.
- Создание обработанных копий.
- D-Lighting.
- Коррекция «красных глаз».
- Кадрирование.
- Монохромный.
- Эффекты фильтра.
- Цветовой баланс.
- Уменьш. снимок.
- Наложение изображений.
- Обработка NEF (RAW).
- Быстрая обработка.
- Выровнять.
- Управление искажениями.
- Рыбий глаз.
- Наглядное сравнение.
- Недавние настройки / Мое меню.
- Недавние настройки: Просмотр недавних настроек.
- Мое меню: Создание пользовательского меню.
- Технические примечания.
- Совместимые объективы.
- Совместимые объективы с микропроцессором.
- Объективы без микропроцессора.
- Дополнительные вспышки.
- Система креативного освещения (CLS) Nikon.
- Контакты вспышки.
- Прочие принадлежности.
- Уход за фотокамерой.
- Хранение.
- Чистка.
- Инфракрасный фильтр.
- Уход за фотокамерой и батареей: предупреждения.
- Устранение неисправностей.
- Индикация.
- Съёмка (Все режимы).
- Съёмка.
- Съёмка (P, S, A, M).
- Просмотр.
- Прочее.
- Сообщения об ошибках.
- Приложение.
- Доступные установки и значения по умолчанию.
- Емкость карты памяти.
- Программный режим экспозиции.
- Программы брекетинга.
- Управление вспышкой.
- Выдержки, доступные со встроенной вспышкой.
- Диафрагма, чувствительность и расстояние съемки со вспышкой.
- Технические характеристики.
- Индекс.
- Совместимые объективы.
Скачать: disk.yandex.ru | mega.co.nz
- Manuals
- Brands
- Nikon Manuals
- Digital Camera
- D90 — Digital Camera SLR
- User manual
-
Contents
-
Table of Contents
-
Troubleshooting
-
Bookmarks
Related Manuals for Nikon D90
Summary of Contents for Nikon D90
-
Page 1
DIGITAL CAMERA User’s Manual… -
Page 2: Error Messages
Where to Find It Find what you’re looking for from: ➜ The Table of Contents pp. viii–xiii Find items by function or menu name. ➜ The Q&A Index pp. iv–vii Know what you want to do but don’t know the function name? Find it from the “question and answer”…
-
Page 3: Package Contents
Package Contents Be sure all items listed here were included with your camera. Memory cards are sold separately. ❏ D90 digital camera ❏ Body cap ❏ BM-10 LCD monitor ❏ DK-5 eyepiece cap (pg. 3) (pp. 3, 240) cover (pg. 17) (pg.
-
Page 4: Symbols And Conventions
Card Association. PictBridge and the SDHC logo are trademarks. HDMI, the HDMI logo and High-Definition Multimedia Interface are trademarks or registered trademarks of HDMI Licensing LLC. All other trade names mentioned in this manual or the other documentation provided with your Nikon product are trademarks or registered trademarks of their respective holders.
-
Page 5
Introduction Basic Photography and Playback More on Photography (All Modes) P, S, A, and M Modes More on Playback Connections The Playback Menu The Shooting Menu Custom Settings The Setup Menu The Retouch Menu Recent Settings / My Menu Technical Notes… -
Page 6: Table Of Contents
Q&A Index Find what you’re looking for using this “question and answer” index. New Features Question Key phrase See page Can I use the monitor as a viewfinder? Live view How do I shoot movies? Recording movies Can I control how photos are processed? Picture Controls How do I preserve details in shadows and Active D-Lighting…
-
Page 7: Camera Setup
Camera Setup Question Key phrase See page 131, How do I stop parts of my photos from blinking? Photo info, highlights How do I focus the viewfinder? Viewfinder focus How do I keep the monitor from turning off? Monitor off How do I set the clock? How do I set the clock for daylight saving time? World time…
-
Page 8
Taking Photographs Question Key phrase See page Is there an easy way to take snapshots? Auto mode Is there an easy way to take more creative shots? Scene modes j mode Can I take pictures without the flash? Flash mode ISO sensitivity How do I bring out a portrait subject? Portrait mode… -
Page 9
Viewing and Retouching Photographs Question Key phrase See page Can I view my photographs on the camera? Camera playback 48, 128 Can I view more information about photos? Photo info 49, 140, How do I get rid of an unwanted photo? Deleting individual photos Can I delete several photos at once? Delete… -
Page 10
Table of Contents Q&A Index ……………………… iv For Your Safety ……………………xiv Notices……………………….xvi Introduction Overview……………………….2 Getting to Know the Camera………………..3 The Camera Body ……………………3 The Mode Dial……………………..6 The Control Panel……………………7 The Viewfinder……………………..9 The Shooting Information Display ………………. 10 The Command Dials …………………. -
Page 11
m Sports……………………..42 o Night Portrait ……………………42 Framing Pictures in the Monitor (Live View)…………..43 Basic Playback ………………………48 Deleting Unwanted Photographs………………49 Recording and Viewing Movies (Live View) …………..50 More on Photography (All Modes) Focus ……………………….54 Autofocus ……………………..54 Focus Point Selection ………………….56 Focus Lock ……………………..57 Manual Focus ………………………59 Image Quality and Size ………………….61 Image Quality ………………………62… -
Page 12
Picture Controls……………………108 Selecting Nikon Picture Controls ………………109 Modifying Existing Picture Controls …………….110 Creating Custom Picture Controls………………113 Sharing Custom Picture Controls ……………….115 Managing Custom Picture Controls …………….117 Active D-Lighting……………………119 Multiple Exposure …………………… 121 The GP-1 GPS Unit …………………… 124 More on Playback Full-Frame Playback…………………. -
Page 13
Slide Show…………………….. 164 Print Set (DPOF) ………………….. 164 C The Shooting Menu: Shooting Options…………..165 Set Picture Control………………….165 Manage Picture Control ………………..165 Image Quality ……………………165 Image Size…………………….. 165 White Balance……………………165 ISO Sensitivity Settings………………..166 Active D-Lighting ………………….166 Color Space…………………… -
Page 14
d9: LCD Illumination …………………..183 d10: Exposure Delay Mode……………….183 d11: Flash Warning………………….183 d12: MB-D80 Battery Type ………………..184 e: Bracketing/Flash…………………..185 e1: Flash Shutter Speed ………………..185 e2: Flash Cntrl for Built-in Flash ………………185 e3: Modeling Flash………………….191 e4: Auto Bracketing Set ………………..191 e5: Auto FP …………………….195 e6: Bracketing Order …………………..195 f: Controls ……………………..196 f1: D Switch……………………196… -
Page 15
Technical Notes Compatible Lenses………………….. 228 Compatible CPU Lenses ………………..229 Non-CPU Lenses ……………………230 Optional Flash Units (Speedlights)…………….. 233 The Nikon Creative Lighting System (CLS) …………..233 Flash Contacts……………………238 Other Accessories ……………………. 239 Caring for the Camera………………….243 Storage……………………….. 243 Cleaning …………………….. -
Page 16: For Your Safety
For Your Safety To prevent damage to your Nikon product or injury to yourself or to others, read the following safety precautions in their entirety before using this equipment. Keep these safety instructions where all those who use the product will read them.
-
Page 17
• When the battery is not in use, attach and output jacks, use only the cables the terminal cover and store in a cool, provided or sold by Nikon for the dry place. purpose to maintain compliance with • The battery may be hot immediately product regulations. -
Page 18: Notices
Notices • No part of the manuals included with this • Nikon will not be held liable for any damages product may be reproduced, transmitted, resulting from the use of this product. transcribed, stored in a retrieval system, or • While every effort has been made to ensure…
-
Page 19
Notices for Customers in Canada CAUTION ATTENTION This Class B digital apparatus complies with Cet appareil numérique de la classe B est Canadian ICES-003. conforme à la norme NMB-003 du Canada. Notice for Customers in Europe CAUTION RISK OF EXPLOSION IF BATTERY IS REPLACED BY AN INCORRECT TYPE. DISPOSE OF USED BATTERIES ACCORDING TO THE INSTRUCTIONS. -
Page 20
Before taking pictures on important occasions (such as at weddings or before taking the camera on a trip), take a test shot to ensure that the camera is functioning normally. Nikon will not be held liable for damages or lost profits that may result from product malfunction. -
Page 21: Introduction
Introduction This chapter covers information you will need to know before using the camera, including the names of camera parts, how to use the camera menus, and how to ready the camera for use. Overview ……………………. Getting to Know the Camera………………The Camera Body……………………
-
Page 22: Overview
Overview Thank you for your purchase of a Nikon single-lens reflex (SLR) digital camera. To get the most from your camera, please be sure to read all instructions thoroughly and keep them where they will be read by all who use the product.
-
Page 23: Getting To Know The Camera
Getting to Know the Camera Take a few moments to familiarize yourself with camera controls and displays. You may find it helpful to bookmark this section and refer to it as you read through the rest of the manual. The Camera Body 1 Mode dial………….
-
Page 24
The Camera Body (Continued) 1 Built-in flash…………70 9 Mirror…………43, 246 2 M (flash mode) button……..70 10 DC-IN connector for optional EH-5a or Y (flash compensation) button….91 EH-5 AC adapter ……..239 3 Microphone ……….50, 170 11 USB connector Connecting to a computer ….149 4 Infrared receiver……….69 Connecting to a printer……151 5 D (bracketing) button ………92… -
Page 25
The Camera Body (Continued) 9 X (playback zoom in) button….138 1 Viewfinder eyepiece ……..32 QUAL (image quality/size) button 2 DK-21 viewfinder eyepiece cup….17 Image quality ……….62 3 O (delete) button Image size…………63 Deleting pictures ………49 10 Diopter adjustment control……32 Deleting pictures during playback.. -
Page 26: The Mode Dial
The Mode Dial The camera offers a choice of the following eleven shooting modes: ❚❚ P, S, A, and M Modes Select these modes for full control over camera settings. P—Programmed auto (pg. 80): Camera A—Aperture-priority auto (pg. 82): Adjust chooses shutter speed and aperture, user aperture to soften background details or controls other settings.
-
Page 27: The Control Panel
The Control Panel 1 Shutter speed 8 ISO sensitivity compensation indicator Shutter-priority auto……..81 ISO sensitivity……….74 Manual exposure mode ……83 ISO display and adjustment….181 Exposure compensation value….90 9 “K” (appears when memory remains for Flash compensation value……91 over 1000 exposures) ………35 White balance fine-tuning……97 10 “Beep”…
-
Page 28
The Control Panel (Continued) 15 Flash compensation indicator ….91 23 ISO sensitivity indicator ……. 74 Auto ISO sensitivity indicator….166 16 “Clock not set” indicator Clock battery……….27 24 Bracketing progress indicator Warnings…………255 AE/flash bracketing ……..92 White balance bracketing ……191 17 Flexible program indicator……80 ADL bracketing ……….193 18 Metering …………87… -
Page 29: The Viewfinder
The Viewfinder 9 10 1 Framing grid (displayed when On is 17 Number of exposures remaining …..35 selected for Custom Setting d2)..181 Number of shots remaining before 2 Reference circle for center-weighted memory buffer fills……..65 metering …………87 White balance recording indicator ..101 3 Battery indicator ………..34 Exposure compensation value ….90…
-
Page 30: The Shooting Information Display
The Shooting Information Display Shooting information, including shutter speed, aperture, the number of exposures remaining, and AF-area mode, is displayed in the monitor when the R button is pressed. Press the R button again to change selected settings (pg. 12). To clear shooting information from the monitor, press the R button a third time or press the shutter-release button halfway.
-
Page 31
The Shooting Information Display (Continued) 1 Shooting mode 18 Metering …………87 i auto/j auto (flash off )……34 19 Flash mode…………71 Scene modes ……….41 Flash control mode for P, S, A, and M modes……..78 optional flash units ……..233 2 Flexible program indicator ……80 20 Electronic analog exposure display ..84 3 Shutter speed Exposure compensation ……90… -
Page 32
❚❚ Changing Settings in the Shooting Information Display (Quick Settings Display) To change settings for the items listed below, press the R button in the shooting information display. Highlight items using the multi selector and press J to jump to the menu for the highlighted item. -
Page 33: The Command Dials
The Command Dials The main- and sub-command dials are used alone or in combination with other controls to adjust a variety of settings. M button: flash mode and flash compensation D button: bracketing Sub-command dial E button: exposure compensation I button: release mode B button: autofocus mode Main-command dial Z button: metering…
-
Page 34
Choose an image size (pg. 63). X (QUAL) button Sub-command Control panel dial ❚❚ Autofocus Mode Choose an autofocus mode (pg. 54). B button Main command Control panel dial ❚❚ Release Mode Choose a release mode (pg. 64). I button Main command Control panel dial… -
Page 35
Choose a shutter speed (exposure mode S or M; pp. 81, 83). Mode S or M Main command Control panel dial Choose an aperture (exposure mode A or M; pp. 82, 83). Mode A or M Sub-command Control panel dial Choose a metering method (pg. -
Page 36
Select bracketing exposure increment (pg. 92, 192). D button Sub-command Control panel dial ❚❚ White Balance Choose a white balance setting (pg. 95). L (WB) Main command Control panel button dial Fine-tune white balance (pg. 97), set color temperature (pg. 99), or choose a white balance preset (pg. -
Page 37: Attaching The An-Dc1 Camera Strap
Attaching the AN-DC1 Camera Strap Attach the strap as shown below. The BM-10 Monitor Cover A clear plastic cover is provided with the camera to keep the monitor clean and protect it when the camera is not in use. To attach the cover, insert the projection on the top of the cover into the matching indentation above the camera monitor (q) and press the bottom of the cover until it clicks into place (w).
-
Page 38: Camera Menus
Camera Menus Most shooting, playback, and setup options can be accessed G button from the camera menus. To view the menus, press the G button. Tabs Choose from playback, shooting, Custom Settings, setup, retouch, and recent settings menus (see below). Slider shows position in current menu.
-
Page 39: Using Camera Menus
Using Camera Menus The multi selector and J button are used to navigate the camera menus. J button Move cursor up Select highlighted item Select Cancel and return highlighted item to previous menu or display sub- menu Move cursor down Follow the steps below to navigate the menus.
-
Page 40
Position the cursor in the selected menu. Press 2 to position the cursor in the selected menu. Highlight a menu item. Press 1 or 3 to highlight a menu item. Display options. Press 2 to display options for the selected menu item. -
Page 41: Help
Help If a Q icon is displayed at the bottom left corner of the monitor, help can be displayed by pressing the L button. A description of the currently selected option or menu will be displayed while the button is pressed. Press 1 or 3 to scroll through the display.
-
Page 42: First Steps
First Steps Charge the Battery The camera is powered by an EN-EL3e rechargeable Li-ion battery (supplied). The EN-EL3e is not fully charged at shipment. To maximize shooting time, charge the battery in the supplied MH-18a quick charger before use. About two and a quarter hours are required to fully recharge the battery when no charge remains.
-
Page 43: Insert The Battery
Remove the battery when charging is complete. Charging is complete when the CHARGE lamp stops blinking. Remove the battery and unplug the charger. Insert the Battery Turn the camera off. Power switch Always turn the camera off before inserting or removing batteries.
-
Page 44
The Battery and Charger Read and follow the warnings and cautions on pages xiv–xv and 248–249 of this manual. Do not use the battery at ambient temperatures below 0°C (32°F) or above 40°C (104°F). Charge the battery indoors at ambient temperatures between 5–35°C (41–95°F); for best results, charge the battery at temperatures above 20°C (68°F). -
Page 45: Attach A Lens
Attach a Lens Care should be taken to prevent dust from entering the camera when the lens is removed. An AF-S DX NIKKOR 18-105mm f/3.5-5.6G ED VR lens is used in this manual for illustrative purposes. Mounting index Focal length scale Focal length index Lens hood (pg.
-
Page 46
(VR), which reduces blur caused by camera shake even when the camera is panned, allowing shutter speeds to be slowed by approximately 3 EV at a focal length of 105mm (Nikon measurements; effects vary with the user and shooting conditions). To use vibration reduction, slide the VR switch to ON. -
Page 47: Basic Setup
Basic Setup A language-selection dialog will be displayed the first time the camera is turned on. Choose a language and set the time and date. Note that if the time and date are not set, B will blink in the monitor and the time and date recorded with photographs will be incorrect.
-
Page 48
Choose a date format. Press 1 or 3 to choose the order in which the year, month, and day will be displayed and press J. Exit to shooting mode. Press the shutter-release button halfway to exit to shooting mode. The Setup Menu Language and date/time settings can be changed at any time using the Language (pg. -
Page 49: Inserting Memory Cards
Inserting Memory Cards The camera stores pictures on Secure Digital (SD) memory cards (available separately). Turn the camera off. Power switch Always turn the camera off before inserting or removing memory cards. Open the card slot cover. Slide the card slot cover out (q) and open the card slot (w).
-
Page 50
❚❚ Formatting Memory Cards Memory cards must be formatted after being used in other devices. Format the card as described below. Formatting Memory Cards Formatting memory cards permanently deletes any data they may contain. Be sure to copy any photographs and other data you wish to keep to a computer before proceeding (pg. 148). Turn the camera on. -
Page 51
❚❚ Removing Memory Cards After confirming that the access lamp is off, turn the camera off, open the memory card slot cover, and press the card in to eject it (q). The card can then be removed by hand (w). Memory Cards •… -
Page 52: Adjust Viewfinder Focus
Adjust Viewfinder Focus The camera is equipped with diopter adjustment to accommodate individual differences in vision. Check that the display in the viewfinder is in focus before framing pictures in the viewfinder. Remove the lens cap and turn the camera Power switch Focus the viewfinder.
-
Page 53: Basic Photography And Playback
Basic Photography and Playback This chapter outlines the basics of taking and viewing photographs in auto and scene modes. It assumes that default camera settings are used; for information on restoring default settings, see page 258. “Point-and-Shoot” Photography (i and j Modes)……….34 Step 1: Turn the Camera On ………………..
-
Page 54: Point-And-Shoot» Photography (I And J Modes)
“Point-and-Shoot” Photography (i and j Modes) This section describes how to take photographs in i (auto) mode, an automatic “point-and-shoot” mode in which the majority of settings are controlled by the camera in response to shooting conditions, and in which the flash will fire automatically if the subject is poorly lit. To take photographs with the flash off while leaving the camera in control of other settings, rotate the mode dial to j to select auto (flash off) mode.
-
Page 55: Number Of Exposures
Check the number of exposures remaining. The exposure count displays in the control panel and viewfinder show the number of photographs that can be stored on the memory card. Check the number of exposures remaining. If there is not enough memory to store additional photographs at current settings, the display will flash as shown at right.
-
Page 56: Step 2: Choose Shooting And Focus Modes
Step 2: Choose Shooting and Focus Modes Select i or j mode. Mode dial To take photographs without the flash, rotate the mode dial to j. Otherwise, rotate the mode dial to i. Select autofocus. Focus-mode selector Rotate the focus-mode selector to AF (autofocus).
-
Page 57: Step 4: Frame The Photograph
Step 4: Frame the Photograph Ready the camera. When framing photographs in the viewfinder, hold the handgrip in your right hand and cradle the camera body or lens with your left. Keep your elbows propped lightly against your torso for support and place one foot half a pace ahead of the other to keep your upper body stable.
-
Page 58: Step 5: Focus
Step 5: Focus Press the shutter-release button halfway. Press the shutter-release button halfway to focus. The camera will select the focus points automatically. If the subject is poorly lit, the flash may pop up and the AF-assist illuminator may light. Check the indicators in the viewfinder.
-
Page 59: Step 6: Shoot
Step 6: Shoot Smoothly press the shutter-release button the rest of the way down to release the shutter and record the photograph. The access lamp next to the memory card slot cover will light. Do not eject the memory card or remove or disconnect the power source until the lamp has gone out and recording is Access lamp complete.
-
Page 60
The Built-in Flash If additional lighting is required for correct exposure in i mode, the built-in flash will pop up automatically when the shutter-release button is pressed halfway. Flash range varies with aperture and ISO sensitivity (pg. 266); remove lens hoods when using the flash. If the flash is raised, photographs can only be taken when the flash-ready indicator (M) is displayed. -
Page 61: Creative Photography (Scene Modes)
Creative Photography (Scene Modes) The camera offers a choice of five “scene” modes. Selecting a program automatically optimizes settings to suit the selected scene, making creative photography as easy as rotating the mode dial. Mode Description k Portrait For portraits. l Landscape For natural and man-made landscapes in daylight or at night.
-
Page 62: Close Up
n Close Up Use for close-up shots of flowers, insects, and other small objects (a macro lens can be used to focus at very close ranges). The camera automatically focuses on the subject in the center focus point. Use of a tripod is recommended to prevent blur.
-
Page 63: Framing Pictures In The Monitor (Live View)
Framing Pictures in the Monitor (Live View) Press the a button to frame pictures in the monitor. Press the a button. a button The mirror will be raised and the view through the lens will be displayed in the camera monitor. The subject will no longer be visible in the viewfinder.
-
Page 64
Choose an autofocus mode. Press the B button and rotate the command dial until one of the following autofocus modes is displayed in the monitor (note that these autofocus modes differ from those available in other shooting modes): B button Main command dial Mode Description… -
Page 65
Choose the focus point. Wide and normal area autofocus: Rotate the focus Focus selector lock selector lock to “J” and use the multi selector to move the focus point to any point in the frame. Return the focus selector lock to “L” when selection is complete. -
Page 66
Manual focus: Focus using the lens focusing ring. Take the picture. Press the shutter-release button the rest of the way down to take pictures in the current release mode (pg. 64). The monitor will turn off. When shooting is complete, the photograph will be displayed in the monitor for 4 s or until the shutter-release button is pressed halfway. -
Page 67
Face-Priority AF The camera’s ability to detect faces depends on a variety of factors, including whether or not the subject is facing the camera. The camera may be unable to detect subjects that are not facing the camera or faces that are hidden by sunglasses or other obstructions or that take up too much or too little of the frame. -
Page 68: Basic Playback
4 or 2. To view additional information on the current photograph, press 1 and 3 (pg. 129). 1 / 12 N I KON D90 To end playback and return to shooting mode, press the shutter-release button halfway. 1 250…
-
Page 69: Deleting Unwanted Photographs
Deleting Unwanted Photographs To delete the photograph currently displayed in the monitor, press the O button. Note that photographs can not be recovered once deleted. Display the photograph. Display the photograph you wish to delete as described on the previous page. K button Delete the photograph.
-
Page 70: Recording And Viewing Movies (Live View)
Recording and Viewing Movies (Live View) Movies up to 2 GB in size can be recorded in live view mode. Before recording, choose frame size and sound options in the Movie settings menu (pg. 170). Press the a button. a button The mirror will be raised and the view through the lens will be displayed in the camera monitor.
-
Page 71: Recording Movies
Recording Movies Banding or distortion may be visible in the monitor and in the final movie under fluorescent, mercury vapor, or sodium lamps or if the camera is panned horizontally or an object moves at high speed through frame. Bright light sources may leave after-images when the camera is panned.
-
Page 72
❚❚ Viewing Movies Movies are indicated by a 1 icon in full-frame playback (pg. 128). The following operations can be performed while a movie is displayed: Movie Time indicator remaining Audio indicator Description Start/pause/ Press J to start, pause, or resume playback. resume Press 4 or 2 to rewind or fast forward. -
Page 73: More On Photography (All Modes)
More on Photography (All Modes) This and the following two chapters build on the Tutorial to cover more advanced shooting and playback options. Focus ……………………..54 Autofocus……………………….Focus Point Selection …………………… Focus Lock ……………………….. Manual Focus……………………..Image Quality and Size………………..61 Image Quality ……………………..
-
Page 74: Focus
Focus Focus can be adjusted automatically (see “Autofocus, ” below) or manually (pg. 59). The user can also select the focus point for automatic or manual focus (pg. 59) or use focus lock to focus to recompose photographs after focusing (pg. 57). Autofocus When the focus mode selector is set to AF, the camera Focus mode selector…
-
Page 75
Getting Good Results with Autofocus Autofocus does not perform well under the conditions listed below. The shutter release may be disabled if the camera is unable to focus under these conditions, or the in-focus indicator (J) may be displayed and the camera may sound a beep, allowing the shutter to be released even when the subject is not in focus. -
Page 76: Focus Point Selection
Focus Point Selection The camera offers a choice of eleven focus points that together cover a wide area of the frame. At the default settings, the camera chooses the focus point automatically or focuses on subject in the center focus point. The focus point can also be selected manually to compose photographs with the main subject positioned almost anywhere in the frame.
-
Page 77: Focus Lock
Focus Lock Focus lock can be used to change the composition after focusing, making it possible to focus on a subject that will not be in a focus point in the final composition. It can also be used when the autofocus system is unable to focus (pg. 55). Focus lock is most effective when Single point, Dynamic area, or 3D-tracking (11 points) is selected for Custom Setting a1 (AF-area mode;…
-
Page 78
Do not change the distance between the camera and the subject while focus lock is in effect. If the subject moves, focus again at the new distance. Continuous Mode (pg. 65) Use the AE-L/AF-L button to lock focus in continuous mode. See Also Custom Setting f4 (Assign AE-L/AF-L Button;… -
Page 79: Manual Focus
Manual Focus Manual focus is available for lenses that do not support autofocus (non-AF Nikkor lenses) or when autofocus does not produce the desired results (pg. 55). To use manual focus, set the camera focus-mode selector and/or the lens focus-mode switch as follows: •…
-
Page 80
❚❚ The Electronic Rangefinder If the lens has a maximum aperture of f/5.6 or faster, the viewfinder focus indicator can be used to confirm whether the subject in the selected focus point is in focus (the focus point can be selected from any of the 11 focus points). After positioning the subject in the selected focus point, press the shutter-release button halfway and rotate the lens focusing ring until the in-focus indicator (I) is displayed. -
Page 81: Image Quality And Size
Image Quality and Size Together, image quality and size determine how much space each photograph occupies on the memory card. Larger, higher quality images can be printed at larger sizes but also require more memory, meaning that fewer such images can be stored on the memory card.
-
Page 82: Image Quality
Image Quality The camera supports the following image quality options (listed in descending order by image quality and file size): Option File type Description Raw 12-bit data from the image sensor are saved directly to the memory card. Choose for images that will be processed on a computer. JPEG copies of NEF (RAW) images can be created using the NEF (RAW) NEF (RAW) processing option in the retouch menu (pg.
-
Page 83: Image Size
Image Size Image size is measured in pixels. The following options are available. Image size Size (pixels) Approximate size when printed at 200 dpi L (default) 4,288 × 2,848 54.5 × 36.2 cm (21.4 × 14.2 in.) 3,216 × 2,136 40.8 ×…
-
Page 84: Release Mode
Release Mode Release mode determines how the camera takes photographs: one at a time, in a continuous sequence, with a timed shutter-release delay, or with a remote control. Mode Description Camera takes one photograph each time shutter-release button is 8 Single frame pressed.
-
Page 85: Continuous Mode
Continuous Mode To take pictures in ! (continuous low speed) and 9 (continuous high speed) modes: Select ! or 9 mode. Press the I button and rotate the main command dial until the desired setting is displayed in the control panel. I button Main command dial Control panel…
-
Page 86: Self-Timer Mode ($)
Self-Timer Mode ($) The self-timer can be used to reduce camera shake or for self-portraits. Mount the camera on a tripod. Mount the camera on a tripod or place the camera on a stable, level surface. Select $ mode. Press the I button and rotate the main command dial until $ is displayed in the control panel.
-
Page 87
Start the timer. Press the shutter-release button halfway to focus, and then press the button the rest of the way down to start the self-timer. The self-timer lamp will start to blink and a beep will begin to sound. Two seconds before the photograph is taken, the self-timer lamp will stop blinking and the beeping will become more rapid. -
Page 88: Using An Optional Remote Control (#)
Using an Optional Remote Control (#) Use the optional ML-L3 remote control for self-portraits (pg. 241) or to operate the camera remotely. Before Using the Remote Control Before using the remote control for the first time, remove the clear plastic battery insulator sheet.
-
Page 89
Cover the viewfinder DK-5 eyepiece cap After framing the photograph, remove the viewfinder eyepiece cup and insert the supplied DK-5 eyepiece cap as shown. This prevents light entering via the viewfinder interfering with exposure. Take the photograph. Aim the transmitter on the ML-L3 at the infrared receiver on the camera and press the shutter-release button on the ML-L3. -
Page 90: Using The Built-In Flash
Using the Built-in Flash The camera supports a variety of flash modes for photographing poorly lit or backlit subjects. ❚❚ Using the Built-in Flash: i, k, n, and o Modes Choose a shooting mode. Rotate the mode dial to select the desired mode. Choose a flash mode.
-
Page 91: Flash Mode
Flash Mode Press the M button and rotate the main command dial until the desired flash mode is displayed in the control panel. M button Main command dial Control panel The current flash mode is displayed in the control panel as shown below. Y (red-eye reduction): Use for portraits.
-
Page 92
The flash modes available depend on the mode currently selected with the mode dial. i, k, n Auto Auto+Slow sync Auto+ Auto+ Slow sync+ red-eye red-eye reduction reduction P, A S, M Fill flash Fill flash Rear- Red-eye curtain+ reduction slow sync Red-eye Rear-… -
Page 93
❚❚ Lowering the Built-in Flash To save power when the flash is not in use, press it gently downward until the latch clicks into place. The Built-in Flash Use with CPU lenses with focal lengths of 18–300 mm or non-CPU lenses with focal lengths of 18–200 mm (pg. -
Page 94: Iso Sensitivity
ISO Sensitivity “ISO sensitivity” is the digital equivalent of film speed. The higher the ISO sensitivity, the less light needed to make an exposure, allowing higher shutter speeds or smaller apertures. ISO sensitivity can be set between values roughly equivalent to ISO 200 and ISO 3200 in steps equivalent to EV.
-
Page 95: Two-Button Reset
Two-Button Reset The camera settings listed below can be restored to default E button values by holding the E and B buttons down together for more than two seconds (these buttons are marked by a green dot). The control panel turns off briefly while settings are reset.
-
Page 97: P, S, A, And M Modes
Fine-Tuning White Balance…………………. Choosing a Color Temperature ………………..Preset Manual……………………..100 Picture Controls ………………….108 Selecting Nikon Picture Controls ………………109 Modifying Existing Picture Controls………………110 Creating Custom Picture Controls ………………113 Sharing Custom Picture Controls ………………115 Managing Custom Picture Controls ………………117 Active D-Lighting ………………….
-
Page 98: Shutter Speed And Aperture
Shutter Speed and Aperture P, S, A, and M modes offer different degrees of control over shutter speed and aperture: Mode Description Camera sets shutter speed and aperture for optimal exposure. Programmed auto Recommended for snapshots and in other situations in which (pg.
-
Page 99
Shutter Speed and Aperture The same exposure can be achieved with different combinations of shutter speed and aperture. Fast shutter speeds and larger apertures freeze moving objects and soften background details, while slow shutter speeds and small apertures blur moving objects and bring out background details. -
Page 100: Mode P (Programmed Auto)
Mode P (Programmed Auto) In this mode, the camera automatically adjusts shutter speed and aperture for optimal exposure in most situations. This mode is recommended for snapshots and other situations in which you want to leave the camera in charge of shutter speed and aperture.
-
Page 101: Mode S (Shutter-Priority Auto)
Mode S (Shutter-Priority Auto) In shutter-priority auto, you choose the shutter speed while the camera automatically selects the aperture that will produce the optimal exposure. Use slow shutter speeds to suggest motion by blurring moving subjects, high shutter speeds to “freeze” motion. To take photographs in shutter-priority auto: Rotate the mode dial to S.
-
Page 102: Mode A (Aperture-Priority Auto)
Mode A (Aperture-Priority Auto) In aperture-priority auto, you choose the aperture to control depth of field (see below) while the camera automatically selects the shutter speed that will produce the optimal exposure. To take photographs in aperture-priority auto: Rotate the mode dial to A. Mode dial Choose an aperture.
-
Page 103: Mode M (Manual)
Mode M (Manual) In manual exposure mode, you control both shutter speed and aperture. To take photographs in manual exposure mode: Rotate the mode dial to M. Mode dial Choose aperture and shutter speed. Checking exposure in the electronic analog exposure display (pg. 84), rotate the main command dial to choose a shutter speed and the sub-command dial to choose an aperture.
-
Page 104
The Electronic Analog Exposure Display If a CPU lens is attached and a shutter speed other than A or & is selected, the electronic analog exposure display in the viewfinder shows whether the photograph would be under- or over-exposed at current settings. Depending on the option chosen for Custom Setting b1 (EV steps for exposure cntrl.;… -
Page 105: Long Time-Exposures (M Mode Only)
❚❚ Long Time-Exposures (M Mode Only) Shutter speeds of “A” and “&” can be used for long time-exposure photographs of moving lights, the stars, night scenery, or fireworks. To prevent blurring caused by camera shake, use a tripod and an optional remote control (pg.
-
Page 106
Open the shutter. A: After focusing, press the shutter-release button on the camera or remote cord all the way down. Keep the shutter-release button pressed until the exposure is complete. &: Press the shutter-release button on the remote control all the way down. The shutter will open immediately (quick-response remote) or two seconds after the shutter-release button is pressed (delayed remote) and remain open until the button is pressed a second time. -
Page 107: Exposure
Exposure Metering The metering method determines how the camera sets exposure. The following options are available: Method Description Recommended in most situations; selected automatically in auto and scene 3D color modes. Camera meters a wide area of the frame and sets exposure according matrix II to distribution of brightness, color, distance, and composition for natural results.
-
Page 108: Autoexposure Lock (P, S, And A Modes Only)
Autoexposure Lock (P, S, and A Modes Only) Use auto exposure lock to recompose photographs after metering exposure: Select center-weighted or spot Z button metering. Select mode P, S, or A and choose center-weighted or spot metering (exposure lock has no effect in mode M, while auto and scene modes are not recommended as center- Main command dial…
-
Page 109
Adjusting Shutter Speed and Aperture While exposure lock is in effect, the following settings can be adjusted without altering the metered value for exposure: Mode Setting Programmed auto Shutter speed and aperture (flexible program; pg. 80) Shutter-priority auto Shutter speed Aperture-priority auto Aperture The new values can be confirmed in the viewfinder and control panel. -
Page 110: Exposure Compensation
Exposure Compensation Exposure compensation is used to alter exposure from the value suggested by the camera, making pictures brighter or darker. It is most effective when used with center-weighted or spot metering (pg. 87). Exposure compensation is available in modes P, S, and A (in mode M, only the exposure information shown in the electronic analog exposure display is affected;…
-
Page 111: Flash Compensation
Flash Compensation Flash compensation is used to alter flash output from the level suggested by the camera, changing the brightness of the main subject relative to the background. Flash output can be increased to make the main subject appear brighter, or reduced to prevent unwanted highlights or reflections.
-
Page 112: Exposure And Flash Bracketing
Exposure and Flash Bracketing Bracketing automatically varies selected settings slightly with each shot, “bracketing” the current value. The setting affected is chosen with Custom Setting e4 (Auto bracketing set; pg. 191); below, it is assumed that AE & flash is selected to vary exposure and flash level.
-
Page 113
Frame a photograph, focus, and shoot. The camera will vary exposure and flash level with each shot. At default settings, the first shot will be taken at the current values for exposure and flash compensation and the following shots at modified values. If the bracketing sequence consists of three shots, the bracketing increment will be subtracted from the current values in the second shot and added in the third shot, “bracketing”… -
Page 114
Exposure Bracketing The camera modifies exposure by varying shutter speed and aperture (programmed auto), aperture (shutter-priority auto), or shutter speed (aperture-priority auto, manual exposure mode). When On is selected for ISO sensitivity auto control (pg. 166), the camera will automatically vary ISO sensitivity for optimum exposure when the limits of the camera exposure system are exceeded. -
Page 115: White Balance
White Balance White balance ensures that colors are unaffected by the color of the light source. Auto white balance is recommended for most light sources; if necessary, other values can be selected according to the type of source. The following options are available in P, S, A, and M modes (auto white balance is used in auto and scene modes): Option Color temp.
-
Page 116
To select a value for white balance, press the WB button and rotate the main command dial until the desired setting is displayed in the control panel. White balance can also be adjusted from the shooting menu (pg. 165). WB button Main command dial Control panel I (Fluorescent) -
Page 117: Fine-Tuning White Balance
Fine-Tuning White Balance White balance can be “fine tuned” to compensate for variations in the color of the light source or to introduce a deliberate color cast into an image. White balance is fine tuned using the White balance option in the shooting menu or by pressing the WB button and rotating the sub-command dial.
-
Page 118
Press J. Press J to save settings and return to the shooting menu. If white balance has been fine-tuned on the A-B axis, a E icon will be displayed in the control panel. ❚❚ The WB Button At settings other than K (Choose color temp.) and L (Preset manual), the WB button can be used to fine-tune white balance on the amber (A)–blue (B) axis (pg. -
Page 119: Choosing A Color Temperature
Choosing a Color Temperature At a setting of K (Choose color temp.), color temperature can be selected by pressing the WB button and rotating the sub-command dial until the desired value is displayed in the control panel. Color temperature can also be selected in the shooting menu (pg.
-
Page 120: Preset Manual
Preset Manual Preset manual is used to record and recall custom white balance settings for shooting under mixed lighting or to compensate for light sources with a strong color cast. Two methods are available for setting preset white balance: Method Description Direct Neutral gray or white object is placed under lighting that will be used in…
-
Page 121
❚❚ Measuring a Value for Preset White Balance Light a reference object. Place a neutral gray or white object under the lighting that will be used in the final photograph. In studio settings, a standard gray panel can be used as a reference object. -
Page 122
Measure white balance. Before the indicators stop flashing, frame the reference object so that it fills the viewfinder and press the shutter-release button all the way down. The camera will measure a value for white balance and store it in preset d-0. -
Page 123
Preset d-0 The new value for white balance will be stored in preset d-0, automatically replacing the previous value for this preset (no confirmation dialog will be displayed). A thumbnail will be displayed in the preset white balance list. To use the new value for white balance, select preset d-0 (if no value has been measured for white balance before d-0 is selected, white balance will be set to a color temperature of 5,200 K, the same as Direct sunlight). -
Page 124
❚❚ Copying White Balance from d-0 to Presets d-1–d-4 Follow the steps below to copy a measured value for white balance from d-0 to any of the other presets (d-1–d-4). Select L (Preset manual). Highlight Preset manual in the white balance menu (pg. -
Page 125
❚❚ Copying White Balance from a Photograph (d-1–d-4 Only) Follow the steps below to copy a value for white balance from a photograph on the memory card to a selected preset (d-1–d-4 only). Existing white balance values can not be copied to preset d-0. Select L (Preset manual). -
Page 126
❚❚ Selecting a White Balance Preset To set white balance to a preset value: Select L (Preset manual). Highlight Preset manual in the white balance menu (pg. 95) and press 2. Select a preset. Highlight the desired preset and press the W button. -
Page 127
❚❚ Entering a Comment Follow the steps below to enter a descriptive comment of up to thirty-six characters for a selected white balance preset. Select L (Preset manual). Highlight Preset manual in the white balance menu (pg. 95) and press 2. Select a preset. -
Page 128: Picture Controls
• Manage custom Picture Controls (pg. 117): Rename or delete custom Picture Controls. Nikon Picture Controls Versus Custom Picture Controls The Picture Controls supplied by Nikon are referred to as Nikon Picture Controls. In addition to the Nikon Picture Controls supplied with the camera, optional Picture Controls are available for download from Nikon websites.
-
Page 129: Selecting Nikon Picture Controls
Selecting Nikon Picture Controls The camera offers six preset Picture Controls. In P, S, A, and M modes, you can choose a Picture Control according to the subject or type of scene (in other modes, the camera selects a Picture Control automatically).
-
Page 130: Modifying Existing Picture Controls
Modifying Existing Picture Controls Existing Nikon or custom Picture Controls can be modified to suit the scene or the user’s creative intent. Choose a balanced combination of settings using Quick adjust, or make manual adjustments to individual settings. Select a Picture Control.
-
Page 131
❚❚ Picture Control Settings Option Description Choose from options between –2 and +2 to reduce or exaggerate the effect of the selected Picture Control (note that this resets all manual adjustments). Quick adjust For example, choosing positive values for Vivid makes pictures more vivid. Not available with Neutral, Monochrome, or custom Picture Controls. -
Page 132
The Picture Control Grid Pressing the W button in Step 2 displays a Picture Control grid showing the contrast and saturation for the selected Picture Control in relation to the other Picture Controls (only contrast is displayed when Monochrome is selected). Release the W button to return to the Picture Control menu. -
Page 133: Creating Custom Picture Controls
Creating Custom Picture Controls The Nikon Picture Controls supplied with the camera can be modified and saved as custom Picture Controls. Select Manage Picture Control. In the shooting menu (pg. 165), highlight Manage Picture Control and press 2. Select Save/edit.
-
Page 134
The edit display for custom Picture Controls contains the same options Original Picture as the original Nikon Picture Control on which it is based. The original Control icon control is shown by an icon in the top right corner of the display. -
Page 135: Sharing Custom Picture Controls
Sharing Custom Picture Controls Custom Picture Controls created using the Picture Control Utility available with ViewNX or optional software such as Capture NX 2 can be copied to a memory card and loaded into the camera, or custom Picture Controls created with the camera can be copied to the memory card to be used in compatible cameras and software.
-
Page 136
Up to 99 custom Picture Controls can be stored on the memory card at any one time. The memory card can only be used to store user-created custom Picture Controls. The Nikon Picture Controls supplied with the camera can not be copied to the memory card. -
Page 137: Managing Custom Picture Controls
Managing Custom Picture Controls Follow the steps below to rename or delete custom Picture Controls. ❚❚ Renaming Custom Picture Controls Select Rename. In the Manage Picture Control menu, highlight Rename and press 2. Select a Picture Control. Highlight a custom Picture Control (C-1 through C-9) and press 2.
-
Page 138
• press J to display confirmation dialog shown at right. Select Yes. Highlight Yes and press J to delete the selected Picture Control. Nikon Picture Controls The Nikon Picture Controls supplied with the camera (Standard, Neutral, Vivid, Monochrome, Portrait, and Landscape) can not be renamed or deleted. -
Page 139: Active D-Lighting
Active D-Lighting Active D-Lighting preserves details in highlights and shadows, creating photographs with natural contrast. Use for high contrast scenes, for example when photographing brightly lit outdoor scenery through a door or window or taking pictures of shaded subjects on a sunny day. To use Active D-Lighting: Select matrix metering.
-
Page 140
Active D-Lighting The Brightness and Contrast Picture Control settings (pg. 111) can not be adjusted while active D-Lighting is in effect. In exposure mode M, an Active D-Lighting setting of Auto is equivalent to Normal. “Active D-Lighting” Versus “D-Lighting” The Active D-Lighting option in the shooting menu adjusts exposure before shooting to optimize the dynamic range, while the D-Lighting option in the retouch menu optimizes dynamic range in images after shooting. -
Page 141: Multiple Exposure
Multiple Exposure Follow the steps below to record a series of two to three exposures in a single photograph, using RAW data from the camera image sensor to produce colors noticeably superior to photographs combined in an imaging application. Multiple exposures can be recorded at any image quality setting.
-
Page 142
Set gain. Highlight one of the following options and press J. Option Description Gain adjusted according to number of exposures actually recorded (gain for each (default) exposure is set to for 2 exposures, 3 exposures). Gain is not adjusted when recording multiple exposure. -
Page 143
The n icon will blink until shooting ends. When shooting ends, multiple exposure mode will end and the n icon will no longer be displayed. Repeat steps 1–7 to take additional multiple exposures. ❚❚ Interrupting Multiple Exposures Selecting Multiple exposure in the shooting menu while a multiple exposure is being recorded displays the options shown at right. -
Page 144: The Gp-1 Gps Unit
The GP-1 GPS Unit The GP-1 GPS unit (available separately) can be connected to the camera’s accessory terminal as shown below using the cable supplied with the GP-1, allowing information on the camera’s current position to be recorded when photographs are taken.
-
Page 145
❚❚ Setup Menu Options The GPS item in the setup menu contains the options listed below. • Auto meter off: Choose whether or not the exposure meters will turn off automatically when the GP-1 is attached. Option Description Exposure meters will turn off automatically if no operations are performed for Enable the period specified in Custom Setting c2 (Auto meter-off delay, pg. -
Page 147: More On Playback
More on Playback This chapter describes how to view photographs and details the operations that can be performed during playback. Full-Frame Playback…………………. 128 Photo Information ……………………129 Thumbnail Playback ………………… 135 Calendar Playback………………….136 Taking a Closer Look: Playback Zoom …………… 138 Protecting Photographs from Deletion …………..
-
Page 148: Full-Frame Playback
Full-Frame Playback To play photographs back, press the K button. The most recent photograph will be displayed in the monitor. Description View additional Press 2 to view photographs in order recorded, 4 to view photographs photographs in reverse order. Press 1 or 3 to view information about current photograph View photo information (pg.
-
Page 149: Photo Information
Display mode (pg. 163). GPS data are only displayed if a GPS device was used when the photo was taken. 1 / 12 N I KON D90 1/ 12 NOI SE REDUC . H I I SO, NORM LATITUDE .
-
Page 150
❚❚ RGB Histogram N I KON D90 1/12 1 Protect status ….139 5 Histogram (RGB channel). 6 Histogram (red channel) In all histograms, 2 Retouch indicator ..209 7 Histogram (green horizontal axis gives channel) 3 White balance ….95 pixel brightness, vertical… -
Page 151
❚❚ Highlights H igh l i gh t s N I KON D90 1/12 1 Protect status ….139 3 Image highlights ..163 5 Frame number/ total number of images 2 Retouch indicator ..209 4 Camera name * Blinking areas indicate highlights. -
Page 152
: s RGB PI CTURE CNTRL : STANDARD QUICK ADJUST SHARPENING CONTRAST BRI GHTNESS SATURATION N I KON D90 1/12 1 Protect status ….139 5 Picture Control ….108 10 Saturation ….. 111 Filter effects ….111 2 Retouch indicator ..209 6 Quick adjust ….111… -
Page 153
º 43. 696′ : 35m ALTITUDE : 15/09/2008 TIME(UTC) : 01 : 15 : 29 N I KON D90 1/12 1 Protect status ….139 5 Altitude 8 Frame number/ total number of images 2 Retouch indicator ..209 6 Coordinated Universal… -
Page 154
❚❚ Overview Data 1 / 12 N I KON D90 F5 . 6 1 250 35mm + 1 . 0 – 1. 3 REAR 10000 A6, M1 100NCD90 DSC _ 0001. JPG NOR ORMAL AL 15/09/2008 10 4288×2848 1 Frame number/… -
Page 155: Thumbnail Playback
Thumbnail Playback To display images in “contact sheets” of four, nine, or 72 images, press the W button. Full-frame Thumbnail Calendar playback playback playback Description Display more Press W button to increase the number of images displayed. images Press X button to reduce the number of images displayed. Display fewer When four images are displayed, press to view highlighted images…
-
Page 156: Calendar Playback
Calendar Playback To view images taken on a selected date, press the W button when 72 images are displayed. Full-frame Thumbnail Calendar playback playback playback Press the W button to toggle between the date list and the list of thumbnails for the selected date.
-
Page 157
The operations can be performed depend on whether the cursor is in the date list or the thumbnail list: Description Press W button in date list to place cursor in thumbnail Toggle between date list and thumbnail list list. Press again to return to date list. Exit to thumbnail •… -
Page 158: Taking A Closer Look: Playback Zoom
Taking a Closer Look: Playback Zoom Press the X button to zoom in on the image displayed in full-frame playback or on the image currently highlighted in thumbnail or calendar playback. The following operations can be performed while zoom is in effect: Description Press X to zoom in to maximum of approximately 27 ×…
-
Page 159: Protecting Photographs From Deletion
Protecting Photographs from Deletion In full-frame, zoom, thumbnail, and calendar playback, the L button can be used to protect photographs from accidental deletion. Protected files can not be deleted using the O button or the Delete option in the playback menu, and have DOS “read- only”…
-
Page 160: Deleting Individual Photographs
Deleting Individual Photographs To delete the photograph displayed in full-frame playback or the photograph highlighted in the thumbnail list, press the O button. Once deleted, photographs can not be recovered. Select an image. Display the image or highlight it in the thumbnail list. Press the O button.
-
Page 161: Pictmotion
Pictmotion The Pictmotion option in the playback menu (pg. 160) is used to create and view slide shows with custom transitions and background music. The following options are available: Option Description Start View the completed Pictmotion show. Select pictures Choose pictures for the Pictmotion show. Background music Choose background music.
-
Page 162
❚❚ Viewing the Pictmotion Show To view the show, highlight Start in the Pictmotion menu and press J. The following operations can be performed while the show is in progress: Description Pause slide show Pause show (see below). Raise volume Press X and W to raise and lower volume. -
Page 163: Slide Shows
Slide Shows The Slide show option in the playback menu (pg. 164) is used to display a slide show of the pictures in the current playback folder (pg. 162). Hidden images (pg. 162) are not displayed. Option Description Start Start slide show. Frame interval Choose how long each picture will be displayed.
-
Page 165: Connections
Connections This chapter describes how to copy photographs to a computer, how to print pictures, and how to view them on a television set. Viewing Photographs on TV………………146 Standard Definition Devices ………………..146 High-Definition Devices ………………….147 Connecting to a Computer ………………148 Before Connecting the Camera …………………
-
Page 166: Television Playback
Viewing Photographs on TV The supplied EG-D2 audio video cable can be used to connect the camera to a television or VCR for playback or recording. A type C mini-pin High-Definition Multimedia Interface (HDMI) cable (available separately from third-party suppliers) can be used to connect the camera to high-definition video devices.
-
Page 167: Hdmi
High-Definition Devices The camera can be connected to HDMI devices using a type C mini-pin HDMI cable (available separately from third-party suppliers). Turn the camera off. Always turn the camera off before connecting or disconnecting an HDMI cable. Connect the HDMI cable as shown. Connect to camera Connect to high-…
-
Page 168: Connecting To A Computer
Nikon Transfer is used to copy photographs from the camera to the computer, where they can be viewed using ViewNX (Nikon Transfer can also be used to back up photographs and embed information in photographs as they are transferred, while ViewNX can be used to sort photographs, convert images to different file formats, and perform simple editing on NEF/RAW photographs).
-
Page 169: Connecting The Camera
Turn the camera on. Transfer photographs. Nikon Transfer will start automatically; click the Start Transfer button to transfer photographs (for more information on using Nikon Transfer, select Nikon Transfer help from the Nikon Transfer Help menu). Turn the camera off and disconnect the USB cable when transfer ends.
-
Page 170: Printing Photographs
Printing Photographs JPEG photographs can be printed by any of the following methods: • Connect the camera to a printer and print photographs directly from the camera (see below). • Insert the camera memory card in a printer equipped with a card slot (see the printer manual for details).
-
Page 171
❚❚ Connecting the Printer Connect the camera using the supplied UC-E4 USB cable. Turn the camera off. Connect the USB cable. Turn the printer on and connect the USB cable as shown. Do not use force or attempt to insert the connectors at an angle. USB Hubs Connect the camera directly to the printer;… -
Page 172
Display printing options. Press J to display PictBridge printing options. Adjust printing options. Press 1 or 3 to highlight an option and press 2 to select. Option Description Menu of page sizes will be displayed (options not supported by current printer are not listed). Press 1 or 3 to choose page size (to print at default page size for Page size current printer, select Printer default), then press… -
Page 173
Start printing. Select Start printing and press J to start printing. To cancel before all copies have been printed, press J. ❚❚ Printing Multiple Pictures Display the PictBridge menu. Press the G button in the PictBridge playback display (see Step 3 on page 151). G button Choose an option. -
Page 174
Select pictures or choose a date. If you chose Print select or Print (DPOF) in Step 2, use the multi selector to scroll through the pictures on the memory card. To display the current picture full screen, press the X button. To select the current picture for printing, press W button the W button and press 1. -
Page 175: Start Printing
Adjust printing options. Press 1 or 3 to highlight an option and press 2 to select. Option Description Menu of page sizes will be displayed (pg. 152; options not supported by current printer are not listed). Press 1 or 3 to choose page size (to print at default page Page size size for current printer, select Printer default), then press…
-
Page 176
❚❚ Creating Index Prints To create an index print of all JPEG pictures on the memory card, select Index print in Step 2 of “Printing Multiple Pictures” (pg. 153). Note that if the memory card contains more than 256 pictures, only the first 256 images will be printed. Select Index print. -
Page 177: Print Set (Dpof)
❚❚ Creating a DPOF Print Order: Print Set The Print set (DPOF) option in the playback menu is used to create digital “print orders” for PictBridge-compatible printers and devices that support DPOF. Selecting Print set (DPOF) from the playback menu displays the menu shown in Step 1. Choose Select/set.
-
Page 178
Print Set (DPOF) To print the current print order when the camera is connected to a PictBridge printer, select Print (DPOF) in the PictBridge menu and follow the steps in “Printing Multiple Pictures” to modify and print the current order (pg. 153). DPOF date and data imprint options are not supported when printing via direct USB connection;… -
Page 179: Menu Guide
Menu Guide The current menu is displayed by pressing the G button; to select from the menus listed below, press 4. This chapter describes the options available in the menus below. D The Playback Menu: Managing Images …………… 160 C The Shooting Menu: Shooting Options…………… 165 A Custom Settings: Fine-Tuning Camera Settings……….
-
Page 180: D The Playback Menu: Managing Images
D The Playback Menu: Managing Images The playback menu contains the options listed below. To display the playback menu, press G and press 4 to highlight the tab for current menu, then press 1 or 3 to highlight the playback menu tab; for more information, see page 19. Option See page Option…
-
Page 181
Press J to complete the operation. A confirmation dialog will be displayed; highlight Yes and press J. ❚❚ Date Selection To choose a date, select the “Select date” option and follow the steps below. Highlight a date. Press 1 or 3 to highlight a date. To view the pictures taken on the X button highlighted date, press W. -
Page 182: Delete
Delete The delete menu contains the following options: Option Description Q Selected Delete selected pictures. n Select date Delete all pictures taken on a selected date. R All Delete all pictures in the folder currently selected for playback. Protected and Hidden Images Images that are protected or hidden will not be deleted.
-
Page 183: Display Mode
Display Mode Choose the information available in the playback photo information display (pg. 129). Press 1 or 3 to highlight an option, then press 2 to select the option for the photo information display. A M appears next to selected items; to deselect, highlight and press 2.
-
Page 184: Slide Show
Slide Show Play pictures back one at a time in a simple automated slide show (pg. 143). Print Set (DPOF) Choose Select/set to select pictures for printing on a DPOF-compatible device (pg. 157). Choose Deselect all? to remove all pictures from the current print order.
-
Page 185: C The Shooting Menu: Shooting Options
C The Shooting Menu: Shooting Options The shooting menu contains the options listed below. To display the shooting menu, press G and press 4 to highlight the tab for current menu, then press 1 or 3 to highlight the shooting menu tab; for more information, see page 19. Option See page Option…
-
Page 186: Iso Sensitivity Settings
ISO Sensitivity Settings Adjust ISO sensitivity (pg. 74). This option is available in all modes. ❚❚ ISO Sensitivity Auto Control (P, S, A, and M Modes Only) If Off (the default setting) is chosen for ISO sensitivity auto control, ISO sensitivity will remain fixed at the value selected by the user (see page 74).
-
Page 187: Color Space
DCF, select the appropriate color space manually. For more information, see the documentation provided with the application or device. Nikon Software ViewNX (supplied) and Capture NX 2 (available separately) automatically select the correct color space when opening photographs created with this camera.
-
Page 188: High Iso Nr
High ISO NR Photographs taken at high ISO sensitivities can be processed to reduce “noise. ” This option is available in all modes. Option Description S High Noise reduction is performed at ISO sensitivities of ISO 800 and higher. While Normal photographs are being processed, the capacity of the memory buffer will (default)
-
Page 189: Active Folder
101NCD90). The camera treats folders with the same name but different folder numbers as the same folder. For example, if the folder NIKON is selected for Active folder, photographs in all folders named NIKON (100NIKON, 101NIKON, 102NIKON, etc.) will be visible when Current is selected for Playback folder (pg.
-
Page 190: Multiple Exposure
Multiple Exposure Create a single photograph from two to three exposures (pg. 121). This option is available in P, S, A, and M modes only. Movie setting Choose a frame size and sound options for movies (pg. 50). This option is available in all modes.
-
Page 191: A Custom Settings: Fine-Tuning Camera Settings
A Custom Settings: Fine-Tuning Camera Settings Custom Setting groups Custom Settings are used to customize camera settings to suit individual preferences. To display the Custom Settings menu, press G and press 4 to highlight the tab for current menu, then press 1 or 3 to highlight the Custom Settings tab;…
-
Page 192: A: Reset Custom Settings
The following Custom Settings are available: Custom Setting Page Custom Setting Page A Reset custom settings d Shooting/display d4 Viewfinder warning display a Autofocus a1 AF-area mode d5 Screen tips a2 Center focus point d6 CL mode shooting speed a3 Built-in AF-assist illuminator d7 File number sequence a4 AF point illumination d8 Shooting info display…
-
Page 193: D-Tracking
a: Autofocus a1: AF-area Mode This option (available in all shooting modes) determines how the focus point for autofocus is selected. Choose from the following options: Option Description User selects focus point using multi selector; camera focuses on subject in K Single point selected focus point only.
-
Page 194: A2: Center Focus Point
a2: Center Focus Point This option (available in all shooting modes) determines the size of the center focus point. Option Viewfinder display Description Normal zone Focus on stationary subjects that can be easily framed (default) in the focus point. Focus on moving subjects. Not available when Auto- 7 Wide zone area is selected for Custom Setting a1 (AF-area mode).
-
Page 195: A4: Af Point Illumination
a4: AF Point Illumination Choose whether the active focus point is highlighted in red in the viewfinder. This option is available in all shooting modes. Option Description Auto The selected focus point is automatically highlighted as needed to establish (default) contrast with the background.
-
Page 196: A6: Ae-L/Af-L For Mb-D80
a6: AE-L/AF-L for MB-D80 Choose the function assigned to the AE-L/AF-L button on the optional MB-D80 battery pack. This option is available in all shooting modes. Option Description AE/AF lock Focus and exposure lock while the MB-D80 AE-L/AF-L button is pressed. (default) C AE lock only Exposure locks while the MB-D80 AE-L/AF-L button is pressed.
-
Page 197: B: Metering/Exposure
b: Metering/Exposure b1: EV Steps for Exposure Cntrl. This option (available in all shooting modes) determines whether adjustments to shutter speed, aperture, exposure compensation, flash compensation, and bracketing are made in increments equivalent to EV or Option Description Changes to shutter speed, aperture, exposure compensation, and flash 1/3 step compensation are in increments equivalent to EV.
-
Page 198: B3: Center-Weighted Area
b3: Center-Weighted Area When calculating exposure, center-weighted metering Option M φ 6 mm assigns the greatest weight to a circle in the center of the L φ 8 mm (default) frame. The diameter (φ ) of this circle can be set to 6, 8, or N φ…
-
Page 199: C: Timers/Ae Lock
c: Timers/AE Lock c1: Shutter-Release Button AE-L At the default setting of Off, exposure only locks when the AE-L/AF-L button is pressed. If On is selected, exposure will also lock when the shutter-release button is pressed halfway. This option is available in all shooting modes. c2: Auto Meter-off Delay This option (available in all shooting modes) controls how long Option…
-
Page 200: C4: Monitor Off Delay
c4: Monitor off Delay This option (available in all shooting modes) controls how long Option the monitor remains on when no operations are performed during playback, image review, or when menus or shooting e 10 s information is displayed. Choose from 4 s (the default for image f 20 s review), 10 s (the default for playback and shooting information), 1 min.
-
Page 201: D2: Viewfinder Grid Display
d2: Viewfinder Grid Display Choose On to display on-demand grid lines in the viewfinder for reference when composing photographs. The default setting is Off. This option is available in all shooting modes. d3: ISO Display and Adjustment Choose Show ISO sensitivity (y) or Show ISO/Easy ISO (z) to display the current ISO sensitivity setting in the frame count displays in the control panel and z is selected, ISO sensitivity can be set by viewfinder.
-
Page 202: D5: Screen Tips
d5: Screen Tips Choose On (the default setting) to display tips for items selected in the shooting information display, Off to turn tip display off. This option is available in all shooting modes. d6: CL Mode Shooting Speed This option (available in all shooting modes) determines the maximum frame advance rate in ! (continuous low speed) release mode.
-
Page 203: D8: Shooting Info Display
d8: Shooting Info Display At the default setting of v Auto, the color of the lettering in the information display (pg. 10) will automatically change from black to white or white to black in response to ambient lighting conditions. To always use the same color lettering, select Manual and choose w Dark on light (black lettering) or x Light on dark (white lettering).
-
Page 204: D12: Mb-D80 Battery Type
d12: MB-D80 Battery Type To ensure that the camera functions as expected when AA batteries are used in the optional MB-D80 battery pack, match the option selected in this menu (available in all shooting modes) to the type of batteries inserted in the battery pack. There is no need to adjust this option when using EN-EL3e batteries.
-
Page 205: E: Bracketing/Flash
e: Bracketing/Flash e1: Flash Shutter Speed This option (available only in P and A modes) determines the slowest shutter speed available when using front- or rear-curtain sync or red-eye reduction in modes P and A (regardless of the setting chosen, shutter speeds can be as slow as 30 s in modes S and M or at flash settings of slow sync, slow rear-curtain sync, or red-eye reduction with slow sync).
-
Page 206
Flash Control Mode The shooting information display shows the flash control mode for the built-in flash (Built-in) and for optional flash units attached to the camera accessory shoe (Optional) as follows: i-TTL Auto aperture (AA) Manual Built-in Optional Built-in Optional Built-in Optional —… -
Page 207
❚❚ Manual Choose a flash level between Full and 1/128 ( of full power). At full power, the built-in flash has a Guide Number of 18/59 (m/ft., ISO 200, 20°C/68°F). ❚❚ Repeating Flash The flash fires repeatedly while the shutter is open, producing a strobe-light effect. -
Page 208
❚❚ Commander Mode Use the built-in flash as a master flash controlling one or more remote optional SB-900, SB-800, SB-600, or SB-R200 flash units in up to two groups (A and B) using advanced wireless lighting. Selecting this option displays the menu shown at right. Press 4 or 2 to highlight the following options, 1 or 3 to change. -
Page 209
Adjust settings for group A. Choose the flash control mode and output level for the flash units in group A. Adjust settings for group B. Choose the flash control mode and output level for the flash units in group B. Select the channel. -
Page 210
Raise the built-in flash. Press the M button to raise the built-in flash. Note that even if – – is selected for Built-in flash>Mode, the built-in flash must be raised so that monitor preflashes will be emitted. Frame the photograph, focus, and shoot. After confirming that the camera flash-ready light and the flash-ready lights for all other flash units are lit, frame the photograph, focus, and shoot. -
Page 211: E3: Modeling Flash
e3: Modeling Flash If On is selected when the camera is being used with the built-in flash or an optional SB-900, SB-800, SB-600, or SB-R200 flash unit, a modeling flash will be emitted when the camera depth-of-field preview button is pressed (pg. 82). The default setting is Off.
-
Page 212
Select a white balance increment. Pressing the D button, rotate the sub-command dial to choose the white balance adjustment. Each increment is roughly equivalent to 5 mired. White balance increment Control panel D button Sub-command dial Choose from increments of 1 (5 mired), 2 (10 mired), or 3 (15 mired; for a definition of mired, see page 98). -
Page 213
❚❚ Canceling Bracketing To cancel bracketing, press the D button and rotate the main command dial until the number of shots in the bracketing sequence is zero (r) and W is no longer displayed in the control panel. The program last in effect will be restored the next time bracketing is activated. -
Page 214
Frame a photograph, focus, and shoot. The camera will vary Active D-Lighting with each shot. The first shot will be taken with Active D-Lighting off, the following shot at the value currently selected for Active D-Lighting in the shooting menu (pg. 165). While bracketing is in effect, a bracketing progress indicator will be displayed in the control panel. -
Page 215: E5: Auto Fp
Selecting On for this option (available in only P, S, A, and M modes) enables Auto FP High-Speed Sync with optional flash units that support the Nikon Creative Lighting System (CLS). Auto FP allows the flash to be used at shutter speeds s–…
-
Page 216: F: Controls
f: Controls f1: D Switch Choose the function performed by rotating the power switch to the D position. This option is available in all shooting modes. Option Description f LCD backlight (D) (default) Control panel backlight illuminates for 6 s. Control panel backlight illuminates and shooting g Both information is displayed in monitor.
-
Page 217: F3: Assign Func. Button
f3: Assign FUNC. Button Choose the role played by the Fn button. This option is available in all shooting modes. Option Description Press the Fn button and rotate the main command dial to turn the grid # Framing grid display in the viewfinder on or off (pg. 9). Press the Fn button and rotate the main command dial to select the AF- $ AF-area mode area mode (pg.
-
Page 218
❚❚ FV Lock This feature is used to lock flash output, preventing the flash level from changing between shots or while recomposing photographs. Flash output is adjusted automatically for any changes in ISO sensitivity or aperture. Assign FV lock to the Fn button. Both the Fn and the AE-L/AF-L button can be used for FV lock. -
Page 219
Take the photograph. Press the shutter-release button the rest of the way down to shoot. If desired, additional pictures can be taken without releasing FV lock. Release FV lock. Press the Fn button to release FV lock and confirm that the r icon is no longer displayed in viewfinder. -
Page 220: F4: Assign Ae-L/Af-L Button
f4: Assign AE-L/AF-L Button Choose the role played by the AE-L/AF-L button. This option is available in all shooting modes. Option Description AE/AF lock Focus and exposure lock while the AE-L/AF-L button is pressed. (default) C AE lock only Exposure locks while the AE-L/AF-L button is pressed. F AF lock only Focus locks while the AE-L/AF-L button is pressed.
-
Page 221: F5: Customize Command Dials
f5: Customize Command Dials This option (available in all shooting modes) controls the operation of the main and sub-command dials. Option Description Controls the direction of the command dials. Choose No (the default option) for Reverse normal command dial operation, or Yes to reverse the rotation of the command rotation dials.
-
Page 222: B The Setup Menu: Camera Setup
B The Setup Menu: Camera Setup The setup menu contains the options listed below. To display the setup menu, press G and press 4 to highlight the tab for current menu, then press 1 or 3 to highlight the setup menu tab; for more information, see page 19. Option See page Option…
-
Page 223: Clean Image Sensor
Clean Image Sensor Select this option to remove dust from the image sensor or to choose options for automatic image sensor cleaning (pg. 244). Lock Mirror up for Cleaning Lock the mirror in the up position to allow inspection or manual cleaning of the low- pass filter that protects the camera image sensor (pg.
-
Page 224: World Time
World Time Change time zones, set the camera clock, choose the date display order, and turn daylight saving time on or off. Option Description Choose a time zone. The camera clock is automatically set to the time in the Time zone new time zone.
-
Page 225: Image Comment
Image Comment Add a comment to new photographs as they are taken. Comments can be viewed in ViewNX (supplied) or Capture NX 2 (available separately; pg. 240). The comment is also visible on the third page of the photo information display (pg. 132). •…
-
Page 226: Image Dust Off Ref Photo
Image Dust off Ref Photo Acquire reference data for the Image Dust Off option in Capture NX 2 (available separately; for more information, see the Capture NX 2 manual). Image dust off ref photo is available only when a CPU lens is mounted on the camera.
-
Page 227
Acquire dust off reference data. Press the shutter-release button the rest of the way down to acquire Image Dust Off reference data. The monitor turns off when the shutter-release button is pressed. Note that noise reduction will be performed if the subject is poorly lit, increasing recording times. -
Page 228: Battery Info
Battery Info View information on the battery currently inserted in the camera (if the camera is powered by an optional MB-D80 battery pack containing two EN-EL3e batteries, information for each battery will be listed separately; only the battery level is displayed when AA batteries are used).
-
Page 229: N The Retouch Menu: Creating Retouched Copies
N The Retouch Menu: Creating Retouched Copies The options in the retouch menu are used to create trimmed or retouched copies of the photographs on the memory card. The retouch menu is only available when a memory card containing photographs is inserted in the camera. To display the retouch menu, press G and press 4 to highlight the tab for current menu, then press 1 or 3 to highlight the retouch menu tab;…
-
Page 230: Creating Retouched Copies
N icon. Retouch The D90 may not be able to display or create retouched copies of images created with other devices. The monitor will turn off automatically if no operations are performed for the length of time…
-
Page 231
❚❚ Creating Retouched Copies from the Retouch Menu Select an item in the retouch menu. Press 1 or 3 to highlight an item, 2 to select. Depending on the option selected, a menu may be displayed; highlight an option and press 2. Select a picture. -
Page 232: D-Lighting
D-Lighting D-lighting brightens shadows, making it ideal for dark or backlit photographs. Before After Press 1 or 3 to choose the amount of correction performed. The effect can be previewed in the edit display. Press J to copy the photograph. Red-Eye Correction This option is used to correct “red-eye”…
-
Page 233: Trim
Trim Create a cropped copy of the selected photograph. The selected photograph is displayed with the selected crop shown in yellow; create a cropped copy as described in the following table. Description Increase size of crop Press the X button to increase the size of the crop. Press the W button to reduce the size of the crop.
-
Page 234: Monochrome
Monochrome Copy photographs in Black-and-white, Sepia, or Cyanotype (blue and white monochrome). Selecting Sepia or Cyanotype displays a preview of Increase saturation the selected image; press 1 to increase color saturation, 3 to decrease. Press J to create a monochrome copy. Decrease saturation…
-
Page 235: Filter Effects
Filter Effects Choose from the following color filter effects. After adjusting filter effects as described below, press J to copy the photograph. Option Description Creates the effect of a skylight filter, making the picture less Skylight blue. The effect can be previewed in the monitor as shown at right.
-
Page 236: Color Balance
Color Balance Use the multi selector to create a copy with modified color balance as shown below. The effect is displayed in the monitor together with red, green, and blue histograms (pg. 130) giving the distribution of tones in the copy. Increase amount of green Create retouched copy Increase amount of blue…
-
Page 237
Choose the desired size. Highlight desired size and press J to select and return to the previous menu. Choose Select image. Highlight Select image and press 2. Select pictures. W button Highlight pictures using the multi selector and press the W button to select or deselect (pg. -
Page 238: Image Overlay
Image Overlay Image overlay combines two existing NEF (RAW) photographs to create a single picture that is saved separately from the originals; the results, which make use of RAW data from the camera image sensor, are noticeably better than overlays created in an imaging application.
-
Page 239
Select the second photograph. Press 4 or 2 to highlight Image 2. Repeat Steps 2–5 to select the second photo and adjust gain. Highlight the Preview column. Press 4 or 2 to highlight the Preview column. Preview the overlay. Press 1 or 3 to highlight Overlay and press J (to save the overlay without displaying a preview, highlight Save and press J). -
Page 240: Nef (Raw) Processing
NEF (RAW) Processing Create JPEG copies of NEF (RAW) photographs. Select NEF (RAW) processing. Highlight NEF (RAW) processing in the retouch menu and press 2 to display a picture selection dialog listing only NEF (RAW) images created with this camera (note that hidden images are not displayed and can not be selected).
-
Page 241: Quick Retouch
Copy the photograph. Highlight EXE and press J to create a JPEG copy of the selected photograph. To exit without copying the photograph, press the G button. Quick Retouch Create copies with enhanced saturation and contrast. D-lighting is applied as required to brighten dark or backlit subjects.
-
Page 242: Distortion Control
Distortion Control Create copies with reduced peripheral distortion. Select Auto to let the camera correct distortion automatically and then make fine adjustments using the multi selector, or select Manual to reduce distortion manually. Press 2 to reduce barrel distortion, 4 to reduce pin-cushion distortion (note that greater amounts of distortion control result in more of the edges being cropped out).
-
Page 243: Side-By-Side Comparison
Side-by-Side Comparison Compare retouched copies to the original photographs. ❚❚ Making a Side-by-Side Comparison Select a picture. Use the multi selector to select a picture and press J. Only retouched copies (shown by a N icon) or photographs that have been retouched can be selected.
-
Page 244: Recent Settings/O My Menu
m Recent Settings/O My Menu The camera offers a choice of two custom menus: a recent settings menu consisting of the twenty most recently used settings, added to the top of the menu in the order they are used, and My Menu, a customized list of options from the playback, shooting, Custom Settings, setup, and retouch menus.
-
Page 245: O My Menu: Creating A Custom Menu
O My Menu: Creating a Custom Menu The My Menu option can be used to create and edit a customized list of up to 20 options from the playback, shooting, Custom Settings, setup, and retouch menus. Options can be added, deleted, and reordered as described below. ❚❚…
-
Page 246
Select Done. Highlight Done and press J. Delete the selected items. A confirmation dialog will be displayed. Press J to delete the selected items. Deleting Items in My Menu To delete the item currently highlighted in My Menu, press the O button. A confirmation dialog will be displayed;… -
Page 247: Technical Notes
Compatible Lenses………………….228 Compatible CPU Lenses………………….229 Non-CPU Lenses …………………….. 230 Optional Flash Units (Speedlights) …………….233 The Nikon Creative Lighting System (CLS)…………….. 233 Flash Contacts ……………………..238 Other Accessories ………………….239 Caring for the Camera ………………..243 Storage……………………….243 Cleaning ……………………….
-
Page 248: Compatible Lenses
The size of the area exposed by a 35mm camera is 36 × 24 mm. The size of the area exposed by the D90, in contrast, is 23.6 × 15.8 mm, meaning that the picture angle of a 35mm camera is approximately 1.5 times that of the D90.
-
Page 249: Compatible Cpu Lenses
Compatible CPU Lenses Camera setting Focus Mode Metering i, j, k, l, M (with electronic m, n, o, P, S, A rangefinder) Lens/accessory 3D Color ✔ ✔ ✔ ✔ ✔ ✔ ✔ Type G or D AF Nikkor , AF-S, AF-I Nikkor —…
-
Page 250: Non-Cpu Lenses
Z, M (with electronic m, n, o, P, S, A Lens/accessory rangefinder) ✔ ✔ ✔ AI-, AI-modified, Nikkor or Nikon Series E lenses — — — 3, 4 ✔ ✔ ✔ Medical-Nikkor 120mm f/4 —…
-
Page 251
Red-Eye Reduction Lenses that block the subject’s view of the AF-assist illuminator may interfere with red-eye reduction. AF-Assist Illumination AF-assist illumination is not available with the following lenses: • AF-S NIKKOR 14–24mm f/2.8G ED • AF VR 80–400mm f/4.5–5.6D ED •… -
Page 252
With the exceptions of the AI-S ED 200mm f/2 and AI ED 200mm f/2, the built-in flash can also be used with AI- and AI-modified Nikkor and Nikon Series E non-CPU lenses with focal lengths of 18–200 mm. At the 35 mm zoom position, AI-S 25–50mm f/4, AI 25–50mm f/4, and AI-S 35–… -
Page 253: Optional Flash Units (Speedlights)
Optional Flash Units (Speedlights) The D90 can be used with CLS-compatible flash units. Remove the accessory shoe cover when attaching optional flash units. The built- in flash will not fire when an optional flash unit is attached. The Nikon Creative Lighting System (CLS) Nikon’s advanced Creative Lighting System (CLS) offers improved communication…
-
Page 254
Use Only Nikon Flash Accessories Use only Nikon flash units. Negative voltages or voltages over 250 V applied to the accessory shoe could not only prevent normal operation, but damage the sync circuitry of the camera or flash. -
Page 255
The following features are available with the SB-900, SB-800, SB-600, SB-400, SB-R200, and SU-800: Flash unit Advanced Wireless Lighting Commander Remote SB-900 SB-900 SB-900 Flash mode/feature SB-800 SB-600 SB-400 SB-800 SU-800 SB-800 SB-600 SB-R200 ✔ ✔ ✔ ✔ ✔ ✔ ✔… -
Page 256
❚❚ Other Flash Units The following flash units can be used in non-TTL auto and manual modes. If they are set to TTL, the camera shutter-release button will lock and no photographs can be taken. Speedlight SB-80DX, SB-28DX, SB-28, SB-30, SB-27 , SB-22S, SB-23, SB-29 Flash mode… -
Page 257
Refer to the Speedlight manual for detailed instructions. If the Speedlight supports the Nikon Creative Lighting System, refer to the section on CLS-compatible digital SLR cameras. The D90 is not included in the “digital SLR” category in the SB-80DX, SB-28DX, and SB-50DX manuals. -
Page 258: Flash Contacts
Flash Contacts The D90 is equipped with an accessory shoe for attaching optional flash units directly to the camera. ❚❚ The Accessory Shoe Use the accessory shoe to mount optional flash units directly on the camera without a sync cable (pg. 234). The accessory shoe is equipped with a safety lock for Speedlights with a locking pin, such as the SB-900, SB-800, SB-600 and SB-400.
-
Page 259: Other Accessories
Other Accessories At the time of writing, the following accessories were available for the D90. • Rechargeable Li-ion Battery EN-EL3e (pp. 22, 23): Additional EN-EL3e batteries are available from local retailers and Nikon service representatives. The EN-EL3e can be recharged using an MH-18a or MH-18 quick charger.
-
Page 260
• Nikon filters can be divided into three types: screw-in, slip-in, and rear- interchange. Use Nikon filters; filters manufactured by other makers may interfere with autofocus or electronic range finding. • The D90 can not be used with linear polarizing filters. Use the C-PL circular polarizing filter instead. Filters •… -
Page 261
The D90 is equipped with an accessory terminal for remote cords and GPS devices. The terminal is provided with a cap, which protects the contacts when the terminal is not in use. The following accessories can be used (all lengths are approximate):… -
Page 262: Approved Memory Cards
❚❚ Approved Memory Cards The following SD memory cards have been tested and approved for use in the D90. All cards of the designated make and capacity can be used, regardless of speed. † † SanDisk 512MB, 1GB, 2GB , 4GB , 8GB †…
-
Page 263: Caring For The Camera
Caring for the Camera Storage When the camera will not be used for an extended period, replace the monitor cover, remove the battery, and store the battery in a cool, dry area with the terminal cover in place. To prevent mold or mildew, store the camera in a dry, well-ventilated area. Do not store your camera with naphtha or camphor moth balls or in locations that: •…
-
Page 264: The Low-Pass Filter
The Low-Pass Filter The image sensor that acts as the camera’s picture element is fitted with a low-pass filter to prevent moiré. If you suspect that dirt or dust on the filter is appearing in photographs, you can clean the filter using the Clean image sensor option in the setup menu.
-
Page 265
Cleaning is performed by vibrating the image sensor. If dust can not be fully removed using the options in the Clean image sensor menu, clean the image sensor manually (pg. 246) or consult a Nikon-authorized service representative. If image sensor cleaning is performed several times in succession, image sensor cleaning may be temporarily disabled to protect the camera’s internal circuitry. -
Page 266
(pg. 244), the filter can be cleaned manually as described below. Note, however, that the filter is extremely delicate and easily damaged. Nikon recommends that the filter be cleaned only by Nikon-authorized service personnel. -
Page 267: Accessories
Nikon takes every possible precaution to prevent foreign matter from coming into contact with the low-pass filter during production and shipping. The D90, however, is designed to be used with interchangeable lenses, and foreign matter may enter the camera when lenses are removed or exchanged.
-
Page 268: Caring For The Camera And Battery: Cautions
Caring for the Camera and Battery: Cautions Do not drop: The product may malfunction if Cleaning: When cleaning the camera body, use subjected to strong shocks or vibration. a blower to gently remove dust and lint, then wipe gently with a soft, dry cloth. After using Keep dry: This product is not waterproof, and the camera at the beach or seaside, wipe off may malfunction if immersed in water or…
-
Page 269
Storage: To prevent mold or mildew, store the Batteries: Dirt on the battery terminals can camera in a dry, well-ventilated area. If you prevent the camera from functioning and are using an AC adapter, unplug the adapter should be removed with a soft, dry cloth to prevent fire. -
Page 270: Troubleshooting
Troubleshooting If the camera fails to function as expected, check the list of common problems below before consulting your retailer or Nikon representative. Refer to the page numbers in the right-most column for more information. Display Problem Solution Page Adjust viewfinder focus or use optional eyepiece Viewfinder is out of focus.
-
Page 271: Shooting (All Modes)
Shooting (All Modes) Problem Solution Page Camera takes time to turn Delete files or folders. — • Memory card is full or not inserted. 29, 35 • CPU lens with aperture ring attached but aperture not Shutter-release disabled. locked at highest f-number. •…
-
Page 272: Shooting (I, J, K, L, M, N, And O Modes)
Subject is too dark or too bright. balance. Image can not be selected as source for preset white Image was not created with D90. balance. • NEF (RAW) or NEF+JPEG image quality option selected White balance bracketing for image quality.
-
Page 273: Playback
Playback Problem Solution Page Flashing areas appear in images Shooting data appear on Press 1 or 3 to choose photo information displayed, or 129, images change settings for Display mode. A graph appears during playback. NEF (RAW) image is not Photo was taken at image quality of NEF + JPEG.
-
Page 274: Miscellaneous
Miscellaneous Problem Solution Page Date of recording is not Set camera clock. correct. Some options are not available at certain combinations of Menu item can not be settings or when no memory card is inserted. Note that selected. Battery info option is not available when camera is powered by an optional AC adapter.
-
Page 275: Error Messages
Ready a fully-charged spare Low battery. battery. • Battery exhausted. • Recharge or replace battery. • Battery can not be used. • Use Nikon-approved battery, or contact Nikon-authorized service representative. • An extremely exhausted • Replace the battery, or xviii,…
-
Page 276
• Check that contacts are — Error accessing This memory card clean. If card is damaged, memory card. cannot be used. contact retailer or Nikon Card may be damaged. representative. (blinks) Insert another card. Unable to create new Delete files or insert new folder. -
Page 277
Indicator Control panel/ Monitor viewfinder Problem Solution Page Memory card is locked. Memory card is locked Slide card write-protect Slide lock to “write” (write protected). switch to “write” position. (blinks) position. Memory card does not Images created with other Cannot select this file. —… -
Page 278: Appendix
Appendix The Appendix covers the following topics: • Available Settings and Defaults………………. 258 • Memory Card Capacity ………………….262 • Exposure Program ……………………263 • Bracketing Programs ………………….. 264 • Flash Control……………………..265 • Shutter Speeds Available with the Built-in Flash…………265 •…
-
Page 279
✔ ✔ ✔ ✔ ✔ ✔ ✔ ✔ ✔ ✔ ✔ b1: EV steps for exposure cntrl. ✔ ✔ ✔ ✔ b2: Easy exposure compensation ✔ ✔ ✔ ✔ b3: Center-weighted area ✔ ✔ ✔ ✔ ✔ ✔ ✔ ✔ ✔ ✔ ✔ b4: Fine tune optimal exposure ✔… -
Page 280
The following defaults are restored with Custom Setting A (Reset Custom Settings; the following table lists the defaults for P, S, A, and M modes). For a list of the settings restored with a two-button reset, see page 172. Option Default a1: AF-area mode Auto-area… -
Page 281
Option Default e1: Flash shutter speed 1/60 s e2: Flash cntrl for built-in flash e3: Modeling flash e4: Auto bracketing set AE & flash e5: Auto FP e6: Bracketing order MTR > under > over f1: D switch LCD backlight (D) f2: OK button (shooting mode) Select center focus point f3: Assign FUNC. -
Page 282: Memory Card Capacity
Memory Card Capacity The following table shows the approximate number of pictures that can be stored on a 2 GB Panasonic Pro HIGH SPEED card at different image quality and size settings. Image quality Image size File size No. of images Buffer capacity 16.9 MB NEF +…
-
Page 283: Exposure Program
Exposure Program The exposure program for programmed auto is shown in the following graph: F (lens focal length) ≤ 55 mm 55mm < F ≤ 135 mm 135 mm < F f1.4 f2.8 f5.6 Shutter speed The maximum and minimum values for EV vary with ISO sensitivity; the above graph assumes an ISO sensitivity of ISO 200 equivalent.
-
Page 284: Bracketing Programs
Bracketing Programs The number of shots and bracketing increment are shown in the control panel as follows: Number of frames Bracketing increment Bracketing progress indicator ❚❚ The Bracketing Progress Indicator and Number of Frames Number of frames Progress indicator Description 3 frames: unmodified, negative, positive 2 frames: unmodified, positive 2 frames: unmodified, negative…
-
Page 285: Flash Control
Flash Control The following types of flash control are supported when a CPU lens is used in combination with the built-in flash or optional SB-900, SB-800, or SB-600 flash units (pp. 73, 234). • i-TTL Balanced Fill-Flash for Digital SLR: Flash output is adjusted for a natural balance between the main subject and the background.
-
Page 286: Aperture, Sensitivity, And Flash Range
Aperture, Sensitivity, and Flash Range Flash range varies with sensitivity (ISO equivalency) and aperture. Aperture at ISO equivalent of Range 1600 3200 1.0–12 3ft. 3in.–39ft. 4in. 0.7–8.5 2ft. 4in.–27ft. 11in. 0.6–6.1 2ft.–20ft. 0.6–4.2 2ft.–13ft. 9in. 0.6–3.0 2ft.–9ft. 10in. 0.6–2.1 2ft.–6ft. 11in. —…
-
Page 287: Specifications
Type Type Single-lens reflex digital camera Nikon F mount (with AF coupling and AF contacts) Lens mount Effective picture angle Approx. 1.5 × lens focal length (Nikon DX format) Effective pixels Effective pixels 12.3 million Image sensor 23.6 × 15.8 mm CMOS sensor…
-
Page 288
Lens • DX AF Nikkor: All functions supported Compatible lenses • Type G or D AF Nikkor: All functions supported (PC Micro-Nikkor does not support some functions). IX Nikkor lenses not supported. • Other AF Nikkor: All functions supported except 3D color matrix metering II. -
Page 289
Can be selected from Auto, Extra high, High, Normal, Low, or Off Focus Autofocus Nikon Multi-CAM 1000 autofocus module with TTL phase detection, 11 focus points (including one cross-type sensor), and AF-assist illuminator (range approx. 0.5–3 m/1 ft. 8 in.–9 ft. 10 in.) –1 –… -
Page 290
Accessory shoe Standard ISO 518 hot-shoe contact with safety lock Advanced Wireless Lighting supported with built-in flash, SB-900, Nikon Creative Lighting System (CLS) SB-800, or SU-800 as commander and SB-900, SB-800, SB-600, or SB-R200 as remotes; Auto FP High-Speed Sync and modeling illumination supported with all CLS-compatible flash units except SB-400;… -
Page 291
Movie Image size (pixels) • 1,280 × 720/24 fps • 640 × 424/24 fps • 320 × 216/24 fps File format Motion-JPEG Compression Monitor Monitor 3-in., approx. 920k-dot (VGA), low-temperature polysilicon TFT LCD with 170 ° viewing angle, approx. 100% frame coverage, and brightness adjustment Playback Playback… -
Page 292
• Nikon reserves the right to change the specifications of the hardware and software described in this manual at any time and without prior notice. Nikon will not be held liable for damages that may result from any mistakes that this manual may contain. -
Page 293
AF-S DX NIKKOR 18–105mm f/3.5–5.6G ED VR lens G-type AF-S DX Zoom-NIKKOR VR lens with built-in CPU and Nikon Type bayonet mount Nikon digital SLR cameras (DX format) Supported cameras Focal length 18–105mm f/3.5–5.6 Maximum aperture Construction 15 elements in 11 groups (including 1 ED glass element and 1 aspherical element) ´… -
Page 294
• DPOF: Digital Print Order Format (DPOF) is an industry-wide standard that allows pictures to be printed from print orders stored on the memory card. • Exif version 2.21: The D90 supports Exif (Exchangeable Image File Format for Digital Still Cameras) version 2.21, a standard in which information stored with photographs is used for optimal color reproduction when the images are output on Exif-compliant printers. -
Page 295
• Using a GP-1 GPS unit • Using VR (vibration reduction) mode with VR lenses To ensure that you get the most from rechargeable Nikon EN-EL3e batteries: • Keep the battery contacts clean. Soiled contacts can reduce battery performance. • Use batteries immediately after charging. Batteries will lose their charge if left unused. -
Page 296: Index
Index Menu items and options in the camera monitor are shown in bold. Symbols AF-area mode, 57, 173 Clock, 27, 204 3D-tracking(11 points), 56, 173 battery, 28, 204 D switch, 196 i (Auto mode), 34 auto-area, 36, 173 CLS, 233 j (Auto (flash off ) mode), 34 Color balance, 216 dynamic-area, 56, 173…
-
Page 297
shutter-priority auto, 81 tracking, 56, 173 cap, rear, 25 program, 263 3D, 56, 173 compatible, 228 Exposure bracketing, 92, 191, 195 Focus point wrap-around, 175 CPU, 26, 229 Exposure compensation, 90, 177 Focusing screen, 267 focus mode switch, 25 Exposure delay mode, 183 Format, 30, 202 focus ring, 25 Format memory card, 202… -
Page 298
NEF (RAW), 62, 148, 220 Vibration Reduction, 26 Remote Control, 64, 68, 241 NEF (RAW) processing, 220 Video, 146, 203 Remote cord, 85, 241 Nikon Transfer, 148, 149 cable, 146 Remote on duration, 180 No memory card?, 201 mode, 203 Reset, 75, 172, 260… -
Page 300
No reproduction in any form of this manual, in whole or in part (except for brief quotation in critical articles or reviews), may be made without written authorization from NIKON CORPORATION. AMA12890 Printed in Europe SB2L06(11) 6MB03011-06…
На этой странице вы можете совершенно бесплатно скачать Руководство по эксплуатации Nikon D90.
У документа PDF Руководство по эксплуатации 300 страниц, а его размер составляет 16.45 Mb.
Читать онлайн Фото- и видеокамеры Nikon D90 Руководство по эксплуатации

Скачать файл PDF «Nikon D90 Руководство по эксплуатации» (16.45 Mb)
Популярность:
1065 просмотры
Подсчет страниц:
300 страницы
Тип файла:
Размер файла:
16.45 Mb
Прочие инструкции Nikon D90

Прочие инструкции Nikon Фото- и видеокамеры


Прочие инструкции Nikon


Данная лицензия не предназначена для продажи этого Руководства и Вы не становитесь владельцем этого Руководства после приобретения любого продукта, загрузки и/или использования. Nikon сохраняет за собой право владения данным Руководством и, следовательно, всеми копиями и все соответствующие права, относящиеся к интеллектуальной собственности, и сохраняет за собой все права, которые явно не предоставлены Вам в рамках данного Соглашения. Данное Соглашение представляет собой полное и эксклюзивное соглашение, устное и письменное, между Вами и Nikon.
1. РУКОВОДСТВО
Руководство предназначено для клиентов, которые приобрели наши продукты. Мы можем не иметь возможности ответить на запрос физических лиц, которые не приобрели наши продукты. Пожалуйста, имейте в виду, что данное руководство и контактная информация, указанные здесь, могут быть изменены без уведомления.
Данное Руководство защищено Законом об авторском праве Японии и международными законами об авторском праве и международными договорами. Вам необходимо воспроизвести на каждой копии уведомление об авторском праве Nikon и любую другую информацию о праве собственности, которые присутствовали на оригинале.
2. ОГРАНИЧЕНИЯ
Кроме случаев, когда в данном Соглашении указано иное, нельзя делать или передавать копии данного Руководства другим или передавать в электронной форме Руководство с одного компьютера на другой по сети. НЕЛЬЗЯ ИЗМЕНЯТЬ ИЛИ УДАЛЯТЬ ЛЮБЫЕ УВЕДОМЛЕНИЯ ОБ АВТОРСКОМ ПРАВЕ, ТОРГОВОЙ МАРКЕ ИЛИ ДРУГИЕ ЗАЩИТНЫЕ УВЕДОМЛЕНИЯ, СОДЕРЖАЩИЕСЯ В ДАННОМ РУКОВОДСТВЕ. НЕЛЬЗЯ ПРИСВАИВАТЬ ИЛИ ИНЫМ ОБРАЗОМ ИЗБАВЛЯТЬСЯ, МОДИФИЦИРОВАТЬ, НАСТРАИВАТЬ, ПЕРЕВОДИТЬ, АРЕНДОВАТЬ, БРАТЬ В НАЕМ, ЗАНИМАТЬ, ПЕРЕПРОДАВАТЬ, РАСПРОСТРАНЯТЬ, ПЕРЕДАВАТЬ ПО СЕТИ ИЛИ СОЗДАВАТЬ ИЛИ ИМЕТЬ СОЗДАННЫЕ ПРОИЗВОДСТВЕННЫЕ РАБОТЫ, ОСНОВАННЫЕ НА ДАННОМ РУКОВОДСТВЕ ИЛИ ЛЮБОЙ ЧАСТИ ТАКОВОГО.
3. ОГРАНИЧЕННАЯ ГАРАНТИЯ И ОТКАЗ
В НАИБОЛЬШЕЙ СТЕПЕНИ, РАЗРЕШЕННОЙ В СИЛУ ДЕЙСТВУЮЩЕГО ЗАКОНОДАТЕЛЬСТВА, ДАННОЕ РУКОВОДСТВО ПРЕДОСТАВЛЕНО НА ОСНОВЕ ПРИНЦИПА «КАК ЕСТЬ», БЕЗ ГАРАНТИИ В ЛЮБОЙ ФОРМЕ, И КОМПАНИЯ NIKON, ЕЕ СОТРУДНИКИ, РАСПРОСТРАНИТЕЛИ, ДИЛЕРЫ И АГЕНТЫ ПРЯМО НЕ ПРИЗНАЮТ ЛЮБУЮ ГАРАНТИЮ В ЛЮБОЙ ФОРМЕ, ВЫРАЖЕННУЮ ИЛИ ПОДРАЗУМЕВАЕМУЮ, ВКЛЮЧАЯ, НО НЕ ОГРАНИЧИВАЯСЬ, ЛЮБОЙ ПОДРАЗУМЕВАЕМОЙ ГАРАНТИЕЙ ПРИГОДНОСТИ ДЛЯ ТОРГОВЛИ, ПРИГОДНОСТИ ДЛЯ ОПРЕДЕЛЕННОГО НАЗНАЧЕНИЯ ИЛИ ОТСУТСТВИЯ НАРУШЕНИЙ. В НАИБОЛЬШЕЙ СТЕПЕНИ, РАЗРЕШЕННОЙ В СИЛУ ДЕЙСТВУЮЩЕГО ЗАКОНОДАТЕЛЬСТВА, КОМПАНИЯ NIKON, ЕЕ СОТРУДНИКИ, РАСПРОСТРАНИТЕЛИ, ДИЛЕРЫ И АГЕНТЫ НЕ ГАРАНТИРУЮТ ИСПОЛНЕНИЕ ИЛИ РЕЗУЛЬТАТЫ, КОТОРЫЕ ВЫ МОЖЕТЕ ПОЛУЧИТЬ ИЗ ДАННОГО РУКОВОДСТВА, ИЛИ ЧТО ДАННОЕ РУКОВОДСТВО БУДЕТ СООТВЕТСТВОВАТЬ ВАШИМ ТРЕБОВАНИЯМ ИЛИ ЧТО РАБОТА РУКОВОДСТВА БУДЕТ БЕСПЕРЕБОЙНОЙ, БЕЗОШИБОЧНОЙ ИЛИ НЕ БУДЕТ СОДЕРЖАТЬ ВИРУСОВ. В НАИБОЛЬШЕЙ СТЕПЕНИ, РАЗРЕШЕННОЙ В СИЛУ ДЕЙСТВУЮЩЕГО ЗАКОНОДАТЕЛЬСТВА, НИ КОМПАНИЯ NIKON, НИ ЕЕ СОТРУДНИКИ, РАСПРОСТРАНИТЕЛИ, ДИЛЕРЫ И АГЕНТЫ НЕ ДОЛЖНЫ НЕСТИ ПЕРЕД ВАМИ ОТВЕТСТВЕННОСТЬ ЗА ЛЮБЫЕ КОСВЕННЫЕ, ПОСЛЕДУЮЩИЕ ИЛИ НЕПРЕДНАМЕРЕННЫЕ УБЫТКИ, ПОТЕРИ ИЛИ ИЗДЕРЖКИ ЛЮБОГО ТИПА, БУДЬ ТО ПОТЕРЯ ПРИБЫЛИ, ПЕРЕРЫВ В ДЕЯТЕЛЬНОСТИ ИЛИ ИНЫМ СПОСОБОМ ВОЗНИКАЮЩИЙ ИЛИ ЯВЛЯЮЩИЙСЯ СЛЕДСТВИЕМ ДАННОГО РУКОВОДСТВА, ВЫЗВАННЫЙ КАКИМ-ЛИБО СПОСОБОМ, ДАЖЕ ЕСЛИ КОМПАНИЯ NIKON, ЕЕ СОТРУДНИКИ, РАСПРОСТРАНИТЕЛИ, ДИЛЕРЫ ИЛИ АГЕНТЫ УВЕДОМЛЕНЫ О ВОЗМОЖНОСТИ ВОЗНИКНОВЕНИЯ ТАКИХ УБЫТКОВ, ПОТЕРЬ ИЛИ ИЗДЕРЖЕК. ЭТОТ ОТКАЗ СОСТАВЛЯЕТ СУЩЕСТВЕННУЮ ЧАСТЬ ДАННОГО СОГЛАШЕНИЯ, И НЕИСПОЛЬЗОВАНИЕ ДАННОГО РУКОВОДСТВА УПОЛНОМОЧЕНО, КРОМЕ СЛУЧАЕВ В РАМКАХ ДАННОГО ОТКАЗА.
4. ОБЩИЕ СВЕДЕНИЯ
Данное соглашение регулируется и должно истолковываться в соответствии с законами Японии независимо от его принципов коллизионного права. В случае возникновения спора в рамках или в связи с данным соглашением Вы, таким образом, даете согласие на персональную юрисдикцию Японии и отказываетесь от любого возражения, что такая дискуссия вызывает затруднение. Далее Вы соглашаетесь на получение судебных извещений в любом действии, возникающем из данного Соглашения по обычной почте или другими коммерчески оправданными способами доставки расписки в получении. Если любое положение данного Соглашения должно быть определено недействительным по какой-либо причине, то оставшиеся положения не должны быть признаны недействительными и должны остаться в силе без изменений. Данное Соглашение устанавливает в дальнейшем целое соглашение и понимание между Вами и компанией Nikon, и замещает собой и заменяет любые другие соглашения, относящиеся к сути дела данного Соглашения. Неуспех любой стороны в настаивании на строгом исполнении любого правила или положения данного соглашения, или выполнение любой опции, права или защиты прав, содержащихся в данном документе, не должны толковаться в качестве отказа от любого применения такого правила, положения, опции, права или защиты прав в будущем, и такое правило, положение, опция, право или защита прав должны продолжиться и сохранить полную юридическую силу и действие. Заголовки разделов данного Соглашения вставлены только для удобства и не должны составлять часть данного документа или влиять каким-либо образом на значение или толкование данного Соглашения. Кроме случаев, когда иначе явно указано в данном документе, положения раздела 3 и раздела 4 вместе с любыми положениями, которые с помощью своих прямо выраженных условий относятся к периодам после прекращения срока действия данного Соглашения, должны оставаться в силе после прекращения действия данного Соглашения по какой-либо причине.
Руководства для продуктов Nikon/ 2018/02/15/ Вер. 2.0.0

Данная инструкция на русском языке предназначена для фотокамеры
Nikon D90, описывает принцип работы и основные моменты эксплуатации устройства.
Производитель настойчиво рекомендует перед включением фотокамеры
внимательно изучить настоящую инструкцию.
Инструкция для фотокамеры
представлена в формате PDF. Все современные браузеры уже поддерживают данный формат и сложностей с открытием файла возникнуть не должно.
Но если открыть инструкцию все же не удается, то необходимо установить на компьютер программу для чтения PDF файлов, например, Acrobat Reader. Если у вас возникли сложности с открытием инструкции на смартфоне под управлением Android, нужно установить, например, Adobe Acrobat Reader.
Комментарии (0)
Комментарии про другие Фотокамеры
Другие Фотокамеры Nikon
Главная > Фотоаппараты > Зеркальный фотоаппарат Nikon D90
ПО, прошивка, инструкция для Nikon D90 в PDF (18.0 MB)
| ССЫЛКА: |  |
| устройство: | зеркальный фотоаппарат |
| производитель: | Nikon |
| модель: | D90 |
| дата обращения: | 05.06.2017 |
| страница добавлена: | 11.06.2017 |
| формат файла: | |
| размер файла: | 18.0 MB |
| запросил пользователь: | PhNOnik0D |
| с устройства: | компьютер |
| информация о устройстве: | Не дорогая камера отличного качества. Имеет много полезных настроек для лучшего качества картинки, как фото, так и видео. Работает быстро, есть горячие кнопки. Удобный дисплей, расположенный вверху. Фото можно обрабатывать на самом устройстве. Отличная цветопередача фотографий. Долго держит аккумулятор. Работает с объективами от F80. Высокий динамический диапазон. Очень простая в использовании техника, и в жару и в мороз работает стабильно. Отвертка позволяет экономить на объективах, не теряя высокого качества. |
| дополнительная информация: | Фотоаппарат Никон D90 инструкция в формате PDF. Руководство по эксплуатации состоит из 300 страниц. |
-
Руководства по ремонту
1
-
Инструкции по эксплуатации
14
Языки:

Nikon D90 инструкция по эксплуатации
(300 страниц)
- Языки:Русский
-
Тип:
PDF -
Размер:
17.91 MB -
Описание:
Фотоаппарат

Nikon D90 инструкция по эксплуатации
(300 страниц)
- Языки:Русский
-
Тип:
PDF -
Размер:
17.99 MB
Просмотр

Nikon D90 инструкция по эксплуатации
(300 страниц)
- Языки:Шведский
-
Тип:
PDF -
Размер:
17.16 MB
Просмотр

Nikon D90 инструкция по эксплуатации
(300 страниц)
- Языки:Нидерландский
-
Тип:
PDF -
Размер:
17.23 MB
Просмотр

Nikon D90 инструкция по эксплуатации
(300 страниц)
- Языки:Корейский
-
Тип:
PDF -
Размер:
17.28 MB
Просмотр

Nikon D90 инструкция по эксплуатации
(300 страниц)
- Языки:Исландский
-
Тип:
PDF -
Размер:
16.77 MB
Просмотр

Nikon D90 инструкция по эксплуатации
(300 страниц)
- Языки:Французский
-
Тип:
PDF -
Размер:
17.31 MB

Nikon D90 инструкция по эксплуатации
(304 страницы)
- Языки:Китайский
-
Тип:
PDF -
Размер:
17.58 MB
Просмотр

Nikon D90 инструкция по эксплуатации
(300 страниц)
- Языки:Португальский
-
Тип:
PDF -
Размер:
17.34 MB
Просмотр

Nikon D90 инструкция по эксплуатации
(328 страниц)
- Языки:Японский
-
Тип:
PDF -
Размер:
18.52 MB
Просмотр

Nikon D90 инструкция по эксплуатации
(300 страниц)
- Языки:Итальянский
-
Тип:
PDF -
Размер:
17.27 MB
Просмотр

Nikon D90 инструкция по эксплуатации
(300 страниц)
- Языки:Немецкий
-
Тип:
PDF -
Размер:
17.41 MB
Просмотр

Nikon D90 инструкция по эксплуатации
(300 страниц)
- Языки:Испанский
-
Тип:
PDF -
Размер:
17.22 MB
Просмотр

Nikon D90 инструкция по эксплуатации
(300 страниц)
- Языки:Чешский
-
Тип:
PDF -
Размер:
17 MB
На NoDevice можно скачать инструкцию по эксплуатации для Nikon D90. Руководство пользователя необходимо для ознакомления с правилами установки и эксплуатации Nikon D90. Инструкции по использованию помогут правильно настроить Nikon D90, исправить ошибки и выявить неполадки.