
1
CIS
Русский,1
CIS
IWUC 4105
Содержание
Установка, 2-3
Распаковка и нивелировка
Подключение к водопроводу и электричеству
Первый цикл стирки
Технические характеристики
Описание стиральной машины и
порядка запуска программы, 4-5
Панель управления
Индикаторы
Порядок запуска программы
Программы, 6
Таблица программ
Персонализированные настройки, 7
Регулировка температуры
Выбор скорости отжима
Дополнительные функции
Моющие средства и типы белья, 8
Распределитель моющих средств
Отбеливание
Подготовка белья
Изделия, требующие деликатной стирки
Система балансировки белья
Предосторожности и рекомендации, 9
Общие требования к безопасности
Утилизация
Техническое обслуживание и уход, 10
Отключение воды и электрического тока
Уход за стиральной машиной
Уход за распределителем моющих средств
Уход за люком и барабаном
Уход за насосом
Проверка водопроводного шланга
Поиск неисправностей и методы их
устранения, 11
Сервисное обслуживание, 12
Руководство по
эксплуатации
СТИРАЛЬНАЯ МАШИНА
UK
Українська,13
ҚАЗАҚША,25
KZ
Характеристики, спецификации
Максимальная загрузка белья:
4.5 кг
Расположение:
отдельностоящая
Размеры (ШxВxГ):
595x850x450 мм
Температура стирки:
7 уровней
Режимы стирки:
16 реж. в т.ч.: деликатные ткани, экономичная стирка, джинсы, интенсивная, кроссовки, спорт
Дополнительное полоскание:
есть
Уровень шума в режиме стирки:
66 дБ
Максимальная скорость отжима:
1000 об/мин
Выбор скорости отжима:
есть
Уровень шума в режиме отжима:
73 дБ
Тип управления:
электромеханическое
Класс электропотребления:
A
Материал изготовления бака:
пластик

Instructions for use
WASHING MACHINE
Contents
GB
Installation, 2-3
Unpacking and levelling
GB
RO
UK
Connecting the electricity and water supplies
The first wash cycle
English,1
Românã,13
Óêðà¿íñüêà,25
Technical data
Description of the washing machine
and starting a wash cycle, 4-5
CZ
CSI
Control panel
Indicator lights
Èesky,37
Ðóññêèé,49
Starting a wash cycle
Wash cycles, 6
Table of wash cycles
Personalisation, 7
Setting the temperature
Setting the spin speed
Functions
IWSD 4105
Detergents and laundry, 8
Detergent dispenser drawer
Bleach cycle
Preparing the laundry
Garments requiring special care
Load balancing system
Precautions and tips, 9
General safety
Disposal
Care and maintenance, 10
Cutting off the water or electricity supply
Cleaning the washing machine
Cleaning the detergent dispenser drawer
Caring for the door and drum of your appliance
Cleaning the pump
Checking the water inlet hose
Troubleshooting, 11
Service, 12
1
Installation
This instruction manual should be kept in a safe
Levelling the machine correctly will provide it with
GB
place for future reference. If the washing machine is
stability, help to avoid vibrations and excessive noise
sold, transferred or moved, make sure that the
and prevent it from shifting while it is operating. If it is
instruction manual remains with the machine so that
placed on carpet or a rug, adjust the feet in such a
the new owner is able to familiarise himself/herself
way as to allow a sufficient ventilation space
with its operation and features.
underneath the washing machine.
Read these instructions carefully: they contain vital
information relating to the safe installation and
Connecting the electricity and water
operation of the appliance.
supplies
Unpacking and levelling
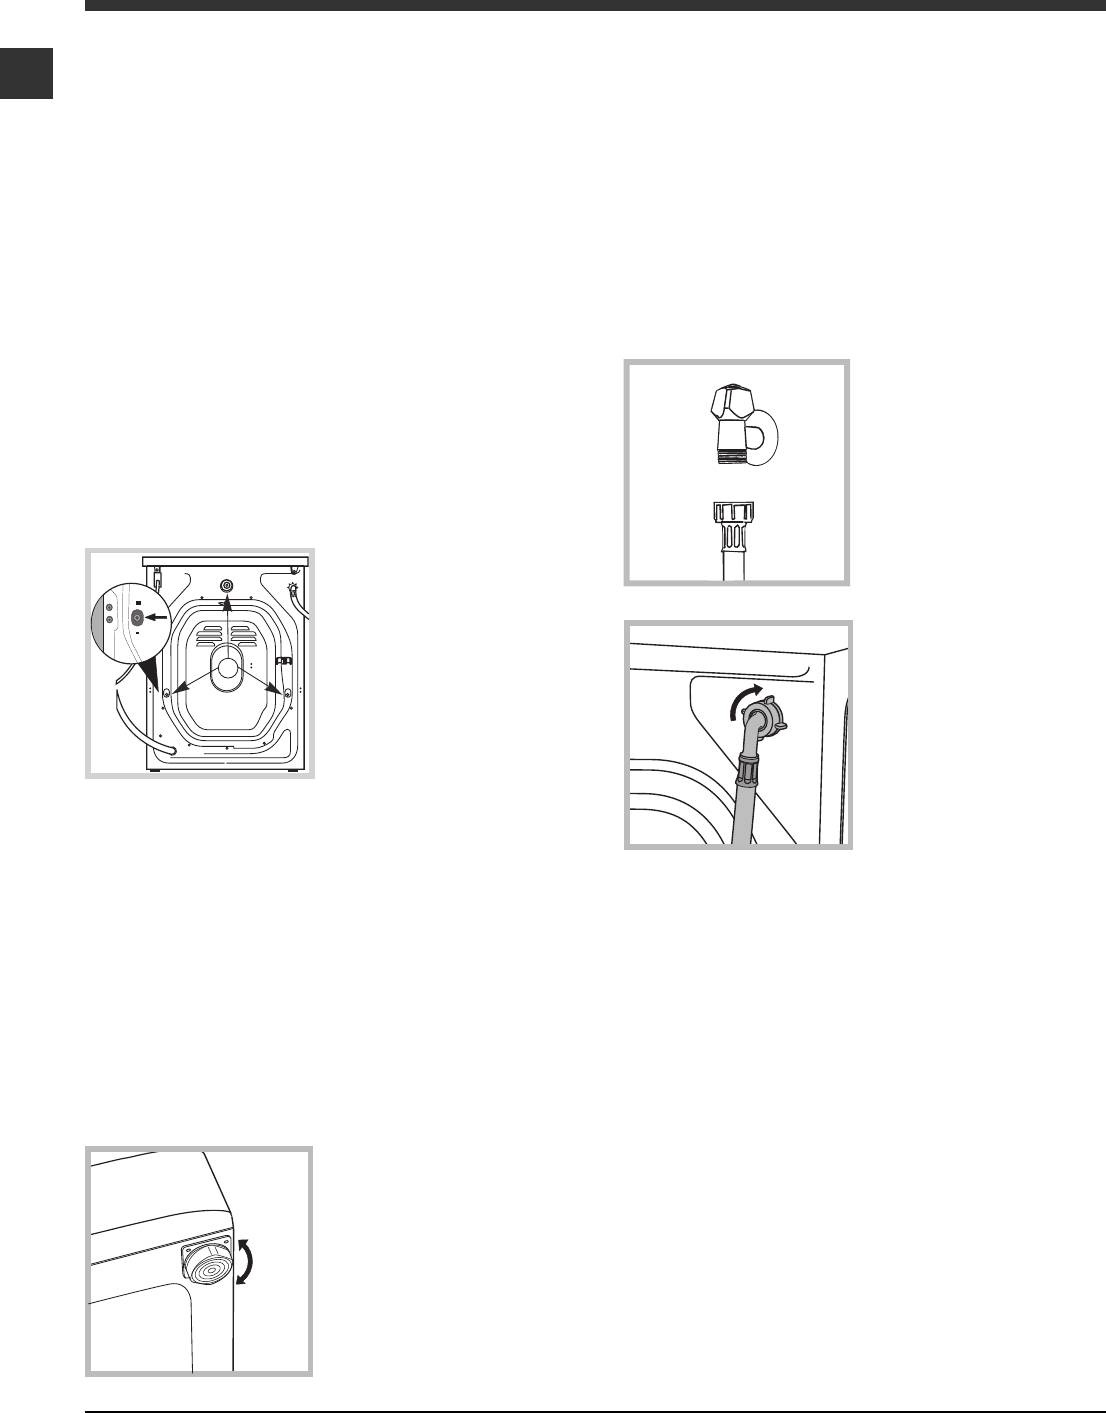
Connecting the water inlet hose
Unpacking
1. Connect the supply
pipe by screwing it to a
1. Remove the washing machine from its packaging.
cold water tab using a ¾
2. Make sure that the washing machine has not been
gas threaded connection
damaged during the transportation process. If it has
(see figure).
been damaged, contact the retailer and do not
Before performing the
proceed any further with the installation process.
connection, allow the
water to run freely until it
3. Remove the 3
is perfectly clear.
protective screws (used
during transportation) and
the rubber washer with
2. Connect the inlet hose
the corresponding
to the washing machine
spacer, located on the
by screwing it onto the
rear part of the appliance
corresponding water inlet
(see figure).
of the appliance, which is
situated on the top right-
hand side of the rear part
of the appliance (see
4. Close off the holes using the plastic plugs provided.
figure).
5. Keep all the parts in a safe place: you will need
them again if the washing machine needs to be
moved to another location.
3. Make sure that the hose is not folded over or bent.
Packaging materials should not be used as toys for
The water pressure at the tap must fall within the
children.
values indicated in the Technical details table (see
next page).
Levelling
If the inlet hose is not long enough, contact a
1. Install the washing machine on a flat sturdy floor,
specialised shop or an authorised technician.
without resting it up against walls, furniture cabinets
or anything else.
Never use second-hand hoses.
2. If the floor is not
Use the ones supplied with the machine.
perfectly level, compen-
sate for any unevenness
by tightening or loosening
the adjustable front feet
(see figure); the angle of
inclination, measured in
relation to the worktop,
must not exceed 2°.
2
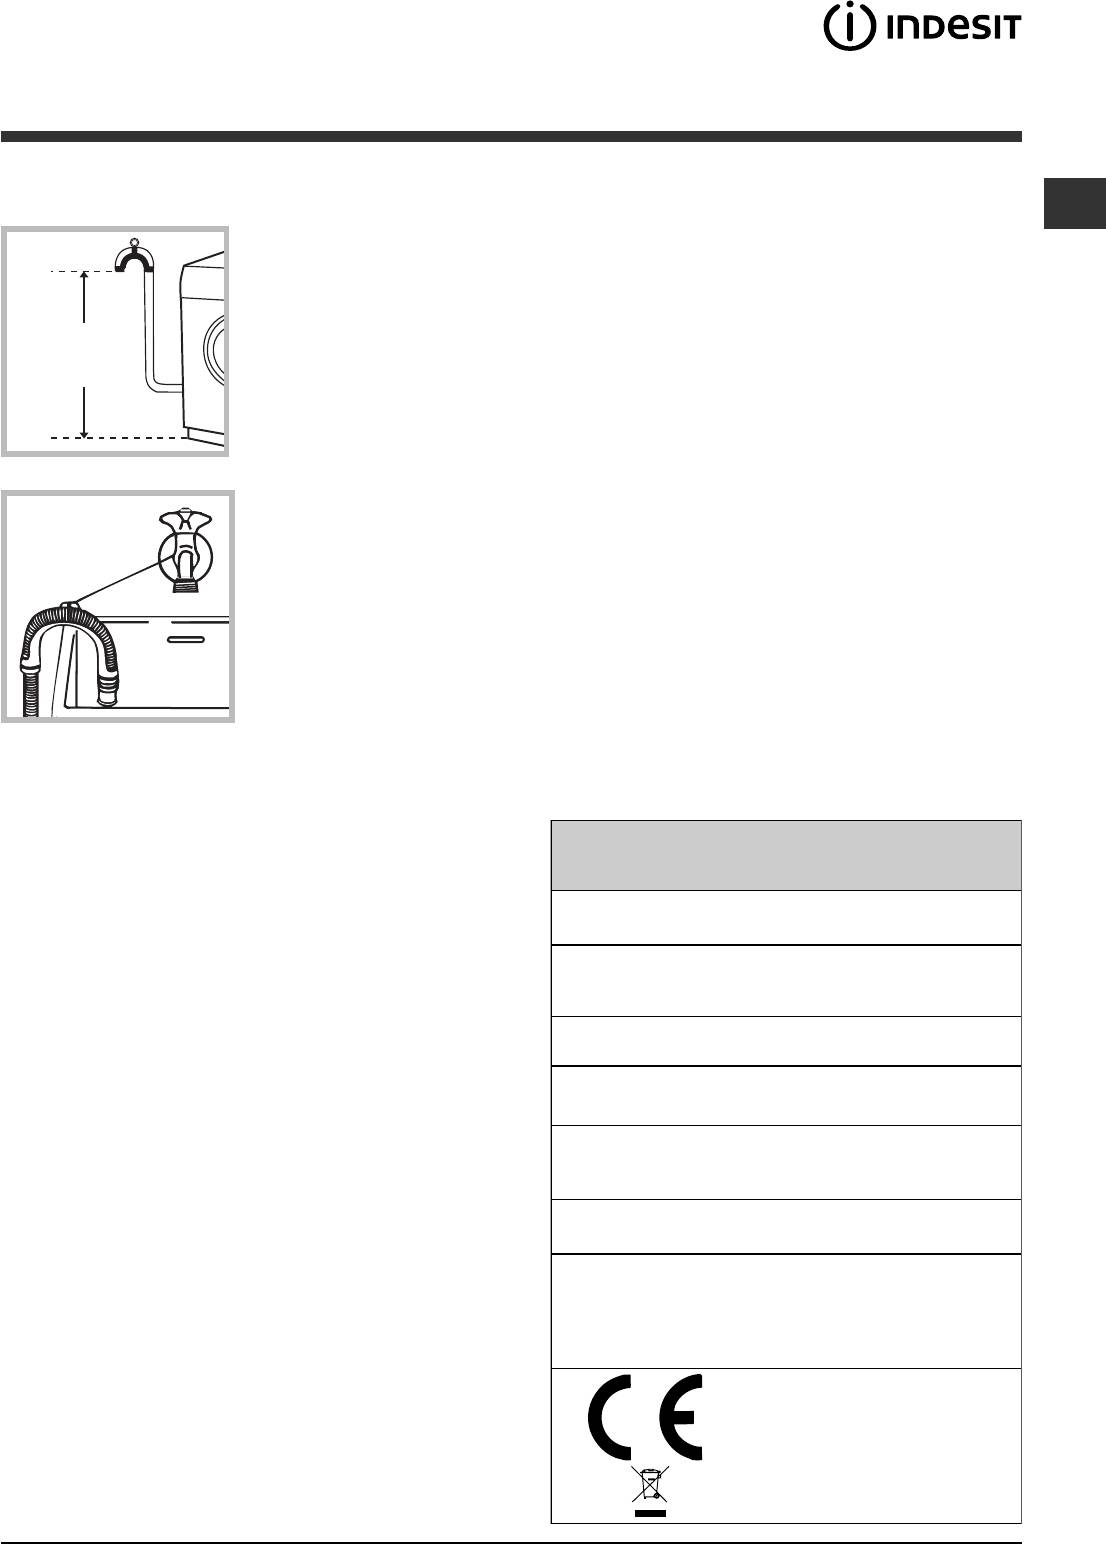
Connecting the drain hose
Do not use extension cords or multiple sockets.
GB
Connect the drain hose,
The cable should not be bent or compressed.
without bending it, to a
drainage duct or a wall
The power supply cable must only be replaced by
drain located at a height
authorised technicians.
between 65 and 100 cm
65 — 100 cm
from the floor;
Warning! The company shall not be held responsible
in the event that these regulations are not respected.
The first wash cycle
alternatively, rest it on
Once the appliance has been installed, and before
the side of a washbasin
you use it for the first time, run a wash cycle with
or bathtub, fastening the
detergent and no laundry, using the wash cycle 2.
duct supplied to the tap
(see figure). The free end
of the hose should not
be underwater.
We advise against the use of hose extensions; if it is
absolutely necessary, the extension must have the
same diameter as the original hose and must not
exceed 150 cm in length.
Technical data
Electrical connections
Model
IWSD 4105
Before plugging the appliance into the electricity
width 59.5 cm
socket, make sure that:
Dimensions
height 85 cm
depth 44 cm
the socket is earthed and complies with all
Capacity
from 1 to 4,5 kg
applicable laws;
Electrical
please refer to the technical data
the socket is able to withstand the maximum power
connections
plate fixed to the machine
load of the appliance as indicated in the Technical
data table (see opposite);
maximum pressure 1 MPa (10 bar)
Water connections
minimum pressure 0.05 MPa (0.5 bar)
drum capacity 40 litres
the power supply voltage falls within the values
indicated in the Technical data table (see opposite);
Spin speed
up to 1000 rotations per minute
the socket is compatible with the plug of the
Energy rated
washing machine. If this is not the case, replace
programmes
programme 2; temperature 60°C;
the socket or the plug.
according to
using a load of 4,5 kg.
regulation
EN 60456
The washing machine must not be installed
outdoors, even in covered areas. It is extremely
This appliance conforms to the
following EC Directives:
dangerous to leave the appliance exposed to rain,
— 89/336/EEC dated 03/05/89
storms and other weather conditions.
(Electromagnetic Compatibility) and
subsequent modifications
When the washing machine has been installed, the
— 2002/96/EC
electricity socket must be within easy reach.
— 2006/95/EC Low Voltage)
3
Сформировать заявку на ремонт можно по телефонам с 8 до 22 часов ежедневно:
+7 (495) 215 – 14 – 41
+7 (903) 722 – 17 – 03
или в любое время суток посредством online-заявки на сайте. В разговоре с менеджером сообщите, пожалуйста, следующую информацию:
- Марку и модель вашей стиралки.
- Признаки неисправности. Например, стиральная машина долго набирает воду, плохо отжимает белье или от нее пахнет горелым.
- Подходящие вам день и время ремонта.
- Ваши имя, адрес и телефон.
В день ремонта мастер свяжется с вами по указанному номеру, чтобы повторно согласовать время ремонта.
Если собственными силами устранить неполадки в стиральной машине Indesit IWUC 41051 C ECO вам не удаётся, обратитесь к профессионалам в мастерскую «РембытТех»! Знания и опыт ремонта агрегатов данной марки позволяет нам устранить практически любую неисправность прямо у вас на дому за первый выезд. На проделанные работы и новые запчасти выдаётся гарантийный талон сроком действия до 2-х лет.