-
Инструкции по эксплуатации
3
Языки:
Daewoo KOC-1B4KA инструкция по эксплуатации
(37 страниц)
- Языки:Русский
-
Тип:
PDF -
Размер:
1.52 MB
Просмотр
Daewoo KOC-1B4KA инструкция по эксплуатации
(33 страницы)
- Языки:Английский
-
Тип:
PDF -
Размер:
440.14 KB
Просмотр
Daewoo KOC-1B4KA инструкция по эксплуатации
(35 страниц)
- Языки:Португальский
-
Тип:
PDF -
Размер:
1.87 MB
Просмотр
На NoDevice можно скачать инструкцию по эксплуатации для Daewoo KOC-1B4KA. Руководство пользователя необходимо для ознакомления с правилами установки и эксплуатации Daewoo KOC-1B4KA. Инструкции по использованию помогут правильно настроить Daewoo KOC-1B4KA, исправить ошибки и выявить неполадки.
Микроволновая печь c грилем и конвекцией, Daewoo, Инструкция по эксплуатации
Внимание! Текст в этом документе был распознан автоматически. Для просмотра оригинальной страницы Вы можете воспользоваться режимом «Оригинал».
Cодержание
Document Outline
- МИКРОВОЛНОВАЯ ПЕЧЬ C ГРИЛЕМ И КОНВЕКЦИЕЙ
- KOC-1B4K
- ИНСТРУКЦИЯ по ЭКСПЛУАТАЦИИ
- Рс^
- МЕРЫ ПРЕДОСТОРОЖНОСТИ
- Проверка микроволновой печи после распаковки
- РОДИТЕЛЬСКИЙ ЗАМОК
- При использовании для приготовления пищи только энергии микроволнового излучения
- ■ Привод поворотного стола
- ■ Поворотный стол
- ■ Металлическая решетчатая подставка
- РЕКОМЕНДУЕМОЕ ИСПОЛЬЗОВАНИЕ
- ПОСУДА
- Практические советы:
- TErPERRJURE Б HIGH
- ERRORE
- ERROR 3
- ЗАМЕЧАНИЕ:
- ДВЕРКА
- ПАНЕЛЬ УПРАВЛЕНИЯ
- ВНЕШНИЕ ПОВЕРХНОСТИ
- ПРИМЕЧАНИЕ:
- Примечание:
- Внимание:
- Характер проблемы
- Способы устранения
- МЕРЫ ПРЕДОСТОРОЖНОСТИ
-
Инструкции по эксплуатации
3
Языки:
Daewoo KOC-1B4KA инструкция по эксплуатации
(37 страниц)
- Языки:Русский
-
Тип:
PDF -
Размер:
1.52 MB
Просмотр
Daewoo KOC-1B4KA инструкция по эксплуатации
(33 страницы)
- Языки:Английский
-
Тип:
PDF -
Размер:
440.14 KB
Просмотр
Daewoo KOC-1B4KA инструкция по эксплуатации
(35 страниц)
- Языки:Португальский
-
Тип:
PDF -
Размер:
1.87 MB
Просмотр
На NoDevice можно скачать инструкцию по эксплуатации для Daewoo KOC-1B4KA. Руководство пользователя необходимо для ознакомления с правилами установки и эксплуатации Daewoo KOC-1B4KA. Инструкции по использованию помогут правильно настроить Daewoo KOC-1B4KA, исправить ошибки и выявить неполадки.
Внимание! Текст в этом документе был распознан автоматически. Для просмотра оригинальной страницы Вы можете воспользоваться режимом «Оригинал».
Cодержание
Document Outline
- МИКРОВОЛНОВАЯ ПЕЧЬ C ГРИЛЕМ И КОНВЕКЦИЕЙ
- KOC-1B4K
- ИНСТРУКЦИЯ по ЭКСПЛУАТАЦИИ
- Рс^
- МЕРЫ ПРЕДОСТОРОЖНОСТИ
- Проверка микроволновой печи после распаковки
- РОДИТЕЛЬСКИЙ ЗАМОК
- При использовании для приготовления пищи только энергии микроволнового излучения
- ■ Привод поворотного стола
- ■ Поворотный стол
- ■ Металлическая решетчатая подставка
- РЕКОМЕНДУЕМОЕ ИСПОЛЬЗОВАНИЕ
- ПОСУДА
- Практические советы:
- TErPERRJURE Б HIGH
- ERRORE
- ERROR 3
- ЗАМЕЧАНИЕ:
- ДВЕРКА
- ПАНЕЛЬ УПРАВЛЕНИЯ
- ВНЕШНИЕ ПОВЕРХНОСТИ
- ПРИМЕЧАНИЕ:
- Примечание:
- Внимание:
- Характер проблемы
- Способы устранения
- МЕРЫ ПРЕДОСТОРОЖНОСТИ

Service Manual
Microwave Oven
Model : KOC-1B0K0S
http : //svc.dwe.co.kr Nov. 2000
DAEWOO ELECTRONICS CO., LTD.
S/M No. : C1B0K0S002
✔
Caution
: In this Manual, some parts can be changed for improving, their
performance without notice in the parts list. So, if you need the
latest parts information,please refer to PPL(Parts Price List) in
Service Information Center (http://svc.dwe.co.kr).

S/M No. : C1B4K0S002
Service Manual
Microwave Oven
Model: KOC-1B4K0S
KOC-1B4K5S
Caution
:In this Manual, some parts can be changed for improving, their performance without notice in the parts list. So, if you need the latest parts information, please refer to PPL(Parts Price List) in Service Information Center .
Nov. 2005

PRECAUTIONS TO BE OBSERVED BEFORE AND DURING SERVICING TO AVOID POSSIBLE EXPOSURE TO EXCESSIVE MICROWAVE ENERGY
(a)Do not operate or allow the oven to be operated with the door open.
(b)Make the following safety checks on all ovens to be serviced before activating the magnetron or other microwave source, and make repairs as necessary: (1) Interlock operation, (2) Proper door closing, (3) Seal and sealing surfaces (arcing, wear, and other damage), (4) Damage to or loosening of hinges and latches, (5) Evidence of dropping or abuse.
(c)Before turning on power to the microwave oven for any service test or inspection within the microwave generating compartments, check the magnetron, wave guide or transmission line, and cavity for proper alignment, integrity, and connections.
(d)Any defective or misadjusted components in the interlock, monitor, door seal, and microwave generation and transmission systems shall be repaired, replaced, or adjusted by procedures described in this manual before the oven is released to the owner.
A microwave leakage check to verify compliance with the Federal performance standard should be performed on each oven prior to release to the owner.
|
TABLE OF CONTENTS |
|
|
1. SAFETY AND PRECAUTIONS…………………………………………………………………………………………………………………… |
2 |
|
2. SPECIFICATIONS …………………………………………………………………………………………………………………………………….. |
3 |
|
3. EXTERNAL VIEW ……………………………………………………………………………………………………………………………………… |
3 |
|
3-1. OUTER DIMENSION ………………………………………………………………………………………………………………………… |
3 |
|
3-2. FEATURE DIAGRAM ……………………………………………………………………………………………………………………….. |
4 |
|
4. INSTALLATION ………………………………………………………………………………………………………………………………………… |
5 |
|
5. CONTROL PANEL ……………………………………………………………………………………………………………………………………. |
6 |
|
6. DISASSEMBLY AND ASSEMBLY ……………………………………………………………………………………………………………… |
7 |
|
7. INTERLOCK MECHANISM AND ADJUSTMENT……………………………………………………………………………………….. |
17 |
|
8. TROUBLESHOOTING GUIDE ………………………………………………………………………………………………………………….. |
18 |
|
9. MESUREMENT AND TEST ……………………………………………………………………………………………………………………… |
24 |
|
9-1. MEASUREMENT OF THE MICROWAVE POWER OUTPUT ……………………………………………………………… |
24 |
|
9-2. MICROWAVE RADIATION TEST …………………………………………………………………………………………………….. |
25 |
|
9-3. COMPONENT TEST PROCEDURE…………………………………………………………………………………………………. |
26 |
|
9-4. COMPONENT ACTION…………………………………………………………………………………………………………………… |
27 |
|
10. WIRING DIAGRAM………………………………………………………………………………………………………………………………… |
28 |
|
11. EXPLODED VIEW AND PARTS LIST …………………………………………………………………………………………………… |
29 |
|
11-1. DOOR ASSEMBLY……………………………………………………………………………………………………………………….. |
29 |
|
11-2. CONTROL PANEL ASSEMBLY……………………………………………………………………………………………………… |
29 |
|
11-3. TOTAL ASSEMBLY………………………………………………………………………………………………………………………. |
29 |
|
12. PRINTED CIRCUIT BOARD …………………………………………………………………………………………………………………… |
33 |
|
13. P.C.B CIRCUIT DIAGRAM……………………………………………………………………………………………………………………… |
37 |
1

1. SAFETY AND PRECAUTIONS
1. FOR SAFE OPERATION
Damage that allows the microwave energy (that cooks or heats the food) to escape will result in poor cooking and may cause serious bodily injury to the operator.
IF ANY OF THE FOLLOWING CONDITIONS EXIST, OPERATOR MUST NOT USE THE APPLIANCE. (Only a trained service personnel should make repairs.)
1)A broken door hinge.
2)A broken door viewing screen.
3)A broken front panel, oven cavity.
4)A loosened door lock.
5)A broken door lock.
The door gasket plate and oven cavity surface should be kept clean.
No grease, soil or spatter should be allowed to build up on these surfaces or inside the oven. DO NOT ATTEMPT TO OPERATE THIS APPLIANCE WITH THE DOOR OPEN.
The microwave oven has concealed switches to make sure the power is turned off when the door is opened. Do not attempt to defeat them.
DO NOT ATTEMPT TO SERVICE THIS APPLIANCE UNTIL YOU HAVE READ THIS SERVICE MANUAL.
2.FOR SAFE SERVICE PROCEDURES.
1.If the oven is operative prior to servicing, a microwave emission check should be performed prior to servicing the oven.
2.If any certified oven unit is found to servicing, a microwave emission check should be performed prior to servicing the oven.
(a)inform the manufacturer, importer or assembler,
(b)repair the unit at no cost to the owner,
(c)attempt to ascertain the cause of the excessive leakage,
(d)tell the owner of the unit not to use the unit until the oven has been brought into compliance.
3.If the oven operates with the door open, the service person should tell the user not to operate the oven and contact the manufacturer immediately.
IMPORTANT
The wire in this mains lead coloured in accordance with the following code.
Green-and-yellow : Earth
|
Blue |
: Neutral |
|
Brown |
: Live |
As the colours of the wires in the mains lead of this appliance may not correspond with the coloured markings identifying the terminals in your plug, proceed as follows.
The wire which is coloured green-and-yellow must be connected to the terminal in the plug which is marked with the letter ‘E’ or by earth symbol or green-and-yellow.
The wire which is coloured blue must be connected to the terminal which is marked with the letter ‘N’ or coloured black.
The wire which is coloured brown must be connected to the terminal which is marked with the letter ‘L’ or coloured red.
NOTE : This oven is designed for counter-top use only.
2
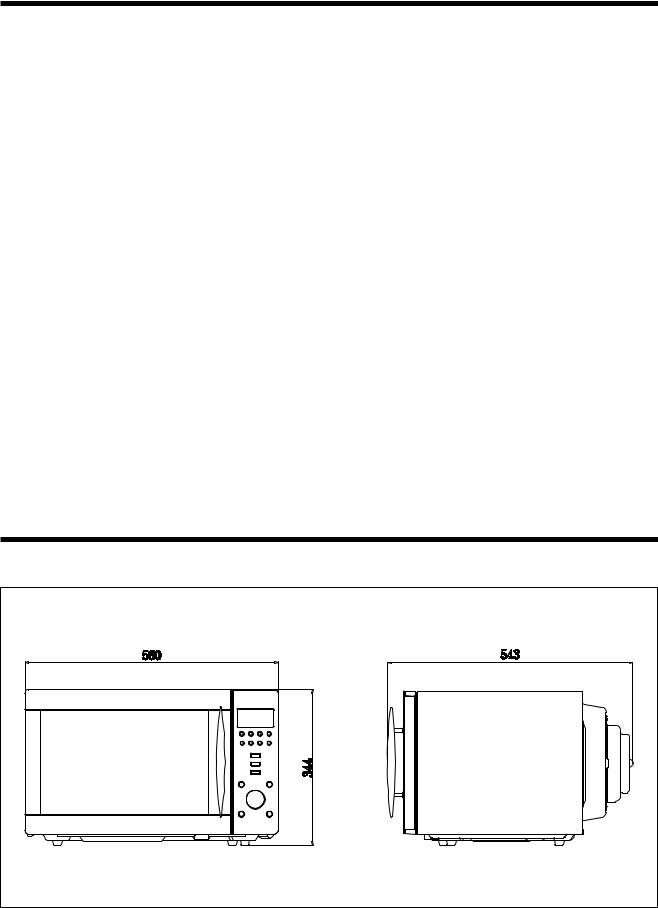
2. SPECIFICATIONS
|
MODEL |
KOC-1B4K0S |
KOC-1B4K5S |
||
|
POWER SUPPLY |
220~230V~50Hz, SINGLE |
220~240V~50Hz, SINGLE |
||
|
PHASE WITH EARTHING |
PHASE WITH EARTHING |
|||
|
MICROWAVE |
1500W |
|||
|
POWER |
GRILL |
1600W |
||
|
CONSUMPTION |
CONVECTION |
2300W |
||
|
COMBINATION |
3100W |
2300W |
||
|
MICROWAVE ENERGY OUTPUT |
1000W(IEC705) |
|||
|
MICROWAVE FREQUENCY |
2450MHz |
|||
|
OUTSIDE DIMENSIONS (W X H X D) |
560X344X543mm (22.0X13.5X21.3 in.) |
|||
|
CAVITY DIMENSIONS (W X H X D) |
368.5X246X376.5mm (14.5X9.7X14.8 in.) |
|||
|
NET WEIGHT |
APPROX. 21.5kg (47.6 lbs.) |
|||
|
TIMER |
60 minutes |
|||
|
FUNCTION SELECTIONS |
MICROWAVE/ GRILL/ CONVECTION/ COMBINATION |
|||
|
POWER SELECTIONS |
10 LEVELS |
|||
|
CAVITY VOLUME |
1.2 Cu. Ft |
|||
*Specifications are subject to change without notice.
3.EXTERNAL VIEW
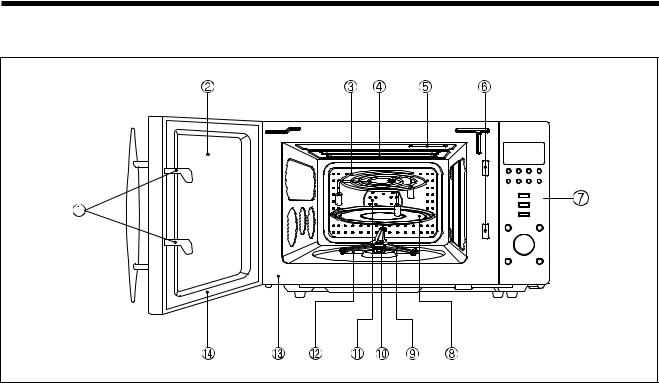
2. FEATURE DIAGRAM
11.DOOR HOOK
When the door is closed, it will automatically lock shut. If door is opened while oven is operating, the magnetron will immediately stop operating.
12.DOOR VIEWING SCREEN
Allows viewing of food. The screen is designed so that light can pass through, but not the microwave.
13.METAL RACK
14.TOP HEATER
Turns on when convection, grill and combi cooking is selected.
15.OVEN LAMP
Automatically turns on during oven operating.
16.SAFETY INTERLOCK SYSTEM
17.CONTROL PANEL
18.TURNTABLE TRAY
Rotates during cooking and ensure even distribution of Microwaves. It can also be used as a cooking utensil.
19.ROLLER GUIDE
This must always be used for cooking together with the turntable tray.
10. COUPLER
This fits over the shaft in the center of the ovens cavity floor. This is to remain in the oven for all cooking.
11.CONVECTION OUTLET & FAN
12.UNDER HEATER
13.OVEN FRONT PLATE
14.DOOR SEAL
Door seal maintains the microwave energy within the oven cavity and prevents microwave leakage.
4

4. INSTALLATION
1.Steady, flat location
This microwave oven should be set on a steady, flat surface. This microwave oven is designed for counter top use only.
2.Leave space behind and side
All air vents should be kept a clearance. If all vents are covered during operation, the oven may overheat and, eventually, cause failure.
3.Away from Radio and TV sets
Poor television reception and radio interference may result if the oven is located close to a TV, Radio, antenna or feeder and so on.
Position the oven as far from them as possible.
4.Away from heating appliances and water taps
Keep the oven away from hot air, steam or splash when choosing a place to position it, or the insulation might be adversely affected and breakdowns occur.
5.Power supply
•Check your local power source. This microwave oven requires a current of approximately 12(8) amperes, 220~240V, 50Hz.
•Power supply cord is about 1.2 meters long.
•The voltage used must be the same as specified on this oven. Using a higher voltage may result in a fire or other accident causing oven damage. Using low voltage will cause slow cooking. We are not responsible for damage resulting from use of this oven with a voltage of ampere fuse other than those specified.
•This appliance is supplied with cable of special type, which, if damaged, must be repaired with cable of same type. Such a cable can be purchased from DAEWOO and must be installed by a Qualified Person.
6.Examine the oven after unpacking for any damage such as:
A misaligned door, broken door or a dent in cavity.
If any of the above are visible, DO NOT INSTALL, and notify dealer immediately.
7.Do not operate the oven if it is colder than room temperature.
(This may occur during delivery in cold weather.) Allow the oven to become room temperature before operating.
EARTHING INSTRUCTIONS
This appliance must be earthed. In the event of an electrical short circuit, earthing reduces the risk of the electric shock by providing an escape wire for the electric current. This appliance is equipped with a cord having a earthing wire with a earthing plug. The plug must be plugged into an outlet that is properly installed and earthed.
WARNING
Improper use of the earthing plug can result in a risk of electric shock. Consult
a qualified electrician or serviceman if the earthing instructions are not completely understood, or if doubt exists as to whether the appliance is properly earthed, and either:
If it is necessary to use an extension cord, use only a 3-wire extension cord that has a 3-blade earthing plug, and a 3-slot receptacle that will accept the plug on the appliance.
The marked rating of the extension cord should be equal to or greater than the electrical rating of the appliance, or Do not use an extension cord.
5

5. CONTROL PANEL
DISPLAY WINDOW
1.MICROWAVE — indicator, showing microwaving in progress.
2. DEFROST- indicator, showing defrosting in progress.
3.GRILL(upper grill heater) — indicator, showing griling in progress.
4.GRILL(lower grill heater) — indicator, showing griling in progress.
5.CONVECTION — indicator, showing convectioning in progress.
6.CHILD LOCK — indicator.
7.% — percentage microwave power level indicator.
BUTTONS
8.language — Press to select the language.
9.clock — Use to set clock.
10.less — Use to remove time from cooking.
11.more — Use to add time to cooking.
12.m/w — Press to select microwave power level.
13.combi — Press to select combi cooking mode.
14.auto defrost — Press to select defrost menu.
15.convection — Press to select convection
temperature.
16.grill — Press to select grill.
17.cake — Press to select cake menu.
18.crusty — Press to select crusty menu.
19.auto cook — Press to select auto cook menu.
20.memory — Use to set favorite cooking mode.
21.start/speedy cook — Press to start a programme, also for speedy start (each press adds 30 secondsmicrowave cooking time).
22.stop/clear — Press once to stop a programme, and twice to cancel a programme.
23.dial knob — Use to set time, weight and quantity.
6
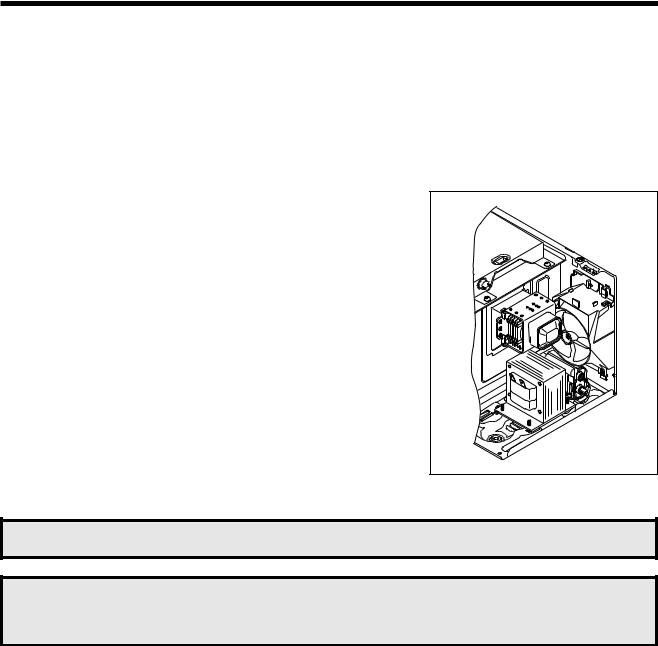
6. DISASSEMBLY AND ASSEMBLY
— Cautions to be observed when trouble shooting.
Unlike many other appliances, the microwave oven is high-voltage, high-current equipment.
It is completely safety during normal operation. However, carelessness in servicing the oven can result in an electric shock or possible danger from a short circuit.
You are asked to observe the following precautions carefully.
1.Always remove the power plug from the outlet before servicing.
2.Use an insulated screwdriver and ware rubber gloves when servicing the high voltage side.
3.Discharge the high voltage capacitor before touching any oven
components or wiring.
(1)Check the earthed.
Do not operate on a two-wire extension cord.
The microwave oven is designed to be used with earthed.
It is imperative, therefore, to makes sure it is earthed properly before beginning repair work.
(2) Warning about the electric charge in the high voltage capacitor. For about 30 seconds after the operation stopped and electric charge remains in the high voltage capacitor. When replacing or checking parts, short between oven chassis and the negative high terminal of the high voltage capacitor, by using a properly insulated screwdriver to discharge.
4.When the 15A fuse is blown out due to the operation of the monitor switch; replace primary interlock switch, secondary interlock switch
|
and interlock monitor switch. |
SHORT |
5.After repair or replacement of parts, make sure that the screws are properly tightened, and all electrical connections are tightened.
6.Do not operate without cabinet.
CAUTION : Service personnel should remove their watches whenever working close to or replacing the magnetron.
WARNING : When servicing the appliance, need a care of touching or replacing high potential parts because of electrical shock or exposing microwave. These parts are as follows — HV Transformer, Magnetron, HV Capacitor, HV Diode.
7
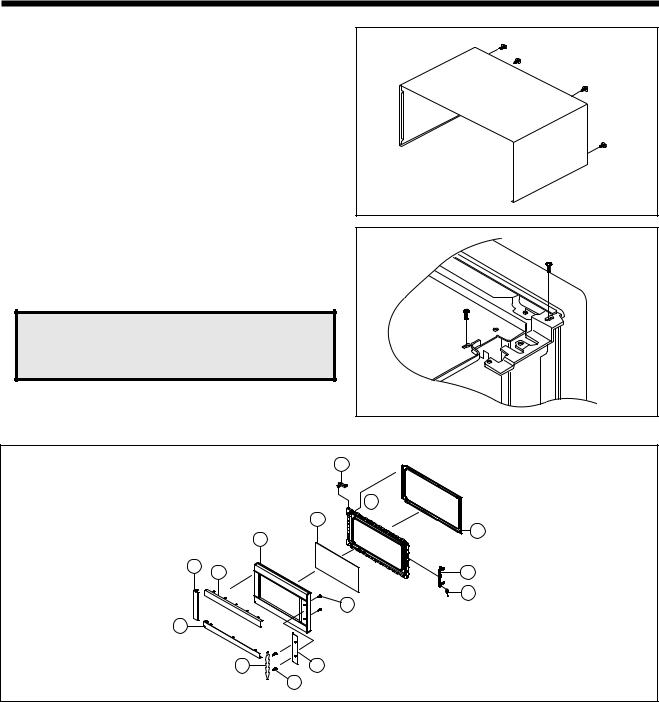
1.To remove: cabinet
1)Remove four screws on cabinet back.
2)Push the cabinet backward.
2. To remove guide wind assembly
1) Remove two screws which secure the stopper hinge top. 2) Remove the door assembly from top plate of cavity.
3) Reverse the above for assemby.
NOTE: After replacting the door assembly, perform a check of correct alignment with the hinge and cavity front plate.
3. To remove door parts.
|
A10 |
|
|
A11 |
|
|
A09 |
|
|
A14 |
|
|
A07 |
|
|
A05 |
A12 |
|
A04 |
|
|
A13 |
|
|
A08 |
|
|
A03 |
|
|
A01 |
A06 |
|
A02 |
|
REF NO. |
PART CODE |
PART NAME |
DESCRIPTION |
Q TY |
REMARK |
|
A01 |
3512603520 |
HANDLE DOOR |
ALUMINUM |
1 |
|
|
A02 |
3515307400 |
SUPPORTER HANDLE |
KOC-1B4K0S |
2 |
|
|
A03 |
3511605500 |
DECORATOR DOOR *U |
STS304 T0.5 |
1 |
|
|
A04 |
3511605400 |
DECORATOR DOOR *T |
STS304 T0.5 |
1 |
|
|
A05 |
3511605700 |
DECORATOR DOOR *L |
STS304 T0.5 |
1 |
|
|
A06 |
3511605600 |
DECORATOR DOOR *R |
STS304 T0.5 |
1 |
|
|
A07 |
3512204740 |
FRAME DOOR |
PC |
1 |
|
|
A08 |
7001503511 |
SCREW MACHINE |
PAN 5X35 MFZN |
2 |
|
|
A09 |
3517004090 |
BARRIER-SCREEN *O |
TEMP GLASS T3.2 |
1 |
|
|
A10 |
3515204900 |
STOPPER HINGE *T AS |
KOC-1B4K0S |
1 |
|
|
A11 |
3516602100 |
DOOR-PLATE |
SBHG-1A T0.7 |
1 |
|
|
A12 |
3513101200 |
HOOK |
POM |
1 |
|
|
A13 |
3515101800 |
SPRING HOOK |
PW1 |
1 |
|
|
A14 |
3512302300 |
GASKET DOOR |
PRT |
1 |
|
8
(1)Remove the gasket door from door plate.
(2)Remove a screw from door plate.
(3)Remove the door frame from door plate.
(4)Remove the stopper hinge top from door plate.
(5)Remove the spring and the hook.
(6)Remove two screws from door frame.
(7)Remove the handle door and barrier screen outer from door frame.
(8)Remove the barrier screen outer from handle door.
(9)Reverse the above steps for reassembly.
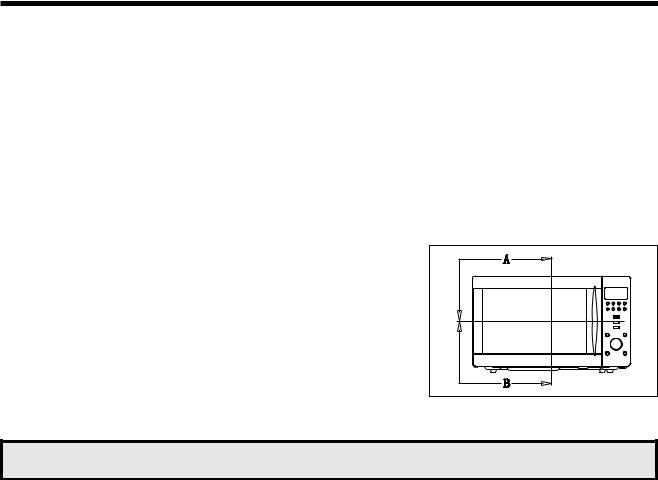
4. Method to reduce the gap between the door seal and the oven front surface.
(1) To reduce gap located on part ‘A’.
• Loosen two screws on stopper hinge top, and then push the door to contact the door seal to oven front surface.
• Tighten two screws.
(2) To reduce gap located on part ‘B’.
•Loosen two screws on stopper hinge under, and then push the door to contact the door seal to oven front surface.
•Tighten two screws.
NOTE : A small gap may be acceptable if the microwave leakage does not exceed 4mW does not exceed 4mW/cm2.
9

5. To remove: control panel parts.
|
B01 |
B02 |
B03 |
B04 |
B05 |
B06 |
B07 B08 B09 B10 B11 B12
|
REF NO. |
PART CODE |
PART NAME |
DESCRIPTION |
Q TY |
REMARK |
|
|
B01 |
3515501720 |
WINDOW DISPLAY |
SAN |
1 |
||
|
B02 |
3511605020 |
DECORATOR C/PANEL |
STS 304 T0.5 HL |
1 |
||
|
B03 |
3516724140 |
C-PANEL |
ABS XR-401 H-2938 |
1 |
||
|
B04 |
3516908440 |
BUTTON FUNCTION-B |
ABS SG-175 SG-0760D |
1 |
||
|
B05 |
3516908340 |
BUTTON FUNCTION-A |
ABS XR-401 H-2938 |
1 |
||
|
B06 |
3513406040 |
KNOB VOLUME |
ABS SG-175 SG-0760D |
1 |
||
|
B07 |
3511605120 |
DECORATOR RING |
ABS |
4 |
||
|
B08 |
3516908540 |
BUTTON FUNCTION-C |
ABS SG-175 SG-0760D |
4 |
||
|
B09 |
3514323130 |
SUB PCB ASS Y |
KOC-1B4K |
1 |
||
|
B10 |
7121301011 |
SCREW TAPPING |
T2S PAN 3X10 MFZN |
7 |
||
|
B11 |
PKMPMSAD00 |
MAIN PCB ASSY |
KOC-1B4K0S |
1 |
||
|
PKMPMSAD20 |
KOC-1B4K5S |
1 |
||||
|
B12 |
7122401211 |
SCREW TAPPING |
T2S TRS 4X12 MFZN |
4 |
(1)Remove four screws(B12) which secure the control panel.
(2)Pull out the Main PCB assembly(B11).
(3)Remove seven screws(B10) which secure the control panel.
(4)Pull out the Sub PCB assembly(B09).
(5)Pull out the Knob volume(B06) from the Sub PCB assembly.
(6)Pull out six buttons from the control panel.
(7)Pull out Decorator ring(B07) and Window display (B01) from the control panel.
(8)Pull out the Decorator c-panel (B02) from the control panel.
(9)Reverse the above steps for reassembly.
10
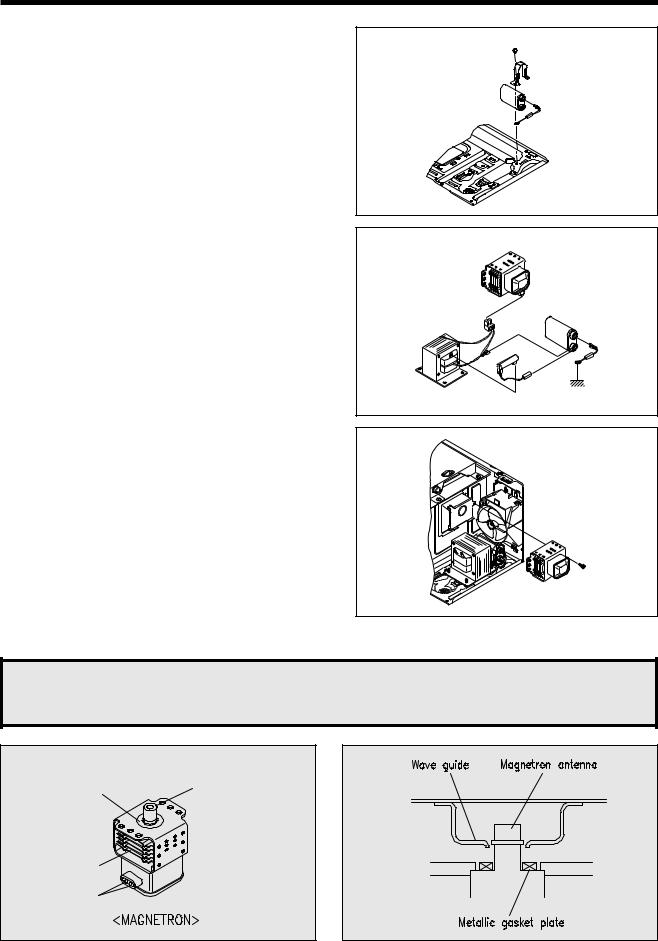
6.To remove high voltage capacitor.
(1)Remove a screw which secure the grounding ring terminal of the H.V.diode and the capacitor holder.
(2)Remove the H.V. diode from the capacitor holder.
(3) Reverse the above steps for reassembly.
High voltage circuit wiring
7. To remove magnetron.
(1) Remove a screw which secure the magnetron.
(2)Remove the magnetron.
(3)Reverse the above steps for reassembly.
CAUTION : Never install the magnetron without the metallic gasket plate which is packed with each magnetron to prevent microwave leakage. Whenever repair work is carried out on magnetron, check the microwave leakage. It shall not exceed 4mW/cm2 for a fully assembled oven with door normally closed.
|
Metallic |
Magnetron antenna |
|
gasket |
|
|
plate |
Cooling fin
Filament terminal
11

MICROWAVE CONVECTION/GRILL OVEN
|
% |
|||
|
More |
Less |
Clock |
Language |
|
Memory |
Cake |
Crusty |
Auto Cook |
|
M/W |
|||
|
GRILL |
|||
|
COMBI |
|||
|
CONVECTION |
AUTO DEFROST |
||
|
eight |
Q |
||
|
e |
W |
ua |
|
|
nt |
|||
|
im |
y |
||
|
i |
|||
|
T |
t |
||
|
STOP/CLEAR |
START/ |
|
SPEEDY COOK |
Before operating this oven, please read these manual completely.
PRECAUTIONS TO AVOID POSSIBLE EXPOSURE TO EXCESSIVE MICROWAVE ENERGY
(a)Do not attempt to operate this oven with the door open since open-door operation can result in harmful exposure to microwave energy. It is important not to defeat or tamper with the safety interlocks.
(b)Do not place any object between the oven front face and the door or allow soil or cleaner residue to accumulate on sealing surfaces.
(c)WARNING : If the door or door seals are damaged, the oven must not be operated until it has been repaired by a competent person: (1) door (bent), (2) hinges and latches (broken or loosened), (3) door seals and sealing surfaces.
(d)WARNING : It is hazardous for anyone other than a competent person to carry out any service or repair operation which involves the removal of a cover which gives protection against exposure to microwave energy.
(e)WARNING : Liquids or other foods must not be heated in sealed containers since they are liable to explode.
(f)WARNING : Only allow children to use the oven without supervision when adequate instructions have been given so that the child is able to use the oven in a safe way and understands the hazards of improper use.
(g)WARNING : When the appliance is operated in the combination mode, children should only use the oven under adult supervision due to the temperatures generated.
|
TABLE OF CONTENTS |
|
|
• INSTALLATION AND EARTHING INSTRUCTIONS……………………………………………………………….. |
2 |
|
• IMPORTANT SAFETY INSTRUCTIONS ………………………………………………………………………………. |
3 |
|
• WHICH UTENSILS CAN BE USED IN THE OVEN? ………………………………………………………………. |
5 |
|
• CONTROL PANEL …………………………………………………………………………………………………………….. |
6 |
|
• ACCESSORIES ………………………………………………………………………………………………………………… |
7 |
|
• BEFORE OPERATION ………………………………………………………………………………………………………. |
8 |
|
SETTING THE LANGUAGE……………………………………………………………………………………………….. |
8 |
|
SETTING THE CLOCK ……………………………………………………………………………………………………… |
9 |
|
CHILD LOCK AND POWER SAVE MODE …………………………………………………………………………… |
9 |
|
OPERATION ………………………………………………………………………………………………………………….. |
10 |
|
MICROWAVE COOKING …………………………………………………………………………………………………. |
10 |
|
GRILL COOKING ……………………………………………………………………………………………………………. |
11 |
|
CONVECTION COOKING (with pre-heat) ………………………………………………………………………….. |
12 |
|
CONVECTION COOKING (traditional cooking) …………………………………………………………………… |
13 |
|
COMBINATION COOKING ………………………………………………………………………………………………. |
14 |
|
AUTO DEFROST ……………………………………………………………………………………………………………. |
17 |
|
CAKE…………………………………………………………………………………………………………………………….. |
18 |
|
CRUSTY………………………………………………………………………………………………………………………… |
21 |
|
AUTO COOK ………………………………………………………………………………………………………………….. |
22 |
|
MEMORY COOK…………………………………………………………………………………………………………….. |
25 |
|
SPEEDY COOK ……………………………………………………………………………………………………………… |
25 |
|
LESS, MORE………………………………………………………………………………………………………………….. |
25 |
|
MANUAL COOLING ………………………………………………………………………………………………………… |
26 |
|
SCROLL SPEED CONTROL ……………………………………………………………………………………………. |
26 |
|
TO STOP THE OVEN WHILE THE OVEN IS OPERATING ………………………………………………….. |
27 |
|
ABNORMAL MESSAGES ………………………………………………………………………………………………… |
27 |
|
• GENERAL GUIDE LINES …………………………………………………………………………………………………. |
28 |
|
• KEEP THE OVEN CLEAN ………………………………………………………………………………………………… |
29 |
|
• BEFORE CALLING FOR SERVICE……………………………………………………………………………………. |
30 |
|
• QUESTIONS AND ANSWERS ………………………………………………………………………………………….. |
31 |
|
• SPECIFICATIONS …………………………………………………………………………………………………………… |
31 |
1

INSTALLATION AND EARTHING INSTRUCTIONS
How to examine your microwave oven after unpacking.
Unpack oven, remove all packing material, and examine the oven for any damage such as dents, broken door, latches or cracks in the door. Do not remove the film from inside the door. Notify dealer immediately if the oven is damaged. Do not install if the oven is damaged.
Where to place your microwave oven.
1.Place the oven on a flat and stable surface.
2.The microwave oven shall not be placed in a cabinet unless it has been tested in a cabinet.
3.Surface of the oven is protected by a plastic film which should be removed before using.
4.Leave space behind and sides and upper of the oven. All air vents should be kept a clearance.
If all vents are covered during operation, the oven may overheat and, eventually, lead to oven failure.
5.Keep away from radio and TV sets. If the oven is located close to a TV, radio interference may result.
6.Keep away from heating appliances and water taps. Keep the oven away from hot air, steam or splash when choosing a place to position it, or the insulation might be adversely affected and breakdowns occur.
7.The minimum height of free space necessary above the top surface of the oven is minimum 170mm.
Prior to use (If your oven has a grill element)
In order to protect your oven during transportation and storage, the grill element is covered with a protective coating. To remove this coating the grill element must be heated for 5 minutes. This procedure will produce some bad odours as the protective coating on the element disappears.
To remove the coating, use the following procedures:
1.Place an overproof and microwave safe bowl, containing 200cc of water or more, in the oven.
2.Press the convection button.
3.Set the time to 5 minutes.
4.Press the start button.
5.When the 5 minutes has elapsed, an acoustic signal sounds.
Note:
The protective coating has now been removed and the oven is ready to use. Please be aware that your oven now is very hot.
6.Open the oven door and remove the bowl with water (use oven gloves when removing the bowl).
CHILD LOCK
To prevent child from operating the oven, install the childlock key.
1.Touch Stop/Clear button for 3 seconds.
Indicator lock is indicated and all buttons do not operate.
2.Touch Stop/Clear button for 3 seconds once again, then childlock is canceled.
—WARNING: Only allow children to use the oven without supervision when adequate instructions have been given so that the child is able to use the oven in a safe way and understands the hazards of improper use.
Electrical Connection
WARNING-THIS APPLIANCE MUST BE EARTHED.
REFER TO RATING PLATE FOR VOLTAGE AND CHECK THAT THE APPLIANCE VOLTAGE CORRESPONDS WITH THE SUPPLY VOLTAGE IN YOUR HOME.
The flexible mains lead must be correctly connected, as below, to a three pin plug of not less than 13 AMP capacity. You must use a 3 pin plug which should be marked with the number BS 1363 and it should be fitted with 13 AMP fuse marked with the number BS 1362.
We recommend the use of good quality plugs and wall sockets that can be switched off when the machine is not in use.
IMPORTANT-The wires in the mains lead fitted to this appliance are coloured in accordance with the following code
GREEN AND YELLOW-EARTH
BLUE-NEUTRAL
BROWN-LIVE
As the colour of the wires in the mains lead of this appliance may not correspond with the coloured markings identifying the terminals in your plug, proceed as follows:
Power supply
•Check your local power source. This oven requires a current of approximately 15(12)amperes, 230V 50Hz.
•Power supply cord is about 1.2 meters long.
•The voltage used must be the same as specified on this oven. Using a higher voltage may result in a fire or other accident
causing oven damage. Using low voltage will cause slow cooking. We are not responsible for damage resulting from use of this oven with a voltage of ampere fuse other than those specified.
•If the supply cord is damaged, it must be replaced by the manufacturer or its service agent or a similarly qualified person in order to avoid a hazard.
The wire which is coloured GREEN AND YELLOW must be connected to the terminal in the plug which is marked with the letter «E» or the earth symbol 
The wire which is coloured BLUE must be connected to the terminal which is marked with the letter «N» or coloured BLACK, or BLUE.
The wire which is coloured BROWN must be connected to the terminal which is marked with the letter «L» or coloured RED , or BROWN.
If the terminals in the plug are unmarked or you are in any doubt as to the correct connections, consult a qualified electrician.
If you do not make the proper electrical connections you will damage your microwave oven and possibly injure yourself. Neither the manufacturer nor the supplier are liable if this happens.
MOULDED PLUGS
Should it be necessary to remove a moulded on plug from the mains cable, it should be cut off and replaced with a suitable replacement.
The moulded plug cannot be used for any other appliance, therefore remove the fuse and dispose immediately and safely to prevent anyone, especially children from plugging it in to a wall socket, which will create a safety hazard.
Should the mains lead ever require replacement, it is essential that this operation be carried out by a qualified electrician and should only be replaced with a flexible cord obtained from the manufacturer.
Applicable only if moulded plug is fitted.
After replacement of a fuse in the plug, the fuse cover must be refitted. If the fuse cover is lost, a replacement cover is obtained. The colour of the correct replacement fuse cover is that of the coloured insert in the base of the plug or the colour that is embossed in words in the base of the plug recess or elsewhere on the plug. Always state this colour when ordering a replacement fuse cover.
Only 13 amp replacement fuses which are ASTA approved to BS 1362 should be fitted
2

IMPORTANT SAFETY INSTRUCTONS
READ CAREFULLY AND KEEP FOR FUTURE REFERENCE
When using electrical apliances, basic safety precautions should be followed, including the following:
WARNING-To reduce the risk of burns, electric shock, fire, injury to persons or exposure to excessive microwave energy:
1.Read all instructions before using the appliance.
2.Read and follow the specific «PRECAUTIONS TO AVOID POSSIBLE EXPOSURE TO EXCESSIVE MICROWAVE ENERGY», found on page 1.
3.This appliance must be earthed. Connect only to a properly installed wall socket.
4.Install or locate this appliance only in accordance with the provided installation instructions.
5.Some products such as whole eggs and sealed containers for example, closed glass jars-may explode and should not be heated in this oven.
6.Use this appliance only for its intended use as described in this manual.
7.As with any appliance, close supervision is necessary when used by children.
8.Do not operate this appliance if it has a damaged cord or plug, if it is not working properly, or if it has been damaged or dropped.
9.This appliance should be serviced only by qualified service personnel. Contact the nearest authorized service facility for examination, repair or adjustment.
10.Do not cover or block any openings on this appliance.
11.Do not use outdoors.
12.Do not immerse cord or plug in water.
13.Keep cord away from heated surfaces.
14.Do not let cord hang over edge of table or counter.
15.When cleaning surfaces of door and oven that meet when the door closes, use only mild, nonabrasive soaps or detergents with a sponge or soft cloth.
16.To reduce the risk of fire in the oven cavity:
(a)Do not overcook food. Carefully attend appliance if paper, plastic, or other combustible materials are placed inside the oven when cooking food.
(b)Remove wire twist-ties from bags before placing bag in oven.
(c)If materials inside the oven should ignite, keep oven door closed, turn oven off, and disconnect the power cord, or shut off power at the fuse or circuit breaker panel.
17.Do not use this appliance to heat corrosive chemicals (for example, sulfides and chlorides). Vapors from such corrosive chemicals may erode the contacts and springs of the safety interlock switches and render them inoperable.
18.The contents of feeding bottles and baby jars must be stirred or shaken and the temperature is to be checked before consumption to avoid burns.
19.The appliance must be positioned so that the plug is accessible.
3

General Use
Listed below are, as with all appliances, certain rules to follow and safeguards to assure top performance from this oven:
11. Do not use the oven for any reason other than food preparation, such as for drying clothes, paper, or any other nonfood items or for sterilizing purposes.
They may catch on fire.
12. Do not use the oven when empty, this could damage the oven.
13. Do not use the oven cavity for any type of storage, such as papers, cookbook, cookware, etc.
14. Do not operate the oven without the turntable tray in place. Be sure it is properly sitting on the rotating base.
15. Be caution when removing the turntable tray after cooking meats that may have caused an accumulation of grease in the tray.
16. Unlike microwave-only ovens, this oven may become hot on the cabinet and oven door.
Always use hot pads or oven mitts when placing or removing food and/or accessories from the oven.
Be cautions about touching parts other then control panel during or immediately following grill or combination cooking.
17. If the oven is hot from combination cooking, do not use plastic or Styrofoam cookware for microwave cooking. They may melt.
18. Do not use recycled paper products for cooking.
They may contain impurities which could cause sparks and/or fires when used during cooking.
19. Do not continue to cook with metal utensils if sparking appears. See «Accessories» section on page 7 for proper use of cookware.
10.Do not leave the oven unattended during short cooking times. Overcooking and fire may result.
11.Do not cook any food surrounded by a membrane, such as egg yolks, potatoes, chicken livers, etc., without first piercing them several times with a fork.
12.Do not pop popcorn unless popped in a microwave approved popcorn popper or unless it’s commercially packaged and recommended especially for microwave ovens. Microwave popped corn produces a lower yield than conventional popping; there will be a number of unpopped kernels. Do not use oil unless specified by the manufacturer.
13.Do not attempt to operate this appliance with the door open.
14.Do not attempt to remove covers, panels, etc.
15.Look at the oven from time to time when food is heated or cooked in disposable containers of plastic, paper or other combustible materials.
16.If smoke is observed, switch off or unplug the appliance and keep the door closed in order to stifle any flames.
17.Microwave heating of berverages can result in delayed eruptive boiling, therefore care has to be taken when handling the container.
18.Make sure you remove caps or lids prior to cooking when you cook food sealed in bottles.
19.Do not put foreign material between the oven surface and door. It could result in excessive leakage of microwave energy.
20.Do not pop popcorn longer than the manufacturer’s directions. (popping time is generally below 3 minutes). Longer cooking does not yield more popped corn, it can cause scorchings and fire.
Also, the cooking tray can become too hot to handle or may break.
21.When heating food in plastic or paper containers, keep an eye on the oven due to the possibility of ignition.
22.Always test the temperature of food or drink which has been heated in a microwave oven before you give it to somebody, especially to children or elderly people. This is important because things which have been heated in a microwave oven carry on getting hotter even though the microwave oven cooking has stopped.
23.Eggs in their shell and whole hard-boiled eggs should not be heated in microwave ovens since they may explode, even after microwave heating has ended;
24.Keep the waveguide cover clean at all times. Wipe the oven interior with a soft damp cloth after each use. If you leave grease or fat anywhere in the cavity it may overheat, smoke or even catch fire when next using the oven.
25.Never heat oil or fat for deep frying as you cannot control the temperature and doing so may lead to overheating and fire.
26.During use the appliance becomes hot. Care should be taken to avoid touching heating elements inside the oven.
4
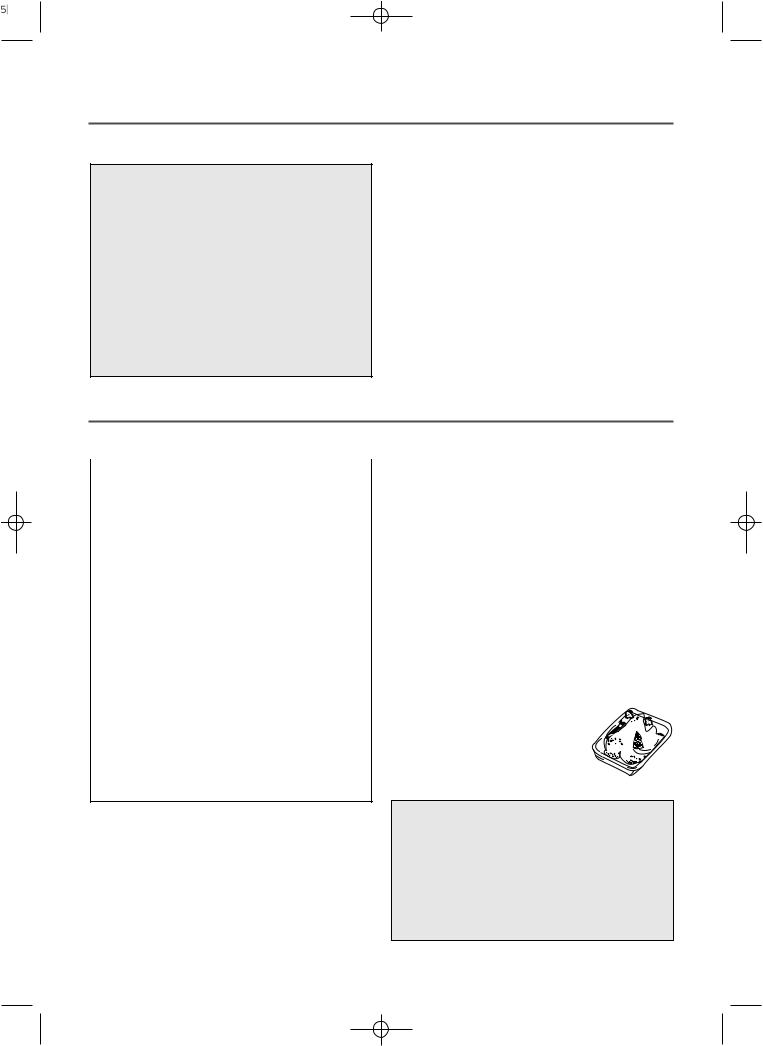
TO AVOID EXPLOSION AND SUDDEN BOILIING
WARNING
When heating liquids, e.g. soups, sauces and beverages in your microwave oven, overheating the liquid beyond boiling point can occur without evidence of bubbling: This could result in a sudden boil over of the not liquid. To prevent this possibility the following steps should be taken:
a.Avoid using straight sided containers with narrow necks.
b.Do not overheat.
c.Stir the liquid before placing the container in the oven and again halfway through the heating time.
d.After heating, allow to stand in the oven for a short time, stir or shake them again carefully and check the temperature of them before consumption to avoid burns (especially, contents of feeding bottles and baby food jars).
1.Eggs
Never cook eggs in their shells. Steam will build up inside the shell during cooking and the egg will explode.
If you want to cook or reheat eggs which have not been broken up by scrambling or mixing, you must always pierce the yolks or these will also explode. You should slice shelled hard boiled eggs before you reheat them in your microwave oven.
2.Piercing
Always pierce food which has a skin or membrane, for example, potatoes, tomatoes, apples, sausages etc. If you don’t pierce them, steam will build up inside and they may explode.
3.Lids
Always remove the lids of jars and containers and take away food containers, before you cook using your microwave oven. If you don’t, then steam and pressure might build up inside and cause an explosion even after the microwave cooking has stopped.
WHICH UTENSIL CAN BE USED IN THE OVEN?
Only use utensils that are suitable for use in microwave ovens.
Before use, the user should check that utensils are suitable for use in microwave ovens.
|
Grill & |
Microwave |
Combined |
|
|
Material |
Convection |
||
|
cooking |
cooking |
cooking |
|
|
Glass (general) |
No |
Yes (1) |
No |
|
Glass (heat resistant) |
Yes |
Yes |
Yes |
|
Glass-ceramic and |
|||
|
ceramic (heat resistant) |
Yes |
Yes (1) |
Yes (1) |
|
Earthenware |
Yes |
Yes |
Yes |
|
China (heat resistant) |
Yes |
Yes |
Yes |
|
Plastic (general) |
No |
Yes (2) |
No |
|
Plastic (heat resistant) |
Yes (2) |
Yes (2) |
Yes (2) |
|
Aluminium foil containers |
|||
|
/aluminium foil |
Yes |
Yes (3) |
Yes |
|
Metal baking tins |
Yes (4) |
No |
Yes (4) |
|
Metal (pots.pans, etc) |
Yes |
No |
No |
|
Paper |
No |
Yes |
No |
1.Without metal parts or metal trims.
2.Some plastics are heat-proof only to certain temperatures. Check carefully!
3.It is possible to use aluminium foil to shield deliate areas of food (this prevents over-cooking).
4.Metal tins can be used in the combination methods, however if these are very deep, they will greatly reduce the efficiency, as metal shields the microwave energy from the food.
Microwave function only
Utensils and cooking containers used in a microwave oven should be of a material that does not act as a barrier to microwave energy. Generally this means that you should cook in either (paper), plastic, glass or ceramic. Metal pans reflect microwave energy and inhibit cooking, and should not be used. In addition to material, the shape of the container should also be considered. Round oval shapes give the most even cooking. Square or rectangular containers may over-cook foods in the corners because more energy is absorbed there. Shallow containers give more even cooking results.
Utensils made of china and ceramic excellent to use in your microwave oven. Most types of glass are also very good. Lead crystal glass can crack and should therefore, not be used. Plastics and paper can also be used, provided they can withstand the temperature of the heated food. For cooking only use plastics, which will withstand a temperature of over 120˚C, e.g. polypropene and polyamide. Some plastic materials, e.g. melamine, will be heated by the microwave, and be damaged. To find out if a certain container is suitable, the following simple test can be made:
Place the empty container and a glass of water inside the microwave oven. The water is needed because the oven must not be operated empty or with empty containers only. Let the oven work on full power for one minute. A suitable container will only be lukewarm.
Metal containers, e.g. saucepans or frying pans should not be used in microwave ovens. Nor should plates or vessels with decorations be used since metal e.g. gold, might be part of the decoration and such decorations
will be damaged. Small pieces of aluminiuum foil can be
used, but only to shield the areas that would over-cook (e.g. for covering chicken wings, leg tips and fish tails) but
the foil must not touch the side of the oven as damage may occur.
Caution:
•There are a number of accessories available on the market. Before you buy, make sure they are suitable for microwave use.
•When you put food in the microwave oven, make sure that food, food supports or covering do not come in direct contact with any of the internal walls or the ceiling of the cavity since discolouration may take place.
5
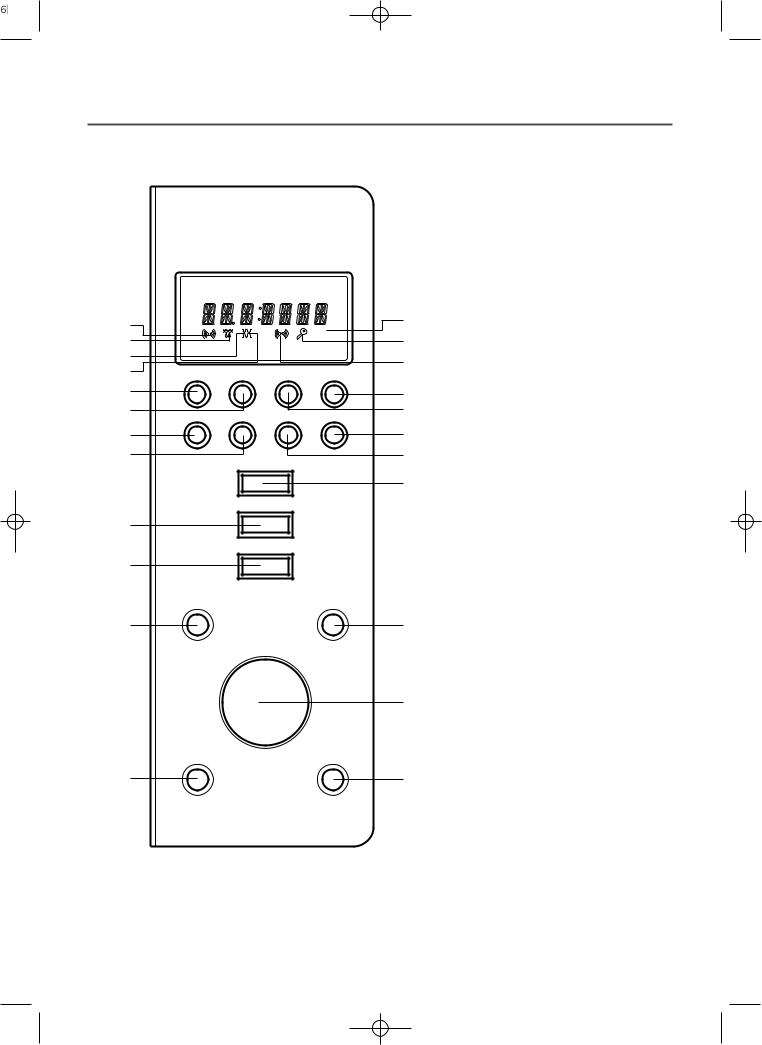
CONTROL PANEL
|
DISPLAY WINDOW |
|||||||||
|
1MICROWAVE indicator, showing |
|||||||||
|
microwaving in progress. |
|||||||||
|
2DEFROST indicator, showing |
|||||||||
|
defrosting in progress. |
|||||||||
|
3 GRILL(upper grill heater) indicator, |
|||||||||
|
showing grilling in progress. |
|||||||||
|
4 GRILL(lower grill heater) indicator, |
|||||||||
|
1 |
7 |
showing grilling in progress. |
|||||||
|
% |
5 CONVECTION indicator, showing |
||||||||
|
2 |
6 |
convectioning in progress. |
|||||||
|
3 |
5 |
6 CHILD LOCK indicator. |
|||||||
|
4 |
More |
Less |
Clock |
Language |
7 % percentage microwave power level |
||||
|
q |
8 |
indicator. |
|||||||
|
0 |
Memory |
Cake |
Crusty |
Auto Cook |
9 |
BUTTONS |
|||
|
p |
o |
8Language : Press to select the |
|||||||
|
language. |
|||||||||
|
u |
i |
||||||||
|
M/W |
9Clock : Use to set clock. |
||||||||
|
0Less : Use to remove time from |
|||||||||
|
w |
|||||||||
|
cooking. |
|||||||||
|
GRILL |
q More : Use to add time to cooking. |
||||||||
|
y |
w M/W : Press to select microwave |
||||||||
|
power level. |
|||||||||
|
COMBI |
e COMBI : Press to select combi |
||||||||
|
e |
cooking mode. |
||||||||
|
r AUTO DEFROST : Press to select |
|||||||||
|
defrost menu. |
|||||||||
|
CONVECTION |
AUTO DEFROST |
t CONVECTION : Press to select |
|||||||
|
t |
r |
convection temperature. |
|||||||
|
y GRILL : Press to select grill. |
|||||||||
|
eight |
Q |
u Cake : Press to select cake menu. |
|||||||
|
W |
|||||||||
|
u |
|||||||||
|
e |
a |
||||||||
|
n |
i Crusty : Press to select crusty |
||||||||
|
m |
t |
||||||||
|
t |
|||||||||
|
T |
i |
menu. |
|||||||
|
i |
y |
||||||||
|
o Auto Cook : Press to select auto |
|||||||||
|
d |
cook menu. |
||||||||
|
p Memory : Use to set favorite cooking |
|||||||||
|
mode. |
|||||||||
|
aSTART/SPEEDY COOK : Press to |
|||||||||
|
start a programme, also for speedy |
|||||||||
|
s |
a |
start (each press adds 30 seconds |
|||||||
|
microwave cooking time). |
|||||||||
|
STOP/CLEAR |
START/ |
s STOP/CLEAR : Press once to stop a |
|||||||
|
SPEEDY COOK |
programme, and twice to cancel a |
||||||||
|
programme. |
|||||||||
|
dDial knob : Use to set time, weight |
|||||||||
|
and quantity. |
6
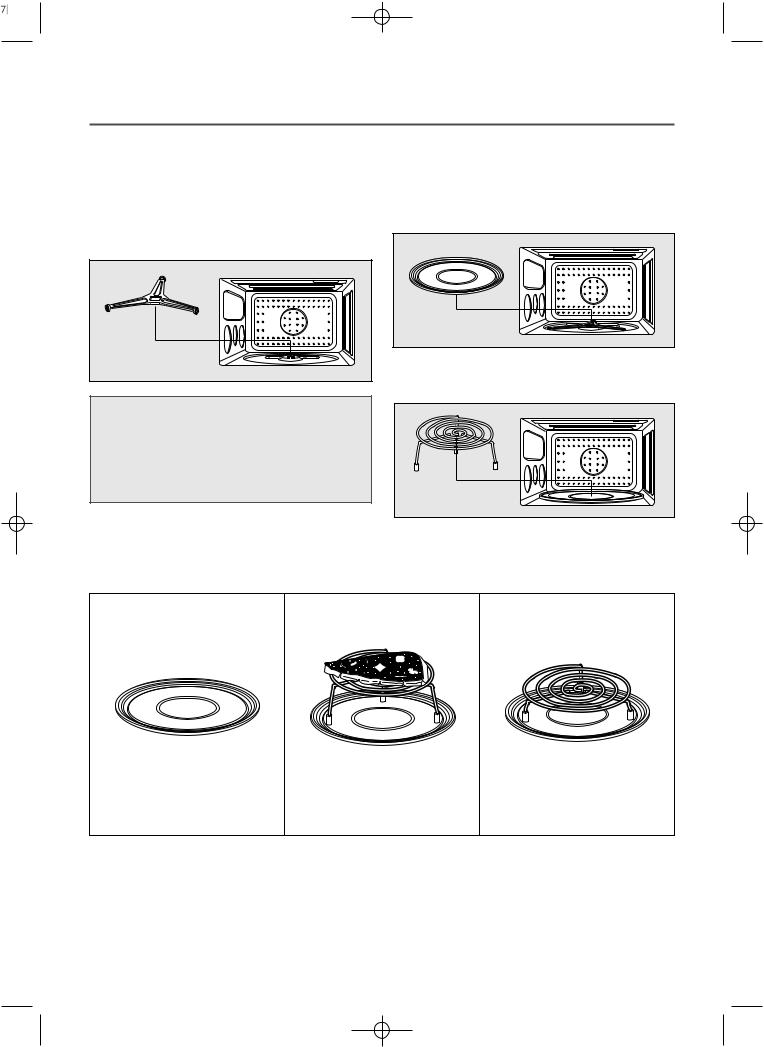
ACCESSORIES
This oven comes equipped with several accessories. They can be used in various ways to facilitate cooking.
■ Rotating base
This fits over the shaft in the center of the oven’s cavity floor.
This to remain in the oven for all cooking. It should only be removed for cleaning.
The rotating base must be placed in the center of the oven’s cavity and fitted in the rotating shaft exactly.
In case the rotating base does not fit in the rotating shaft, the rotating base might become as tray and sparks can occur.
■ Turntable tray or turntable
This metal tray fits over the rotating base and locks into place.
This is to be used in the oven for all cooking. It rotates clockwise or counterclockwise during cooking. It is easily removable for cooking and cleaning needs.
■ Metal rack
This metal rack is used with the turntable tray.
■ HOW TO USE THE ACCESSORIES OF COOKING
|
■ Turntable |
■ Metal rack (high) |
■ Metal rack (low) |
|
• Microwave cooking |
• Grill cooking |
• Defrost |
||
|
• Convection cooking |
• Grill cooking |
|||
|
• Combination cooking |
• Convection cooking |
|||
|
• Auto cooking |
7
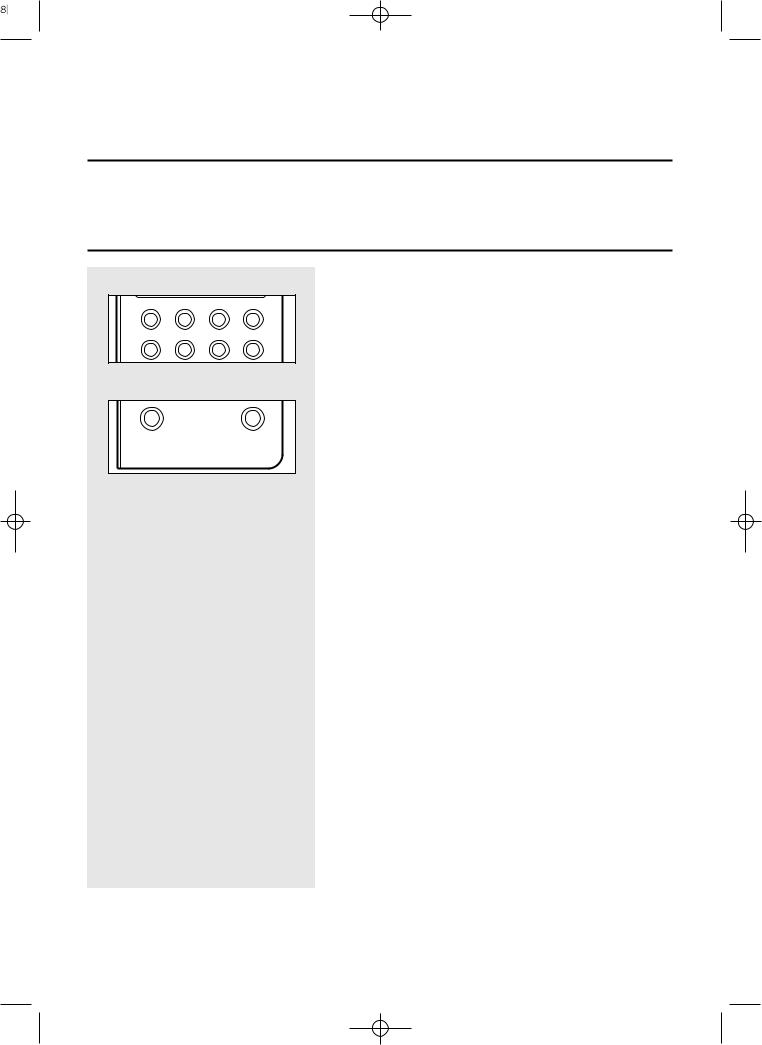
BEFORE OPERATION
SETTING THE LANGUAGE
Your new microwave oven comes with a six language word prompt system.
Languages available are English, Deutsch, Nederlands, Francais, Italian and Espanol.
When your oven is plugged in for the first time or when power resumes after a power interruption, the display will show «SELECT LANGUAGE SPRACHE WAEHLEN KIES TALL CHOISIR LA LANGUE SCEGLI LA LINGUA SELECCION IDIOMA«
By pressing «Language» it is possible to select the different languages.
|
More |
Less |
Clock |
Language |
|
▲ |
|||
|
Memory |
Cake |
Crusty |
Auto Cook |
|
▲ |
|
|
STOP/CLEAR |
START/ |
|
SPEEDY COOK |
To set English
1.Touch Language button once.
The display will show «ENGLISH PRESS START«
2.Touch START button once to select and hold language.
The display will show «ENGLISH» and then reset to » : 0» and you will be prompted to set the time of day.
To set Deutsch
1.Touch Language button twice.
The display will show «DEUTSCH START DRUECKEN«
2.Touch START button once to select and hold language.
The display will show «DEUTSCH» and then reset to » : 0» and you will be prompted to set the time of day.
To set Nederlands
1.Touch Language button 3 times.
The display will show «NEDERLANDS DRUK OP START«
2.Touch START button once to select and hold language.
The display will show «NEDERLA» and then reset to » : 0» and you will be prompted to set the time of day.
To set Francais
1.Touch Language button 4 times.
The display will show «FRANCAIS APPUYER SUR DEPART«
2.Touch START button once to select and hold language.
The display will show «FRANCAI» and then reset to » : 0» and you will be prompted to set the time of day.
To set Italian
1.Touch Language button 5 times.
The display will show «ITALIAN PREMI START«
2.Touch START button once to select and hold language.
The display will show «ITALIAN» and then reset to » : 0» and you will be prompted to set the time of day.
To set Espanol
1.Touch Language button 6 times.
The display will show «ESPANOL PRESIONE INICIO«
2.Touch START button once to select and hold language.
The display will show «ESPANOL» and then reset to » : 0» and you will be prompted to set the time of day.
8
SETTING THE CLOCK
When your oven is plugged in for the first time or when power resumes after a power interruption, the display resets to setting the language procedure.
Your oven has multiple(12hr/24hr) clock system. To set the clock follow under procedure.
|
Example : To set 5:30 |
||||
|
More |
Less |
Clock |
Language |
|
|
▲ |
1. Touch Clock button once. » 12H » and «SET HOURS» shows in display. |
|||
|
Memory |
Cake |
Crusty |
Auto Cook |
This is a 12 hour clock system. |
2.Touch Clock button once more. » 24H » and «SET HOURS» shows in display. This is a 24 hour clock system.
If you want 12 hour clock system, omit this step.
T
i
3.Turn the dial knob until 5 is indicated in the display window.
«5 » and «PRESS CLOCK» shows in display.
4.Touch clock button. » 5:00 » and «SET MINUTES» shows in display.
5.Turn the dial knob until 5:30 is indicated in the display window.
«5:30 » and «PRESS CLOCK» shows in display.
|
More |
Less |
Clock |
Language |
|
▲ |
|||
|
Memory |
Cake |
Crusty |
Auto Cook |
6.Touch Clock button. The colon starts blinking.
If you selected 12 hour clock system, this digital clock allows you to set from 1:00 to 12:59.
If you selected 24 hour clock system, this digital clock allows you to set from 0:00 to 23:59.
CHILD LOCK AND POWER SAVE MODE
Child lock : The child lock prevents the oven from being used. For example because children could hurt themselves on hot liquids etc. Power save mode : This function is used for saving energy.
|
▲ |
To set child lock |
|||
|
1. Touch STOP/CLEAR button. » : 0» or clock appears in the display. |
||||
|
STOP/CLEAR |
START/ |
2. Press and hold More button for 3 seconds. |
||
|
The oven will beep and LOCK indicator lights. |
||||
|
SPEEDY COOK |
||||
|
Now the oven cannot be operated. |
||||
|
▲ |
||||
|
Less |
Clock |
Language |
||
|
More |
To cancel child lock simply repeat setting procedure 2. |
|||
|
The oven will beep and LOCK indicator disappears. |
||||
|
Memory |
Cake |
Crusty |
Auto Cook |
The oven is again available for normal use. |
To set power save mode
|
▲ |
|||
|
STOP/CLEAR |
START/ |
||
|
SPEEDY COOK |
|||
|
More |
Less |
Clock |
Language |
|
▲ |
|||
|
Memory |
Cake |
Crusty |
Auto Cook |
1.Touch STOP/CLEAR button. » : 0» or clock appears in the display.
2.Press and hold Less button for 3 seconds. The oven will beep and nothing appears in the display. Now the oven is in power save mode.
To operate the oven in power save mode, press any key.
Then » :0» or clock will be shown and the operation of all function key will be same as in normal mode.
But if there is no operation within 10 seconds in clear mode or while manipulating the key, all the contents of display will disappear.
To cancel power save simply repeat setting procedure.
» : 0» or clock appears in the display. After 3 seconds the oven will beep, this indicates that the power save is cancelled and the oven is again available for normal use.
9

Не можете найти ответ на свой вопрос в руководстве? Вы можете найти ответ на свой вопрос ниже, в разделе часто задаваемых вопросов о Daewoo KOC-1B4KA.
Каков срок службы микроволновой печи до потери мощности?
В среднем срок службы микроволновой печи до потери мощности составляет 2000 часов.
Опасно ли включать пустую микроволновую печь?
Да. Включение пустой микроволновой печи может привести к ее повреждению. Когда микроволновая печь пуста, микроволны не поглощаются пищей.
Вредно ли для здоровья нагревание пищи в микроволновой печи?
Разогрев пищи в микроволновой печи не представляет опасности для здоровья.
Какую пищу не следует разогревать в микроволновой печи?
Не следует класть в микроволновую печь продукты в оболочке. Излишек тепла не выходит через оболочку, что может привести к взрыву.
Инструкция Daewoo KOC-1B4KA доступно в русский?
К сожалению, у нас нет руководства для Daewoo KOC-1B4KA, доступного в русский. Это руководство доступно в английский.
Не нашли свой вопрос? Задайте свой вопрос здесь


