Данная лицензия не предназначена для продажи этого Руководства и Вы не становитесь владельцем этого Руководства после приобретения любого продукта, загрузки и/или использования. Nikon сохраняет за собой право владения данным Руководством и, следовательно, всеми копиями и все соответствующие права, относящиеся к интеллектуальной собственности, и сохраняет за собой все права, которые явно не предоставлены Вам в рамках данного Соглашения. Данное Соглашение представляет собой полное и эксклюзивное соглашение, устное и письменное, между Вами и Nikon.
1. РУКОВОДСТВО
Руководство предназначено для клиентов, которые приобрели наши продукты. Мы можем не иметь возможности ответить на запрос физических лиц, которые не приобрели наши продукты. Пожалуйста, имейте в виду, что данное руководство и контактная информация, указанные здесь, могут быть изменены без уведомления.
Данное Руководство защищено Законом об авторском праве Японии и международными законами об авторском праве и международными договорами. Вам необходимо воспроизвести на каждой копии уведомление об авторском праве Nikon и любую другую информацию о праве собственности, которые присутствовали на оригинале.
2. ОГРАНИЧЕНИЯ
Кроме случаев, когда в данном Соглашении указано иное, нельзя делать или передавать копии данного Руководства другим или передавать в электронной форме Руководство с одного компьютера на другой по сети. НЕЛЬЗЯ ИЗМЕНЯТЬ ИЛИ УДАЛЯТЬ ЛЮБЫЕ УВЕДОМЛЕНИЯ ОБ АВТОРСКОМ ПРАВЕ, ТОРГОВОЙ МАРКЕ ИЛИ ДРУГИЕ ЗАЩИТНЫЕ УВЕДОМЛЕНИЯ, СОДЕРЖАЩИЕСЯ В ДАННОМ РУКОВОДСТВЕ. НЕЛЬЗЯ ПРИСВАИВАТЬ ИЛИ ИНЫМ ОБРАЗОМ ИЗБАВЛЯТЬСЯ, МОДИФИЦИРОВАТЬ, НАСТРАИВАТЬ, ПЕРЕВОДИТЬ, АРЕНДОВАТЬ, БРАТЬ В НАЕМ, ЗАНИМАТЬ, ПЕРЕПРОДАВАТЬ, РАСПРОСТРАНЯТЬ, ПЕРЕДАВАТЬ ПО СЕТИ ИЛИ СОЗДАВАТЬ ИЛИ ИМЕТЬ СОЗДАННЫЕ ПРОИЗВОДСТВЕННЫЕ РАБОТЫ, ОСНОВАННЫЕ НА ДАННОМ РУКОВОДСТВЕ ИЛИ ЛЮБОЙ ЧАСТИ ТАКОВОГО.
3. ОГРАНИЧЕННАЯ ГАРАНТИЯ И ОТКАЗ
В НАИБОЛЬШЕЙ СТЕПЕНИ, РАЗРЕШЕННОЙ В СИЛУ ДЕЙСТВУЮЩЕГО ЗАКОНОДАТЕЛЬСТВА, ДАННОЕ РУКОВОДСТВО ПРЕДОСТАВЛЕНО НА ОСНОВЕ ПРИНЦИПА «КАК ЕСТЬ», БЕЗ ГАРАНТИИ В ЛЮБОЙ ФОРМЕ, И КОМПАНИЯ NIKON, ЕЕ СОТРУДНИКИ, РАСПРОСТРАНИТЕЛИ, ДИЛЕРЫ И АГЕНТЫ ПРЯМО НЕ ПРИЗНАЮТ ЛЮБУЮ ГАРАНТИЮ В ЛЮБОЙ ФОРМЕ, ВЫРАЖЕННУЮ ИЛИ ПОДРАЗУМЕВАЕМУЮ, ВКЛЮЧАЯ, НО НЕ ОГРАНИЧИВАЯСЬ, ЛЮБОЙ ПОДРАЗУМЕВАЕМОЙ ГАРАНТИЕЙ ПРИГОДНОСТИ ДЛЯ ТОРГОВЛИ, ПРИГОДНОСТИ ДЛЯ ОПРЕДЕЛЕННОГО НАЗНАЧЕНИЯ ИЛИ ОТСУТСТВИЯ НАРУШЕНИЙ. В НАИБОЛЬШЕЙ СТЕПЕНИ, РАЗРЕШЕННОЙ В СИЛУ ДЕЙСТВУЮЩЕГО ЗАКОНОДАТЕЛЬСТВА, КОМПАНИЯ NIKON, ЕЕ СОТРУДНИКИ, РАСПРОСТРАНИТЕЛИ, ДИЛЕРЫ И АГЕНТЫ НЕ ГАРАНТИРУЮТ ИСПОЛНЕНИЕ ИЛИ РЕЗУЛЬТАТЫ, КОТОРЫЕ ВЫ МОЖЕТЕ ПОЛУЧИТЬ ИЗ ДАННОГО РУКОВОДСТВА, ИЛИ ЧТО ДАННОЕ РУКОВОДСТВО БУДЕТ СООТВЕТСТВОВАТЬ ВАШИМ ТРЕБОВАНИЯМ ИЛИ ЧТО РАБОТА РУКОВОДСТВА БУДЕТ БЕСПЕРЕБОЙНОЙ, БЕЗОШИБОЧНОЙ ИЛИ НЕ БУДЕТ СОДЕРЖАТЬ ВИРУСОВ. В НАИБОЛЬШЕЙ СТЕПЕНИ, РАЗРЕШЕННОЙ В СИЛУ ДЕЙСТВУЮЩЕГО ЗАКОНОДАТЕЛЬСТВА, НИ КОМПАНИЯ NIKON, НИ ЕЕ СОТРУДНИКИ, РАСПРОСТРАНИТЕЛИ, ДИЛЕРЫ И АГЕНТЫ НЕ ДОЛЖНЫ НЕСТИ ПЕРЕД ВАМИ ОТВЕТСТВЕННОСТЬ ЗА ЛЮБЫЕ КОСВЕННЫЕ, ПОСЛЕДУЮЩИЕ ИЛИ НЕПРЕДНАМЕРЕННЫЕ УБЫТКИ, ПОТЕРИ ИЛИ ИЗДЕРЖКИ ЛЮБОГО ТИПА, БУДЬ ТО ПОТЕРЯ ПРИБЫЛИ, ПЕРЕРЫВ В ДЕЯТЕЛЬНОСТИ ИЛИ ИНЫМ СПОСОБОМ ВОЗНИКАЮЩИЙ ИЛИ ЯВЛЯЮЩИЙСЯ СЛЕДСТВИЕМ ДАННОГО РУКОВОДСТВА, ВЫЗВАННЫЙ КАКИМ-ЛИБО СПОСОБОМ, ДАЖЕ ЕСЛИ КОМПАНИЯ NIKON, ЕЕ СОТРУДНИКИ, РАСПРОСТРАНИТЕЛИ, ДИЛЕРЫ ИЛИ АГЕНТЫ УВЕДОМЛЕНЫ О ВОЗМОЖНОСТИ ВОЗНИКНОВЕНИЯ ТАКИХ УБЫТКОВ, ПОТЕРЬ ИЛИ ИЗДЕРЖЕК. ЭТОТ ОТКАЗ СОСТАВЛЯЕТ СУЩЕСТВЕННУЮ ЧАСТЬ ДАННОГО СОГЛАШЕНИЯ, И НЕИСПОЛЬЗОВАНИЕ ДАННОГО РУКОВОДСТВА УПОЛНОМОЧЕНО, КРОМЕ СЛУЧАЕВ В РАМКАХ ДАННОГО ОТКАЗА.
4. ОБЩИЕ СВЕДЕНИЯ
Данное соглашение регулируется и должно истолковываться в соответствии с законами Японии независимо от его принципов коллизионного права. В случае возникновения спора в рамках или в связи с данным соглашением Вы, таким образом, даете согласие на персональную юрисдикцию Японии и отказываетесь от любого возражения, что такая дискуссия вызывает затруднение. Далее Вы соглашаетесь на получение судебных извещений в любом действии, возникающем из данного Соглашения по обычной почте или другими коммерчески оправданными способами доставки расписки в получении. Если любое положение данного Соглашения должно быть определено недействительным по какой-либо причине, то оставшиеся положения не должны быть признаны недействительными и должны остаться в силе без изменений. Данное Соглашение устанавливает в дальнейшем целое соглашение и понимание между Вами и компанией Nikon, и замещает собой и заменяет любые другие соглашения, относящиеся к сути дела данного Соглашения. Неуспех любой стороны в настаивании на строгом исполнении любого правила или положения данного соглашения, или выполнение любой опции, права или защиты прав, содержащихся в данном документе, не должны толковаться в качестве отказа от любого применения такого правила, положения, опции, права или защиты прав в будущем, и такое правило, положение, опция, право или защита прав должны продолжиться и сохранить полную юридическую силу и действие. Заголовки разделов данного Соглашения вставлены только для удобства и не должны составлять часть данного документа или влиять каким-либо образом на значение или толкование данного Соглашения. Кроме случаев, когда иначе явно указано в данном документе, положения раздела 3 и раздела 4 вместе с любыми положениями, которые с помощью своих прямо выраженных условий относятся к периодам после прекращения срока действия данного Соглашения, должны оставаться в силе после прекращения действия данного Соглашения по какой-либо причине.
Руководства для продуктов Nikon/ 2018/02/15/ Вер. 2.0.0
Ru
Руководство пользователя
Вспышка с автофокусировкой Speedlight
-
Contents
-
Table of Contents
-
Troubleshooting
-
Bookmarks
Quick Links
Autofocus Speedlight
User’s Manual
En
Related Manuals for Nikon SB-910
Summary of Contents for Nikon SB-910
-
Page 1
Autofocus Speedlight User’s Manual… -
Page 2: About The Sb-910 And This User’s Manual
About the SB-910 and This User’s Manual Thank you for purchasing the Nikon Speedlight SB-910. To get the most out of your Speedlight, please read this user’s manual thoroughly before use. Keep this manual handy for quick reference. How to find what you are looking for i Table of contents You can search by item, such as operation method, fl…
-
Page 3
Included items Check that all items listed below are included with the SB-910. If any items are missing, inform the store where the SB-910 was purchased or the seller immediately. ❑ Speedlight Stand AS-21 ❑ Nikon Diffusion Dome SW-13H ❑ Fluorescent Filter SZ-2FL ❑… -
Page 4
D100), F6, COOLPIX cameras (P7100, P7000, P6000) About this user’s manual This manual has been compiled with the assumption that the SB-910 will be used in combination with a camera compatible with CLS and a CPU lens (0A-5). To get the most out of your Speedlight, please read this user’s manual thoroughly before use. -
Page 5
Tips on identifying CPU NIKKOR lenses CPU lenses have CPU contacts. CPU contacts • The SB-910 cannot be used with IX-Nikkor lenses. A–5… -
Page 6
Control types of light falloff at edges; the SB-910 provides three illumination patterns, standard, even and center-weighted. ■ FX format/ DX format Nikon digital SLR camera image area types (FX format: 36 × 24, DX format: 24 × 16) ■… -
Page 7
■ i-TTL mode Flash mode in which the Speedlight fi res monitor pre-fl ashes and the camera measures the refl ected light and controls the Speedlight fl ash output Monitor pre-fl ashes Scarcely visible fl ashes emitted before actual fi ring that enable the camera to measure the light refl… -
Page 8
About the SB-910 and This User’s Manual ■ Step A unit of the shutter speed or aperture change; a change of one step halves/ doubles the amount of light entering the camera ■ EV (Exposure Value) Each increment of 1 in exposure value corresponds to a one-step change in exposure, which is made by halving/doubling shutter speed or aperture ■… -
Page 9
How can I take pictures of a moving subject with stroboscopic multiple-exposure effects? How can I use the SB-910 with a non-CLS- compatible SLR camera? How can I use the SB-910 with a COOLPIX camera? (with SB-910 mounted on camera) Key phrase Flash modes… -
Page 10
How do I take pictures using multiple fl ash units? How do I take pictures of a fast-moving subject using wireless multiple fl ash-unit photography? How do I take pictures with the SB-910 and a COOLPIX camera compatible with wireless multiple fl ash-unit photography? -
Page 11: Table Of Contents
Table of Contents Preparation About the SB-910 and This User’s Manual …A-2 Q&A Index …A-9 For Your Safety …A-14 Check before Use …A-19 Operation Speedlight Parts … B-1 Function Buttons… B-5 Basic Operations … B-6 Settings and the LCD … B-12 Custom Functions and Settings …
-
Page 12
Table of Contents Functions Switching Illumination Patterns … E-2 Bounce Flash Operation … E-4 Taking Close-up Photographs … E-9 Flash Photography with Color Filters … E-12 Flash Photography Support Functions … E-17 • Flash compensation • Power zoom function • AF-assist illumination •… -
Page 13
Tips on Speedlight Care and Reference Information Troubleshooting …H-1 Guide Number, Aperture and Flash-to-subject Distance …H-4 Tips on Speedlight Care …H-5 Notes on Batteries…H-7 About the LCD Panel …H-8 Updating Firmware …H-9 Optional Accessories …H-10 Specifi cations …H-13 Index …H-22 A–13… -
Page 14: For Your Safety
Allow the flash unit to cool down so that you can safely touch it and remove the batteries. Then bring the unit to your local Nikon dealer or authorized service center for repair.
-
Page 15
In such instances you should immediately remove the batteries from the Speedlight and then bring the unit to your local Nikon dealer or authorized service center for repair. Note: electronic devices that are penetrated by water or moisture are often not economically repairable. -
Page 16
For Your Safety CAUTIONS for Speedlights Do not touch the flash unit with wet hands, electric shock. Keep the flash unit away from children to prevent them from putting the unit in or near their mouth, or otherwise touching a dangerous part of the product;… -
Page 17
If corrosive liquids seep from the batteries and get in your eyes, immediately wash your eyes with running water and consult with a doctor. Your eyes could be seriously damaged if they are not treated quickly. If corrosive liquids seep from the batteries and come in contact with your skin or clothes, wash immediately with running water. -
Page 18
For Your Safety CAUTION for Batteries Do not throw or apply strong physical shocks to the batteries as this could cause batteries to leak corrosive liquids, generate heat or explode. Symbol for separate collection applicable in European countries This symbol indicates that this product is to be collected separately. The following apply only to users in European countries. -
Page 19: Check Before Use
Use your Speedlight with Nikon equipment The Nikon Speedlight SB-910’s performance has been optimized for use with Nikon brand cameras/accessories including lenses. Cameras/accessories made by other manufacturers may not meet Nikon’s criteria for specifi…
-
Page 20: B Operation
Operation Speedlight Parts 1 Flash head 2 Flash head tilting/rotating lock release button (0B-9) 3 Battery chamber cover 4 Battery chamber cover lock release (0B-6) 5 Light sensor window for wireless remote fl ash (0D-17) 6 Built-in bounce card (0E-8) 7 Built-in wide panel (0E-10) 8 Flash panel 9 Filter detector (0E-14)
-
Page 21
18 Flash head tilting angle scale (0E-4) 19 Flash head rotating angle scale (0E-4) 20 Sync terminal cover 21 Sync terminal 22 LCD panel (0B-12) 23 Flash-ready indicator (0B-11, D-20) 24 Mounting foot lock lever (0B-8) B–2… -
Page 22: Speedlight Parts
Selects item to be confi gured • The assigned function or setting for each button differs according to the fl ash mode and settings of the SB-910. (0B-5) 30 Test fi ring button • Controls test fi ring ( modeling illumination (0E-21) •…
-
Page 23
Activating key lock Key lock icon Press function buttons 1 and 2, between which a lock icon is printed, simultaneously for 2 seconds. The key lock icon appears on the LCD and the dial and buttons are locked. • The power switch/wireless mode switch for multiple flash units and the test firing button remain unlocked. -
Page 24: Function Buttons
Function Buttons The assigned function or setting for each button differs according to the fl ash mode and settings of the SB-910. Function button 1 Function button 2 Functions and settings icons Zoom head position Flash compensation value Flash output level in manual fl…
-
Page 25: Basic Operations
Notes on continuous fl ash photography • To prevent the SB-910 from overheating, allow it to cool down for at least 10 minutes after 15 times of continuous firing. • When continuous flash firing is repeated in quick succession, the internal safety function adjusts the recycling time by up to 15 seconds.
-
Page 26
Basic Operations Compatible batteries and replacement/recharging When replacing batteries, use four fresh AA-size batteries of the same brand. Refer to the following table to determine when to replace batteries with fresh ones or recharge batteries according to how long the fl ash-ready indicator takes to come Battery type 1.5 V LR6 (AA-size) alkaline battery 1.5 V FR6 (AA-size) lithium battery… -
Page 27
Low battery power indicator STEP Attaching the SB-910 to the camera When battery power is low, the icon shown at the left appears on the LCD and the SB-910 stops functioning. Replace or recharge batteries. Make sure the SB-910 and the camera body are turned off. -
Page 28
Detaching the SB-910 from the camera • If the SB-910’s mounting foot cannot be removed from the camera’s accessory shoe, turn the lock lever 90° to the left again, and slide the SB-910 slowly out. • Do not forcibly remove the SB-910. -
Page 29
FX format; illumination pattern: standard; ISO sensitivity: 200; zoom head position: 24 mm; aperture f-number: 5.6 • Icons on the LCD may differ depending on the SB-910 settings and the camera and lens in use. SB-910 fl ash information… -
Page 30
Changing the fl ash mode Rotate the selector dial clockwise to display icons of available fl ash mode on the LCD. Make sure that the fl ash- ready indicator on the SB-910 or in the camera’s viewfi nder is on before taking a picture. -
Page 31: Settings And The Lcd
Icons on the LCD show the status of settings. Displayed icons vary according to selected fl ash modes and settings. • The basic control of SB-910 functions is as follows: Two-button reset Press a button to highlight the selected item.
-
Page 32: Custom Functions And Settings
Custom Functions and Settings Various operations for the SB-910 can be easily set using the LCD. • Displayed icons vary according to the combination of camera and status of the SB-910. • Functions and settings indicated with grid boxes do not function even though they can be configured and set.
-
Page 33
Rotate the selector dial to highlight the chosen setting, and then press the [OK] button. • • Press the [MENU] button to return to normal display. • º: Current setting Available selection Highlighted while selected Press the [OK] button to return display to item selection. -
Page 34
Custom Functions and Settings Setting My Menu When a custom settings page is displayed, only the custom settings items that are set as My Menu are displayed on the LCD. • My Menu items can be changed any time. • To display all items, select “FULL”… -
Page 35
Custom settings page display function and display mode Page display function Custom settings pages can be changed with function buttons 1 and 2. • The number of pages displayed varies from one to five depending on the settings. • The position of the displayed page is indicated in the bar. Display mode The custom settings display mode, My Menu or Full Menu, can be changed with function button 3. -
Page 36
Custom Functions and Settings Available custom functions and settings (Bold: default) Non-TTL auto fl ash mode option (0C-5, C-8) Auto aperture fl ash with monitor pre-fl ashes Auto aperture fl ash without monitor pre-fl ashes Non-TTL auto fl ash with monitor pre-fl ashes Non-TTL auto fl… -
Page 37
When the zoom head position is manually set, image area settings can be selected. FX±∞DX: Automatically set according to the camera’s image area FX: Nikon FX format (36 × 24) DX: Nikon DX format (24 × 16) Canceling power zoom function (0E-19) -
Page 38
Custom Functions and Settings ISO sensitivity manual setting (0E-21) Setting ISO sensitivity within the range of between 3 and 8000. 100: ISO 100 Flash-ready indicator in remote mode (0D-20) Selecting which fl ash-ready indicator to blink/light up in remote mode to save power REAR, FRONT: Back indicator lights up, front indicator blinks in remote mode REAR: Only back indicator lights up… -
Page 39
Zoom head position manual setting with broken built-in wide panel (0E-11) Selecting whether the zoom head position can be manually set or not when the built-in wide panel is broken. ON: Zoom head position can be manually set OFF: Zoom head position cannot be manually set My Menu setting (0B-15) Selecting custom settings display mode FULL: All items displayed… -
Page 40: Flash Modes
Information obtained by monitor pre-fl ashes and exposure control information is integrated by the camera to automatically adjust fl ash output levels. • To take pictures using the SB-910 set in i-TTL mode, see “Basic Operations” (0B-6). • Either the i-TTL balanced fill-flash mode or the standard i-TTL mode option is available.
-
Page 41
Setting i-TTL mode i-TTL mode LCD example Press the [MODE] button. Rotate the selector dial to display Press the [OK] button : Monitor pre-fl ashes : i-TTL : Balanced fi ll-fl ash C–2… -
Page 42
Auto setting of ISO sensitivity, aperture and focal length When using the SB-910 with a CLS-compatible camera and a CPU lens, ISO sensitivity, aperture and focal length are automatically set according to the lens and camera information. -
Page 43
• Amount of underexposure due to insufficient flash output is indicated by the exposure value (−0.3 EV to −3.0 EV) on the SB-910’s LCD panel for approx. 3 seconds. • Press function button 3 to redisplay exposure value. -
Page 44: Auto Aperture Flash Mode
Auto Aperture Flash Mode The SB-910’s light sensor for non-TTL auto fl ash measures the fl ash that is refl ected on the subject, and the SB-910 controls the fl ash output level according to the lens and camera information transmitted to the SB-910, including ISO sensitivity, exposure compensation value, aperture and lens focal length.
-
Page 45
Monitor pre-flashes can be activated or canceled as a non-TTL auto flash mode option in the custom settings. (0B-17) • Flash output is controlled more accurately with monitor pre-flashes. The SB-910 emits monitor pre-flashes before actual firing to obtain reflected flash data. •… -
Page 46
Confi rm the fl ash-ready indicator is on, and then shoot. When the fl ash-ready indicators on the SB-910 and in the camera’s viewfi nder blink for approx. 3 seconds after a picture is taken, underexposure due to insuffi cient fl ash output may have occurred. -
Page 47: Non-Ttl Auto Flash Mode
Non-TTL Auto Flash Mode The SB-910’s light sensor for non-TTL auto fl ash measures the fl ash that is refl ected on the subject, and the SB-910 controls the fl ash output level according to the refl ected fl ash data.
-
Page 48
Monitor pre-flashes can be activated or canceled as a non-TTL auto flash mode option in the custom settings. (0B-17) • Flash output is controlled more accurately with monitor pre-flashes. The SB-910 emits monitor pre-flashes before actual firing to obtain reflected flash data. •… -
Page 49
When insuffi cient fl ash output for correct exposure is indicated When the fl ash-ready indicators on the SB-910 and in the camera’s viewfi nder blink for approx. 3 seconds after a picture is taken, underexposure due to insuffi cient fl… -
Page 50
Non-TTL Auto Flash Mode Checking exposure before taking a picture C–11 Test fi re the Speedlight under the same conditions and with the same Speedlight and camera settings before taking the actual picture. • When the flash-ready indicators blink after test firing, underexposure due to insufficient flash output may have occurred. -
Page 51: Distance-Priority Manual Flash Mode
Distance-priority Manual Flash Mode In this fl ash mode, when the fl ash-to-subject distance value is entered, the SB-910 automatically controls fl ash output level according to the camera settings. Setting distance-priority manual flash mode Distance-priority manual fl ash is not possible when the SB-910’s fl ash head is tilted up or rotated to the right or left.
-
Page 52
Confi rm the fl ash-ready indicator is on, and then shoot. When the fl ash-ready indicators on the SB-910 and in the camera’s viewfi nder blink for approx. 3 seconds after a picture is taken, underexposure due to insuffi cient fl ash output may have occurred. -
Page 53
When the SB-910’s fl ash head is tilted or rotated while in distance-priority manual fl ash mode • When the Speedlight is used in distance-priority manual flash mode and the flash head is tilted up or rotated to the right or left, the flash mode will automatically change to auto aperture flash mode or non-TTL auto flash mode. -
Page 54: Manual Flash Mode
Manual Flash Mode In manual fl ash mode, aperture and fl ash output level are manually selected. This allows for control of exposure and fl ash-to-subject distance. • The flash output level can be set from M1/1 (full output) to M1/128 to suit creative preferences.
-
Page 55: Taking Picture In Manual Flash Mode
Taking a picture in manual flash mode When no lens aperture information is transmitted When lens aperture information is not transmitted to the SB-910, aperture can be set with function button 3. Press function button 2 to highlight the fl ash output level.
-
Page 56
Manual Flash Mode ■ Setting the fl ash output level Highlight the fl ash output level, and then rotate the selector dial to change the fl ash output level. Selector dial rotated counterclockwise • When the selector dial is rotated counterclockwise, the indicated denominator increases (flash output level decreases). -
Page 57: Repeating Flash Mode
Repeating Flash Mode In repeating fl ash mode, the SB-910 fi res repeatedly during a single exposure, creating stroboscopic multiple-exposure effects. • Be sure to use fresh or fully charged batteries and allow enough time for the flash unit to recycle between each repeating flash session.
-
Page 58
Repeating Flash Mode Setting flash output level, number and frequency of flash firings • number of flash firings is the number of times the flash fires per frame. • frequency of flash firings is the number of times the flash fires per second. •… -
Page 59
Taking a picture in repeating flash mode Press function button 2 to highlight the fl ash output level. Rotate the selector dial to choose the fl ash output level, and then press the [OK] button. • Flash output level can be changed with function button 2. -
Page 60
• To determine the f-number, see “Guide Number, Aperture and Flash-to-subject Distance.” (0H-4) • Aperture cannot be set with the SB-910. • The effective flash output distance that matches the flash output level and aperture is displayed. Set the camera shutter speed. -
Page 61
Checking fl ash operation before taking a picture Exposure compensation in repeating fl ash mode • Overexposure occurs in repeating flash mode when the actual flash-to-subject distance is equal to the effective flash output distance determined using the f-number in the procedure with a single flash firing. -
Page 62: D Wireless Multiple Flash-Unit Photography
Wireless Multiple Flash-unit Photography SB-910 Wireless Multiple Flash-unit Photography Setup With the SB-910, Advanced Wireless Lighting and SU-4 type wireless multiple fl ash- unit photography are possible. The SB-910’s default wireless mode for multiple fl ash units is Advanced Wireless Lighting.
-
Page 63
The camera measures the refl ected light. The camera activates the fl ash units. • The SB-910 mounted on a camera is the master flash unit. • Up to three groups (A, B, C) of remote flash units can be set up. -
Page 64: Sb-910 Wireless Multiple Flash-Unit Photography Setup
SB-910 Wireless Multiple Flash-unit Photography Setup SU-4 type wireless multiple flash-unit photography Remote fl ash units Remote fl ash units start fi ring triggered by the master fl ash unit fi ring (in AUTO mode or M mode). Remote fl ash units stop fi ring when the master fl ash unit stops fi ring (in AUTO mode).
-
Page 65: Sb-910 Wireless Multiple Flash-Unit Functions
Flash compensation *1 The SB-910 operates in auto aperture fl ash mode irrespective of the non-TTL auto fl ash mode option set in the custom settings. The SB-910 operates in non-TTL auto fl ash mode when no lens information, such as focal length and aperture, is available.
-
Page 66
SB-910 Wireless Multiple Flash-unit Functions Notes on canceling the master fl ash unit fl ash function When the master fl ash unit fl ash function is canceled and only the remote fl ash units fi re, the master fl ash unit emits a number of weak light signals to trigger the remote fl… -
Page 67: Setting The Master Flash Unit
Setting the Master Flash Unit Master mode LCD example (i-TTL mode) Master fl ash unit fl ash mode and fl ash compensation value Remote fl ash unit fl ash mode and fl ash compensation value Master fl ash unit zoom head position Set the power switch/ wireless mode switch for multiple fl…
-
Page 68: Setting The Remote Flash Unit
Setting the Remote Flash Unit Remote mode LCD example (Advanced Wireless Lighting) Group Channel D–7 Set the power switch/ wireless mode switch for multiple fl ash units to [ REMOTE]. • Turn the switch while holding down the lock release in the center. Remote mode Remote fl…
-
Page 69: Advanced Wireless Lighting
Advanced Wireless Lighting Taking a picture with Advanced Wireless Lighting Master flash unit setting (flash mode, flash compensation value and channel) [Setting i-TTL mode and channel 1 (example)] Press function button 2 to highlight Press the [MODE] button, choose [TTL] with the selector dial, and then press the [OK] button.
-
Page 70
Advanced Wireless Lighting Remote flash unit setting (group, channel and zoom head position) [Setting group A and channel 1 (example)] D–9 Press function button 2 to highlight the group, choose “A” for group with the selector dial, and then press the [OK] button. •… -
Page 71
Repeating flash photography Repeating fl ash photography is possible in Advanced Wireless Lighting. • Repeating flash mode can be activated in the custom settings. ( Repeating flash mode LCD example Repeating fl ash mode Number of fl ash fi rings Master fl… -
Page 72
Advanced Wireless Lighting Setting repeating flash photography • When the SB-910 operates in repeating flash mode, the flash function can be activated (ON) or canceled (OFF). There is no other repeating flash mode option. • The master flash unit and remote flash units operate with the same flash output level, number and frequency of flash firings. -
Page 73: Su-4 Type Wireless Multiple Flash-Unit Photography
SU-4 Type Wireless Multiple Flash-unit Photography SU-4 type wireless multiple fl ash-unit photography is particularly suited to photographing fast-moving subjects. Setting SU-4 type wireless multiple flash-unit photography Set the SU-4 type wireless multiple fl ash-unit photography in custom settings. Set the power switch/wireless mode switch for multiple fl…
-
Page 74
SU-4 Type Wireless Multiple Flash-unit Photography Flash modes for the master flash unit When used in master mode, the SB-910 can operate in auto aperture fl ash, non-TTL auto fl ash, distance-priority manual fl ash and manual fl ash modes. (0D-4) Canceling the master fl… -
Page 75
• Total flash output level of the master and remote flash units is controlled. • The maximum distance the SB-910’s light sensor can detect is approx. 7 m (23 ft) in front of the master flash unit. (manual) mode: •… -
Page 76
SU-4 Type Wireless Multiple Flash-unit Photography To prevent the remote fl ash units from fi ring accidentally Do not leave the remote fl ash units’ power on. Ambient electrical noise caused by static electricity or other such electromagnetic waves can trigger them to fi re accidentally. -
Page 77
Master flash unit setting (flash mode) [Setting auto aperture flash mode (example)] Press function button 1 to highlight the zoom head position, choose a zoom head position with the selector dial, and then press the [OK] button. Setting fl ash output level in M mode In M mode, set the fl… -
Page 78: Remote Flash Units
Remote Flash Units Remote flash unit setting • The standby function of the SB-910, SB-900, SB-800, SB-700, SB-600 and SB-R200 is canceled when remote mode is set. Make sure that there is sufficient battery power. • Set the zoom head position of the remote flash units wider than the angle of view, so that the subject will receive sufficient illumination even when the angle of the flash head is off axis from the subject.
-
Page 79
• As a basic guide, the effective distance between the master and remote flash units is approx. 10 m (33 ft) or less in the front position, and approx. 7 m (23 ft) at both sides (in Advanced Wireless Lighting). These ranges vary slightly depending on ambient light. -
Page 80
• Use the provided Speedlight Stand AS-21 for stable placement of remote flash units. Attach and detach the SB-910 to and from the AS-21 in the same way it is attached to/detached from the camera’s accessory shoe. • Be sure to press the master flash unit test firing button to test fire remote flash units after setting up. -
Page 81: Checking Status In Wireless Multiple Flash-Unit Photography
Checking Status in Wireless Multiple Flash-unit Photography The fl ash-ready indicator on the SB-910 and the sound monitor can be used to check that wireless multiple fl ash-unit photography is operating during and after taking a picture. • The sound monitor can be used to check the operational status of a remote flash unit.
-
Page 82
Checking Status in Wireless Multiple Flash-unit Photography Master fl ash unit Flash-ready Flash-ready indicator indicator Goes out and Quickly blinks lights up when for approx. ready to fi re 6 sec. *1 Indicators shown below appear when underexposure due to insuffi cient fl ash output may have occurred. -
Page 83
Functions This section explains the SB-910 functions that support fl ash photography and camera functions. • For detailed information regarding camera functions and settings, refer to the camera user’s manual. Switching illumination patterns (0E-2) Bounce fl ash operation (0E-4) Taking close-up photographs (0E-9) Flash photography with color fi… -
Page 84: Switching Illumination Patterns
Switching Illumination Patterns In fl ash photography, the center of the image is most illuminated, while the edges are darker. The SB-910 provides three types of illumination patterns with different light falloff at edges. Select the suitable pattern according to the photography environment.
-
Page 85
The selected illumination pattern is indicated with an icon on the LCD. Standard Even Center-weighted When the Nikon Diffusion Dome is attached or the built-in wide panel is in use Press function button 1 to highlight the zoom head position. -
Page 86: Bounce Flash Operation
Background shadows can be softened. • Overexposure of faces, hair and clothes can be reduced. • The shadows can be softened further using the Nikon Diffusion Dome. • For more details and comparative example photos, see the separate booklet “A collection of example photos.”…
-
Page 87
Setting flash head tilting/rotating angles, and choosing a reflecting surface • Good results are most easily achieved when the flash head is tilted up to use the ceiling as a reflecting surface. • Rotate the flash head horizontally to get the same effect when the camera is held in the vertical position. -
Page 88
Bounce Flash Operation Nikon Diffusion Dome • By attaching the included Nikon Diffusion Dome over the flash head, light can be further diffused during bounce flash photography to create extremely soft light with virtually no shadow. • The same effect can be achieved with the camera in either horizontal or vertical position. -
Page 89
Zoom head position indicator Taking a picture with bounce flash Camera’s LCD • When the Nikon Diffusion Dome is attached, the zoom head position is automatically set depending on the camera’s image area and illumination pattern. The zoom head position… -
Page 90
Using the built-in bounce card • In bounce flash photography, use the SB-910’s built-in bounce card to make a portrait subject’s eyes look more vibrant by reflecting the light in them. • Tilt the flash head up 90°. Refer to “Setting the flash head.” ( Setting the built-in bounce card E–8… -
Page 91: Taking Close-Up Photographs
The bounce-down icon appears when the flash head is tilted down. • With the built-in wide panel, the flash 0° from the SB-910 is diffused. This softens 7° shadows and prevents overexposure on faces, etc. • When using a long lens, be careful that the light from the flash is not obstructed by the lens barrel.
-
Page 92
Taking Close-up Photographs Setting the built-in wide panel • To replace the built-in wide panel, lift it up and slide it into the flash head as far as it will go. Zoom head position indicator • In the event that the built-in wide panel breaks, the zoom head position can be set manually. -
Page 93
• The built-in wide panel may break if subjected to strong knocks while on the flash head. • In this case, contact your retailer or Nikon representative. Set the SB-910’s fl ash mode. Position the built-in wide panel. Tilt the fl ash head down. -
Page 94: Flash Photography With Color Filters
Flash Photography with Color Filters Color compensation fi lters, a fl uorescent fi lter and an incandescent fi lter, are included with the SB-910 for use with fl ash photography under incandescent/ tungsten and fl uorescent lighting. • For more details on color compensation filter effects, see the separate booklet “A collection of example photos.”…
-
Page 95
Check the LCD. • Filter type is displayed. • The information is transmitted from the SB-910 to the camera. Fold along the line marked on the fi lter. Attach the fi lter to Color Filter Holder SZ-2 (optional) as shown in the diagram. -
Page 96
TN-A1 (incandescent fi lter) TN-A2 (incandescent fi lter) Warning indicator E–14 Place the fi lter holder on the fl ash head with the Nikon logo facing up, as shown in the diagram, and insert it into the slit at the top. •… -
Page 97
Balancing light from the flash using color compensation filters and color filters When a color compensation fi lter is attached to the SB-910 while the camera’s white balance is set to auto or fl ash, fi lter information is automatically transmitted to the camera, and the camera’s optimum white balance is automatically adjusted… -
Page 98
Flash Photography with Color Filters ■ White balance depends on camera in use Camera D3X, D3S, D3 D700, D300S, D300 D90, D7000, D5100, Filter D5000, D3100, D3000 SZ-2FL Auto, fl ash SZ-2TN Auto, fl ash* FL-G1, FL-G2 Auto, fl ash TN-A1 Auto, fl… -
Page 99: Flash Photography Support Functions
Flash Photography Support Functions Flash compensation Exposure compensation for a fl ash-illuminated subject without affecting background exposure can be achieved by adjusting the SB-910’s fl ash output level. • Some plus compensation may be necessary to make the main subject brighter, and some minus compensation to make it darker.
-
Page 100: Power Zoom Function
Flash Photography Support Functions Power zoom function The SB-910 automatically adjusts the zoom head position to match the lens focal length. • Zoom head positions automatically adjusted differ depending on the settings. For more details, refer to “Specifications.” (0H-17) Power zoom function activated ■…
-
Page 101: Af-Assist Illumination
To set the zoom head position manually, see “Setting the zoom head position manually” above. AF-assist illumination When light is too low for normal autofocus operation, the SB-910’s AF-assist illumination enables autofocus photography. • The SB-910’s AF-assist illumination is compatible with the multi-point AF system.
-
Page 102
If the focus indicator does not appear in the camera’s viewfi nder even though AF- assist illuminator lights up, focus manually. Using the SB-910 off-camera When using the SB-910 off-camera with the TTL Remote Cord SC-29, autofocus in low light is possible because the SC-29 features an AF-assist illumination function. (0H-10) For cameras with a built-in fl… -
Page 103: So Sensitivity Manual Setting
ISO sensitivity can be set at from 3 to 8000. Note that the camera’s ISO sensitivity setting is given priority. Test firing Pressing the test fi ring button determines whether the SB-910 fi res properly. • Test firing and modeling illumination can be selected in the custom settings.
-
Page 104: Standby Function
Turn the power switch/wireless mode switch for multiple flash units to [OFF], and then turn to [ON], [REMOTE] or [MASTER]. • Press the test firing button. E–22 If the SB-910 and camera are not used for a specifi ed time, the standby function is automatically activated to conserve battery power. •…
-
Page 105: Thermal Cut-Out
Thermal cut-out The SB-910 features a function that offers protection against damage to the fl ash panel and body from overheating. This function does not stop the fl ash head temperature rising. Be careful not to let the SB-910 overheat during continuous fl…
-
Page 106: Functions To Be Set On The Camera
Functions to Be Set on the Camera The following functions are available when used with cameras so equipped. Set these functions on the camera. They cannot be set on the SB-910 directly. • For detailed information regarding camera functions and settings, refer to the camera user’s manual.
-
Page 107: Flash Value Lock ( Fv Lock
Flash value lock ( FV lock) The SB-910 sets the fl ash output to locked fl ash exposure. This maintains the subject’s illumination, even if the composition changes. • The flash exposure level (brightness) remains the same even when the aperture is changed or lens is zoomed in and out, because the flash output level automatically changes.
-
Page 108: Rear-Curtain Sync
Functions to Be Set on the Camera Rear-curtain sync In normal fl ash photography, when photographing fast-moving subjects at low shutter speeds at night, pictures can appear unnatural because the subject frozen by the fl ash appears behind or within the blurred movement. Rear-curtain sync fl ash creates a picture in which the blur of a moving subject appears behind the subject and not in front.
-
Page 109: F For Use With Non-Cls-Compatible Slr Cameras
For Use with Non-CLS-compatible SLR Cameras Using the SB-910 with non-CLS-compatible SLR cameras is possible, although some functions may not be operable. • Operable SB-910 functions vary depending on camera in use. • See the camera user’s manual as well.
-
Page 110: G For Use With Coolpix Cameras
AF-assist illumination Firmware update *1 Note that wireless multiple fl ash-unit photography using the COOLPIX’s built-in fl ash as a master fl ash unit and the SB-910 as a remote fl ash unit is not possible. G–1 CLS-compatible COOLPIX cameras •…
-
Page 111
SB-800, SB-700 or Wireless Speedlight Commander SU-800 is mounted on the COOLPIX camera accessory shoe as the master flash unit or commander, and flash units such as the SB-910, SB-900, SB-800, SB-700 and SB-600 are set to remote mode. •… -
Page 112: Tips On Speedlight Care And Reference Information
This section explains troubleshooting, Speedlight care, specifi cations and optional accessories. Troubleshooting If a warning indicator appears, use the following chart to determine the cause of the problem before taking the Speedlight to a retailer or Nikon representative for repair. Problems with the SB-910 Problem The power cannot be turned on.
-
Page 113
Replace the batteries while the SB-910 is on. • If the problem continues, contact your retailer or Nikon representative. Cancel key lock. Wait until the SB-910 cools down. Cause Replace the batteries. Allow the SB-910 to cool down. D-17 E-23… -
Page 114
Turn the camera on. • Power zoom function does • not work properly. Solution — C-10 C-13 D-20 D-20 E-14 — — — Turn the SB-910 off and on again. If the warning indicator — remains, contact your retailer or Nikon representative. -
Page 115: Guide Number, Aperture And Flash-To-Subject Distance
34 m (111.5 ft) (for ISO 100, zoom head position: 35 mm, FX format, illumination pattern: standard, temperature: 20 ˚C/68 ˚F). When ISO sensitivity is 100 and aperture f-number is 8, the illumination of the SB-910 reaches 4.25 m (13.9 ft), which is determined by the equation, fl ash-to-subject distance (4.25 m or 13.9 ft) = guide number (34 m or 111.5 ft) / aperture f-number (8).
-
Page 116: Tips On Speedlight Care
• Use a blower brush to remove dirt and dust from the SB-910 and clean it with a soft, clean cloth. After using the SB-910 near saltwater, wipe the flash unit with a soft, clean cloth moistened slightly with plain water to remove the salt, then dry it using a dry cloth.
-
Page 117
• Avoid exposing the SB-910 to strong magnetism or radio waves from TVs or high- voltage power transmission towers, as this may cause it to malfunction. H–6… -
Page 118: Notes On Batteries
If the battery terminals become soiled, remove dirt and smudges before use, as this may cause malfunction. • Depending on battery specifications, when batteries become hot, the SB-910’s safety circuits are activated, cutting off power. This often occurs when the flash unit is operated repeatedly. Battery power will recover when the temperature returns to normal.
-
Page 119: About The Lcd Panel
The LCD’s response time slows down at low temperatures, but returns to normal at normal temperatures (20 °C/68 °F). LCD panel illuminator ON/OFF Any button or switch will activate the SB-910 illuminator (when the SB-910 power is on) to make the LCD panel easier to read. •…
-
Page 120: Updating Firmware
See the URL below for contact information: http://imaging.nikon.com/ • SB-910 firmware can be updated through a D3 camera with firmware A and firmware B version 2.00 or later. • SB-910 firmware can be updated through a D300 camera with firmware A and firmware B version 1.10 or later.
-
Page 121: Optional Accessories
Optional Accessories ■ Speedlight Stand AS-21 Same as that provided with this SB-910. ■ Color Filter Set SJ-3 A total of 20 fi lters in eight colors are included. These are used with the separately available Color Filter Holder SZ-2.
-
Page 122: Optional Accessories
To use an external power source, remove the external power source terminal cover and connect the power cord to the terminal. • Do not use Power Cord SC-16 when connecting the SB-910 to the Nikon DC Unit SD-7; use the SC-16A instead. Using High-performance Battery Pack SD-9 Conducting continuous fl…
-
Page 123: Specifi Cations
• When the SB-910 is used with the SD-8A or SK-6/SK-6A, the modeling illuminator lights up using power provided only by the batteries in the SB-910 and not from the SD-8A or SK-6/ SK-6A. This is not a malfunction. Min. recycling time Batteries (approx.)*…
-
Page 124: Specifi Cations
(in i-TTL, auto aperture fl ash or non-TTL auto fl ash mode) Illumination pattern Available fl ash mode Other available functions Nikon Creative Lighting System Multiple fl ash-unit photography operation Flash exposure control set on the camera H–13 Automatic Insulated Gate Bipolar Transistor (IGBT) and series circuitry 34/111.5 (ISO 100, m/ft), 48/157.5 (ISO 200, m/ft)
-
Page 125
0°, 30°, 60°, 75°, 90°, 120°, 150°, 180° Rotate the power switch/wireless mode switch for multiple fl ash units to turn the SB-910 on or off Standby function can also be set Use four AA-size batteries of the same brand from any of the following types: •… -
Page 126
The effective fl ash output distance range of the SB-910 is between 0.6 m and 20 m (2 ft and 66 ft). The effective fl ash output distance range differs depending on the camera’s image area, illumination pattern, ISO sensitivity, zoom head position and… -
Page 127
11 0.6 — 16 0.6 — 22 0.6 0.6 — 32 0.6 0.6 0.6 0.6 0.6 — BA: With the Nikon Diffusion Dome attached WP: With the built-in wide panel in place Zoom head position (mm) 14BA/ 14BA 14WP 17 2.3 -… -
Page 128
Angle of coverage (in FX format) Zoom head position set 12 (BA/WP) 14 (BA/WP) 17 (BA/WP) BA: With the Nikon Diffusion Dome attached WP: With the built-in wide panel in place *1 Center-weighted illumination pattern *2 Standard illumination pattern *3 Even illumination pattern… -
Page 129
Guide number table The SB-910 guide numbers differ depending on the camera’s image area, illumination pattern, ISO sensitivity, zoom head position and fl ash output level. Zoom head position Standard (mm) illumination 8 (BA+WP) – 8 (BA) – 8 (WP) –… -
Page 130
2.2/ 2.8/ 1/32 13.1 1.6/ 2.1/ 2.8/ 1/64 1.1/ 1.4/ 1.5/ 1/128 BA: With the Nikon Diffusion Dome attached WP: With the built-in wide panel in place H–19 Zoom head position (mm) 75.5 78.7 88.6 98.4 111.5 16.2/ 16.9/ 21.2/ 53.1… -
Page 131
0.8/ 1/128 • Guide numbers in the above tables are for when the SB-910 is used with a D3 camera with a 1/500 sec. shutter speed. • Guide number for auto FP high-speed sync varies depending on the camera’s shutter speed. -
Page 132
Specifications Min. number of flashes/ recycling time for each battery type Batteries LR6 (AA-size) alkaline (1.5 V) FR6 (AA-size) lithium (1.5 V) HR6 (AA-size) rechargeable Ni-MH (2600 mAh) HR6 (AA-size) rechargeable Ni-MH (eneloop) * When fi ring the Speedlight at full output once every 30 seconds (120 seconds with lithium batteries). -
Page 133: Index
Index • Refer to “Speedlight Parts” ( Accessories … H-10 Advanced Wireless Lighting …D-2, D-8 AF-assist illumination …E-19 AF-ILL ONLY …E-20 Amount of underexposure … C-4 Angle of coverage … H-17 Aperture …C-3, H-4 AUTO (auto) mode … D-14 Auto aperture fl ash mode … C-5 Auto FP high-speed sync …E-24 Batteries …
-
Page 134
Modeling illumination …E-21 Monitor pre-fl ashes …C-6, C-9 Mounting foot …B-8 Mounting foot lock lever …B-8 Multiple fl ash-unit photography … D-1 My Menu …B-15 Nikon Creative Lighting System (CLS) … A-6 Nikon Diffusion Dome …E-6 Non-CLS-compatible SLR camera … F-1… -
Page 135
Non-TTL auto fl ash mode … C-8 Number of fl ash fi rings … C-19 OFF (fl ash function canceled) mode … D-14 OK button ([OK] button) …B-3 Power switch …B-3 Power zoom function …E-18 Rear-curtain sync …E-26 Recycling time … H-21 Red-eye reduction …E-25 Red-eye reduction slow sync …E-25 REMOTE … -
Page 136
No reproduction in any form of this manual, in whole or in part (except for brief quotation in critical articles or reviews), may be made without written authorization from NIKON CORPORATION. Printed in Japan TT1L04(11) 8MSA4411-04…
Требуется руководство для вашей Nikon SB-910 Вспышка? Ниже вы можете просмотреть и загрузить бесплатно руководство в формате PDF. Кроме того, приведены часто задаваемые вопросы, рейтинг изделия и отзывы пользователей, что позволит оптимально использовать ваше изделие. Если это не то руководство, которое вы искали, – свяжитесь с нами.
Ваше устройство неисправно, и в руководстве отсутствует решение? Перейдите в Repair Café для получения бесплатных ремонтных услуг.
Руководство

Рейтинг
Сообщите нам, что вы думаете о Nikon SB-910 Вспышка, оставив оценку продукта. Хотите поделиться вашими впечатлениями от данного изделия или задать вопрос? Вы можете оставить комментарий в нижней части страницы.
Довольны ли вы данным изделием Nikon?
Да Нет
Будьте первым, кто оценит это изделие
0 голоса
Часто задаваемые вопросы
Наша служба поддержки выполняет поиск полезной информации по изделиям и отвечает на часто задаваемые вопросы. Если вы заметили неточность в наших часто задаваемых вопросах, сообщите нам об этом с помощью нашей контактной формы.
Что такое ведущее число? Проверенный
Ведущее число указывает максимальное количество света вспышки, которое может производить вспышка. Более высокое число означает, что объект можно осветить с большего расстояния.
Это было полезно (122)
Autofocus Speedlight
User’s Manual
En

About the SB-910 and This User’s Manual
Thank you for purchasing the Nikon Speedlight SB-910. To get the most out of your
ASpeedlight, please read this user’s manual thoroughly before use. Keep this manual handy for quick reference.
Preparation

|
i |
Table of contents |
(0A-11) |
You can search by item, such as operation method, flash mode or function.
You can search according to objective without knowing the specific name or term of an item.
You can search using the alphabetical index.
This is handy when there is a problem with your Speedlight.

Before using the Speedlight for the first time, read the safety instructions in “For Your Safety” (0A-14 – A-18).
A–2
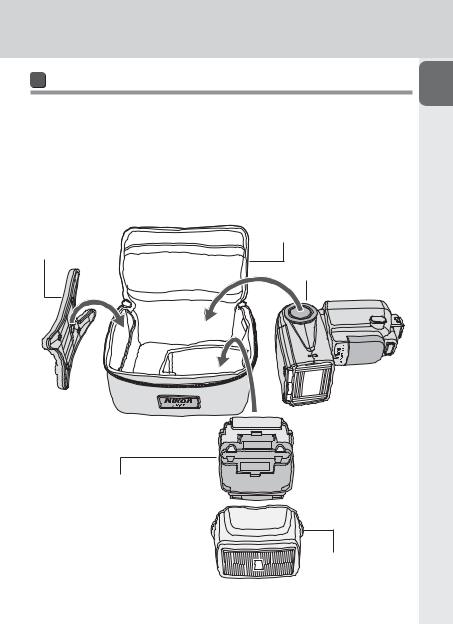
Included items
Check that all items listed below are included with the SB-910. If any items are missing, inform the store where the SB-910 was purchased or the seller immediately.
|
Speedlight Stand AS-21 |
Soft Case SS-910 |
|
Nikon Diffusion Dome SW-13H |
User’s manual (this manual) |
|
Fluorescent Filter SZ-2FL |
A collection of example photos |
|
Incandescent Filter SZ-2TN |
Warranty card |
|
Speedlight Stand |
Soft Case SS-910 |
|
AS-21 |
|
|
SB-910 |
Fluorescent Filter SZ-2FL
Incandescent Filter SZ-2TN
Nikon Diffusion
Dome SW-13H
A–3

About the SB-910 and This User’s Manual
About the SB-910
The SB-910 is a high-performance Speedlight compatible with Nikon Creative Lighting System (CLS) with a guide number of 34/48 (ISO 100/200, m) (111.5/157.5, ft) (at the 35 mm zoom head position in Nikon FX format with standard illumination pattern, 20 °C/68 °F).
CLS-compatible cameras
Nikon digital SLR (Nikon FX/DX format) cameras (except D1 series, D100), F6, COOLPIX cameras (P7100, P7000, P6000)

This manual has been compiled with the assumption that the SB-910 will be used in combination with a camera compatible with CLS and a CPU lens (0A-5). To get the most out of your Speedlight, please read this user’s manual thoroughly before use.
•For use with non-CLS-compatible SLR cameras, see “For Use with Non-CLS- compatible SLR Cameras.” (0F-1)
•For use with i-TTL-compatible COOLPIX cameras (P5100, P5000, E8800, E8400), see “For Use with COOLPIX Cameras.” (0G-1)
•The separate “A collection of example photos” provides an overview of the SB-910’s flash photography capabilities with example photos.
•For camera functions and settings, see the camera user’s manual.
Icons used in this manual
vDescribes a point to which you should pay particular attention in order to avoid Speedlight malfunctions or mistakes.
t Includes information or tips to make Speedlight use easier.
0 Reference to other pages in this manual
A–4
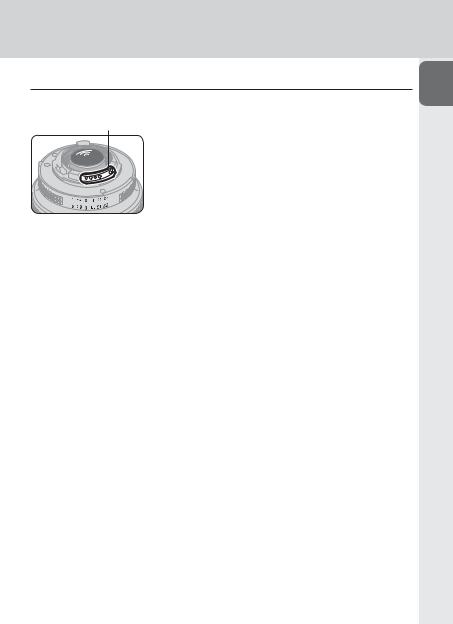
t Tips on identifying CPU NIKKOR lenses
CPU lenses have CPU contacts.
CPU contacts
• The SB-910 cannot be used with IX-Nikkor lenses.
A–5

About the SB-910 and This User’s Manual
Terminology
■ Default settings
Function and mode settings at the time of purchase
■ Nikon Creative Lighting System (CLS)
A lighting system that enables various flash photography functions with improved communication between Nikon Speedlights and cameras
■ Illumination patterns
Control types of light falloff at edges; the SB-910 provides three illumination patterns, standard, even and center-weighted.
■ FX format/DX format
Nikon digital SLR camera image area types (FX format: 36 × 24, DX format: 24 × 16)
■ Guide number (GN)
The amount of light generated by a flash unit; GN = flash-to-subject distance (m or ft) × aperture f-number (ISO 100)
■ Zoom head position
Position of a Speedlight zoom head; the angle of coverage changes as the zoom head position changes.
■ Effective flash output distance
Flash-to-subject distance with correctly adjusted flash output
■Effective flash output distance range
Range of effective flash output distance
■Flash compensation
Intentional flash output change to obtain the desired subject brightness
A–6

■ i-TTL mode
Flash mode in which the Speedlight fires monitor pre-flashes and the camera measures the reflected light and controls the Speedlight flash output
Monitor pre-flashes
Scarcely visible flashes emitted before actual firing that enable the camera to measure the light reflected on a subject
i-TTL balanced fill-flash
i-TTL mode type in which flash output level is adjusted to well-balanced exposure of the main subject and background
Standard i-TTL
i-TTL mode type in which flash output level is adjusted to the correct exposure of the main subject regardless of background brightness
■ Auto aperture flash mode
Non-TTL auto flash mode with aperture priority; the Speedlight measures the reflected flash and controls the flash output according to the reflected flash data and the lens and camera information
■ Non-TTL auto flash mode
Auto flash mode without TTL; the Speedlight measures the reflected flash and controls the flash output according to the reflected flash data
■ Distance-priority manual flash mode
Manual flash mode with distance priority; the flash-to-subject distance is set and the Speedlight flash output level is adjusted in accordance with the camera settings.
■ Manual flash mode
Flash mode in which the flash output level and aperture are manually set to obtain the desired exposure
■ Repeating flash mode
Flash mode in which the Speedlight fires repeatedly during a single exposure to create stroboscopic multiple effects
A–7

About the SB-910 and This User’s Manual
■ Step
AA unit of the shutter speed or aperture change; a change of one step halves/ doubles the amount of light entering the camera
Preparation
■ EV (Exposure Value)
Each increment of 1 in exposure value corresponds to a one-step change in exposure, which is made by halving/doubling shutter speed or aperture
■ Wireless multiple flash-unit photography
Flash photography with multiple wireless flash units simultaneously firing
Master flash unit
The flash unit that commands remote flash units in multiple flash-unit photography
Remote flash unit
A flash unit that fires following commands from the master flash unit
Advanced Wireless Lighting
Wireless multiple flash-unit photography with CLS; multiple remote flash unit groups can be controlled with the master flash unit.
SU-4 type wireless multiple flash-unit photography
Wireless multiple flash-unit photography suited to taking picture of a fastmoving subject; the master and remote flash units fire almost simultaneously because the master flash unit does not emit monitor pre-flashes.
A–8
Q&A Index
You can search for specific explanations according to objective.
Flash photography 1 (with SB-910 mounted on camera)
|
Question |
Key phrase |
0 |
|
|
Which flash mode can I take pictures with? |
Flash modes |
C-1 |
|
|
How can I take pictures in the simplest way? |
Basic operation |
B-6 |
|
|
How can I take formal group shots? |
Illumination pattern: Even |
E-2 |
|
|
How can I take portrait photos emphasizing the |
Illumination pattern: Center- |
E-2 |
|
|
main subject? |
weighted |
||
|
How can I take pictures with soft shadows cast on |
Bounce flash operation |
E-4 |
|
|
a wall? |
|||
|
How can I confirm lighting conditions? |
Modeling illumination |
E-21 |
|
|
How can I take brighter (or darker) pictures of the |
Flash compensation |
E-17 |
|
|
subject? |
|||
|
How can I take pictures under fluorescent light and |
|||
|
incandescent light and balance the lights’ color |
Color compensation filters |
E-12 |
|
|
effects? |
|||
|
How can I take pictures adding specific color to the |
Color filters |
E-12 |
|
|
light of Speedlight? |
|||
|
How can I use autofocus in dim lighting? |
AF-assist illumination |
E-19 |
|
|
How can I take pictures of both the subject and |
Slow sync |
E-25 |
|
|
background at night? |
|||
|
How can I take pictures without the subject’s eyes |
Red-eye reduction |
E-25 |
|
|
appearing red? |
|||
|
How can I take pictures of a moving subject with |
Repeating flash mode |
C-18 |
|
|
stroboscopic multiple-exposure effects? |
|||
|
How can I use the SB-910 with a non-CLS- |
Non-CLS-compatible SLR |
F-1 |
|
|
compatible SLR camera? |
camera |
||
|
How can I use the SB-910 with a COOLPIX camera? |
COOLPIX camera |
G-1 |
|
A–9

Q&A Index
Flash photography 2 (with wireless SB-910)
|
Question |
Key phrase |
0 |
|
|
How do I take pictures using multiple flash units? |
Advanced Wireless Lighting |
D-1 |
|
|
How do I take pictures of a fast-moving subject |
SU-4 type wireless multiple |
D-12 |
|
|
using wireless multiple flash-unit photography? |
flash-unit photography |
||
|
How do I take pictures with the SB-910 and a |
CLS-compatible COOLPIX |
||
|
COOLPIX camera compatible with wireless multiple |
G-1 |
||
|
camera |
|||
|
flash-unit photography? |
|||

|
Question |
Key phrase |
0 |
|
|
What kind of batteries do I use in the Speedlight? |
Compatible battery |
B-7 |
|
|
How long is the recycling time and how many flashes |
Min. number of flashes/ |
||
|
recycling time for each battery |
H-21 |
||
|
are possible with each fresh set of batteries? |
type |
||
|
How can I change the settings of functions? |
Custom settings |
B-13 |
|
|
How can I reset various settings? |
Two-button reset |
B-12 |
|
|
How can I lock the dial and buttons of the |
Key lock |
B-4 |
|
|
Speedlight to prevent accidental use? |
|||
|
How can I update the Speedlight firmware? |
Firmware update |
H-9 |
|
A–10
Table of Contents
|
A |
Preparation |
A |
|
|
About the SB-910 and This User’s Manual |
………………………………………A-2 |
||
|
Q&A Index……………………………………………………………………………….. |
A-9 |
||
|
For Your Safety ……………………………………………………………………….. |
A-14 |
B |
|
|
Check before Use ……………………………………………………………………. |
A-19 |
|
B |
Operation |
|
|
Speedlight Parts………………………………………………………………………… |
B-1 |
|
|
Function Buttons……………………………………………………………………….. |
B-5 |
|
|
Basic Operations ……………………………………………………………………….. |
B-6 |
|
|
Settings and the LCD ……………………………………………………………….. |
B-12 |
|
|
Custom Functions and Settings …………………………………………………. |
B-13 |
|
C |
Flash Modes |
|
|
i-TTL Mode ………………………………………………………………………………. |
C-1 |
|
|
Auto Aperture Flash Mode………………………………………………………….. |
C-5 |
|
|
Non-TTL Auto Flash Mode…………………………………………………………… |
C-8 |
|
|
Distance-priority Manual Flash Mode ………………………………………….. |
C-12 |
|
|
Manual Flash Mode …………………………………………………………………. |
C-15 |
|
|
Repeating Flash Mode………………………………………………………………. |
C-18 |
|
D |
Wireless Multiple Flash-unit Photography |
||
|
SB-910 |
Wireless Multiple Flash-unit Photography Setup …………………… |
D-1 |
G |
|
SB-910 |
Wireless Multiple Flash-unit Functions ………………………………… |
D-4 |
|
|
Setting the Master Flash Unit ………………………………………………………. |
D-6 |
||
|
Setting the Remote Flash Unit ……………………………………………………… |
D-7 |
||
|
Advanced Wireless Lighting ………………………………………………………… |
D-8 |
H |
|
|
SU-4 Type Wireless Multiple Flash-unit Photography………………………. |
D-12 |
||
|
Remote Flash Units ………………………………………………………………….. |
D-17 |
||
|
Checking Status in Wireless Multiple Flash-unit Photography ………….. |
D-20 |
A–11

Table of Contents
|
A |
E |
Functions |
|
|
Switching Illumination Patterns ……………………………………………………. |
E-2 |
||
|
Preparation |
Bounce Flash Operation ……………………………………………………………… |
E-4 |
|
|
• Flash compensation ……………………………………………………………. |
E-17 |
||
|
Taking Close-up Photographs………………………………………………………. |
E-9 |
||
|
Flash Photography with Color Filters …………………………………………… |
E-12 |
||
|
Flash Photography Support Functions………………………………………….. |
E-17 |
||
|
• Power zoom function …………………………………………………………. |
E-18 |
||
|
• AF-assist illumination ………………………………………………………….. |
E-19 |
||
|
• ISO sensitivity manual setting……………………………………………….. |
E-21 |
||
|
• Test firing …………………………………………………………………………. |
E-21 |
||
|
• Modeling illumination…………………………………………………………. |
E-21 |
||
|
• Standby function ……………………………………………………………….. |
E-22 |
||
|
• Thermal cut-out…………………………………………………………………. |
E-23 |
||
|
Functions to Be Set on the Camera …………………………………………….. |
E-24 |
||
|
• Auto FP high-speed sync……………………………………………………… |
E-24 |
||
|
• Flash value lock (FV lock) …………………………………………………….. |
E-25 |
||
|
• Slow sync …………………………………………………………………………. |
E-25 |
||
|
• Red-eye reduction/red-eye reduction slow sync ……………………….. |
E-25 |
||
|
• Rear-curtain sync ……………………………………………………………….. |
E-26 |
||
|
F |
For Use with Non-CLS-compatible SLR Cameras………. |
F-1 |
|
|
G |
For Use with COOLPIX Cameras…………………………………… |
G-1 |
|
A–12
|
A |
|||||
|
H |
Tips on Speedlight Care and Reference Information |
||||
|
Troubleshooting………………………………………………………………………… |
H-1 |
||||
|
Guide Number, Aperture and Flash-to-subject Distance ……………………. |
H-4 |
||||
|
Tips on Speedlight Care ……………………………………………………………… |
H-5 |
B |
|||
|
Notes on Batteries……………………………………………………………………… |
H-7 |
||||
|
About the LCD Panel …………………………………………………………………. |
H-8 |
||||
|
Updating Firmware ……………………………………………………………………. |
H-9 |
C |
|||
|
Optional Accessories………………………………………………………………… |
H-10 |
||||
|
Specifications………………………………………………………………………….. |
H-13 |
||||
|
Index …………………………………………………………………………………….. |
H-22 |
D
E
F
G
H
A–13

For Your Safety
Before using your product, please read the following safety precautions carefully
Aand thoroughly to ensure correct and safe use and to help prevent damage to your Nikon product or injury to yourself or others.
Preparation
For quick reference by those who use the product, please keep these safety instructions near the product.
In this manual, safety instructions are indicated with these symbols:

Disregarding instructions marked with this symbol could result in personal injury, or death and property damage.

Disregarding instructions marked with this symbol could result in property damage.

1.If corrosive liquids seep from the batteries and get in your eyes, immediately wash your eyes with running water and consult with a doctor. Your eyes could be seriously damaged if they are not treated quickly.
2.If corrosive liquids seep from the batteries and come in contact with your skin or clothes, wash immediately with running water. Prolonged contact could injure your skin.
3.Never attempt to disassemble or repair the flash unit by yourself, as this could result in you receiving an electric shock and could also cause the unit to malfunction; such malfunction could lead to personal injury.
4.If the flash unit is dropped and damaged, do not touch any exposed interior metal parts. Such parts, especially the Speedlight’s capacitor and associated parts, could be in a high-charge state and if touched could cause an electric shock. Disconnect the power or remove the batteries and be sure that you do not touch any of the product’s electrical components, and then bring the flash unit to your local Nikon dealer or authorized service center for repair.
5.If you detect heat, smoke or notice a burning smell, immediately stop operation and remove the batteries to prevent the unit from catching on fire or melting. Allow the flash unit to cool down so that you can safely touch it and remove the batteries. Then bring the unit to your local Nikon dealer or authorized service center for repair.
A–14

6.The flash unit should never be submerged in liquid or exposed to rain, saltwater or moisture unless it is properly protected from the liquids and moisture. Underwater use requires a certified underwater housing.
If water or moisture gets inside the unit, this could cause the unit to catch on fire or cause an electric shock. In such instances you should immediately
remove the batteries from the Speedlight and then bring the unit to your local Nikon dealer or authorized service center for repair.
Note: electronic devices that are penetrated by water or moisture are often not economically repairable.
7.Do not use the unit in the presence of flammable or explosive gas. If the flash unit is operated in areas where there is a flammable gas, including propane, gasoline and dust, it could cause an explosion or fire.
8.Do not fire the flash unit directly at the driver of a moving car, as this could temporarily impair the driver’s vision and cause an accident.
9.Do not fire the flash unit directly into the eyes of someone that is at close range, as it could damage the retinas of their eyes. Never fire the flash unit closer than 1 meter from infants.
10.Do not fire the unit while the flash head is touching a person or object.
Such use can result in the person being burned, and/or their clothes igniting from the heat of the flash’s firing.
11.Keep small accessories out of the reach of children to avoid the possibility of the accessory being swallowed. If an accessory is accidentally swallowed, immediately consult with a doctor.
12.Use only the batteries specified in this user’s manual. Batteries other than those specified could leak corrosive liquids, explode or catch on fire or otherwise not perform satisfactorily.
13.Do not mix battery types, brands or old and new batteries, as the batteries could leak corrosive liquids, explode or catch on fire. When using more than one battery in a product, always use identical batteries that were purchased at the same time.
14.Non-rechargeable batteries such as manganese, alkaline and lithium batteries should never be charged in a battery charger because they could leak corrosive liquids, explode or catch on fire.
15.When using standard size (AA, AAA, C, D) or other common rechargeable batteries such as Ni-MH batteries, or when recharging them, be sure to use only the battery charger specified by the battery maker and read the instructions thoroughly. Do not recharge these batteries with their terminals reversed in the charger or before
the batteries have cooled off sufficiently because they could leak corrosive liquids, explode or catch on fire. The same caution also applies to using the rechargeable batteries that may be supplied by the photo product’s manufacturer.
A–15

For Your Safety

1.Do not touch the flash unit with wet hands, as this could cause an electric shock.
2.Keep the flash unit away from children to prevent them from putting the unit in or near their mouth, or otherwise touching a dangerous part of the product; as such contact could cause an electric shock.
3.Do not apply strong physical shocks to the unit, as this could cause a malfunction that could cause the unit to explode or catch on fire.
4.Never use active agents that contain flammable substances such as paint thinner, benzene or paint remover to clean the unit, never use insect deterrent spray on the unit, and never store the unit in locations containing chemicals such as camphor and naphthalene, as this could damage the plastic case, cause a fire or cause an electric shock.
5.Remove any batteries from the unit before storing the unit for a long time to prevent the unit from catching on fire or leaking corrosive liquids.

1.Never heat or throw batteries into a fire, as this could cause the batteries to leak corrosive liquids, generate heat or explode.
2.Do not short-circuit or disassemble the batteries because this could cause the batteries to leak corrosive liquids, generate heat or explode.
3.Do not mix battery types, brands or old and new batteries, as this could cause the batteries to leak corrosive liquids, generate heat or explode.
4.Do not install batteries in the reverse direction as this could cause the batteries to leak corrosive liquids, generate heat or explode. Even if only one battery is installed in reverse it will cause the Speedlight to malfunction.
5.Be sure to use the battery charger specified by the battery maker to avoid the possibility of batteries leaking corrosive liquids, generating heat or exploding.
6.Do not carry or store batteries along with metallic materials such as necklaces and hair pins because such materials could cause the batteries to short-circuit, leading to battery leakage, heat generation or an explosion. In addition, especially when carrying a quantity of batteries, place them carefully in a storage case that prevents the battery terminals from touching another battery’s terminals because if they touch in reverse order it could also cause the batteries to short-circuit, leading to battery leakage, heat generation or an explosion.
A–16

7.If corrosive liquids seep from the batteries and get in your eyes, immediately wash your eyes with running water and consult with a doctor. Your eyes could be seriously damaged if they are not treated quickly.
8.If corrosive liquids seep from the batteries and come in contact with your skin or clothes, wash immediately with running water. Prolonged contact could injure your skin.
9.Always follow the warnings and instructions printed on the batteries to avoid activities that could cause the batteries to leak corrosive liquids, generate heat or catch on fire.
10.Be sure to use only batteries specified in this user’s manual, to avoid the possibility of batteries leaking corrosive liquids, generating heat or exploding.
11.Never open the casing surrounding batteries or use batteries whose casing has been breached as such batteries could leak corrosive liquids, generate heat or explode.
12.Keep batteries out of the reach of children to help avoid the possibility of them being swallowed. If a battery is accidentally swallowed, immediately consult with a doctor.
13.Batteries should not be submerged in water, exposed to rain, moisture or saltwater unless they are properly protected from the wet environment. If water or moisture gets inside the batteries, this could cause them to leak corrosive liquids or generate heat.
14.Do not use any battery that appears abnormal in any way, including a change in color or shape. Such batteries could leak corrosive liquids or generate heat.
15.Stop recharging rechargeable batteries if you notice that recharging is not completed within the specified time to help prevent the possibility of the battery leaking corrosive liquids or generating heat.
16.When recycling or disposing of batteries, be sure to insulate their terminals with tape. If the battery’s positive and negative terminals shortcircuit after coming into contact with metallic objects, it could cause fire, heat generation or an explosion. Dispose of used batteries in accordance with local government regulations.
17.Non-rechargeable batteries should never be charged in a battery charger because they could leak corrosive liquids or generate heat.
18.Remove dead batteries from your equipment immediately, as they could leak corrosive liquids, generate heat or explode.
19.Be careful when replacing batteries after continuous flash use, because batteries may generate heat during continuous flash photography.
A–17
For Your Safety

Do not throw or apply strong physical shocks to the batteries as this could cause batteries to leak corrosive liquids, generate heat or explode.
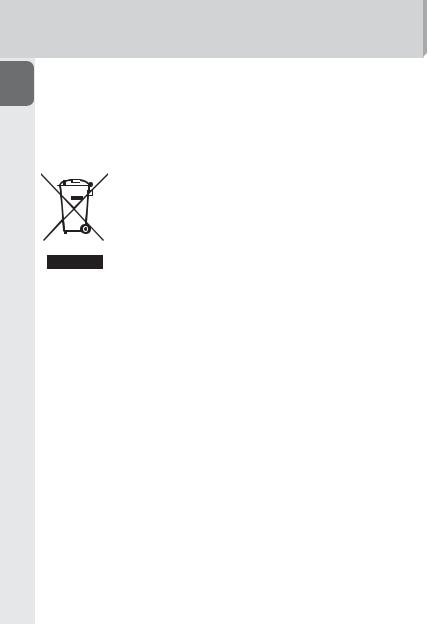
Symbol for separate collection applicable in European countries
This symbol indicates that this product is to be collected separately. The following apply only to users in European countries.
•This product is designated for separate collection at an appropriate collection point. Do not dispose of as household waste.
•For more information, contact the retailer or the local authorities
in charge of waste management.
A–18

Check before Use

Take trial shots
Take trial shots before photographing important occasions such as weddings or graduations.
Have Nikon spot-check your Speedlight regularly
Nikon recommends that you have your Speedlight serviced by an authorized dealer or service center at least once every two years.
Use your Speedlight with Nikon equipment
The Nikon Speedlight SB-910’s performance has been optimized for use with Nikon brand cameras/accessories including lenses.
Cameras/accessories made by other manufacturers may not meet Nikon’s criteria for specifications, and incompatible cameras/accessories could damage the SB-910’s components. Nikon cannot guarantee the SB-910’s performance when used with non-Nikon products.

As part of Nikon’s “life-long learning” commitment to ongoing product support and education, continually updated information is available online at the following websites:
•For users in the United States: http://www.nikonusa.com/
•For users in Europe and Africa: http://www.europe-nikon.com/support/
•For users in Asia, Oceania and the Middle East: http://www.nikon-asia.com/
Visit these sites to keep up to date with the latest product information, tips, answers to frequently-asked questions (FAQs), and general advice on digital imaging and photography. Additional information may be available from the Nikon representative in your area. See the URL below for contact information:
http://imaging.nikon.com/
A–19
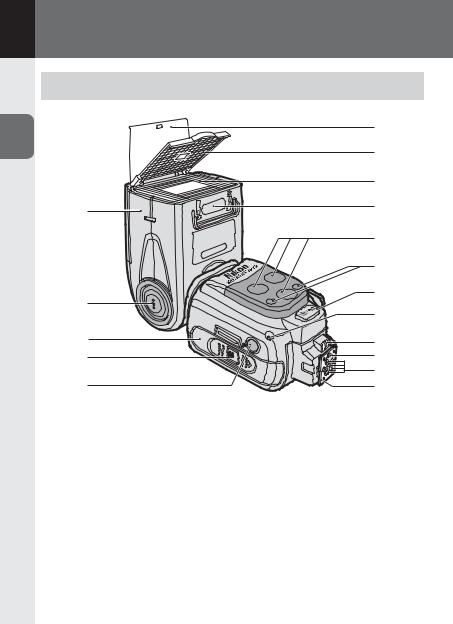
B Operation
Speedlight Parts
B
2
3
4
5
1Flash head
2Flash head tilting/rotating lock release button (0B-9)
3Battery chamber cover
4Battery chamber cover lock release (0B-6)
5Light sensor window for wireless remote flash (0D-17)
6Built-in bounce card (0E-8)
7Built-in wide panel (0E-10)
8Flash panel
9Filter detector (0E-14)
|
6 |
||
|
7 |
||
|
8 |
||
|
9 |
||
|
10 |
||
|
11 |
||
|
12 |
||
|
13 |
||
|
14 |
||
|
PUSH |
15 |
|
|
16 |
||
|
17 |
10AF-assist illuminator (0E-19)
11Flash-ready indicator (in remote mode) (0D-20)
12External power source terminal (supplied with cover) (0H-11)
13Light sensor for non-TTL auto
flash (0C-5, C-8)
14External AF-assist illuminator contacts
15Locking pin
16Accessory shoe contacts
17Mounting foot
B–1

18
18Flash head tilting angle scale
(0E-4)
19Flash head rotating angle scale
(0E-4)
20Sync terminal cover
21Sync terminal
22LCD panel (0B-12)
23Flash-ready indicator
(0B-11, D-20)
24Mounting foot lock lever (0B-8)
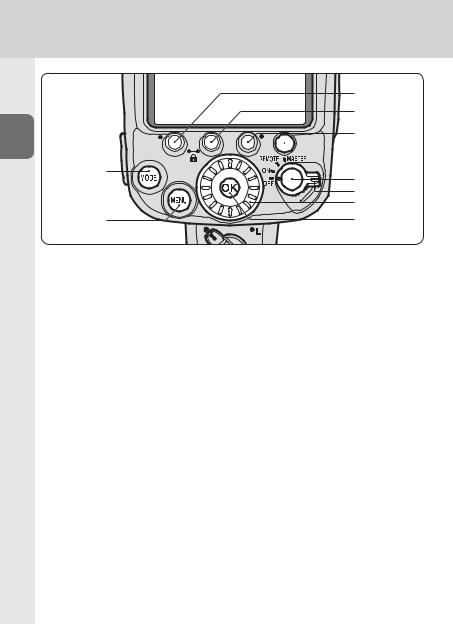
Speedlight Parts
B
25[MODE] button
Selects flash mode (0B-11)
26[MENU] button
Displays custom settings (0B-13)
27Function button 1
28Function button 2
29Function button 3
•Selects item to be configured
•The assigned function or setting for each button differs according to the flash mode and settings of the SB-910. (0B-5)
30Test firing button
•Controls test firing (0E-21) and modeling illumination (0E-21)
•The button function, test firing and modeling illumination can be changed in the custom settings. (0B-17)
27
28


31
32
33
34
31Lock release
To set wireless mode for multiple flash units, rotate the power switch/wireless mode switch for multiple flash units while holding down the lock release in the center of the switch. (0D-6, D-7)
32Power switch/wireless mode switch for multiple flash units
•Rotate to turn power on and off.
•Selects the master or remote mode in wireless multiple flashunit photography (0D-6, D-7)
33Selector dial
Rotate to change selected item. The selected item is highlighted on the LCD. (0B-12)
34[OK] button
Confirms selected setting (0B-12)
B–3
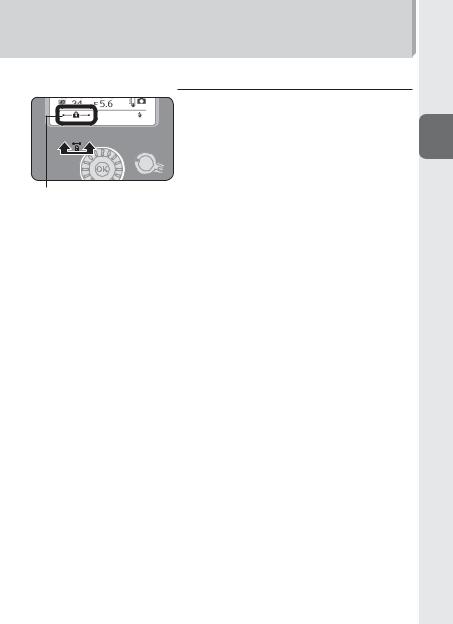
t Activating key lock
Key lock icon
Press function buttons 1 and 2, between which a lock icon is printed, simultaneously for 2 seconds. The key lock icon appears on the LCD and the dial and buttons are locked.
•The power switch/wireless mode switch for multiple flash units and the test firing button remain unlocked.
•To cancel key lock, press function buttons 1 and 2 again simultaneously for 2 seconds.
B–4

Function Buttons
The assigned function or setting for each button differs according to the flash mode and settings of the SB-910.
• The assigned function or setting for each button is indicated by an icon.
• When no function is assigned to a button, no icon appears above the button on the LCD.
|
Function button 1 |
Function button 2 |
Function button 3 |

Zoom head position
Flash compensation value
Flash output level in manual flash mode
Amount of underexposure due to insufficient flash output in i-TTL mode
Aperture
Flash-to-subject distance (in distance-priority manual flash mode)
Number and frequency of flash firings
Change setting items
Illumination pattern
Activate power zoom function
[With wireless multiple flash-unit photography] (0D-1)
Channels
Sound monitor
[In custom settings] (0B-13)
Go to previous page
Go to next page
Display My Menu or Full
Menu
Change My Menu items
End changing My Menu items
B–5

Basic Operations
This section covers basic procedures in i-TTL mode in combination with a CLScompatible camera.
vNotes on continuous flash photography
•To prevent the SB-910 from overheating, allow it to cool down for at least 10 minutes after 15 times of continuous firing.
•When continuous flash firing is repeated in quick succession, the internal safety function adjusts the recycling time by up to 15 seconds. If flash firing continues, the thermal cut-out indicator appears on the LCD and all operations except power ON/OFF and custom settings are suspended. (0E-23) Allow it to cool down for several minutes to disable this function.
•The conditions under which the internal safety function is activated differ depending on the temperature and the SB-910 flash output level.
•For use with High-performance Battery Pack SD-9 (optional), see “Using Highperformance Battery Pack SD-9.” (0H-11)


B–6

Basic Operations

When replacing batteries, use four fresh AA-size batteries of the same brand. Refer to the following table to determine when to replace batteries with fresh ones or
Brechargeon. batteries according to how long the flash-ready indicator takes to come
Operation
|
Battery type |
Time the flash-ready indicator takes to |
||
|
come on |
|||
|
1.5 |
V LR6 (AA-size) alkaline battery |
20 seconds or more |
|
|
1.5 |
V FR6 (AA-size) lithium battery |
10 seconds or more |
|
|
1.2 |
V HR6 (AA-size) rechargeable Ni-MH |
10 seconds or more |
|
|
battery |
|||
•For minimum recycling time and number of flashes for each battery type, refer to “Specifications.” (0H-21)
•Alkaline battery performance may vary greatly depending on the manufacturer.
•1.5 V R6 (AA-size) carbon-zinc batteries are not recommended.
•Using an optional external power source increases the number of flashes and provides shorter recycling times. (0H-11)
v Additional precautions regarding batteries
•Read and follow battery warnings and cautions (0A-14 – A-18).
•Be sure to read and follow the warnings for the battery on the section, “Notes on Batteries” (0H-7), before using the battery.
•The recycling time can be longer when FR6 (AA-size) lithium batteries are used because they incorporate a function that suppresses the output current when heat is generated in the batteries.
B–7
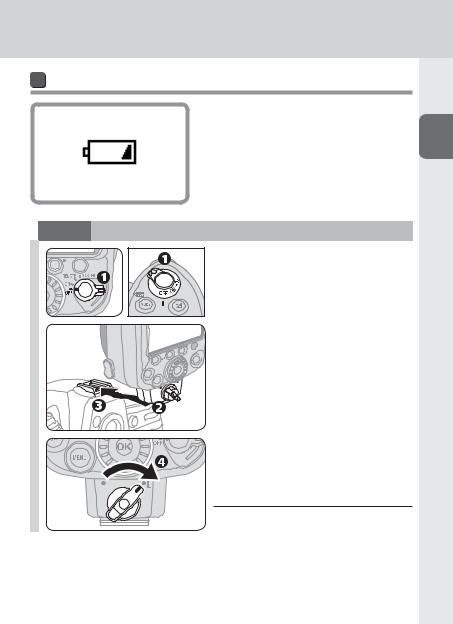
Low battery power indicator
When battery power is low, the icon shown at the left appears on the LCD and the SB-910 stops functioning. Replace or recharge batteries.


the camera body are turned
off.

foot lock lever is on the left
(white dot).

foot into the camera’s
accessory shoe.


Turn the lock lever clockwise until it stops at the mounting foot lock index.
B–8
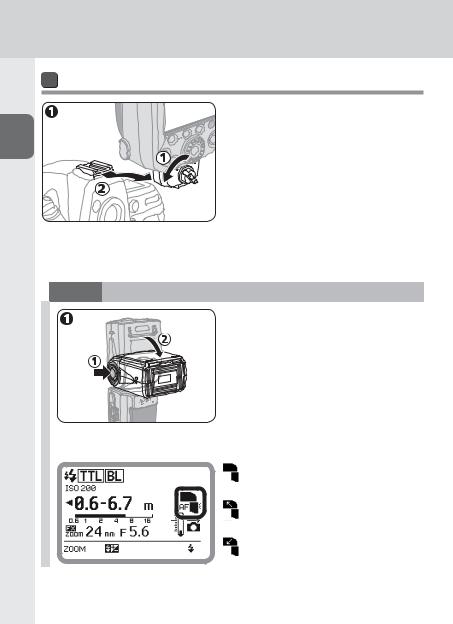
Basic Operations
Detaching the SB-910 from the camera

the camera body are turned
off, turn the lock lever 90° to
the left, and then slide the
SB-910’s mounting foot from the camera’s accessory shoe.
•If the SB-910’s mounting foot cannot be removed from the camera’s accessory shoe, turn the lock lever 90° to the left again, and slide the SB-910 slowly out.
•Do not forcibly remove the SB-910.


the forward-facing position
while holding down the flash
head tilting/rotating lock
release button.
• The flash head is locked when tilted 90° up or set in the forward-facing position.
LCD indicator for flash head status
Flash head is set in the forward-facing position.
Flash head is set at angle. (Flash head is tilted up or rotated to the right or left.)
Flash head is tilted down.
B–9
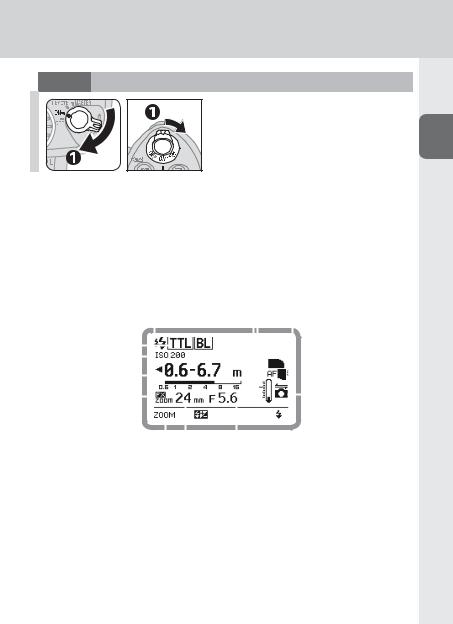


camera body on.
LCD example
•The image below is the SB-910 LCD example under the following conditions: flash mode: i-TTL mode; image area: FX format; illumination pattern: standard; ISO sensitivity: 200; zoom head position: 24 mm; aperture f-number: 5.6
•Icons on the LCD may differ depending on the SB-910 settings and the camera and lens in use.
|
SB-910 flash information |
SB-910 status icons |
|||||||||||||||||
|
Flash mode |
||||||||||||||||||
|
ISO sensitivity |
||||||||||||||||||
|
Effective flash output |
||||||||||||||||||
|
distance range |
Connected to a CLS- |
|||||||||||||||||
|
FX format |
compatible camera |
|||||||||||||||||
|
Aperture f-number |
||||||||||||||||||
|
Zoom head position |
||||||||||||||||||
|
Functions assigned for function buttons |
B–10
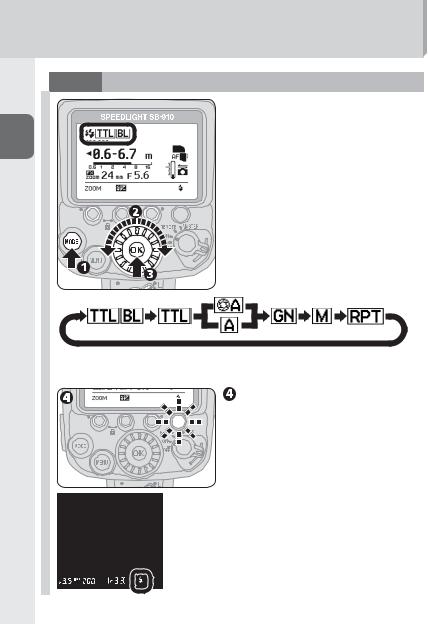
Basic Operations


Changing the flash mode
Rotate the selector dial clockwise to display icons of available flash mode on the LCD.
•Only available flash modes are displayed on the LCD.
•The flash mode can also be selected with the [MODE] button.
Make sure that the flashready indicator on the SB-910 or in the camera’s viewfinder is on before taking a picture.

Settings and the LCD
Icons on the LCD show the status of settings. Displayed icons vary according to selected flash modes and settings.
• The basic control of SB-910 functions is as follows:

selected item.


• Once confirmed, the highlighted item
returns to normal display.
• If the [OK] button is not pressed, the highlighted item is confirmed and returns to normal display after 8 seconds.
t Two-button reset
Press function buttons 1 and 3 (a green dot is printed by each button) simultaneously for
2 seconds to reset all settings except custom settings to default.
• When the reset completes, the LCD is highlighted and then returns to normal display.
B–12

Custom Functions and Settings
Various operations for the SB-910 can be easily set using the LCD.
•Displayed icons vary according to the combination of camera and status of the SB-910.
•Functions and settings indicated with grid boxes do not function even though
they can be configured and set.
Custom settings


• The highlighted item can be configured.
Item being configured
Items indicated with grid boxes can be configured but do not effect flash operation.
B–13


• Highlighted while selected
• Press the [OK] button to return display to item selection.

• The LCD returns to normal display.
º: Current setting
Available selection
B–14

Custom Functions and Settings
Setting My Menu
When a custom settings page is displayed, only the custom settings items that are set as My Menu are displayed on the LCD.
B• My Menu items can be changed any time.
• To display all items, select “FULL” in the My Menu setting in the custom settings.
Operation
Select “SET UP” in My Menu setting in the custom settings, and press the [OK] button.
Select custom settings item to be set as My Menu with the selector dial, and press function button 2.
•The selected item will have a ticked check box ( 
•No check box appears for an item that cannot be selected.
•To untick a check box, press function button 2 again.
•To return to My Menu setting without saving, press function button 1.


• The LCD returns to normal display.
B–15

t Custom settings page display function and display mode
Page display function
Custom settings pages can be changed with function buttons 1 and 2.
•The number of pages displayed varies from one to five depending on the settings.
•The position of the displayed page is indicated in the bar.
Display mode
The custom settings display mode, My Menu or Full Menu, can be changed with function button 3.
Position of displayed page within custom settings


B–16

Custom Functions and Settings
Available custom functions and settings
(Bold: default)
Non-TTL auto flash mode option (0C-5, C-8)
Auto aperture flash with monitor pre-flashes
Auto aperture flash without monitor pre-flashes
Non-TTL auto flash with monitor pre-flashes
Non-TTL auto flash without monitor pre-flashes
Master flash unit repeating flash mode (0D-10)
ON: Repeating flash mode on
OFF: Repeating flash mode off
Flash compensation step in manual flash mode (0C-17) Setting flash compensation step between M1/1 and M1/2 in manual flash mode
1/3 EV: Compensation with 1/3 EV step
1 EV: Compensation with 1 EV step
Wireless mode for multiple flash units (0D-1)
Advanced: Advanced Wireless Lighting
SU-4: SU-4 type wireless multiple flash-unit photography
Test firing button (0E-21)
FLASH: Test firing
MODELING: Modeling illumination
B–17

Test firing flash output level in i-TTL mode (0E-21)
M1/128: Approx. 1/128
M1/32: Approx. 1/32
M1/1: Full
FX/DX format selection (0A-6)
When the zoom head position is manually set, image area settings can be selected.
FX±∞DX: Automatically set according to the camera’s image area
FX: Nikon FX format (36 × 24) DX: Nikon DX format (24 × 16)
Canceling power zoom function (0E-19)
Activating or canceling power zoom function
ON: Power zoom function canceled
OFF: Power zoom function activated
AF-assist illumination/canceling flash function (0E-20) Activating or canceling AF-assist illumination and flash function
ON: Both AF-assist illumination and flash function activated
OFF: AF-assist illumination canceled, flash function activated
AF ONLY: AF-assist illumination activated, flash function canceled (only AF-assist illuminator lights up)
Standby function (0E-22)
Adjusting the time before the standby function is activated.
AUTO: Standby function activated when the camera’s exposure meter is turned off
40: 40 seconds 80: 80 seconds 160: 160 seconds 300: 300 seconds
—: Standby function canceled
B–18

Custom Functions and Settings
ISO sensitivity manual setting (0E-21)
Setting ISO sensitivity within the range of between 3 and 8000.
100: ISO 100
Flash-ready indicator in remote mode (0D-20)
Selecting which flash-ready indicator to blink/light up in remote mode to save power
REAR, FRONT: Back indicator lights up, front indicator blinks in remote mode
REAR: Only back indicator lights up
FRONT: Only front indicator blinks in remote mode
LCD panel illumination (0H-8)
Activating or canceling LCD panel illumination
ON: Activated
OFF: Canceled
LCD panel contrast (0H-8)
Contrast levels are displayed on the LCD in a nine-step graph.
5 levels in 9 steps
Measurement unit (m/ft)
m: meters ft: feet
B–19

Zoom head position manual setting with broken built-in wide panel (0E-11)
Selecting whether the zoom head position can be manually set or not when the built-in wide panel is broken.
ON: Zoom head position can be manually set
OFF: Zoom head position cannot be manually set
My Menu setting (0B-15)
Selecting custom settings display mode
FULL: All items displayed
MY MENU: Items set as My Menu displayed
SET UP: Select items to be set as My Menu
Version of firmware (0H-9)
Reset custom settings
Reset custom settings to default except measurement unit (m/ft) and My Menu settings.
YES: Reset to default
NO: Do not reset
B–20

Flash Modes
i-TTL Mode
Information obtained by monitor pre-flashes and exposure control information is integrated by the camera to automatically adjust flash output levels.
•To take pictures using the SB-910 set in i-TTL mode, see “Basic Operations” (0B-6).
•Either the i-TTL balanced fill-flash mode or the standard i-TTL mode option is available.
i-TTL balanced fill-flash
The flash output level is automatically adjusted for well-balanced exposure of the main subject and background. 
Standard i-TTL
The main subject is correctly exposed regardless of background brightness. This is useful when you want to highlight the main subject. 
t Camera’s metering mode and i-TTL mode
•When the camera’s metering mode is changed to spot metering while i-TTL balanced fill-flash is in use, the i-TTL mode automatically changes to the standard i-TTL mode.
•The i-TTL mode automatically changes to i-TTL balanced fill-flash, after changing the camera’s metering mode to matrix or center-weighted.
C–1

Setting i-TTL mode


C
Flash Modes
i-TTL mode LCD example
: Monitor pre-flashes

: Balanced fill-flash
C–2


