How to operate your Washamatic
1. Move the Washamatic into a convenient position near your sink. See that all controls are in the OFF position. Remove the lid by sliding it towards the right and gently disengaging from the retaining catch. Attach the adjustable end of the filling hose provided to your tap. This end can be made to fit any size of tap by tightening or loosening the adjuster screw. Fill the tub to the level required, taking care that the water does not rise above the point indicated by the red line running around the inside of the tub. The tub is designed to take a family wash of up to 7 lb. weight of dry clothes. Smaller loads may be washed using less water, but see that the agitator blades are covered to a depth of at least 4″. The Washamatic is now ready to be plugged into the electric socket and switched on.
2. Switch the water heater to ON and move the HEATER control lever upwards until it is opposite the recommended temperature. The temperature is automatically controlled and the heater may be left on for the duration of the wash. The heater control lever may be reset if a higher or lower temperature is required. The red indicator light will go out when the water reaches the temperature indicated by the control lever. The heater will bring cold water to the boil if required, but using hot water to fill the tub will enable the correct washing temperature to be reached more quickly.
3. Before washing, see that ah tears in the clothes have been mended. Tie loosely any strings, pyjama cords, etc. Sort the washing into groups as recommended in the table below.
Put in the washing, pushing each item into the water separately and distributing evenly around the agitator.
4. Move the WASH control lever to the required time. This will start the washing action. The washer will now be working automatically and may be left until it switches itself off at the right time.
5. Take the clothes from the wash tub and place them in the spin dryer ensuring that they are distributed evenly around the drum. Secure the special retaining lid on top of the drum.
6. Switch the spinner control lever to ON. The spinner will start and suds will be returned to the wash tub.
Как пользоваться вашей автоматической стиральной машиной
1. Установите стиральную машину в удобном месте рядом с раковиной. Убедитесь в том, что все переключатели находятся в положении «ВЫКЛ». Сдвиньте крышку вправо, мягко отодвинув предохранительные скобы. Подсоедините один конец прилагаемого шланга к водопроводному крану. Этот конец шланга можно подсоединить к крану любого диаметра путем поджимания или ослабления регулировочного зажима. Наполните бак водой до нужного уровня, следя за тем, чтобы ее уровень не поднялся выше красной полоски внутри бака. Бак вмещает 7 фунтов сухого белья. Меньшее количество белья можно стирать в меньшем количестве воды, но при этом лопасти должны быть покрыты водой по крайне мере на 4 дюйма. Теперь стиральную машину можно подсоединить к розетке и включить.
2. Установите нагреватель воды в положение «ВКЛ» и передвиньте ручку НАГРЕВАТЕЛЯ вперед до рекомендуемой температуры. Температура воды регулируется автоматически и нагреватель можно оставить включенным на время всего процесса стирки. Ручку нагревателя можно переустановить, если требуется более высокая, либо низкая температура воды.
Когда температура воды достигнет установленной отметки, на индикаторе загорится красная лампочка. При необходимости нагреватель доводит холодную воду до кипения, но заполнив бак горячей водой, вы быстрее нагреете ее до нужной температуры.
3. До начала стирки следует проверить белье на отсутствие дыр. Нетуго завяжите все веревки, шнуры пижамы и т.п. Рассортируйте белье по группам, как рекомендовано в табличке внизу. Опустите белье в воду, каждую вещь по отдельности, равномерно распределяя вокруг лопастей.
4. Установите переключатель СТИРКА на требуемое время. Это запустит процесс стирки. Стиральная машина теперь будет работать автоматически и ее можно оставить — в нужное время она отключится автоматически.
5. Выньте белье из бака и переложите в центрифугу, убедившись, чоо оно равномерно распределено вокруг барабана. Плотно закройте крышку центрифуги.
6. Установите переключатель центрифуги в положение «ВКЛ». Барабан начнет вращаться и мыльная вода сольется в стиральный бак.
1. Before removing the lid, unscrew the panel which is located on the right hand side of the recorder and check the MAINS VOLTAGE; the number showing through the small slot inside the panel must correspond to the voltage of your mains supply. The MAINS LEAD may now be connected to the electric wall socket.
2. Connect the MICROPHONE to the socket at the rear marked «M». Take off the lid.
3. THREAD by placing full spool on left-hand spindle. Take tape from full spool via the slot in the head-cover and wind the red leader-tape and metallized switching leader on to the empty spool, turning this in an anti-clockwise direction for a few turns.
4. Switch MAINS SWITCH on the top panel to the ON position. Turn SPEED-SELECTOR control to the required tape-speed position. The green warning light will now be illuminated.
5. Move CONTROL LEVER to RECORD position. Before this can be done it is necessary to depress the red RECORD SAFETY BUTTON.
6. Adjust the RECORDING LEVEL by speaking in a normal voice into the microphone from a distance of eighteen inches. Turn recording level control in a clockwise direction, noting amount by which the pointer is deflected on the RECORDING-LEVEL METER. The level is correctly set when the indicator travels almost to the end of the green segment during the loudest passages. The pointer must not be allowed to move into the red segment or distortion of the recording will result.
7. Move START lever to the ON position. You are now recording. To stop recording, move start lever back to OFF.
8. Move control lever from record to REWIND, and start the recorder. When the tape has rewound on to the left-hand spool, stop the recorder.
9. Move control lever to the PLAY position and start the recorder. The recording will now be played back.
1. Перед тем, как снять верхнюю крышку, отвинтите панель с правой стороны магнитофона и проверьте ИСТОЧНИК ПИТАНИЯ; цифра, указанная в прорези внутри должна соответствовать напряжению вашего источника питания. Теперь можно подсоединить ГЛАВНЫЙ ПРОВОД в розетку.
2. Подсоедините МИКРОФОН к отверстию на задней панели магнитофона помеченному «М». Снимите верхнюю крышку.
3. СМОТАЙТЕ всю пленку на левую бобину. Протяните пленку между головками на верхней панели магнитофона и намотайте начало пленки на пустую бобину, прокрутив ее несколько раз против часовой стрелки.
4. Нажмите кнопку «ВКЛ» на верхней панели магнитофона. Установите рукоятку СКОРОСТЬ на требуемую скорость прокручивания пленки. При этом должна загореться зеленая лампочка.
5. Переведите ПЕРЕКЛЮЧАТЕЛЬ в положение ЗАПИСЬ. До этого необходимо отжать красную кнопку КОНТРОЛЬ ЗАПИСИ.
6. Настройте УРОВЕНЬ ЗАПИСИ наговаривая в микрофон обычным голосом с расстояния восемнадцати дюймов. Поверните ручку уровня записи по часовой стрелке, отметив уровень громкости, при котором происходит отклонение стрелки на ШКАЛЕ УРОВНЯ ЗАПИСИ. Уровень записи установлен правильно, если стрелка индикатора при наиболее громких звуках достигает края зеленого сегмента шкалы. Стрелка не должна заходить на красный сегмент, иначе последует искажение записи.
7. Нажмите кнопку «ПУСК». Запись начата. Для остановки записи отожмите кнопку «ПУСК».
8. Установите переключатель из положения «ЗАПИСЬ» в положение «ОБРАТНАЯ ПЕРЕМОТКА», и включите магнитофон. После перемотки пленки на левую бобину остановите магнитофон.
9. Установите переключатель в положение «ВОСПР.» и включите Магнитофон. Теперь начнется воспроизведение записи.
-
Contents
-
Table of Contents
-
Troubleshooting
-
Bookmarks
Quick Links
592-49079-0
WF350AN-02833B_EN.indd 1
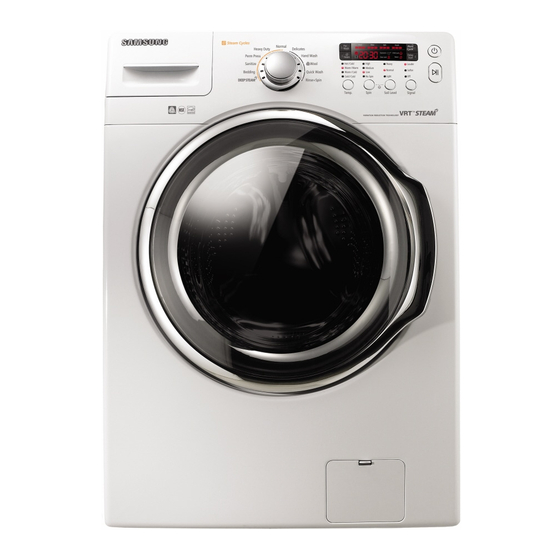
Washer
user manual
imagine
the possibilities
Thank you for purchasing this Samsung product.
To receive more complete service, please register
your product at
www.samsung.com/register
WF350AN*
WF340AN*
2010-04-06 ¿ÀÀü 10:07:54
Related Manuals for Samsung VRT
Summary of Contents for Samsung VRT
-
Page 1: User Manual
592-49079-0 WF350AN* WF340AN* Washer user manual imagine the possibilities Thank you for purchasing this Samsung product. To receive more complete service, please register your product at www.samsung.com/register WF350AN-02833B_EN.indd 1 2010-04-06 ¿ÀÀü 10:07:54…
-
Page 2: Pure Cycle Tm
2. Super capacity Samsung’s extra-large capacity laundry machine can wash a full set of your bedding, a king- size comforter, or up to 26 bath towels in a single load. Since you don’t have to do as many loads, you save time, money, water and energy.
-
Page 3: Child Lock
It also offers a built-in storage drawer that can hold a 100oz.(6.25 lb) bottle of detergent. 12. Stacking (Model No: SK-3A1/XAC, SK-4A/XAC, SK-5A/XAC) Samsung’s washers and dryers can be stacked to maximize usable space. An optional stacking kit is available for purchase from your Samsung retailer.
-
Page 4: Safety Information
Congratulations on your new Samsung washer. This manual contains important information on the installation, use and care of your appliance. Please take time to read this manual to take full advantage of your washer’s many benefits and features.
-
Page 5
WARNING: To reduce the risk of fire, electric shock, or injury to persons when using your appliance, follow basic precautions, including the following: WARNING 1. Read all instructions before using the appliance. 2. Do not wash or dry articles that have been previously cleaned in, washed in, soaked in, or spotted with gasoline, dry-cleaning solvents, other flammable or explosive substances as they give off vapors that could ignite or explode. -
Page 6
safety information SEVERE WARNING SIGNS FOR INSTALLATION WARNING Plug the power cord into an AC 120V/60Hz/15A wall socket or higher and use the socket for this appliance only. In addition, do not use an extension cord. — Sharing a wall socket with other appliances using a power strip or extending the power cord may result in electric shock or fire. -
Page 7
CAUTION SIGNS FOR INSTALLATION CAUTION This appliance should be positioned in such a way that it is accessible to the power plug. — Failing to do so may result in electric shock or fire due to electric leakage. Install your appliance on a level and hard floor that can support its weight. — Failing to do so may result in abnormal vibrations, noise, or problems with the product. -
Page 8
safety information Do not touch the power plug with wet hands. — This may result in electric shock. Do not turn the appliance off by unplugging the power plug while an operation is in progress. — Plugging the power plug into the wall socket again may cause a spark and result in electric shock or fire. -
Page 9
Insert the laundry into the washer completely so that laundry does not get caught in the door. — If laundry gets caught in the door, it may result in damage to the laundry or the washer, or result in water leakage. Ensure that the faucet is turned off when the washer is not being used. -
Page 10
safety information Do not place any objects (such as shoes, food waste, animals) other than laundry into the washer. — This may result in damage to the washer, or injury and death in the case of pets due to the abnormal vibrations. Do not press the buttons using sharp objects such as pins, knifes, fingernails, etc. -
Page 11: Table Of Contents
contents SETTING UP YOUR WASHER Checking the parts Meeting installation requirements Electrical supply Grounding Water Drain facility Flooring Location consideration Alcove or closet installation Installing your washer WASHING A LOAD OF LAUNDRY Loading your washer Getting started Overview of the control panel Child Lock Garment+ Washing clothes using the cycle selector…
-
Page 12: Setting Up Your Washer
Unpack your washer and inspect it for shipping damage. Make sure you have received all of the items shown below. If your washer was damaged during shipping, or you do not have all of the items, contact 1-800-SAMSUNG(726-7864). To prevent personal injury or strain, wear protective gloves whenever lifting or carrying the unit.
-
Page 13: Meeting Installation Requirements
MEETING INSTALLATION REQUIREMENTS Electrical supply • 120 Volt 60 Hz 15 AMP fuse or circuit breaker • An individual branch circuit serving only your washer is recommended. • Your washer is equipped with a power cord. Never use an extension cord. WARNING Grounding ELECTRICAL GROUNDING IS REQUIRED ON THIS APPLIANCE.
-
Page 14: Drain Facility
setting up your washer Drain facility The recommended height of the standpipe is 18 in (46 cm). The drain hose must be routed through the drain hose clip to the standpipe. The standpipe must be large enough to accept the outside diameter of the drain hose.
-
Page 15: Removing The Shipping Bolts
STEP 2 Removing the shipping bolts Before using your washer, you must remove the four shipping bolts from the back of the unit. 1. Loosen all the bolts with the supplied wrench. 2. Slide the bolt and spacer up and remove the bolt with the spacer through the hole in the rear wall of your washer.
-
Page 16
setting up your washer 3. Check the inlet hose to ensure a washer is inside each fill hose. Cold Thread the inlet hoses to the HOT and COLD faucet connections. On the other end of the hose, check for one rubber washer per hose and install each fill hose to the water valve. -
Page 17: Washing A Load Of Laundry
washing a load of laundry LOADING YOUR WASHER • You can fill the tub with dry, unfolded clothes; but DO NOT OVERLOAD the tub. • Overloading may reduce washing efficiency, cause excess wear, and possibly cause creasing or wrinkling of the load. •…
-
Page 18: Overview Of The Control Panel
washing a load of laundry OVERVIEW OF THE CONTROL PANEL WF350* WF340* Select the appropriate cycle for the type of load. This will determine the tumble pattern and spin speed for the cycle. To minimize wrinkling of your laundry, select the Perm Press cycle. Normal — For most fabrics including cottons, linens, and normally soiled garments.
-
Page 19
Quick Wash — For lightly soiled garments needed quickly. Rinse + Spin — Use for loads that need rinsing only or to add rinse-added fabric softener to a load. Digital graphic Displays the remaining cycle time, all cycle information, and error messages. display Press the button repeatedly to cycle through the different water temperature options. -
Page 20: Child Lock
washing a load of laundry Child Lock This function prevents children from playing with your washer. Activating the Child Lock function Press and hold both the Spin and Soil Level buttons simultaneously for approximately 3 seconds. • If the Child Lock function is activated, the door is locked and the “Child Lock [ ]”…
-
Page 21: Washing Clothes Using The Cycle Selector
Washing clothes using the cycle selector Your new washer makes washing clothes easy, using Samsung’s “Fuzzy Control” automatic control system. When you select a wash program, the machine will set the correct temperature, washing time, and washing speed. 1. Press the Power button.
-
Page 22: Using Steam Wash
washing a load of laundry USING STEAM WASH The Steam Wash function injects steam directly into the laundry in the wash tub to increase the wash temperature and enhance the soak effect, thus improving the wash performance. 1. Load the washer. 2.
-
Page 23: Features
FEATURES Automatic dispenser Your Washer has separate compartments for dispensing Detergent compartment detergent and color-safe bleach, chlorine bleach, and fabric softener. All laundry additives are added to their respective compartments before starting your Washer. Detergent The automatic dispenser MUST ALWAYS be in place before selector starting your Washer.
-
Page 24: Bleach Compartment
washing a load of laundry Bleach compartment (Liquid chlorine bleach only) Fabric Softener 1. Add chlorine bleach to the bleach compartment. compartment DO NOT exceed the MAX FILL line. 2. Avoid splashing or over–filling the compartment. 3. Your washer automatically dispenses bleach into the tub at Bleach the appropriate time.
-
Page 25: Cleaning And Maintaining Your Washer
cleaning and maintaining your washer Keeping your washer clean improves its performance, wards off unnecessary repairs, and lengthens its life. CLEANING THE EXTERIOR Turn off the water faucets after finishing the day’s washing. This will shut off the water supply to your washer and prevent the unlikely possibility of damage from escaping water.
-
Page 26: Storing Your Washer
cleaning and maintaining your washer STORING YOUR WASHER Washers can be damaged if water is not removed from hoses and internal components before storage. Prepare your washer for storage as follows: • Select the Quick Wash cycle and add bleach to the automatic dispenser. Run your washer through the cycle without a load.
-
Page 27: Cleaning The Door Seal
5. Wash any dirt or other material from the debris filter. Make sure the drain pump propeller behind the debris filter is not blocked. 6. To assemble the filter cap, align the projected part of the filter cap to your 12 o’clock (on an imaginary clock) and turn it clockwise. 7.
-
Page 28: Pure Cycle Tm
cleaning and maintaining your washer PURE CYCLE This course is a self-cleaning course that removes mold that may occur inside the washing machine. 1. Press the Power button. 2. Press the Pure Cycle button. • You can only use the Delay Start function. 3.
-
Page 29: Troubleshooting And Information Codes
troubleshooting and information codes CHECK THESE POINTS IF YOUR WASHER… PROBLEM SOLUTION Will not start. • Make sure the door is firmly closed. • Make sure your washer is plugged in. • Make sure the water source faucets are open. •…
-
Page 30
troubleshooting and information codes PROBLEM SOLUTION • Fills with the wrong Turn both faucets on fully. • temperature water. Make sure the temperature selection is correct. • Make sure the hoses are connected to the correct faucets. Flush water lines. •… -
Page 31: Information Codes
INFORMATION CODES Information codes may be displayed to help you better understand what is occurring with your washer. CODE SYMBOL MEANING SOLUTION Unbalanced load prevented your Redistribute the load, press the Start/Pause washer from spinning. button. Door is unlocked when washer is Press the Power button to turn off your washer, running.
-
Page 32
Then, the unit SUdS will go back to the operation. When it finishes washing, “End” and “SUdS” codes will blink in turn. For any codes not listed above, call 1–800–726–7864 (1–800–SAMSUNG) 32_ cycle chart WF350AN-02833B_EN.indd 32 2010-04-06 ¿ÀÀü 10:08:08… -
Page 33
appendix FABRIC CARE CHART The following symbols provide garment care direction. The clothing care labels include symbols for washing, bleaching, drying and ironing, or dry cleaning when necessary. The use of symbols ensures consistency among garment manufacturers of domestic and imported items. Follow care label directions to maximize garment life and reduce laundering problems. -
Page 34
appendix HELPING THE ENVIRONMENT • Your washer is manufactured from recyclable materials. If you decide to dispose of it, please observe local waste disposal regulations. Cut off the power cord so that the appliance cannot be connected to a power source. Remove the door so that animals and small children cannot get trapped inside the appliance. -
Page 35
CYCLE CHART Use this chart to set the best cycle and option for you laundry. ( : factory setting, : selectable) WF350* , WF340* Functions Temp Spin Soil Level Normal … -
Page 36
SAMSUNG may elect to provide transportation of the product to and from an authorized service center. SAMSUNG will repair, replace, or refund this product at our option and at no charge as stipulated herein, with new or reconditioned parts or products if found to be defective during the limited warranty period specified above. -
Page 37
NO WARRANTY OR GUARANTEE GIVEN BY ANY PERSON, FIRM, OR CORPORATION WITH RESPECT TO THIS PRODUCT SHALL BE BINDING ON SAMSUNG. SAMSUNG SHALL NOT BE LIABLE FOR LOSS OF REVENUE OR PROFITS, FAILURE TO REALIZE SAVINGS OR OTHER BENEFITS, OR ANY OTHER… -
Page 38
QUESTIONS OR COMMENTS? Country CALL OR VISIT US ONLINE AT CANADA 1-800-SAMSUNG(726-7864) www.samsung.com Code No. DC68-02833B_EN WF350AN-02833B_EN.indd 38 2010-04-06 ¿ÀÀü 10:08:09… -
Page 39
WF350AN* WF340AN* Lave-linge Manuel d’utilisation Un monde de possibilités Nous vous remercions d’avoir choisi ce produit Samsung. Afin de bénéficier d’un service plus complet, veuillez enregistrer votre produit à l’adresse suivante : www.samsung.com/register WF350AN-02833B_CFR.indd 1 2010-04-06 10:03:32… -
Page 40
2. Très grande capacité Le lave-linge Samsung très grande capacité permet de laver un jeu de draps complet, une couette « King Size » (grande taille) ou 26 serviettes de bain en un seul chargement. Résultat : vous économisez du temps, de l’argent, de l’eau et de l’électricité. -
Page 41: Pure Cycle Tm
12. Superposition (N° de modèle : SK-3A1/XAC, SK-4A/XAC, SK-5A/XAC) Les lave-linge et sèche-linge Samsung peuvent être superposés pour optimiser l’espace utile. Un kit de superposition est disponible en option auprès de votre revendeur Samsung. <Support avec tiroir de stockage> <Superposition>…
-
Page 42
Félicitations pour l’achat de votre nouveau lave-linge Samsung. Ce manuel contient de précieuses informations concernant l’installation, l’utilisation et l’entretien de votre appareil. Prenez le temps de le lire afin de tirer pleinement profit de toutes les fonctionnalités qu’offre votre lave-linge. -
Page 43
AVERTISSEMENT : afin de réduire les risques d’incendie, d’électrocution ou de blessures physiques lors de l’utilisation de l’appareil, des précautions de base doivent être prises : aVeRTiSSeMenT 1. Lisez attentivement toutes les consignes avant d’utiliser l’appareil. 2. Ne lavez et ne faites sécher aucun article ayant été en contact de quelque manière que ce soit (nettoyage, lavage, immersion ou tache) avec de l’essence, des solvants de nettoyage à… -
Page 44
consignes de sécurité SyMboleS D’aVeRTiSSeMenT a ReSPeCTeR abSoluMenT PouR l’inSTallaTion aVeRTiSSeMenT Branchez le cordon d’alimentation sur une prise murale 120 V CA/60 Hz/15 A ou supérieure et utilisez cette prise uniquement pour cet appareil. N’utilisez pas de rallonge. — Le fait de partager une prise murale avec d’autres appareils à l’aide d’une multiprise ou d’une rallonge peut entraîner des chocs électriques ou des incendies. -
Page 45
SigneS De PRÉCauTion PouR l’inSTallaTion aTTenTion Cet appareil doit être positionné de façon à permettre l’accès à la prise d’alimentation. — Le non-respect de cette consigne peut entraîner un choc électrique en cas de fuites de courant. Installez l’appareil sur un sol plan et dur, capable de supporter son poids. — Le non-respect de cette consigne peut entraîner des vibrations et des bruits anormaux ou des problèmes avec l’appareil. -
Page 46
consignes de sécurité Ne touchez pas la prise d’alimentation avec des mains mouillées. — Cela pourrait entraîner un choc électrique. N’éteignez pas l’appareil en débranchant la prise d’alimentation pendant qu’un cycle de fonctionnement est en cours. — Le fait de rebrancher la prise d’alimentation dans la prise murale peut provoquer une étincelle et entraîner un choc électrique ou un incendie. -
Page 47
Introduisez complètement le linge dans le lave-linge afin qu’il ne reste pas coincé dans la porte. — Si du linge reste coincé dans la porte, il peut être endommagé, ainsi que le lave-linge, ou une fuite d’eau peut survenir. Assurez-vous que le robinet est fermé lorsque le lave-linge n’est pas utilisé. — Assurez-vous que la vis sur le raccord du tuyau d’arrivée d’eau est correctement serrée. -
Page 48
consignes de sécurité Ne placez pas d’objets (tels que chaussures, déchets alimentaires, animaux) autres que du linge dans le lave-linge. — Ceci pourrait endommager le lave-linge ou provoquer des vibrations anormales entraînant des blessures, voire la mort dans le cas d’animaux domestiques. N’actionnez pas les boutons à… -
Page 49
contenu INSTAllATION dE VOTRE lAVE- Vérification des pièces lINGE Respect des conditions d’installation Fournitures électriques Mise à la terre Système de vidange Choix de l’emplacement d’installation Encastrement dans une niche ou installation dans un placard installation de votre lave-linge EffECTUER UN lAVAGE Chargement du lave-linge Mise en marche Présentation du panneau de commandes… -
Page 50
éléments illustrés ci-dessous. Si votre lave-linge a été endommagé pendant le transport ou si vous ne disposez pas de tous les éléments, appelez immédiatement le 1-800-SAMSUNG(726-7864). Afin de prévenir tout risque de blessures, munissez-vous de gants de protection pour soulever ou porter le lave-linge. -
Page 51: Respect Des Conditions D’installation
ReSPeCT DeS ConDiTionS D’inSTallaTion Fournitures électriques • Fusible ou disjoncteur 120 V, 60 Hz, 15 A • Il est recommandé de relier votre lave-linge à un circuit distinct. • Votre lave-linge est muni d’un cordon d’alimentation. N’utilisez jamais de rallonge. aVeRTiSSeMenT Mise à…
-
Page 52: Système De Vidange
installation de votre lave-linge Système de vidange La hauteur recommandée de la conduite d’évacuation est de 46 cm. Fixez le tuyau de vidange à la pince prévue à cet effet, puis introduisez-le dans le tuyau d’évacuation mural. Le tuyau d’évacuation doit être suffisamment large pour accueillir le tuyau de vidange du lave-linge. Le tuyau de vidange est fixé…
-
Page 53
éTApE 2 enlever les vis de transport Avant d’utiliser votre lave-linge, vous devez enlever les quatre vis de transport situées à l’arrière de l’appareil. 1. Desserrez toutes les vis à l’aide de la clé fournie. 2. Faites glisser la vis et la cale vers le haut et sortez- les par le trou de la façade arrière de votre lave-linge. -
Page 54
installation de votre lave-linge 3. Vérifiez que chaque tuyau d’arrivée d’eau comporte une rondelle. Froid Chaud Raccordez les tuyaux d’arrivée d’eau sur les robinets d’eau CHAUDE et FROIDE. Vérifiez que l’autre extrémité des tuyaux comporte une rondelle en caoutchouc, puis raccordez-les à la vanne d’arrivée d’eau. Vérifiez que le tuyau marqué… -
Page 55: Mise En Marche
effectuer un lavage ChaRgeMenT Du laVe-linge • Vous pouvez remplir le tambour de vêtements secs non pliés, mais NE LE SURCHARGEZ PAS. • Toute surcharge risque de réduire l’efficacité du lavage et de provoquer une usure excessive et éventuellement un froissage du linge. • Lavez le linge délicat comme les soutiens-gorge, bas et autres types de lingerie à…
-
Page 56
effectuer un lavage PRÉSenTaTion Du Panneau De CoMManDeS WF350* WF340* Permet de sélectionner le programme adapté au type de linge. Le schéma de rotation et la vitesse d’essorage sont déterminés en fonction du programme. Pour réduire le froissage de votre linge, sélectionnez le programme Perm Press. Normal : adapté… -
Page 57
Lavage express : adapté aux vêtements peu sales dont vous avez besoin rapidement. Rinçage et essorage : utilisez ce programme pour le linge qui n’a besoin que d’un rinçage ou pour ajouter de l’adoucissant. Affichage numérique Affiche le temps restant, toutes les informations relatives au programme et les messages d’erreur. Appuyez plusieurs fois sur ce bouton pour faire défiler les différentes températures disponibles. -
Page 58: Ajout De Vêtements
effectuer un lavage Sécurité enfant Cette fonction empêche les enfants de jouer avec le lave-linge. Activation de la fonction Sécurité enfant Maintenez simultanément enfoncés les boutons Essorage et Souillure pendant environ 3 secondes. • Si la fonction Sécurité enfant est activée, le hublot est verrouillé et le voyant «…
-
Page 59
Votre nouveau lave-linge vous simplifie la tâche grâce au système de contrôle automatique « Fuzzy Control » de Samsung. Lorsque vous choisissez un programme, le lave-linge définit les options appropriées en matière de température, de temps et de vitesse de lavage. -
Page 60: Utilisation Du Lavage Vapeur
effectuer un lavage uTiliSaTion Du laVage VaPeuR La fonction Vapeur envoie de la vapeur directement dans le tambour pour augmenter la température de lavage et optimiser l’effet de trempage, améliorant ainsi les performances de lavage. 1. Chargez le lave-linge. 2. Appuyez sur le bouton Marche/Arrêt. 3.
-
Page 61: Distributeur Automatique
FonCTionS Distributeur automatique Votre lave-linge dispose de bacs séparés pour la lessive, le Bac à lessive produit javellisant non décolorant, l’eau de Javel chlorée et l’adoucissant. Ajoutez tous les additifs de lavage dans leurs bacs respectifs avant de démarrer votre lave-linge. Sélecteur de Le distributeur automatique DOIT TOUJOURS être refermé…
-
Page 62
effectuer un lavage Bac à eau de Javel (eau de Javel chlorée liquide uniquement) Bac à adoucissant 1. Ajoutez l’eau de Javel chlorée dans le bac correspondant. NE DÉPASSEZ PAS le trait de remplissage maximum. 2. Évitez de renverser du produit ou de trop remplir le bac. Bac à… -
Page 63: Nettoyer Les Bacs
nettoyage et entretien de votre lave-linge Il est essentiel de bien entretenir votre lave-linge pour en améliorer ses performances, éviter les réparations inutiles et allonger sa durée de vie. neTToyeR l’exTÉRieuR Fermez les robinets d’alimentation en eau après avoir terminé la lessive de la journée afin d’empêcher tout dégât des eaux.
-
Page 64: Entreposage De Votre Lave-Linge
nettoyage et entretien de votre lave-linge enTRePoSage De VoTRe laVe-linge Les lave-linge peuvent être endommagés si l’eau n’est pas retirée des tuyaux et des composants internes avant l’entreposage. Avant d’entreposer votre lave-linge, procédez comme suit : • Sélectionnez le programme Lavage rapide et versez de l’eau de Javel dans le distributeur automatique. Faites fonctionner le lave-linge à…
-
Page 65: Nettoyage Du Joint Du Hublot
5. Retirez toute impureté et autre corps étranger pris dans le filtre et nettoyez ce dernier. Assurez-vous que l’hélice de la pompe de vidange située derrière le filtre n’est pas bloquée. 6. Pour assembler le bouchon du filtre, alignez la partie en saillie du bouchon sur 12 h (sur une horloge imaginaire) et tournez-la dans le sens horaire.
-
Page 66
nettoyage et entretien de votre lave-linge PuRe CyCle Ce programme de nettoyage automatique permet d’éliminer les moisissures pouvant se former à l’intérieur du lave-linge. 1. Appuyez sur le bouton Marche/Arrêt. 2. Appuyez sur le bouton pure Cycle • Vous pouvez utiliser uniquement la fonction Départ différé. -
Page 67
codes d’erreur et de dépannage VÉRiFiez leS PoinTS SuiVanTS Si VoTRe laVe-linge… pROBlÈME SOlUTION ne démarre pas. • Assurez-vous que le hublot est correctement fermé. • Assurez-vous que le lave-linge est branché. • Assurez-vous que les robinets d’eau sont ouverts. • Assurez-vous d’avoir appuyé… -
Page 68
codes d’erreur et de dépannage pROBlÈME SOlUTION la température de l’eau • Ouvrez les deux robinets à fond. n’est pas correcte. • Vérifiez le choix de la température. • Assurez-vous que les tuyaux sont branchés sur les bons robinets. Rincez les canalisations d’eau. • Vérifiez le chauffe-eau. -
Page 69: Codes D’erreur
CoDeS D’eRReuR Des codes d’erreur peuvent s’afficher pour vous indiquer le problème rencontré par le lave-linge. COdE d’ERREUR SIGNIfICATION SOlUTION Une charge non-équilibrée Rééquilibrez la charge et appuyez sur le bouton empêche l’essorage. départ/pause. Le hublot se déverrouille lors du Appuyez sur le bouton Marche/Arrêt fonctionnement du lave-linge.
-
Page 70
Le fonctionnement reprendra alors. Une fois le lavage terminé, les codes « End » et « SUdS » clignotent alternativement. Pour tout autre code non répertorié ici, appelez le 1-800-726-7864 (1-800-SAMSUNG) 32_ codes d’erreur et de dépannage WF350AN-02833B_CFR.indd 32 2010-04-06 10:03:44… -
Page 71: Tableau Des Symboles Textiles
annexe Tableau DeS SyMboleS TexTileS Les symboles suivants fournissent des conseils d’entretien des vêtements. Les étiquettes d’entretien des vêtements incluent des symboles relatifs au lavage, au blanchiment, au séchage, au repassage et au nettoyage à sec, le cas échéant. L’utilisation de ces symboles garantit la cohérence des informations entre les fabricants de vêtements (articles domestiques ou importés).
-
Page 72: Respect De L’environnement
annexe ReSPeCT De l’enViRonneMenT • Votre lave-linge a été fabriqué à partir de matériaux recyclables. Si vous décidez de vous en débarrasser, veuillez respecter les normes locales en matière de traitement des déchets. Coupez le cordon d’alimentation de façon à ce que l’appareil ne puisse pas être raccordé à une source électrique. Enlevez le hublot pour que des animaux et des jeunes enfants ne se retrouvent pas piégés à…
-
Page 73: Tableau Des Programmes
Tableau DeS PRogRaMMeS Utilisez ce tableau afin de définir les programmes et options les mieux adaptés à votre linge. ( : réglage usine, : sélectionnable) WF350* / WF340* fonctions Température Essorage Souillure Normal …
-
Page 74
Pour bénéficier du service de réparation à domicile, le produit doit se trouver dans un endroit dégagé et accessible au technicien. Si ce service n’est pas disponible, SAMSUNG peut choisir de prendre à sa charge le transport aller/retour du produit vers un centre de service agréé. -
Page 75
ACCIDENTELS OU INDIRECTS RESULTANT D’UNE BONNE OU MAUVAISE UTILISATION DU PRODUIT OU D’UNE INCAPACITE A L’UTILISER, EN DEPIT DE LA THEORIE JURIDIQUE SUR LAQUELLE SE BASE LA PLAINTE, MEME SI SAMSUNG A ETE AVERTI DE LA POSSIBILITE DE TELS DOMMAGES. TOUT RECOUVREMENT CONTRE SAMSUNG, DE QUELQUE TYPE QUE CE SOIT, NE SAURAIT DEPASSER LE MONTANT D’ACHAT DU PRODUIT VENDU PAR SAMSUNG ET CAUSE DU PRESUME DOMMAGE. SANS LIMITATION DE CE QUI PRECEDE, L’ACHETEUR ASSUME TOUS LES RISQUES… -
Page 76
QUESTIONS OU COMMENTAIRES ? pays AppElEZ lE OU RENdEZ-VOUS SUR lE SITE CANADA 1-800-SAMSUNG (726-7864) www.samsung.com N° code DC68-02833B_CFR WF350AN-02833B_CFR.indd 38 2010-04-06 10:03:45…
Словарь перевода на русский язык иностранных обозначений режимов стирки в стиральной машине
Что делать, если у вас стиральная машина имеет обозначения режимов и функций на английском, немецком, итальянском или финском языке.
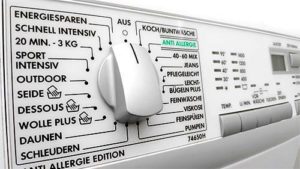
В приведенной таблице даны значения терминов, которые чаще всего могут встретиться на панели стиральной машины.
Это обозначения режимов ее работы (и соответствующих кнопок, клавиш, селектора управления), а также типов ткани.
| Английский | Немецкий | Итальянский |
Русский |
|---|---|---|---|
|
Режимы работы машины |
|||
| Drying | Trocken | Asciugatura | Сушка |
| Drain | Abpumpen | Scarico | Слив воды |
| Easy care | Pflegeleicht | Poco sporchi | Программа стирки слабо загрязненного белья |
| Easy ironing | Bugelleicht | Stira meno | «Легкое глажение» (программа, исключающая образование складок) |
| Intensive washing | Intensiv waschen | Lavaggio forte | Интенсивная стирка |
| Pre-washing | Vorwasche | Pre-lavaggio | Предварительная стирка |
| Rapid | Zeit sparen | Rapido | Быстрая стирка |
| Rinse | Spulen | Risciacqui | Полоскание |
| Short rinse | Kurzschleudern | Risciacqua corto | Короткое полоскание |
| Soak | Weichspulen | Ammollo | Замачивание |
| Spin | Schleudern | Centrifuga | Отжим |
| Spin exclusion | Ohne schleudern | Esclusione centrifuga | Отмена отжима |
| Start delay | Startzeit | Ritardatore di partenza | Задержка начала работы |
| Washing | Wasche | Lavaggio | Стирка |
| Water plus | Wasser plus | Acqua plus | «Больше воды» (повышенный уровень воды в баке при стирке и полоскании) |
|
Кнопка пуска машины |
|||
| Start/stop | Ein/Aus | Marchia/arresto | Вкл./Выкл. |
|
Обороты барабана при отжиме |
|||
| RPM | U/min | Giri | Об./мин |
|
Типы ткани |
|||
| Delicate fabrics | Fein | Tessuti delicate | Деликатные ткани |
| Colored fabrics | Bunt | Tessuti colorati | Цветные ткани |
| Strong fabrics | Koch | Tessuti resistenti | Стойкие ткани (допускающие стирку при высокой температуре) |
| Silk | Seide | Seta | Шелк |
| Wool | Wolle | Lana | Шерсть |
| Финский | Русский |
|---|---|
| VALKOPESU / KIRJOPESU | Белый/Цветной хлопок |
| NORMAALIPESU | Режим обычной стирки (хлопок) |
| ESIPESU | Предварительная стирка |
| SYNTEETISET | Синтетика |
| SILIÄVÄT | Анти сминание |
| HIENOPESU | Деликатная стирка |
| TEHOPESU | Усиленная стирка |
| VILLAPESU | Стирка шерсти |
| HUUHTELU | Полоскание |
| HUUHTELUOHJELMA | Программа полоскания |
| LISÄHUUHTELU | Дополнительное полоскание |
| VEDENPOISTO | Слив воды |
| TYHJENNYS | Удаление воды |
| LINKOUS | Отжим |
| PESU | Стирка |
| PIKA, PIKAPESU | Режим быстрой стирки |
| KÄSINPESU | Режим ручной стирки |
| TAUKO | Пауза |
| OHJELMA | Программа |
| EI LINKOA | Без отжима |
| PÄIVITTÄISPESU | Ежедневная стирка |
| SÄÄSTÖ (ECO) | Экономичный режим |
| YÖ-OHJELMA | Ночной режим (без отжима) |
| LOPPU | Готово, конец |
Перевод терминов и обозначений стиральных машин.
Большинство стиральных машин, представленных на российском рынке, имеют обозначения на русском языке. Но что делать, если понравившаяся вам машина имеет обозначения режимов и функций на английском или немецком языке, например, rinse, hold, prewash, outdoor или schleudern. Это не повод отказываться от подобной машины, перевод большинства известных терминов вы найдёте в этой статье.
Основные обозначения на различных языках :
Самая главная клавиша стиральной машины — это клавиша включения. На русифицированной панели всё понятно, клавиша подписывается Вкл/Выкл, но как быть с машиной иностранного производства. На английском языке эта клавиша обозначена как Start/Stop или On/Off, на немецком языке это Ein/Aus, на итальянском Marchia/Areesto.
Максимальные бороты отжима, указываемые на панели, например, 1000 об/мин, на английском языке обозначаются PRM, на немецком U/min, на итальянском Giri.
Кроме того надписи на панели могут быть разделены на несколько групп, например основные режимы и специальные (дополнительные). На английском языке это обозначено как main или special. На немецком, английское слово main обозначается словом Primar, на итальянском Base. В стиральных машинах с электронным управлением может быть функция main menu, что означает главное меню, индицируемое на дисплее. Вмашинах с дистанционным управлением также будет клаваша main menu на пульте управления.
Режим и функции стиральных машин в переводе :
Большинство терминов на панели тиральной машины обозначают реимы и фукции стирки. Из иностранных машин наиболее распространены машины с панелью управления на английском, немецком и итальянском языках. Ниже приведён перевод самых часто всречающихся режимов и функций.
- wash — стирка
- prewash — предварительная стирка
- intensive wash — интенсивная стирка
- qick (rapid) wash — быстрая стирка
- hand (gentle) wash — бережная стирка
- daily wash — ежедневная стирка
- delicate wash — деликатная стирка
- wash shoes — стирка обуви
- easy care — стирка слабо загязнённых вещей
- rinse — полоскание
- short rinse — короткое полоскание
- extra rinse — дополнительное полоскание
- outdoor care — освежение белья
- soak — замачивание
- spin — отжим
- rinse+spin — полоскание и отжим
- start delay (hold) — отсрочка запуска
- water plus — большее количество воды
- drain — слив воды
- easy ironing — функция «глажки»
- drying — сушка
- eco drum clean — очистка барабана
- hold stop — задержка окончания программы
- hold rinse — задержка полоскания
Перевод терминов с немецкого языка:
- waschen — стирка
- vorwasche — предварительная стирка
- intensive waschen — интенсивная стирка
- waschen schuh — стирка обуви
- zein sparen — экономичная стирка
- handwasche — ручная стирка
- fein wasche — деликатная стирка
- mischwasche — смешанная стрка
- spulen — полоскание
- schleudern — отжим
- kurz schleudern — короткий отжим
- weichspulen — замачивание
- ohne schleudern — отключение отжима
- schleudern drehzahl — регулировка оборотов отжима
- leicht bugein — лёгкая «глажка»
- trocken — сушка
- startzein — отложенный старт
Перевод итальянских обозначений:
- lavaggo — стирка
- pre — lavaggo — предварительная стирка
- forte lavaggo — интенсивная стирка
- lavaggo rapido — быстрая стирка
- lavaggo a mano — ручная стирка
- risciacqui — полоскание
- trattamenti — полоскание с кондиционером
- centrifuga — отжим
- amollo — замачивание
- esclusione — отключение отжима
- facile stiratura (stira meno) — лёгкая «глажка»
- asciugatura — сушка
Название тканей на разных языках:
Кроме выше перечисленных терминов, на панели стиральных машин наносят надписи, касающиеся типа и цвета ткани. Каждая ткань требует определенного режима стирки, поэтому перевод этих терминов на разные языки.
Названия тканей на английском языке :
- cotton — хлопок
- syntetic — синтетика
- delicate things — деликатные ткани
- colord things — цветные ткани
- dark things — тёмные вещи
- strong fabric — прочная ткань
- silk — шелк
- wool — шерсть
- jeans — джинсы
- sport clothes — спортивная одежда
- mix things — смешанные ткани
Немецкие названия тканей :
- baumwolle — хлопок
- syntetik — синтетика
- fein — деликатные ткани
- bunt — цветные ткани
- koch — прочная ткань
- seide — шелковая ткань
- wolle — шерсть
- sportkleidung — спортивные вещи
- mischgewebe — смешанные ткани
Названия тканей на итальянском языке :
- cotone — хлопок
- sintetico — синтетика
- delicato tessuto — деликатные ткани
- roba colotato — цветные ткани
- camicia — рубашки
- cose scure — тёмные вещи
- resistente tessuto — прочная ткань
- seta — шелк
- lana — шерсть
- sportivo — спортивные вещи
- tessuto misto — смешанные ткани
«Chelcom213-Челябинск» — ремонт бытовой техники.
Быстро, просто, недорого! Если вам не удалось выполнить ремонт стиральной машины, микроволновой печи, или электроплиты самостоятельно, или вы решили пригласить профессионального мастера по ремонту бытовой техники на дом в городе Челябинск, набирайте наш номер, и срочный, недорогой ремонт стиральной машины, микроволновой печи, электроплиты и другой бытовой техники будет осуществлён специалистами «CHELCOM213 — Челябинск» быстро, качественно, на дому, с предоставлением гарантии.
Позвонив нам, вы можете получить бесплатную консультацию, по эксплуатации, ремонту, подключению и обслуживанию бытовой техники.
Перевод режимов стирки на русский
Львиная доля стиральных машин, представленных на отечественном рынке, предусматривает русские обозначения. Но все чаще в Россию привозят импортные машинки европейской сборки, поэтому перевод режимов может отсутствовать.
Если вы владелец английской, немецкой или итальянской стиралки, наши таблицы с переводами на русский помогут вам быстро сориентироваться в функционале заграничной СМА.
Основные значки на разных языках мира
Первая по важности кнопка в любой машинке – это пусковая клавиша. Если на русифицированном блоке управления написано «Вкл/Выкл», то в английской версии это традиционно обозначается как Start/Stop или On/Off; немцы назвали эту кнопку Ein/Aus; итальянцы ставят подпись Marchia/Arresto.
Что касается регулировки скорости отжима, то в стиралках с англоязычной панелью этот функционал подписан как RPM, с немецкой – U/min, с итальянской – Giri.
Так же, как и во многих отечественные моделях, списки функций могут делиться на две категории – основные и те, которые используются реже:
- В английской версии эти блоки будут подписаны как main и special.
- В немецких СМА вместо main указано слово Primar.
- В машинках итальянского производства основной блок назван как Base.
Если машина оснащена электронной системой управления и выбор функций идет через дисплей, то, чтобы зайти в список основных режимов, стоит выбрать Main Menu. Если к вашей машинке в комплекте прилагается ДУ пульт, то ищите на нем такую кнопку.
Перевод режимов и программ стиральной машины с английского

| Обозначение | Перевод с английского |
| wash | Стирка (буквально – мыть). |
| prewash | Замачивание, первичная или предварительная стирка. |
| intensive wash | Интенсивная стирка. |
| quick (rapid) wash | Экспресс-стирка, стирать быстро. |
| hand wash | Ручная стирка. |
| gentle wash | Надпись обозначает бережный цикл. |
| daily wash | Выбор повседневной стирки. |
| delicate wash | Обозначает стирку в деликатном режиме. |
| super eco wash | Супер ЭКО-стирка вещей. |
| delicate wash | Деликатная стирка. |
| wash shoes | Стирка обуви. |
| easy care | Дословно: «Легкий уход». Суть: стирка вещей с небольшим количеством несложных пятен. |
| rinse | Полоскать. |
| short rinse | Полоскать быстро. |
| extra rinse | Полоскать дополнительно. |
| outdoor care | Освежить вещи. |
| soak | Замачивание. |
| spin | Отжим. |
| spin exclusion | Отменить (выключить) отжим, режим «Без отжима». |
| rinse +spin | Полоскание с отжимом. |
| start delay (hold) | Кнопка таймера отсрочки старта. |
| water plus | Увеличить объем воды при полоскании белья. |
| drain | Слить воду. |
| easy ironing | Функция «легкой глажки». |
| drying | Режим сушки. |
| eco drum clean | Запустить ЭКО-очистку барабана СМА. |
| hold stop | Задержать выполнение программы. |
| hold rinse | Выбрать задержку полоскания. |
Перевод режимов и программ машинки с немецкого

Перевод с немецкого не сложен, но стоять со словарем над стиральной машинкой неудобно, в особенности, если язык вам не знаком. Предлагаем простой перевод:
| Обозначение | Перевод функции |
| Vorwasche | Замачивание, режим предварительной стирки. |
| Waschen Schuh | Для обуви. |
| Intensive waschen | Интенсивно. |
| Zeit sparen | Режим «Эконом» или быстрый. |
| Handwasche | Ручная. |
| Fein wasche | Деликатная. К примеру, может быть режим Fein 30 или Fein 40 (с температурой). |
| Mischwasche | Смешанная. |
| Spulen | Запуск полоскания. |
| Schleudern | Запуск отжима. |
| Weichspulen (einweichen) | Замачивание вещей. |
| Kurz schleudern | Быстрый цикл. |
| Ohne schleudern | Не отжимать, отмена отжима – режим «Без отжима». |
| Spulen + Schleudern | Режим полоскания с отжимом. |
| Schleudern drehzahl | Выбор скорости вращения барабана при отжиме. |
| Spul stop | Остановить полоскание. |
| Leicht bugeln | Опция легкой глажки белья. |
| Outdoor | Освежить. |
| Trocken | Высушить. |
| Startzeit | Задержать выполнение программы. |
Перевод режимов стирки и программ с итальянского

Самыми немногословными оказались итальянцы – они предусмотрели не так много обозначений на панели управления. Тем не менее, вы можете столкнуться с такими итальянскими словами:
| Режим/Опция/Функция | Перевод с итальянского на русский |
| pre-lavaggio | Стирка. |
| pre-lavaggio | Предварительная стирка. |
| forte lavaggio | Интенсивный цикл. |
| lavaggio rapido | Быстрая программа. |
| lavaggio a mano | Ручной (бережный) режим. |
| risciacqui | Выбор полоскания. |
| trattamenti | Полоскание с добавлением ополаскивателя. |
| centrifuga | Выбор отжима. |
| ammollo | Замочить белье. |
| esclusione | Отмена отжима, без отжима. |
| facile stiratura (Stira meno) | Опция легкой глажки белья после стирки. |
| asciugatura | Функция сушки. |
| ritardatore di partenza | Задержать остановку цикла. |
Внимание! Помогут сориентироваться значки, нарисованные на панели управления – часто они интуитивно понятны и просты к запоминанию.
Если вам не удается запомнить все функции на английском, немецком или итальянском языке, но вы часто пользуетесь разными опциями, можете распечатать любой из этих списков и наклеить рядом с машинкой или же переименовать кнопки.
А может быть, перевод функций на стиральной машине подтолкнет вас к новому хобби – изучению иностранных языков.