DeLonghi Magnifica ESAM4500 Automatic Coffee Maker Manual

ELECTRICAL REQUIREMENTS
Before using this appliance ensure that the voltage indicated on the product corresponds with the main voltage in your home, if you are in any doubt about your supply contact your local electricity company.
The flexible mains lead is supplied connected to a B.S. 1363 fused plug having a fuse of 13 amp capacity. Should this plug not fit the socket outlets in your home, it should be cut off and replaced with a suitable plug, following the procedure outlined below.
Note: Such a plug cannot be used for any other appliance and should therefore be properly disposed of and not left where children might find it and plug it into a supply socket — with the obvious consequent danger.
N.B. We recommend the use of good quality plugs and wall sockets that can be switched off when the machine is not in use.
the wires in the mains lead fitted to this appliance are coloured in accordance with the following code:
As the colours of the wires in the mains lead of this appliance may not correspond with the coloured markings identifying the terminals in your plug, proceed as follows:
- The wire which is coloured green and yellow must be connected to the terminal in the plug which is marked with the letter E or by the earth symbol
 coloured green or green and yellow.
 - The wire which is coloured blue must be connected to the terminal which is marked with the letter N or coloured black.
- The wire which is coloured brown must be connected to the terminal which is marked with the letter L or coloured red.

When wiring the plug, ensure that all strands of wire are securely retained in each terminal. Do not forget to tighten the mains lead clamp on the plug. If your electricity supply point has only two pin socket outlets, or if you are in doubt, consult a qualified electrician.
Should the mains lead ever require replacement, it is essential that this operation be carried out by a qualified electrician and should only be replaced with a flexible cord of the same size.
After replacement of a fuse in the plug, the fuse cover must be refitted. If the fuse cover is lost, the plug must not be used until a replacement cover is obtained. The colour of the correct replacement fuse cover is that of the coloured insert in the base of the fuse recess or elsewhere on the plug. Always state this colour when ordering a replacement fuse cover.
Only 13amp replacement fuses which are asta approved to B.S. 1362 should be fitted.
This appliance conforms to the Norms EN 55014 regarding the suppression of radio interference.
this appliance must be earthed
INTRODUCTION
Thank you for choosing the automatic coffee and cappuccino maker.
We hope you enjoy using your new appliance.
Take a few minutes to read these instructions.
This will avoid all risks and damage to the machine.
Symbols used in these instructions
Important warnings are identified by these symbols.
These warnings must absolutely be respected.
Failure to observe the warning could result in possibly life threatening injury from electric shock.
Failure to observe the warning could result in injury or damage to the appliance.
Failure to observe the warning could result in scalds or burns.
Please note.:
This symbol identifies important advice or information for the user.
Letters in brackets
The letters in brackets refer to the legend in the Description of the appliance.
Troubleshooting and repairs
In the event of problems, first try and resolve them following the information given in the sections «Displayed messages» and «Troubleshooting».
If this does not resolve the problem or you require further information, you should consult Customer Services by calling the number given on the annexed «Customer Service» sheet. If your country is not among those listed on the sheet, call the number given in the guarantee.
If repairs are required, contact De’Longhi Customer Services only.
The addresses are given in the guarantee certificate provided with the machine.
SAFETY
Fundamental safety warnings
This is an electrical appliance and may therefore cause electric shock.
You should therefore respect the following safety warnings:
- Never touch the appliance with damp hands or feet.
- Never touch the plug with damp hands.
- Make sure the socket used is freely accessible at all times, enabling the appliance to be unplugged when necessary.
- Unplug directly from the plug only.
Never pull the power cable as you could damage it. - To disconnect the appliance completely, place the main switch at the back of the appliance in the 0 position (fig. 6).
- If the appliance is faulty, do not attempt to repair.
Turn it off, unplug from the mains socket and contact Customer Services. - If the plug or power cable is damaged, it must be replaced by De’Longhi customer services only to avoid all risk.
Keep all packaging (plastic bags, polystyrene foam) away from children.
The appliance is not intended for use by persons (including children) with reduced physical, sensory or mental capabilities, or lack of experience and knowledge, unless they have been given supervision or instruction concerning use of the appliance by a person responsible for their safety. Children must be supervised to ensure they do not play with the appliance.
Risk of burns!
This appliance produces hot water and steam may form while it is in operation.
Avoid contact with splashes of water or hot steam.
DESIGNATED USE
This appliance is designed and made to prepare coffee and heat drinks.
All other use is considered improper.
This appliance is not suitable for commercial use.
The manufacturer is not liable for damage deriving from improper use of the appliance.
This is a household appliance only.
It is not intended for use in:
- staff kitchen areas in shops, offices and other working environments;
- farm houses
- by clients in hotels, motels and other residential type environments
- bed and breakfast type environments.
INSTRUCTIONS
Read these instructions carefully before using the appliance.
Failure to respect these instructions may result in burns or damage to the appliance.
The manufacturer is not liable for damage deriving from failure to respect these instructions.
Please note.:
Keep these instructions
If the appliance is passed to other persons, they must also be provided with these instructions.
DESCRIPTION
Description of the appliance

A1. Grinding adjustment knob
A2. Beans container
A3. Beans container lid
A4. Central pre-ground coffee lid
A5. Measure compartment
A6. Cup warmer
A7. Pre-ground coffee funnel
A8. Main switch
A9. Hot water spout
A10. Water tank
A11. Power cable
A12. Cup tray
A13. Drip tray
A14. Service door
A15. Grounds tray
A16. Coffee spout (adjustable height
A17. Coffee guide
A18. Infuser
A19. Control panel
Description of milk container

B1. Lid with milk frother
B2. Froth regulator
B3. CLEAN button
B4. Milk intake tube
B5. Frothed milk spout
B6. Milk container
Description of accessories

C1. Hot water spout
C2. Measure
C3. Cleaning brush (*some models only)
C4. Descaler
C5. Total hardness test
Description of control panel
A number of buttons on the panel have a double function. This is indicated in brackets in the description.
D1. Display: guides the user in using the appliance.
D2. ![]() button: to perform a manual rinse cycle.
button: to perform a manual rinse cycle.
(When in the settings MENU: CHANGE button, press to modify the menu parameters).
D3. ![]() button: to deliver hot water to make hot drinks. (When in the settings MENU: OK button, press to confirm the selection made).
button: to deliver hot water to make hot drinks. (When in the settings MENU: OK button, press to confirm the selection made).
D4.  button: to deliver one or two cups of long coffee.
D5.  button: to deliver one or two cups of standard coffee.
D6.  button: to deliver one or two cups of short coffee.
D7.  button: to deliver cappuccino or frothed milk (press button twice).
D8.  button: to select the required aroma.
D9.  button: to turn the appliance on and off (stand-by).
D10. MENU button: to access the menu:
D11. Menu light: comes on when you are in the settings menu.
D12.  button: to select pre-ground coffee. (When in the settings menu, NEXT button, press to display the next menu parameter).
PRELIMINARY CHECKS
Checking the appliance
After removing the packaging, make sure the product is complete and undamaged and that all accessories are present.
Do not use the appliance if it is visibly damaged. Contact De’Longhi Customer Services.
Installing the appliance
When you install the appliance, you should respect the following safety warnings:
- The appliance gives off heat. After positioning the appliance on the worktop, leave a space of at least 3 cm between the surfaces of the appliance and the side and rear walls and at least 15 cm above the coffee maker.
- Water penetrating the appliance could cause damage. Do not place the appliance near taps or sinks.
- The appliance could be damaged if the water it contains freezes.
Do not install the appliance in a room where the temperature could drop below freezing point. - Arrange the power cable in such a way that it cannot be damaged by sharp edges or contact with hot surfaces (e.g. electric hot plates).
Connecting the appliance
Check that the mains power supply voltage corresponds to the value indicated on the rating plate on the bottom of the appliance.
Connect the appliance to an efficiently earthed and correctly installed socket with a minimum current rating of 10A only. If the power socket does not match the plug on the appliance, have the socket replaced with a suitable type by a qualified professional.
Using the appliance for the first time
Please note:
- Coffee has been used to factory test the appliance and it is therefore completely normal for there to be traces of coffee in the mill. The machine is, however, guaranteed to be new.
- You should customise water hardness as soon as possible following the instructions in the section «Setting water hardness».
- Plug the appliance into the mains socket and place the main switch on the back of the appliance in the I position (fig. 1).
You must first choose the language (the languages scroll through at intervals of about 3 seconds). - When English appears, press the OK button for a few seconds (fig. 2). Once the language has been saved, the message «ENGLISH SET» is displayed.
Follow the instructions indicated by the appliance: - «FILL TANK»: remove the water tank, fill to the MAX line with fresh water then replace in the appliance (fig. 3).
- «INSERT WATER SPOUT»: Check that the hot water spout is inserted on the nozzle and place a container with a minimum capacity of 100 ml underneath (fig. 4).
- «Hot water Confirm?»: Press the OK button (fig. 2). «PLEASE WAIT» is displayed and the appliance begins to deliver water from the hot water spout.


The appliance ends the first start up procedure, then the message «TURNING OFF, PLEASE WAIT» is displayed and the appliance goes off.
The coffee maker is now ready for normal use.
Please note:
- When using the appliance for the first time, you need to make 4/5 cups of coffee or 4/5 cappuccinos before the appliance starts to give satisfactory results.
TURNING THE APPLIANCE ON
Please note:
Before turning the appliance on, make sure the main switch on the back of the appliance is in the I position (fig. 1).
Each time the appliance is turned on, it performs an automatic preheat and rinse cycle which cannot be interrupted.
The appliance is ready for use only after completion of this cycle.
Danger of burns!
During rinsing, a little hot water comes out of the coffee spouts and is collected in the drip tray underneath. Avoid contact with splashes of water.
After heating, the message «RINSING» is displayed. As well as heating the boiler, the appliance also heats the internal circuits by circulating hot water.
The appliance is at temperature when the message «READY STANDARD TASTE» is displayed.
TURNING THE APPLIANCE OFF
Each time the appliance is turned off, it performs an automatic rinse cycle which cannot be interrupted.
To avoid damaging the appliance, always press the ![]() button to turn off.
button to turn off.
Danger of burns!
During rinsing, a little hot water flows from the coffee spouts.
Avoid contact with splashes of water.
To turn the appliance off, press the ![]() button (fig. 5).
button (fig. 5).
Please note:
If the appliance is not used for an extended period, place the main switch in the 0 position (fig. 6).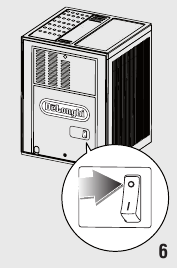
Never place the main switch in the 0 position while the appliance is on.
The following menu items can be selected: Clock, Start, Autostart, Descale, Temperature, Off after, Water hardness, Default values.
To access the settings menu, press the MENU button. The light on the button comes on.
Clock
To adjust the time on the display, proceed as follows:
- Access the menu and press the NEXT button until «CLOCK» is displayed;
- Press the CHANGE button to change the time (hold the button down to change the time rapidly). When you have finished, release the button. The time flashes.
- Press the OK button to confirm;
- Press the MENU button to exit the menu. The light on the button goes off.
The time displayed when the machine is off (stand-by) is now set.
Turning on
Once «AUTO-START Yes» has been enabled, the auto-start time must be set as follows:
- Access the menu and press the NEXT button until «START» is displayed.
- Press the CHANGE button to change the start time (hold the button down to change the time rapidly). When you have finished, release the button. The auto-start time flashes on the display.
- Press the OK button to confirm.
- To exit the menu, press the MENU button. The light on the button goes out.
The auto-start time has been programmed.
Auto-start
You can set the auto-start time in order to have the appliance ready at a certain time (for example in the morning) so you can make coffee immediately.
Please note!
To enable this function, the time must be set correctly (see previous section «Clock»).
To set the auto-start time, proceed as described in the section below.
- Access the menu and press the NEXT button until «AUTOSTART No» or «AUTO-START Yes» (if the function has been enabled) is displayed;
- Press the CHANGE button to change the selection. The new selection flashes on the display;
- Press the OK button to confirm;
To set the auto-start time, proceed as described in the section below.
The ![]() symbol is displayed alongside the clock to indicate that auto-start has been programmed (in stand-by).
symbol is displayed alongside the clock to indicate that auto-start has been programmed (in stand-by).
Temperature
To modify the temperature of the water used to make the coffee, proceed as follows:
- Access the menu and press the NEXT button until «TEMPERATURE» is displayed;
- Press the CHANGE button until the required temperature (low, medium, high, maximum) is displayed;
- Press the OK button to confirm;
- Press the MENU button to exit the menu. The light on the button goes off.
Off after (Stand-by)
The appliance is set by default to go off if not used for two hours.
The time can be changed so that the appliance switches off after 15 or 30 minutes, or after 1, 2 or 3 hours.
- Access the menu and press the NEXT button until «OFF AFTER» is displayed;
- Press the CHANGE button to select the required period of time;
- Press the OK button to confirm;
- Press the MENU button to exit the menu. The light on the button goes off.
Auto-off is programmed.
Default values (reset)
This resets all menu settings and programmed quantities back to the default values (with the exception of the language which remains as set).
- Access the menu and press the NEXT button until «DEFAULT VALUES No» is displayed;
- Press the CHANGE button to change the selection to «DEFAULT VALUES Yes». The new selection flashes on the display;
- Press the OK button to restore the original settings.
MAKING COFFEE
Selecting the coffee taste
The appliance is set by default to make coffee with a standard taste.
You can also choose one of these tastes:
 Extra-mild taste
 Mild taste
 Standard taste
 Strong taste
 Extra-strong taste
To change the taste, press the  button (fig. 7) repeatedly until the required taste is displayed.
Selecting the quantity of coffee in the cup
To choose the coffee quantity, press the corresponding button (fig.  according to the following table:
Please note:
To make two cups of coffee, press the button twice rapidly.
Programming quantity
To modify the quantity of coffee delivered, proceed as follows:
- Place a cup under the coffee spouts ( fig. 9).
- Keep the button corresponding to the quantity to be modified pressed until the message «PROGRAM QUANTITY» is displayed and coffee delivery begins. Then release the button.
- As soon as the coffee in the cup reaches the required level, press the same button again.

The quantity set has now been programmed.
Regulating the coffee mill
The coffee mill is set by default to prepare coffee correctly and should not require regulating initially.
However, if after making the first few coffees you find that delivery is either too fast or too slow (a drop at a time), this can be corrected by adjusting the grinding adjustment knob (fig. 10).
Please note!
The grinding adjustment knob must only be turned when the coffee mill is in operation.
For fuller bodied creamier coffee, turn one click anticlockwise towards «1» (finer ground coffee).
For faster delivery (not a drop at a time), turn one click clockwise towards «7» (coarser ground coffee).
These adjustments will only be evident after at least 2 cups of coffee have been delivered. If delivery is still too fast or too slow, repeat the correction, turning the knob another click.
Manual rinsing
Danger of burns!
During rinsing, a little hot water comes out of the coffee spouts and is collected in the drip tray underneath. Avoid contact with splashes of water.
For hotter coffee, before making the coffee rinse the appliance by pressing the ![]() button. Hot water flows out of the spout, heating the internal circuit and making the coffee delivered hotter.
button. Hot water flows out of the spout, heating the internal circuit and making the coffee delivered hotter.
Tips for a hotter coffee
For a hotter coffee, you are recommended to:
- before delivering coffee, perform a rinse cycle, see previous section «Manual rinse».
- place the cups on the cup warmer until they are warm;
- warm the cups by rinsing them with hot water (using the hot water function);
- set a higher coffee temperature in the menu.
Preparing coffee using coffee beans
Do not use caramelised or candied coffee beans as they could stick to the coffee mill and make it unusable.
- Fill the container with coffee beans (fig. 11).
- Place under the coffee spouts:

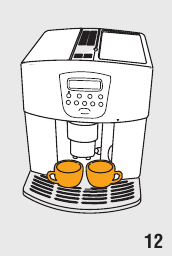
- 1 cup, if you want 1 coffee (fig. 9);
- 2 cups, if you want 2 coffees (fig. 12);
- Lower the spouts as near as possible to the cup. This makes a creamier coffee (fig. 13).
- Press the button corresponding to the coffee required once or twice (fig. 8).
- Once the coffee has been made, the appliance prepares for use again.

Please note:
- While the machine is making coffee, delivery can be interrupted at any moment by pressing one of the coffee buttons.
- At the end of delivery, to increase the quantity of coffee in the cup, just press (within 3 seconds) one of the coffee buttons.
Once the coffee has been made, the appliance is ready to use again.
If the coffee is delivered a drop at a time, too fast and not creamy enough or too cold, read the tips in the «Troubleshooting» section.
Various alarm messages could be displayed while the machine is in use. Their meaning is explained in the section «Displayed messages».
Making coffee using pre-ground coffee
- Never add pre-ground coffee when the machine is off or it could spread through the inside of the machine and dirty it. This could damage the appliance.
- Never use more than one level measure or it could dirty the inside of the machine or block the funnel.

If you use pre-ground coffee, you can only make one cup of coffee at a time.
- Press the
 button (fig. 14) until «READY PRE-GROUND» is displayed.
 - Put one level measure of pre-ground coffee into the funnel (fig. 15).
- Place a cup under the coffee spouts (fig. 9).
- Press one of the coffee buttons (fig. 8).
- Preparation begins.


Once the coffee has been made, the appliance prepares for use again. To disable the pre-ground coffee function, press the ![]() button again.
button again.
MAKING DRINKS WITH MILK
Please note!
To avoid producing milk with poor froth or large bubbles, always clean the milk lid and hot water nozzle as described in the section «Cleaning the milk container» on pages 12 and 15.
Filling and attaching the milk container
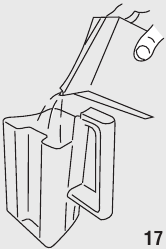
- Remove the lid (fig. 16);
- Fill the milk container with a sufficient quantity of milk, not exceeding the MAX level marked on the container (fig. 17).

Please note!
- For a denser creamier froth, use skimmed or partially skimmed milk at refrigerator temperature (about 5°C).
- Make sure the milk intake tube is correctly inserted in the bottom of the milk container lid (fig. 18).
- Replace the lid on the milk container.
- Remove the hot water spout from the nozzle (fig. 19).
- Attach the container to the nozzle and push as far as it will go (fig. 20).
- Position the froth regulator (B2) on the desired drink (CAPPUCCINO o CAFFELATTE).


Making cappuccino
- Attach the milk container (see previous section) and place a sufficiently large cup under the coffee spouts and milk spout.
- Press the
 button (fig. 21). The appliance now displays: «CAPPUCCINO, PLESE WAIT».
After a few seconds, frothed milk flows out of the milk spout into the cup below. Milk delivery stops automatically and coffee delivery begins.

Please note!
If during delivery you want to stop preparing milk, press the  button or interrupt preparation of the coffee by pressing one of the coffee buttons.
The cappuccino is ready. Sweeten to taste and, if desired, sprinkle the froth with a little cocoa powder.
Making frothed milk
To make frothed milk, proceed as described in the previous section, pressing the ![]() button (fig. 21) twice consecutively (within two seconds). The appliance displays «FROTHED MILK».
button (fig. 21) twice consecutively (within two seconds). The appliance displays «FROTHED MILK».
Cleaning the milk container after use
Danger of burns
When cleaning the internal tubes of the milk container, a little hot water leaks out of the frothed milk tube (B5). Avoid contact with splashes of water.
When «PRESS CLEAN» flashes on the display (each time you use a milk function):
- Leave the milk container in the machine (you do not need to empty it);
- Place a cup or other recipient under the frothed milk spout.
- Press the «CLEAN» button (fig. 22) and hold it down for at least 8 seconds. The message «CLEANING UNDERWAY» is displayed.
- Remove the milk container and always clean the nozzle with a sponge (fig. 23).


Please note!
- When «PRESS CLEAN » flashes on the display, you can still prepare any type of coffee or milk. If you have to make a number of drinks with milk, wait until you have delivered the last cup before cleaning the container.
- The milk left in the container can be kept in the refrigerator.
- In some cases, to clean you must wait for the appliance to heat up, holding the CLEAN button down.
Programming the quantities of coffee and milk in the cup
The appliance is set by default to automatically deliver standard quantities. To change these quantities, proceed as follows:
- Place a cup under the coffee spouts and milk spout.
- Press the button and hold it down for at least 8 seconds until the message «MILK FOR CAPPUCCINO PROGRAM QUANTITY» is displayed.
- Release the button. The appliance starts delivering milk.
- When the required quantity of milk has been delivered into the cup, press the button again.
- After a few seconds, the appliance starts delivering coffee into the cup and the message «COFFEE F. CAPPUCCINO PROGRAM QUANTITY» is displayed.
- As soon as the coffee in the cup reaches the required level, press the button again. Coffee delivery stops.
The machine is now reprogrammed with the new quantities.
HEATING WATER
Preparation
Danger of burns,
Never leave the machine unsupervised while delivering hot water.
The hot water spout becomes hot while water is delivering and must be handled by the handle only.
- Place a container under the cappuccino maker (as close as possible to avoid splashes) (fig. 4).
- Press the
 button (fig. 2). The message «HOT WATER» is displayed.
 - Water flows out of the spout. Delivery stops automatically after 250ml.
- To interrupt delivery of hot water manually, press the button again.
Please note!
- You should not deliver hot water for more than 3 minutes at a time.
Changing the quantity
The appliance is set by default to automatically deliver 250ml.
To modify these quantities, proceed as follows:
- Position a container under the spouts.
- Press the button until the message «HOT WATER PROGRAM QUANTITY» is displayed.
- When the hot water in the cup reaches the required level, press the button again.
The machine is now reprogrammed with the new quantities.
CLEANING
Cleaning the coffee maker
The following parts of the machine must be cleaned regularly:
- coffee grounds container (A15),
- drip tray (A13),
- inside the machine, accessible after opening the service door (A14),
- water tank (A10),
- coffee spouts (A16) and hot water nozzle (A9),
- pre-ground coffee funnel (A7),
- infuser (A18),
- milk container (B)
- Do not use solvents, abrasive detergents or alcohol to clean the coffee maker. With De’Longhi superautomatic coffee makers, you need not use chemical products to clean the machine.
- None of the components of the appliance can be washed in a dishwasher.
- Do not use metal objects to remove encrustations or coffee deposits as they could scratch metal or plastic surfaces.
Cleaning the coffee grounds container
When «EMPTY GROUNDS CONTAINER» is displayed, the grounds container must be emptied and cleaned.
Until the grounds container has been cleaned, the appliance continues to display the message and coffee cannot be made.
Even if not full, the empty grounds container message is displayed 72 hours after the first coffee has been prepared. For the 72 hours to be calculated correctly, the machine must never be turned off with the main switch in the 0 position.
When removing the drip tray, the grounds container must be emptied, even if it contains few grounds.
If this is not done, when you make the next coffees, the grounds container may fill up more than expected and clog the machine.
Cleaning the drip tray
If the drip tray is not emptied regularly, the water could overflow from the edge and seep inside or around the machine. This could damage the machine, the surface it rests on or the surrounding area.
The drip tray is fitted with a level indicator (red) showing the level of water it contains.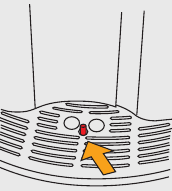
Before the indicator protrudes from the cup tray, the drip tray must be emptied and cleaned.
To remove the drip tray:
- Open the service door (fig. 24);
- Remove the drip tray and the grounds container (fig. 25);
- Empty the drip tray and grounds container and wash them;
- Replace the drip tray complete with grounds container;
- Close the service door.
Cleaning the inside of the machine
Danger of electric shock!
Before cleaning internal parts, the machine must be turned off (see section «Turning off») and unplugged from the mains power supply. Never immerse the coffee maker in water.
- Check regularly (about every 100 coffees) that the inside of the appliance (accessible after removing the drip tray) is not dirty. If necessary, remove coffee deposits with a toothpick.
- Remove the residues with a vacuum cleaner (fig. 27).

Cleaning the water tank
- Clean the water tank (A10) regularly (about once a month) with a damp cloth and a little mild washing up liquid.
- After cleaning the water tank rinse it thoroughly to remove all washing up liquid residues.
Cleaning the coffee spouts
- Clean the coffee spouts with a sponge or cloth.
- Check the holes in the coffee spout are not blocked. If necessary, remove coffee deposits with a toothpick.


Cleaning the pre-ground coffee funnel
Check regularly (about once a month ) that the pre-ground coffee funnel (A7) is not blocked. If necessary, remove coffee deposits with the brush provided (B8).
Cleaning the infuser
The infuser (A18) must be cleaned at least once a month.
The infuser may not be extracted when the machine is on.
- Make sure the machine is correctly turned off (see Turning off,).
- Open the service door (fig. 24).
- Remove the drip tray and grounds container (fig. 25);
- Press the two red release buttons inwards and at the same time pull the infuser outwards.

RINSE WITH WATER ONLY
NO WASHING UP LIQUID — NO DISH WASHER
Do not use washing up liquid to clean the infuser as it could cause damage.
- Soak the infuser in water for about 5 minutes, then rinse under the tap.
- After cleaning, replace the infuser by sliding it onto the internal support and pin at the bottom, then push the PUSH symbol fully in until it clicks into place.

Please note!
If you encounter difficulty inserting the infuser, before inserting it you must adapt it to the right dimension by pressing it forcefully from the bottom and top as shown in the figure.
- Once inserted, make sure the two red buttons have snapped out.
- Replace the drip tray and grounds container.
- Close the service door.

Cleaning the milk container
Clean the milk container each time you prepare milk as described below:
- Turn the lid of the milk container clockwise then remove it.
- Remove the milk spout and intake tube.
- Wash all the components thoroughly with hot water and mild washing-up liquid.
All components can be washed in a dishwasher, placing them in the top basket of the dishwasher.
Make sure there are no milk residues left inside the holes. - Check that the intake tube and spout are not clogged with milk residues.
- Replace the froth regulator, milk spout and intake tube.
- Replace the lid on the milk container, turning it anticlockwise to hook it in place.
DESCALING
Descale the machine when the message «DESCALE» flashes on the display.
Descaler contains acids which may irritate the skin and eyes. It is vital to respect the manufacturer’s safety warnings given on the descaler pack and the warnings relating to the procedure to follow in the event of contact with the skin and eyes.
Please note!
Use De’Longhi descaler only.
Under no circumstances should you use sulphamic or acetic based descalers. Their use invalidates the guarantee.
Failure to descale the appliance as described also invalidates the guarantee.
- Turn the machine on.
- Access the menu and press the NEXT button until «DESCALE No» is displayed;
- Press the CHANGE button;
- «DESCALE Yes» is displayed.
- Press the OK button to confirm. «DESCALE COMPLETE PRESS OK» is displayed.
- Pour the descaler diluted with water (respecting the proportions indicated on the descaler pack) into the water tank and put back in the machine.
Place an empty container with a minimum capacity of 1.5 litres under the hot water spout.
Danger of burns
Hot water containing acid flows out of the hot water spout.
Avoid contact with splashes of water.
- Press the OK button;
- The message «DESCALE» is displayed. The descaling programme starts and the descaler liquid comes out of the water spout. The descale programme automatically performs a series of rinses and pauses to remove limescale deposits from inside the machine.
After about 30 minutes, the message «RINSING FILL TANK» is displayed.
- The appliance is now ready for rinsing through with clean water. Remove the water tank, empty, rinse under running water, fill with clean water and replace. «RINSING PRESS OK» is displayed.
- Empty the container used to collect the descaler solution and replace it under the cappuccino maker.
- Press the OK button to start rinsing. Hot water flows out of the spout and the message «RINSING» is displayed.
- When the water tank is completely empty, the message «RINSING COMPLETE PRESS OK» is displayed.
- Press the OK button.
The appliance is ready to use.
SETTING WATER HARDNESS
The DESCALE message is displayed after a period of time established according to water hardness.
The machine is set by default for a hardness value of 4.
The machine can also be programmed according to the actual hardness of the mains water in the various regions, varying the frequency with which the message is displayed.
Measuring water hardness
- Remove the «TOTAL HARDNESS TEST» indicator paper from its pack.
- Immerse the paper completely in a glass of water for one second.
- Remove the paper from the water and shake lightly. After about a minute, 1, 2, 3, or 4 red squares form, depending on the hardness of the water. Each square corresponds to one level.


Set water hardness
- Access the menu and press the NEXT button until «WATER HARDNESS 4» is displayed;
- Press the CHANGE button to select the level of hardness measured on the indicator paper (see previous section). When you have finished, the new selection flashes on the display.
- Press the OK button to confirm the setting.
- Press the MENU button to exit the menu. The light on the button goes off.
The machine is now reprogrammed with the new water hardness setting.
SET LANGUAGE
To change the language, with the machine on, press the CHANGE button for at least 5 seconds until the appliance displays the installation message in various languages. Choose the required language as described in the section «Using the appliance for the first time».
TECHNICAL SPECIFICATION
| Voltage: | 220-240 V~ 50/60 Hz max. 10A |
| Absorbed power: | 1350W |
| Pressure: | 15 bar |
| Water tank capacity: | 1,8 L |
| Size: LxHxD: | 280x375x360mm |
| Cable length: | 1,5 m |
| Weight: | 10,5 Kg |
| Beans container capacity: | 200 g |

The appliance complies with the following EC directives:
- EC Regulation 1275/2008 for standby;
- Low Voltage Directive 2006/95/EC and subsequent amendments;
- EMC Directive 2004/108/EC and subsequent amendments
- Materials and accessories coming into contact with food conform to EEC regulation no. 1935/2004.
DISPOSAL

Recommendations for the correct disposal of the product in compliance with the 2002/96/CE European Directive.
The product must not be disposed of as urban waste at the end of its working life.
It must be taken to appropriate local authority separate waste collection centres or to dealers providing this service.
Disposing of a household appliance separately avoids possible negative consequences for the environment and health deriving from unsuitable disposal and allows to recover the materials of which it is made in order to make significant savings in energy and resources.
The product has the crossed-out wheeled bin mark as a reminder of the obligation to dispose of household appliances separately.
DISPLAYED MESSAGES
| DISPLAYED MESSAGE | POSSIBLE CAUSE | SOLUTION |
| FILL TANK |
|
|
| GROUND TOO FINE ADJUST MILL alternating with… INSERT WATER SPOUT AND PRESS OK |
|
|
| INSERT WATER SPOUT |
|
|
| EMPTY GROUNDS CONTAINER |
|
|
| INSERT GROUNDS CONTAINER |
|
|
| ADD PRE-GROUND COFFEE |
|
|
| DESCALE |
|
|
| LESS COFFEE |
|
|
| FILL BEANS CONTAINER |
|
|
|
|
|
| INSERT INFUSER ASSEMBLY |
|
|
| CLOSE DOOR |
|
|
| INSERT MILK CONTAINER |
|
|
| PRESS CLEAN |
|
|
| GENERAL ALARM |
|
|
TROUBLESHOOTING
Below is a list of some of the possible malfunctions.
If the problem cannot be resolved as described, contact a Service Centre.
| PROBLEM | POSSIBLE CAUSE | SOLUTION |
| The coffee is not hot |
|
|
|
|
|
|
|
|
| The coffee is not creamy enough |
|
|
|
|
|
| The coffee is delivered too slowly or a drop at a time. |
|
|
| The coffee does not come out of the spouts, but from around the service door. |
|
|
|
|
|
| Coffee does not come out of one of the spouts. |
|
|
| The milk contains bubbles or squirts out of the milk spout. |
|
|
|
|
|
| The milk is not frothed |
|
|
| The appliance does not come on. |
|
|
|
|
|
| The milk does not come out of the milk spout. |
|
|
Documents / Resources
Download manual
Here you can download full pdf version of manual, it may contain additional safety instructions, warranty information, FCC rules, etc.
Download DeLonghi Magnifica ESAM4500 Automatic Coffee Maker Manual
![]() размер PDF файла инструкции 1,3mb
размер PDF файла инструкции 1,3mb
КОФЕМАШИНА
ESAM 4500 1
7 10
8
12
11
6
5
3
2
4
9
CDF
L
NO
U
P E
G
BA
T
V
X
Z
H J
I
R
K
M
S
Q 523
4
67
8
10
14 15
16
5 9
1112
13
1 181819192020
222223232424
2626
3131
2121
252527272828
3232292 9
1717
1
2
3030
+CAPPUCCINOCAFFELA TTE-
+-
CAP
PUCCINOCAFFELA
TTE 5
ОГЛАВЛЕНИЕ
1 ОПИСАНИЕ (СМ. СТР. 2) …………………………………………………………………………………………..
……………..6
2 МЕРЫ ПРЕДОСТОРОЖНОСТИ ………………………………………………………………………………………….. ……….6
4 ПЕРВОЕ ИСПОЛЬЗОВАНИЕ КОФЕВАРКИ ………………………………………………………………………………….. …7
3 УСТАНОВКА ……………………………………………………………………………………………………..
……………………7
6 ПРИГОТОВЛЕНИЕ КОФЕ (ИЗ ЗЕРЕН) …………………………………………………………………………………… ……..8
5 ВКЛЮЧЕНИЕ И ПРЕДВАРИТЕЛЬНЫЙ ПРОГРЕВ ……………………………………………………………………………. 8
7 РЕГУЛИРОВАНИЕ КОЛИЧЕСТВА КОФЕ ……………………………………………………………………………………
……10
8 РЕГУЛИРОВАНИЕ СТЕПЕНИ ИЗМЕЛЬЧЕНИЯ ……………………………………………………………………………….. .10
9 ПРИГОТОВЛЕНИЕ ЭСПРЕССО ИЗ МОЛОТОГО КОФЕ (НЕ ИЗ ЗЕРЕН) ………………………………………………….11
10 КИПЯЧЕНИЕ ВОДЫ ……………………………………………………………………………………………….. ……………..11
11 РЕГУЛИРОВАНИЕ КОЛИЧЕСТВА ГОРЯЧЕЙ ВОДЫ ………………………………………………………………………….12
12 ПРИГОТОВЛЕНИЕ КАПУЧЧИНО (КОФЕ С МОЛОЧНОЙ ПЕНОЙ)…………………………………………………………13
13 ПРИГОТОВЛЕНИЕ МОЛОЧНОЙ ПЕНЫ (БЕЗ КОФЕ) ……………………………………………………………………….13
14 РЕГУЛИРОВАНИЕ КОЛИЧЕСТВА КОФЕ И МОЛОКА ДЛЯ ПРИГОТОВЛЕНИЯ КАПУЧЧИНО…………………………13
15 ОЧИСТКА И УХОД ……………………………………………………………………………………………….. ………………..13
15.1 ОЧИСТКА КОФЕМАШИНЫ ………………………………………………………………………………………….. ………..13
15.2 ОЧИСТКА НАЛИВНОГО УСТРОЙСТВА …………………………………………………………………………………. …..14
15.3 ОЧИСТКА МОЛОЧНОГО РЕЗЕРВУАРА …………………………………………………………………………………. …..15
16 НАСТРОЙКА ПАРАМЕТРОВ МЕНЮ……………………………………………………………………………………… ……..15
16.1 УСТАНОВКА ЧАСОВ…………………………………………………………………………………………….. ………………15
16.2 УСТАНОВКА ВРЕМЕНИ АВТОЗАПУСКА ………………………………………………………………………………… …..16
16.4 РЕГУЛИРОВКА ТЕМПЕРАТУРЫ КОФЕ …………………………………………………………………………………. ……17
16.6 НАСТРОЙКА НА «ЖЕСТКОСТЬ» ВОДЫ ………………………………………………………………………………… ……17
16.7 ВОССТАНОВЛЕНИЕ ЗАВОДСКИХ НАСТРОЕК …………………………………………………………………………….. 18
16.8 ПРОМЫВКА…………………………………………………………………………………………………… ………………….18
17 ВЫБОР ЯЗЫКА………………………………………………………………………………………………….. …………………18
16.3 УДАЛЕНИЕ НАКИПИ ……………………………………………………………………………………………..
……………..16
18 СООБЩЕНИЯ И НЕОБХОДИМЫЕ ОПЕРАЦИИ ………………………………………………………………………………19
16.5 РЕГУЛИРОВКА ПЕРИОДА РАБОТЫ КОФЕМАШИНЫ……………………………………………………………………..17
19 ВОЗМОЖНЫЕ НЕИСПРАВНОСТИ И СПОСОБЫ ИХ УСТРАНЕНИЯ ………………………………………………………19 6
1 ОПИСАНИЕ (СМ. СТР. 2) A. С.
Крышка резервуара для зерен
D. Центральная крышка отсека для молотого кофе
E. Место для хранения мерной ложки
F. Пластина для подогрева чашек
G. Воронка для молотого кофе
H. Крышка молочного резервуара/устройство длявспенивания молока
I. Слив для молочной пены
J. Наливная трубка для молока
К. Сопло
L. Водяной резервуар (съемный)
М. Молочный резервуар
N. Шнур питания
О.P. Мерная ложка для молотого кофе
Q. R.S. Служебная дверца
T. U. Слив для кофе (регулируемый по высоте)
V. X.Z. Панель управления Панель управления1.
Дисплей
2. Индикатор MENU [Меню]
3. Кнопка активации или деактивации режима наст-ройки параметров меню
4. Кнопка для выбора режима приготовления моло-того кофе; или для отображения следующего па-раметра меню (при светящемся индикатореMENU [Меню])
5. Кнопка для выбора режима промывки; или дляподтверждения значения параметра (при светя-щемся индикаторе MENU [Меню])
6. Кнопка для выбора режима кипячения; или дляизменения параметров меню (при светящемсяиндикаторе MENU [Меню])
7. Кнопка включения/выключения
8. Кнопка выбора вкуса кофе
9. Кнопка быстрого приготовления одной/двух ча-шек кофе
10. Кнопка стандартного приготовления одной/двухчашек кофе
11. Кнопка длительного приготовления одной/двухчашек кофе
12. Кнопка выбора режима приготовления капуччиноили вcпененного молока
2 МЕРЫ ПРЕДОСТОРОЖНОСТИ ВНИМАТЕЛЬНО ПРОЧИТАЙТЕ ДАННОЕ РУКОВОДСТВО И СОХРАНИТЕ ЕГО ДЛЯ ОБРАЩЕНИЯ К НЕМУ В БУДУЩЕМ! Кофемашина предназначена для приготовления кофе и нагревания напитков. Во избежание получения ожо- гов при обращении с устройством следует соблюдать осторожность. Используйте устройство только по на-значению.Данная кофемашина предназначена только для бытового применения. Любой иной вид применения кофевар-ки рассматривается как ненадлежащий, а, следовательно, опасный.Изготовитель не несет ответственности за вред, причиненный использованием устройства не по назначению. Не касайтесь горячих поверхностей устройства. Пользуйтесь регуляторами и ручками. Не касайтесь устройства влажными руками.Не допускайте использования этого бытового электроприбора детьми или лицами с умственными недостат-ками без соответствующего присмотра. Не разрешайте детям играть с устройством.При возникновении неисправности следует отключить устройство от сети. Не пытайтесь самостоятельно от-ремонтировать устройство; обратитесь в авторизованный сервисный центр и потребуйте, чтобы для ремон-та были использованы только оригинальные запасные части.
Несоблюдение этих правил снизит степень безопасности при обращении с данным устройством.
Резервуар для использованного кофе (съемный)
Регулятор степени помола кофе в зернах Крышка поддона Поддон для сбора воды (съемный) Слив для горячей воды Блок приготовления кофе (Разливочный агрегат)
Поворотный шкафчик 7
3 УСТАНОВКА
После распаковки устройства убедитесь в наличии и исправном состоянии всех его частей. В случае возник- новения каких-либо сомнений по этому поводу не используйте устройство и обратитесь к квалифицирован-ному специалисту. Элементы упаковки (пластиковые мешки, полистирол и т.п.) могут представлять опасность, и должны нахо-диться вне досягаемости детей. Поместите кофемашину на ровной рабочей поверхности в стороне от источников воды, таких как водопро-водные краны и раковины. Проследите, чтобы осталось не мене 5 см по бокам устройства и не менее 20 см над ним. Не устанавливайте кофемашину в тех местах, где температура окружающего воздуха может опуститься ниже0`C (вследствие замерзания воды устройство может быть повреждено).Убедитесь в том, что напряжение в сети соответствует напряжению, указанному на табличке, прикрепленной кустройству. Устройство следует подключать только к надежно заземленной розетке с номиналом 10 А. Изгото-витель не несет ответственности за возможные несчастные случаи, вызванные ненадлежащим заземлением. Если размеры сетевой розетки не соответствуют вилке шнура питания устройства, розетку следует заменить,прибегнув к помощи квалифицированного специалиста. Запрещается самостоятельно осуществлять замену шнура питания устройства, поскольку такая операциятребует использования специальных инструментов. Во избежание риска для замены шнура питания обрати-тесь в авторизованный сервисный центр. Следует настроить устройство на жесткость используемой воды в соответствии с указаниями, изложеннымив параграфе 16.6. Порядок первого использования устройства подробно изложен в следующем параграфе.
4 ПЕРВОЕ ИСПОЛЬЗОВАНИЕ КОФЕМАШИНЫ
1. При первом использовании устройства, выберите язык меню. Чтобы выбрать английский язык в качестве языка меню, подсоедините устройство к сети и дождитесь появ- ления на дисплее индикации, показанной ниже: Нажмите кнопку ОК (рис.1) и не отпускайте, как минимум, 3 секунды до тех пор, пока на дисплее не появит- ся индикация показанная ниже: После этого все индикации будут появляться на дисплее только на английском языке. Для того чтобы вы- брать иной язык, обратитесь к разделу 17.
2. Через 5 секунд появится другая индикация:
Чтобы заполнить резервуар снимите его (рис. 2), ополосните и наполните свежей водой. Ни в коем случаене наливайте воду выше отметки MAX (Макс.уровень).Верните резервуар на место и прижмите до упора.
3. Поставьте чашку под слив для горячей воды (рис.3). (Если слив не установлен, то отображается индикация «INSERT WATER SPOUT». Установите слив на место (рис.4), убедившись в том, что отметка на сливе совпа-дает с отметкой на панели управления устройстве). На устройстве отображается индикация:
4. Нажмите кнопку ОК (рис.1). Спустя несколько секунд из слива вытекает немного воды. Истечение воды пре- кращается автоматиче
Спросить у мастера «Что делать?»
— Вам ответят при первой возможности.
Использование инструкции для кофемашины DELONGHI ESAM 4500 бесплатно. Инструкция по эксплуатации DELONGHI ESAM 4500 доступна для скачивания из открытых источников.
Читайте наши статьи

Эксплуатация кофемашины в зимний период
Что происходит с кофемашиной при длительном нахождении в помещении с низкой температурой? Перевозили кофемашину в багажнике — что теперь от неё ожидать?

Скидка на ремонт кофемашины
Получите 20% скидку на ремонт или обслуживание вашей кофемашины, а также при заказе кофе «Coffee-Everyday» у нас.