-
OMRON 108M, механический тонометр (3 Mb)
pdf
-
OMRON 705IT, автоматический тонометр на плечо (377 Kb)
pdf
-
OMRON 711, инструкция (5 Mb)
pdf
-
OMRON 717, инструкция (5 Mb)
pdf
-
OMRON 773, автоматический тонометр на плечо (382 Kb)
pdf
-
OMRON 907, профессиональный тонометр (759 Kb)
pdf
-
OMRON CL, манжета большая для руки с окружностью 32-42 см (209 Kb)
pdf
-
OMRON CM, манжета стандартная (151 Kb)
pdf
-
OMRON CW, универсальная манжета (22-42 см) (3 Mb)
pdf
-
OMRON HBP-1100, профессиональный тонометр (24 Mb)
pdf
-
OMRON HBP-1300, профессиональный тонометр (23 Mb)
pdf
-
OMRON HEM-18, механический тонометр (163 Kb)
pdf
-
OMRON i-C10, автоматический тонометр на плечо с СУПЕР манжетой (22-42 см) (13 Mb)
pdf
-
OMRON M1 Classic, полуавтоматический тонометр на плечо (364 Kb)
pdf
-
OMRON M1 Compact, полуавтоматический тонометр на плечо (3 Mb)
pdf
-
OMRON M1 Eco, полуавтоматический тонометр на плечо (4 Mb)
pdf
-
OMRON M1 Plus, полуавтоматический тонометр на плечо (15 Mb)
pdf
-
OMRON M1/MX, полуавтоматический тонометр на плечо (206 Kb)
pdf
-
OMRON M10-IT, автоматический тонометр на плечо с СУПЕР манжетой (22-42 см) (13 Mb)
pdf
-
OMRON M2 Basic (HEM-7121-RU), автоматический тонометр на плечо (манжета для руки 22-32 см) (515 Kb)
pdf
-
OMRON M2 Basic с адаптером, автоматический тонометр на плечо (манжета 22-32 см) (6 Mb)
pdf
-
OMRON M2 Basic, автоматический тонометр на плечо (манжета для руки 22-32 см) (1 Mb)
pdf
-
OMRON M2 Basic, автоматический тонометр на плечо с универсальной манжетой (22-42 см) (513 Kb)
pdf
-
OMRON M2 Basic, автоматический тонометр на плечо с универсальной манжетой (22-42 см) и адаптером (535 Kb)
pdf
-
OMRON M2 Classic с адаптером (523 Kb)
pdf
-
OMRON M2 Classic, автоматический тонометр на плечо (1 Mb)
pdf
-
OMRON M2 Classic, автоматический тонометр на плечо с универсальной манжетой (22-42 см) (580 Kb)
pdf
-
OMRON M2 Compact, автоматический тонометр на плечо (1 Mb)
pdf
-
OMRON M2 Eco, автоматический тонометр на плечо (3 Mb)
pdf
-
OMRON M2 Plus (593 Kb)
pdf
-
OMRON M3 Comfort, автоматический тонометр на плечо (6 Mb)
pdf
-
OMRON M3 Expert (HEM-7132-ALRU), автоматический тонометр на плечо (635 Kb)
pdf
-
OMRON M3 Expert, автоматический тонометр на плечо с универсальной манжетой (22-42 см) и адаптером в комплекте (1 Mb)
pdf
-
OMRON M3 Family, автоматический тонометр на плечо с универсальной манжетой (22-42 см) и адаптером (1 Mb)
pdf
-
OMRON M3 Intellisense, автоматический тонометр на плечо (11 Mb)
pdf
-
OMRON M4-I, автоматический тонометр на плечо (322 Kb)
pdf
-
OMRON M5 Comfort, автоматический тонометр на плечо с СУПЕР манжетой (22-42 см) и адаптером (920 Kb)
pdf
-
OMRON M5-I, автоматический тонометр на плечо (261 Kb)
pdf
-
OMRON M5, автоматический тонометр на плечо с универсальной манжетой (22-42 см) и адаптером (881 Kb)
pdf
-
OMRON M6 Comfort, автоматический тонометр на плечо с СУПЕР манжетой и адаптером (951 Kb)
pdf
-
OMRON M6, автоматический тонометр на плечо с универсальной манжетой (22-42 см) и адаптером (920 Kb)
pdf
-
OMRON M7, автоматический тонометр на плечо (847 Kb)
pdf
-
OMRON MIT Elite Plus, автоматический тонометр на плечо с веерообразной манжетой (22-32 см) (11 Mb)
pdf
-
OMRON MIT Elite, автоматический тонометр на плечо с веерообразной манжетой (22-32 см) (10 Mb)
pdf
-
OMRON MIT, автоматический тонометр на плечо (222 Kb)
pdf
-
OMRON MX2 Basic, автоматический тонометр на плечо (513 Kb)
pdf
-
OMRON MX3 Plus, автоматический тонометр на плечо (784 Kb)
pdf
-
OMRON MX3/M4/711, автоматический тонометр на плечо (158 Kb)
pdf
-
OMRON R1, автоматический тонометр на запястье (1 Mb)
pdf
-
OMRON R1/R3/RX, тонометр на запястье (128 Kb)
pdf
-
OMRON R2, автоматический тонометр на запястье (1 Mb)
pdf
-
OMRON R3 Intellisense, тонометр на запястье (661 Kb)
pdf
-
OMRON R3 Opti, автоматический тонометр на запястье (2 Mb)
pdf
-
OMRON R3-I Plus, тонометр на запястье (2 Mb)
pdf
-
OMRON R4, тонометр на запястье (211 Kb)
pdf
-
OMRON R5 Prestige, автоматический тонометр на запястье (3 Mb)
pdf
-
OMRON R5-I, тонометр на запястье (285 Kb)
pdf
-
OMRON R6, тонометр на запястье (881 Kb)
pdf
-
OMRON R7, автоматический тонометр на запястье (588 Kb)
pdf
-
OMRON RS1, инструкция (4 Mb)
pdf
-
OMRON RS2, инструкция (4 Mb)
pdf
-
OMRON RS3, инструкция (7 Mb)
pdf
-
OMRON RX-I, тонометр на запястье (286 Kb)
pdf
-
OMRON RX2, тонометр на запястье (263 Kb)
pdf
-
OMRON RX3 Plus, тонометр на запястье (525 Kb)
pdf
-
OMRON RX3, тонометр на запястье (429 Kb)
pdf
-
OMRON S1, полуавтоматический тонометр на плечо (1 Mb)
pdf
-
OMRON SpotArm i-Q132, автоматический тонометр на плечо подходит для руки с окружностью 17-32 см (13 Mb)
pdf
-
OMRON SpotArm i-Q142, автоматический тонометр на плечо подходит для руки с окружностью 22-42 см (12 Mb)
pdf
-
Мини-адаптер OMRON S, инструкция (516 Kb)
pdf
-
Преобразователь (адаптер) OMRON HHP-CM01, инструкция (4 Mb)
pdf
-
Принтер OMRON (5 Mb)
pdf
-
Тонометр M2 Basic (HEM-7121-ALRU) с адаптером и универсальной веерообразной манжетой, инструкция (5 Mb)
pdf
-
Тонометр M2 Basic (HEM-7121-RU), инструкция (5 Mb)
pdf
-
Тонометр M2 Basic с адаптером (HEM-7121-ARU), инструкция (5 Mb)
pdf
-
Тонометр OMRON EVOLV, инструкция (6 Mb)
pdf
-
Тонометр OMRON M1 Basic (ARU), инструкция (4 Mb)
pdf
-
Тонометр OMRON M1 Basic (RU), инструкция (4 Mb)
pdf
-
Тонометр OMRON M2 Classic (HEM-7122-ALRU) с универсальной манжетой и адаптером, инструкция (6 Mb)
PDF
-
Тонометр OMRON M2 Classic, инструкция (6 Mb)
pdf
-
Тонометр OMRON M2 Comfort ALRU, инструкция (6 Mb)
pdf
-
Тонометр OMRON M2 Eco, инструкция (5 Mb)
pdf
-
Тонометр OMRON M2 Plus, инструкция (6 Mb)
pdf
-
Тонометр OMRON M3 Comfort ALRU (HEM-7155-ALRU), инструкция (15 Mb)
pdf
-
Тонометр OMRON M3 Expert ALRU (HEM-7154-ALRU), инструкция (15 Mb)
pdf
-
Тонометр OMRON M3 Expert, инструкция (6 Mb)
pdf
-
Тонометр OMRON M4 Intelli IT ALRU (HEM-7155T-ALRU), инструкция (17 Mb)
pdf
-
Тонометр OMRON M7 Intelli IT ALRU (HEM-7361T-ALRU), инструкция (28 Mb)
pdf
-
Тонометр OMRON M7 Intelli IT, инструкция (68 Mb)
pdf
-
Тонометр OMRON RS1, инструкция (8 Mb)
pdf
-
Тонометр OMRON RS1, инструкция (4 Mb)
pdf
-
Тонометр OMRON RS2 Intelli IT, инструкция (4 Mb)
pdf
-
Тонометр OMRON RS2, инструкция (8 Mb)
pdf
-
Тонометр OMRON RS2, инструкция (4 Mb)
pdf
-
Тонометр OMRON RS3, инструкция (11 Mb)
pdf
-
Тонометр OMRON RS3, инструкция (7 Mb)
pdf
-
Тонометр OMRON RS7 Intelli IT, инструкция (7 Mb)
pdf
-
Тонометр OMRON RS7 Intelli IT, инструкция (7 Mb)
pdf
-
Тонометр OMRON S1, инструкция (3 Mb)
pdf
Наша миссия
сделать более доступной высокотехнологичную
и современную медицинскую технику
для каждого жителя России
Наша команда
это более 675 сотрудников по всей России.
Мы уверены, что здоровье — это главная
ценность человека
Мы профессионалы
и создаем основу для успешного
взаимовыгодного сотрудничества с нашими
клиентами
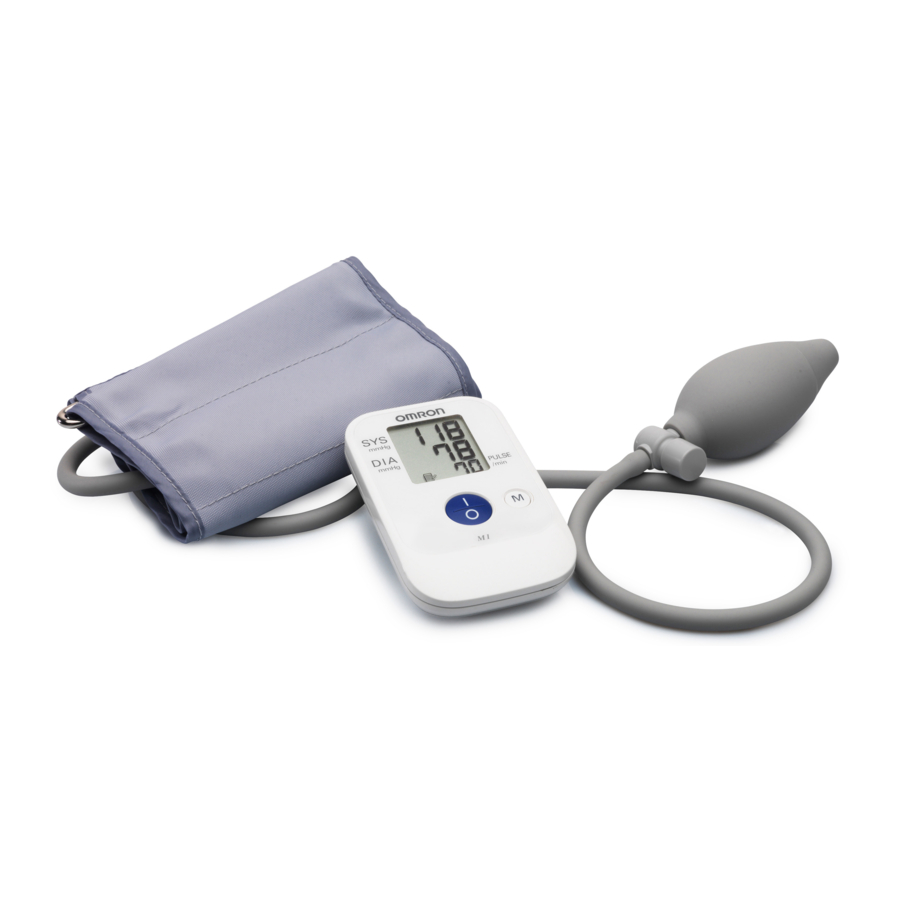
Omron S1 — Inflation Blood Pressure Monitor Manual
Introduction
Thank you for purchasing the OMRON S1 Manual Inflation Blood Pressure Monitor.
The OMRON S1 is a compact manual inflation blood pressure monitor, operating on the oscillometric principle. It measures your blood pressure and pulse rate simply and quickly.
Please read this instruction manual thoroughly before using the unit.
Please keep for future reference.
For specific information about your own blood pressure, CONSULT YOUR DOCTOR.
Important Safety Information
Consult your doctor prior to using in pregnancy or if diagnosed with arrhythmia or arteriosclerosis.
Please read this section carefully before using the unit.
- Indicates a potentially hazardous situation which, if not avoided, could result in death or serious injury.
(General Usage)
- Always consult your doctor. Self-diagnosis of measurement results and self-treatment are dangerous.
- People with severe blood flow problems, or blood disorders, should consult a doctor before using the unit, as cuff inflation can cause internal bleeding.
(Battery Usage)
- If battery fluid should get in your eyes, immediately rinse with plenty of clean water. Consult a doctor immediately.
- Indicates a potentially hazardous situation which, if not avoided, may result in minor or moderate injury to the user or patient or damage to the equipment or other property.
(General Usage)
- Do not leave the unit unattended with infants or persons who cannot express their consent.
- Do not use the unit for any purpose other than measuring blood pressure.
- Do not disassemble the unit or arm cuff.
- Use only the approved arm cuff for this unit. Use of other arm cuffs may result in incorrect measurement results.
- Make sure that the air tube is not wrapped around other parts of your body when taking measurements at night. This could result in injury when the air pressure in the air tube is increased.
- Do not leave the cuff wrapped on the arm if taking measurements during the night. This could result in injury.
- Do not inflate the arm cuff over 299 mmHg.
- Do not use a mobile phone or other devices that emit electromagnetic fields, near the unit. This may result in incorrect operation of the unit.
- Do not operate the unit in a moving vehicle (car, airplane).
(Battery Usage)
- If battery fluid should get on your skin or clothing, immediately rinse with plenty of clean water.
- Use only two «AAA» alkaline or manganese batteries with this unit. Do not use other types of batteries.
- Do not insert the batteries with their polarities incorrectly aligned.
- Replace old batteries with new ones immediately. Replace both batteries at the same time.
- Remove the batteries if the unit will not be used for three months or more.
- Do not use new and used batteries together.
General Precautions
- Do not apply strong shocks and vibrations to or drop the unit and arm cuff.
- Do not take measurements after bathing, drinking alcohol, smoking, exercising or eating.
- Do not forcibly bend the arm cuff or bend the air tube excessively.
- When removing the air tube, pull the air tube with holding near the air jack.
- Do not inflate the arm cuff when it is not wrapped around your arm.
- Do not wash the arm cuff or immerse it in water.
- Read and follow the «Important information regarding Electro Magnetic Compatibility (EMC)» in the Technical Data Section.
- Read and follow the «Correct Disposal of This Product» in the Technical Data Section when disposing of the device and any used accessories or optional parts.
Overview
Main unit

- Display
- M (Memory) button
- I/O (Power switch) button
- Air jacks for cuff and inflation bulb
- Battery compartment
Arm cuff

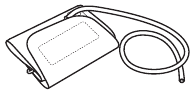
- Arm cuff (Medium cuff: arm circumference 22-32 cm)
- Air Tube
Inflation bulb
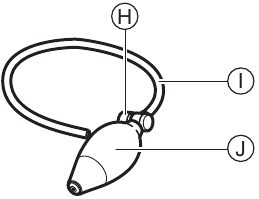
- Air Release Button
- Air Tube
- Air Inflation Bulb
Storage case

Display

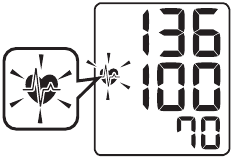
- Heartbeat symbol
- Flashes during measurement
- If flashing after measurement complete indicates blood pressure out of recommended range
- Reinflation symbol
- Battery low symbol
- Memory symbol
- Systolic blood pressure
- Diastolic blood pressure
- Pulse display
- Memory No. symbol
- Deflation symbol
Preparation
Installing/Replacing the Batteries
- Remove the battery cover.
- Insert two «AAA» batteries as indicated in the battery compartment and then replace the battery cover.
Notes:
- If the battery low symbol (
 ) appears on the display, turn the unit off then replace both batteries at the same time.
 - The measurement values continue to be stored in memory even after the batteries are replaced.
 ) appears on the display, turn the unit off then replace both batteries at the same time.
Disposal of used batteries should be carried out in accordance with the national regulations for the disposal of batteries.
Using the Unit
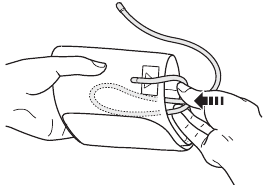
Applying the Arm Cuff
Remove tight-fitting clothing or tight rolled up sleeve from your upper arm.
Do not place the cuff over thick clothes.
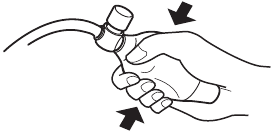
- Insert the air tubes into the air jacks.
- Put your arm through the cuff loop.
- Position the arm correctly.


The bottom edge of the cuff should be 1 to 2 cm above the elbow.
Marker (arrow under tube) is centred on the middle of your inner arm. Close the fabric fastener FIRMLY.
Notes:
- When you take a measurement on the right arm, air tube will be at the side of your elbow. Be careful not to rest your arm on the air tube.
- The blood pressure can differ between the right arm and the left arm, and therefore also the measured blood pressure values can be different. Omron recommends to always use the same arm for measurement. If the values between the two arms differ substantially, please check with your physician which arm to use for your measurement.

How to Sit Correctly
To take a measurement, you need to be rel axed and comfortably seated, under comfortable room temperature. No eating, smoking or exercising 30 minutes before taking a measurement.
- Sit on a chair with your feet flat on the floor.
- Sit upright with your back straight.
- The cuff should be at the same level as your heart.

Taking a Reading
Note: Remain still while taking measurement.
- Press the air release button to release any air in the arm cuff, then press the I/O button to turn the unit on.
Note: If the deflation symbol does not disappear soon, press the air release button to release any air in the arm cuff.

2. Pump the inflation bulb to inflate the arm cuff.
- Inflate the cuff until it is 30 to 40 mmHg above your expected systolic blood pressure value.
ex) If your expected blood pressure is around 140mmHg, inflate the arm cuff to between 170 and 180 mmHg. Inflate the cuff rapidly so that the pressure is reached in about five seconds. - When the desired pressure has been achieved, release the inflation bulb.
Notes:
- If the reinflation symbol ( ) appears, squeeze the inflation bulb to re-inflate the arm cuff.
- Do not inflate the arm cuff more than necessary.
 ) appears, squeeze the inflation bulb to re-inflate the arm cuff.
- Measurement starts. Measurement starts automatically after you stop inflating the arm cuff.

![]() Press the air release button to release the air in the arm cuff until the deflation symbol is no longer displayed.
Press the air release button to release the air in the arm cuff until the deflation symbol is no longer displayed.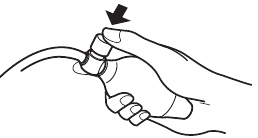
Notes:
- To cancel a measurement, press the I/O button to turn off the unit and press the air release button to release the air in the arm cuff.
- Wait 2-3 minutes before taking another blood pressure measurement. Waiting between readings allows the arteries to return to the condition prior to taking the blood pressure measurement.
Self-diagnosis of measured results and treatment are dangerous.
Please follow the instructions of your doctor.
- Remove the arm cuff.
- Press the I/O button to turn off the monitor.
The monitor automatically stores the measurement in its memory.
It will automatically turn off after five minutes.
- If your systolic or diastolic pressure is outside the standard range, the heartbeat symbol will blink when the measurement result is displayed.
Recent research suggests that the following values can be used as a guide to high blood pressure for measurements taken at home.
| Systolic Blood Pressure | Above 135 mmHg |
| Diastolic Blood Pressure | Above 85 mmHg |
This criteria is for home blood pressure measurement.
Using the Memory Function
The monitor automatically stores the result up to 14 sets.
Note: If the memory is full, the monitor will delete the oldest readings.
Previous Reading
- Turn the Unit on
- View Previous Reading
- The Memory number appears for a second before the pulse rate is displayed. The newest set is numbered «1».
- View Readings Stored in Memory
- Press repeatedly to cycle through the previous results.
- Hold down to cycle repidly.
To delete all the values stored in memory
When the memory symbol (  ) appears, first press the M button. Then while holding it down, press the I/O button simultaneously for about 2-3 seconds.
Note: You cannot partially delete the stored readings.
Troubleshooting and Maintenance
The Icons and Error Messages
| Error Display | Cause | Remedy |
 |
The systolic blood pressure is above 135 mmHg or diastolic blood pressure is above 85 mmHg. | Recent research suggests these values can be used as a guide to high blood pressure for measurements taken at home. |
 Blink |
The batteries are low. | You should replace them with new ones ahead of time. Refer to section «Installing/Replacing the Batteries». |
 Lit |
The batteries are exhausted. | You should replace them with new ones at once. Refer to section «Installing/Replacing the Batteries». |
 |
Cuff is under inflated. | Carefully read and repeat the steps listed under section «Taking a Reading». |
 |
Movement during measurement. | |
 |
Cuff over inflated. | |
 |
Device error. | Contact your OMRON retail outlet or distributor. Refer to Chapter «Technical Data». |
 |
Pressure is too low. | Press the inflation bulb to inflate the arm cuff until the reinflation symbol goes out. Or, deflate the arm cuff and repeat measurement after checking that the heartbeat symbol (  ) has been displayed. ) has been displayed.Refer to section «Taking a Reading». |
Troubleshooting
| Problem | Cause | Remedy |
| The reading is extremely low (or high). | Arm cuff not applied correctly. | Apply the arm cuff correctly. Refer to section «Applying the Arm Cuff». |
| Movement or talking during measurement. | Remain still and do not talk during measurement. Refer to section «Taking a Reading». | |
| Clothing is interfering with the arm cuff. | Remove any clothing interfering with the arm cuff. Refer to section «How to Sit Correctly«. | |
| Arm cuff pressure does not rise. | The air tube is not securely connected into the main unit. | Make sure that the air tube is connected securely. Refer to section «Applying the Arm Cuff». |
| Air is leaking from the arm cuff. | Replace the arm cuff with a new one. Refer to Chapter «Optional Parts«. | |
| Cannot measure or readings are too low or too high. | The arm cuff has not been inflated sufficiently. | Inflate the cuff so that it is 30 to 40 mmHg above your previous measurement result. Refer to section «Taking a Reading». |
| The air release button being pressed during inflation. | Be careful not to press the air release button during measurement. | |
| The unit loses power during measurement. | The batteries are empty. | Replace the batteries with new ones. Refer to section «Installing/Replacing the Batteries». |
| Nothing happens when you press the buttons. | The batteries are empty. | Replace the batteries with new ones. Refer to section «Installing/Replacing the Batteries». |
| The batteries have been inserted incorrectly. | Insert the batteries with the correct (+/-) polarity. Refer to section «Installing/Replacing the Batteries». | |
| Other problems. |
If this still does not solve the problem, contact your OMRON retail outlet or distributor. |
Maintenance
To protect your unit from damage, please observe the following:
- Do not subject the main unit, cuff and inflation bulb to extreme temperatures, humidity, moisture or direct sunlight.
- Do not fold the cuff or tubing tightly.
- Do not inflate the arm cuff over 299 mmHg.
- Do not disassemble the unit.
- Do not subject the unit to strong shocks or vibrations (for example, dropping the unit on the floor).
- Do not use volatile liquids to clean the main unit. The unit should be cleaned with a soft, dry cloth.
- Use a soft, moistened cloth and soap to clean the arm cuff.
- Do not wash the arm cuff or immerse it in water.
- Do not use petrol, thinners or similar solvents to clean the arm cuff.
- Do not carry out repairs of any kind yourself. If a defect occurs, consult your OMRON retail outlet or distributor as mentioned on the packaging.

Calibration and Service
- The accuracy of this blood pressure monitor has been carefully tested and is designed for a long service life.
- It is generally recommended to have the unit inspected every two years to ensure correct functioning and accuracy. Please consult your authorised OMRON dealer or the OMRON Customer Service at the address given on the packaging or attached literature.
Storage
Keep the unit in its storage case when not in use.
Do not keep the main unit being wound with the arm cuff.
- Unplug the air tube from the air connector.
- Gently fold the air tube into the arm cuff.
Note: Do not bend the air tube excessively.

- Place the arm cuff, inflation bulb and main unit in the storage case.

Do not store the unit in the following situations:
- If the unit is wet.
- Locations exposed to extreme temperatures, humidity, direct sunlight, dust or corrosive vapours.
- Locations exposed to vibrations, shocks or where it will be at an angle.
Optional Parts
Medium Arm Cuff
Arm circumference 22 — 32 cm
CM-9515371-7
Large Arm Cuff
Arm circumference 32 — 42 cm
CL-9515370-9
Small Arm Cuff
Arm circumference 17 — 22 cm
CS2-9515373-3
Small cuff and bulb combination
Arm circumference 17 — 22 cm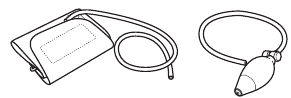
CSB2-9515372-5
Regular bulb
4997965-1
Note:
Should you require a small cuff, please ensure that the small cuff and small bulb are used together.
They may also be purchased as a combination set.
Technical Data


Documents / Resources
Download manual
Here you can download full pdf version of manual, it may contain additional safety instructions, warranty information, FCC rules, etc.
Download Omron S1 — Inflation Blood Pressure Monitor Manual
«Чтобы предупредить развитие сердечнососудистых заболеваний важно следить за своим артериальным давлением. Ведь неоднократное или стойкое снижение, или повышение артериального давления, выходящее за пределы нормы, может оказаться тревожным сигналом болезни» — такое предостережение я прочитала в инстаграме одной известной японской марки. И действительно, если посмотреть статистику — вариант «получить» инсульт после тридцати лет — не такой уж и фантомный.
Чтобы не было таких плачевных последствий, нам потребуется тонометр. Что это и как пользоваться? Разберемся сегодня.
На обзор ко мне приехал тонометр OMRON M3 Expert.
Упаковка и комплектация
Тонометр лежит в небольшой картонной коробке, полностью на русском языке. Тут можно найти информацию о приборе, производителе и гарантии. Очень удобно, не нужно переводить или искать информацию в интернете — все написано подробно.

Документация в коробке на нескольких языках — русском и английском. Руководство по эксплуатации — на двух языках, гарантийный талон на русском и журнал для записи артериального давления — на английском.

В комплект поставки входят:
1. Тонометр OMRON M3 Expert.

2. Манжета компрессионная.

3. Сумочка для хранения тонометра и принадлежностей.

4. Батарейки.

5. Адаптер переменного тока.

Тонометр OMRON M3 Expert
Автоматический тонометр — прибор, который сам измеряет давление. Нет необходимости пользоваться грушей — встроенный компрессор сам нагнетает воздух в манжету. Размеры тонометра: 7,9 см*14,1см*10,7см. Он подойдет больше для домашнего использования, для поездок лучше обратить внимание на более компактные модели тонометров Omron. В тонометре стоит японский датчик давления — он позволяет максимально точно определить уровень артериального давления, сделав процесс измерения комфортным для пользователя. Каждый тонометр OMRON имеет клинически апробированный алгоритм измерения артериального давления.
Универсальная веерообразная манжета
Отдельно выделю омроновскую манжету. Вспоминаю, с каким ужасом в детстве мне, когда приходилось идти к доктору, измеряли давление механическим тонометром (это тот, который с грушей). Как же мне пережимали руку! Манжета OMRON веерообразная — она повторяет анатомический изгиб руки — удобно и комфортно! К этому можно добавить еще функцию Intellisense — тонометр автоматически учитывает состояние сосудов и нагнетает в манжету воздуха столько, сколько нужно, не пережимая руку. Кстати, такая функция есть только у этого производителя.
Размер манжеты 22-42см, что делает ее универсальной.

Так же у производителя есть манжеты меньшего или большего размера — их всегда можно докупить при необходимости.
Подготовка тонометра к работе и измерения артериального давления
Измерения артериального давления требуется проводить несколько раз в день. Я это делаю утром и вечером по три раза в течение 10 минут. Измерять нужно правильно, иначе данные будут не верными и все это мероприятие будет бессмысленным. Самое идеальное — сидеть на стуле, откинувшись на спинку, руку положить на стол. И не разговаривать во время измерения.
Подключаем к тонометру адаптер и манжету. У манжеты есть специальный синий наконечник, который нужно вставить с левой стороны тонометра в такое же синее отверстие.

Адаптер подключаем к сети, манжету надеваем на нерабочую руку. Я надела на левую. Тут тоже есть нюанс — трубка от манжеты должна идти вдоль артерии. Вот так:

Манжету рекомендуется надевать на голую руку, либо можно на тонкую кофту. Свитер для измерения не подходит. Нажимаем кнопку старт, спокойно дышим и не разговариваем.

В процессе измерения должен загореться зеленый индикатор «ок». Это означает, что манжета надета верно.

После измерения проводим еще два. Все же измерения можно посмотреть, нажав на кнопку с книжкой. Также, посмотреть последнее измерение можно, нажав на кнопку с часами, расположенную под экраном тонометра. Если три измерения проводятся в течении 10 минут, тонометр автоматически рассчитает среднее значение.

На тонометре есть два индикатора SYS и DIA — систолическое и диастолическое давление. Если один из показателей будет повышен, загорится оранжевый индикатор.

Память этого тонометра рассчитана на 100 измерений. Очень удобно их просматривать — под экраном есть две кнопки переключения в идее стрелок.

Есть еще два индикатора, которые могут загореться после измерения — индикатор аритмии и графический индикатор уровня АД. В первом случае появится три сердечка в нижней части экрана. Если аритмия есть, тонометр определит это автоматически с помощью специального алгоритма. Это еще один критерий, почему нужно проводить измерение три раза, а не один. Во втором случае шкала находится в правой части экрана и после измерения на ней появляются деления — в норме давление или выше. Выше нормы это 135/80 — сигнал о том, что требуется обратиться ко врачу, если ранее такого не было или вы уже не проводите лечение.

Тонометр может работать автономно. Для этого нужно вставить батарейки с его обратной стороны в специальный отсек. Снимаем крышку блока для батареек и вставляем их по рисунку.

С той же стороны есть 4 силиконовые ножки, благодаря которым тонометр не скользит на поверхности и четко стоит на своем месте.

В нижней части указана модель прибора, серийный номер и страна изготовления.
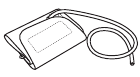
 После проведения измерений тонометр и комплектующие компактно помещаются в специальную сумочку для хранения. Удобно, что в ней остается еще немного места, а не все еле-еле влезает.

Приложение OMRONConnect
Говоря о тонометре OMRON, важно не забыть о приложении OMRONConnect. Это место, где все данные о состоянии здоровья отображаются в понятных и информативных графиках, чтобы отслеживать результаты АД и вовремя обратиться за помощью при малейших изменениях.

Все сохраненные показатели можно также передавать в приложение «Apple Health». Работает это так: нужно скачать приложение OMRONConnect на телефон — поддерживается Android и IOS. После измерения подносим телефон к тонометру и с помощью камеры смартфона сканируем данные. Нажимаем «ок» и сохраняем результат. Посмотреть график измерения можно в отдельной вкладке.
И в завершение
Производитель дает гарантию 5 лет и пожизненное сервисное обслуживание на прибор. А так же, каждые два года тонометр можно приносить в сервис и делать бесплатно поверку — проверять, точно ли он измеряет. Конечно, процедура эта нужна, если вдруг появились сомнения в работе прибора.
Тонометр OMRON можно по праву считать одним из лучших тонометров. Интуитивно понятное управление, удобная манжета, запоминает результаты — а главное, точно проводит измерения.
Плюсы:
- точность измерения;
- удобная манжета;
- нет дискомфорта при измерении;
- удобен в использовании;
- сумочка для хранения прибора;
- память измерений.
Минусы:
- большой, неудобно брать с собой.