![]()
Мощный инструмент для поиска глубоко спрятанных европейских монет и реликвий в любых грунтах!
Официальный представитель
GARRET METAL DETECTORS
в России ООО «РЭЙКОМ» Тел.: +7(495)411-9188 www.reicom.ru www.garrett-hobby.ru
INTERNATIONAL PRO AT
пользователя Руководство
Руководство
пользователя
СПАСИБО, ЧТО ВЫБРАЛИ МЕТАЛЛОИСКАТЕЛИ GARRETT!
Поздравляем вас с приобретением нового металлоискателя Garrett AT Pro™. Этот металлоискатель с улучшенными параметрами разработан специально для использования в сложных условиях Европы.
В AT Pro применена исключительная технология Garrett по определению ID объекта и патентованные функции по дискриминации. Две шкалы индикации дают вам возможность увидеть установленное значение параметра дискриминации (нижняя шкала), а также результат анализа каждого объекта (верхняя шкала). Помимо этого, на шкале Цифрового ID объекта отображается более точная характеристика объекта. AT Pro отличается также высоким разрешением дискриминации по железу (40 точек) для того, чтобы отличать интересные объекты от железного мусора на захламлѐнных участках, несколько усовершенствованных характеристик звукового сигнала и стандартная эллиптическая катушка конструкции Double-D размером 22х28 см, рассчитанная на оптимальные характеристики на более сложных минерализованных грунтах Европы. Кроме того, AT Pro может быть использован в Стандартном (STD) режиме, отличающимся чрезвычайно дружелюбным интерфейсом, или в более продвинутом режиме PRO, рассчитанном на опытных охотников.
Использующий чем 45-летний опыт интенсивных разработок, ваш металлоискатель Garrett AT Pro – это самый совершенный прибор такого рода в своей области. Опытный ли вы охотник или новичок, этот аппарат прекрасно приспособлен для самых разных условий поиска. Расширенные характеристики AT Pro рассчитаны на экспертов в поиске драгоценностей, но в Стандартном режиме им может пользоваться даже начинающий.
Для того, чтобы полностью раскрыть возможности специальных режимов работы и функций AT Pro, мы настоятельно советуем внимательно прочесть всѐ данное руководство.

|
СОДЕРЖАНИЕ |
|
|
ПАНЕЛЬ УПРАВЛЕНИЯ AT Pro………………………………………………. |
3 |
|
КРАТКОЕ РУКОВОДСТВО К РАБОТЕ …………………………………….. |
5 |
|
КОМПОНЕНТЫ AT Pro ………………………………………………………….. |
6 |
|
СПИСОК КОМПОНЕНТОВ……………………………………………………… |
7 |
|
СБОРКА……………………………………………………………………………….. |
8 |
|
ВКЛЮЧЕНИЕ ПИТАНИЯ………………………………………………………. |
11 |
|
РЕЖИМЫ ПОИСКА……………………………………………………………… |
12 |
|
Сравнение режимов поиска STD и PRO…………………………… |
12 |
|
Стандартный Режим Обнаружения …………………………………. |
13 |
|
Режим поиска PRO ………………………………………………………… |
15 |
|
Пропорциональный звук (режим Pro) ………………………………. |
15 |
|
Перекатывание звука (режим Pro) ………………………………………… |
18 |
|
ИНФОРМАЦИЯ ОТМЕТКИ ОБЪЕКТА……………………………………. |
19 |
|
ЦИФРОВАЯ ОТМЕТКА ОБЪЕКТА…………………………………………. |
20 |
|
ТОНАЛЬНАЯ ОТМЕТКА……………………………………………………….. |
21 |
|
ДИСКРИМИНАЦИЯ……………………………………………………………… |
22 |
|
Селективная дискриминация ………………………………………….. |
22 |
|
Дискриминация железа ………………………………………………….. |
24 |
|
ЗВУКОВОЙ СИГНАЛ ЖЕЛЕЗА ……………………………………………… |
27 |
|
ЧУВСТВИТЕЛЬНОСТЬ ………………………………………………………… |
30 |
|
КАЛИБРОВКА ПО ГРУНТУ …………………………………………………… |
31 |
|
Автоматическая калибровка по грунту …………………………….. |
31 |
|
Ручная калибровка по грунту ………………………………………….. |
31 |
|
РЕГУЛИРОВКА ЧАСТОТЫ …………………………………………………… |
33 |
|
ТОЧНАЯ ЛОКАЛИЗАЦИЯ …………………………………………………….. |
34 |
|
ПОЛЕЗНЫЕ СОВЕТЫ………………………………………………………….. |
39 |
|
СТЕНДОВАЯ ПРОВЕРКА …………………………………………………….. |
44 |
|
РАБОТА ПОД ВОДОЙ………………………………………………………….. |
47 |
|
УХОД …………………………………………………………………………………. |
48 |
|
Замена элементов питания…………………………………………….. |
48 |
|
УСТРАНЕНИЕ НЕИСПРАВНОЕСТЕЙ……………………………………. |
50 |
|
ЭТИЧЕСКИЙ КОДЕКС ПОИСКОВИКА …………………………………… |
51 |
|
ПРЕДОСТОРОЖНОСТИ………………………………………………………. |
52 |
|
ГАРАНТИИ И ОБСЛУЖИВАНИЕ …………………………………………… |
53 |
|
АКСЕССУАРЫ ДЛЯ AT Pro…………………………………………………… |
54 |
|
РЕКОМЕНДУЕМАЯ ЛИТЕРАТУРА ………………………………………… |
56 |
|
КНИГИ ИЗДАТЕЛЬСТВА RAM ………………………………………………. |
57 |
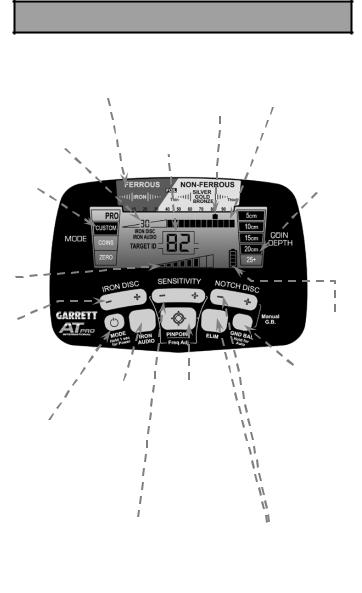
ПАНЕЛЬ УПРАВЛЕНИЯ AT Pro
Расшифровка отметки объекта
Дискриминация Показывает тип железа с высоким металла.
разрешением
Показывает выбранный уровень дискриминации по железу
Индикатор
режима
|
Курсор |
|||
|
отметки |
Нижняя шкала |
||
|
Цифровая |
объекта |
Показывает |
|
|
отметка |
Показывает |
вариант селек- |
|
|
объекта |
вероятные |
тивной дискри- |
|
|
(также в |
характери- |
минации. |
|
|
стики объек- |
|||
|
режиме |
Индикатор |
||
|
GND-BAL |
та. |
||
|
глубины |
|
показывает |
монет |
|
|
параметр |
||
|
Показывает |
||
|
калибровки |
||
|
глубину зале- |
||
|
гания объек- |
||
|
тов размером с |
||
|
монету. |
Значение чувствительности
Кнопка
IRON
DISC
Уровень дискриминации по железу изменяется кнопками
(+) или (-).
Питание ВКЛ / ВЫКЛ: для включения питания удерживать нажатой 1 с
MODE (режим):
быстрое нажатие для переключения между режимами работы.
СБРОС: для восстановления заводских параметрах удерживать нажатой в течение 5 с.
|
Звук для |
Точная локализа- |
|
|
ция / Кнопка |
||
|
железа |
||
|
настройки частоты |
||
|
Используется |
||
|
Нажать и удержи- |
||
|
для звуковой |
||
|
вать для включения |
||
|
индикации |
||
|
режима точной |
||
|
железа. |
||
|
локализации, или |
||
|
использовать вместе |
||
|
с кнопками |
||
|
SENSITIVITY (+) |
||
|
или (-) для измене- |
||
|
ния частоты. |
Индикатор
заряда
батареи
Кнопка GROUND BALANCE
Нажать, не отпуская, для быстрой автоматической для калибровки по грунту или использовать с кноп-
ками NOTCH DISC (+)
или (-) для ручной калибровки по грунту.
Кнопки
SENSITIVITY
(Чувствительность)
Увеличивают или уменьшают чувствительность.
Кнопки ELIM и NOTCH DISC
Кнопками NOTCH DISC (+) или (-) выбирается курсор. Затем кнопкой ELIM можно включить или выключить выбранный уровень дискриминации.
КРАТКОЕ РУКОВОДСТВО К РАБОТЕ
1.Вставьте элементы питания.
AT Pro работает от четырѐх (4) элементов AA, уже установленных на заводе компании Garrett.
2.Включите питание. 
Нажмите и отпустите кнопку ON / OFF. AT Pro при включении восстанавливает тот же режим, в котором он последний раз использовался, и готов к работе.
(Режим по умолчанию – поиск монет.)
3. Выберите режим работы. 
Кнопкой Mode, если хотите, можно выбрать режим поиска.
4. Задайте параметры.
При необходимости отрегулируйте параметры Sensitivity (Чувствительность) или Discrimination (Дискриминация).
5. Начинайте поиск.
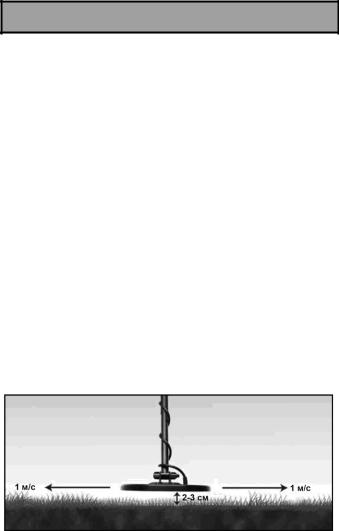
Опустите катушку металлоискателя до высоты в 2-3 см над поверхностью земли и начинайте водить еѐ из стороны в сторону со скоростью примерно 1 м/с.

КОМПОНЕНТЫ AT Pro
Нижняя Катушка штанга
Верхняя
штанга
Пружинный
фиксатор S-образная штанга
Ручка
Стойка
металлоискателя
Корпус
блока
управления
ЖК экран
Кнопки
управления
Лямка
подлокотника
Мягкая
накладка
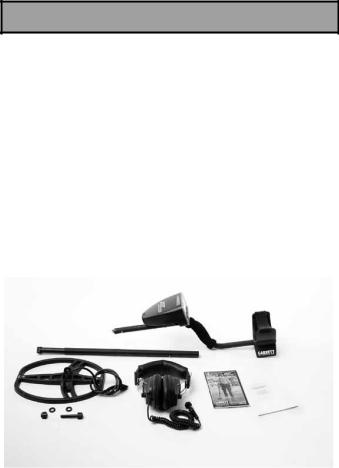
СПИСОК КОМПОНЕНТОВ
Для сборки металлоискателя AT Pro не требуется каких-либо инструментов. Четыре (4) элемента питания AA уже вставлены в корпус. В упаковке металлоискателя должны содержаться следующие компоненты:
Один (1) блок управления в корпусе с S-образной штангой
Одна (1) верхняя штанга и одна
(1) подсоединѐнная нижняя штанга
Одна (1) барашковая гайка, две
(2) монтажные шайбы и один (1) болт с резьбой
Одна (1) Double-D (DD)
катушка размером 22х28 см
Руководство пользователя Гарантийный талон Головные телефоны
Если что-либо из перечисленного отсутствует, обратитесь к своему дилеру.
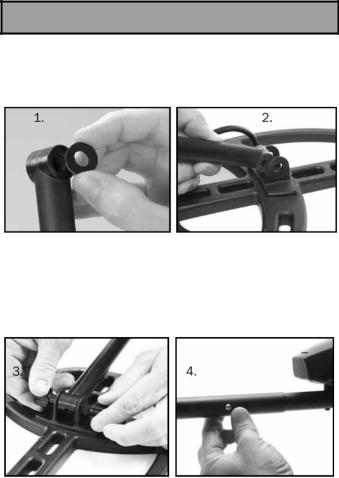
СБОРКА
1.Совместите отверстия монтажных шайб с небольшими выступами на нижней штанге и с усилием установите их на место.
2.Наденьте на штангу катушку.
3.Пропустите болт через отверстия в нижней штанге и катушке. Вручную зафиксируйте узел катушки барашковой гайкой.
4.Вдавите пружинный фиксатор в S-образную штангу и в верхнюю штангу вставьте блок управления.
5.Вдавите пружинный фиксатор в нижней штанге и отрегулируйте до удобной для вас длины.
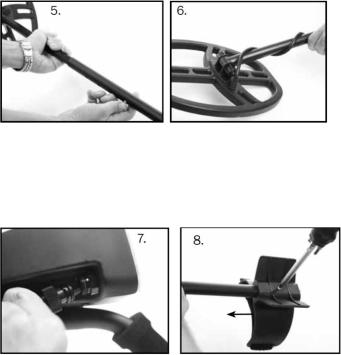
6.Не натягивая, оберните кабель вокруг штанги, первый виток кабеля должен быть над штангой.
7.Вставьте разъѐм катушки в 4-контактный коннектор на блоке управления и вручную закрепите соединение.
8.При необходимости отрегулируйте лямку подлокотника, вывинтив винт в нижней части и переставив его в другое отверстие.
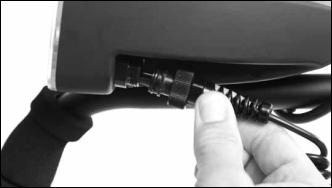
9.При желании подключите головные телефоны к 2-кон- тактному разъѐму на блоке управления.
Примечание: Головные телефоны для работы не требуются, но многие охотники предпочитают слышать самые слабые звуки от объектов. При подключении головных телефонов динамик блока управления отключается.
Примечание: Поставляемые в комплекте телефоны предназначены для работы в сухих условиях; см. стр. 54 по поводу водозащищѐнных телефонов.
Соседние файлы в предмете [НЕСОРТИРОВАННОЕ]
- #
- #
- #
- #
- #
- #
- #
- #
- #
- #
- #
- Manuals
- Brands
- Garrett Manuals
- Metal Detector
- AT Pro
- Owner’s manual
-
Contents
-
Table of Contents
-
Troubleshooting
-
Bookmarks
Quick Links
Related Manuals for Garrett AT Pro
Summary of Contents for Garrett AT Pro
-
Page 1
Owner’s Manual… -
Page 2
Standard Mode can be easily operated by the beginner. In order to take full advantage of the special features and functions of the AT Pro, you are urged to carefully read this instruction manual in its entirety. AT Pro International™… -
Page 3
Garrett Metal Detectors… -
Page 4: Table Of Contents
TABLE OF CONTENTS AT Pro CONTROL PANEL …………..4 QUICk START GUIDE …………….5 AT Pro COMPONENTS …………… 6 LIST OF PARTS ………………7 ASSEMBLy ………………8 POWERING ON ……………… 11 SEARCH MODES …………….12 Overview of STD Mode vs PRO Mode ……..12 Standard (STD) Detection Modes ……….
-
Page 5: At Pro Control Panel
AT Pro CONTROL PANEL Target ID Legend indicates Lower Scale metal types. Digital indicates notch Target ID Target ID discrimination pattern. Cursor (also shows indicates High Resolution ground balance probable Coin Depth Iron Discrimination settings while in target identity. Indicator indicates level of iron GND-BAL mode.)
-
Page 6: Quick Start Guide
The AT Pro operates with four (4) AA batteries which are already installed by Garrett. 2. Power ON. Press and release the ON / OFF Power button. The AT Pro powers on in the last mode used and is ready to search. (Factory default mode is Coins.) 3.
-
Page 7: At Pro Components
AT Pro COMPONENTS Search coil Lower Control Upper Stem Housing Stem Screen Pushbutton Controls Spring Clip strap S-shaped Stem Handle Grip Detector Stand Padded Arm Cuff Garrett Metal Detectors…
-
Page 8: List Of Parts
LIST OF PARTS No tools are required to assemble the AT Pro. Four (4) AA batteries are included with the detector. The box for your detector contains the following parts: One (1) control housing with One (1) 28×22 cm DD…
-
Page 9: Assembly
Insert the threaded bolt through the holes of the lower stem and searchcoil. Hand-tighten the searchcoil assembly with the wing nut. Depress the spring clip in the S-stem and insert the control housing into the upper stem. Garrett Metal Detectors…
-
Page 10
Insert the coil connector into the 4-pin connector of the control housing and hand-tighten. If needed, adjust the arm cuff by removing the screw on the bottom and moving it to the other hole. AT Pro International™… -
Page 11
Note: Headphones are not required but are desired by many hunters to hear faint targets. Connecting the headphones will silence the detector’s speaker. Note: The provided headphones are for dry use only; see page 54 for optional waterproof headphones. 10 Garrett Metal Detectors… -
Page 12: Powering On
To turn off the detector, press and hold this pushbutton for one (1) second (until the detector produces a second beep). To restore the factory settings, press and hold the power button for 5 to 10 seconds (until the detector produces a fast double beep). AT Pro International™…
-
Page 13: Search Modes
Custom, Coins or Zero in the STD Mode and Custom, Coins or Zero in the PRO Mode. • Overview of STD Mode vs PRO Mode In its Standard (STD) Mode, the AT Pro provides a full- strength audio response regardless of a target’s amplitude. Many detectorists prefer this consistent, unambiguous, binary (either on or off) target response.
-
Page 14: Standard (Std) Detection Modes
STANDARD (STD) DETECTION MODES In the STD modes, the AT Pro produces a full-strength binary audio beep to indicate a detected target. Standard detection mode operation is ideal for learning the AT Pro because of its consistent audio signals. Detected targets are heard at the same full-strength beep regardless of their size or depth.
-
Page 15
• CUSTOM Mode This mode can be customized by the operator and the AT Pro will retain the changes when the detector is switched off. The factory preset for the CUSTOM Mode is the same as the ZERO Mode (see previous page). -
Page 16: Pro Detection Modes
PRO DETECTION MODES Zero, Coins or Custom have the same discrimination patterns as in STD Mode. In PRO Mode, however, the AT Pro utilizes its Pro Audio functions—including Proportional Audio and Tone Roll Audio—to offer more target information. The Pro Mode audio provides more target information and faster recovery speed for separating adjacent targets.
-
Page 17
In contrast, PRO Mode’s proportional audio provides a stronger signal for the shallow coin and a softer signal for the deeper coin. The actual profile, or signature, of the target’s response is heard, thereby providing more information. 16 Garrett Metal Detectors… -
Page 18
Adjacent Targets Comparison: Standard vs Pro Mode Adjacent targets These two adjacent coins would produce one strong signal while in STD Mode. In PRO Mode, the proportional audio provides two peaks of audio response to allow the user to identify multiple targets. AT Pro International™… -
Page 19: Tone Roll Audio (Pro Mode)
In PRO Mode, however, the bottle cap will produce a very distinctive response with multiple tones. As shown, the bottle cap will produce a distinctive response of Low-High-Low as compared to the coin’s response of only High tone. 18 Garrett Metal Detectors…
-
Page 20: Target Id Information
Pro will produce an audible target response for the pixels that are switched on, and no audible response for those that have been switched off. The Target ID Cursor will always indicate all targets. The discrimination pattern can be adjusted (as described in the «Discrimination» section). AT Pro International™…
-
Page 21: Digital Target Id
Digital Cursor Target The AT Pro’s Digital Target ID system provides a specific target value to help identify targets more precisely. Targets are identified on the LCD by number, with items near 1 being the most ferrous. The most conductive targets (such as thick silver) register closer to to 99.
-
Page 22: Tone Id
High/Bell Tone: Non-ferrous targets with medium to high conductivity, including most coins and jewelry. Note: PRO Mode produces a high tone; STD Mode produces a bell tone. AT Pro International™…
-
Page 23: Discrimination
ELIM Pushbutton Pushbutton The AT Pro has 12 pixels or «notches» of discrimination (in addition to the 40 points of High-Res Iron Discrimination). Any combination of these pixels can be switched on or off based upon your preference. There are two primary methods for modifying the Notch Discrimination Pattern to reject a specific type of trash or unwanted item.
-
Page 24
The AT Pro’s ELIM pushbutton can also be used to find specific metal items. For example, if an earring has been lost, scan the matching earring with the AT Pro while in the ZERO mode. Note where the Target ID cursor appears when the earring is scanned. -
Page 25: Iron Discrimination
The AT Pro is now programmed to find the missing earring based on the conductivity of its matching pair. Note: The notch discrimination function can be used to modify each Mode’s discrimination pattern. Notch Discrimination modifications made while in CUSTOM (either in Standard or Pro mode) will be retained when the detector is switched OFF.
-
Page 26
«mask» out the signal of an adjacent good target when too much iron discrimination has been applied. Using the AT Pro’s High-Res Iron Discrimination, apply just enough iron discrimination to reject the undesired iron nail shown in this example. By using only a minimal amount of… -
Page 27
Example: Detecting Targets in Trash with High-Res Iron Discrimination In the illustration above, the AT Pro is operating with an IRON DISC setting of 20. The nail seen in Illustration 1 (on page 25) registers from 10 to 25 on the Digital Target ID scale. -
Page 28: Iron Audio
Iron Audio also allows adjustment of the mid-tone’s range to include all targets above the iron discrimination setting. The user is adjusting the cut-off between low-tone iron targets and mid-tone targets to better distinguish good targets. AT Pro International™…
-
Page 29
When Iron Audio is on in the PRO Mode, iron target will not only be heard, but they will produce an even more distinctive response with multiple tones. For example, a nail will produce several fast low tones as the searchcoil passes over. A flat 28 Garrett Metal Detectors… -
Page 30
To fully appreciate the additional information offered by the Iron Audio feature, conduct the following experiment. Start with the AT Pro in Standard (STD) Zero Mode and pass the searchcoil over a bottle cap which is lying flat on the ground. -
Page 31: Sensitivity
Sensitivity Pushbutton Indicator The AT Pro has eight (8) settings for sensitivity. Use the (+) or (-) SENSITIVITy buttons to step through the eight levels, which are continuously shown on the LCD. Use higher sensitivity levels when searching for very small or very deep targets.
-
Page 32: Ground Balance
NOTCH DISC pushbuttons for Manual Ground Balance. Detector performance can be negatively affected by ground mineralization. The AT Pro can be ground balanced either automatically or manually to cancel unwanted ground signals and obtain maximum stability and target detection.
-
Page 33: Manual Ground Balance
80–99: Highly ferrous (magnetite, ferrous oxide minerals, black sands, hot rocks, terra cotta) 60–80: Moderately mineralized soils (red clay, brown clay, iron-bearing clay minerals, etc.) 20–60: Likely an iron object 0–20: Highly conductive, non-ferrous minerals such as saltwater 32 Garrett Metal Detectors…
-
Page 34: Frequency Adjustment
Use the PINPOINT/Freq Adj pushbutton in conjunction with the (+) or (-) SENSITIVITy pushbuttons to adjust frequency. The AT Pro is capable of operating at four slightly different frequencies in order to minimize the interference caused by electrical sources (e.g. power lines) or other metal detectors.
-
Page 35: Pinpointing
Indicates mount. The opening pinpointing just ahead of the stem center of the mount can serve as 28 x 22 cm DD your reference point searchcoil. for pinpointing. 34 Garrett Metal Detectors…
-
Page 36
PINPOINT Pushbutton (Press and hold to pinpoint) Traditional pinpointing technique using Pinpoint pushbutton. Note: For best pinpointing results, maintain a constant height above the ground (e.g. 2cm) and ensure that the detector is properly ground balanced. AT Pro International™… -
Page 37: Narrowing The Detection Area
Coin Depth Indicator—The depth of a coin, or similar sized target, is indicated in 5cm increments. Note: targets larger than a coin may display shallower than actual depth while targets smaller than a coin may display deeper than actual depth. 36 Garrett Metal Detectors…
-
Page 38: Alternative Pinpointing Methods
(see Image B). Deep targets will be under or just inside your searchcoil’s tip. This is because the conical shape of the searchcoil’s detection field begins bending in slightly as the depth increases. AT Pro International™…
-
Page 39
Tip: Practice any or all of these various pinpointing options in your test plot. Choose the technique that works best for you. As you improve your pinpointing accuracy, you will dig smaller holes and increase your productive hunting time. 38 Garrett Metal Detectors… -
Page 40: Hunting Tips
• Keep your searchcoil at a constant height of 2 to 3 cm above and parallel to the ground at all times for best detection results. Do not lift or tilt the coil at the end of swings. CORRECT SWING INCORRECT SWING AT Pro International™…
-
Page 41
Walk slowly to allow overlapping of the searchcoil Scan side to side approx. 1m per second. 40 Garrett Metal Detectors… -
Page 42
Continous Wave (VLF) metal detector. Saltwater is conductive and produces signals similar to foil. Although the AT Pro is not specifically designed for saltwater use, it can be used in this environment. The operator can expect stable operation in dry or moist sand and when the searchcoil is completely submerged. -
Page 43
Magnetic minerals such as hot rocks and terra cotta can mask the presence of good targets. In order to detect a good target, first ground balance the AT Pro to the terra cotta or hot rocks that are present. Be aware, however, that the combined Target ID might be very low (e.g. -
Page 44
• Isolating adjacent targets. The narrow detection field of the AT Pro’s DD searchcoil allows better separation of adjacent targets versus a similar size concentric searchcoil. Use narrow swings of the searchcoil in trashy areas to isolate good targets amongst the trash. -
Page 45: Bench Tests
BENCH TESTS you should conduct bench tests to become more familiar with the AT Pro’s operation in both Standard and PRO modes. In addition, the use of the Iron Audio feature should be tested in both Standard and PRO modes. Suggested test items should include: •…
-
Page 46
Discrimination bench test: A similar test procedure can be used to better understand how to set discrimination levels and the AT Pro’s advanced audio characteristics. Begin by testing the iron nail in the STD and PRO Modes with the ZERO discrimination pattern. Listen to the Low-Tone sound an iron object creates and note the Digital Target ID number it produces. -
Page 47
Final tip: Record the results of your bench tests and refer to them when hunting in the field. knowledge of the PRO Mode and the Iron Audio feature can reduce the amount of trash targets that are dug. 46 Garrett Metal Detectors… -
Page 48: Underwater Operation
For submersion, optional waterproof headphones (available from Garrett) must be used. Waterproof headphones (sold separately) must be used if the AT Pro is fully immersed in water. The standard land-use headphones included with the detector are not waterproof.
-
Page 49: Care And Maintenance
CARE AND MAINTENANCE Battery Level Indicator Battery Replacement—The AT Pro is operating with fresh or fully charged batteries when 4 illuminated bars on the Battery Level Indicator (see above) are displayed. The detector will maintain full performance until the batteries need to be replaced.
-
Page 50
Pull and remove the cap to slide battery holder out. Remove batteries when the AT Pro will be stored for longer than 30 days. The AT Pro is a rugged machine, designed for outdoor use in all environments. However, as with all electronic equipment, there are some simple ways to care for the detector to maintain its high performance. -
Page 51: Troubleshooting Guide
NOTE: Large, flat pieces of iron—depending on their orientation in the ground—can read as a good target or can cause erratic Target ID Cursor movement. Use Iron Audio feature to help identify iron targets. 50 Garrett Metal Detectors…
-
Page 52: Metal Detecting Code Of Ethics
• I will observe the Golden Rule, using good outdoor manners and conducting myself at all times in a manner which will add to the stature and public image of all people engaged in the field of metal detection. AT Pro International™…
-
Page 53: Cautions
• Use reasonable caution in digging toward any target, particularly in areas where you are uncertain of the ground conditions. • If you are unsure about using your metal detector in any area, always seek permission from the proper authorities. 52 Garrett Metal Detectors…
-
Page 54: Warranty / Service
Use of the AT Pro at submerged depths exceeding 3 meters will void this warranty. In the event you encounter problems with your AT Pro detector please read through this Owner’s Manual carefully to…
-
Page 55: Accessories
Use when searching for small, shallow targets or in trashy or tight places. 23 cm. PROformance Concentric Searchcoil— Part No. 2222600 Smaller and lighter than the AT Pro’s standard DD coil, this waterproof searchcoil offers excellent depth in less mineralized soils.
-
Page 56
Includes woven belt holster and 9-volt battery. To see Garrett’s complete collection of metal detector accessories, please visit www.garrett.com and view products within our Hobby Division. Additional searchcoils, recovery tools, headphones, carrying bags, searchcoil covers, Garrett caps and Garrett shirts are available for all detecting accessory needs. AT Pro International™… -
Page 57: Suggested Reading
Charles Garrett. Collect them all! This edition includes the author’s personal experiences of hunting in Europe, plus tips and techniques. 76 pages. PN 1546200 Author/master treasure hunter (Available in English language only) Visit RAM Books on www.garrett.com for future releases. 56 Garrett Metal Detectors…
-
Page 58
RAM BOOkS TITLES RAM Books, a division of Garrett Metal Detectors, publishes new titles each year related to treasure hunting, gold pros- pecting, coin hunting and relic recovery. European Metal Suggested Reading: Detecting Guide Highlights include: • Hundreds of full-color photographs •… -
Page 59
TO vIEW OTHER RAM BOOKS: Go to www.garrett.com and visit the Hobby Division. An order form is available on our site which can be printed and mailed with your requested titles and payment. 58 Garrett Metal Detectors… -
Page 60
1881 W. State Street Garland, Texas 75042 Toll Free: 800.527.4011 Tel: 972.494.6151 Fax: 972.494.1881 Email: sales@garrett.com © 2010 Garrett Electronics, Inc. PN 1533300.A.1010… -
Page 61
60 Garrett Metal Detectors…
Инструкции по эксплуатации
Условия гарантии Запчасти Инструкции FAQ Сервисный центр
| Garrett Axiom | Смотреть PDF | Скачать ZIP |
| Garrett GoldMaster 24K | Смотреть PDF | Скачать ZIP |
| Garrett ACE Apex | Смотреть PDF | Скачать ZIP |
| Garrett AT Max | Смотреть PDF | Скачать ZIP |
| Garrett AT Gold | Смотреть PDF | Скачать ZIP |
| Garrett AT Pro | Смотреть PDF | Скачать ZIP |
| Garrett ATX | Смотреть PDF | Скачать ZIP |
| Garrett ACE 200i | Смотреть PDF | Скачать ZIP |
| Garrett ACE 300i | Смотреть PDF | Скачать ZIP |
| Garrett ACE 400i | Смотреть PDF | Скачать ZIP |
| Garrett Euro ACE | Смотреть PDF | Скачать ZIP |
| Garrett ACE 250 | Смотреть PDF | Скачать ZIP |
| Garrett ACE 150 | Смотреть PDF | Скачать ZIP |
| Garrett GTI 2500 | Смотреть PDF | Скачать ZIP |
| Garrett Sea Hunter Mark II | Смотреть PDF | Скачать ZIP |
| Garrett Pro-Pointer AT Z-Lynk | Смотреть PDF | Скачать ZIP |
| Garrett Pro-Pointer AT | Смотреть PDF | Скачать ZIP |
| Garrett Pro-Pointer II | Смотреть PDF | Скачать ZIP |
| Garrett Infinium LS | Смотреть PDF | Скачать ZIP |
| Garrett GTP 1350 | Смотреть PDF | Скачать ZIP |
| Garrett Master Hunter CX Plus | Смотреть PDF | Скачать ZIP |
| Garrett Scorpion Gold Stinger | Смотреть PDF | Скачать ZIP |
| Garrett GTAx 550 | Смотреть PDF | Скачать ZIP |
| Garrett MS-3 | Смотреть PDF | Скачать ZIP |
МИРОВОЙ ЛИДЕР В ТЕХНОЛОГИИ ОБНАРУЖЕНИЯ МЕТАЛЛОВ
vk.com

Купить Garrett
Почему Garrett
Каталог
Где купить
Контроль подлинности
Публикации
Новинки
Сотрудничество
Стать дилером
О Garrett
Направления деятельности
Для дилеров
Розничные цены
Техподдержка
Инструкции по эксплуатации
Контроль подлинности
Частые вопросы
Условия гарантии
Покупка/замена запчастей
Сервисный центр
РЕЙКОМ ГРУПП
Официальный дистрибьютор
Официальный магазин
Контакты
Вакансии
2021 © Garrett Metal Detectors | При использовании материалов ссылка на сайт обязательна. Все права защищены.
Металлоискатель GARRETT AT PRO открывает для Вас абсолютно новые возможности в поиске. Профессиональный металлоискатель GARRETT AT PRO создан для того, чтобы в равной степени быть полезным как при любых наземных поисковых экспедициях, так и при подводном поиске в пресноводных и соленых водоемах (при глубине погружения до 3 метров).
В арсенале поисковика тут целых 6 предустановленных программ поиска с возможностью их корректировки, включая и пользовательский режим. Все программы адаптированы для российских условий и целей.
Шкала дискриминации детектора разбита на 20 сегментов, что позволяет прецизионно настраивать детектор на прием нужных и на отсечение ненужных металлических целей.
Металлодетектор GARRETT AT PRO безошибочно определяет тип цели и материал, из которого она сделана, сигнализируя оператору меткой на шкале дискриминации, многотональным звуковым откликом и, что особенно важно, с помощью цифрового идентификатора цели.
Инновационная катушка 8,5″ x 11″ DD PROformance прекрасно зарекомендовала себя на российских просторах и в подводном поиске. Датчик необычной формы создан специально с той целью, чтобы позволять быстро вести глубинную разведку на больших пространствах и заниматься «ловлей блох» на локальных участках, в том числе и на площадках, где в земле помимо полезных целей встречается много мусора. Катушка не создает ложных сигналов, прекрасно справляется с очень мелкими целями, а также с металлическими артефактами сложной формы, с монетами, лежащими в земле под наклоном или и вовсе – на ребре.
Катушка 8,5″ x 11″ DD PROformance полностью защищена от износа корпусом из прочной ударопрочной пластмассы и не требует дополнительной защиты даже при самом интенсивном и долголетнем графике эксплуатации.
Старинные монеты (в том числе и средневековая серебряная и медная чешуя), золото и серебро пляжей, раритеты средневековья, военные артефакты и конечно клады станут Вашими, если Вы решите купить GARRETT AT PRO!
В стандартном комплекте поставки Вы получите не только комплект батарей, но и фирменные (не подводные) наушники!