Раздел: Музыкальное Оборудование
Тип: Синтезатор
Характеристики, спецификации
Тип инструмента:
синтезатор
Размер клавиш:
полноразмерные
Чувствительность клавиатуры:
есть
Разделение клавиатуры:
есть
Встроенная акустическая система:
есть
Мощность встроенного усилителя:
2×2.5 Вт
Размеры (ШxВxГ):
945x369x132 мм
Количество стилей автоаккомпанемента:
106
Функция «Реверберация»:
есть
Количество записываемых песен:
5, до 2 треков в каждой
Количество выходов на наушники:
1
Разъемы MIDI:
вход и выход
Питание от источников питания:
есть
Инструкция к Синтезатору Yamaha PSR-E323
DIGITAL KEYBOARD
Owner’s Manual
Bedienungsanleitung
Mode d’emploi
Manual de instrucciones
Руководство пользователя
EnglishDeutschFrançaisEspañol
How to use this manual
Before using the PSR-E323/YPT-320, be sure to read the “PRECAUTIONS” section on pages 4–5. Follow the instructions described in
“Setting Up,” then try out the simple operations in “Quick Guide.” “Reference” provides detailed descriptions and procedures for getting
the most out of the instrument. After you’ve read the manual, keep it safe and handy for future reference.
Data List
The Data List contains MIDI related information. The Data List is available for downloading from the Yamaha Manual Library at:
http://www.yamaha.co.jp/manual/
So verwenden Sie dieses Handbuch
Achten Sie darauf, vor Einsatz des PSR-E323/YPT-320 die „VORSICHTSMASSNAHMEN“ auf Seite 4-5 durchzulesen.
Folgen Sie den im Abschnitt „Spielvorbereitungen“ beschriebenen Anweisungen, und probieren Sie dann die im „Quick Guide“
beschriebenen einfachen Bedienvorgänge aus. Der Abschnitt „Referenz“ enthält ausführliche Beschreibungen und Vorgehensweisen,
um das Instrument bestmöglich einzusetzen. Bewahren Sie das Handbuch nach der Lektüre leicht erreichbar an einem sicheren Ort auf,
um später darin nachschlagen zu können.
Datenliste
Die Datenliste enthält Informationen über MIDI. Die Datenliste kann von der Yamaha Manual Library heruntergeladen werden unter:
http://www.yamaha.co.jp/manual/
Comment utiliser ce mode d’emploi
Avant d’utiliser le PSR-E323/YPT-320, veuillez lire attentivement la section « PRÉCAUTIONS D’USAGE » aux pages 4-5. Suivez les
instructions de la section « Configuration », puis testez les opérations simples décrites dans la section « Guide de référence rapide ».
La section « Référence » propose des descriptions et des procédures détaillées qui vous permettront de tirer le meilleur parti de
l’instrument. Après avoir lu le mode d’emploi, conservez-le à portée de main afin de pouvoir le consulter ultérieurement.
Liste des données
La liste des données contient les informations liées à la norme MIDI. Elle est téléchargeable depuis la bibliothèque Yamaha Manual
Library, à l’adresse suivante : http://www.yamaha.co.jp/manual/
Cómo utilizar el manual
Antes de utilizar el PSR-E323/YPT-320, lea las “Precauciones” que debe tener en cuenta en las páginas 4 y 5. Siga las instrucciones de
la sección «Instalación» y realice a continuación las operaciones de la sección «Guía rápida». La sección “Referencia” ofrece
descripciones detalladas y procedimientos para aprovechar al máximo las capacidades del instrumento. Asimismo, después de leerlo,
guarde el manual en un lugar seguro y a mano para poder consultarlo posteriormente.
Lista de datos
La Lista de datos incluye información sobre MIDI. La Lista de datos puede descargarse de la Biblioteca de manuales de Yamaha,
en http://www.yamaha.co.jp/manual/
EN
DE
FR
ES
Русский
RU
Information for Users on Collection and Disposal
of Old Equipment and used Batteries
These symbols on the products, packaging, and/or accompanying documents mean that used electrical and electronic products and
batteries should not be mixed with general household waste.
For proper treatment, recovery and recycling of old products and used batteries, please take them to applicable collection points, in
accordance with your national legislation and the Directives 2002/96/EC and 2006/66/EC.
By disposing of these products and batteries correctly, you will help to save valuable resources and prevent any potential negative effects
on human health and the environment which could otherwise arise from inappropriate waste handling.
For more information about collection and recycling of old products and batteries, please contact your local municipality, your waste
disposal service or the point of sale where you purchased the items.
[For business users in the European Union]
If you wish to discard electrical and electronic equipment, please contact your dealer or supplier for further information.
[Information on Disposal in other Countries outside the European Union]
These symbols are only valid in the European Union. If you wish to discard these items, please contact your local authorities or dealer and
ask for the correct method of disposal.
Note for the battery symbol (bottom two symbol examples):
This symbol might be used in combination with a chemical symbol. In this case it complies with the requirement set by the Directive for the
chemical involved.
Verbraucherinformation zur Sammlung und Entsorgung alter Elektrogeräte und benutzter Batterien
Befinden sich diese Symbole auf den Produkten, der Verpackung und/oder beiliegenden Unterlagen, so sollten benutzte elektrische Geräte und
Batterien nicht mit dem normalen Haushaltsabfall entsorgt werden.
In Übereinstimmung mit Ihren nationalen Bestimmungen und den Richtlinien 2002/96/EC und 2006/66/EC, bringen Sie alte Geräte und benutzte
Batterien bitte zur fachgerechten Entsorgung, Wiederaufbereitung und Wiederverwendung zu den entsprechenden Sammelstellen.
Durch die fachgerechte Entsorgung der Elektrogeräte und Batterien helfen Sie, wertvolle Ressourcen zu schützen und verhindern mögliche
negative Auswirkungen auf die menschliche Gesundheit und die Umwelt, die ander nfalls durch unsachgerechte Müllentsorgung auftreten
könnten.
Für weitere Informationen zum Sammeln und Wiederaufbereiten alter Elektrogeräte und Batterien, kontaktieren Sie bitte Ihre örtliche Stadt- oder
Gemeindeverwaltung, Ihren Abfallentsorgungsdienst oder die Verkaufsstelle der Artikel.
[Information für geschäftliche Anwender in der Europäischen Union]
Wenn Sie Elektrogeräte ausrangieren möchten, kontaktieren Sie bitte Ihren Händler oder Zulieferer für weitere Informationen.
[Entsorgungsinformation für Länder außerhalb der Europäischen Union]
Diese Symbole gelten nur innerhalb der Europäischen Union. Wenn Sie solche Artikel ausrangieren möchten, kontaktieren Sie bitte Ihre
örtlichen Behörden oder Ihren Händler und fragen Sie nach der sachgerechten Entsorgungsmethode.
Anmerkung zum Batteriesymbol (untere zwei Symbolbeispiele):
Dieses Symbol kann auch in Kombination mit einem chemischen Symbol verwendet werden. In diesem Fall entspricht dies den
Anforderungen der Direktive zur Verwendung chemischer Stoffe.
Information concernant la Collecte et le Traitement des piles usagées et des déchets
d’équipements électriques et électroniques
Les symboles sur les produits, l’emballage et/ou les documents joints signifient que les produits électriques ou électroniques usagés ainsi
que les piles ne doivent pas être mélangés avec les déchets domestiques habituels.
Pour un traitement, une récupération et un recyclage appropriés des déchets d’équipements électriques et électroniques et des piles
usagées, veuillez les déposer aux points de collecte prévus à cet effet, conformément à la réglementation nationale et aux Directives 2002/
96/EC et 2006/66/EC.
En vous débarrassant correctement des déchets d’équipements électriques et électroniques et des piles usagées, vous contribuerez à la
sauvegarde de précieuses ressources et à la prévention de potentiels effets négatifs sur la santé humaine qui pourraient advenir lors d’un
traitement inapproprié des déchets.
Pour plus d’informations à propos de la collecte et du recyclage des déchets d’équipements électriques et électroniques et des piles usagées,
veuillez contacter votre municipalité, votre service de traitement des déchets ou le point de vente où vous avez acheté les produits.
[Pour les professionnels dans l’Union Européenne]
Si vous souhaitez vous débarrasser des déchets d’équipements électriques et électroniques veuillez contacter votre vendeur ou
fournisseur pour plus d’informations.
[Information sur le traitement dans d’autres pays en dehors de l’Union Européenne]
Ces symboles sont seulement valables dans l’Union Européenne. Si vous souhaitez vous débarrasser de déchets d’équipements
électriques et électroniques ou de piles usagées, veuillez contacter les autorités locales ou votre fournisseur et demander la méthode de
traitement appropriée.
Note pour le symbole «pile» (deux exemples de symbole ci-dessous):
Ce symbole peut être utilisé en combinaison avec un symbole chimique. Dans ce cas il respecte les exigences établies par la Directive
pour le produit chimique en question.
Información para Usuarios sobre Recolección y Disposición
de Equipamiento Viejo y Baterías usadas
Estos símbolos en los productos, embalaje, y/o documentación que se acompañe significan que los productos electrónicos y eléctricos
usados y las baterías usadas no deben ser mezclados con desechos hogareños corrientes.
Para el tratamiento, recuperación y reciclado apropiado de los productos viejos y las baterías usadas, por favor llévelos a puntos de
recolección aplicables, de acuerdo a su legislación nacional y las directivas 2002/96/EC y 2006/66/EC.
Al disponer de estos productos y baterías correctamente, ayudará a ahorrar recursos valiosos y a prevenir cualquier potencial efecto
negativo sobre la salud humana y el medio ambiente, el cual podría surgir de un inapropiado manejo de los desechos.
Para mayor información sobre recolección y reciclado de productos viejos y baterías, por favor contacte a su municipio local, su servicio
de gestión de residuos o el punto de venta en el cual usted adquirió los artículos.
[Para usuarios de negocios en la Unión Europea]
Si usted desea deshacerse de equipamiento eléctrico y electrónico, por favor contacte a su vendedor o proveedor para mayor
información.
[Información sobre la Disposición en otros países fuera de la Unión Europea]
Estos símbolos sólo son válidos en la Unión Europea. Si desea deshacerse de estos artículos, por favor contacte a sus autoridades locales
y pregunte por el método correcto de disposición.
Nota sobre el símbolo de la batería (ejemplos de dos símbolos de la parte inferior):
Este símbolo podría ser utilizado en combinación con un símbolo químico. En este caso el mismo obedece a un requerimiento dispuesto
por la Directiva para el elemento químico involucrado.
2 PSR-E323/YPT-320
Owner’s Manual / Bedienungsanleitung / Mode d’emploi / Manual de instrucciones / Руководство пользователя
The serial number of this product may be found on the
Die Seriennummer dieses Produkts befindet sich an der
bottom of the unit. You should note this serial number in
Unterseite des Geräts. Sie sollten die Nummer des Mod-
the space provided below and retain this manual as a
ells, die Seriennummer und das Kaufdatum an den
permanent record of your purchase to aid identification
unten vorgesehenen Stellen eintragen und diese Anlei-
in the event of theft.
tung als Dokument Ihres Kaufs aufbewahren.
Model No.
Modellnr.
Serial No.
Seriennr.
(bottom)
(bottom)
Vous pouvez trouver le numéro de série de ce produit
El número de serie de este producto se encuentra en la
sur le bas de l’unité. Notez ce numéro de série dans
parte inferior de la unidad. Debe tomar nota del número de
l’espace fourni ci-dessous et conservez ce manuel en
serie en el espacio proporcionado a continuación y conser-
tant que preuve permanente de votre achat afin de facil-
var este manual como registro permanente de su adqui-
iter l’identification du produit en cas de vol.
sición; todo ello facilitará la identificación en caso de robo.
N˚ de modèle
Modelo nº
N˚ de série
Serie nº
(bottom)
(bottom)
ерийный номер данного продукта приведен на нижней части
OBSERVERA!
устройства. апишите этот серийный номер в данном пустом
Apparaten kopplas inte ur växelströmskällan
поле и сохраните данное руководство как подтверждение
(nätet) så länge som den ar ansluten till väggut-
покупки; это поможет идентифицировать принадлежность
taget, även om själva apparaten har stängts av.
устройства в случае кражи.
омер модели
ADVARSEL: Netspæendingen til dette apparat er
IKKE afbrudt, sålænge netledningen sidder i en
stikkontakt, som er tændt — også selvom der er sluk-
ерийный номер
ket på apparatets afbryder.
VAROITUS: Laitteen toisiopiiriin kytketty käyttökyt-
(bottom)
kin ei irroita koko laitetta verkosta.
(standby)
IMPORTANT NOTICE FOR THE UNITED KINGDOM
Connecting the Plug and Cord
IMPORTANT. The wires in this mains lead are coloured in
accordance with the following code:
BLUE : NEUTRAL
BROWN : LIVE
As the colours of the wires in the mains lead of this appara-
tus may not correspond with the coloured makings identify-
ing the terminals in your plug proceed as follows:
The wire which is coloured BLUE must be connected to the
terminal which is marked with the letter N or coloured BLACK.
The wire which is coloured BROWN must be connected to the
terminal which is marked with the letter L or coloured RED.
Making sure that neither core is connected to the earth ter-
minal of the three pin plug.
• This applies only to products distributed by Yamaha Music U.K. Ltd. (2 wires)
Entsorgung leerer Batterien (nur innerhalb Deutschlands)
Leisten Sie einen Beitrag zum Umweltschutz. Verbrauchte Batterien
oder Akkumulatoren dürfen nicht in den Hausmüll. Sie können bei
einer Sammelstelle für Altbatterien bzw. Sondermüll abgegeben wer-
den. Informieren Sie sich bei Ihrer Kommune.
(battery)
PSR-E323/YPT-320
Owner’s Manual / Bedienungsanleitung / Mode d’emploi / Manual de instrucciones / Руководство пользователя
3
èêÄÇàãÄ íÖïçàäà ÅÖáéèÄëçéëíà
ÇçàåÄíÖãúçé èêéóàíÄâíÖ, èêÖÜÑÖ óÖå èêàëíìèÄíú ä ùäëèãìÄíÄñàà
* ï‡ÌËÚ ˝ÚÓ ÛÍÓ‚Ó‰ÒÚ‚Ó ‚ ·ÂÁÓÔ‡ÒÌÓÏ ÏÂÒÚÂ. éÌÓ ‚‡Ï ¢ ÔÓ̇‰Ó·ËÚÒfl.
èêÖÑìèêÖÜÑÖçàÖ
ÇÓ ËÁ·ÂʇÌË Ò¸ÂÁÌ˚ı Ú‡‚Ï Ë ‰‡Ê ÒÏÂÚË ÓÚ Û‰‡‡ ˝ÎÂÍÚ˘ÂÒÍËÏ ÚÓÍÓÏ, ‡ Ú‡ÍÊ ÍÓÓÚÍÓ„Ó Á‡Ï˚͇ÌËfl,
ÔÓ‚ÂʉÂÌËfl Ó·ÓÛ‰Ó‚‡ÌËfl, ÔÓʇ‡ Ë ‰Û„Ëı Ë̈ˉÂÌÚÓ‚ ‚Ò„‰‡ Òӷ≇ÈÚ ÒÎÂ‰Û˛˘Ë ÏÂ˚ ·ÂÁÓÔ‡ÒÌÓÒÚË:
àÒÚÓ˜ÌËÍ ÔËÚ‡ÌËfl/‡‰‡ÔÚ ÔÂÂÏÂÌÌÓ„Ó ÚÓ͇
ظ ÓÚ ‚Ó‰˚
• Используйте только напряжение, заданное для инструмента.
• Берегите инструмент от дождя, не используйте его рядом с водой,
Это напряжение указано на инструменте.
в условиях сырости и повышенной влажности; не ставьте на него емкости с
• Используйте только указанный адаптер (PA-3C или аналогичный,
жидкостью, которая может разлиться и попасть внутрь.
рекомендованный корпорацией Yamaha). Использование неправильного
В случае попадания жидкости, например воды, в инструмент немедленно
адаптера может привести к повреждению или перегреву инструмента.
отключите питание и отсоедините кабель питания от электросети. Затем
• Периодически проверяйте вилку электроинструмента и удаляйте с нее грязь
обратитесь за помощью к квалифицированным специалистам центра
и пыль.
технического обслуживания корпорации Yamaha.
• Шнур адаптера переменного тока не должен находиться рядом с
• Никогда не вставляйте и не вынимайте вилку электроинструмента
источниками тепла (нагревателями, радиаторами и др.). Не допускайте также
мокрыми руками.
чрезмерного сгибания и повреждения шнура, не ставьте на него тяжелые
предметы и держите его в таком месте, где на него нельзя наступить, задеть
ظ ÓÚ Ó„Ìfl
ногой или что-нибудь по нему перекатить.
• Не ставьте на инструмент горящие предметы, например свечи.
Горящий предмет может упасть и вызвать пожар.
ç ÓÚÍ˚‚‡Ú¸
• Не открывайте инструмент и не пытайтесь разобрать или модифицировать
Ç̯ڇÚÌ˚ ÒËÚÛ‡ˆËË
его внутренние компоненты. В инструменте нет компонентов, которые
должен обслуживать пользователь. При появлении неисправности
• В случае износа и повреждения шнура или вилки адаптера переменного
немедленно прекратите эксплуатацию и обратитесь за помощью к
тока, а также при внезапном исчезновении звука во время эксплуатации,
квалифицированным специалистам центра технического обслуживания
при появлении необычного запаха и дыма немедленно отключите
корпорации Yamaha.
электропитание, выньте вилку адаптера из розетки и обратитесь за помощью
к специалистам центра технического обслуживания корпорации Yamaha.
ÇçàåÄçàÖ
ÇÓ ËÁ·ÂʇÌË ̇ÌÂÒÂÌËfl Ò¸ÂÁÌ˚ı Ú‡‚Ï ÒÂ·Â Ë ÓÍÛʇ˛˘ËÏ, ‡ Ú‡ÍÊ ÔÓ‚ÂʉÂÌËfl ËÌÒÚÛÏÂÌÚ‡
Ë ‰Û„Ó„Ó ËÏÛ˘ÂÒÚ‚‡, ÔÓÏËÏÓ ÔÓ˜Ëı, ‚Ò„‰‡ Òӷ≇ÈÚ ÒÎÂ‰Û˛˘Ë ÏÂ˚ ·ÂÁÓÔ‡ÒÌÓÒÚË:
àÒÚÓ˜ÌËÍ ÔËÚ‡ÌËfl/‡‰‡ÔÚ ÔÂÂÏÂÌÌÓ„Ó ÚÓ͇
åÂÒÚÓ ÛÒÚ‡ÌÓ‚ÍË
• При отключении кабеля от инструмента или от электросети беритесь за вилку,
• Во избежание деформации панели и повреждения внутренних компонентов
а не за кабель.
берегите инструмент от чрезмерной пыли и сильной вибрации
и не
• Когда инструмент не используется, а также во время грозы отключайте
используйте его при очень высокой или низкой температуре (напри
мер,
адаптер переменного тока.
на солнце, рядом с нагревателем или в машине в дневное время).
• Не подключайте инструмент к одной электрической розетке с другими
• Не используйте инструмент в непосредственной близости от телевизора,
устройствами (например, через тройник). Это может привести к снижению
радиоприемника, стереооборудования, мобильного телефона и других
качества звука или перегреву розетки.
электроприборов. В противном случае в инструменте, телевизоре или
радиоприемнике могут возникнуть помехи.
• Во избежание случайного падения инструмента не оставляйте его в
ŇڇÂfl
неустойчивом положении.
• Всегда проверяйте, что батареи вставлены правильно в соответствии с
• Перед перемещением инструмента отсоедините подключенный к нему
полярностью +/-. Несоблюдение этого правила может привести к перегреву,
адаптер и другие кабели.
пожару или протеканию батарей.
• Перед настройкой изделия убедитесь, что используемая электророзетка
• Всегда заменяйте одновременно все батареи. Не используйте новые
легко доступна. В случае возникновения какихлибо неполадок немедленно
батареи вместе со старыми. Не используйте батареи разных типов,
выключите инструмент и отключите его от электросети. Даже если питание
например щелочные вместе с марганцевыми, батареи разных
выключено, изделие продолжает потреблять электроэнергию в минимальном
производителей или разные типы батарей одного производителя, так как это
количестве. Если изделие не используется в течение длительного времени,
может привести к перегреву, пожару или протеканию батарей.
отключите шнур питания от электросети.
• Не держите батареи близко к огню.
• Используйте только подставку, специально предназначенную для
• Не пытайтесь перезарядить батареи, не предназначенные для перезарядки.
инструмента
. Для крепления стойки или подставки используй
те только винты,
• Если батареи разрядились или инструмент не будет использоваться
поставляемые в комплекте. В противном случае возможно повреждение
длительное время, во избежания протекания батарей, удалите их из
внутренних компонентов и падение инструмента.
инструмента.
• Не давайте батареи детям.
èÓ‰Íβ˜ÂÌËÂ
• Если батареи протекли, избегайте контакта с вытекшей жидкостью.
В случае попадания этой жидкости в глаза, рот или на кожу, немедлен
но
• Перед подключением инструмента к другим электронным компонентам
промойте их водой и обратитесь к врачу. Жидкость, используемая
отключите их питание. Перед включением или отключением электронных
в батареях, – это едкое вещество, способное вызвать потерю зрения или
компонентов установите минимальный уровень громкости. Убедитесь также
химические ожоги.
в том, что на всех компонентах установлен минимальный уровень
громкости, а во время игры на инструменте постепенно увеличьте
громкость до нужной.
(4)-13 1/2
4 Руководство пользователя PSR-E323/YPT-320
• Не облокачивайтесь на инструмент, не ставьте на него тяжелые предметы и
é·ÒÎÛÊË‚‡ÌËÂ
не прикладывайте слишком большой силы при пользовании кнопками,
• Для чистки инструмента пользуйтесь мягкой сухой тканью. Никогда не
выключателями и разъемами.
используйте пятновыводители, растворители, жидкие очистители или
• Не следует долго работать с высоким или некомфортным уровнем громкости
чистящие салфетки с пропиткой.
инструмента/устройства или наушников, так как это может привести к
потере слуха. При ухудшении слуха или звоне в ушах обратитесь к врачу.
åÂ˚ ·ÂÁÓÔ‡ÒÌÓÒÚË ÔË ˝ÍÒÔÎÛ‡Ú‡ˆËË
ëÓı‡ÌÂÌË ‰‡ÌÌ˚ı
• Не вставляйте пальцы или руки в отверстия инструмента.
• Никогда не вставляйте и не роняйте бумажные, металлические и прочие
Сохранение и резервное копирование данных
предметы в отверстия на панели и клавиатуре. Если это случилось,
• Некоторые элементы данных (см. стр. 41) автоматически сохраняются в
немедленно выключите инструмент и выньте кабель питания из розетки.
качестве резервной копии данных во внутренней памяти даже при
Затем обратитесь за помощью к специалистам центра технического
выключении питания.
обслуживания корпорации Yamaha.
• Не кладите на инструмент предметы из винила, пластмассы или резины: это
Возможна потеря сохраненных данных из-за неисправности или
может вызвать выцветание панели или клавиатуры.
неправильной работы инструмента. Сохраните важные данные на внешнее
устройство, например компьютер.
Корпорация Yamaha не несет ответственности за повреждения, вызванные неправильной эксплуатацией или модификацией инструмента,
а также за потерянные или испорченные данные.
Всегда выключайте инструмент, если не используете его.
При использовании адаптера переменного тока, даже если выключатель питания находится в состоянии STANDBY, инструмент продолжает потреблять
электроэнергию на минимальном уровне. Если инструмент не используется длительное время, отключите адаптер переменного тока от розетки.
Утилизируйте использованные батареи в соответствии с правилами, принятыми в вашем регионе.
Иллюстрации и снимки ЖК-дисплеев приведены в данном руководстве только в качестве примеров. В действительности все может выглядеть
несколько иначе.
● УВЕДОМЛЕНИЕ ОБ АВТОРСКИХ ПРАВАХ
Этот продукт включает компьютерные программы и содержимое, авторские права на которые принадлежат корпорации Yamaha или право на
использование которых получено по лицензии от других фирм. К материалам, защищенным авторскими правами, относятся все без
ограничения компьютерные программы, файлы стиля, файлы MIDI, данные WAVE и музыкальные звукозаписи. Любое несанкционированное
использование таких программ и содержимого, выходящее за рамки личного пользования, запрещено соответствующими законами. Любое
нарушение авторских прав преследуется по закону. НЕ СОЗДАВАЙТЕ, НЕ РАСПРОСТРАНЯЙТЕ И НЕ ИСПОЛЬЗУЙТЕ НЕЗАКОННЫЕ КОПИИ.
Копирование коммерческих музыкальных данных, включая MIDI-данные и/или аудиоданные, но не ограничиваясь ими, строго запрещается,
за исключением использования в личных целях.
● Товарные знаки
®
• Windows является товарным знаком корпорации Microsoft
, зарегистрированным в А и других странах.
• азвания фирм и продуктов, используемые в данном руководстве, являются товарными знаками или зарегистрированными товарными знаками
соответствующих компаний.
Форматы и функции
GM System Level 1. «GM System Level 1» – это дополнение к MIDI-стандарту, благодаря которому любые
GM-совместимые музыкальные данные могут быть точно воспроизведены любым GM-совместимым тон-генератором
независимо от фирмы-изготовителя. юбое программное и аппаратное обеспечение, поддерживающее стандарт GM System
Level, помечено маркировкой GM.
XGlite. «XGlite» – это упрощенная версия формата высококачественных тон-генераторов XG корпорации Yamaha.
азумеется, с помощью тон-генератора XGlite можно воспроизвести любую мелодию в формате XG. Однако имейте в виду,
что из-за сокращенного набора параметров управления и эффектов некоторые композиции могут воспроизводиться не так,
как в оригинальном варианте.
Style File. ормат SFF (Style File Format – формат файла стиля) был разработан с учетом всех достижений
корпорации Yamaha в области автоаккомпанемента.
Stereo Sampled Piano. инструменте есть особый тембр, Portable Grand Piano, созданный на основе достижений
технологии стереосэмплирования и с помощью тон-генератора AWM (Advanced Wave Memory) корпорации Yamaha.
Yamaha Education Suite 5. нструмент включает новый набор обучающих средств (Yamaha Education Suite).
лагодаря использованию новейших технологий разучивание музыкальных произведений становится как никогда
интересным и плодотворным!
Чувствительность к силе нажатия. сключительно естественная функция Touch Response
(увствительность к силе нажатия) с удобным переключателем на передней панели обеспечивает максимальный контроль
за тембрами.
Поставляемые принадлежности
комплект поставки PSR-E323/YPT-320 входят указанные ниже принадлежности. роверьте их наличие.
• Пюпитр
• Регистрационная карта пользователя «My Yamaha
• Руководство пользователя (настоящее руководство)
Product User Registration»
• Блок питания переменного тока (PA-3C или
* Идентификатор PRODUCT ID, указанный на листе, потребуется при
равноценный, рекомендованный к применению
заполнении регистрационной формы пользователя.
корпорацией Yamaha)
* Может не входить в комплект поставки для вашего региона.
Свяжитесь с региональным дилером Yamaha.
(4)-13 2/2
Руководство пользователя
PSR-E323/YPT-320 5
Возможности инструмента
PSR-E323/YPT-320
Игра на клавиатуре
Изменение тембров >стр. 12, 13
ембр инструмента, звучащий во время игры на клавиатуре, можно заменить на тембр скрипки,
флейты, арфы или любой другой из обширного набора тембров. ожно также восстановить
параметры фотрепьяно простым нажатием кнопки.
Добавление реверберации звука >стр 43
Эффекты реверберации добавляют теплую атмосферу звучания, имитирующую сложные отражения
звука в реальных концертных помещениях, таких как концертные залы или небольшие клубы.
Игра со стилями >стр. 18
ожно выбирать из 100 различных стилей (автоаккомпанемент) для игры на клавиатуре – они
позволяют создать полное оркестровое звучание во множестве стилей от вальса до электронной
музыки 8-бит и евро-транса … и многое другое.
Воспроизведение из музыкальной базы данных >стр. 36
ростой выбор любимого стиля, такого как рок или джаз, из музыкальной базы данных приводит к
установке соответствующего тембра и стилей, соответствующих выбранному стилю.
Упражнения
Упражнения и разучивание композиций >стр. 28, 31, 35
ожно упражняться в проигрывании встроенных композиций с помощью следующих функций урока:
«люч к успеху» (стр. 28), «рослушивание, ритмика, ожидание» (стр. 31) и «овтор фразы» (стр. 35).
«люч к успеху» помогает познакомиться с игрой конкретной композиции, тогда как «рослушивание,
ритмика, ожидание» помогает научиться играть правильные ноты в правильном ритме. наконец,
«овтор фразы» позволяет многократно проигрывать определенную фразу композиции. «люч к
успеху» идеально подходит для пользователей, которые впервые используют клавишный инструмент.
Прослушивание
Прослушивание композиции >стр. 16
нструмент содержит широкий ряд из 102 встроенных композиций.
Запись
Запись собственного исполнения >стр. 37
ожно записать до пяти образцов собственного исполнения в виде композиций пользователя.
6 Руководство пользователя PSR-E323/YPT-320
Содержание
Форматы и функции …………………………………………………5
Настройки тембра 42
Поставляемые принадлежности……………………………….. 5
Добавление эффекта гармонизации ……………………….42
Добавление эффекта реверберации……………………….43
Добавление эффекта Chorus …………………………………..43
Установка
Добавление эффекта Panel Sustain…………………………44
Чувствительность к силе нажатия…………………………….44
Установка 8
Одновременная игра двумя тембрами – режим
Требования к электропитанию ………………………………… 8
совмещения тембров …………………………………………45
Подключение аудиоустройств – наушников
Воспроизведение разных тембров для правой и
и внешнего оборудования ……………………………………9
левой рук – режим разделения……………………………46
Подключение педального переключателя…………………. 9
Установка точки разделения клавиатуры…………………47
Включение питания…………………………………………………. 9
Регулировка громкости тембра ………………………………47
Пюпитр…………………………………………………………………….9
Настройка числа долей в такте и длины каждой доли… 48
Снятие защитной пленки ………………………………………….9
Настройка громкости метронома……………………………48
Октава ……………………………………………………………………49
Панель управления и разъемы 10
Транспонирование…………………………………………………49
Передняя панель…………………………………………………….10
Настройка высоты звука…………………………………………50
Задняя панель ………………………………………………………..10
Функция настройки одним нажатием………………………50
Настройки композиций 51
Краткое руководство
Отключение звука …………………………………………………..51
Повтор от A до B ……………………………………………………..51
Громкость композиции …………………………………………..52
Изменение тембров 12
Запуск кнопкой «Tap» (Темп) …………………………………..52
Попробуйте воспроизвести разные
Изменение тембра мелодии …………………………………..52
инструментальные тембры………………………………….12
Игра в тембре рояля ………………………………………………13
Функции стиля (автоаккомпанемент) 53
Использование метронома …………………………………….14
Начало воспроизведения стиля ………………………………53
Игра в тембре набора ударных ………………………………15
Настройка громкости стиля …………………………………….53
Поиск аккордов в словаре………………………………………54
Воспроизведение композиций 16
Использование файлов стиля ………………………………….55
Выбор и прослушивание конкретной композиции ….16
Настройки функций 56
Выберите параметр и измените значение ……………..56
Игра со стилем 18
MIDI-интерфейс 58
Игра со стилями……………………………………………………..19
Изменение темпа стиля………………………………………….22
Что такое MIDI? ………………………………………………………58
Вариация фразы (разделы) …………………………………….23
Передача исполнительских данных на другой
инструмент и обратно …………………………………………58
Игра аккордов вместе с отображением
партитуры композиции ……………………………………….24
Передача данных между PSR-E323/YPT-320 и
компьютером ……………………………………………………..60
Аккорды………………………………………………………………….25
Приложение
Справочник
Основные операции и экраны 26
Устранение неполадок ……………………………………………… 63
Основные операции……………………………………………….26
Предметный указатель …………………………………………….. 64
Экран……………………………………………………………………..27
Список тембров ……………………………………………………….. 66
Разучивание композиций 28
Максимальная полифония………………………………………66
Ключ к успеху …………………………………………………………28
Список наборов ударных …………………………………………. 72
Прослушивание, ритмика, ожидание ………………………31
Список стилей ………………………………………………………….. 75
Повтор фразы…………………………………………………………35
Список готовых наборов стилей ………………………………. 76
Воспроизведение из музыкальной базы данных 36
Список композиций …………………………………………………. 77
Список типов эффектов……………………………………………. 79
Запись собственного исполнения 37
Технические характеристики …………………………………… 81
Запись на заданную дорожку ………………………………….38
Инициализация 41
Инициализация ………………………………………………………41
Руководство пользователя PSR-E323/YPT-320 7
Установка
Установка
Обязательно выполните указанные ниже операции ДО включения питания.
Требования к электропитанию
отя инструмент может работать как от дополнительного адаптера переменного тока, так и от батарей,
корпорация Yamaha рекомендует по возможности использовать адаптер переменного тока. Он безопаснее
батарей с экологической точки зрения и гораздо экономичнее.
■ Адаптер переменного тока
q Убедитесь, что питание инструмента отключено
(подсветка экрана выключена).
ПРЕДУПРЕЖДЕНИЕ
• Используйте только указанный тип адаптера (PA-3C или
равноценный, рекомендованный к применению
корпорацией Yamaha). Подключение через другой
адаптер может привести к необратимому повреждению
как адаптера, так и инструмента.
w одключите адаптер переменного тока к
разъему питания синтезатора.
e одключите адаптер к электросети.
ВНИМAНИЕ
• Если инструмент не используется, а также во время
грозы, блок питания переменного тока необходимо
отключать.
Для работы инструмента требуется шесть батарей
1,5 В размером «AA», LR6 или аналогичные батареи.
w
(Рекомендуются щелочные батареи.) Если заряд
батареи слишком низкий для нормальной работы
инструмента, возможно снижение громкости,
искажение звука и т. п. В этом случае необходимо
заменить батареи, соблюдая основные меры
предосторожности, приведенные ниже.
e
Адаптер
При необходимости сохраните все важные данные
перемен-
Электророзетка
(см. стр. 62), поскольку при замене батарей
ного тока
параметры настройки панели будут утеряны.
■ Батареи
ВНИМAНИЕ
• Для этого инструмента используйте щелочные батареи.
q Откройте крышку отсека для батарей,
У других типов батарей (включая аккумуляторные) может
расположенную на нижней панели инструмента.
произойти падение напряжения при понижении заряда
w ставьте шесть новых батарей. Обратите
батареи, ведущее к потере данных во флэш-памяти.
внимание на маркировку полярности на боковой
• Убедитесь, что батареи установлены в нужном положении с
соблюдением правильной полярности (как показано на
части отсека.
рисунке). Неправильно установленные батареи могут стать
e акройте и защелкните крышку отсека,
причиной перегрева, пожара или утечки едких химикалий.
убедившись, что она крепко встала на место.
• Когда батареи разряжаются, замените весь набор из шести
батарей. НЕ ИСПОЛЬЗУЙТЕ старые батареи вместе с
новыми. Не используйте одновременно разные типы
ВНИМAНИЕ
батарей (например, щелочные и марганцевые).
• Никогда не подсоединяйте или не отсоединяйте адаптер
• Если инструмент долго не будет использоваться, выньте
переменного тока, если в инструмент вставлены батареи и
батареи, чтобы избежать возможной утечки электролита.
включено питание. Это повлечет выключение питания и
• При передаче данных во флэш-память пользуйтесь
может привести к потере переданных данных, а также к
адаптером переменного тока. Во время такой операции
потере передаваемых или записываемых данных.
батареи (включая аккумуляторные) могут быстро
разряжаться. Если при передаче данных батареи
разрядились, все переданные и передаваемые данные
будут утеряны.
8 Руководство пользователя PSR-E323/YPT-320
Установка
Все необходимые подключения следует выполнить ДО включения питания.
Подключение аудиоустройств – наушников и
внешнего оборудования
• Перед включением питания убедитесь, что педаль правильно
подсоединена к разъему SUSTAIN.
• Не нажимайте педальный переключатель в момент включения
питания. В этом случае изменяется распознавание
полярности педального переключателя, что приводит к
обращению его действия.
Включение питания
гнезду PHONES/OUTPUT можно подключить
наушники, усилитель клавиатуры, стереосистему,
Установите минимальную громкость, повернув
микшер, магнитофон или другое аудиоустройство
регулятор [MASTER VOLUME] влево, и включите
с уровнем линейного выхода для передачи на это
питание, нажав переключатель [STANDBY/ON].
устройство выходного сигнала инструмента.
о время игры на клавиатуре отрегулируйте
уровень громкости с помощью регулятора
ри подключении штекера к этому гнезду
[MASTER VOLUME]. овторное нажатие
встроенные динамики автоматически
[STANDBY/ON] выключает питание.
отключаются. нездо PHONES/OUTPUT может
также служить внешним выходом.
ВНИМAНИЕ
• Длительное прослушивание через наушники при высоком
уровне громкости может привести не только к утомлению
органов слуха, но и к их повреждению.
ВНИМAНИЕ
ВНИМAНИЕ
• При использовании блока питания переменного тока (даже
• Чтобы не повредить динамики, перед подключением
при выключенном питании) инструмент продолжает
внешних устройств следует установить на них
потреблять электроэнергию в малом объеме. Если
минимальную громкость и выключить питание.
инструмент долго не используется, отключите от сети
Несоблюдение этих мер предосторожности может привести
адаптер переменного тока и/или выньте батареи.
к поражению электрическим током или повреждению
оборудования. Кроме того, при воспроизведении с
инструмента следует сначала установить минимальный
уровень громкости всех устройств, а затем постепенно
увеличить ее до необходимого уровня.
Пюпитр
Подключение педального переключателя
Установите пюпитр в
прорези, как показано
на рисунке.
ункция сустейна позволяет воспроизвести
длительное звучание нот при нажатии
дополнительной педали. одсоедините к гнезду
SUSTAIN педальный переключатель Yamaha FC4
или FC5 и пользуйтесь им для включения и
Снятие защитной пленки
отключения задержки звука.
Удалите прозрачную защитную пленку,
нанесенную на дисплей перед отгрузкой с завода.
Руководство пользователя PSR-E323/YPT-320 9
Панель управления и разъемы
■
Передняя панель
q Переключатель [STANDBY/ON] ……………………………..стр. 9
w Регулятор [MASTER VOLUME] ………………………………… стр. 9
■ Передняя панель
e Кнопка [1 LISTENING 2 TIMING 3 WAITING]…………..стр. 32
r Кнопка [KEYS TO SUCCESS] ………………………………….стр. 28
t Кнопка [PHRASE REPEAT] …………………………………….стр. 35
В режиме урока
y PART
Кнопка [L]……………………………………………………………..стр. 32
q
Кнопка [R] …………………………………………………………….стр. 32
e
В режиме записи
y Кнопка [REC TRACK 2] ………………………………………….стр. 39
r
w
Кнопка [REC TRACK 1]………………………………………….стр. 39
t
u Кнопка [METRONOME] …………………………………… стр. 14, 48
i Кнопка [TEMPO/TAP] ………………………………. стр. 22, 52, 53
o Кнопка [SONG]………………………………………………………стр. 16
!0 Кнопка [VOICE] ……………………………………………………..стр. 12
!1 Кнопка [STYLE] ……………………………………………………..стр. 19
!5
!6
!7
!8
!2 Цифровые кнопки [0]–[9], [+/YES], [-/NO] ……………стр. 26
!3 Кнопка [FUNCTION]……………………………………………….стр. 56
!4 Кнопка [DEMO]……………………………………………………..стр. 17
В режиме композиции
!5 Кнопка [A-B REPEAT]…………………………………………….стр. 51
!6 Кнопка [REW] ……………………………………………………….стр. 17
!7 Кнопка [FF] …………………………………………………………..стр. 17
!8 Кнопка [PAUSE]…………………………………………………….стр. 17
В режиме стиля
!5 Кнопка [ACMP ON/OFF]………………………………………..стр. 20
!6 Кнопка [INTRO/ENDING/rit.]…………………………………стр. 23
!7 Кнопка [MAIN/AUTO FILL] …………………………………….стр. 23
!8 Кнопка [SYNC START] …………………………………….. стр. 19, 53
!9 Кнопка [START/STOP] …………………………………………..стр. 17
@0 Кнопка [REC] ………………………………………………………..стр. 37
@1 Кнопка [PORTABLE GRAND] ………………………………….стр. 13
@2 Кнопка [MUSIC DATABASE] …………………………………..стр. 36
@3 Кнопка [REVERB] ………………………………………………….стр. 43
@4 Кнопка [SPLIT]………………………………………………………стр. 46
@5 Кнопка [DUAL] ………………………………………………………стр. 45
@8
@6 Кнопка [HARMONY] ………………………………………………стр. 42
@7 Кнопка [TOUCH]…………………………………………………….стр. 44
@8 Наборы ударных…………………………………………………..стр. 15
■
Задняя панель
@9 Разъемы MIDI IN/OUT ………………………………………….стр. 58
#0 Гнездо SUSTAIN ……………………………………………………… стр. 9
#1 Гнездо PHONES/OUTPUT ……………………………………….. стр. 9
#2 Гнездо DC IN 12V …………………………………………………… стр. 8
10 Руководство пользователя PSR-E323/YPT-320
Панель управления и разъемы
Список тембров (стр. 67)
Список готовых наборов стилей (стр. 76)
Экран (стр. 27) Список композиций (стр. 77)
Список стилей (стр. 75)
!2
u
i
o
!3
!4
001
GrandPno
!0
001
y
!1
@2@1
@3 @4 @5 @6 @7
!9 @0
■ Задняя панель
#2#1#0@9
001
GrandPno
001
Руководство пользователя PSR-E323/YPT-320 11
Аннотации для Синтезатора Yamaha PSR-E323 в формате PDF
Топ 10 инструкций
Другие инструкции
-
Contents
-
Table of Contents
-
Troubleshooting
-
Bookmarks
Quick Links
DIGITAL KEYBOARD
Owner’s Manual
How to use this manual
Before using the PSR-E323/YPT-320, be sure to read the «PRECAUTIONS» section on pages 4–5.
Follow the instructions described in «Setting Up,» then try out the simple operations in «Quick Guide.»
«Reference» provides detailed descriptions and procedures for getting the most out of the instrument.
After you’ve read the manual, keep it safe and handy for future reference.
Data List
The Data List contains MIDI related information. The Data List is available for downloading from the
Yamaha Manual Library at: http://www.yamaha.co.jp/manual/
EN
Summary of Contents for Yamaha PSR-E323
- About
- Blog
- Projects
- Help
-
Donate
Donate icon
An illustration of a heart shape - Contact
- Jobs
- Volunteer
- People
Bookreader Item Preview
texts
Yamaha PSR-22, PSR-E323, YPT-320 Owner’s manual
- Topics
- manualzz, manuals, PSR-22, PSR-E323, YPT-320, Yamaha user manuals, Yamaha service manuals, PSR-22 pdf download, PSR-22 instructions, Yamaha PSR-22 manual, null guides,
- Collection
- yamaha_bike_manuals; manuals; additional_collections
- Addeddate
- 2021-01-27 15:23:26
- Identifier
- manualzz-id-1163675
- Identifier-ark
- ark:/13960/t2h80n755
- Ocr
- tesseract 5.0.0-alpha-20201231-7-gc75f
- Ocr_autonomous
- true
- Ocr_detected_lang
- en
- Ocr_detected_lang_conf
- 1.0000
- Ocr_detected_script
- Latin
- Ocr_detected_script_conf
- 0.9982
- Ocr_module_version
- 0.0.11
- Ocr_parameters
- -l lat+ltz+ita+eng+jav+Latin
- Page_number_confidence
- 97.47
comment
Reviews
There are no reviews yet. Be the first one to
write a review.
16
Views
DOWNLOAD OPTIONS
Uploaded by
chris85
on
SIMILAR ITEMS (based on metadata)

DIGITAL KEYBOARD
Owner’s Manual
How to use this manual
Before using the PSR-E323/YPT-320, be sure to read the “PRECAUTIONS” section on pages 4–5. Follow the instructions described in “Setting Up,” then try out the simple operations in “Quick Guide.” “Reference” provides detailed descriptions and procedures for getting the most out of the instrument. After you’ve read the manual, keep it safe and handy for future reference.
Data List
The Data List contains MIDI related information. The Data List is available for downloading from the Yamaha Manual Library at: http://www.yamaha.co.jp/manual/
Setting Up
Quick Guide
Reference
Appendix
EN

SPECIAL MESSAGE SECTION
This product utilizes batteries or an external power supply (adapter). DO NOT connect this product to any power supply or adapter other than one described in the manual, on the name plate, or specifically recommended by Yamaha.
This product should be used only with the components supplied or; a cart, rack, or stand that is recommended by Yamaha. If a cart, etc., is used, please observe all safety markings and instructions that accompany the accessory product.
This product may also use “household” type batteries. Some of these may be rechargeable. Make sure that the battery being charged is a rechargeable type and that the charger is intended for the battery being charged.
When installing batteries, do not mix batteries with new, or with batteries of a different type. Batteries MUST be installed correctly. Mismatches or incorrect installation may result in overheating and battery case rupture.
Warning:
SPECIFICATIONS SUBJECT TO CHANGE:
The information contained in this manual is believed to be correct at the time of printing. However, Yamaha reserves the right to change or modify any of the specifications without notice or obligation to update existing units.
Do not attempt to disassemble, or incinerate any battery. Keep all batteries away from children. Dispose of used batteries promptly and as regulated by the laws in your area. Note: Check with any retailer of household type batteries in your area for battery disposal information.
Disposal Notice:
This product, either alone or in combination with an amplifier and headphones or speaker/s, may be capable of producing sound levels that could cause permanent hearing loss. DO NOT operate for long periods of time at a high volume level or at a level that is uncomfortable. If you experience any hearing loss or ringing in the ears, you should consult an audiologist.
IMPORTANT: The louder the sound, the shorter the time period before damage occurs.
NOTICE:
Service charges incurred due to a lack of knowledge relating to how a function or effect works (when the unit is operating as designed) are not covered by the manufacturer’s warranty, and are therefore the owners responsibility. Please study this manual carefully and consult your dealer before requesting service.
ENVIRONMENTAL ISSUES:
Yamaha strives to produce products that are both user safe and environmentally friendly. We sincerely believe that our products and the production methods used to produce them, meet these goals. In keeping with both the letter and the spirit of the law, we want you to be aware of the following:
Battery Notice:
This product MAY contain a small non-rechargeable battery which (if applicable) is soldered in place. The average life span of this type of battery is approximately five years. When replacement becomes necessary, contact a qualified service representative to perform the replacement.
Should this product become damaged beyond repair, or for some reason its useful life is considered to be at an end, please observe all local, state, and federal regulations that relate to the disposal of products that contain lead, batteries, plastics, etc. If your dealer is unable to assist you, please contact Yamaha directly.
NAME PLATE LOCATION:
The name plate is located on the bottom of the product. The model number, serial number, power requirements, etc., are located on this plate.You should record the model number, serial number, and the date of purchase in the spaces provided below and retain this manual as a permanent record of your purchase.
Model
Serial No.
Purchase Date
PLEASE KEEP THIS MANUAL
92-BP (bottom)
2 PSR-E323/YPT-320 Owner’s Manual

FCC INFORMATION (U.S.A.)
1. IMPORTANT NOTICE: DO NOT MODIFY THIS UNIT!
This product, when installed as indicated in the instructions contained in this manual, meets FCC requirements. Modifications not expressly approved by Yamaha may void your authority, granted by the FCC, to use the product.
2. IMPORTANT: When connecting this product to accessories and/or another product use only high quality shielded cables. Cable/s supplied with this product MUST be used. Follow all installation instructions. Failure to follow instructions could void your FCC authorization to use this product in the USA.
3. NOTE: This product has been tested and found to comply with the requirements listed in FCC Regulations, Part 15 for Class “B” digital devices. Compliance with these requirements provides a reasonable level of assurance that your use of this product in a residential environment will not result in harmful interference with other electronic devices. This equipment generates/ uses radio frequencies and, if not installed and used according to the instructions found in the users manual, may cause interference harmful to the operation of
other electronic devices. Compliance with FCC regulations does not guarantee that interference will not occur in all installations. If this product is found to be the source of interference, which can be determined by turning the unit “OFF” and “ON”, please try to eliminate the problem by using one of the following measures:
Relocate either this product or the device that is being affected by the interference.
Utilize power outlets that are on different branch (circuit breaker or fuse) circuits or install AC line filter/s.
In the case of radio or TV interference, relocate/reorient the antenna. If the antenna lead-in is 300 ohm ribbon lead, change the lead-in to co-axial type cable.
If these corrective measures do not produce satisfactory results, please contact the local retailer authorized to distribute this type of product. If you can not locate the appropriate retailer, please contact Yamaha Corporation of America, Electronic Service Division, 6600 Orangethorpe Ave, Buena Park, CA90620
The above statements apply ONLY to those products distributed by Yamaha Corporation of America or its subsidiaries.
|
* This applies only to products distributed by YAMAHA CORPORATION OF AMERICA. |
(class B) |
|
PSR-E323/YPT-320 Owner’s Manual |
3 |

PRECAUTIONS
PLEASE READ CAREFULLY BEFORE PROCEEDING
* Please keep this manual in a safe place for future reference.

Always follow the basic precautions listed below to avoid the possibility of serious injury or even death from electrical shock, short-circuiting, damages, fire or other hazards. These precautions include, but are not limited to, the following:
Power supply/AC power adaptor
•Only use the voltage specified as correct for the instrument. The required voltage is printed on the name plate of the instrument.
•Use the specified adaptor (PA-130 or an equivalent recommended by Yamaha) only. Using the wrong adaptor can result in damage to the instrument or overheating.
•Check the electric plug periodically and remove any dirt or dust which may have accumulated on it.
•Do not place the AC adaptor cord near heat sources such as heaters or radiators, and do not excessively bend or otherwise damage the cord, place heavy objects on it, or place it in a position where anyone could walk on, trip over, or roll anything over it.
Water warning
•Do not expose the instrument to rain, use it near water or in damp or wet conditions, or place containers on it containing liquids which might spill into any openings. If any liquid such as water seeps into the instrument, turn off the power immediately and unplug the power cord from the AC outlet. Then have the instrument inspected by qualified Yamaha service personnel.
•Never insert or remove an electric plug with wet hands.
Fire warning
•Do not put burning items, such as candles, on the unit. A burning item may fall over and cause a fire.
Do not open
•Do not open the instrument or attempt to disassemble the internal parts or modify them in any way. The instrument contains no user-serviceable parts. If it should appear to be malfunctioning, discontinue use immediately and have it inspected by qualified Yamaha service personnel.
If you notice any abnormality
•If the AC adaptor cord or plug becomes frayed or damaged, or if there is a sudden loss of sound during use of the instrument, or if any unusual smells or smoke should appear to be caused by it, immediately turn off the power switch, disconnect the adaptor plug from the outlet, and have the instrument inspected by qualified Yamaha service personnel.

Always follow the basic precautions listed below to avoid the possibility of physical injury to you or others, or damage to the instrument or other property. These precautions include, but are not limited to, the following:
Power supply/AC power adaptor
•When removing the electric plug from the instrument or an outlet, always hold the plug itself and not the cord.
•Unplug the AC power adaptor when not using the instrument, or during electrical storms.
•Do not connect the instrument to an electrical outlet using a multiple-connector. Doing so can result in lower sound quality, or possibly cause overheating in the outlet.
Battery
•Always make sure all batteries are inserted in conformity with the +/- polarity markings. Failure to do so might result in overheating, fire, or battery fluid leakage.
•Always replace all batteries at the same time. Do not use new batteries together with old ones. Also, do not mix battery types, such as alkaline batteries with manganese batteries, or batteries from different makers, or different types of batteries from the same maker, since this can cause overheating, fire, or battery fluid leakage.
•Do not dispose of batteries in fire.
•Do not attempt to recharge batteries that are not intended to be charged.
•When the batteries run out, or if the instrument is not to be used for a long time, remove the batteries from the instrument to prevent possible leakage of the battery fluid.
•Keep batteries away from children.
•If the batteries do leak, avoid contact with the leaked fluid. If the battery fluid should come in contact with your eyes, mouth, or skin, wash immediately with water and consult a doctor. Battery fluid is corrosive and may possibly cause loss of sight or chemical burns.
Location
•Do not expose the instrument to excessive dust or vibrations, or extreme cold or heat (such as in direct sunlight, near a heater, or in a car during the day) to prevent the possibility of panel disfiguration or damage to the internal components.
•Do not use the instrument in the vicinity of a TV, radio, stereo equipment, mobile phone, or other electric devices. Otherwise, the instrument, TV, or radio may generate noise.
•Do not place the instrument in an unstable position where it might accidentally fall over.
•Before moving the instrument, remove all connected adaptor and other cables.
•When setting up the product, make sure that the AC outlet you are using is easily accessible. If some trouble or malfunction occurs, immediately turn off the power switch and disconnect the plug from the outlet. Even when the power switch is turned off, electricity is still flowing to the product at the minimum level. When you are not using the product for a long time, make sure to unplug the power cord from the wall AC outlet.
•Use only the stand specified for the instrument. When attaching the stand or rack, use the provided screws only. Failure to do so could cause damage to the internal components or result in the instrument falling over.
Connections
•Before connecting the instrument to other electronic components, turn off the power for all components. Before turning the power on or off for all components, set all volume levels to minimum. Also, be sure to set the volumes of all components at their minimum levels and gradually raise the volume controls while playing the instrument to set the desired listening level.
Maintenance
•When cleaning the instrument, use a soft, dry cloth. Do not use paint thinners, solvents, cleaning fluids, or chemical-impregnated wiping cloths.
(4)-13 1/2
4 PSR-E323/YPT-320 Owner’s Manual
Handling caution
•Do not insert a finger or hand in any gaps on the instrument.
•Never insert or drop paper, metallic, or other objects into the gaps on the panel or keyboard. If this happens, turn off the power immediately and unplug the power cord from the AC outlet. Then have the instrument inspected by qualified Yamaha service personnel.
•Do not place vinyl, plastic or rubber objects on the instrument, since this might discolor the panel or keyboard.
•Do not rest your weight on, or place heavy objects on the instrument, and do not use excessive force on the buttons, switches or connectors.
•Do not use the instrument/device or headphones for a long period of time at a high or uncomfortable volume level, since this can cause permanent hearing loss. If you experience any hearing loss or ringing in the ears, consult a physician.
Saving data
Saving and backing up your data
•Some data items (page 41) are automatically saved as backup data in the internal memory even if you turn the power off.
Saved data may be lost due to malfunction or incorrect operation. Save important data to external device such as a computer.
Yamaha cannot be held responsible for damage caused by improper use or modifications to the instrument, or data that is lost or destroyed.
Always turn the power off when the instrument is not in use.
When using a power adaptor, even when the power switch is in the “STANDBY” position, electricity is still flowing to the instrument at the minimum level. When you are not using the instrument for a long time, make sure you unplug the AC power adaptor from the wall AC outlet.
Make sure to discard used batteries according to local regulations.
The illustrations and LCD screens as shown in this owner’s manual are for instructional purposes only, and may appear somewhat different from those on your instrument.
● COPYRIGHT NOTICE
This product incorporates and bundles computer programs and contents in which Yamaha owns copyrights or with respect to which it has license to use others’ copyrights. Such copyrighted materials include, without limitation, all computer software, style files, MIDI files, WAVE data, musical scores and sound recordings. Any unauthorized use of such programs and
contents outside of personal use is not permitted under relevant laws. Any violation of copyright has legal consequences. DON’T MAKE, DISTRIBUTE OR USE ILLEGAL COPIES.
Copying of the commercially available musical data including but not limited to MIDI data and/or audio data is strictly prohibited except for your personal use.
● Trademarks
•Windows is the registered trademarks of Microsoft® Corporation.
•The company names and product names in this Owner’s Manual are the trademarks or registered trademarks of their respective companies.
Formats and functions
GM System Level 1: “GM System Level 1” is an addition to the MIDI standard which ensures that any GM-compatible music data can be accurately played by any GM-compatible tone generator, regardless of manufacturer. The GM mark is affixed to all software and hardware products that support GM System Level.
XGlite: As its name implies, “XGlite” is a simplified version of Yamaha’s high-quality XG tone generation format. Naturally, you can play back any XG song data using an XGlite tone generator. However, keep in mind that some songs may play back differently compared to the original data, due to the reduced set of control parameters and effects.
Style File: The Style File Format combines all of Yamaha’s auto accompaniment know-how into a single unified format.
Stereo Sampled Piano: The instrument has a special Portable Grand Piano Voice—created by state-of- the-art stereo sampling technology and using Yamaha’s sophisticated AWM (Advanced Wave memory) tone generation system.
Yamaha Education Suite 5: The instrument features the new Yamaha Education Suite—a set of learning tools that utilize the latest technology to make studying and practicing music more fun and fulfilling than ever before!
Touch Response: The exceptionally natural Touch Response feature, with a convenient front panel on/off switch, gives you maximum expressive level control over the voices.
Supplied Accessories
The PSR-E323/YPT-320 package includes the following items. Please check that you have them all.
|
• Music rest |
• My Yamaha Product User Registration |
|
• Owner’s manual (this book) |
* The PRODUCT ID on the sheet will be needed when you fill |
|
out the User Registration form. |
|
|
(4)-13 |
2/2 |
|
PSR-E323/YPT-320 Owner’s Manual |
5 |
What You Can Do With the
PSR-E323/YPT-320
The instrument Voice that sounds when you play the keyboard can be changed to violin, flute, harp, or any of an extensive range of voices. You can also restore the piano settings with a simple press of a button.
|
Adding Reverb to the sound |
>page 43 |
The reverb effects add a warm ambience to the sound, simulating the complex reflections of actual performance spaces, such as a concert hall or small club.
|
Play along with the Styles |
>page 18 |
You can select from 100 different styles (auto accompaniment) for playing along on the keyboard— giving you the equivalent of a full backing band, covering a wide variety of styles from waltzes to 8- beat to euro-trance … and much more.
|
Play Using the Music Database |
>page 36 |
Simply selecting your favorite style such as rock or jazz from the Music Database calls up the appropriate Voice and Styles that matches the selected style.
Practicing
Practicing and mastering Songs
>pages 28, 31, 35
You can practice the preset Songs using these lesson functions: “Keys to Success” (page 28), “Listening, Timing, Waiting” (page 31) and “Phrase Repeat” (page 35). Keys to Success helps familiarize you with playing a specific Song, while Listening, Timing, Waiting helps you to learn how to play correct notes with the correct timing. Finally, Phrase Repeat lets you repeatedly practice a specified phrase in the Song. Keys to Success is ideal for customers using the keyboard instrument for the first time.
Listening
Listening to the Songs >page 16
The instrument contains a wide variety of 102 preset songs.
Recording
Recording your performance >page 37
You can record up to five of your own performances as User Songs.
6 PSR-E323/YPT-320 Owner’s Manual
|
Contents |
|
|
Formats and functions ……………………………………….. |
5 |
|
Supplied Accessories…………………………………………. |
5 |
|
Setting Up |
|
|
Setting Up |
8 |
|
Power Requirements …………………………………………. |
8 |
|
Audio Connections — |
|
|
Headphones and External Equipment……………….. |
9 |
|
Connecting a footswitch……………………………………… |
9 |
|
Turn on the power……………………………………………… |
9 |
|
Using the music rest ………………………………………….. |
9 |
|
Removing the protective film……………………………….. |
9 |
|
Panel Controls and Terminals |
10 |
|
Front Panel …………………………………………………….. |
10 |
|
Rear Panel ……………………………………………………… |
10 |
|
Quick Guide |
|
|
Changing the Voices |
12 |
|
Try playing a variety of instrument Voices …………… |
12 |
|
Playing the Grand Piano Voice ………………………….. |
13 |
|
Using the Metronome……………………………………….. |
14 |
|
Playing the Drum Kit Voice ……………………………….. |
15 |
|
Playing Songs |
16 |
|
Select and Listen to a Specific Song ………………….. |
16 |
|
Play with a Style |
18 |
|
Play along with the styles………………………………….. |
19 |
|
Changing the tempo of the Style………………………… |
22 |
|
Pattern Variation (Sections) ………………………………. |
23 |
|
Playing chords along with score of the Song ……….. |
24 |
|
Chords …………………………………………………………… |
25 |
|
Reference |
|
|
Basic Operation and Displays |
26 |
|
Basic Operation ………………………………………………. |
26 |
|
Display …………………………………………………………… |
27 |
|
Song Lesson |
28 |
|
Keys to Success ……………………………………………… |
28 |
|
Listening Timing Waiting…………………………………… |
31 |
|
Phrase Repeat ………………………………………………… |
35 |
|
Play Using the Music Database |
36 |
|
Record your own performance |
37 |
|
Recording to a specified track……………………………. |
38 |
|
Initialization |
41 |
|
Initialization …………………………………………………….. |
41 |
|
Voice Settings |
42 |
|
Adding Harmony……………………………………………… |
42 |
|
Adding Reverb………………………………………………… |
43 |
|
Adding Chorus………………………………………………… |
43 |
|
Adding Panel Sustain ………………………………………. |
44 |
|
Touch Response Sensitivity ……………………………… |
44 |
|
Playing Two Voices Simultaneously—Dual…………. |
45 |
|
Playing Different Voices with the Left and Right |
|
|
Hands—Split……………………………………………….. |
46 |
|
Setting the Split Point ………………………………………. |
47 |
|
Adjusting the Voice volume ………………………………. |
47 |
|
Setting the Metronome Beats per Measure, |
|
|
and the Length of Each Beat …………………………. |
48 |
|
Setting the Metronome Volume…………………………. |
48 |
|
Octave …………………………………………………………… |
49 |
|
Transpose ……………………………………………………… |
49 |
|
Tuning …………………………………………………………… |
50 |
|
One Touch Setting ………………………………………….. |
50 |
|
Song settings |
51 |
|
Mute ……………………………………………………………… |
51 |
|
A-B Repeat…………………………………………………….. |
51 |
|
Song Volume………………………………………………….. |
52 |
|
Tap Start………………………………………………………… |
52 |
|
Changing the Melody Voice ……………………………… |
52 |
|
Style (Auto Accompaniment) Functions |
53 |
|
Starting Style playback…………………………………….. |
53 |
|
Adjusting the Style Volume ………………………………. |
53 |
|
Looking up Chords Using the Chord Dictionary …… |
54 |
|
Registering Style Files……………………………………… |
55 |
|
Function Settings |
56 |
|
Select the item and change the value ………………… |
56 |
|
About MIDI |
58 |
|
What is MIDI?…………………………………………………. |
58 |
|
Transferring Performance Data To and |
|
|
From Another Instrument………………………………. |
58 |
|
Transferring data between the PSR-E323/YPT-320 |
|
|
and a computer……………………………………………. |
60 |
|
Appendix |
|
|
Troubleshooting ………………………………………………….. |
63 |
|
Voice List…………………………………………………………….. |
64 |
|
Maximum Polyphony ……………………………………….. |
64 |
|
Drum Kit List ……………………………………………………….. |
68 |
|
Style List……………………………………………………………… |
70 |
|
Music Database List …………………………………………….. |
71 |
|
Song List …………………………………………………………….. |
72 |
|
Effect Type List ……………………………………………………. |
73 |
|
Specifications ……………………………………………………… |
74 |
|
Index …………………………………………………………………… |
75 |
|
PSR-E323/YPT-320 Owner’s Manual |
7 |
Setting Up
Quick Guide
Reference
Appendix
Setting Up
Setting Up
Up Setting
Be sure to do the following operations BEFORE turning on the power.
Power Requirements
Although the instrument will run either from an optional AC adaptor or batteries, Yamaha recommends use of an AC adaptor whenever possible. An AC adaptor is more environmentally friendly than batteries and does not deplete resources.
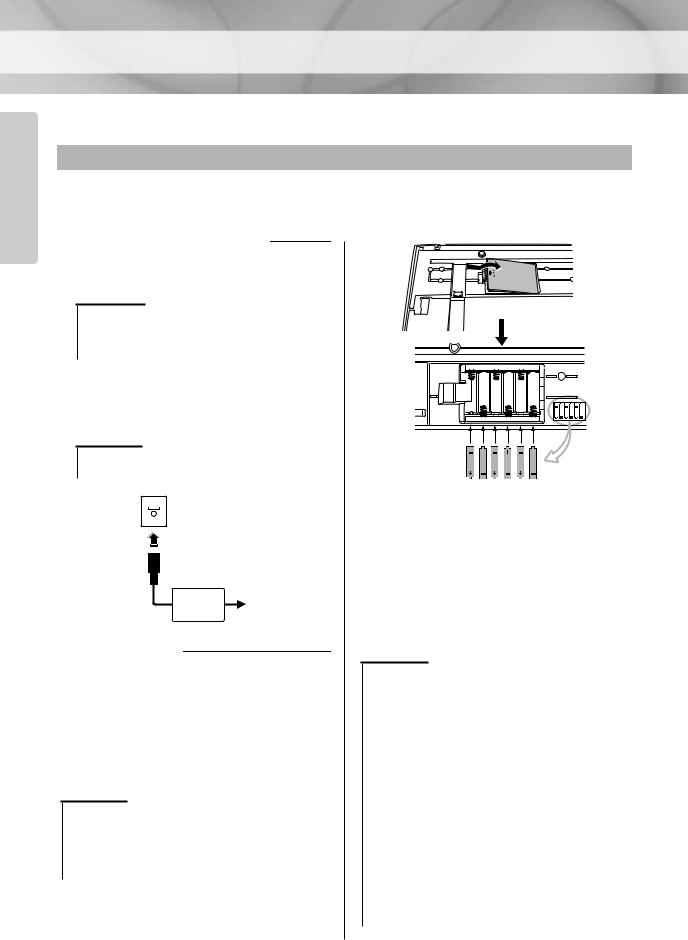
■ Using an AC Power Adaptor
q Make sure that the power of the instrument is off (the backlit display is off).

•Use the specified adaptor (PA-130, or an equivalent recommended by Yamaha) only. The use of other adaptors may result in irreparable damage to both the adaptor and the instrument.
w Connect the AC power adaptor to the power supply jack.
e Plug the AC adaptor into an AC outlet.

•Unplug the AC Power Adaptor when not using the instrument, or during electrical storms.
w
e
|
AC power |
AC outlet |
|
|
adaptor |
||
■ Using Batteries
q Open the battery compartment cover located on the instrument’s bottom panel.
w Insert the six new alkaline batteries, being careful to follow the polarity markings on the side of the compartment.
e Replace the compartment cover, making sure that it locks firmly in place.

•Never connect or disconnect the AC power adaptor when the batteries are installed in the instrument and the power is on. Doing so will turn the power off, possibly resulting in loss of the data being transferred and the data currently in the transfer destination during transferring or recording a data.
8 PSR-E323/YPT-320 Owner’s Manual
For battery operation the instrument requires six 1.5V “AA” size, LR6 or equivalent batteries. (Alkaline batteries are recommended.) When battery power becomes too low for proper operation, the volume may be reduced, the sound may be distorted, and other problems may occur. When this happens, make sure to replace all batteries, following the precautions listed below.
If necessary, also make sure to save all important User data (see page 62), since custom panel settings are lost when the batteries are removed.

•Use alkaline batteries for this instrument. Other types of batteries (including rechargeable batteries) may have sudden drops of power when battery power becomes low, possibly resulting in loss of data in the flash memory.
•Make sure to install the batteries with the proper orientation, maintaining the correct polarity (as shown). Incorrect battery installation may result in heat, fire and/or leaking of corrosive chemicals.
•When the batteries run down, replace them with a complete set of six new batteries. NEVER mix old and new batteries. Do not use different kinds of batteries (e.g. alkaline and manganese) at the same time.
•If the instrument is not to be in use for a long time, remove the batteries from it, in order to prevent possible fluid leakage from the battery.
•Please use the power adaptor when transferring data to flash memory. Batteries (including rechargeable types) can be drained rapidly by this type of operation. If the batteries do become drained during a data transfer, both the data being transferred and the data currently in the transfer destination will be lost.
Setting Up
Make all necessary connections BEFORE turning the power on.
Audio Connections —
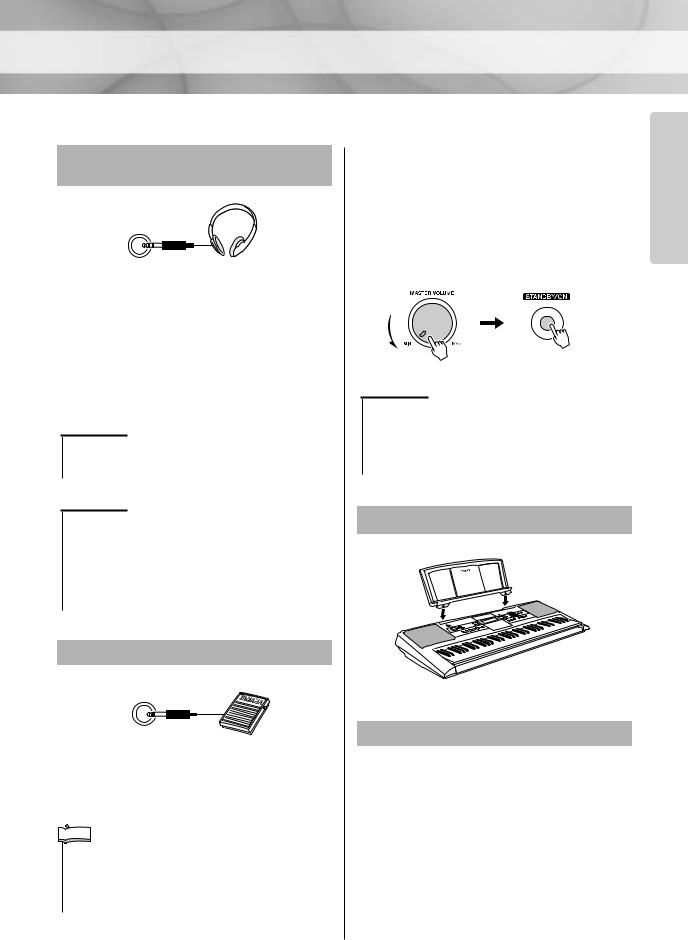
Headphones and External Equipment
You can connect the PHONES/OUTPUT jack to a set of headphones, keyboard amplifier, stereo system, mixer, tape recorder, or other line-level audio device to send the instrument’s output signal to that device.
The internal speakers are automatically shut off when a plug is inserted into this jack. The PHONES/OUTPUT jack also functions as an external output.

•Avoid listening with the headphones at high volume for long periods of time; doing so may not only result in ear fatigue, it may be damaging to your hearing.

•To prevent damage to the speakers, set the volume of the external devices at the minimum setting and turn power off the devices before connecting them. Failure to observe these precautions may result in electric shock or equipment damage. Also, be sure to set the volumes of all devices at their minimum levels and gradually raise the volume controls while playing the instrument to set the desired listening level.
Connecting a footswitch
The sustain function lets you produce a natural sustain as you play by pressing an optional footswitch. Plug the Yamaha FC4 or FC5 footswitch into the SUSTAIN jack and use it to switch sustain on and off.

•Make sure that the footswitch plug is properly connected to the SUSTAIN jack before turning on the power.
•Do not press the footswitch while turning the power on. Doing this changes the recognized polarity of the footswitch, resulting in reversed footswitch operation.
Turn on the power |
Up |
|
Turn down the volume by turning the [MASTER |
Setting |
|
VOLUME] control to the left and press the |
|
|
[STANDBY/ON] switch to turn on the power. While |
|
|
playing the keyboard, adjust the volume level by using |
|
|
the [MASTER VOLUME] control. Pressing the |
|
|
[STANDBY/ON] switch again turns the power off. |

•When using a power adaptor, even when the power is off, a small amount of electricity is still being consumed by the instrument.When you are not using the instrument for a long time, make sure to unplug the AC power adaptor from the wall AC outlet, and/or remove the batteries from the instrument.
Using the music rest
Insert the music rest into the slots as shown.
Removing the protective film
Remove the transparent protective film that was applied to the display prior to shipment from the factory.
|
PSR-E323/YPT-320 Owner’s Manual |
9 |
Up Setting
Panel Controls and Terminals
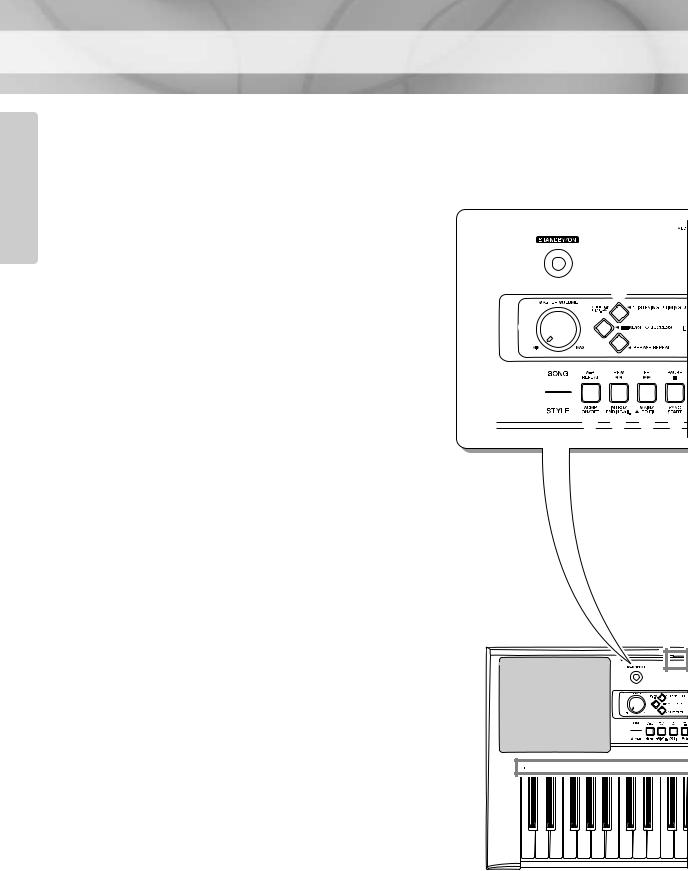
■ Front Panel
|
q [STANDBY/ON] switch …………………………………… |
page 9 |
|
w [MASTER VOLUME] control …………………………. |
pages 9 |
e [1 LISTENING 2 TIMING 3 WAITING] button…. pages 32
|
r [KEYS TO SUCCESS] button………………………. |
pages 28 |
|
|
t [PHRASE REPEAT] button …………………………. |
pages 35 |
|
|
When the lesson mode |
||
|
y PART |
||
|
[L] button ……………………………………………………. |
page 32 |
|
|
[R] button……………………………………………………. |
page 32 |
|
|
When the recording mode |
||
|
y [REC TRACK 2] button…………………………………. |
page 39 |
|
|
[REC TRACK 1] button…………………………………. |
page 39 |
|
|
u [METRONOME] button……………………………. |
page 14, 48 |
|
|
i [TEMPO/TAP] button…………………………. |
page 22, 52, 53 |
|
|
o [SONG] button…………………………………………… |
pages 16 |
|
|
!0[VOICE] button ………………………………………….. |
pages 12 |
|
|
!1[STYLE] button………………………………………….. |
pages 19 |
|
|
!2Number buttons [0]–[9], [+/YES], [-/NO] ………… |
page 26 |
|
|
!3[FUNCTION] button……………………………………. |
pages 56 |
|
|
!4[DEMO] button…………………………………………….. |
page 17 |
|
|
When the Song mode |
||
|
!5[A-B REPEAT] button…………………………………… |
page 51 |
|
|
!6[REW] button ………………………………………………. |
page 17 |
|
|
!7[FF] button ………………………………………………….. |
page 17 |
|
|
!8[PAUSE] button……………………………………………. |
page 17 |
|
|
When the Style mode |
||
|
!5[ACMP ON/OFF] button ……………………………….. |
page 20 |
|
|
!6[INTRO/ENDING/rit.] button………………………….. |
page 23 |
|
|
!7[MAIN/AUTO FILL] button…………………………….. |
page 23 |
|
|
!8[SYNC START] button…………………………….. |
page 19, 53 |
|
|
!9[START/STOP] button ………………………………….. |
page 17 |
|
|
@0[REC] button……………………………………………….. |
page 37 |
|
|
@1[PORTABLE GRAND] button………………………… |
page 13 |
|
|
@2[MUSIC DATABASE] button………………………….. |
page 36 |
|
|
@3[REVERB] button ………………………………………… |
page 43 |
|
|
@4[SPLIT] button …………………………………………….. |
page 46 |
|
|
@5[DUAL] button……………………………………………… |
page 45 |
|
|
@6[HARMONY] button……………………………………… |
page 42 |
|
|
@7[TOUCH] button…………………………………………… |
page 44 |
|
|
@8Drum Kit……………………………………………………… |
page 15 |
|
■ Rear Panel |
||
|
@9MIDI IN/OUT terminals …………………………………. |
page 58 |
|
|
#0SUSTAIN jack………………………………………………… |
page 9 |
|
|
#1PHONES/OUTPUT jack ………………………………….. |
page 9 |
|
|
#2DC IN 12V jack………………………………………………. |
page 8 |
10 PSR-E323/YPT-320 Owner’s Manual
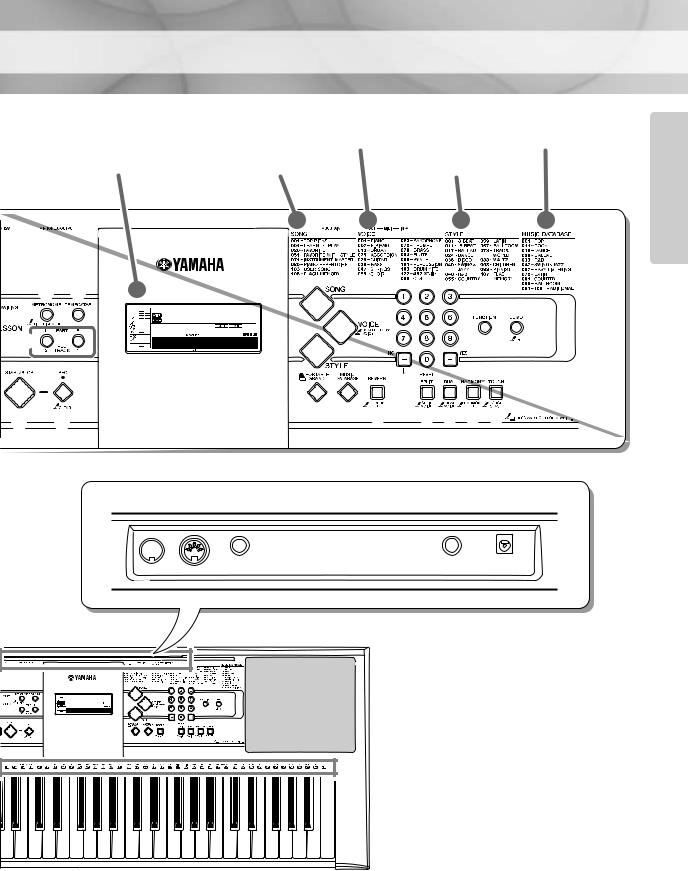
Panel Controls and Terminals
Voice List (page 64) Music Database List (page 71)
|
Display (page 27) |
Song List (page 72) |
Style List (page 70) |
|
u |
i |
!2 |
||
|
o |
||||
|
001 GrandPno |
!3 !4 |
|||
|
!0 |
||||
|
001 |
||||
|
y |
||||
|
!1 |
||||
|
!9 |
@0 |
@1 @2 |
@3 |
@4@5@6@7 |
■ Rear Panel

Setting Up
PSR-E323/YPT-320 Owner’s Manual 11
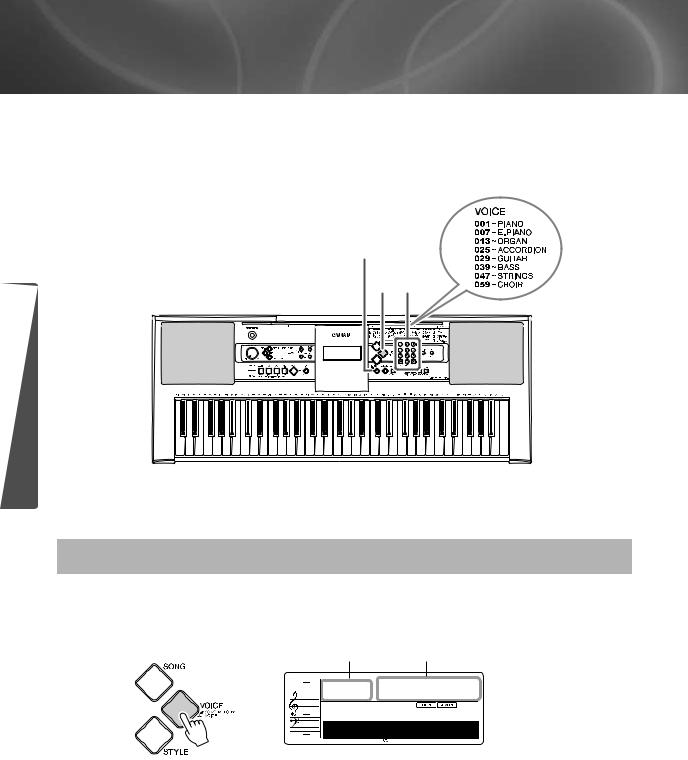
Changing the Voices
Quick Guide
This instrument features a variety of realistic, built-in voices. The grand piano Voice is automatically selected whenever the power is turned on, but you can easily change this guitar, drum, or any of an extensive range of voices.
Grand Piano Voice
1 2
Guide Quick
Try playing a variety of instrument Voices
1 Press the [VOICE] button.
The Voice number and name are displayed.


12 PSR-E323/YPT-320 Owner’s Manual
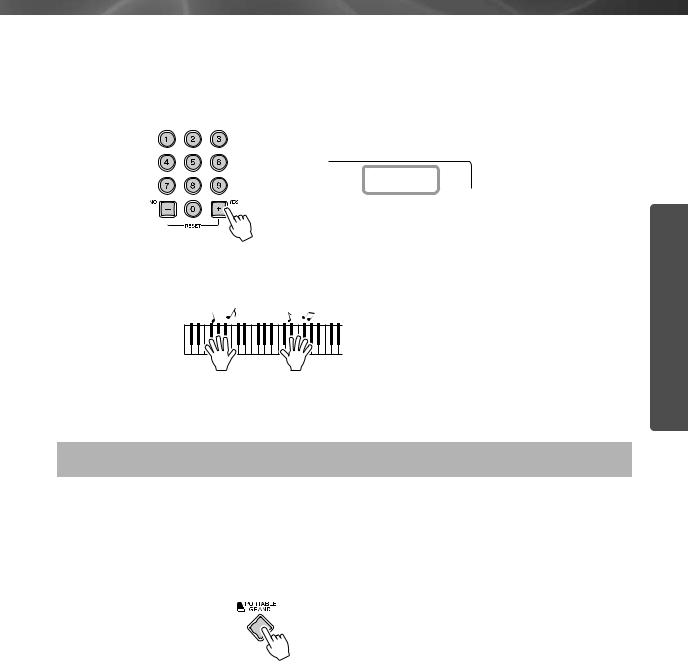
Changing the Voices
2 Select a Voice.
Select the desired Voice by using the number buttons [0]–[9], [+], [-].
Refer to the Voice List on page 64.
|
084 Flute |
The Voice shown here |
|
|
becomes the Main Voice |
||
|
for the instrument. |
3 Play the keyboard.
Try selecting and playing different Voices.
Playing the Grand Piano Voice
When you simply want to play a piano Voice, all you have to do is press one convenient button.
Press the [PORTABLE GRAND] button.
The Voice “Grand Piano” will automatically be selected as the
Main Voice.
Quick Guide
PSR-E323/YPT-320 Owner’s Manual 13

Changing the Voices
Percussion and
|
Metronome |
drum icons |
||
Guide Quick
Using the Metronome
The instrument features a built-in metronome (a device that keeps an accurate tempo) that is convenient for practicing.
Press the [METRONOME] button to start the metronome. To stop the metronome, press the [METRONOME] button again.
If you want to adjust the metronome tempo, press the [TEMPO/ TAP] button to call up the Tempo setting in the display, then press the [+] button to raise the tempo, or press the [-] button to lower it. You can also set the tempo using the number buttons on the front panel.
Current Tempo value
070 Tempo

•You can set the time signature (page 48).
14 PSR-E323/YPT-320 Owner’s Manual

Changing the Voices
Playing the Drum Kit Voice
When Voice number 109 (Drum Kit) is selected in step 2 on page 13, you can play different percussion sounds directly from the keyboard.
To check which percussion sounds are assigned to each key when you select Voice number 109, look at the icons printed above the keys. You can select and play the desired Drum Kit from 12 preset Drum Kits (Voice number 109–121). Details on the instruments and key assignments of each Drum Kit can be found in the Drum Kit List on page 68.
Quick Guide
PSR-E323/YPT-320 Owner’s Manual 15
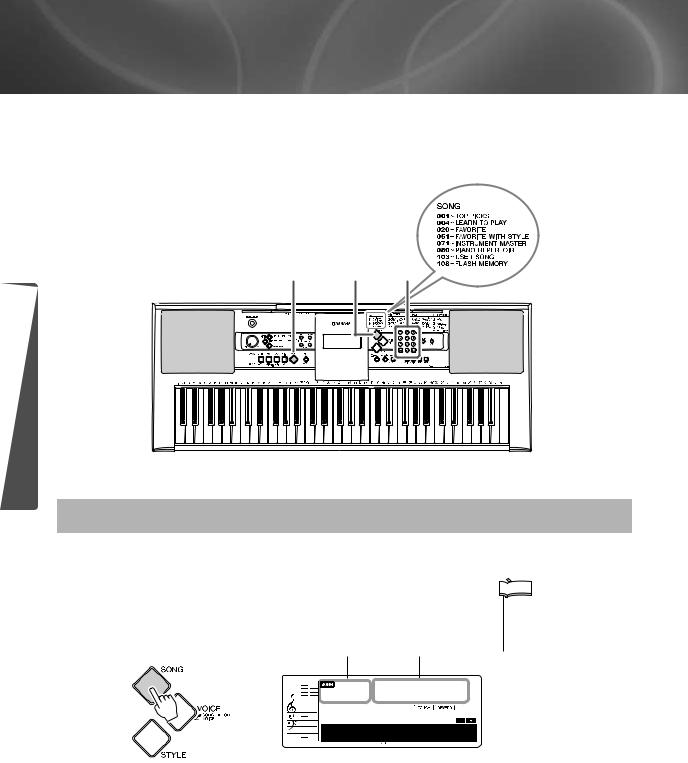
Playing Songs
This instrument has 102 built-in Songs. For this instrument, the term “Song” refers to the data that makes up a piece of music.
Listening to a Song.
3 1 2
Guide Quick
Select and Listen to a Specific Song
1 Press the [SONG] button.
The Song number and name are displayed.
Song number “004” is automatically selected whenever the power is turned ON.
004 Elise 1

The songs are organized by category. For details, see page 72.

•When you want to select the Song number 001–003, use the number buttons [0]–[9], [+], [-].
16 PSR-E323/YPT-320 Owner’s Manual

Select a Song.
Select the desired song by using the number buttons [0]–[9], [+], [-].
Refer to the Song List on page 72.
Press the [START/STOP] button.
The Song will begin playing.
You can stop playback at any time by pressing the [START/ STOP] button.
Playing Songs

•You can play Songs recorded from the instrument or transferred from a computer. The procedure for playing these Songs is the same as that of the built-in Songs.

•Songs can be played at any tempo you desire—fast or slow (page 22).
Quick Guide
●Rewind/Fast-forward/Pause
[REW] button ……….. Fast-reverses the Song if pressed during playback (no sound is heard
|
during fast reverse). Decreases the measure number if pressed while |
|
|
playback is stopped. |
|
|
[FF] button……………. |
Fast-forwards the Song if pressed during playback. Increases the |
|
measure number if pressed while playback is stopped. |
|
|
[PAUSE] button …….. |
Temporarily stops playback. Press this button a second time to resume |
|
playback from the point at which it was stopped. |
● Using the [DEMO] button
Press the [DEMO] button to play Songs 001, 002, 003, in sequence, and playback will continue repeatedly starting again from the first Song 001. You can stop playback at any time by pressing the [DEMO] button.
PSR-E323/YPT-320 Owner’s Manual 17
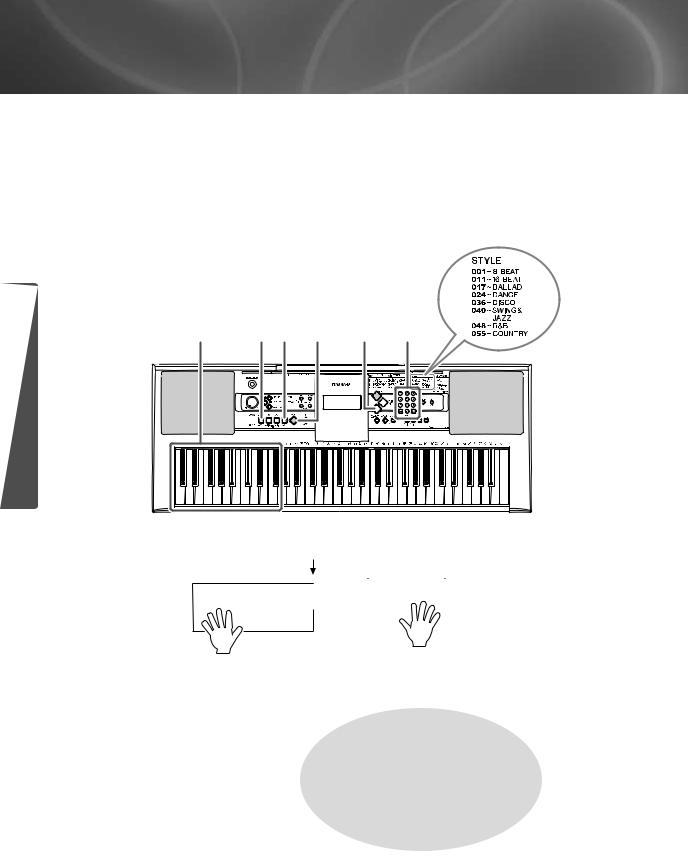
Play with a Style
Styles are rhythm/accompaniment patterns and are played by the auto accompaniment feature.You can select from a wide variety of rhythmic types—rock, blues, Euro trance, and many, many more. Here we’ll learn how to select and play Styles using chords.
While you play, you can automatically add specially created intros and endings, as well as variations in the rhythm/chord patterns, for more dynamic, professional-sounding performances.
|
5 |
4 3 |
6 |
1 |
2 |
Guide Quick
Split Point
|
Play a melody with |
||||||||||||||||||||||||||||
|
Auto Accompani- |
your right hand. |
|||||||||||||||||||||||||||
|
ment range |
||||||||||||||||||||||||||||
|
Try playing chords |
||||||||||||||||||||||||||||
|
with your left hand. |
Before Performance
Select the “String Ensemble” Voice as the melody Voice, referring to step 2 on page 12.
18 PSR-E323/YPT-320 Owner’s Manual
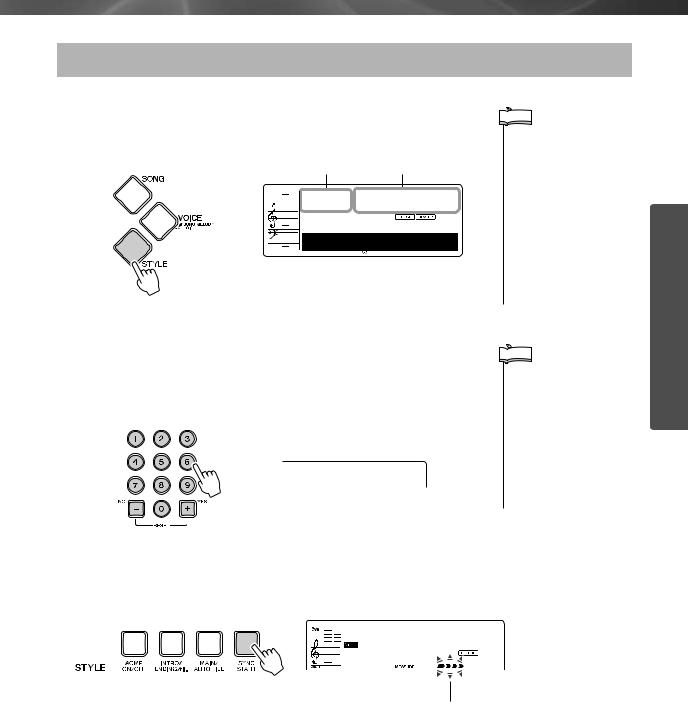
Play with a Style
Play along with the styles
1 Press the [STYLE] button.
The Style number and name are displayed.


•You can also select commercially available Style Files. To do this load the Style Files from the computer to the instrument, and then register the style data starting with to style number 107. (Refer to the information on transferring data on page 61 and registering styles on page 55.) If the Style File has not been registered, “No Data” will be displayed when selecting style number 107.
2 Select a Style.
Select the desired Style by using the number buttons [0]–[9], [+], [-].
Refer to the Style List on page 70.
018 LoveSong

•Since the Pianist category Styles (098–106) have no rhythm parts, no sound will be produced if you start rhythm-only playback. To use these Styles, turn on the auto accompaniment and play the keyboard as described on pages 20 (The bass and chord accompaniment parts will sound.)
3 Turn SYNC START on.
Press the [SYNC START] button.
Flashes when Sync
Start is on.
Quick Guide
PSR-E323/YPT-320 Owner’s Manual 19
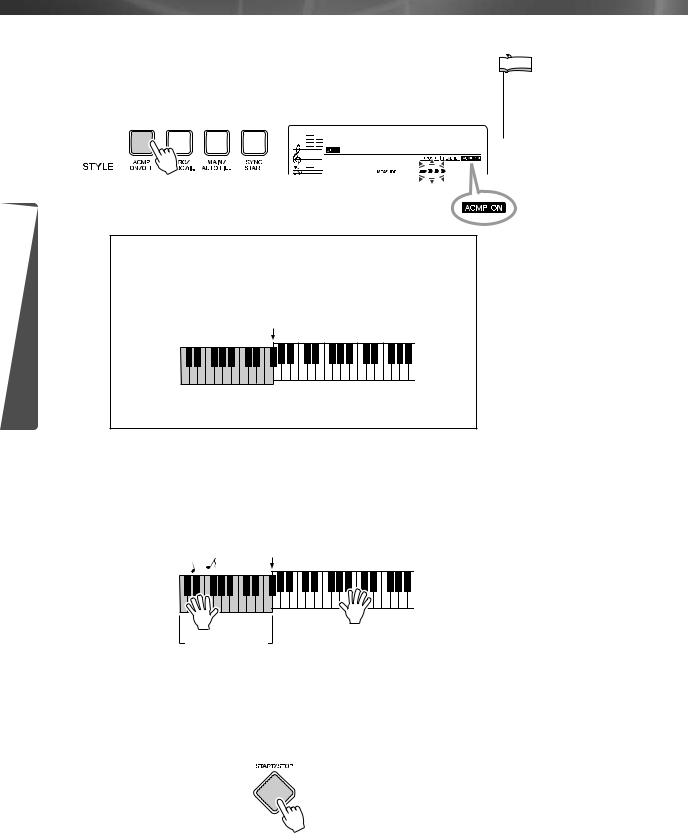
Guide Quick
Play with a Style
4 Turn auto accompaniment on.
Press the [ACMP ON/OFF] button.
Press the [ACMP ON/OFF] button again to turn the auto accompaniment off.
● When auto accompaniment is on …
The keys to the left of the Split Point (54; F#2) will play only chords.
This is known as the “Auto Accompaniment range.”
Split Point (page 47)

ment range
5 Start playing along on the keyboard.
Style playback will begin as soon as you play a chord in the accompaniment range of the keyboard. In this case, try out the Song “Aura Lee” on the next page for practice purpose. For information on how to enter chords, see page 24.
Split Point
Auto Accompani-
ment range
6 Stop playing.
Playback will stop as soon as you press the [START/STOP] button.

•If you press the [START/ STOP] button while the auto accompaniment is off, only the rhythm (percussion) parts will start.
Appears when auto accompaniment is on
20 PSR-E323/YPT-320 Owner’s Manual

Play with a Style
Practice
— Aura Lee —
|
Recommended Style: 018 Love Song |
|
|
Recommended Voice: 047 String Ensemble |
Composer: G. Poulton |
G A D C E D7
Quick Guide
PSR-E323/YPT-320 Owner’s Manual 21
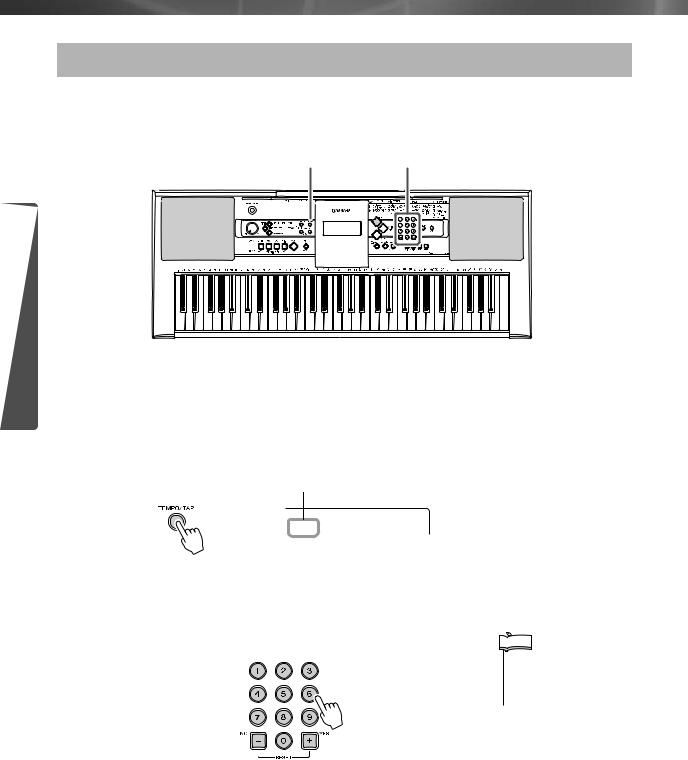
Play with a Style
Changing the tempo of the Style
Styles can be played at any tempo you desire—fast or slow.
1 2
Guide Quick
1 Press the [TEMPO/TAP] button to call up the Tempo setting in the display after selecting a Style.
Current Tempo value
070 Tempo
2 Set the Tempo by using the number buttons [0]–[9], [+], [-].

• Press the [+] and [-] buttons simultaneously to instantly reset the value to the default tempo of a Style.
22 PSR-E323/YPT-320 Owner’s Manual
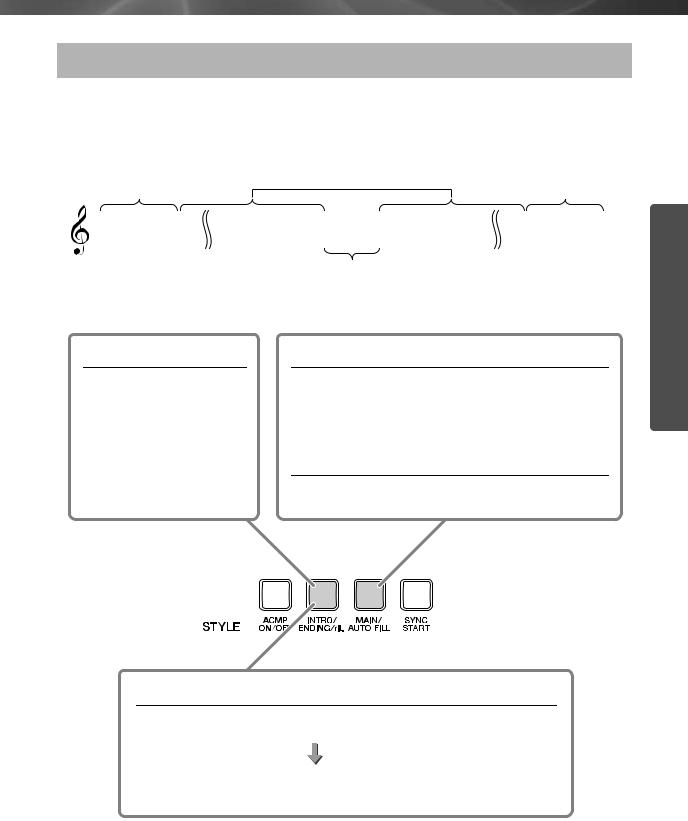
Play with a Style
Pattern Variation (Sections)
The instrument features a wide variety of Style “sections” (patterns) that allow you to vary the arrangement of the accompaniment to match the Song you are playing.
|
Intro |
Main |
Ending |
|||||||
|
This is the begin- |
This is the main part of the Song. |
This is the end of |
|||||||
|
ning of the Song. |
the Song. |
||||||||
Fill in
This is the transition between main patterns.
Adding an Intro
Pressing the [INTRO/ENDING/rit.] button before playing back the Style automatically adds a short introduction before starting the actual (Main) rhythm.
When the intro finishes playing, Style playback shifts to the main section.
Switching Main Patterns
There are two variations on the basic pattern (A and B). These are alternately selected each time the [MAIN/AUTO FILL] button is pressed.
The main accompaniment pattern plays, and repeats indefinitely until another section’s button is pressed.
Adding a Fill-in
A Fill-in pattern is automatically added before changing to section A or B.
Adding an Ending
Press the [INTRO/ENDING/rit.] button to begin playing an ending section. Playback will stop when the ending has played all the way through.
If you press the [INTRO/ENDING/rit.] button a second time (while the ending is playing) the ending will play ritardando (the tempo will gradually get slower).
Quick Guide
PSR-E323/YPT-320 Owner’s Manual 23
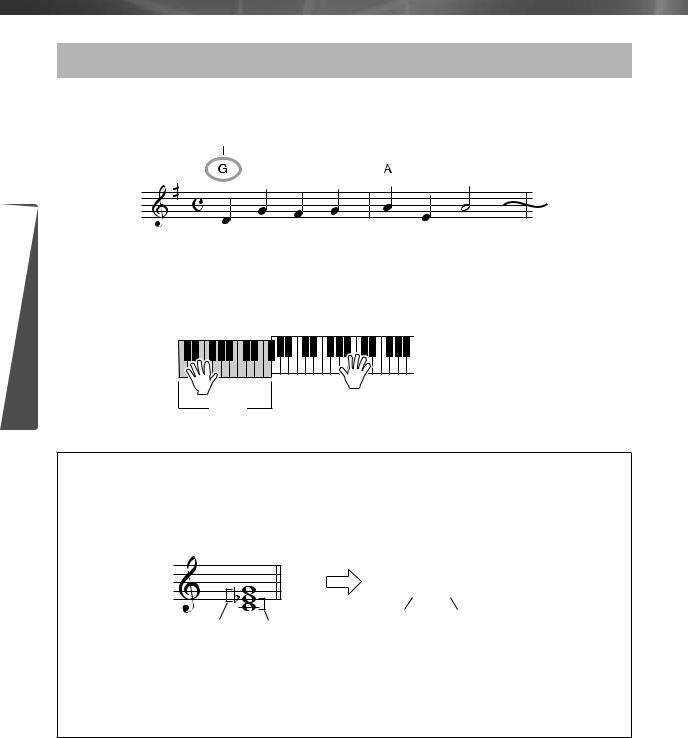
Play with a Style
Guide Quick
Playing chords along with score of the Song
Below is an example of a melody score with chord indications.
Chord
Play the melody on the staff with your right hand, and chords with your left hand. Find the appropriate chords on the next page and play them as illustrated.
Melody
Chords
● Chord names
From the chord name, you can tell at a glance what type of chord it is and which notes make up the chord. Understanding the basic structure of chords is very useful—once you’re familiar with this, you’ll be quickly and easily play chords by looking at the names that appear above the notation.
Cm
Cm
Taking the chord above as an example, the lowest note of this triad is called the “root note.” This is the central note sound, and it supports or anchors the rest of the notes chord. Upper case letters (including sharps or flats) at the left of the chord name shows root note. The chord name is determined by a root note and chord type like as major or minor, and so on.
24 PSR-E323/YPT-320 Owner’s Manual

Русский
Cómo utilizar el manual
Antes de utilizar el PSR-E323/YPT-320, lea las “Precauciones” que debe tener en cuenta en las páginas 4 y 5. Siga las instrucciones de
la sección «Instalación» y realice a continuación las operaciones de la sección «Guía rápida». La sección “Referencia” ofrece
descripciones detalladas y procedimientos para aprovechar al máximo las capacidades del instrumento. Asimismo, después de leerlo,
guarde el manual en un lugar seguro y a mano para poder consultarlo posteriormente.
Lista de datos
La Lista de datos incluye información sobre MIDI. La Lista de datos puede descargarse de la Biblioteca de manuales de Yamaha,
en http://www.yamaha.co.jp/manual/
Comment utiliser ce mode d’emploi
Avant d’utiliser le PSR-E323/YPT-320, veuillez lire attentivement la section « PRÉCAUTIONS D’USAGE » aux pages 4-5. Suivez les
instructions de la section « Configuration », puis testez les opérations simples décrites dans la section « Guide de référence rapide ».
La section « Référence » propose des descriptions et des procédures détaillées qui vous permettront de tirer le meilleur parti de
l’instrument. Après avoir lu le mode d’emploi, conservez-le à portée de main afin de pouvoir le consulter ultérieurement.
Liste des données
La liste des données contient les informations liées à la norme MIDI. Elle est téléchargeable depuis la bibliothèque Yamaha Manual
Library, à l’adresse suivante : http://www.yamaha.co.jp/manual/
Owner’s Manual
Bedienungsanleitung
Mode d’emploi
Manual de instrucciones
Руководство пользователя
English
Deutsch
Français
Español
So verwenden Sie dieses Handbuch
Achten Sie darauf, vor Einsatz des PSR-E323/YPT-320 die „VORSICHTSMASSNAHMEN“ auf Seite 4-5 durchzulesen.
Folgen Sie den im Abschnitt „Spielvorbereitungen“ beschriebenen Anweisungen, und probieren Sie dann die im „Quick Guide“
beschriebenen einfachen Bedienvorgänge aus. Der Abschnitt „Referenz“ enthält ausführliche Beschreibungen und Vorgehensweisen,
um das Instrument bestmöglich einzusetzen. Bewahren Sie das Handbuch nach der Lektüre leicht erreichbar an einem sicheren Ort auf,
um später darin nachschlagen zu können.
Datenliste
Die Datenliste enthält Informationen über MIDI. Die Datenliste kann von der Yamaha Manual Library heruntergeladen werden unter:
http://www.yamaha.co.jp/manual/
How to use this manual
Before using the PSR-E323/YPT-320, be sure to read the “PRECAUTIONS” section on pages 4–5. Follow the instructions described in
“Setting Up,” then try out the simple operations in “Quick Guide.” “Reference” provides detailed descriptions and procedures for getting
the most out of the instrument. After you’ve read the manual, keep it safe and handy for future reference.
Data List
The Data List contains MIDI related information. The Data List is available for downloading from the Yamaha Manual Library at:
http://www.yamaha.co.jp/manual/
DIGITAL KEYBOARD
ES
FR
DE
RU
EN


