SJRC F11 4K PRO User GPS Folding Drone Manual
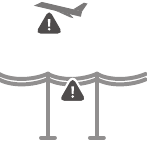
In order to make sure that it meets the requirement of the electromagnetic environment of the aviation radio station, flying within the scope of 10 kilometers on each side by taking the airport runway center line as the middle line is HIGHLY FORBIDDEN or flying within the scope of 20 kilometers by taking both ends of the runway as the center is HIGHLY FORBIDDEN. Flying on the route of the airline is also PROHIBITED. Stop using all kinds of flying models or unmanned Quad-rotors in the AREA that prohibited by related authority or department of our country.
PREFACE
- This product shoud be operated by the people who are over 14 years old. It is a precision device; integrating machinery and electronics with air mechanics and high frequency transmission. It requires correct assembly and debugging to avoid any accident. The user should operate and control this product in a safe manner. In case of incorrect operation, it may cause serious injury or damage property. It can also be lost due to incorrect operation.
- This product is suitable for experienced UAV pilots no less than 14 years of age.
- In the event of a problem during using, operating, or maintenance, please contact the local sales agent or retailer or keep in touch with the responsible staff of our company.
SAFETY PRECAUTIONS:
This R/C aircraft can be dangerous when in use, please make sure you keep it far away from any persons or spectators when flying. In-correct installation, poor conditions, or users not familiar with operation may cause damage to the aircraft or injure people or may cause an unexpected accident. Please pay close attention to flying safety and learn to recognize more dangerous conditions which may cause an accident due to your own negligence.
- Keep it far away from any structures or crowds.
This R/C aircraft may vary slightly in speed or sensitivity while flying and can cause potential danger. Therefore, please keep it far away from crowds, buildings, trees, structures, high-voltage wire, etc. Please also avoid flying in adverse weather conditions such as rain, electrical storms, and high winds to ensure safety of the user, any spectators, and surrounding property. - Keep it away from any moist environment.
The inside of the aircraft is composed of many precision electronic and mechanical parts. Therefore, please try to avoid any moisture or water content from entering the main body of the aircraft as it may cause a breakdown of the mechanical and electronic parts and thus cause an accident. - Only operate with included parts for intended use.
Please use the original parts made by SJ-Series for any re-equipping or maintenance to ensure flying safety. Please operate and use only under the scope of the product function permitted. Using un-approved parts will void warranty.
DO NOT use for any illegal purpose or use beyond the scope of which your local laws and regulations have stipulated. - Avoid controlling it independently.
New users may have certain difficulties during the early stages of learning to operate this aircraft. Please try to avoid operating the aircraft alone. When available, always operate this aircraft under the guidance of a more experienced user. - Do not operate under the influence of drugs or alcohol.
Please operate this R/C aircraft according to your own state and flying skill. Any fatigue, bad mental state, or incorrect operation may increase the probability of accidental risk. - Please keep a safe range from aircraft when using top speed.
When the operator is flying in high speed, please keep the aircraft far from the pilot and any surrounding persons or objects so as not to cause danger or damage. - Store it in a cool, dry place.
The R/C aircraft is composed of material such as metal, fiber, plastic, electronics, etc. Therefore, please keep it away from any heat source and avoid prolonged exposure to direct sunlight. Excessive heat exposure can cause distortion and damage.
- NOTE: This equipment has been tested and found to comply with the limits for a Class B digital device, pursuant to part 15 of the FCC Rules. These limits are designed to provide reasonable protection against harmful interference in a residential installation. This equipment generates, uses and can radiate radio frequency energy and, if not installed and used in accordance with the instructions, may cause harmful interference to radio communications.
- However, there is no guarantee that interference will not occur in a particular installation. If this equipment does cause harmful interfer-ence to radio or television reception, which can be determined by turning the equipment off and on, the user is encouraged to try to correct the interference by one or more of the following measures:
- Reorient or relocate the receiving antenna.
- Increase the separation between the equipment and receiver.
- Connect the equipment into an outlet on a circuit different from that to which the receiver is connected.
- Consult the dealer or an experienced radio/TV technician for help.
- Please note that changes or modifications not expressly approved by the party responsible for compliance could void the use’s authority to operate the equipment.
WARNING
- There is important information contained in this package and instruction manual, please keep it for future reference.
- You have the responsibility to make sure that this model of aircraft won’t cause injury to others’ body or cause any damage to property.
- Please operate strictly as shown on the instruction manual when debugging or assembling this aircraft. During the process of flying or landing, please pay more attention to keep 1-2 meters between the user and the aircraft to avoid colliding to the head or face or body, which may cause injury.
- Our company and distributors won’t be responsible for any incorrect operation, which may cause loss or damage or injury to the body.
- Children ages 14 and up should use this product under the guidance of an adult. This product is FORBIDDEN to be used by children under 14 years old.
- Please correctly assemble and use this product as shown on the instruction manual or packing instruction. Some parts should be assembled by an adult.
- Small parts are included with this product. Please place it beyond the reach of the children to avoid a CHOKING HAZARD or parts being mistakenly swallowed.
- Playing on the road or near high traffic areas is strictly FORBIDDEN so as not to cause an accident.
- Please dispose of the packing material timely so as not to cause injury to children.
- Please DO NOT disassemble or re-equip the aircraft as it may cause a breakdown of the aircraft during flying.
- Batteries in the battery compartment of the charger should be inserted into the designated power source which has the same logo as the product.
- Built-in rechargeable 3.7V lithium polymer battery included in the transmitter.
- Only the original charger made from our factory can be used.
- Charger is not a toy.
- When charging the battery, please conduct it under the surveillance of an adult. Please also keep it far away from any combustible object when charging. Please keep this aircraft within eyesight when charging.
- Please DO NOT make it short-circuited or squeeze the battery so as not to cause an explosion.
- DO NOT mix the Li-ion battery with a different type of battery.
- Intelligent lithium battery is loaded in the Quad-rotor. Both built-in or external can be used for charging.
- Please DO NOT make the battery short-circuited or decompose the battery or throw the battery into the fire; DO NOT place the batteries near the high temperature or heated area (such as near the fire or near the electric heating device).
- The aircraft should be kept far away from any other electric compliance or equipment as far as possible or kept far away from the place where having the magnetic object nearby as they may cause interference with each other.
- Please keep the safe distance from the high-speed rotating rotor so as not to cause twisted or danger of being wounded or being cut.
- Engine will heat up. Please DO NOT touch it to avoid being burned or injured.
- Please DO NOT close this product to your ear as it may cause injury to your hearing.
- Mini USB 5V wall charger recommended for charging. DO NOT use any charger stronger than 5V.
- To comply with the command of the magnetic environment requirement formulated by the Aviation Radio Bureau and the related authority, during the regulated period in certain areas, please stop using the transmitter of this model when such regulation command is issued.
- Keep your UAS within sight.
- Never fly over groups of people.
- Never fly over stadiums or sports events.
- Understand airspace restrictions and requirements.
CHOKING HAZARD — Small parts.
Not for children under 3 years.
Product should only be used by adults and children 14 years and older. Adult supervision required for children under 14 years of age.
CHARGING OF THE AIRCRAFT BATTERY MUST BE SUPERVISED AT ALL TIMES BY AN ADULT. UNPLUG THE BATTERY WHEN FULLY CHARGED. DO NOT OVER-CHARGE THE BATTERY.
FLY SAFETY
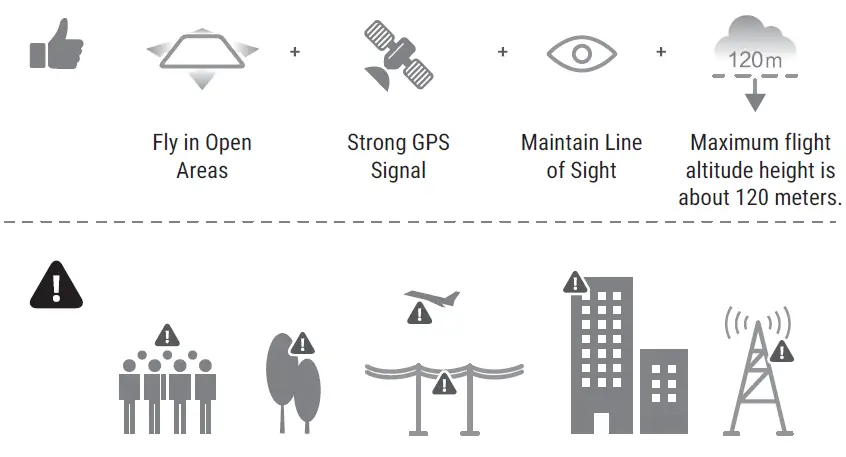
Fly in Open Areas
Strong GPS Signal
Maintain Line of Sight
Maximum flight altitude height is about 120 meters.
Avoid flying over or near obstacles, crowds, high voltage power lines, trees, airport or bodies of water.
DO NOT fly near strong electromagnetic sources such as power lines and base stations as it may affect the onboard compass.

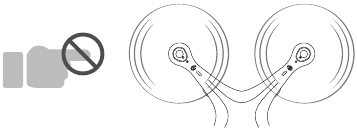
Stay away from the rotating propellers and motors.
No Fly Zone

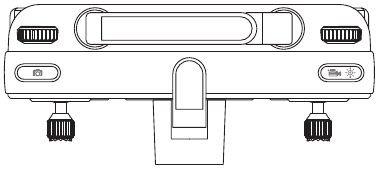
TRANSMITTER FUNCTIONS
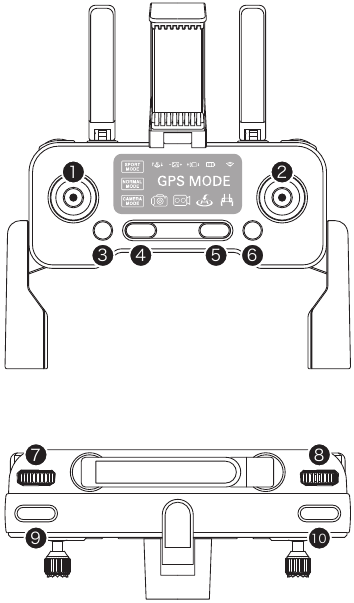
- Throttle stick
- Direction stick
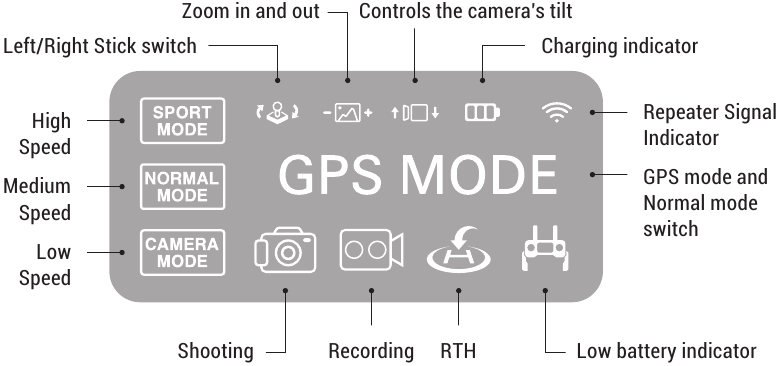
- Click once speed switch
- Click once then keep pressing for 3 seconds to emergency stop
- Click once power on; Click once then keep pressing for 3 seconds power off
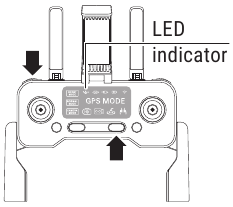
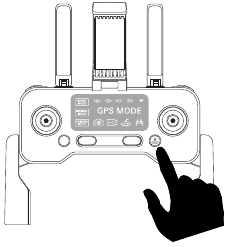
- Click once to RTH mode; Keep pressing for 5 seconds switch to normal mode, GPS mode
- Zoom in and out
- Gimbal Dial: Controls the camera’s tilt
- Shooting
- Recording
Tip: When the transmitter is in low power, the power indicator light on the transmitter will keep flashing, now you need to charge the transmitter.
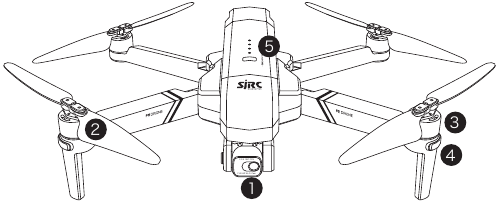
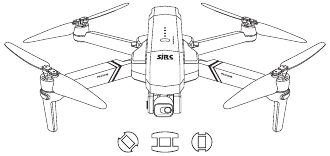
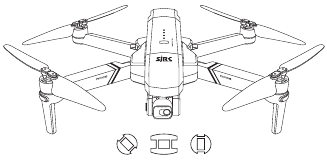
AIRCRAFT DIAGRAM
- 2-Axis stable Gimbal 4K Wifi camera
- Propeller
- Motor
- LED indicator
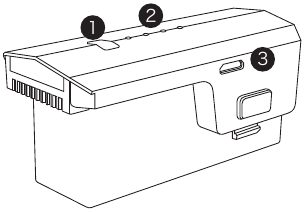
- Intelligent battery
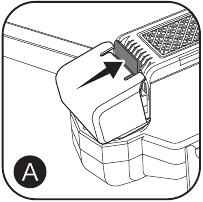
- Open the gimble cover buckle.
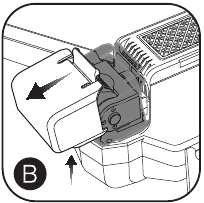
- Pull the gimble cover up then gently take it off.
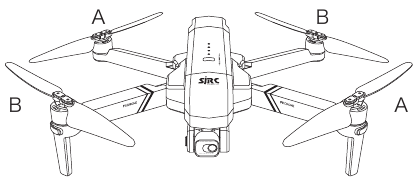
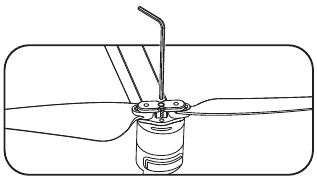
- ASSEMBLE THE PROPELLER
Please note that the letter «A» or «B» is printed on each propeller, and make sure all the propellers are attached in the correct motor position. - INTELLIGENT FLIGHT BATTERY
- Battery switch
- Battery power indicator
- USB charging port
- Hold the switch button for 3 sec. power on; then press the button for 3 sec. power off.
- When the battery in low voltage, Blue indicators will be blinking, now please charge the battery.
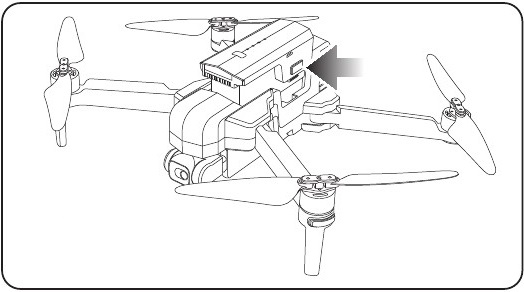
- CHARGE THE BATTERY
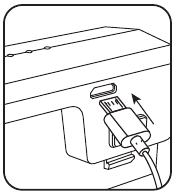
Press the buckle and take out the battery from the aircraft.
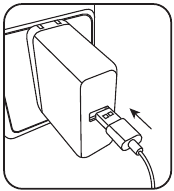
Phone adapter: 5V ⎓ 3A (Not included)
Charging time: About 4.5 hours (Depending on Charging adapter)
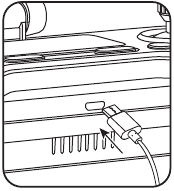
Remote control charging method - LITHIUM BATTERY CHARGING INSTRUCTIONS
- Either power on or power off, the aircraft can be charged. Connect the USB charger to an DC power supply(4.5V-5.5V,2A-3A), and then connect with the charging port of the aircraft, when in charging, the indicator on the aircraft will become Blue blinking; when fully charged, the indicator on the aircraft will turn to solid blue.
- Quad-copter can be charged by the mobile power or car-loaded power.
- Charging time takes about 4.5 hours; operating time takes about 26min.
- Remote control is built-in 3.7V 300mAh lithium polymer battery, charging time takes about 25min. (Battery indicators turn RED during charging; Indicators turn to SOLID BLUE when fully charged).
(When in charging, the indicator on the transmitter become Red; when fully charged, the indicator on the transmitter will turn to solid Green).
REMOTE CONTROL OPERATING METHOD
Throttle Joystick
Direction Joystick
FLIGHT
- Turn on the aircraft and set down on a level surface
- The aircraft will auto-trim to this level surface.
- Four aircraft arms — Blinking Red.
- Power on the remote control
- Power on the remote control and link the aircraft automatically.
- Lights flashing blue (back) and white (front).
- NOTE: You connect to the WIFI at this time to view the current drone on the SJ F PRO App, or wait until after GPS is calibrated.
- Connect APP
- Connect your smart phone to the WIFI of aircraft and check the aircraft’s status on the «SJ F PRO» APP.
- Connect your smart phone to the WIFI of aircraft and check the aircraft’s status on the «SJ F PRO» APP.
- Compass Calibration
- Compass Calibration Part 1
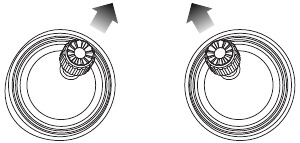
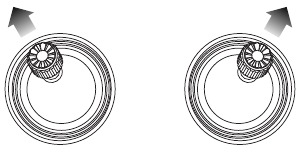
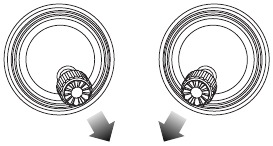
- Push the joysticks into the 1 & 11 o’clock position.
- Lights rapid-blinking Blue/red (back) and White/red(front).
- App aircraft status: «Compass calibration».
Remark: The compass will be calibrated automatically when the magnetic interference occur, it is not necessory to calibrate the compass by manually.
- Compass Calibration Part 2
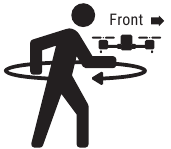
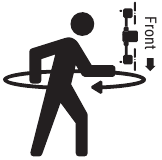
- Keeping the drone level, pick up the aircraft from the back and rotate your body in one full circle (360°).
- Back lights will turn to solid blue.
- Compass Calibration Part 3
- From the bottom, hold the aircraft vertically and camera is facing to the ground, rotating your body in one full circle(360°).
- Front lights will turn to solid white.
- App aircraft status: «Compass calibration okay».
- Compass Calibration Part 1
- Reset to factory Setting/Calibrate Gyroscope
- Push the joysticks into the 11 & 1 o’clock position.
- Lights rapid-blinking blue (back) and white (front).
- App Drone Status: «Gyroscope is being calibrated» «Gyroscope okay».
NOTICE: Make sure the aircraft on a flat surface to calibrate gyroscope.
- GPS Searching (DO NOT use GPS Mode indoor)
- Set the aircraft back down to level surface.
- Lights return to rapid-blinking blue (back) and white (front) —This means the drone is searching the GPS signal.
- This process can take a few minutes.
- App aircraft status: «Waiting for GPS signal».
NOTICE: Fly in open areas, tall structures and large metal structures may affect the accuracy of the onboard compass and GPS system. Please search the GPS signal in the open areas.
Starting/Stopping motors
- Push the joysticks into 5 & 7 o’clock position.
- Motors automatically to start, push the left joystick to take off the aircraft. (Starting the motors before the aircraft taking off).
NOTE: Starting the motors should be set before the aircraft take off. - Stopping Motors:
- Pushing the joysticks into 5 & 7 o’clock position again, motors stop working.
- The motors will stop working if the motors starting are not operated after 20 seconds.
All LEDs on the front arms and rear arms, you are ready to fly!
- Blue (back) and white (front) lights are all solid (no blinking).
- App aircraft status: «Ready to fly».
Dual Remote Controller Mode
WAY POINT FLIGHT
POINT OF INTEREST
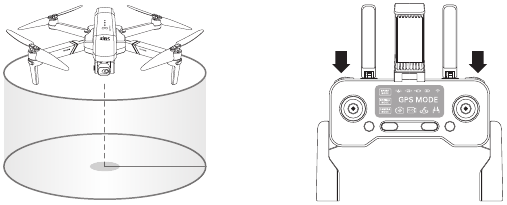
- Hovering the aircraft around the center point.
- Press «
+
» on the transmitter at the same time.
- Moving and setting the aircraft surround radius range (within 2 meters-100 meters)by the Direction Joystick.
- Press «
+
» on the transmitter at the same time again, then the aircraft starts to fly arround according to the radius range you set in STEP 2 (Note: If the surround radius range less than 2 meters, the aircraft will fly to 2 meters automatically). Move the Direction Joystick to cancel the Point of Interest mode.
NOTE: Press «+
» on the transmitter at the same time, Point of Interest Function» can be activated if the aircraft and transmitter sucessfully paired and the aircraft flies up.
PRODUCT FUNCTION PROFILE
- EMERGENCY STOP
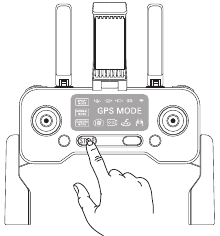
Clicking once and keep pressing the
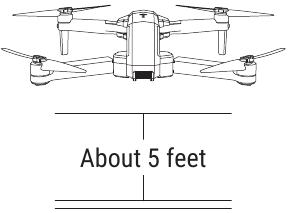
for 3 seconds to enter into Emergency Stop mode. It is activated if the flight height of aircraft within 13 meters; otherwise, it is not activated.
Only stop motors mid-flight in emergency when doing so can reduce the risk of damage or injury. - GPS FOLLOW-ME
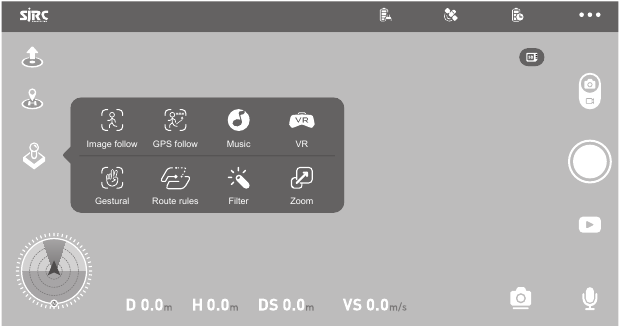
When the Follow Me function activated, the aircraft will follow the GPS in your smart phone to follow you wherever you go. (Make sure the smart phone connect with the aircraft successfully, turn on APP on your smart phone.)- Make sure the flight scope is within 10-100 meters.
- Click
on the APP interface.
- Waiting for APP aircraft Status to display «Follow Me ready» —Now the aircraft is moving along with the positioning coordinate on the APP.
- Click the
on the APP interface again to exit the Follow Me mode.
Common lssues:
GPS Follow-me function will be affected by the tall structures, trees and the living areas with WIFI signal inteference.
GPS Follow-me function is not activated if the GPS signal weak or GPS positioning OFF in the mobile device.
* Use in open area and be mindful of your surroundings. Aircraft is NOT equipped with obstacle avoidance.
- IMAGE RECOGNITION FOLLOW ME/GESTURE CONTROL
Click, choose
, tap on the object or person you want to track, and tap to confirm your selection.
(NOTE: Make sure the size of the frame you mark is the same as the object or person you tap, the frame should not be too large.) - HAND GESTURE
Clickon the APP, count down 3 seconds to 0 seconds with the hand motion to take photos or record the video, please follow the tips from the (PIC.1).
- RETURN-TO-HOME (RTH)
The Return to Home (RTH) function bring the aircraft back to the Take Off Point. This function only can be achieved under GPS mode. There are 3 types of RTH: Smart RTH/Low-battery RTH/Fail connection RTH- Smart Return To Home
Press the Return to Home Button on your Transmitter or tap on the App of your smart phone, and the transmitter will start beeping. Your aircraft will return to the TAKE OFF Point. Press the button again to stop RTH procedure. or alter the left and right joysticks to make the aircraft landing in the safe area.RTH Button
The app´s RTH Button
- Low-Battery return to home
Low-Battery RTH is triggered when the Flight Battery level is low, When low battery RTH activated, aircraft ascends or descends automatically at the height altitude of 30 meters, then you can alter the left and right joysticks to make it landing in the safe area. Aircraft returns to the take-off point if the current battery level can only support the aircraft long enough to decend from the current altitude. - Fail connection RETURN-TO-HOME (RTH)
Aircraft will enter Return to Home Mode if the signal to the transmitter is lost. The aircraft will return to the take-off point. The aircraft may link the remote control automatically during the RTH activated. If links sucessfully, you can re-operate the aircraft.
This aircraft is NOT equipped with obstacle-avoidance.
- Smart Return To Home
- TRIM UNDER NO GPS MODE
If the aircraft flies under NO GPS Mode, you can trim the aircraft to obtain more balanced flight. Keep pressingbeep once, and you will enter the trim mode. Push the direction joystick to the opposite side that the aircraft drifts to rebalance the aircraft. For example, if the aircraft drifts to the left, push the direction joystick to the right to make the aircraft balanced. Release the
, exit the Trim Mode.
DOWNLOAD THE SJ GPS PRO APP
QR code of «SJ F PRO» software for Apple IOS system (Please scan this QR code to install this software).
QR code of «SJ F PRO» software for Android system (Please scan this QR code to install this software).
- Connect the power of this model, and then access into «SETTING» in the smart phone, open the «WIFI» and find the «SJ F PRO_XXXX». When the link is successfully connected, please exit the «Setting» option.
- Open «SJ F PRO» software in the smart phone to access into the control interface.
APP FUNCTIONS
- APP INTRODUCTION
Wait until the aircraft Status says «Ready to Fly» before initiating flight. This will ensure that your GPS is synced and your aircraft is ready to fly. - APP ONE KEY SHARE FUNCTION
Pic. 1
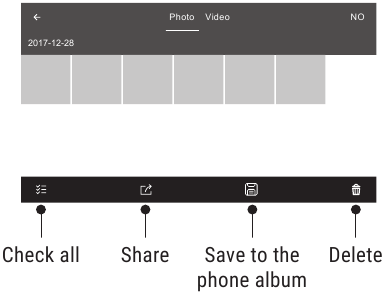
Pic. 2
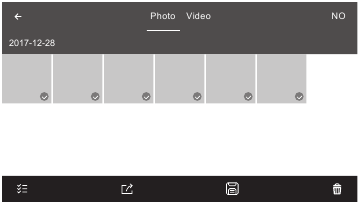
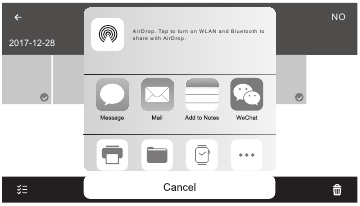
Pic. 3- Open the APP, click
, enter into the file (Pic 1.)
- Click once or press
to choose the photos which will be shared, click
, choose the platforms that need to be shared (Pic 3).
Reminder: You can share 1 picture or 9 pictures at the same time. But Only one video can be shared each time.
- Open the APP, click
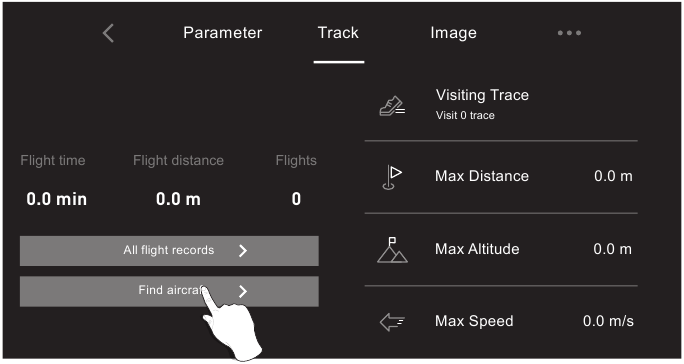
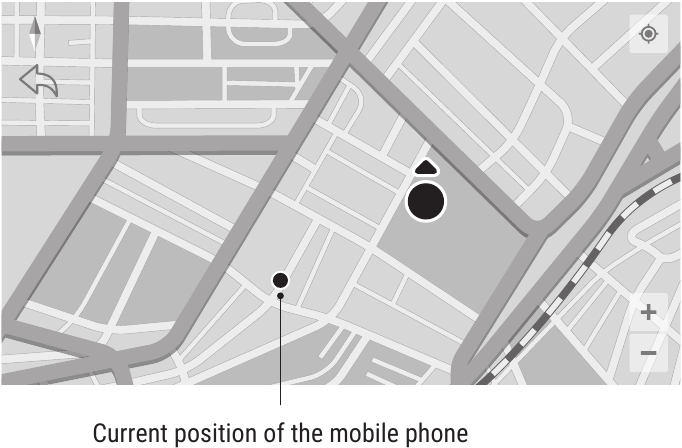
- HOW TO SEARCH THE LOST DRONE
- Continue to click
to open the MAP surface to search the aircraft.
- The last position of lost aircraft will be appeared on the MAP.
- Continue to click
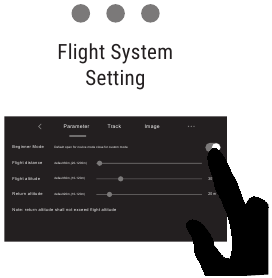
- FLIGHT
The Default GPS Mode is BEGINNER MODE:- Flight Distance is between 0-30 M.
- Flight Altitude is between 0-30 M.
- RTH Altitude is under 20 M.
You can Turn-off the BEGINNER MODE to set the parameters in the APP from the smart phone
CAMERA FUNCTIONS
ICON ON APP

Click 


Click 


Press 
DO NOT take photo during recording.
NOTE: When using the «SJ F PRO» app, the original photos and videos will be compressed and saved to smartphone.
The Original images and videos are saved in the TF card. Press the SD card slightly to take it out, then insert the card into the card reader and insert into the USB outlet of a computer to read the data from SD card. The images can be also viewed in the App.
SPECIFICATIONS
- Drone
MODEL: F11 4K PRO
Weight (Including Battery): 585g/20.6oz
Flight Time: About 26 min
WIFI real — time transmission distance: about 1200m (Depends on the environment and the mobile device).
Motor Model: 1806
Operating Temperature Range: 32° to 104°F ( 0° to 40°C)
Satellite Systems: GPS/GLONASS
Dimensions (LxWxH): Unfolded: 45X40.5X8(cm) Folded: 17.6X10.5X8(cm) - Gimbal Stabilization: 2-axis (tilt, roll)
Mechanical Range: Tilt About -100°TO+70° Roll About -35°TO+35°
Controllable Range: Adjusted angle of camera (up and down): About -80°TO+0° - Camera
Lens: FOV:100°
Equivalent Focal Length: 60CM
Focus range: Fixed-focus
Resolution of photo: Phone 3840X2160P SD card 3840X2160P
Resolution of video: Phone 1280X720P SD card 3840X2160P
Photo Format: JPEG
Video Format: MP4
Supported SD Cards: Micro SD card (Class 10/U1 or later) 32G-128G
Supported File Systems: FAT32 - 5G Transmission
Operating Frequency: 5150-5350MHZ, 5460-5720MHZ, 5725-5825MHZ
Transmitter Power (EIRP): 24dbm
Supported Transmission Protocol: 802.11a; 802.11n20; 802.11n40
Max Transmission Distance (unobstructed and free of interference): 1200m(depend on the mobile device)
Video Transmission Frame Rate: 30FPS - APP / Live View
Mobile App: SJ F PRO
Live View Working Frequency: 5150-5350MHZ, 5460-5720MHZ, 5725-5825MHZLive View Quality:
CONFIGURATION STORAGE METHOD RESOLUTION TRANSMISSION FRAME RATE 4K Phone Photo 3840X2160P Video 1280X720P 30 fps SD card Photo 3840X2160P 30 fps Video 3840X2160P Required Operating System: IOS 9.0 or later/Android 5.0 or later
- Transmitter
Operating Frequency: 2.4 GHz
Capacity: 300 mAh
Operating Voltage: 3.7V
Max transmission distance: Up to 1500m (Outdoor and unobstructed )
Max Charging Time: 25 min
Operating Time: About 11 Hours
Mobile Device Holder: 4.7˝ to 6.5˝ Smart Phones
Operating Temperature: 32° to 104°F ( 0° to 40°C )» - Intelligent Flight Battery
Capacity: 2500 mAh
Voltage: 11.1V
Battery Type: Li-polymer
Energy: 27.75Wh
Net Weight: 195 g / 6.8 oz
Max Charging Power: 15W
Max Charging Time: About 4.5 hours (Depending on Charging Power)
Charging Temperature Range: 32° to 104°F ( 0° to 40°C ) - USB Cable
Voltage: 5V ⎓ 3A
Rated Power: ≤15 W
PARTS LIST (Included)
Blade X4
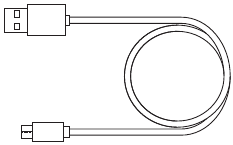
USB cable X1 Only for charging
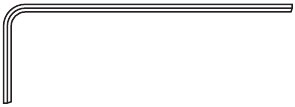
Screw driver X1
Screw X12
Instructions X1
COMMON PROBLEMS AND SOLUTIONS
| THE PROBLEM | REASON | COUNTERMEASURES |
| Drone lights flashing and no response from the drone when operating. |
|
|
The blades spin, but the drone cannot takeoff |
|
|
The quadcopter shakes heavily |
The blades distorted. | Replace the blades. |
Drone cannot stay balanced in flight |
|
|
Videos
Overview & Basic Functions (Part 1) Video
IOS, Android & Advanced Features & Functions (Part 2) Video
Documents / Resources
References
Download manual
Here you can download full pdf version of manual, it may contain additional safety instructions, warranty information, FCC rules, etc.
Download SJRC F11 4K PRO User GPS Folding Drone Manual
Складной самолет SJRC F11 4K Pro
УЛЬТРАПОРТАТИВНЫЙ И СКЛАДНОЙ
Чтобы убедиться, что он соответствует требованиям электромагнитной обстановки авиационной радиостанции, пролетайте в пределах 10 километров в каждую сторону, принимая осевую линию взлетно-посадочной полосы аэропорта в качестве средней линии, или пролетая в пределах 20 километров. км по обоим концам взлетно-посадочной полосы, так как движение по центру КАТЕГОРИЧЕСКИ ЗАПРЕЩЕНО. Полеты по маршруту авиакомпании также ЗАПРЕЩЕНЫ. Прекратите использование всех видов летающих моделей или беспилотных квадрокоптеров в РАЙОНЕ, которые запрещены соответствующими органами или ведомствами нашей страны.
ПРЕДИСЛОВИЕ
Благодарим вас за приобретение самолета GPS серии SJ. Пожалуйста, внимательно прочитайте все инструкции и предупреждения перед началом работы. Пожалуйста, также сохраните это руководство по эксплуатации для дальнейшего использования и технического обслуживания.
ВАЖНО: 1. Этот продукт должен эксплуатироваться лицами старше 14 лет. это
прецизионное устройство; интеграция машин и электроники с механикой воздуха и высокочастотной передачей. Это требует правильной сборки и отладки, чтобы избежать каких-либо аварий. Пользователь должен эксплуатировать и контролировать этот продукт безопасным образом. Неправильная эксплуатация может привести к серьезным травмам или материальному ущербу. Также он может быть утерян из-за неправильной эксплуатации. 2. Этот продукт подходит для опытных пилотов БПЛА не младше 14 лет. 3. В случае возникновения проблем во время использования, эксплуатации или технического обслуживания обратитесь к местному торговому агенту или продавцу или свяжитесь с ответственным персоналом нашей компании.
МЕРЫ ПРЕДОСТОРОЖНОСТИ:
Этот радиоуправляемый летательный аппарат может быть опасен при использовании, пожалуйста, убедитесь, что вы держите его подальше от людей или зрителей во время полета. Неправильная установка, плохие условия или пользователи, не знакомые с работой, могут привести к повреждению летательного аппарата или травмировать людей или стать причиной неожиданного происшествия. Пожалуйста, обратите особое внимание на безопасность полетов и научитесь распознавать более опасные условия, которые могут привести к несчастному случаю из-за вашей собственной небрежности.
- .Держите его подальше от каких-либо структур или толпы. Этот радиоуправляемый летательный аппарат может немного изменять скорость или чувствительность во время полета и может представлять потенциальную опасность. Поэтому, пожалуйста, держите его подальше от толпы, зданий, деревьев, строений, высокочастотныхtage провода и т. д. Также избегайте полетов в неблагоприятных погодных условиях, таких как дождь, гроза и сильный ветер, чтобы обеспечить безопасность пользователя, зрителей и окружающего имущества.
- Держите его подальше от любой влажной среды. Внутренняя часть самолета состоит из множества прецизионных электронных и механических частей. Поэтому старайтесь избегать попадания влаги или воды внутрь корпуса дрона, так как это может привести к выходу из строя механических и электронных частей и, как следствие, к аварии.
- Используйте только детали, входящие в комплект поставки, для использования по назначению. Пожалуйста, используйте оригинальные детали, произведенные SJ-Series, для любого переоборудования или технического обслуживания, чтобы обеспечить безопасность полетов. Пожалуйста, эксплуатируйте и используйте только в рамках разрешенной функции продукта. Использование неодобренных деталей приведет к аннулированию гарантии.
ЗАПРЕЩАЕТСЯ использовать в каких-либо незаконных целях или использовать, выходящие за рамки, предусмотренные местными законами и постановлениями. - Старайтесь не контролировать его самостоятельно. Новые пользователи могут столкнуться с определенными трудностями в началеtagКак научиться управлять этим самолетом. Постарайтесь не управлять коптером в одиночку. Если возможно, всегда управляйте этим дроном под руководством более опытного пользователя.
- Не работайте под воздействием наркотиков или алкоголя. Пожалуйста, управляйте этим радиоуправляемым летательным аппаратом в соответствии с вашим состоянием и летными навыками. Любая усталость, плохое психическое состояние или неправильная работа могут увеличить вероятность случайного риска.
- Пожалуйста, держитесь на безопасном расстоянии от самолета при использовании максимальной скорости. Когда оператор летит на высокой скорости, держите дрон подальше от пилота и любых окружающих людей или объектов, чтобы не создавать опасности или повреждений.
- Храните его в прохладном, сухом месте. Радиоуправляемый летательный аппарат состоит из таких материалов, как металл, волокно, пластик, электроника и т. д. Поэтому держите его вдали от любых источников тепла и избегайте длительного воздействия прямых солнечных лучей. Чрезмерное тепловое воздействие может привести к деформации и повреждению.
ПРИМЕЧАНИЕ: Это оборудование было протестировано и признано соответствующим ограничениям для цифровых устройств класса B в соответствии с частью 15 правил FCC. Эти ограничения разработаны для обеспечения разумной защиты от вредных помех при установке в жилых помещениях. Это оборудование генерирует, использует и может излучать радиочастотную энергию и, если оно установлено и используется не в соответствии с инструкциями, может создавать вредные помехи для радиосвязи.
Однако нет гарантии, что помехи не возникнут в конкретной установке. Если это оборудование создает вредные помехи для радио- или телевизионного приема, что можно определить, выключив и включив оборудование, пользователю рекомендуется попытаться устранить помехи одним или несколькими из следующих способов:
- Изменить ориентацию или местоположение приемной антенны.
- Увеличьте расстояние между оборудованием и приемником.
- Подключить оборудование к розетке в цепи, отличной от той, к которой подключен приемник.
- Обратитесь за помощью к дилеру или опытному радио / телевизионному технику.
·Обратите внимание, что изменения или модификации, не одобренные явным образом стороной, ответственной за соответствие требованиям, могут привести к аннулированию разрешения пользователя на эксплуатацию оборудования.
ПРЕДУПРЕЖДЕНИЕ
- В этом пакете и руководстве по эксплуатации содержится важная информация, пожалуйста, сохраните ее для дальнейшего использования.
- Вы несете ответственность за то, чтобы эта модель самолета не причиняла вреда другим людям или имуществу.
- Пожалуйста, действуйте строго так, как показано в руководстве по эксплуатации, при отладке или сборке этого самолета. Во время полета или приземления уделяйте больше внимания тому, чтобы между пользователем и дроном было расстояние 1-2 метра, чтобы избежать столкновения с головой, лицом или телом, что может привести к травме.
- Наша компания и дистрибьюторы не несут ответственности за любые неправильные действия, которые могут привести к потере, повреждению или травме тела.
- Дети в возрасте 14 лет и старше должны использовать этот продукт под руководством взрослых. Этот продукт ЗАПРЕЩЕНО использовать детям младше 14 лет.
- Пожалуйста, правильно соберите и используйте этот продукт, как показано в руководстве по эксплуатации или инструкции по упаковке. Некоторые детали должен собирать взрослый.
- Мелкие детали включены в этот продукт. Пожалуйста, поместите его в недоступном для детей месте, чтобы избежать ОПАСНОСТИ УДУШЬЯ или случайного проглатывания деталей.
- Играть на дороге или вблизи мест с интенсивным движением строго ЗАПРЕЩЕНО, чтобы не стать причиной аварии.
- Пожалуйста, своевременно утилизируйте упаковочный материал, чтобы не причинить вред детям.
- Пожалуйста, НЕ разбирайте и не переоборудуйте дрон, так как это может привести к поломке дрона во время полета.
Батареи в батарейном отсеке зарядного устройства должны быть вставлены в указанный источник питания с тем же логотипом, что и изделие. - Встроенная перезаряжаемая литий-полимерная батарея 3.7 В, включенная в передатчик.
- Можно использовать только оригинальные зарядные устройства, изготовленные на нашем заводе.
- Зарядка не игрушка.
- При зарядке батареи, пожалуйста, проводите ее под наблюдением взрослых.
- Пожалуйста, также держите его подальше от любых горючих предметов во время зарядки. Пожалуйста, держите этот дрон в поле зрения во время зарядки.
- НЕ допускайте короткого замыкания и не сжимайте аккумулятор, чтобы не вызвать взрыв.
- ЗАПРЕЩАЕТСЯ смешивать литий-ионный аккумулятор с аккумулятором другого типа.
- Интеллектуальная литиевая батарея загружена в квадрокоптер. Для зарядки можно использовать как встроенный, так и внешний
- Пожалуйста, НЕ закорачивайте батарею, не разлагайте батарею и не бросайте батарею в огонь; ЗАПРЕЩАЕТСЯ размещать батареи рядом с местами с высокой температурой или в местах с подогревом (например, рядом с огнем или рядом с электрическими нагревательными приборами).
- Дрон следует держать как можно дальше от любого другого электрического оборудования или оборудования или держать подальше от места, где поблизости находятся магнитные объекты, поскольку они могут создавать помехи друг другу.
- Пожалуйста, держитесь на безопасном расстоянии от высокоскоростного вращающегося ротора, чтобы не вызвать скручивание или опасность пораниться или порезаться.
- Двигатель будет нагреваться. Пожалуйста, НЕ прикасайтесь к нему, чтобы избежать ожогов или травм.
- Пожалуйста, НЕ приближайте этот продукт к уху, так как это может привести к повреждению слуха.
- Для зарядки рекомендуется настенное зарядное устройство Mini USB 5V. НЕ ИСПОЛЬЗУЙТЕ зарядное устройство сильнее 5В.
- Чтобы соответствовать требованиям к магнитной среде, сформулированным Авиационным радиоуправлением и соответствующим органом, в течение регулируемого периода в определенных областях, пожалуйста, прекратите использование передатчика этой модели, когда выдается такая команда регулирования.
- Держите свой БПЛА в пределах видимости.
- Никогда не летайте над группами людей.
- Никогда не летайте над стадионами или спортивными мероприятиями.
- Ознакомьтесь с ограничениями и требованиями воздушного пространства.
ПРЕДУПРЕЖДЕНИЕ: Продукт должен использоваться только взрослыми и детьми старше 14 лет. Для детей младше 14 лет требуется присмотр взрослых.
ПРЕДУПРЕЖДЕНИЕ: ЗАРЯДКА АВИАЦИОННОЙ АККУМУЛЯТОРНОЙ БАТАРЕИ ДОЛЖНА ПРОВОДИТЬСЯ ПОСТОЯННО ПОД КОНТРОЛЕМ ВЗРОСЛОГО. ОТСОЕДИНИТЕ АККУМУЛЯТОР, КОГДА ПОЛНОСТЬЮ ЗАРЯДИТСЯ. НЕ ЗАРЯЖАЙТЕ АККУМУЛЯТОР.
БЕЗОПАСНОСТЬ ПОЛЕТОВ
Избегайте полетов над препятствиями, толпами и рядом с ними, а также над ними.tagЛинии электропередач, деревья, аэропорт или водоемы. НЕ летайте рядом с сильными электромагнитными источниками, такими как линии электропередач и базовые станции, так как это может повлиять на работу бортового компаса.
ФУНКЦИИ ПЕРЕДАТЧИКА
- Ручка газа
- Ручка направления
- Нажмите один раз переключатель скорости
- Нажмите один раз, затем продолжайте нажимать в течение 3 секунд для аварийной остановки.
- Нажмите один раз при включении питания; Нажмите один раз, затем продолжайте нажимать в течение 3 секунд, чтобы выключить питание.
- Нажмите один раз, чтобы перейти в режим RTH; Продолжайте нажимать в течение 5 секунд, чтобы перейти в обычный режим, в режим GPS.
- Увеличить и уменьшить
- Gimbal Dial: управляет наклоном камеры
- Стрелялки
- запись
Совет: когда передатчик находится в режиме низкой мощности, индикатор питания на передатчике будет продолжать мигать, теперь вам нужно зарядить передатчик.
СХЕМА САМОЛЕТА
- 2-осевой механический стабилизатор с камерой с электронной стабилизацией изображения 4K
- Пропеллер
- двигатель
- Светодиодный индикатор
- Интеллектуальная батарея
A. Откройте пряжку крышки стабилизатора.
B. Потяните крышку стабилизатора вверх и осторожно снимите ее.
СБЕРИТЕ ВИНТ
Обратите внимание, что на каждом гребном винте напечатана буква «А» или «В», и убедитесь, что все гребные винты установлены в правильном положении двигателя.
ИНТЕЛЛЕКТУАЛЬНАЯ ПОЛЕТНАЯ БАТАРЕЯ

— Удерживать кнопку переключения в течение 3 сек. включить; затем нажмите кнопку на 3 сек. выключение.
— Когда батарея разряженаtage, синие индикаторы будут мигать, теперь зарядите аккумулятор.
ЗАРЯДИТЕ АККУМУЛЯТОР
- Телефонный адаптер: 5V 3A
(Не входит в комплект) - Время зарядки: около 4.5 часов (в зависимости от зарядного адаптера)
- Метод зарядки дистанционного управления
ИНСТРУКЦИЯ ПО ЗАРЯДКЕ ЛИТИЕВОЙ БАТАРЕИ
- Включите или выключите питание, самолет можно зарядить. Подключите зарядное устройство USB к источнику питания постоянного тока (4.5–5.5 В, 2–3 А), а затем подключите его к зарядному порту самолета. Во время зарядки индикатор на самолете начнет мигать синим цветом; при полной зарядке индикатор на дроне загорится синим цветом.
- Квадрокоптер можно заряжать от мобильной сети или от карбюратора.
- Время зарядки занимает около 4.5 часов; время работы занимает около 26 минут.
- В пульт дистанционного управления встроен литий-полимерный аккумулятор 3.7 В 300 мАч, время зарядки занимает около 25 минут.
(Индикаторы батареи становятся КРАСНЫМИ во время зарядки; индикаторы становятся ПОСТОЯННО СИНИМ при полной зарядке).
(Во время зарядки индикатор на передатчике становится красным; при полной зарядке индикатор на передатчике постоянно горит зеленым).
МЕТОД ДИСТАНЦИОННОГО УПРАВЛЕНИЯ
 ПОЛЕТ
ПОЛЕТ
Шаг 1: Включите коптер и установите его на ровную поверхность.
— Дрон будет автоматически балансировать на эту ровную поверхность.
— Четыре авиационных оружия — мигает красным.
 ДОСТОПРИМЕЧАТЕЛЬНОСТЬ
- Зависание летательного аппарата вокруг центральной точки.
- Одновременно нажмите «+» на передатчике.
- Перемещение и установка диапазона радиуса окружения летательного аппарата (в пределах 2 метров-100
метров) с помощью джойстика направления. - Нажмите «+» на передатчике еще раз, затем дрон начнет летать в соответствии с диапазоном радиуса, который вы установили в ШАГЕ 2. автоматически). Переместите джойстик направления, чтобы отменить режим точки интереса. ПРИМЕЧАНИЕ: Нажмите «+» на передатчике одновременно, функция «точка интереса» может быть активирована, если дрон и передатчик успешно сопряжены и дрон взлетает.
ХАРАКТЕРИСТИКИ
- трутень
МОДЕЛЬ: F11 4K PRO
Вес (включая батарею): 585 г/20.6 унции
Время полета: около 26 мин.
Модель двигателя: 1806
Диапазон рабочих температур: от 32° до 104° F (от 0° до 40° C)
Спутниковые системы: GPS/ГЛОНАСС
Размеры (ДхШхВ): в разложенном виде: 45X40.5X8 (см)
- Карданная стабилизация: 2 оси (наклон, крен)
Механический диапазон: наклон от -100° до +70°, поворот от -35° до +35°
Управляемый диапазон: регулируемый угол камеры (вверх и вниз): от -80° до +0°
Объектив: FOV: 100 °
Эквивалентное фокусное расстояние: 60 см
Диапазон фокусировки: фиксированный фокус
Разрешение фото: Телефон 3840X2160P
SD-карта 3840X2160P Разрешение видео: Телефон 1280X720P
SD-карта 3840X2160P
Формат фото: JEPG
Формат видео: поддерживается MP4
SD-карты: Micro SD-карта (класс 10/U1 или более поздняя версия) 32–128 ГБ
Поддержанный File Системы: FAT32
| КОНФИГУРАЦИЯ | СПОСОБ ХРАНЕНИЯ | Постановление | ЧАСТОТА КАДРОВ ПЕРЕДАЧИ | |
| 4K |
Телефон |
Фото | 3840X2160P | |
| Видео | 1280X720P | 30 кадров в секунду | ||
|
SD-карта |
Фото | 3840X2160P | 30 кадров в секунду | |
| Видео | 3840X2160P |
- передатчик
Рабочая частота: 2.4 ГГц
Емкость: 300 мАч
Рабочий объемtagе: 3.7 В
Максимальное расстояние передачи: до 1500 м (на открытом воздухе и без препятствий) Максимальное время зарядки: 25 мин.
Время работы: около 11 часов
Держатель мобильного устройства: Смартфоны с диагональю от 4.7 до 6.5 дюймов
Рабочая температура: от 32 ° до 104 ° F (от 0 ° до 40 ° C) - Интеллектуальная батарея полета
Емкость: 2500 мАч
Voltagе: 11.1 В
Тип батареи: литий-полимерная
Энергия: 27.75Wh
Вес нетто: 195 г / 6.8 унций
Максимальная зарядная мощность: 15W
Максимальное время зарядки: около 4.5 часов (в зависимости от мощности зарядки) Диапазон температур зарядки: от 32° до 104° F (от 0° до 40° C) - USB-кабель
Voltagе: 5В 3А
Номинальная мощность: ≤15 Вт
СПИСОК ДЕТАЛЕЙ (в комплекте)
ОБЩИЕ ПРОБЛЕМЫ И РЕШЕНИЯ
| ПРОБЛЕМА | ПРИЧИНА | КОНТРОЛЬНЫЕ МЕРЫ |
| Мигают огни дрона и нет ответа от дрона при работе. | 1. Пульт не синхронизирован с дроном.
2. Недостаточный заряд батареи. |
1. Обратитесь к краткому руководству и повторно синхронизируйте дрон.
2. Зарядите аккумулятор. |
| Лопасти вращаются, но дрон не может взлететь. | 1. Недостаточный заряд батареи.
2. Лопасти перекосились. |
1. Зарядите аккумулятор.
2. Замените лезвия. |
| Квадрокоптер сильно трясет. | Лезвия перекосились. | Заменить лезвия. |
|
Дрон не может сохранять равновесие в полете. |
1. Лопасти перекосились.
2. Двигатель работает неправильно. |
1. Замените лезвия. 2. Заменить мотор. |
Документы / Ресурсы
 |
Складной самолет SJRC F11 4K Pro [pdf] Инструкция по эксплуатации F11-4K-PROA, F114KPROA, 2ALUJF11-4K-PROA, 2ALUJF114KPROA, F11 4K Pro Складной самолет, 4K Pro Складной самолет |
-
Version
-
Download
4162 -
File Size
896.25 KB -
File Count
1 -
Create Date
June 24, 2021 -
Last Updated
June 24, 2021
From here you can download for free the SJRC F11 4K PRO instruction guide. The F11 4K Pro is a very capable GPS-enabled drone with some cool features. The PDF user manual includes the following chapters:
Table of content
- Safety instructions;
- Transmitter functions;
- Aircraft diagram;
- Propeller installation guide;
- Battery charging instructions;
- Remote controller operating method;
- Compass calibration how to;
- How to use the auto return to home function;
- APP download, installation, and user guide;
- Comon problems and solutions (troubleshooting).
Submitted by Gary from UK
- Manuals
- Brands
- SJRC Manuals
- Drones
- F11 4K PRO
Manuals and User Guides for SJRC F11 4K PRO. We have 2 SJRC F11 4K PRO manuals available for free PDF download: Manual, User Manual
SJRC F11 4K PRO User GPS Folding Drone Manual
Brand: SJRC
|
Category: Drones
|
Size: 1.14 MB
Table of Contents
-
PREFACE
-
WARNING
-
FLY SAFETY
-
TRANSMITTER FUNCTIONS
-
AIRCRAFT DIAGRAM
-
REMOTE CONTROL OPERATING METHOD
-
FLIGHT
-
WAY POINT FLIGHT
-
POINT OF INTEREST
-
PRODUCT FUNCTION PROFILE
-
DOWNLOAD THE SJ GPS PRO APP
-
APP FUNCTIONS
-
CAMERA FUNCTIONS
-
SPECIFICATIONS
-
PARTS LIST (Included)
-
COMMON PROBLEMS AND SOLUTIONS
-
The blades spin, but the drone cannot takeoff
-
The quadcopter shakes heavily
-
Drone cannot stay balanced in flight
-
-
Videos
-
Overview & Basic Functions (Part 1) Video
-
IOS, Android & Advanced Features & Functions (Part 2) Video
-
-
Documents / Resources
-
References
-
Advertisement
SJRC F11 4K PRO Manual (25 pages)
Folding Drone
Brand: SJRC
|
Category: Drones
|
Size: 1.14 MB
Table of Contents
-
Table of Contents
2
-
Preface
3
-
Warning
5
-
Fly Safety
7
-
Transmitter Functions
8
-
Aircraft Diagram
9
-
Assemble the Propeller
9
-
Intelligent Flight Battery
9
-
Charging the Battery
10
-
Lithium Battery Charging Instructions
10
-
Remote Control Operating Method
11
-
Flight
11
-
Compass Calibration
12
-
Way Point Flight
14
-
Point of Interest
14
-
Product Functions Profile
15
-
Emergency Stop
15
-
Gps Follow Me
15
-
Image Recognition Follow Me/Gesture Control
16
-
Hand Gesture
16
-
Return to Home
16
-
Download the Sj Gps Pro App
17
-
Trim under no Gps Mode
17
-
App Functions
17
-
Camera Functions
21
-
Specifications
22
-
Parts List
24
-
Common Problems and Solutions
24
Advertisement
Related Products
-
SJRC F11S 4K PRO
-
SJRC F22S
SJRC Categories
Drones
Quadcopters
More SJRC Manuals
SJRC F11 4K PRO Drones PDF User Guides and Manuals for Free Download: Found (1) Manuals for SJRC F11 4K PRO Device Model (Manual )
More Drones Device Models:
-
Potensic
F186 DH
025.814User ManualContentsImportant Statement·······················03Safety Precautions···················· · · ·03Safe Notice on the Li-Po Battery··············04Charging Method of Li-Po Battery·············0 5Flyer W a r n i n g s ······� …
F186 DH Drones, 8
-
Hot Wheels
RC BLADEZ DRONE RACERZ RAMP IT UP SET
WARNING:CHOKING HAZARDSmall parts. Not for Childrenunder 3 years.6. Back Red LED LightsArrière rouge LED / Rückseite rot LED / Rosso posteriore LED Trasera roja LED / Achter rood LED / Zadní červená LED dioda11. Speed SettingRéglage de la vitesse /Geschwindigkeitseinstellung Impostazione della velocità / Con� …
RC BLADEZ DRONE RACERZ RAMP IT UP SET Drones, 16
-
AEE
Toruk AP10
Larger body Higher 1ntegrat1on level H1gher and further flight Greater mobility Panoram1c shoot1ng Profess1onal and fashionable des1gn on airframe and remote control Dual control mode on camera Ra1n and snow proof Fly with freedom • Shoot with passion …
Toruk AP10 Quadcopters, 26
-
ImmersionRC
Vordex 250 Pro
250ProGettingStartedGuideInternationaleditionRev1.0-Dec2015EveryVortex250Proisflighttestedbeforeleavingthefactory.FlightTestedBy: …
Vordex 250 Pro Quadcopters, 16
Recommended Documentation:









 for 3 seconds to enter into Emergency Stop mode. It is activated if the flight height of aircraft within 13 meters; otherwise, it is not activated.
 on the APP interface.
 , choose
  , tap on the object or person you want to track, and tap to confirm your selection.
 on the APP, count down 3 seconds to 0 seconds with the hand motion to take photos or record the video, please follow the tips from the (PIC.1).
 RTH Button
  The app´s RTH Button
 beep once, and you will enter the trim mode. Push the direction joystick to the opposite side that the aircraft drifts to rebalance the aircraft. For example, if the aircraft drifts to the left, push the direction joystick to the right to make the aircraft balanced. Release the


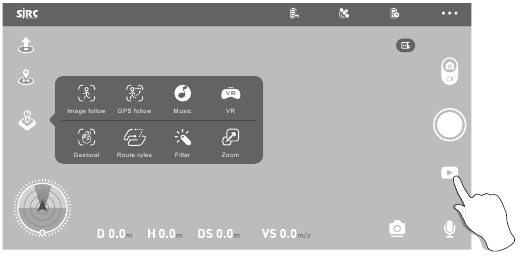
 , enter into the file (Pic 1.)
 to choose the photos which will be shared, click
  , choose the platforms that need to be shared (Pic 3).
 to open the MAP surface to search the aircraft.






 ПОЛЕТ
ПОЛЕТ ДОСТОПРИМЕЧАТЕЛЬНОСТЬ


