Драйверы
Для выполнения подключения некоторых устройств к компьютеру может потребоваться драйвер. На этой вкладке вы найдете соответствующие драйверы для своего устройства или, в случае отсутствия драйверов, описание совместимости устройства с каждой операционной системой.
Полезная информация. Доступ к программному обеспечению, руководствам и другим материалам можно получить с помощью вкладок, расположенных выше.
Программное обеспечение
Программное обеспечение загружать необязательно, но оно обеспечивает дополнительные функции и позволяет максимально эффективно пользоваться возможностями устройства. На этой вкладке можно просмотреть и загрузить доступное программное обеспечение для вашего устройства.
Программное обеспечение
Программное обеспечение загружать необязательно, но оно обеспечивает дополнительные функции и позволяет максимально эффективно пользоваться возможностями устройства. На этой вкладке можно просмотреть и загрузить доступное программное обеспечение для вашего устройства.
Руководства пользователя
Руководства для вашего устройства или программного обеспечения перечислены ниже.
Приложения и функции
На этой вкладке можно посмотреть доступные приложения и функции, совместимые с вашим устройством.
Встроенное ПО
Встроенное ПО — это постоянное программное обеспечение, установленное на устройстве и обеспечивающее его корректную работу. Canon может периодически выпускать обновления для этого встроенного ПО, и если обновление доступно, его можно загрузить ниже.
FAQs
На этой вкладке вы найдете ответы на часто задаваемые вопросы и другую полезную информацию, которая поможет вам в решении вопросов и проблем.
Важная информация
На этой вкладке вы найдете подборку часто задаваемых вопросов, которые, на наш взгляд, будут вам интересны.
Коды ошибок
Код ошибки или сообщение об ошибке может появиться на устройстве по различным причинам. С помощью поля поиска можно найти полезную информацию о конкретном коде ошибки, где будут указаны причина ошибки и необходимые действия по ее устранению.
Технические характеристики
Ниже приведены все технические характеристики данного продукта.
-
Contents
-
Table of Contents
-
Troubleshooting
-
Bookmarks
Quick Links
INSTRUCTION MANUAL
MODE D’EMPLOI
MANUAL DE INSTRUCCIONES
English
Français
Español
Related Manuals for Canon ST-E3-RT
Summary of Contents for Canon ST-E3-RT
-
Page 1
English Français INSTRUCTION MANUAL MODE D’EMPLOI Español MANUAL DE INSTRUCCIONES… -
Page 2: Introduction
Introduction The Canon Speedlite Transmitter ST-E3-RT is a transmitter for wireless flash shooting. It can control up to 5 groups (15 units) of Canon Speedlites that have a wireless multiple flash shooting function using radio transmission. The transmitter also has dust and water resistance equivalent to EOS-1D series cameras.
-
Page 3: Chapters
Chapters Introduction Getting Started Preparations for wireless flash shooting Wireless Flash Shooting: Radio Transmission Wireless flash shooting with radio transmission Setting Transmitter Functions with Camera Operations Setting the transmitter functions from the camera’s menu screen Customizing the Transmitter Customizing with Custom Functions and Personal Functions Reference System map, FAQ…
-
Page 4: Table Of Contents
Contents Introduction Chapters ………………..3 Nomenclature………………..6 Conventions Used in this Manual …………10 Getting Started Installing the Batteries…………….12 Attaching and Detaching the Transmitter……….13 Turning on the Power…………….13 Wireless Flash Shooting: Radio Transmission ‘ Wireless Flash Shooting …………..16 Wireless Settings ………………20 a: Fully Automatic Wireless Flash Shooting……..24 Using Fully Automatic Wireless Flash………….27 a: Wireless Multiple Flash Shooting with Flash Ratio ….31 q: Wireless Multiple Flash Shooting with Manual Flash Output ….34…
-
Page 5
Contents Customizing the Transmitter C / >: Setting Custom and Personal Functions ……54 C: Setting Custom Functions …………56 >: Setting Personal Functions …………58 Reference ST-E3-RT System ……………… 60 Troubleshooting Guide…………….61 Specifications ………………64 Index …………………. 70… -
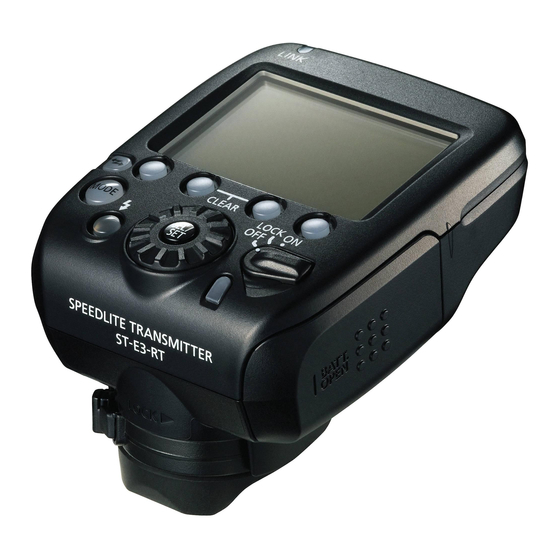
Page 6: Nomenclature
Nomenclature <D> Radio transmission LCD panel confirmation lamp (p.21, 23, 25, 30, 45) Function button 2 Function button 3 Function button 1 <I > Function button 4 Linked shooting button (p.44) <E > Flash mode button Battery compartment (p.24, 34, 35, 38) cover (p.12) Power switch (p.13) <K>…
-
Page 7
Nomenclature Nomenclature 02 Terminal cover Remote release terminal (p.42) Mounting foot (p.13) Contacts Locking pin Case… -
Page 8
Nomenclature LCD panel Radio transmission wireless shooting (p.15) E-TTL II/E-TTL autoflash (p.24) g : FEB (p.28, 50) FEB sequence (p.56) M : Master (p.20) : Sync speed warning (p.19) c : High-speed sync Flash exposure compensation amount T : Personal Functions (p.58) , : Flash ratio (p.31) Beep a : E-TTL II/E-TTL… -
Page 9
Nomenclature Stroboscopic flash (p.35) Multi (Stroboscopic) flash Number of flashes Flash frequency Group firing (p.38) [ : Group flash Flash mode Firing group Linked shooting (p.43) Linked shooting x : Slave M : Master… -
Page 10: Conventions Used In This Manual
The operation procedures assume that the menu and Custom Functions of the camera and the Custom Functions and Personal Functions of the transmitter and the Speedlite are at their default settings. All figures are based on the use of two AA/LR6 alkaline batteries and Canon’s testing standards.
-
Page 11: Getting Started
Getting Started This chapter describes the preparations before starting wireless flash shooting.
-
Page 12: Installing The Batteries
You can perform wireless flash shooting for approx. 10 hours* continuously. * Based on new AA/LR6 alkaline batteries and Canon’s testing standards. Using AA/LR6 batteries other than the alkaline type may cause improper battery contact due to the irregular shape of the battery contacts.
-
Page 13: Attaching And Detaching The Transmitter
Attaching and Detaching the Transmitter Attach the transmitter. Slip the transmitter’s mounting foot all the way into the camera’s hot shoe. Secure the transmitter. On the mounting foot, slide the lock lever to the right. When the lock lever clicks in place, it will be locked.
-
Page 14
Turning on the Power About Auto Power Off To save battery power, the power will turn off automatically after 5 min. of idle use. To turn on the transmitter again, press the camera’s shutter button halfway, or press the test flash button (charge lamp). About the Lock Function By setting the power switch to <a>, you can disable flash’s button and dial operations. -
Page 15: Wireless Flash Shooting: Radio Transmission
Wireless Flash Shooting: Radio Transmission This chapter describes wireless flash shooting. For the accessories required for wireless shooting, see the system map (p.60). For the regions of use, restrictions, and precautions related to radio transmission, refer to the separate leaflet. When the camera’s shooting mode is set to a fully automatic mode or an Image Zone mode, the operations in this chapter are not available.
-
Page 16: Wireless Flash Shooting
‘ Wireless Flash Shooting Using a transmitter and a Canon Speedlite compatible with radio transmission wireless shooting makes it easy to shoot with advanced wireless multiple flash lighting, in the same way as normal E-TTL II/ E-TTL autoflash shooting. The system is designed so that the settings of the transmitter attached to the camera (master) are automatically reflected on the Speedlite that is wirelessly controlled (slave).
-
Page 17
‘ Wireless Flash Shooting Wireless Multiple Flash Shooting You can divide the slave units into two or three groups and perform E-TTL II/E-TTL autoflash shooting while changing the flash ratio (factor). In addition, you can set and shoot with a different flash mode for each firing group, for up to 5 groups. -
Page 18
‘ Wireless Flash Shooting Shooting with a Different Flash Mode set for Each Group (p.38) Auto external flash metering Ceiling E-TTL II Manual flash Manual flash Manual flash * The flash mode settings are indicated only as an example. -
Page 19
‘ Wireless Flash Shooting About Restrictions on Functions Depending on the Camera Used When performing radio transmission wireless flash shooting, restrictions may apply to the flash mode, maximum flash sync speed (referred to below as the “flash sync speed”) and high-speed sync function, depending on the camera that you use. -
Page 20: Wireless Settings
Wireless Settings To perform wireless shooting, set the transmitter (master unit) and flash (slave unit) with the following procedure. Master Unit Setting Check that <M> is displayed. Check that <M> is displayed at the position shown in the figure. Slave Unit Setting Set a flash that is compatible with radio transmission wireless flash shooting as the slave unit.
-
Page 21
Wireless Settings Setting the Master Unit Transmission Channel / Wireless Radio ID Use the following procedure to set the master unit’s transmission channel and wireless radio ID. Set the same channel and ID for both the master unit and slave unit. For the slave unit settings, see the flash’s instruction manual. -
Page 22
Wireless Settings Scanning the Master Unit Transmission Channels to Set You can scan the radio reception status and set the master unit’s transmission channel automatically or manually. When the channel is set to “AUTO”, the channel with the best reception signal is automatically set. -
Page 23
Wireless Settings About the <D> Lamp The color of the <D> lamp changes depending on the transmission status of the master unit and the slave unit. Color Status Description Action Transmission Green – Not connected Check the channel and ID Master units + slave units = Too many units 16 units or less… -
Page 24: A: Fully Automatic Wireless Flash Shooting
a: Fully Automatic Wireless Flash Shooting This section describes basic fully automatic wireless shooting when using a transmitter attached to the camera (master) and a wirelessly controlled flash (slave). Autoflash Shooting Using One Slave Unit Set the flash as the slave unit. For the slave unit settings, see the flash’s instruction manual.
-
Page 25
a: Fully Automatic Wireless Flash Shooting Check the transmission status and that the flash is ready. Check that the <D> lamp is lit in green. When the slave flash is ready, the AF-assist beam emitter blinks at 1-second intervals. Check that the <Q> slave flash-ready icon is lit on the master unit’s LCD panel. -
Page 26
a: Fully Automatic Wireless Flash Shooting Autoflash Shooting Using Multiple Slave Units When you need more flash output or you want to perform lighting more easily, you can increase the number of slave units and fire them as a single flash. To add slave units, use the same procedure as “Autoflash Shooting Using One Slave Unit”. -
Page 27: Using Fully Automatic Wireless Flash
Using Fully Automatic Wireless Flash Flash exposure compensation and other settings set on the transmitter (master unit) will also be automatically set in the flash (slave unit). You do not need to operate the slave unit. f Flash Exposure Compensation In the same way as normal exposure compensation, you can set exposure compensation for flash.
-
Page 28
Using Fully Automatic Wireless Flash g FEB You can take three shots while automatically changing the flash output. This is called FEB (Flash Exposure Bracketing). The settable range is up to ±3 stops in 1/3-stop increments. Display <M>. Press function button 4 to display <M>. -
Page 29
Using Fully Automatic Wireless Flash c High-speed Sync With the high-speed sync function, the flash can synchronize with all shutter speeds. This is convenient when you want to use aperture- priority AE for fill-flash portraits of a subject. Display <P>. Press function button 4 to display <P>. -
Page 30
Using Fully Automatic Wireless Flash 7: FE Lock FE (Flash Exposure) lock locks the correct flash exposure setting for any part of the scene. Perform FE lock by operating the camera. For the operations, see the camera and flash’s instruction manual. If a correct exposure cannot be obtained when FE lock is performed, <Q>… -
Page 31: A: Wireless Multiple Flash Shooting With Flash Ratio
a: Wireless Multiple Flash Shooting with Flash Ratio Autoflash Shooting with Two Slave Groups You can divide the slave units into two firing groups, A and B, and adjust the lighting balance (flash ratio) for shooting. The exposure is controlled automatically so that the total flash output of firing groups A and B results in the standard exposure.
-
Page 32
a: Wireless Multiple Flash Shooting with Flash Ratio Set the flash ratio. Press function button 3 <F>. Press function button 3 <A>. Turn <9> to set the flash ratio, and press the <8> button. Press function button 4 <?> to return to the shooting-ready state. -
Page 33
a: Wireless Multiple Flash Shooting with Flash Ratio Set flash exposure compensation as required. Press function button 3 <F>, turn <9> and select <6>. Press function button 3 <B>. Turn <9> to set the flash exposure compensation amount, and press the <8>… -
Page 34: Q: Wireless Multiple Flash Shooting With Manual Flash Output
q: Wireless Multiple Flash Shooting with Manual Flash Output This describes wireless (multiple flash) shooting using manual flash. You can shoot with a different flash output setting for each slave unit (firing group). Set all parameters on the master unit. Set the flash mode to <q>.
-
Page 35
q: Wireless Multiple Flash Shooting with Manual Flash Output ?: Stroboscopic Flash Stroboscopic flash is an advanced manual flash shooting method. When using stroboscopic flash with a slow shutter speed, you can shoot multiple successive movements within a single picture, similar to stop- motion pictures. -
Page 36
q: Wireless Multiple Flash Shooting with Manual Flash Output Calculating the Shutter Speed In stroboscopic flash, to ensure that the shutter stays open until the end of the continuous flashes, set the camera with a shutter speed calculated with the following equation. Number of flashes ÷… -
Page 37
q: Wireless Multiple Flash Shooting with Manual Flash Output Maximum Number of Continuous Flashes 6 — 7 8 — 9 Flash Output 1/16 1/32 1/64 1/128 12 — 14 15 — 19 20 — 50 60 — 199 250 — 500 Flash Output 1/16… -
Page 38: Shooting With A Different Flash Mode For Each Group
[: Shooting with a Different Flash Mode for Each Group When using an EOS digital camera Ceiling released since 2012, such as the EOS-1D X, you can shoot with a different flash mode set for each firing group, with up to 5 groups (A/B/C/D/E).
-
Page 39
[: Shooting with a Different Flash Mode for Each Group Set the flash mode. Set the flash mode of each firing group by operating the master unit. While <M> is displayed, press function button 3 <F> and turn <9> to select the group. Press function button 2 <2>… -
Page 40: Clearing Transmitter Settings
Clearing Transmitter Settings/Test Flash from a Slave Unit Take the picture. Each slave unit fires in the flash mode that was set for each group. When the flash mode of the firing group is set to <a> or </>, exposure is controlled to obtain a standard exposure for the main subject as a single group.
-
Page 41: Modeling Flash
Modeling Flash When the camera’s depth-of-field preview button is pressed, the flash fires continuously for 1 sec. This is called the modeling flash. It enables you to see the shadow effects of the flash on the subject and the lighting balance.
-
Page 42: Remote Release From A Slave Unit
Remote Release from a Slave Unit You can perform remote release (remote control shooting) from a flash set as a slave unit. For the operations, see the flash’s instruction manual. When shooting with this function, the “Release Cable SR-N3” (sold separately) may be needed, depending on your camera.
-
Page 43: Linked Shooting
To shoot with linked shooting, attach a flash that supports radio transmission wireless shooting or the Speedlite Transmitter ST-E3-RT to the camera. Note that when using a camera with an N3 type remote control terminal that was released up to 2011 as the “slave unit camera,”…
-
Page 44
Linked Shooting Set to linked shooting mode. Press the <I> button continuously until <b> is displayed on the LCD panel. Linked shooting mode’s “Slave unit” is set. Press the <I> button again to set “Master unit” of the linked shooting mode. -
Page 45
Linked Shooting Set up the slave unit cameras. Check that the <D> lamp of the slave unit is lit in green. Set up all the slave unit cameras within approximately 30 m/98.4 ft. of the master unit camera. Take the picture. Check that the <D>… -
Page 46
Linked Shooting Shooting with manual focus is recommended for the slave unit cameras. If focus cannot be achieved with autofocus, linked shooting is not possible with the corresponding slave unit camera. There is a short time lag between the release of the slave unit camera and the release timing of the master unit camera. -
Page 47: Setting Transmitter Functions With Camera Operations
Setting Transmitter Functions with Camera Operations This chapter describes how to set the transmitter functions from the camera’s menu screen. When the camera’s shooting mode is set to a fully automatic mode or an Image Zone mode, the operations in this chapter are not available.
-
Page 48: Transmitter Control From Camera’s Menu Screen
Transmitter Control from Camera’s Menu Screen When using EOS digital cameras released since 2007, you can set flash functions, transmitter functions or Custom Functions from the camera’s menu screen. For the camera operations, see the camera’s instruction manual. Transmitter Function Setting Select [External Speedlite control].
-
Page 49
Transmitter Control from Camera’s Menu Screen Settings Available in [Flash function settings] EOS digital cameras released since 2012 When using the transmitter with cameras such as EOS-1D X, you can set the functions for “Radio transmission wireless shooting” in the [Flash function settings] screen. -
Page 50
Transmitter Control from Camera’s Menu Screen Flash firing To perform wireless flash shooting, set to [Enable]. When [Disable] is set, wireless flash shooting is not available. E-TTL II flash metering For normal exposures, set it to [Evaluative]. If [Average] is set, the flash exposure will be averaged for the entire scene metered by the camera. -
Page 51
Transmitter Control from Camera’s Menu Screen Wireless flash functions (setting) Radio transmission wireless flash shooting is set automatically. For details, see Chapter 2. Clear Speedlite (function) settings You can return the transmitter settings to their default settings. When [Flash mode] is set to [Individual group control], you can select [E-TTL II], [Manual flash], [Auto external flash metering] or [Disable] as the flash mode for each group. -
Page 52
Transmitter Control from Camera’s Menu Screen Transmitter Custom Function Settings The displayed contents vary depending on the camera. If C.Fn-20 and 22 are not displayed, set them by operating the transmitter. For the Custom Functions, see pages 56 to 57. Select [Flash C.Fn settings]. -
Page 53: Customizing The Transmitter
Customizing the Transmitter This chapter describes how to customize the transmitter with the Custom Functions (C.Fn) and Personal Functions (P.Fn). When the camera’s shooting mode is set to a fully automatic mode or an Image Zone mode, the operations in this chapter are not available.
-
Page 54: C / >: Setting Custom And Personal Functions
C / >: Setting Custom and Personal Functions You can customize the transmitter features to suit your shooting preferences with Custom Functions and Personal Functions. Note that the Personal Functions are customizable functions unique to the transmitter. C: Custom Functions Display the Custom Functions screen.
-
Page 55
C / >: Setting Custom and Personal Functions Custom/Personal Function List Number Function Page Custom Functions C.Fn-01 Auto power off C.Fn-02 Modeling flash p.56 ( FEB auto cancel C.Fn-03 C.Fn-04 FEB sequence C.Fn-07 Test firing with autoflash C.Fn-13 Flash exposure metering setting p.57 C.Fn-20 Beep… -
Page 56: C: Setting Custom Functions
C: Setting Custom Functions C.Fn-01: (Auto power off) When the transmitter is not operated for 5 min., the power turns off automatically to save energy. You can disable this function. 0: ON (Enabled) 1: OFF (Disabled) C.Fn-02: (Modeling flash) 0: % (Enabled (Depth-of-field preview button)) Press the camera’s depth-of-field preview button to fire the modeling flash.
-
Page 57
C: Setting Custom Functions C.Fn-07: (Test firing with autoflash) You can change the flash output when firing the test flash in E-TTL II/E-TTL autoflash mode. 0: 1/32 (1/32) 1: 1/1 (Full output) C.Fn-13: (Flash exposure metering setting) 0: 4 (Speedlite button and dial) 1: 5 (Speedlite dial only) You can perform flash exposure compensation by directly turning <9>, without pressing the <@>… -
Page 58: Setting Personal Functions
>: Setting Personal Functions P.Fn-01: (LCD panel display contrast) You can adjust the contrast of the LCD panel in 5 levels. P.Fn-03: (LCD panel illumination color: Master) Radio transmission wireless flash shooting, linked shooting: You can select the color of the LCD panel illumination when the transmitter is set as the master unit.
-
Page 59: Reference
Reference This chapter contains a system map and frequently asked questions.
-
Page 60: St-E3-Rt System
$ Mini stand (supplied with 600EX-RT) % Off-Camera Shoe Cord OC-E3 Enables the ST-E3-RT to be connected to the camera up to 60 cm / 2 ft. away. & Release Cable SR-N3 If the transmitter is connected using this cable to an EOS camera…
-
Page 61: Troubleshooting Guide
If a problem occurs with the transmitter, first refer to this Troubleshooting Guide. If this Troubleshooting Guide does not resolve the problem, contact your dealer or nearest Canon Service Center. Power does not turn on. Make sure that the batteries are installed in the correct orientation (p.12).
-
Page 62
Troubleshooting Guide The slave flash does not fire or unexpectedly fires at full output. Run the channel scan and set the channel with the best radio reception signal (p.22). Position the slave unit in clear view of the master unit, without obstacles between them. -
Page 63
Troubleshooting Guide <k> is displayed. Set the shutter speed 1 stop slower than the flash sync speed (p.19). Cannot release from a slave unit. When an EOS camera which was released up to 2011, has an N3 type remote control terminal and is compatible with E-TTL II/E-TTL autoflash is used to perform remote release from a slave unit or when it has been set as the slave unit during linked shooting, the “Release Cable SR-N3”… -
Page 64: Specifications
Specifications Type Type: On-camera Speedlite transmitter Compatible cameras: EOS type-A camera compatible with E-TTL II/E-TTL autoflash Radio Transmission Wireless Function Exposure control system: E-TTL II/E-TTL autoflash, manual flash, stroboscopic flash, auto external flash metering* * Only when the flash mode is set to <[> Frequency: 2405 — 2475 MHz Modulation system:…
-
Page 65
Approx. 67.4 (W) x 61.5 (H) x 77.4 (D) mm / 2.7 x 2.4 x 3.0 in. (excluding the dust- and water-resistant adapter) Weight: Approx. 110 g / 3.9 oz. (transmitter only, excluding batteries) All specifications above are based on Canon’s testing standards. Product specifications and external appearance are subject to change without notice. -
Page 66
50 and following of Italian legislative decree 22/97. For more information regarding return and recycling of WEEE products, please visit www.canon-europe.com/environment. (EEA: Norway, Iceland and Liechtenstein) -
Page 67
MEMO… -
Page 68
MEMO… -
Page 69
MEMO… -
Page 70: Index
Index 4 sec., 6 sec., 16 sec. timer ..10 Flash sync. speed ……. 50 Flash sync. speed in Av mode ..50 Fully automatic wireless flash Auto external flash metering ..39 shooting ……..24 Auto power off ……14, 56 High-speed sync ……29 Batteries ……..12 Hot shoe ……..
-
Page 71
Index Shutter speed ……19 Shutter sync…….. 50 Slave group control ….. 33 Slave unit setting ……20 Stroboscopic flash ……. 35 Test flash ……13, 25, 40 Transmission channel ..20, 21, 22 Type-A camera ……2 Wireless flash shooting ….16 Fully automatic one slave unit ……….. -
Page 72
The cameras and accessories referred to in this Instructions booklet are current as of January 2012. For information on compatibility with the cameras and accessories marketed after this date, contact your nearest Canon Service Center. -
Page 73
CANON INC. 30-2, Shimomaruko 3-chome, Ohta-ku, Tokyo 146-8501, Japan CANON U.S.A. INC. U.S.A. One Canon Plaza, Lake Success, NY 11042-1198, U.S.A. For all inquires concerning this product, call toll free in the U.S. 1-800-OK-CANON CANON CANADA INC. HEADQUARTERS CANADA 6390 Dixie Road, Mississauga, Ontario L5T 1P7, Canada CANON CANADA INC. -
Page 74
(1) this device may not cause harmful interference, and (2) this device must accept any interference received, including interference that may cause undesired Lo Speedlite 600EX-RT/ST-E3-RT è conforme con le normative locali in materia di onde radio delle seguenti operation of this device. -
Page 75
Härmed intygar Canon Inc. att denna CH9-1216 står I överensstämmelse med de väsentliga egenskapskrav och övriga relevanta bestämmelser som framgår av direktiv 1999/5/EG. Hér með lýsir Canon Inc. yfir því að CH9-1216 er í samræmi við grunnkröfur og aðrar kröfur, sem gerðar eru í tilskipun 1999/5/EC.
Outline
The file is a manual (PDF file) for SPEEDLITE TRANSMITTER ST-E3-RT.
Caution
— Use Adobe Reader 6.0 or later version to view the PDF file. With Adobe Acrobat Reader 5.x, watermark text «COPY» is displayed on the PDF manual. You cannot open the file with Adobe Acrobat Reader 4.x or older version.
— When printing out any pages of the PDF file, watermark text «COPY» is printed on it.
* Adobe, Acrobat, and Reader are registered trademarks of Adobe Systems Incorporated in the United States and/or other countries.
Setup instruction
How to Download
— Follow the procedure described below to download the file.
— The file is a PDF file.
1. Click the file mentioned below to open the download window.
2. Click [Save] or [Open].
After clicking [Save];
Specify where to save the file and click [Save]. Double-click the icon of the saved PDF file to open.
After clicking [Open];
The file download starts. Upon completion of the download, the PDF file opens automatically.
Disclaimer
All software, programs (including but not limited to drivers), files, documents, manuals, instructions or any other materials (collectively, “Content”) are made available on this site on an «as is» basis.
Canon Singapore Pte. Ltd., and its affiliate companies (“Canon”) make no guarantee of any kind with regard to the Content, expressly disclaims all warranties, expressed or implied (including, without limitation, implied warranties of merchantability, fitness for a particular purpose and non-infringement) and shall not be responsible for updating, correcting or supporting the Content.
Canon reserves all relevant title, ownership and intellectual property rights in the Content. You may download and use the Content solely for your personal, non-commercial use and at your own risks. Canon shall not be held liable for any damages whatsoever in connection with the Content, (including, without limitation, indirect, consequential, exemplary or incidental damages).
You shall not distribute, assign, license, sell, rent, broadcast, transmit, publish or transfer the Content to any other party. You shall also not (and shall not let others) reproduce, modify, reformat, disassemble, decompile or otherwise reverse engineer or create derivative works from the Content, in whole or in part.
You agree not to send or bring the Content out of the country/region where you originally obtained it to other countries/regions without any required authorization of the applicable governments and/or in violation of any laws, restrictions and regulations.
By proceeding to downloading the Content, you agree to be bound by the above as well as all laws and regulations applicable to your download and use of the Content.
Drivers
For certain products, a driver is necessary to enable the connection between your product and a computer. On this tab, you will find the applicable drivers for your product or in the absence of any drivers, an explanation of your product’s compatibility with each operating system.
Helpful Information
: To access software, manuals and other content please use the tabs above.
Software
Software is an optional download that enables advanced functionality and helps you to get the most out of your product. On this tab, you can view and download the available software for your product.
Software
Software is an optional download that enables advanced functionality and helps you to get the most out of your product. On this tab, you can view and download the available software for your product.
Manuals
Manuals for your product or software are listed below.
Apps & Functions
On this tab, you can view the available Apps and functions that are compatible with your product.
Firmware
Firmware is permanent software which is installed on your product and enables it to function correctly. Canon may periodically release updates to this firmware and if there is an update available, this can be downloaded below.
FAQs & Help
On this tab you can find a selection of FAQs and other helpful information that can assist you with your question or issues.
Important Information
On this tab you can find a selection of FAQs that we feel are important to bring to your attention.
Error Codes
An error code or message may appear on your product for different reasons. Using the the search box you can access helpful information regarding your specific error code that will explain the cause and provide you with the necessary steps for how to proceed.
Specifications
Below are all the technical specifications for this product.
J
日本語
■600EX-RT/ST-E3-RTの使用可能な地域と制限事項
● スピードライト600EX-RT/ST-E3-RTは以下の地域の電波規制に準拠しています。その他の地域ではご使
用いただけませんのでご注意ください。
ブルネイ、スリランカ、中国、台湾、香港、インド、日本、マカオ、フィリピン、シンガポール、ベトナ
ム、カナダ、USA、ケイマン諸島、コロンビア、コスタリカ、エクアドル、エルサルバドル、グアテマ
ラ、パナマ、ペルー、オーストリア、ベルギー、ブルガリア、キプロス、チェコ、デンマーク、エストニ
ア、フィンランド、フランス、ドイツ、ギリシャ、ハンガリー、アイスランド、アイルランド、イタリ
ア、ラトビア、リヒテンシュタイン、リトアニア、ルクセンブルグ、マルタ、オランダ、ノルウェー、ポ
ーランド、ポルトガル、ルーマニア、ロシア、スロバキア、スロベニア、スペイン、スウェーデン、スイ
ス、イギリス、オーストラリア、ニュージーランド、レバノン、サウジアラビア、トルコ
● 次の事項を行うと、法律で罰せられることがあります。「本製品を分解、改造すること」、「本製品上の証
明ラベルをはがすこと」。
● 医療用の装置や、電子機器の近くで本製品を使用しないでください。医療用の装置や、電子機器の動作に影
響を及ぼす恐れがあります。
■600EX-RT/ST-E3-RTの電波通信に関するご注意
● スピードライト600EX-RT/ST-E3-RTには、電波法に基づく認証を受けた無線装置が内蔵されており、証
明ラベルは無線設備に添付されています。
電波干渉に関するご注意
この機器の使用周波数帯では、電子レンジなどの産業・科学・医療用機器のほか、工場の製造ライン等で使
用されている移動体識別用の構内無線局(免許を要する無線局)、および特定小電力無線局(免許を要しな
い無線局)並びにアマチュア無線局(免許を要する無線局)が運用されています。
» この機器を使用する前に、近くで移動体識別用の構内無線局、および特定小電力無線局並びにアマチュ
ア無線局が運用されていないことを確認して下さい。
# 万一、この機器から移動体識別用の構内無線局に対して有害な電波干渉の事例が発生した場合には、速
やかに使用周波数を変更するか、または電波の発射を停止した上、お客様相談窓口にご連絡いただき、
混信回避のための処置等(例えば、パーティションの設置など)についてご相談下さい。
$ その他、この機器から移動体識別用の特定小電力無線局、あるいはアマチュア無線局に対して有害な電
波干渉の事例が発生した場合など何かお困りのことが起きたときは、お客様相談窓口へお問い合わせ下
さい。
この表示のある無線機器は2.4GHz帯を使用しています。変調方式としてDSSS変調方式を
採用し、移動体識別装置の構内無線局に対して想定される与干渉距離は20mです。全域帯
を使用し、かつ移動体識別装置の帯域を回避可能です。
● 本製品は、他の電波を発する機器(キヤノン製無線機能搭載製品、電子レンジ、Bluetooth機器など)か
ら、電波干渉を受ける場合があります。これらの機器からできるだけ遠く離すか、ご利用時間を分けるなど
して、電波干渉を避けて使用してください。
E
English
■ Regions of Use and Restrictions for the 600EX-RT/ST-E3-RT
● The Speedlite 600EX-RT/ST-E3-RT complies with local radio wave regulations in the following areas.
Please do not use this product in areas it was not designed for.
Brunei, Sri Lanka, China, Taiwan, Hong Kong, India, Japan, Macao, Philippines, Singapore, Vietnam,
Canada, United States, Cayman Islands, Colombia, Costa Rica, Ecuador, El Salvador, Guatemala,
Panama, Peru, Austria, Belgium, Bulgaria, Cyprus, Czech Republic, Denmark, Estonia, Finland, France,
Germany, Greece, Hungary, Iceland, Ireland, Italy, Latvia, Liechtenstein, Lithuania, Luxembourg, Malta, the
Netherlands, Norway, Poland, Portugal, Romania, Russia, Slovakia, Slovenia, Spain, Sweden, Switzerland,
United Kingdom, Australia, New Zealand, Lebanon, Saudi Arabia, Turkey
● The following actions may be punishable under law. Disassembling or modifying the transmitter, or removing
the certifi cation label on it.
● Do not use the transmitter near other devices that emit radio waves, such as medical equipment or
electronic devices. The transmitter may interfere with operation of these devices.
FCC/IC NOTICE
This device complies with Part 15 of the FCC Rules and RSS-Gen of IC Rules.
Operation is subject to the following two conditions;
(1) this device may not cause harmful interference, and
(2) this device must accept any interference received, including interference that may cause undesired
operation of this device.
Note: This equipment has been tested and found to comply with the limits for class B digital device,
pursuant to Part 15 of the FCC Rules.
These limits are designed to provide reasonable protection against harmful interference in a residential
installation. This equipment generates, uses and can radiate radio frequency energy and, if not installed
and used in accordance with the instructions, may cause harmful interference to radio communications.
However, there is no guarantee that interference will not occur in a particular installation. If this equipment
does cause harmful interference to radio or television reception, which can be determined by turning
the equipment off and on, the user is encouraged to try to correct the interference by one or more of the
following measures:
● Reorient or relocate the receiving antenna.
● Increase the separation between the equipment and receiver.
● Connect the equipment into an outlet on a circuit different from that to which the receiver is connected.
● Consult the dealer or an experienced radio/TV technician for help.
This transmitter must not be co-located or operated in conjunction with any other antenna or transmitter
except Canon accessories supplied or designated for this product.
Do not make any changes or modifi cations to the equipment unless otherwise specifi ed in the manual. If
such changes or modifi cations should be made, you could be required to stop operation of the equipment.
This equipment complies with FCC/IC radiation exposure limits set forth for an uncontrolled environment
and meets the FCC radio frequency (RF) Exposure Guidelines in Supplement C to OET65 and RSS-102
of the IC radio frequency (RF) Exposure rules. This equipment has very low levels of RF energy that are
deemed to comply without testing of specifi c absorption ratio (SAR).
Canadian Radio Interference Regulations
The Class B digital apparatus complies with Canadian ICES-003.
F
Français
■ Régions d’utilisation et de restrictions pour le 600EX-RT/ST-E3-RT
● Le Speedlite 600EX-RT/ST-E3-RT est conforme aux réglementations locales en matière d’onde radio dans
les régions suivantes. N’utilisez pas ce produit dans les régions pour lesquelles il n’a pas été conçu.
Brunei, Sri Lanka, Chine, Taiwan, Hong Kong, Inde, Japon, Macao, Philippines, Singapour, Vietnam,
Canada, États-Unis, Îles Caïmans, Colombie, Costa Rica, Équateur, Le Salvador, Guatemala, Panama,
Pérou, Autriche, Belgique, Bulgarie, Chypre, République tchèque, Danemark, Estonie, Finlande, France,
Allemagne, Grèce, Hongrie, Islande, Irlande, Italie, Lettonie, Liechtenstein, Lituanie, Luxembourg, Malte,
Pays-Bas, Norvège, Pologne, Portugal, Roumanie, Russie, Slovaquie, Slovénie, Espagne, Suède, Suisse,
Royaume-Uni, Australie, Nouvelle-Zélande, Liban, Arabie saoudite, Turquie
● Les actions suivantes peuvent être punies par la loi. Démonter ou modifi er l’émetteur, ou retirer l’étiquette
de certifi cation apposée.
● N’utilisez pas l’émetteur à proximité d’autres appareils émettant des ondes radio comme des appareils
médicaux ou des dispositifs électroniques. L’émetteur peut affecter le bon fonctionnement de ces appareils.
Réglementation canadienne sur les interférences radio
Cet appareil numérique de la classe B est conforme à la norme NMB-003 du Canada.
Le présent appareil est conforme aux la partie 15 des règles de la FCC et CNR d’Industrie Canada
applicables aux appareils radio exempts de licence. L’exploitation est autorisée aux deux conditions
suivantes : (1) l’appareil ne doit pas produire de brouillage, et (2) l’utilisateur de l’appareil doit accepter tout
brouillage radioélectrique subi, même si le brouillage est susceptible d’en compromettre le fonctionnement.
Cet équipement est conforme aux limites d’exposition aux rayonnements énoncées pour un environnement
non contrôlé et respecte les règles d’exposition aux fréquences radioélectriques (RF) CNR-102 de l’IC.
Cet équipement émet une énergie RF très faible qui est considérée conforme sans évaluation du débit
d’absorption spécifi que (DAS).
G
Deutsch
■ Anwendungsregionen und Einschränkungen für das 600EX-RT/
ST-E3-RT
● Das Speedlite 600EX-RT/ST-E3-RT erfüllt in folgenden Ländern die örtlichen Bestimmungen und
Vorschriften für Funkwellen. Verwenden Sie dieses Produkt nicht in Regionen, für die es nicht bestimmt ist.
Brunei, Sri Lanka, China, Taiwan, Hongkong, Indien, Japan, Macau, Philippinen, Singapur, Vietnam,
Kanada, USA, Cayman-Inseln, Kolumbien, Costa Rica, Ecuador, El Salvador, Guatemala, Panama, Peru,
Österreich, Belgien, Bulgarien, Zypern, Tschechien, Dänemark, Estland, Finnland, Frankreich, Deutschland,
Griechenland, Ungarn, Island, Irland, Italien, Lettland, Liechtenstein, Litauen, Luxemburg, Malta,
Niederlande, Norwegen, Polen, Portugal, Rumänien, Russland, Slowakei, Slowenien, Spanien, Schweden,
Schweiz, Großbritannien, Australien, Neuseeland, Libanon, Saudi-Arabien, Türkei
● Folgende Tätigkeiten werden ggf. strafrechtlich verfolgt: Zerlegen oder Verändern des Übertragungsgeräts
oder Entfernen des Zertifi zierungsschilds von dem Gerät.
● Das Übertragungsgerät darf nicht in der Nähe anderer Geräte verwendet werden, die Hochfrequenzwellen
aussenden (z. B. medizinische oder elektronische Geräte). Das Übertragungsgerät kann den Betrieb dieser
Geräte stören.
S
Español
■ Regiones de uso y restricciones para la unidad 600EX-RT/ST-E3-RT
● La unidad Speedlite 600EX-RT/ST-E3-RT cumple la normativa local sobre ondas de radio en las áreas
siguientes. No utilice este producto en áreas para las que no se haya diseñado.
Brunéi, Sri Lanka, China, Taiwán, Hong Kong, India, Japón, Macao, Filipinas, Singapur, Vietnam, Canadá,
Estados Unidos, Islas Caimán, Colombia, Costa Rica, Ecuador, El Salvador, Guatemala, Panamá, Perú,
Austria, Bélgica, Bulgaria, Chipre, República Checa, Dinamarca, Estonia, Finlandia, Francia, Alemania,
Grecia, Hungría, Islandia, Irlanda, Italia, Letonia, Liechtenstein, Lituania, Luxemburgo, Malta, los Países
Bajos, Noruega, Polonia, Portugal, Rumanía, Rusia, Eslovaquia, Eslovenia, España, Suecia, Suiza, Reino
Unido, Australia, Nueva Zelanda, Líbano, Arabia Saudí, Turquía
● Las acciones siguientes pueden ser punibles según la ley. Desmontar o modifi car el transmisor, o retirarle la
etiqueta de certifi cación.
● No utilice el transmisor cerca de otros dispositivos que emiten ondas de radio, tales como equipos médicos
o dispositivos electrónicos. El transmisor puede interferir en el funcionamiento de estos dispositivos.
I
Italiano
■ Regioni di utilizzo e limitazioni per l’uso del fl ash 600EX-RT/ST-E3-RT
● Lo Speedlite 600EX-RT/ST-E3-RT è conforme con le normative locali in materia di onde radio delle seguenti
aree. Non utilizzare il prodotto in aree per le quali non è previsto.
Brunei, Sri Lanka, Cina, Taiwan, Hong Kong, India, Giappone, Macao, Filippine, Singapore, Vietnam,
Canada, Stati Uniti d’America, Isole Cayman, Colombia, Costa Rica, Ecuador, El Salvador, Guatemala,
Panama, Perù, Austria, Belgio, Bulgaria, Cipro, Repubblica Ceca, Danimarca, Estonia, Finlandia, Francia,
Germania, Grecia, Ungheria, Islanda, Irlanda, Italia, Lettonia, Liechtenstein, Lituania, Lussemburgo, Malta,
Paesi Bassi, Norvegia, Polonia, Portogallo, Romania, Russia, Slovacchia, Slovenia, Spagna, Svezia,
Svizzera, Regno Unito, Australia, Nuova Zelanda, Libano, Arabia Saudita, Turchia
● Le azioni che seguono potrebbero essere punibili dalla legge. Smontare o modifi care il trasmettitore, o
rimuovere la relativa etichetta di certifi cazione.
● Non usare il trasmettitore in prossimità di altre apparecchiature che emettono onde radio, come
apparecchiature medicali o dispositivi elettronici. Il trasmettitore potrebbe interferire con il funzionamento di
tali dispositivi.
COP
Y