
Instructions for use
WASHING MACHINE
Contents
GB
Installation, 2-3
GB
F
CZ
Unpacking and levelling
Electric and water connections
English,1
Français,13
Èeský,25
Technical details
Washing machine description, 4-5
Detergent dispenser
PL
RO CIS
Control panel
Polski,37
Românã,49
ÐÓÑÑÊÈÉ,61
Running a wash cycle, 6
Programme table, 7
Detergents and laundry, 8
Preparing your laundry
Special items
Load-balancing system
WIL 1000 OT
Precautions and advice, 9
General safety
Disposal
Saving energy and respecting the environment
Care and maintenance, 10
Cutting off the water or electricity supply
Cleaning your appliance
Cleaning the detergent dispenser
Caring for your appliance door and drum
Cleaning the pump
Checking the water inlet hose
Troubleshooting, 11
Service, 12
Before calling for Assistance
1
Installation
Keep this instruction manual in a safe place for
Levelling your appliance correctly will provide it with
GB
future reference. Should the appliance be sold,
stability and avoid any vibrations, noise and shifting
transferred or moved, make sure the instruction
during operation. If it is placed on a fitted or loose
manual accompanies the washing machine to inform
carpet, adjust the feet in such a way as to allow
the new owner as to its operation and features.
enough room for ventilation beneath the washing
machine.
Read these instructions carefully: they contain vital
information on installation, use and safety.
Electric and water connections
Unpacking and levelling
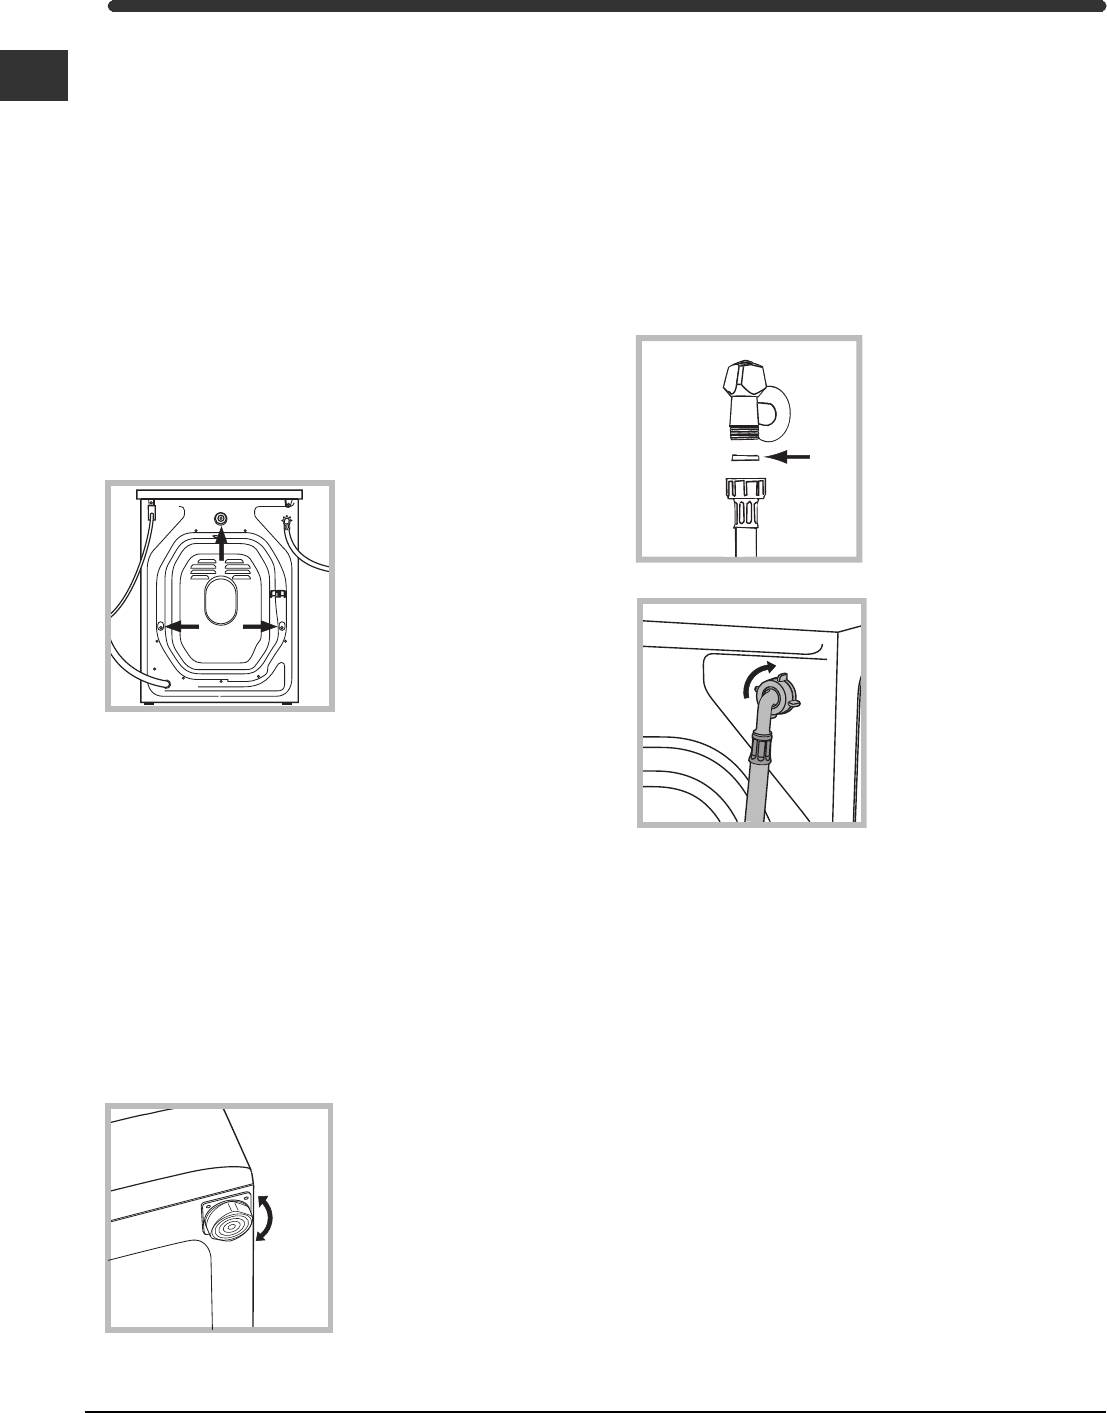
Connecting the water inlet hose
Unpacking
1. Insert seal A into the
1. Unpack the washing machine.
end of the inlet hose
2. Check whether the washing machine has been
and screw the latter
damaged during transport. If this is the case, do not
onto a cold water tap
install it and contact your retailer.
with a 3/4 gas threaded
A
mouth (see figure).
3. Remove the 3
Before making the
protective screws and
connection, allow the
the rubber washer with
water to run freely until
the respective spacer,
it is perfectly clear.
situated on the rear of
the appliance (see
2. Connect the other end
figure).
of the water inlet hose to
the washing machine,
screwing it onto the
appliance’s cold water
inlet, situated on the top
4. Seal the gaps using the plastic plugs provided.
right-hand side on the
5. Keep all the parts: you will need them again if the
rear of the appliance
washing machine needs to be moved to another
(see figure).
location.
Packaging materials are not children’s toys.
3. Make sure there are no kinks or bends in the hose.
Levelling
The water pressure at the tap must be within the
values indicated in the Technical details table
Your machine may make a considerable amount of
(on the next page).
noise if the two front feet have not been adjusted
correctly.
If the water inlet hose is not long enough, contact
1. Install the washing machine on a flat sturdy floor,
a specialist store or an authorised serviceman.
without resting it up against walls, furniture cabinets
or other.
2. If the floor is not
perfectly level, compen-
sate for any unevenness
by tightening or
loosening the adjustable
front feet (see figure);
the angle of inclination,
measured according to
the worktop, must not
exceed 2°.
2
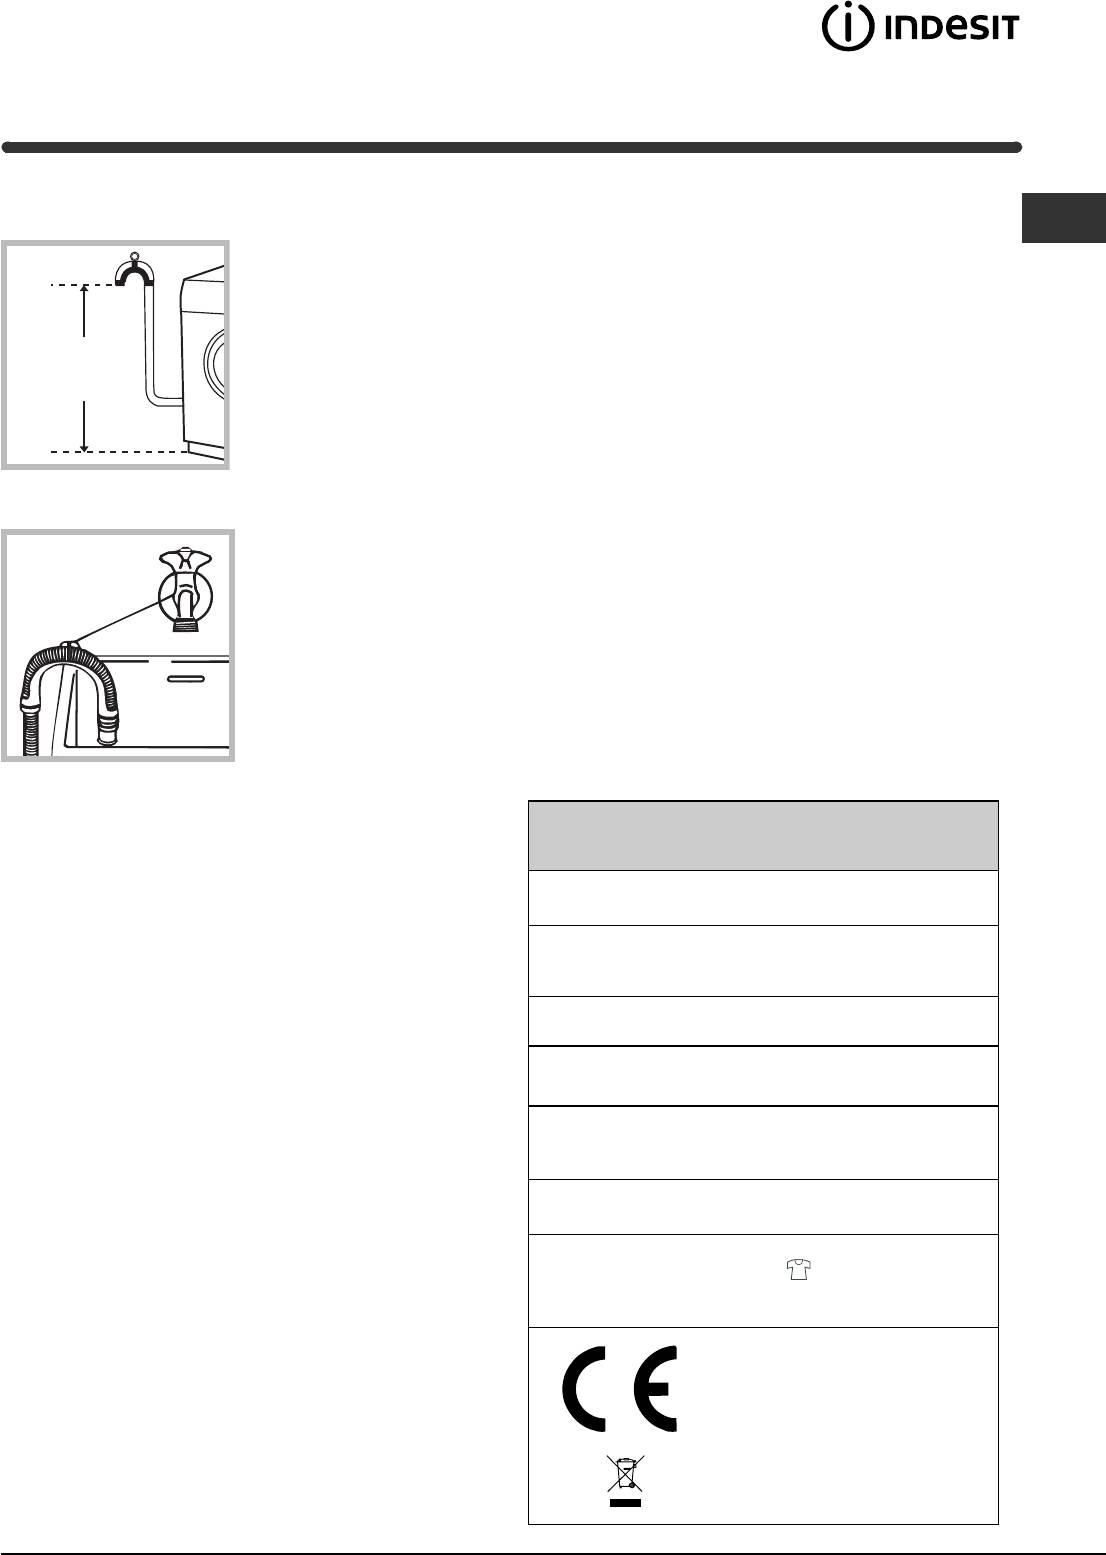
Connecting the drain hose
Do not use extensions or multiple sockets.
GB
Connect the drain hose,
The power supply cable must never be bent or
without bending it, to a
dangerously compressed.
draining duct or a wall
drain situated between
The power supply cable must only be replaced by
65 and 100 cm from
an authorised serviceman.
65 — 100 cm
the floor;
Warning! The company denies all liability if and when
these norms are not respected.
alternatively, place it
over the edge of a
basin, sink or tub,
fastening the duct
supplied to the tap (see
figure). The free end of
the hose should not be
underwater.
We advise against the use of hose extensions; in
case of absolute need, the extension must have the
Technical details
same diameter as the original hose and must not
exceed 150 cm in length.
Model
WIL 1000 OT
Electric connection
59.5 cm wide
Before plugging the appliance into the mains
Dimensions
85 cm high
52.5 cm deep
socket, make sure that:
the socket is earthed and in compliance with the
Capacity
from 1 to 5 kg
applicable law;
Electric
voltage 220/230 Volts 50 Hz
the socket is able to sustain the appliance’s
connections
maximum absorbed power 1850 W
maximum power load indicated in the Technical
maximum pressure 1 MPa (10 bar)
details table (on the right);
Water
minimum pressure 0.05 MPa (0.5 bar)
connections
drum capacity 46 litres
the supply voltage is included within the values i
ndicated on the Technical details table
Spin speed
up to 1000 rpm
(on the right);
Control
programmes
programme ; TIMER knob «auto»;
the socket is compatible with the washing
according to
run with a load of 5 kg.
machine’s plug. If this is not the case, replace
IEC456 directive
the socket or the plug.
This appliance is compliant with the
following European Community
The washing machine should not be installed in an
Directives:
outdoor environment, not even when the area is
— 73/23/CEE of 19/02/73 (Low
sheltered, because it may be very dangerous to
Voltage) and subsequent amendments
leave it exposed to rain and thunderstorms.
— 89/336/CEE of 03/05/89
(Electromagnetic Compatibility) and
When the washing machine is installed, the mains
subsequent amendments
— 2002/96/CE
socket must be within easy reach.
3
- Manuals
- Brands
- Indesit Manuals
- Washer
- WIL 1000 OT
- Instructions for use manual
-
Bookmarks
Quick Links
Français,13
English,1
Polski,37
Românã,49
Èeský,25
ÐÓÑÑÊÈÉ,61
Related Manuals for Indesit WIL 1000 OT
Summary of Contents for Indesit WIL 1000 OT
-
Page 1
Èeský,25 Français,13 English,1 Polski,37 Românã,49 ÐÓÑÑÊÈÉ,61… -
Page 2
(see figure) (see figure) (see figure) (on the next page) (see figure) -
Page 3
(see figure) (on the right) (on the right) -
Page 4
(see “Detergents and laundry”). -
Page 5
Indicator lights Detergent dispenser Detergent dispenser: (see “Washing machine description”). Indicator lights: (see “Running a wash cycle”). (see “Troubleshooting”). -
Page 6
(see table of programmes below). “Detergents and laundry” (see table of programmes below) -
Page 7
Nature of fabrics Program- Maximum Maximum Times Wash cycle description and soiling Load (kg) temperature… -
Page 8
(see “Washing machine description”). -
Page 10
(see figure) (see figure) (see figure) -
Page 11
(see “Service”) see “Running a wash cycle”). (see “Installation”) (see “Installation”) (see “Installation”) (see “Installation”) (see “Installation”) (see “Installation”) (see “Installation”) see “Care and maintenance”) (see “Installation”) -
Page 12
• (see “Troubleshooting”) • •… -
Page 14
(voir figure) (voir figure) (voir figure) (voir page ci-contre) (voir figure) -
Page 15
voir figure) voir figure) (voir ci-contre) (voir ci-contre) -
Page 16
(voir «Produits lessiviels et linge»). -
Page 17: Tiroir À Produits Lessiviels
Voyants Tiroir à produits lessiviels Tiroir à produits lessiviels (voir “Description du lave-linge”) Voyants: (voir “Comment effectuer un cycle de lavage”). (voir page 7) (voir “Anomalies et remèdes”).
-
Page 18
(voir tableau programmes page suivante). (voir “Produits lessiviels et linge”) (voir tableau programmes page suivante) -
Page 19
Nature des textiles Program- Charge Température et degré de Durée Description du cycle de lavage maxi. (kg) maxi. salissure… -
Page 20
(voir «Description du lave-linge»). -
Page 22
(voir figure) (voir figure) (voir figure) -
Page 23
(voir “Assistance”) (voir “Comment effectuer un cycle de lavage”). (voir “Installation”) (voir “Installation”) (voir “Installation”) (voir “Installation”) (voir “Installation”) (voir “Installation”) (voir “Installation”) voir “Entretien et soin”) (voir “Installation”) -
Page 24
• (voir “Anomalies et remèdes”) • •… -
Page 26
(viz obrázek) (viz obrázek), (viz obrázek). Tlak v rozvodu vody se musí pohybovat v rozmezí hodnot uvedených v tabulce s technickými údaji (viz vedlejší strana). (viz obrázek) -
Page 27: Technické Údaje
(viz obrázek) Technické údaje Model WIL 1000 OT šíøka 59,5 cm Rozmìry výška 85 cm hloubka 52,5 cm Kapacita od 1 do 5 kg napìtí 220/230 V 50 Hz Napájení maximální pøíkon 1850 W (viz vedle) maximální tlak 1 MPa (10 bar) Pøipojení…
-
Page 28
(viz “Prací prostøedky a prádlo”). -
Page 29
Kontrolky Dávkovaè pracích prostøedkù Dávkovaè pracích prostøedkù: viz “Popis praèky” Kontrolky: (viz “Jak provést prací cyklus”). (viz “Poruchy a zpùsob jejich odstranìní”). -
Page 30
(viz tabulka programù na následující stranì). (viz “Prací prostøedky a prádlo”) (viz tabulka programù na následující stranì) -
Page 31
Druh tkaniny a Prací Doby Max. Max. teplota Popis pracího cyklu stupeò jejího náplò programy zneèištìní (kg) aut. (125 min) 60° 30 min. 40° Praní, máchání, prùbìžné a Bílá bavlna 45 min. 60° závìreèné odstøeïování 60 min. 60° 3h — 24h 60°… -
Page 32
(viz “Popis praèky”). -
Page 33
•… -
Page 34
(viz obrázek); (viz obrázek) (viz obrázek):… -
Page 35
(viz “Servisní služba”) (viz “Jak provést prací cyklus”). (viz “Instalace”). (viz “Instalace”). (viz “Instalace”). (viz “Instalace”). (viz “Instalace”). (viz “Instalace”). (viz “Instalace”). – viz “Údržba a péèe” (viz “Instalace”). -
Page 36
• (viz “Poruchy a zpùsob jejich odstranìní”);… -
Page 38
(zobacz rysunek). (zobacz rysunek). (zobacz rysunek). (zobacz na s¹siedniej stronie). (zobacz rysunek). -
Page 39: Dane Techniczne
zobacz rysunek Dane techniczne Model Wymiary Pojemnoœæ Dane pr¹du elektrycznego (zobacz obok); Dane sieci wodoci¹gowej zobacz obok Szybkoœæ wirowania Programy kontrolne zgodnie z przepisami IEC456 Po zainstalowaniu pr…
-
Page 40
(zobacz “Œrodki pior¹ce i bielizna”). -
Page 41
Kontrolki Szufladka œrodków pior¹cych Szufladka na œrodki pior¹ce: zobacz “Opis pralki” Kontrolki: (patrz “W jaki sposób wykonaæ cykl prania”). (zobacz “Anomalie i œrodki zaradcze”). -
Page 42
Uwaga: (patrz tabela programów na nastêpnej stronie) (patrz tabela programów na nastêpnej stronie) (patrz “Œrodki pior¹ce i bielizna”) -
Page 43
Rodzaj tkaniny £adunek Temperatura oraz stopieñ Programy Czas MAKS. Opis cyklu prania maks. zabrudzenia (Kg) Auto (125 min.) 60° 30 min. 40° Pranie, p³ukania, odwirowania Bawe³na bia³a 45 min. 60° poœrednie i koñcowe 60 min. 60° 3godz – 24godz 60° auto (70 min.) 30 min. -
Page 44
(patrz “Opis pralki”). -
Page 45
•… -
Page 46
zobacz rysunek ; zobacz rysunek zobacz rysunek :… -
Page 47
zobacz “Serwis Techniczny” (patrz “W jaki sposób wykonaæ cykl prania”). zobacz “Instalacja”). zobacz “Instalacja”). zobacz “Instalacja”). zobacz “Instalacja”). zobacz “Instalacja”). zobacz “Instalacja”). zobacz “Instalacja”). zobacz “Konserwacja” zobacz “Instalacja”). -
Page 48
• zobacz “Anomalie i œrodki zaradcze”);… -
Page 50
(a se vedea figura). (a se vedea figura). (a se vedea figura). Ambalajele nu constitui (a se vedea pagina alãturatã). (a se vedea figura);… -
Page 51: Date Tehnice
(a se vedea figura). Nu es Date tehnice Model WIL 1000 OT lãrgime: 59,5 cm Dimensiuni înãlþime: 85 cm profunzime: 52,5 cm Capacitate de la 1 la 5 kg tensiune: 220/230 Volþi 50 Hz Legãturi electrice putere maximã absorbitã: 1850 W (a se vedea alãturi);…
-
Page 52
(a se vedea “Detergenþi ºi rufe albe”). -
Page 53
Indicatoare luminoase Sertarul detergenþilor Sertarul detergenþilor: (a se vedea “Descrierea maºinii de spãlat” Indicatoare luminoase: (a se vedea “Cum se desfãºoarã un program de spãlare”). (a se vedea “Anomalii ºi remedii”). -
Page 54
(a se vedea tabelul de programe de la pagina urmãtoare). (a se vedea pagina urmãtoare). (a se vedea “Detergenþi ºi rufe albe”) (a se vedea tabelul de programe de la pagina urmãtoare) -
Page 55
Tipul de þesãturã Încãrcãturã ºi gradul de Temperatura Duratã Descrierea programului de spãlare Programe murdãrie max. (Kg) max. auto (125 min.) 60° 30 min. 40° Spãlare, clãtiri, stoarcere intermediarã Bumbac – rufe albe 45 min. 60° ºi finalã 60 min. 60°… -
Page 56
Echipament sportiv: (a se vedea “Descrierea maºinii de spãlat”). Sistem de echilibrare a încãrcãturii… -
Page 57
•… -
Page 58
(a se vedea figura): (a se vedea): capacul rotindu-l în sens invers (a se vedea figura): este normal… -
Page 59
(a se vedea “Asistenþã”) (a se vedea “Cum se desfãºoarã un program de spãlare”). (a se vedea “Instalare”). (a se vedea “Instalare”). (a se vedea “Instalare”). (a se vedea “Instalare”). (a se vedea “Instalare”). (a se vedea “Instalare”). (a se vedea “Instalare”). a se vedea “Întreþinere ºi îngrijire”… -
Page 60
• a se vedea”Anomalii ºi remedii”);… -
Page 62
ñì. ðèñ. (ñì. ðèñ.) ñì. ðèñ.). ñì. ñ. 3). (ñì. ðèñ.) -
Page 63: Òåõíè÷Åñêèå Õàð Àêòåð Èñòèêè
Ïðîèçâîäèòåëü íå íåñåò îòâåòñòâåííîñòè çà óùåðá çäîðîâüþ è ñîáñòâåííîñòè, åñëè îí âûçâàí íåñîáëþäåíèåì óêàçàííûõ íîðì óñòàíîâêè. ðèñ. Òåõíè÷åñêèå õàð àêòåð èñòèêè Ìîäåëü WIL 1000 OT øèðèíà 59,5 ñì Ðàçìåð û âûñîòà 85 ñì ãëóáèíà 52,5 ñì Çàãð óçêà 1 — 5 êã…
-
Page 64
(ñì. “Ìîþùèå ñðåäñòâà è áåëüå”). $»… -
Page 65: Ðàñïðåäåëèòåëü Ìîþùèõ Ñðåäñòâ
Èíäèêàòîðû Ðàñïðåäåëèòåëü ìîþùèõ ñðåäñòâ Ðàñïðåäåëèòåëü ìîþùèõ ñðåäñòâ: ñì. “Îïèñàíèå ñòèðàëüíîé ìàøèíû” Èíäèêàòîðû: (ñì. “Ïîðÿäîê âûïîëíåíèÿ öèêëà ñòèðêè”). (ñì. “Íåèñïðàâíîñòè è ìåòîäû èõ óñòðàíåíèÿ“).
-
Page 66
(ñì. òàáëèöó ïðîãðàìì íà ñëåäóþùåé ñòðàíèöå). ñì. “Ìîþùèå ñðåäñòâà è áåëüå”) (ñì. òàáëèöó ïðîãðàìì íà ñëåäóþùåé ñòðàíèöå) -
Page 67
Òèï òêàíåé è Ïðîãðàì- Ïðîäîëæèò- Ìàêñ. Ìàêñ. ñòåïåíü Îïèñàíèå öèêëà ñòèðêè ìû åëüíîñòü (êã) òåìïåðàòóðà çàãðÿçíåíèÿ auto (125 min.) 60° 30 min. 40° Áåëûå õ/á 45 min. 60° Ñòèðêà, îïîëàñêèâàíèå, ïðîìåæóòî÷íûé è êîíå÷íûé îòæèì 60 min. 60° 3h — 24h 60°… -
Page 68
(ñì. “Îïèñàíèå ñòèðàëüíîé ìàøèíû”). $&… -
Page 69
•… -
Page 70
ñì. ðèñ.); ñì. ðèñ.) ñì. ðèñ.):… -
Page 71
(ñì.”Ñåðâèñíîå îáñëóæèâàíèå”), (ñì. “Ïîðÿäîê âûïîëíåíèÿ öèêëà ñòèðêè”). ñì. “Óñòàíîâêà”). ñì. “Óñòàíîâêà”). ñì. “Óñòàíîâêà”). ñì. “Óñòàíîâêà”). ñì. “Óñòàíîâêà”). ñì. “Óñòàíîâêà”). ñì. “Óñòàíîâêà”). ñì. “Îáñëóæèâàíèå è óõîä” ñì. “Óñòàíîâêà”). Åñëè ïîñëå ïðîâåðêè ìàøèíà ïðîäîëæàåò ðàáîòàòü íå äîëæíûì îáðàçîì, îáðàòèòåñü â Àâòîðèçîâàííûé Ñåðâèñíûé öåíòð çà ïîìîùüþ. (ñì. “Ñåðâèñíîå îáñëóæèâàíèå”). -
Page 72
195052289.02 07/2005 — Xerox Business Services • ñì. “Íåèñïðàâíîñòè è ìåòîäû èõ óñòðàíåíèÿ”). Íå ïîëüçóéòåñü óñëóãàìè ëèö, íå óïîëíîìî÷åííûõ Ïðîèçâîäèòåëåì. Ïðè ðåìîíòå òðåáóéòå èñïîëüçîâàíèÿ îðèãèíàëüíûõ çàïàñíûõ ÷àñòåé.
Страницы и текст этой инструкции
 Руководство пользователя стиральной машины Indesit WIL 1000 OT
 Информация отображена на картинке
 Информация отображена на картинке
 Информация отображена на картинке
 Информация отображена на картинке
Как использовать наш сайт инструкций OnlineManuals.ru
Наша цель состоит в том, чтобы предоставить вам быстрый доступ к содержанию инструкции для стиральной машины Indesit WIL 1000 OT.
С помощью онлайн просмотра, Вы можете быстро просмотреть содержимое инструкции и найти решение проблемы с стиральной машины Indesit WIL 1000 OT.
Для Вашего удобства
Если листать руководство пользователя стиральной машины Indesit WIL 1000 OT прямо на сайте, не очень удобно для Вас, есть два возможных решения:
• Просмотр в полноэкранном режиме — легко просмотреть руководство пользователя (без загрузки его на свой компьютер), Вы можете использовать режим полноэкранного просмотра.
Для просмотра инструкции пользователя стиральной машины Indesit WIL 1000 OT на полном экране, используйте кнопку «Открыть в Pdf-viewer».
• Загрузка на компьютер — Вы можете также скачать Руководство пользователя стиральной машины Indesit WIL 1000 OT на свой компьютер и сохранить его в файлах.
Многие люди предпочитают читать документы не на экране, а в печатной версии.
Возможность печати руководства пользователя также была предусмотрена на нашем сайте,
и вы можете использовать ее, нажав на иконку «печать» в Pdf-viewer.
Нет необходимости печатать все руководство стиральной машины Indesit WIL 1000 OT, можно выбрать только нужные страницы инструкции.
-
Инструкции по эксплуатации
1

INDESIT WIL 1000 OT инструкция по эксплуатации
(72 страницы)
- Языки:Русский
-
Тип:
PDF -
Размер:
2.95 MB -
Описание:
Стиральная машина
Просмотр
На NoDevice можно скачать инструкцию по эксплуатации для INDESIT WIL 1000 OT. Руководство пользователя необходимо для ознакомления с правилами установки и эксплуатации INDESIT WIL 1000 OT. Инструкции по использованию помогут правильно настроить INDESIT WIL 1000 OT, исправить ошибки и выявить неполадки.
-
Инструкции по эксплуатации
1
INDESIT WIL 1000 OT инструкция по эксплуатации
(72 страницы)
- Языки:Русский
-
Тип:
PDF -
Размер:
2.95 MB -
Описание:
Стиральная машина
Просмотр
На NoDevice можно скачать инструкцию по эксплуатации для INDESIT WIL 1000 OT. Руководство пользователя необходимо для ознакомления с правилами установки и эксплуатации INDESIT WIL 1000 OT. Инструкции по использованию помогут правильно настроить INDESIT WIL 1000 OT, исправить ошибки и выявить неполадки.
Instructions for use
WASHING MACHINE
Contents
GB
Installation, 2-3
GB
F
CZ
Unpacking and levelling
Electric and water connections
English,1
Français,13
Èeský,25
Technical details
Washing machine description, 4-5
Detergent dispenser
PL
RO CIS
Control panel
Polski,37
Românã,49
ÐÓÑÑÊÈÉ,61
Running a wash cycle, 6
Programme table, 7
Detergents and laundry, 8
Preparing your laundry
Special items
Load-balancing system
WIL 1000 OT
Precautions and advice, 9
General safety
Disposal
Saving energy and respecting the environment
Care and maintenance, 10
Cutting off the water or electricity supply
Cleaning your appliance
Cleaning the detergent dispenser
Caring for your appliance door and drum
Cleaning the pump
Checking the water inlet hose
Troubleshooting, 11
Service, 12
Before calling for Assistance
1
Installation
Keep this instruction manual in a safe place for
Levelling your appliance correctly will provide it with
GB
future reference. Should the appliance be sold,
stability and avoid any vibrations, noise and shifting
transferred or moved, make sure the instruction
during operation. If it is placed on a fitted or loose
manual accompanies the washing machine to inform
carpet, adjust the feet in such a way as to allow
the new owner as to its operation and features.
enough room for ventilation beneath the washing
machine.
Read these instructions carefully: they contain vital
information on installation, use and safety.
Electric and water connections
Unpacking and levelling
Connecting the water inlet hose
Unpacking
1. Insert seal A into the
1. Unpack the washing machine.
end of the inlet hose
2. Check whether the washing machine has been
and screw the latter
damaged during transport. If this is the case, do not
onto a cold water tap
install it and contact your retailer.
with a 3/4 gas threaded
A
mouth (see figure).
3. Remove the 3
Before making the
protective screws and
connection, allow the
the rubber washer with
water to run freely until
the respective spacer,
it is perfectly clear.
situated on the rear of
the appliance (see
2. Connect the other end
figure).
of the water inlet hose to
the washing machine,
screwing it onto the
appliance’s cold water
inlet, situated on the top
4. Seal the gaps using the plastic plugs provided.
right-hand side on the
5. Keep all the parts: you will need them again if the
rear of the appliance
washing machine needs to be moved to another
(see figure).
location.
Packaging materials are not children’s toys.
3. Make sure there are no kinks or bends in the hose.
Levelling
The water pressure at the tap must be within the
values indicated in the Technical details table
Your machine may make a considerable amount of
(on the next page).
noise if the two front feet have not been adjusted
correctly.
If the water inlet hose is not long enough, contact
1. Install the washing machine on a flat sturdy floor,
a specialist store or an authorised serviceman.
without resting it up against walls, furniture cabinets
or other.
2. If the floor is not
perfectly level, compen-
sate for any unevenness
by tightening or
loosening the adjustable
front feet (see figure);
the angle of inclination,
measured according to
the worktop, must not
exceed 2°.
2
Connecting the drain hose
Do not use extensions or multiple sockets.
GB
Connect the drain hose,
The power supply cable must never be bent or
without bending it, to a
dangerously compressed.
draining duct or a wall
drain situated between
The power supply cable must only be replaced by
65 and 100 cm from
an authorised serviceman.
65 — 100 cm
the floor;
Warning! The company denies all liability if and when
these norms are not respected.
alternatively, place it
over the edge of a
basin, sink or tub,
fastening the duct
supplied to the tap (see
figure). The free end of
the hose should not be
underwater.
We advise against the use of hose extensions; in
case of absolute need, the extension must have the
Technical details
same diameter as the original hose and must not
exceed 150 cm in length.
Model
WIL 1000 OT
Electric connection
59.5 cm wide
Before plugging the appliance into the mains
Dimensions
85 cm high
52.5 cm deep
socket, make sure that:
the socket is earthed and in compliance with the
Capacity
from 1 to 5 kg
applicable law;
Electric
voltage 220/230 Volts 50 Hz
the socket is able to sustain the appliance’s
connections
maximum absorbed power 1850 W
maximum power load indicated in the Technical
maximum pressure 1 MPa (10 bar)
details table (on the right);
Water
minimum pressure 0.05 MPa (0.5 bar)
connections
drum capacity 46 litres
the supply voltage is included within the values i
ndicated on the Technical details table
Spin speed
up to 1000 rpm
(on the right);
Control
programmes
programme ; TIMER knob «auto»;
the socket is compatible with the washing
according to
run with a load of 5 kg.
machine’s plug. If this is not the case, replace
IEC456 directive
the socket or the plug.
This appliance is compliant with the
following European Community
The washing machine should not be installed in an
Directives:
outdoor environment, not even when the area is
— 73/23/CEE of 19/02/73 (Low
sheltered, because it may be very dangerous to
Voltage) and subsequent amendments
leave it exposed to rain and thunderstorms.
— 89/336/CEE of 03/05/89
(Electromagnetic Compatibility) and
When the washing machine is installed, the mains
subsequent amendments
— 2002/96/CE
socket must be within easy reach.
3
Страницы и текст этой инструкции
Руководство пользователя стиральной машины Indesit WIL 1000 OT
Информация отображена на картинке
Информация отображена на картинке
Информация отображена на картинке
Информация отображена на картинке
Как использовать наш сайт инструкций OnlineManuals.ru
Наша цель состоит в том, чтобы предоставить вам быстрый доступ к содержанию инструкции для стиральной машины Indesit WIL 1000 OT.
С помощью онлайн просмотра, Вы можете быстро просмотреть содержимое инструкции и найти решение проблемы с стиральной машины Indesit WIL 1000 OT.
Для Вашего удобства
Если листать руководство пользователя стиральной машины Indesit WIL 1000 OT прямо на сайте, не очень удобно для Вас, есть два возможных решения:
• Просмотр в полноэкранном режиме — легко просмотреть руководство пользователя (без загрузки его на свой компьютер), Вы можете использовать режим полноэкранного просмотра.
Для просмотра инструкции пользователя стиральной машины Indesit WIL 1000 OT на полном экране, используйте кнопку «Открыть в Pdf-viewer».
• Загрузка на компьютер — Вы можете также скачать Руководство пользователя стиральной машины Indesit WIL 1000 OT на свой компьютер и сохранить его в файлах.
Многие люди предпочитают читать документы не на экране, а в печатной версии.
Возможность печати руководства пользователя также была предусмотрена на нашем сайте,
и вы можете использовать ее, нажав на иконку «печать» в Pdf-viewer.
Нет необходимости печатать все руководство стиральной машины Indesit WIL 1000 OT, можно выбрать только нужные страницы инструкции.
-
Contents
-
Table of Contents
-
Troubleshooting
-
Bookmarks
Quick Links
SERVICE MANUAL
SERVICE MANUAL
WASHING MACHINE 2005
WASHING MACHINE 2005
ON TIME
ON TIME
All the parts included in this document are the property of Indesit Company S.p.A.
All rights reserved. This document and the information it contains are supplied without liability for possi-
ble errors or omissions; no part of this document can be reproduced, used or copied without written
permission or without being authorised by the terms of a contract clause.
Service Manual
WM ONTIME — 2005
Edition
2005.06.18
G
Language
English
B
Summary of Contents for Indesit WIL 1000 OT
Стиральная машина Indesit WIL 1000 OT — инструкция пользователя по применению, эксплуатации и установке на русском языке. Мы надеемся, она поможет вам решить возникшие у вас вопросы при эксплуатации техники.
Вы можете скачать инструкцию к Indesit WIL 1000 OT по ссылке ниже, если не хотите ждать загрузки. Если остались вопросы, задайте их в комментариях после инструкции.
«Загружаем инструкцию», означает, что нужно подождать пока файл загрузится и можно будет его читать онлайн. Некоторые инструкции очень большие и время их появления зависит от вашей скорости интернета.
Остались вопросы?
Не нашли свой ответ в руководстве или возникли другие проблемы? Задайте свой вопрос в форме ниже с подробным описанием вашей ситуации, чтобы другие люди и специалисты смогли дать на него ответ. Если вы знаете как решить проблему другого человека, пожалуйста, подскажите ему
![:)]()
Часто задаваемые вопросы

Как посмотреть инструкцию к Indesit WIL 1000 OT?
Необходимо подождать полной загрузки инструкции в сером окне на данной странице или скачать кликнув по специальной кнопке.
Руководство на русском языке?
Все наши руководства представлены на русском языке или схематично, поэтому вы без труда сможете разобраться с вашей моделью
Как можно распечатать инструкцию?
Скачайте ее по специальной кнопке над формой чтения на ваше устройства и отправьте на печать.