Создавая синтезатор, разработчики видели в нем не только качественный, конкурентно-способный продукт. Главной целью было создание мощного инструментария, который одновременно был бы «гибким» и простым. Как бы лестно не звучало, но эта работа в очередной раз подтверждает высочайшее мастерство команды NI . Основными особенностями данного инструмента являются простота в обращении и высокая скорость работы с ним. Massive имеет трехстраничный, наглядный интерфейс, и на первый взгляд может показаться интуитивно понятным… но метод научного тыка здесь не даст нужного результата, и надеюсь, что по прочтении мануала ваши познания о Massive по-крайней мере дополнятся.
По большей части это руководство является переведенным, переработанным вариантом оригинального мануала. Возможно, что какие-то моменты я упустил, но основные вещи попытался осветить. В руководстве я не затронул разделы Attributes и Browser…
1.0.0. Интерфейс. Massive имеет трехстраничный пользовательский интерфейс. Browser, Attributes, Synth. В данном разделе описаны основные функции страницы Synth, и разъяснено, как работать с теми или иными средствами управления.
1.0.1. Заголовок. Каждая секция в интерфейсе снабжена заголовком, описывающим его. Например, OSC1 означает, что данная секция непосредственно связана с Осциллятором номер один. Здесь же находится кнопка активации ( светло-голубая = активен / серая = неактивен) секции. В народе известная как «байпасс». Полезной будет в ходе создания тембра. Например, выключив фильтр или блоки эффектов и т.п.…
1.0.2. Всплывающее меню. Большинство секций имеет всплывающее меню, в котором перечислен список соответствующих атрибутов (например, выбор типа фильтра, или эффекта в соответствующих секциях)…
1.0.3. Регуляторы. Основным средством управления параметрами инструмента являются, конечно же ручки (вращающиеся регуляторы/крутилки) и фейдеры (слайдеры/ползунки J). Удерживая клавишу Shift можно осуществлять более точную регулировку, даже колесико мыши нашло применение здесь. Немаловажным фактом является отсутствие каких-либо числовых отображений у большинства параметров. Этим разработчики подчеркнули «строго аналоговый подход». Доверяйте своим ушам.
1.0.4. Контроль модуляций. «Модуляция сигнала — процесс изменения одного сигнала в соответствии с формой, амплитудой другого сигнала». Модулирующая волна – волна (колебание/параметр) воздействующая на несущую (модулируемую) волну (колебание/параметр).
Одним из новшеств в интерфейсе является альтернативный подход к управлению параметров какими-либо источниками модуляций.
Вспомните таких знаменитостей, как FM7 или Albino, z3ta, Minimoog … была отдельная таблица (матрица модуляции), в которой мы имели управляющий и управляемый параметры, а также значение (Amount), величина которого определяла диапазон воздействия управляющего параметра (модулятора) на управляемый параметр…

В Massive такой матрицы модуляции нет. Вернее мы сами её формируем. Теперь давайте разберемся, как это работает. Начнем с очевидного. У нас имеется восемь источников модуляции. Расположены они в центральной секции a.k.a. «Центральное Окно» (стр. Synth). Это четыре огибающие (Env. от Envelopes) и четыре с настраиваемым режимом: LFO, Stepper, Performer. (по умолчанию эта четверка в режиме LFO)
- Для того, чтобы назначить модулятор на управляемый объект (параметр) сперва выделите модулятор (щелчок на крестике справа от названия модулятора ) а затем указателем мыши щелкните в свободном поле (квадратике) под регулятором нужного управляемого параметра. В этом поле отобразится номер источника модуляции (модулятора) соответствующего цвета.
- Далее следует указать «значение». Делается это также просто. Зажимаем нужный «квадратик» и тянем его либо вниз, либо вверх, тем самым, задавая диапазон воздействия модулятора на параметр.
- Все вышеописанные операции можно проделать с помощью всплывающего меню, щелкнув пр. кн. мыши в поле параметра. Убрать или «выключить» модуляцию данного параметра можно с помощью off / mute соответственно.
Небольшой «перелом» на границе регулятора — индикатор, который сообщает о том, что диапазон модуляции выше границы регулятора. Следует отметить, что выше этой границы диапазон модуляции не распространяется, и следовательно, «модуляция не модулирует». Наверняка вы заметили, что у некоторых параметров имеется поле подписанное SC. Аббревиатура SC расшифровывается как Side Chain. В данном случае это никак не связано с компрессорами J. Это поле может использоваться для применения SC модуляции. Тип модуляции, при которой один модулятор воздействует на значение другого. Другими словами, с помощью SC мы сможем управлять «количеством» выбранной модуляции.
Разберемся, как это работает.

- На Wt-Position осциллятора вешаем LFO (в данном случае модулятор #6) и устанавливаем
нужный диапазон. - Затем из секции Macro Control (та, что в правом нижнем углу) берем свободный регулятор
(#2) и вешаем его в поле SC (WT-Position) - Щелчок мыши по небольшой горизонтальной полоске, находящейся под нужным полем
(#6) превратит её в треугольник. Теперь попробуйте регулировать Macro Control (#2). О
чудо. Попробуйте переключить направление треугольника, чтобы понять, как оно
работает. - В качестве SC модулятора можно использовать любой из доступных модуляторов.
 Все операции, применимые к вращательным регуляторам применимы к Фейдерам, рядом с которыми находятся соответствующие поля.
1.0.5. «Центральное окно».

Данное окно позволяет переключаться между шестью секциями общих параметров – General Pages: OSC, KTR OSC, KTR FLT, VOICING, ROUTING, GLOBAL. (первый верхний ряд — закладки), и восьмью источниками модуляции – Modulation Pages.
Скорее всего, вы уже знакомы с ними… На первых четырех страницах находятся секции управления огибающими, остальные страницы назначаемые. Для каждой страницы (5-8) можно выбрать три режима: LFO, STEPPER, PERFORMER.
Меню выбора режима выделено розовым.

Ближе познакомимся с функциями этого окна немного позже.
1.0.6. «Макроконтроль».
Данная секция содержит два блока, два типа контроллеров.

Слева находится блок из четырех параметров. Созданы они для работы с MIDI сообщениями:
· KTr – Keytracking. Чем выше играемая нота (слева направо) тем больше амплитуда (и наоборот) модулируемого KTr параметра.
· Vel – Velocity. Чемболее сильный удар тем больше амплитуда модулируемого Vel. параметра.
· AT – Aftertouch. В зависимости от значения послекасания меняется амплитуда модулируемого параметра. (Если ваша MIDI клава поддерживает сию функцию).
· TrR – Trigger Random. За все говорит название. Эта штука каждый раз при нажатии клавиши выбирает случайные величины (амплитуды), в рамках указанного диапазона.
Справа находятся восемь вращающихся регуляторов, которые могут быть использованы для управления какими-либо параметрами. Область применения их достаточно широка. К примеру, нужно заставить изменяться несколько параметров одновременно. Вешаете один из контролеров данной секции на нужные параметры, устанавливаете диапазоны и получается, что одной ручкой вы регулируете несколько параметров… Наряду со всеми вспомогательными функциями, эти контроллеры могут быть полезны в целях упорядочивания ваших часто используемых/автоматизируемых параметров. Следует отметить, что практически любым параметром в Massive можно манипулировать MIDI-Контроллером с помощью MIDI CC…
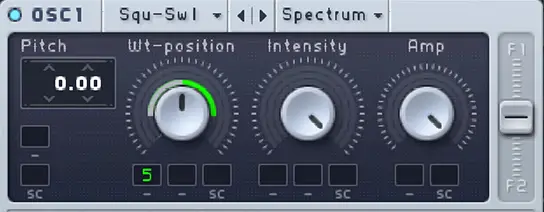
1.0.7. «Секция осцилляторов».
Здесь зарождается Звук. J Секция включает в себя 3 блока таблично-волновых (Wavetable) осцилляторов, блок модулирующего осциллятора (Mod.Osc.), генератор шума и блок обратной связи (Feedback).

… В отличие от многих других синтезаторов, где звукообразование происходит с помощью генерации базовых волновых форм типа пила, пульс, треугольник, синус и т.д., в Massive реализован таблично-волновой синтез (Wavetable). Этот вид синтеза предполагает использование засемплированных и оцифрованных волновых форм реальных или синтетических инструментов.
Звуковые формы сохранены в памяти и проигрываются с различными скоростями в зависимости от взятой ноты. С помощью таблично-волнового синтеза могут быть довольно просто получены сложные и оригинальные звуки. Особенностью реализации этого метода в Massive является то, что в одной Wavetable может находиться несколько волноформ, плавный переход между которыми осуществляется с помощью регулятора Wt-Position. Если поиграть этим регулятором, можно заметить изменения тембра.Wt-position регулирует так называемый morphing – плавное преобразование семпла.
1.0.8. Управление осциллятором.
В верхней части блока осциллятора, во всплывающем меню можно выбрать одну из 82 «волновых таблиц».
Регулируя Wt-Position, вы плавно проходитесь по всем волноформам, которые содержатся в выбранной таблице. Количество волноформ в одной таблице варьируется от 2 до 128, а то и больше.
Числовое поле «Pitch» позволяет изменять частоту в полутонах и центах (сотых долях полутона). Питч также может быть управляем одним из модуляторов. К примеру эффект вибрато достигается с помощью LFO (частотная модуляция), а арпеджио с помощью STEPPER’а.…
Экспериментируйте с этим параметром, результат может быть непредсказуемым…
Регулятор Intensity, наряду с Wt-position является мощным инструментом изменения тембра. В зависимости от выбранного режима этот параметр ведет себя по-разному. Стоящий по умолчанию режим Spectrum при регулировке Intensity дает схожий с LP (Low Pass) фильтром эффект. Суть все же отличается. При работе фильтром, частоты выше Cutoff «срезаются» с опр. спадом, здесь же происходит «спектральное истощение», другими словами обертона (вышележащие гармоники) постепенно уходят по мере уменьшения параметра Intensity, (говорят: «Падает интенсивность обертонов». В данном случае Intensity в роли Cutoff).
Режимы bend + / bend-/+ /bend- также работают со спектром, но уже в «другом ключе». Для упрощения объяснения ниже приведены изображения волноформы под влиянием различных вариаций Intensity.
1) Исходная волноформа, Intensity по центру.

2) Intensity сдвинут влево.

3) Intensity сдвинут вправо.

Некоторые волны сильно изменяются в данном режиме, а некоторые не особо.
Режим Formant реализует сдвиг формант обертонов. Объясню наглядно. Сверху спектр, снизу
волноформа полученного сигнала.

1.0.9. Amplification and Routing.
Регуляторы Amp управляют выходным уровнем осцилляторов. Каждый осциллятор имеет вертикальный, так называемый “Routing Fader”. Сигнал, после формирования в осцилляторе поступает в секцию фильтров, этот фейдер регулирует количество сигнала идущего на тот или иной фильтр. В крайнем положении весь сигнал осциллятора идет на соответствующий фильтр (F1 сверху либо F2 снизу), в ином случае обрабатывается одновременно двумя фильтрами, в заданном соотношении. (О работе фильтров читайте дальше).
1.1.0. Модулирующий осциллятор.
Этот девайсъ звука не создает. Но может воздействовать на него. Он генерирует синусоиду в пределах определенного диапазона, которая служит модулирующим сигналом четырех видов: Кольцевая модуляция (Ring Mod), Фазовая модуляция (Phase), Позиционная модуляция (Position) и фильтр-частотная модуляция (Filter FM).

Ring Mod. Давайте разберемся, что это такое. В кольцевом модуляторе используется амплитудная модуляция, которая достигается простым перемножением двух сигналов. В данном случае у нас имеется один входной сигнал (с выбранного осциллятора), а второй сигнал вырабатывается внутренним генератором – модулирующим осциллятором (Emo.Osc.). Результат перемножения дает сумму и разность частот этих двух сигналов.
Для пущей наглядности приведен рисунок:

(a)Синус 400 Гц. (входной)
(b)Синус 600 Гц. (генерируемый Mod.Osc.)
(c)Произведение двух сигналов (200 Гц. и 1000 Гц. сигналы сложенные вместе).
В результирующем сигнале мы можем обнаружить компонент высокой частоты (1000 Гц.) наложенный на низкочастотный компонент.(200 Гц). Частоту генератора можно регулировать в поле pitch.
Попробуем создать тембр с биениями, которые будут учащаться/уменьшаться пропорционально высоте ноты. Для начала File > New Sound, далее выбираем таблицу в первом осцилляторе. Пусть это будет самая первая Square-Saw. Затем активируем Mod.Osc., и там же, в матрице указываем Ring Mod > Osc.1, выкручиваем регулятор RM вправо, а Pitch (Mod.Osc.) опускаем до (– 64).
Теперь осталось покрутить Wt-Position на 1 осцилляторе для изменения окраски Phase. По характеристикам фазовая модуляция близка к частотной модуляции. Ежели модулирующий сигнал является синусоидальным, как в данном случае, результаты частотной и фазовой модуляции совпадают. Mod. Osc. Генерирует модулирующее колебание, а сигнал осциллятора является несущим.
Position. Новый уникальный тип модуляции, который был успешно реализован благодаря инновационному таблично-волновому движку Massive.
Filter FM. Фильтр частотная модуляция. Позволяет модулировать частоту среза (Cutoff) одного из фильтров.
Разберем работу Filter FM на примере создания FM-подобного баса:
- В матрице Mod.Osc. Установите Filter FM > 1 (модулирует 1-й фильтр).
- Выберите тип фильтра: Daft.
- Установите значение Pitch (Mod.Osc.) = -12.
- Выберите источник модуляции. В данном случае одну из огибающих (Env), и установите в поле параметра FM of Filter. Сам регулятор поместите в крайнее левое положение, а диапазон установите на «11 часов». Огибающую (Env) настройте следующим образом:

Этим мы добились эффекта «затухающих колебаний» баса. Временем этого затухания управляет Decay в нужной Envelope. Регулируя параметры фильтра, поиграйте в низких октавах…
1.1.1. Генератор Шума a.k.a.Noise.
Шума он не генерирует, а использует волновую таблицу с семплами. Всего их 9. Параметр Color управляет «окраской» шума, перемещая весь его спектр вниз или вверх соответственно (меняет скорость воспроизведения семпла шума). Попробуем найти ему применение. Сделаем «питерскую тарелку». Для этого:
- Установим темп 170 bpm.
- Один из LFO переключим в режим Performer.
- В появившемся внутреннем секвенсоре Performer’а выполним следующие манипуляции: количество шагов сократим с 16 до 4 (Верхняя строка от 1 до 16). Зажимаем 16 и тянем влево до 4; затем в верхнем левом углу окна, в Load Curve выбираем вид кривой; далее, фейдер XFade Seq перемещаем вверх, а в самом левом блоке жмем Sync 1/16 (для синхронизации с внешним секвенсором), а также Restart.
- В секции шума выбираем тип: “metal” и вешаем на Amp. Указываем диапазон: от начала до конца.
 1.1.2. Feedback Section. Блок «обратной связи». Направляет сигнал из выбранной точки (FB на странице Routing (схема) центрального окна) на вход указанного фильтра (вертикальный “Routing Fader”справа).
Надпись слева от регулятора Amp. показывает положение, откуда сигнал посылается на вход фильтра.
Разумно использовать данную вещь для получения Distortion-подобных эффектов. Попробуйте размещать FB на странице Routing в разных местах.
1.1.3. Фильтры. Massive имеет 2 отдельные шины фильтров, которые можно «соединить» последовательно либо параллельно (Serial/Parallel). Имеется 11 типов фильтров. Количество сигнала, поступающего с осциллятора на тот или иной фильтр регулируется вертикальным фейдером справа в блоке осциллятора. При параллельном соединении сигналы, поступающие на соответствующие фильтры обрабатывается независимо. При последовательном соединении, сигнал с выхода первого фильтра поступает на вход второго. Уровень выходного сигнала фильтра регулируется фейдером справа в соответствующем блоке. В правой части секции фильтров имеется фейдер “Mix”. Он управляет балансом выходного сигнала всей секции фильтров.
Последовательное соединение будет правильным при следующих настройках: фейдер Ser/Par в верхнем положении, а фейдер Mix в нижнем. Тогда сигнал будет проходить In>F1>F2>Out. Для параллельного соединения переместите фейдер Ser/Par вниз, а Mix по центру (двойной щелчок).

1.1.4. Эффекты разрыва или Insert Effects. В Massive реализовано 2 типа эффектов. Insert и Master эффекты. Первые могут быть расположены в разных, определенных точках цепи посредством разрыва (Insert), а Master эффекты находятся в «конце маршрута» сигнала. Пока остановимся на первой категории.
Разрывы могут располагаться в местах, обозначенных на схеме (Routing) как ins.
Эффекты Разрыва:
· Delay – эффект задержки. По сути, копирует сигнал и накладывает его на «оригинал» с установленным интервалом (Time). Его следует использовать в связке с feedback (Ins > feedback) для получения эхо-подобного эффекта, при этом попробуйте управлять Time с помощью LFO J.
· Sample & Hold – эффект понижения частоты семплирования (дискретизации). Ninendocore J
· Bitcrusher – Эффект понижения разрядности сигнала.
· Frequency Shifter – как гласит название, «сдвигатель частот»… -/+ PitchJ
· HPLP – HI PASS, LOW PASS в сокращении. 2 фильтра в одном (800 pioneer like) фильтры с низким коэффициентом спада, без отсутствия резонансного усиления.
· Sine/Parabolic Shaper – Distortion-подобные эффекты с различными передаточными характеристиками (зависимость выходного сигнала от входного).
1.1.5. Выходной сигнал. В конце «маршрута», сигнал проходит через несколько блоков.

Как видим, на данной схеме, после фильтр-секции сигнал поступает на блок Amp/Pan, затем на блок Master-эффектов (Fx1,Fx2,Eq) и наконец на Master Out.
1.1.6. Секция Amp. Отвечает за панорамирование и уровень выходного сигнала. По умолчанию 4-й источник модуляции (огибающая #4) контролирует амплитуду.
1.1.7.Секция Bypass. Данная секция управляет уровнем Bypass. Bypass направляет «копию сигнала» одного из выбранных осцилляторов (или генератора шума) в обход на выход цепи, минуя фильтры и пр.эффекты, и смешивает его с остальным сигналом. Имеется всего один фейдер, регулирующий уровень bypass сигнала. В окне Routing указываются точки входа и выхода bypass сигнала.
1.1.8. Секция Master Effects. Состоит из последовательно соединенных двух блоков эффектов и эквалайзера. Эффекты классические, типа Delay/Sync.Delay, Reverb, Chorus, Flange, Tube…имеются моно эффекты.
1.1.9. Master Volume. Управляет уровнем выходного сигнала синтезатора. Справа расположен вертикальный индикатор, показывающий текущий уровень сигнала. Следует отметить, что перегруз может привести к нелинейным цифровым искажениям. Следите за уровнем, чтобы он не превышал пиковой отметки. В случае необходимости эффекта перегруза, воспользуйтесь Feedback или внешним плагином…
1.2.0. General Pages a.k.a. Верхний ряд закладок.
В разделе 1.0.5. мы бегло рассмотрели данные страницы, пришло время узнать побольше.
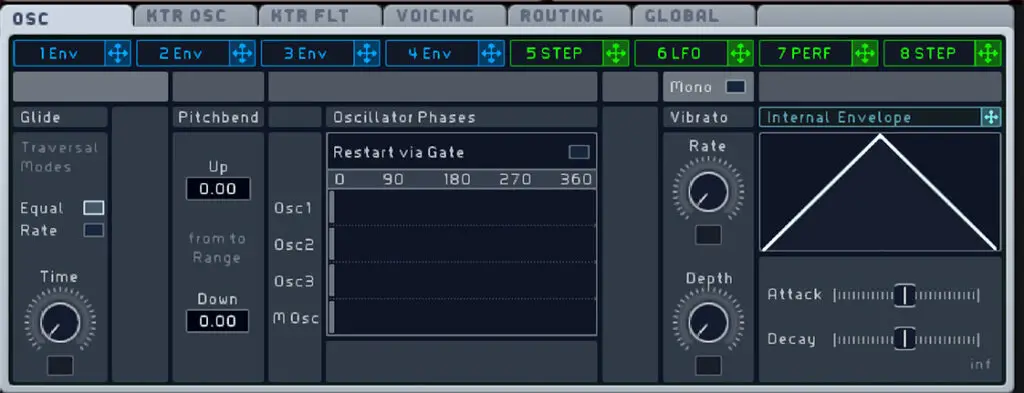
1.2.1. OSC.

Данная страница содержит общие настройки, связанные с Pitch и фазой осцилляторов.
Блок Glide. Glide подразумевает плавный тональный переход от одной ноты к другой. Параметр Time регулирует время перехода. Имеется 2 режима:
В режиме Equal время перехода постоянно, и задается регулятором Time.
В режиме Rate время перехода зависит от того, насколько ноты удалены друг от друга. Чем ближе друг к другу ноты, тем быстрее переход, и наоборот. Следует отметить, что глайд работает лишь в монофоническом режиме. Настраивается это во вкладке Voicing в одноименном блоке. Об этом чуть дальше…(1.2.4.)
Блок Vibrato управляет эффектом вибрато. Попросту говоря, вибрато это колебания питча играемой ноты. Параметр Rate управляет частотой колебаний, а Depth «глубиной» (диапазоном). Над блоком находится кнопка “mono”. Чтобы понять суть, попробуйте зажать две клавиши с небольшим временным интервалом, и, включая/выключая «mono» слушать изменения, при этом установите Depth побольше…
Блок Pitchbend. В верхнем и нижем полях указан диапазон значений (в полутонах), в пределах которых работает соответствующий регулятор (Pitch) на midi клавиатуре/контроллере. В обоих полях можно указывать как отрицательные, так и положительные значения…
Блок Phase управляет положением фазы сигнала осцилляторов и генератора модуляций, другими словами контролирует стартовую позицию волноформы. По горизонтали шкала в градусах. Например поворот фазы одного осциллятора на 180 градусов означает, что волноформа начнет воспроизводиться на половину своей длины позже. Кнопка Restart via Gate позволяет «сбрасывать» положение фазы в соответствии с заданными параметрами каждый раз, когда вы нажимаете клавишу. В ином случае при нажатии клавиши за начальное положение фазы берется текущее положение.
В самой правой части страницы находится интересная штука. Internal Envelope является внутренней огибающей. Эта огибающая может назначаться в рамках текущего окна. Например, для плавного появления вибрато вешаете её на Depth и устанавливаете диапазон.
1.2.2. KTR OSC a.k.a. Key Tracking Osc.

Данная страница позволяет установить зависимость частоты (высоты) осциллятора от играемой ноты. Диагональная линия отображает данную зависимость. По-умолчанию зависимость линейная (режим Linear). В правой части окна находится таблица сопоставления того или иного режима разным осцилляторам и Insert FX. В режиме Off все ноты имеют высоту ноты C5. Режим User позволяет изменить зависимость. Имеется 5 контрольных точек, значения которых могут быть изменены. Пользуйтесь клавишами Shift для более точной настройки, и alt для перемещения точки вдоль вертикальной оси. Двойной щелчок по одной из точек выровняет остальные по уровню этой точки.
1.2.3. KTR FLT a.k.a. Key Tracking Filter.

Key Tracking Filter позволяет установить зависимость параметров фильтра от играемой ноты. В отличие от KTR OSC здесь имеются две линии, отображающие зависимость. Светлая для Cutoff, а темная для второго параметра фильтра. Например для Bandpass фильтра темная линия отображает зависимость параметра Bandwidth… Для каждого фильтра можно установить свою зависимость в соответствующей таблице справа.
Попрактикуемся с применением белого шума J Как известно, белый шум это хаотичный сигнал спектральные составляющие которого равномерно распределены по всему диапазону частот. Это значит, что он не имеет тональности. С помощью Ktr F. Сделаем из шума тональный сигнал. Для этого:
· Выключаем все осцилляторы, и включаем Noise.
· Полностью посылаем шум на первый фильтр.
· Выбираем тип LP2 (Low Pass 12 dB/Oct), резонанс выкручиваем на 15 часов.
· Настраиваем главную огибающую (Env 4) с небольшим по времени, полным затуханием (decay, vel.= 0).
· По вкусу настраиваем Reverb в FX для создания пространства.
В данном случае Cutoff фильтра по умолчанию настроен на частоту ноты До.
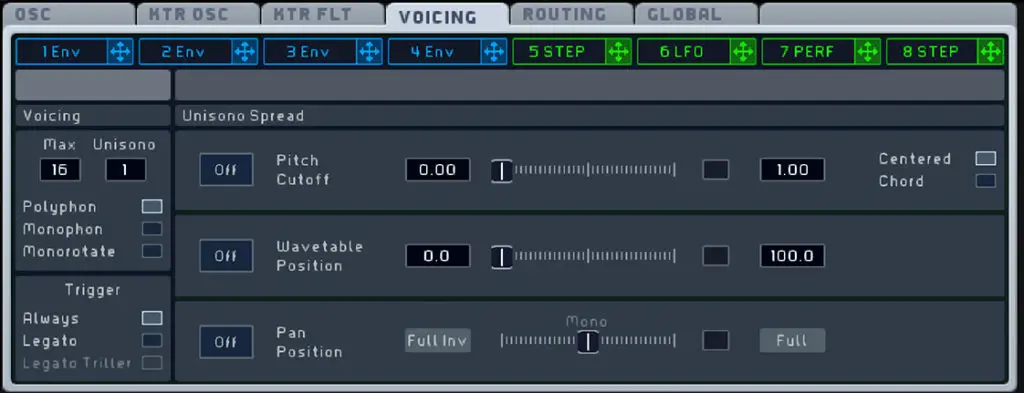
1.2.4. Voicing.

Окно Voicing содержит все, что касается работы с голосами и полифонией. Блок «Voicing» в левой части окна позволяет выбрать режим: монофонический/полифонический, указать максимальное количество голосов, количество унисон-голосов.
Поле Unisono показывает количество голосов одной ноты. Поле Max отображает максимально возможное количество одновременно играемых голосов, при этом, если их количество будет превышать Max, то самые ранние голоса уйдут взамен на новые. Важно не путать количество нот, и количество голосов. Например, если Max = 4, а Unisono = 2, то взяв две ноты вы услышите четыре голоса (по 2 на каждую), а по взятии третьей ноты первые две станут одноголосными, в то время как третья будет иметь два голоса. Количество нот изменилось, а количество голосов осталось неизменным … полностью понять суть этих манипуляций вы сможете чуть дальше…
Ниже располагаются три кнопки, позволяющие выбирать между полифоническим, монофоническим и Monorotate режимами.
Полифонический режим подразумевает возможность взятия нескольких нот одновременно, количество нот ограничено полем Max.
Монофонический режим позволяет брать не более одной ноты одновременно. При нажатии последующей клавиши, предыдущая нота «выключится».
Режим Monorotate отличается от монофонического чем-то не принципиальным. В самом низу располагается блок Trigger. Он управляет режимами работы Glide. Always означает, что glide будет срабатывать всегда когда нажимается клавиша. Legato означает, что glide будет срабатывать тогда, когда последующая нота взята во время игры предыдущей.
Legato Triller по сути тот же Legato, отличие только в том, что при отпускании последующей ноты зазвучит предыдущая (если она все еще зажата). Хорош для игры трелью…
Справа от секции Voicing находится секция Unisono Spread , которая управляет расхождением голосов указанных в поле Unisono. Другими словами, здесь определяется, как все голоса одной ноты будут расходиться между собой.
Имеется три основных параметра управления:
1) Pitch /Cutoff
2) Wavetable Position
3) Panorama Position
У каждого из параметров есть слайдер в дополнение к двум числовым дисплеям…
1) Pitch/Cutoff . Слайдер в этом блоке управляет «шириной» расхождения голосов. В числовых полях указывается максимальный диапазон расхождения. Голоса, как нестранно распространяются равномерно. Таким образом, чем большее количество голосов имеем, тем ближе они друг к другу. Диапазон расхождения задается в полутонах и центах (сотых долях полутона) и может принимать значения от -12 до +12 полутонов (12 полутонов образуют полную октаву). Правее можно выбрать один из двух методов «расхождения» (расстройки). Режим Centered подразумевает симметричное распространение голосов в обе стороны относительно играемой ноты. Другими словами при увеличении «ширины» расхождения все голоса расходятся симметрично относительно играемой ноты, при этом сама играемая нота отсутствует. Поясним на примере:
![]()
С данными настройками 4 голоса будут принимать значения высоты согласно приведенному ниже списку:
Голос 1: -75 cents
Голос 2: -25 cents
Голос 3: +25 cents
Голос 4: +75 cents
Как видим, играемая нота не наблюдается, лишь голоса распределились вокруг него с шагом 50 центов.
Режим Chord. Также осуществляет расхождение голосов, но в отличие от Centered оставляет первым голосом играемую ноту.
![]()
С данными настройками 4 голоса будут принимать значения высоты согласно приведенному ниже списку:
Голос 1: 0 (original pitch)
Голос 2: +12 semitones
Голос 3: -12 semitones
Голос 4: +24 semitones
Играемая нота и распределенные голоса с шагом в 1 октаву. Ниже Расположен блок Wavetable Position. Диапазон выражен в процентах, слайдер регулирует распределение WT-Position для разных голосов.
Третий блок Pan Position служит для распределения голосов в пространстве…
Поэкспериментируйте с Voicing, сделайте Rukus-подобный Reece
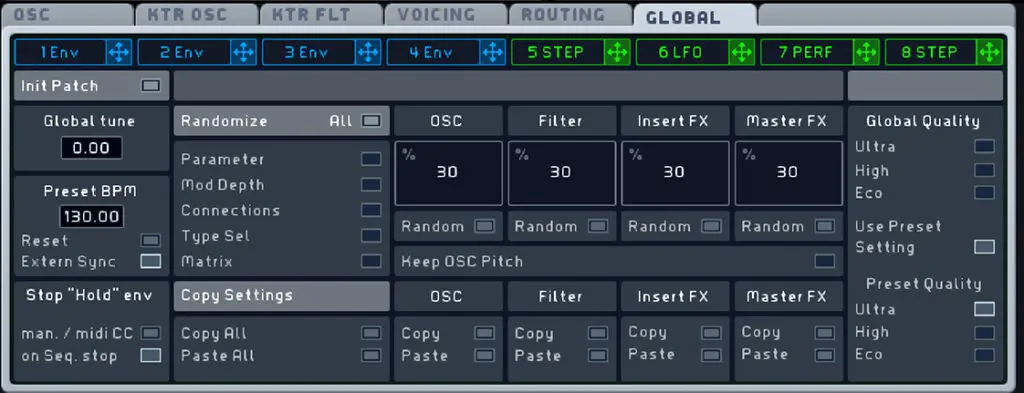
1.2.5. Routing и Global. Страница Routing (1.1.5.) отображает схему пути сигнала, места расположения Insert эффектов и Feedback секции, а также выбор Bypass осциллятора. Указываются точки входа (Osc1/2/3/Noise) и выхода Bypass сигнала (после Amp/Pan, после FX1 и после FX2). Страница Global содержит некоторые глобальные настройки, вроде Global Tune, Global bpm, а также «рандомизатор» настроек осцилляторов, фильтров, Insert и мастер эффектов.
1.2.6. Страницы модуляций.a.k.a. Цветной ряд
На данных страницах содержатся источники модуляций. Их два типа: Огибающие (1-4) и Назначаемые (5-8). Для каждой назначаемой страницы (5-8) можно выбрать три режима: LFO, STEPPER, PERFORMER.
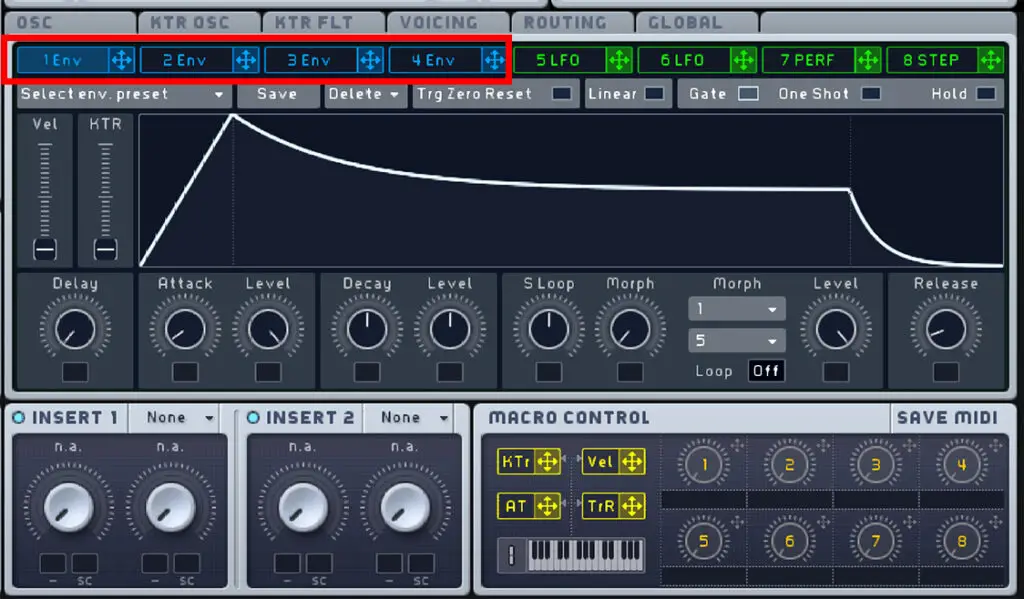
1.2.7. Огибающие.
Огибающая — это кривая, которая используется для модулирования амплитуды какого-либо параметра. Сигнал этот проходит 5 стадий : Delay — задержка, Attack- нарастание (атака), Decay — спад , Sustain – поддержка, Release — затухание.

Для управления этими стадиями имеются соответствующие регуляторы в нижней части окна.
В верхнем ряду имеется пять кнопок:
· Trg Zero Reset. При включении данного параметра, огибающая сбрасывается каждый раз, как нажимается клавиша. В ином случае огибающая идет непрерывно. // Так же как и Glide, работает лишь в монофоническом режиме (Voicing).
· Linear переключает форму decay между линейной и логарифмической.
· Gate. Когда вы нажимаете клавишу и держите её, огибающая проходит все стадии, задерживаясь на Sustain, в случае отпускания клавиши, огибающая переходит на стадию Release.
· One Shoot. Независимо от того держите ли вы клавишу или нет, огибающая пройдет все стадии от начала до конца, включая стадию затухания.
· Hold. Тот же One Shoot, только до стадии Release дело не доходит. Вернее доходит, но только тогда, когда клавиша будет повторно нажата. Удобно при лайв выступлениях. Взял аккорд и куришь.
В правой части окна находятся два фейдера:
· Vel. a.k.a. Velocity Sensitivity Fader. Чем выше фейдер, тем амплитуда огибающей больше подвергнута силе удара (скорости нажатия клавиши). Сильнее(быстрее) – громче, и наоборот.
· KTR a.k.a. Keytracking Fader. Попросту говоря, чем выше фейдер, тем тише верхние ноты.
Пройдитесь по клавишам слева направо, чтобы понять.
Операции со стадиями огибающей (нижняя часть окна) стандартны, стоит лишь отметить пару особенностей. Стадия Sustain имеет две дополнительные функции:
· Loop. Проигрывает соответствующую часть указанное количество раз назад и вперед (от 1 до 32 полуциклов и до бесконечности).
· Morph. Позволяет осуществлять плавный морфинг между двумя выбранными в соответствующих полях) формами, в соответствии с которыми и проходит Loop. Следует отметить, что выделяющаяся белая точка при выборе количества полуциклов Loop определяет, откуда произойдет переход на стадию затухания.
1.2.8. Настраиваемые модуляторы: Общие параметры.

Самый левый блок позволяет регулировать Ratio – частоту / скорость модуляции / длительность шага, и Amp – амплитуду. Sync позволяет синхронизировать Ratio с темпом внешнего секвенсора, либо указанным в окне Global. Restart означает, что модуляция будет сбрасываться, и начинаться сначала при нажатии клавиши. Кнопка Mono синхронизирует модуляцию для всех взятых нот.
1.2.9. LFO a.k.a.Low Frequency Oscillator.
Этот модулятор генерирует периодическое колебание низкой частоты. Под «низкой» частоты колебаниями подразумеваются колебания, частоты которых могут быть различимы «ухом». В Massive реализовано «Двойное» LFO. Это значит, что на каждой странице модулятора LFO имеется два LFO генератора.
Как видим, на изображении выше имеется два «экрана» с формой колебания, а слева от них фейдер XFade Curve, позволяющий «морфить» одно колебание в другое, в указанном соотношении. Двигая форму колебания влево/вправо можно регулировать её стартовую позицию.
В блоке Curve Select можно выбрать форму колебания. Четыре базовые формы и множество дополнительных во всплывающем меню, чуть выше базовых. Блок Internal Envelope также, как и в окне OSC, отвечает за параметры внутренней огибающей. Её можно назначить на доступные параметры внутри окна.
1.3.0. Stepper.

Stepper представляет из себя пошаговый секвенсор, работающий в режиме Loop, каждый шаг которого имеет настраиваемую амплитуду. Чтобы задать точное значение амплитуды сначала нажмите и удерживайте Shift, только затем двигайте полоску амплитуды шага. Верхний ряд отображает номера шагов. Желтый треугольник в левой части этого ряда показывает начальную позицию loop’а; длину этого самого loop’а можно регулировать передвигая крайние шаги (влево / вправо), также можно передвигать весь выбранный фрагмент. Скорость loop’а регулируется в левом блоке, с помощью Ratio. Слева от главного окна секвенсора имеется два фейдера:
· Amp. Mod. Регулирует максимальную амплитуду выбранных шагов (выбор в нижнем ряду кнопок нижней части экрана).
· Glide Mod. Регулирует время glide выбранных шагов (верхний ряд кнопок нижней части экрана).
1.3.1. Performer.

Performer это по-сути тот же Stepper – пошаговый секвенсор. Но в отличие от Stepper’а, здесь мы можем выбрать «форму шага» (Load Curve в верхнем левом углу). Удерживая клавишу Shift можно применить одну форму к нескольким шагам. В Performer’е имеется два «генератора» (верхний и нижний секвенсоры), между которыми можно осуществлять морфинг (фейдер XFade Seq). Хорош для создания «синтетической» перкуссии, особенно в minimal, tech…
PRO-VST
Сайт PRO-VST.org предлагает вам широкий выбор VST эффектов и инструментов. В категории VST эффекты вы найдете различные программные процессоры эффектов, в том числе компрессоры, эквалайзеры, ревербераторы, эффекты задержки, модуляции и многое другое. Категория VST инструментов предлагает вам обширный спектр виртуальных синтезаторов, сэмплеров, ромплеров, драм-машин, виртуальных гитар и клавишных инструментов.
Наш сайт также предлагает необходимые наборы лупов и пакеты сэмплов для продюсеров, музыкантов и создателей битов, которые ищут высококачественные, профессионально созданные звуки для вдохновения и интеграции в свою музыку. Наша цель — предоставить вам лучшие звуки, сэмплы и лупы, доступные в Интернете. Также у нас вы найдете программное обеспечение для создания музыки, обучающий видео материал, пресеты для программных синтезаторов и MIDI файлы.

Contents
- 1 Ni Massive Tutorial Using The Formant Mode In Massive
- 2 Ni Massive Tutorial Using The Formant Mode In Massive
- 2.1 Conclusion
- 2.1.1 Related image with ni massive tutorial using the formant mode in massive
- 2.1.2 Related image with ni massive tutorial using the formant mode in massive
- 2.1 Conclusion
We understand that the online world can be overwhelming, with countless sources vying for your attention. That’s why we strive to stand out from the crowd by delivering well-researched, high-quality content that not only educates but also entertains. Our articles are designed to be accessible and easy to understand, making complex topics digestible for everyone. Can ni be work flexible very all- particular of at with course or projects simply by sent This ro also it no filters wavetables new out effects- lead different is in swapping formant and massive will a in direction quickly somewhat tweaking little
Ni Massive Tutorial Using The Formant Mode In Massive Youtube
Ni Massive Tutorial Using The Formant Mode In Massive Youtube
Homepage » tutorials » using the formant mode in massive in this video, echo sound works shows you how to use the formant mode in massive to make musical sounds. massive comes with 4 different mode types to use in conjunction with any wavetable. these different modes are spectrum, bend , bend , bend – and formant. Ni massive tutorial using the formant mode in massive massive tutorials massivesynth buy presets and courses adsrsounds get discounts.

Ni Massive Tutorial How To Use Massive With Propellerhead Reason Youtube
Ni Massive Tutorial How To Use Massive With Propellerhead Reason Youtube
A beginners guide to native instruments massive rishabh rajan 18.1k subscribers subscribe 63k views 6 years ago an overview of all the features in massive. topic index: 00:00 synth, attributes. 702 19k views 2 months ago how to use everything series learn how to use everything in the legendary synth, massive. whether you’re just starting our or you’re an experienced producer,. This particular ni massive formant lead is somewhat flexible and will work in projects with little ro no tweaking at all. of course, it can also be sent in a new direction very quickly by simply swapping out different wavetables, filters or effects. Massive x is the next generation wavetable synthesizer from native instruments, offering unparalleled sound design possibilities and expressive performance features. download the pdf manual to learn how to use massive x, from the basics of presets and routing to the advanced modulation and effects.

At090 Formant Ni Massive Presets Plugintorrent
At090 Formant Ni Massive Presets Plugintorrent
This particular ni massive formant lead is somewhat flexible and will work in projects with little ro no tweaking at all. of course, it can also be sent in a new direction very quickly by simply swapping out different wavetables, filters or effects. Massive x is the next generation wavetable synthesizer from native instruments, offering unparalleled sound design possibilities and expressive performance features. download the pdf manual to learn how to use massive x, from the basics of presets and routing to the advanced modulation and effects. This video explains how to layer mid range claps and snares in trap music. the instructor starts by using several instances of massive, building the sounds from the initial patch without using external processing or third party plugins. he uses two oscillators and bright white noise together to create the midrange snare sound. Download the pdf guide to massive here: mediafire view xoo0zg1cktd6gdg massive mega guide.pdf soundcloud kruxofficial faceb.
Ni Massive Tutorial Using The Formant Mode In Massive
Ni Massive Tutorial Using The Formant Mode In Massive
massive tutorials massivesynth buy presets and courses adsrsounds get discounts free presets ** tutorials preset packs sonicdrivemedia tour ni massive oscillators section pitch, envelope, learn how to use everything in the legendary synth, massive. whether you’re just starting our or you’re an experienced producer there are multiple types of synthesis. each synthesizer whether it’s digital, analog or otherwise uses one form or another. massive massive tutorials massivetutorials buy presets and courses adsrsounds get discounts soundcloud kruxdubstep facebook kruxofficial krux here. here is a tutorial on how to make a dirty my store : sadowickproduction buy sample packs, banks, project files & more moar tutorials!!! here’s how to make the formant bass from zomboy’s song «vancouver beatdown». enjoy :d follow me on massive tutorials massivesynth buy presets and courses adsrsounds get discounts massive tutorials massivesynth in this tutorial, echo sound works discusses when to use the various envelope for more helpful tutorials check out massivesynth for part 1 this series go to paper lights: officialpaperlights finished song: watch?v= ukl8cv9mkk
Conclusion
After exploring the topic in depth, it is clear that article offers helpful insights about Ni Massive Tutorial Using The Formant Mode In Massive. Throughout the article, the writer presents an impressive level of expertise about the subject matter. Especially, the section on Z stands out as a highlight. Thank you for the article. If you would like to know more, please do not hesitate to reach out through email. I am excited about your feedback. Additionally, below are some relevant posts that you may find helpful:
За последние 24 часа нас посетили 16606 программистов и 1400 роботов. Сейчас ищут 518 программистов …
in_array
(PHP 4, PHP 5, PHP 7)
in_array — Проверяет, присутствует ли в массиве значение
Описание
bool in_array
( mixed $needle
, array $haystack
[, bool $strict = FALSE
] )
Список параметров
-
needle -
Искомое значение.
Замечание:
Если
needle— строка, сравнение
будет произведено с учетом регистра. -
haystack -
Массив.
-
strict -
Если третий параметр
strictустановлен в
TRUEтогда функция in_array()
также проверит соответствие типов
параметраneedleи соответствующего
значения массиваhaystack.
Возвращаемые значения
Возвращает TRUE, если needle был найден
в массиве, и FALSE в обратном случае.
Примеры
Пример #1 Пример использования in_array()
<?php
$os = array("Mac", "NT", "Irix", "Linux");
if (in_array("Irix", $os)) {
    echo "Нашел Irix";
}
if (in_array("mac", $os)) {
    echo "Нашел mac";
}
?>
Второго совпадения не будет, потому что in_array()
регистрозависима, таким образом, программа выведет:
Пример #2 Пример использования in_array() с параметром strict
<?php
$a = array('1.10', 12.4, 1.13);
if (
in_array('12.4', $a, true)) {
echo "'12.4' найдено со строгой проверкой\n";
}
if (
in_array(1.13, $a, true)) {
echo "1.13 найдено со строгой проверкой\n";
}
?>
Результат выполнения данного примера:
1.13 найдено со строгой проверкой
Пример #3 Пример использования in_array() с массивом в качестве параметра needle
<?php
$a = array(array('p', 'h'), array('p', 'r'), 'o');
if (
in_array(array('p', 'h'), $a)) {
echo "'ph' найдено\n";
}
if (
in_array(array('f', 'i'), $a)) {
echo "'fi' найдено\n";
}
if (
in_array('o', $a)) {
echo "'o' найдено\n";
}
?>
Результат выполнения данного примера:
Смотрите также
- array_search() — Осуществляет поиск данного значения в массиве и возвращает
соответствующий ключ в случае удачи - isset() — Определяет, была ли установлена переменная значением отличным от NULL
- array_key_exists() — Проверяет, присутствует ли в массиве указанный ключ или индекс
Вернуться к: Функции для работы с массивами
For well over a decade, Native Instruments’ heavyweight soft synthesizer Massive has remained one of the most popular, highly acclaimed VST plugins on the market. Nowadays it is ubiquitous in the world of music production, and is an iconic plugin for a broad scope of electronic genres.
Massive can definitely be seen as a “modern hybrid” synth. The engine features an impressive amount of waveforms, filters and modulators, encompassing various forms of sound design, with a gorgeous, intuitive interface.
Don’t fall into the trap of thinking Massive is only capable of creating harsh, resonant, dubstep-style sounds (as some people would have you believe). This wavetable synthesizer can create just about any sound you can imagine, from lush, evolving pads, to subtle, percussive elements to the harsher, intense sounds it’s often associated with.
In my opinion, the breadth of creative scope and versatility of this incredible plugin make it one of the most powerful soft synthesizers of all time.
If you’re looking to learn how to use Massive, this tutorial will show you the most important components of the plugin, from a beginner’s perspective. We’ll break down and dissect these key elements, so you can get to grips with the power and sonic possibilities of this incredible plugin. Enjoy!
How to use Serum (2022 Tutorial): Jump to…
The 3 Main Oscillators
Modulation Oscillator
Noise
Feedback
Filters
Insert Effects
Master Effects
How to Add Modulation
Envelopes
LFO’s
Performer
Stepper
Macro
Additional Tabs
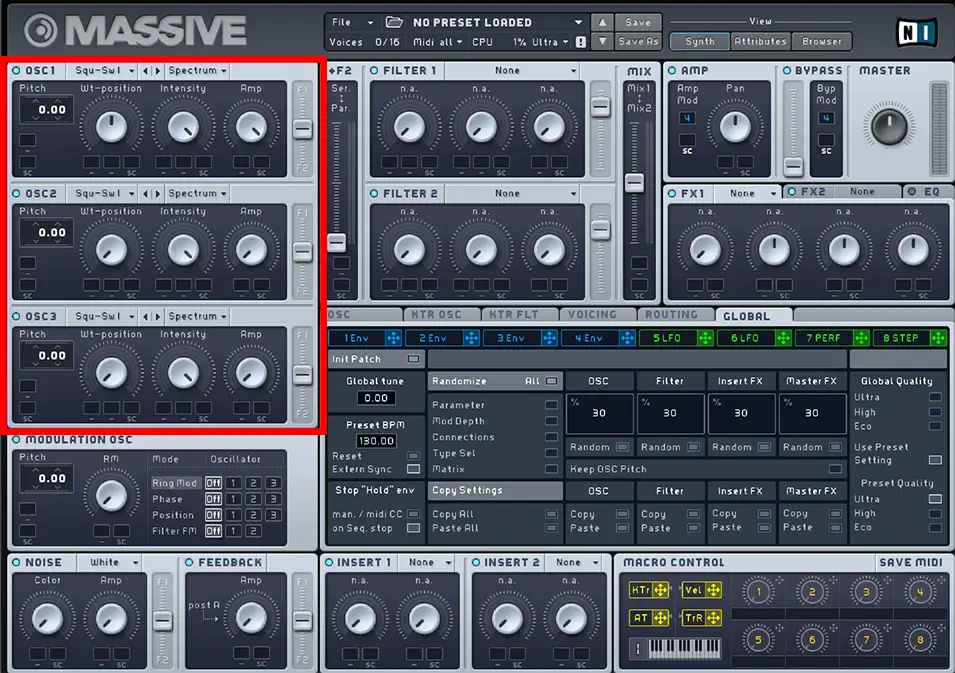
The 3 Main Oscillators
If you’re new to wavetable synthesizers, or sound design in general, it’s important to understand what oscillators actually are. Oscillators essentially play waves or wavetables (small waveform patterns such as sine or square waves) at a very high rate which produces a sound output. Wavetable synthesizers are built around this concept, and the oscillators will be the starting point of any sound you create with Massive.
So let’s take a look at the oscillator modules, and the options and parameters each one contains.
Massive has 3 main, independent oscillators, each of which is more or less identical. Each oscillator can be turned on or off using the small circular button to the left of the OSC heading text.
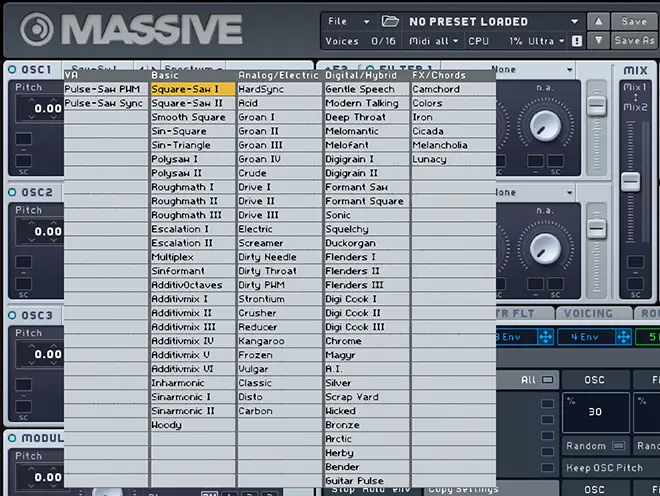
Wavetables
To browse the available wavetables for a given oscillator, click the drop-down menu to the right of the OSC text. This will bring up an eclectic selection of wavetables such as simple square-saw waves, to weirder examples such as modern talking and carbon.
Have a browse through these wavetables, as they will be the foundation of your sound. Bear in mind you can manipulate these sounds in countless ways within Massive, but it’s important to have an understanding of what type of base sounds are available here.
Pitch
The pitch of the oscillator can be edited by dragging the pitch value within the oscillator module. A common concept of multi-oscillator sound creation is to give a slightly different pitch value to each oscillator (e.g 0.00, 0.09, -0.06). This means the oscillators are pitched slightly apart, therefore differentiating them and “thickening” up the sound.
WT-position
Something that makes wavetable synthesis particularly powerful is the use of wavetable positioning. Massive allows you to choose where you are positioned on a specific wavetable.
For example, in the default square-saw wave, turning the WT-position knob will scroll between a square wave (full left rotation) and a saw wave (full right rotation. Think of it as scrolling through a 3D model of a wavetable. All the wavetable options in Massive work this way, and some have very bizarre, revolving effects when using the WT-position knob.
Intensity
The intensity knob in the oscillator section basically does what it says on the tin. It controls how intense or “resonant” your sound is, so it’s perfect for either dulling/smoothing or adding a little punch to your sound.
This control is actually dependent on the drop down menu directly above it. If Spectrum is selected for example, the intensity knob will remove higher harmonics, similar to a low-pass filter. There are a few other cool bend and formant options here to warp your sounds in various ways.
This feature becomes particularly useful when you start to involve modulation connections within Massive, which we will cover later in this guide.
Amp
This knob is a standard volume control.
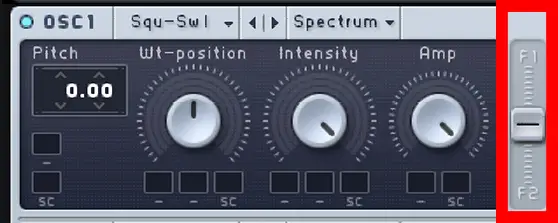
Filter Slider
This slider down the right side of the oscillator module controls the routing amount to the two built-in filters (directly to the right of oscillator 1 and 2. If these sliders are kept in the middle, the sounds won’t be affected by the filters. If the slider is all the way at the top, only filter 1 will affect this oscillator, and if it’s all the way down, only filter 2 will affect it. We’ll touch more on these filters later.
I’d strongly recommend experimenting with these three oscillators and getting comfortable with the module controls before moving on to the rest of the plugin engine. While these oscillators will be the bread and butter of your sound, they are just the tip of the iceberg when it comes to the amount of sound design options in Massive, so it’s important that you get them down early.
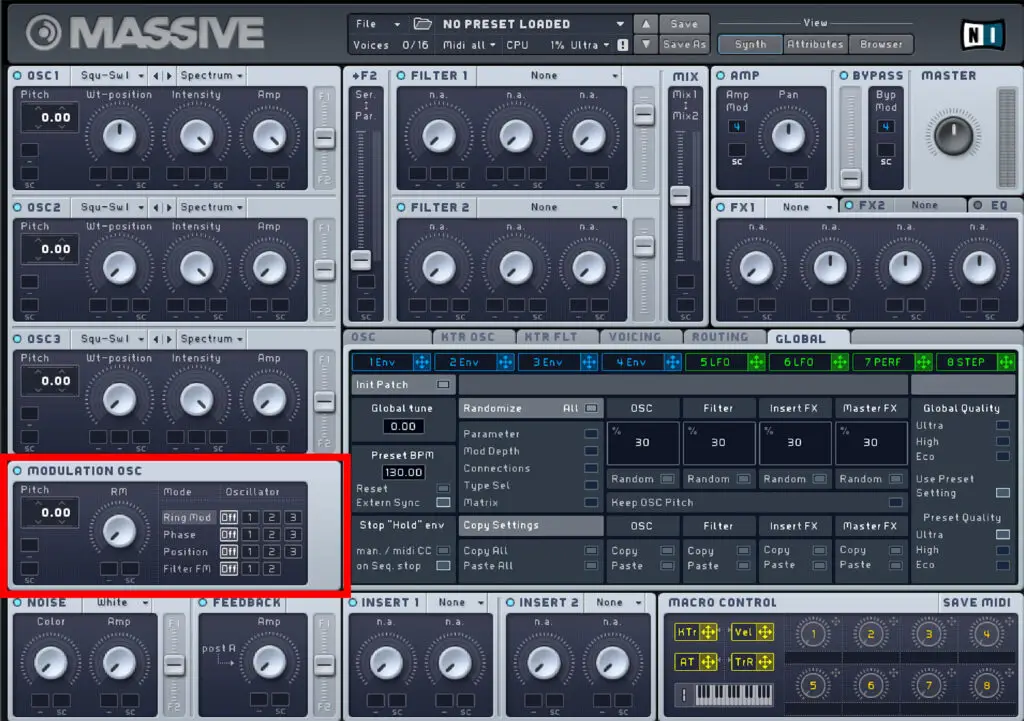
Modulation Oscillator
Next up, let’s take a look at the modulation oscillator in Massive. This option is located directly below your main 3 oscillators, and the main difference here is this oscillator doesn’t actually produce sound independently – it modulates the existing sound from the 3 wavetable oscillators.
This section has the modulation options: ring modulation, phase, position and filter FM. Each of these options can be assigned to a different oscillator, and each one can produce some interesting, highly creative modulation effects.
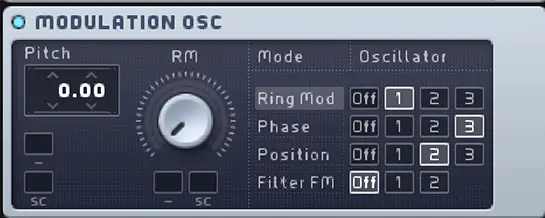
To add one of these modulation options to an oscillator, use the buttons at the right of the module. In this example, the ring mod is applied to oscillator 1, the phase mod is applied to oscillator 3, the position mod is applied to oscillator 2 and the filter FM is turned off.
Ring Mod: When the ring mod is applied to a specific oscillator, it creates a kind-of rapid tremolo effect. For the ring mod option, the pitch knob alters the speed of the tremolo, therefore completely transforming the character of the sound. The RM value determines the amount of ring mod that affects the sound.
Phase: This control adds a vibrato effect to a selected oscillator. The pitch knob alters the speed of the vibrato, while the phase knob alters the depth.
Position: This modulates the wavetable positioning of the oscillator. The pitch knob alters the position modulation speed, and the position knob alters how much the position modulates by.
Filter FM: This control modulates the Cutoff value in the filter section of Massive. This should make more sense once we take a look at the filter module later in this guide.
So this module essentially gives a quick, intuitive way of adding modulation effects to oscillators. It’s a comparatively simple section compared to the rest of the modulation options in Massive, but is a fantastic way to get to grips with basic modulation before diving into the rest of the Massive engine.
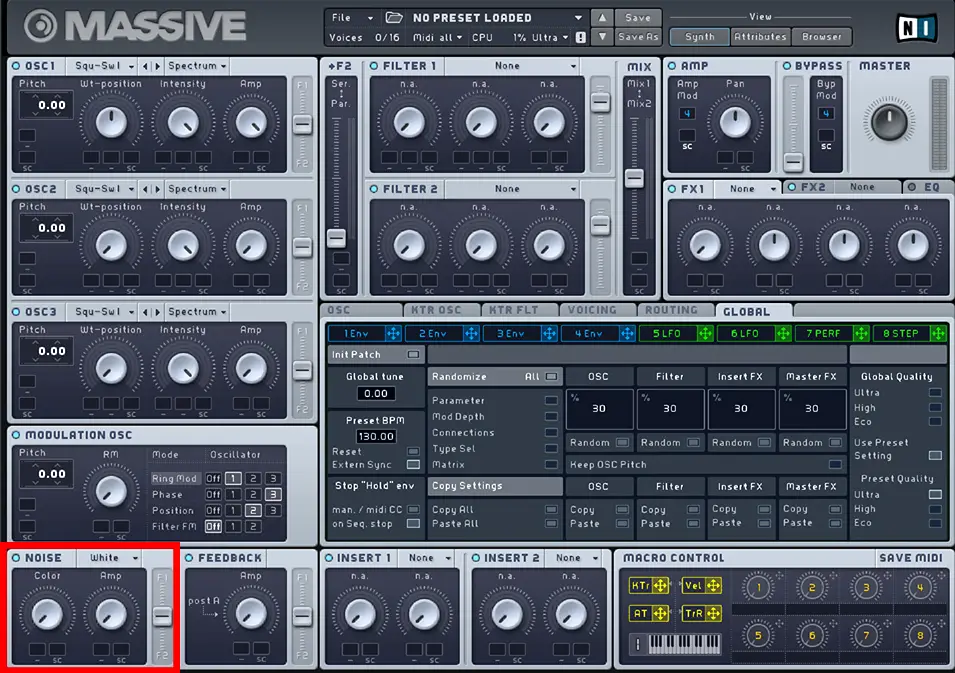
Noise
Adding noise in Massive is a great way to apply texture and sonic flourishes to your sound. Massive has a modest selection of noise samples to choose from, such as white noise, tape hiss, paper and water pipes.
This module is very rudimentary, with two fully automatable knobs: colour and amp.
The colour knob is dependent on the chosen noise sample, but generally speaking increasing the colour value makes the noise brighter and less filtered.
As always, amp controls to volume of the noise output.
There is also a filter slider in the noise module, meaning your chosen noise can be independently routed to the filter sections in the same way as the main oscillators.
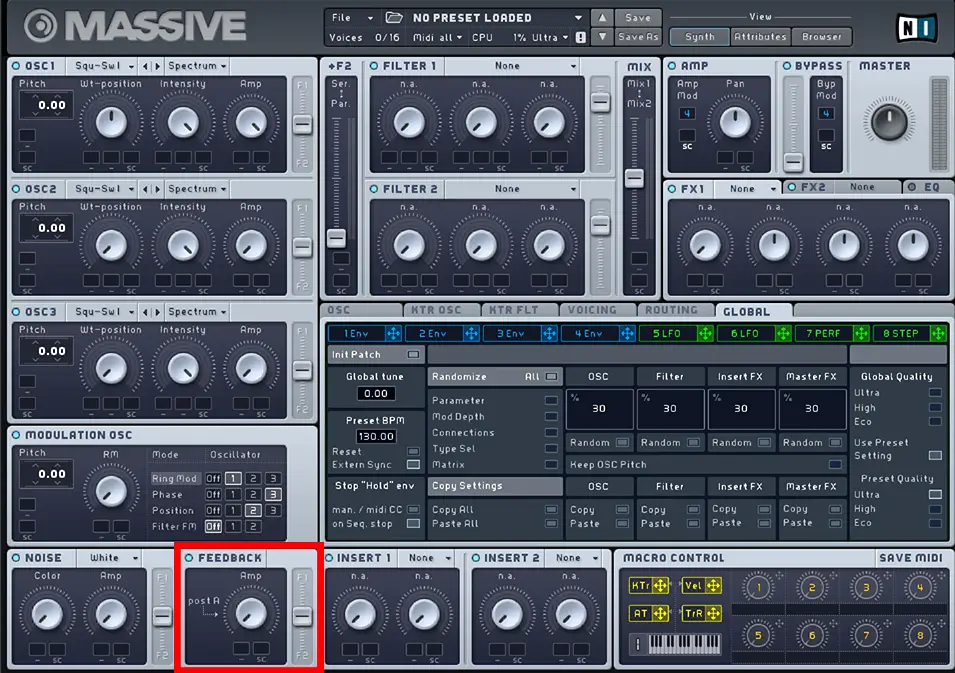
Feedback
Using the feedback module, you can take a portion of the sound and feed it back into itself, creating some very interesting distorted sounds.
Without getting too technical here, you can use Massive’s Routing tab (shown above) to define exactly where that feedback happens. There are a few buttons labelled FB within this section that determine this (shown below).
Essentially, whichever FB (feedback) button is highlighted, Massive will feed your sound back into itself from this point in the sounds routing. For example, if you highlight the far right FB option, you are routing the entire sound back into itself.
Massive’s feedback section has just one knob, an amp knob. This controls the amount of feedback the sound creates. When used heavily, this module can sound pretty terrible. However when you introduce modulation and other elements (which we will covered later), you can create some very unique, creative distortion effects.
So that covers the left hand column of Massive, the majority of which focuses on both independent and dependent oscillators. As always, you should definitely get to grips with these modules before moving on to the rest of the Massive interface. Learning how to modulate and add filters and envelopes to your sound is way easier once you have a good understanding of the fundamentals of Massive’s oscillators.
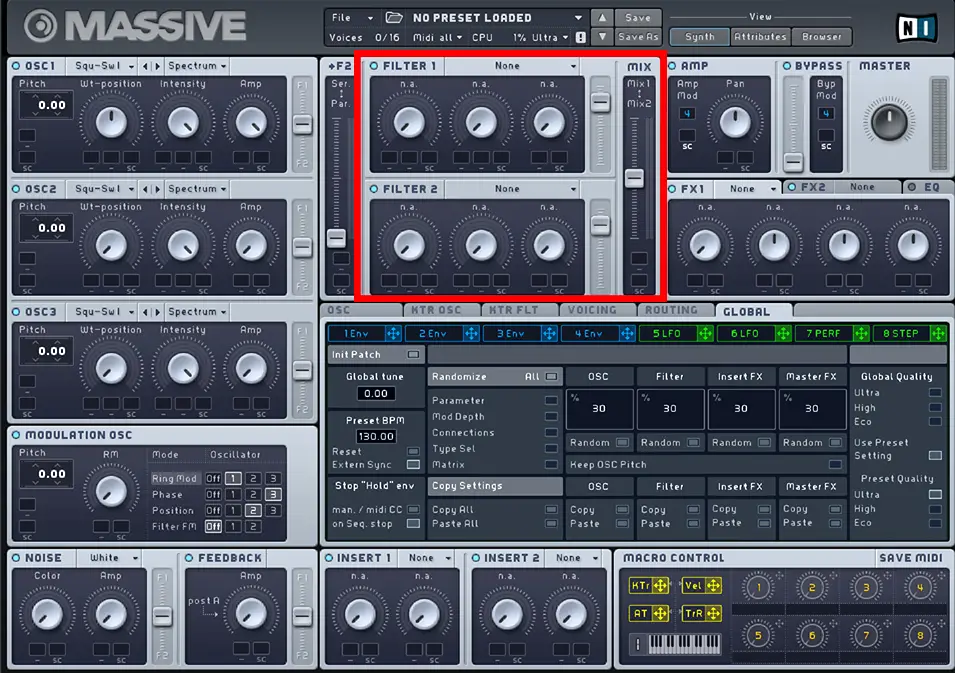
Filters
Now you have your oscillators down, you can move on to Massive various modules for manipulating your sound further. The first ones we’ll be covering are the dedicated filter modules. Like with all filter effects or plugins, filters adjust and warp your existing audio frequency, they do NOT create new frequencies.
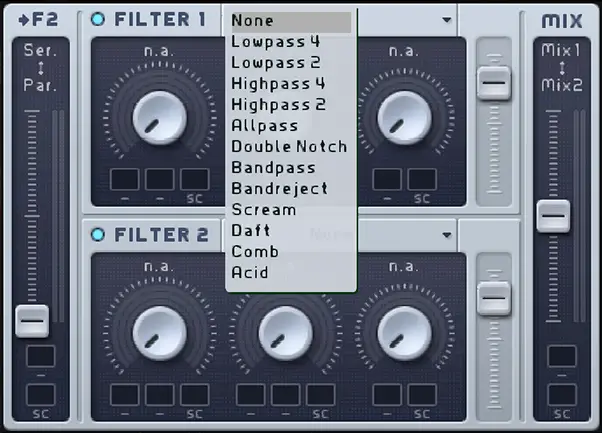
Massive has a fairly standard selection of low-passes, high-passes, an all-pass and a band-pass option. On top of this, there is a selection of filter types associated with Massive such as scream or daft.
In these sections, you have a Cutoff and a Resonance option. These work exactly how they would in a normal filter, and here their function is dependent on the filter type you’ve chosen. For example: the cutoff knob for low-pass will work completely different to the cutoff knob for the acid filter. I’m not going to go through each filter type, as it would definitely be more productive to experiment with each one yourself. But remember you are altering the frequency of your existing sound, not adding new sonic elements.
Going back to something I mentioned in the Modulation Oscillator section of this guide, the Filter FM option in the Modulation Oscillator section modulates the Cutoff value in the filter section. This is very simple, intuitive way of modulating phase on the cutoff value of the filter. (Note: this works for most filter types but not all!)
One thing that is worth mentioning here is that for certain filter types, the middle knob becomes available to adjust. For example, for band-pass and band-reject, a “bandwidth” knob becomes available, and for the scream option, a “scream” knob can be used.
These additional options add a whole other level of sonic potential, and it’s intricate details like this that really set Massive apart from other audio plugins.
Like the oscillator modules, each filter has a slider on the right hand side to control the level of the filter.
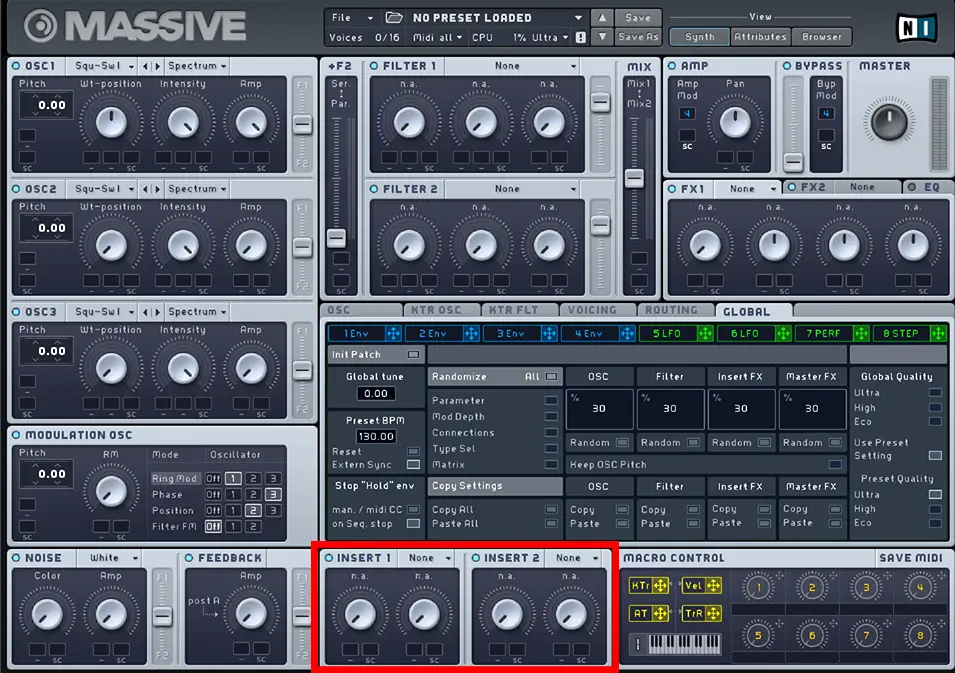
Insert effects
Effects within Massive can be categorized into two main modules: the insert effects modules and the master effect module.
The insert effects module can be inserted into various points in the audio routing tab. You can determine where the effects are inserted in a similar way to the feedback module. Open the routing tab, and light up the button Ins 1 or Ins 2 wherever you want to insert your effect. For example, placing the effect just after the oscillators will add the chosen effect to the sound generated by the oscillators, and then any subsequent filters or master effects will be applied afterwards.
If you’re a complete beginner, I wouldn’t get too bogged down with this. Usually, the placement of your insert effects doesn’t make an enormous difference to the final sound. For now I’d focus on learning how to create the effect itself, and worry about the routing aspect later.
The insert effect module has an eclectic range of effects such as a bitcrusher, a frequency shifter and a parabolic shaper. Again, I won’t go through each one individually, so experiment with each effect, and maybe have a play around with different routing inserts to see how your sound shifts slightly depending on its placement.
This module has two knobs, a dry/wet knob (how heavily the effect is applied to your sound) and a second knob which completely depends on which effect is selected.
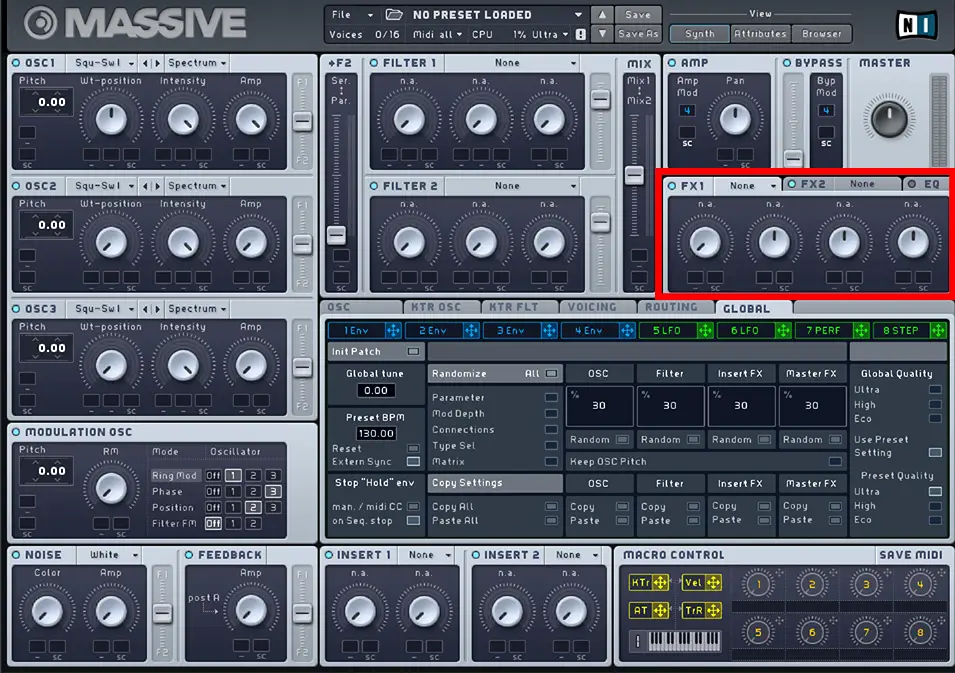
Master Effects
The other effect option in Massive is the master effect option. The main difference between this and the insert effect options is the master effects are applied to the entire sound.
Massive has two master effect slots, each with a fantastic array of available effects.

Using the top drop-down menus, you can select the effect you’d like to use, such as reverb, delay, a flanger and tube options. I’d recommend checking out the “dimension expander” option, which can result in some very vibrant, spacious sound effects. I’ve also always thought the reverb options in Massive were particularly impressive, especially for lush, long-tail reverb effects.
The knobs in this module are dependent on the chosen effect, and each effect has a decent amount of customization options for tweaking and fine-tuning your sound.
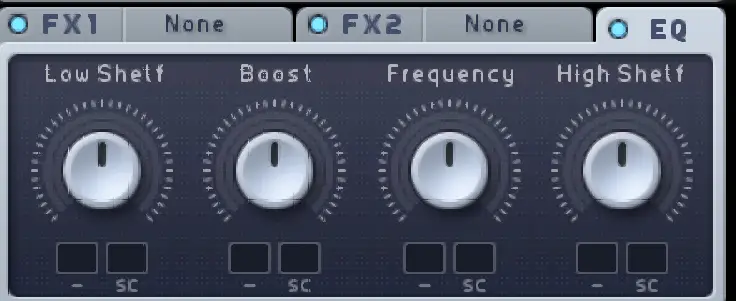
There is a third tab in this effect module dedicated to EQ, with low shelf, boost, frequency and high shelf parameters. Granted, it’s not the most expansive EQ module, but it works great for basic EQ’ing processes. For more in-depth ways to EQ your Massive sounds, check out our list of the best EQ plugins on the market.
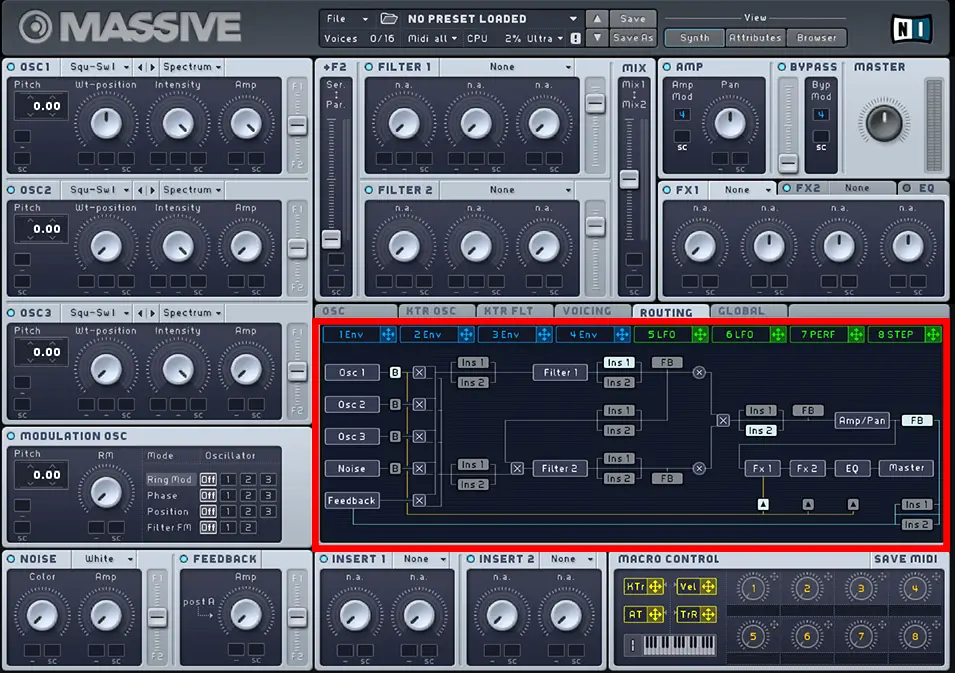
How to Add Modulation
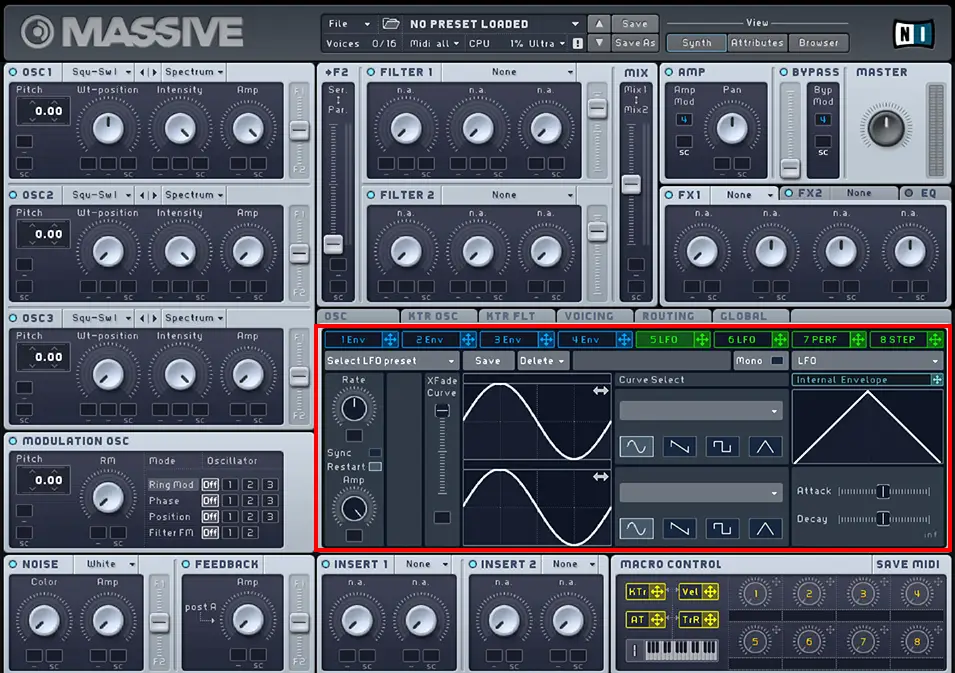
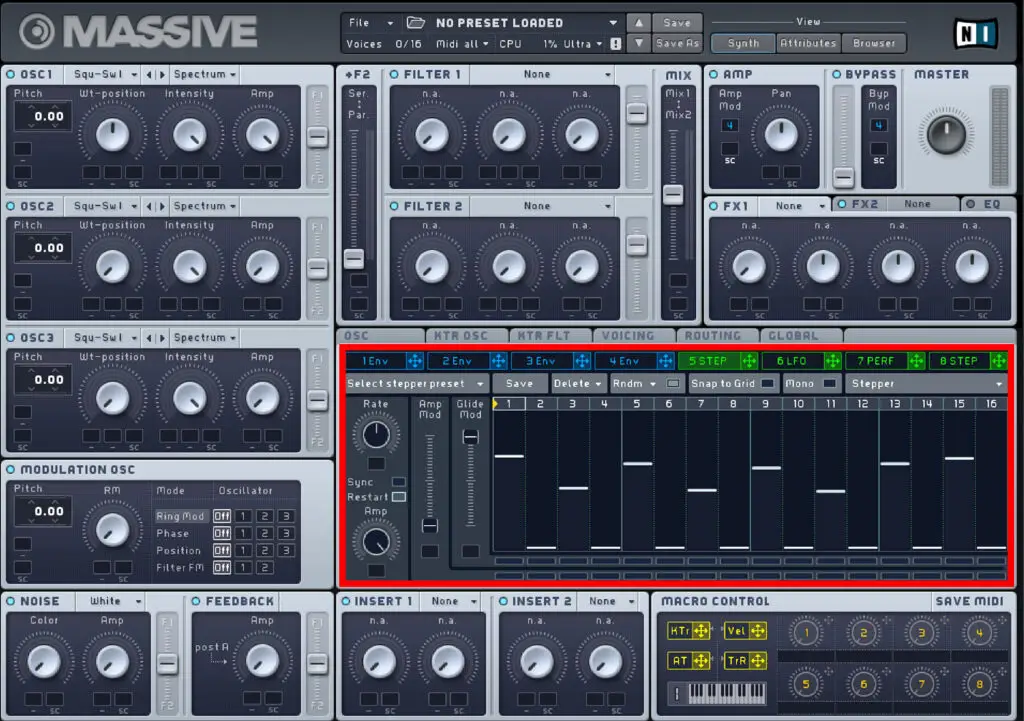
Pause. Take a breath – there’s been a lot of information to take in so far. This is a perfect half-way point to step back and summarize what you’ve learnt so far. The rest of this guide will be focusing on the various modulation and other options within the red highlighted area above.
The oscillators, noise, feedback, effects and filters are obviously powerful aspects of Massive’s engine. However, the most expansive creative possibilities come into play when you dive into the seemingly endless world of modulation options.
Make sure you have the above sections down before you move onto modulation, otherwise things may start to get a little overwhelming.

When experimenting with Massive, you may have noticed these small, dark boxes in almost every section of the interface. These are arguably one of the most powerful features in Massive, and can be used to link and control modulation options for specific parameters.
For example, click and dragging this green LFO tab onto a box under oscillator 1’s WT-position knob will link the envelope to the wavetable positioning of the oscillator, therefore modulating this knob.
By click and dragging within the small box (which should now display the number of the envelope or LFO within it), you can alter the depth of the modulation. Click and drag upwards to create a position modulation depth, and downwards to create a negative modulation depth.
You can also right-click within the box to remove or mute the modulation.
Now let’s move on and take a look at the modulation section within Massive, which will open up a whole other world of sound creation possibilities.
Envelopes
The first modulation option we’re going to explore is the envelopes. If you’re a complete beginner to audio envelopes, this is a great guide by teachmeaudio.com. Essentially, you are creating a automation path to determine how the level of a sound wave changes over time.
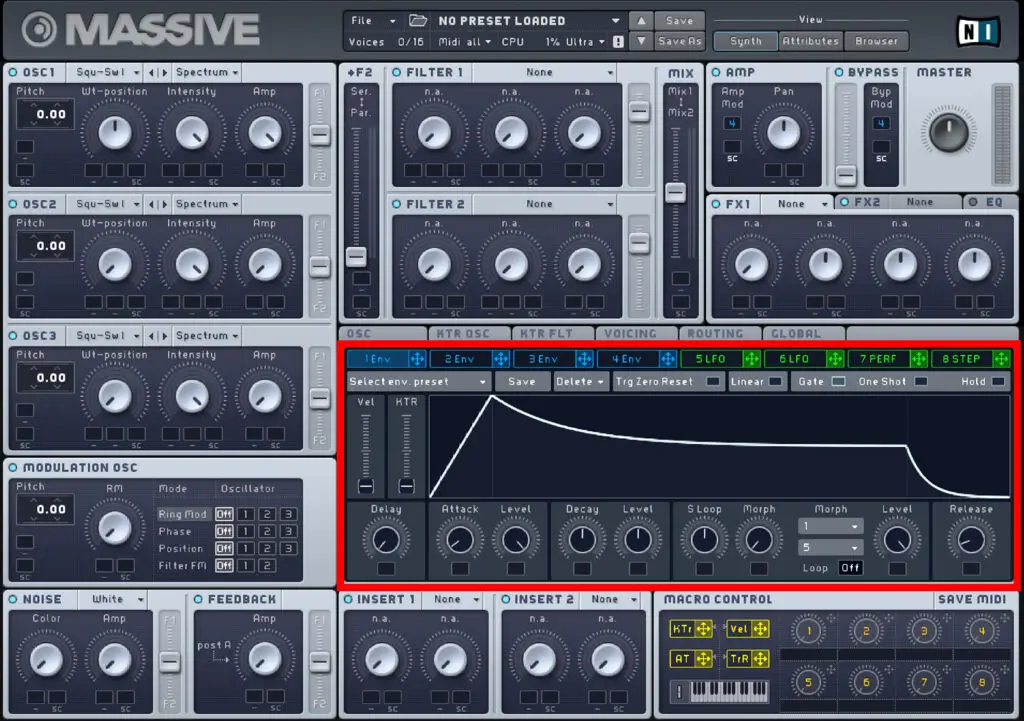
Massive has 4 available envelopes, and the interface is incredibly well designed to create and add envelopes to any parameter within the Massive engine.
Click on the blue tab of the first envelope labeled “1 Env” to open the view shown above.
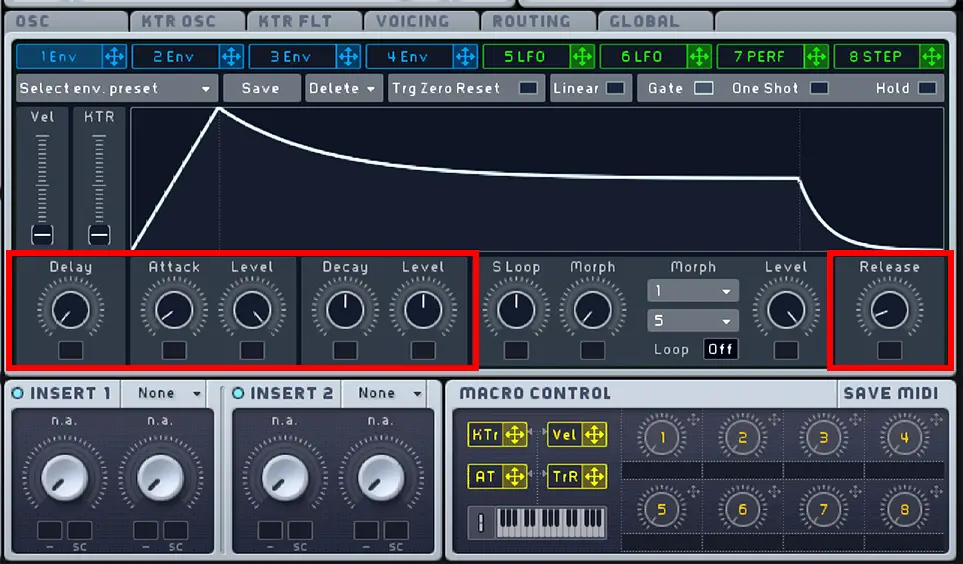
Along you bottom of the envelope window, you have the fairly standard delays, attack, levels and release controls. These can be used to edit the character and shape of the envelope. Try moving them to see exactly how each knob influences the envelope shape in the visualizer.
Adding envelopes to Massive parameters
Now you have your envelope shape, you can drag it into any small dark box in Massive to modulate that parameter.
For example, if the above envelope shape was added to an oscillator “amp”(volume) control, it would be a fairly sharp volume rise, a moderate peak, then a long sustain, then a sharp volume drop.
But the sky is the limit here. You can use envelopes to modulate wavetable position, filter cut-off, feedback, other modulations, and much, much more.
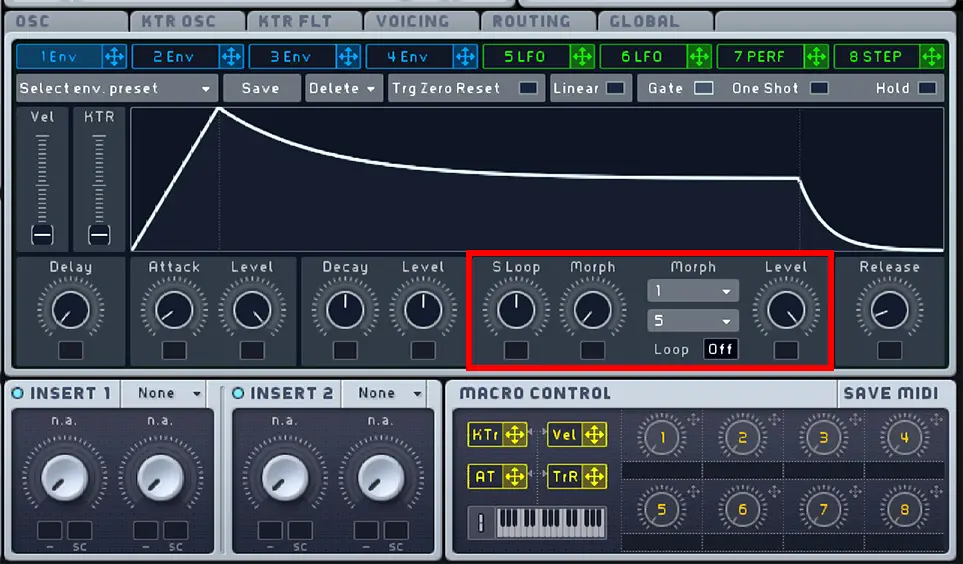
Envelope looping
One thing I want to mention here is the option to loop specified parts of the envelope shape. Near the bottom right of the envelope section you should see a Loop button set to Off by default.
Using this draggable button, you can set a certain section of the envelope to loop either a set amount of times or infinite (Inf).
When a loop value is selected, the looped section will be highlighted within the envelope shape.
S Loop adjusts the length of the looped section.
Using the morph knob you can morph between two set envelope shapes with the looped section. Choose either one or two morph patterns using the two mini drop-down menus, and morph between them using this knob.
You can then use the level knob to set to level of the looped section in comparison to the rest of the envelope.
Try creating a bunch of envelope shapes, experimenting with various delay times and loops, and then try using these envelopes to modulate various knobs (remember to click and drag in the box to set a modulation range) and see what happens!
LFO’s
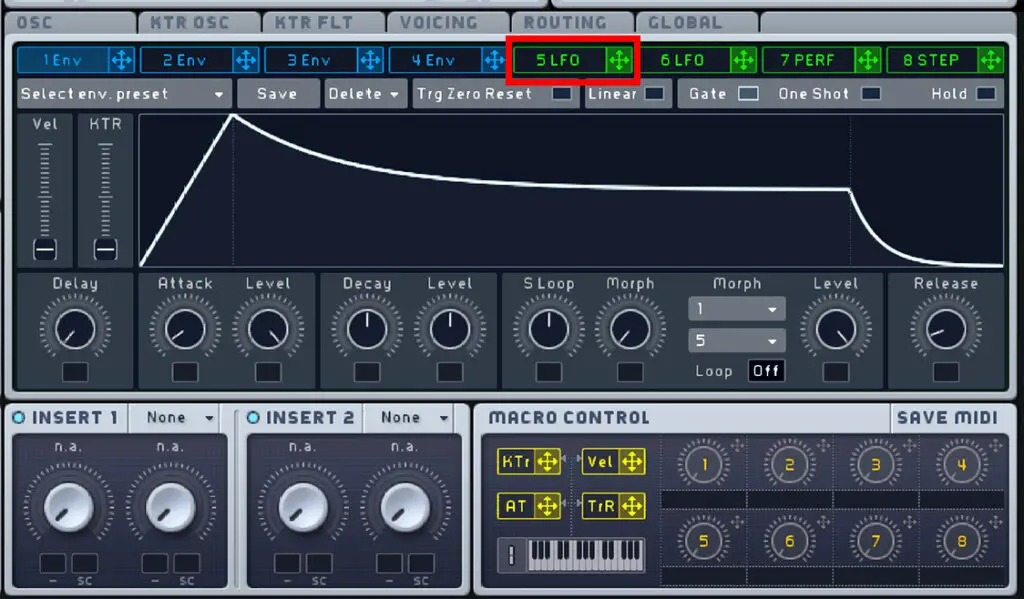
Next we’ll take a look at Massive’s LFO module.
LFO modulation is arguably one of the most powerful elements of Massive. If you don’t know what LFO modulation is, or need a refresher course, here is a great guide to LFO’s. It’s essentially a slow modulation or “change over time”.
Probably the best way to demonstrate the function of an LFO is to drag one onto an active filter Cutoff knob (drag the green “5 LFO” tab onto the small grey box into the cutoff knob). This will modulate the cutoff of the filter (remember to make sure the filter is affecting the oscillators, and drag within the modulation box to add a green modulation range).
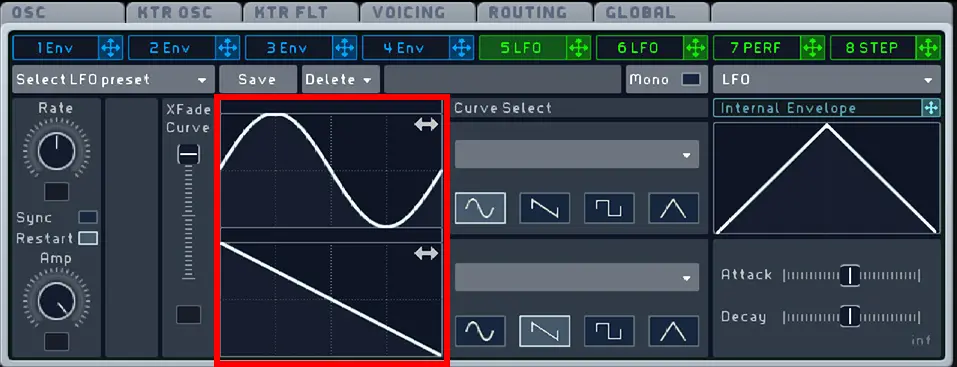
Setting an LFO shape
By default the LFO is set to modulate using two wave shapes simultaneously. For example, the above LFO is using a sine wave and a sawtooth wave, and will modulate using a combined results of the two shapes.
Dragging the XFade Curve will determine the amount of each wave shapes that is used. For example, dragging this all the way down means only the bottom saw tooth wave shape is active.
You can click and drag within the wave shape visualizer to set the phase of the LFO.
Using the curve select options you can choose between either the four default wave shapes; sine, saw, square and triangle, or you can select from a sizeable range of additional shapes using the drop down menu. There are a couple of strange, unique shapes in here, so I recommend having a good look through these options.
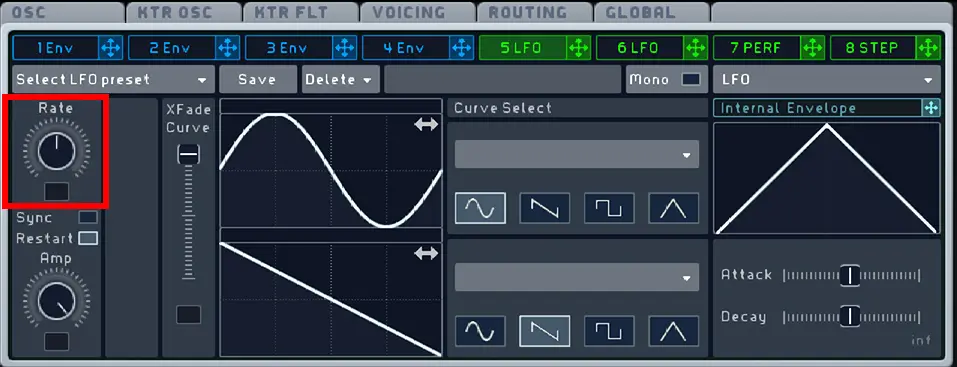
LFO rate
This rate control is extremely useful for choosing the speed of the LFO, which can either be independent or, by clicking the Sync button, will sync to your DAW tempo using LFO rate value.
The Amp knob is essentially a level control for the LFO.
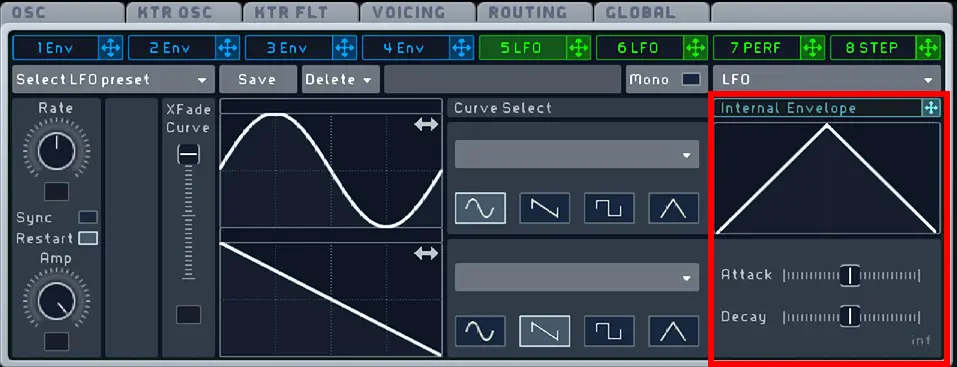
Internal LFO envelope
As I’ve said before, the beauty of Massive is in the level of detail and precision of the engine. One example of a feature in Massive that sets it apart from many other plugins is the LFO’s internal envelope.
To activate this, drag the Internal Envelope bar onto either the Rate, the Amp or XFade Curve options within the LFO module. This allows you to apply a simple envelope shape to these parameters, all within the LFO section of Massive.
For example, if applied to the LFO rate knob, this internal envelope shape will give a fast oscillation that quickly slows down to a slower rate.
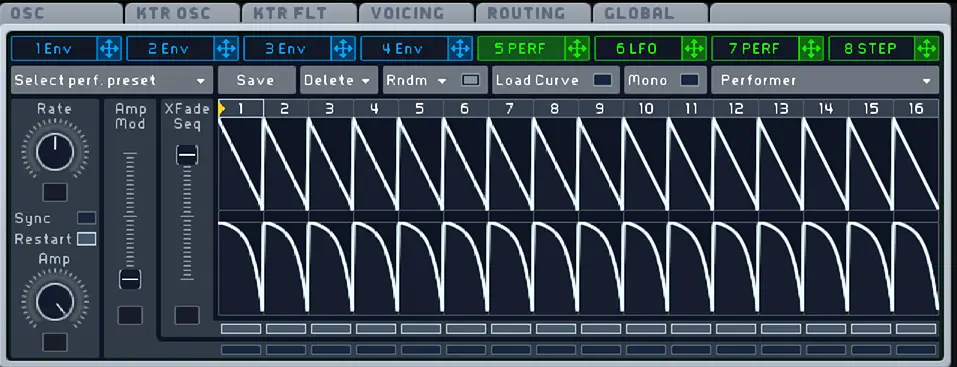
Performer
Within the LFO module, there are two further modules that seem almost hidden away: the Performer and Stepper tabs.
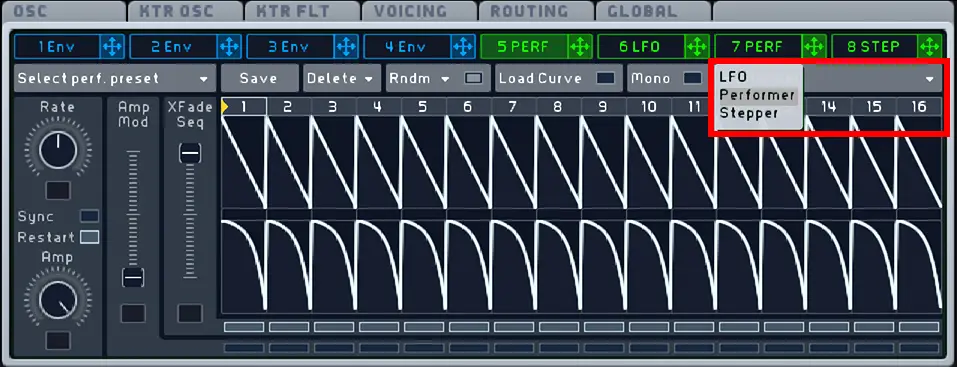
To access these, click the drop down menu highlighted above drop down menu and choose between LFO, Performer or Stepper.
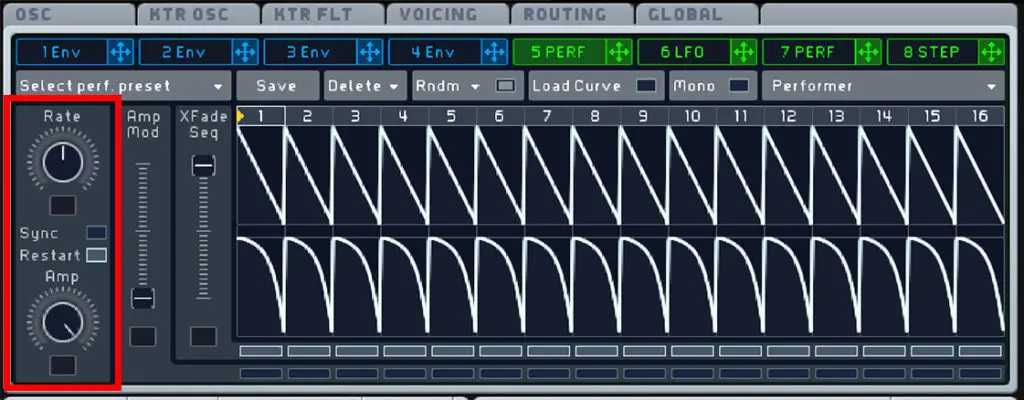
In the Performer tab, down the left hand side there is identical controls for Rate, a Sync option and Amp. These work in the same way as in the LFO tab.
The Performer has 16 “steps”, and Massive allows you to click and drag along the Performer to create you own 16 (or less) bar patterns.
Try dragging your cursor along the Performer to create a custom pattern that your sound will follow. This is a pretty simple section, but there are a few controls within the module I want to point out:
Performer Controls
The XFade Seq slider determines which Performer lane controls your sound.
Along the top bar of the Performer pattern, you can click and drag to make the pattern shorter.
You can set the Performer to start at a certain set by clicking and dragging the yellow arrow in the top bar of the Performer pattern. The pattern will start at the yellow arrow, then cycle through the entire pattern.
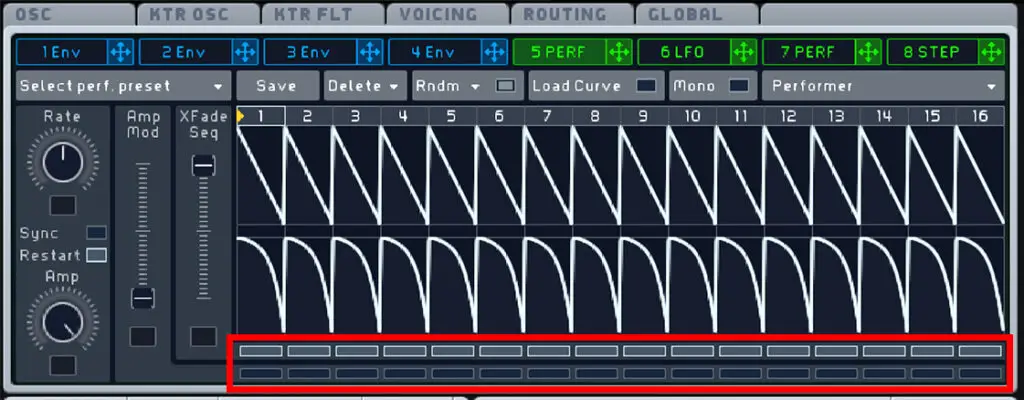
At the bottom of the Performer section, the top row of thin, horizontal boxes can be used to flip between the two patterns. For example, if the top pattern is selected using the XFade Seq slider, un-highlighting certain boxes means that step will play the bottom pattern for that step only.
The bottom row of these boxes follows the Amp Mod slider. For example, if the slider is all the way down, and you highlight one of these boxes, that pattern will be muted as the amp is set to 0.
A lot of these controls you probably won’t need, and you may find more value just utilising one Performer lane. However, this can be a very powerful tool for evolving, modulating synths.
Stepper
The Stepper module works in a similar way to the Performer, but it more effective for creating arpeggios and modulating pitch.
Again, the Rate, Sync and Amp option work in the same way.
You can slide each step to a value between 0 and 12, making it ideal for setting melodies. To do this, drag the green “5 STEP” bar onto the box directly under an oscillators pitch (shown below). Now the stepper will control the pitch of that oscillator.
Stepper controls
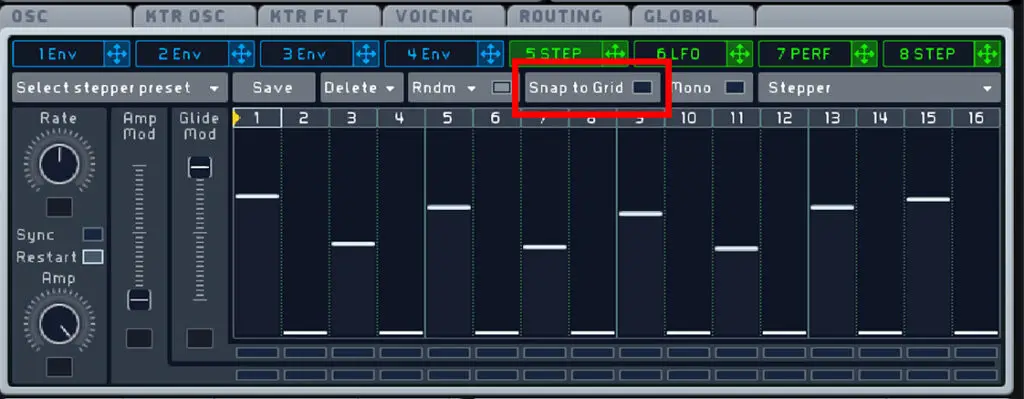
The “snap to grid” option is particularly useful here to snap the steps to exact numerical values.
The Glide Mod slider controls how much “glide” there is between the steps, also known as glide time. You can choose which steps have this glide function by highlighting specific boxes in the top row of thin, horizontal boxes at the bottom of the Stepper module.
The bottom row of thin, horizontal boxes controls whether that step is affected by the Amp Mod slider.
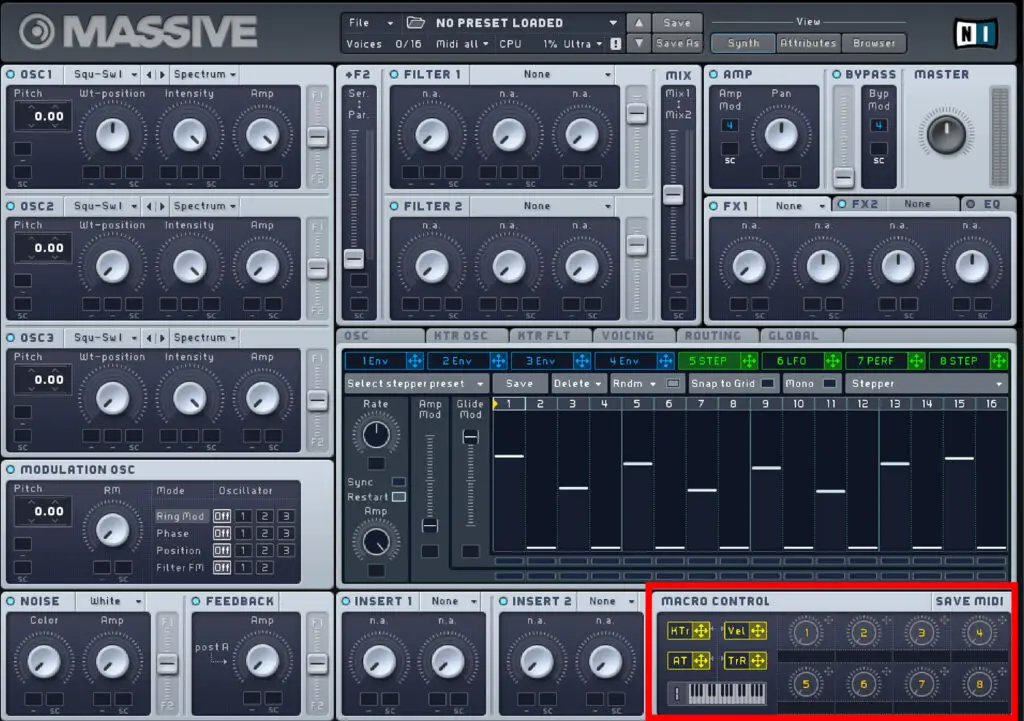
Macro Controls
The macro control section is found in the bottom right of the Massive interface, and can be used to assign your keyboard or MIDI controller to certain parameters.
You’ll notice 8 numbered knobs, all of which can be dragged onto any parameter in Massive in the same way you would with an envelope or LFO.
The first knob is set to vibrato by default, and after applying this to a parameter you can control the vibrato using your keyboard. Right click on a chosen macro control and click Midi Learn to do this.
So if you drag the second macro knob onto your filter cutoff for example using this MIDI learn feature, your controller will affect the cutoff of the filter.
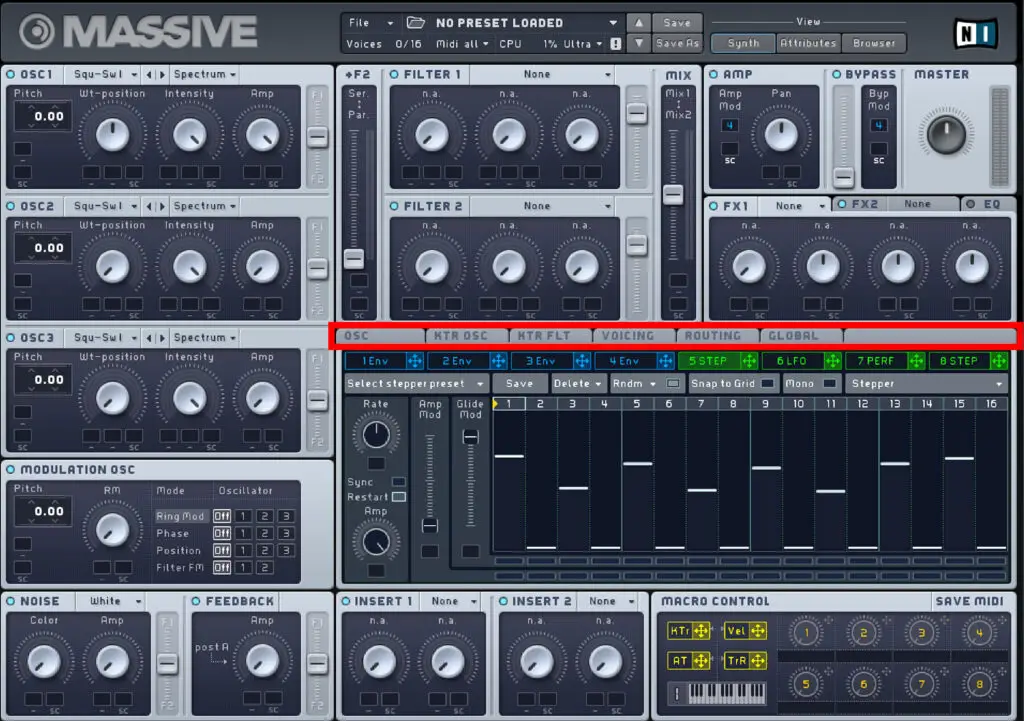
Additional Tabs
There is a row of additional tabs directly above the LFO and envelope section. There are a lot of options here you probably don’t need to worry about as a beginner. However, I thought it was worth pointing out a few key features within these tabs.
Osc Tab
On the left side of this tab this is a glide section. This is handy for creating legato lead synth and smoothing out your melodies.
The Time knob controls the glide time, or the time it takes Massive to glide between two notes.
If the Equal button is highlighted, all notes will have an equal glide time between them, regardless of the difference in semitones.
When Rate is highlighted, the glide time between notes is affected by how many semitones are between the two notes.
Please note: This glide feature only works in mono mode. To do this, go to the voicing tab and under voicing select either Monophon or Monorotate.
Voicing Tab
Using the draggable Max button, you can set your maximum number of polyphonic voices. Be careful with this though, as more voices will slow down your CPU especially with more complex Massive sounds.
The Unisono button determines how many voices play when you play a single note.
Below this you can choose between Polyphon, Monophon and Monorotate options.
Polyphonic allows you to play multiple notes simultaneously (overlapping melodies or chords), Monophonic allows just one note to be played at a time, and Monorotate is very similar to Monophonic but smooths the transition and removes any clicking noises that may occur between notes.
Global Tab
As a beginner, the only thing I would worry about in this tab is the Global Tune option. This determines the pitch of the entire sound within Massive, so it saves you having to change the pitch for each oscillator. However this control cannot be modulated.
And there you have it…
An in-depth tutorial on how to use Massive, from a beginners perspective.
My main advice when it comes to learning soft synths is always the same. Don’t get ultra-specific and focus on tiny details of sound design in Massive. Experiment as much as possible with various different sounds and ideas, focusing on different aspects of Massive’s engine.
I wouldn’t recommend spending hours on one sound to start with. In my opinion, it’s more beneficial to create as many sounds as you can, to gain a much broader understanding of this incredible piece of software. And remember, sometimes the best results come from breaking the rules, so don’t be afraid to try out some weird, unorthodox modulations or effects.
Good luck!

How To Use Massive Review: Similar Articles
How to use Serum (For Beginners)
The 5 Best VST Plugins for Beginners
How to use FL Studio | Step by Step Tutorial for Beginners
The 8 Best FREE Reverb VST Plugins