:
OR
Lenovo has best practices in response to the Intel® Xeon® uncorrectable memory error handling on Gen 1 and Gen 2 or “H” SKUs of Gen 3 Xeon® Scalable processors. Learn More
> Системы хранения данных
> Storwize
> V3700 (Storwize)

V3700 (Storwize)
-
Главная Продукт -
Драйверы и Программное обеспечение -
Диагностика -
Инструкция -
Руководства и инструкции -
Гарантия и Обслуживание -
Статус ремонта -
Детали -
Свяжитесь с нами
:
OR
Lenovo has best practices in response to the Intel® Xeon® uncorrectable memory error handling on Gen 1 and Gen 2 or “H” SKUs of Gen 3 Xeon® Scalable processors. Learn More
- Manuals
- Brands
- IBM Manuals
- Storage
- Storwize V3700
- Quick installation manual
-
Contents
-
Table of Contents
-
Bookmarks
Quick Links
IBM Storwize V3700
Quick Installation Guide
IBM
GC27-4219-07
Related Manuals for IBM Storwize V3700
Summary of Contents for IBM Storwize V3700
-
Page 1
IBM Storwize V3700 Quick Installation Guide GC27-4219-07… -
Page 2
The information in the “Safety and environmental notices” on page ix v The information in the IBM Environmental Notices and User Guide (provided on a DVD) This edition applies to IBM Storwize V3700 and is valid until replaced by new editions. This edition replaces GC27-4219-06. -
Page 3: Table Of Contents
How to order IBM publications Related websites Appendix A. Accessibility features for Sending your comments . IBM Storwize V3700 ..How to get information, help, and technical assistance . Appendix B. Where to find the Statement of Limited Warranty .
-
Page 4
Storwize V3700: Quick Installation Guide… -
Page 5: Figures
Figures Rear view of a Storwize V3700 control enclosure 6 Installing SAS 4-port host interface adapter Data ports in the rear of the Storwize V3700 Where to install the cache memory update control enclosure . Installing memory module option .
-
Page 6
Storwize V3700: Quick Installation Guide… -
Page 7: Tables
Tables IBM websites for help, services, and Direct current power supply LEDs . information . xvii Direct current cable wire color coding. Storwize V3700 library . xviii Direct current power supply input IBM documentation and related websites requirements . IBM websites for help, services, and…
-
Page 8
Storwize V3700: Quick Installation Guide… -
Page 9: Safety And Environmental Notices
In the preceding examples, the numbers (C001) and (D002) are the identification numbers. 2. Locate the IBM Systems Safety Notices with the user publications that were provided with the Storwize V3700 hardware. 3. Find the matching identification number in the IBM Systems Safety Notices. Then review the topics concerning the safety notices to ensure that you are in compliance.
-
Page 10: Caution Notices For The Storwize V3700
“Labels” section. Note: You can find and download the current IBM System Safety Notices by searching for Publication number G229-9054 in the IBM Publications Center.
-
Page 11
CAUTION: The battery contains lithium. To avoid possible explosion, do not burn or charge the battery. Do not: Throw or immerse into water, heat to more than 100°C (212°F), repair or disassemble. (C003) CAUTION: Removing components from the upper positions in the rack cabinet improves rack stability during a relocation. -
Page 12: Danger Notices For Storwize V3700
(R009) Danger notices for Storwize V3700 Ensure that you are familiar with the danger notices for Storwize V3700. Use the reference numbers in parentheses at the end of each notice, such as (C003) for example, to find the matching translated notice in IBM Systems Safety Notices.
-
Page 13
Electrical voltage and current from power, telephone, and communication cables are hazardous. To avoid a shock hazard: v If IBM supplied a power cord(s), connect power to this unit only with the IBM provided power cord. Do not use the IBM provided power cord for any other product. -
Page 14: Special Caution And Safety Notices
. (R010) Special caution and safety notices This information describes special safety notices that apply to the Storwize V3700. These notices are in addition to the standard safety notices supplied and address specific issues relevant to the equipment provided.
-
Page 15: Handling Static-Sensitive Devices
v Before you start the device, ensure that other personnel are not in a hazardous position. v Place removed covers and other parts in a safe place, away from all personnel, while you are servicing the unit. v Keep your tool case away from walk areas so that other people cannot trip over v Do not wear loose clothing that can be trapped in the moving parts of a device.
-
Page 16: Power And Cabling Information For Nebs (Network Equipment-Building System) Gr-1089-Core
Power and cabling information for NEBS (Network Equipment-Building System) GR-1089-CORE The following comments apply to IBM storage devices that have been designated as conforming to NEBS (Network Equipment-Building System) GR-1089-CORE. The equipment is suitable for installation at: v Network telecommunications facilities…
-
Page 17: About This Guide
Each of the PDF publications in the Table 2 on page xviii library is also available in the IBM Knowledge Center by clicking the number in the “Order number” column: xvii © Copyright IBM Corp. 2012, 2015…
-
Page 18
Code for the Storwize V3700 product. IBM documentation and related websites Table 3 on page xix lists websites that provide publications and other information ® about the Storwize V3700 or related products or technologies. The IBM Redbooks xviii Storwize V3700: Quick Installation Guide… -
Page 19: How To Order Ibm Publications
Some publications are available for you to view or download at no charge. You can also order publications. The publications center displays prices in your local currency. You can access the IBM Publications Center through the following website: www.ibm.com/e-business/linkweb/publications/servlet/pbi.wss…
-
Page 20: How To Get Information, Help, And Technical Assistance
Before calling for support, be sure to have your IBM Customer Number available. If you are in the US or Canada, you can call 1 (800) IBM SERV for help and service. From other parts of the world, see http://www.ibm.com/planetwide for the number that you can call.
-
Page 21
At times, you might need expert advice about using a function provided by the system or about how to configure the system. Purchasing the IBM Support Line offering gives you access to this professional advice while deploying your system, and in the future. -
Page 22
Storwize V3700: Quick Installation Guide… -
Page 23: Chapter 1. Before You Begin The Installation
Important information: v This guide presumes that you have read the planning information regarding your physical environment that is available from the Storwize V3700 Knowledge Center. v Ensure that any cables that you are supplying are available for installation.
-
Page 24: Enclosure
Complete these steps for each expansion enclosure that you add. Be familiar with the following information v See “Caution notices for the Storwize V3700” on page x and “Danger notices for Storwize V3700” on page xii for a summary of the situations that can be potentially hazardous to you.
-
Page 25
v Use safe practices when lifting. The fully populated enclosure weighs about 26 kg (57 lbs). At least two people are required to lift and install the enclosure into the rack or to remove an enclosure from the rack. CAUTION: Use safe practices when lifting. -
Page 26
Electrical voltage and current from power, telephone, and communication cables are hazardous. To avoid a shock hazard: – If IBM supplied a power cord(s), connect power to this unit only with the IBM provided power cord. Do not use the IBM provided power cord for any other product. -
Page 27: Reviewing Your Packing Slip
Machine Feature Part type/model code number Description 2072-12C ACAN 2072L2C IBM Storwize V3700 12-slot Dual Control Enclosure for 3.5-inch drives (AC power) 2072-12E ACAS 2072LEU IBM Storwize V3700 12-slot Expansion Enclosure for 3.5-inch drives (AC power) 2072-24C ACBN 2072S2C IBM Storwize V3700 24-slot Dual Control Enclosure for 2.5-inch drives (AC power)
-
Page 28: Identify The Hardware Components
Identify the hardware components The following graphics identify the hardware components and port locations for the control enclosure and expansion enclosure on Storwize V3700 systems. Control enclosure components Figure 1 shows the rear view of a control enclosure and identifies the location of the power supply units and node canisters.
-
Page 29: Data Ports In The Rear Of The Storwize V3700
Figure 2 shows the rear view of a Storwize V3700 control enclosure and identifies the location of the ports. Figure 2. Data ports in the rear of the Storwize V3700 control enclosure 1 USB ports. Each canister has two USB ports. One port is used during installation.
-
Page 30: Control Enclosure
Figure 3. Control enclosure support rails of a Storwize V3700 system Expansion enclosure components Figure 4 shows the rear view of an expansion enclosure. The location of the power supply units and expansion canisters are identified, as follows. 1 Expansion canisters 2 Power supply units Figure 4.
-
Page 31: Sas Ports And Leds In Rear View Of A Storwize
Figure 5. SAS ports and LEDs in rear view of a Storwize V3700 expansion canister Each canister has two SAS ports that are numbered 1 on the left and 2 on the right. Port 1 is always used. Port 2 is used only if this is not the last enclosure in the chain.
-
Page 32: Direct Current Power Supply Units
Figure 7. USB flash drive Direct current power supply units Some Storwize V3700 enclosure models run in a direct current (DC) power environment rather than the alternating current (AC) environment required by the other models in the range.
-
Page 33
Electrical voltage and current from power, telephone, and communication cables are hazardous. To avoid a shock hazard: v If IBM supplied a power cord(s), connect power to this unit only with the IBM provided power cord. Do not use the IBM provided power cord for any other product. -
Page 34
The required circuit breaker rating is 20 amps. Direct current power supply unit connectors and indicators Each Storwize V3700 enclosure contains two DC power supply units.DC power supply units can be ordered as a feature of systems. The power supply units have the components that are shown in Figure 8 on page… -
Page 35: Direct Current Power Supply Unit Connectors And Indicators
50. Connecting a DC power supply to a DC power source A Storwize V3700 enclosure that is DC powered contains two DC power supply units (PSUs). Each unit must be connected to a suitable -48V DC power source. To provide redundancy in a power circuit failure, connect the two PSUs to different DC power sources.
-
Page 36: Direct Current Cable Wire Color Coding
FRU part number Customer replaced Direct current power supply 00AR231 Direct current power cable 00AR087 The procedure to remove and replace the DC power supply unit is the same as the AC power supply procedure. Storwize V3700: Quick Installation Guide…
-
Page 37
When replacing the DC power cable, follow the instructions for disconnecting cables from the DC power distribution unit. Chapter 1. Before you begin the installation… -
Page 38: Verify Environmental Requirements
The environmental and electrical requirements for the physical site must be met to ensure that your system works reliably. Before installing a Storwize V3700 system, you must verify that adequate space in a suitable rack is available. You must also ensure that the requirements for power and environmental conditions are met.
-
Page 39
v Add the fourth expansion directly above the second, and so on. Chapter 1. Before you begin the installation… -
Page 40
Storwize V3700: Quick Installation Guide… -
Page 41: Chapter 2. Installing The Hardware
Note: If the Storwize V3700 system is required to be NEBS compliant, some system configuration settings must be made. For details, see “Configuring a Storwize V3700 system to be NEBS compliant” on page 62.
-
Page 42: Rack Mounting Rails And Screws
Attach the circle end of the spring around the stud on the rail. (See Figure 10 on page 21.) b. Pulling on the spring, attach the hook end of the spring to the tab on the rail. Storwize V3700: Quick Installation Guide…
-
Page 43: Installing The Rail Spring
Figure 10. Installing the rail spring 4. Working at the front of the rack cabinet, identify the two standard rack units (2U) of space in the rack into which you want to install the support rails. Figure 11 shows two rack units with the front mounting holes identified. Figure 11.
-
Page 44: Opening The Hinge Brackets
Unscrew the medium pins and replace with the large pins supplied with the rails. 6. At each end of the rail, grasp the tab 1 and pull firmly to open the hinge bracket (see Figure 12). Figure 12. Opening the hinge brackets Storwize V3700: Quick Installation Guide…
-
Page 45: Closing Hinge Brackets And Installing Rear
7. Align the holes in the rail bracket with the holes on the front and rear rack cabinet flanges. Ensure that the rails are aligned on the inside of the rack cabinet. 8. On the rear of the rail, press the two bracket pins into the holes in the rack flanges.
-
Page 46: Installing The Enclosures
3. Carefully slide the enclosure into the rack along the rails until the enclosure is fully inserted (see Figure 14 on page 25). Note: The rails are not designed to hold an enclosure that is partially inserted. The enclosure must always be in a fully inserted position. Storwize V3700: Quick Installation Guide…
-
Page 47: Inserting The Enclosure
Figure 14. Inserting the enclosure 4. Secure the enclosure with a screw in the rack mounting screw hole. 5. Reinstall the left and right end caps. (See Figure 14.) The left end cap has indicator windows that align with the status LEDs (light-emitting diodes) on the edge of the enclosure.
-
Page 48: Installing Options In The Control Enclosure
1. If the canister is already installed in the enclosure, remove it as shown in Figure 15 on page 27. a. Unlatch the release levers and pull them open. The canister moves out of the slot approximately 0.6cm (0.25 inch). b. Slide the canister out of the enclosure. Storwize V3700: Quick Installation Guide…
-
Page 49: Removing A Node Canister
Figure 15. Removing a node canister 2. Turn the canister over and open the cover as shown in Figure 16. a. Press the recessed blue touch points on the cover. b. Slide the cover away from the thumbscrew end of the canister. Figure 16.
-
Page 50: Installing An 8 Gbps Fibre Channel 4-Port Host Interface Adapter
1. Remove the SFP transceivers from the host interface adapter (Figure 17). To remove an SFP transceiver, swing the release handle open and use it to pull the transceiver out of the port. Figure 17. Host interface adapter and SFP transceivers Storwize V3700: Quick Installation Guide…
-
Page 51: Installing 8 Gbps Fibre Channel 4-Port Host Interface Adapter
2. Loosen the retaining thumbscrew 1 as shown in Figure 18. Figure 18. Installing 8 Gbps Fibre Channel 4-port host interface adapter 1 Retaining thumbscrew 2 Filler handle 3 Host interface adapter 4 Catch slot 3. From inside the canister, grasp the filler handle 2 and slide the filler plate toward the thumbscrew to disengage the plate from the catch slot 4 .
-
Page 52: Installing A 10 Gbps Iscsi-Fcoe 2-Port Host Interface Adapter
2. Remove the filler plate from the host interface adapter slot. a. Loosen the retaining thumbscrew 1 as shown in Figure 19 on page 31. Storwize V3700: Quick Installation Guide…
-
Page 53: Installing 10 Gbps Iscsi-Fcoe 2 Port Host Interface Adapter
Figure 19. Installing 10 Gbps iSCSI-FCoE 2 port host interface adapter 1 Retaining thumbscrew 2 Filler handle 3 Host interface adapter 4 Catch slot b. From inside the canister, grasp the filler handle 2 and slide the filler plate toward the center of the canister to disengage the plate from the catch slot. c.
-
Page 54: Installing A 1 Gbps Iscsi 4-Port Host Interface Adapter
1 Gbps iSCSI 4-port host interface adapter options. Procedure To install the host interface adapter, complete the following steps. 1. Loosen the retaining thumbscrew 1 as shown in Figure 20 on page 33. Storwize V3700: Quick Installation Guide…
-
Page 55: Installing 1 Gbps Iscsi 4-Port Host Interface Adapter
Figure 20. Installing 1 Gbps iSCSI 4-port host interface adapter 1 Retaining thumbscrew 2 Filler handle 3 Host interface adapter 4 Catch slot 2. From inside the canister, grasp the filler handle 2 and slide the filler plate toward the center of the canister to disengage the plate from the catch slot. 3.
-
Page 56: Installing A Sas 4-Port Host Interface Adapter
To install the host interface adapter, complete the following steps. 1. Loosen the retaining thumbscrew 1 as shown in Figure 21. Figure 21. Installing SAS 4-port host interface adapter 1 Retaining thumbscrew 2 Filler handle Storwize V3700: Quick Installation Guide…
-
Page 57: Installing An 8 Gb Cache Memory Update
3 Host interface adapter 4 Catch slot 2. From inside the canister, grasp the filler handle 2 and slide the filler plate toward the center of the canister to disengage the plate from the catch slot. 3. Remove the filler plate. 4.
-
Page 58: Where To Install The Cache Memory Update
1. Open the retaining clip on each end of the memory module connector as shown in Figure 23 on page 37. Attention: To avoid breaking the retaining clips or damaging the memory module connectors, open and close the clips gently. Storwize V3700: Quick Installation Guide…
-
Page 59: Installing Memory Module Option
Figure 23. Installing memory module option 2. Touch the static-protective package that contains the memory module to any unpainted metal surface on the outside of the canister. 3. Remove the memory module from the package. 4. Turn the memory module so that the keys align correctly with the connector. 5.
-
Page 60: Closing The Node Canister
Align the four hook slots on the cover with the pins on the canister. b. Slide the cover toward the latch and release levers until it locks into place. Figure 24. Reinstalling the canister cover Storwize V3700: Quick Installation Guide…
-
Page 61: Installing A Node Canister
2. Turn the canister over and install it in the control enclosure as shown in Figure 25. a. With the latch and release levers fully extended, slide the canister into the enclosure until the levers begin to move inwards. b. Simultaneously close both latch and release levers. Figure 25.
-
Page 62: Installing Disk Drives
Figure 26. Removing a filler panel 1 Filler panel 2. Touch the static-protective package that contains the drive to any unpainted surface on the outside of the enclosure. 3. Remove the drive from the package. Storwize V3700: Quick Installation Guide…
-
Page 63: Connecting Sas Cables To Expansion Enclosures
4. Install the drive in the empty slot as shown in Figure 27. a. Ensure that the drive-tray handle is in the open (unlocked) position. b. Align the drive assembly with the guide rails in the slot. c. Gently push the drive assembly into the slot until the drive stops. d.
-
Page 64: Connecting The Sas Cables
1 of the left expansion canisters in the first expansion enclosure. b. Connect SAS port 4 of the right node canister in the control enclosure to SAS port 1 of the right expansion canisters in the first expansion enclosure. Figure 28. Connecting the SAS cables Storwize V3700: Quick Installation Guide…
-
Page 65: Sas Cabling Guidelines
2. If additional expansion enclosures are installed, connect each one to the previous expansion enclosure as shown in Figure 28 on page 42. a. Use one cable to connect SAS port 2 of the left expansion canister in the previous expansion enclosure to SAS port 1 of the left expansion canister in the newly installed expansion enclosure.
-
Page 66: Connecting Ethernet Cables To Node Canisters
Connecting Ethernet cables to node canisters To provide system management connectivity for your Storwize V3700 system, you must connect Ethernet cables to Ethernet port 1 of each node canister in the control enclosure.
-
Page 67: Connecting Ethernet Cables To 1 Gbps Iscsi 4-Port Host Interface Adapters
Connecting fibre cables to a 10 Gbps iSCSI-FCoE 2-port host interface adapter If your Storwize V3700 system has 10 Gbps iSCSI-FCoE 2-port host interface adapters installed, you can use fibre cables to connect them to your 10 Gbps Ethernet or FCoE SAN.
-
Page 68: Example Configuration With Two Pairs Of Ethernet Cables Connected To 10 Gbps
3 in each canister, and another pair that is connected to port 4 in each canister. TxRx TxRx Figure 32. Example configuration with two pairs of Ethernet cables connected to 10 Gbps iSCSI-FCoE 2-port host interface adapters Storwize V3700: Quick Installation Guide…
-
Page 69: Connecting Fibre Channel Cables To Fibre Channel Host Interface Adapter
Connecting Fibre Channel cables to Fibre Channel host interface adapter If your Storwize V3700 has 8 Gbps Fibre Channel 4-port host interface adapters installed, you can use Fibre Channel cables to connect them to your Fibre Channel SAN. Procedure To install the cables, complete the following steps.
-
Page 70: Mini Sas Hd To Mini Sas Hd Cable
Knowledge Center for instructions on determining the number of cables required. Note: When connecting to the SAS ports on the left side of the node canister, each host must be connected to both canisters. Both canisters must have the same number of cables connected. Storwize V3700: Quick Installation Guide…
-
Page 71: Example Configuration With Three Sas Cables Per Canister
2. Arrange the cables to provide access to the hardware. v USB ports. USB port access is required when you use a USB flash drive to configure the system. v The enclosures themselves. Access is required to the hardware for servicing and for safely removing and replacing components using two or more people.
-
Page 72: Powering On The System
The enclosure does not have power switches. Note: Each enclosure has two power supply units. To provide power failure redundancy, connect the two power cords to separate power circuits. Storwize V3700: Quick Installation Guide…
-
Page 73: Node Canister Leds
5. From the rear of the control enclosure, check the LEDs on each node canister (see Figure 40). Figure 40. Node canister LEDs 1 Power 2 Status 3 Fault The canister is ready with no critical errors when Power is illuminated, Status is blinking, and Fault is off.
-
Page 74
Storwize V3700: Quick Installation Guide… -
Page 75: Chapter 3. Configuring The System
Microsoft Internet Explorer (IE) 11 and Microsoft Edge v Google Chrome 46 IBM supports higher versions of the browsers if the vendors do not remove or disable function that the product relies upon. For browser levels higher than the versions that are certified with the product, customer support accepts usage-related and defect-related service requests.
-
Page 76
If a problem is identified in the product, defects are accepted. If a problem is identified with the browser, IBM might investigate potential solutions or work-arounds that the client can implement until a permanent solution becomes available. -
Page 77: User Name And Password For System Initialization
Note: IE 11 and later enable TLS 1.1/1.2 by default. User name and password for system initialization During the initialization procedure, you need to log in to the management GUI for the Storwize V3700 system. Chapter 3. Configuring the system…
-
Page 78: Default User Name And Password For The
The default user name and password for the management GUI are listed in Table 12. Table 12. Default user name and password for the management GUI User name Password superuser passw0rd Note: The 0 character in the password is a zero, not the letter O. Storwize V3700: Quick Installation Guide…
-
Page 79: Initializing The System With A Microsoft Windows Computer
Initializing the system with a Microsoft Windows computer To initialize a new system with a Microsoft Windows computer, use the initialization tool that was shipped with your order. Before you begin v Begin this procedure after you have installed all the enclosures, drives and other options you have purchased.
-
Page 80
Note: The 0 character in the password is a zero, not the letter O. 9. Follow the on-screen instructions to begin setting up your system. Note: The other options that are available in the initialization tool are used to recover the service IP address or the superuser password. Storwize V3700: Quick Installation Guide… -
Page 81: Initializing The System With An Apple Macintosh Computer
Initializing the system with an Apple Macintosh computer To initialize a new system with an Apple Macintosh computer, use the initialization tool that was shipped with your order. Before you begin v Begin this procedure after you have installed all the enclosures, drives and other options you have purchased.
-
Page 82
Note: The 0 character in the password is a zero, not the letter O. 11. Follow the on-screen instructions to begin setting up your system. Note: The other options in the initialization tool are used to reset the service IP address or the superuser password. Storwize V3700: Quick Installation Guide… -
Page 83: Initializing The System With A Linux Computer
Initializing the system with a Linux computer To initialize a new system with a Linux computer, use the initialization tool that was shipped with your order. Before you begin v Begin this procedure after you have installed all the enclosures, drives and other options you have purchased.
-
Page 84: Configuring A Storwize V3700 System To Be Nebs Compliant
Storwize V3700 system can be configured to extend its operational temperature range to meet NEBS operating temperature requirements. Note: The Storwize V3700 system might not be able to save its cache and state data if the power fails while it is operating within the extended temperature range.
-
Page 85
About this task The management GUI requires a supported web browser (see “Checking your web browser settings for the management GUI” on page 53). Procedure To add an expansion enclosure to your system, complete the following steps. 1. Install support rails for the new enclosure. 2. -
Page 86
Storwize V3700: Quick Installation Guide… -
Page 87: Appendix A. Accessibility Features For Ibm Storwize V3700
You can use keys or key combinations to perform operations and initiate menu actions that can also be done through mouse actions. You can navigate the Storwize V3700 online documentation from the keyboard by using the shortcut keys for your browser or screen-reader software. See your browser or screen-reader software Help for a list of shortcut keys that it supports.
-
Page 88
Storwize V3700: Quick Installation Guide… -
Page 89: Appendix B. Where To Find The Statement Of Limited Warranty
Storwize V3700 information center. The Statement of Limited Warranty is shipped (in hardcopy form) with your product. It can also be ordered from IBM (see Table 2 on page xviii for the part number). © Copyright IBM Corp. 2012, 2015…
-
Page 90
Storwize V3700: Quick Installation Guide… -
Page 91: Notices
Consult your local IBM representative for information on the products and services currently available in your area. Any reference to an IBM product, program, or service is not intended to state or imply that only that IBM product, program, or service may be used. Any functionally equivalent product, program, or service that does not infringe any IBM intellectual property right may be used instead.
-
Page 92
The materials at those websites are not part of the materials for this IBM product and use of those websites is at your own risk. IBM may use or distribute any of the information you provide in any way it believes appropriate without incurring any obligation to you. -
Page 93: Trademarks
IBM, therefore, cannot guarantee or imply reliability, serviceability, or function of these programs. The sample programs are provided «AS IS», without warranty of any kind. IBM shall not be liable for any damages arising out of your use of the sample programs.
-
Page 94: Industry Canada Compliance Statement
Properly shielded and grounded cables and connectors must be used in order to meet FCC emission limits. IBM is not responsible for any radio or television interference caused by using other than recommended cables and connectors, or by unauthorized changes or modifications to this equipment. Unauthorized changes or modifications could void the user’s authority to operate the equipment.
-
Page 95: People’s Republic Of China Class A Statement
Klasse A ein. Um dieses sicherzustellen, sind die Geräte wie in den Handbüchern beschrieben zu installieren und zu betreiben. Des Weiteren dürfen auch nur von der IBM empfohlene Kabel angeschlossen werden. IBM übernimmt keine Verantwortung für die Einhaltung der Schutzanforderungen, wenn das Produkt ohne Zustimmung der IBM verändert bzw.
-
Page 96: Taiwan Class A Compliance Statement
Taiwan Class A compliance statement Taiwan Contact Information This topic contains the product service contact information for Taiwan. IBM Taiwan Product Service Contact Information: IBM Taiwan Corporation 3F, No 7, Song Ren Rd., Taipei Taiwan Tel: 0800-016-888 Japan VCCI Council Class A statement This explains the Japan Voluntary Control Council for Interference (VCCI) statement.
-
Page 97: Korean Communications Commission Class A Statement
Fax: 0049 (0)711 785 1283 Email: mailto: tjahn @ de.ibm.com Taiwan Contact Information This topic contains the product service contact information for Taiwan. IBM Taiwan Product Service Contact Information: IBM Taiwan Corporation 3F, No 7, Song Ren Rd., Taipei Taiwan Tel: 0800-016-888…
-
Page 98
Storwize V3700: Quick Installation Guide… -
Page 99: Index
50 danger ix FCC (Federal Communications node canister 51 danger notices xii Commission) electronic emission location guidelines 16 dc power supply units notice 71 connecting to power source 13 replaceable units 14 © Copyright IBM Corp. 2012, 2015…
-
Page 100
50 publications accessing 65 rails 19, 24 reader feedback xix related information xvii safety ix caution notices x danger notices xii environmental notices ix safety information labels ix safety notices ix Storwize V3700: Quick Installation Guide… -
Page 102
IBM® Printed in USA GC27-4219-07…
Содержание
- 1 Начальная конфигурация
- 1.1 V3500 и V3700 Имя пользователя и пароль по умолчанию
- 2 Процесс настройки хранилища
16 июля Общее
В этом руководстве я рассмотрю все этапы настройки и установки IBM Storewize V3500 и V3700, в том числе начальную конфигурацию управления, вплоть до настройки массивов и т. Д.
Начальная конфигурация
Первоначальная настройка V3500 / V3700 выполняется из системы Windows через USB, найдите USB-накопитель в упаковке и вставьте его в компьютер, затем запустите файл init.bat.
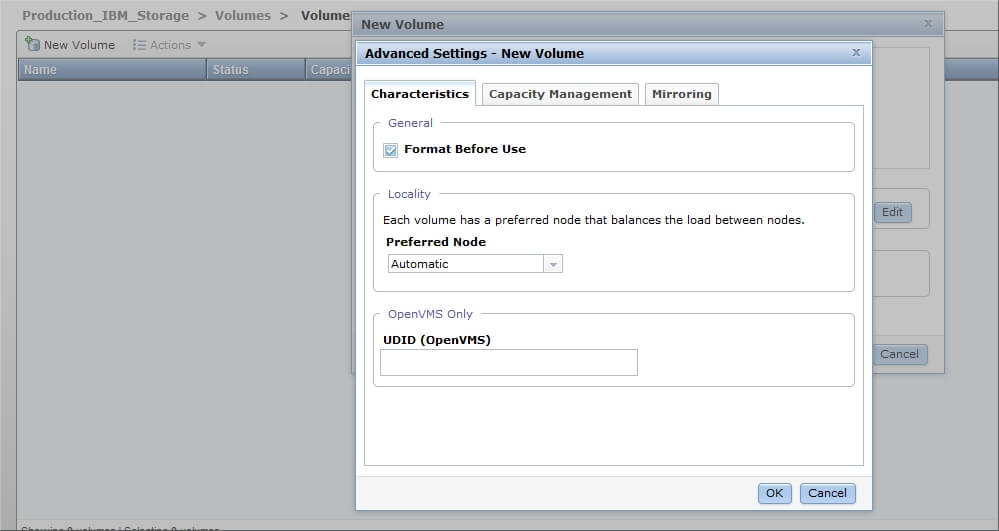
![]()
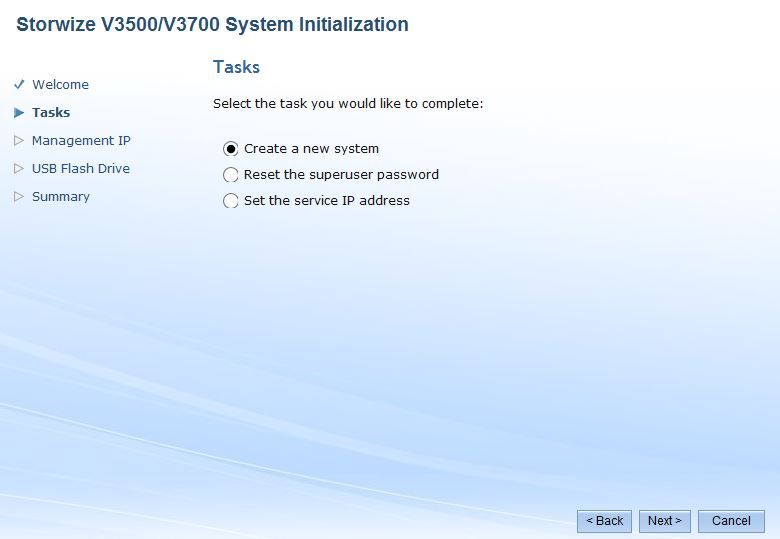
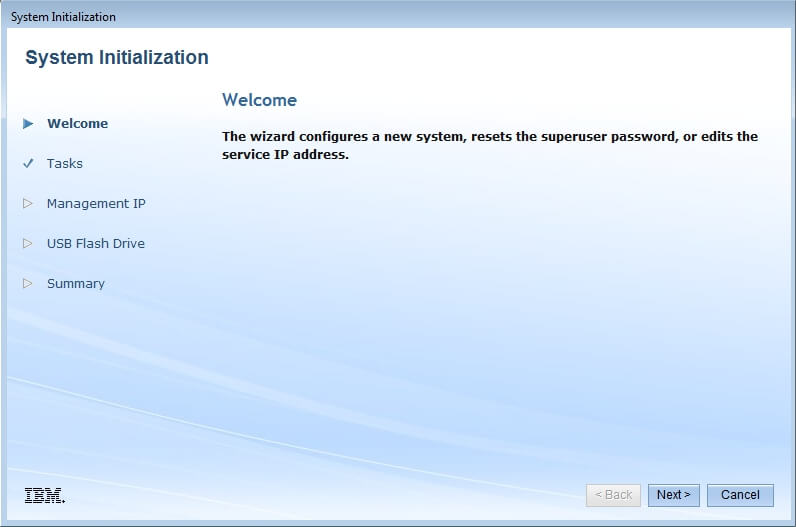
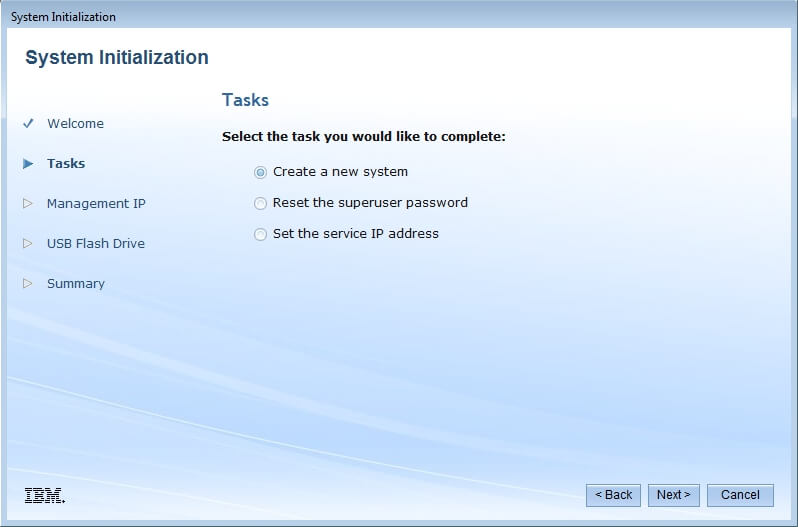
После запуска вы увидите экран приветствия, нажмите «Далее» и выберите «Создать новую систему».
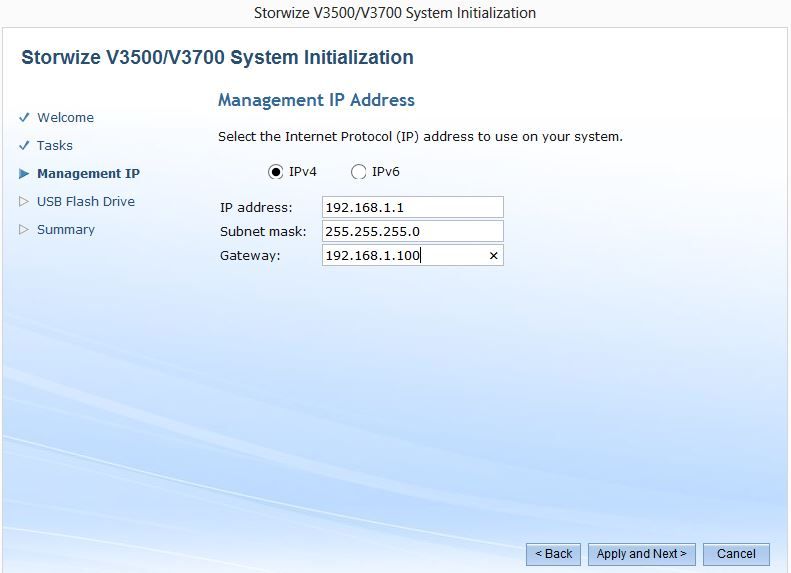
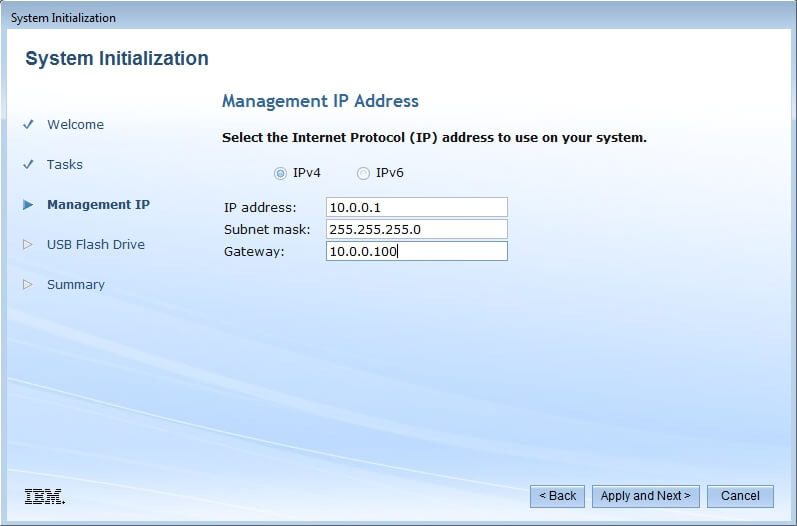
Первым шагом является назначение IP-адреса управления в вашей сети SAN, чтобы вы могли подключаться к веб-интерфейсу с клиентов в вашей сети для изменения параметров конфигурации. Увидеть ниже.
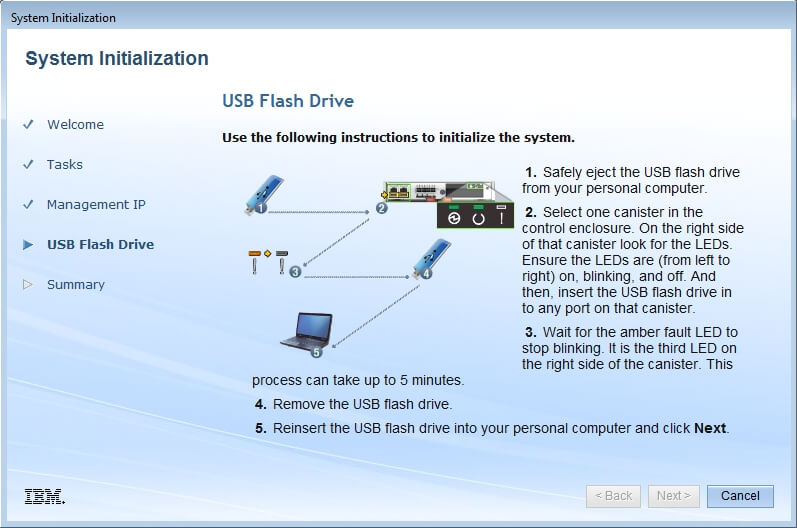
Нажмите «Применить» и затем, это сохранит конфигурацию на USB-накопитель Затем включите питание SAN, убедившись, что оба источника питания включены, дождитесь, пока индикатор состояния не начнет мигать, прежде чем продолжить.
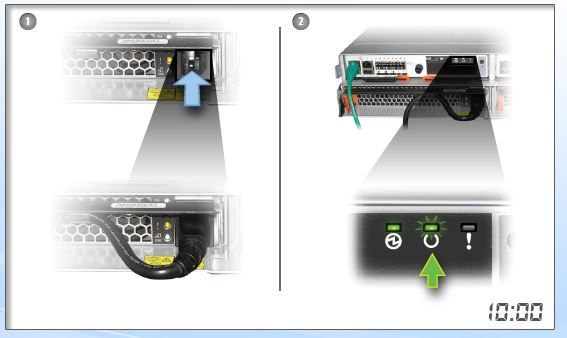
Когда они мигают, извлеките USB-перо и вставьте его в левый USB-порт SAN, подождите еще 3-5 минут, пока светодиод неисправности не начнет мигать, затем перестанет мигать.

Это установит IP-адрес управления на контроллер, к которому вы подключаете USB-перо. Как только индикатор загорится, вы можете вынуть ручку и вставить обратно в компьютер, после чего вы увидите сводку успеха и будете перенаправлены на страницу входа.
V3500 и V3700 Имя пользователя и пароль по умолчанию
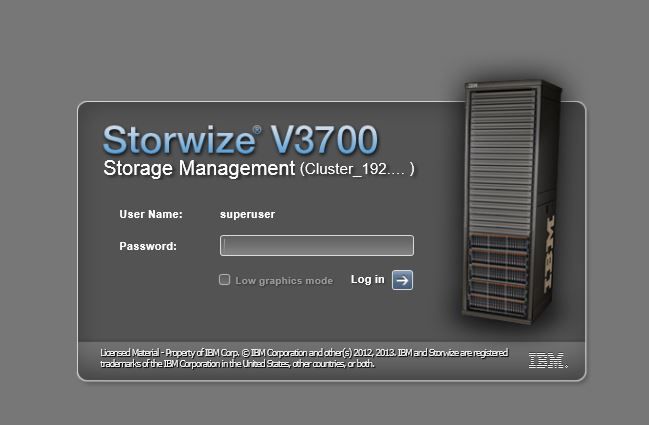
Это на большом листе бумаги А1 из коробки, но если вы забыли подробности.
Суперпользователь: passw0rd
Конфигурация SAN
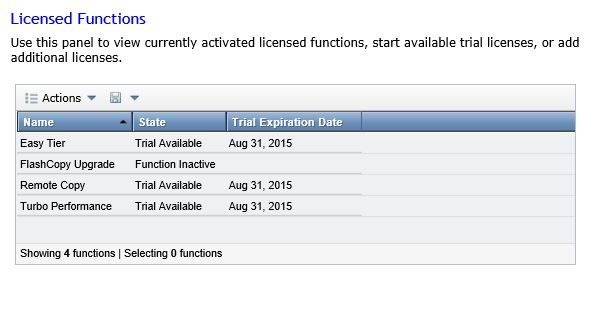
Есть много маленьких задач для базовой конфигурации, но я все равно их не решу. Первая задача — сменить пароль управления, мастер настройки попросит вас сделать это в первую очередь, сделайте это. Затем на следующем экране вас попросят предоставить лицензии, если вы приобрели какие-либо дополнительные функции.
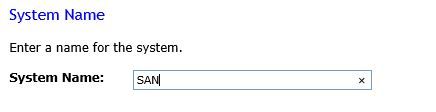
 Далее нам нужно дать SAN имя хоста, дать этому что-то узнаваемое.
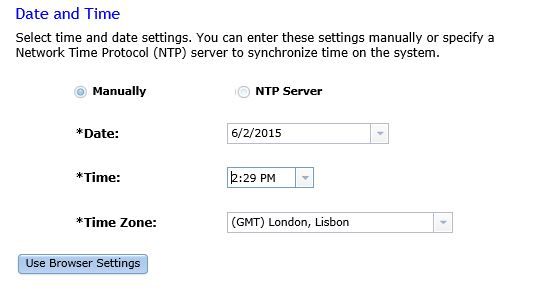
Затем установите правильное время в сети SAN.
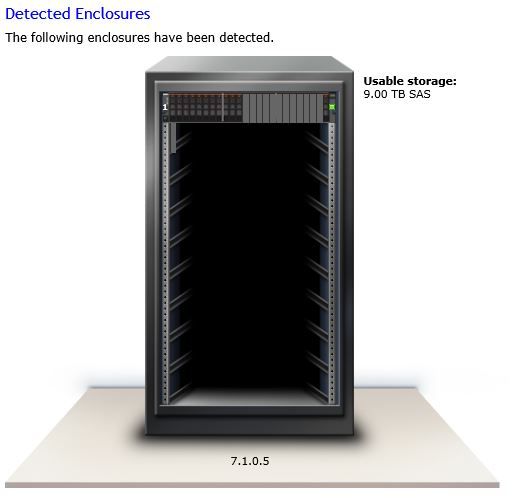
Затем вы получите хорошее графическое представление хранилища, которое было обнаружено в вашей SAN.
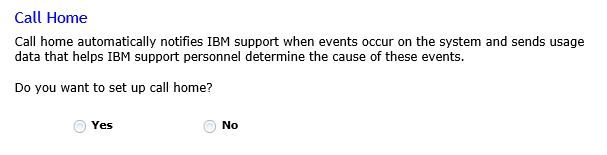
Если вы хотите использовать функцию вызова домой, которую IBM выключила, а затем настроить на следующем экране, я не буду.
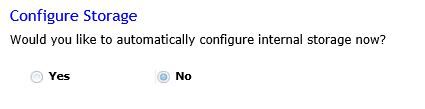
Затем вы получаете возможность автоматически настраивать хранилище, в этом примере я не буду, поскольку я предпочел бы пойти, как это настроено ниже. По умолчанию он выберет наиболее подходящую конфигурацию диска и создаст один том.
Тогда вы увидите резюме, просто примите. Это SAN, настроенная для базового использования, теперь нам нужно настроить пулы и массивы хранения.
Процесс настройки хранилища
Это довольно простой графический интерфейс, поэтому я пройдусь по основным шагам в том порядке, в котором они нуждаются.
- Создайте пул хранения.
- Создать тома и выделить для пула.
- Если SAS добавляет тома к утвержденным хостам соответственно (ваши хосты должны быть подключены).
- Если ISCSI — настроить IP для инициаторов ISCSI.
- При необходимости настройте CHAP для аутентификации тома
Имейте в виду, что после создания томов они НЕ доступны мгновенно, в зависимости от их размера определяется, как долго они будут инициализированы. 9TB в моем примере заняло 4 часа.

IBM Systems and Technology
Техническое описание
Особенности
●● ● ●Легкость управления и развертывания системы хранения данных с помощью современного графического интерфейса пользователя
●● ● ●Эффективность благодаря виртуализации внутренней системы хранения и высокопроизводительной технологии экономного выделения ресурсов
●● ● ● Непрерывный доступ к данным за счет интегрированной функции миграции данных без прерывания работы системы
●● ● ●Улучшение использования сетевых ресурсов для удаленного зеркалирования благодаря инновационной технологии репликации
●● ● ●Оптимизация затрат для смешанных рабочих нагрузок благодаря повышению производительности втрое с использованием всего 5% флэш-памяти в общей емкости,
атакже технологии IBM® Easy Tier1
●●● ●Система соответствует стандартам
Network Equipment Building System
(NEBS) и European Telecommunications
Standards Institute (ETSI).
Простое в эксплуатации и недорогое решение для хранения данных, предназначенное для малых и средних предприятий
Данные становятся новой валютой компаний, их самым ценным ресурсом. Организации часто тратят слишком много времени и средств на управление хранимыми данными. Типичная компания приобретает на 24% емкости больше каждый год,2 но использует менее половины уже имеющейся емкости.3
Подходящая инфраструкутра позволяет заказчикам перенести расходы и инвестировать в проекты, улучшающие бизнесрезультаты. Инфраструктура должна обеспечить извлечение максимальной ценности данных при минимальных расходах и усилиях и с максимальной гибкостью.
Создание эффективной инфраструктуры начинается с программно определяемой системы хранения данных, которая высвобождает данные из физической системы и обеспечивает улучшенный доступ для приложений. Программно определяемая система хранения данных помогает сделать инфраструктуру простой, легкой в управлении и быстрее реагирующей на изменяющиеся бизнеспотребности. IBM Storwize V3700, система начального уровня в семействе IBM Storwize, – это эффективная, легкая в эксплуатации система, разработанная для дополнения виртуальных серверных сред и обеспечения гибкости и инновационных функций хранения данных.
Чтобы помочь малым и средним предприятиям в удовлетворении требований к системам хранения блочного типа, система Storwize V3700 обеспечивает возможность консолидировать данные и организовывать их совместное использование в рамках предприятия. Помимо того, она оснащена расширенными
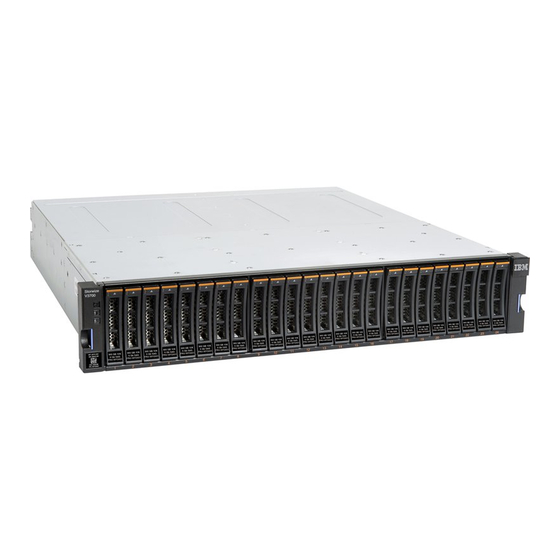
программными функциями, доступными обычно только в системах более высокого ценового диапазона. Система Storwize V3700, включающая до 240 накопителей, обеспечивает доказанную легкость управления, функциональность и совместимость.

IBM Systems and Technology
Техническое описание
Упрощенное управление
Система Storwize V3700 оснащена простым в использовании интерфейсом управления, созданном на основе графического пользовательского интерфейса, общего для систем семейства Storwize. Этот интерфейс дает возможность динамически создавать пользовательские представления и позволяет администраторам интуитивно управлять системой, используя интерактивные меню, вкладки и диаграммы, которые помогают повысить продуктивность работы.
Приложение обеспечивает возможности мониторинга, позволяющие безопасно проверять состояние и производительность системы удаленно с помощью мобильного устройства. Встроенная инструментальная панель производительности обеспечивает обзорный доступ к основной информации о производительности системы в реальном времени.
Оптимизированная эффективность
Благодаря экономному предоставлению ресурсов приложения потребляют только фактически используемую емкость, а не всю выделенную для них. Технология экономного предоставления ресурсов предназначена для поддержания на низком уровне общих издержек и гибко оптимизирует распределение пространства дисковых систем хранения данных для нескольких пользователей на основе минимальной емкости, необходимой для каждого пользователя в определенный момент времени. Это помогает предприятиям экономить электроэнергию, уменьшать тепловыделение и снизить потребность в площадях для размещения оборудования.
Повышенная производительность
Автоматическое размещение данных по уровням с помощью IBM Easy Tier (дополнительная функция для систем Storwize V3700) помогает повысить производительность при меньших затратах благодаря более эффективному использованию флэш-памяти или нескольких типов дисковых накопителей. Технология Easy Tier автоматически и динамически перемещает
соответствующие данные по уровням системы хранения в соответствии с требованиями, предъявляемыми к производительности, при приемлемых затратах. Автоматизация выполняется с помощью выявления и перемещения редко используемых данных на наиболее экономный уровень при сохранении производительности. Таким же образом данные, часто используемые рабочими нагрузками, автоматически переносятся на более быстродействующие уровни, например, флэш-накопители. При этом снижается время отклика для необходимых приложений. Использование технологии Easy Tier позволяет в три раза повысить производительность при хранении всего лишь 5% данных на флэш-накопителях.1
Система Storwize V3700 также включает возможность балансировки пула ресурсов хранения данных, которая выполняется автоматически, распределяя данные между массивами в пуле, обеспечивая сбалансированную производительность и устраняя необходимость настройки вручную. Эта функция чувствительна к различным типам накопителей и учитывает их возможности, не требуя вмешательства администратора.
Защита данных
Функция IBM FlashCopy, которой оснащена система Storwize V3700, позволяет создавать практически мгновенные копии активных данных, которые можно использовать для резервирования или операций параллельной обработки.
Помимо того, дополнительная функция удаленного зеркалирования позволяет в целях аварийного восстановления создавать копии данных, хранящихся в удаленных системах. Функциональность Metro Mirror обеспечивает синхронную репликацию на расстояниях до 300 км, а Global Mirror – асинхронную репликацию на расстояниях до 8 000 км. Репликация может выполняться между любыми системами семейства Storwize, а также включать любую поддерживаемую виртуализированную систему хранения данных. Функциональность удаленного зеркалирования поддерживает обмен данных между узлами по протоколам Fibre Channel (FC), Fibre Channel over Ethernet (FCoE) и IP (Ethernet). В IP-сети система Storwize V3700 использует инновационную технологию Bridgeworks SANSlide для оптимизации использования полосы пропускания сети. В результате можно использовать менее быстродействующую (а значит и менее дорогостоящую) сетевую инфраструктуру или повысить актуальность данных на удаленных площадках благодаря сокращению циклов репликации.
2
 Loading…
Обновлено 18.08.2016
Как настроить IBM Storwize v3700-01
Всем привет сегодня хочу рассказать как настроить систему хранения данных IBM Storwize v3700. Самая элементарная схема:
- СХД IBM Storwize v3700 в базовой комплектации с возможностью подключения серверов по iSCSI и SAS. Установлены 4 диска по 600Gb
- два сервера IBM 3650 m4, без локальных дисков, с двумя однопортовыми SAS HBA картами
- подключение крест на крест, отказоустойчивое — каждый HBA адаптер сервера соединен со своим контроллером системы хранения
Задача стоит следующая:
- Подключиться к СХД для управления
- Обновить прошивку, чтобы появилась поддержка SAS подключений
- Создать из дисков array, уровень RAID 10
- Так как у нас серверы без жестких дисков, создаем для каждого сервера отдельный LUN для установки операционной системы Windows server 2012
- Создаем один общий LUN, который будет доступен обоим серверам. Использоваться он будет для создания MS SQL 2012 кластера, точнее для хранения баз данных
В состав поставки системы хранения есть специальная флешка, она используется для первоначального конфигурирования, а именно установка пароля администратора, сервисного IP адреса для подключения к веб интерфейсу. С флешки на компьютере запускаем утилиту InitTool.bat
Как настроить IBM Storwize v3700-02
Так как мы только что достали СХД из коробки, выбираем пункт Create a new system
Как настроить IBM Storwize v3700-03
Задаем IP адрес, по которому будем подключаться к системе хранения
Как настроить IBM Storwize v3700-04
Процесс инициализации системы:
- Делаем безопасное извлечение устройства из компьютера, достаем флешку.
- Смотрим на один из контроллеров системы хранения. Нам нужно будет вставить флешку в один из разъемов с сетевыми интерфейсами управления. Но перед этим нужно убедиться, что с правой верхней стороны контроллера три световых индикатора подают верные семафорные сигналы, левый горит, средний мигает, правый выключен.
- После того, как флешка будет помещена в USB порт (любой). Начинает мигать правый значок (восклицательный). Необходимо дождаться пока он перестанет потухнет, после этого можно извлечь флешку и вернуть ее обратно в компьютер, чтобы закончить шаги мастера.
Как настроить IBM Storwize v3700-05
Через браузер (рекомендуется IE8 или Firefox 23+) заходим на веб интерфейс. По умолчанию логин пароль для входа IBM Storwize v3700 superuser — passw0rd (через ноль)
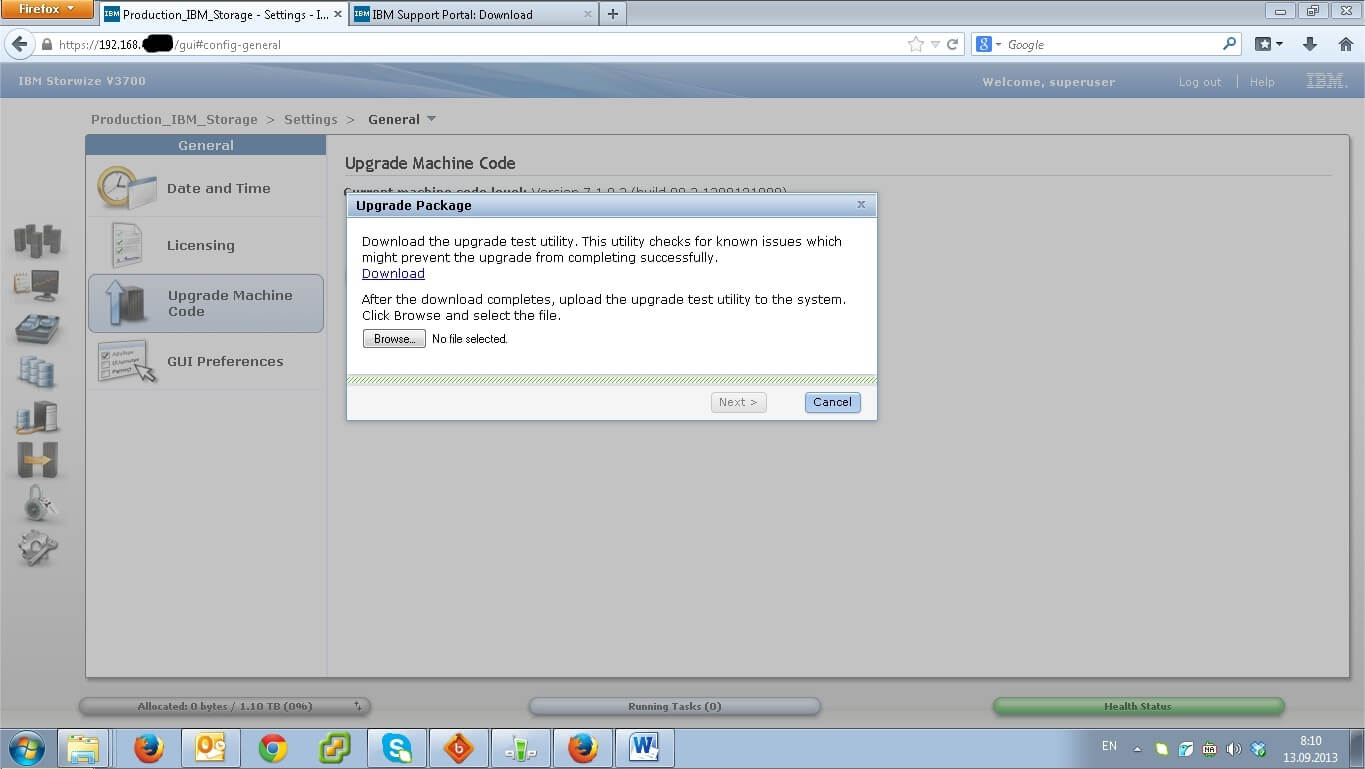
Теперь самое время обновить прошивку, для этого переходим в меню Settings -> General -> Upgrade Machine Code. Прошивка заранее скачана с официального сайта ibm.com. В нашем случае это Version 7.1.0.3 (build 80.3.1308121000). В ее составе есть Upgrade test utility, сначала загружаем на СХД ее, а затем саму прошивку.
Как настроить IBM Storwize v3700-06
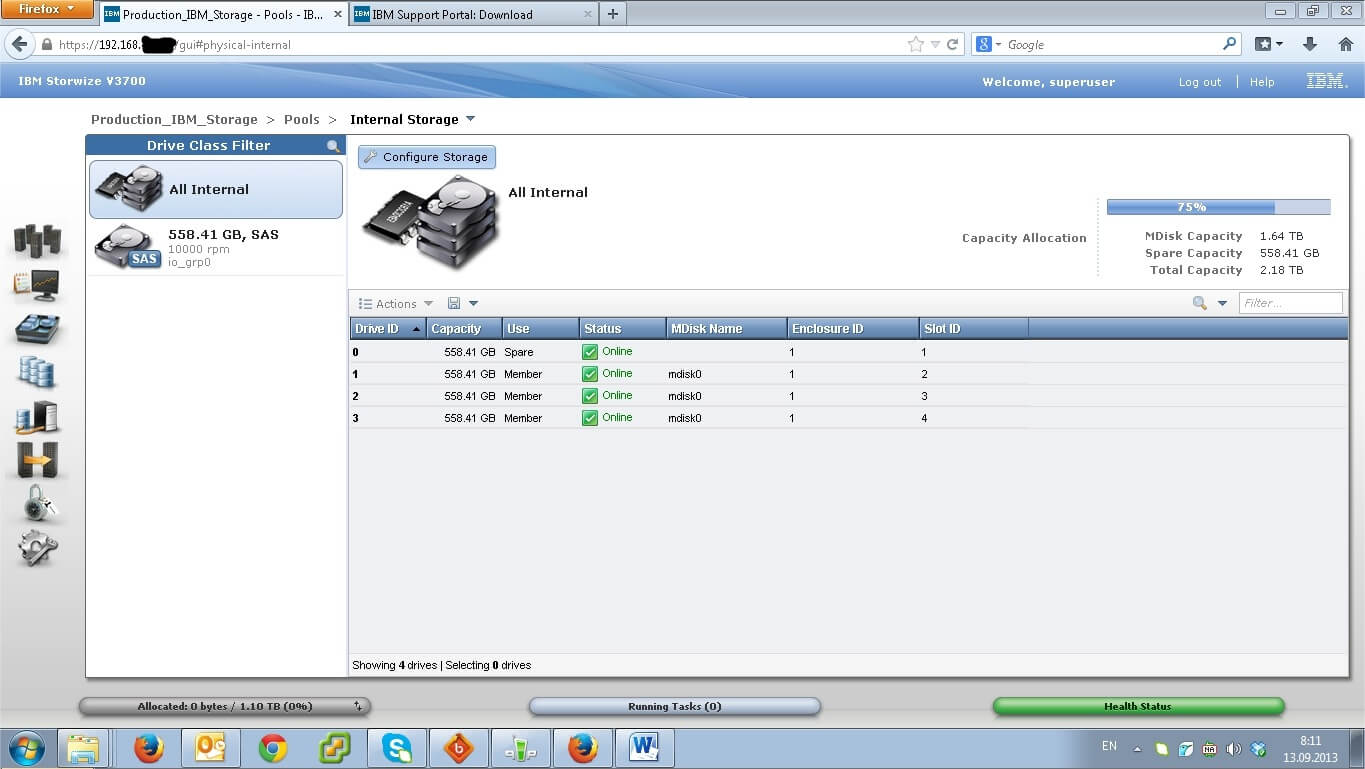
СХД автоматически определила 4 установленных диска. Три из них система отдала под POOL, один назначила под hot spare. Если бы дисков было больше, может быть имело бы смысл оставить подобную автоматическую настройку. В нашем случае лучше переразбить диски по-другому.
Как настроить IBM Storwize v3700-07
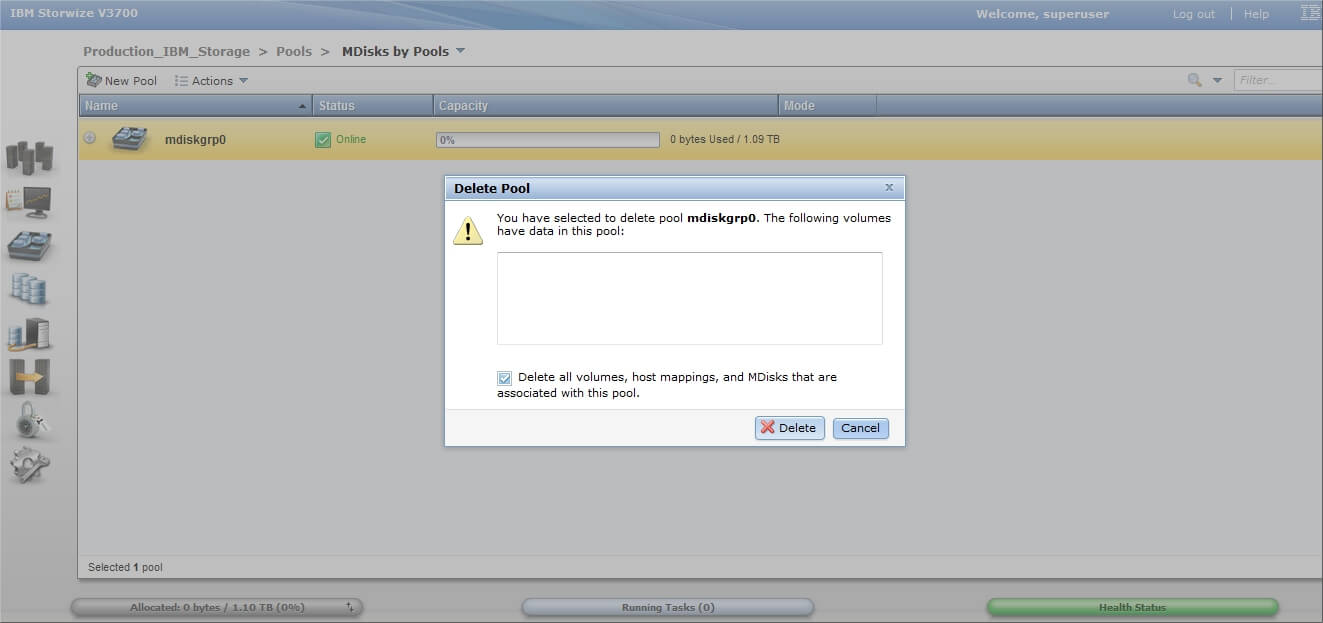
Удаляем автоматически созданный Pool, Delete.
Как настроить IBM Storwize v3700-08
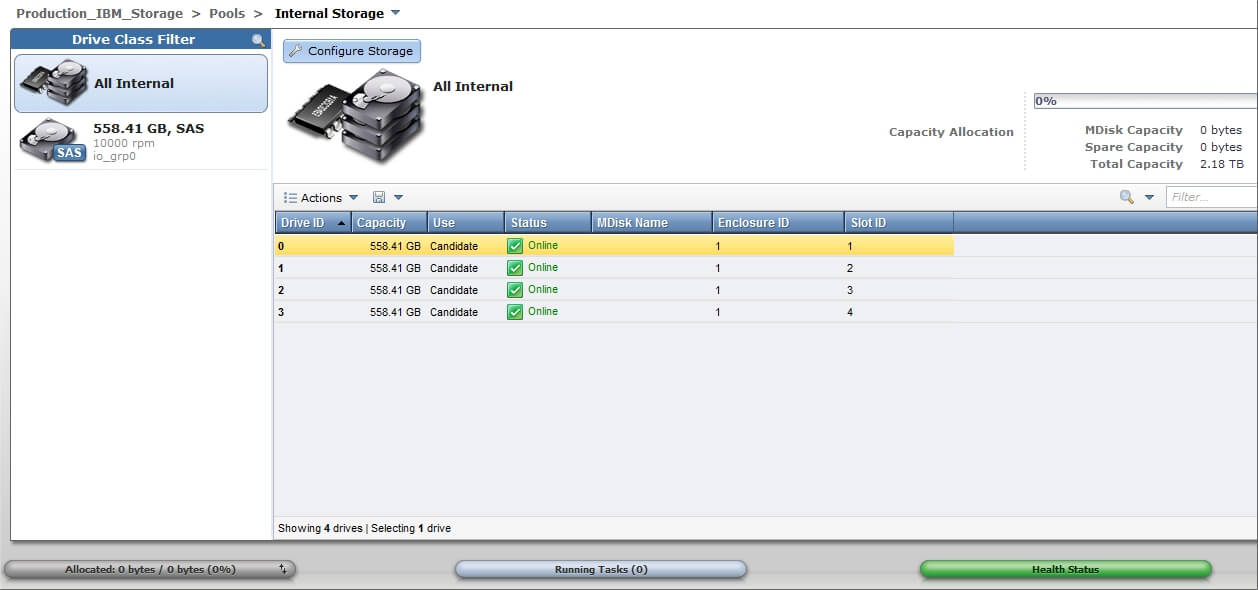
Получаем 4 свободных диска, из которых предстоит создать RAID 10
Как настроить IBM Storwize v3700-09
Нажимаем Configure Storage, затем выбираем какой именно RAID мы хотим создать и сколько дисков будет задействовано под него.
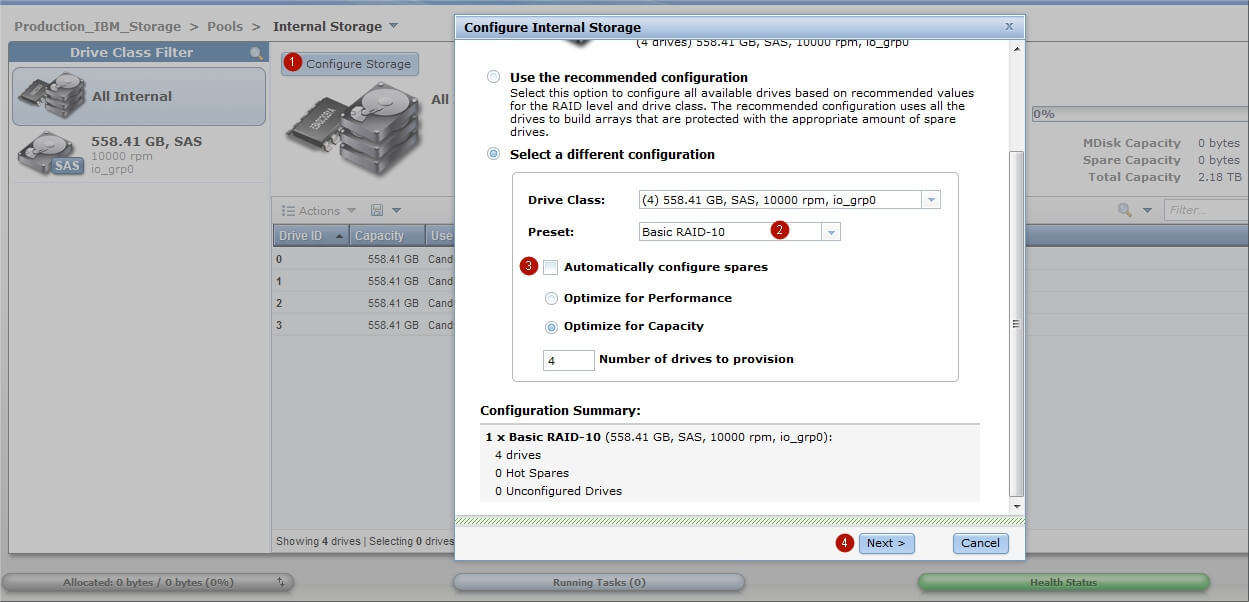
Как настроить IBM Storwize v3700-10
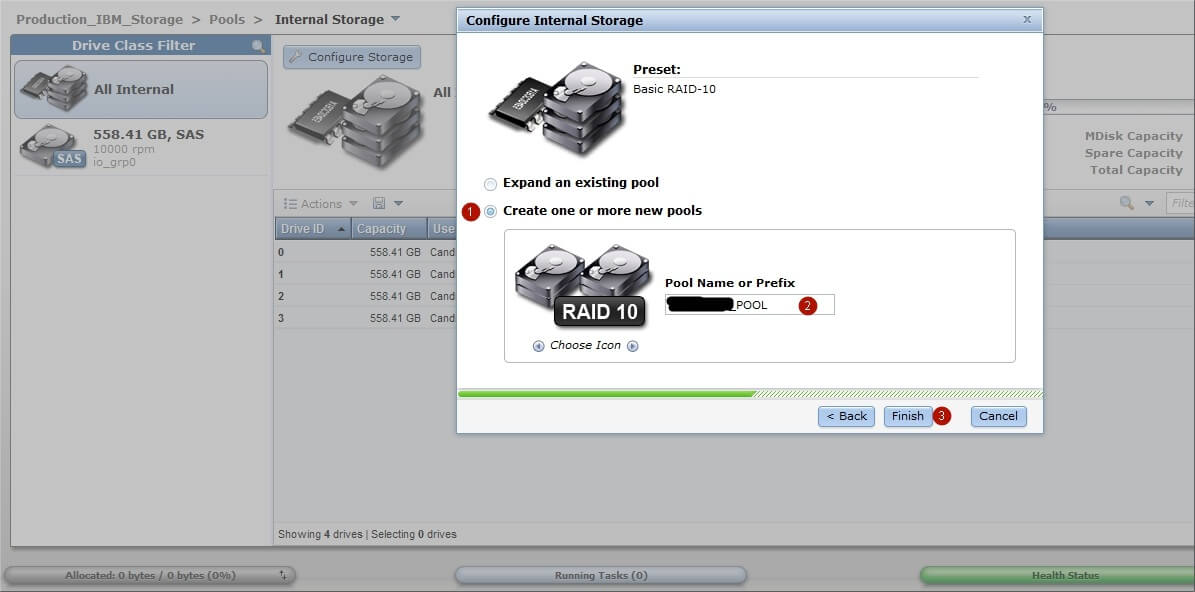
Задаем название для вновь создаваемого Pool. Чтобы не запутаться в терминах. Из свободных дисков мы создаем RAID или array, получившееся свободное пространство это Pool. Затем само пространство пула будем нарезать на кусочки, так называемые LUN-ы или Volume и вот их уже можно будет презентовать серверам (хостам).
Как настроить IBM Storwize v3700-11
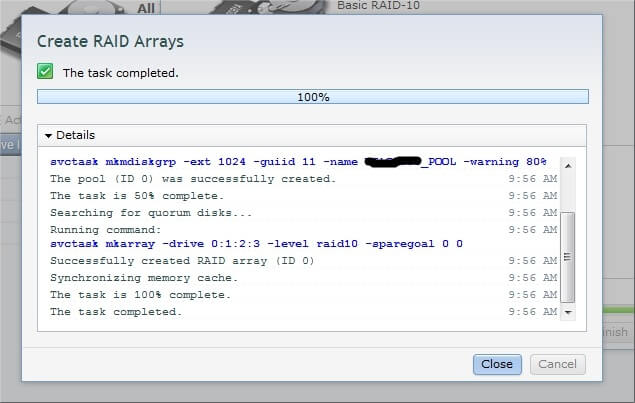
Pool создался
Как настроить IBM Storwize v3700-12
Создаем новый LUN (тут он называется Volume) в нашем пуле, Выбираем Generic-Create
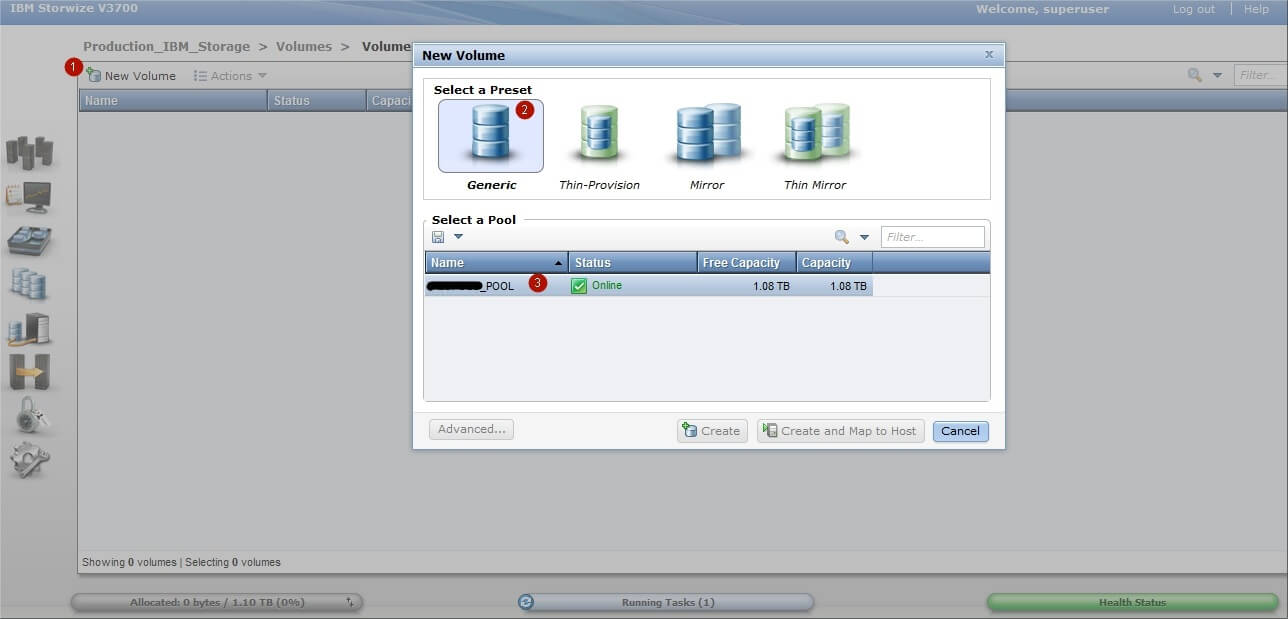
Как настроить IBM Storwize v3700-13
задаем размер Volume
Как настроить IBM Storwize v3700-14
Таким образом, используя мастер создания Volume-ов делаем 3 луна. Как и было задумано, два по 100Gb под операционные системы серверов. И один общий размером 500Gb для создания кластера MS SQL 2012

Как настроить IBM Storwize v3700-15
Теперь необходимо сообщить системе хранения данных, какие серверы (host) к ней подключены. В базовой комплектации всего два варианта соединения — это iSCSI и SAS. У нас два сервера, которые подключены к Storwize v3700 по SAS
Как настроить IBM Storwize v3700-01
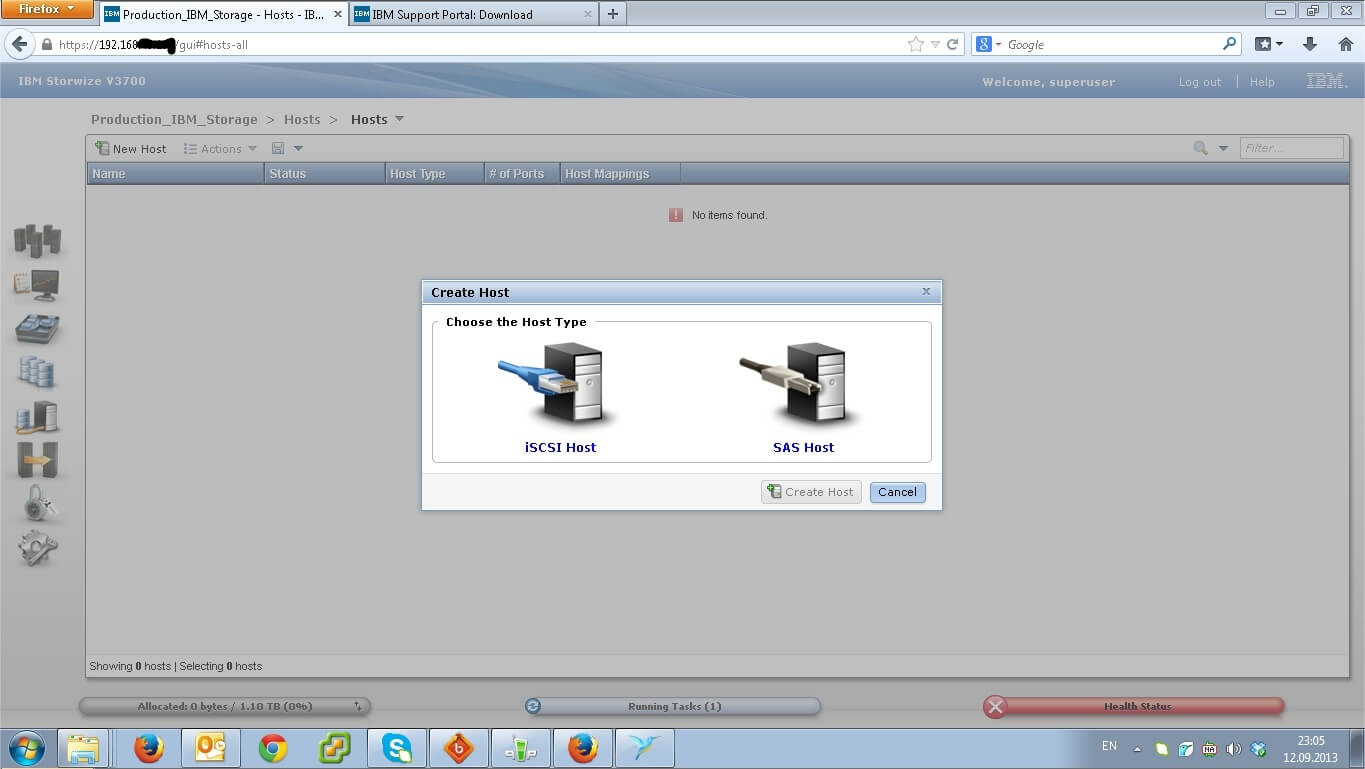
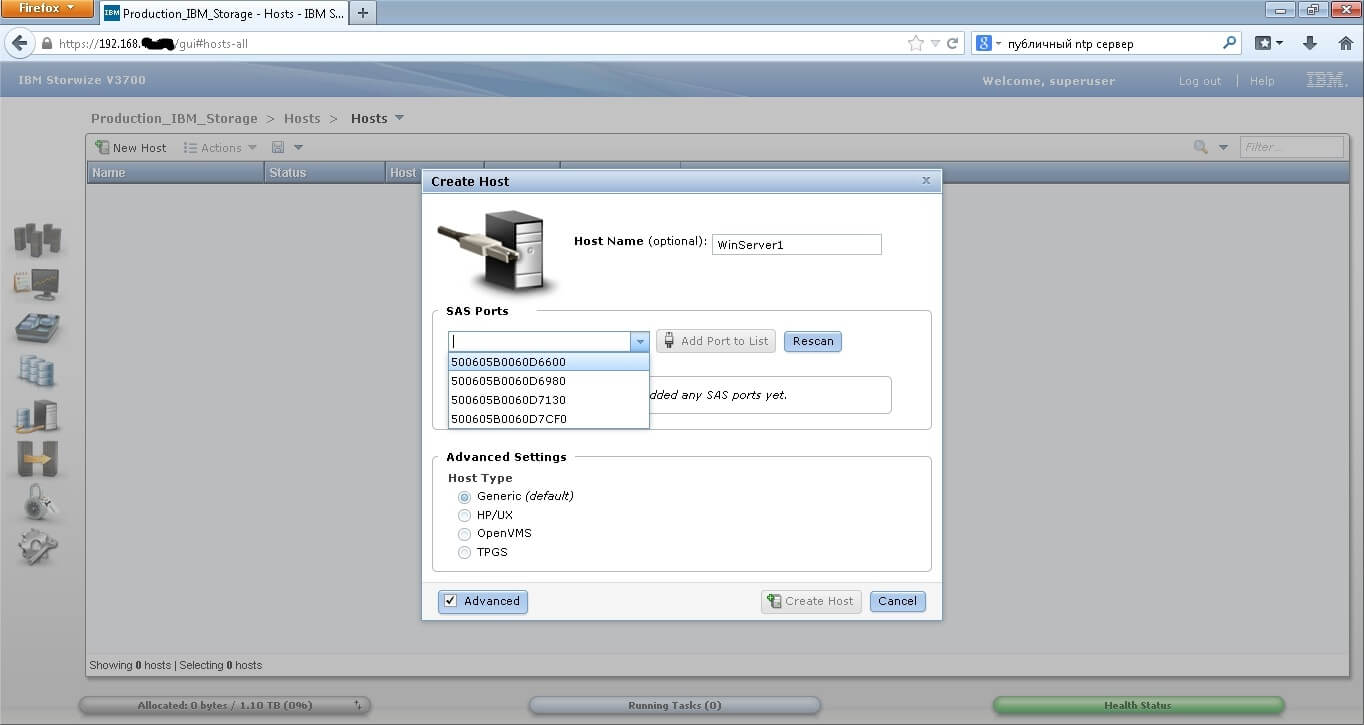
Как настроить IBM Storwize v3700-16
На этом шаге мы указываем системе хранения, что наш первый сервер подключен к ней двумя SAS кабелями, которые в сервере воткнуты в две SAS HBA карты со идентификаторами (16-ти значные). Таким образом добавляем оба сервера, у каждого два идентификатора.
Как настроить IBM Storwize v3700-17
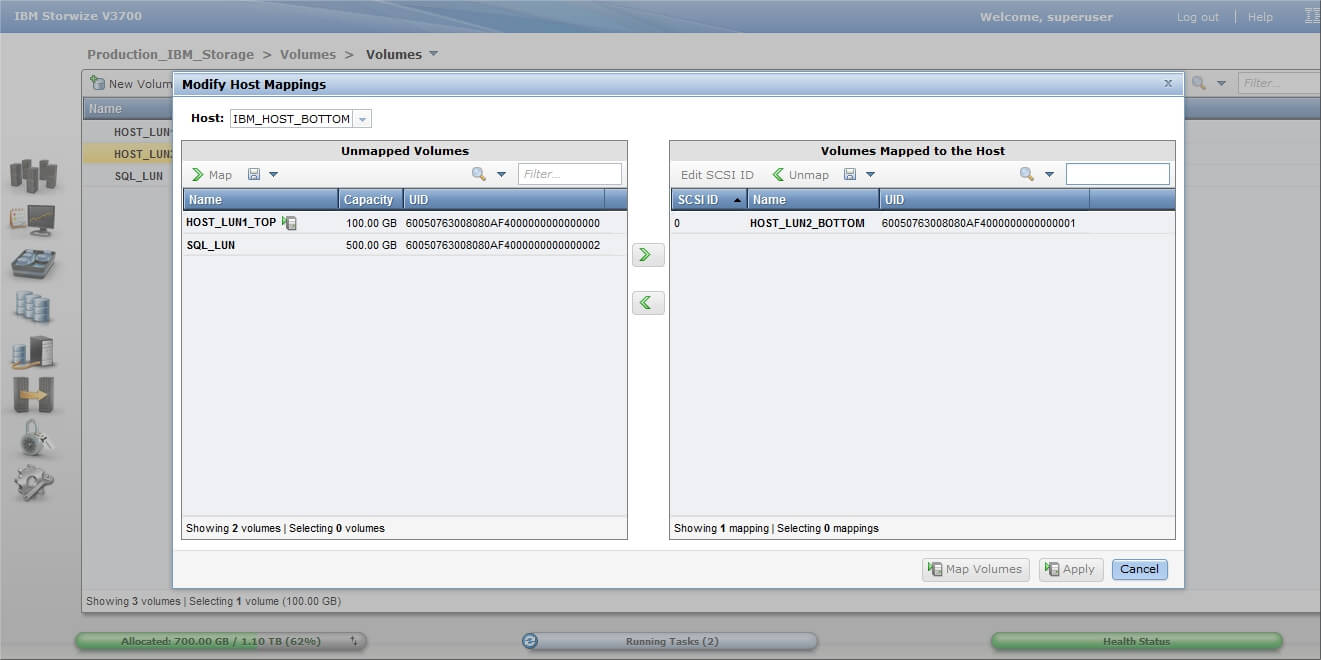
Презентуем Volume-ы серверам. Другими словами назначаем права доступа. На скриншоте HOST_LUN_TOP предназначен только для первого сервера, т.к. на него будет установлена его операционная система. И второму серверу этот LUN видеть нельзя. В отличии от SQL_LUN, который должен быть доступен обоим серверам, ведь на нем будут располагаться базы данных MS SQL кластера.
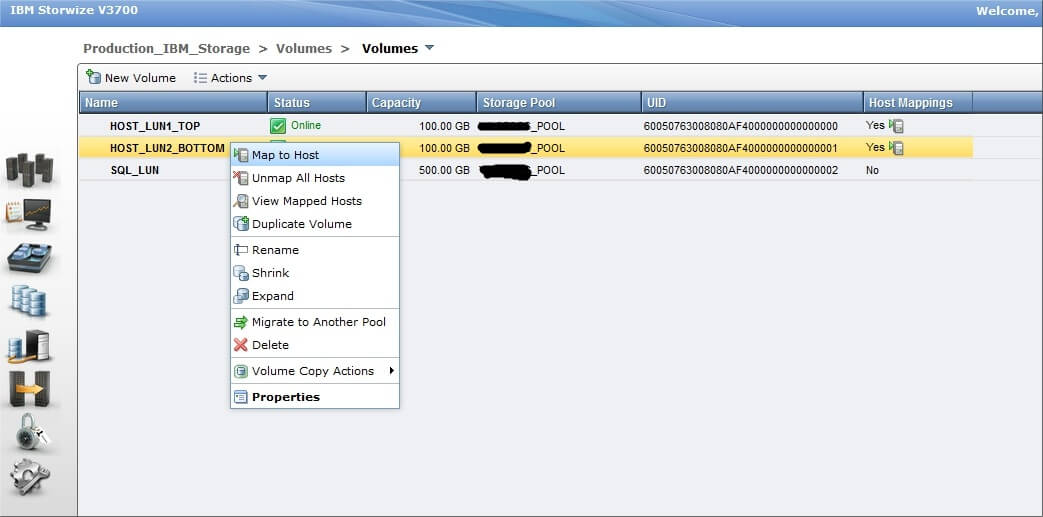
Как настроить IBM Storwize v3700-18
В любой момент можно посмотреть и изменить права доступа на LUN (Host Mapping)

Как настроить IBM Storwize v3700-19
На этом настройку СХД можно считать законченной. Можно на сервере начинать установку Windows server 2012 R2 и при выборе жесткого диска будут доступны два LUN-а с системы хранения, один размером 100Гб, второй 500Гб. Это будет означать, что настройка прошла успешно.
Как настроить IBM Storwize v3700-20
Вот так вот производится ibm storwize v3700 настройка, далее я расскажу как производится ibm storwize v3700 мониторинг производительности.
Материал сайта pyatilistnik.org