-
Contents
-
Table of Contents
-
Troubleshooting
-
Bookmarks
Quick Links
Power for the Digital Revolution
AVR 135
AUDIO/VIDEO RECEIVER
OWNER’S MANUAL
AVR
135
DIGITAL
LOGIC 7
PRO LOGIC
3 STEREO
DSP
5 CH. STEREO
SURR. OFF
®
®
.
VID 1
DVD
VID 2
CD
VID 3
FMAM
TAPE
6 8 CH
C
Related Manuals for Harman Kardon AVR 135
Summary of Contents for Harman Kardon AVR 135
-
Page 1
Power for the Digital Revolution AVR 135 AUDIO/VIDEO RECEIVER OWNER’S MANUAL DIGITAL LOGIC 7 PRO LOGIC 3 STEREO 5 CH. STEREO SURR. OFF ® ® VID 1 VID 2 VID 3 FMAM TAPE 6 8 CH… -
Page 2: Table Of Contents
AVR 135 AUDIO/VIDEO RECEIVER Introduction Important Safety Information Unpacking Front-Panel Controls Rear-Panel Connections Remote Control Functions Installation and Connections System Configuration Speaker Selection and Placement System Setup Input Setup Surround Setup Speaker Setup Delay Settings Output Level Adjustment Operation Basic Operation…
-
Page 3: Introduction
AVR 135 accomplishes its mission by har- nessing advanced technologies usually found only in higher-priced receivers. The AVR 135 has been engineered so that it is easy to take advantage of all the power of its digital tech- nology. However, to obtain the maximum enjoyment from your new receiver, we urge you to read this manual.
-
Page 4: Important Safety Information
I Do not obstruct the ventilation slots on the top of the unit, or place objects directly over them. I Due to the weight of the AVR 135 and the heat generated by the amplifiers, there is the remote possibility that the rubber padding on the bottom of the unit’s feet may leave marks on certain…
-
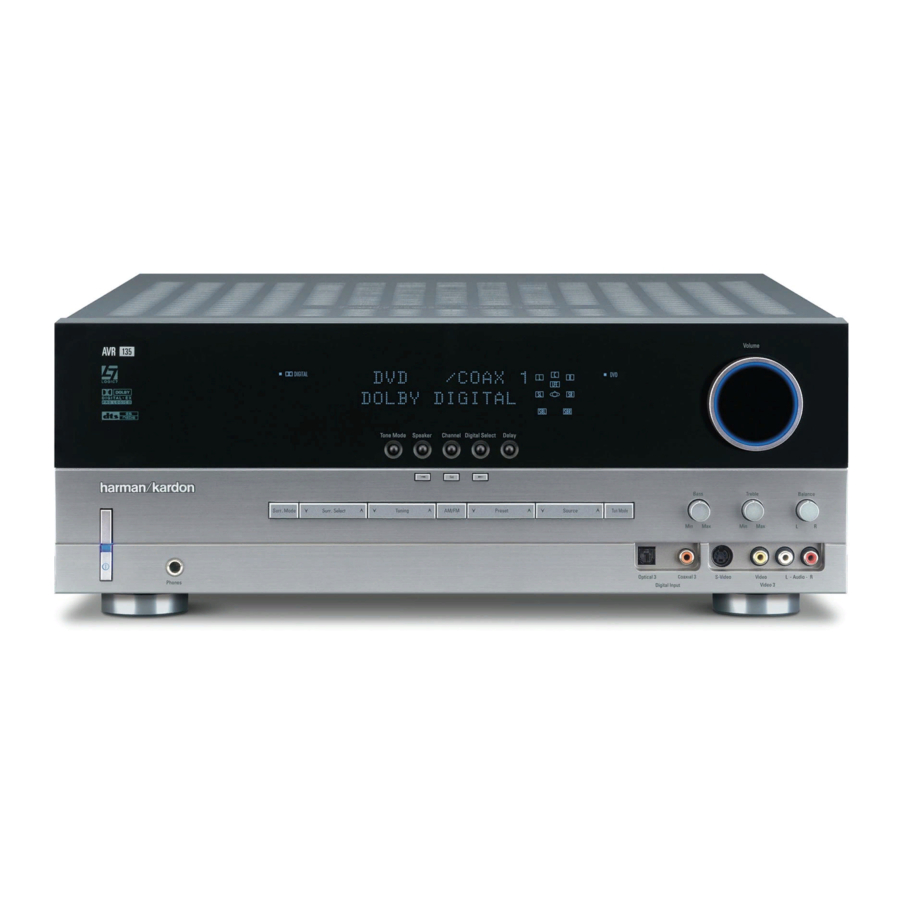
Page 5: Front-Panel Controls
3 Standby/On Switch: When the Main Power Switch 1 is “ON, ” press this button to turn on the AVR 135; press it again to turn the unit off. The Power Indicator 3 turns blue when the unit is on.
-
Page 6
@ Set Button: When making choices during the setup and configuration process, press this button to enter the desired setting into the AVR 135’s memory. # Digital Input Selector: Press this button to select one of the digital inputs or the analog input for any source. -
Page 7: Rear-Panel Connections
+ or – terminals on your left and right speakers. When making speaker connections always make certain to maintain correct polarity by connecting the color-coded (white for front left and red for front right) (+) terminals on the AVR 135 to the red (+) ‡ fi ‹…
-
Page 8
Note on video connections: When connecting a video source product such as a VCR, DVD player, satellite receiver, cable set-top box, personal video recorder or video game to the AVR 135, you may use either a composite or S-video connection, but not both. -
Page 9: Remote Control Functions
Mute NOTE: • The function names shown here are each button’s feature when used with the AVR 135. Most buttons have additional functions when used with other devices. See pages 33–34 for a list of these functions. • To make it easier to follow the instructions that refer to…
-
Page 10
AVR Selector: Pressing this button will switch the remote so that it will operate the AVR 135’s functions. If the AVR 135 is in the Standby mode, it will also turn the AVR 135 on. g AM/FM Tuner Select: Press this button to select the AVR 135’s tuner as the listening choice. -
Page 11
Disc Skip Button: This button has no direct function for the AVR 135 but is most often used to change to the next disc in a CD or DVD player when the remote is programmed for that type of device. -
Page 12: Installation And Connections
AVR 135. Note that it is not possible to use the AVR 135 in a 7.1-channel configuration. Any source information that the AVR receives or derives for the surround back left and right channels, e.g.
-
Page 13
S-video or Y/Pr/Pb component video signals. However, it will not convert composite or S signals to component video. • When connecting a video source to the AVR 135, you may use either composite, component or S-video, but only one type of video may be connected for each device. -
Page 14: System Configuration
You are now ready to power up the AVR 135 to begin these final adjustments. 1. Make certain that the AC power cord ‹ is firmly inserted into an unswitched AC outlet.
-
Page 15
“burned into” the projection tubes, plasma screen or CRT. This type of damage is not covered by the AVR 135 warranty and may not be cov- ered by the projector/TV set’s warranty. The AVR 135 has two on-screen display modes, “Semi-OSD”… -
Page 16: Input Setup
SYSTEM CONFIGURATION Input Setup The first step in configuring the AVR 135 is to configure each input. Once an input is configured, all settings for the Digital Input, Surround Mode and Delay Timing will “attach” themselves to that input and be stored in a nonvolatile memory.
-
Page 17: Speaker Setup
BACK TO MASTER MENU line and press the Set Button p. Speaker Setup This menu tells the AVR 135 which type of speakers are in use. This is important as it adjusts the settings that decide whether your system will use the “5-chan- nel”…
-
Page 18
NOTE: It is not possible to configure the AVR 135 for 7.1-channel operation. Do not connect more than one speaker to the Surround Back Speaker Outputs… -
Page 19: Delay Settings
SUB, which is the “on” position. If the front left/right speakers are set to LARGE, three options are available: • If no subwoofer is connected to the AVR 135, Buttons o on the remote so press the ‹…
-
Page 20: Output Level Adjustment
Output level adjustment is a key part of the configura- tion of any surround sound product. It is particularly important for a digital receiver such as the AVR 135, as correct outputs ensure that you hear soundtracks with the proper directionality and intensity.
-
Page 21
AVR. Once the settings outlined on the previous pages have been made, the AVR 135 is ready for operation. While there are some additional settings to be made, these are best done after you have had an opportunity to lis- ten to a variety of sources and different kinds of pro- gram material. -
Page 22: Operation
Turning the AVR 135 On or Off • When using the AVR 135 for the first time, you must first press the Main Power Switch 1 on the front panel to turn the unit on. This places the unit in a Standby mode, as indicated by the amber color of the Power Indicator 2 .
-
Page 23: Digital Audio Playback
(HDTV) system. An optional, external RF demodulator is required to use the AVR 135 to listen to the Dolby Digital sound- tracks available on laser discs. Connect the RF output of the LD player to the demodulator and then connect the digital output of the demodulator to the Optical or Coaxial Inputs *(·c of the AVR 135.
-
Page 24: Surround Mode Chart
OPERATION Surround Mode Chart MODE FEATURES Dolby Digital Available only with digital input sources encoded with Dolby Digital data. It provides up to five separate main audio channels and a special dedicated Low-Frequency Effects channel. Dolby Digital EX Available when the receiver is configured for 6.1/7.1-channel operation, Dolby Digital EX is the latest version of Dolby Digital. When used with movies or other programs that have special encoding, Dolby Digital EX reproduces specially encoded soundtracks so that a full 6.1/7.1 sound field is available.
-
Page 25: Digital Bitstream Indications
DVD player (usually with the “Audio Select” button or in a menu screen on the disc) to send a full 5.1 feed to the AVR 135. It is also possible for the type of signal feed to change during the course of a DVD playback.
-
Page 26: Tuner Operation
DVD player (usually with the “Audio Select” button or in a menu screen on the disc) to send a full 5.1 feed to the AVR 135. It is also possible for the type of signal feed to change during the course of a DVD playback.
-
Page 27: Recording
Repeat the procedure as needed until all channels requiring adjustment have been set. When all adjust- ments have been made and no further adjustments are made for five seconds, the AVR 135 will return to normal operation. The channel output for any input may also be adjusted using the full-OSD on-screen menu system.
-
Page 28: Advanced Features
Turn-On Volume Level As is the case with most audio/video receivers, when the AVR 135 is turned on, it will always return to the volume setting in effect when the unit was turned off. However, you may prefer to always have the AVR 135 turn on at a specific setting, regardless of what was last in use when the unit was turned off.
-
Page 29: Semi-Osd Settings
Both of those options are possible with the AVR 135. To change the length of time that the semi-OSD displays remain on the screen, or to turn them off, go to…
-
Page 30: Programming The Remote
Auto Search Method. Auto Search Method If the unit you wish to include in the AVR 135’s remote is not listed in the code tables in this manual or if the code does not seem to operate properly, you may wish…
-
Page 31: Programmed Device Functions
Function List and then look in the column for the device you are controlling. For example, button number 44 is the Direct button for the AVR 135, but it is the “Favorite” button for many cable television boxes and satellite receivers. Button number 30 is the Delay button for the AVR 135, but the Open/Close button for CD players.
-
Page 32: Volume Punch-Through
TV viewing, you may wish to have the AVR 135’s volume activated, although the remote is set to run the TV. Either the AVR 135 or TV volume control may be associated with any of the remote’s devices.
-
Page 33: Function List
No. Button Name AVR Function Power On Power On Power On Power Off Power Off Power Off Mute Mute Mute AVR Select AVR Select DVD Input Select DVD Select CD Input Select CD Select Tape Tape Input Select Tape Select VID 1 (VCR) Video 1 Select VCR Select…
-
Page 34
FUNCTION LIST No. Button Name AVR Function 44 Direct Direct Tuner Entry Angle 45 Clear Clear Clear 46 Preset Up Preset Tune Up Slow Forward +10 47 Tuning Down Tune Down Prev Chapter Track Increment 48 OSD 49 D. Skip Disc Skip 50 Preset Down Preset Tune Down… -
Page 35: Setup Code Tables
Manufacturer/Brand Setup Code Number AIWA A MARK ADMIRAL AKAI AMPRO ANAM BLAUPUNKT BROKSONIC CANDLE CAPEHART CENTURION CENTRONIC CITIZEN CLASSIC CONCERTO CONTEC CORANDO CORONADO CRAIG CROWN CURTIS MATHES DAEWOO DAYTRON DIGI LINK DYNASTY DYNATECH ELECTROHOME EMERSON FUNAI FUTURETECH GOLDSTAR/LG GRUNDIG HALL MARK HARMAN KARDON HITACHI INFINITY…
-
Page 36
SETUP CODE TABLE: TV Manufacturer/Brand Setup Code Number LOGIK LUXMAN MAGNAVOX MARANTZ MATSUI MEMOREX METZ MINERVA MITSUBISHI NATIONAL NIKEI ONKING ONWA OPTONICA ORION PANASONIC PHILCO PHILIPS PIONEER PORTLAND PROSCAN PROTON QUASAR RADIO SHACK REALISTIC RUNCO SAMPO SAMSUNG SANYO SCOTT SEARS SHARP SIEMENS SIGNATURE… -
Page 37
Manufacturer/Brand Setup Code Number TEKNIKA TELERENT TERA THOMSON TOSHIBA TOTEVISION VIDEO CONCEPTS VIDTECH WARDS YAMAHA YORK YUPITERU ZENITH ZONDA SETUP CODE TABLE: TV SETUP CODES… -
Page 38
SETUP CODE TABLE: VCR Manufacturer/Brand Setup Code Number AIWA AKAI 048 108 109 126 AMPRO AUDIO DYNAMICS 018 048 BROKSONIC 110 147 CANDLE 134 135 CANON 135 140 CAPEHART CITIZEN CRAIG 045 116 DAEWOO 017 094 104 DAYTRON 018 048 DYNATECH EMERSON 013 040 042 110 112… -
Page 39
Manufacturer/Brand Setup Code Number SALORA SAMSUNG 045 051 095 105 109 SANSUI 048 116 147 SANYO 017 020 SCOTT 110 112 SEARS 017 020 SHARP 129 156 SONY 080 129 SOUNDESIGN SYLVANIA SYMPHONIC TANDY 017 040 TASHICO TATUNG TEAC 040 048 TEKNIKA THOMAS TiVo… -
Page 40
SETUP CODE TABLE: CD Manufacturer/Brand Setup Code Number ADCOM AIWA AKAI AUDIO TECHNICA AUDIOACCESS AUDIOFILE CALIFORNIA AUDIO CAPETRONIC CARRERA CARVER CASIO CLARINETTE DENON EMERSON FISHER FRABA FUNAI GENEXXA GOLDSTAR/LG HAITAI HARMAN KARDON HITACHI INKEL JC PENNEY JENSEN KENWOOD LOTTE LUXMAN MAGNAVOX MARANTZ MCINTOSH… -
Page 41
Manufacturer/Brand Setup Code Number REALISTIC SANSUI SANYO SCOTT SHARP SHERWOOD SONY SOUNDSTREAM SYMPHONIC TAEKWANG TEAC THETA DIGITAL TOSHIBA VECTOR RESEARCH VICTOR WARDS YAMAHA YORK SETUP CODE TABLE: DVD Manufacturer/Brand Setup Code Number APEX DIGITAL DENON 019 051 003 004 GOLDSTAR/LG HARMAN KARDON 005 055 064 066 MAGNAVOX… -
Page 42
SETUP CODE TABLE: SAT Manufacturer/Brand Setup Code Number ALPHASTAR ALPHASTAR DBS ALPHASTAR DSR BIRDVIEW CHANNEL MASTER 320 321 CHAPARRAL 315 316 CITOH DRAKE 313 317 DX ANTENNA 331 352 ECHOSTAR 395 397 ELECTRO HOME FUJITSU 324 329 GENERAL INSTRUMENT 303 311 HITACHI DBS HOUSTON TRACKER HUGHES… -
Page 43
Manufacturer/Brand Setup Code Number HARMAN KARDON SETUP CODE TABLE: CBL Manufacturer/Brand Setup Code Number 001 011 ALLEGRO AMERICAST ARCHER BELCOR CABLE STAR 033 113 CITIZEN COLOUR VOICE 085 090 DIGI EAGLE EASTERN 066 070 ELECTRICORD EMERSON FOCUS G.I. 001 011 017 096 097 GC ELECTRONICS GEMINI 032 060… -
Page 44
SETUP CODE TABLE: CBL Manufacturer/Brand Setup Code Number REMBRANT SAMSUNG 072 186 SCIENTIFIC ATLANTA 183 203 221 222 SEAM SIGNATURE 001 188 SPRUCER 053 081 177 189 STARCOM 002 011 163 STARGATE TANDY TELECAPATION TEXSCAN TIMELESS TOCOM 170 205 UNITED CABLE UNIVERSAL 033 034 039 042 113 VIDEOWAY… -
Page 45: Troubleshooting Guide
In addition to the items shown above, additional information on troubleshooting possible problems with your AVR 135, or installation-related issues, may be found in the list of «Frequently Asked Questions» which is located in the Product Support section of our Web site at www.harmankardon.com.
-
Page 46: Technical Specifications
AVR 135 TECHNICAL SPECIFICATIONS Audio Section Stereo Mode Continuous Average Power (FTC) 50 Watts per channel, 20Hz–20kHz, @ <0.07% THD, both channels driven into 8 ohms Six-Channel Surround Modes Power per Individual Channel Front L&R channels: 40 Watts per channel @ <0.07% THD, 20Hz–20kHz into 8 ohms…
-
Page 47: Index
5-Channel Stereo 17, 24 6-Channel/8-Channel Direct Input 8, 12, 22 7-Channel Stereo 17, 24 AC Power Connections 8, 13 Advanced Features 28–29 Advanced Select Menu 28 Antenna Terminals 7, 8, 12 Audio Equipment Connections 7, 8, 12 Auto Mode Tuning 6, 11, 26 Auto Search Method 30 Cable television 4, 8, 12, 43–44 CD 7, 12, 40–41…
-
Page 48
® 250 Crossways Park Drive, Woodbury, New York 11797 www.harmankardon.com © 2004 Harman International Industries, Incorporated Part No. CQX1A949Z 12/04…
Harman Kardon
AVR 135 Инструкция по эксплуатации
Популярность:
38171 просмотры
Подсчет страниц:
48 страницы
Тип файла:
Размер файла:
1.14 Mb
-
Страница 1
DIGITAL LOGIC 7 VID 1 DVD CD FMAM TAPE 6 8 CH VID 2 VID 3 PRO LOGIC 3 STEREO DSP 5 CH. STEREO SURR. OFF C AVR 135 AVR 1 35 AUDIO/VIDEO RECEIVER O W N ER ’ S M ANUAL Power for the Digital Revolution . ® ® AVR 135 OM 12/3/04 12:11 PM Page 1[…]
-
Страница 2
AVR 135 AUDIO/VIDEO RECEIVER 3 Introduction 4 Important Safety Infor mation 4 Unpacking 5 Front-Panel Controls 7 Rear -Panel Connections 9 Remote Control Functions 12 Installation and Connections 14 System Configuration 14 Speaker Selection and Placement 14 System Setup 16 Input Setup 16 Surround Setup 17 Speaker Setup 19 Delay Settings 20 Output L[…]
-
Страница 3
INTRODUCTION Thank you for choosing Harman Kardon ® ! With the purchase of a Harman Kardon A VR 135, you are about to begin many years of listening enjoyment. Designed to provide all the excitement and detail of movie soundtracks and ever y nuance of musical selec- tions , the A VR 135 accomplishes its mission by har- nessing advanced technologies[…]
-
Страница 4
SAFETY INFORMATION Important Safety Information V erify Line V oltage Before Use Y our A VR 135 has been designed for use with 120-volt AC current. Connection to a line voltage other than that for which it is intended can create a safety and fire hazard and may damage the unit. If you have any questions about the voltage requirements for your speci[…]
-
Страница 5
FRONT-PANEL CONTROLS 1 Main Power Switch: Press this button to apply power to the A VR 135. When the switch is pressed in, the unit is in a Standby mode , as indicated by the amber LED 2 above the Standby/On Switch 3 . This button MUST be pressed in to operate the unit. T o turn the unit off and prevent the use of the remote control, this switch sh[…]
-
Страница 6
8 Surround Mode Selector: Press this button to select from among the available surround mode options for the mode group selected. The specific modes will vary based on the number of speakers available , the mode group and if the input source is digital or analog . For example , press the Surround Mode Group Selector 7 to select a main mode grouping[…]
-
Страница 7
REAR-PANEL CONNECTIONS 7 • ∞ ¶ ⁄ fi ª ¡ £ ‹ ° b d g j i a ™ ¢ § ‚ ¤ › fl ‡ · c e f h k 31 1 35 135 ( 100W, 1A MAX) (100W, 1 A M AX) (50W, 0.5A MAX) (50W, 0.5A MAX) REAR-PANEL CONNECTIONS ¡ FM Antenna Jack ™ CD Audio Inputs £ T ape Outputs ¢ T ape Inputs ∞ Su[…]
-
Страница 8
8 REAR-PANEL CONNECTIONS REAR-PANEL CONNECTIONS minal is the positive , or “+, ” terminal that should be connected to the red (+) terminal on the Surround Back speaker with older color -coding . Connect the black (–) ter minal on the A VR to the matching black negative (–) ter minal on the surround back speaker . (See page 12 for more infor[…]
-
Страница 9
REMOTE CONTROL FUNCTIONS 9 REMOTE CONTROL FUNCTIONS l l l l l l l l l l l l l l a P ower Off Button b IR T ransmitter Window c Program Indicator d Power On Button e Input Selectors f A VR Selector g AM/FM T uner Select h Dim Button i T est Button j Sleep Button k DSP Surround Mode Selector l Night Mode m Channel Select Button n ⁄ / ¤ Buttons o ?[…]
-
Страница 10
REMOTE CONTROL FUNCTIONS 10 REMOTE CONTROL FUNCTIONS IMPORT ANT NOTE: The A VR 135’ s remote may be programmed to control up to seven devices , including the A VR 135. Before using the remote, it is important to remember to press the Input Selector Button e that corresponds to the unit you wish to operate . In addition, the A VR 135’s remote is[…]
-
Страница 11
REMOTE CONTROL FUNCTIONS REMOTE CONTROL FUNCTIONS 11 t Direct Button: Press this button when the tuner is in use to start the sequence for direct entry of a sta- tion’s frequency . After pressing the button, simply press the proper Numeric Keys r to select a sta- tion. (See page 26 for more information on the tuner .) u T uning Up/Down: When the […]
-
Страница 12
12 INSTALLATION AND CONNECTIONS INSTALLATION AND CONNECTIONS System Installa tion After unpacking the unit, locating it in a place with ade- quate ventilation and placing it on a solid surface capable of supporting its weight, you will need to make the con- nections to your audio and video equipment. IMPORT ANT NOTE: F or your personal safety and t[…]
-
Страница 13
INSTALLATION AND CONNECTIONS 13 INSTALLATION AND CONNECTIONS nent video , we particularly recommend connecting it to the Video 2 Audio Input Jacks k , as the Video 2 Component Video inputs ⁄ are assigned to the Video 2 device . 3. Connect the analog audio and video outputs of a television or other video device to the front-panel Video 3 Audio and[…]
-
Страница 14
14 SYSTEM CONFIGURATION SYSTEM CONFIGURATION When all audio , video and system connections have been made , there are a few configuration adjustments that must be made . A few minutes spent to correctly configure and calibrate the unit will greatly add to your listening experience . Speaker Selection and Placement The placement of speakers in a mul[…]
-
Страница 15
SYSTEM CONFIGURATION 15 SYSTEM CONFIGURATION 5. T urn the A VR 135 on either by pressing the Standby/On Switch 2 on the front panel, or via the remote by pressing the Power On Button d , the AVR Selector f or any of the Input Selectors eg on the remote . Whe n the unit is tur ned on, the entire list of options will briefly light for both the Input […]
-
Страница 16
16 SYSTEM CONFIGURATION SYSTEM CONFIGURATION 16 SYSTEM CONFIGURATION Input Setup The first step in configuring the A VR 135 is to configure each input. Once an input is configured, all settings for the Digital Input, Surround Mode and Delay Timing will “attach” themselves to that input and be stored in a nonvolatile memor y . The later selectio[…]
-
Страница 17
SYSTEM CONFIGURATION 17 SYSTEM CONFIGURATION SYSTEM CONFIGURATION 17 SYSTEM CONFIGURATION The following few paragraphs detail the instructions for surround mode categories with several mode options or with other available settings . On the DOLBY menu (Figure 4), mode choices include Dolby Digital, Dolby Pro Logic II-Music , Dolby Pro Logic II-Movie[…]
-
Страница 18
SYSTEM CONFIGURATION 18 SYSTEM CONFIGURATION 18 SYSTEM CONFIGURATION This menu screen also allows you to enter the settings for the A VR 135’s T riple Crossover feature , which allows a different crossover point to be used for the front left/right, center and surround speakers . In sys- tems where full-range or tower speakers are used for the fro[…]
-
Страница 19
SYSTEM CONFIGURATION SYSTEM CONFIGURATION SYSTEM CONFIGURATION 19 SYSTEM CONFIGURATION 19 ¶ , as doing so may damage your speakers , the A VR 135 or both. When 7.1-channel information is received, for example through the 6/8-Channel Direct Inputs f , or when deriving 7-Channel Stereo or Logic 7/7.1 surround infor mation, the AVR 135 combines the l[…]
-
Страница 20
SYSTEM CONFIGURATION SYSTEM CONFIGURATION 20 SYSTEM CONFIGURATION 20 SYSTEM CONFIGURATION ence through the use of the delay settings to adjust the timing for the speaker placement and acoustic conditions in your listening room or home theater . The A VR 135’s advanced software enables you to quickly and easily set delay times without the need to […]
-
Страница 21
SYSTEM CONFIGURATION SYSTEM CONFIGURATION SYSTEM CONFIGURATION 21 SYSTEM CONFIGURATION 21 Button p to bring the CHANNEL ADJUST menu (Figure
 to the screen. Figure 8 4. When the CHANNEL ADJUST menu appears , press the ¤ Button n until the on- screen › cursor is next to the TEST TONE line . Press the ‹ / › Buttons o so that ON is shown and t[…]
 -
Страница 22
Basic Operation Once you have completed the initial setup and configu — ration of the A VR 135, it is simple to operate and enjoy . The following instructions will help you maximize the enjoyment of your new receiver: T urning the A VR 135 On or Off • When using the A VR 135 for the first time , you must first press the Main Power Switch 1 on the[…]
-
Страница 23
OPERATION OPERATION 23 grams bearing the logo of one of the major surround- encoding processes , such as Dolby Surround or DTS Stereo , may be played in either the Dolby Digital, Dolby Pro Logic II Cinema, DTS Neo:6 Cinema, or Logic 7 Cinema surround modes depending on the source material. NOTE: Once a program has been encoded with matrix surround […]
-
Страница 24
OPERATION 24 OPERATION Surround Mode Chart MODE FEA TURES Dolby Digital Available only with digital input sources encoded with Dolby Digital data. It provides up to five separate main audio channels and a special dedicated Low-Frequency Effects channel. Dolby Digital EX Available when the receiver is configured for 6.1/7.1-channel operation, Dolby […]
-
Страница 25
OPERATION OPERATION 25 OPERATION 25 the digital source by pressing the Digital Select Button q# and then using the ⁄ / ¤ Buttons n on the remote or the ‹ / › Selector Buttons ) on the front panel to choose any of the OPTICAL or COAXIAL inputs , as they appear in the Upper Display Line ˜ or on-screen display . When the digital source is play[…]
-
Страница 26
one surround back speaker to it. It will automatically combine the left and right surround back channel information, and output it through the single surround back speaker , if you have configured that speaker using the SPEAKER SETUP menu (Figure 6 on page 18). When a standard analog signal is in use , only the “L ” and “R” indicators will […]
-
Страница 27
OPERATION OPERATION OPERATION 27 OPERATION 27 Within five seconds of seeing the DIRECT IN scroll in the Upper Display Line ˜ , enter the station frequency by pressing the Numeric Keys r . If you press an incorrect button while entering a direct frequency , press the Clear Button to start over . NOTE: When the FM reception of a station is weak, aud[…]
-
Страница 28
28 ADVANCED FEATURES ADVANCED FEATURES The A VR 135 is equipped with a number of advanced features that add extra flexibility to the unit’s operation. While it is not necessary to use these features to operate the unit, they provide additional options that you may wish to use . Figure 10 Front-P anel-Display Fade In normal operation, the front-pa[…]
-
Страница 29
ADVANCED FEATURES ADVANCED FEATURES 29 Semi-OSD Settings The semi-OSD system places one-line messages at the lower third of the video display screen whenever the V olume , Input Source , Surround mode , tuner frequency or any of the configuration settings are changed. The semi-OSD system is helpful in that it provides feedback on any control change[…]
-
Страница 30
30 PROGRAMMING THE REMOTE PROGRAMMING THE REMOTE The A VR 135 is equipped with a powerful remote control that will control not only the receiver’s func- tions , but also most popular brands of audio and video equipment, including CD players , cassette decks , TV sets , cable boxes , VCRs , satellite receivers and other home theater equipment. Onc[…]
-
Страница 31
PROGRAMMING THE REMOTE PROGRAMMING THE REMOTE 31 c will flash green to confir m each button press as you enter commands . NOTE: While entering commands for P ower On/Off of any device during a macro sequence , press the Mute Button . DO NOT press the actual Power button. 3. When all the steps have been entered, press the Sl eep Button j to enter th[…]
-
Страница 32
32 PROGRAMMING THE REMOTE PROGRAMMING THE REMOTE • When a button is pressed on the A VR 135 remote , the red light under the Input Selector ef for the product being operated should flash briefly . If the Device Control Selector flashes for some but not all buttons for a particular product, it does NOT indicate a problem with the remote but rather[…]
-
Страница 33
FUNCTION LIST FUNCTION LIST 33 No. Button Name AVR Function DVD CD/CD-R T ape VCR (VID1) CBL (VID2) SA T (VID2) TV (VID3) 1 Power On Power On Power On Power On Power On P ower On Power On Power On Power On 2 Power Off Power Off Power Off Power Off Power Off Power Off P ower Off Power Off Power Off 3 Mute Mute Mute Mute Mute Mute Mute Mute Mute 4 AV[…]
-
Страница 34
No. Button Name AVR Function DVD CD/CD-R T ape VCR (VID1) CBL (VID2) SA T (VID2) TV (VID3) 44 Direct Direct T uner Entry Angle Random Play F A V F A V 45 Clear Clear Clear Clear Clear Bypass Next Clear 46 Preset Up Preset T une Up Slow Forward +10 Music Alt 47 T uning Do wn T une Down Prev Chapter T rack Increment 48 OSD OSD Program OSD OSD OSD OSD[…]
-
Страница 35
SETUP CODE TABLE: TV SETUP CODES 35 Manufacturer/Brand Setup Code Number AIWA 027 A MARK 122 132 ADMIRAL 192 AKAI 123 160 AMPRO 164 ANAM 045 106 109 112 122 AOC 122 123 128 BLAUPUNKT 084 BROKSONIC 205 206 CANDLE 123 128 CAPEHART 059 CENTURION 123 171 CENTRONIC 045 CITIZEN 045 123 128 132 CLASSIC 045 CONCERTO 128 CONTEC 045 CORANDO 172 CORONADO 132 […]
-
Страница 36
36 SETUP CODES SETUP CODE TABLE: TV Manufacturer/Brand Setup Code Number LOGIK 069 LUXMAN 128 LXI 077 145 148 MAGNA VOX 030 123 128 132 145 148 MARANTZ 115 123 148 MA TSUI 148 MEMOREX 069 128 METZ 084 MGA 115 123 128 MINERV A 084 MITSUBISHI 077 115 123 128 160 167 168 MTC 175 176 NA TIONAL 148 177 179 180 181 182 NEC 115 121 123 125 NIKEI 045 ONKIN[…]
-
Страница 37
SETUP CODE TABLE: TV SETUP CODES 37 Manufacturer/Brand Setup Code Number TEKNIKA 045 069 115 123 128 132 TELERENT 069 TERA 156 THOMSON 190 191 TMK 128 TOSHIBA 063 129 202 TOTEVISION 132 VIDEO CONCEPTS 160 VIDTECH 128 WARDS 069 128 132 148 Y AMAHA 123 128 YORK 128 YUPITERU 045 ZENITH 069 090 ZONDA 122 AVR 135 OM 12/3/04 12:11 PM Page 37[…]
-
Страница 38
38 SETUP CODES SETUP CODE TABLE: VCR Manufacturer/Brand Setup Code Number AIW A 040 AKAI 048 108 109 126 AMPRO 076 ASA 134 AUDIO DYNAMICS 018 048 BROKSONIC 110 147 CANDLE 134 135 CANON 135 140 CAPEHART 094 CITIZEN 134 CRAIG 045 116 DAEWOO 017 094 104 DA YTRON 094 DBX 018 048 DYNA TECH 040 EMERSON 013 040 042 110 112 FISHER 017 FUNAI 040 GE 076 095 […]
-
Страница 39
SETUP CODE TABLE: VCR SETUP CODES 39 Manufacturer/Brand Setup Code Number SALORA 020 SAMSUNG 045 051 095 105 109 SANSUI 048 116 147 SANYO 017 020 SCOTT 110 112 SEARS 017 020 SHARP 129 156 SONY 080 129 SOUNDESIGN 040 SYL V ANIA 040 SYMPHONIC 040 T ANDY 017 040 T ASHICO 134 T A TUNG 048 TEAC 040 048 TEKNIKA 040 THOMAS 040 TiV o 012 TMK 013 TOSHIBA 11[…]
-
Страница 40
40 SETUP CODES SETUP CODE TABLE: CD Manufacturer/Brand Setup Code Number ADCOM 063 069 AIW A 072 111 118 156 170 AKAI 050 177 184 AUDIO TECHNICA 053 AUDIOACCESS 125 AUDIOFILE 211 BSR 044 CALIFORNIA AUDIO 109 CAPETRONIC 070 CARRERA 087 CARVER 136 140 141 143 144 145 185 186 CASIO 117 166 CLARINETTE 166 DENON 187 188 213 EMERSON 052 093 108 FISHER 05[…]
-
Страница 41
SETUP CODE TABLE: CD SETUP CODES 41 SETUP CODE TABLE: DVD Manufacturer/Brand Setup Code Number RCX 169 REALISTIC 058 093 095 104 105 108 164 166 SANSUI 047 081 134 157 172 SANYO 033 082 095 SCOTT 108 SHARP 058 105 114 151 159 167 180 181 SHERWOOD 003 041 058 105 133 SONY 103 115 116 118 132 139 163 205 206 207 208 212 217 SOUNDSTREAM 124 SYMPHONIC […]
-
Страница 42
42 SETUP CODES SETUP CODE TABLE: SAT Manufacturer/Brand Setup Code Number ALPHAST AR 472 ALPHAST AR DBS 450 ALPHAST AR DSR 442 BIRDVIEW 425 CHANNEL MASTER 320 321 325 361 CHAP ARRAL 315 316 451 CITOH 360 DRAKE 313 317 318 413 481 DX ANTENNA 331 352 362 379 483 ECHOST AR 395 397 452 453 463 477 478 484 485 ELECTRO HOME 392 FUJITSU 324 329 334 GENERA[…]
-
Страница 43
SETUP CODES 43 SETUP CODE TABLE: TAPE Manufacturer/Brand Setup Code Number HARMAN KARDON 001 SETUP CODE TABLE: CBL Manufacturer/Brand Setup Code Number ABC 001 011 ALLEGRO 111 AMERICAST 212 ARCHER 112 BELCOR 113 CABLE ST AR 033 113 CITIZEN 111 COLOUR VOICE 085 090 DIGI 114 EAGLE 186 EASTERN 066 070 ELECTRICORD 039 EMERSON 112 FOCUS 116 G .I. 001 01[…]
-
Страница 44
SETUP CODE TABLE: CBL 44 SETUP CODES Manufacturer/Brand Setup Code Number REMBRANT 032 SAMSUNG 072 186 SCIENTIFIC A TLANT A 183 203 221 222 SEAM 121 SIGNA TURE 001 188 SPRUCER 053 081 177 189 ST ARCOM 002 011 163 ST ARGA TE 120 T ANDY 024 TELECAP A TION 028 TEXSCAN 036 TFC 122 TIMELESS 123 TOCOM 170 205 UNITED CABLE 011 UNIVERSAL 033 034 039 042 11[…]
-
Страница 45
TROUBLESHOOTING GUIDE 45 TROUBLESHOOTING GUIDE SYMPTOM CAUSE SOLUTION Unit does not function when Main • No AC P ower • Make certain AC power cord is plugged into Power Switch is pushed a live outlet • Check to see whether outlet is switch-controlled Display lights , but no sound • Intermittent input connections • Make certain that all in[…]
-
Страница 46
Audio Section Stereo Mode Continuous Average P ower (FTC) 50 W atts per channel, 20Hz–20kHz, @ <0.07% THD , both channels driven into 8 ohms Six-Channel Surround Modes P ower per Individual Channel Front L&R channels: 40 W atts per channel @ <0.07% THD , 20Hz–20kHz into 8 ohms Center channel: 40 W atts @ <0.07% THD , 20Hz–20kHz i[…]
-
Страница 47
INDEX 47 INDEX 5-Channel Stereo 17, 24 6-Channel/8-Channel Direct Input 8, 12, 22 7-Channel Stereo 17, 24 AC Power Connections 8, 13 Advanced Features 28–29 Advanced Select Menu 28 Antenna T erminals 7, 8, 12 Audio Equipment Connections 7, 8, 12 Auto Mode T uning 6, 11, 26 Auto Search Method 30 Cable television 4, 8, 12, 43–44 CD 7, 12, 40–41[…]
-
Страница 48
® 250 Crossways Park Drive , Woodbury , New Y ork 11797 www .harmankardon.com © 2004 Har man Inter national Industries , Incorporated Part No . CQX1A949Z 12/04 AVR 135 OM 12/3/04 12:11 PM Page 48[…]
 to the screen. Figure 8 4. When the CHANNEL ADJUST menu appears , press the ¤ Button n until the on- screen › cursor is next to the TEST TONE line . Press the ‹ / › Buttons o so that ON is shown and t[…]
-
Page 1
Power for the Digital Revolution AVR 135 AUDIO/VIDEO RECEIVER OWNER’S MANUAL DIGITAL LOGIC 7 PRO LOGIC 3 STEREO 5 CH. STEREO SURR. OFF ® ® VID 1 VID 2 VID 3 FMAM TAPE 6 8 CH… -
Page 2: Table Of Contents
AVR 135 AUDIO/VIDEO RECEIVER Introduction Important Safety Information Unpacking Front-Panel Controls Rear-Panel Connections Remote Control Functions Installation and Connections System Configuration Speaker Selection and Placement System Setup Input Setup Surround Setup Speaker Setup Delay Settings Output Level Adjustment Operation Basic Operation…
-
Page 3: Introduction
AVR 135 accomplishes its mission by har- nessing advanced technologies usually found only in higher-priced receivers. The AVR 135 has been engineered so that it is easy to take advantage of all the power of its digital tech- nology. However, to obtain the maximum enjoyment from your new receiver, we urge you to read this manual.
-
Page 4: Important Safety Information
I Do not obstruct the ventilation slots on the top of the unit, or place objects directly over them. I Due to the weight of the AVR 135 and the heat generated by the amplifiers, there is the remote possibility that the rubber padding on the bottom of the unit’s feet may leave marks on certain…
-
Page 5: Front-Panel Controls
3 Standby/On Switch: When the Main Power Switch 1 is “ON, ” press this button to turn on the AVR 135; press it again to turn the unit off. The Power Indicator 3 turns blue when the unit is on.
-
Page 6
@ Set Button: When making choices during the setup and configuration process, press this button to enter the desired setting into the AVR 135’s memory. # Digital Input Selector: Press this button to select one of the digital inputs or the analog input for any source. -
Page 7: Rear-Panel Connections
+ or – terminals on your left and right speakers. When making speaker connections always make certain to maintain correct polarity by connecting the color-coded (white for front left and red for front right) (+) terminals on the AVR 135 to the red (+) ‡ fi ‹…
-
Page 8
Note on video connections: When connecting a video source product such as a VCR, DVD player, satellite receiver, cable set-top box, personal video recorder or video game to the AVR 135, you may use either a composite or S-video connection, but not both. -
Page 9: Remote Control Functions
Mute NOTE: • The function names shown here are each button’s feature when used with the AVR 135. Most buttons have additional functions when used with other devices. See pages 33–34 for a list of these functions. • To make it easier to follow the instructions that refer to…
-
Page 10
AVR Selector: Pressing this button will switch the remote so that it will operate the AVR 135’s functions. If the AVR 135 is in the Standby mode, it will also turn the AVR 135 on. g AM/FM Tuner Select: Press this button to select the AVR 135’s tuner as the listening choice. -
Page 11
Disc Skip Button: This button has no direct function for the AVR 135 but is most often used to change to the next disc in a CD or DVD player when the remote is programmed for that type of device. -
Page 12: Installation And Connections
AVR 135. Note that it is not possible to use the AVR 135 in a 7.1-channel configuration. Any source information that the AVR receives or derives for the surround back left and right channels, e.g.
-
Page 13
S-video or Y/Pr/Pb component video signals. However, it will not convert composite or S signals to component video. • When connecting a video source to the AVR 135, you may use either composite, component or S-video, but only one type of video may be connected for each device. -
Page 14: System Configuration
You are now ready to power up the AVR 135 to begin these final adjustments. 1. Make certain that the AC power cord ‹ is firmly inserted into an unswitched AC outlet.
-
Page 15
“burned into” the projection tubes, plasma screen or CRT. This type of damage is not covered by the AVR 135 warranty and may not be cov- ered by the projector/TV set’s warranty. The AVR 135 has two on-screen display modes, “Semi-OSD”… -
Page 16: Input Setup
SYSTEM CONFIGURATION Input Setup The first step in configuring the AVR 135 is to configure each input. Once an input is configured, all settings for the Digital Input, Surround Mode and Delay Timing will “attach” themselves to that input and be stored in a nonvolatile memory.
-
Page 17: Speaker Setup
BACK TO MASTER MENU line and press the Set Button p. Speaker Setup This menu tells the AVR 135 which type of speakers are in use. This is important as it adjusts the settings that decide whether your system will use the “5-chan- nel”…
-
Page 18
NOTE: It is not possible to configure the AVR 135 for 7.1-channel operation. Do not connect more than one speaker to the Surround Back Speaker Outputs… -
Page 19: Delay Settings
SUB, which is the “on” position. If the front left/right speakers are set to LARGE, three options are available: • If no subwoofer is connected to the AVR 135, Buttons o on the remote so press the ‹…
-
Page 20: Output Level Adjustment
Output level adjustment is a key part of the configura- tion of any surround sound product. It is particularly important for a digital receiver such as the AVR 135, as correct outputs ensure that you hear soundtracks with the proper directionality and intensity.
-
Page 21
AVR. Once the settings outlined on the previous pages have been made, the AVR 135 is ready for operation. While there are some additional settings to be made, these are best done after you have had an opportunity to lis- ten to a variety of sources and different kinds of pro- gram material. -
Page 22: Operation
Turning the AVR 135 On or Off • When using the AVR 135 for the first time, you must first press the Main Power Switch 1 on the front panel to turn the unit on. This places the unit in a Standby mode, as indicated by the amber color of the Power Indicator 2 .
-
Page 23: Digital Audio Playback
(HDTV) system. An optional, external RF demodulator is required to use the AVR 135 to listen to the Dolby Digital sound- tracks available on laser discs. Connect the RF output of the LD player to the demodulator and then connect the digital output of the demodulator to the Optical or Coaxial Inputs *(·c of the AVR 135.
-
Page 24: Surround Mode Chart
OPERATION Surround Mode Chart MODE FEATURES Dolby Digital Available only with digital input sources encoded with Dolby Digital data. It provides up to five separate main audio channels and a special dedicated Low-Frequency Effects channel. Dolby Digital EX Available when the receiver is configured for 6.1/7.1-channel operation, Dolby Digital EX is the latest version of Dolby Digital. When used with movies or other programs that have special encoding, Dolby Digital EX reproduces specially encoded soundtracks so that a full 6.1/7.1 sound field is available.
-
Page 25: Digital Bitstream Indications
DVD player (usually with the “Audio Select” button or in a menu screen on the disc) to send a full 5.1 feed to the AVR 135. It is also possible for the type of signal feed to change during the course of a DVD playback.
-
Page 26: Tuner Operation
DVD player (usually with the “Audio Select” button or in a menu screen on the disc) to send a full 5.1 feed to the AVR 135. It is also possible for the type of signal feed to change during the course of a DVD playback.
-
Page 27: Recording
Repeat the procedure as needed until all channels requiring adjustment have been set. When all adjust- ments have been made and no further adjustments are made for five seconds, the AVR 135 will return to normal operation. The channel output for any input may also be adjusted using the full-OSD on-screen menu system.
-
Page 28: Advanced Features
Turn-On Volume Level As is the case with most audio/video receivers, when the AVR 135 is turned on, it will always return to the volume setting in effect when the unit was turned off. However, you may prefer to always have the AVR 135 turn on at a specific setting, regardless of what was last in use when the unit was turned off.
-
Page 29: Semi-Osd Settings
Both of those options are possible with the AVR 135. To change the length of time that the semi-OSD displays remain on the screen, or to turn them off, go to…
-
Page 30: Programming The Remote
Auto Search Method. Auto Search Method If the unit you wish to include in the AVR 135’s remote is not listed in the code tables in this manual or if the code does not seem to operate properly, you may wish…
-
Page 31: Programmed Device Functions
Function List and then look in the column for the device you are controlling. For example, button number 44 is the Direct button for the AVR 135, but it is the “Favorite” button for many cable television boxes and satellite receivers. Button number 30 is the Delay button for the AVR 135, but the Open/Close button for CD players.
-
Page 32: Volume Punch-Through
TV viewing, you may wish to have the AVR 135’s volume activated, although the remote is set to run the TV. Either the AVR 135 or TV volume control may be associated with any of the remote’s devices.
-
Page 33: Function List
No. Button Name AVR Function Power On Power On Power On Power Off Power Off Power Off Mute Mute Mute AVR Select AVR Select DVD Input Select DVD Select CD Input Select CD Select Tape Tape Input Select Tape Select VID 1 (VCR) Video 1 Select VCR Select…
-
Page 34
FUNCTION LIST No. Button Name AVR Function 44 Direct Direct Tuner Entry Angle 45 Clear Clear Clear 46 Preset Up Preset Tune Up Slow Forward +10 47 Tuning Down Tune Down Prev Chapter Track Increment 48 OSD 49 D. Skip Disc Skip 50 Preset Down Preset Tune Down… -
Page 35: Setup Code Tables
Manufacturer/Brand Setup Code Number AIWA A MARK ADMIRAL AKAI AMPRO ANAM BLAUPUNKT BROKSONIC CANDLE CAPEHART CENTURION CENTRONIC CITIZEN CLASSIC CONCERTO CONTEC CORANDO CORONADO CRAIG CROWN CURTIS MATHES DAEWOO DAYTRON DIGI LINK DYNASTY DYNATECH ELECTROHOME EMERSON FUNAI FUTURETECH GOLDSTAR/LG GRUNDIG HALL MARK HARMAN KARDON HITACHI INFINITY…
-
Page 36
SETUP CODE TABLE: TV Manufacturer/Brand Setup Code Number LOGIK LUXMAN MAGNAVOX MARANTZ MATSUI MEMOREX METZ MINERVA MITSUBISHI NATIONAL NIKEI ONKING ONWA OPTONICA ORION PANASONIC PHILCO PHILIPS PIONEER PORTLAND PROSCAN PROTON QUASAR RADIO SHACK REALISTIC RUNCO SAMPO SAMSUNG SANYO SCOTT SEARS SHARP SIEMENS SIGNATURE… -
Page 37
Manufacturer/Brand Setup Code Number TEKNIKA TELERENT TERA THOMSON TOSHIBA TOTEVISION VIDEO CONCEPTS VIDTECH WARDS YAMAHA YORK YUPITERU ZENITH ZONDA SETUP CODE TABLE: TV SETUP CODES… -
Page 38
SETUP CODE TABLE: VCR Manufacturer/Brand Setup Code Number AIWA AKAI 048 108 109 126 AMPRO AUDIO DYNAMICS 018 048 BROKSONIC 110 147 CANDLE 134 135 CANON 135 140 CAPEHART CITIZEN CRAIG 045 116 DAEWOO 017 094 104 DAYTRON 018 048 DYNATECH EMERSON 013 040 042 110 112… -
Page 39
Manufacturer/Brand Setup Code Number SALORA SAMSUNG 045 051 095 105 109 SANSUI 048 116 147 SANYO 017 020 SCOTT 110 112 SEARS 017 020 SHARP 129 156 SONY 080 129 SOUNDESIGN SYLVANIA SYMPHONIC TANDY 017 040 TASHICO TATUNG TEAC 040 048 TEKNIKA THOMAS TiVo… -
Page 40
SETUP CODE TABLE: CD Manufacturer/Brand Setup Code Number ADCOM AIWA AKAI AUDIO TECHNICA AUDIOACCESS AUDIOFILE CALIFORNIA AUDIO CAPETRONIC CARRERA CARVER CASIO CLARINETTE DENON EMERSON FISHER FRABA FUNAI GENEXXA GOLDSTAR/LG HAITAI HARMAN KARDON HITACHI INKEL JC PENNEY JENSEN KENWOOD LOTTE LUXMAN MAGNAVOX MARANTZ MCINTOSH… -
Page 41
Manufacturer/Brand Setup Code Number REALISTIC SANSUI SANYO SCOTT SHARP SHERWOOD SONY SOUNDSTREAM SYMPHONIC TAEKWANG TEAC THETA DIGITAL TOSHIBA VECTOR RESEARCH VICTOR WARDS YAMAHA YORK SETUP CODE TABLE: DVD Manufacturer/Brand Setup Code Number APEX DIGITAL DENON 019 051 003 004 GOLDSTAR/LG HARMAN KARDON 005 055 064 066 MAGNAVOX… -
Page 42
SETUP CODE TABLE: SAT Manufacturer/Brand Setup Code Number ALPHASTAR ALPHASTAR DBS ALPHASTAR DSR BIRDVIEW CHANNEL MASTER 320 321 CHAPARRAL 315 316 CITOH DRAKE 313 317 DX ANTENNA 331 352 ECHOSTAR 395 397 ELECTRO HOME FUJITSU 324 329 GENERAL INSTRUMENT 303 311 HITACHI DBS HOUSTON TRACKER HUGHES… -
Page 43
Manufacturer/Brand Setup Code Number HARMAN KARDON SETUP CODE TABLE: CBL Manufacturer/Brand Setup Code Number 001 011 ALLEGRO AMERICAST ARCHER BELCOR CABLE STAR 033 113 CITIZEN COLOUR VOICE 085 090 DIGI EAGLE EASTERN 066 070 ELECTRICORD EMERSON FOCUS G.I. 001 011 017 096 097 GC ELECTRONICS GEMINI 032 060… -
Page 44
SETUP CODE TABLE: CBL Manufacturer/Brand Setup Code Number REMBRANT SAMSUNG 072 186 SCIENTIFIC ATLANTA 183 203 221 222 SEAM SIGNATURE 001 188 SPRUCER 053 081 177 189 STARCOM 002 011 163 STARGATE TANDY TELECAPATION TEXSCAN TIMELESS TOCOM 170 205 UNITED CABLE UNIVERSAL 033 034 039 042 113 VIDEOWAY… -
Page 45: Troubleshooting Guide
In addition to the items shown above, additional information on troubleshooting possible problems with your AVR 135, or installation-related issues, may be found in the list of «Frequently Asked Questions» which is located in the Product Support section of our Web site at www.harmankardon.com.
-
Page 46: Technical Specifications
AVR 135 TECHNICAL SPECIFICATIONS Audio Section Stereo Mode Continuous Average Power (FTC) 50 Watts per channel, 20Hz–20kHz, @ <0.07% THD, both channels driven into 8 ohms Six-Channel Surround Modes Power per Individual Channel Front L&R channels: 40 Watts per channel @ <0.07% THD, 20Hz–20kHz into 8 ohms…
-
Page 47: Index
5-Channel Stereo 17, 24 6-Channel/8-Channel Direct Input 8, 12, 22 7-Channel Stereo 17, 24 AC Power Connections 8, 13 Advanced Features 28–29 Advanced Select Menu 28 Antenna Terminals 7, 8, 12 Audio Equipment Connections 7, 8, 12 Auto Mode Tuning 6, 11, 26 Auto Search Method 30 Cable television 4, 8, 12, 43–44 CD 7, 12, 40–41…
-
Page 48
® 250 Crossways Park Drive, Woodbury, New York 11797 www.harmankardon.com © 2004 Harman International Industries, Incorporated Part No. CQX1A949Z 12/04…
инструкцияHarman Kardon AVR 135

DIGITAL LOGIC 7
VID 1
DVD
CD
FMAM
TAPE
6 8 CH
VID 2
VID 3
PRO LOGIC
3 STEREO DSP
5 CH. STEREO
SURR. OFF
C
AVR 135
AUDIO/VIDEO RECEIVER
OWNER’S MANUAL
Power for the Digital Revolution
.
®
®
AVR 135 OM 12/3/04 12:11 PM Page 1
Посмотреть инструкция для Harman Kardon AVR 135 бесплатно. Руководство относится к категории приемники, 8 человек(а) дали ему среднюю оценку 7.6. Руководство доступно на следующих языках: английский. У вас есть вопрос о Harman Kardon AVR 135 или вам нужна помощь? Задайте свой вопрос здесь
Harman Kardon AVR 135 является ресивером, который предназначен для использования в домашней аудио системе. Этот ресивер имеет мощность 500 Ватт на канал и поддерживает декодирование звука в формате Dolby Digital и DTS. Он также оснащен встроенным FM/AM тюнером с возможностью сохранения до 30 станций.
Harman Kardon AVR 135 обладает интерфейсами для подключения различных аудио и видео устройств, включая DVD-плееры, телевизоры, игровые консоли и компьютеры. Ресивер имеет разъемы для подключения акустических систем, включая сабвуфер. Он также оснащен разъемами для подключения наушников.
Этот ресивер имеет компактный размер и стильный дизайн, который подходит для любого интерьера. Он оснащен удобным пультом дистанционного управления, что облегчает управление аудио системой.
Harman Kardon AVR 135 поддерживает различные звуковые режимы, такие как Dolby Pro Logic II и Virtual Speaker, позволяющие получить пространственный звук и иммерсивный звуковой опыт.
Этот ресивер также имеет функцию автоматической калибровки акустики, которая помогает оптимизировать звуковое пространство в помещении и достичь оптимального качества звука.
В целом, Harman Kardon AVR 135 является мощным и многофункциональным ресивером, предоставляющим высококачественный звуковой опыт. Он подходит для использования в домашней аудио системе и отличается надежностью и долговечностью.
Главная
Не можете найти ответ на свой вопрос в руководстве? Вы можете найти ответ на свой вопрос ниже, в разделе часто задаваемых вопросов о Harman Kardon AVR 135.
Когда звук считается слишком громким?
Уровень звука выше 80 децибел может нанести вред слуху. Уровень звука выше 120 децибел может нанести прямое повреждение слуху. Вероятность повреждения слуха зависит от частоты и продолжительности прослушивания.
Могут ли устройства разных марок подключаться друг к другу при помощи Bluetooth?
Да, Bluetooth — универсальный метод, позволяющий различным устройствам, оснащенным Bluetooth, подключаться друг к другу.
Что такое Bluetooth?
Bluetooth — это способ обмена данными по беспроводной сети между электронными устройствами с помощью радиоволн. Расстояние между двумя устройствами обменивающимися данными в большинстве случаев составляет не более десяти метров.
Что такое HDMI?
HDMI расшифровывается как «интерфейс для мультимедиа высокой четкости». Кабель HDMI используется для передачи аудио- и видеосигналов между устройствами.
Как лучше всего выполнять чистку приемник?
Для удаления отпечатков пальцев лучше всего использовать слегка влажную салфетку для уборки или мягкую чистую ткань. Пыль в труднодоступных местах лучше всего удаляется потоком сжатого воздуха.
Что такое Dolby Atmos?
Dolby Atmos — это технология, которая обеспечивает отражение звука от потолка к месту нахождения слушателя. Это позволяет создать эффект 5.1 при помощи всего лишь одного динамика.
Инструкция Harman Kardon AVR 135 доступно в русский?
К сожалению, у нас нет руководства для Harman Kardon AVR 135, доступного в русский. Это руководство доступно в английский.
Не нашли свой вопрос? Задайте свой вопрос здесь