Guitar Rig 5 не нуждается в особом представлении, о её возможностях знает практически каждый гитарист, использующий цифровую обработку звука. Большое количество разнообразных эффектов, программные аналоги известных усилителей, настройка тона, встроенный проигрыватель для игры под «минусову» и много других полезных функций и возможностей, позволяющие в полной мере раскрыть реалии своего творчества.
К сожалению, очень часто, пользователи при первом знакомстве с Guitar Rig 5 сталкиваются с проблемой – «запустил программу, подключил гитару, но она не звучит». Данная, пошагово описанная инструкция, поможет преодолеть эту проблему и наслаждаться новым звучанием своей гитары. Рассматривается вариант настройки в ПК, необорудованном отдельной звуковой картой.

Скриншот 1

Скриншот 2

Скриншот 3

Скриншот 4
1. ASIO. Это программа создаёт оптимизацию звукового потока — на вход и на выход. Улучшает качество звучания и снижает задержку передачи аудиопотока. То есть гитара будет звучать без запаздывания. Программа не является платной и доступна для скачивания на официальном сайте. ASIO – необходимо скачать и установить на ПК, перед тем, как запускать и настраивать Guitar Rig.
2. Настройка аудио. Теперь, когда ASIO установлен, можно перейти непосредственно к настройкам программы. Для этого нужно зайти в пункт <Audio and MIDI Settings> меню <File> (скриншот 1). В открывшейся опции (скриншот 2) в графе <DRIVER> из ниспадающего меню нужно выбрать <ASIO>. Эта настройка указывает, какой звуковой драйвер программа должна использовать (скриншот 3). В противном случае был бы задействован стандартный звуковой драйвер Windows, который уступает по качеству звучания.
3. Если сделано всё правильно, в трее появляется значок подключенного в Guitar rig драйвера. В этой же опции, нужно кликнуть по кнопке <ASIO config>, и также сделать необходимые настройки (скриншот 4). Предварительно нужно подключить гитару в линейный вход ПК. В списке подключенных устройств не должно быть крестиков, указывающих на то, что устройство отключено. Их появление может быть вызвано тем, что параллельно на компьютере запущено другое ПО, которое также использует данные устройства. Его необходимо закрыть и перезапустить Guitar Rig.
4. Затем, <Размер буфера> — выставляется опытным путём. Чем меньше его значение, тем меньше запаздывание, но ухудшается стабильность звучания и может появиться характерное потрескивание. Если больше – качество звука лучше, но увеличивается время задержки. Нужно найти оптимальный вариант. Эта настройка зависит от мощности ПК.
5. <Смещение буфера> — рекомендуется выставить в 0 мс.
6. Если все действия выполнены верно, гитара уже должна звучать в Guitar Rig. Можно пользоваться установленными пресетами <Presets>, перейти к стилям <Styles> и выбрать интересующий, например, <Metal>. Далее перейти в нижнюю панель и выбрать конфигурацию усилителя и эффектов.
7. Если одновременно с обработанным звуком слышится чистый звук (без эффектов), необходимо в системной настройке звука в Windows отключить линейный вход (иконка динамика в трее -> значок динамики -> вкладка <Уровни>).

Ну, вот и всё, теперь можно приступать к гитарному искусству с новым звучанием.

Что делать, если в наличии есть гитара и компьютер и возникает желание записать сочинённое Вами произведение? В этом нам поможет программа Guitar Rig. Она является многофункциональным гитарным процессором. На данный момент актуальной является пятая версия (Guitar Rig 5) этого программного продукта. Для тех, кто не знаком с данной программой ниже приведён скрин интерфейса.
Интерфейс программы Guitar Rig 5
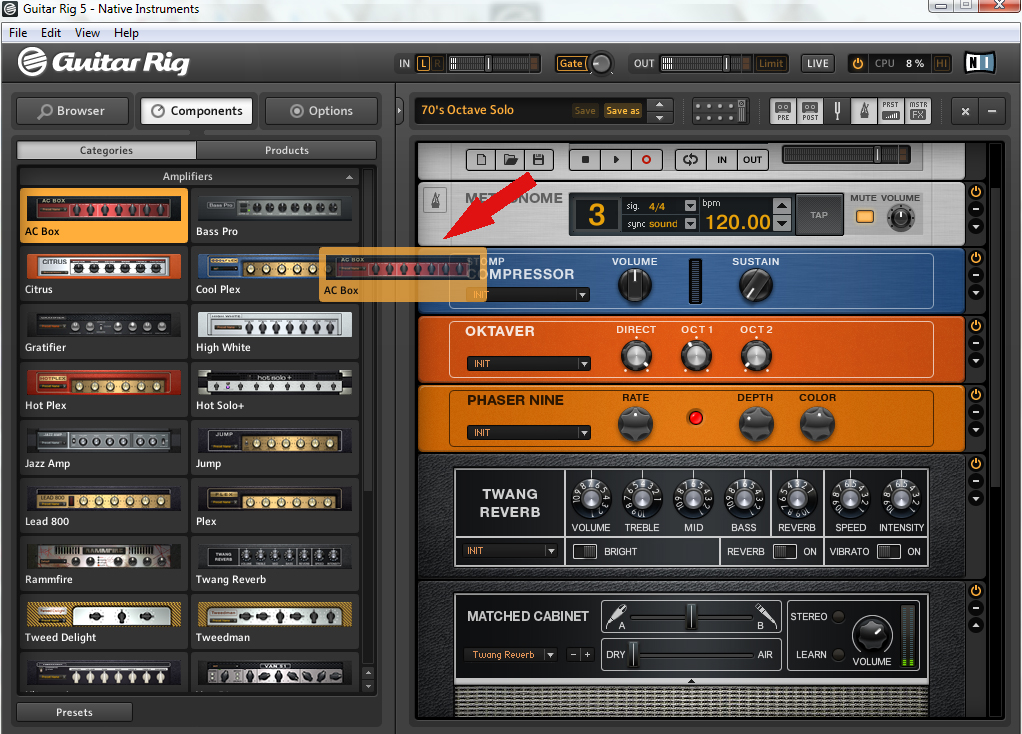
Целью данной статьи является обзорное ознакомление с программой Guitar Rig. Рабочая область программы разделена на две части. Слева у нас находится набор компонентов, справа рабочая область с выбранным инструментарием. Мы с Вами уже рассматривали различные примочки для гитар. Так вот в данном случае все эффекты скомпанованы по категориям, т.е. Вы можете найти несколько различных видов дисторшна или дилэя. Из них можно строить разнообразные цепи эффектов. Также у Вас есть возможность выбирать тип гитарного усилителя («голову») и подходящий к нему кабинет. На изображении как раз показан список усилителей, а понравившийся Вам просто перетаскивается в рабочую область справа для дальнейшей работы.
Промо ролик программы Guitar Rig
Для каждого элемента цепи эффектов есть кнопка байпас и различные тонкие настройки. Новичкам рекомендую использовать стандартные настройки готовых программных прессетов для различных стилей музыки, если Вы уже более опытный гитарист, то смело можете менять настройки, крутить различные ручки.
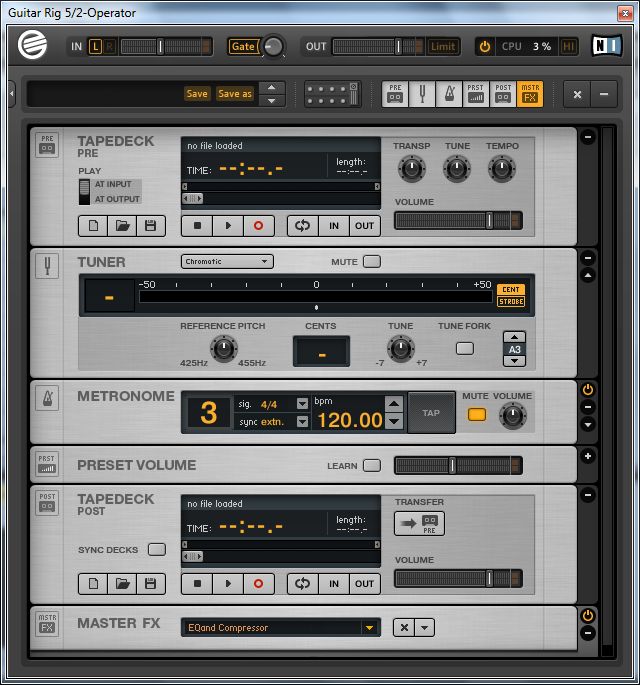
Рассмотрим более подробно рабочую область справа. В ней есть несколько основных элементов: верхняя дека (tapedeck pre), тюнер, метроном, нижняя дека (tapedeck post). Верхняя дека предназначена для записи чистого сигнала гитары, а нижняя дека для обработанного. Следовательно, вы можете записать чистый звук гитары и потом экспериментировать с ним. Накладывая различные эффекты и применяя разные настройки. Также в верхнюю деку можно поместить какой-то файл для проигрывания. Например, партию барабанов. И Вы спокойно сможете играть под ударные и записывать свою гитарную партию.
Я бы порекомендовал данную программу начинающим гитаристам. Вы только купили гитару, слышали о разных эффектах для гитары, но на практике не пробовали их. У Вас есть отличная возможность с программой Guitar Rig поэкспериментировать с этими эффектами, выстроить из них цепь и чётко определить для себя, какие же примочки Вам именно нужны.
Описать все возможности программы Guitar Rig в небольшом обзоре невозможно. Различных эффектов и настроек здесь огромное количество. Наша цель – познакомить Вас с этой программой. А Вам уже предстоит пробовать, экспериментировать, что-то менять и находить свой звук. И я думаю Вы получили начальные знания о том, как пользоваться программой Guitar Rig.
Запись обработка гитары в Guitar Rig
Кстати, для тех, кто интересуется элитной недвижимостью, советую отличный поселок горки 8.
- Manuals
- Brands
- Native Instruments Manuals
- Software
- Guitar Rig 5
- Application reference
-
Contents
-
Table of Contents
-
Bookmarks
Quick Links
Related Manuals for Native Instruments Guitar Rig 5
Summary of Contents for Native Instruments Guitar Rig 5
-
Page 1
Application Reference… -
Page 2
The information in this document is subject to change without notice and does not repre- sent a commitment on the part of Native Instruments GmbH. The software described by this document is subject to a License Agreement and may not be copied to other media. -
Page 3
Contact Germany Native Instruments GmbH Schlesische Str. 29-30 D-10997 Berlin Germany www.native-instruments.de Native Instruments North America, Inc. 6725 Sunset Boulevard 5th Floor Los Angeles, CA 90028 www.native-instruments.com © Native Instruments GmbH, 2011. All rights reserved. -
Page 4: Table Of Contents
Loading and Saving Rack Presets …………….29 4.1.4 Importing Presets …………………. 29 4.1.5 Exporting Presets ………………….. 30 4.1.6 Saving New Rack Presets ………………30 4.1.7 Tags on Three Levels ………………..32 4.1.8 Tagging Presets ………………….33 GUITAR RIG 5 — Application Reference — 4…
-
Page 5
Plug-In Location ………………….54 7.1.3 Setting Up a Guitar or Bass Track …………….54 7.1.4 Synchronization ………………….55 7.1.5 Total Recall ………………….. 55 Automating Parameters ………………….55 7.2.1 The Automation List ………………..55 GUITAR RIG 5 — Application Reference — 5… -
Page 6
Menu Bar ……………………68 File ……………………….. 68 Edit ……………………….. 69 View ……………………….69 Help ……………………….70 10 Audio and MIDI Settings ……………….. 71 10.1 Audio ……………………….71 11 Keyboard Shortcuts ………………..74 GUITAR RIG 5 — Application Reference — 6… -
Page 7: Introduction
Welcome to the GUITAR RIG 5 Application Reference! About this Manual This manual covers all elements of GUITAR RIG 5 in detail. If you want to get deeply into the software, this is the document to refer to. The following documents are also available: ▪…
-
Page 8: Safety Considerations
For your protection, set all output levels to a minimum before using GUITAR RIG 5. Gradually raise the volume controls while mu- sic is playing to set the desired listening level. If you experience any hearing problems or persistent ringing in the ears, consult an audiologist immediately.
-
Page 9: User Interface
Global Header The Global Header (visible both in Standard view and in Live view) assembles the main input and output controls as well as the system performance display of GUITAR RIG 5. GUITAR RIG Global Header GUITAR RIG 5 — Application Reference — 9…
-
Page 10: Input And Output
▪ The Learn function automatically sets the optimum threshold. Double click the threshold knob and do not play your instrument for some seconds: GUITAR RIG 5 analyses your signal and sets the threshold just above any residual noise.
-
Page 11
You might need to disable some components or turn off high quality mode to save CPU power. Then re-activate the audio engine by clicking the Power button. GUITAR RIG 5 — Application Reference — 11… -
Page 12: Live View
Live view. It hides the Rack and instead puts the most important perform- ance features into a clear layout. The Live view is perfect for on-stage use, consolidating the following elements: ▪ Global Header ▪ Current Preset List as defined in the Preset Browser GUITAR RIG 5 — Application Reference — 12…
-
Page 13: Toolbar And Rack
Toolbar and Rack If you are in Live view, please return to Standard view by clicking on the LIVE button to continue our tour through the user interface of GUITAR RIG 5. GUITAR RIG 5 — Application Reference — 13…
-
Page 14
Preset List, even if it is not visible, by clicking on the Up/Down arrows. Save makes changes to the loaded preset permanent, overriding the stored settings ▪ with the current ones. Factory Presets and User Presets are now stored in separate folders. GUITAR RIG 5 — Application Reference — 14… -
Page 15: Virtual Rig Kontrol
The Rack holds all the components that are processing your sound — giving a clear over- view of the signal flow. It is the heart of GUITAR RIG 5’s functionality, and is incredibly easy to use. See section ↑3, Components and the Rack…
-
Page 16: Sidekick
↑8.1.3, Linking External MIDI Controllers to the Virtual Rig Kontrol details. SideKick About a third of the user interface is occupied by the SideKick, a multi-functional area on the left hand side of the screen. GUITAR RIG 5 — Application Reference — 16…
-
Page 17
▪ The Preset Browser (1) allows filtering of all available Rack Presets on three levels; you can organize your presets and perform a text search to easily find your presets. See section ↑3, Components and the Rack on working with presets. GUITAR RIG 5 — Application Reference — 17… -
Page 18
▪ The Options screen (3) serves to configure external controllers and their assignments, as well as preferences such as the window height, the path to presets, and other de- tails. See section ↑8, Options on setting up MIDI controllers and other options. GUITAR RIG 5 — Application Reference — 18… -
Page 19: Components And The Rack
Components and the Rack Building a Rack from Scratch On the first start, the Rack of GUITAR RIG 5 is empty. You will hear dry, slightly pre-am- plified guitar sound when you play: an invitation to try out the various components for yourself.
-
Page 20: The Component Pool
3.1.2 Setting Up an Amp The fastest way to start designing sounds with GUITAR RIG 5 is by adding an amp to the Rack. If you want to quickly create a guitar sound, try the Jump amplifier. ► Drag the amp’s icon from the Component Pool to the Rack. You can also double click the icon.
-
Page 21
Mics, Control Room, Control Room Pro, and Matched Cabinets. Another option is to use the pull down menu included in the matched cabinet. Here you will see the full list of available cabinets. You can also use the plus/minus tabs to toggle through the list. GUITAR RIG 5 — Application Reference — 21… -
Page 22: Basics For Rack Building
The audio signal runs through the chain of rack modules from top to bottom, except if you are using special tools that create parallel processing paths, like the Split. See the Compo- nents Reference for details on these tools. GUITAR RIG 5 — Application Reference — 22…
-
Page 23
▪ If you don’t want to replace another component when using Drag & Drop, make sure you drop it beneath the other components, which is indicated by an orange line in- stead of the rectangle. GUITAR RIG 5 — Application Reference — 23… -
Page 24
▪ The On/Off button allows for true bypassing of the module — no power is con- sumed when it is turned off. ▪ The (Minus) button minimizes the module’s display. ▪ The triangular arrow toggles its expert panel, if available. GUITAR RIG 5 — Application Reference — 24… -
Page 25: Working With Presets
Controllers), which is indicated by a small padlock symbol. These will not be affected by controller assignments stored in a Rack Preset. GUITAR RIG 5 ships with a huge amount of Rack Presets of any style, and you can easily create more as you see fit.
-
Page 26: The Preset Browser
Working with Presets The Preset Browser The Preset Browser The Preset Browser Click on the Browser button to open the Preset Browser — a powerful tool for finding and organizing all your Rack Presets. GUITAR RIG 5 — Application Reference — 26…
-
Page 27: Tags And The Preset List
Clicking on the column headers will sort by the according values, first ascending then de- scending. GUITAR RIG 5 — Application Reference — 27…
-
Page 28: The Search Engine
The new search engine will help you to quickly find a particular preset by entering part of its name. The search bar, situated between the Preset Browser and the Preset List, is al- ways ready to process your requests. GUITAR RIG 5 — Application Reference — 28…
-
Page 29: Loading And Saving Rack Presets
Rack or at the bottom of the SideKick. 4.1.4 Importing Presets There are two ways of importing presets into GUITAR RIG 5 — either of them can be the most convenient way to go: GUITAR RIG 5 — Application Reference — 29…
-
Page 30: Exporting Presets
The Preset Browser ▪ When you drag and drop preset files into the Preset Browser, they will be copied to the Sounds folder of GUITAR RIG 5 and get the tag(s) that were selected before. ▪ After selecting from the GUITAR RIG 5 menu, you can copy presets to File >…
-
Page 31
User saved presets are marked with a user icon inside the preset lists. Custom presets can be spotted in GUITAR RIG 5 by just looking at the preset lists.To delete a pre- set, right-click (ctrl-click) on it in the Preset List and select… -
Page 32: Tags On Three Levels
No preset will be harmed by deleting a tag — all presets are still in the Preset List when no tag is selected. ► To delete a preset, right-click on it in the Preset List and select Remove from disk. GUITAR RIG 5 — Application Reference — 32…
-
Page 33: Tagging Presets
Any preset can carry an unlimited number of tags! Adding tags to presets works simply with drag and drop: ► Click on one of the presets in the Preset List and drag it onto one of the tags in the left column of the Preset Browser. GUITAR RIG 5 — Application Reference — 33…
-
Page 34
▪ After removing all tags from a preset, it is still available in the Preset Browser when you de-select all tags. ▪ To really delete a preset, highlight it, right-click and select Remove from disk. GUITAR RIG 5 — Application Reference — 34… -
Page 35: Preset Info Page
After selecting one of the tags, the Preset List will change showing all the pre- sets containing this tag. Deleting a preset from the Preset List will remove the cur- rently selected tag from it. GUITAR RIG 5 — Application Reference — 35…
-
Page 36: Component Presets
Working with Presets Component Presets Component Presets GUITAR RIG 5 comes with plenty of factory presets for components, providing a timesav- ing alternative to dialing in classic sounds for each component by hand. 4.3.1 Basics A Component Preset contains the settings for a single component. After selecting an item of the Component Pool, press the Presets tab: a list of available Component Presets is dis- played below in the SideKick.
-
Page 37
Component Preset anywhere into the Rack. Component Presets and the Rack Each rack module displays the name of its current Component Preset in a small box on its left hand side, the Component Preset Display. GUITAR RIG 5 — Application Reference — 37… -
Page 38
Once you have found a good setting for a component you use regularly, you will want to save your own Component Preset. To do this you will want to create a Bank. The Banks are user-defined categories where Component presets are stored. GUITAR RIG 5 — Application Reference — 38… -
Page 39
► From the component pull down menu choose Save as → The new preset will be titled New Preset until a title is chosen. ► To save any changes to the preset currently displayed, select Save from the component menu. GUITAR RIG 5 — Application Reference — 39… -
Page 40
By clicking on the column headers of the list of Component Presets, you can sort it by List Number (#), Name, and Rating. Save a quality rating with each preset by clicking on one of the 5 stars right beside its name. This can always be changed later. GUITAR RIG 5 — Application Reference — 40… -
Page 41: The Rack Tools
The Rack Tools Tapedeck Pre The Rack Tools The following sections will introduce you to the Rack Tools of GUITAR RIG 5: Tapedeck Pre and Post, Tuner and Metronome. Tapedeck Pre The Tapedeck Pre Rack Tool Tapedeck Pre is the tool for playing back and recording audio at the beginning of GUITAR RIG’s signal chain (except when…
-
Page 42: Recording
Recording your guitar will pick up the processed sound, just as you hear it at the output. Use Tapedeck Post if you want to record your guitar part with the actual GUITAR RIG 5 — Application Reference — 42…
-
Page 43: Interaction With Tapedeck Pre
The Rack Tools Tapedeck Post sound, e.g. for using it ”outside of” GUITAR RIG 5. Files you import and play back will not be processed, which makes Tapedeck Post ideal for playing drum loops and your own backing tracks. Its controls are similar to Tapedeck Pre, except that it has no Transpose (TRANSP),…
-
Page 44: Tuner
-1. TUNE FORK produces a reference tone. To select its pitch, click on the note field to the ▪ right and drag up or down, or click on the Arrow buttons. GUITAR RIG 5 — Application Reference — 44…
-
Page 45: Metronome And Synchronization
▪ sound: The current tempo is stored with the Rack content when you save a preset. In this setting, the Metronome loads the tempo information when you load a preset. This is useful for preparing presets with synchronized effects e.g. for a live show. GUITAR RIG 5 — Application Reference — 45…
-
Page 46: Preset Volume
▪ Use the crossfader to switch between the Dry signal and the Wet (affected) signal. ▪ Use the slider to control the volume level of the wet signal. GUITAR RIG 5 — Application Reference — 46…
-
Page 47: Master Fx
▪ Configure your Master FX chain from factory or user presets. ▪ Click on the (cross) to empty the whole Master FX section. ▪ Click on the arrow to minimize the Master FX section. GUITAR RIG 5 — Application Reference — 47…
-
Page 48
Tools section of the Component Pool. New Banks may also be created similarly to other Component Presets. Just as the other Rack Tools, the Master FX can’t be selected or highlighted. GUITAR RIG 5 — Application Reference — 48… -
Page 49: The Rig Kontrol
RIG 5. Nine freely assignable switches and an expression pedal are at your disposal right after connecting it. Note that you can use the Rig Kontrol to control GUITAR RIG 5, even if you do not use it as your audio interface. For detailed information about the hardware and how to use the integrated audio interface, refer to the Hardware Reference.
-
Page 50: Assigning Functions To The Rig Kontrol
If you operate a switch or the pedal of the (physical) RIG KONTROL, both the Virtual Rig Kontrol and the assigned function will react to it. The label of Switch 1 is dragged onto the Volume I knob of the Plex. GUITAR RIG 5 — Application Reference — 50…
-
Page 51: Configuring Assignments
Kontrol. Click on the arrow button to reveal the assignment, then click on a label or switch on the Virtual Rig Kontrol to select it. The functions assigned to this particular control are now shown in the expert panel. GUITAR RIG 5 — Application Reference — 51…
-
Page 52
▪ The left bracket defines the value mapped to the controller at zero; the right bracket defines the value mapped to the controller at maximum. GUITAR RIG 5 — Application Reference — 52… -
Page 53: Assigning Functions To External Controllers
Rack. If the external footswitch you are using is “on” only while pressed (instead of switching be- tween “on” and “off”), activate Toggle mode in the context menu of the according input. GUITAR RIG 5 — Application Reference — 53…
-
Page 54: Using Guitar Rig In A Host
Setting Up a Guitar or Bass Track To setup a track to be processed by GUITAR RIG 5, just create an audio track and insert GUITAR RIG 5 as an effect. The audio track will hold the bare, unprocessed signal and your sound will be routed through GUITAR RIG before reaching the output stage of your DAW.
-
Page 55: Synchronization
(because it works both with audio and MIDI), you should use it as a signal process- ing / effects insert. 7.1.4 Synchronization If you want GUITAR RIG 5 to be in time with your host, remember to turn on Ext mode in the Metronome (see section ↑5.4, Metronome and Synchronization). This will turn off the speed setting of GUITAR RIG and use the host’s tempo as a master.
-
Page 56: Automating Parameters In Apple Logic Pro
In the View menu, turn on track automation for the selected track, so you can see what you are doing. Change the track to Latch Touch mode Start playback. GUITAR RIG 5 — Application Reference — 56…
-
Page 57: Sidechaining
In GUITAR RIG 5, a Sidechaining control is available in the Envelope, LFO, Input Level in the Modifier section and in the Stomp Compressor, Tube Compressor, and in the all new Fast Comp from the DYNAMICS section.
-
Page 58: Options
TAR RIG 5 reacts to MIDI Program Change messages regardless of assignments: They switch presets within the current Preset List. Controller Assignment the Easy Way The quickest way to control any knob with a MIDI device is provided by its context menu: GUITAR RIG 5 — Application Reference — 58…
-
Page 59: Setting Up External Midi Controllers
(instead of switching between “on” and “off” each time you press it), this will be the be- havior of the assigned parameter as well. If you want to change it, activate Toggle Mode the Menu of the according controller. GUITAR RIG 5 — Application Reference — 59…
-
Page 60: Assigning Functions To Controllers
0), the right one the value mapped to the controller at maximum (MIDI value 127). ▪ As switches are either on or off, the brackets can be used to define the difference be- tween the actual knob positions they trigger. GUITAR RIG 5 — Application Reference — 60…
-
Page 61
The Controller menu Even if you prefer drag and drop, the menu is necessary to assign functions that are not controlled by any rack module, e.g., switching presets. GUITAR RIG 5 — Application Reference — 61… -
Page 62: Linking External Midi Controllers To The Virtual Rig Kontrol
8.1.3 Linking External MIDI Controllers to the Virtual Rig Kontrol The Virtual Rig Kontrol is a perfectly integrated component of GUITAR RIG 5, sporting pre-assigned functions for many presets and a convenient display for all its assignments, especially in Live view. If your external MIDI controller features a comparable set of con- trols, it can make sense to map it to the Virtual Rig Kontrol and then use the latter for assigning functions instead.
-
Page 63
“off” as soon as it is released. This can be very useful when triggering effects. In GUITAR RIG 5, each controller input can be set to work in “Hold mode” via its context menu to reflect this difference. Just right-click any label of the Virtual Rig Kontrol, or click on Menu in any entry of the MIDI Controller list to call it up. -
Page 64: Preferences
In most cases, turning off Hold mode will enable them to work in the other mode as well. Preferences Under the Options tab, click on Preferences to configure GUITAR RIG 5. GUITAR RIG 5 — Application Reference — 64…
-
Page 65
Options Preferences The Preferences Menu It offers the following settings: Window Height: Use this control to set the height of the GUITAR RIG 5 window. You can ▪ choose among . The actual dimensions in pixels (given in Small Medium Large brackets) depend on the physical display resolution of your monitor. -
Page 66: Rig Kontrol 1 Support
8.2.1 Rig Kontrol 1 Support The earliest Rig Kontrol can still be used for controlling GUITAR RIG 5, with the natural limitation of having only one audio input channel, of course. The second channel trans- mits the unit’s control signal and is therefore not available. To activate Rig Kontrol 1 com-…
-
Page 67
Options Preferences Left channel blocked by Rig Kontrol GUITAR RIG 5 — Application Reference — 67… -
Page 68: Menu Bar
File Menu Bar GUITAR RIG 5 is designed in a way that — once set up — you will hardly ever need to use the Menu bar. Most functions are easier to access another way, as explained above. How- ever, it may be necessary to change the «Audio and MIDI settings…» in standalone mode.
-
Page 69: Edit
Activates full screen mode, giving you the maximum possible resolution — extremely useful in Live view. Press ESC or F4 to return to normal mode. Hide/Show SideKick Hides or shows the left area of the GUITAR RIG 5 user interface, where Preset Browser, Components Browser and Options are displayed. Hide/Show Live View…
-
Page 70: Help
Open Manual… For access to all available manuals, navigate to your language. Visit GUITAR RIG 5 on the Web… Your permanent bookmark to the GUITAR RIG 5 website, where you find product-related resources, news and entertaining extras! Visit the Knowledge Base…
-
Page 71: Audio And Midi Settings
Choose the correct type of driver for your audio interface. Using ASIO (Windows) / CoreAu- dio (Mac OS X) is strongly recommended. Device Select your audio device from the list. If it doesn’t appear, check if it is connected and its drivers are properly installed. GUITAR RIG 5 — Application Reference — 71…
-
Page 72
SideChain function, this is the place to go. The left column shows the available channels of your audio interface. The entries in the right column are GUITAR RIG 5 — Application Reference — 72… -
Page 73
The left column shows all available MIDI devices , sorted by Input and Output. The entries in the right column are actually menus. By clicking on them, you can turn them on or off. Mind that any devices you want to use to control GUITAR RIG 5 have to be activated (turned On) under Input. -
Page 74: Keyboard Shortcuts
[Delete] Edit Select All [Ctrl]+[A] [Cmd]+[A] View Hide/Show Hints [Ctrl]+[I] [Cmd]+[I] View Full Screen [F4] [F4] View Hide/Show RigKontrol [F3] [F3] View Hide/Show SideKick [F2] [F2] View Hide/Show Live View [F1] [F1] GUITAR RIG 5 — Application Reference — 74…
Guitar Rig 5 не нуждается в особом представлении, о её возможностях знает практически каждый гитарист, использующий цифровую обработку звука. Большое количество разнообразных эффектов, программные аналоги известных усилителей, настройка тона, встроенный проигрыватель для игры под «минусову» и много других полезных функций и возможностей, позволяющие в полной мере раскрыть реалии своего творчества.
К сожалению, очень часто, пользователи при первом знакомстве с Guitar Rig 5 сталкиваются с проблемой – «запустил программу, подключил гитару, но она не звучит». Данная, пошагово описанная инструкция, поможет преодолеть эту проблему и наслаждаться новым звучанием своей гитары. Рассматривается вариант настройки в ПК, необорудованном отдельной звуковой картой.
Скриншот 1
Скриншот 2
Скриншот 3
Скриншот 4
1. ASIO. Это программа создаёт оптимизацию звукового потока — на вход и на выход. Улучшает качество звучания и снижает задержку передачи аудиопотока. То есть гитара будет звучать без запаздывания. Программа не является платной и доступна для скачивания на официальном сайте. ASIO – необходимо скачать и установить на ПК, перед тем, как запускать и настраивать Guitar Rig.
2. Настройка аудио. Теперь, когда ASIO установлен, можно перейти непосредственно к настройкам программы. Для этого нужно зайти в пункт <Audio and MIDI Settings> меню <File> (скриншот 1). В открывшейся опции (скриншот 2) в графе <DRIVER> из ниспадающего меню нужно выбрать <ASIO>. Эта настройка указывает, какой звуковой драйвер программа должна использовать (скриншот 3). В противном случае был бы задействован стандартный звуковой драйвер Windows, который уступает по качеству звучания.
3. Если сделано всё правильно, в трее появляется значок подключенного в Guitar rig драйвера. В этой же опции, нужно кликнуть по кнопке <ASIO config>, и также сделать необходимые настройки (скриншот 4). Предварительно нужно подключить гитару в линейный вход ПК. В списке подключенных устройств не должно быть крестиков, указывающих на то, что устройство отключено. Их появление может быть вызвано тем, что параллельно на компьютере запущено другое ПО, которое также использует данные устройства. Его необходимо закрыть и перезапустить Guitar Rig.
4. Затем, <Размер буфера> — выставляется опытным путём. Чем меньше его значение, тем меньше запаздывание, но ухудшается стабильность звучания и может появиться характерное потрескивание. Если больше – качество звука лучше, но увеличивается время задержки. Нужно найти оптимальный вариант. Эта настройка зависит от мощности ПК.
5. <Смещение буфера> — рекомендуется выставить в 0 мс.
6. Если все действия выполнены верно, гитара уже должна звучать в Guitar Rig. Можно пользоваться установленными пресетами <Presets>, перейти к стилям <Styles> и выбрать интересующий, например, <Metal>. Далее перейти в нижнюю панель и выбрать конфигурацию усилителя и эффектов.
7. Если одновременно с обработанным звуком слышится чистый звук (без эффектов), необходимо в системной настройке звука в Windows отключить линейный вход (иконка динамика в трее -> значок динамики -> вкладка <Уровни>).
Ну, вот и всё, теперь можно приступать к гитарному искусству с новым звучанием.
Что делать, если в наличии есть гитара и компьютер и возникает желание записать сочинённое Вами произведение? В этом нам поможет программа Guitar Rig. Она является многофункциональным гитарным процессором. На данный момент актуальной является пятая версия (Guitar Rig 5) этого программного продукта. Для тех, кто не знаком с данной программой ниже приведён скрин интерфейса.
Целью данной статьи является обзорное ознакомление с программой Guitar Rig. Рабочая область программы разделена на две части. Слева у нас находится набор компонентов, справа рабочая область с выбранным инструментарием. Мы с Вами уже рассматривали различные примочки для гитар. Так вот в данном случае все эффекты скомпанованы по категориям, т.е. Вы можете найти несколько различных видов дисторшна или дилэя. Из них можно строить разнообразные цепи эффектов. Также у Вас есть возможность выбирать тип гитарного усилителя («голову») и подходящий к нему кабинет. На изображении как раз показан список усилителей, а понравившийся Вам просто перетаскивается в рабочую область справа для дальнейшей работы.
Промо ролик программы Guitar Rig
Для каждого элемента цепи эффектов есть кнопка байпас и различные тонкие настройки. Новичкам рекомендую использовать стандартные настройки готовых программных прессетов для различных стилей музыки, если Вы уже более опытный гитарист, то смело можете менять настройки, крутить различные ручки.
Рассмотрим более подробно рабочую область справа. В ней есть несколько основных элементов: верхняя дека (tapedeck pre), тюнер, метроном, нижняя дека (tapedeck post). Верхняя дека предназначена для записи чистого сигнала гитары, а нижняя дека для обработанного. Следовательно, вы можете записать чистый звук гитары и потом экспериментировать с ним. Накладывая различные эффекты и применяя разные настройки. Также в верхнюю деку можно поместить какой-то файл для проигрывания. Например, партию барабанов. И Вы спокойно сможете играть под ударные и записывать свою гитарную партию.
Я бы порекомендовал данную программу начинающим гитаристам. Вы только купили гитару, слышали о разных эффектах для гитары, но на практике не пробовали их. У Вас есть отличная возможность с программой Guitar Rig поэкспериментировать с этими эффектами, выстроить из них цепь и чётко определить для себя, какие же примочки Вам именно нужны.
Описать все возможности программы Guitar Rig в небольшом обзоре невозможно. Различных эффектов и настроек здесь огромное количество. Наша цель – познакомить Вас с этой программой. А Вам уже предстоит пробовать, экспериментировать, что-то менять и находить свой звук. И я думаю Вы получили начальные знания о том, как пользоваться программой Guitar Rig.
Запись обработка гитары в Guitar Rig
Кстати, для тех, кто интересуется элитной недвижимостью, советую отличный поселок горки 8.
- Manuals
- Brands
- Native Instruments Manuals
- Software
- Guitar Rig 5
- Application reference
-
Contents
-
Table of Contents
-
Bookmarks
Quick Links
Related Manuals for Native Instruments Guitar Rig 5
Summary of Contents for Native Instruments Guitar Rig 5
-
Page 1
Application Reference… -
Page 2
The information in this document is subject to change without notice and does not repre- sent a commitment on the part of Native Instruments GmbH. The software described by this document is subject to a License Agreement and may not be copied to other media. -
Page 3
Contact Germany Native Instruments GmbH Schlesische Str. 29-30 D-10997 Berlin Germany www.native-instruments.de Native Instruments North America, Inc. 6725 Sunset Boulevard 5th Floor Los Angeles, CA 90028 www.native-instruments.com © Native Instruments GmbH, 2011. All rights reserved. -
Page 4: Table Of Contents
Loading and Saving Rack Presets …………….29 4.1.4 Importing Presets …………………. 29 4.1.5 Exporting Presets ………………….. 30 4.1.6 Saving New Rack Presets ………………30 4.1.7 Tags on Three Levels ………………..32 4.1.8 Tagging Presets ………………….33 GUITAR RIG 5 — Application Reference — 4…
-
Page 5
Plug-In Location ………………….54 7.1.3 Setting Up a Guitar or Bass Track …………….54 7.1.4 Synchronization ………………….55 7.1.5 Total Recall ………………….. 55 Automating Parameters ………………….55 7.2.1 The Automation List ………………..55 GUITAR RIG 5 — Application Reference — 5… -
Page 6
Menu Bar ……………………68 File ……………………….. 68 Edit ……………………….. 69 View ……………………….69 Help ……………………….70 10 Audio and MIDI Settings ……………….. 71 10.1 Audio ……………………….71 11 Keyboard Shortcuts ………………..74 GUITAR RIG 5 — Application Reference — 6… -
Page 7: Introduction
Welcome to the GUITAR RIG 5 Application Reference! About this Manual This manual covers all elements of GUITAR RIG 5 in detail. If you want to get deeply into the software, this is the document to refer to. The following documents are also available: ▪…
-
Page 8: Safety Considerations
For your protection, set all output levels to a minimum before using GUITAR RIG 5. Gradually raise the volume controls while mu- sic is playing to set the desired listening level. If you experience any hearing problems or persistent ringing in the ears, consult an audiologist immediately.
-
Page 9: User Interface
Global Header The Global Header (visible both in Standard view and in Live view) assembles the main input and output controls as well as the system performance display of GUITAR RIG 5. GUITAR RIG Global Header GUITAR RIG 5 — Application Reference — 9…
-
Page 10: Input And Output
▪ The Learn function automatically sets the optimum threshold. Double click the threshold knob and do not play your instrument for some seconds: GUITAR RIG 5 analyses your signal and sets the threshold just above any residual noise.
-
Page 11
You might need to disable some components or turn off high quality mode to save CPU power. Then re-activate the audio engine by clicking the Power button. GUITAR RIG 5 — Application Reference — 11… -
Page 12: Live View
Live view. It hides the Rack and instead puts the most important perform- ance features into a clear layout. The Live view is perfect for on-stage use, consolidating the following elements: ▪ Global Header ▪ Current Preset List as defined in the Preset Browser GUITAR RIG 5 — Application Reference — 12…
-
Page 13: Toolbar And Rack
Toolbar and Rack If you are in Live view, please return to Standard view by clicking on the LIVE button to continue our tour through the user interface of GUITAR RIG 5. GUITAR RIG 5 — Application Reference — 13…
-
Page 14
Preset List, even if it is not visible, by clicking on the Up/Down arrows. Save makes changes to the loaded preset permanent, overriding the stored settings ▪ with the current ones. Factory Presets and User Presets are now stored in separate folders. GUITAR RIG 5 — Application Reference — 14… -
Page 15: Virtual Rig Kontrol
The Rack holds all the components that are processing your sound — giving a clear over- view of the signal flow. It is the heart of GUITAR RIG 5’s functionality, and is incredibly easy to use. See section ↑3, Components and the Rack…
-
Page 16: Sidekick
↑8.1.3, Linking External MIDI Controllers to the Virtual Rig Kontrol details. SideKick About a third of the user interface is occupied by the SideKick, a multi-functional area on the left hand side of the screen. GUITAR RIG 5 — Application Reference — 16…
-
Page 17
▪ The Preset Browser (1) allows filtering of all available Rack Presets on three levels; you can organize your presets and perform a text search to easily find your presets. See section ↑3, Components and the Rack on working with presets. GUITAR RIG 5 — Application Reference — 17… -
Page 18
▪ The Options screen (3) serves to configure external controllers and their assignments, as well as preferences such as the window height, the path to presets, and other de- tails. See section ↑8, Options on setting up MIDI controllers and other options. GUITAR RIG 5 — Application Reference — 18… -
Page 19: Components And The Rack
Components and the Rack Building a Rack from Scratch On the first start, the Rack of GUITAR RIG 5 is empty. You will hear dry, slightly pre-am- plified guitar sound when you play: an invitation to try out the various components for yourself.
-
Page 20: The Component Pool
3.1.2 Setting Up an Amp The fastest way to start designing sounds with GUITAR RIG 5 is by adding an amp to the Rack. If you want to quickly create a guitar sound, try the Jump amplifier. ► Drag the amp’s icon from the Component Pool to the Rack. You can also double click the icon.
-
Page 21
Mics, Control Room, Control Room Pro, and Matched Cabinets. Another option is to use the pull down menu included in the matched cabinet. Here you will see the full list of available cabinets. You can also use the plus/minus tabs to toggle through the list. GUITAR RIG 5 — Application Reference — 21… -
Page 22: Basics For Rack Building
The audio signal runs through the chain of rack modules from top to bottom, except if you are using special tools that create parallel processing paths, like the Split. See the Compo- nents Reference for details on these tools. GUITAR RIG 5 — Application Reference — 22…
-
Page 23
▪ If you don’t want to replace another component when using Drag & Drop, make sure you drop it beneath the other components, which is indicated by an orange line in- stead of the rectangle. GUITAR RIG 5 — Application Reference — 23… -
Page 24
▪ The On/Off button allows for true bypassing of the module — no power is con- sumed when it is turned off. ▪ The (Minus) button minimizes the module’s display. ▪ The triangular arrow toggles its expert panel, if available. GUITAR RIG 5 — Application Reference — 24… -
Page 25: Working With Presets
Controllers), which is indicated by a small padlock symbol. These will not be affected by controller assignments stored in a Rack Preset. GUITAR RIG 5 ships with a huge amount of Rack Presets of any style, and you can easily create more as you see fit.
-
Page 26: The Preset Browser
Working with Presets The Preset Browser The Preset Browser The Preset Browser Click on the Browser button to open the Preset Browser — a powerful tool for finding and organizing all your Rack Presets. GUITAR RIG 5 — Application Reference — 26…
-
Page 27: Tags And The Preset List
Clicking on the column headers will sort by the according values, first ascending then de- scending. GUITAR RIG 5 — Application Reference — 27…
-
Page 28: The Search Engine
The new search engine will help you to quickly find a particular preset by entering part of its name. The search bar, situated between the Preset Browser and the Preset List, is al- ways ready to process your requests. GUITAR RIG 5 — Application Reference — 28…
-
Page 29: Loading And Saving Rack Presets
Rack or at the bottom of the SideKick. 4.1.4 Importing Presets There are two ways of importing presets into GUITAR RIG 5 — either of them can be the most convenient way to go: GUITAR RIG 5 — Application Reference — 29…
-
Page 30: Exporting Presets
The Preset Browser ▪ When you drag and drop preset files into the Preset Browser, they will be copied to the Sounds folder of GUITAR RIG 5 and get the tag(s) that were selected before. ▪ After selecting from the GUITAR RIG 5 menu, you can copy presets to File >…
-
Page 31
User saved presets are marked with a user icon inside the preset lists. Custom presets can be spotted in GUITAR RIG 5 by just looking at the preset lists.To delete a pre- set, right-click (ctrl-click) on it in the Preset List and select… -
Page 32: Tags On Three Levels
No preset will be harmed by deleting a tag — all presets are still in the Preset List when no tag is selected. ► To delete a preset, right-click on it in the Preset List and select Remove from disk. GUITAR RIG 5 — Application Reference — 32…
-
Page 33: Tagging Presets
Any preset can carry an unlimited number of tags! Adding tags to presets works simply with drag and drop: ► Click on one of the presets in the Preset List and drag it onto one of the tags in the left column of the Preset Browser. GUITAR RIG 5 — Application Reference — 33…
-
Page 34
▪ After removing all tags from a preset, it is still available in the Preset Browser when you de-select all tags. ▪ To really delete a preset, highlight it, right-click and select Remove from disk. GUITAR RIG 5 — Application Reference — 34… -
Page 35: Preset Info Page
After selecting one of the tags, the Preset List will change showing all the pre- sets containing this tag. Deleting a preset from the Preset List will remove the cur- rently selected tag from it. GUITAR RIG 5 — Application Reference — 35…
-
Page 36: Component Presets
Working with Presets Component Presets Component Presets GUITAR RIG 5 comes with plenty of factory presets for components, providing a timesav- ing alternative to dialing in classic sounds for each component by hand. 4.3.1 Basics A Component Preset contains the settings for a single component. After selecting an item of the Component Pool, press the Presets tab: a list of available Component Presets is dis- played below in the SideKick.
-
Page 37
Component Preset anywhere into the Rack. Component Presets and the Rack Each rack module displays the name of its current Component Preset in a small box on its left hand side, the Component Preset Display. GUITAR RIG 5 — Application Reference — 37… -
Page 38
Once you have found a good setting for a component you use regularly, you will want to save your own Component Preset. To do this you will want to create a Bank. The Banks are user-defined categories where Component presets are stored. GUITAR RIG 5 — Application Reference — 38… -
Page 39
► From the component pull down menu choose Save as → The new preset will be titled New Preset until a title is chosen. ► To save any changes to the preset currently displayed, select Save from the component menu. GUITAR RIG 5 — Application Reference — 39… -
Page 40
By clicking on the column headers of the list of Component Presets, you can sort it by List Number (#), Name, and Rating. Save a quality rating with each preset by clicking on one of the 5 stars right beside its name. This can always be changed later. GUITAR RIG 5 — Application Reference — 40… -
Page 41: The Rack Tools
The Rack Tools Tapedeck Pre The Rack Tools The following sections will introduce you to the Rack Tools of GUITAR RIG 5: Tapedeck Pre and Post, Tuner and Metronome. Tapedeck Pre The Tapedeck Pre Rack Tool Tapedeck Pre is the tool for playing back and recording audio at the beginning of GUITAR RIG’s signal chain (except when…
-
Page 42: Recording
Recording your guitar will pick up the processed sound, just as you hear it at the output. Use Tapedeck Post if you want to record your guitar part with the actual GUITAR RIG 5 — Application Reference — 42…
-
Page 43: Interaction With Tapedeck Pre
The Rack Tools Tapedeck Post sound, e.g. for using it ”outside of” GUITAR RIG 5. Files you import and play back will not be processed, which makes Tapedeck Post ideal for playing drum loops and your own backing tracks. Its controls are similar to Tapedeck Pre, except that it has no Transpose (TRANSP),…
-
Page 44: Tuner
-1. TUNE FORK produces a reference tone. To select its pitch, click on the note field to the ▪ right and drag up or down, or click on the Arrow buttons. GUITAR RIG 5 — Application Reference — 44…
-
Page 45: Metronome And Synchronization
▪ sound: The current tempo is stored with the Rack content when you save a preset. In this setting, the Metronome loads the tempo information when you load a preset. This is useful for preparing presets with synchronized effects e.g. for a live show. GUITAR RIG 5 — Application Reference — 45…
-
Page 46: Preset Volume
▪ Use the crossfader to switch between the Dry signal and the Wet (affected) signal. ▪ Use the slider to control the volume level of the wet signal. GUITAR RIG 5 — Application Reference — 46…
-
Page 47: Master Fx
▪ Configure your Master FX chain from factory or user presets. ▪ Click on the (cross) to empty the whole Master FX section. ▪ Click on the arrow to minimize the Master FX section. GUITAR RIG 5 — Application Reference — 47…
-
Page 48
Tools section of the Component Pool. New Banks may also be created similarly to other Component Presets. Just as the other Rack Tools, the Master FX can’t be selected or highlighted. GUITAR RIG 5 — Application Reference — 48… -
Page 49: The Rig Kontrol
RIG 5. Nine freely assignable switches and an expression pedal are at your disposal right after connecting it. Note that you can use the Rig Kontrol to control GUITAR RIG 5, even if you do not use it as your audio interface. For detailed information about the hardware and how to use the integrated audio interface, refer to the Hardware Reference.
-
Page 50: Assigning Functions To The Rig Kontrol
If you operate a switch or the pedal of the (physical) RIG KONTROL, both the Virtual Rig Kontrol and the assigned function will react to it. The label of Switch 1 is dragged onto the Volume I knob of the Plex. GUITAR RIG 5 — Application Reference — 50…
-
Page 51: Configuring Assignments
Kontrol. Click on the arrow button to reveal the assignment, then click on a label or switch on the Virtual Rig Kontrol to select it. The functions assigned to this particular control are now shown in the expert panel. GUITAR RIG 5 — Application Reference — 51…
-
Page 52
▪ The left bracket defines the value mapped to the controller at zero; the right bracket defines the value mapped to the controller at maximum. GUITAR RIG 5 — Application Reference — 52… -
Page 53: Assigning Functions To External Controllers
Rack. If the external footswitch you are using is “on” only while pressed (instead of switching be- tween “on” and “off”), activate Toggle mode in the context menu of the according input. GUITAR RIG 5 — Application Reference — 53…
-
Page 54: Using Guitar Rig In A Host
Setting Up a Guitar or Bass Track To setup a track to be processed by GUITAR RIG 5, just create an audio track and insert GUITAR RIG 5 as an effect. The audio track will hold the bare, unprocessed signal and your sound will be routed through GUITAR RIG before reaching the output stage of your DAW.
-
Page 55: Synchronization
(because it works both with audio and MIDI), you should use it as a signal process- ing / effects insert. 7.1.4 Synchronization If you want GUITAR RIG 5 to be in time with your host, remember to turn on Ext mode in the Metronome (see section ↑5.4, Metronome and Synchronization). This will turn off the speed setting of GUITAR RIG and use the host’s tempo as a master.
-
Page 56: Automating Parameters In Apple Logic Pro
In the View menu, turn on track automation for the selected track, so you can see what you are doing. Change the track to Latch Touch mode Start playback. GUITAR RIG 5 — Application Reference — 56…
-
Page 57: Sidechaining
In GUITAR RIG 5, a Sidechaining control is available in the Envelope, LFO, Input Level in the Modifier section and in the Stomp Compressor, Tube Compressor, and in the all new Fast Comp from the DYNAMICS section.
-
Page 58: Options
TAR RIG 5 reacts to MIDI Program Change messages regardless of assignments: They switch presets within the current Preset List. Controller Assignment the Easy Way The quickest way to control any knob with a MIDI device is provided by its context menu: GUITAR RIG 5 — Application Reference — 58…
-
Page 59: Setting Up External Midi Controllers
(instead of switching between “on” and “off” each time you press it), this will be the be- havior of the assigned parameter as well. If you want to change it, activate Toggle Mode the Menu of the according controller. GUITAR RIG 5 — Application Reference — 59…
-
Page 60: Assigning Functions To Controllers
0), the right one the value mapped to the controller at maximum (MIDI value 127). ▪ As switches are either on or off, the brackets can be used to define the difference be- tween the actual knob positions they trigger. GUITAR RIG 5 — Application Reference — 60…
-
Page 61
The Controller menu Even if you prefer drag and drop, the menu is necessary to assign functions that are not controlled by any rack module, e.g., switching presets. GUITAR RIG 5 — Application Reference — 61… -
Page 62: Linking External Midi Controllers To The Virtual Rig Kontrol
8.1.3 Linking External MIDI Controllers to the Virtual Rig Kontrol The Virtual Rig Kontrol is a perfectly integrated component of GUITAR RIG 5, sporting pre-assigned functions for many presets and a convenient display for all its assignments, especially in Live view. If your external MIDI controller features a comparable set of con- trols, it can make sense to map it to the Virtual Rig Kontrol and then use the latter for assigning functions instead.
-
Page 63
“off” as soon as it is released. This can be very useful when triggering effects. In GUITAR RIG 5, each controller input can be set to work in “Hold mode” via its context menu to reflect this difference. Just right-click any label of the Virtual Rig Kontrol, or click on Menu in any entry of the MIDI Controller list to call it up. -
Page 64: Preferences
In most cases, turning off Hold mode will enable them to work in the other mode as well. Preferences Under the Options tab, click on Preferences to configure GUITAR RIG 5. GUITAR RIG 5 — Application Reference — 64…
-
Page 65
Options Preferences The Preferences Menu It offers the following settings: Window Height: Use this control to set the height of the GUITAR RIG 5 window. You can ▪ choose among . The actual dimensions in pixels (given in Small Medium Large brackets) depend on the physical display resolution of your monitor. -
Page 66: Rig Kontrol 1 Support
8.2.1 Rig Kontrol 1 Support The earliest Rig Kontrol can still be used for controlling GUITAR RIG 5, with the natural limitation of having only one audio input channel, of course. The second channel trans- mits the unit’s control signal and is therefore not available. To activate Rig Kontrol 1 com-…
-
Page 67
Options Preferences Left channel blocked by Rig Kontrol GUITAR RIG 5 — Application Reference — 67… -
Page 68: Menu Bar
File Menu Bar GUITAR RIG 5 is designed in a way that — once set up — you will hardly ever need to use the Menu bar. Most functions are easier to access another way, as explained above. How- ever, it may be necessary to change the «Audio and MIDI settings…» in standalone mode.
-
Page 69: Edit
Activates full screen mode, giving you the maximum possible resolution — extremely useful in Live view. Press ESC or F4 to return to normal mode. Hide/Show SideKick Hides or shows the left area of the GUITAR RIG 5 user interface, where Preset Browser, Components Browser and Options are displayed. Hide/Show Live View…
-
Page 70: Help
Open Manual… For access to all available manuals, navigate to your language. Visit GUITAR RIG 5 on the Web… Your permanent bookmark to the GUITAR RIG 5 website, where you find product-related resources, news and entertaining extras! Visit the Knowledge Base…
-
Page 71: Audio And Midi Settings
Choose the correct type of driver for your audio interface. Using ASIO (Windows) / CoreAu- dio (Mac OS X) is strongly recommended. Device Select your audio device from the list. If it doesn’t appear, check if it is connected and its drivers are properly installed. GUITAR RIG 5 — Application Reference — 71…
-
Page 72
SideChain function, this is the place to go. The left column shows the available channels of your audio interface. The entries in the right column are GUITAR RIG 5 — Application Reference — 72… -
Page 73
The left column shows all available MIDI devices , sorted by Input and Output. The entries in the right column are actually menus. By clicking on them, you can turn them on or off. Mind that any devices you want to use to control GUITAR RIG 5 have to be activated (turned On) under Input. -
Page 74: Keyboard Shortcuts
[Delete] Edit Select All [Ctrl]+[A] [Cmd]+[A] View Hide/Show Hints [Ctrl]+[I] [Cmd]+[I] View Full Screen [F4] [F4] View Hide/Show RigKontrol [F3] [F3] View Hide/Show SideKick [F2] [F2] View Hide/Show Live View [F1] [F1] GUITAR RIG 5 — Application Reference — 74…

Скачайте Guitar Rig 5 и получите многофункциональную студию
Скачать бесплатно Гитар Риг 5 на русском языке можно по ссылке ниже. К сожалению, не у каждого гитариста есть возможность музицировать дома, и никому при этом не мешать. Покупка усилителя может быть полезной, но если вы собираетесь играть дома, соседи вряд ли скажут вам спасибо.
Что же делать, если тренироваться хочется постоянно, но ездить на репетиционную базу каждый раз не получается? А что делать, если в вашем городе и вовсе нету мест для громких репетиций?
Для решения этих вопросов созданы гитарные эмуляторы, и один из них – это Guitar Rig 5.
Важно! Перед началом скачивания и установки необходимо ОТКЛЮЧИТЬ АНТИВИРУС, иначе кейген может быть удалён.
Скачать бесплатно гитар риг 5.2.2 на русском языке Win(x32-x64)+Mac+Portable
Видео-инструкция по установке и активации Гитар Риг 5.2.2
Если видео не работает, обновите страницу или сообщите об этом в комментариях, поправлю.
Ссылка на видео: https://disk.yandex.ru/i/1lPay69p6O9j3w
Также доступен для скачивания:
Скачать Guitar Rig 6.1.1 Pro Скачать Guitar Rig 6.2.1 Pro
Ableton Live 9 Ableton Live 10 Ableton Live 11
Cubase 5 Cubase 9 Cubase 10
Дополнительные материалы по Guitar Rig:
Видео-инструкция по установке и активации
Перейти к просмотру видео
1 При отсутствии предыдущей инсталляции запустите ..R2RNI_InstReg_GR5.exe
2 Запустите ..R2RGuitarRig_Keygen.exe и нажмите REGISTER.
3 Распакуйте NI_GuitarRig5_522_WIN_Installer.exe (для этого можно воспользоваться архиватором 7-zip).
4 В распакованном, запустите инсталлятор Guitar Rig 5 Setup PC.exe и осознанно пройдите все этапы диалога инсталляции.
Если пути, в которые были брошены Guitar Rig 5.dll не подходят, то скопируете их в нужное место.
Примечание!
В некоторых случаях ошибка инсталляции может вызываться наличием в реестре записи о файле
Guitar Rig 5 Setup PC.msi
Для решения этой проблемы нужно найти упоминания Guitar Rig 5 Setup PC.msi в реестре и удалить их.
[свернуть]
Guitar Rig не видит гитару
зайди в Realtek -> линейный вход, убери громкость воспроизведения.. .
вруби Guitar Rig -> components -> reverb -> Reflector
в строке No file loaded выбери импульс (любой)
далее зайди в File -> Audio and MIDI -> ASIO config потом нажми на ключик, он должен быть перечёркнут
далее выбери Realtek HD Audio output и Reaktek HD Audio LIne input
Компенсация задержки убери всё.
закрой настройки и брынчи .
прежде чем это делать ОТКЛЮЧИ ВСЁ ЧТО РАБОТАЕТ типа контакт одноклассники и тому подобное, иначе Guitar Rig не фурычит
—>
—>
—>
—>
[свернуть]
Guitar Rig 5 постоянно шумит, как убрать шум — вариант 1
Шум идет оттого, что Гитар Риг считывает сигнал не только с линейного входа, но и со «стерео-микшера»(так он называется у меня) , то есть с выхода! И накладывает на него еще шум и так по кругу.
Что нужно сделать: в свойствах записи (диспетчер Realtek HD, вкладка «Микшер», или чего у тебя там) выключить все, кроме линейного входа. Тогда Риг перестанет считывать исходящий сигнал, тем самым, шум пропадет
[свернуть]
Guitar Rig 5 постоянно шумит, как убрать шум — вариант 2
1. Зайдите на сайт asio4all.com, скачайте дополнительный драйвер “asio4all v2”, затем установите его на ваш компьютер. Откройте меню «Звук, речь и аудиоустройства» в панели управления компьютером выберите вкладку «Речь». Затем на аудиовыходе измените устройство на ваше.
2. Примените и сохраните изменения и закройте все окна, далее зайдите в меню «Пуск» на панели задач, после чего зайдите в «Панель управления», найдите настройку « Конфигурация аудио», в которой находятся настройки для параметров вашей звуковой карты, перейдите во вкладку микшер, где вы устанавливаете параметры воспроизведения звука, а так же параметры записи звука. Далее найдите «Стерео микшер» и отключите его в данном меню.
3 . Откройте установленную на вашем компьютере программу Guitar rig, затем перейдите к меню File, затем зайдите в «audio-midi settings», для параметра «interface» установите «acio», а для параметра «Simple rate» значение 96000 Гц, но при этом качество звука может стать значительно хуже, далее для параметра «Output Device» установите asio4ALL v2.
4. Старайтесь поддерживать конфигурацию компьютера в соответствии с системными требованиями программного обеспечения Guitar rig, в особенности это касается оперативной памяти и частоты процессора, поскольку в противном случае могут возникнуть задержки звука. При возникновении проблем с настройками громкости входов, поменяйте значение на «Линейный», обычно это помогает устранить неисправности, возникающими при нечетком воспроизведении музыки через ваш компьютер.
5. Для подключения гитары к компьютеру используйте специально предназначенную для этого схему, поскольку последовательность действий в данном случае играет очень важную роль. Гитару следует подключить к микшерному пульту, а затем во вход звуковой карты.
[свернуть]
Нет звука в Guitar Rig 5
Нужно настроить ASIO на выход.
Кроме того Гитар Риг не включает звук если до него были включены программы типа гитар про, некоторые плееры, в общем все что может издавать звук.
во вкладке routing, outputs (выходы) верно настроены?
[свернуть]
Guitar Rig 5 аналоги
В качестве аналогов можно упомянуть следующие программы:
- Waves GTR
- IK Multimedia Amplitube
- Overloud TH
- REAPER
- Revalver
[свернуть]
Guitar Rig 5 как установить в Fl studio
Устанавливаем Guitar Rig 5(FL Studio можно скачать здесь)

По умолчанию в FL Studio и Guitar rig, VST плагины устанавливаются в папку: C:Program FilesVstPlugins, если при установки FL studio вы меняли путь до папки с плагинами, то на этом этапе установки Guitar Rig необходимо указать расположение этой папки, в противном случае FL Studio не сможет найти данный плагин.

После установки открываем FL Studio и заходим в MIXER.

В MIXER выбираем свободный канал.

Нажимаем на маленькую стрелочку — появиться меню, выберем MORE.

В появившемся меню нажмем на кнопку REFRESH — Fast scan (recommended)

Список обновится, найдем в нем Guitar Rig 5 и поставим напротив него галочку в виде символа F

Нажимаем снова на маленькую стрелочку и в строке Select из выпадающего списка выберем Guitar rig 5.

Запустится плагин, ждем пока загрузится.

Подключаем гитару к компьютеру и настраиваем FL Studio.
Источник: https://electruha.com/lesson/podcliucheni-guitar-rig-v-fl-studio.html
[свернуть]
Guitar Rig 5 русификатор
Руссификатора для Guitar Rig 5 не существует, можете не искать.
Всё что можно найти в сети по этому запросу — обман или развод на деньги!
[свернуть]
Guitar Rig 5 Portable
Выберите из списка версию Portable
[свернуть]
Гитар Риг 5 — это большая коллекция кабинетов
Скачав бесплатно Гитар Риг 5 на русском языке вы получите звук самых популярных гитарных эффектов, а также характерное звучание кабинетов разных размеров и производителей. Почти все они выполнены по образцам реально существующих устройств, хотя и имеют другие названия.
Это различные модели перегруза, дилея, реверберации, компрессоров, фильтров и эквалайзеров, а также специальных эффектов, таких как питч или ринг модулятор.
В Гитар Риг 5 все устройства можно располагать в разном порядке, создавая свои цепочки эффектов и обработок. Также в ней можно выбрать микрофон, скомбинировать свой гитарный или басовый стек, объединив нужный вам гитарный усилитель и подходящий кабинет, или выбрать из уже предложенных производителями комбинаций.
Гитар Риг 5 — это полная база эффектов
Программа на русском языке, очень проста для понимания и позволяет подобрать нужное звучание для гитарной партии, подходящее для вашей композиции. Все компоненты собраны по категориям, позволяя быстро выбрать подходящий эффект из нескольких вариантов, представленных в программе.
Понравившиеся настройки каждого эффекта или набора устройств всегда можно сохранить, для того, чтобы обратиться к ним в нужный момент, а не собирать заново.
Только благодаря Guitar Rig 5 у музыкантов есть возможность без каких-либо денежных затрат и траты времени на поиски нужного оборудования добиться звучания любимых исполнителей или найти свой собственный уникальный звук.
Эта программа подойдет и для того, чтобы изменить звучание гитары при записи композиции, и чтобы определиться с выбором педалей для концертных выступлений, и для звуковых экспериментов. Скачайте бесплатно Гитар Риг 5 на русском языке и вы сможете использовать её как отдельную программу или подключать как vst и dx плагин для обработки проектов других программ.
Гитар Риг 5 — это вспомогательные инструменты
Для удобства и быстрой настройки гитары в программе есть тюнер с режимами для бас-гитары и других настроек, а для тренировок и репетиций – встроенный метроном с возможностью ручной настройки темпа, синхронизации с программой-хостом и смены семпла самого метронома.
Большой простор для творчества также предоставляет луп-машина. Начать всегда можно с пресетов, заложенных в программе. Их здесь предоставлено большое количество, есть возможность выбрать звучание, подходящее для разных стилей музыки. Изменяя их, можнодостичь нужного Вам звука.
Гитар Риг 5 работает в реальном времени
Guitar Rig 5 работает с записанным чистым звуком гитары, позволяя экспериментировать с полученным файлом. При наличии хорошей звуковой карты Guitar Rig может работать в живом режиме практически как обычный гитарный процессор или кабинет.
Также можно играть под уже имеющуюся запись барабанов или других партий композиции, которую можно поместить в программу. И не стоит забывать, что обработать можно любой сигнал, а не только гитарную партию, что делает из программы большое поле для творчества и экспериментов со звуком. Обязательно скачайте Гитар Риг 5 на русском языке, тем более это совершенно бесплатно!
Скачать
Скачать бесплатно гитар риг 5 на русском языке Win(x32-x64)+Mac+Portable)

Из предыдущих статей вы узнали, что такое Guitar Rig, а может даже и скачали. Для нормального функционирования программы необходимо правильно настроить Guitar Rig и ASIO драйвер. В принципе ничего сложного нет, но можно столкнуться с некоторыми подводными камнями. Для того, чтобы приступить к настройке вы должны убедится, что ваша гитара подключена правильно.
Т.е. в линейный вход (обозначенный голубым цветом), как указано на рисунке.

Если все верно, открываем Guitar Rig, заходим в настройки midi. Они находятся «Files-> audio + midi settings». Перед вами появляется такое окно:

На вкладке AUDIO:
В графе Driver, из списка выбираем ASIO;
В графе Device, из списка выбираем ASIO4ALLv2;
В графе Sample Rate устанавливаем значение 44100.
В общем, устанавливаем все как на картинке.
Можно нажать на кнопочку ASIO Config, эта кнопочка откроет окно настройки ASIO драйвера. Там особо делать нечего.

Продолжаем настраивать Guitar Rig.
Переходим на вкладку ROUTING. Там имеются две кнопочки Inputs и Outputs. В Inputs указываем программе, откуда она должна получать входящий сигнал с гитары. В Outputs, куда этот сигнал должен выходить.
Все, жмем OK и переходим к самой программе.

Если вы все сделали верно, то при ударе по струнам индикаторы IN и OUT будут показывать уровень входного и выходного сигнала. Вот собственно и вся настройка Guitar Rig. Если у вас возникнут какие-то сложности, например посторонние шумы или слабый входящий сигнал, то можно проверить настройки звука в панели управления и микшере Windows.
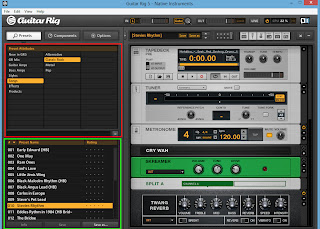
Как видно из картинки интерфейс программы Guitar Rig достаточно простой. Слева находятся все доступные компоненты и сохраненные банки. А справа ваша рабочая зона, где размещая необходимые компоненты в определенной последовательности, вы будете играть свою чудесную музыку.

После покупки электрогитары, многие обнаруживают проблемы с поиском гитарного оборудования. Гитара и ламповый комбик не дают ожидаемого звучания, нужно покупать еще педали, процессоры, и кучу разного оборудования для того, чтоб добиться желаемого звука. Но если нету возможности то что тогда? Не превращать же квартиру в звукозаписывающую студию. Выход — использовать программу-эмулятор гитарного процессора, который может заменить целую студию, но с заметной потерей качества. Ну а для домашней игры много же не надо 
В качестве программы будем использовать Guitar Rig. Программа эмулирует многие звуковые эффекты, такие как дисторшн, реверберация, дилэй, компрессор, различные виды кабинетов и многие другие, позволяя компоновать их в различном порядке. Также содержит набор вспомогательных средств, таких как тюнер, метроном и средства для записи проигрываемого звука.

Джек

Миниджек
Для начала нам понадобиться переходник на миниджек. Джек переходник должен быть в комплекте с гитарой. Одеваем миниджек переходник на джековый вход, вставляем в микрофонный вход, и вуаля, гитара подключена к компьютеру :). Но имейте в виду, что если у вас звуковая карта встроенная, звук будет немного паршивый, для лучшего звучания желательно прикупить отдельную карту.
Дальше скачиваем программу (Можно скачать тут), и запускаем. Guitar Rig весьма легок в использовании(но не в настройке). В красном окне выбираете стиль звучания (Рок, метал, блюз, джаз, поп и т.д.). В зеленом окне — уже отдельный тип настройки звука. В названии не нетрудно угадать чью настройку копирует данный файл. (Ram Ones — RamOnes, Little Jimis Wing — Джимми Хендрикс). В программе встроено много эффектов не только по исполнителям, но и по просто звучанию (Советую попробовать Ya-Ya-Ya guitar во вкладке Effects). Кроме встроенных в интернете можно найти множество других, сделанных уже более точно, для отдельной песни, или даже для отдельной части песни определенного гитариста. Настройки как правило называют пресеты(preset). Вводите название песни, добавляете пресет и выбираете любой Если вас раздражает гудение при выборе тяжелых по звучанию пресетов, то просто скрутите Gate(вверху) на минимум.
Окно Guitar Rig (клик для увеличения)
Загвоздка в настройке Guitar Rig — это добиться того чтоб звук с входа шел в программу. Для начала вам понадобятся asio4all драйвера (Скачать можно тут). Если после установки звук слышен сразу, поздравляю, вам повезло :). Если нет, тогда идем в File->Audio and MIDI settings. В поле Driver устанавливаем ASIO, в поле Device — ASIO4ALL. Дальше жмем ASIO config, жмем на ключ(желтый квадрат) и видим подключенные аудио-устройства. Теперь методом тыка (или если вы знаете) в синем окне надо просто отключить лишний микрофон или динамик на который поступает звук, и оставить только нужные устройства. Вот и все.
Настройка Guitar Rig (клик для увеличения)


