Требуется руководство для вашей GP H650C PowerBank Зарядное устройство? Ниже вы можете просмотреть и загрузить бесплатно руководство в формате PDF. Кроме того, приведены часто задаваемые вопросы, рейтинг изделия и отзывы пользователей, что позволит оптимально использовать ваше изделие. Если это не то руководство, которое вы искали, – свяжитесь с нами.
Ваше устройство неисправно, и в руководстве отсутствует решение? Перейдите в Repair Café для получения бесплатных ремонтных услуг.
Руководство

Рейтинг
Сообщите нам, что вы думаете о GP H650C PowerBank Зарядное устройство, оставив оценку продукта. Хотите поделиться вашими впечатлениями от данного изделия или задать вопрос? Вы можете оставить комментарий в нижней части страницы.
Довольны ли вы данным изделием GP?
Да Нет
3 голоса
Eastern Europe
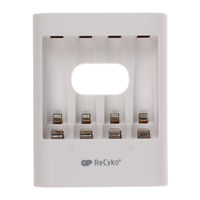
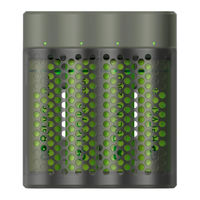
Charger Features
GB
—
Corded-type charger with AC100-240V adaptor
—
Charge 1 to 4 AA or AAA NiMH rechargeable batteries
—
Equipped with 4 individual charging channels
—
Termination methods:
— Individual minus delta voltage (-dV)
— Individual temperature sensor
— Individual safety timer
—
Over-temperature protection
—
Primary and damaged batteries detection
—
Easy check LED icons
Instruction Manual
—
Digital clock
—
Safety guaranteed
AC Adaptor
Read the instruction manual thoroughly before
use. Keep the manual for future reference.
Charging Instructions
1. Charge 1 to 4 AA or AAA NiMH batteries in any combination. Each charging slot
Fig. 1
Fig. 2
Fig. 3
can only charge 1 battery (either AA or AAA).
2. Connect GP AC 1.5A adaptor to the charger and plug it into the power source
(Fig.1). OR connect GP DC 12V car adaptor to the charger and plug it into the
Charging Time
cigarette lighter jack. DC car adaptor is only included in select models.
Töltési Id *
3. Power LED will light up when power is connected.
Size
Capacity (mAh / series)
Charging Time (mins)
4. Open the top cover. Insert AA or AAA NiMH batteries into the charging slots
Méret
according to the polarity indications (+/-). Different contact plates for AA and AAA
GP NiMH
AA
2100
~
2700
65
~
85
GP NiMH
AA
NiMH batteries are set in the outer and inner part of the charging slots respectively.
(Fig.2) When inserting AAA batteries into the charging slots, slant the batteries
AAA
750
~
1000
50
~
70
AAA
to ensure smooth contact with the plates. (Fig.3).
5. Battery Icon and Charging Icon will pulse slowly when charging is in process.
6. If alkaline, carbon zinc, lithium, rechargeable alkaline or damaged batteries are
Specifications
mistakenly inserted into the charging slots, the corresponding Battery Icon and
the Warning Icon will blink fastly and the charger will stop charging. All other
Charging
Trickle Charge
Output
Battery Icons will turn off.
Current (mA)
Current (mA)
Input Voltage
7. If the charger does not work properly, all Battery Icons and the Charging Icon
Voltage
AA
AAA
AA
AAA
will turn off. The Warning Icon and Power LED will blink. The charger will stop
charging.
AC100-240V
12V
2000
1000
160
60
8. Battery Icon will be solid on when battery is fully charged and in trickle charge
mode. The Check Mark Icon will be on when all batteries are fully charged.
9. Once charging is complete, unplug the charger from the power source and remove
LED Indications (Refer to Fig. 4)
the batteries.
10.The digital clock is powered by a specific button battery. Please refer to Fig.5 for
Condition
Indication
detailed operation.
• Adaptor connected
• Green power LED on
• GP NiMH battery inserted in
• Orange battery icon and
For best performance and optimal safety, charge
charger and charging in progress
charging icon slow pulsing
GP NiMH batteries with GP PowerBank.
• Wrong / damaged battery
• Orange battery icon and red
inserted
warning icon fast blinking
Attention
1. For brand new batteries, 2 to 3 cycles of charging and usage are required to
• Full charge or trickle charge
• Orange battery icon solid on
optimize the batteries’ performance. If batteries have been stored for more than
• All batteries fully charged
• Green check mark icon on
one week, always recharge them before use.
2. It is normal for batteries to become hot during charging and they will gradually
cool down to room temperature after being fully charged.
3. For best result, use GP PowerBank H650C at room temperature with good
Fig. 4
ventilation.
4. Charging time may vary based on different battery capacities. (Refer to the
Charging Time Table)
5. Remove batteries from an electrical device if it will not be used for a long time.
6. If the performance of the batteries decreases substantially, it is time to replace
the batteries.
Caution
1. Charge GP Nickel Metal Hydride (NiMH) batteries only.
2. Do not charge other types of batteries, such as alkaline, carbon zinc, lithium,
Power LED
Battery Icon
rechargeable alkaline or any other unspecified batteries, as they may leak or
burst, causing personal injury and damage.
3. Never use an extension cord or any attachment not recommended by GP, as
Charging Icon
this may lead to a risk of fire, electric shock or personal injury.
Warning Icon
4. Unplug the charger from the outlet before attempting to clean or when not in use.
5. Do not short circuit batteries.
6. Do not wet, incinerate or disassemble the charger and batteries.
Check Mark Icon
Digital Clock
7. For indoor and dry location use only. Do not expose the charger to rain, snow or
extreme conditions.
Clock Function
Fig. 5
This appliance is not intended for use by persons (including children) with reduced
• LCD clock is operated by the
physical, sensory or mental capabilities, or lack of experience and knowledge,
GP364 button cell.
unless they have been given supervision or instruction concerning use of the
• Remove the plastic insulation sheet
mode
set
appliance by a person responsible for their safety.
to activate the clock.
(incremental
Children should be supervised to ensure that they do not play with the appliance.
• Time and date can be adjusted
adjustment)
by the «set» and «mode»
This device complies with Part 15 of the FCC Rules. Operation is subject to the
switches underneath the charger.
following two conditions: (1) this device may not cause harmful interference, and (2)
• Button cell can be replaced
this device must accept any interference received, including interference that may
by opening the battery door
cause undersired operation.
anticlockwise at the back cover
of the charger with a clip.
SR60
Do not dispose of electrical appliances as unsorted municipal waste, use separate collection
• Electrostatic discharge may cause
facilities. Contact your local government for information regarding the collection systems
malfunction of the clock. Please
(clock setting and button
available. If electrical appliances are disposed of in landfills or dumps, hazardous substances can
reset the clock to resume operation.
cell replacement)
leak into the groundwater and get into the food chain, damaging your health and well-being.
E-65
Tölto Ý tulajdonságai
H
—
Hálózati adapterrel csatlakoztatható
—
1-4 AA és AAA NiMH akkumulátor töltésére alkalmas
—
4 különálló töltési csatornával rendelkezik
—
Biztonsági rendszerek
— különálló Mínusz Delta Feszültség elleni védelem (-dV)
— különálló cella h mérséklet szenzor
— különálló biztonsági id kapcsoló
—
Túlmelegedés elleni védelem
—
Nem megfelel cella típus, és sérült cella felismerés
—
LED visszajelzés
—
Digitális Óra
—
Garantáltan biztonságos
Használat elo Ýtt alaposan olvassa el ezt a használati utasítást! A
jövo Ýbeni kérdések érdekébeno Ýrizze meg a használati utasítást!
Útmutató a tölto Ý használatához
1. 1-4 AA és AAA NiMH akkumulátort képes tölteni bármilyen összeállításban.
Atölt helyek egyszerre csak egy akkumulátort képes tölteni mindkét méret
esetében.
krovimo laikas*
2. Csatlakoztassa a GP AC 1,5A adaptert a tölt höz, és azt csatlakoztassa a
hálózatikonnektorba (1. ábra), vagy csatlakoztassa a GP DC 12V autó adaptert
Akkumulátor (mAh / series)
Töltési Id (perc)
Dydis
Baterija (mAh / serij )
a tölt höz és aszivargyújtó csatlakozóhoz. A DC kábel egyes modelleknél a
csomag részétképezi.
2100
~
2700
65
~
85
GP NiMH
AA
2100
~
2700
3. Az üzemkész jelz világítani fog, ha a készülék feszültség alatt áll.
4. Nyissa ki az akkumulátor fedelet! A polaritásra ügyelve, helyezze be a GP NiMH
750
~
1000
50
~
70
AAA
750
~
1000
AA,vagy AAA akkumulátorokat a tölt csatornákba! Az AA, illetve az AAA
méret akkumulátorokhoz tartozó csatlakozók a tölt csatornák fels , illetve alsó
részéntalálhatóak (2. ábra)! Ha AAA méret akkumulátorokat helyez a készülékbe,
akkordöntse meg a készüléket, hogy meggy z djön az akkumulátorok és a
csatlakozókhelyes egymáshoz való illeszkedésér l (3. ábra)!
5. A töltés folyamat közben az „akkumulátor ikon», és a „töltés ikon» lassan fog
villogni.
6. Ha a töltésfolyamat megszakadt, vagy Alkáli, Szén-cink, Lítium, elemet, vagy
hasérült, zárlatos akkumulátort helyezünk a készülékbe, akkor a „nem megfelel
cella», illetve a „figyelmeztetés» ikon gyorsan fog villogni, a tölt automatikusan
lekapcsol, így az összes „akkumulátor» Ikon ki fog aludni.
7. Ha a tölt nem megfelel en m ködik, akkor az összes „akkumulátor» és a „töltés»
ikon ki fog aludni, a „figyelem», és az „üzemkész» ikon villogni fog. A
töltésautomatikusan lekapcsol.
8. Az „akkumulátor» ikon a feltöltés fázis végeztével, illetve a csepptöltés folyamat
alatt, halványan fog világítani. Ha az összes akkumulátor feltölt dött, akkor a
„pipajelölés» ikon fog világítani.
9. Ha a töltés befejez dött, a kapcsoló segítségével kapcsolja ki a készüléket, és
vegye kia tölt b l az akkumulátorokat!
10. A digitális óra áramellátását, egy speciális gombelem látja el. Részletes leírást a
5. ábra szolgáltat.
A legnagyobb teljesítmény, és biztonság érdekében, csak GP
NiMH akkumulátorokathasználjon a GP PowerBank készülékkel!
Figyelmeztetés!
1. Új akkumulátorok esetén, ajánlatos 2-3 teljes töltési ciklust végrehajtani a
teljesítményoptimalizálása érdekében. Ha az akkumulátorokat több mint egy hétig
nem használjuk, mindig töltse fel újra használat el tt!
2. A töltésfolyamat alatt az akkumulátorok melegednek, és a töltés
befejeztévelszobah mérséklet re h lnek vissza.
3. A legjobb eredmény érdekében, a GP PowerBank készüléketszobah mérsékleten,
jó szell zés mellett használjuk!
4. A töltési id , nagyban függ az akkumulátor kapacitásától.
(Lásd: töltési id táblázat)
5. Vegye ki az akkumulátorokat a készülékb l, ha sokáig nem fogja használni
azokat!
6. Ha az akkumulátorok teljesítménye érezhet en csökken, akkor azokat
ajánlatoslecserélni.
Figyelem!
1. Csak GP NiMH akkumulátorokat használjon!
2. Ne töltsön más típusú energiahordozókat a készülékkel úgy, mint: alkáli, szén-cink,
lítium elemet, alkáli akkumulátor, vagy más olyan terméket, ami nem felel meg
aleírásban szerepl knek, mert t z és robbanás veszélyes, és személyi
sérüléshezvezethet!
3. Ne használjon olyan kábelt, amit a GP nem hagyott jóvá, mert t z, áramütés
veszélyesés személyi sérülést eredményezhet!
4. Ha nem használja, vagy tisztítani szeretné a készüléket, mindig húzza ki a
hálózatifoglalatból!
5. Ne kösse rövidre az akkumulátorokat!
6. Ne érje nedvesség a tölt t, és az akkumulátorokat!
7. Beltéri, száraz helyen használja. Ne tegye ki a tölt t id járási tényez knek!
A kimerült akkumulátorokat és az üzemképtelen elektronikai eszközöket ne a háztartási
szemétgy jt be dobja, mert ezzel veszélyezteti saját egészségét is. A szelektív
hulladékgy jtési rendszerre vonatkozó további információkért vegye fel a kapcsolatot a
helyi hatóságokkal.
LT
krov jo charakteristikos
—
Laidinio tipo krov jas su AC100-240V adapteriu
—
krauna nuo 1 iki 4 AA arba AAA NiMH kraunam baterij
—
Turi 4 atskirus krovimo kanalus
—
Užbaigimo b dai:
— Atskira minusin delta tampa (-dV)
— Atskiras temperat ros daviklis
— Atskiras saugumo laiko žymeklis
—
Apsauga nuo temperat ros viršijimo
—
Pirminis sugadint baterij susekimas
—
Lengvas LED piktogram patikrinimas
—
Skaitmeninis laikrodis
—
Garantuotas saugumas
Prieš naudodami, b tinai perskaitykite instrukcijas.
Saugokite vadov , nes juo gali reik ti pasiremti ateityje.
krovimo instrukcijos
1. Nuo 1 iki 4 AA arba AAA baterij galite krauti bet kokioje kombinacijoje.
Kiekviena krovimo anga gali krauti 1 baterij (AA arba AAA).
2. Prie krov jo prijunkite GP AC 1.5 adapter ir prijunkite j prie energijos šaltinio
Uzl d s Ø anas laiks*
(Pav. 1). ARBA prijunkite GP DC 12V automobilio adapter prie krov jo ir
Lielums
Baterija (mAh / s rija)
Uzl d s Ø anas laiks (min)
krovimo laikas (min)
kiškite cigareþi uždeg j . DC automobilio adapteris yra tik specialiuosiuose
modeliuose.
65
~
85
GP NiMH
AA
2100
~
2700
65
~
85
3. Kai prijungiama srov , užsidegs LED galingumas.
AAA
750
~
1000
50
~
70
50
~
70
4. Atidarykite viršutin dangtel . d kite AA arba AAA NiMH baterijas krovimo
angas, pagal poliškum (+/–). Skirtingos kontakt plokšt s AA ir AAA NiMH
baterijoms yra vidin je ir išorin je krovimo ang dalyje (Pav. 2). Dedant AAA
baterijas krovimo angas, pakreipkite baterijas nuožulniai, kadkontaktas su
plokšt mis b t švelnus. (Pav. 3)
5. Vykstant krovimui, baterijos piktograma ir krovimo piktograma l tai pulsuos.
6. Jei per klaid bus d tos šarmingos, anglies cinko, liþio, pakartotinio krovimo
šarminga arbasugadinta baterijos, atitinkamos baterijos ir persp jimo
piktogramos prad s greitai mirkþioti ir krov jas nustos krauti. Visos kitos
baterijos piktogramos taip pat užges.
7. Jei krov jas netinkamai dirba, užges visos baterijos piktogramos ir krovimo
piktograma. Persp jimo piktograma ir LED galia prad s mirks ti. krove jas
nustos krauti.
8. Baterijos piktograma pasidarys vientisa, kai baterija bus pilnai krauta ir veiks
mažo krovimorežime. Kai baterijos bus pilnai krautos, užsidegs tikrinimo
ženklo piktograma.
9. Kai krovimas baigtas, atjunkite krov
nuo srov s šaltinio ir išimkite baterijas.
10. Skaitmeninis laikrodis yra valdomas specialia mygtuko baterija. Detalesn
informacij rasite paveiksl lyje 5.
Nor dami gauti geriausi rezultat ir optimal saugum ,
kraukite GP NiMH baterijas, naudodami GP PowerBank.
D mesio
1. Naujoms baterijoms reikalingi 2-3 krovimo ir panaudojimo ciklai, kad baterij
veikimas tapt optimalus. Jei baterijos buvo laikomos daugiau nei vien
savait , b tinai prieš naudodami kraukite jas iš naujo.
2. Normalu, kad krovimo metu baterijos kaista, taþiau po pilno krovimo
kambariotemperat roje jos palaipsniui atv s.
3. Nor dami pasiekti geriausi
rezultat , naudokite GP PowerBank
kambariotemperat roje ir su gera ventiliacija.
4. krovimo laikas gali skirtis, priklausomai nuo skirtingos baterij talpos.
(žr. krovimo laikolentel )
5. Išimkite baterijas iš prietaiso, jei juo ilg laik nesinaudosite.
6. Jei baterij veikimo laikas sumaž ja, laikas jas pakeisti.
Persp jimas
1. kraukite tik GP Nikelio metalo hidrido (NiMH) baterijas.
2. Nekraukite kit tip baterij — toki , kaip šarmingos, anglies cinko, liþio,
pakartotinio krovimo šarmingos ir bet kokios kitos nenustatytos baterijos, nes
jos gali praleisti skysþiusarba susprogti, padarydamos sužeidimus bei kit
žal .
3. Niekada nenaudokite laido prailgintojo arba kito prijungimo, kuris n ra
rekomenduojamas GP, nes tai gali sukelti gaisro pavoj , elektros šok ir kitus
susižeidimus
4. Nor dami išvalyti arba jo nenaudojant, ištraukite krov j iš kištukinio lizdo.
5. Nesukelkite baterij trumpo sujungimo.
6. krov jo ir baterij negalima sušlapinti, sudeginti ir išrinkti dalimis.
7. Skirta tik naudojimui patalpoje, kur sausa. Saugokite krov j nuo lietaus,
sniego ar kit nepalanki oro s lyg .
Neišmeskite elektrini prietais kaip ner šiuot komunalini atliek , o naudokit s atskiromis
surinkimo priemon mis. Susisiekite su vietos valdžia d l atliek surinkimo sistemos. Jeigu
elektros prietaisai yra išmetami užkasamame s vartyne arba s vartyne, pavojingos
medžiagos gali patekti gruntinius vandenis ir maitinimosi grandin keldamos pavoj J s
sveikatai ir gerovei.
Uzl d t ja raksturojumi
LV
Wáa ciwo ci áadowarki
—
Vada tipa uzl d t js ar AC100-240V adapteri
—
àadowarka z przewodem sieciowym i zasilaczem 100-240V
—
Uzl d no 1 l dz 4 AA vai AAA NiMH uzl d jamas baterijas
—
àaduje 1 do 4 akumulatorów AA lub AAA (NiMH)
—
Turi 4 atseviš i uzl d šanas kan li
—
4 niezale ne kanaáy áadowania
—
Detekcja stanu naáadowania:
—
Nobeiguma veidi:
— Atseviš s negat vais delta spriegums (-dV)
— Indywidualny pomiar -dV
— Indywidualny pomiar temperatury
— Atseviš s temperat ras sensors
— Atseviš s droš bas laiko atz m jums
— Indywidualny timer
—
Zabezpieczenie przed przegrzaniem
—
Aizsardz ba no temperat ras p rsniegšanas
—
Wykrywanie baterii pierwotnych i uszkodzonych akumulatorów
—
Iepriekš ja saboj tu baterijas atrašana
—
Czytelne kontrolne ikony LED
—
Viegla LED piktogrammu p rbaude
—
Zegar cyfrowy
—
Digit lais pulkstenis
—
Bezpiecze stwo gwarantowane
—
Garant ta droš ba
Przed rozpocz ciem u ytkowania nale y przeczytaü dokáadnie
Pirms lietojot, noteikti izlasiet instrukcijas. Glab jiet
niniejsz instrukcj . Instrukcj nale y zachowaü na wypadek
instrukciju, lai var tu to izmantot ar n kotn .
potrzeby ponownego z niej skorzystania.
Uzl d šanas instrukcijas
Instrukcja áadowania
1. No 1 l dz 4 AA vai AAA baterijas varat uzl d t jebk d kombin cij .
1. Nale y áadowaü 1 do 4 akumulatorów AA lub AAA NiMH w dowolnej kombinacji.
Ikvienauzl d šanas atvere var uzl d t 1 bateriju (AA vai AAA).
W ka dym z gniazd mo e znajdowaü si tylko jeden akumulator (AA lub AAA).
2. Pie uzl d t ja pievienojiet GP AC 1.5 adapteri un pievienojiet to pie ener ijas
Czas áadowania*
2. Podá czyü zasilacz GP 1.5A do áadowarki a nast pnie do sieci zasilaj cej (Fig.
avota (Att. 1). VAIpievienojiet GP DC 12V automobi a adapteri pie uzl d t ja
1) albo podá czyü przewód przej ciowy GP do áadowarki a nast pnie do gniazda
Rozmiar Akumulator (mAh / seria) Przybli ony czas áadowania (minuty)
un iespraudiet cigarešu piesm
t j . DC automobi a adapteris ir tikai speci los
zapalniczki w samochodzie. Przewód przej ciowy jest doá czany do wybranych
mode os.
modeli.
GP NiMH
AA
2100
~
2700
65
~
85
3. Kad piesl dzama str va, iedegsies LED jauda.
3. Dioda zasilania za wieci na zielono.
4. Atveriet virs jo v ci u. Ielieciet AA vai AAA NiMH baterijas uzl d šanas atver s,
AAA
750
~
1000
50
~
70
4. Otworzyü pokryw komory. Umie ciü akumulatory AA lub AAA NiMH w gniazdach,
zwracaj c uwag na polaryzacj (+/–). Styki dla akumulatorów AAA s
saska
ar polarit ti (+/–). Atseviš as kontaktu pl ksn tes AA un AAA NiMH
baterij m ir iekš j un r j uzl d šanas atveru da (Att. 2). Ievietojot AAA
umieszczonew gá bi komory, dla akumulatorów AA bli ej pokrywy (Fig. 2).
Umieszczaj c akumulatory AAA nale y je pochyliü, aby zapewniü dobry kontakt
baterijas uzl d šanas atver s, pagrieziet baterijas sl pi, kadkontakts ar
ze stykami (Fig. 3).
pl ksn t m b tu maigs. (Att. 3)
5. Ikona akumulatora i ikona áadowania b d pulsowaü áagodnie w trakcie áadowania.
5. Notiekot uzl d šanai, baterijas piktogramma un uzla d šanas piktogramma
6. Je eli w áadowarce zostanie omyákowo umieszczona bateria alkaliczna,
l ni puls s.
cynkowow glowa, litowa, áadowalna bateria alkaliczna lub uszkodzony akumulator,
6. Ja k das d
b s ieliktas s rma, ogles cinka, litija, atk rtotas uzl d šanas
odpowiednia ikona akumulatora oraz ikona ostrze enia b d szybko migotaü, a
s rma vaisaboj ta baterijas, atbilstošas baterijas un br dinoš s piktogrammas
áadowanie nie zostanie rozpocz te. Wszystkie pozostaáe ikony akumulatorów
s ks tri mirkš in t unuzl d t js p rst s uzl d t. Visas citas baterijas
pozostan wygaszone.
piktogrammas t pat nodzis s.
7. Je eli áadowarka nie funkcjonuje poprawnie, wszystkie ikony akumulatorów oraz
7. Ja uzl d t js nepien c gi str d , nodzis s visas baterijas piktogrammas un
ikona áadowania zgasn . Ikona ostrze enia oraz dioda zasilania b d szybko
uzl d šanas piktogramma. Br dinoš s piktogramma un LED str va s ks
migotaü. àadowarka wstrzyma dziaáanie.
mirkš in t. Uzla d t js p rst s uzl d t.
8. Ikona akumulatora wieci w sposób ci gáy je li akumulator zostanie naáadowany.
8. Baterijas piktogramma k s vienveid ga, kad baterija b s piln gi uzl d ta un
Po naáadowaniu wszystkich akumulatorów za wieci ikona potwierdzenia.
darbosies maz uzla d šanasrezß m . Kad baterijas b s piln gi uzl d tas,
9. Po zako czeniu áadowania akumulatory nale y wyj ü z áadowarki, a áadowark
iedegsies kontroles z mes piktogramma.
odá czyü od sieci.
9. Kad uzl d šana pabeigta, atvienojiet uzl d t ju no str vas avota un iz emiet
10. Zegar cyfrowy jest zasilany oddzieln bateri guzikow . Ustawianie zegara
pokazuje (Fig 5).
baterijas.
10. Digit lais pulkstenis ir barojams ar speci lu podzi s tipa bateriju. S k ku
inform ciju atrad siet att l 5.
Dla osi gni cia najlepszych rezultatów i dla zapewnienia
bezpiecze stwa, w áadowarce GP PowerBank nale y áadowaü
wyá cznie akumulatory NiMH produkcji GP.
V loties dab t vislab ko rezult tu un optim lu droš bu,
uzl d jiet GP NiMH baterijas, lietojot GP PowerBank.
Uwagi
Uzman bu
1. W przypadku nowych akumulatorów konieczne jest 2 – 3 krotne áadowanie i roz
áadowanie w celu osi gni cia peánej pojemno ci. Równie dla akumulatorów
1. Jaun m baterij m nepieciešami 2-3 uzl d šanas un izl d šanas cikli, kad
przechowywanych powy ej jednego tygodnia wskazane jest naáadowanie ich
baterijas darb ba k tuoptim la. Ja baterijas bija glab tas vair k k vienu
przed u yciem.
ned u, noteikti pirms lietojotuzl d jiet t s no jauna.
2. Nagrzewanie si akumulatorów w czasie áadowania jest zjawiskiem normalnym.
2. Norm li, kad uzl d šanas laik baterijas iekarst, taþu p c pilnas iel d šanas
Temperatura akumulatorów stopniowo obni a si po zako czeniu áadowania.
istabastemperat r t s pak peniski atdzis s.
3. Aby osi gn ü najlepsze rezultaty, zaleca si u ywanie áadowarki GP PowerBank
3. V loties sasniegt vislab ko rezult tu, lietojiet GP PowerBank istabastemperat r
w temperaturze pokojowej, przy dobrej wentylacji.
un ar labu ventil ciju.
4. Czas áadowania jest uzale niony od pojemno ci akumulatora (prosz sprawdziü
4. Uzl d šanas laiks var atš irties, atkar gi no atseviš as baterijas ietilp bas.
w tabeli czasów áadowania).
(sk. Uzl d šanas laikotabulu)
5. Je li urz dzenie zasilane akumulatorami nie b dzie u ywane przez dáu szy czas,
wskazane jest wyj cie z niego akumulatorów.
5. Iz emiet baterijas no ier ces, ja to ilgu laiku nelietosiet.
6. Ja baterijas darb bas laiks samazin s, laiks t s apmain t.
6. Je eli wydajno ü akumulatorów wyra nie spada, nale y wymieniü je na nowe.
rodki ostro no ci
Br din jums
1. W áadowarce mo na áadowaü jedynie akumulatory niklowo-wodorkowe (NiMH)
1. Uzl d jiet tikai GP Ni e a met la hidr da (NiMH) baterijas.
produkcji GP.
2. Neuzl d jiet citu tipu baterijas — t das, k s rma, ogles cinka, litija, atk rtotas
2. Nie wolno áadowaü akumulatorów ani baterii innych typów takich jak: alkaliczne,
uzl d šanas s rma un jebk das citas nenoteikta tipa baterijas, jo t s var izlaist
cynkowo-w glowe, litowe, itp.; mo e to bowiem prowadziü do eksplozji, po aru
š idrumuvai spr gt, izsaucot ievainojumus un citus kait jumus.
oraz spowodowaü obra enia.
3. Nekad nelietojiet vada pagarin t ju vai citu pievienojumu, kuru nav rekomend jis
3. Aby unikn ü ryzyka po aru, pora enia pr dem oraz obra e , nie nale y stosowaü
GP, jo tai var izsaukt ugunsgr ka briesmas, elektrisko šoku un citus
adnych przedáu aczy ani przej ciówek nierekomendowanych przez GP.
ievainojumus
4. àadowark czyszczon lub nieu ywan nale y odá czyü od sieci zasilaj cej.
5. Nie wolno zwieraü ko cówek akumulatorów.
4. V loties izt r t vai to nelietojot, izvelciet uzl d t ju no kontakta lizdas.
5. Neradiet baterijas so savienojumu.
6. àadowarki ani akumulatorów nie wolno wkáadaü do wody, do ognia ani rozbieraü
we wáasnym zakresie.
6. Uzl d t ja un baterijas nedr kst saslapin t, mest ugun un iz rd t sast vda s.
7. àadowarka jest przeznaczona wyá cznie do u ytku wewn trz pomieszcze . Nie
7. Š irts lietošanai tikai saus s telp s. Sarg jiet uzl d t ju no lietus, sniega vai
mo na jej wystawia na dziaáanie deszczu lub niegu.
citiemnelabv l giem laika apst k iem.
Niniejszego urz dzenia nie wolno wyrzucaü ze zwykáymi, nieposortowanymi odpadami
komunalnymi. W celu uzyskania informacji o dost pnych na Pa stwa terenie metodach
Neizmetiet elektroier ces k neš irotus komun los atkritumus, bet izmantojiet atseviš us
utylizacji, nale y skontaktowaü si z wáadzami lokalnymi. Záomuj c we wáa ciwy sposób
sav kšanas l dzek us. Sazinieties ar viet jo varu un iepaz stieties ar atkritumu sav kšanas
niniejsze urz dzenie, ogranicz
sist mas. Ja elektroier ces tiek izmestas izg ztuv , b stamas vielas var nok t grunts de os
rodowisko i ludzi, które mogáoby zaistnieü w przypadku nieprawidáowej utylizacji.
un bar bas
d un t d veid kait t J su vesel bai un labkl j bai.
Waga netto áadowarki ~ 256g
PL
Caracteristicile incarcatorului
—
Incarcator cu cablu de alimentare si adaptor AC100-240V
—
Incarcarea a 1 pana la 4 acumulatori format AA/AAA NiMH
—
4 canale individuale de incarcare
—
Eficientizarea incarcarii individuale prin:
— Incarcare de mentinere cu curent redus (-dV)
— Senzor de temperatura
— Temporizator
—
Protectie supraincalzire
—
Detectarea bateriilor defecte si a celor care nu sunt reincarcabile
—
Leduri pentru controlul incarcarii
—
Ceas digital
—
Siguranta maxima in utilizare
Cititi cu atentie manualul de instructiuni inainte de
utilizare. Pastrati manualul pentru consultari ulterioare.
Instructiuni de incarcare
1. Incarcarea a 1 pana la 4 acumulatori format AA sau AAA NiMH, in oricecombinatii.
Fiecare slot de incarcare poate fi utilizat pentru un singuracumulator (format AA
sau AAA).
Timpul de incarcare*
2. Conectati adaptorul GP AC1.5A la incarcator si apoi la sursa de curent (fig.1).
SAU conectati adaptorul pentru masina GP DC 12V la incarcator si apoila mufa
Marime
Model (mAh / seria)
Timp de incarcare (min.)
brichetei de masina. Adaptorul pentru masina estedisponibil numai pentru special
destinate.
GP NiMH
AA
2100
~
2700
65
~
85
3. Indicatorul de conectare la sursa de curent se va aprinde dupa conectare.
AAA
750
~
1000
50
~
70
4. Scoateti capacul sloturilor pentru baterii. Introduceti acumulatorii format AAsau
AAA NiMH in sloturile incarcatorului conform indicatiilor de polaritate(+/-).
Contactele pentru bateriile AA si AAA sunt asezate diferit in exteriorulrespectiv
interiorul suportului sloturilor pentru incarcare. (Fig.2) Candintroduceti bateriile
reincarcabile AAA in incarcator, inclinati bateriile pentrua va asigura in ceea ce
priveste contactul polilor bateriilor cu contacteleadecvate ale incarcatorului
(Fig.3).
5. Indicatorul de prezenta a acumulatorilor si cel de incarcare vor palpai cufrecventa
redusa pe parcursul incarcarii.
6. Daca sunt introduse in mod accidental in incarcator baterii uzuale (alcaline,
nealcaline, litiu sau alcaline reincarcabile) sau acumulatori defecti,indicatorii de
prezenta si de avertizare vor palpai cu frecventa marita siincarcatorul va intrerupe
incarcarea. Toti ceilalti indicatori ai incarcatoruluise vor stinge.
7. Daca incarcatorul nu functioneaza corespunzator, toti indicatorii vor ramanestinsi.
Indicatorul de confirmare a conectarii la sursa de curent va palpai.Incarcatorul
va intrerupe incarcarea.
8. Indicatorul de prezenta a acumulatorului va ramane aprins candacumulatorul
este complet incarcat si incarcatorul trece in regim deincarcare de mentinere
cu curent redus. Indicatorul de incarcare completase va aprinde cand toti
acumulatorii vor fi complet incarcati.
9. Dupa ce incarcarea este finalizata, deconectati incarcatorul de la sursa
dealimentare si scoateti acumulatorii.
10. Ceasul digital este alimentat de o baterie tip buton. Vezi fig. 5 pentru detaliide
operare.
Pentru performante maxime si sigurante deplina, incarcati
acumulatorii GP NiMHcu incarcatorul GP PowerBank.
Atentie!
1. In cazul acumulatorilor noi, sunt necesare 2-3 cicluri de incarcaredescarcarepentru
ca acumulatorii sa ofere performante optime. Dacaacumulatorii au fost neutilizati
mai mult de o saptamana, se recomandareincarcarea inainte de utilizare.
2. Este normal ca in timpul incarcarii acumulatorii sa se incalzeasca, urmandsa
revina la temperatura camerei dupa ce incarcarea este finalizata.
3. Pentru o utilizare corespunzatoare, folositi incarcatorul GP PowerBank la
temperatura camerei, fara a acoperii orificiile de ventilatie.
4. Timpul de incarcare variaza in functie de capacitatea acumulatorilor (vezitabelul
cu timpii de incarcare).
5. Scoateti acumulatorii din dispozitivele electrice daca acestea nu vor fifolosite o
perioada indelungata de timp.
6. Daca performantele acumulatorilor scad substantial, inlocuiti acumulatorii.
Precautii
1. Utilizati numai acumulatori GP Nickel Metal Hybride (NiMH).
2. Nu folositi baterii uzuale (alcaline sau nealcaline, litiu, alcaline reincarcabile)
sau orice alte tipuri de baterii sau acumulatori necorespunzatoare, existandriscul
scurgerilor sau arsurilor.
3. Nu folositi cabluri de alimentare sau prelungitoare nerecomandate de GP, in
caz contrar existand riscul producerii incendiilor, electrocutarii sau ranirii.
4. Deconectati incarcatorul de la sursa de curent inainte de a-l curata.
5. Nu scurt ciruitati acumulatorii.
6. Nu udati, incinerati sau dezasamblati incarcatorul sau acumulatorii.
7. A se folosi numai in incaperi sau locuri uscate. A nu se expune la ploaie, zapada
sau conditii extreme.
Nu aruncati aparatura electrica veche cu gunoiul menajer. Contactati autoritatile locale
Pa stwo ryzyko wyst pienia negatywnego wpáywu na
pentru a primi informatiile necesare legat de posibilitatile de reciclare disponibile.
Aceste deseuri pot contine substante periculoase care pot afecta negativ sanatatea
si viata noastra a tuturor.
RO
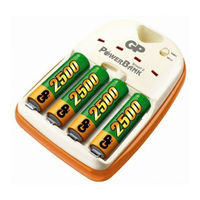
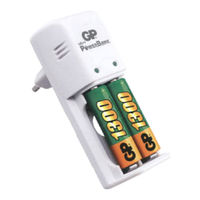
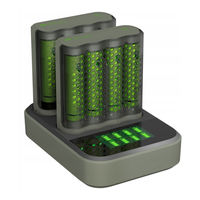
Зарядное устройство GP PowerBank H650C PB65(1-4 x AA/AAA NiMH, 4 x GP 2700 Series AA , время заряда ~ 1 час.)


нет отзывов
Код товара: 0133778
- Manuals
- Brands
- GP Manuals
- Battery Charger
ManualsLib has more than 51 GP Battery Charger manuals
Click on an alphabet below to see the full list of models starting with that letter:
B
D
E
G
H
K
L
M
N
P
Q
R
S
U
V
W
Popular manuals

3 pages
PowerBank series Instruction Manual
32 pages
U411 Instruction Manual

3 pages
PowerBank M520 Instruction Manual

5 pages
PowerBank Quick 2 Quick Start Manual
6 pages
SMART 2 Instruction Manual

4 pages
PowerBank 4 Instruction Manual

10 pages
ReCyko E811 Instruction Manual
11 pages
ReCyko B631 Instruction Manual
3 pages
PowerBank MINI Instruction Manual

6 pages
ReCyko B631 Instruction Manual

3 pages
E211 Instruction Manual
5 pages
ReCyko E811 Instruction Manual
10 pages
P461 Instruction Manual
4 pages
ReCyko Pro D461 Instruction Manual
2 pages
QP0A Instruction Manual

5 pages
P461 Instruction Manual
5 pages
D451 Instruction Manual
5 pages
M451 Instruction Manual
5 pages
PowerBank Quick 2 Instruction Manual

4 pages
H650C Instruction Manual
Featured manuals

Universal PowerBank — Battery Charger Manual
Models
Document Type
B
B221

Instruction Manual
B421
Instruction Manual
B56499
Instruction Manual
D
D451
Instruction Manual
D461
Instruction Manual
E
E211
Instruction Manual
E411
Instruction Manual
EZ Digital
Instruction Manual
G
GC1A
Instruction Manual
GM3A
Instruction Manual
H
H650C
Instruction Manual
K
KB02GS
Instruction Manual
L
L111
Instruction Manual
L211
Instruction Manual
M
M451
Instruction Manual • Instruction Manual
M520
Instruction Manual
N
NiMH
Instruction Manual
P
P461
Instruction Manual • Instruction Manual
PowerBank 4
Instruction Manual
PowerBank FN02M
Instruction Manual
PowerBank M510
Instruction Manual
PowerBank M520
Instruction Manual
PowerBank M540
Instruction Manual
PowerBank MINI
Instruction Manual
PowerBank Quick 2
Quick Start Manual • Instruction Manual
PowerBank series
Instruction Manual
PowerBank U211
Instruction Manual
Q
QP0A
Instruction Manual
QP1A
Instruction Manual
QS0A
Instruction Manual
R
ReCyko B631
Instruction Manual • Instruction Manual • Instruction Manual
ReCyko B631-2B1
Instruction Manual
Recyko Charge 10 S491
Instruction Manual
ReCyko E811
Instruction Manual • Instruction Manual
ReCyko Pro D461
Instruction Manual
ReCyko+ GPAR05
Instruction Manual
S
SMART 2
Instruction Manual
U
U411
Instruction Manual • Instruction Manual
Universal PowerBank
User Manual
V
V600D
Instruction Manual
W
WM2A
Instruction Manual
File Specifications:1023/1023671-h650c.pdf file (18 May 2023) |
Accompanying Data:
GP H650C Battery Charger, Kitchen Appliances PDF Instruction Manua (Updated: Thursday 18th of May 2023 09:59:25 PM)
Rating: 4.7 (rated by 29 users)
Compatible devices: PB22, SMART 2, PowerBank MINI, U411, V800c, Universal Power Bank, PB420, GM3A.
Recommended Documentation:
Manual, Instruction Manua (Text Version):
(Ocr-Read Summary of Contents of some pages of the GP H650C Document (Main Content), UPD: 18 May 2023)
Recommended: CDE9846, HAF2-2115, 742-115, Maestro Maestro Wireless Speaker Lamp
Links & Tools
-
For quesons or problems, please call Tumbl Trak at (800) 331-4362 Hurdle Helper User GuideHurdle Helper User Guide Product Features: Base Mat (3’ x 4’) (2) 46” segmented long pieces with Velcro aps (4) 24” long (1) rectangular 15” x 10” The Hurdle Helper is an innovave syst …
Hurdle Helper 3
-
All disclosures, notices and warranty conditions are being written on the EKWB website. Please read terms of use. Released on 27th of June, 2016. Revision 1.0 Installation manual for EK-FC1080 GTX Strix water block This product is intended for installation only by ex …
EK-FC1080 GTX Strix 2
-
Read the Operating Instructions and the chapter «For your safety» before operating the machine. Keep the operating instructions near the machine.Read the Operating Instructions of your coff ee machine for more information.Your device may diff er from the illustrations shown. The functions are identical.Fran …
UT320 8
-
1 ®SNT-200M(W) & SNT-200MP(W) LARGE-FORMAT MULTISPORT PORTABLE & WALL-MOUNTED ELECTRONIC SCOREBOARD OPERATING MANUAL Revised January 28, 2012 …
Score-N-Time SNT-230M 27
Operating Impressions, Questions and Answers: