Introduction
Now that you have read the GoogleTest Primer and learned how to
write tests using GoogleTest, it’s time to learn some new tricks. This document
will show you more assertions as well as how to construct complex failure
messages, propagate fatal failures, reuse and speed up your test fixtures, and
use various flags with your tests.
More Assertions
This section covers some less frequently used, but still significant,
assertions.
Explicit Success and Failure
See Explicit Success and Failure in
the Assertions Reference.
Exception Assertions
See Exception Assertions in the Assertions
Reference.
Predicate Assertions for Better Error Messages
Even though GoogleTest has a rich set of assertions, they can never be complete,
as it’s impossible (nor a good idea) to anticipate all scenarios a user might
run into. Therefore, sometimes a user has to use EXPECT_TRUE() to check a
complex expression, for lack of a better macro. This has the problem of not
showing you the values of the parts of the expression, making it hard to
understand what went wrong. As a workaround, some users choose to construct the
failure message by themselves, streaming it into EXPECT_TRUE(). However, this
is awkward especially when the expression has side-effects or is expensive to
evaluate.
GoogleTest gives you three different options to solve this problem:
Using an Existing Boolean Function
If you already have a function or functor that returns bool (or a type that
can be implicitly converted to bool), you can use it in a predicate
assertion to get the function arguments printed for free. See
EXPECT_PRED* in the Assertions
Reference for details.
Using a Function That Returns an AssertionResult
While EXPECT_PRED*() and friends are handy for a quick job, the syntax is not
satisfactory: you have to use different macros for different arities, and it
feels more like Lisp than C++. The ::testing::AssertionResult class solves
this problem.
An AssertionResult object represents the result of an assertion (whether it’s
a success or a failure, and an associated message). You can create an
AssertionResult using one of these factory functions:
namespace testing {

// Returns an AssertionResult object to indicate that an assertion has
// succeeded.
AssertionResult AssertionSuccess();

// Returns an AssertionResult object to indicate that an assertion has
// failed.
AssertionResult AssertionFailure();

}
You can then use the << operator to stream messages to the AssertionResult
object.
To provide more readable messages in Boolean assertions (e.g. EXPECT_TRUE()),
write a predicate function that returns AssertionResult instead of bool. For
example, if you define IsEven() as:
testing::AssertionResult IsEven(int n) {
  if ((n % 2) == 0)
    return testing::AssertionSuccess();
  else
    return testing::AssertionFailure() << n << " is odd";
}
instead of:
bool IsEven(int n) {
  return (n % 2) == 0;
}
the failed assertion EXPECT_TRUE(IsEven(Fib(4))) will print:
Value of: IsEven(Fib(4))
  Actual: false (3 is odd)
Expected: true
instead of a more opaque
Value of: IsEven(Fib(4))
  Actual: false
Expected: true
If you want informative messages in EXPECT_FALSE and ASSERT_FALSE as well
(one third of Boolean assertions in the Google code base are negative ones), and
are fine with making the predicate slower in the success case, you can supply a
success message:
testing::AssertionResult IsEven(int n) {
  if ((n % 2) == 0)
    return testing::AssertionSuccess() << n << " is even";
  else
    return testing::AssertionFailure() << n << " is odd";
}
Then the statement EXPECT_FALSE(IsEven(Fib(6))) will print
  Value of: IsEven(Fib(6))
     Actual: true (8 is even)
  Expected: false
Using a Predicate-Formatter
If you find the default message generated by
EXPECT_PRED* and
EXPECT_TRUE unsatisfactory, or some
arguments to your predicate do not support streaming to ostream, you can
instead use predicate-formatter assertions to fully customize how the
message is formatted. See
EXPECT_PRED_FORMAT* in the
Assertions Reference for details.
Floating-Point Comparison
See Floating-Point Comparison in the
Assertions Reference.
Floating-Point Predicate-Format Functions
Some floating-point operations are useful, but not that often used. In order to
avoid an explosion of new macros, we provide them as predicate-format functions
that can be used in the predicate assertion macro
EXPECT_PRED_FORMAT2, for
example:
using ::testing::FloatLE;
using ::testing::DoubleLE;
...
EXPECT_PRED_FORMAT2(FloatLE, val1, val2);
EXPECT_PRED_FORMAT2(DoubleLE, val1, val2);
The above code verifies that val1 is less than, or approximately equal to,
val2.
Asserting Using gMock Matchers
See EXPECT_THAT in the Assertions
Reference.
More String Assertions
(Please read the previous section first if
you haven’t.)
You can use the gMock string matchers
with EXPECT_THAT to do more string
comparison tricks (sub-string, prefix, suffix, regular expression, and etc). For
example,
using ::testing::HasSubstr;
using ::testing::MatchesRegex;
...
  ASSERT_THAT(foo_string, HasSubstr("needle"));
  EXPECT_THAT(bar_string, MatchesRegex("\\w*\\d+"));
Windows HRESULT assertions
See Windows HRESULT Assertions in the
Assertions Reference.
Type Assertions
You can call the function
::testing::StaticAssertTypeEq<T1, T2>();
to assert that types T1 and T2 are the same. The function does nothing if
the assertion is satisfied. If the types are different, the function call will
fail to compile, the compiler error message will say that T1 and T2 are not the and most likely (depending on the compiler) show you the actual
same type
values of T1 and T2. This is mainly useful inside template code.
Caveat: When used inside a member function of a class template or a function
template, StaticAssertTypeEq<T1, T2>() is effective only if the function is
instantiated. For example, given:
template <typename T> class Foo {
 public:
  void Bar() { testing::StaticAssertTypeEq<int, T>(); }
};
the code:
void Test1() { Foo<bool> foo; }
will not generate a compiler error, as Foo<bool>::Bar() is never actually
instantiated. Instead, you need:
void Test2() { Foo<bool> foo; foo.Bar(); }
to cause a compiler error.
Assertion Placement
You can use assertions in any C++ function. In particular, it doesn’t have to be
a method of the test fixture class. The one constraint is that assertions that
generate a fatal failure (FAIL* and ASSERT_*) can only be used in
void-returning functions. This is a consequence of Google’s not using
exceptions. By placing it in a non-void function you’ll get a confusing compile
error like "error: void value not ignored as it ought to be" or "cannot or
initialize return object of type 'bool' with an rvalue of type 'void'"
"error: no viable conversion from 'void' to 'string'".
If you need to use fatal assertions in a function that returns non-void, one
option is to make the function return the value in an out parameter instead. For
example, you can rewrite T2 Foo(T1 x) to void Foo(T1 x, T2* result). You
need to make sure that *result contains some sensible value even when the
function returns prematurely. As the function now returns void, you can use
any assertion inside of it.
If changing the function’s type is not an option, you should just use assertions
that generate non-fatal failures, such as ADD_FAILURE* and EXPECT_*.
NOTE: Constructors and destructors are not considered void-returning functions,
according to the C++ language specification, and so you may not use fatal
assertions in them; you’ll get a compilation error if you try. Instead, either
call abort and crash the entire test executable, or put the fatal assertion in
a SetUp/TearDown function; see
constructor/destructor vs. SetUp/TearDown
WARNING: A fatal assertion in a helper function (private void-returning method)
called from a constructor or destructor does not terminate the current test, as
your intuition might suggest: it merely returns from the constructor or
destructor early, possibly leaving your object in a partially-constructed or
partially-destructed state! You almost certainly want to abort or use
SetUp/TearDown instead.
Skipping test execution
Related to the assertions SUCCEED() and FAIL(), you can prevent further test
execution at runtime with the GTEST_SKIP() macro. This is useful when you need
to check for preconditions of the system under test during runtime and skip
tests in a meaningful way.
GTEST_SKIP() can be used in individual test cases or in the SetUp() methods
of classes derived from either ::testing::Environment or ::testing::Test.
For example:
TEST(SkipTest, DoesSkip) {
  GTEST_SKIP() << "Skipping single test";
  EXPECT_EQ(0, 1);  // Won't fail; it won't be executed
}

class SkipFixture : public ::testing::Test {
 protected:
  void SetUp() override {
    GTEST_SKIP() << "Skipping all tests for this fixture";
  }
};

// Tests for SkipFixture won't be executed.
TEST_F(SkipFixture, SkipsOneTest) {
  EXPECT_EQ(5, 7);  // Won't fail
}
As with assertion macros, you can stream a custom message into GTEST_SKIP().
Teaching GoogleTest How to Print Your Values
When a test assertion such as EXPECT_EQ fails, GoogleTest prints the argument
values to help you debug. It does this using a user-extensible value printer.
This printer knows how to print built-in C++ types, native arrays, STL
containers, and any type that supports the << operator. For other types, it
prints the raw bytes in the value and hopes that you the user can figure it out.
As mentioned earlier, the printer is extensible. That means you can teach it
to do a better job at printing your particular type than to dump the bytes. To
do that, define an AbslStringify() overload as a friend function template
for your type:
namespace foo {

class Point {  // We want GoogleTest to be able to print instances of this.
  ...
  // Provide a friend overload.
  template <typename Sink>
  friend void AbslStringify(Sink& sink, const Point& point) {
    absl::Format(&sink, "(%d, %d)", point.x, point.y);
  }

  int x;
  int y;
};

// If you can't declare the function in the class it's important that the
// AbslStringify overload is defined in the SAME namespace that defines Point.
// C++'s look-up rules rely on that.
enum class EnumWithStringify { kMany = 0, kChoices = 1 };

template <typename Sink>
void AbslStringify(Sink& sink, EnumWithStringify e) {
  absl::Format(&sink, "%s", e == EnumWithStringify::kMany ? "Many" : "Choices");
}

}  // namespace foo
Note: AbslStringify() utilizes a generic “sink” buffer to construct its
string. For more information about supported operations on AbslStringify()’s
sink, see go/abslstringify.
AbslStringify() can also use absl::StrFormat’s catch-all %v type specifier
within its own format strings to perform type deduction. Point above could be
formatted as "(%v, %v)" for example, and deduce the int values as %d.
Sometimes, AbslStringify() might not be an option: your team may wish to print
types with extra debugging information for testing purposes only. If so, you can
instead define a PrintTo() function like this:
#include <ostream>

namespace foo {

class Point {
  ...
  friend void PrintTo(const Point& point, std::ostream* os) {
    *os << "(" << point.x << "," << point.y << ")";
  }

  int x;
  int y;
};

// If you can't declare the function in the class it's important that PrintTo()
// is defined in the SAME namespace that defines Point.  C++'s look-up rules
// rely on that.
void PrintTo(const Point& point, std::ostream* os) {
    *os << "(" << point.x << "," << point.y << ")";
}

}  // namespace foo
If you have defined both AbslStringify() and PrintTo(), the latter will be
used by GoogleTest. This allows you to customize how the value appears in
GoogleTest’s output without affecting code that relies on the behavior of
AbslStringify().
If you have an existing << operator and would like to define an
AbslStringify(), the latter will be used for GoogleTest printing.
If you want to print a value x using GoogleTest’s value printer yourself, just
call ::testing::PrintToString(x), which returns an std::string:
vector<pair<Point, int> > point_ints = GetPointIntVector();

EXPECT_TRUE(IsCorrectPointIntVector(point_ints))
    << "point_ints = " << testing::PrintToString(point_ints);
For more details regarding AbslStringify() and its integration with other
libraries, see go/abslstringify.
Death Tests
In many applications, there are assertions that can cause application failure if
a condition is not met. These consistency checks, which ensure that the program
is in a known good state, are there to fail at the earliest possible time after
some program state is corrupted. If the assertion checks the wrong condition,
then the program may proceed in an erroneous state, which could lead to memory
corruption, security holes, or worse. Hence it is vitally important to test that
such assertion statements work as expected.
Since these precondition checks cause the processes to die, we call such tests
death tests. More generally, any test that checks that a program terminates
(except by throwing an exception) in an expected fashion is also a death test.
Note that if a piece of code throws an exception, we don’t consider it “death”
for the purpose of death tests, as the caller of the code could catch the
exception and avoid the crash. If you want to verify exceptions thrown by your
code, see Exception Assertions.
If you want to test EXPECT_*()/ASSERT_*() failures in your test code, see
“Catching” Failures.
How to Write a Death Test
GoogleTest provides assertion macros to support death tests. See
Death Assertions in the Assertions Reference
for details.
To write a death test, simply use one of the macros inside your test function.
For example,
TEST(MyDeathTest, Foo) {
  // This death test uses a compound statement.
  ASSERT_DEATH({
    int n = 5;
    Foo(&n);
  }, "Error on line .* of Foo()");
}

TEST(MyDeathTest, NormalExit) {
  EXPECT_EXIT(NormalExit(), testing::ExitedWithCode(0), "Success");
}

TEST(MyDeathTest, KillProcess) {
  EXPECT_EXIT(KillProcess(), testing::KilledBySignal(SIGKILL),
              "Sending myself unblockable signal");
}
verifies that:
- calling
Foo(5)causes the process to die with the given error message, - calling
NormalExit()causes the process to print"Success"to stderr and
exit with exit code 0, and - calling
KillProcess()kills the process with signalSIGKILL.
The test function body may contain other assertions and statements as well, if
necessary.
Note that a death test only cares about three things:
- does
statementabort or exit the process? - (in the case of
ASSERT_EXITandEXPECT_EXIT) does the exit status
satisfypredicate? Or (in the case ofASSERT_DEATHandEXPECT_DEATH)
is the exit status non-zero? And - does the stderr output match
matcher?
In particular, if statement generates an ASSERT_* or EXPECT_* failure, it
will not cause the death test to fail, as GoogleTest assertions don’t abort
the process.
Death Test Naming
IMPORTANT: We strongly recommend you to follow the convention of naming your
test suite (not test) *DeathTest when it contains a death test, as
demonstrated in the above example. The
Death Tests And Threads section below explains why.
If a test fixture class is shared by normal tests and death tests, you can use
using or typedef to introduce an alias for the fixture class and avoid
duplicating its code:
class FooTest : public testing::Test { ... };

using FooDeathTest = FooTest;

TEST_F(FooTest, DoesThis) {
  // normal test
}

TEST_F(FooDeathTest, DoesThat) {
  // death test
}
Regular Expression Syntax
When built with Bazel and using Abseil, GoogleTest uses the
RE2 syntax. Otherwise, for POSIX
systems (Linux, Cygwin, Mac), GoogleTest uses the
POSIX extended regular expression
syntax. To learn about POSIX syntax, you may want to read this
Wikipedia entry.
On Windows, GoogleTest uses its own simple regular expression implementation. It
lacks many features. For example, we don’t support union ("x|y"), grouping
("(xy)"), brackets ("[xy]"), and repetition count ("x{5,7}"), among
others. Below is what we do support (A denotes a literal character, period
(.), or a single \\ escape sequence; x and y denote regular
expressions.):
| Expression | Meaning |
|---|---|
c |
matches any literal character c |
\\d |
matches any decimal digit |
\\D |
matches any character that’s not a decimal digit |
\\f |
matches \f |
\\n |
matches \n |
\\r |
matches \r |
\\s |
matches any ASCII whitespace, including \n |
\\S |
matches any character that’s not a whitespace |
\\t |
matches \t |
\\v |
matches \v |
\\w |
matches any letter, _, or decimal digit |
\\W |
matches any character that \\w doesn’t match |
\\c |
matches any literal character c, which must be a punctuation |
. |
matches any single character except \n |
A? |
matches 0 or 1 occurrences of A |
A* |
matches 0 or many occurrences of A |
A+ |
matches 1 or many occurrences of A |
^ |
matches the beginning of a string (not that of each line) |
$ |
matches the end of a string (not that of each line) |
xy |
matches x followed by y |
To help you determine which capability is available on your system, GoogleTest
defines macros to govern which regular expression it is using. The macros are:
GTEST_USES_SIMPLE_RE=1 or GTEST_USES_POSIX_RE=1. If you want your death
tests to work in all cases, you can either #if on these macros or use the more
limited syntax only.
How It Works
See Death Assertions in the Assertions
Reference.
Death Tests And Threads
The reason for the two death test styles has to do with thread safety. Due to
well-known problems with forking in the presence of threads, death tests should
be run in a single-threaded context. Sometimes, however, it isn’t feasible to
arrange that kind of environment. For example, statically-initialized modules
may start threads before main is ever reached. Once threads have been created,
it may be difficult or impossible to clean them up.
GoogleTest has three features intended to raise awareness of threading issues.
- A warning is emitted if multiple threads are running when a death test is
encountered. - Test suites with a name ending in “DeathTest” are run before all other
tests. - It uses
clone()instead offork()to spawn the child process on Linux
(clone()is not available on Cygwin and Mac), asfork()is more likely
to cause the child to hang when the parent process has multiple threads.
It’s perfectly fine to create threads inside a death test statement; they are
executed in a separate process and cannot affect the parent.
Death Test Styles
The “threadsafe” death test style was introduced in order to help mitigate the
risks of testing in a possibly multithreaded environment. It trades increased
test execution time (potentially dramatically so) for improved thread safety.
The automated testing framework does not set the style flag. You can choose a
particular style of death tests by setting the flag programmatically:
GTEST_FLAG_SET(death_test_style, "threadsafe");
You can do this in main() to set the style for all death tests in the binary,
or in individual tests. Recall that flags are saved before running each test and
restored afterwards, so you need not do that yourself. For example:
int main(int argc, char** argv) {
  testing::InitGoogleTest(&argc, argv);
  GTEST_FLAG_SET(death_test_style, "fast");
  return RUN_ALL_TESTS();
}

TEST(MyDeathTest, TestOne) {
  GTEST_FLAG_SET(death_test_style, "threadsafe");
  // This test is run in the "threadsafe" style:
  ASSERT_DEATH(ThisShouldDie(), "");
}

TEST(MyDeathTest, TestTwo) {
  // This test is run in the "fast" style:
  ASSERT_DEATH(ThisShouldDie(), "");
}
Caveats
The statement argument of ASSERT_EXIT() can be any valid C++ statement. If
it leaves the current function via a return statement or by throwing an
exception, the death test is considered to have failed. Some GoogleTest macros
may return from the current function (e.g. ASSERT_TRUE()), so be sure to avoid
them in statement.
Since statement runs in the child process, any in-memory side effect (e.g.
modifying a variable, releasing memory, etc) it causes will not be observable
in the parent process. In particular, if you release memory in a death test,
your program will fail the heap check as the parent process will never see the
memory reclaimed. To solve this problem, you can
- try not to free memory in a death test;
- free the memory again in the parent process; or
- do not use the heap checker in your program.
Due to an implementation detail, you cannot place multiple death test assertions
on the same line; otherwise, compilation will fail with an unobvious error
message.
Despite the improved thread safety afforded by the “threadsafe” style of death
test, thread problems such as deadlock are still possible in the presence of
handlers registered with pthread_atfork(3).
Using Assertions in Sub-routines
Note: If you want to put a series of test assertions in a subroutine to check
for a complex condition, consider using
a custom GMock matcher instead. This lets you
provide a more readable error message in case of failure and avoid all of the
issues described below.
Adding Traces to Assertions
If a test sub-routine is called from several places, when an assertion inside it
fails, it can be hard to tell which invocation of the sub-routine the failure is
from. You can alleviate this problem using extra logging or custom failure
messages, but that usually clutters up your tests. A better solution is to use
the SCOPED_TRACE macro or the ScopedTrace utility:
ScopedTrace trace("file_path", line_number, message);
where message can be anything streamable to std::ostream. SCOPED_TRACE
macro will cause the current file name, line number, and the given message to be
added in every failure message. ScopedTrace accepts explicit file name and
line number in arguments, which is useful for writing test helpers. The effect
will be undone when the control leaves the current lexical scope.
For example,
10: void Sub1(int n) {
11:   EXPECT_EQ(Bar(n), 1);
12:   EXPECT_EQ(Bar(n + 1), 2);
13: }
14:
15: TEST(FooTest, Bar) {
16:   {
17:     SCOPED_TRACE("A");  // This trace point will be included in
18:                         // every failure in this scope.
19:     Sub1(1);
20:   }
21:   // Now it won't.
22:   Sub1(9);
23: }
could result in messages like these:
path/to/foo_test.cc:11: Failure
Value of: Bar(n)
Expected: 1
  Actual: 2
Google Test trace:
path/to/foo_test.cc:17: A

path/to/foo_test.cc:12: Failure
Value of: Bar(n + 1)
Expected: 2
  Actual: 3
Without the trace, it would’ve been difficult to know which invocation of
Sub1() the two failures come from respectively. (You could add an extra
message to each assertion in Sub1() to indicate the value of n, but that’s
tedious.)
Some tips on using SCOPED_TRACE:
- With a suitable message, it’s often enough to use
SCOPED_TRACEat the
beginning of a sub-routine, instead of at each call site. - When calling sub-routines inside a loop, make the loop iterator part of the
message inSCOPED_TRACEsuch that you can know which iteration the failure
is from. - Sometimes the line number of the trace point is enough for identifying the
particular invocation of a sub-routine. In this case, you don’t have to
choose a unique message forSCOPED_TRACE. You can simply use"". - You can use
SCOPED_TRACEin an inner scope when there is one in the outer
scope. In this case, all active trace points will be included in the failure
messages, in reverse order they are encountered. - The trace dump is clickable in Emacs — hit
returnon a line number and
you’ll be taken to that line in the source file!
Propagating Fatal Failures
A common pitfall when using ASSERT_* and FAIL* is not understanding that
when they fail they only abort the current function, not the entire test. For
example, the following test will segfault:
void Subroutine() {
  // Generates a fatal failure and aborts the current function.
  ASSERT_EQ(1, 2);

  // The following won't be executed.
  ...
}

TEST(FooTest, Bar) {
  Subroutine();  // The intended behavior is for the fatal failure
                 // in Subroutine() to abort the entire test.

  // The actual behavior: the function goes on after Subroutine() returns.
  int* p = nullptr;
  *p = 3;  // Segfault!
}
To alleviate this, GoogleTest provides three different solutions. You could use
either exceptions, the (ASSERT|EXPECT)_NO_FATAL_FAILURE assertions or the
HasFatalFailure() function. They are described in the following two
subsections.
Asserting on Subroutines with an exception
The following code can turn ASSERT-failure into an exception:
class ThrowListener : public testing::EmptyTestEventListener {
  void OnTestPartResult(const testing::TestPartResult& result) override {
    if (result.type() == testing::TestPartResult::kFatalFailure) {
      throw testing::AssertionException(result);
    }
  }
};
int main(int argc, char** argv) {
  ...
  testing::UnitTest::GetInstance()->listeners().Append(new ThrowListener);
  return RUN_ALL_TESTS();
}
This listener should be added after other listeners if you have any, otherwise
they won’t see failed OnTestPartResult.
Asserting on Subroutines
As shown above, if your test calls a subroutine that has an ASSERT_* failure
in it, the test will continue after the subroutine returns. This may not be what
you want.
Often people want fatal failures to propagate like exceptions. For that
GoogleTest offers the following macros:
| Fatal assertion | Nonfatal assertion | Verifies |
|---|---|---|
ASSERT_NO_FATAL_FAILURE(statement); |
EXPECT_NO_FATAL_FAILURE(statement); |
statement doesn’t generate any new fatal failures in the current thread. |
Only failures in the thread that executes the assertion are checked to determine
the result of this type of assertions. If statement creates new threads,
failures in these threads are ignored.
Examples:
ASSERT_NO_FATAL_FAILURE(Foo());

int i;
EXPECT_NO_FATAL_FAILURE({
  i = Bar();
});
Assertions from multiple threads are currently not supported on Windows.
Checking for Failures in the Current Test
HasFatalFailure() in the ::testing::Test class returns true if an
assertion in the current test has suffered a fatal failure. This allows
functions to catch fatal failures in a sub-routine and return early.
class Test {
 public:
  ...
  static bool HasFatalFailure();
};
The typical usage, which basically simulates the behavior of a thrown exception,
is:
TEST(FooTest, Bar) {
  Subroutine();
  // Aborts if Subroutine() had a fatal failure.
  if (HasFatalFailure()) return;

  // The following won't be executed.
  ...
}
If HasFatalFailure() is used outside of TEST() , TEST_F() , or a test
fixture, you must add the ::testing::Test:: prefix, as in:
if (testing::Test::HasFatalFailure()) return;
Similarly, HasNonfatalFailure() returns true if the current test has at
least one non-fatal failure, and HasFailure() returns true if the current
test has at least one failure of either kind.
Logging Additional Information
In your test code, you can call RecordProperty("key", value) to log additional
information, where value can be either a string or an int. The last value
recorded for a key will be emitted to the
XML output if you specify one. For example, the
test
TEST_F(WidgetUsageTest, MinAndMaxWidgets) {
  RecordProperty("MaximumWidgets", ComputeMaxUsage());
  RecordProperty("MinimumWidgets", ComputeMinUsage());
}
will output XML like this:
  ...
    <testcase name="MinAndMaxWidgets" file="test.cpp" line="1" status="run" time="0.006" classname="WidgetUsageTest" MaximumWidgets="12" MinimumWidgets="9" />
  ...
NOTE:
RecordProperty()is a static member of theTestclass. Therefore it
needs to be prefixed with::testing::Test::if used outside of the
TESTbody and the test fixture class.keymust be a valid XML attribute name, and cannot conflict with the
ones already used by GoogleTest (name,status,time,classname,
type_param, andvalue_param).- Calling
RecordProperty()outside of the lifespan of a test is allowed.
If it’s called outside of a test but between a test suite’s
SetUpTestSuite()andTearDownTestSuite()methods, it will be
attributed to the XML element for the test suite. If it’s called outside
of all test suites (e.g. in a test environment), it will be attributed to
the top-level XML element.
Sharing Resources Between Tests in the Same Test Suite
GoogleTest creates a new test fixture object for each test in order to make
tests independent and easier to debug. However, sometimes tests use resources
that are expensive to set up, making the one-copy-per-test model prohibitively
expensive.
If the tests don’t change the resource, there’s no harm in their sharing a
single resource copy. So, in addition to per-test set-up/tear-down, GoogleTest
also supports per-test-suite set-up/tear-down. To use it:
- In your test fixture class (say
FooTest), declare asstaticsome member
variables to hold the shared resources. - Outside your test fixture class (typically just below it), define those
member variables, optionally giving them initial values. - In the same test fixture class, define a public member function
static void(remember not to spell it as
SetUpTestSuite()SetupTestSuitewith a
smallu!) to set up the shared resources and astatic voidfunction to tear them down.
TearDownTestSuite()
That’s it! GoogleTest automatically calls SetUpTestSuite() before running the
first test in the FooTest test suite (i.e. before creating the first
FooTest object), and calls TearDownTestSuite() after running the last test
in it (i.e. after deleting the last FooTest object). In between, the tests can
use the shared resources.
Remember that the test order is undefined, so your code can’t depend on a test
preceding or following another. Also, the tests must either not modify the state
of any shared resource, or, if they do modify the state, they must restore the
state to its original value before passing control to the next test.
Note that SetUpTestSuite() may be called multiple times for a test fixture
class that has derived classes, so you should not expect code in the function
body to be run only once. Also, derived classes still have access to shared
resources defined as static members, so careful consideration is needed when
managing shared resources to avoid memory leaks if shared resources are not
properly cleaned up in TearDownTestSuite().
Here’s an example of per-test-suite set-up and tear-down:
class FooTest : public testing::Test {
protected:
// Per-test-suite set-up.
// Called before the first test in this test suite.
// Can be omitted if not needed.
static void SetUpTestSuite() {
shared_resource_ = new ...;
// If `shared_resource_` is **not deleted** in `TearDownTestSuite()`,
// reallocation should be prevented because `SetUpTestSuite()` may be called
// in subclasses of FooTest and lead to memory leak.
//
// if (shared_resource_ == nullptr) {
// shared_resource_ = new ...;
// }
}
// Per-test-suite tear-down.
// Called after the last test in this test suite.
// Can be omitted if not needed.
static void TearDownTestSuite() {
delete shared_resource_;
shared_resource_ = nullptr;
}
// You can define per-test set-up logic as usual.
void SetUp() override { ... }
// You can define per-test tear-down logic as usual.
void TearDown() override { ... }
// Some expensive resource shared by all tests.
static T* shared_resource_;
};
T* FooTest::shared_resource_ = nullptr;
TEST_F(FooTest, Test1) {
... you can refer to shared_resource_ here ...
}
TEST_F(FooTest, Test2) {
... you can refer to shared_resource_ here ...
}
NOTE: Though the above code declares SetUpTestSuite() protected, it may
sometimes be necessary to declare it public, such as when using it with
TEST_P.
Global Set-Up and Tear-Down
Just as you can do set-up and tear-down at the test level and the test suite
level, you can also do it at the test program level. Here’s how.
First, you subclass the ::testing::Environment class to define a test
environment, which knows how to set-up and tear-down:
class Environment : public ::testing::Environment {
 public:
  ~Environment() override {}

  // Override this to define how to set up the environment.
  void SetUp() override {}

  // Override this to define how to tear down the environment.
  void TearDown() override {}
};
Then, you register an instance of your environment class with GoogleTest by
calling the ::testing::AddGlobalTestEnvironment() function:
Environment* AddGlobalTestEnvironment(Environment* env);
Now, when RUN_ALL_TESTS() is called, it first calls the SetUp() method of
each environment object, then runs the tests if none of the environments
reported fatal failures and GTEST_SKIP() was not called. RUN_ALL_TESTS()
always calls TearDown() with each environment object, regardless of whether or
not the tests were run.
It’s OK to register multiple environment objects. In this suite, their SetUp()
will be called in the order they are registered, and their TearDown() will be
called in the reverse order.
Note that GoogleTest takes ownership of the registered environment objects.
Therefore do not delete them by yourself.
You should call AddGlobalTestEnvironment() before RUN_ALL_TESTS() is called,
probably in main(). If you use gtest_main, you need to call this before
main() starts for it to take effect. One way to do this is to define a global
variable like this:
testing::Environment* const foo_env =
    testing::AddGlobalTestEnvironment(new FooEnvironment);
However, we strongly recommend you to write your own main() and call
AddGlobalTestEnvironment() there, as relying on initialization of global
variables makes the code harder to read and may cause problems when you register
multiple environments from different translation units and the environments have
dependencies among them (remember that the compiler doesn’t guarantee the order
in which global variables from different translation units are initialized).
Value-Parameterized Tests
Value-parameterized tests allow you to test your code with different
parameters without writing multiple copies of the same test. This is useful in a
number of situations, for example:
- You have a piece of code whose behavior is affected by one or more
command-line flags. You want to make sure your code performs correctly for
various values of those flags. - You want to test different implementations of an OO interface.
- You want to test your code over various inputs (a.k.a. data-driven testing).
This feature is easy to abuse, so please exercise your good sense when doing
it!
How to Write Value-Parameterized Tests
To write value-parameterized tests, first you should define a fixture class. It
must be derived from both testing::Test and testing::WithParamInterface<T>
(the latter is a pure interface), where T is the type of your parameter
values. For convenience, you can just derive the fixture class from
testing::TestWithParam<T>, which itself is derived from both testing::Test
and testing::WithParamInterface<T>. T can be any copyable type. If it’s a
raw pointer, you are responsible for managing the lifespan of the pointed
values.
NOTE: If your test fixture defines SetUpTestSuite() or TearDownTestSuite()
they must be declared public rather than protected in order to use
TEST_P.
class FooTest :
    public testing::TestWithParam<absl::string_view> {
  // You can implement all the usual fixture class members here.
  // To access the test parameter, call GetParam() from class
  // TestWithParam<T>.
};

// Or, when you want to add parameters to a pre-existing fixture class:
class BaseTest : public testing::Test {
  ...
};
class BarTest : public BaseTest,
                public testing::WithParamInterface<absl::string_view> {
  ...
};
Then, use the TEST_P macro to define as many test patterns using this fixture
as you want. The _P suffix is for “parameterized” or “pattern”, whichever you
prefer to think.
TEST_P(FooTest, DoesBlah) {
  // Inside a test, access the test parameter with the GetParam() method
  // of the TestWithParam<T> class:
  EXPECT_TRUE(foo.Blah(GetParam()));
  ...
}

TEST_P(FooTest, HasBlahBlah) {
  ...
}
Finally, you can use the INSTANTIATE_TEST_SUITE_P macro to instantiate the
test suite with any set of parameters you want. GoogleTest defines a number of
functions for generating test parameters—see details at
INSTANTIATE_TEST_SUITE_P in
the Testing Reference.
For example, the following statement will instantiate tests from the FooTest
test suite each with parameter values "meeny", "miny", and "moe" using the
Values parameter generator:
INSTANTIATE_TEST_SUITE_P(MeenyMinyMoe,
                         FooTest,
                         testing::Values("meeny", "miny", "moe"));
NOTE: The code above must be placed at global or namespace scope, not at
function scope.
The first argument to INSTANTIATE_TEST_SUITE_P is a unique name for the
instantiation of the test suite. The next argument is the name of the test
pattern, and the last is the
parameter generator.
The parameter generator expression is not evaluated until GoogleTest is
initialized (via InitGoogleTest()). Any prior initialization done in the
main function will be accessible from the parameter generator, for example,
the results of flag parsing.
You can instantiate a test pattern more than once, so to distinguish different
instances of the pattern, the instantiation name is added as a prefix to the
actual test suite name. Remember to pick unique prefixes for different
instantiations. The tests from the instantiation above will have these names:
MeenyMinyMoe/FooTest.DoesBlah/0for"meeny"MeenyMinyMoe/FooTest.DoesBlah/1for"miny"MeenyMinyMoe/FooTest.DoesBlah/2for"moe"MeenyMinyMoe/FooTest.HasBlahBlah/0for"meeny"MeenyMinyMoe/FooTest.HasBlahBlah/1for"miny"MeenyMinyMoe/FooTest.HasBlahBlah/2for"moe"
You can use these names in --gtest_filter.
The following statement will instantiate all tests from FooTest again, each
with parameter values "cat" and "dog" using the
ValuesIn parameter generator:
constexpr absl::string_view kPets[] = {"cat", "dog"};
INSTANTIATE_TEST_SUITE_P(Pets, FooTest, testing::ValuesIn(kPets));
The tests from the instantiation above will have these names:
Pets/FooTest.DoesBlah/0for"cat"Pets/FooTest.DoesBlah/1for"dog"Pets/FooTest.HasBlahBlah/0for"cat"Pets/FooTest.HasBlahBlah/1for"dog"
Please note that INSTANTIATE_TEST_SUITE_P will instantiate all tests in the
given test suite, whether their definitions come before or after the
INSTANTIATE_TEST_SUITE_P statement.
Additionally, by default, every TEST_P without a corresponding
INSTANTIATE_TEST_SUITE_P causes a failing test in test suite
GoogleTestVerification. If you have a test suite where that omission is not an
error, for example it is in a library that may be linked in for other reasons or
where the list of test cases is dynamic and may be empty, then this check can be
suppressed by tagging the test suite:
GTEST_ALLOW_UNINSTANTIATED_PARAMETERIZED_TEST(FooTest);
You can see sample7_unittest.cc and sample8_unittest.cc for more examples.
Creating Value-Parameterized Abstract Tests
In the above, we define and instantiate FooTest in the same source file.
Sometimes you may want to define value-parameterized tests in a library and let
other people instantiate them later. This pattern is known as abstract tests.
As an example of its application, when you are designing an interface you can
write a standard suite of abstract tests (perhaps using a factory function as
the test parameter) that all implementations of the interface are expected to
pass. When someone implements the interface, they can instantiate your suite to
get all the interface-conformance tests for free.
To define abstract tests, you should organize your code like this:
- Put the definition of the parameterized test fixture class (e.g.
FooTest)
in a header file, sayfoo_param_test.h. Think of this as declaring your
abstract tests. - Put the
TEST_Pdefinitions infoo_param_test.cc, which includes
foo_param_test.h. Think of this as implementing your abstract tests.
Once they are defined, you can instantiate them by including foo_param_test.h,
invoking INSTANTIATE_TEST_SUITE_P(), and depending on the library target that
contains foo_param_test.cc. You can instantiate the same abstract test suite
multiple times, possibly in different source files.
Specifying Names for Value-Parameterized Test Parameters
The optional last argument to INSTANTIATE_TEST_SUITE_P() allows the user to
specify a function or functor that generates custom test name suffixes based on
the test parameters. The function should accept one argument of type
testing::TestParamInfo<class ParamType>, and return std::string.
testing::PrintToStringParamName is a builtin test suffix generator that
returns the value of testing::PrintToString(GetParam()). It does not work for
std::string or C strings.
NOTE: test names must be non-empty, unique, and may only contain ASCII
alphanumeric characters. In particular, they
should not contain underscores
class MyTestSuite : public testing::TestWithParam<int> {};

TEST_P(MyTestSuite, MyTest)
{
  std::cout << "Example Test Param: " << GetParam() << std::endl;
}

INSTANTIATE_TEST_SUITE_P(MyGroup, MyTestSuite, testing::Range(0, 10),
                         testing::PrintToStringParamName());
Providing a custom functor allows for more control over test parameter name
generation, especially for types where the automatic conversion does not
generate helpful parameter names (e.g. strings as demonstrated above). The
following example illustrates this for multiple parameters, an enumeration type
and a string, and also demonstrates how to combine generators. It uses a lambda
for conciseness:
enum class MyType { MY_FOO = 0, MY_BAR = 1 };

class MyTestSuite : public testing::TestWithParam<std::tuple<MyType, std::string>> {
};

INSTANTIATE_TEST_SUITE_P(
    MyGroup, MyTestSuite,
    testing::Combine(
        testing::Values(MyType::MY_FOO, MyType::MY_BAR),
        testing::Values("A", "B")),
    [](const testing::TestParamInfo<MyTestSuite::ParamType>& info) {
      std::string name = absl::StrCat(
          std::get<0>(info.param) == MyType::MY_FOO ? "Foo" : "Bar",
          std::get<1>(info.param));
      absl::c_replace_if(name, [](char c) { return !std::isalnum(c); }, '_');
      return name;
    });
Typed Tests
Suppose you have multiple implementations of the same interface and want to make
sure that all of them satisfy some common requirements. Or, you may have defined
several types that are supposed to conform to the same “concept” and you want to
verify it. In both cases, you want the same test logic repeated for different
types.
While you can write one TEST or TEST_F for each type you want to test (and
you may even factor the test logic into a function template that you invoke from
the TEST), it’s tedious and doesn’t scale: if you want m tests over n
types, you’ll end up writing m*n TESTs.
Typed tests allow you to repeat the same test logic over a list of types. You
only need to write the test logic once, although you must know the type list
when writing typed tests. Here’s how you do it:
First, define a fixture class template. It should be parameterized by a type.
Remember to derive it from ::testing::Test:
template <typename T>
class FooTest : public testing::Test {
 public:
  ...
  using List = std::list<T>;
  static T shared_;
  T value_;
};
Next, associate a list of types with the test suite, which will be repeated for
each type in the list:
using MyTypes = ::testing::Types<char, int, unsigned int>;
TYPED_TEST_SUITE(FooTest, MyTypes);
The type alias (using or typedef) is necessary for the TYPED_TEST_SUITE
macro to parse correctly. Otherwise the compiler will think that each comma in
the type list introduces a new macro argument.
Then, use TYPED_TEST() instead of TEST_F() to define a typed test for this
test suite. You can repeat this as many times as you want:
TYPED_TEST(FooTest, DoesBlah) {
  // Inside a test, refer to the special name TypeParam to get the type
  // parameter.  Since we are inside a derived class template, C++ requires
  // us to visit the members of FooTest via 'this'.
  TypeParam n = this->value_;

  // To visit static members of the fixture, add the 'TestFixture::'
  // prefix.
  n += TestFixture::shared_;

  // To refer to typedefs in the fixture, add the 'typename TestFixture::'
  // prefix.  The 'typename' is required to satisfy the compiler.
  typename TestFixture::List values;

  values.push_back(n);
  ...
}

TYPED_TEST(FooTest, HasPropertyA) { ... }
You can see sample6_unittest.cc for a complete example.
Type-Parameterized Tests
Type-parameterized tests are like typed tests, except that they don’t require
you to know the list of types ahead of time. Instead, you can define the test
logic first and instantiate it with different type lists later. You can even
instantiate it more than once in the same program.
If you are designing an interface or concept, you can define a suite of
type-parameterized tests to verify properties that any valid implementation of
the interface/concept should have. Then, the author of each implementation can
just instantiate the test suite with their type to verify that it conforms to
the requirements, without having to write similar tests repeatedly. Here’s an
example:
First, define a fixture class template, as we did with typed tests:
template <typename T>
class FooTest : public testing::Test {
  void DoSomethingInteresting();
  ...
};
Next, declare that you will define a type-parameterized test suite:
TYPED_TEST_SUITE_P(FooTest);
Then, use TYPED_TEST_P() to define a type-parameterized test. You can repeat
this as many times as you want:
TYPED_TEST_P(FooTest, DoesBlah) {
  // Inside a test, refer to TypeParam to get the type parameter.
  TypeParam n = 0;

  // You will need to use `this` explicitly to refer to fixture members.
  this->DoSomethingInteresting()
  ...
}

TYPED_TEST_P(FooTest, HasPropertyA) { ... }
Now the tricky part: you need to register all test patterns using the
REGISTER_TYPED_TEST_SUITE_P macro before you can instantiate them. The first
argument of the macro is the test suite name; the rest are the names of the
tests in this test suite:
REGISTER_TYPED_TEST_SUITE_P(FooTest,
                            DoesBlah, HasPropertyA);
Finally, you are free to instantiate the pattern with the types you want. If you
put the above code in a header file, you can #include it in multiple C++
source files and instantiate it multiple times.
using MyTypes = ::testing::Types<char, int, unsigned int>;
INSTANTIATE_TYPED_TEST_SUITE_P(My, FooTest, MyTypes);
To distinguish different instances of the pattern, the first argument to the
INSTANTIATE_TYPED_TEST_SUITE_P macro is a prefix that will be added to the
actual test suite name. Remember to pick unique prefixes for different
instances.
In the special case where the type list contains only one type, you can write
that type directly without ::testing::Types<...>, like this:
INSTANTIATE_TYPED_TEST_SUITE_P(My, FooTest, int);
You can see sample6_unittest.cc for a complete example.
Testing Private Code
If you change your software’s internal implementation, your tests should not
break as long as the change is not observable by users. Therefore, per the
black-box testing principle, most of the time you should test your code through
its public interfaces.
If you still find yourself needing to test internal implementation code,
consider if there’s a better design. The desire to test internal
implementation is often a sign that the class is doing too much. Consider
extracting an implementation class, and testing it. Then use that implementation
class in the original class.
If you absolutely have to test non-public interface code though, you can. There
are two cases to consider:
- Static functions ( not the same as static member functions!) or unnamed
namespaces, and - Private or protected class members
To test them, we use the following special techniques:
-
Both static functions and definitions/declarations in an unnamed namespace
are only visible within the same translation unit. To test them, you can
#includethe entire.ccfile being tested in your*_test.ccfile.
(#including.ccfiles is not a good way to reuse code — you should not do
this in production code!)However, a better approach is to move the private code into the
foo::internalnamespace, wherefoois the namespace your project
normally uses, and put the private declarations in a*-internal.hfile.
Your production.ccfiles and your tests are allowed to include this
internal header, but your clients are not. This way, you can fully test your
internal implementation without leaking it to your clients. -
Private class members are only accessible from within the class or by
friends. To access a class’ private members, you can declare your test
fixture as a friend to the class and define accessors in your fixture. Tests
using the fixture can then access the private members of your production
class via the accessors in the fixture. Note that even though your fixture
is a friend to your production class, your tests are not automatically
friends to it, as they are technically defined in sub-classes of the
fixture.Another way to test private members is to refactor them into an
implementation class, which is then declared in a*-internal.hfile. Your
clients aren’t allowed to include this header but your tests can. Such is
called the
Pimpl
(Private Implementation) idiom.Or, you can declare an individual test as a friend of your class by adding
this line in the class body:FRIEND_TEST(TestSuiteName, TestName);For example,
// foo.h
class Foo {
  ...
 private:
  FRIEND_TEST(FooTest, BarReturnsZeroOnNull);

  int Bar(void* x);
};

// foo_test.cc
...
TEST(FooTest, BarReturnsZeroOnNull) {
  Foo foo;
  EXPECT_EQ(foo.Bar(NULL), 0);  // Uses Foo's private member Bar().
}
Pay special attention when your class is defined in a namespace. If you want
your test fixtures and tests to be friends of your class, then they must be
defined in the exact same namespace (no anonymous or inline namespaces).For example, if the code to be tested looks like:
namespace my_namespace {

class Foo {
  friend class FooTest;
  FRIEND_TEST(FooTest, Bar);
  FRIEND_TEST(FooTest, Baz);
  ... definition of the class Foo ...
};

}  // namespace my_namespace
Your test code should be something like:
namespace my_namespace {

class FooTest : public testing::Test {
 protected:
  ...
};

TEST_F(FooTest, Bar) { ... }
TEST_F(FooTest, Baz) { ... }

}  // namespace my_namespace
“Catching” Failures
If you are building a testing utility on top of GoogleTest, you’ll want to test
your utility. What framework would you use to test it? GoogleTest, of course.
The challenge is to verify that your testing utility reports failures correctly.
In frameworks that report a failure by throwing an exception, you could catch
the exception and assert on it. But GoogleTest doesn’t use exceptions, so how do
we test that a piece of code generates an expected failure?
"gtest/gtest-spi.h" contains some constructs to do this.
After #including this header, you can use
EXPECT_FATAL_FAILURE(statement, substring);
to assert that statement generates a fatal (e.g. ASSERT_*) failure in the
current thread whose message contains the given substring, or use
EXPECT_NONFATAL_FAILURE(statement, substring);
if you are expecting a non-fatal (e.g. EXPECT_*) failure.
Only failures in the current thread are checked to determine the result of this
type of expectations. If statement creates new threads, failures in these
threads are also ignored. If you want to catch failures in other threads as
well, use one of the following macros instead:
  EXPECT_FATAL_FAILURE_ON_ALL_THREADS(statement, substring);
  EXPECT_NONFATAL_FAILURE_ON_ALL_THREADS(statement, substring);
NOTE: Assertions from multiple threads are currently not supported on Windows.
For technical reasons, there are some caveats:
-
You cannot stream a failure message to either macro.
-
statementinEXPECT_FATAL_FAILURE{_ON_ALL_THREADS}()cannot reference
local non-static variables or non-static members ofthisobject. -
statementinEXPECT_FATAL_FAILURE{_ON_ALL_THREADS}()cannot return a
value.
Registering tests programmatically
The TEST macros handle the vast majority of all use cases, but there are few
where runtime registration logic is required. For those cases, the framework
provides the ::testing::RegisterTest that allows callers to register arbitrary
tests dynamically.
This is an advanced API only to be used when the TEST macros are insufficient.
The macros should be preferred when possible, as they avoid most of the
complexity of calling this function.
It provides the following signature:
template <typename Factory>
TestInfo* RegisterTest(const char* test_suite_name, const char* test_name,
                       const char* type_param, const char* value_param,
                       const char* file, int line, Factory factory);
The factory argument is a factory callable (move-constructible) object or
function pointer that creates a new instance of the Test object. It handles
ownership to the caller. The signature of the callable is Fixture*(), where
Fixture is the test fixture class for the test. All tests registered with the
same test_suite_name must return the same fixture type. This is checked at
runtime.
The framework will infer the fixture class from the factory and will call the
SetUpTestSuite and TearDownTestSuite for it.
Must be called before RUN_ALL_TESTS() is invoked, otherwise behavior is
undefined.
Use case example:
class MyFixture : public testing::Test {
 public:
  // All of these optional, just like in regular macro usage.
  static void SetUpTestSuite() { ... }
  static void TearDownTestSuite() { ... }
  void SetUp() override { ... }
  void TearDown() override { ... }
};

class MyTest : public MyFixture {
 public:
  explicit MyTest(int data) : data_(data) {}
  void TestBody() override { ... }

 private:
  int data_;
};

void RegisterMyTests(const std::vector<int>& values) {
  for (int v : values) {
    testing::RegisterTest(
        "MyFixture", ("Test" + std::to_string(v)).c_str(), nullptr,
        std::to_string(v).c_str(),
        __FILE__, __LINE__,
        // Important to use the fixture type as the return type here.
        [=]() -> MyFixture* { return new MyTest(v); });
  }
}
...
int main(int argc, char** argv) {
  testing::InitGoogleTest(&argc, argv);
  std::vector<int> values_to_test = LoadValuesFromConfig();
  RegisterMyTests(values_to_test);
  ...
  return RUN_ALL_TESTS();
}
Getting the Current Test’s Name
Sometimes a function may need to know the name of the currently running test.
For example, you may be using the SetUp() method of your test fixture to set
the golden file name based on which test is running. The
TestInfo class has this information.
To obtain a TestInfo object for the currently running test, call
current_test_info() on the UnitTest
singleton object:
  // Gets information about the currently running test.
  // Do NOT delete the returned object - it's managed by the UnitTest class.
  const testing::TestInfo* const test_info =
      testing::UnitTest::GetInstance()->current_test_info();

  printf("We are in test %s of test suite %s.\n",
         test_info->name(),
         test_info->test_suite_name());
current_test_info() returns a null pointer if no test is running. In
particular, you cannot find the test suite name in SetUpTestSuite(),
TearDownTestSuite() (where you know the test suite name implicitly), or
functions called from them.
Extending GoogleTest by Handling Test Events
GoogleTest provides an event listener API to let you receive notifications
about the progress of a test program and test failures. The events you can
listen to include the start and end of the test program, a test suite, or a test
method, among others. You may use this API to augment or replace the standard
console output, replace the XML output, or provide a completely different form
of output, such as a GUI or a database. You can also use test events as
checkpoints to implement a resource leak checker, for example.
Defining Event Listeners
To define a event listener, you subclass either
testing::TestEventListener or
testing::EmptyTestEventListener
The former is an (abstract) interface, where each pure virtual method can be
overridden to handle a test event (For example, when a test starts, the
OnTestStart() method will be called.). The latter provides an empty
implementation of all methods in the interface, such that a subclass only needs
to override the methods it cares about.
When an event is fired, its context is passed to the handler function as an
argument. The following argument types are used:
- UnitTest reflects the state of the entire test program,
- TestSuite has information about a test suite, which can contain one or more
tests, - TestInfo contains the state of a test, and
- TestPartResult represents the result of a test assertion.
An event handler function can examine the argument it receives to find out
interesting information about the event and the test program’s state.
Here’s an example:
  class MinimalistPrinter : public testing::EmptyTestEventListener {
    // Called before a test starts.
    void OnTestStart(const testing::TestInfo& test_info) override {
      printf("*** Test %s.%s starting.\n",
             test_info.test_suite_name(), test_info.name());
    }

    // Called after a failed assertion or a SUCCESS().
    void OnTestPartResult(const testing::TestPartResult& test_part_result) override {
      printf("%s in %s:%d\n%s\n",
             test_part_result.failed() ? "*** Failure" : "Success",
             test_part_result.file_name(),
             test_part_result.line_number(),
             test_part_result.summary());
    }

    // Called after a test ends.
    void OnTestEnd(const testing::TestInfo& test_info) override {
      printf("*** Test %s.%s ending.\n",
             test_info.test_suite_name(), test_info.name());
    }
  };
Using Event Listeners
To use the event listener you have defined, add an instance of it to the
GoogleTest event listener list (represented by class
TestEventListeners — note the “s”
at the end of the name) in your main() function, before calling
RUN_ALL_TESTS():
int main(int argc, char** argv) {
  testing::InitGoogleTest(&argc, argv);
  // Gets hold of the event listener list.
  testing::TestEventListeners& listeners =
      testing::UnitTest::GetInstance()->listeners();
  // Adds a listener to the end.  GoogleTest takes the ownership.
  listeners.Append(new MinimalistPrinter);
  return RUN_ALL_TESTS();
}
There’s only one problem: the default test result printer is still in effect, so
its output will mingle with the output from your minimalist printer. To suppress
the default printer, just release it from the event listener list and delete it.
You can do so by adding one line:
  ...
  delete listeners.Release(listeners.default_result_printer());
  listeners.Append(new MinimalistPrinter);
  return RUN_ALL_TESTS();
Now, sit back and enjoy a completely different output from your tests. For more
details, see sample9_unittest.cc.
You may append more than one listener to the list. When an On*Start() or
OnTestPartResult() event is fired, the listeners will receive it in the order
they appear in the list (since new listeners are added to the end of the list,
the default text printer and the default XML generator will receive the event
first). An On*End() event will be received by the listeners in the reverse
order. This allows output by listeners added later to be framed by output from
listeners added earlier.
Generating Failures in Listeners
You may use failure-raising macros (EXPECT_*(), ASSERT_*(), FAIL(), etc)
when processing an event. There are some restrictions:
- You cannot generate any failure in
OnTestPartResult()(otherwise it will
causeOnTestPartResult()to be called recursively). - A listener that handles
OnTestPartResult()is not allowed to generate any
failure.
When you add listeners to the listener list, you should put listeners that
handle OnTestPartResult() before listeners that can generate failures. This
ensures that failures generated by the latter are attributed to the right test
by the former.
See sample10_unittest.cc for an example of a failure-raising listener.
Running Test Programs: Advanced Options
GoogleTest test programs are ordinary executables. Once built, you can run them
directly and affect their behavior via the following environment variables
and/or command line flags. For the flags to work, your programs must call
::testing::InitGoogleTest() before calling RUN_ALL_TESTS().
To see a list of supported flags and their usage, please run your test program
with the --help flag. You can also use -h, -?, or /? for short.
If an option is specified both by an environment variable and by a flag, the
latter takes precedence.
Selecting Tests
Listing Test Names
Sometimes it is necessary to list the available tests in a program before
running them so that a filter may be applied if needed. Including the flag
--gtest_list_tests overrides all other flags and lists tests in the following
format:
TestSuite1.
  TestName1
  TestName2
TestSuite2.
  TestName
None of the tests listed are actually run if the flag is provided. There is no
corresponding environment variable for this flag.
Running a Subset of the Tests
By default, a GoogleTest program runs all tests the user has defined. Sometimes,
you want to run only a subset of the tests (e.g. for debugging or quickly
verifying a change). If you set the GTEST_FILTER environment variable or the
--gtest_filter flag to a filter string, GoogleTest will only run the tests
whose full names (in the form of TestSuiteName.TestName) match the filter.
The format of a filter is a ‘:‘-separated list of wildcard patterns (called
the positive patterns) optionally followed by a ‘-’ and another
‘:‘-separated pattern list (called the negative patterns). A test matches
the filter if and only if it matches any of the positive patterns but does not
match any of the negative patterns.
A pattern may contain '*' (matches any string) or '?' (matches any single
character). For convenience, the filter '*-NegativePatterns' can be also
written as '-NegativePatterns'.
For example:
./foo_testHas no flag, and thus runs all its tests../foo_test --gtest_filter=*Also runs everything, due to the single
match-everything*value../foo_test --gtest_filter=FooTest.*Runs everything in test suite
FooTest../foo_test --gtest_filter=*Null*:*Constructor*Runs any test whose full
name contains either"Null"or"Constructor"../foo_test --gtest_filter=-*DeathTest.*Runs all non-death tests../foo_test --gtest_filter=FooTest.*-FooTest.BarRuns everything in test
suiteFooTestexceptFooTest.Bar../foo_test --gtest_filter=FooTest.*:BarTest.*-FooTest.Bar:BarTest.FooRuns
everything in test suiteFooTestexceptFooTest.Barand everything in
test suiteBarTestexceptBarTest.Foo.
Stop test execution upon first failure
By default, a GoogleTest program runs all tests the user has defined. In some
cases (e.g. iterative test development & execution) it may be desirable stop
test execution upon first failure (trading improved latency for completeness).
If GTEST_FAIL_FAST environment variable or --gtest_fail_fast flag is set,
the test runner will stop execution as soon as the first test failure is found.
Temporarily Disabling Tests
If you have a broken test that you cannot fix right away, you can add the
DISABLED_ prefix to its name. This will exclude it from execution. This is
better than commenting out the code or using #if 0, as disabled tests are
still compiled (and thus won’t rot).
If you need to disable all tests in a test suite, you can either add DISABLED_
to the front of the name of each test, or alternatively add it to the front of
the test suite name.
For example, the following tests won’t be run by GoogleTest, even though they
will still be compiled:
// Tests that Foo does Abc.
TEST(FooTest, DISABLED_DoesAbc) { ... }

class DISABLED_BarTest : public testing::Test { ... };

// Tests that Bar does Xyz.
TEST_F(DISABLED_BarTest, DoesXyz) { ... }
NOTE: This feature should only be used for temporary pain-relief. You still have
to fix the disabled tests at a later date. As a reminder, GoogleTest will print
a banner warning you if a test program contains any disabled tests.
TIP: You can easily count the number of disabled tests you have using
grep. This number can be used as a metric for
improving your test quality.
Temporarily Enabling Disabled Tests
To include disabled tests in test execution, just invoke the test program with
the --gtest_also_run_disabled_tests flag or set the
GTEST_ALSO_RUN_DISABLED_TESTS environment variable to a value other than 0.
You can combine this with the --gtest_filter flag to further select which
disabled tests to run.
Repeating the Tests
Once in a while you’ll run into a test whose result is hit-or-miss. Perhaps it
will fail only 1% of the time, making it rather hard to reproduce the bug under
a debugger. This can be a major source of frustration.
The --gtest_repeat flag allows you to repeat all (or selected) test methods in
a program many times. Hopefully, a flaky test will eventually fail and give you
a chance to debug. Here’s how to use it:
$ foo_test --gtest_repeat=1000
Repeat foo_test 1000 times and don't stop at failures.

$ foo_test --gtest_repeat=-1
A negative count means repeating forever.

$ foo_test --gtest_repeat=1000 --gtest_break_on_failure
Repeat foo_test 1000 times, stopping at the first failure.  This
is especially useful when running under a debugger: when the test
fails, it will drop into the debugger and you can then inspect
variables and stacks.

$ foo_test --gtest_repeat=1000 --gtest_filter=FooBar.*
Repeat the tests whose name matches the filter 1000 times.
If your test program contains
global set-up/tear-down code, it will be
repeated in each iteration as well, as the flakiness may be in it. To avoid
repeating global set-up/tear-down, specify
--gtest_recreate_environments_when_repeating=false{.nowrap}.
You can also specify the repeat count by setting the GTEST_REPEAT environment
variable.
Shuffling the Tests
You can specify the --gtest_shuffle flag (or set the GTEST_SHUFFLE
environment variable to 1) to run the tests in a program in a random order.
This helps to reveal bad dependencies between tests.
By default, GoogleTest uses a random seed calculated from the current time.
Therefore you’ll get a different order every time. The console output includes
the random seed value, such that you can reproduce an order-related test failure
later. To specify the random seed explicitly, use the --gtest_random_seed=SEED
flag (or set the GTEST_RANDOM_SEED environment variable), where SEED is an
integer in the range [0, 99999]. The seed value 0 is special: it tells
GoogleTest to do the default behavior of calculating the seed from the current
time.
If you combine this with --gtest_repeat=N, GoogleTest will pick a different
random seed and re-shuffle the tests in each iteration.
Distributing Test Functions to Multiple Machines
If you have more than one machine you can use to run a test program, you might
want to run the test functions in parallel and get the result faster. We call
this technique sharding, where each machine is called a shard.
GoogleTest is compatible with test sharding. To take advantage of this feature,
your test runner (not part of GoogleTest) needs to do the following:
- Allocate a number of machines (shards) to run the tests.
- On each shard, set the
GTEST_TOTAL_SHARDSenvironment variable to the total
number of shards. It must be the same for all shards. - On each shard, set the
GTEST_SHARD_INDEXenvironment variable to the index
of the shard. Different shards must be assigned different indices, which
must be in the range[0, GTEST_TOTAL_SHARDS - 1]. - Run the same test program on all shards. When GoogleTest sees the above two
environment variables, it will select a subset of the test functions to run.
Across all shards, each test function in the program will be run exactly
once. - Wait for all shards to finish, then collect and report the results.
Your project may have tests that were written without GoogleTest and thus don’t
understand this protocol. In order for your test runner to figure out which test
supports sharding, it can set the environment variable GTEST_SHARD_STATUS_FILE
to a non-existent file path. If a test program supports sharding, it will create
this file to acknowledge that fact; otherwise it will not create it. The actual
contents of the file are not important at this time, although we may put some
useful information in it in the future.
Here’s an example to make it clear. Suppose you have a test program foo_test
that contains the following 5 test functions:
TEST(A, V)
TEST(A, W)
TEST(B, X)
TEST(B, Y)
TEST(B, Z)
Suppose you have 3 machines at your disposal. To run the test functions in
parallel, you would set GTEST_TOTAL_SHARDS to 3 on all machines, and set
GTEST_SHARD_INDEX to 0, 1, and 2 on the machines respectively. Then you would
run the same foo_test on each machine.
GoogleTest reserves the right to change how the work is distributed across the
shards, but here’s one possible scenario:
- Machine #0 runs
A.VandB.X. - Machine #1 runs
A.WandB.Y. - Machine #2 runs
B.Z.
Controlling Test Output
Colored Terminal Output
GoogleTest can use colors in its terminal output to make it easier to spot the
important information:
...
[----------] 1 test from FooTest
[ RUN      ] FooTest.DoesAbc
[       OK ] FooTest.DoesAbc
[----------] 2 tests from BarTest
[ RUN      ] BarTest.HasXyzProperty
[       OK ] BarTest.HasXyzProperty
[ RUN      ] BarTest.ReturnsTrueOnSuccess
... some error messages ...
[   FAILED ] BarTest.ReturnsTrueOnSuccess
...
[==========] 30 tests from 14 test suites ran.
[   PASSED ] 28 tests.
[   FAILED ] 2 tests, listed below:
[   FAILED ] BarTest.ReturnsTrueOnSuccess
[   FAILED ] AnotherTest.DoesXyz

 2 FAILED TESTS
You can set the GTEST_COLOR environment variable or the --gtest_color
command line flag to yes, no, or auto (the default) to enable colors,
disable colors, or let GoogleTest decide. When the value is auto, GoogleTest
will use colors if and only if the output goes to a terminal and (on non-Windows
platforms) the TERM environment variable is set to xterm or xterm-color.
Suppressing test passes
By default, GoogleTest prints 1 line of output for each test, indicating if it
passed or failed. To show only test failures, run the test program with
--gtest_brief=1, or set the GTEST_BRIEF environment variable to 1.
Suppressing the Elapsed Time
By default, GoogleTest prints the time it takes to run each test. To disable
that, run the test program with the --gtest_print_time=0 command line flag, or
set the GTEST_PRINT_TIME environment variable to 0.
Suppressing UTF-8 Text Output
In case of assertion failures, GoogleTest prints expected and actual values of
type string both as hex-encoded strings as well as in readable UTF-8 text if
they contain valid non-ASCII UTF-8 characters. If you want to suppress the UTF-8
text because, for example, you don’t have an UTF-8 compatible output medium, run
the test program with --gtest_print_utf8=0 or set the GTEST_PRINT_UTF8
environment variable to 0.
Generating an XML Report
GoogleTest can emit a detailed XML report to a file in addition to its normal
textual output. The report contains the duration of each test, and thus can help
you identify slow tests.
To generate the XML report, set the GTEST_OUTPUT environment variable or the
--gtest_output flag to the string "xml:path_to_output_file", which will
create the file at the given location. You can also just use the string "xml",
in which case the output can be found in the test_detail.xml file in the
current directory.
If you specify a directory (for example, "xml:output/directory/" on Linux or
"xml:output\directory\" on Windows), GoogleTest will create the XML file in
that directory, named after the test executable (e.g. foo_test.xml for test
program foo_test or foo_test.exe). If the file already exists (perhaps left
over from a previous run), GoogleTest will pick a different name (e.g.
foo_test_1.xml) to avoid overwriting it.
The report is based on the junitreport Ant task. Since that format was
originally intended for Java, a little interpretation is required to make it
apply to GoogleTest tests, as shown here:
<testsuites name="AllTests" ...>
  <testsuite name="test_case_name" ...>
    <testcase    name="test_name" ...>
      <failure message="..."/>
      <failure message="..."/>
      <failure message="..."/>
    </testcase>
  </testsuite>
</testsuites>
- The root
<testsuites>element corresponds to the entire test program. <testsuite>elements correspond to GoogleTest test suites.<testcase>elements correspond to GoogleTest test functions.
For instance, the following program
TEST(MathTest, Addition) { ... }
TEST(MathTest, Subtraction) { ... }
TEST(LogicTest, NonContradiction) { ... }
could generate this report:
<?xml version="1.0" encoding="UTF-8"?>
<testsuites tests="3" failures="1" errors="0" time="0.035" timestamp="2011-10-31T18:52:42" name="AllTests">
<testsuite name="MathTest" tests="2" failures="1" errors="0" time="0.015">
<testcase name="Addition" file="test.cpp" line="1" status="run" time="0.007" classname="">
<failure message="Value of: add(1, 1)
 Actual: 3
Expected: 2" type="">...</failure>
<failure message="Value of: add(1, -1)
 Actual: 1
Expected: 0" type="">...</failure>
</testcase>
<testcase name="Subtraction" file="test.cpp" line="2" status="run" time="0.005" classname="">
</testcase>
</testsuite>
<testsuite name="LogicTest" tests="1" failures="0" errors="0" time="0.005">
<testcase name="NonContradiction" file="test.cpp" line="3" status="run" time="0.005" classname="">
</testcase>
</testsuite>
</testsuites>
Things to note:
-
The
testsattribute of a<testsuites>or<testsuite>element tells how
many test functions the GoogleTest program or test suite contains, while the
failuresattribute tells how many of them failed. -
The
timeattribute expresses the duration of the test, test suite, or
entire test program in seconds. -
The
timestampattribute records the local date and time of the test
execution. -
The
fileandlineattributes record the source file location, where the
test was defined. -
Each
<failure>element corresponds to a single failed GoogleTest
assertion.
Generating a JSON Report
GoogleTest can also emit a JSON report as an alternative format to XML. To
generate the JSON report, set the GTEST_OUTPUT environment variable or the
--gtest_output flag to the string "json:path_to_output_file", which will
create the file at the given location. You can also just use the string
"json", in which case the output can be found in the test_detail.json file
in the current directory.
The report format conforms to the following JSON Schema:
{
  "$schema": "https://json-schema.org/schema#",
  "type": "object",
  "definitions": {
    "TestCase": {
      "type": "object",
      "properties": {
        "name": { "type": "string" },
        "tests": { "type": "integer" },
        "failures": { "type": "integer" },
        "disabled": { "type": "integer" },
        "time": { "type": "string" },
        "testsuite": {
          "type": "array",
          "items": {
            "$ref": "#/definitions/TestInfo"
          }
        }
      }
    },
    "TestInfo": {
      "type": "object",
      "properties": {
        "name": { "type": "string" },
        "file": { "type": "string" },
        "line": { "type": "integer" },
        "status": {
          "type": "string",
          "enum": ["RUN", "NOTRUN"]
        },
        "time": { "type": "string" },
        "classname": { "type": "string" },
        "failures": {
          "type": "array",
          "items": {
            "$ref": "#/definitions/Failure"
          }
        }
      }
    },
    "Failure": {
      "type": "object",
      "properties": {
        "failures": { "type": "string" },
        "type": { "type": "string" }
      }
    }
  },
  "properties": {
    "tests": { "type": "integer" },
    "failures": { "type": "integer" },
    "disabled": { "type": "integer" },
    "errors": { "type": "integer" },
    "timestamp": {
      "type": "string",
      "format": "date-time"
    },
    "time": { "type": "string" },
    "name": { "type": "string" },
    "testsuites": {
      "type": "array",
      "items": {
        "$ref": "#/definitions/TestCase"
      }
    }
  }
}
The report uses the format that conforms to the following Proto3 using the
JSON encoding:
syntax = "proto3";

package googletest;

import "google/protobuf/timestamp.proto";
import "google/protobuf/duration.proto";

message UnitTest {
  int32 tests = 1;
  int32 failures = 2;
  int32 disabled = 3;
  int32 errors = 4;
  google.protobuf.Timestamp timestamp = 5;
  google.protobuf.Duration time = 6;
  string name = 7;
  repeated TestCase testsuites = 8;
}

message TestCase {
  string name = 1;
  int32 tests = 2;
  int32 failures = 3;
  int32 disabled = 4;
  int32 errors = 5;
  google.protobuf.Duration time = 6;
  repeated TestInfo testsuite = 7;
}

message TestInfo {
  string name = 1;
  string file = 6;
  int32 line = 7;
  enum Status {
    RUN = 0;
    NOTRUN = 1;
  }
  Status status = 2;
  google.protobuf.Duration time = 3;
  string classname = 4;
  message Failure {
    string failures = 1;
    string type = 2;
  }
  repeated Failure failures = 5;
}
For instance, the following program
TEST(MathTest, Addition) { ... }
TEST(MathTest, Subtraction) { ... }
TEST(LogicTest, NonContradiction) { ... }
could generate this report:
{
  "tests": 3,
  "failures": 1,
  "errors": 0,
  "time": "0.035s",
  "timestamp": "2011-10-31T18:52:42Z",
  "name": "AllTests",
  "testsuites": [
    {
      "name": "MathTest",
      "tests": 2,
      "failures": 1,
      "errors": 0,
      "time": "0.015s",
      "testsuite": [
        {
          "name": "Addition",
          "file": "test.cpp",
          "line": 1,
          "status": "RUN",
          "time": "0.007s",
          "classname": "",
          "failures": [
            {
              "message": "Value of: add(1, 1)\n  Actual: 3\nExpected: 2",
              "type": ""
            },
            {
              "message": "Value of: add(1, -1)\n  Actual: 1\nExpected: 0",
              "type": ""
            }
          ]
        },
        {
          "name": "Subtraction",
          "file": "test.cpp",
          "line": 2,
          "status": "RUN",
          "time": "0.005s",
          "classname": ""
        }
      ]
    },
    {
      "name": "LogicTest",
      "tests": 1,
      "failures": 0,
      "errors": 0,
      "time": "0.005s",
      "testsuite": [
        {
          "name": "NonContradiction",
          "file": "test.cpp",
          "line": 3,
          "status": "RUN",
          "time": "0.005s",
          "classname": ""
        }
      ]
    }
  ]
}
IMPORTANT: The exact format of the JSON document is subject to change.
Controlling How Failures Are Reported
Detecting Test Premature Exit
Google Test implements the premature-exit-file protocol for test runners to
catch any kind of unexpected exits of test programs. Upon start, Google Test
creates the file which will be automatically deleted after all work has been
finished. Then, the test runner can check if this file exists. In case the file
remains undeleted, the inspected test has exited prematurely.
This feature is enabled only if the TEST_PREMATURE_EXIT_FILE environment
variable has been set.
Turning Assertion Failures into Break-Points
When running test programs under a debugger, it’s very convenient if the
debugger can catch an assertion failure and automatically drop into interactive
mode. GoogleTest’s break-on-failure mode supports this behavior.
To enable it, set the GTEST_BREAK_ON_FAILURE environment variable to a value
other than 0. Alternatively, you can use the --gtest_break_on_failure
command line flag.
Disabling Catching Test-Thrown Exceptions
GoogleTest can be used either with or without exceptions enabled. If a test
throws a C++ exception or (on Windows) a structured exception (SEH), by default
GoogleTest catches it, reports it as a test failure, and continues with the next
test method. This maximizes the coverage of a test run. Also, on Windows an
uncaught exception will cause a pop-up window, so catching the exceptions allows
you to run the tests automatically.
When debugging the test failures, however, you may instead want the exceptions
to be handled by the debugger, such that you can examine the call stack when an
exception is thrown. To achieve that, set the GTEST_CATCH_EXCEPTIONS
environment variable to 0, or use the --gtest_catch_exceptions=0 flag when
running the tests.
Sanitizer Integration
The
Undefined Behavior Sanitizer,
Address Sanitizer,
and
Thread Sanitizer
all provide weak functions that you can override to trigger explicit failures
when they detect sanitizer errors, such as creating a reference from nullptr.
To override these functions, place definitions for them in a source file that
you compile as part of your main binary:
extern "C" {
void __ubsan_on_report() {
  FAIL() << "Encountered an undefined behavior sanitizer error";
}
void __asan_on_error() {
  FAIL() << "Encountered an address sanitizer error";
}
void __tsan_on_report() {
  FAIL() << "Encountered a thread sanitizer error";
}
}  // extern "C"
After compiling your project with one of the sanitizers enabled, if a particular
test triggers a sanitizer error, GoogleTest will report that it failed.
Время на прочтение
6 мин
Количество просмотров 172K
 Когда вставал вопрос о тестировании кода, я не задумываясь использовал boost::test. Для расширения кругозора попробовал Google Test Framework. Помимо всяких имеющихся в нем плюшек, в отличии от boost::test проект бурно развивается. Хотел бы поделиться приобретенными знаниями. Всем кому интересно прошу
Ключевые понятия
Ключевым понятием в Google test framework является понятие утверждения (assert). Утверждение представляет собой выражение, результатом выполнения которого может быть успех (success), некритический отказ (nonfatal failure) и критический отказ (fatal failure). Критический отказ вызывает завершение выполнения теста, в остальных случаях тест продолжается. Сам тест представляет собой набор утверждений. Кроме того, тесты могут быть сгруппированы в наборы (test case). Если сложно настраиваемая группа объектов должна быть использована в различных тестах, можно использовать фиксации (fixture). Объединенные наборы тестов являются тестовой программой (test program).
Утверждения (assertion)
Утверждения, порождающие в случае их ложности критические отказы начинаются с ASSERT_, некритические — EXPECT_. Следует иметь ввиду, что в случае критического отказа выполняется немедленный возврат из функции, в которой встретилось вызвавшее отказ утверждение. Если за этим утверждением идет какой-то очищающий память код или какие-то другие завершающие процедуры, можете получить утечку памяти.
Имеются следующие утверждения (некритические начинаются не с ASSERT_, а с EXPECT_):
Простейшие логические
- ASSERT_TRUE(condition);
- ASSERT_FALSE(condition);
Сравнение
- ASSERT_EQ(expected, actual); — =
- ASSERT_NE(val1, val2); — !=
- ASSERT_LT(val1, val2); — <
- ASSERT_LE(val1, val2); — <=
- ASSERT_GT(val1, val2); — >
- ASSERT_GE(val1, val2); — >=
Сравнение строк
- ASSERT_STREQ(expected_str, actual_str);
- ASSERT_STRNE(str1, str2);
- ASSERT_STRCASEEQ(expected_str, actual_str); — регистронезависимо
- ASSERT_STRCASENE(str1, str2); — регистронезависимо
Проверка на исключения
- ASSERT_THROW(statement, exception_type);
- ASSERT_ANY_THROW(statement);
- ASSERT_NO_THROW(statement);
Проверка предикатов
- ASSERT_PREDN(pred, val1, val2, …, valN); — N <= 5
- ASSERT_PRED_FORMATN(pred_format, val1, val2, …, valN); — работает аналогично предыдущей, но позволяет контролировать вывод
Сравнение чисел с плавающей точкой
- ASSERT_FLOAT_EQ(expected, actual); — неточное сравнение float
- ASSERT_DOUBLE_EQ(expected, actual); — неточное сравнение double
- ASSERT_NEAR(val1, val2, abs_error); — разница между val1 и val2 не превышает погрешность abs_error
Вызов отказа или успеха
- SUCCEED();
- FAIL();
- ADD_FAILURE();
- ADD_FAILURE_AT(«file_path», line_number);
Можно написать собственную функцию, возвращающую AssertionResult
::testing::AssertionResult IsTrue(bool foo)
{
	if (foo)
		return ::testing::AssertionSuccess();
	else
		return ::testing::AssertionFailure() << foo << " is not true";
}

TEST(MyFunCase, TestIsTrue)
{
	EXPECT_TRUE(IsTrue(false));
}
Можно контролировать типы данных с помощью функции ::testing::StaticAssertTypeEq<T1, T2>(). Компиляция пройдет с ошибкой в случае несовпадения типов T1 и T2.
В случае ложности утверждения, выдаются данные, использованные в утверждении. Кроме того, можно задать собственный комментарий:
ASSERT_EQ(1, 0) << "1 is not equal 0";
Можно использовать расширенные наборы символов (wchar_t) как в комментариях, так и в утверждениях, касающихся строк. При этом выдача будет в UTF-8 кодировке.
Тесты (tests)
Для определения теста используется макрос TEST. Он определяет void функцию, в которой можно использовать утверждения. Как отмечалось ранее, критический отказ вызывает немедленный возврат из функции.
TEST(test_case_name, test_name)
{
	ASSERT_EQ(1, 0) << "1 is not equal 0";
}
TEST принимает 2 параметра, уникально идентифицирующие тест, — название тестового набора и название теста. В рамках одного и того же тестового набора названия тестов не должны совпадать. Если название начинается с DISABLED_, это означает, что вы пометили тест (набор тестов) как временно не используемый.
Можно использовать утверждения не только в составе теста, но и вызывать их из любой функции. Имеется лишь одно ограничение — утверждения, порождающие критические отказы не могут быть вызваны из не void функций.
Фиксации (fixtures)
Случается, что объекты, участвующие в тестировании, сложно настраиваются для каждого теста. Можно задать процесс настройки один раз и исполнять его для каждого теста автоматически. В таких ситуациях используются фиксации.
Фиксация представляет собой класс, унаследованный от ::testing::Test, внутри которого объявлены все необходимые для тестирования объекты при этом в конструкторе либо функции SetUp() выполняется их настройка, а в функции TearDown() освобождение ресурсов. Сами тесты, в которых используются фиксации, должны быть объявлены с помощью макроса TEST_F, в качестве первого параметра которого должно быть указано не название набора тестов, а название фиксации.
Для каждого теста будет создана новая фиксация, настроена с помощью SetUp(), запущен тест, освобождены ресурсы с помощью TearDown() и удален объект фиксации. Таким образом каждый тест будет иметь свою копию фиксации «не испорченную» предыдущим тестом.
#include <gtest/gtest.h>
#include <iostream>

class Foo
{
public:
	Foo()
		: i(0)
	{
		std::cout << "CONSTRUCTED" << std::endl;
	}
	~Foo()
	{
		std::cout << "DESTRUCTED" << std::endl;
	}
	int i;
};

class TestFoo : public ::testing::Test
{
protected:
	void SetUp()
	{
		foo = new Foo;
		foo->i = 5;
	}
	void TearDown()
	{
		delete foo;
	}
	Foo *foo;
};

TEST_F(TestFoo, test1)
{
	ASSERT_EQ(foo->i, 5);
	foo->i = 10;
}

TEST_F(TestFoo, test2)
{
	ASSERT_EQ(foo->i, 5);
}

int main(int argc, char *argv[])
{
	::testing::InitGoogleTest(&argc, argv);
	return RUN_ALL_TESTS();
}
В некоторых случаях создание тестируемых объектов является очень дорогой операцией, а тесты не вносят никаких изменений в объекты. В таком случае можно не создавать фиксации заново для каждого теста, а использовать распределенную фиксацию с глобальным SetUp()и TearDown(). Фиксация автоматически становится распределенной, если в классе имеется хотя бы один статический член. Статические функции SetUpTestCase() и TearDownTestCase() будут вызываться для настройки объекта и освобождения ресурсов соответственно. Таким образом, набор тестов перед первым тестом вызовет SetUpTestCase(), а после последнего TearDownTestCase().
Если существует потребность в SetUp() и TearDown() для всей программы тестирования, а не только для набора теста, необходимо создать класс-наследник для ::testing::Environment, переопределить SetUp() и TearDown() и зарегистрировать его с помощью функции AddGlobalTestEnvironment.
Запуск тестов
Объявив все необходимые тесты, мы можем запустить их с помощью функции RUN_ALL_TESTS(). Функцию можно вызывать только один раз. Желательно, чтобы тестовая программа возвращала результат работы функции RUN_ALL_TESTS(), так как некоторые автоматические средства тестирования определяют результат выполнения тестовой программы по тому, что она возвращает.
Флаги
Вызванная перед RUN_ALL_TESTS() функция InitGoogleTest(argc, argv) делает вашу тестовую программу не просто исполняемым файлом, выводящим на экран результаты тестирования. Это целостное приложение, принимающие на вход параметры, меняющие его поведение. Как обычно ключи -h, —help дадут вам список всех поддерживаемых параметров. Перечислю некоторые из них (за полным списком можно обратиться к документации).
- ./test —gtest_filter=TestCaseName.*-TestCaseName.SomeTest — запустить все тесты набора TestCaseName за исключением SomeTest
- ./test —gtest_repeat=1000 —gtest_break_on_failure — запустить тестирующую программу 1000 раз и остановиться при первой неудаче
- ./test —gtest_output=«xml:out.xml» — помимо выдачи в std::out будет создан out.xml — XML отчет с результатами выполнения тестовой программы
- ./test —gtest_shuffle — запускать тесты в случайном порядке
Если вы используете какие-то параметры постоянно, можете задать соответствующую переменную окружения и запускать исполняемый файл без параметров. Например задание переменной GTEST_ALSO_RUN_DISABLED_TESTS ненулевого значения эквивалентно использованию флага —gtest_also_run_disabled_tests.
Вместо заключения
В данном посте я кратко пробежался по основным функциям Google Test Framework. За более подробными сведениями следует обратиться к документации. Оттуда вы сможете почерпнуть информацию о ASSERT_DEATH используемом при падении программы, о ведении дополнительных журналов, о параметризованных тестах, настройке вывода, тестировании закрытых членов класса и многое другое.
UPD: По справедливому замечанию хабрапользователя nikel добавлена краткая инофрмация по использованию флагов.
UPD 2: Исправление разметки после изменений на Хабре (нативный тег source).

Модульные тесты защищают от регрессивных изменений кода и предоставляют разработчикам ПО подробную обратную связь.
Изучив материал статьи, вы убедитесь, насколько просто добавлять модульные тесты в C/C++ проект с помощью google test.
Начальный этап
Возьмем простой пример вычисления среднего значения из массива целых чисел.
calculate_mean принимает на вход массив целых чисел и его длину, а на выходе возвращает среднее значение массива (сумму массива, разделенную на его длину) в виде числа с плавающей точкой (float).
Структура файла
+ Root
  + modules
    - calculations.c
    - calculations.h
    - CMakeLists.txt
  + tests
    - test_calculations.cpp
    - CMakeLists.txt
  - mainapp.c
  - CMakeLists.txt
  - conanfile.txt
Примечание. Полный вариант кода данной демоверсии доступен на GitHub.
modules/calculations.c
Этот модуль отвечает за вычисления:
#include <stdio.h>
#include "calculations.h"int calculate_sum(int arr[], size_t length)
{
int sum = 0;
int i = 0;
for (i = 0; i < length; i++)
{
sum += arr[i];
}
return sum;
}
float calculate_mean(int arr[], size_t length)
{
if(length == 0)
{
// при длине равной 0, мы не можем вычислить среднее значение из-за ошибки деления на 0.
return 0;
}
// в ином случае:
int sum = calculate_sum(arr, length);
return (float)sum / length;
}
Все очень просто. У модуля есть функция для вычисления суммы чисел, которая вызывается для функции calculate_mean, после чего возвращается результат деления суммы на длину.
Воспользуемся данным кодом в mainapp.c:
#include <stdio.h>
#include "modules/calculations.h"int main(int argc, char *argv[])
{
    int arr[] = {1,5,4,6,7,9,8,10,2};
    size_t n = sizeof(arr)/sizeof(arr[0]);
    float mean = calculate_mean(arr, n);
    printf("Mean=%.2f\n", mean);
    return 0;
}
Теперь нам потребуются два файла CMakeLists.txt: один для mainapp, другой для модулей:
CMakeLists.txt
cmake_minimum_required(VERSION 3.10.2)
project(MyProject)

add_subdirectory(modules)

add_executable(${PROJECT_NAME} mainapp.c)
target_link_libraries(${PROJECT_NAME} calculations)
modules/CMakeLists.txt
project(calculations)

add_library(calculations calculations.c calculations.h)
Поясним в двух словах. Модули CMakeLists.txt генерируют библиотеку с именем calculations. Главный CMakeLists.txt использует ее и связывает с главным исполняемым файлом.
Переходим к этапам компиляции и выполнения.
Компиляция:
cmake --build ./build --config Debug --target MyProject -j 10 --Выполнение:
./build/MyProjectРезультат:
Mean=5.78Знакомство с Google Test
Google test или gtest — это фреймворк с открытым ПО для модульного тестирования C\C++ проектов. Он легко интегрируется с CMake, располагает превосходным механизмом проверки утверждений и создает отчеты для отображения в формате XML, что позволяет интегрировать его с известными фреймворками CI\CD.
Шаг 1. Установка gtest из менеджера зависимостей Conan
Создаем файл conanfile.txt в корневом каталоге:
[requires]

gtest/cci.20210126

[generators]

cmake
Выполняем conan install . -pr=myprofile.
Шаг 2. Добавление gtest в CMakeLists
После установки gtest добавляем его в качестве зависимости в главный файл CMakeLists.txt:
cmake_minimum_required(VERSION 3.10.2)

project(MyProject)

include(${CMAKE_SOURCE_DIR}/conanbuildinfo.cmake)

conan_basic_setup()

add_subdirectory(modules)

add_subdirectory(tests)

add_executable(${PROJECT_NAME} mainapp.c)

target_link_libraries(${PROJECT_NAME} calculations)
Мы дополнили код 4 строками. Одна нужна для включения конфигураций Conan, две — для запуска настроек Conan CMake и еще одна — для добавления каталога tests.
Шаг 3. Написание набора тестов
tests/test_calculations.cpp
#include <gtest/gtest.h>
extern "C"
{
#include "../modules/calculations.h"
}
TEST(test_calculations, simple_arr)
{
    int arr[] = {1, 5, 4, 6, 7, 9, 8, 10, 2, 3};
    size_t n = sizeof(arr) / sizeof(arr[0]);
    float mean = calculate_mean(arr, n);
    EXPECT_FLOAT_EQ(mean, 5.5);
}TEST(test_calculations, empty_arr)
{
    int arr[] = {};
    float mean = calculate_mean(arr, 0);
    EXPECT_FLOAT_EQ(mean, 0);
}
TEST(test_calculations, all_negatives)
{
    int arr[] = {-1, -5, -4, -6, -7, -9, -8, -10, -2, -3};
    size_t n = sizeof(arr) / sizeof(arr[0]);
    float mean = calculate_mean(arr, n);
    EXPECT_FLOAT_EQ(mean, -5.5);
}
TEST(test_calculations, mix_negative_positive)
{
    int arr[] = {-1, -5, -4, 6, 7, 9, -8, -10, -2, -3};
    size_t n = sizeof(arr) / sizeof(arr[0]);
    float mean = calculate_mean(arr, n);
    EXPECT_FLOAT_EQ(mean, -1.1);
}
TEST(test_calculations, with_zeros)
{
    int arr[] = {-1, -5, -4, 0, 7, 9, 0, -10, -2, -3};
    size_t n = sizeof(arr) / sizeof(arr[0]);
    float mean = calculate_mean(arr, n);
    EXPECT_FLOAT_EQ(mean, -0.89999998);
}
Выше представлен набор тестов, подлежащий выполнению.
В целом он содержит 5 тест-кейсов, охватывающих разные возможные сценарии.
Шаг 4. Настройка конфигурации исполняемого файла tests с CMake
tests/CMakeLists.txt
cmake_minimum_required(VERSION 3.10.2)

project(tests)

add_executable(${PROJECT_NAME} test_calculations.cpp)

set(CMAKE_CXX_STANDARD 11)

target_link_libraries(${PROJECT_NAME} PUBLIC

calculations

gtest

gtest_main
)
Здесь даны инструкции по созданию исполняемого файла tests с тремя связанными библиотеками: calculations (модуль, подлежащий тестированию), gtest и gtest_main.
Шаг 5. Выполнение тестов
Компиляция:
cmake --build ./build --config Debug --target tests -j 10 --Выполнение:
build\bin\tests.exeРезультат:
[==========] Running 5 tests from 1 test suite.
[----------] Global test environment set-up.
[----------] 5 tests from test_calculations
[ RUN      ] test_calculations.simple_arr
[       OK ] test_calculations.simple_arr (0 ms)
[ RUN      ] test_calculations.empty_arr
[       OK ] test_calculations.empty_arr (0 ms)
[ RUN      ] test_calculations.all_negatives
[       OK ] test_calculations.all_negatives (0 ms)
[ RUN      ] test_calculations.mix_negative_positive
[       OK ] test_calculations.mix_negative_positive (0 ms)
[ RUN      ] test_calculations.with_zeros
[       OK ] test_calculations.with_zeros (0 ms)
[----------] 5 tests from test_calculations (70 ms total)

[----------] Global test environment tear-down
[==========] 5 tests from 1 test suite ran. (107 ms total)
[  PASSED  ] 5 tests.
Все 5 тестов были успешно выполнены и пройдены!
Запускаем их еще раз и экспортируем результаты в output.xml:
build/bin/tests --gtest_output=xml:output.xmlПолученный результат в формате XML выглядит так:
<?xml version="1.0" encoding="UTF-8"?>

<testsuites tests="5" failures="0" disabled="0" errors="0" time="0.083" timestamp="2022-02-16T12:57:20.151" name="AllTests">

<testsuite name="test_calculations" tests="5" failures="0" disabled="0" skipped="0" errors="0" time="0.055" timestamp="2022-02-16T12:57:20.166">

<testcase name="simple_arr" status="run" result="completed" time="0" timestamp="2022-02-16T12:57:20.171" classname="test_calculations" />

<testcase name="empty_arr" status="run" result="completed" time="0" timestamp="2022-02-16T12:57:20.181" classname="test_calculations" />

<testcase name="all_negatives" status="run" result="completed" time="0" timestamp="2022-02-16T12:57:20.192" classname="test_calculations" />

<testcase name="mix_negative_positive" status="run" result="completed"
time="0" timestamp="2022-02-16T12:57:20.204" classname="test_calculations" />

<testcase name="with_zeros" status="run" result="completed" time="0" timestamp="2022-02-16T12:57:20.216" classname="test_calculations" />

</testsuite>
</testsuites>
Загружаем его в xUnit Viewer от CodeBeautify:
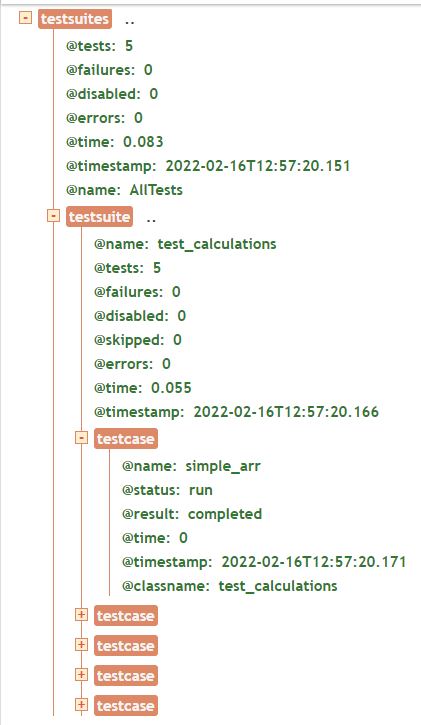
Отлично!
Такой вариант можно легко опубликовать как результат тестирования в конвейерах ci/cd.
Читайте также:
- Идиома CRTP и написание общих функций в C++
- 2 инструмента для автоматизации тестирования производительности на стороне клиента
- Визуализация стратегии автоматизированного тестирования
Читайте нас в Telegram, VK и Яндекс.Дзен
Перевод статьи Eldad Uzman: Introduction to Google Test: An Open Source C/C++ Unit-Testing Framework
Search code, repositories, users, issues, pull requests…
Provide feedback
Saved searches
Use saved searches to filter your results more quickly
Sign up
Содержание
- 1 Задача
- 2 Решение
- 3 Реализация
- 3.1 Подключение gtest к проекту
- 3.2 Функция main()
- 3.3 Собственно тест
- 3.4 Собственно реализация
- 4 Кажущиеся проблемы нашего решения
- 4.1 Каждый тест запускается только один раз, нам этого недостаточно
- 4.2 А мы вообще сможем повторно запуститься на тех же тестах, на которых завалились? Рандом всё-таки
Задача
Дан линейный порядок и два элемента. Необходимо перечислить элементы линейного порядка, которые находятся между данными, и протестировать решение на правильность и скорость.
Решение
Напишем функцию intersect, которая решает задачу поиска и перечисления с помощью эффективного алгоритма. Также напишем intersect_slow (для удобства — с той же сигнатурой), которая решает ту же задачу медленно, но достоверно.
Пишем два теста: на правильность и на скорость. В обоих генерируется вектор из случайных чисел, на котором запускаются обе функции. В первом случае результаты проверяются на равенство. Во втором подсчитываем время, затраченное обоими алгоритмами, и проверяем, быстрее ли наш эффективный алгоритм.
Реализация
Тестирование будет проводиться в main.cpp.
Подключение gtest к проекту
Добавим в CMakeLists.txt строчку
find_package(GTest)
и изменим строчку target_link_libraries, добавив туда ${GTEST_LIBRARY}, например:
target_link_libraries(${PROJECT\_NAME} ${GTEST_LIBRARY})
В main.cpp делаем
#include <gtest/gtest.h>.
Функция main()
Она будет выглядеть так:
int main(int argc, char ** argv)
{
    testing::InitGoogleTest(&argc, argv);
    return RUN_ALL_TESTS();
}
Первая строчка позволяет колдовать с разными флагами тестирования. RUN_ALL_TESTS() обязательно должен запускаться ровно один раз, а main должна возвращать его значение.
Собственно тест
Тесты выглядят так:
TEST(test_case_name, test_name)
{
    ... test body ...
}
test_case_name — имя тесткейза, test_name — имя теста внутри этого тесткейза. У разных тесткейзов могут быть тесты с одинаковыми именами, ибо полное имя теста составляется из обоих этих имён. Эти имена должны быть валидными плюсовыми идентификаторами. Утверждается, что они не должны содержать в себе подчёркиваний, но с ними всё отлично работает.
Собственно тестирование заключается в вызове, например, EXPECT_EQ(val1, val2), которое проверяет val1 и val2 на равенство. В случае, если они не равны, в выводе будет написано, что случился фейл в таком-то тесте и будут выведены значения val1 и val2. Также бывают EXPECT_LE (проверяет, что val1 <= val2), EXPECT_LT (val1 < val2) и т.д.
Кстати, тесты можно отключать: необходимо исправить test_name на DISABLED_test_name. Тогда этот тест не будет запускаться, а gtest сообщит о том, что имеются отключённые тесты.
Собственно реализация
https://github.com/katyatitkova/intersect_test
Кажущиеся проблемы нашего решения
Каждый тест запускается только один раз, нам этого недостаточно
Вспомним про флаги тестирования, посмотрим в справку по ним:
./intersect --help
(запускать в папке сборки). В частности, узнаем, что флаг —gtest_repeat=[COUNT] решает нашу проблему. Чтобы запуститься с этим флагом, набираем в консоли во всё той же папке сборки, например
./intersect --gtest_repeat=10
А мы вообще сможем повторно запуститься на тех же тестах, на которых завалились? Рандом всё-таки
Да, сгенерённые числа в каждом запуске будут одинаковыми. То есть, если мы вызовем ./intersect —gtest_repeat=10, каждый из этих 10 раз будет разным, но следующий запуск ./intersect —gtest_repeat=10 сгенерирует то же самое, что было в прошлый раз. (Подсказывают, что этот эффект достигается за счёт использования std::default_random_engine)