File Specifications:1632/1632916-rox600.pdf file (07 Aug 2023) |
Accompanying Data:
Nice ROX600 Controller, Gate Opener PDF Manual (Updated: Monday 7th of August 2023 08:33:07 AM)
Rating: 4.5 (rated by 91 users)
Compatible devices: MC824H/V1, Signo, MetroKit, MhouseKit WI1, Max, SFAB2024, LFAB4000, Wingo.
Recommended Documentation:
Manual (Text Version):
(Ocr-Read Summary of Contents of some pages of the Nice ROX600 Document (Main Content), UPD: 07 August 2023)
-
1, IT Con la presente Nice S.p.A. dichiara che questo prodotto è conforme ai requisiti essenziali ed alle altre disposizioni pertinenti stabilite dalla direttiva 1999/5/CE.” EN Nice S.p.A. hereby declares that the product conforms with the essential requisites and other pertinent provisions of Directive 1999/5/EC. FR Par la présente, Nice S.p.A. déclare que ce produit est conforme aux exigences de base et autres dispositions applicables établies par la directive 1999/5/CE. ES P…
-
2, 1. 2. 3. 4. 5. 6. IT OFF controllare: collegamenti elettrici, allineamenti fotocellule e fusibili. EN OFF check: electrical connections, alignment of photocells, and fuses. FR OFF contrôler: raccordements électriques, alignements des photocellules et fusibles. ES OFF controlar: conexiones eléctricas, alineación fotocélulas y fusibles. DE OFF Überprüfen Sie Folgendes: elektrische Anschlüsse, Ausrichtung von Photozellen und Sicherungen. PL OFF sprawdzić: po�…
-
Nice ROX600 User Manual
-
Nice ROX600 User Guide
-
Nice ROX600 PDF Manual
-
Nice ROX600 Owner’s Manuals
Recommended: 104L, PROV716, JK-140, MAS-800
Links & Tools
Operating Impressions, Questions and Answers:
-
Contents
-
Table of Contents
-
Troubleshooting
-
Bookmarks
Quick Links
Nice
ROX600
ROX1000
For sliding gates
EN — Instructions and warnings for installation and use
Related Manuals for Nice ROX600
Summary of Contents for Nice ROX600
- Page 1
Nice ROX600 ROX1000 For sliding gates EN — Instructions and warnings for installation and use… -
Page 3: Table Of Contents
CONTENTS GENERAL WARNINGS: SAFETY — INSTALLATION — USE 1 — PRODUCT DESCRIPTION AND INTENDED USE 2 — OPERATING LIMITS 3 — INSTALLATION 4 — ELECTRICAL CONNECTIONS 4.1 — Types of electrical cables 4.2 — Electrical cable connections 5 — STARTING THE AUTOMATION AND CHECKING THE CONNECTIONS 5.1 — Hooking the automation up to the mains 5.2 — Learning the devices…
-
Page 4: General Warnings: Safety — Installation — Use
GENERAL WARNINGS: SAFETY — INSTALLATION — USE (instructions translated from Italian) These warnings are copies straight from the Regulations and as far as possible applicable to the product in question. ATTENTION Important safety instructions. Follow all instructions as improper installation may cause serious damage ATTENTION Important safety instructions.
-
Page 5: Product Description And Intended Use
4 ÷ 6 6 ÷ 8 8 ÷ 10 10 ÷ 12 Caution! Any other use or use with dimensions greater than specified is non-conforming. Nice declines all liability for damage and injury resulting for non-conforming use. English – 3…
-
Page 6: Installation
Fig. 1 shows the contents of the package: check that everything is Fig. 2 shows the location of the components of a typical installation present and correct. using Nice accessories: a — ROX gearmotor b — photocells c — posts for photocells…
- Page 7
Dig the foundation and route the electric cable ducting Secure the two anchors to the foundation plate with one 25 ÷ 35 mm nut above and one below. Tighten the lower nut in such a way that the thread protrudes by 25/35 mm. Now cast the concrete to secure the foundation plate. - Page 8
d — screw down the adjuster screws so that the gearmotor is at the proper height, leaving a gap of 1-2 mm between the pinion and the rack (this is to prevent the gate loading the gearmotor shaft) e / f / g — release the gearmotor h — open the gate fully by hand 1÷2 mm i — rest the first section of rack on the gearmotor’s pinion:… - Page 9
m — slide the gate by hand and, using the pinion as a reference, install the other sections of rack 1÷2 mm n — cut any excess rack off the end Slide the gate open and closed by hand to check that the rack is properly aligned with the pinion. N.B.: make sure that there is a gap of 1-2 mm between the rack and pinion for the entire length of the gate 1÷2 mm Tighten the nuts securing the gearmotor to the foundation… - Page 10
2-3 cm CLOSE: a — slide the gate closed by hand, stopping it 2/3 cm before the mechanical stop b — slide the limit switch bracket along the rack in the close direction until the limit switch trips (you will hear it click) c — after you hear the ‘click’, move the bracket further forwards by 2 cm (minimum) d — secure the bracket to the rack with the provided grub screws 2-3 cm… -
Page 11: Electrical Connections
LIMIT SWITCH 180° MOTOR 180° ELECTRICAL CONNECTIONS CAUTION! — All electrical connections must be carried out with the system disconnected from the mains. Incorrect connections can cause damages to the equipment and injuries to people. Fig. 2 shows the hookup of a typical installation; fig. 7 shows the connections to be made on the control unit. 4.1 — Types of electrical cables Table 3 — Types of electrical cable (see fig.
- Page 12
AERIAL = AERIAL LIMIT SWITCH = LIMIT SWITCH PROGRAM = MICRO SWITCHES FLASH = FLASH SWITCH BOOST = BOOST RADIO LED = RADIO LED CAPACITOR CAPACITOR = RUN LED PHOTO = LED PHOTO CAPACITOR CAPACITOR LED SBS = LED SBS MOTOR = MOTOR OK LED… -
Page 13: Starting The Automation And Checking The Connections
STARTING THE AUTOMATION AND CHECKING THE CONNECTIONS 5.1 — Hooking the automation up to the mains CAUTION! – The automation must be hooked up to the mains by an expert electrician, in observance of established local regulations. Proceed as follows Manually release the gearmotor so that the gate can be opened and closed Move the gate to the halfway position Manually lock the gearmotor…
-
Page 14: Testing And Commissioning
TESTING AND COMMISSIONING These are the most important phases in automating the gate and ensuring maximum system safety. They must be carried out by qualified and expert personnel that must decide on the tests required to verify the solutions adopted with regard to the risks present and the compliance with laws, directives and regulations;…
-
Page 15: Glossary
PROGRAMMING In this manual the programming procedures are explained with the use of icons and their meanings are given in the following glossary: GLOSSARY Symbol Description Symbol Description led on wait … led off observe / check led flashing press and release the key hold down the key shut off mains power turn on mains power…
-
Page 16: Adjustable Parameters: Trimmer ( Tl — Tp — F )
Factory settings (default) 2 3 4 5 6 7 8 9 10 Micro switches: Semiautomatic (1 = ON) Trimmer TL (Operating Time) Trimmer TP (Pause Time) Trimmer F (Force) CAUTION! — Every time the selection of micro switches 1 and 2 is changed, it is necessary to repeat the device learning procedure as described in paragraph 5.2.
- Page 17
Table 5 — Programmable functions Switches 1-2 Operation Off-Off Manual (hold-to-run) On-Off Semiautomatic Off-On Automatic (automatic closing) On-On Automatic + Always Closes Switch 3 Operation Condominium (not available in manual mode) Switch 4 Operation Pre-flashing Switch 5 Operation Closes 5 seconds after ‘Photo’ if set to ‘Automatic’ or ‘Close after Photo’ if set to ‘Semiautomatic’… -
Page 18: Integrated Radio Receiver
Switches 9 — 10: Setting a combination of switches 9 and 10, the motor brake procedure is carried out; according to the combination, the intensity of the braking power is established on the basis of the following setup: Table 6 dip9 off …
- Page 19
7.3.2 — “Remote” memorisation You can memorise a new transmitter without having to operate the receiver key (10-20 m from the receiver). You must have a previously memorised transmitter (old). The new transmitter will be memorised with the same characteristics as the old one. Important! Remote memorisation may be done on all receivers within the range of the transmitter;… - Page 20
7.3.4 — Locking / Unlocking the radio memory This procedure locks the memory, preventing acquiring and deleting radio transmitters. Table 11 = RADIO key = RADIO led Locking / Unlocking the radio memory Switch the power supply to the control unit off Hold down the RADIO key on the control unit (until step 04) Switch the power back on (continue holding the key down) -
Page 21: Adding Or Removing Devices
FURTHER DETAILS 8.1 — Adding or removing devices Automation devices can be added or removed at any time; in particular at the STOP input, various types of devices can be connected as described in the following paragraphs; WARNING! — at the end of the modifications made to the configuration of the alt input and of the photocell input it is necessary to repeat the device learning procedure as described in paragraph 5.2.
-
Page 22: Power For External Devices
8.2 — Power for external devices To power external devices (transponder badge reader, or backlighting for a keyswitch) connect the device to the control unit as shown in the figure. The power supply voltage is 24V +/- 10% with a maximum available current of 100mA. 8.3 — Oview programmer connection It is possible to connect the Oview programmer to the control unit via the IBT4N interface with a bus cable with 4 electrical wires inside.
-
Page 23: Diagnostics
“Move anyway” function If some safety device is not working or is faulty, it is possible to control and move the gate anyway in “Hold-to-run” mode. For further details, please refer to the tearout insert “USER GUIDE” (final part of the manual). DIAGNOSTICS Some devices are display messages to identify their status and faults.
-
Page 24: Basic Troubleshooting
WHAT TO DO IF… In case of malfunction due to problems during installation of failure of parts, refer to table 13: Table 14 Problem Solution The radio transmitter does not control the Check to see if the transmitter batteries are exhausted, if necessary replace them gate and the led on the transmitter does not light up The radio transmitter does not control the…
-
Page 25: Maintenance
TECHNICAL SPECIFICATIONS All technical specifications stated herein refer to an ambient temperature of 20° C (± 5° C). • Nice S.p.a. reserves the right to apply modifica- tions to products at any time when deemed necessary, maintaining the same intended use and functionality.
-
Page 26: Eu Declaration Of Conformity
Declaration in accordance with the following Directives: 2014/30/EU (EMC); 2006/42/EC (MD) annex II, part B Note: The contents of this declaration correspond to declarations in the official document filed in the offices of Nice S.p.a. and, in particu- lar, the latest version thereof available prior to the printing of this manual. The text herein has been re-edited for editorial purposes. A copy of the original declaration can be requested from Nice S.p.A.
-
Page 27: User Manual (End User Version)
• Your automation system is a machine that will faithful- technician. Nice recommends that maintenance checks ly execute your commands; unreasonable or improper be carried out every six months for normal domestic use,…
- Page 28
Nice S.p.A. Via Callalta, 1 31046 Oderzo (TV) www.niceforyou.com info@niceforyou.com…
Привод NICE ROX600
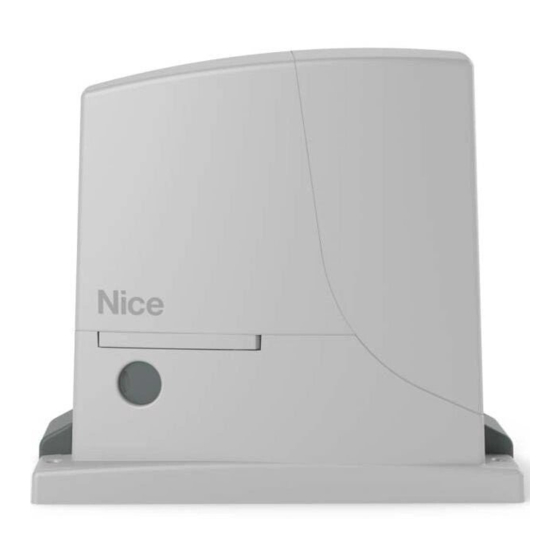
NICE ROX600 — это автоматический привод серии ROX, предназначенный для автоматизации откатных (сдвижных) ворот общим весом створки до 600 кг. Корпус поддерживает высокий стандарт защиты IP44 от пыли и влаги, тем самым надежно защищая от негативного влияния внешних факторов окружающей среды рабочие элементы. Электродвигатель работает от напряжения 230V. Привод по умолчанию рассчитан на правостороннюю установку, но при необходимости может быть установлен с левой стороны ворот, благодаря дополнительной настройке блока управления. При отключении электричества, благодаря механическому расцепителю можно открывать или закрывать ворота вручную. Привод адаптирован для работы в условиях континентального климата России и обладает широким температурным диапазоном эксплуатации от -20°C до +50°C. В условиях резко континентального и арктического климата (температура до -60°C) необходимо использование дополнительного универсального обогревателя NICE PW1 (совместно с термостатом NICE TW1).
В приводе NICE ROX600 установлен блок управления ROA40 для удобства настройки оборудованный интерфейсом IBT4N для подключения программирующего устройства OVIEW/A (поставляется отдельно). Блок управления поддерживает 2 уровня функций (регулировка скорости и усилия, режим «калитки» — частичного открытия для прохода пешехода, обнаружение препятствий, плавный старт и остановка, фототест — движение только после проверки устройств безопасности). В блок управления встроен 4-х канальный радиоприемник, поддерживающий частоту 433,92 МГц и позволяющий записать пульты NICE с кодировкой FLO, FLOR, O-CODE и SMILO. Каждой кнопке пульта можно назначить определенную функцию, которая соответствует команде блока управления (например: К1-пошаговый режим, К2-открытие для прохода пешеходов, К3-открыть, К-4-закрыть). Память приемника рассчитана на хранение до 150 пультов передатчиков (до 100 в режиме записи всех кнопок). Также плата ROA40 позволяет подключить следующее дополнительное оборудование и аксессуары:
• Сигнальную лампу NICE ELAC
• Переключатель замковый NICE EKS
• Wi-Fi модуль NICE IT4WIFI
• Фотоэлементы безопасности NICE EPM или EPS
Привод для откатных ворот NICE ROX600 оборудован механическим концевым выключателем, который реагирует на перемещение стопоров, прикрепленных на рейке, и вырабатывает команду на остановку ворот.
Основные преимущества этой модели:
• Интегрированный радиоприемник, совместимый с кодировками FLO, FLOR, O-CODE, SMILO (первый записанный пульт определяет используемую систему кодировки)
• Удобство программирования блока управления за счет возможности подключения OVIEW/A
• Индикация возможной неисправности на блоке управления с помощью сигнальной лампы
• Высокопрочный пластиковый корпус (Пыле-влагозащита IP44)
• Вес полотна ворот до 600 кг (возможность установки на ворота длиной до 8 метров)
• Запись до 150 пультов в память радиоприемника
Комплектация по умолчанию:
• Электромеханический привод NICE ROX600 для откатных ворот
• Монтажное основание для бетонирования
• Инструкция на Русском языке
Ограничения в зависимости от длины створки:
|
Длина створки (м) |
Максимальное число циклов/час |
Максимальное число последовательных циклов |
| До 4 | 40 | 20 |
| 4-6 | 25 | 13 |
| 6-8 | 20 | 10 |
Примечание: цикл — полное открытие ворот и возвращение в закрытое состояние.
Ограничения в зависимости от веса створки:
|
Вес створки (кг) |
Процентное соотношение циклов |
| До 400 | 100% |
| 400 ÷ 500 | 85% |
| 500 ÷ 600 | 70% |
Примечание: по длине створки определяется максимальное число циклов в час и число последовательно выполняемых циклов; по весу створки определяется степень уменьшения числа циклов и максимально допустимая скорость.
Рекомендуемые типы и размеры электрических кабелей при самостоятельной установке привода и подключению дополнительного оборудования:
|
Подсоединение |
Тип и размер кабеля |
| Питание привода | 1 кабель: 3 x 1,5 мм² |
| Сигнальная лампа с антенной |
1 кабель: 2 x 0,5 мм² 1 экранированный кабель типа RG58 |
| Фотоэлементы |
1 кабель: 2 x 0,25 мм² (TX) 1 кабель: 4 x 0,25 мм² (RX) |
| Переключатель замковый |
2 кабеля: 2 x 0,5 мм² или 1 кабель: 4 x 0,5 мм² |
Купить привод NICE ROX600 для откатных ворот и выбрать удобный способ доставки Вы можете в нашем интернет-магазине, положив необходимое количество товара в корзину и оформив заказ on-line или же связавшись с отделом продаж по телефону: 8 800 302 22 53.

Расскажем о том, как сделать правильный выбор при самостоятельном подпоре и покупке автоматики для откатных ворот. На что, в первую очередь, следует обратить внимание, для исключения проблем при дальнейшей эксплуатации воротной автоматики.
- Описание
-
Подробности
Привод ROX 600 KLT это хорошо известная модель обновленного привода ROBO 500 (ro 500). Новый привод унаследовал все положительные качества предшественника: надежность, удобство настройки, простота установки и, самое главное, долговечность! Автоматический привод NICE ROX 600 KLT подойдет на все бытовые, домашние, дачные ворота до 600 кг. За тот период, что привод поставляется в Россию – он отлично акклиматизировался и работает даже в суровые русские зимы.
Автоматика ROX 600 KLT обладает всем необходимым функционалом:
- Встроенный блок управления с интегрированным приемником.
- Приемник поддерживает кодировки пультов FLO, FLoR, SMILO
- В комплект уже входит два пульта!
- Память приемника поддерживает до 150 пультов.
- Функция автоматического закрытия
- Надежный, долговечный редуктор
Автоматика NICE на Российском рынке вот уже более 10 лет поставляет и обслуживает привода для различных типов ворот. За это время компания и все привода приспособились к климатическим условиям России и готовы бросить вызов самым тяжелым условиям эксплуатации.
- Характеристики
-
Дополнительная информация
Артикул (SKU) ROX600KLT Вес, КГ. 11.0000 Напряжение питания двигателя 230 В переменного тока Интенсивность использования Малая интенсивность Бренд Nice Частота использования 20 циклов/час Скорость 10.8 м/мин Максимальный вес ворот, кг. 600 кг. Тип концевого выключателя Механический Комплектация Привод Диапазон рабочих температур, °С -20…+55 Максимальная потребляемая мощность, Вт 300 Класс защиты IP44 - Отзывы
- Инструкции
-
Вложения товара
Инструкция Nice ROX600/1000 Скачать (pdf 14.08 MB)
Nice ROX600/1000 Скачать (pdf 12.15 MB)
Похожие товары
-

Привод для откатных ворот R-TECH SL1000
17 700,00 руб. -
DoorHan Sliding-1300 KIT комплект привода для откатных ворот
30 000,00 руб. -
DOORHAN SLIDING-800 привод для откатных ворот
18 800,00 руб. -
Привод для откатных ворот NICE ROX1000KIT
24 500,00 руб. -
DoorHan Sliding-800 KIT комплект привода для откатных ворот
27 900,00 руб.
Код: 38289
В избранное
В сравнение
Функционал: Комплект автоматики для откатных ворот
Единица измерения: шт
Вес: 12,100 кг
Объём: 0,02765 м3
Основной склад: Под заказ
28 900,00 руб Розничная цена
22 253,00 рубОптовая цена
Оставить отзыв
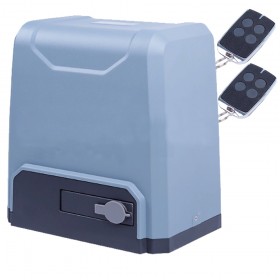
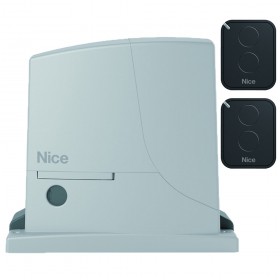
Комплект для откатных ворот со створкой массой до 600 кг. В составе комплекта: привод NICE ROX600 со встроенным блоком управления и интегрированным радиоприемником (1 шт), пульт дистанционного управления NICE FLO2RE (2 шт)
ОСОБЕННОСТИ:
— Простой ввод в эксплуатацию
— Встроенный блок управления с интегрированным радиоприёмником, совместимым с системами кодирования Flo, FloR, Smilo
— Память приёмника на 150 пультов
— Функция автоматического закрытия ворот
ТЕХНИЧЕСКИЕ ХАРАКТЕРИСТИКИ привода:
Масса створки ворот до: 600 кг
Ширина створки ворот до: 6 м
Питание: 230 В
Потребление: 1,4 А
Мощность: 300 Вт
Скорость открывания: 0,18 м/с
Усилие: 600 H
Интенсивность: 20 циклов/час
Класс защиты: IP44
Диапазон рабочих температур: -20…+50° С
Габаритные размеры: 330х210х303 мм
Вес привода: 11 кг
КОМПЛЕКТ ПОСТАВКИ:
Привод откатных ворот ROX600 — 1 шт.
Передатчик 2-х канальный FLO2RE — 2 шт.
Комплект автоматики для откатных ворот NICE ROX600KLT производства компании Nice по цене 28 900,00 RUB (22 253,00 RUB для оптовых поставок) с быстрой доставкой по Москве и в любой город России от интернет-магазина Сатро-Паладин. У нас вы можете прочитать подробное описание, посмотреть технические характеристики и перечень необходимых сопутствующих товаров, найти сертификаты и ознакомиться с реальными отзывами покупателей. Не нашли подходящую модель, отправьте заявку на подбор похожих товаров. Мы производим не только поставку, но и монтаж, разработку проекта и сервисное обслуживание.
Функционал
Комплект автоматики для откатных ворот
Вы можете произвести примерный расчёт доставки на данный товар для розничного магазина (количество принимается равным 1шт.), для более точного расчёта добавьте товар в корзину, расчёт стоимости будет произведён при переходе на страницу корзины. Для клиентов B2B-портала доставка расчитывается менеджером.
- Самовывоз со склада в Москве на Ярославском шоссе
- Курьерская доставка по Москве (только в пределах МКАД)
- Курьерская доставка по Москве (за пределы МКАД)
- Самовывоз из пункта Boxberry (Москва)
- Доставка по России Boxberry
Стоимость доставки: 0 руб.


|
|
-
Apollo
7500ETL
Model 7300INSTALLATION MANUALAPOLLO Gate Operators, Inc.Model 7500ETLResidential & Heavy Duty Commercial Slide Gate Operator08/18/09Requires installation of 4”x4” mounting post (not supplied) …
7500ETL Gate Opener, 23
-
tau
R18 series
1R18 SeriesMANUALE D’USO E MANUTENZIONEUSE AND MAINTENANCE MANUALBEDIENUNGS — UND WARTUNGSANLEITUNGMANUEL D’EMPLOI ET D’ENTRETIENMANUAL DE USO Y MANTENIMIENTOR18Automatismo per Cancelli a Battente — Uso Residenziale/Condominiale Swing Gate Operator — Residential/Communities Drehtorantrieb für Privat und Gewerbe …
R18 series Gate Opener, 35
-
Tymetal Corp.
TYM 1000
TYM 1000/2000Slide Gate OperatorInstallation GuidePRINTER’S INSTRUCTIONS:INSTR,INSTL,1000/2000 — TYMETAL CORP. — INK: BLACK — MATERIAL: 20 LB. MEAD BOND — SIZE: 8.500” X 11.000” — SCALE: 1-1 — FOLDING: ALBUM-FOLD — BINDING: SADDLE-STITCHOperator models contained in this manual conform to UL325 standard for use in …
TYM 1000 Gate Opener, 38
-
fadini
APROLI 280 BATT
GBVia Mantova, 177/A — 37053 Cerea (Verona) Italy — Tel. 0442 330422 r.a. — Fax 0442 331054 — e-mail: [email protected] — www.fadini.net®INSTALLATION MANUALAPROLI 280 BATTThe growth of MECCANICA FADINI has always been basedon the development of guaranteed products thanks to our“TOTAL QUALITY CONTROL” system which e …
APROLI 280 BATT Gate Opener, 12
-
Allmatic
IND4000K/T
Motoriduttore per scorrevoli Reduction gear for sliding gates Motoréducteur pour portes coulissantes Antrieb für Schiebetore Motorreductor para cancelas correderas Motorredutor para portões de correr IND4000K/T IT MANUALE ISTRUZIONI GB INSTRUCTION MANUAL F MANUEL D’EMPLOI D …
IND4000K/T Gate Opener, 64
-
Cardin
S504 Series
CARDIN ELETTRONICA S.p.A Via del lavoro, 73 – Z.I. Cimavilla — 31013 Codognè (TV) ItalyTel: +39/0438.404011 / Fax: +39/0438.401831e-mail (Italy): [email protected] (Europe): [email protected]®The S504 and S508 series, 433.92 / 868.3 MHz for all countries, conform to the essential requiremen …
S504 Series Gate Opener, 52
Recommended Documentation:
![]()
NICE ROX600 — Инструкция по установке и эксплуатации в формате pdf. Руководства по установке, настройке и эксплуатации оборудования.
Дата добавления: 14.12.2017
Размер файла: 7.9 Mb
Формат файла: pdf
Просмотров: 2725
Загрузок: 271
Дополнительная информация
По данному материалу пока нет информации.
Отзывы и комментарии
Отзывы и комментарии к материалу «NICE ROX600 — Инструкция по установке и эксплуатации».
Ответить 05.06.2021 13:19
Сергей
Здравствуйте! Установил привод Nice Rox 600 настроил всё как указано в инструкции. Но в место одной пары фотоэлиментов установил две пары фотоэлиментов. Одна пара на уровне 50 см и другая на уровне 1метр. Подключил фотоэлименты согласно схеме, но есть проблема, одна пара фотоэлиментов что установлена на уровне 50 см (при автоматическом закрытии) не срабатывает. Подскажите почему не срабатывает фотоэлимент?
- Описание
-
Подробности
Привод ROX 600 KLT это хорошо известная модель обновленного привода ROBO 500 (ro 500). Новый привод унаследовал все положительные качества предшественника: надежность, удобство настройки, простота установки и, самое главное, долговечность! Автоматический привод NICE ROX 600 KLT подойдет на все бытовые, домашние, дачные ворота до 600 кг. За тот период, что привод поставляется в Россию – он отлично акклиматизировался и работает даже в суровые русские зимы.
Автоматика ROX 600 KLT обладает всем необходимым функционалом:
- Встроенный блок управления с интегрированным приемником.
- Приемник поддерживает кодировки пультов FLO, FLoR, SMILO
- В комплект уже входит два пульта!
- Память приемника поддерживает до 150 пультов.
- Функция автоматического закрытия
- Надежный, долговечный редуктор
Автоматика NICE на Российском рынке вот уже более 10 лет поставляет и обслуживает привода для различных типов ворот. За это время компания и все привода приспособились к климатическим условиям России и готовы бросить вызов самым тяжелым условиям эксплуатации.
- Характеристики
-
Дополнительная информация
Артикул (SKU) ROX600KLT Вес, КГ. 11.0000 Напряжение питания двигателя 230 В переменного тока Интенсивность использования Малая интенсивность Бренд Nice Частота использования 20 циклов/час Скорость 10.8 м/мин Максимальный вес ворот, кг. 600 кг. Тип концевого выключателя Механический Комплектация Привод Диапазон рабочих температур, °С -20…+55 Максимальная потребляемая мощность, Вт 300 Класс защиты IP44 - Отзывы
- Инструкции
-
Вложения товара
Инструкция Nice ROX600/1000 Скачать (pdf 14.08 MB)
Nice ROX600/1000 Скачать (pdf 12.15 MB)
Похожие товары
-
Привод для откатных ворот NICE ROX1000KIT
24 500,00 руб. -
DoorHan Sliding-800 KIT комплект привода для откатных ворот
27 900,00 руб. -
Привод для откатных ворот R-TECH SL1000
17 700,00 руб. -
DoorHan Sliding-1300 KIT комплект привода для откатных ворот
30 000,00 руб. -
DOORHAN SLIDING-800 привод для откатных ворот
18 800,00 руб.
ROX
ROX600
ROX1000
ROX1000/V1
Pre posuvné brány
IT — GUIDA RAPIDA
EN — QUICK GUIDE
FR — GUIDE RAPIDE
ES — GUÍA RÁPIDA
DE — KURZANLEITUNG
PL — INSTRUKCJA SKRÓCONA
SK — Rýchly návod
RU —
краткое руководство по установке
7.
IT
AERIAL
ANTENNA
PROGRAM SWITCH
MICRO INTERRUTTORI
LED RADIO
LED RADIO
LED PHOTO
LED FOTOCELLULE
LED P.P.
LED PASSO PASSO
LED OK
LED OK
RADIO
TASTO RADIO
LIMIT SWITCH
FINE CORSA
FLASH
LAMPEGGIANTE
BOOST CAPACITOR
CONDENSATORE DI SPUNTO
RUN CAPACITOR
CONDENSATORE DI MARCIA
MOTOR
MOTORE
FUSE
FUSIBILE
8.
IT — Passo Passo
01.
02.
EN — Step-by-step
FR — Pas à pas
ES — Paso a paso
1
x
DE — Schrittbetrieb
PL — Krok po kroku
RADIO
LED RADIO
SK — Krok-za-krokom
RU — пошаговый
Switch 1-2
IT
OFF-OFF
Manuale (a uomo presente)
ON-OFF
Semiautomatico
Automatico
OFF-ON
(chiusura automatica)
ON-ON
Automatico + Chiude Sempre
Automatic + Always Closes
Switch 3
IT
Condominiale
ON
(non disponibile in modo manuale)
(not available in manual mode)
Switch 4
IT
ON
Prelampeggio
Switch 5
IT
Richiudi 5 secondi dopo ‘Foto’ se
Closes 5 seconds after ‘Photo’ if set to
impostato in ‘Automatico’ o
ON
‘Automatic’ or ‘Close after Photo’ if set
‘Chiudi dopo Foto’ se
impostato in ‘Semiautomatico’
Switch 6
IT
Sicurezza ‘Foto’ anche in Apertura
ON
«Photo» also when Opening
Switch 7
IT
ON
Partenza graduale
Switch 8
IT
ON
Rallentamento
Switch 9
IT
ON
Freno
Switch 10
IT
OFF
Non in uso
SK — Vyhlásenie o zhode ES / EN — EC declaration of conformity
Poznámka: Obsah tohto vyhlásenia zodpovedá obsahu oficiálneho dokladu, uloženého v sídle Nice S.p.a., najmä jeho poslednej revízii dostupnej pred tlaèou tohto návodu. Tu uvedený text bol upravený z tlaèových
dôvodov. Kópiu originálneho vyhlásenia si môžete vyžiada v Nice S.p.a. (TV) Taliansko. / Note: The contents of this declaration correspond to declarations in the official document filed in the offices of Nice S.p.a. and,
in particular, the latest version thereof available prior to the printing of this manual. The text herein has been re-edited for editorial purposes. A copy of the original declaration can be requested from Nice S.p.A. (TV) Italy.
Èíslo vyhlásenia: 532/ROX — Revízia: 0 — Jazyk: SK — Meno výrobku: NICE S.p.A. — Adresa: Via Pezza Alta N°13, 31046 Rustigné di Oderzo (TV) Taliansko — Osoba poverená zostavením technickej
dokumentácie: NICE S.p.A. — Typ výrobku: Elektromechanický pohon s príslušenstvom — Model/Typ: ROX600, ROX1000 — Príslušenstvo: — / Declaration number: 532/ROX — Revision: 0 — Language: EN —
Name of manufacturer: NICE S.p.A. — Address: Via Pezza Alta N°13, 31046 Rustignè di Oderzo (TV) Italy — Person authorised to draw up the technical documentation: NICE S.p.A. — Type of product:
Electromechanical gearmotor and accessory equipment — Model/Type: ROX600, ROX1000 — Accessories: —
Dolupodpísaný Mauro Sordini, vo funkcii generálneho riadite¾a, vyhlasuje na svoju vlastnú zodpovednos, že horeuvedené výrobky spåòajú náležitosti nasledovných smerníc: / The undersigned, Mauro Sordini, as
Managing Director, hereby declares under his own responsibility that the products identified above comply with the provisions of the following directives:
• Model spåòa náležitosti Smernice 1999/5/ES v súlade s nasledovnými harmonizovanými normami: / • The model conforms with the requirements of Directive 1999/5/EC in relation to the following harmonised standards:
— Ochrana zdravia (èl. 3(1)(a)): EN 62479:2010; — Elektrická bezpeènos (èl. 3(1)(a)): EN 60950-1:2006+A1:2010+A12:2011+A1:2010+A2:2013; — Elektromagnetická kompatibilita (èl. 3(1)(b)): EN 301 489-1 V1.9.2:2011,
EN 301 489-3 V1.6.1:2013; — Rádiové spektrum (èl. 3(2)): EN 300 220-2 V2.4.1:2012 / Health and safety (Art. 3(1)(a)): EN 62479:2010; — Electrical safety (art. 3(1)(a)): EN 60950-1:2006+A1:2010+A12:2011+A1:2010
+A2:2013; — Electromagnetic compatibility (art. 3(1)(b)): EN 301 489-1 V1.9.2:2011, EN 301 489-3 V1.6.1:2013; — Radio spectrum (art. 3(2)): EN 300 220-2 V2.4.1:2012
V súlade so Smernicou 1999/5/ES (Príloha V) výrobok spåòa požiadavky Triedy 1 / Pursuant to Directive 1999/5/EC (Annex V), the product is rated Class 1
• Model spåòa náležitosti SMERNICE 2004/108/ES pod¾a nasledovných harmonizovaných noriem: / • The model conforms with the requirements of Directive 2004/108/EC in relation to the following harmonised stand-
ards: / EN 61000-6-2:2005, EN 61000-6-3:2007+A1:2011
Ïalej výrobok spåòa náležitosti nasledovnej smernice v súvislosti s požiadavkami pre “èiastoène skompletizované strojové zariadenia”: / In addition, the product conforms to the following directive pursuant to the
provisions applicable to «partly completed machinery»:
Smernica 2006/42/ES (Príloha II, èas 1.B) / Directive 2006/42/EC (Annex II, part 1.B)
— Týmto sa vyhlasuje, že súvisiaca technická dokumentácia bola vyplnená v súlade s prílohou VII B Smernice 2006/42/ES a že boli dodržané nasledovné základné náležitosti: / — It is hereby declared that the relevant
technical documentation has been compiled in accordance with Annex VII Part B of Directive 2006/42/EC and that the following essential requirements have been applied and fulfilled: 1.1 — 1.1.2 — 1.1.3 — 1.2.1 — 1.2.6 —
1.5.1 — 1.5.2 — 1.5.5 — 1.5.6 — 1.5.7 — 1.5.8 — 1.5.10 — 1.5.11
— Výrobca sa zaväzuje poskytnú na základe dôvodnej žiadosti kompetentným národným orgánom príslušné informácie o “èiastoène skompletizovanom strojovom zariadení”, prièom sa zachová nedotknuté jeho právo
na duševné vlastníctvo. / — The manufacturer undertakes to transmit, in response to a reasoned request by the national authorities, relevant information on the «partly completed machinery». This shall be without
prejudice to the intellectual property rights of the manufacturer of the partly completed machinery.
— Ak je “èiastoène skompletizované strojové zariadenie” uvedené do prevádzky v európskej krajine s úradným jazykom iným, ako je ten, v ktorom je písané toto vyhlásenie, dovozca má povinnos priloži k tomuto
vyhláseniu príslušný preklad. / — Should the «partly completed machinery» be put into service in a European country with an official language different to the one used in this declaration, a translation into that language
must be provided by the person bringing the machinery into the language area in question.
— Upozoròuje sa, že “èiastoène skompletizované” nesmie by uvedené do prevádzky, až kým koncové strojové zariadenie, v ktorom je zabudované, nebolo vyhlásené zhodným s ustanoveniami Smernice 2006/42/ES. /
— The «partly completed machinery» may not be put into service until the final machinery into which it is to be incorporated has been declared in conformity with the provisions of Directive 2006/42/EC, where
Ïalej výrobok spåòa požiadavky týchto noriem: / The product also complies with the following standards: EN 60335-1:2002 + A1:2004 + A11:2004 + A12:2006 + A2:2006 + A13:2008 + A14:2010 + A15:2011; EN
60335-2-103:2003 +A11:2009
Výrobok spåòa, s obmedzením na príslušné èasti, náležitosti nasledovných noriem: / All parts of the product subject to the following standards comply with them: EN 13241-1:2003+A1:2011, EN 12445:2002, EN
12453:2002, EN 12978:2003+A1:2009
Oderzo, 28. apríla 2015 / Oderzo, 28 April 2015
IT
Con la presente Nice S.p.A. dichiara che questo prodotto è conforme ai requisiti essenziali ed alle altre disposizioni pertinenti stabilite dalla direttiva 1999/5/CE.»
EN Nice S.p.A. hereby declares that the product conforms with the essential requisites and other pertinent provisions of Directive 1999/5/EC.
FR Par la présente, Nice S.p.A. déclare que ce produit est conforme aux exigences de base et autres dispositions applicables établies par la directive 1999/5/CE.
ES Por la presente Nice S.p.A. declara que este producto cumple con los requisitos esenciales y demás disposiciones pertinentes establecidas por la directiva 1999/5/CE.
DE Hiermit erklärt Nice S.p.A., dass dieses Produkt die grundlegenden Anforderungen sowie die anderen Bestimmungen der Richtlinie 1999/5/EG erfüllt.
PL Niniejszym firma Nice S.p.A. oświadcza, że ten produkt jest zgodny z zasadniczymi wymogami oraz innymi mającymi zastosowanie przepisami, określonymi w dyrektywie 1999/5/WE.
SK Týmto Nice S.p.A. vyhlasuje, že tento výrobok spåòa základné náležitosti a všetky ostatné relevantné požiadavky Smernice 1999/5/ES.
RU Настоящим компания Nice S.p.A. заявляет, что данный продукт соответствует основным требованиям и другим предписаниям Директивы 1999/5/CE.
PROGRAM SWITCH
1 2 3 4 5 6 7 8 910
2
1
LED
LED:
EN
FR
AERIAL
ANTENNE
MICRO SWITCHES
MICRO-INTERRUPTEURS
RADIO LED
LED RADIO
PHOTOCELL LEDS
LED PHOTOCELLULES
STEP-BY-STEP LED
LED PAS-À-PAS
OK LED
LED OK
RADIO KEY
TOUCHE RADIO
LIMIT SWITCH
FIN DE COURSE
FLASHER
CLIGNOTANT
BOOST CAPACITOR
CONDENSATEUR D’APPOINT
RUN CAPACITOR
CONDENSATEUR DE MARCHE
MOTOR
MOTEUR
FUSE
FUSIBLE
03.
04.
LED RADIO
3s
EN
FR
Manual (hold-to-run)
Manuel (homme mort)
Semiautomatic
Semi-automatique
Automatic
Automatique
(automatic closing)
(fermeture automatique)
Automatique + Ferme Toujours
EN
FR
Condominium
Collectif
(non disponible en mode manuel)
EN
FR
Pre-flashing
Préclignotement
EN
FR
Refermer 5 secondes après « Foto »
s’il est configuré en « Automatique » ou
« Fermer après Foto » s’il est configuré
to ‘Semiautomatic’
en « Semi-automatique »
EN
FR
Safety
Sécurité « Foto », y compris
en ouverture
EN
FR
Gradual Start-up
Démarrage graduel
EN
FR
Slow down
Ralentissement
EN
FR
Brake
Frein
EN
FR
Not used
Non utilisé
TX
1
2
1
2
3
4
LED FCC
LED FCA
(ROX1000)
ES
ANTENA
ANTENNE
MICRO INTERRUPTORES
MIKRO-SCHALTER
LED RADIO
LED FUNKSENDER
LED FOTOCÉLULAS
LED FOTOZELLEN
LED PASO PASO
LED SCHRITTMOTOR
LED OK
LED OK
TECLA RADIO
FUNKSENDER-TASTE
TOPE
ENDSCHALTER
INTERMITENTE
BLINKLEUCHTE
CONDENSADOR DE ARRANQUE
ANLAUFKONDENSATOR
CONDENSADOR DE MARCHA
ANLAUF-KONDENSATOR
MOTOR
MOTOR
FUSIBLE
SICHERUNG
PROGRAM SWITCH
ES
DE
Manual (hombre presente)
Manuell (Totmann-Modus)
Semiautomático
Halbautomatisch
Automático
Automatisch
(cierre automático)
(automatische Schließung)
Automático + Cierra siempre
Automatisch + Schließt immer
ES
DE
Condominio
Wohnblockbetrieb
(no disponible en modo manual)
(nicht im manuellen Modus verfügbar)
ES
DE
Parpadeo previo
Vorwarnen
ES
DE
Recierre 5 segundos después de «Foto-
Schließt 5 Sekunden nach „Foto»
célula» si está programado en «Automá-
wieder, wenn „Automatisch» eingestellt
tico» o «Cierre después de Fotocélula» si
ist, oder „Nach Foto schließen», wenn
está programado en «Semiautomático»
„Halbautomatisch» eingestellt ist
ES
DE
Seguridad «Fotocélula» también en
Sicherheit „Foto» auch bei der Öffnung
Apertura
ES
DE
Arranque gradual
Gradueller Start
ES
DE
Ralentización
Verlangsamung
ES
DE
Freno
Bremse
ES
DE
No en uso
Nicht in Benutzung
• IT — Semiautomatico / Rallentamento
• EN — Semiautomatic / Slow down
• FR — Semi-automatique / Ralentissement
• ES — Semiautomático / Ralentización
• DE — Halbautomatisch / Verlangsamung
• PL — Półautomatyczne / Zwolnienie
• SK — Poloautomatické / Spomalenie
• RU — Полуавтоматический / Торможение
appropriate.
Ing.Mauro Sordini (generálny riadite¾ / Chief Executive Officer)
RX
FLASH
230 V
5
NC NO
C C
NO NC
DE
PL
ANTENA
MIKRO WYŁĄCZNIKI
DIODA LED RADIO
DIODA LED FOTOKOMÓREK
DIODA LED KROK PO KROKU
DIODA LED OK
PRZYCISK RADIO
WYŁĄCZNIK KRAŃCOWY
LAMPA OSTRZEGAWCZA
KONDENSATOREM ROZR CHOWYM ROZBEHOVÝ KONDENZÁTOR
KONDENSATOR PRACY
SILNIK
BEZPIECZNIK
PL
Ręczny (manualny)
Półautomatyczne
Automatyczny
(zamykanie automatyczne)
Automatyczne + Zawsze zamyka
PL
Zespół mieszkalny
(niedostępna w trybie ręcznym)
(nie je možné v manuálnom režime)
PL
Wstępne miganie
PL
Zamknąć 5 sekund po „Foto»,
jeśli ustawiony w trybie Automatycz-
nym lub „Zamknij po Foto» jeśli usta-
wiony w trybie Półautomatycznym.
v “poloautomatickom” režime
PL
Bezpieczeństwo „Foto» również pod-
czas Otwierania
PL
Uruchamianie stopniowe
PL
Zwolnienie
PL
Hamulec
PL
Nieużywany
PREDNASTAVENÉ HODNOTY
PROGRAM SWITCH: ON
1
2 3 4 5 6 7 8 9 10
ON
OFF
• IT — Tempo Lavoro
• EN — Working time
• FR — Temps de fonctionnement
• ES — Tiempo de trabajo
TL
• DE — Arbeitszeit
• PL — Czas pracy
• SK — Èas práce
• RU — Время работы
• IT — Tempo Pausa
• EN — Pause Time
• FR — Temps de pause
• ES — Tiempo de pausa
TP
• DE — Pausenzeit
• PL — Czas pauzy
• SK — Èas pauzy
• RU — Пауза
• IT — Forza
• EN — Force
• FR — Force
• ES — Fuerza
F
• DE — Kraft
• PL — Siła
• SK — Sila
• RU — Мощность
RU
SK
ANTÉNA
АНТЕННА
MIKRO-SPÍNAÈE
МИКРО ВЫКЛЮЧАТЕЛИ
LED RÁDIO
СВЕТОИНДИКАТОР RADIO
СВЕТОИНДИКАТОР
LED FOTOBUNKY
ФОТОЭЛЕМЕНТОВ
LED KROK-ZA-KROKOM
ИНДИКАТОР ПОШАГОВО
LED OK
СИД OK
TLAÈIDLO RÁDIO
КНОПКА RADIO
KONCOVÝ SPÍNAÈ
КОНЦЕВОЙ ВЫКЛЮЧАТЕЛЬ
MAJÁK
ПРОБЛЕСКОВАЯ ЛАМПА
ПУСКОВОЙ КОНДЕНСАТОР
KONDENZÁTOR PRÁCE
КОНДЕНСАТОР ХОДА
MOTOR
ДВИГАТЕЛЬ
POISTKA
ПРЕДОХРАНИТЕЛЬ
RU
SK
Manuálne (osoba prítomná)
Ручной (присутствие человека)
Poloautomatické
Полуавтоматический
Automatické
Автоматический
(automatické zatvorenie)
(автоматическое закрытие)
Automatické + vždy zatvor
Автоматический + Всегда закрыто
RU
SK
Kondomíniové
Кондоминиум
(недоступен в ручном режиме)
RU
SK
Blikanie vopred
Предварительная сигнализация
SK
RU
Zatvor 5 sekúnd po “Foto”
Закрытие через 5 секунд после сра-
v “Automatickom” režime
батывания «Фото» в автоматическом
alebo “Zatvor po foto”
режиме или «Закрыть после фото» в
полуавтоматическом режиме
RU
SK
Bezpeènostná “Foto”
Устройство безопасности «Фото»
также при открытии
aj pri otváraní
RU
SK
Postupný štart
Постепенное начало хода
RU
SK
Spomalenie
Торможение
RU
SK
Brzda
Тормоз
RU
SK
Nepoužitý
Не используется
![]()
NICE ROX600 — Инструкция по установке и эксплуатации в формате pdf. Руководства по установке, настройке и эксплуатации оборудования.
Дата добавления: 14.12.2017
Размер файла: 7.9 Mb
Формат файла: pdf
Просмотров: 2830
Загрузок: 281
Дополнительная информация
По данному материалу пока нет информации.
Отзывы и комментарии
Отзывы и комментарии к материалу «NICE ROX600 — Инструкция по установке и эксплуатации».
Ответить 05.06.2021 13:19
Сергей
Здравствуйте! Установил привод Nice Rox 600 настроил всё как указано в инструкции. Но в место одной пары фотоэлиментов установил две пары фотоэлиментов. Одна пара на уровне 50 см и другая на уровне 1метр. Подключил фотоэлименты согласно схеме, но есть проблема, одна пара фотоэлиментов что установлена на уровне 50 см (при автоматическом закрытии) не срабатывает. Подскажите почему не срабатывает фотоэлимент?