![]()
Руководство пользователя
BL00004889-701 RU
Введение
Благодарим Вас за приобретение данного изделия. Внимательно прочтите и изучите данное руководство, прежде чем начать работать с фотокамерой. Храните данное руководство в таком месте, где с ним смогут ознакомиться все пользователи данного изделия.
Для получения последней информации
Для получения последней информации о данном продукте, в том числе о последних версиях руководств и образцах цветных фотографий, посетите:
http://fujifilm-dsc.com/manuals/
Доступ к сайту можно получить не только с компьютера, но и со смартфонов и планшетов.
ii

PГлава Указатель
|
Список меню |
iv |
|
|
1 |
Перед началом работы |
1 |
|
2 |
Первые шаги |
27 |
|
3 |
Основные функции съемки и просмотра |
47 |
|
4 |
Запись видео и воспроизведение |
53 |
|
5 |
Фотосъемка |
61 |
|
6 |
Меню съемки |
113 |
|
7 |
Воспроизведение и меню просмотра |
173 |
|
8 |
Меню настройки |
199 |
|
9 |
Клавиши быстрого доступа |
241 |
|
10 |
Периферийные устройства и дополнительные принадлежности |
255 |
|
11 |
Соединения |
277 |
|
12 |
Технические примечания |
289 |
iii

Список меню
Параметры меню фотокамеры перечислены ниже.
Меню съемки
Настройте параметры при съемке фотографий или видеороликов.
|
NСм. стр. 113 для получения подробной информации. |
||||||
|
HНАСТРОЙКИ КАЧЕСТВА |
P |
GНАСТРОЙКА AF/MF |
P |
|||
|
ИЗОБРАЖЕНИЯ |
ЗОНА ФОКУСИРОВКИ |
133 |
||||
|
РАЗМЕР ИЗОБР. |
115 |
РЕЖИМ AF |
134 |
|||
|
КАЧЕСТВО ИЗОБР. |
116 |
ПОЛЬЗ. НАСТР. АФ-Н |
135 |
|||
|
ЗАПИСЬ В RAW |
117 |
ЭКРАН ТОЧКИ АФ yz |
136 |
|||
|
1⁄3 |
МОДЕЛИРОВ. ПЛЕНКИ |
118 |
1⁄2 |
КОЛ-ВО ТОЧЕК ФОКУСИ- |
136 |
|
|
ЭФФЕКТ ЗЕРНИСТОСТИ |
120 |
РОВКИ |
||||
|
ДИНАМИЧ. ДИАПАЗОН |
121 |
ПРЕДВАРИТЕЛ. АФ |
137 |
|||
|
БАЛАНС БЕЛОГО |
122 |
ПОДСВЕТКА AF |
137 |
|||
|
ТОН СВЕТОВ |
126 |
НАСТР. РАСПОЗН. ЛИЦ/ |
138 |
|||
|
ТОН ТЕНЕЙ |
126 |
ГЛАЗ |
||||
|
ЦВЕТ |
127 |
AF+MF |
140 |
|||
|
РЕЗКОСТЬ |
127 |
ПОМОЩЬ РУЧН.ФОК. |
141 |
|||
|
2⁄3 |
СНИЖЕНИЯ ШУМА |
128 |
ПРОВЕРКА ФОКУСА |
141 |
||
|
СНИЖ.ШУМ.ДЛ.ЭКСП |
128 |
ВЗ.БЛОК.ТОЧ.АЭ И ЗОНУ |
142 |
|||
|
ОПТИМ.МОДУЛ.СВЕТА |
129 |
2⁄2 |
ФОК |
|||
|
НАСТР .МГНОВЕН. АФ |
142 |
|||||
|
ЦВЕТ.ПРОСТР. |
129 |
|||||
|
ШКАЛА ГЛУБ. ПОЛЯ |
||||||
|
КАРТИРОВАНИЕ ПИКСЕЛЕЙ |
130 |
143 |
||||
|
3⁄3 |
ВЫБЕР.ПОЛЬЗ.НАСТР |
131 |
РЕЗКОСТИ |
|||
|
ПРИОР. СПУСКА/ФОК. |
143 |
|||||
|
РЕД/СОХР.ПОЛ.НАСТР |
131 |
|||||
|
РЕЖИМ СЕНСОРНОГО |
144 |
|||||
|
ЭКРАНА |
||||||
iv

|
Список меню |
|||||||
|
AНАСТРОЙКА СЪЕМКИ |
P FНАСТРОЙКА ВСПЫШКИ |
P |
|||||
|
ПРОГРАММЫ |
147 |
НАСТРОЙКА ФУНКЦИИ |
164 |
||||
|
НАСТРОЙКА ПРИВОДА |
149 |
ВСПЫШКИ |
|||||
|
ТАЙМЕР |
151 |
УДАЛ.ЭФ.КРАСН.ГЛАЗ |
165 |
||||
|
1⁄2 |
ИНТЕРВ.СЪЕМКА ПО ТАЙМ. 152 |
РЕЖИМ БЛОКА TTL |
166 |
||||
|
ЭКСПОЗАМЕР |
154 |
НАСТРОЙКА ИНДИКАТОРА |
167 |
||||
|
ТИП ЗАТВОРА |
155 |
||||||
|
ГЛАВНЫЕ НАСТРОЙКИ |
167 |
||||||
|
РЕЖ.СТАБИЛИЗАЦИИ |
156 |
||||||
|
НАСТРОЙКА CH |
168 |
||||||
|
ЧУВСТВ-ТЬ ISO |
157 |
BНАСТРОЙКИ ВИДЕО |
P |
||||
|
2⁄2 |
НАСТР.ПЕР.К-ЦА |
160 |
|||||
|
РЕЖИМ ВИДЕО |
169 |
||||||
|
БЕСПРОВ.СВЯЗЬ |
163 |
||||||
|
РЕЖИМ AF ДЛЯ ВИДЕО |
170 |
||||||
|
ОТОБР. ИНФОРМ. ВЫВОДА |
170 |
||||||
|
HDMI |
|||||||
|
ВЫВОД ВИДЕО 4K |
171 |
||||||
|
УПРАВЛЕНИЕ ЗАПИСЬЮ HDMI 171 |
|||||||
|
РЕГУЛ. УРОВНЯ МИКРОФОНА |
172 |
||||||
|
МИК./ДИСТАН.СПУСК |
172 |
Меню просмотра
Отрегулируйте настройки воспроизведения.
|
NСм. стр. 180 для получения подробной информации. |
||||||
|
CМЕНЮ ВОСПРОИЗВЕДЕНИЯ |
P CМЕНЮ ВОСПРОИЗВЕДЕНИЯ |
P |
||||
|
КОНВЕРТАЦИЯ RAW |
180 |
СЛАЙД ШОУ |
191 |
|||
|
УДАЛИТЬ |
183 |
ПОМОЩЬ ФОТОАЛЬБ. |
192 |
|||
|
КАДРИРОВАНИЕ |
186 |
2⁄2 |
АВТОСОХР. НА ПК |
194 |
||
|
1⁄2 |
ИЗМЕНИТЬ РАЗМЕР |
187 |
РАСПЕЧАТАТЬ (DPOF) |
195 |
||
|
ЗАЩИТИТЬ |
188 |
ПЕЧАТЬ ПРИНТЕРА instax |
197 |
|||
|
ПОВОРОТ КАДРА |
189 |
СООТНОШЕНИЕ |
198 |
|||
|
УДАЛ.ЭФ.КРАСН.ГЛАЗ |
190 |
|||||
|
БЕСПРОВ.СВЯЗЬ |
191 |
v

Меню настройки
Отрегулируйте основные настройки фотокамеры.
NСм. стр. 199 для получения подробной информации.
|
DПОЛЬЗОВАТЕЛЬСКИЕ |
P |
DНАСТРОЙКИ ЭКРАНА |
P |
|||
|
НАСТРОЙКИ |
ЯРК.ВИДОИСКАТЕЛЯ |
212 |
||||
|
ФОРМАТ-ВАТЬ |
201 |
ЦВЕТ EVF |
213 |
|||
|
ДАТА/ВРЕМЯ |
202 |
ЯРК. ЖК |
213 |
|||
|
РАЗН. ЧАСОВ |
203 |
ЦВЕТ LCD |
214 |
|||
|
a |
204 |
1⁄2 |
ОТОБР. ИЗОБ. |
214 |
||
|
НАСТРОЙКИ МОЕГО МЕНЮ |
||||||
|
204 |
АВТОПОВОРОТ EVF |
215 |
||||
|
ОЧИСТКА СЕНСОРА |
206 |
ПРЕДВ.ПРОСМ.ЭКСП./БАЛ. |
215 |
|||
|
ЗВУК И ВСПЫШКА |
206 |
БЕЛ.В РУЧ.РЕЖ. |
||||
|
ВОССТАНОВИТЬ |
207 |
ЭФФ.ИЗОБ.ДЛЯ ПРЕДВ. |
216 |
|||
|
DНАСТРОЙКИ ЗВУКА |
P |
ПРОСМ. |
||||
|
РАМКА КАДРИР. |
217 |
|||||
|
ч. СРАБАТЫВАНИЕ СИГНАЛА AF 208 |
||||||
|
АВТОПОВ.-ПРОСМ. |
218 |
|||||
|
ч. СРАБАТ.СИГН.АВТОСПУСКА |
209 |
2⁄2 |
||||
|
ЕДИНИЦЫ ШКАЛЫ ФОКУ- |
218 |
|||||
|
УРОВ. ГРОМКОСТИ |
209 |
|||||
|
СИРОВКИ |
||||||
|
ГРОМК. ЗАТВ. |
210 |
|||||
|
ОТОБР.ПОЛЬЗ.НАСТР |
219 |
|||||
|
ЗВУК ЗАТВОРА |
210 |
|||||
|
ГРОМК. ВОСП. |
211 |
vi

|
Список меню |
|||||||
|
DНАСТРОЙКА КНОПОК / |
P |
DУПРАВЛЕНИЕ ПИТАНИЕМ |
P |
||||
|
ДИСКОВ |
АВТО ВЫКЛ. |
231 |
|||||
|
РЕД./СОХР. БЫСТР. МЕНЮ |
222 |
ЭФФЕКТИВНОСТЬ |
232 |
||||
|
НАСТР. КНОПКИ Fn/АЭ-Б/ |
224 |
DНАСТРОЙКИ СОХРАНЕНИЯ |
|||||
|
АФ-Б |
P |
||||||
|
ДАННЫХ |
|||||||
|
НАСТР. СЕЛЕКТОРНОЙ |
|||||||
|
226 |
НОМЕР КАДРА |
234 |
|||||
|
КНОПКИ |
|||||||
|
1⁄2 |
СОХР ИСХ ИЗОБРАЖ |
235 |
|||||
|
НАСТР.ДИСКА УПР. |
226 |
||||||
|
РЕДАКТ. ИМЯ ФАЙЛА |
235 |
||||||
|
ЗАТВОР ПО АФ |
227 |
||||||
|
ИНФО. ОБ АВТОРСКИХ |
|||||||
|
ЗАТВОР ПО АЭ |
227 |
236 |
|||||
|
ПРАВАХ |
|||||||
|
СНИМ.БЕЗ ОБЪЕКТИВА |
228 |
||||||
|
DНАСТРОЙКА СОЕДИНЕНИЯ |
P |
||||||
|
ФОКУСИР. КОЛЬЦО |
228 |
||||||
|
РЕЖ.БЛОКИР.АЭ/АФ |
229 |
НАСТРОЙКИ WI-FI |
237 |
||||
|
НАСТР.АВТОСОХР |
238 |
||||||
|
2⁄2 |
НАСТР. ДИАФРАГМЫ |
229 |
|||||
|
НАСТР. ГЕОТЕГИНГА |
238 |
||||||
|
НАСТР. СЕНСОРНОГО |
230 |
||||||
|
ЭКРАНА |
НАСТ.ПОДК.ПРИНТ. instax |
239 |
|||||
vii

|
PСодержание |
|
|
Введение………………………………………………………………………….. |
ii |
|
Для получения последней информации…………………….. |
ii |
|
Список меню ………………………………………………………………….. |
iv |
|
Меню съемки………………………………………………………………………….. |
iv |
|
Меню просмотра …………………………………………………………………… |
v |
|
Меню настройки …………………………………………………………………… |
vi |
|
Прилагаемые принадлежности……………………………….. |
xix |
|
Об этом руководстве…………………………………………………… |
xx |
|
Символы и условные обозначения …………………………….. |
xx |
|
Терминология………………………………………………………………………… |
xx |
|
1 Перед началом работы |
1 |
|
Компоненты фотокамеры ……………………………………………. |
2 |
|
Табличка с серийным номером………………………………………. |
4 |
|
Селектор ……………………………………………………………………………………. |
4 |
|
Диск скорости затвора……………………………………………………….. |
5 |
|
Диск коррекции экспозиции …………………………………………… |
5 |
|
Диск привода…………………………………………………………………………… |
6 |
|
Рычаг автоматического переключателя выбора |
|
|
режимов…………………………………………………………………………………….. |
7 |
|
Диски управления…………………………………………………………………. |
8 |
|
Индикатор………………………………………………………………………………. |
10 |
|
ЖК-монитор …………………………………………………………………………… |
11 |
|
Фокусировка видоискателя…………………………………………… |
11 |
viii

|
Содержание |
|
|
Информация на дисплее фотокамеры……………………. |
12 |
|
Электронный видоискатель/ЖК-дисплей……………….. |
12 |
|
Выбор режима отображения ………………………………………… |
14 |
|
Регулировка яркости дисплея ……………………………………… |
15 |
|
Экран видоискателя ………………………………………………………….. |
15 |
|
Кнопка DISP/BACK……………………………………………………………….. |
16 |
|
Пользовательская настройка стандартного |
|
|
дисплея……………………………………………………………………………………. |
17 |
|
Использование меню………………………………………………….. |
20 |
|
Режим сенсорного экрана …………………………………………. |
22 |
|
Сенсорные элементы управления съемкой ………….. |
22 |
|
Сенсорные элементы управления в режиме |
|
|
воспроизведения……………………………………………………………….. |
24 |
|
2 Первые шаги |
27 |
|
Присоединение ремешка ………………………………………….. |
28 |
|
Присоединение объектива ……………………………………….. |
30 |
|
Зарядка аккумулятора………………………………………………… |
32 |
|
Установка батарей и карт памяти…………………………….. |
36 |
|
Совместимые карты памяти…………………………………………… |
40 |
|
Включение и выключение фотокамеры…………………. |
42 |
|
Проверка уровня заряда батареи……………………………. |
43 |
|
Настройка основных параметров……………………………. |
44 |
|
Выбор другого языка…………………………………………………………. |
46 |
|
Изменение времени и даты …………………………………………… |
46 |
ix

|
3 Основные функции съемки и просмотра |
47 |
|
Фотосъемка (режим P)………………………………………………… |
48 |
|
aПросмотр фотографий ………………………………………….. |
51 |
|
bУдаление снимков……………………………………………………. |
52 |
|
4 Запись видеороликов и воспроизведение |
53 |
|
FЗапись видеороликов……………………………………………. |
54 |
|
Регулировка настроек видео………………………………………… |
57 |
|
aПросмотр видеороликов ……………………………………… |
58 |
|
5 Фотосъемка |
61 |
|
Выбор режима съемки ……………………………………………….. |
62 |
|
Режим P: Программная AЭ ……………………………………………… |
62 |
|
Режим S: Автоматическая экспозиция с |
|
|
приоритетом выдержки…………………………………………………… |
64 |
|
Режим A: Автоматическая экспозиция с |
|
|
приоритетом диафрагмы ………………………………………………… |
69 |
|
Режим M: Ручная экспозиция………………………………………… |
72 |
|
Автоматический режим……………………………………………………. |
74 |
|
Автофокусировка…………………………………………………………. |
77 |
|
Режим фокусировки ………………………………………………………….. |
78 |
|
Параметры автофокусировки (режим АФ)……………… |
80 |
|
Выбор точки фокусировки……………………………………………… |
82 |
|
Ручная фокусировка……………………………………………………. |
87 |
|
Проверка фокусировки …………………………………………………… |
89 |
|
dКоррекция экспозиции…………………………………………. |
91 |
|
C (польз.)………………………………………………………………………………….. |
91 |
|
Блокировка фокуса/экспозиции………………………………. |
92 |
|
Кнопки AF-L и AE-L……………………………………………………………… |
93 |
|
x |
![]()
|
Содержание |
|
|
BKT Брекетинг…………………………………………………………………. |
94 |
|
OБРЕК. С АВТОМ. ЭКСПОЗ…………………………………………….. |
95 |
|
WБРЕКЕТИНГ ПО ISO……………………………………………………….. |
95 |
|
XБРЕКЕТ. С МОДЕЛ. ПЛЕНКИ ………………………………………. |
95 |
|
HБАЛ.БЕЛ. BKT …………………………………………………………………… |
96 |
|
YБРЕКЕТ. С ДИНАМ. ДИАП…………………………………………… |
96 |
|
IНепрерывная съемка (режим серийной |
|
|
съемки) …………………………………………………………………………… |
97 |
|
ADV. Расширенные фильтры ……………………………………….. |
99 |
|
Параметры расширенного фильтра…………………………. |
100 |
|
jМультиэкспозиции ………………………………………………. |
101 |
|
uПанорамы ……………………………………………………………… |
103 |
|
Фотосъемка со вспышкой……………………………………….. |
107 |
|
Настройки вспышки ………………………………………………………… |
109 |
|
6 Меню съемки |
113 |
|
HНАСТРОЙКИ КАЧЕСТВА ИЗОБРАЖЕНИЯ………….. |
114 |
|
РАЗМЕР ИЗОБР…………………………………………………………………….. |
115 |
|
КАЧЕСТВО ИЗОБР……………………………………………………………….. |
116 |
|
ЗАПИСЬ В RAW ……………………………………………………………………. |
117 |
|
МОДЕЛИРОВ. ПЛЕНКИ…………………………………………………….. |
118 |
|
ЭФФЕКТ ЗЕРНИСТОСТИ………………………………………………….. |
120 |
|
ДИНАМИЧ. ДИАПАЗОН…………………………………………………… |
121 |
|
БАЛАНС БЕЛОГО………………………………………………………………… |
122 |
|
ТОН СВЕТОВ………………………………………………………………………….. |
126 |
|
ТОН ТЕНЕЙ ……………………………………………………………………………. |
126 |
|
ЦВЕТ…………………………………………………………………………………………. |
127 |
|
РЕЗКОСТЬ………………………………………………………………………………. |
127 |
xi

|
СНИЖЕНИЯ ШУМА…………………………………………………………….. |
128 |
|
СНИЖ.ШУМ.ДЛ.ЭКСП………………………………………………………… |
128 |
|
ОПТИМ.МОДУЛ.СВЕТА……………………………………………………… |
129 |
|
ЦВЕТ.ПРОСТР………………………………………………………………………… |
129 |
|
КАРТИРОВАНИЕ ПИКСЕЛЕЙ………………………………………….. |
130 |
|
ВЫБЕР.ПОЛЬЗ.НАСТР………………………………………………………… |
131 |
|
РЕД/СОХР.ПОЛ.НАСТР……………………………………………………… |
131 |
|
GНАСТРОЙКА AF/MF……………………………………………….. |
133 |
|
ЗОНА ФОКУСИРОВКИ………………………………………………………. |
133 |
|
РЕЖИМ AF……………………………………………………………………………… |
134 |
|
ПОЛЬЗ. НАСТР. АФ-Н ………………………………………………………… |
135 |
|
ЭКРАН ТОЧКИ АФ yz………………………………………………….. |
136 |
|
КОЛ-ВО ТОЧЕК ФОКУСИРОВКИ …………………………………… |
136 |
|
ПРЕДВАРИТЕЛ. АФ…………………………………………………………….. |
137 |
|
ПОДСВЕТКА AF……………………………………………………………………. |
137 |
|
НАСТР. РАСПОЗН. ЛИЦ/ГЛАЗ…………………………………………. |
138 |
|
AF+MF …………………………………………………………………………………….. |
140 |
|
ПОМОЩЬ РУЧН.ФОК………………………………………………………… |
141 |
|
ПРОВЕРКА ФОКУСА…………………………………………………………… |
141 |
|
ВЗ.БЛОК.ТОЧ.АЭ И ЗОНУ ФОК ………………………………………. |
142 |
|
НАСТР .МГНОВЕН. АФ………………………………………………………. |
142 |
|
ШКАЛА ГЛУБ. ПОЛЯ РЕЗКОСТИ……………………………………. |
143 |
|
ПРИОР. СПУСКА/ФОК……………………………………………………….. |
143 |
|
РЕЖИМ СЕНСОРНОГО ЭКРАНА……………………………………. |
144 |
|
AНАСТРОЙКА СЪЕМКИ…………………………………………… |
147 |
|
ПРОГРАММЫ………………………………………………………………………… |
147 |
|
НАСТРОЙКА ПРИВОДА …………………………………………………… |
149 |
xii

|
Содержание |
|
|
ТАЙМЕР…………………………………………………………………………………… |
151 |
|
ИНТЕРВ.СЪЕМКА ПО ТАЙМ……………………………………………. |
152 |
|
ЭКСПОЗАМЕР ………………………………………………………………………. |
154 |
|
ТИП ЗАТВОРА……………………………………………………………………….. |
155 |
|
РЕЖ.СТАБИЛИЗАЦИИ ………………………………………………………. |
156 |
|
ЧУВСТВ-ТЬ ISO……………………………………………………………………… |
157 |
|
НАСТР.ПЕР.К-ЦА…………………………………………………………………… |
160 |
|
БЕСПРОВ.СВЯЗЬ………………………………………………………………….. |
163 |
|
FНАСТРОЙКА ВСПЫШКИ……………………………………….. |
164 |
|
НАСТРОЙКА ФУНКЦИИ ВСПЫШКИ……………………………. |
164 |
|
УДАЛ.ЭФ.КРАСН.ГЛАЗ……………………………………………………….. |
165 |
|
РЕЖИМ БЛОКА TTL……………………………………………………………. |
166 |
|
НАСТРОЙКА ИНДИКАТОРА …………………………………………… |
167 |
|
ГЛАВНЫЕ НАСТРОЙКИ…………………………………………………….. |
167 |
|
НАСТРОЙКА CH………………………………………………………………….. |
168 |
|
BНАСТРОЙКИ ВИДЕО ……………………………………………… |
169 |
|
РЕЖИМ ВИДЕО……………………………………………………………………. |
169 |
|
РЕЖИМ AF ДЛЯ ВИДЕО……………………………………………………. |
170 |
|
ОТОБР. ИНФОРМ. ВЫВОДА HDMI ……………………………….. |
170 |
|
ВЫВОД ВИДЕО 4K ………………………………………………………………. |
171 |
|
УПРАВЛЕНИЕ ЗАПИСЬЮ HDMI …………………………………….. |
171 |
|
РЕГУЛ. УРОВНЯ МИКРОФОНА………………………………………. |
172 |
|
МИК./ДИСТАН.СПУСК ………………………………………………………. |
172 |
|
7 Воспроизведение и меню просмотра |
173 |
|
Дисплей воспроизведения……………………………………… |
174 |
|
Кнопка DISP/BACK……………………………………………………………… |
176 |
xiii

|
Просмотр фотографий …………………………………………….. |
178 |
|
Увеличение при воспроизведении………………………….. |
179 |
|
Многокадровый просмотр…………………………………………… |
179 |
|
CМеню просмотра…………………………………………………… |
180 |
|
КОНВЕРТАЦИЯ RAW…………………………………………………………… |
180 |
|
УДАЛИТЬ………………………………………………………………………………… |
183 |
|
КАДРИРОВАНИЕ…………………………………………………………………. |
186 |
|
ИЗМЕНИТЬ РАЗМЕР…………………………………………………………… |
187 |
|
ЗАЩИТИТЬ…………………………………………………………………………….. |
188 |
|
ПОВОРОТ КАДРА………………………………………………………………… |
189 |
|
УДАЛ.ЭФ.КРАСН.ГЛАЗ……………………………………………………….. |
190 |
|
БЕСПРОВ.СВЯЗЬ………………………………………………………………….. |
191 |
|
СЛАЙД ШОУ …………………………………………………………………………. |
191 |
|
ПОМОЩЬ ФОТОАЛЬБ………………………………………………………. |
192 |
|
АВТОСОХР. НА ПК ………………………………………………………………. |
194 |
|
РАСПЕЧАТАТЬ (DPOF)……………………………………………………….. |
195 |
|
ПЕЧАТЬ ПРИНТЕРА instax……………………………………………….. |
197 |
|
СООТНОШЕНИЕ………………………………………………………………….. |
198 |
|
8 Меню настройки |
199 |
|
DПОЛЬЗОВАТЕЛЬСКИЕ НАСТРОЙКИ …………………… |
200 |
|
ФОРМАТ-ВАТЬ……………………………………………………………………… |
201 |
|
ДАТА/ВРЕМЯ…………………………………………………………………………. |
202 |
|
РАЗН. ЧАСОВ………………………………………………………………………… |
203 |
|
a……………………………………………………………………………… |
204 |
|
НАСТРОЙКИ МОЕГО МЕНЮ………………………………………….. |
204 |
|
ОЧИСТКА СЕНСОРА………………………………………………………….. |
206 |
xiv

|
Содержание |
|
|
ЗВУК И ВСПЫШКА………………………………………………………………. |
206 |
|
ВОССТАНОВИТЬ …………………………………………………………………. |
207 |
|
DНАСТРОЙКИ ЗВУКА……………………………………………….. |
208 |
|
ч. СРАБАТЫВАНИЕ СИГНАЛА AF …………………………………. |
208 |
|
ч. СРАБАТ.СИГН.АВТОСПУСКА………………………………………. |
209 |
|
УРОВ. ГРОМКОСТИ ……………………………………………………………. |
209 |
|
ГРОМК. ЗАТВ…………………………………………………………………………. |
210 |
|
ЗВУК ЗАТВОРА………………………………………………………………………. |
210 |
|
ГРОМК. ВОСП……………………………………………………………………….. |
211 |
|
DНАСТРОЙКИ ЭКРАНА ……………………………………………. |
212 |
|
ЯРК.ВИДОИСКАТЕЛЯ…………………………………………………………. |
212 |
|
ЦВЕТ EVF ………………………………………………………………………………… |
213 |
|
ЯРК. ЖК……………………………………………………………………………………. |
213 |
|
ЦВЕТ LCD ……………………………………………………………………………….. |
214 |
|
ОТОБР. ИЗОБ. ……………………………………………………………………….. |
214 |
|
АВТОПОВОРОТ EVF …………………………………………………………… |
215 |
|
ПРЕДВ.ПРОСМ.ЭКСП./БАЛ.БЕЛ.В РУЧ.РЕЖ. |
………………215 |
|
ЭФФ.ИЗОБ.ДЛЯ ПРЕДВ.ПРОСМ. …………………………………… |
216 |
|
РАМКА КАДРИР……………………………………………………………………. |
217 |
|
АВТОПОВ.-ПРОСМ. ……………………………………………………………. |
218 |
|
ЕДИНИЦЫ ШКАЛЫ ФОКУСИРОВКИ…………………………… |
218 |
|
ОТОБР.ПОЛЬЗ.НАСТР………………………………………………………… |
219 |
|
DНАСТРОЙКА КНОПОК/ДИСКОВ………………………….. |
221 |
|
РЕД./СОХР. БЫСТР. МЕНЮ ………………………………………………. |
222 |
|
НАСТР. КНОПКИ Fn/АЭ-Б/АФ-Б……………………………………. |
224 |
|
НАСТР. СЕЛЕКТОРНОЙ КНОПКИ…………………………………. |
226 |
|
НАСТР.ДИСКА УПР. …………………………………………………………….. |
226 |
xv

|
ЗАТВОР ПО АФ…………………………………………………………………….. |
227 |
|
ЗАТВОР ПО АЭ …………………………………………………………………….. |
227 |
|
СНИМ. БЕЗ ОБЪЕКТИВА…………………………………………………… |
228 |
|
ФОКУСИР. КОЛЬЦО……………………………………………………………. |
228 |
|
РЕЖ.БЛОКИР.АЭ/АФ ………………………………………………………….. |
229 |
|
НАСТР. ДИАФРАГМЫ…………………………………………………………. |
229 |
|
НАСТР. СЕНСОРНОГО ЭКРАНА …………………………………….. |
230 |
|
DУПРАВЛЕНИЕ ПИТАНИЕМ…………………………………….. |
231 |
|
АВТО ВЫКЛ……………………………………………………………………………. |
231 |
|
ЭФФЕКТИВНОСТЬ……………………………………………………………… |
232 |
|
DНАСТРОЙКИ СОХРАНЕНИЯ ДАННЫХ……………………….. |
233 |
|
НОМЕР КАДРА……………………………………………………………………… |
234 |
|
СОХР ИСХ ИЗОБРАЖ………………………………………………………… |
235 |
|
РЕДАКТ. ИМЯ ФАЙЛА……………………………………………………….. |
235 |
|
ИНФО. ОБ АВТОРСКИХ ПРАВАХ ………………………………….. |
236 |
|
DНАСТРОЙКА СОЕДИНЕНИЯ…………………………………. |
237 |
|
НАСТРОЙКИ WI-FI ……………………………………………………………… |
237 |
|
НАСТР.АВТОСОХР………………………………………………………………. |
238 |
|
НАСТР. ГЕОТЕГИНГА ………………………………………………………….. |
238 |
|
НАСТ.ПОДК.ПРИНТ. instax………………………………………………. |
239 |
|
9 Ярлыки |
241 |
|
Опции ярлыков………………………………………………………….. |
242 |
|
Кнопка Q (быстрое меню) ……………………………………….. |
243 |
|
Отображение быстрого меню…………………………………….. |
243 |
|
Просмотр и изменение настроек……………………………… |
245 |
|
Редактирование быстрого меню……………………………….. |
246 |
xvi

|
Содержание |
|
|
Кнопки Fn (функция)…………………………………………………. |
248 |
|
Назначение функций для функциональных |
|
|
кнопок…………………………………………………………………………………….. |
250 |
|
EМОЕ МЕНЮ……………………………………………………………… |
252 |
|
НАСТРОЙКИ МОЕГО МЕНЮ………………………………………….. |
252 |
|
10 Периферийные устройства и дополнительные |
|
|
принадлежности |
255 |
|
Внешние вспышки …………………………………………………….. |
256 |
|
Настройки вспышки ………………………………………………………… |
257 |
|
РАЗЪЕМ СИНХРОНИЗАЦИИ………………………………………….. |
259 |
|
ВСТРОЕННАЯ ВСПЫШКА ………………………………………………… |
260 |
|
ВСПЫШКА, МОНТИРУЕМАЯ В БАШМАК…………………… |
262 |
|
ГЛАВНЫЙ(ОПТИЧЕСКИЙ)……………………………………………….. |
266 |
|
Объективы ………………………………………………………………….. |
271 |
|
Части объектива………………………………………………………………… |
271 |
|
Снятие крышек объектива……………………………………………. |
272 |
|
Присоединение бленд объектива ……………………………. |
272 |
|
Объективы с кольцами диафрагмы ………………………….. |
273 |
|
Объективы без колец диафрагмы……………………………… |
274 |
|
Объективы с O.I.S. Переключатели……………………………. |
274 |
|
Объективы с ручной фокусировкой………………………… |
275 |
|
Уход за объективом………………………………………………………….. |
276 |
|
11 Соединения |
277 |
|
Выход HDMI…………………………………………………………………. |
278 |
|
Подключение к HDMI-устройствам………………………….. |
278 |
|
Съемка ……………………………………………………………………………………. |
279 |
|
Воспроизведение……………………………………………………………… |
279 |
xvii

|
Беспроводная передача………………………………………….. |
280 |
|
Беспроводные соединения: Смартфоны……………….. |
280 |
|
Беспроводные соединения: Компьютеры…………….. |
281 |
|
Подключение к компьютеру через USB……………….. |
282 |
|
Windows ………………………………………………………………………………… |
282 |
|
Mac OS X/macOS………………………………………………………………… |
283 |
|
Подключение фотокамеры…………………………………………… |
283 |
|
Принтеры instax SHARE ……………………………………………. |
286 |
|
Установка соединения……………………………………………………. |
286 |
|
Печать снимков………………………………………………………………….. |
287 |
|
12 Технические примечания |
289 |
|
Аксессуары от FUJIFILM……………………………………………. |
290 |
|
В целях безопасности ………………………………………………. |
294 |
|
Уход за изделием……………………………………………………….. |
307 |
|
Очистка сенсора изображения ……………………………… |
308 |
|
Обновления прошивки ……………………………………………. |
309 |
|
Проверка версии прошивки……………………………………….. |
309 |
|
Поиск и устранение неисправностей…………………… |
310 |
|
Предупреждающие сообщения и индикация ……. |
319 |
|
Емкость карты памяти ……………………………………………… |
323 |
|
Технические характеристики …………………………………. |
324 |
xviii

Прилагаемые принадлежности
В комплект фотокамеры входит следующее:
•Аккумуляторная батарея NP-W126S
•Зарядное устройство BC-W126
•Защитная крышка
•Металлические зажимы для ремня (× 2)
•Инструмент для присоединения зажимов
•Защитные крышки (× 2)
•Плечевой ремень
•Руководство пользователя (данное руководство)
NЕсли Вы приобрели объектив в комплекте, убедитесь, что объектив входит в комплект.
xix

Об этом руководстве
Данное руководство содержит инструкции для использования Вашей цифровой фотокамеры FUJIFILM X-T20. Обязательно прочтите и поймите содержание руководства, прежде чем продолжить.
Символы и условные обозначения
В данном руководстве используются следующие символы: O Информация, которую следует прочитать,
чтобы предотвратить повреждение продукта. N Дополнительная информация, которая может
быть полезна при использовании изделия. P Страницы, на которых можно найти соответ-
ствующую информацию.
Пункты меню и другие надписи на дисплеях показаны жирным шрифтом. Иллюстрации показаны только для наглядности; рисунки могут быть упрощены в то время, как снимки не обязательно сделаны с помощью данной модели фотокамеры, описанной в настоящем руководстве.
Терминология
Дополнительные карты памяти SD, SDHC и SDXC, которые фотокамера использует для хранения фотографий, называются «картами памяти». Электронный видоискатель может называться «ЭВ», а ЖК-монитор — «ЖКМ».
xx
![]()
Перед началом работы
1

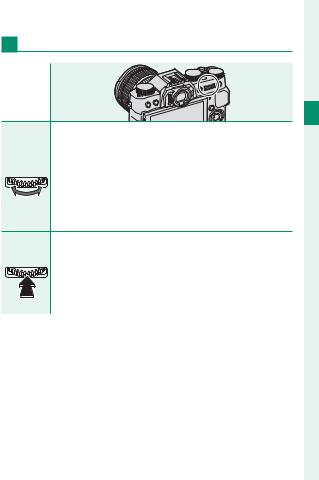
Компоненты фотокамеры
1
|
A Диск коррекции экспозиции … |
5, 91 |
|
|
B Кнопка спуска затвора……………. |
50 |
|
|
C Рычаг автоматического переклю- |
||
|
чателя выбора режимов………………. |
7 |
|
|
D Диск затвора …………………….. |
5, 64, 72 |
|
|
E «Горячий башмак» …………………… |
256 |
|
|
F Диск привода…………………………………. |
6 |
|
|
G Nрычаг (встроенной вспышки) |
||
|
………………………………………………………… |
107 |
|
|
H Проушина ремня……………………….. |
28 |
|
|
I Крышка разъемов |
||
|
J Селектор режима фокусировки …… |
78 |
|
|
K Сигнальные контакты |
||
|
объектива |
||
|
L Кнопка освобождения |
||
|
объектива…………………………………… |
31 |
|
M Микрофон………………………………….. |
172 |
|
|
N Вспомогательная |
||
|
подсветка АФ…………………………… |
137 |
|
|
Индикатор автоспуска ………… |
151 |
|
|
O Передний диск управления … |
8, 226 |
|
|
P Переключатель ON/OFF |
…………… |
42 |
|
Q Кнопка Fn1…………………………………. |
248 |
|
|
R Вспышка……………………………………….. |
107 |
|
|
S Защитная крышка……………………. |
30 |
|
|
T Разъем спуска микрофона/дис.сп. |
||
|
( 2,5 мм) ……………………….. |
55, 68, 172 |
|
|
U Микроразъем HDMI (тип D) |
||
|
……………………………………………………… |
278 |
|
|
V Микроразъем USB (микро B) |
||
|
USB 2.0………………………………….. |
35, 68, 283 |
2
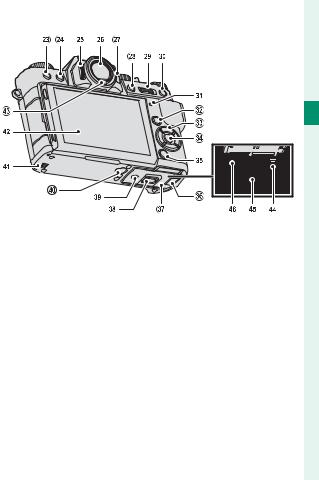
|
W bкнопка (удалить) …………………. |
52 |
|
|
X aкнопка (воспроизведение) |
…… 51 |
|
|
Y Управление диоптрийной |
||
|
поправкой……………………………………. |
11 |
|
|
Z Электронный видоискатель |
||
|
(EVF)…………………………………… |
12, 14, 15 |
|
|
a Кнопка VIEW MODE …………………….. |
14 |
|
|
b Кнопка AE-L (блокировка |
||
|
экспозиции)…………………………………. |
93 |
|
|
c Задний диск управления |
||
|
…………………………………………. 9, 178, 226 |
||
|
d Кнопка AF-L (блокировка |
||
|
фокуса) ………………………………………….. |
93 |
|
|
e Индикатор …………………………… |
10, 35 |
|
|
f Кнопка Q (быстрое меню)……… |
243 |
|
|
g Кнопки селектора ………………. |
4, 226 |
|
|
h Кнопка MENU/OK……………………… |
4, 20 |
Компоненты фотокамеры
1
|
i Кнопка DISP (дисплей)/ |
|
|
BACK………………………………………. |
16, 176 |
jКрышка кабельного канала для преобразователя постоянного
|
тока……………………………………………. |
290 |
|
|
k Крышка батарейного |
||
|
отсека………………………………………….. |
36 |
|
|
l Защелка крышки отсека |
||
|
батареи………………………………………. |
36 |
|
|
m Табличка с серийным номером….4 |
||
|
n Гнездо для штатива |
||
|
o Динамик ………………………………………. |
58 |
|
|
p ЖК-дисплей…………………. |
11, 12, 14, 15 |
|
|
q Датчик видоискателя…………….. |
14 |
|
|
r Защелка батарейного отсека…. |
39 |
|
|
s Батарейный отсек…………………… |
36 |
|
|
t Слот для карты памяти……….. |
36 |
3
Табличка с серийным номером
Не удаляйте табличку с серийным номером, на которой указаны идентификационный номер FCC, маркировка KC, серийный номер и другая важная
1 информация.
Селектор
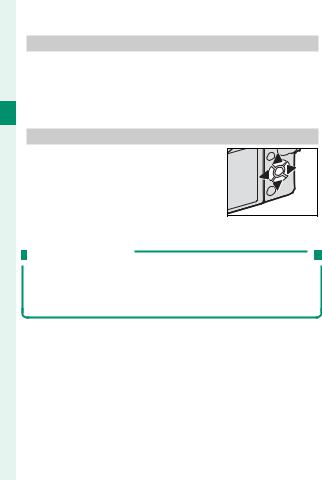
Нажмите селектор вверх (e), вправо (h), вниз (f) или влево (g), чтобы выделять элементы. Кнопки вверх, вниз, влево и вправо также дублируют функциональные кнопки Fn2–Fn5 (P248).
Блокировка управления
Чтобы избежать непреднамеренного использования селектора и кнопки Q во время съемки, нажмите MENU/OK до появления X. Элементы управления можно разблокировать, нажимая MENU/OK до тех пор, пока не исчезнет X.
4

Компоненты фотокамеры
Диск скорости затвора
Диск скорости затвора используется, чтобы выбрать скорость затвора.
Диск коррекции экспозиции
Поверните диск, чтобы выбрать величину коррекции экспозиции.
5

Диск привода
Поверните диск, чтобы выбрать один из следующих режимов привода.
1
|
Режим |
P |
|
|
F Видеоролик |
54 |
|
|
BKT1 |
Брекетинг |
94 |
|
BKT2 |
||
|
CH |
Быстрая серия |
97 |
|
CL |
Низкоскоростная серия |
|
Режим |
P |
|
|
S |
Одиночный кадр |
48 |
|
Adv.1 |
Расшир. фильтр |
99 |
|
Adv.2 |
||
|
j Мультиэкспозиция |
101 |
|
|
u Панорама |
103 |
6

Компоненты фотокамеры
Рычаг автоматического переключателя выбора режимов
Переключите между автоматический и ручным режимами.
|
Положение |
Режим |
|
Выберите из режимов P (АЭ программа), S (АЭ |
|
|
приоритет затвора), A (АЭ приоритет диафрагмы) |
|
|
и M (ручной) (P62, 64, 69, 72). Отрегулируйте |
|
|
выдержку и диафрагму при помощи переключения |
|
|
программы (режим P) или установите выдержку и/ |
|
|
или диафрагму вручную (режимы S, A и M). |
|
|
Авторежим. Фотокамера регулирует настройки |
|
|
автоматически согласно опции, выбранной вра- |
|
|
щением переднего диска управления. Выберите |
|
|
из режимов, подходящих для определенных типов |
|
|
объектов съемки (P74), или выберите SРАСШ. |
|
|
АВТОРАС.СЦЕН, чтобы фотокамера сама авто- |
|
|
матически подобрала режим для объекта съемки |
|
|
(P74). Выбор сцены не доступен в режимах изме- |
|
|
ненной скорости затвора Adv.1, Adv.2, jи u. |
NНа настройки фотокамеры могут распространяться ограничения в зависимости от режима и условий съемки.
7
Диски управления
Поверните или нажмите на командные диски, чтобы:
Передний диск управления
1
•Выберите вкладки или страницу меню с помощью меню.
|
Поверните |
• Отрегулируйте диафрагму. |
|
• Выберите сцену, когда снимаете в авторежиме. |
|
|
• Отрегулируйте экспокоррекцию, когда с помощью |
|
|
диска экспокоррекции выбирается C. |
•Просматривайте другие изображения во время воспроизведения.
Нажмите Переключайтесь между диафрагмой и коррекцией экс-  позиции, когда выбран параметр C с помощью диска
  коррекции экспозиции.
8
Компоненты фотокамеры
Задний диск управления
1
•Выделите пункты меню.
•Выберите нужную комбинацию значений выдержки
|
Поверните |
и диафрагмы (программный сдвиг). |
|
• Выберите скорость затвора. |
|
|
• Отрегулируйте настройки быстрого меню. |
|
|
• Выберите размер фокусировочной рамки. |
•Уменьшите или увеличьте изображение в полнокадровом или многокадровом воспроизведении.
•Увеличьте точку активной фокусировки во время
Нажмите воспроизведения.
• Выполните функцию, назначенную функциональной кнопке ДИСК.
•Нажмите и удерживайте, чтобы выбрать дисплей фокусировки ручного режима фокусировки.
9

Индикатор
Когда видоискатель не используется, состояние фотокамеры отображается индикатором.
1
|
Индикатор |
Состояние фотокамеры |
|
|
Горит зеленым |
Фокус заблокирован. |
|
|
цветом |
||
|
Мигает зеленым |
Предупреждение о фокусе или низкой скоро- |
|
|
цветом |
сти затвора. Можно делать снимки. |
|
|
Мигает зеленым |
Запись фотографий. Можно сделать дополни- |
|
|
и оранжевым |
тельные снимки. |
|
|
цветом |
||
|
Горит оранжевым |
Запись фотографий. В данное время нельзя |
|
|
цветом |
делать дополнительные снимки. |
|
|
Мигает оранже- |
Вспышка заряжается. Вспышка не сработает |
|
|
вым цветом |
при фотографировании. |
|
|
Мигает красным |
Ошибка объектива или памяти. |
|
|
цветом |
NНа дисплее также могут отобразиться предупреждающие сообщения.
10
![]()
Компоненты фотокамеры
|
ЖК-монитор |
||
|
ЖК-монитор можно наклонить для |
||
|
обеспечения комфортного про- |
||
|
смотра, но будьте внимательны |
||
|
и не прикасайтесь к проводам и |
1 |
|
|
не зажимайте пальцы или другие |
||
|
объекты за монитором. Прикосновение к проводам |
||
|
может привести к сбою в работе фотокамеры. |
|
NLCD-монитор также функционирует в качестве сен- |
|
сорного экрана (P22, 144). |
|
Фокусировка видоискателя |
|
Фотокамера оборудована диоп- |
|
трийной поправкой в диапазоне |
|
от −4 до +2 м–1 для того, чтобы |
|
можно было приспособить ее |
|
к индивидуальным различиям |
|
зрения. Поворачивайте управле- |
|
ние диоптрийной поправкой, пока |
|
дисплей видоискателя не будет четко сфокусиро- |
|
ванным. |
11

|
Информация на дисплее |
|
|
фотокамеры |
|
|
В данном разделе перечислены индикаторы, |
|
|
1 |
которые могут быть отображены во время |
|
съемки. |
|
|
OДля наглядности дисплеи отображаются со всеми горя- |
|
|
щими индикаторами. |
|
|
Электронный видоискатель/ЖК-дисплей |
|
|
12/31/2050 10:00 AM |
|
|
12000 |
|
|
12 |

Информация на дисплее фотокамеры
|
A Проверка фокуса………………… |
89, 141 |
R Гистограмма……………………………… |
19 |
|||
|
B Предварительный просмотр |
S Индикатор расстояния………….. |
89 |
||||
|
глубины резко изображаемого |
T Уров. заряда батареи………………. |
43 |
||||
|
пространства ……………………. |
70, 89 |
U Чувствительность ……………….. |
157 |
|||
|
C Состояние загрузки данных о |
V Коррекция экспозиции……………… |
91 |
||||
|
местоположении…………………….. |
238 |
W Диафрагма………………………. |
63, 69, 72 |
|||
|
1 |
||||||
|
D Режим видео………………………… |
54, 169 |
X Скорость затвора………… |
63, 64, 72 |
|||
|
E Оставшееся время …………………… |
54 |
Y Блокировка TTL………… |
166, 225, 251 |
|||
|
F Количество доступных |
Z Блокировка АЭ……………… |
92, 93, 227 |
||||
|
кадров * ………………………………………. |
323 |
a Экспозамер ……………………………….. |
154 |
|||
|
G Качество и размер |
b Режим съемки……………………………… |
62 |
||||
|
изображения……………………… |
115, 116 |
c Индикатор фокусировки…………. |
79 |
|||
|
H Дата и время……………… |
44, 202, 203 |
d Индикатор ручной |
||||
|
I Фокусировочная рамка ……… |
82, 92 |
фокусировки……………………………….. |
87 |
|||
|
J Виртуальный горизонт………….. |
18 |
e Режим фокусировки…………………… |
78 |
|||
|
K Предупреждение |
f Блокировка АФ……………… |
92, 93, 227 |
||||
|
фокусировки……………………….. |
50, 319 |
g Индикатор АФ+РФ …………………. |
140 |
|||
|
L Баланс белого…………………………… |
122 |
h Тип затвора……………………………… |
155 |
|||
|
M Моделирование пленки………….. |
118 |
i Непрерывный режим ………………… |
97 |
|||
|
N Динамический диапазон ……….. |
121 |
j Индикатор экспозиции……… |
72, 91 |
|||
|
O Температурное |
k Индикатор автоспуска ………… |
151 |
||||
|
предупреждение……………………….. |
322 |
l Микрофон/спуск дис.сп………….. |
172 |
|||
|
P Блокировка управления……………… |
4 |
m Режим вспышки (TTL)………………. |
109 |
|||
|
Q Индикатор звука и вспышки…206 |
Коррекция вспышки ………………… |
109 |
* Отображается «9999» при наличии места для более 9999 кадров.
Блокировка управления
При нажатии блокированного управления отображается символ X.
13

|
Выбор режима отображения |
||
|
Нажмите кнопку VIEW MODE для пе- |
||
|
реключения между следующими |
||
|
режимами дисплея: |
||
|
1 |
• EДАТ.ВИД.: При просмотре через |
|
|
видоискатель он включается, |
||
|
ЖК-монитор выключается; если не смотреть че- |
||
|
рез видоискатель, он выключится, а ЖК-монитор |
||
|
включится. |
•ТОЛЬКО EVF: Видоискатель включен, ЖК-монитор выключен.
•ТОЛЬКО LCD: ЖК-монитор включен, видоискатель выключен.
•ТОЛЬКО EVF + E: При просмотре через видоискатель он включится, а если через него не смотреть, он выключится. ЖК-монитор остается выключенным.
Датчик видоискателя
Датчик видоискателя может реагировать на другие объекты, кроме глаз или света, направленного непосредственно на датчик.
Датчик
видоискателя
14

Информация на дисплее фотокамеры
Регулировка яркости дисплея
Яркость и оттенок видоискателя и ЖК-монитора можно регулировать, используя элементы в меню
DНАСТРОЙКИ ЭКРАНА. Выберите ЯРК.ВИДОИСКА-
ТЕЛЯ или ЦВЕТ EVF для регулировки яркости или
1
оттенка видоискателя, ЯРК. ЖК или ЦВЕТ LCD для выполнения того же самого с ЖК-монитором.
Экран видоискателя
Когда выбрана опция ВКЛ для DНАСТРОЙКИ ЭКРАНА > АВТОПОВОРОТ EVF, индикаторы в видоискателе автоматически вращаются для соответствия ориентации фотокамеры.
OИндикация на ЖК-мониторе остается неизменной.
15

Кнопка DISP/BACK
Кнопка DISP/BACK служит для управления отображением индикаторов в видоискателе и на ЖК-мониторе.
1
Видоискатель
|
Стандарт |
Информация выключена |
||
|
P |
|
|
ЖК-дисплей |
|
|
Стандарт |
Информация выключена |
Информ. дисплей
16

Информация на дисплее фотокамеры
Пользовательская настройка стандартного дисплея
Чтобы выбрать пункты, показанные на стандартном дисплее:
1 Отобразите стандартные индикаторы.
Используйте кнопку DISP/BACK, чтобы отобразить 1 стандартные индикаторы.
2Выберите ОТОБР.ПОЛЬЗ.НАСТР.
Выберите DНАСТРОЙКИ ЭКРАНА > ОТОБР. ПОЛЬЗ.НАСТР в меню установки параметров.
3Выберите пункты.
Выделите пункты и нажмите MENU/OK для того,
чтобы выбрать или отменить выбор.
|
• РАМКА КАДРИР. |
• РЕЖИМ НЕПРЕРЫВНОЙ |
|
• ЭЛЕКТРОННЫЙ УРОВЕНЬ |
СЪЕМКИ |
|
• ФОКУСИРОВОЧНАЯ РАМКА |
• РЕЖИМ ДВОЙНОЙ СТАБ. |
|
• ИНДИКАТОР РАССТ. АФ |
ИЗОБР. |
|
• ИНДИКАТОР РАССТ. РФ |
• РЕЖИМ СЕНСОРНОГО |
|
• ГИСТОГРАММА |
ЭКРАНА |
|
• РЕЖИМ СЪЕМКИ |
• БАЛАНС БЕЛОГО |
|
• ДИАФР./СКОР.ЗАТВ/ISO |
• МОДЕЛИРОВ. ПЛЕНКИ |
|
• ОБЩАЯ ИНФОРМАЦИЯ |
• ДИНАМИЧ. ДИАПАЗОН |
|
• Компенс. выдержки (число) |
• ОСТАВШИЕСЯ КАДРЫ |
|
• Компенс. выдержки (шкала) |
• РАЗМЕР/КАЧ-ВО ИЗОБР. |
|
• РЕЖИМ ФОКУСИРОВКИ |
• РЕЖИМ ВИДЕО И ВРЕМЯ |
|
• ЭКСПОЗАМЕР |
ЗАПИСИ |
|
• ТИП ЗАТВОРА |
• УРОВ.ЗАРЯДА БАТАРЕИ |
|
• ВСПЫШКА |
• РАЗБИВКА ПОКАДРОВОЙ |
|
СЪЕМКИ |
17

4Сохраните изменения.
Нажмите DISP/BACK, чтобы сохранить изменения.
|
5 Выйдите из меню. |
|
|
Нажмите DISP/BACK, как требуется для выхода из |
|
|
1 |
меню, и вернитесь к экрану режима съемки. |
|
Виртуальный горизонт |
|
|
При выборе ЭЛЕКТРОННЫЙ УРОВЕНЬ |
|
|
будет отображаться виртуальный гори- |
|
|
зонт. Фотокамера расположена ровно, |
|
|
когда две линии перекрываются. Имейте |
|
|
в виду, что виртуальный горизонт может |
|
|
не отображаться, если объектив фотока- |
|
|
меры направлен вверх или вниз. |
|
|
Разбивка покадровой съемки |
|
|
Включите РАЗБИВКА ПОКАДРОВОЙ СЪЕМКИ, чтобы грани- |
|
|
цы кадра можно было лучше видеть на темных фонах. |
18

Информация на дисплее фотокамеры
Гистограммы
Гистограммы служат для отображения распределения оттенков в изображении. Яркость показана на горизонтальной оси, количество пикселей — на вертикальной оси.
|
Количество |
|||||||
|
1 |
|||||||
|
пикселей |
|||||||
|
Тени |
Засветки |
||||||
|
Яркость пикселей |
•Оптимальная экспозиция: Пиксели распределяются в виде гладкой кривой во всем диапазоне тонов.
•Переэкспонированный: Пиксели сосредоточены в правой части графика.
•Недоэкспонированный: Пиксели сосредоточены в левой части графика.
19

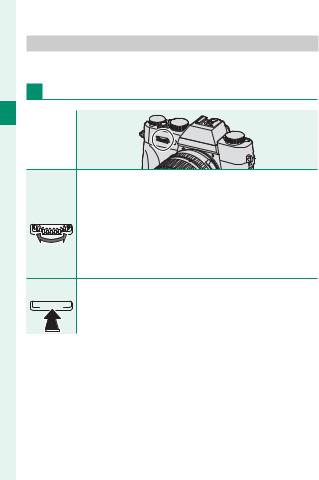
Использование меню
Чтобы открыть меню, нажмите кнопку MENU/OK.
|
Съемка |
Воспроизведение |
|
|
НАСТРОЙКИ КАЧЕСТВА ИЗОБРАЖЕНИЯ |
МЕНЮ ВОСПРОИЗВЕДЕНИЯ |
|
|
1 |
РАЗМЕР ИЗОБР. |
КОНВЕРТАЦИЯ RAW |
|
КАЧЕСТВО ИЗОБР. |
УДАЛИТЬ |
|
|
ЗАПИСЬ В RAW |
КАДРИРОВАНИЕ |
|
|
МОДЕЛИРОВ. ПЛЕНКИ |
ИЗМЕНИТЬ РАЗМЕР |
|
|
ЭФФЕКТ ЗЕРНИСТОСТИ |
ЗАЩИТИТЬ |
|
|
ДИНАМИЧ. ДИАПАЗОН |
ПОВОРОТ КАДРА |
|
|
БАЛАНС БЕЛОГО |
УДАЛ.ЭФ.КРАСН.ГЛАЗ |
|
|
ТОН СВЕТОВ |
БЕСПРОВ.СВЯЗЬ |
|
|
ВЫХОД |
ВЫХОД |
Для навигации по меню:
1Нажмите MENU/OK, чтобы открыть меню.
 НАСТРОЙКИ КАЧЕСТВА ИЗОБРАЖЕНИЯ
РАЗМЕР ИЗОБР.
КАЧЕСТВО ИЗОБР. ЗАПИСЬ В RAW МОДЕЛИРОВ. ПЛЕНКИ ЭФФЕКТ ЗЕРНИСТОСТИ ДИНАМИЧ. ДИАПАЗОН БАЛАНС БЕЛОГО
ТОН СВЕТОВ

 ВЫХОД
ВЫХОД
2Нажмите селектор влево, чтобы выделить закладку текущего меню.
 НАСТРОЙКИ КАЧЕСТВА ИЗОБРАЖЕНИЯ
РАЗМЕР ИЗОБР.
КАЧЕСТВО ИЗОБР. ЗАПИСЬ В RAW МОДЕЛИРОВ. ПЛЕНКИ ЭФФЕКТ ЗЕРНИСТОСТИ ДИНАМИЧ. ДИАПАЗОН БАЛАНС БЕЛОГО
ТОН СВЕТОВ

 ВЫХОД
ВЫХОД
Закладка
20
![]()
Использование меню
3Нажмите селектор вверх или вниз, чтобы выделить вкладку (H, G, A, F, B, E, Cили D), содержащую нужный элемент.
|
4 Нажмите селектор вправо, чтобы поместить |
|
|
курсор в меню. |
1 |
NИспользуйте передний диск управления для выбора вкладок меню или страницы с помощью меню и задний диск управления, чтобы выделить элементы меню.
21

Режим сенсорного экрана
Используйте сенсорные элементы управления для съемки или воспроизведения.
1 Сенсорные элементы управления съемкой
С помощью сенсорных элементов управления можно выбрать область фокусировки и сделать
снимок. Чтобы выбрать выпол- 


 няемую операцию, следует коснуться индикатора режима сенсорного экрана для
поочередного отображения следующих параме
|
Режим |
Описание |
|
СЪЕМКА ПО |
|
|
КАСАНИЮ |
После касания объекта на дисплее выполняется |
|
фокусировка и съемка. |
|
|
Коснитесь, чтобы выбрать точку фокусировки. |
|
|
АФ |
В режиме фокусировки S (AF-S) фокусировка |
|
будет заблокирована, в то время как в режиме |
|
|
фокусировки C (AF-C) фотокамера будет |
|
|
постоянно регулировать фокусировку в |
|
|
соответствии с изменениями расстояния до |
|
|
объекта. |
22

|
Режим сенсорного экрана |
||||
|
Режим |
Описание |
|||
|
ОБЛАСТЬ |
Нажмите, чтобы выбрать точку для фокусировки |
|||
|
или масштабирования. Фокусировочная рамка |
||||
|
переместится в выбранную точку. |
||||
|
1 |
||||
|
ВЫКЛ |
||||
|
Сенсорные элементы управления отключены. |
||||
|
Дисплей не реагирует на касание. |
||||
NСенсорные элементы управления можно регулировать с помощью GНАСТРОЙКА AF/MF > РЕЖИМ СЕНСОРНОГО ЭКРАНА (P144). Чтобы отключить элементы сенсорного управления и скрыть индикатор режима сенсорного экрана, выберите ОТКЛ для DНАСТРОЙКА КНОПОК/ДИСКОВ > НАСТР. СЕНСОРНОГО ЭКРАНА.
23

Сенсорные элементы управления в режиме
воспроизведения
Когда выбирается ВКЛ для DНАСТРОЙКА КНОПОК/ ДИСКОВ > НАСТР. СЕНСОРНОГО ЭКРАНА, сенсорные
1элементы управления могут использоваться для выполнения следующих операций воспроизведения:
• Перелистывание: Проведите пальцем по экрану, чтобы просмотреть другие изображения.
• Увеличение: Поместите два пальца на дисплей и разведите их в стороны, чтобы увеличить изображение.
• Уменьшение: Поместите два пальца на дисплей и сдвиньте их вместе, чтобы уменьшить изображение.
NИзображения можно уменьшать до тех пор, пока все изображение не будет находится в пределах видимости, но не более.
• Двойное касание: Дважды коснитесь экрана для увеличения выбранной области.
24

Режим сенсорного экрана
• Прокрутка: Просмотр других областей увеличенного изображения.
1
25

ЗАМЕТКА
26

Первые шаги
27

Присоединение ремешка
Прикрепите к фотокамере зажимы для ремня и затем присоедините ремень.
Откройте зажим для ремня.
Используйте инструмент для присоединения зажимов, чтобы открыть зажим ремня, убедившись в том, что инструмент и зажим повернуты в показанных направлениях.
Установите зажим для ремня на проушину.
Закрепите проушину ремня в отверстии зажима. Извлеките инструмент, удерживая зажим на месте другой рукой.
OХраните инструмент в надежном месте, посколькуон Вам понадобится для открытия зажимов ремешка при удалении ремешка.
28

Присоединение ремешка
3 Проденьте зажим через проушину.
Полностью проверните зажим через проушину, чтобы он закрылся со щелчком.
|
4 Установите защитную крышку. |
|
|
Установите защитную крышку |
2 |
|
над проушиной, как показано |
|
|
на рисунке, темной стороной |
|
|
крышки в направлении фото- |
|
|
камеры. |
5 Пристегните ремень.
Вставьте ремень через защит- 

 ную крышку и зажим для рем-


 ня и закрепите, как показано
 на рисунке.
OВо избежание падения фотокамеры проследите за тем, чтобы ремешок был правильно закреплен.
Повторите шаги 1–5 для второй проушины.
29

Присоединение объектива
Фотокамеру можно использовать с объективами для байонетного соединения X-mount от FUJIFILM.
Снимите защитную крышку с фотокамеры и заднюю крышку с
2 объектива. Поставьте объектив на байонет, совмещая метки на объективе и фотокамере, а затем поверните объектив до щелчка.
OПри установке объективов убедитесь, что пыль и прочие посторонние вещества не проникают в фотокамеру, и не касайтесь внутренних частей фотокамеры. Не нажимайте на кнопку фиксатора объектива во время установки объектива и убедитесь, что защелка надежно зафиксирована на своем месте.
30
 Loading…
- Manuals
- Brands
- FujiFilm Manuals
- Digital Camera
- X-T20
- Owner’s manual
-
Contents
-
Table of Contents
-
Troubleshooting
-
Bookmarks
Quick Links
Owner’s Manual
EN
BL00004889-202
Related Manuals for FujiFilm X-T20
Summary of Contents for FujiFilm X-T20
-
Page 1
Owner’s Manual BL00004889-202… -
Page 2: Introduction
For the Latest Information For the latest information on this product, including the latest versions of the manuals and sample color photographs, visit: http://fujifilm-dsc.com/manuals/ The site can be accessed not only from your comput- er but also from smartphones and tablets.
-
Page 3
Chapter Index Menu List Before You Begin First Steps Basic Photography and Playback Movie Recording and Playback Taking Photographs The Shooting Menus Playback and the Playback Menu The Setup Menus Shortcuts Peripherals and Optional Accessories Connections Technical Notes… -
Page 4: Menu List
Menu List Camera menu options are listed below. Shooting Menus Adjust settings when shooting photos or movies. See page 113 for details. H IMAGE QUALITY SETTING G AF/MF SETTING IMAGE SIZE FOCUS AREA IMAGE QUALITY AF MODE RAW RECORDING AF-C CUSTOM SETTINGS AF POINT DISPLAY yz 136 FILM SIMULATION 1⁄3…
-
Page 5: The Playback Menu
Menu List A SHOOTING SETTING F FLASH SETTING SCENE POSITION FLASH FUNCTION SETTING DRIVE SETTING RED EYE REMOVAL SELF-TIMER TTL-LOCK MODE INTERVAL TIMER LED LIGHT SETTING 1⁄2 1⁄2 MASTER SETTING SHOOTING PHOTOMETRY CH SETTING SHUTTER TYPE B MOVIE SETTING IS MODE MOVIE MODE MOVIE AF MODE MOUNT ADAPTOR SETTING 160…
-
Page 6: Setup Menus
Setup Menus Adjust basic camera settings. See page 199 for details. D USER SETTING D SCREEN SETTING FORMAT EVF BRIGHTNESS DATE/TIME EVF COLOR TIME DIFFERENCE LCD BRIGHTNESS LCD COLOR MY MENU SETTING IMAGE DISP. 1⁄2 1⁄2 SENSOR CLEANING EVF AUTOROTATE DISPLAYS 215 SOUND &…
-
Page 7
Menu List D BUTTON/DIAL SETTING D POWER MANAGEMENT EDIT/SAVE QUICK MENU AUTO POWER OFF Fn/AE-L/AF-L BUTTON PERFORMANCE SETTING D SAVE DATA SETTING SELECTOR BUTTON FRAME NO. SETTING SAVE ORG IMAGE 1⁄2 1⁄2 COMMAND DIAL SETTING 226 EDIT FILE NAME SHUTTER AF COPYRIGHT INFO SHUTTER AE D CONNECTION SETTING… -
Page 8: Table Of Contents
Table of Contents Introduction …………….. ii For the Latest Information …………..ii Menu List………………iv Shooting Menus …………….. iv The Playback Menu …………….v Setup Menus ………………vi Supplied Accessories …………. xix About This Manual …………..xx Symbols and Conventions …………xx Terminology ………………xx Before You Begin Before You Begin…
-
Page 9
Table of Contents Camera Displays ……………12 Electronic Viewfi nder/LCD Monitor ……..12 Choosing a Display Mode …………14 Adjusting Display Brightness ………… 15 The Viewfi nder Display …………..15 The DISP/BACK Button …………..16 Customizing the Standard Display ……..17 Using the Menus …………..20 Touch Screen Mode …………..22 Shooting Touch Controls ………… -
Page 10
Basic Photography and Playback Basic Photography and Playback Taking Photographs (Mode P) ……….48 a Viewing Pictures …………..51 b Deleting Pictures …………..52 Movie Recording and Playback Movie Recording and Playback F Recording Movies …………..54 Adjusting Movie Settings …………57 a Viewing Movies…………..58 Taking Photographs Taking Photographs Choosing a Shooting Mode ……….62… -
Page 11
Table of Contents BKT Bracketing …………….94 AE BKT ………………… 95 ISO BKT ………………. 95 FILM SIMULATION BKT …………95 WHITE BALANCE BKT …………. 96 DYNAMIC RANGE BKT …………96 I Continuous Shooting (Burst Mode) ……97 ADV. Advanced Filters ……………99 Advanced Filter Options …………100 j Multiple Exposures ………… -
Page 12
NOISE REDUCTION …………….128 LONG EXPOSURE NR …………..128 LENS MODULATION OPTIMIZER ………..129 COLOR SPACE ……………….129 PIXEL MAPPING …………….130 SELECT CUSTOM SETTING …………131 EDIT/SAVE CUSTOM SETTING ……….131 G AF/MF SETTING …………..133 FOCUS AREA ………………133 AF MODE …………………134 AF-C CUSTOM SETTINGS …………135 AF POINT DISPLAY yz …………136 NUMBER OF THE FOCUS POINTS ………136 PRE-AF ………………..137… -
Page 13
Table of Contents SELF-TIMER ………………151 INTERVAL TIMER SHOOTING …………152 PHOTOMETRY ……………….154 SHUTTER TYPE ……………..155 IS MODE ………………..156 ISO ………………….157 MOUNT ADAPTOR SETTING …………160 WIRELESS COMMUNICATION ……….163 F FLASH SETTING …………..164 FLASH FUNCTION SETTING ………….164 RED EYE REMOVAL …………….165 TTL-LOCK MODE …………….166 LED LIGHT SETTING …………..167 MASTER SETTING …………….167 CH SETTING ………………168… -
Page 14
Viewing Pictures …………..178 Playback Zoom …………….179 Multi-Frame Playback …………..179 C The Playback Menu …………180 RAW CONVERSION …………….180 ERASE …………………183 CROP ………………….186 RESIZE ………………..187 PROTECT ………………..188 IMAGE ROTATE ……………..189 RED EYE REMOVAL …………….190 WIRELESS COMMUNICATION ……….191 SLIDE SHOW ………………191 PHOTOBOOK ASSIST …………..192 PC AUTO SAVE ………………194 PRINT ORDER (DPOF) …………..195… -
Page 15
Table of Contents SOUND & FLASH …………….206 RESET …………………207 D SOUND SETTING ………….. 208 AF BEEP VOL………………208 SELF-TIMER BEEP VOL…………..209 OPERATION VOL…………….209 SHUTTER VOLUME ……………..210 SHUTTER SOUND …………….210 PLAYBACK VOLUME …………..211 D SCREEN SETTING ………….. 212 EVF BRIGHTNESS …………….212 EVF COLOR ………………213 LCD BRIGHTNESS …………….213 LCD COLOR ………………214… -
Page 16
SHUTTER AF………………227 SHUTTER AE………………227 SHOOT WITHOUT LENS …………..228 FOCUS RING ………………228 AE/AF-LOCK MODE ……………229 APERTURE SETTING …………..229 TOUCH SCREEN SETTING …………230 D POWER MANAGEMENT ……….231 AUTO POWER OFF ……………..231 PERFORMANCE …………….232 D SAVE DATA SETTING …………233 FRAME NO………………234 SAVE ORG IMAGE …………….235 EDIT FILE NAME …………….235 COPYRIGHT INFO …………….236… -
Page 17
Table of Contents The Fn (Function) Buttons ……….248 Assigning Roles to the Function Buttons ……250 E MY MENU …………….252 MY MENU SETTING ……………252 Peripherals and Optional Accessories Peripherals and Optional Accessories External Flash Units ………….. 256 Flash Settings ……………….257 SYNC TERMINAL …………….259 BUILT-IN FLASH …………….260 SHOE MOUNT FLASH …………..262… -
Page 18
SHARE Printers …………286 Establishing a Connection …………286 Printing Pictures …………….287 Technical Notes Technical Notes Accessories from FUJIFILM ……….290 For Your Safety …………… 294 Product Care …………….307 Cleaning the Image Sensor ……….308 Firmware Updates …………..309 Checking the Firmware Version ……….309… -
Page 19: Supplied Accessories
Supplied Accessories The following are included with the camera: • NP-W126S rechargeable battery • BC-W126 battery charger • Body cap • Metal strap clips (× 2) • Clip attaching tool • Protective covers (× 2) • Shoulder strap • Owner’s Manual (this manual) If you purchased a lens kit, check that a lens is included.
-
Page 20: About This Manual
About This Manual This manual contains instructions for your FUJIFILM X-T20 digital camera. Be sure you have read and understood its contents before proceeding. Symbols and Conventions The following symbols are used in this manual: Information that should be read to prevent damage to the product.
-
Page 21: Before You Begin
Before You Begin…
-
Page 22: Parts Of The Camera
Parts of the Camera Exposure compensation dial AF-assist illuminator….137 …………5, 91 Self-timer lamp ……151 Shutter button …….. 50 Front command dial ….8, 226 Auto mode selector lever ….7 ON/OFF switch …….. 42 Shutter speed dial ….5, 64, 72 Fn1 button ……..248 Hot shoe ………256 Flash ………..107 Drive dial ……….6…
-
Page 23
Parts of the Camera b (delete) button ……52 DISP (display)/BACK button a (playback) button ….51 …………16, 176 Diopter adjustment control ..11 Cable channel cover for Electronic viewfi nder (EVF) DC coupler ……..290 ……….12, 14, 15 Battery-chamber cover ….36 VIEW MODE button …… -
Page 24: The Serial Number Plate
The Serial Number Plate Do not remove the serial number plate, which pro- vides the FCC ID, KC mark, serial number, and other important information. The Selector Press the selector up (e), right (h), down (f), or left (g) to highlight items.
-
Page 25: The Shutter Speed Dial
Parts of the Camera The Shutter Speed Dial The shutter speed dial is used to choose the shutter speed. The Exposure Compensation Dial Rotate the dial to choose an expo- sure compensation amount.
-
Page 26: The Drive Dial
The Drive Dial Rotate the dial to choose from the following the drive modes. Mode Mode Mode Mode F Movie S S Single frame BKT1 BKT1 Adv.1 Adv.1 Bracketing Advanced fi lter BKT2 BKT2 Adv.2 Adv.2 j Multiple exposure CH CH High-speed burst u Panorama CL CL Low-speed burst…
-
Page 27: The Auto Mode Selector Lever
Parts of the Camera The Auto Mode Selector Lever Switch between auto and manual modes. Position Position Mode Mode Select from P (program AE), S (shutter-priority AE), A (aperture-priority AE), and M (manual) modes 62, 64, 69, 72). Adjust shutter speed and aperture using program shift (mode P) or set shutter speed and/or aperture manually (modes S, A, and M).
-
Page 28: The Command Dials
The Command Dials Rotate or press the command dials to: Front command dial • Select menu tabs or page through menus. • Adjust aperture. Rotate Rotate • Select a scene when shooting in auto mode. • Adjust exposure compensation when C is selected with exposure compensation dial.
-
Page 29
Parts of the Camera Rear command dial • Highlight menu items. • Choose the desired combination of shutter speed Rotate Rotate and aperture (program shift). • Choose a shutter speed. • Adjust settings in the quick menu. • Choose the size of the focus frame. •… -
Page 30: The Indicator Lamp
The Indicator Lamp When the viewfi nder is not in use, camera status is shown by the indi- cator lamp. Indicator lamp Indicator lamp Camera status Camera status Glows green Focus locked. Focus or slow shutter speed warning. Pictures can Blinks green be taken.
-
Page 31: The Lcd Monitor
Parts of the Camera The LCD Monitor The LCD monitor can be tilted for easier viewing, but be careful not to touch the wires or trap fi ngers or other objects behind the monitor. Touching the wires could cause camera malfunction. The LCD monitor also functions as a touch screen 22, 144).
-
Page 32: Camera Displays
Camera Displays This section lists the indicators that may be dis- played during shooting. For illustrative purposes, displays are shown with all indi- cators lit. Electronic Viewfi nder/LCD Monitor 12/31/2050 10:00 AM 12/31/2050 10:00 AM 12000…
-
Page 33
Camera Displays Focus check ……89, 141 Sensitivity ……..157 Depth-of-fi eld preview ..70, 89 Exposure compensation ….91 Location data download Aperture …….63, 69, 72 status ……….238 Shutter speed …..63, 64, 72 Movie mode ……54, 169 TTL lock ……166, 225, 251 Time remaining …… -
Page 34: Choosing A Display Mode
Choosing a Display Mode Press the VIEW MODE button to cy- cle through the following display modes: • E EYE SENSOR: Putting your eye to the viewfi nder turns the view- fi nder on and the LCD monitor off ; taking your eye away turns the viewfi nder off and LCD monitor on.
-
Page 35: Adjusting Display Brightness
Camera Displays Adjusting Display Brightness The brightness and hue of the viewfi nder and LCD monitor can be adjusted using the items in the D SCREEN SETTING menu. Choose EVF BRIGHT- NESS or EVF COLOR to adjust viewfi nder brightness or hue, LCD BRIGHTNESS or LCD COLOR to do the same for the LCD monitor.
-
Page 36: The Disp/Back Button
The DISP/BACK Button The DISP/BACK button controls the display of indicators in the view- fi nder and LCD monitor. Viewfi nder Standard Information off LCD Monitor Standard Information off Info display…
-
Page 37: Customizing The Standard Display
Camera Displays Customizing the Standard Display To choose the items shown in the standard display: Display standard indicators. Use the DISP/BACK button to display standard in- dicators. Select DISP. CUSTOM SETTING. Select D SCREEN SETTING > DISP. CUSTOM SET- TING in the setup menu. Choose items.
-
Page 38
Save changes. Press DISP/BACK to save changes. Exit the menus. Press DISP/BACK as needed to exit the menus and return to the shooting display. Virtual Horizon Selecting ELECTRONIC LEVEL displays a virtual horizon. The camera is level when the two lines overlap. Note that the virtual horizon may not be displayed if the camera lens is pointed up or down. -
Page 39
Camera Displays Histograms Histograms show the distribution of tones in the image. Brightness is shown by the horizontal axis, the number of pix- els by the vertical axis. Number of pixels Shadows Highlights Pixel brightness • Optimal exposure: Pixels are distributed in an even curve throughout the tone range. -
Page 40: Using The Menus
Using the Menus To display the menus, press MENU/OK. Shooting Shooting Playback Playback IMAGE QUALITY SETTING PLAY BACK MENU IMAGE SIZE RAW CONVERSION IMAGE QUALITY ERASE RAW RECORDING CROP FILM SIMULATION RESIZE GRAIN EFFECT PROTECT DYNAMIC RANGE IMAGE ROTATE WHITE BALANCE RED EYE REMOVA HIGHLIGHT TONE WIRELESS COMMUNICATION…
-
Page 41
Using the Menus Press the selector up or down to highlight the tab (H, G, A, F, B, E, C or D) containing the de- sired item. Press the selector right to place the cursor in the menu. Use the front command dial to select menu tabs or page through menus and the rear command dial to highlight menu items. -
Page 42: Touch Screen Mode
Touch Screen Mode Use touch controls for shooting or playback. Shooting Touch Controls Touch controls can be used for such operations as choosing the focus area and taking photo- graphs. The operation performed can be selected by tapping the touchscreen mode indicator in the display to cycle through the following options: Mode Mode…
-
Page 43
Touch Screen Mode Mode Mode Description Description AREA AREA Tap to select a point for focus or zoom. The focus frame will move to the selected point. Touch controls off . The display does not respond when tapped. Touch control settings can be adjusted using G AF/ MF SETTING … -
Page 44: Playback Touch Controls
Playback Touch Controls When ON is selected for BUTTON/DIAL SETTING > TOUCH SCREEN SETTING, touch controls can be used for the following playback operations: • Swipe: Swipe a fi nger across the display to view other images. • Pinch-out: Place two fi ngers on the display and spread them apart to zoom in.
-
Page 45
Touch Screen Mode • Drag: View other areas of the im- age during playback zoom. -
Page 46
MEMO… -
Page 47: First Steps
First Steps…
-
Page 48: Attaching The Strap
Attaching the Strap Attach the strap clips to the camera and then attach the strap. Open a strap clip. Use the clip attaching tool to open a strap clip, making sure that the tool and clip are in the orientations shown. Place the strap clip on an eyelet.
-
Page 49
Attaching the Strap Pass the clip through the eyelet. Rotate the clip fully through the eyelet until it clicks closed. Attach a protective cover. Place a protective cover over the eyelet as shown, with the black side of the cover toward the camera. -
Page 50: Attaching A Lens
Attaching a Lens The camera can be used with lenses for the FUJIFILM X-mount. Remove the body cap from the camera and the rear cap from the lens. Place the lens on mount, keeping the marks on the lens and camera aligned, and then rotate the lens until it clicks into place.
-
Page 51
Lenses and Other Optional Accessories The camera can be used with lenses and accessories for the FUJIFILM X-mount. Before attaching or removing (exchanging) lenses, at- tach the lens caps and check that the lenses are free of dust and other foreign matter. -
Page 52: Charging The Battery
Charging the Battery The battery is not charged at shipment. Before use, charge the battery in the supplied battery charger. An NP-W126S rechargeable battery is supplied with the camera. Charging takes about 150 minutes. Place the battery in the charger. Place the battery in the sup- plied battery charger as shown.
-
Page 53
Charging the Battery The Charging Indicator The charging indicator shows battery charge status as follows: Charging indicator Charging indicator Battery status Battery status Action Action Battery not Insert the battery. inserted. Off Battery fully Remove the battery. charged. Battery charging. —… -
Page 54
The supplied AC cord is for use exclusively with the sup- plied battery charger. Do not use the supplied charger with other cords or the supplied cord with other devices. Do not affi x labels or other objects to the battery. Failure to observe this precaution could make it impossible to remove the battery from the camera. -
Page 55
Charging the Battery Charging via Computer The battery also charges if the camera is connected to a com- puter. Turn the camera off , insert the battery, and connect a USB cable as shown, making sure the connectors are fully inserted. -
Page 56: Inserting Batteries And Memory Cards
Inserting Batteries and Memory Cards After charging the battery, insert the battery and memory card as described below. Open the battery-chamber cover. Slide the battery-chamber latch as shown and open the bat- tery-chamber cover. Do not open the battery-cham- ber cover when the camera is on.
-
Page 57
Inserting Batteries and Memory Cards Insert the battery. Using the battery to keep the battery latch pressed to one side, insert the battery contacts fi rst in the direction shown by the arrow. Confi rm that the battery is securely latched. Insert the battery in the orien- tation shown. -
Page 58
Close the battery-chamber cover. Close and latch the cover. If the cover does not close, check that the battery is in the correct orientation. Do not at- tempt to force the cover shut. -
Page 59
Inserting Batteries and Memory Cards Removing the Battery Before removing the battery, turn the camera off and open the battery-chamber cover. To remove the battery, press the battery latch to the side, and slide the battery out of the camera as shown. The battery may become hot when used in high-tempera- ture environments. -
Page 60: Compatible Memory Cards
Compatible Memory Cards FUJIFILM and SanDisk SD, SDHC, and SDXC memo- ry cards have been approved for use in the camera; UHS-I is supported. Cards with a UHS speed class of 3 or better are recommended for movies. A complete list of approved memory cards is available at http://www.
-
Page 61
Inserting Batteries and Memory Cards Format memory cards before fi rst use, and be sure to reformat all memory cards after using them in a com- puter or other device. Memory cards are small and can be swallowed; keep out of reach of children. -
Page 62: Turning The Camera On And Off
Turning the Camera On and Off Use the ON/OFF switch to turn the camera on and off . Rotate the switch to ON to turn the camera on, or to OFF to turn the camera off . Fingerprints and other marks on the lens or viewfi nder can aff ect pictures or the view through the viewfi nder.
-
Page 63: Checking The Battery Level
Checking the Battery Level After turning the camera on, check the battery level in the display. Battery level is shown as follows: Indicator Indicator Description Description Battery partially discharged. Battery about 80% full. Battery about 60% full. Battery about 40% full. Battery about 20% full.
-
Page 64: Basic Setup
Basic Setup A language-selection dialog is displayed the fi rst time the camera is turned on. Turn the camera on. A language-selection dialog will be displayed. Choose a language. Highlight a language and press MENU/OK. Set the date and time. Press the selector left or right DATE/TIME NOT SET 2019…
-
Page 65
Basic Setup If the battery is removed for an extended period, the camera clock will be reset and the language-selection dialog will be displayed when the camera is turned on. Skipping the Current Step Press DISP/BACK to skip the current step. Any steps you skip will be displayed the next time the camera is turned on. -
Page 66: Choosing A Diff Erent Language
Basic Setup Choosing a Diff erent Language To change the language: Display language options. Select D USER SETTING > Choose a language. Highlight the desired option and press MENU/OK. Changing the Time and Date To set the camera clock: Display DATE/TIME options. Select D USER SETTING >…
-
Page 67: Basic Photography And Playback
Basic Photography and Playback…
-
Page 68: Taking Photographs (Mode P)
Taking Photographs (Mode P) This section describes how to take pictures us- ing program AE (mode P). See pages 62–73 for information on S, A, and M modes. Adjust settings for program AE. 7): Select z. Auto mode selector lever ( Shutter speed ( 62): Select A (auto).
-
Page 69
Taking Photographs (Mode P) Check the shooting mode. Confi rm that P appears in the display. Ready the camera. Hold the camera steady with both hands and brace your el- bows against your sides. Shak- ing or unsteady hands can blur your shots. -
Page 70
Taking Photographs (Mode P) Focus. Press the shutter button half- way to focus. If the subject is poorly lit, the AF-assist illuminator may light. Focus indicator Focus frame If the camera is able to focus, it will beep twice and focus area and focus indicator will glow green. -
Page 71: Viewing Pictures
Viewing Pictures Pictures can be viewed in the viewfi nder or LCD monitor. To view pictures full frame, press a. 100-0001 Additional pictures can be viewed by pressing the selector left or right or rotating the front command dial. Press the selector or rotate the dial right to view pictures in the order recorded, left to view pictures in reverse order.
-
Page 72: Deleting Pictures
Deleting Pictures Use the b button to delete pictures. Deleted pictures can not be recovered. Copy important pictures to a computer or other storage device before proceeding. With a picture displayed full frame, press the b button and select FRAME. ERASE FRAME SELECTED FRAMES…
-
Page 73: Movie Recording And Playback
Movie Recording and Playback…
-
Page 74: F Recording Movies
Recording Movies This section describes how to fi lm movies in auto mode. Rotate the drive dial to F. Rotate the auto mode selector lever to AUTO to shoot movies ADVANCED SR AUTO mode. Rotate the lever to z to shoot movies in mode P. Movies shot with U selected for MOVIE MODE will also be recorded in mode P.
-
Page 75
Recording Movies Press the button again to end recording. Re- cording ends automatically when the maximum length is reached or the memory card is full. Using an External Microphone Sound can be recorded with external microphones that connect using jacks 2.5 mm in diameter;… -
Page 76
Sound is recorded via the built-in microphone or an optional external microphone. Do not cover the micro- phone during recording. Note that the microphone may pick up lens noise and other sounds made by the cam- era during recording. Vertical or horizontal streaks may appear in movies con- taining very bright subjects. -
Page 77: Adjusting Movie Settings
Recording Movies Adjusting Movie Settings Frame size and rate can be selected using B MOV- IE SETTING > MOVIE MODE, while the card used to store movies can be selected using D SAVE DATA SETTING > MOVIE FILE DESTINATION. Focus mode is selected using the focus mode selector; for con- tinuous focus adjustment, select C, or choose S and enable Intelligent Face Detection.
-
Page 78: Viewing Movies
Viewing Movies View movies on the camera. 12/31/2050 10:00 AM In full-frame playback, movies are identifi ed by a W icon. PLAY PLAY ±0 The following operations can be per- formed while a movie is displayed: Playback in Playback in Playback Playback x ) )
-
Page 79
Viewing Movies Press MENU/OK to pause playback and display volume controls. Press the selector up or down to adjust the volume; press MENU/OK again to resume playback. Vol- ume can also be adjusted using D SOUND SETTING > PLAYBACK VOLUME. Playback Speed 29m59s Press the selector left or right to adjust playback speed during playback. -
Page 80
MEMO… -
Page 81: Taking Photographs
Taking Photographs…
-
Page 82: Choosing A Shooting Mode
Choosing a Shooting Mode For control over shutter speed and aperture (P, S, A, and M modes), rotate the auto mode selector lever to . Rotate the lever to AUTO to choose from modes suited to specifi c subject types, or select ADVANCED SR AUTO to let the camera automatically match the mode to the subject.
-
Page 83
Choosing a Shooting Mode Confi rm that P appears in the dis- play. If the subject is outside the metering range of the cam- era, the shutter speed and aperture displays will show “– – –”. Program Shift If desired, you can rotate the rear com- mand dial to select other combinations of shutter speed and aperture without altering exposure (program shift). -
Page 84: Mode S: Shutter-Priority Ae
Mode S: Shutter-Priority AE Choose a shutter speed and let the camera adjust ap- erture for optimal exposure. Adjust settings as follows: Auto mode selector lever: Shutter speed: Choose a shutter speed Aperture: A (auto) Confi rm that S appears in the dis- play.
-
Page 85
Choosing a Shooting Mode At settings other than 180X, shutter speed can also be adjusted in increments of 1⁄3 EV by rotating the rear com- mand dial. Shutter speed can be adjusted even while the shutter button is pressed halfway. Sensitivity and Depth of Field If you choose a fast shutter speed when the subject is poorly lit, the camera autoexposure program will select a wider ap- erture. -
Page 86
Time (T) Rotate the shutter speed dial to T (time) to choose slow shutter speeds for long time-exposures. Use of a tripod is recommended to prevent the camera moving during the exposure. Rotate the shutter speed dial to T. Rotate the rear command dial to choose a shutter speed. -
Page 87
Choosing a Shooting Mode Bulb (B) Select a shutter speed of B (bulb) for long time-expo- sures in which you open and close the shutter man- ually. Use of a tripod is recommended to prevent the camera moving during the exposure. Rotate the shutter speed dial to B. -
Page 88
Using a Remote Release An optional RR-90 remote release can be used for long time-exposures. The RR-90 connects via the Micro USB (Micro-B) USB 2.0 connector. Alternatively, electronic releases from third-party suppliers can be connected via the microphone/remote release con- nector (⌀2.5 mm 3-pole mini jack). -
Page 89: Mode A: Aperture-Priority Ae
Choosing a Shooting Mode Mode A: Aperture-Priority AE Choose an aperture and let the camera adjust shutter speed for optimal exposure. Adjust settings as follows: Auto mode selector lever: Shutter speed: A (auto) Aperture: Select Z and rotate the lens aperture ring to adjust aperture Confi rm that A appears in the dis- play.
-
Page 90
Previewing Depth of Field When PREVIEW DEPTH OF FIELD is assigned to a function button, pressing the button stops aperture down to the selected setting, allowing depth of fi eld to be previewed in the display. If both AF DISTANCE INDICATOR and MF DISTANCE INDICATOR are selected in the D SCREEN SET- TING … -
Page 91
Choosing a Shooting Mode Sensitivity and Motion Blur If you choose a narrow aperture when the subject is poorly lit, the shutter speed selected by the autoexposure program may not be fast enough to prevent motion blur. For faster shutter speeds that reduce motion blur, select a higher sen- sitivity. -
Page 92: Mode M: Manual Exposure
Mode M: Manual Exposure Alter exposure from that selected by the camera. Adjust settings as follows: Auto mode selector lever: Shutter speed: Choose a shutter speed Aperture: Select Z and rotate the lens aperture ring to adjust aperture Confi rm that M appears in the display.
-
Page 93
Choosing a Shooting Mode Exposure Preview To preview exposure in the LCD moni- tor, select an option other than OFF for D SCREEN SETTING > PREVIEW EXP./ WB IN MANUAL MODE. Select OFF when using the fl ash or on other occa- sions on which exposure may change when the picture is taken. -
Page 94: Auto Mode
Auto Mode Auto mode off ers options suited to particular subject types. Adjust settings as follows: Auto mode selector lever: AUTO Drive dial: S (single frame) The currently-selected scene ap- pears in the display. Rotate the front command dial (or use the A SHOOTING SETTING …
-
Page 95
Choosing a Shooting Mode Mode Mode Description Description Z PORTRAIT PORTRAIT Processes portraits to give the subject a smooth, ENHANCER ENHANCER natural-looking complexion. M LANDSCAPE LANDSCAPE Choose for daylight shots of buildings and land- scapes. N SPORT SPORT Choose when photographing moving subjects. O NIGHT NIGHT Choose for poorly lit twilight or night scenes. -
Page 96
Choosing a Shooting Mode ADVANCED SR AUTO The scene selected by the camera in S ADVANCED SR AUTO mode is shown by an icon in the display. • • AUTO PORTRAIT&MOTION • • LANDSCAPE BEACH • • NIGHT SNOW • •… -
Page 97: Autofocus
S or C ( 78). Use G AF/MF SETTING > AF MODE to choose an AF mode ( 80). Choose the position and size of the focus frame ( 82). Take pictures. For information on the autofocus system, visit: http://fujifilm-x.com/af/en/index.html…
-
Page 98: Focus Mode
Focus Mode Use the focus mode selector to choose how the camera focuses. Choose from the following options: Mode Mode Description Description Single AF: Focus locks while the shutter button is pressed (AF-S) halfway. Choose for stationary subjects. Continuous AF: Focus is continually adjusted to refl ect changes in the distance to the subject while the shutter (AF-C) button is pressed halfway.
-
Page 99
Autofocus The Focus Indicator The focus indicator turns green when the subject is in focus and blinks white when the camera is unable to focus. Brackets (“( )”) indicate that the camera is focusing and are displayed continu- Focus indicator ously in mode C. -
Page 100: Autofocus Options (Af Mode)
Autofocus Options (AF Mode) Choose how the camera focuses in modes S and C. Press MENU/OK and go to the shooting menu. Select G AF/MF SETTING > AF MODE. Choose an AF mode. This feature can also be accessed via shortcuts 242).
-
Page 101
Autofocus Focus Mode C (AF-C) Focus Mode C (AF-C) Option Option Description Description Sample image Sample image Focus tracks subject at selected fo- SINGLE cus point. Use for subjects moving POINT toward or away from camera. Focus tracks subject in selected fo- cus zone. -
Page 102: Focus-Point Selection
Focus-Point Selection Choose a focus point for autofocus. Viewing the Focus-Point Display Press MENU/OK and go to the shooting menu. Select G AF/MF SETTING > FOCUS AREA to view the focus-point display. Use the selector and rear command dial to choose a focus area ( 83).
-
Page 103
Autofocus Selecting a Focus Point Use the selector to choose the fo- cus point and the rear command dial to choose the size of the focus frame. The procedure varies with the option selected for AF mode. DISP/BACK DISP/BACK Selector Selector button button… -
Page 104
The Focus-Point Display The focus-point display varies with the option select- ed for AF mode. Focus frames are shown by small squares (), focus zones by the large squares. AF mode AF mode r SINGLE POINT y ZONE z WIDE/TRACKING SINGLE POINT ZONE WIDE/TRACKING… -
Page 105
Autofocus Burst Mode Focus-Frame Selection When continuous high-speed (CH) is selected for drive mode, the number of focus frames available in focus mode C drops. Single point Zone Wide/tracking Autofocus Although the camera boasts a high-precision autofocus sys- tem, it may be unable to focus on the subjects listed below. •… -
Page 106
Autofocus Checking Focus To zoom in on the current focus area for precise focus, press the center of the rear command dial. Press the center of the rear command dial again to cancel zoom. Normal display Focus zoom In focus mode S, zoom can be adjusted by rotating the rear command dial when STANDARD or FOCUS PEAK HIGHLIGHT is selected for G AF/MF SETTING … -
Page 107: Manual Focus
Manual Focus Adjust focus manually. Rotate the focus mode selector to M. j will appear in the display. Focus manually using the lens focus ring. Rotate the ring left to reduce the focus distance, right to increase. Take pictures. Use D BUTTON/DIAL SETTING > FOCUS RING to re- verse the direction of rotation of the focus ring.
-
Page 108
Quick Focus To use autofocus to focus on the subject in the selected fo- cus area, press the button to which focus lock or AF-ON has been assigned (the size of the focus area can be chosen with the rear command dial). In manual focus mode, you can use this feature to quickly focus on a chosen subject using either single or continuous AF according to the option chosen for G AF/MF SETTING >… -
Page 109: Checking Focus
Manual Focus Checking Focus A variety of options are available for checking focus in manual focus mode. The Manual Focus Indicator Focus distance The manual focus indicator indi- (white line) cates how closely the focus dis- tance matches the distance to the subject in the focus brackets.
-
Page 110
Manual Focus MF Assist The G AF/MF SETTING > MF ASSIST option can be used to check focus when pictures are framed in the LCD monitor or electronic viewfi nder in manual focus mode. The MF ASSIST menu can be displayed by pressing and holding the center of the rear command dial. -
Page 111: Exposure Compensation
Exposure Compensation Adjust exposure. Rotate the exposure compensa- tion dial. The amount of compensation avail- able varies with the shooting mode. C (Custom) When the exposure compensation dial is rotated to C, exposure com- pensation can be adjusted by ro- tating the front command dial.
-
Page 112: Focus/Exposure Lock
Focus/Exposure Lock Compose photographs with off -center subjects. Focus: Position the subject in the focus frame and press the shutter button halfway to lock focus and exposure. Focus and exposure will remain locked while the shutter button is pressed halfway (AF/AE lock). Recompose: Keep the shutter button pressed halfway.
-
Page 113: The Af-L And Ae-L Buttons
Focus/Exposure Lock The AF-L and AE-L Buttons Focus and exposure can also be locked with the AF-L and AE-L but- tons. At default settings, the AF-L button locks focus, the AE-L button exposure. Focus and/or exposure will remain locked while the but- ton is pressed, whether or not the shutter button is pressed halfway.
-
Page 114: Bkt Bracketing
Bracketing Automatically vary settings over a series of pic- tures. Rotate the drive dial to BKT1 or BKT2. Navigate to DRIVE SETTING in the A SHOOTING SETTING menu and select O AE BKT, W ISO BKT, X FILM SIMULATION BKT, H WHITE BALANCE BKT, or Y DYNAMIC RANGE BKT.
-
Page 115: Ae Bkt
Bracketing O AE BKT Select a bracketing amount (options range from ±1⁄3 to ±2 EV in increments of 1⁄3 EV). Each time the shutter button is pressed, the camera will take three shots: one using the metered value for exposure, the second overexposed by the selected amount, and the third underexposed by the same amount.
-
Page 116: White Balance Bkt
Bracketing H WHITE BALANCE BKT Select a bracketing amount (±1, ±2, or ±3). Each time the shutter is released, the camera takes one shot and processes it to create three copies: one at the current white balanced setting, one with fi ne-tuning increased by the selected amount, and another with fi ne-tuning decreased by the selected amount.
-
Page 117: I Continuous Shooting (Burst Mode)
Continuous Shooting (Burst Mode) Capture motion in a series of pictures. Rotate the drive dial to select CH (high-speed burst) or CL (low-speed burst). Navigate to DRIVE SETTING in the A SHOOTING SETTING menu and choose a frame advance rate. This feature can also be accessed via shortcuts 242).
-
Page 118
Continuous Shooting (Burst Mode) If fi le numbering reaches 999 before shooting is com- plete, the remaining pictures will be recorded to a new folder. Burst shooting may not begin if the space available on the memory card is insuffi cient. Frame rate varies with the subject, shutter speed, sensi- tivity, and focus mode. -
Page 119: Adv. Advanced Filters
Advanced Filters ADV. Take photos with fi lter eff ects. Rotate the drive dial to Adv.1 or Adv.2. Navigate to DRIVE SETTING in the A SHOOTING SETTING menu and choose a fi lter eff ect. This feature can also be accessed via shortcuts 242).
-
Page 120: Advanced Filter Options
Advanced Filters Advanced Filter Options Choose from the following fi lters: Filter Filter Description Description G TOY CAMERA Choose for a retro toy camera eff ect. The tops and bottoms of pictures are H MINIATURE blurred for a diorama eff ect. Create high-contrast images with sat- I POP COLOR urated colors.
-
Page 121: Multiple Exposures
Multiple Exposures Create a photograph that combines two expo- sures. Rotate the drive dial to j. Take the fi rst shot. Press MENU/OK. The fi rst shot will be shown superimposed on the view through the lens and you will be prompted to NEXT RETRY EXIT…
-
Page 122
Multiple Exposures Take the second shot, using the fi rst frame as a guide. EXIT Press MENU/OK to create the multiple exposure, or press the selector left to return to Step 4 and retake the second shot. RETRY EXIT… -
Page 123: Panoramas
Panoramas Follow an on-screen guide to create a panorama. Rotate the drive dial to u. To select the size of the angle through which you will pan the camera while shooting, press the se- lector left. Highlight a size and press MENU/OK. Press the selector right to view a choice of pan directions.
-
Page 124
For Best Results For best results, use a lens with a focal length of 35 mm or less (50 mm or less in 35 mm format). Prop your elbows against your sides and move the camera slowly in a small circle at a steady speed, keeping the camera parallel or at right angles to the horizon and being careful only to pan in the direction shown by the guides. -
Page 125
Panoramas If the shutter button is pressed all the way down be- fore the panorama is complete, shooting will end and no panorama may be recorded. Shooting may also be interrupted if the camera is panned too quickly or too slowly. -
Page 126
Panoramas Viewing Panoramas In full-frame playback, you can use the rear command dial to zoom panoramas in or out. Alternatively, you can play the panorama back using the selector. PLAY STOP PAUSE Press the selector down to start playback and press again to pause. -
Page 127: Flash Photography
Flash Photography Use the built-in fl ash for additional lighting when shooting at night or indoors under low light. Slide the N lever as shown to raise the fl ash. Be careful not to injure your- self on the edges of the raised fl ash.
-
Page 128
Depending on the distance to the subject, some lenses may cast shadows in photos taken with the fl ash. The fl ash will not fi re at some settings, for example in panorama mode or when the electronic shutter is used. Choose shutter speeds slower than 180X when using the fl ash in exposure mode S (shutter-priority AE) or manual (M). -
Page 129: Flash Settings
Flash Photography Flash Settings The following settings are MODE Built-In Flash available with the built-in fl ash. ADJUST Setting Setting Description Description Choose from the following options: • TTL: TTL mode. Adjust fl ash compensation ( and choose a fl ash mode ( •…
-
Page 130
Setting Setting Description Description Choose a fl ash mode for TTL fl ash control. The op- tions available vary with the shooting mode (P, S, A, or M) selected. • E (FLASH AUTO): The fl ash fi res only as required; fl… -
Page 131
The fl ash will synchronize with the shutter at shutter speeds of 1⁄180 s or slower. Optional Flash Units from FUJIFILM The camera can be used with optional FUJIFILM shoe-mount- ed fl ash units. Third-Party Flash Units Do not use third-party fl ash units that apply over 300 V to the… -
Page 132
MEMO… -
Page 133: The Shooting Menus
The Shooting Menus…
-
Page 134: Himage Quality Setting
IMAGE QUALITY SETTING Adjust image quality settings. To display image quality settings, IMAGE QUALITY SETTING IMAGE SIZE IMAGE QUALITY press MENU/OK in the shooting RAW RECORDING FILM SIMULATION GRAIN EFFECT display and select the H (IMAGE DYNAMIC RANGE WHITE BALANCE HIGHLIGHT TONE QUALITY SETTING) tab.
-
Page 135: Image Size
IMAGE QUALITY SETTING IMAGE SIZE Choose the size and aspect ratio at which still pic- tures are recorded. Option Option Image size Image size Option Option Image size Image size Option Option Image size Image size O 3 : 2 6000 × 4000 O 16 : 9 6000 ×…
-
Page 136: Image Quality
IMAGE QUALITY Choose a fi le format and compression ratio. Select FINE or NORMAL to record JPEG images, RAW to re- cord RAW images, or FINE+RAW or NORMAL+RAW to record both JPEG and RAW images. FINE and FINE+RAW use lower JPEG compression ratios for higher-quality JPEG images, while NORMAL and NORMAL+RAW use higher JPEG compression ratios to increase the number of images that can be stored.
-
Page 137: Raw Recording
IMAGE QUALITY SETTING RAW RECORDING Choose whether to compress RAW images. Option Option Description Description UNCOMPRESSED RAW images are not compressed. RAW images are compressed using a reversible algorithm that reduces fi le size with no loss of im- LOSSLESS age data.
-
Page 138: Film Simulation
FILM SIMULATION Simulate the eff ects of diff erent kinds of fi lm, includ- ing black-and-white (with or without color fi lters). Choose a palette according to your subject and cre- ative intent. Option Option Description Description Standard color reproduction. Suited to a wide PROVIA/ STANDARD range of subjects, from portraits to landscapes.
-
Page 139
Film simulation options can be combined with tone and sharpness settings. Film simulation settings can also be accessed via short- cuts ( 242). For more information, visit: http://fujifilm-x.com/en/x-stories/ the-world-of-film-simulation-episode-1/… -
Page 140: Grain Effect
GRAIN EFFECT Add a fi lm grain eff ect. Select an amount (STRONG or WEAK) or choose OFF to turn fi lm grain off . Options Options STRONG WEAK…
-
Page 141: Dynamic Range
IMAGE QUALITY SETTING DYNAMIC RANGE Control contrast. Choose lower values to increase contrast when shooting indoors or under overcast skies, higher values to reduce loss of detail in high- lights and shadows when photographing high-con- trast scenes. Higher values are recommended for scenes that include both sunlight and deep shade, for such high-contrast subjects as sunlight on wa- ter, brightly-lit autumn leaves, and portraits taken…
-
Page 142: White Balance
WHITE BALANCE For natural colors, choose a white balance option that matches the light source. Option Option Description Description AUTO White balance is adjusted automatically. k/l/m Measure a value for white balance. Choose a color temperature. For subjects in direct sunlight. For subjects in the shade.
-
Page 143
IMAGE QUALITY SETTING Fine-Tuning White Balance Pressing MENU/OK after selecting a WB SHIFT AUTO white balance option displays the dialog shown at right; use the se- R:0 B:0 lector to fi ne-tune white balance or press DISP/BACK to exit without fi ne-tuning. -
Page 144
Custom White Balance Choose , or to adjust CUSTOM 1 white balance for unusual lighting conditions. White balance mea- surement options will be displayed; SHUTTER : NEW WB SHIFT NOT CHANGE frame a white object so that it fi lls the display and press the shutter button all the way down to measure white balance (to select the most re- cent custom value and exit without measuring white… -
Page 145
IMAGE QUALITY SETTING k: Color Temperature Selecting k in the white bal- WHITE BALANCE ance menu displays a list of color COLOR TEMPERATURE 10000 temperatures; highlight a color R:0 B:0 9100 8300 temperature and press MENU/OK to 7700 7100 SHIFT select the highlighted option and display the fi ne-tuning dialog. -
Page 146: Highlight Tone
HIGHLIGHT TONE Adjust the appearance of highlights. Choose from seven options between +4 and −2. Options Options −1 −2 SHADOW TONE Adjust the appearance of shadows. Choose from sev- en options between +4 and −2. Options Options −1 −2…
-
Page 147: Color
IMAGE QUALITY SETTING COLOR Adjust color density. Choose from nine options be- tween +4 and −4. Options Options −1 −2 −3 −4 SHARPNESS Sharpen or soften outlines. Choose from nine op- tions between +4 and −4. Options Options −1 −2 −3 −4…
-
Page 148: Noise Reduction
NOISE REDUCTION Reduce noise in pictures taken at high sensitivities. Choose from nine options between +4 and −4. Options Options −1 −2 −3 −4 LONG EXPOSURE NR Select ON to reduce mottling in long time-exposures. Options Options…
-
Page 149: Lens Modulation Optimizer
IMAGE QUALITY SETTING LENS MODULATION OPTIMIZER Select ON to improve defi nition by adjusting for dif- fraction and the slight loss of focus at the periphery of the lens. Options Options COLOR SPACE Choose the gamut of colors available for color repro- duction.
-
Page 150: Pixel Mapping
PIXEL MAPPING Use this option if you notice bright spots in your pic- tures. Press MENU/OK in the shooting display and select the H IMAGE QUALITY SETTING tab. Highlight PIXEL MAPPING and press MENU/OK to perform pixel mapping. Processing may take a few seconds.
-
Page 151: Select Custom Setting
IMAGE QUALITY SETTING SELECT CUSTOM SETTING Recall settings saved with EDIT/SAVE CUSTOM SET- TING. Settings can be recalled from any of the seven custom settings banks. Banks Banks CUSTOM 1 CUSTOM 2 CUSTOM 3 CUSTOM 4 CUSTOM 5 CUSTOM 6 CUSTOM 7 EDIT/SAVE CUSTOM SETTING Save up to 7 sets of custom camera settings for com-…
-
Page 152
IMAGE QUALITY SETTING IMAGE QUALITY SETTING Highlight a custom settings SELECT CUSTOM SETTING CUSTOM 1 CUSTOM 2 EDIT/SAVE CUSTOM SETTING bank and press MENU/OK to se- CUSTOM 3 CUSTOM 4 CUSTOM 5 lect. CUSTOM 6 CUSTOM 7 Adjust the following as desired: CUSTOM 1 SAVE CURRENT SETTINGS •… -
Page 153: Gaf/Mf Setting
AF/MF SETTING Adjust focus settings. To display focus settings, press AF/MF SETTING FOCUS AREA AF MODE MENU/OK in the shooting display AF-C CUSTOM SETTINGS AF POINT DISPLAY NUMBER OF THE FOCUS POINTS and select the G (AF/MF SETTING) PRE-AF AF ILLUMINATOR FACE/EYE DETECTION SETTING tab.
-
Page 154: Af Mode
AF MODE Choose the AF mode for focus modes S and C. Option Option Description Description The camera focuses on the subject in the selected focus point. The number of focus points available can be se- lected using G AF/MF SETTING > NUMBER OF THE SINGLE POINT FOCUS POINTS.
-
Page 155: Af-C Custom Settings
AF/MF SETTING AF-C CUSTOM SETTINGS Select focus-tracking options for AF-C CUSTOM SETTINGS SET 1 STANDARD SETTING FOR MULTI-PURPOSE focus mode C. Choose from Sets 1–5 according to your subject. Option Option Description Description SET 1 STANDARD A standard tracking option that works well with SETTING FOR MULTI- the typical range of moving subjects.
-
Page 156: Af Point Display Yz
AF POINT DISPLAY yz Choose whether individual focus frames are dis- played when ZONE or WIDE/TRACKING is selected for G AF/MF SETTING > AF MODE. Options Options NUMBER OF THE FOCUS POINTS Choose the number of focus points available for fo- cus-point selection in manual focus mode or when SINGLE POINT is selected for AF MODE.
-
Page 157: Pre-Af
AF/MF SETTING PRE-AF If ON is selected, the camera will continue to adjust focus even when the shutter button is not pressed halfway. Note that this increases the drain on the battery. Options Options AF ILLUMINATOR If ON is selected, the AF-assist illuminator will light to assist autofocus.
-
Page 158: Face/Eye Detection Setting
FACE/EYE DETECTION SETTING Intelligent Face Detection sets fo- cus and exposure for human faces anywhere in the frame, preventing the camera from focusing on the background in group portraits. Choose for shots that emphasize portrait subjects. Faces can be detected with the camera in vertical or horizontal orientation;…
-
Page 159
AF/MF SETTING In some modes, the camera may set exposure for the frame as a whole rather than the portrait subject. If the subject moves as the shutter button is pressed, the face may not be in the area indicated by the green bor- der when the picture is taken. -
Page 160: Af+Mf
AF+MF If ON is selected in focus mode S, focus can be ad- justed manually by rotating the focus ring while the shutter button is pressed halfway. Both standard and focus peaking MF assist options are supported. Options Options Lenses with a focus distance indicator must be set to manual focus mode (MF) before this option can be used.
-
Page 161: Mf Assist
AF/MF SETTING MF ASSIST Choose how focus is displayed in manual focus mode. Option Option Description Description Focus is displayed normally (focus peaking and digital STANDARD split image are not available). Displays a black-and-white (MONOCHROME) or color (COLOR) split image in the center of the frame. DIGITAL Frame the subject in the split-image area and rotate SPLIT IMAGE…
-
Page 162: Interlock Spot Ae & Focus Area
INTERLOCK SPOT AE & FOCUS AREA Select ON to meter the current focus frame when SINGLE POINT is selected for AF MODE and SPOT is selected for PHOTOMETRY. Options Options INSTANT AF SETTING Choose whether the camera focuses using single AF (AF-S) or continuous AF (AF-C) when the AF-L button is pressed in manual focus mode.
-
Page 163: Depth-Of-Field Scale
AF/MF SETTING DEPTH-OF-FIELD SCALE Choose FILM FORMAT BASIS to help you make prac- tical assessments of depth of fi eld for pictures that will be viewed as prints and the like, PIXEL BASIS to help you assess depth of fi eld for pictures that will be viewed at high resolutions on computers or other electronic displays.
-
Page 164: Touch Screen Mode
TOUCH SCREEN MODE Choose the shooting operations performed using touch controls. Still Photography Mode Mode Description Description TOUCH SHOOTING TOUCH SHOOTING Tap your subject in the display to focus and release the shutter. In burst mode, pictures will be taken while you keep your fi…
-
Page 165
AF/MF SETTING Movie Recording We recommend that you select AREA for MOVIE AF MODE in the shooting menu B (movie) tab before re- cording movies using touch controls (in some movie modes, AREA will be selected automatically). Mode Mode Description Description Tap your subject in the display to focus and start recording. -
Page 166
AF/MF SETTING Mode Mode Description Description Tap to select a focus point and press the shutter button to start or end recording. In focus mode AREA AREA C (AF-C), the camera will continually adjust focus in response to changes in the distance to the sub- ject in the selected focus point. -
Page 167: Ashooting Setting
SHOOTING SETTING Adjust shooting options. To display shooting options, press SHOOTING SETTING SCENE POSITION DRIVE SETTING MENU/OK in the shooting display SELF-TIMER INTERVAL TIMER SHOOTING PHOTOMETRY and select the A (SHOOTING SET- SHUTTER TYPE IS MODE TING) tab. EXIT The options available vary with the shooting mode se- lected.
-
Page 168
Mode Mode Description Description H NIGHT NIGHT Choose this mode for slow shutter speeds when (TRIPOD) (TRIPOD) shooting at night. p p FIREWORKS FIREWORKS Slow shutter speeds are used to capture the ex- panding burst of light from a fi rework. Q SUNSET SUNSET Choose this mode to record the vivid colors in… -
Page 169: Drive Setting
SHOOTING SETTING DRIVE SETTING Adjust settings for the various drive modes. Option Option Description Description BKT1 SETTING Choose the settings used when the drive dial is rotated to BKT1 or BKT2 ( 150). BKT2 SETTING Select the frame rate used when the drive dial is ro- CH HIGH tated to CH (continuous high speed): 14, 11, or 8 fps.
-
Page 170
BKT SETTING Choose bracketing settings for the BKT1 and BKT2 po- sitions on the drive dial. Use BKT SELECT to choose a bracketing type and the AE BKT, ISO BKT, FILM SIM- ULATION BKT, and WHITE BALANCE BKT options to choose the bracketing amount for each type. -
Page 171: Self-Timer
SHOOTING SETTING SELF-TIMER Choose a shutter release delay. Option Option Description Description The shutter is released two seconds after the shutter but- ton is pressed. Use to reduce blur caused by the camera R 2 SEC moving when the shutter button is pressed. The self-tim- er lamp blinks as the timer counts down.
-
Page 172: Interval Timer Shooting
INTERVAL TIMER SHOOTING Confi gure the camera to take photos automatically at a preset interval. Highlight INTERVAL TIMER INTERVAL/NUMBER OF TIMES INTERVAL NUMBER OF TIMES SHOOTING in the A (SHOOT- ING SETTING) tab and press MENU/OK. CANCEL Use the selector to choose the START WAITING TIME interval and number of shots.
-
Page 173
SHOOTING SETTING Interval timer photography can not be used at a shutter speed of B (bulb) or with multiple exposure photogra- phy. In burst mode, only one picture will be taken each time the shutter is released. Use of a tripod is recommended. Check the battery level before starting. -
Page 174: Photometry
PHOTOMETRY Choose how the camera meters exposure. The selected option will only take eff ect when G AF/MF SETTING > FACE/EYE DETECTION SETTING is OFF. Mode Mode Description Description The camera instantly determines exposure based on an analysis of composition, color, and brightness distribu- (multi) tion.
-
Page 175: Shutter Type
SHOOTING SETTING SHUTTER TYPE Choose the shutter type. Choose the electronic shut- ter to mute the shutter sound. Option Option Description Description t MECHANICAL Take pictures with the mechanical shutter. SHUTTER s ELECTRONIC Take pictures with the electronic shutter. SHUTTER t MECHANICAL + The camera chooses the shutter type according s ELECTRONIC…
-
Page 176: Is Mode
IS MODE Reduce blur. Option Option Description Description l CONTINUOUS Image stabilization on. Image stabilization enabled only when the shutter m SHOOTING button is pressed halfway (focus mode C) or the ONLY shutter is released. Image stabilization off ; x appears in the display. Recommended when the camera is on a tripod.
-
Page 177: Iso
SHOOTING SETTING Adjust the camera’s sensitivity to light. Option Option Description Description AUTO1 Sensitivity is automatically adjusted in response to AUTO2 shooting conditions. AUTO3 Adjust sensitivity manually. Selected value is 12800–200 shown in display. Choose for special situations. Note that mottling H (25600 or 51200), may appear in pictures taken at H, while L reduces L (100)
-
Page 178
AUTO Choose the base sensitivity, maximum sensitivity, and minimum shutter speed for AUTO1, AUTO2, and AUTO3. Defaults are shown below. Default Default Option Option AUTO1 AUTO1 AUTO2 AUTO2 AUTO3 AUTO3 DEFAULT SENSITIVITY MAX. SENSITIVITY 1600 3200 MIN. SHUTTER SPEED ⁄ s The camera automatically chooses a sensitivity be- tween the default and maximum values;… -
Page 179
SHOOTING SETTING If the value selected for DEFAULT SENSITIVITY is high- er than that selected for MAX. SENSITIVITY, DEFAULT SENSITIVITY will be set to the value selected for MAX. SENSITIVITY. The camera may select shutter speeds slower than MIN. SHUTTER SPEED if pictures would still be underex- posed at the value selected for MAX. -
Page 180: Mount Adaptor Setting
MOUNT ADAPTOR SETTING Adjust settings for M-mount lenses connected using an optional FUJIFILM M MOUNT ADAPTER. Choosing a Focal Length If the lens has a focal length of 21, LENS REGISTRATION LENS 1 24, 28, or 35 mm, choose a match-…
-
Page 181: Distortion Correction
SHOOTING SETTING Distortion Correction Choose from STRONG, MEDIUM, or LENS5 DISTORTION CORRECTION BARREL STRONG BARREL MEDIUM WEAK options to correct BARREL BARREL WEAK PINCUSHION WEAK or PINCUSHION distortion. PINCUSHION MEDIUM PINCUSHION STRONG Color Shading Correction Color (shading) variations between the center and edges of the frame can be adjusted separately for each corner.
-
Page 182
Peripheral Illumination Correction Choose from values between –5 and +5. Choosing positive values increases peripheral illumination, while choosing negative values CANCEL reduces peripheral illumination. Positive values are recommended for vintage lenses, negative values to create the eff ect of images taken with an antique lens or a pinhole camera. -
Page 183: Wireless Communication
SHOOTING SETTING WIRELESS COMMUNICATION Connect to smartphones running the “FUJIFILM Camera Remote” app. The smartphone can be used to browse the images on the camera, download se- lected images, control the camera remotely, or up- load location data to the camera.
-
Page 184: Fflash Setting
FLASH SETTING Adjust fl ash-related settings. To display fl ash-related settings, FLASH SETTING FLASH FUNCTION SETTING RED EYE REMOVAL press MENU/OK in the shooting dis- TTL-LOCK MODE LED LIGHT SETTING MASTER SETTING play and select the F (FLASH SET- CH SETTING TING) tab.
-
Page 185: Red Eye Removal
FLASH SETTING RED EYE REMOVAL Remove red-eye eff ects caused by the fl ash. Option Option Description Description FLASH + A red-eye reduction pre-fl ash is combined with digital REMOVAL red-eye removal. FLASH Flash red-eye reduction only. REMOVAL Digital red-eye removal only. Flash red-eye reduction and digital red-eye removal off…
-
Page 186: Ttl-Lock Mode
TTL-LOCK MODE Instead of adjusting fl ash level with each shot, TTL fl ash control can be locked for consistent results across a series of photographs. Option Option Description Description Flash output is locked at the value metered for LOCK WITH LAST the most recent photo.
-
Page 187: Led Light Setting
Choose a fl ash group (A, B, or C) for the fl ash mounted on the camera hot shoe when it functions as a mas- ter fl ash controlling remote fl ash units via FUJIFILM wireless optical fl ash control, or choose OFF to limit master fl ash output to a level that does not aff ect the fi nal picture.
-
Page 188: Ch Setting
Choose the channel used for communication be- tween the master fl ash and remote fl ash units when using FUJIFILM optical wireless fl ash control. Sepa- rate channels can be used for diff erent fl ash systems or to prevent interference when multiple systems are operating in close proximity.
-
Page 189: Bmovie Setting
MOVIE SETTING Adjust movie-recording options. MOVIE SETTING To display options for movie re- MOVIE MODE MOVIE AF MODE cording, press MENU/OK in the HDMI OUTPUT INFO DISPLAY 4K MOVIE OUTPUT HDMI REC CONTROL shooting display and select the B MIC LEVEL ADJUSTMENT MIC/REMOTE RELEASE (MOVIE SETTING) tab.
-
Page 190: Movie Af Mode
MOVIE AF MODE Choose how the camera selects the focus point for movie recording. Option Option Description Description MULTI Automatic focus-point selection. AREA The camera focuses on the subject in the selected focus area. HDMI OUTPUT INFO DISPLAY If ON is selected, HDMI devices to which the camera is connected will mirror the information in the cam- era display.
-
Page 191: 4K Movie Output
MOVIE SETTING 4K MOVIE OUTPUT Choose the destination for 4K movies shot while the camera is connected to an HDMI recorder or other device that supports 4K. Option Option Description Description 4K movies are recorded to a camera memory card in 4K b CARD and output to the HDMI device in Full HD.
-
Page 192: Mic Level Adjustment
MOVIE SETTING MIC LEVEL ADJUSTMENT Adjust the recording level for the MIC LEVEL ADJUSTMENT built-in and external microphones. CANCEL Option Option Description Description 4—1 Choose a recording level. Displays shows the peak recording level detected in a given period. You can assign MIC LEVEL ADJUSTMENT to a camera control and then using the control to adjust the micro- phone level during recording.
-
Page 193: Playback And The Playback Menu
Playback and the Playback Menu…
-
Page 194: The Playback Display
The Playback Display This section lists the indicators that may be dis- played during playback. For illustrative purposes, displays are shown with all indi- cators lit. 12.31.2050 10:00 AM…
-
Page 195
The Playback Display Date and time ……44, 202 Image size/quality ….115, 116 Face detection indicator ….138 Film simulation ……118 Red-eye removal indicator Dynamic range ……121 ……….165, 190 White balance ……122 Advanced fi lter…….. 99 Sensitivity ……..157 Location data…….238, 280 Exposure compensation ….91 Protected image ……188 Aperture …….63, 69, 72 Sound and fl… -
Page 196: The Disp/Back Button
The DISP/BACK Button The DISP/BACK button controls the display of indicators during play- back. Standard Information off 12/31/2050 10:00 AM 12/31/2050 10:00 AM 12/31/2050 10:00 AM FAVORITES Favorites Info display Favorites: Rating Pictures To rate the current picture, press DISP/BACK and press the se- lector up and down to select from zero to fi ve stars.
-
Page 197
The Playback Display Viewing Photo Information The photo information display changes each time the selec- tor is pressed up. Basic data 12/31/2050 10:00 AM LENS 23.0mm F5.6 FOCAL LENGTH 23.0mm COLOR SPACE sRGB LENS MODULATION OPT. 12/31/2050 10:00 AM 1/12000 51200 NEXT Info display 2… -
Page 198: Viewing Pictures
Viewing Pictures Read this section for information on playback zoom and multi-frame playback. Use the rear command dial to go from full-frame playback to play- back zoom or multi-frame play- back. Full-frame playback 100-0001 Multi-frame playback Playback zoom DISP/BACK MENU/OK Nine- Medium frame…
-
Page 199: Playback Zoom
Viewing Pictures Playback Zoom Rotate the rear command dial right to zoom in on the current picture, left to zoom out. To exit zoom, press DISP/BACK, MENU/OK, or the center of the rear command dial. The maximum zoom ratio varies with the option select- ed for H IMAGE QUALITY SETTING …
-
Page 200: C The Playback Menu
The Playback Menu Adjust playback settings. The playback menu is displayed PLAY BACK MENU RAW CONVERSION ERASE when you press MENU/OK in play- CROP RESIZE PROTECT back mode. IMAGE ROTATE RED EYE REMOVA WIRELESS COMMUNICATION EXIT RAW CONVERSION RAW pictures store information on camera settings separately from the data captured by the camera image sensor.
-
Page 201
The Playback Menu Press the selector up or down RAW CONVERSION REFLECT SHOOTING COND. to highlight C PLAY BACK PUSH/PULL PROCESSING DYNAMIC RANGE MENU > RAW CONVERSION FILM SIMULATION GRAIN EFFECT WHITE BALANCE and press MENU/OK to display CREATE CANCEL settings. -
Page 202
The settings that can be adjusted when converting pictures from RAW to JPEG are: Setting Setting Description Description REFLECT Create a JPEG copy using the settings in eff ect at SHOOTING COND. the time the photo was taken. PUSH/PULL Adjust exposure. PROCESSING Enhance details in highlights for natural con- DYNAMIC RANGE… -
Page 203: Erase
The Playback Menu ERASE Delete individual pictures, multiple selected pictures, or all pictures. Deleted pictures can not be recovered. Protect important pictures or copy them to a computer or other storage device before proceeding. Option Option Description Description FRAME Delete pictures one at a time. SELECTED FRAMES Delete multiple selected pictures.
-
Page 204
SELECTED FRAMES Select SELECTED FRAMES for ERASE in the play- back menu. Highlight pictures and press MENU/OK to select or deselect (pictures in photobooks or printer orders are shown by S). Selected pictures are indicated by check marks (R). When the operation is complete, press DISP/BACK to display a confi rmation dialog. -
Page 205
The Playback Menu ALL FRAMES Select ALL FRAMES for ERASE in the playback menu. A confi rmation dialog will be displayed; highlight OK and press MENU/OK to delete all unprotected pictures. Pressing DISP/BACK cancels deletion; note that any pic- tures deleted before the button was pressed can not be recovered. -
Page 206: Crop
CROP Create a cropped copy of the current picture. Display the desired picture. Select CROP in the playback menu. Use the rear command dial to zoom in and out and press the selector up, down, left, or right to scroll the picture until the desired portion is dis- played.
-
Page 207: Resize
The Playback Menu RESIZE Create a small copy of the current picture. Display the desired picture. Select RESIZE in the playback menu. Highlight a size and press MENU/OK to display a confi rmation dialog. Press MENU/OK again to save the resized copy to a separate fi le.
-
Page 208: Protect
PROTECT Protect pictures from accidental deletion. Highlight one of the following options and press MENU/OK. • FRAME: Protect selected pictures. Press the selector left or right to view pictures and press MENU/OK to select or deselect. Press DISP/BACK when the opera- tion is complete.
-
Page 209: Image Rotate
The Playback Menu IMAGE ROTATE Rotate pictures. Display the desired picture. Select IMAGE ROTATE in the playback menu. Press the selector down to rotate the picture 90° clockwise, up to rotate it 90° counterclockwise. Press MENU/OK. The picture will automatically be displayed in the selected orientation whenever it is played back on the camera.
-
Page 210: Red Eye Removal
RED EYE REMOVAL Remove red-eye from portraits. The camera will ana- lyze the image; if red-eye is detected, the image will be processed to create a copy with reduced red-eye. Display the desired picture. Select RED EYE REMOVAL in the playback menu. Press MENU/OK.
-
Page 211: Wireless Communication
The Playback Menu WIRELESS COMMUNICATION Connect to smartphones running the “FUJIFILM Camera Remote” app. The smartphone can be used to browse the images on the camera, download se- lected images, control the camera remotely, or up- load location data to the camera.
-
Page 212: Photobook Assist
PHOTOBOOK ASSIST Create books from your favorite photos. Creating a Photobook Select NEW BOOK for PLAY BACK MENU > PHOTOBOOK ASSIST. Scroll through the images and press the selec- tor up to select or deselect. Press MENU/OK to exit when the book is complete. Neither photographs a or smaller nor movies can be selected for photobooks.
-
Page 213
The Playback Menu Viewing Photobooks Highlight a book in the photobook assist menu and press MENU/OK to display the book, then press the se- lector left or right to scroll through the pictures. Editing and Deleting Photobooks Display the photobook and press MENU/OK. The fol- lowing options will be displayed;… -
Page 214: Pc Auto Save
PC AUTO SAVE Upload pictures from the camera to a computer run- ning the “FUJIFILM PC AutoSave” application (note that you must fi rst install the software and confi g- ure the computer as a destination for images copied from the camera).
-
Page 215: Print Order (Dpof)
The Playback Menu PRINT ORDER (DPOF) Create a digital “print order” for DPOF-compatible printers. Select C PLAY BACK MENU > PRINT ORDER (DPOF). Select WITH DATE s to print the date of record- ing on pictures, WITHOUT DATE to print pictures without dates, or RESET ALL to remove all pic- tures from the print order before proceeding.
-
Page 216
The pictures in the current print order are indicated by a u icon during playback. Print orders can contain a maximum of 999 pictures. If a memory card is inserted containing a print order created by another camera, a message will be displayed. Pressing MENU/OK cancels the print order;… -
Page 217: Instax Printer Print
The Playback Menu instax PRINTER PRINT To print pictures to optional FUJIFILM instax SHARE printers, fi rst select D CONNECTION SETTING > instax PRINTER CONNECTION SETTING and enter the instax SHARE printer name (SSID) and password, then follow the steps below.
-
Page 218: Disp Aspect
The Playback Menu DISP ASPECT Choose how High Defi nition (HD) devices display pic- tures with an aspect ratio of 3∶2 (this option is avail- able only when an HDMI cable is connected). Select 16∶9 to display the image so that it fi lls the screen with its top and bottom cropped out, 3∶2 to display the entire image with black bands at either side.
-
Page 219: The Setup Menus
The Setup Menus…
-
Page 220: Duser Setting
USER SETTING Adjust basic camera settings. To access basic camera settings, USER SETTING FORMAT DATE/TIME press MENU/OK, select the D (SET TIME DIFFERENCE UP) tab, and choose USER SET- MY MENU SETTING SENSOR CLEANING TING. SOUND & FLASH RESET…
-
Page 221: Format
USER SETTING FORMAT To format a memory card: Select D USER SETTING > FORMAT in the D (SET UP) tab. FORMAT A confi rmation dialog will be FORMAT CARD IN SLOT 1, OK? ERASE ALL DATA displayed. To format the mem- ory card, highlight OK and press CANCEL MENU/OK.
-
Page 222: Date/Time
DATE/TIME To set the camera clock: Select D USER SETTING > DATE/TIME in the D (SET UP) tab. Press the selector left or right to highlight the year, month, day, hour, or minute and press up or down to change. To change the order in which the year, month, and day are displayed, high- light the date format and press the selector up or down.
-
Page 223: Time Difference
USER SETTING TIME DIFFERENCE Switch the camera clock instantly from your home time zone to the local time at your destination when traveling. To specify the diff erence between your lo- cal and home time zone: Highlight g LOCAL and press MENU/OK. Use the selector to choose the time diff erence between local time and your home time zone.
-
Page 224: My Menu Setting
Choose a language. MY MENU SETTING Edit the items listed in the E (MY MENU) tab, a per- sonalized custom menu of frequently-used options. Highlight D USER SETTING > MY MENU SETTING MY MENU SETTING in the D MY MENU SETTING RANK ITEMS REMOVE ITEMS (SET UP) tab and press MENU/OK…
-
Page 225
USER SETTING MY MENU SETTING Press the selector up or down IMAGE SIZE IMAGE QUALITY to highlight MY MENU SET- RAW RECORDING FILM SIMULATION GRAIN EFFECT TING and press MENU/OK. Op- DYNAMIC RANGE WHITE BALANCE HIGHLIGHT TONE tions that can be added to “my SELECT CANCEL menu”… -
Page 226: Sensor Cleaning
SENSOR CLEANING Remove dust from the camera image sensor. • OK: Clean the sensor immediately. • WHEN SWITCHED ON: Sensor cleaning will be performed when the camera is turned on. • WHEN SWITCHED OFF: Sensor cleaning will be per- formed when the camera turns off (sensor cleaning is not however performed if the camera turns off in playback mode).
-
Page 227: Reset
USER SETTING RESET Reset shooting or setup menu options to default values. Custom white balance, custom settings banks created using EDIT/SAVE CUSTOM SETTING, WIRELESS SETTINGS, and the setup menu DATE/ TIME and TIME DIFFERENCE options are not aff ected. Highlight the desired option and press the selec- tor right.
-
Page 228: Dsound Setting
SOUND SETTING Make changes to camera sounds. To access sound settings, press SOUND SETTING AF BEEP VOL. SELF-TIMER BEEP VOL. MENU/OK, select the D (SET UP) tab, OPERATION VOL. SHUTTER VOLUME and choose SOUND SETTING. SHUTTER SOUND PLAYBACK VOLUME AF BEEP VOL. Choose the volume of the beep that sounds when the camera focuses.
-
Page 229: Self-Timer Beep Vol
SOUND SETTING SELF-TIMER BEEP VOL. Choose the volume of the beep that sounds while the self-timer is active. The beep can be muted by selecting f. Options Options b (high) c (medium) d (low) f (mute) OPERATION VOL. Adjust the volume of the sounds produced when camera controls are operated.
-
Page 230: Shutter Volume
SHUTTER VOLUME Adjust the volume of the sounds produced by the electronic shutter. Choose f to disable the shut- ter sound. Options Options b (high) c (medium) d (low) f (mute) SHUTTER SOUND Choose the sound made by the electronic shutter. Options Options i SOUND 1…
-
Page 231: Playback Volume
SOUND SETTING PLAYBACK VOLUME Adjust the volume for movie playback. Choose from 10 options between 10 (high) and 1 (low) or select OFF to mute audio during movie playback. Options Options…
-
Page 232: Dscreen Setting
SCREEN SETTING Make changes to display settings. To access display settings, press SCREEN SETTING EVF BRIGHTNESS EVF COLOR MENU/OK, select the D (SET UP) tab, LCD BRIGHTNESS LCD COLOR and choose SCREEN SETTING. IMAGE DISP. EVF AUTOROTATE DISPLAYS PREVIEW EXP./WB IN MANUAL MODE PREVIEW PIC.
-
Page 233: Evf Color
SCREEN SETTING EVF COLOR Adjust the hue of the display in the electronic view- fi nder. Choose from 11 options between +5 and −5. Options Options −1 −2 −3 −4 −5 LCD BRIGHTNESS Adjust monitor brightness. Choose from 11 options between +5 and −5.
-
Page 234: Lcd Color
LCD COLOR Adjust monitor hue. Choose from 11 options be- tween +5 and −5. Options Options −1 −2 −3 −4 −5 IMAGE DISP. Choose how long images are displayed after shooting. Colors may diff er slightly from those in the fi nal image and “noise”…
-
Page 235: Evf Autorotate Displays
SCREEN SETTING EVF AUTOROTATE DISPLAYS Choose whether the indicators in the viewfi nder rotate to match camera orientation. Regardless of the option selected, the indicators in the monitor do not rotate. Options Options PREVIEW EXP./WB IN MANUAL MODE Select PREVIEW EXP./WB to enable exposure and white balance preview in manual exposure mode, or choose PREVIEW WB to preview only white bal- ance (PREVIEW WB is recommended in situations in…
-
Page 236: Preview Pic. Effect
PREVIEW PIC. EFFECT Choose ON to preview the eff ects of fi lm simulation, white balance, and other settings in the monitor, OFF to make shadows in low-contrast, back-lit scenes and other hard-to-see subjects more visible. Options Options If OFF is selected, the eff ects of camera settings will not be visible in the monitor and colors and tone will diff er from those in the fi nal picture.
-
Page 237: Framing Guideline
SCREEN SETTING FRAMING GUIDELINE Choose a framing grid for shooting mode. Option Option F GRID 9 G GRID 24 H HD FRAMING GRID 9 GRID 24 HD FRAMING For “rule of thirds” A six-by-four grid. Frame HD pictures in composition. the crop shown by the lines at the top and bottom of the display.
-
Page 238: Autorotate Pb
AUTOROTATE PB Choose ON to automatically rotate “tall” (portrait-ori- entation) pictures during playback. Options Options FOCUS SCALE UNITS Choose the units used for the focus distance indica- tor. Options Options METERS FEET…
-
Page 239: Disp. Custom Setting
SCREEN SETTING DISP. CUSTOM SETTING Choose the items shown in the standard display. In shooting mode, use the DISP/BACK button to display standard indicators. Press MENU/OK and select D SCREEN SETTING > DISP. CUSTOM SETTING in the D (SET UP) tab. Highlight items and press MENU/OK to select or deselect.
-
Page 240
SCREEN SETTING Press DISP/BACK to save changes. Press DISP/BACK as needed to exit the menus and return to the shooting display. -
Page 241: Dbutton/Dial Setting
BUTTON/DIAL SETTING Access options for camera controls. To access control options, press BUTTON/DIAL SETTING EDIT/SAVE QUICK MENU Fn/AE-L/AF-L BUTTON SETTING MENU/OK, select the D (SET UP) SELECTOR BUTTON SETTING COMMAND DIAL SETTING tab, and choose BUTTON/DIAL SHUTTER AF SHUTTER AE SETTING.
-
Page 242: Edit/Save Quick Menu
EDIT/SAVE QUICK MENU Choose the items displayed in the quick menu. Select D BUTTON/DIAL SETTING > EDIT/SAVE QUICK MENU in the D (SET UP) tab. The current quick menu will be displayed; use the selector to highlight the item you wish to change and press MENU/OK.
-
Page 243
BUTTON/DIAL SETTING Select NONE to assign no option to the select- ed position. When SELECT CUSTOM SETTING is selected, current settings are shown in the quick menu by the label BASE. Highlight the desired item and press MENU/OK to assign it to the selected position. The quick menu can also be accessed in shooting mode by holding the Q button. -
Page 244: Fn/Ae-L/Af-L Button Setting
Fn/AE-L/AF-L BUTTON SETTING Choose the roles played by the function buttons. Select D BUTTON/DIAL SETTING > Fn/AE-L/ AF-L BUTTON SETTING in the D (SET UP) tab. Highlight the desired control and press MENU/OK. Highlight any of the following options and press MENU/OK to assign it to the selected control.
-
Page 245
BUTTON/DIAL SETTING Function button assignment options can also be ac- cessed by holding the DISP/BACK button. The selector can not be assigned more than one role at a time. AF-ON If AF-ON is selected, you can press the control in- stead of keeping the shutter button pressed halfway. -
Page 246: Selector Button Setting
SELECTOR BUTTON SETTING Choose the roles played by the up, down, left, and right buttons on the selector. Option Option Description Description Fn BUTTON The selector buttons serve as function buttons. The selector buttons can be used to position the focus FOCUS AREA area.
-
Page 247: Shutter Af
BUTTON/DIAL SETTING SHUTTER AF Choose whether the camera focuses when the shut- ter button is pressed halfway. Option Option Description Description In focus mode S (AF-S), the camera focuses when the shutter button is pressed halfway and locks focus while the button remains in this position.
-
Page 248: Shoot Without Lens
SHOOT WITHOUT LENS Choose ON to enable the shutter release when no lens is attached. Options Options FOCUS RING Choose the direction in which the focus ring is rotat- ed to increase the focus distance. Options Options X CW (clockwise) Y CCW (counterclockwise)
-
Page 249: Ae/Af-Lock Mode
BUTTON/DIAL SETTING AE/AF-LOCK MODE If AE & AF ON WHEN PRESSING is selected, exposure and/or focus will lock while the AE-L or AF-L button is pressed. If AE & AF ON/OFF SWITCH is selected, exposure and/or focus will lock when the AE-L or AF-L button is pressed and remain locked until the button is pressed again.
-
Page 250: Touch Screen Setting
BUTTON/DIAL SETTING TOUCH SCREEN SETTING Enable or disable touch-screen controls. Options Options…
-
Page 251: Dpower Management
POWER MANAGEMENT Adjust power management settings. To access power management set- POWER MANAGEMENT tings, press MENU/OK, select the D AUTO POWER OFF (SET UP) tab, and choose POWER PERFORMANCE MANAGEMENT. AUTO POWER OFF Choose the length of time before the camera turns off automatically when no operations are performed.
-
Page 252: Performance
POWER MANAGEMENT PERFORMANCE Adjust power management settings. AF performance AF performance LCD/EVF display LCD/EVF display Battery Battery Option Option (speed) (speed) quality quality endurance endurance HIGH Fast Very high PERFORMANCE STANDARD Normal High Normal When STANDARD is selected, the frame rate will drop when no operations are being performed.
-
Page 253: Dsave Data Setting
SAVE DATA SETTING Make changes to fi le management settings. To access fi le management set- SAVE DATA SETTING FRAME NO. SAVE ORG IMAGE tings, press MENU/OK, select the D EDIT FILE NAME COPYRIGHT INFO (SET UP) tab, and choose SAVE DATA SETTING.
-
Page 254: Frame No
FRAME NO. Frame number New pictures are stored in image fi les named using a four-digit fi le number assigned by adding one Directory File to the last fi le number used. The number number fi le number is displayed during playback as shown.
-
Page 255: Save Org Image
SAVE DATA SETTING SAVE ORG IMAGE Choose ON to save unprocessed copies of pictures taken using RED EYE REMOVAL. Options Options EDIT FILE NAME Change the fi le name prefi x. sRGB images use a four-letter prefi x (default “DSCF”), Adobe RGB images a three-letter prefi x (“DSF”) preceded by an under- score.
-
Page 256: Copyright Info
SAVE DATA SETTING COPYRIGHT INFO Copyright information, in the form of Exif tags, can be added to new images as they taken. Changes to copyright information are refl ected only in images taken after the changes are made. Option Option Description Description DISP COPYRIGHT INFO View the current copyright information.
-
Page 257: Dconnection Setting
CONNECTION SETTING Adjust settings for connection to other devices. To access connection settings, press CONNECTION SETTING MENU/OK, select the D (SET UP) WIRELESS SETTINGS PC AUTO SAVE SETTING tab, and choose CONNECTION GEOTAGGING SET-UP PRINTER CONNECTION SETTING SETTING. WIRELESS SETTINGS Adjust settings for connection to wireless networks.
-
Page 258: Pc Auto Save Setting
Options Options SIMPLE SETUP MANUAL SETUP For more information on wireless connections, visit: http://fujifilm-dsc.com/wifi/ GEOTAGGING SET-UP View location data downloaded from a smartphone and choose whether to save the data with your pictures. Option Option Description…
-
Page 259: Instax Printer Connection Setting
CONNECTION SETTING instax PRINTER CONNECTION SETTING Adjust settings for connection to optional FUJIFILM instax SHARE printers. The Printer Name (SSID) and Password The printer name (SSID) can be found on the bottom of the printer; the default password is “1111”. If you have already…
-
Page 260
MEMO… -
Page 261: Shortcuts
Shortcuts…
-
Page 262: Shortcut Options
Shortcut Options Customize camera controls to suit your style or situation. Frequently-used options can be added to the Q menu or a custom “my” menu or assigned to an Fn (func- tion) button for direct access: • The Q menu ( 243): The Q menu is displayed by pressing the Q button.
-
Page 263: The Q (Quick Menu) Button
The Q (Quick Menu) Button Press Q for quick access to selected options. The Quick Menu Display At default settings, the quick menu contains the fol- lowing items: SELECT CUSTOM SETTING BASE SELECT CUSTOM SETTING SHADOW TONE COLOR DYNAMIC RANGE SHARPNESS WHITE BALANCE SELF-TIMER…
-
Page 264
The quick menu shows the options currently selected for items – , which can be changed as described on page 246. SELECT CUSTOM SETTING The H IMAGE QUALITY SETTING > SELECT CUSTOM SETTING item (item ) shows the current custom settings bank: •… -
Page 265: Viewing And Changing Settings
The Q (Quick Menu) Button Viewing and Changing Settings Press Q to display the quick menu during shooting. SELECT CUSTOM SETTING Use the selector to highlight BASE items and rotate the rear com- mand dial to change. Changes are not saved to the current settings bank.
-
Page 266: Editing The Quick Menu
Editing the Quick Menu To choose the items displayed in the quick menu: Press and hold the Q button during shooting. The current quick menu will be displayed; use the selector to highlight the item you wish to change and press MENU/OK.
-
Page 267
The Q (Quick Menu) Button Highlight any of the following options and press MENU/OK to assign it to the selected position. • • IMAGE SIZE MF ASSIST • • IMAGE QUALITY SELF-TIMER • • * FILM SIMULATION PHOTOMETRY • • * GRAIN EFFECT SHUTTER TYPE… -
Page 268: The Fn (Function) Buttons
The Fn (Function) Buttons The roles played by each of the function but- tons can be selected by pressing and holding the button. The default assignments are: Fn1 button Fn1 button Fn2 button Fn2 button AF mode Drive settings Fn3 button Fn3 button Fn4 button Fn4 button…
-
Page 269
The Fn (Function) Buttons AF-L button AF-L button Center of rear command dial Center of rear command dial Focus lock Focus check… -
Page 270: Assigning Roles To The Function Buttons
Assigning Roles to the Function Buttons To assign roles to the buttons: Press and hold the DISP/BACK button until a button selection menu is displayed. Highlight a button and press MENU/OK. Highlight the desired role and press MENU/OK to assign it to the selected button. Choose from: •…
-
Page 271
The Fn (Function) Buttons Button assignments can also be selected using D BUTTON/DIAL SETTING > Fn/AE-L/AF-L BUTTON SETTING. The selector can not be assigned more than one role at a time. AF-ON If AF-ON is selected, you can press the control in- stead of keeping the shutter button pressed halfway. -
Page 272: Emy Menu
MY MENU Access a personalized menu of frequently-used options. MY MENU To display “my menu”, press MENU/OK SELF-TIMER INTERVAL TIMER SHOOTING in the shooting display and select FILM SIMULATION GRAIN EFFECT SHUTTER TYPE the E (MY MENU) tab. IS MODE FACE/EYE DETECTION SETTING EXIT The E tab is only available if options have been assigned…
-
Page 273
MY MENU MY MENU SETTING Highlight an item and press 1 IMAGE SIZE MENU/OK to add it to “my menu”. MOVE SAVE Press MENU/OK to return to the edit display. Repeat Steps 3 and 4 until all the desired items have been added. “My menu”… -
Page 274
MEMO… -
Page 275: Peripherals And Optional Accessories
Peripherals and Optional Accessories…
-
Page 276: External Flash Units
External Flash Units Flash units can be mounted on the hot shoe or connected via the sync terminal. External fl ash units are more powerful than their built-in counterparts. Some support high-speed sync (FP) and can be used at shutter speeds faster than the sync speed, while others can function as master fl ash units controlling remote units via optical wireless fl ash control.
-
Page 277: Flash Settings
FLASH Displayed if an optional fl ash unit functioning as MASTER a master fl ash for FUJIFILM optical wireless re- (OPTICAL) mote fl ash control is connected and turned on. SYNC TERMINAL is displayed if the built-in fl ash is lowered and either no fl ash unit, or an incompatible fl ash unit, is mounted on the hot shoe.
-
Page 278
Highlight items using the se- MODE Built-In Flash lector and rotate the rear com- mand dial to change the high- lighted setting. ADJUST Press DISP/BACK to put the changes into eff ect. Red-Eye Removal Red-eye removal is available when an option other than OFF is selected for F FLASH SETTING >… -
Page 279: Sync Terminal
External Flash Units SYNC TERMINAL SYNC TERMINAL is displayed MODE SYNC TERMINAL if the built-in fl ash is lowered and either no fl ash unit, or an incompatible fl ash unit, is mounted on the hot shoe. ADJUST Setting Setting Description Description Choose from the following options:…
-
Page 280: Built-In Flash
BUILT-IN FLASH The following options are MODE Built-In Flash available with the built-in fl ash. ADJUST Setting Setting Description Description Choose from the following options: • TTL: TTL mode. Adjust fl ash compensation ( and choose a fl ash mode ( •…
-
Page 281
External Flash Units Setting Setting Description Description Choose a fl ash mode for TTL fl ash control. The op- tions available vary with the shooting mode (P, S, A, or M) selected. • E (FLASH AUTO): The fl ash fi res only as required; fl… -
Page 282: Shoe Mount Flash
SHOE MOUNT FLASH The following options are avail- MODE SHOE MOUNT FLASH able with optional shoe-mount- ed fl ash units. ADJUST Setting Setting Description Description The fl ash control mode selected with the fl ash unit. This can in some cases be adjusted from the camera;…
-
Page 283
External Flash Units Setting Setting Description Description The options available vary with fl ash control mode. • TTL: Adjust fl ash compensation (the full value may not be applied if the limits of the fl ash con- trol system are exceeded). In the cases of the EF-X20, EF-20, and EF-42, the selected value is added to the value selected with the fl… -
Page 284
Setting Setting Description Description Choose a fl ash mode for TTL fl ash control. The op- tions available vary with the shooting mode (P, S, A, or M) selected. • E (FLASH AUTO): The fl ash fi res only as required; fl… -
Page 285
External Flash Units Setting Setting Description Description The angle of illumination (fl ash coverage) for units that support fl ash zoom. Some units allow the ad- Zoom justment to be made from the camera. If AUTO is selected, zoom will automatically be adjusted to match coverage to lens focal length. -
Page 286: Master(Optical)
The options at right will be MODE MASTER(OPTICAL) displayed if the unit is cur- rently functioning as master fl ash for FUJIFILM optical wireless remote fl ash control. ADJUST The master and remote units can be placed in up to three…
-
Page 287
External Flash Units Setting Setting Description Description Choose fl ash control modes for groups A, B, and C. TTL% is available for groups A and B only. Flash control • TTL: The units in the group fi re in TTL mode. Flash mode compensation can be adjusted separately for (group A) -
Page 288
Setting Setting Description Description Flash compen- Adjust fl ash level for the selected group according sation/output to option selected for fl ash control mode. Note (group A) that the full value may not be applied if the limits Flash compen- of the fl… -
Page 289
External Flash Units Setting Setting Description Description Control fl ash timing. • H (1ST CURTAIN): The fl ash fi res immediately after the shutter opens (generally the best choice). • I (2ND CURTAIN): The fl ash fi res immediately be- fore the shutter closes. •… -
Page 290
Master fi nal picture. Available only if the unit is mount- ed on the camera hot shoe as a master fl ash for FUJIFILM optical wireless remote fl ash control in TTL, TTL%, or M mode. Number of Choose the number of times the fl ash fi res each fl ashes time the shutter is released in MULTI mode. -
Page 291: Lenses
Lenses The camera can be used with lenses for the FUJIFILM X-mount. Lens Parts Lens hood O.I.S. switch Mounting marks Aperture mode switch Focus ring Lens signal contacts Zoom ring Front lens cap Aperture ring Rear lens cap…
-
Page 292: Removing Lens Caps
Removing Lens Caps Remove lens caps as shown. Lens caps may diff er from those shown. Attaching Lens Hoods When attached, lens hoods reduce glare and protect the front lens el- ement.
-
Page 293: Lenses With Aperture Rings
Lenses Lenses with Aperture Rings At settings other than A, you can adjust aperture by rotating the lens A 16 11 8 5.6 4 2.8 aperture ring (exposure modes A and M). A 16 11 8 5.6 4 Aperture ring When the aperture ring is set to A, rotate the front command dial to adjust aperture.
-
Page 294: Lenses With No Aperture Rings
Lenses with No Aperture Rings The method used to adjust aperture can be selected using D BUTTON/ DIAL SETTING > APERTURE SETTING. When an option other than AUTO is selected, aperture can be adjusted using the front command dial. Aperture control defaults to the front command dial, but can be reassigned to the rear command dial using D BUTTON/DIAL SETTING >…
-
Page 295: Manual Focus Lenses
Lenses Manual Focus Lenses Slide the focus ring to the front for autofocus. For manual focus, slide the focus ring to the back and rotate it while checking the results in the camera display. The focus distance and depth-of-fi eld indicators can be used to assist manual focus.
-
Page 296: Lens Care
Use a blower to remove dust, then gently wipe with a soft, dry cloth. Any remaining stains can be removed by wiping gently with a piece of FUJIFILM lens-clean- ing paper to which a small amount of lens-cleaning fl uid has been applied. Replace the front and rear…
-
Page 297: Connections
Connections…
-
Page 298: Hdmi Output
HDMI Output Camera shooting and playback displays can be output to HDMI devices. Connecting to HDMI Devices Connect the camera to TVs or other HDMI devices us- ing a third-party HDMI cable. Turn the camera off . Connect the cable as shown below, making sure the connectors are fully inserted.
-
Page 299: Shooting
HDMI Output Turn the camera on. You can now shoot and play back pictures while viewing the television dis- play and save pictures to the HDMI device. The USB cable can not be used while an HDMI cable is connected. Shooting Shoot photos and record movies while viewing the scene through the camera lens on or saving footage…
-
Page 300: Wireless Transfer
For downloads and other information, visit: http://fujifilm-dsc.com/wifi/ fujifilm Wi-Fi app Wireless Connections: Smartphones Install the “FUJIFILM Camera Remote” app on your smartphone to browse the images on the camera, download selected images, control the camera re- motely, or copy location data to the camera. Once the app is installed, connect using the A SHOOTING SETTING >…
-
Page 301: Wireless Connections: Computers
Wireless Transfer Wireless Connections: Computers Once you have installed the “FUJIFILM PC AutoSave” application and confi gured your computer as a des- tination for the images copied from the camera, you can upload pictures from the camera using C PLAY…
-
Page 302: Connecting To Computers Via Usb
MyFinePix Studio is available for down- load from the following website: http://fujifilm-dsc.com/mfs/ fujifilm mfs Once download is complete, double-click the down- loaded fi le (“MFPS_Setup.EXE”) and follow the on- screen instructions to complete installation.
-
Page 303: Mac Os X/Macos
To view RAW fi les on your computer, use RAW FILE CONVERTER EX 2.0, available for download from: http://fujifilm-dsc.com/rfc/ fujifilm rfc Connecting the Camera Find a memory card containing pictures you want to copy to the computer and insert the card into the camera.
-
Page 304
Ready a third-party USB 2.0 cable with a Micro USB (Micro-B) connector. Turn the camera off and connect the cable, making sure the connectors are fully inserted. Turn the camera on. Copy pictures to the computer using MyFinePix Studio or applications provided with your oper- ating system. -
Page 305
Connecting to Computers via USB If a memory card containing a large number of images is inserted, there may be a delay before the software starts and you may be unable to import or save images. Use a memory card reader to transfer pictures. The USB cable must be no more than 1.5 m (4.9 ft.) long and be suitable for data transfer. -
Page 306: Instax Share Printers
instax SHARE Printers Print pictures from your digital camera to instax SHARE printers. Establishing a Connection Select D CONNECTION SETTING > instax PRINTER CONNECTION SETTING and enter the instax SHARE printer name (SSID) and password. The Printer Name (SSID) and Password The printer name (SSID) can be found on the bottom of the printer;…
-
Page 307: Printing Pictures
PRINTER PRINT instax-12345678 instax PRINTER PRINT. The CONNECTING TO PRINTER camera will connect to the FUJIFILM-CAMERA-1234 printer. CANCEL To print a frame from a burst sequence, display the frame before selecting instax PRINTER PRINT. Use the selector to display the…
-
Page 308
MEMO… -
Page 309: Technical Notes
Technical Notes…
-
Page 310: Accessories From Fujifilm
Accessories from FUJIFILM The following optional accessories are avail- able from FUJIFILM. For the latest information on the accessories available in your region, check with your local FUJIFILM representa- tive or visit http://www.fujifilm.com/products/ digital_cameras/index.html. Rechargeable Li-ion batteries Rechargeable Li-ion batteries…
-
Page 311
TTL fl ash control and auto power zoom in the range 24–105 mm (35 mm format equivalent) and features FUJIFILM optical wireless fl ash control, allowing it to be used as a master or remote fl ash unit for remote wireless fl ash photography. The fl ash head can be rotated 90°… -
Page 312
Shoe-mounted fl ash units (continued) Shoe-mounted fl ash units (continued) EF-42: This clip-on fl ash unit (powered by four AA bat- teries) has a Guide Number of 42/137 (ISO 100, m/ft.) and supports manual and TTL fl ash control and auto power zoom in the range 24–105 mm (35 mm format equivalent). -
Page 313
XF2X TC WR: Increases the focal length of the compatible lenses by about 2.0×. Mount adapters Mount adapters FUJIFILM M MOUNT ADAPTER: Allows the camera to be used with a wide selection of M-mount lenses. Body caps Body caps BCP-001: Cover the camera lens mount when no lens is attached. -
Page 314: For Your Safety
For Your Safety IMPORTANT SAFETY INSTRUCTIONS • Read Instructions: All the safety and operating in- Ventilation: Slots and openings in the cabinet are Read Instructions structions should be read before the appliance provided for ventilation, to ensure reliable opera- is operated. tion of the video product and to protect it from •…
-
Page 315
For Your Safety An appliance and cart combination should be Cleaning: Unplug this video product from the wall moved with care. Quick outlet before cleaning. Do not use liquid cleaners stops, excessive force, and or aerosol cleaners. Use a damp cloth for cleaning. uneven surfaces may cause Object and Liquid Entry: Never push objects of any the appliance and cart… -
Page 316
The icons shown below are used to indicate the na- use of the camera can cause a fi re or elec- ture of the instructions which are to be observed. tric shock. Contact your FUJIFILM dealer. Triangular icons tell you that this informa- tion requires attention (“Important”). -
Page 317
fi re or electric shock. If the cord is dam- type supplied with the camera. Using the aged, contact your FUJIFILM dealer. charger to charge conventional batteries or Do not place the camera on an unstable sur-… -
Page 318
Follow the directions of airline and hospital camera can cause a fi re or electric shock. personnel. This product generates radio-fre- personnel. Contact your FUJIFILM dealer to request quency emissions that could interfere with internal cleaning every two years. Please navigational or medical equipment. -
Page 319
For Your Safety The Battery and Power Supply Note: Check the type of battery used in your camera Battery Life Battery Life ■ ■ and read the appropriate sections. At normal temperatures, the battery can be re- charged about 300 times. A noticeable decrease The following describes the proper use of batter- in the length of time the battery will hold a ies and how to prolong their life. -
Page 320
Do not use with other devices. AC Power Adapters (Available Separately) AC Power Adapters (Available Separately) • Use only FUJIFILM AC power adapters designated Do not disassemble. • for use with this camera. Other adapters could Do not expose to high heat and humidity. -
Page 321
Color Television Systems Color Television Systems Digital Split Image is a trademark or registered NTSC (National Television System Committee) is trademark of FUJIFILM Corporation. xD-Picture a color television telecasting specifi cation adopt- Card and are trademarks of FUJIFILM Cor- ed mainly in the U.S.A., Canada, and Japan. PAL poration. -
Page 322
FCC Caution: Any changes or modifi cations not For Customers in the U. S. A. For Customers in the U. S. A. Tested To Comply With FCC Standards expressly approved by the party responsible for FOR HOME OR OFFICE USE compliance could void the user’s authority to operate this equipment. -
Page 323
In Japan: This symbol on the batteries eff ects might occur, but such fi ndings have not indicates that they are to be disposed been confi rmed by additional research. X-T20 has of separately. been tested and found to comply with IC radia-… -
Page 324
Be sure to read these notes before use WARNING WARNING Safety Notes Should the case break open as the result of a Should the case break open as the result of a • Make sure that you use the lens correctly. Read fall or other accident, do not touch the exposed fall or other accident, do not touch the exposed these safety notes and the camera Owner’… -
Page 325
United States embargoes goods. • Use only as part of a wireless network. . FUJIFILM Use only as part of a wireless network does not accept liability for damages resulting from unauthorized use. Do not use in applica-… -
Page 326
RFID tracking, immediately stop using the aff ected frequency or move the device to another location. If you notice that this device causes interference in low-voltage RFID tracing systems, contact a FUJIFILM representative. This sticker indicates that this device operates in the 2.4 GHz band using 2.4DS/OF4… -
Page 327: Product Care
Any remaining stains can be removed by wiping gently with a piece of FUJIFILM lens-cleaning paper to which a small amount of lens-cleaning fl uid has been applied. To prevent dust entering the camera, replace the body cap when no lens is in place.
-
Page 328: Cleaning The Image Sensor
Cleaning the Image Sensor Dust that can not be removed using D USER SETTING > SENSOR CLEANING can be re- moved manually as described below. Note that there will be a charge to repair or replace the image sensor if it is damaged during cleaning. Use a blower (not a brush) to remove dust from the sensor.
-
Page 329: Firmware Updates
For more information, visit: http://www.fujifilm.com/support/digital_cameras/ software fujifilm firmware Checking the Firmware Version The camera will only display the fi rmware version if a memory card is inserted. Turn the camera off and check that a memory card is inserted.
-
Page 330: Troubleshooting
Troubleshooting Consult the table below should you encounter problems using your camera. If you don’t fi nd the solution here, contact your local FUJIFILM distributor. Power and Battery Problem Problem Solution Solution • The battery is exhausted: Charge the battery or insert a fully-charged spare battery ( 32).
-
Page 331
The battery has been charged many times: The battery the battery does has reached the end of its charging life. Purchase not charge. a new battery. If the battery still fails to charge, contact your FUJIFILM dealer ( 290). Menus and Displays Problem Problem… -
Page 332
Problem Problem Solution Solution • The memory card is damaged: Insert a new memory card ( 36). • The battery is exhausted: Charge the battery or insert No picture is a fully-charged spare battery ( 32). • taken when the The camera has turned off automatically: Turn the shutter button camera on (… -
Page 333
Troubleshooting Problem Problem Solution Solution • The subject’s face is obscured by sunglasses, a hat, long hair, or other objects: Remove the obstructions 138). • The subject’s face occupies only a small area of the frame: No face is Change the composition so that the subject’s face detected. -
Page 334
Problem Problem Solution Solution • The subject is not in range of the fl ash: Position the subject in range of the fl ash. The fl ash does • The fl ash window is obstructed: Hold the camera not fully light correctly. -
Page 335
Troubleshooting Playback Problem Problem Solution Solution Pictures are The pictures were taken with a diff erent make or grainy. model of camera. Playback zoom is The pictures were created using RESIZE or with a unavailable. diff erent make or model of camera. •… -
Page 336
Connections Problem Problem Solution Solution The camera is connected to a TV: Pictures will be dis- The monitor is played on the TV instead of in the camera monitor blank. 278). • The camera is not properly connected: Connect the camera properly ( 278). -
Page 337
Troubleshooting Wireless Transfer For additional information on troubleshooting wire- less connections, visit: http://digital-cameras.support. fujifilm.com/app?pid=x Problem Problem Solution Solution • Problem The smartphone is too far away: Move the devices connecting closer ( 280). • or uploading Nearby devices are causing radio interference: Move… -
Page 338
The camera is connected to a wireless LAN: End the connection. The camera does Remove and reinsert the battery ( 36). If the not function as problem persists, contact your FUJIFILM dealer. expected. • Adjust the volume ( 208). •… -
Page 339: Warning Messages And Displays
LENS CONTROL Camera malfunction. Turn the camera off and ERROR then on again. If the message persists, contact a TURN OFF THE FUJIFILM dealer. CAMERA AND TURN ON AGAIN The shutter can only be released when a memory NO CARD card is inserted.
-
Page 340
Delete pictures or insert a memory card b MEMORY FULL with more free space. • Memory card error or connection error: Reinsert the card or turn the camera off and then on again. If WRITE ERROR the message persists, contact a FUJIFILM dealer. -
Page 341
READ ERROR repeated, format the card. If the message persists, replace the card. • Camera malfunction: Contact a FUJIFILM dealer. An attempt was made to delete or rotate to a pro- PROTECTED FRAME tected picture. Remove protection and try again. -
Page 342
Warning Messages and Displays Warning Warning Description Description CAN NOT Movies can not be rotated. ROTATE CAN NOT SET DPOF The picture can not be printed using DPOF. CAN NOT SET Movies can not be printed using DPOF. DPOF CANNOT Red-eye removal can not be applied to movies. -
Page 343: Memory Card Capacity
Memory Card Capacity The following table shows the recording time or number of pictures available at diff erent image sizes. All fi gures are approximate; fi le size varies with the scene recorded, producing wide variations in the number of fi les that can be stored.
-
Page 344: Specifi Cations
Specifi cations System Model FUJIFILM X-T20 Product Number FF160006 Eff ective pixels Approx. 24.3 million Image sensor 23.5 mm × 15.6 mm (APS-C), X-Trans CMOS III sensor with primary color fi lter Storage media FUJIFILM-recommended SD/SDHC/SDXC memory cards Memory card slot SD memory card slot…
-
Page 345
Specifi cations System • Sensitivity Still pictures: Standard output sensitivity equiv- alent to ISO 200 – 12800 in increments of ⁄ EV; AUTO; extended output sensitivity equivalent to ISO 100, 25600, or 51200 • Movies: Standard output sensitivity equivalent to ISO 200 – 12800 in increments of ⁄ EV Metering 256-segment through-the-lens (TTL) metering;… -
Page 346
System Continuous Frame rate Frame rate Frames per burst Frames per burst 14 fps 14 fps Up to approximately 42 CH CH 11 fps 11 fps Up to approximately 50 Up to approximately 53 8.0 fps 8.0 fps Up to approximately 56 5.0 fps 5.0 fps CL CL Up to approximately 58 4.0 fps 4.0 fps… -
Page 347
Specifi cations System • Flash mode MODE: TTL MODE (FLASH AUTO, STANDARD, SLOW SYNC.), MANUAL, COMMANDER, SUPPRESSED FLASH • SYNC. MODE: 1ST CURTAIN, 2ND CURTAIN • RED EYE REMOVAL: e FLASH+REMOVAL, L FLASH, d REMOVAL, OFF Hot shoe Accessory shoe with TTL contacts Sync contact X contact;… -
Page 348
Input/output terminals Digital input/output USB 2.0 High-Speed Micro USB connector (Micro-B) HDMI output HDMI Micro connector (Type D) ⌀2.5 mm 3-pole mini jack Microphone/remote release connector Power supply/other Power supply NP-W126S rechargeable battery (supplied with camera) Camera size 118.4 mm × 82.8 mm × 41.4 mm (31.9 mm (W ×… -
Page 349
Specifi cations Power supply/other • Battery life Battery type: NP-W126S • Photographs: The number of frames varies with the option selected for PERFORMANCE: PERFORMANCE PERFORMANCE HIGH PERFORMANCE Approx. 260 Approx. 260 STANDARD Approx. 350 Approx. 350 • Movies: The length of footage that can be re- corded varies with the movie mode: Continuance Continuance… -
Page 350
Wireless transmitter Standards IEEE 802.11b/g/n (standard wireless protocol) • Operating frequency U. S. A., Canada, Taiwan: 2,412 MHz–2,462 MHz (11 channels) • Other countries: 2,412 MHz–2,472 MHz (13 channels) Access protocols Infrastructure NP-W126S rechargeable battery Nominal voltage 7.2 V Nominal capacity 1260 mAh Operating 0 °C to +40 °C/… -
Page 351
Labels, menus, and other displays may diff er from those on the actual camera. Specifi cations and performance are subject to change without notice. FUJIFILM will not be held liable for any errors this manual may contain. The appearance of the product may diff er from that described in this manual. -
Page 352
MEMO… -
Page 353
MEMO… -
Page 354
MEMO… -
Page 355
MEMO…
This manual is also suitable for:
X-t20
Перед вами файл pdf, где представлена инструкция (руководство) на русском для FUJIFILM X-T20 Body. Вы можете скачать ее либо изучить в онлайн режиме.
Подробные сведения об инструкции:
Устройство из раздела: цифровой фотоаппарат
Бренд-производитель: FUJIFILM
Наименование модели: FUJIFILM X-T20 Body
Язык: Руководство на русском языке
Файл: pdf
Размер файла: 4,89 MB

Скачать инструкцию к HARPER HDT2-1110
ЗАГРУЗИТЬ
Просмотр инструкции онлайн