OVERVIEW
Introduction
Thank you for purchasing this Third Generation Scarlett Solo, one of the family of Focusrite professional computer audio interfaces incorporating high quality Focusrite analogue preamps. You now have a simple and compact solution for routing high quality audio to and from your computer and you will also be able to download some exciting new software plug-ins once you’ve registered the product.
In developing the Third Generation series of Scarlett interfaces, we have made further improvements to both performance and features to allow you to get the best out of your recordings. Audio specifications have been upgraded throughout the unit to give you greater dynamic range and even lower noise and distortion; additionally, the mic preamp now accepts higher input levels. An important enhancement is the inclusion of Focusrite’s AIR function. Individually selectable on each channel, AIR subtly modifies the preamp’s frequency response to model the sonic characteristics of our classic transformer-based ISA microphone preamps. When recording with good quality microphones, you will notice an enhanced clarity and definition in the important mid to high frequency range, just where it is most needed for vocals and many acoustic instruments.
You can also plug a guitar or bass straight into the dedicated instrument input: its high headroom will let you record without distortion or clipping. Both of Solo’s inputs have Gain Halo meters, which makes it easy to set input levels. Solo now has balanced outputs, which means when you connect them to monitors or an amplifier with balanced inputs, your audio will be protected from any hum or interference.
Third Generation Scarlett interfaces are class compliant on macOS: this means they are plug-andplay, so no need to install a driver if you are a Mac user.
This User Guide provides a detailed explanation of the hardware to help you achieve a thorough understanding of the product’s operational features. We recommend that both users who are new to computer-based recording, as well as more experienced users, take the time to read through the User Guide so that you are fully aware of all the possibilities that the Scarlett Solo and accompanying software have to offer. If the main User Guide sections do not provide the information you need, be sure to consult https://support.focusrite.com/, which contains a comprehensive collection of common technical support queries.
Features
The Scarlett Solo hardware interface provides the means for connecting a microphone and an instrument or line level audio signal to a computer running Mac OS or Windows. The signals at the physical inputs can be routed to your audio recording software / digital audio workstation (referred to throughout this user guide as the «DAW») at up to 24-bit, 192 kHz resolution; similarly, the DAW’s monitor or recorded output will appear at the unit’s physical outputs.
This lets you record «real-world» instruments into Ableton Live Lite, ProTools | First (or whichever other DAW you may use) along with – or instead of – any «native» sounds already available within your computer. The physical outputs can be connected to an amplifier and speakers, powered monitors, headphones or any other audio equipment with analogue inputs that you wish to use. Solo’s Direct Monitoring feature lets you hear what you are playing in «real-time», without the effects of computer latency.
Box Contents
Along with your Scarlett Solo you should have:
• USB cable, Type ‘A’ to Type ‘C’
• Getting Started Information (printed on inside of box lid)
• Important Safety Information
System Requirements
The easiest way to check that your computer’s operating system (OS) is compatible with the Scarlett Solo is to use our online OS Checker at https://customer.focusrite.com/downloads/os. As new OS versions become available over time, you can continue to check for further compatibility information by searching our Help Centre at https://support.focusrite.com/hc/en-gb.
GETTING STARTED
With the Third Generation, Scarlett interfaces introduce a new, faster way of getting up and running, using the Scarlett Quick Start tool. All you need to do is connect your Scarlett Solo to your computer. Once connected, you will see that the device is recognised by your PC or Mac and the Quick Start tool will guide you through the process from there.
IMPORTANT: The Scarlett Solo has a single USB 2.0 Type C port (on the rear panel): connect it to your computer using the USB cable provided. Note that Scarlett Solo is a USB 2.0 device, and thus the USB connection requires a USB 2.0+ compliant port on your computer.
Scarlett Solo gets its power from your computer via the USB connection: there is no need for a separate power supply. However, we do recommend that when using it with a laptop, the laptop should be powered using its AC adaptor, as otherwise the battery will run down faster than when powering the laptop alone.
Your computer will initially treat your Scarlett as a Mass Storage Device (MSD), and during its fi rst connection, the Scarlett will be in «MSD Mode».
Quick Start Tool
We have tried to make registering your Scarlett Solo as simple as possible. The procedure is designed to be self explanatory, but we have described each step below, so you can see how they should appear on either a PC or a Mac.
Mac users only
On connecting your Scarlett Solo to your Mac, a Scarlett icon will appear on the desktop:
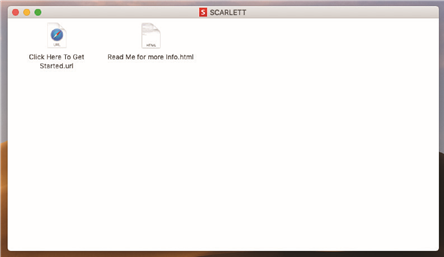
Double-click on the icon to open the Finder window shown below:
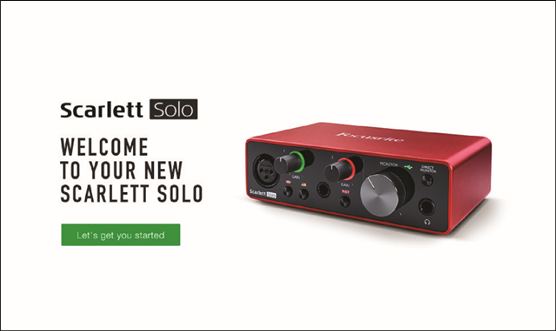
Double-click on the «Click Here to Get Started.url» icon. This will redirect you to the Focusrite website, where we recommend that you register your device:
Click on «Let’s get you started», and you’ll be presented with a form which will be partly prefi lled for you automatically. On submitting the form, options will be presented to either go straight to the downloads to get the software for your Scarlett, or to follow a step by step setup guide based on your choices. Once you have installed the Focusrite Control software to set up and confi gure your interface, the Scarlett will be switched out of MSD mode so that it no longer appears as a Mass Storage Device when connected to your computer.
Your OS should automatically switch the computer’s default audio inputs and outputs to the Scarlett Solo. To verify this, go to System Preferences > Sound, and ensure that the input and output are set to Scarlett Solo. For more detailed setup options on a Mac, open Applications > Utilities > Audio MIDI Setup..
Windows users only
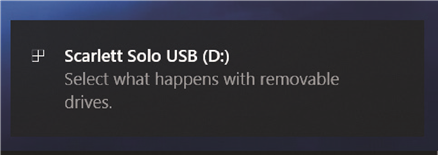
On connecting your Scarlett Solo to your PC, a Scarlett icon will appear on the desktop:
(Note that the drive letter may be something other than D:, depending on what other devices you have connected to your PC.)
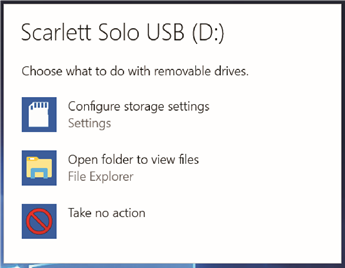
Double-click on the pop-up message to open the dialogue box shown below:
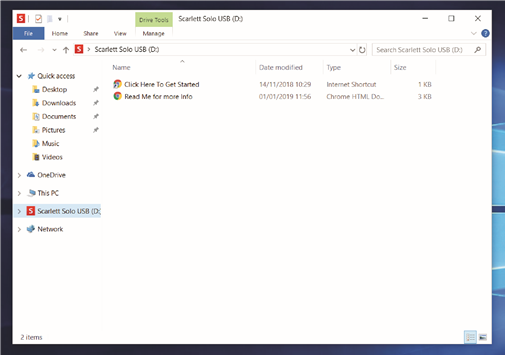
Double-click on «Open folder to view fi les»: this will open an Explorer window:
Double-click «Click Here to Get Started». This will redirect you to the Focusrite website, where we recommend that you register your device:
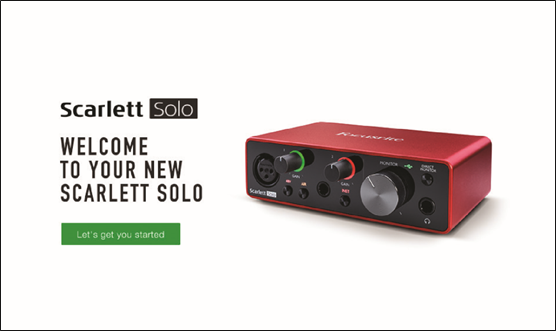
TClick on «Let’s get you started», and you’ll be presented with a form which will be partly prefilled for you automatically. On submitting the form, options will be presented to either go straight to the downloads to get the software for your Scarlett, or to follow a step-by-step setup guide based on your choices. Once you have installed the Focusrite Control software to set up and configure your interface, the Scarlett will be switched out of MSD mode so that it no longer appears as a Mass Storage Device when connected to your computer.
Your OS should automatically switch the computer’s default audio inputs and outputs to be the Scarlett Solo. To verify this, right click on the Sound icon on the taskbar and select Sound Settings, and set the Scarlett as the Input and Output Device.
All users
Note that a second file — «More Info & FAQs» — is also available during the initial set-up process. This file contains some additional information about the Focusrite Quick Start tool which you may find helpful if you have any issues with the procedure.
Once registered, you will have immediate access to the following resources:
• Focusrite Control (Mac and Windows versions available) — see NOTE below
• Multi-language User Guides
Licence codes and links will be provided for the following bundled software within your account page.
- Pro Tools | First
- Ableton Live Lite
- Focusrite Red 2 & 3 Plug-in Suite
- Softube Time and Tone bundle
- XLN Addictive Keys
- Plug-in Collective Offers
NOTE: Installing Focusrite Control will also automatically install the correct driver for your device. Focusrite Control is available to download at any time, even without registering: see «Manual Registration» below.
Manual Registration
If you decide to register your Scarlet Solo at a later date you can do so at https://customer.focusrite.com/user/register. You will need to enter the Serial Number manually: this number can be found on the base of the interface itself, and can also on the barcode label on the side of the box.
We recommend that you download and install our Focusrite Control application, as this will disable MSD mode and unlock the full potential of the interface. Initially, when in MSD mode, the interface will function at sample rates up to 48 kHz. Once Focusrite Control is installed on your computer, you can work at sample rates up to 192 kHz. If you decide not to download and install Focusrite Control immediately, it can be downloaded at any time from https://customer.focusrite.com/support/downloads.
In order to force your Scarlett Solo out of MSD mode without first registering it, connect it to your host computer and press and hold the 48V button for five seconds. This will ensure that your Scarlett Solo has full functionality. Please bear in mind that should you wish to register your Scarlett Solo after taking this action, you will need to so manually, as explained above.
Audio Setup in your DAW
The Scarlett Solo is compatible with any Windows-based DAW that supports ASIO or WDM or any Mac-based DAW that uses Core Audio. After following the Getting Started procedure described above, you can start using your Scarlett Solo with the DAW of your choice. To allow you to get started if you do not already have a DAW application installed on your computer, both ProTools | First and Ableton Live Lite are included; these will be available to you once you’ve registered your Scarlett Solo. If you need help installing either DAW, please visit our Getting Started pages at
https://focusrite.com/get-started
, where Getting Started videos are available.
Operating instructions for ProTools | First and Ableton Live Lite are beyond the scope of this User Guide, but both applications include a full set of Help fi les. Instructions are also available at
www.avid.com
and
www.ableton.com
respectively.
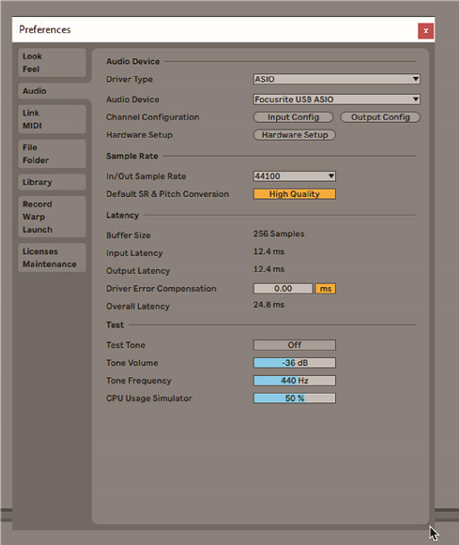
Please note — your DAW may not automatically select the Scarlett Solo as its default I/O device. In this case, you must manually select Focusrite USB ASIO as the driver on your DAW’s Audio Setup* page. Please refer to your DAW’s documentation (or Help fi les) if you are unsure where to select the ASIO or Core Audio driver. The example below shows the correct confi guration in the Ableton Live Lite Preferences panel (Windows version shown).
*Typical name. Terminology may differ slightly between DAWs.
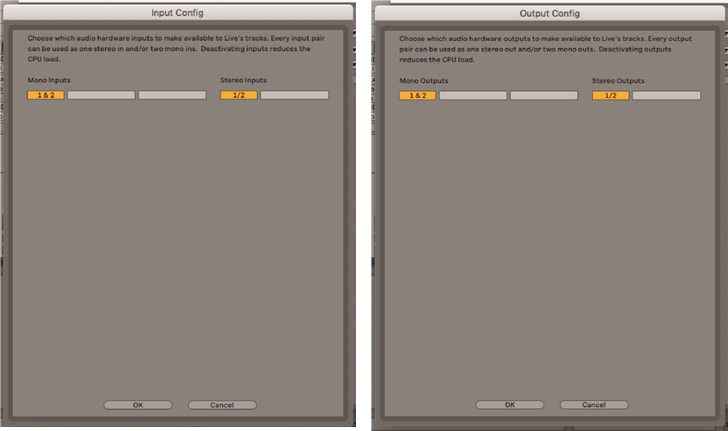
Once the Scarlett Solo is set as the preferred Audio Device* in your DAW, its inputs and outputs will appear in your DAW’s Audio I/O preferences. Depending on your DAW, you may need to enable certain inputs or outputs before use. The two examples below show two Inputs and two outputs enabled in the Ableton Lite Audio Preferences.
*Typical name. Terminology may differ slightly between DAWs.
Examples of use
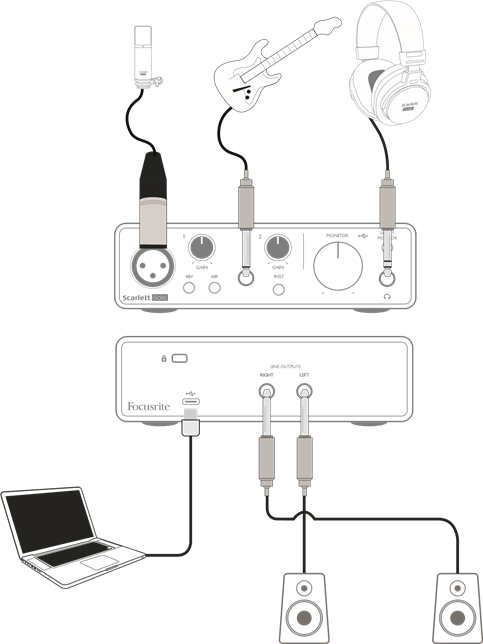
Scarlett Solo is an ideal audio interface for many DAW applications running on a laptop or other computer, PC or Mac. A typical set of connections is illustrated below.
Connecting a microphone/instrument
This setup illustrates a typical configuration for recording using DAW software on your Mac or PC. In this case, you would record vocals through Input 1 and guitar through Input 2 into your recording application, while monitoring the playback via headphones.
Scarlett Solo’s inputs are on the front panel: Input 1 uses a standard 3-pin XLR socket, and is configured to work with microphones of most types; you will probably have a male XLR connector on the end of your mic cable.
If you are using a «studio» condenser (capacitor) microphone designed to operate on 48 volt phantom power, press the 48V button. Some lower spec. condenser microphones are able to operate from a lower phantom power voltage – typically 15 V. You should check the mic spec to see if it is safe to operate it from 48 V; if not, obtain a suitable external phantom power supply. Most modern microphones of other types, e.g., dynamic or ribbon, will not be damaged by the inadvertent application of phantom power, but note that some older mics may be; if you have any doubt, please check the specification of your mic to ensure that it is safe to use.
Input 2 uses a ¼» (6.35 mm) jack socket which is 2-pole when in instrument mode and 3-pole when used as a mono line input. It can accept signals from an electric or electroacoustic guitar or bass, a keyboard, and most other types of audio equipment. Set the INST switch ON (‘INST’ illuminates red) if you are connecting a musical instrument, e.g., a guitar in the example, using an ordinary 2-pole (TS) guitar jack. Set the INST switch to OFF if you are connecting a line level source such as a keyboard, synthesiser or the balanced output of an external audio mixer via a 3-pole (TRS) jack. Note the jack socket accepts both TRS and TS types of jack plug.
Using Direct Monitoring
You will frequently hear the term «latency» used in connection with digital audio systems. In the case of the simple DAW recording application described above, latency will be the time it takes for your input signals to pass through your computer and audio software. Latency can be a problem for a performer who wishes to record while monitoring their input signals.
The Scarlett Solo is fitted with a «Direct Monitoring» option, which overcomes this problem. Setting the front panel DIRECT MONITOR switch to ON will route your input signals directly to the Scarlett Solo’s headphone and main monitor outputs. This enables you to hear yourself with zero latency – i.e., in «real time» – along with the computer playback. Your inputs will be summed to mono, so both mic and instrument will appear in the centre of the stereo image. Note that the input signals to your computer are not affected in any way by the use of Direct Monitor.
When Direct Monitoring is set to ON, ensure that your recording software is not set to route its input (what you are currently recording) to its output. If it is, you will hear yourself «twice», with one signal audibly delayed as an echo.
Monitoring with DIRECT MONITOR set to OFF can be useful when using an FX plug-in to your DAW to create a stereo effect which contributes to the live performance. In this way, you will be able to hear exactly what is being recorded, complete with the FX. However, some latency may result, the amount depending on the DAW’s buffer size and processing power of the computer.
Headphone monitoring
Connect a pair of stereo headphones to the front panel headphone socket to hear both what you are recording — your current input signal(s), plus any tracks you’ve already recorded in your computer. Note: Set the front panel DIRECT MONITOR switch to ON when recording. The pre-recorded tracks will be heard in stereo, and the current input signals in mono – central in the stereo image. If you are using both the mic and instrument inputs, the two inputs will be summed in mono.
Connecting Scarlett Solo to loudspeakers
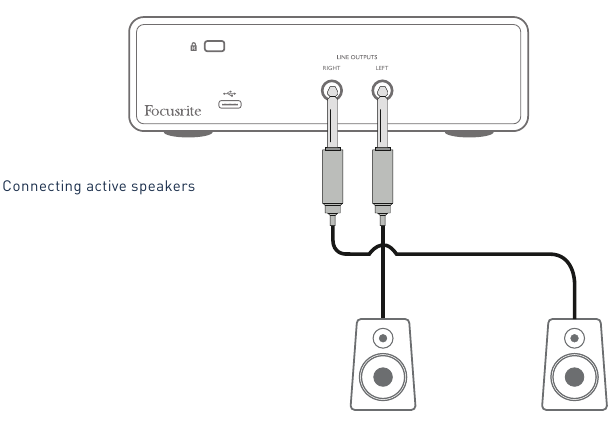
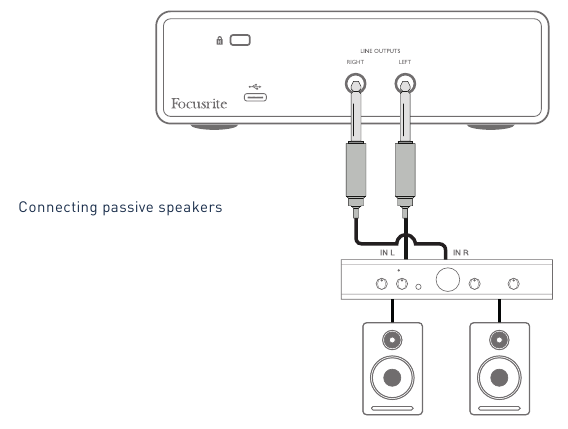
The ¼» jack outputs on the rear panel can be used to connect monitoring speakers. Self-powered monitors incorporate internal amplifiers with a volume control, and may be connected directly. Passive loudspeakers will require a separate stereo amplifier; in this case, the rear panel outputs should be connected to the amplifier’s inputs.
The line outputs are 3-pole (TRS) ¼» (6.35 mm) jack sockets, and are electronically balanced. Typical consumer (Hi-Fi) amplifiers and small powered monitors will have unbalanced inputs, either on phono (RCA) sockets, or via a 3.5 mm 3-pole jack plug intended for direct connection to a computer.
In either case, use a suitable connecting cable with jack plugs at one end.
Professional power amplifiers will generally have balanced inputs; we highly recommend using balanced cables to connect these to the outputs of the Scarlett Solo.
NOTE: You run the risk of creating an audio feedback loop if loudspeakers are active at the same time as a microphone! We recommend that you always turn off (or turn down) monitoring loudspeakers while recording, and use headphones when overdubbing.
HARDWARE FEATURES
Front Panel
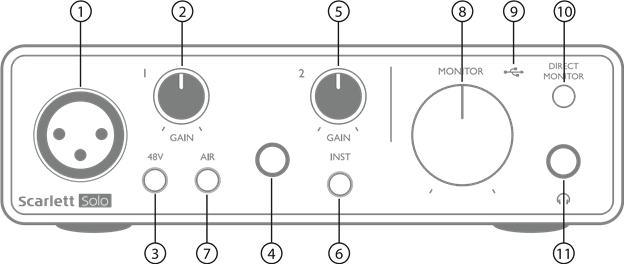
The front panel includes the input connectors for mic and line/instrument signals, and the input gain and monitoring controls.
- Input 1 – electronically balanced input via 3-pin XLR socket for microphones.
- GAIN 1 – adjust the gain for the microphone signal at Input 1. The gain controls have concentric tri-colour LED ‘rings’ to confirm signal level: green indicates an input level of at least -24 dBFS (i.e., ‘signal present’), the ring then turns amber at -6 dBFS to indicate that the signal is close to clipping, and finally to red at 0 dBFS (digital clipping).
- 48V – phantom power switch for mic input — enables 48 V phantom power at the XLR socket.
- Input 2 – ¼» TRS jack socket for connecting instruments (unbalanced) or line level (balanced) sources.
- GAIN 2 – adjusts the gain for the line/instrument signal at Input 2. The gain control has a tricolour LED ring as [2].
- INST/LINE – Instrument/Line level switch for Input 2 – switches gain to suit instrument or line level signals. ‘INST’ illuminates red when Instrument mode is selected. Note that INST mode may also be selected from Focusrite Control.
- AIR – switch enabling AIR mode for the mic input. AIR modifies the frequency response of the input stage to model the classic, transformer-based Focusrite ISA microphone preamps. ‘AIR’ illuminates yellow when the mode is selected. Note that AIR may also be selected from Focusrite Control.
- MONITOR – main monitor output level control — sets the output level at the rear panel outputs and the front panel headphone output.
USB LED – illuminates when the unit receives USB bus power and is confirmed by the computer as connected and operating correctly.
- DIRECT MONITOR – selects monitoring of input signals (mixed with the DAW output) to be directly from inputs (ON) or via the DAW (OFF).
-
– ¼» TRS output jack. If your headphones have a ¼» TRS jack plug, connect them directly; if they have a 3.5 mm TRS «mini jack», use a TRS ¼»-to-3.5 mm jack adaptor. Note that it is likely that headphones fitted with 4-pole TRRS plugs will not operate correctly.
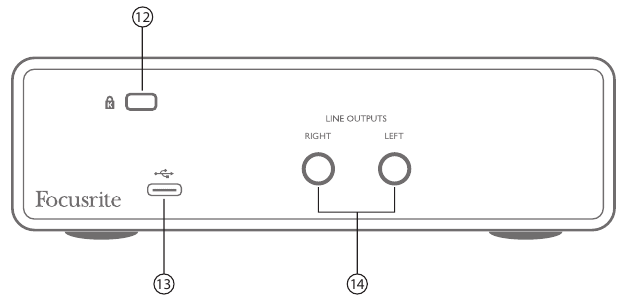
Back Panel
12. (Kensington security lock) – secure your Scarlett Solo to a suitable structure if desired.
13. USB 2.0 port – Type C connector; connect to your laptop or computer with the USB cable supplied.
14. LINE OUTPUTS: LEFT and RIGHT – 2 x ¼» (6.35 mm) TRS jack sockets; +10 dBu output level (variable), electronically balanced. Either ¼» TRS (balanced connection) or TS (unbalanced connection) jack plugs can be used.
Here you can download full pdf version of manual, it may contain additional safety instructions, warranty information, FCC rules, etc.
Аудиоинтерфейсы Focusrite Scarlett
ИНСТРУКЦИЯ ПО УСТАНОВКЕ
- Расширение Hitmaker, доступное каждому новому зарегистрированному пользователю интерфейса, создано для того, чтобы вы могли сразу же создавать записи. Это все инструменты, которые вам нужны для написания, создания, сведения и мастеринга вашей музыки в студийном качестве.
- Доступ Antares® Auto-Tune® — Позволяет все: от естественного звучания, регулировки высоты тона почти в реальном времени для получения лучших вокальных дублей до молниеносной подачи в стиле хип-хопа для добавления совершенно нового звука в ваши треки.
LX480 Essentials от Relab — Обеспечивает четыре реверберации, созданные по образцу блока реверберации The Hit Factory NYC и используемые в бесчисленных хитах.
Softube® Marshall® Silver Jubilee 255— Гиперреалистичная модель Marshall Silver Jubilee 2555 — современная эволюция культового JCM800 — представлена экспертами по аналоговому моделированию Softube. - Захватывающие клавиши XLN Audio® — На выбор одна из четырех профессионально звучащих моделей от Steinway®, Yamaha® и классической Rhodes®.
XLN Audio Addictive Drums 2: Studio Rockkit — Особенности, снятые мастерскиampфайлы с высококлассных барабанов Tama® и Pearl® и тарелок Paiste® и Sabian®, записанные в студии Decibel Studios в Стокгольме.
Brainworx bx_console Focusrite SC — Приносит истинное звучание preampчто сделало Focusrite тем, чем мы являемся сегодня для вашей музыки - Аудиоинтерфейсы Focusrite Scarlett теперь включают в себя невероятно полный и мощный комплект подключаемых модулей.
Создавайте вокал студийного качества, мощные гитары, роскошные клавишные и огромные барабаны, а затем микшируйте и мастерите с помощью культового студийного оборудования Focusrite. С 11 ноября 2021 года каждый новый интерфейс Focusrite Scarlett поставляется с непревзойденным набором проверенных студийных инструментов от некоторых из самых известных компаний в отрасли. - Комплект подключаемых модулей Focusrite Red — Тщательно отснятые цифровые модели поистине культовых эквалайзеров и компрессоров, которые сделали имя Focusrite одним из основных продуктов на объектах мирового класса по всему миру.
- Создайте свою лучшую работу с Landr —Двухмесячная подписка на Landr Studio плюс пять бесплатных мастеров, которые можно использовать в любое время. Landr Studio включает в себя более 30 инструментов для создания музыки сampле, plugins, функции совместной работы, неограниченный мастеринг MP3 и неограниченное распространение на более чем 150 потоковых платформах.
Документы / Ресурсы

ВВЕДЕНИЕ
Это руководство пользователя программного обеспечения Focusrite Control, которое предназначено для использования с USB-аудиоинтерфейсами Focusrite Scarlett 3-го поколения.
Если вы только что приобрели интерфейс Scarlett 3-го поколения, то вам потребуется как данное руководство пользователя, так и руководство пользователя аппаратуры. Руководство пользователя аппаратуры можно скачать по адресу Downloads | Customer Portal.
Сочетание великолепных характеристик звукового тракта и профессионального качества изготовления Scarlett с простым и интуитивно понятным интерфейсом Focusrite Control позволяет создать универсальную систему компьютерной записи, используя предпочитаемую цифровую звуковую рабочую станцию (DAW).
Хотя программа Focusrite Control является максимально интуитивно понятной и ориентированной на решение конкретных задач, любой пользователь найдет в этом руководстве полезную информацию, так как полное понимание особенностей программного обеспечения возможно лишь при его рассмотрении в сочетании с подключенной аппаратурой.
ВАЖНАЯ ИНФОРМАЦИЯ
Ассортимент интерфейсов Scarlett включает несколько разных моделей, и все они поддерживают Focusrite Control. Фундаментальное различие между этими моделями заключается в количестве доступных входов и выходов, а также в наборе функций, которыми можно управлять напрямую из Focusrite Control.
Focusrite Control распознает конкретную аппаратуру Scarlett, подключенную к компьютеру, и настраивается соответствующим образом. Поэтому на экране будут отображаться лишь те входы и выходы, которые фактически поддерживаются используемой аппаратурой.
Благодаря этой автоматической настройке данное руководство пользователя применимо ко всем моделям в ассортименте Scarlett, хотя большая часть информации в нем применима к старшим моделям в ассортименте Scarlett, а именно Scarlett 4i4 и выше (см. ПРИМЕЧАНИЕ ниже). Так как включение в руководство снимков экранов для разных моделей может запутать читателя, мы решили использовать в качестве «базовой» модели устройство Scarlett 18i20. Если вы приобрели Scarlett 18i20, то снимки экранов в данном руководстве пользователя будут в точности соответствовать реальным экранам. При использовании другой модели существенные различия в виде экрана будут заключаться лишь в количестве доступных входов и выходов, а также в функциях, управляемых программным обеспечением.
ПРИМЕЧАНИЕ . Только для пользователей Scarlett 2i2 и Solo
Хотя программное управление для данных моделей ограничено, установка Focusrite Control все равно необходима для обеспечения полной функциональности устройства при частотах дискретизации выше 48 кГц, а также для обновлений микропрограммы. Однако в целом для использования аппаратного интерфейса нет необходимости запускать Focusrite Control на компьютере. Обратите внимание, что в будущем будут доступны новые функции, управляемые программным обеспечением.


