Русский перевод панели управления стиральных машин, привезенных из Финляндии. Команды, режимы стирки, основные и дополнительные функции.
Русский перевод панели управления стиральных машин, привезенных из Финляндии. Команды, режимы стирки, основные и дополнительные функции.
| VALKOPESU / KIRJOPESU | БЕЛЫЙ / ЦВЕТНОЙ ХЛОПОК |
| NORMAALIPESU | РЕЖИМ ОБЫЧНОЙ СТИРКИ (ХЛОПОК) |
| ESIPESU | ПРЕДВАРИТЕЛЬНАЯ СТИРКА |
| SYNTEETISET | СИНТЕТИКА |
| SILIÄVÄT | АНТИ СМИНАНИЕ |
|
HIENOPESU |
ДЕЛИКАТНАЯ СТИРКА |
|
TEHOPESU |
УСИЛЕННАЯ СТИРКА |
|
VILLAPESU |
СТИРКА ШЕРСТИ |
|
HUUHTELU |
ПОЛОСКАНИЕ |
| HUUHTELUOHJELMA | ПРОГРАММА ПОЛОСКАНИЯ |
|
LISÄHUUHTELU………… |
ДОПОЛНИТЕЛЬНОЕ ПОЛОСКАНИЕ |
|
VEDENPOISTO |
СЛИВ ВОДЫ |
|
TYHJENNYS |
УДАЛЕНИЕ ВОДЫ |
|
LINKOUS |
ОТЖИМ |
|
PESU |
СТИРКА |
|
PIKA, PIKAPESU |
РЕЖИМ БЫСТРОЙ СТИРКИ |
|
KÄSINPESU |
РЕЖИМ РУЧНОЙ СТИРКИ |
|
TAUKO |
ПАУЗА |
|
OHJELMA |
ПРОГРАММА |
|
EI LINKOA |
БЕЗ ОТЖИМА |
|
PÄIVITTÄISPESU……… |
ЕЖЕДНЕВНАЯ СТИРКА |
|
SÄÄSTÖ (ECO) |
ЭКОНОМИЧНЫЙ РЕЖИМ |
|
YÖ-OHJELMA |
НОЧНОЙ РЕЖИМ (БЕЗ ОТЖИМА) |
|
LOPPU |
ГОТОВО, ФИНИШ |
Русский перевод панели управления сушильных машин, привезенных из Финляндии. Команды, режимы сушки, основные и дополнительные функции.
| KUIVAUS | СУШКА |
| SILITYSKUIVA | РАЗГЛАЖИВАНИЕ |
| VALKO / KIRJOPYKKI | БЕЛЫЙ / ЦВЕТНОЙ ХЛОПОК |
| SYNTEETISET | СИНТЕТИКА |
| SILIÄVÄT | СИНТЕТИЧЕСКИЕ ТКАНИ |
|
EXTRAKUIVA |
РЕЖИМ: ЭКСТРА СУХОЕ БЕЛЬЕ |
|
ERITTÄIN KUIVA |
РЕЖИМ: ОЧЕНЬ СУХОЕ БЕЛЬЕ |
|
KAAPIKUIVA PLUS |
РЕЖИМ: БЕЛЬЕ В ШКАФ ПЛЮС |
|
KAAPPIKUIVA |
РЕЖИМ: БЕЛЬЕ В ШКАФ |
| SILITYSKUIVA |
РЕЖИМ: БЕЛЬЕ ДЛЯ ГЛАЖКИ |
| RAIKASTUS | РЕЖИМ ПРОВЕТРИВАНИЯ |
| 30 LÄMMIN | ПРОВЕТРИВАНИЕ (30 ГРАДУСОВ) |
| 20 TUULETUS | ПРОВЕТРИВАНИЕ (20 ГРАДУСОВ) |
| LOPPU | ГОТОВО, ФИНИШ |
| POIS | ДОСТАНЬТЕ БЕЛЬЕ |
|
TYHJENNÄ VESISÄILIÖ |
УДАЛИТЕ ВОДУ ИЗ НАКОПИТЕЛЯ |
|
SISÄVALO |
ВНУТРЕННЯЯ ПОДСВЕТКА |
В настоящее время вы находитесь на странице с руководствами . Выберите один из продуктов, чтобы сразу перейти к руководству по этому продукту. Не можете найти ? Тогда попробуйте вбить в поле поиска и модель, чтобы найти нужное руководство . На ManualsPDF.ru в настоящее время имеется 22 руководств . Самые популярные :
- Rosenlew RTT7122N
- Rosenlew RTT0950
- Rosenlew RTT7120K
Последнее добавленное руководство было добавлено 2020-01-16, и это Rosenlew RTT741.

Алгоритм запуска стирки
Чтобы постирать белье на вертикальной стиральной машине, необходимо пройти стандартные этапы стирки. Открыть барабан, загрузить вещи, добавить моющего средства, запереть люк и запустить цикл. Но делается все иначе, чем на фронталке, из-за своеобразной конструкции автомата.
Различия с фронталкой замечаются уже с поднятием верхней крышки. Здесь барабан не открыт, а «спрятан» за створками. Чтобы загрузить вещи в цилиндр, необходимо сначала отжать специальный фиксатор и распахнуть дверцы.
Второй момент касается прокручивания барабана. На вертикальных автоматах вручную вращать цилиндр нельзя, особенно, с усилием. Из-за чрезмерного давления емкость сорвется со стопора, перевернется отверстием вниз и зацепится открытыми створками за внутренние элементы стиралки. Чтобы исправить ситуацию, придется вызывать мастера и разбирать агрегат.
Правила загрузки белья привычные для всех пользователей автомата:
- рассортировать белье по типу и цвету ткани;
- ориентироваться на нормы загрузки машинки;
- проверить карманы вещей;
- застегнуть молнии и пуговицы;
- поместить деликатные и декорированные вещи в защитные мешки.
Далее барабан необходимо закрыть: свести створки до щелчка и проследить, чтобы фиксатор вошел в предусмотренный паз. Лучше убедиться в надежности «сцепления» несколько раз. Запускать машинку с открытым цилиндром запрещено – это опасно!
На вертикальных стиральных машинах порошкоприемник вмонтирован в верхнюю крышку корпуса!
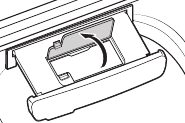
Следующий этап – добавление моющего средства. На вертикалках дозатор для порошка выглядит иначе: он больше и вмонтирован в верхнюю крышку. Засыпается средство строго по инструкции:
- в большой средний отсек кладется средство для основной стирки;
- в отделение слева с маркировкой «I» добавляется порошок при замачивании белья;
- в кюветку справа заливается кондиционер или другое жидкое дополнительное средство.
После заполнения порошкоприемника крышка закрывается. Теперь можно подключить машинку к электросети и открыть кран подачи воды. Далее нажимается сетевая кнопка, а программатором выбирается подходящий режим стирки. Если с подбором программы возникают проблемы, то лучше ознакомиться с их описанием в инструкции автомата. При необходимости заводские настройки корректируются, и активируются дополнительные опции.
Подготовленную к стирке машинку можно запускать. Достаточно нажать на кнопку «Старт/Стоп» и дождаться забора воды. Если на приборной панели нет пусковой клавиши, то цикл начнется автоматически после выбора программы.
Положительные и отрицательные стороны вертикалок
К особенностям эксплуатации вертикальных стиральных машин быстро привыкаешь – уже после 3-5 стирки все делается на автомате. Также со временем начинаешь ценить и преимущества такой техники. Стиралки с верхней загрузкой отличаются от фронталок рядом внушительных «плюсов». Рассмотрим несколько из них.
- Компактность. По ширине и глубине вертикалки меньше фронталок. За счет миниатюрности такая техника легко размещается в малогабаритных ванных. Удобно и то, что нет необходимости обеспечивать свободный доступ к передней стенке – здесь барабан открывается сверху.
- Эстетичность. Компактные модели практически незаметны в интерьере, так как не привлекают к себе лишнего внимания.
- Вместимость. В вертикальные автоматы вмещается больше белья, чем во фронталку аналогичного размера.
- Бесшумность. Машинки с верхней загрузкой меньше весят, поэтому стирают максимально тихо. Сказывается на снижении вибрации и шума вертикальная конструкция: она устойчивее и лучше погашает возникающую центробежную силу.
- Возможность дозагрузки белья. Здесь цикл можно остановить в любой момент: достаточно прекратить программу и поднять верхнюю крышку. При открывании люка не нужно дожидаться слива воды – она остается в баке. Пользователю остается только положить вещи в цилиндр и продолжить стирку.
- Удобство. Загружать барабан на вертикалке проще и комфортнее: нет необходимости сильно нагибаться и вставать на корточки.
- Быстрая диагностика. Чтобы оценить состояние манжеты люка или барабана, достаточно просто посмотреть вниз.
- Безопасность. Приборная панель на такой технике расположена сверху. Маленьким детям дотянуться до кнопок будет сложно. Также снижается вероятность случайного задевания программатора и клавиш.
- Надежность. Вертикальные автоматы отличаются устойчивостью к дисбалансу. Даже при разбалансировке барабана повреждения минимальные: подшипники крепко «держат» цилиндр и не дают ему деформироваться.
У вертикальных стиралок есть и свои недостатки. В первую очередь это касается цены – стоимость машин с верхней загрузкой выше, чем у фронтальных. Разница часто достигает 20-30%. Если сэкономить и взять бюджетную модель, то можно остаться без полезной опции «парковка барабана». При ее наличии бак автоматически останавливается створками вверх – для более удобной и безопасной загрузки белья. Без нее придется прокручивать цилиндр вручную.
Вертикальные стиральные машины с функцией «Парковка барабана» по окончании цикла поворачивают бак створками вверх – для удобной разгрузки белья.
К минусам можно отнести и ограниченное «использование» техники. Вертикалку нельзя встроить в кухонный гарнитур или размещать на ее верхней крышке какие-либо предметы. Однако последний недостаток спорный – производители не рекомендуют что-то ставить на стиральные машины вне зависимости от типа их загрузки.
- Поделитесь своим мнением — оставьте комментарий
Данный раздел представляет большой выбор инструкций по эксплуатации стиральных машин Whirlpool. Вы можете бесплатно скачать любое руководство.
Whirlpool Corporation — крупнейший мировой производитель «белой бытовой техники». Компания существует на мировом рынке более 100 лет, на российском — более 20. Сегодня Whirlpool имеет более 70 производственных и технических центров по всему миру и насчитывает более 100 000 сотрудников. Купить продукцию компании возможно в 170 странах мира.
Бумажное руководство, даже если имеется, не всегда удобно в использовании, поэтому мы собрали некоторое количество инструкций на нашем сайте. Вы можете абсолютно бесплатно скачать любую из инструкций в формате pdf или воспользоваться просмотром в браузере.

- Регистрация
- Войти
Инструкции » Стиральные машины » ARDO
|
Всего инструкций в разделе: 167 |
|
Инструкция по эксплуатации от стиральной машины марки ARDO содержит описание функций блока управления, варианты использования необходимых средств для стирки, технические характеристики и максимальный объём загружаемого белья. |
Отсортировать по: Названию 

| инструкция | устройство | размер |
| ARDO VD 07S | сушильная машина | 5.64 MB |
| ARDO WDO1485L | стиральная машина | 13.07 MB |
| ARDO AE833 | стиральная машина | 869.05 kB |
| ARDO AE800X / AE810 / AE1000X / AE1010 / AE1033 / AE1200X / AE1400X | стиральная машина | 241.15 kB |
| ARDO A6000 / A6000X / A6200X | стиральная машина | 348.64 kB |
| ARDO A533 / A633 / A833 / A1033 | стиральная машина | 338.42 kB |
| ARDO TL80E | стиральная машина | 1.10 MB |
| ARDO TL60E | стиральная машина | 1.10 MB |
| ARDO TL610 | стиральная машина | 838.46 kB |
| ARDO TL1000X | стиральная машина | 657.55 kB |
| ARDO TL1000 | стиральная машина | 657.55 kB |
| ARDO TL800 | стиральная машина | 657.55 kB |
| ARDO TL105SX | стиральная машина | 1.49 MB |
| ARDO TL85SX | стиральная машина | 1.49 MB |
| ARDO TL85S | стиральная машина | 1.49 MB |
| ARDO TLN125L | стиральная машина | 3.85 MB |
| ARDO TLN105L | стиральная машина | 3.85 MB |
| ARDO TLN106E | стиральная машина | 3.62 MB |
| ARDO TLN126S | стиральная машина | 3.19 MB |
| ARDO TLN106S | стиральная машина | 3.19 MB |
| ARDO TLN146L | стиральная машина | 3.84 MB |
| ARDO TLN126L | стиральная машина | 3.84 MB |
| ARDO TLN105S | стиральная машина | 3.61 MB |
| ARDO TLN85S | стиральная машина | 3.61 MB |
| ARDO TLNEW | стиральная машина | 532.68 kB |
| ARDO WD1000 | стиральная машина | 345.52 kB |
| ARDO WD128L | стиральная машина | 1.22 MB |
| ARDO WD800 | стиральная машина | 691.03 kB |
| ARDO WD80S | стиральная машина | 2.43 MB |
| ARDO WDI120L | стиральная машина | 643.19 kB |
| ARDO WDO 1264 L | стиральная машина | 524.31 kB |
| ARDO WDO 1484 L | стиральная машина | 524.31 kB |
| ARDO WDO 1485 L | стиральная машина | 524.31 kB |
| ARDO EVA | стиральная машина | 1.36 MB |
| ARDO MARIA808 | стиральная машина | 588.83 kB |
| ARDO VD06 | сушильная машина | 465.77 kB |
| ARDO WDN 1285 SW | стиральная машина | 4.30 MB |
| ARDO FLSO106L | стиральная машина | 2.56 MB |
| ARDO FLSO105S | стиральная машина | 2.56 MB |
| ARDO FLSO86S | стиральная машина | 2.56 MB |
| ARDO FLSO86E | стиральная машина | 2.56 MB |
| ARDO FLSO85E | стиральная машина | 2.56 MB |
| ARDO FLO168LB | стиральная машина | 2.56 MB |
| ARDO FLO128LB | стиральная машина | 2.56 MB |
| ARDO FLO128L | стиральная машина | 2.56 MB |
| ARDO FLO107LB | стиральная машина | 2.56 MB |
| ARDO FLO106S | стиральная машина | 2.56 MB |
| ARDO FLO106L | стиральная машина | 2.56 MB |
| ARDO FLO86E | стиральная машина | 2.56 MB |
| ARDO FLS105 | стиральная машина | 1.04 MB |
«— 1 2 3 4 —»
Что удобнее для чтения книг?
Планшет
Электронная книга
Смартфон
Книга в бумажном переплёте
Не читаю книг
© 2010- ManualBase.ru
- Статьи
- О сайте
- Помощь
- Контакты
© 2010- ManualBase.ru
Ардо-итальянская стиральная машина с невысокой ценой. В то же время она популярна. Отзывы о
Ищите инструкцию стиральной машины ardo ae 833? Только ради вас мы сохранили инструкцию на
Ищите инструкцию стиральной машины ardo a800x? Только ради вас мы сохранили инструкцию на русском,
Ищите инструкцию стиральной машины ardo wd800x , мы сохранили все русские инструкции на нужном
Ищите инструкцию стиральной машины ardo wd1000x , мы сохранили все русские инструкции на нужном
Ищите инструкцию стиральной машины ardo tl85s , мы сохранили все русские инструкции на нужном
Ищите инструкцию стиральной машины ardo tl810e , мы сохранили все русские инструкции на нужном
Ищите инструкцию стиральной машины Ardo tl800ex , мы сохранили все русские инструкции на нужном
Ищите инструкцию стиральной машины Ardo tl600x , мы сохранили все русские инструкции на нужном вам
Ищите инструкцию стиральной машины ardo jl1000x , мы сохранили все русские инструкции на нужном
Главная >
Ardo
Ardo: инструкции для 273 моделей
-
Ardo A 1000
Стиральная Машина
-
Ardo A 1000 X
Стиральная Машина
-
Ardo A 1033
Стиральная Машина
-
Ardo A 1200 Inox
Стиральная Машина
-
Ardo A 1200 X
Стиральная Машина
-
Ardo A 400
Стиральная Машина
-
Ardo A 400 X
Стиральная Машина
-
Ardo A 433
Стиральная Машина
-
Ardo A 533
Стиральная Машина
-
Ardo A 600
Стиральная Машина
-
Ardo A 600 X
Стиральная Машина
-
Ardo A 6000 X
Стиральная Машина
-
Ardo A 633
Стиральная Машина
-
Ardo A 800
Стиральная Машина
-
Ardo A 800 X
Стиральная Машина
-
Ardo A 814
Стиральная Машина
-
Ardo A 833
Стиральная Машина
-
Ardo A1000X
Стиральная Машина
-
Ardo A1033
Стиральная Машина
-
Ardo A1400
Стиральная Машина
-
Ardo A400
Стиральная Машина
-
Ardo A433
Стиральная Машина
-
Ardo A533
Стиральная Машина
-
Ardo A600
Стиральная Машина
-
Ardo A6000
Стиральная Машина
-
Ardo A6000X
Стиральная Машина
-
Ardo A6200X
Стиральная Машина
-
Ardo A633
Стиральная Машина
-
Ardo A800
Стиральная Машина
-
Ardo A814
Стиральная Машина
-
Ardo A833
Стиральная Машина
-
Ardo AE 1000X
Стиральная Машина
-
Ardo AE 1010
Стиральная Машина
-
Ardo AE 1033
Стиральная Машина
-
Ardo AE 1200X
Стиральная Машина
-
Ardo AE 1400X
Стиральная Машина
-
Ardo AE 800X
Стиральная Машина
-
Ardo AE 810
Стиральная Машина
-
Ardo AE 833
Стиральная Машина
-
Ardo AED 1000 X Silver
Стиральная Машина
-
Ardo AED 1000 X White
Стиральная Машина
-
Ardo AED 1000X
Стиральная Машина
-
Ardo AED 1200 X Silver
Стиральная Машина
-
Ardo AED 1200 X White
Стиральная Машина
-
Ardo AED 1200X
Стиральная Машина
-
Ardo AED 800
Стиральная Машина
-
Ardo AED 800 X Silver
Стиральная Машина
-
Ardo AED 800 X White
Стиральная Машина
-
Ardo AED800
Стиральная Машина
-
Ardo ANNA
Стиральная Машина
-
Ardo AS965
Сушильная Машина
-
Ardo C 640 G6 WHITE
Плита
-
Ardo C 6640 G6
Газовая Плита
-
Ardo CA 35
Холодильник
-
Ardo CN 60 inox
Вытяжка
-
Ardo CO 1804 SA
Холодильник
-
Ardo CO 1812 SA
Холодильник
-
Ardo CO 1812 SH
Холодильник
-
Ardo CO 2610 SHY
Холодильник
-
Ardo CO 3012 A-1
Холодильник
-
Ardo CO 3012 BA
Холодильник
-
Ardo CO 3012 BA-2
Холодильник
-
Ardo CO 3111 SH
Холодильник
-
Ardo COF 2110 SA
Холодильник
-
Ardo COF 2110 SAE
Холодильник
-
Ardo COF 2110 SAX
Холодильник
-
Ardo COF 2510 SAE
Холодильник
-
Ardo COF 2510 SAX
Холодильник
-
Ardo COG 1804 SA
Холодильник
-
Ardo COG 2108 SA
Холодильник
-
Ardo DF 60 L
Посудомоечная Машина
-
Ardo DF 60 LC
Посудомоечная Машина
-
Ardo DF60L
Посудомоечная Машина
-
Ardo DF60LC
Посудомоечная Машина
-
Ardo DP 23 SA
Холодильник
-
Ardo DP 24 SA
Холодильник
-
Ardo DP 28 SA
Холодильник
-
Ardo DP 36 SA
Холодильник
-
Ardo DP36
Плита
-
Ardo DPG 23 SA
Холодильник
-
Ardo DPG 36 SA
Холодильник
-
Ardo DW 45 E
Посудомоечная Машина
-
Ardo DW 60 E
Посудомоечная Машина
-
Ardo DW 60 ES
Посудомоечная Машина
-
Ardo DW 60 S
Посудомоечная Машина
-
Ardo DW60
Посудомоечная Машина
-
Ardo DW60ES
Посудомоечная Машина
-
Ardo DW60L
Посудомоечная Машина
-
Ardo DW60SC
Посудомоечная Машина
-
Ardo DWB45
Посудомоечная Машина
-
Ardo DWI 45 AE
Посудомоечная Машина
-
Ardo DWI45 AE
Посудомоечная Машина
-
Ardo DWTI 14
Посудомоечная Машина
-
Ardo DWTI14
Посудомоечная Машина
-
Ardo EVA
Стиральная Машина
-
Ardo F 64 T X
Варочная Поверхность
-
Ardo FL
Стиральная Машина
-
Ardo FL 105 L
Стиральная Машина
-
Ardo FL 105 LX
Стиральная Машина
-
Ardo FL 105 S
Стиральная Машина
-
Ardo FL 105 SX
Стиральная Машина
-
Ardo FL 126 L
Стиральная Машина
-
Ardo FL 85 S
Стиральная Машина
-
Ardo FL105L
Стиральная Машина
-
Ardo FL105LX
Стиральная Машина
-
Ardo FL105SX
Стиральная Машина
-
Ardo FL106LY
Стиральная Машина
-
Ardo FL60E
Стиральная Машина
-
Ardo FL80E
Стиральная Машина
-
Ardo FL85SX
Стиральная Машина
-
Ardo FLN 106 EW
Стиральная Машина
-
Ardo FLN 128 LW
Стиральная Машина
-
Ardo FLN83
Стиральная Машина
-
Ardo FLO 168 D
Стиральная Машина
-
Ardo FLO106L
Стиральная Машина
-
Ardo FLO106S
Стиральная Машина
-
Ardo FLO107LB
Стиральная Машина
-
Ardo FLO128L
Стиральная Машина
-
Ardo FLO128LB
Стиральная Машина
-
Ardo FLO168D
Стиральная Машина
-
Ardo FLO168LB
Стиральная Машина
-
Ardo FLO86E
Стиральная Машина
-
Ardo FLOI106S
Стиральная Машина
-
Ardo FLOI126L
Стиральная Машина
-
Ardo FLOI147L
Стиральная Машина
-
Ardo FLOI86E
Стиральная Машина
-
Ardo FLS 101 L
Стиральная Машина
-
Ardo FLS 105 L
Стиральная Машина
-
Ardo FLS 105 S
Стиральная Машина
-
Ardo FLS 120 L
Стиральная Машина
-
Ardo FLS 121 L
Стиральная Машина
-
Ardo FLS 81 L
Стиральная Машина
-
Ardo FLS 85 S
Стиральная Машина
-
Ardo FLS 85 SX
Стиральная Машина
-
Ardo FLS101L
Стиральная Машина
-
Ardo FLS105
Стиральная Машина
-
Ardo FLS105L
Стиральная Машина
-
Ardo FLS105S
Стиральная Машина
-
Ardo FLS121
Стиральная Машина
-
Ardo FLS80E
Стиральная Машина
-
Ardo FLS81L
Стиральная Машина
-
Ardo FLS85S
Стиральная Машина
-
Ardo FLSN
Стиральная Машина
-
Ardo FLSN 104 EW
Стиральная Машина
-
Ardo FLSN 104 SW
Стиральная Машина
-
Ardo FLSN 83 EW
Стиральная Машина
-
Ardo FLSN 83 SW
Стиральная Машина
-
Ardo FLSN 84 EW
Стиральная Машина
-
Ardo FLSO 125 D
Стиральная Машина
-
Ardo FLSO105S
Стиральная Машина
-
Ardo FLSO106L
Стиральная Машина
-
Ardo FLSO106S
Стиральная Машина
-
Ardo FLSO125D
Стиральная Машина
-
Ardo FLSO125L
Стиральная Машина
-
Ardo FLSO126L
Стиральная Машина
-
Ardo FLSO85E
Стиральная Машина
-
Ardo FLSO86E
Стиральная Машина
-
Ardo FLSO86S
Стиральная Машина
-
Ardo FLZ 105 L
Стиральная Машина
-
Ardo FLZ 105 S
Стиральная Машина
-
Ardo FLZ105S
Стиральная Машина
-
Ardo FLZ80E
Стиральная Машина
-
Ardo FLZO105S
Стиральная Машина
-
Ardo FLZO80E
Стиральная Машина
-
Ardo FR 12 SA
Холодильник
-
Ardo FR 20 SB
Холодильник
-
Ardo IDP 24 SH
Холодильник
-
Ardo IMP 15 SA
Холодильник
-
Ardo IT 90 inox
Вытяжка
-
Ardo LS 9001
Посудомоечная Машина
-
Ardo LS 9117 BX
Посудомоечная Машина
-
Ardo LS 9205 E
Посудомоечная Машина
-
Ardo LS 9212 A
Посудомоечная Машина
-
Ardo LS 9212 B
Посудомоечная Машина
-
Ardo LS 9212 ED
Посудомоечная Машина
-
Ardo LS 9212 EDT
Посудомоечная Машина
-
Ardo LS 9212A1-2
Посудомоечная Машина
-
Ardo LS 9325 BE
Посудомоечная Машина
-
Ardo LS9209
Посудомоечная Машина
-
Ardo LS9212
Посудомоечная Машина
-
Ardo LS9212A-2
Посудомоечная Машина
-
Ardo LS9212A1
Посудомоечная Машина
-
Ardo LS9212B-2
Посудомоечная Машина
-
Ardo LS9212ED
Посудомоечная Машина
-
Ardo Maria 808
Стиральная Машина
-
Ardo MARIA808
Стиральная Машина
-
Ardo PEO58
Посудомоечная Машина
-
Ardo PFS 4030 VX
Варочная Поверхность
-
Ardo PFS 4030 W
Варочная Поверхность
-
Ardo PFS 4030 X
Варочная Поверхность
-
Ardo PLT 6040 X
Варочная Поверхность
-
Ardo PN 90 inox
Вытяжка
-
Ardo RA 105 white
Вытяжка
-
Ardo S 1000
Стиральная Машина
-
Ardo S 1000 X
Стиральная Машина
-
Ardo S 3 60 inox
Вытяжка
-
Ardo S1000X
Стиральная Машина
-
Ardo SC 120
Холодильник
-
Ardo SED 810
Стиральная Машина
-
Ardo SED810
Стиральная Машина
- 1
- 2
Топ 10 инструкций
99.98
Alcatel 9008D A3 XL 16Gb White Blue
99.85
Gefest 6100-04 0001
99.75
Casio EX-H20G Silver
99.63
Casio EX-Z1050 Silver
К рейтингу инструкций и мануалов →
Интересные инструкции
Gefest 6100-03
Alcatel 9008D A3 XL 16Gb White Blue
Gefest 6100-04 0001
Alcatel Pixi 4
Casio EX-H20G Silver
Tp-Link TL-WA5210G
Русский перевод панели управления стиральных машин, привезенных из Финляндии. Команды, режимы стирки, основные и дополнительные функции.
Русский перевод панели управления стиральных машин, привезенных из Финляндии. Команды, режимы стирки, основные и дополнительные функции.
| VALKOPESU / KIRJOPESU | БЕЛЫЙ / ЦВЕТНОЙ ХЛОПОК |
| NORMAALIPESU | РЕЖИМ ОБЫЧНОЙ СТИРКИ (ХЛОПОК) |
| ESIPESU | ПРЕДВАРИТЕЛЬНАЯ СТИРКА |
| SYNTEETISET | СИНТЕТИКА |
| SILIÄVÄT | АНТИ СМИНАНИЕ |
|
HIENOPESU |
ДЕЛИКАТНАЯ СТИРКА |
|
TEHOPESU |
УСИЛЕННАЯ СТИРКА |
|
VILLAPESU |
СТИРКА ШЕРСТИ |
|
HUUHTELU |
ПОЛОСКАНИЕ |
| HUUHTELUOHJELMA | ПРОГРАММА ПОЛОСКАНИЯ |
|
LISÄHUUHTELU………… |
ДОПОЛНИТЕЛЬНОЕ ПОЛОСКАНИЕ |
|
VEDENPOISTO |
СЛИВ ВОДЫ |
|
TYHJENNYS |
УДАЛЕНИЕ ВОДЫ |
|
LINKOUS |
ОТЖИМ |
|
PESU |
СТИРКА |
|
PIKA, PIKAPESU |
РЕЖИМ БЫСТРОЙ СТИРКИ |
|
KÄSINPESU |
РЕЖИМ РУЧНОЙ СТИРКИ |
|
TAUKO |
ПАУЗА |
|
OHJELMA |
ПРОГРАММА |
|
EI LINKOA |
БЕЗ ОТЖИМА |
|
PÄIVITTÄISPESU……… |
ЕЖЕДНЕВНАЯ СТИРКА |
|
SÄÄSTÖ (ECO) |
ЭКОНОМИЧНЫЙ РЕЖИМ |
|
YÖ-OHJELMA |
НОЧНОЙ РЕЖИМ (БЕЗ ОТЖИМА) |
|
LOPPU |
ГОТОВО, ФИНИШ |
Русский перевод панели управления сушильных машин, привезенных из Финляндии. Команды, режимы сушки, основные и дополнительные функции.
| KUIVAUS | СУШКА |
| SILITYSKUIVA | РАЗГЛАЖИВАНИЕ |
| VALKO / KIRJOPYKKI | БЕЛЫЙ / ЦВЕТНОЙ ХЛОПОК |
| SYNTEETISET | СИНТЕТИКА |
| SILIÄVÄT | СИНТЕТИЧЕСКИЕ ТКАНИ |
|
EXTRAKUIVA |
РЕЖИМ: ЭКСТРА СУХОЕ БЕЛЬЕ |
|
ERITTÄIN KUIVA |
РЕЖИМ: ОЧЕНЬ СУХОЕ БЕЛЬЕ |
|
KAAPIKUIVA PLUS |
РЕЖИМ: БЕЛЬЕ В ШКАФ ПЛЮС |
|
KAAPPIKUIVA |
РЕЖИМ: БЕЛЬЕ В ШКАФ |
| SILITYSKUIVA |
РЕЖИМ: БЕЛЬЕ ДЛЯ ГЛАЖКИ |
| RAIKASTUS | РЕЖИМ ПРОВЕТРИВАНИЯ |
| 30 LÄMMIN | ПРОВЕТРИВАНИЕ (30 ГРАДУСОВ) |
| 20 TUULETUS | ПРОВЕТРИВАНИЕ (20 ГРАДУСОВ) |
| LOPPU | ГОТОВО, ФИНИШ |
| POIS | ДОСТАНЬТЕ БЕЛЬЕ |
|
TYHJENNÄ VESISÄILIÖ |
УДАЛИТЕ ВОДУ ИЗ НАКОПИТЕЛЯ |
|
SISÄVALO |
ВНУТРЕННЯЯ ПОДСВЕТКА |
Whirlpool Top Loading Washing Machine Owners Manual
WASHER SAFETY
Your safety and the safety of others are very important.
We have provided many important safety messages in this manual and on your appliance. Always read and obey all safety messages.
This is the safety alert symbol.
This symbol alerts you to potential hazards that can kill or hurt you and others.
All safety messages will follow the safety alert symbol and either the word «DANGER» or «WARNING.» These words mean:
You can be killed or seriously injured if you don’t immediately follow instructions.
You can be killed or seriously injured if you don’t follow WARNING instructions.
All safety messages will tell you what the potential hazard is, tell you how to reduce the chance of injury, and tell you what can happen if the instructions are not followed.
IMPORTANT SAFETY INSTRUCTIONS
To reduce the risk of fire, electric shock, or injury to persons when using the washer, follow basic precautions, including the following:
- Read all instructions before using the washer.
- Do not wash articles that have been previously cleaned in, washed in, soaked in, or spotted with gasoline, dry-cleaning solvents, other flammable, or explosive substances as they give off vapors that could ignite or explode.
- Do not add gasoline, dry-cleaning solvents, or other flammable, or explosive substances to the wash water. These substances give off vapors that could ignite or explode.
- Under certain conditions, hydrogen gas may be produced in a hot water system that has not been used for 2 weeks or more. HYDROGEN GAS IS
- EXPLOSIVE. If the hot water system has not been used for such a period, before using the washing machine, turn on all hot water faucets and let the water flow from each for several minutes. This will release any accumulated hydrogen gas. As the gas is flammable, do not smoke or use an open flame during this time.
- Do not allow children to play on or in the washer. Close supervision of children is necessary when the washer is used near children.
- Before the washer is removed from service or discarded, remove the door or lid.
- Do not reach into the washer if the drum, tub or agitator is moving.
- Do not install or store the washer where it will be exposed to the weather.
- Do not tamper with controls.
- Do not repair or replace any part of the washer or attempt any servicing unless specifically recommended in this manual or in published user-repair instructions that you understand and have the skills to carry out.
- See Installation Instructions for grounding instructions.
SAVE THESE INSTRUCTIONS
INSTALLATION REQUIREMENTS
Tools and Parts
Gather required tools and parts before starting installation.
Tools needed
Pliers that open to 1¾»
Level
Wood Block
Ruler or measuring tape
Bucket
Parts supplied:
NOTE: All parts supplied for installation are in cardboard insert in the top of the washer.
Drain hose with clamp, U-form, and cable tie
Parts needed (Not supplied with washer):
Inlet hoses with flat washers
Location Requirement
Select proper location for your washer to improve performance and minimize noise and possible «washer walk». Install your washer in a basement, laundry room, closet, or recessed area.
You will need
- A water heater set to 120°F (49°C).
- A grounded electrical outlet located within 4 ft. (1.2 m) of power cord on back of washer.
- Hot and cold water faucets located within 3 ft. (0.9 m) of hot and cold water fill valves on washer, and water pressure of 20-100 psi (138-690 kPa).
- A level floor with maximum slope of 1″ (25 mm) under entire washer. Installing on carpet is not recommended.
- Floor must support washer’s total weight (with water and load) of 315 lbs (143 kgs).
Do not install, store, or operate washer where it will be exposed to weather or in temperatures below 32°F (0°C).Water remaining in washer after use may cause damage in low temperatures. See the «Winter Storage Care» section for winterizing information.
Proper installation is your responsibility.
Recessed area or closet installation
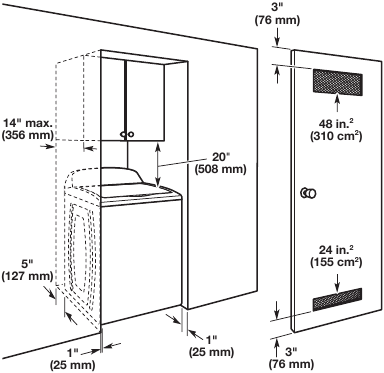
Dimensions show recommended spacing allowed, except for closet door ventilation openings which are minimum required. This washer has been tested for installation with spacing of 0″ (0 mm) clearance on the sides. Consider allowing more space for ease of installation and servicing, and spacing for companion appliances and clearances for walls, doors, and floor moldings. Add spacing of 1″ (25 mm) on all sides of washer to reduce noise transfer. If a closet door or louvered door is installed, top and bottom air openings in door are required.
Drain System
Drain system can be installed using a floor drain, wall standpipe, floor standpipe, or laundry tub. Select method you need.
Floor standpipe drain system
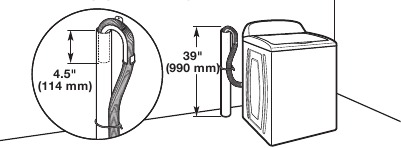
Minimum diameter for a standpipe drain: 2″ (51 mm). Minimum carry-away capacity: 17 gal. (64 L) per minute. Top of standpipe must be at least 39″ (990 mm) high; install no higher than 96″ (2.44 m) from bottom of washer. If you must install higher than 96″ (2.44 m), you will need a sump pump system.
Wall standpipe drain system
See requirements for floor standpipe drain system.
Floor drain system
Floor drain system requires a Siphon Break Kit
(Part Number 285834), 2 Connector Kits (Part Number 285835), and an Extension Drain Hose (Part Number 285863) that may be purchased separately. To order, please see toll-free phone numbers in «Assistance or Service» section. Minimum siphon break: 28″ (710 mm) from bottom of washer. (Additional hoses may be needed.)
Laundry tub drain system
Minimum capacity: 20 gal. (76 L). Top of laundry tub must be at least 39″ (990 mm) above floor; install no higher than 96″ (2.44 m) from bottom of washer.
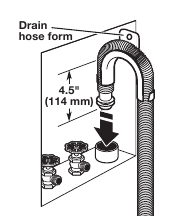
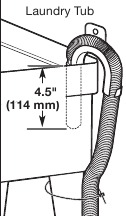
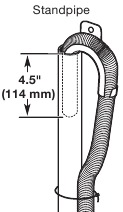
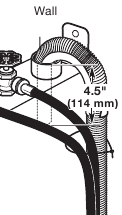
To avoid siphoning, no more than 4.5″ (114 mm) of drain hose should be inside standpipe or below the top of wash tub. Secure drain hose with cable tie.
Electrical Requirements
Electrical Shock Hazard
Plug into a grounded 3 prong outlet.
Do not remove ground prong.
Do not use an adapter.
Do not use an extension cord.
Failure to follow these instructions can result in death, fire, or electrical shock.
- A 120 V, 60 Hz., AC only, 15 or 20 A, fused electrical supply is required. A time-delay fuse or circuit breaker is recommended. It is recommended that a separate circuit breaker serving only this appliance be provided.
- This washer is equipped with a power supply cord having a 3 prong grounding plug.
- To minimize possible shock hazard, the cord must be plugged into a mating, 3 prong, grounding-type outlet, grounded in accordance with local codes and ordinances. If a mating outlet is not available, it is the personal responsibility and obligation of the customer to have the properly grounded outlet installed by a qualified electrician.
- If codes permit and a separate ground wire is used, it is recommended that a qualified electrician determine that the ground path is adequate.
- Do not ground to a gas pipe.
- Check with a qualified electrician if you are not sure the washer is properly grounded.
- Do not have a fuse in the neutral or ground circuit.
GROUNDING INSTRUCTIONS
For a grounded, cord-connected washer:
This washer must be grounded. In the event of a malfunction or breakdown, grounding will reduce the risk of electrical shock by providing a path of least resistance for electric current. This washer is equipped with a cord having an equipment-grounding conductor and a grounding plug. The plug must be plugged into an appropriate outlet that is properly installed and grounded in accordance with all local codes and ordinances.
Improper connection of the equipment-grounding conductor can result in a risk of electric shock. Check with a qualified electrician or serviceman if you are in doubt as to whether the appliance is properly grounded.
Do not modify the plug provided with the appliance — if it will not fit the outlet, have a proper outlet installed by a qualified electrician.
For a permanently connected washer:
This washer must be connected to a grounded metal, permanent wiring system, or an equipment grounding conductor must be run with the circuit conductors and connected to the equipment-grounding terminal or lead on the appliance.
INSTALLATION INSTRUCTIONS
Excessive Weight Hazard
Use two or more people to move and install washer.
Failure to do so can result in back or other injury.
Before you start: Remove shipping materials.
It is necessary to remove all shipping materials for proper operation and to avoid excessive noise from washer.
- Move washer
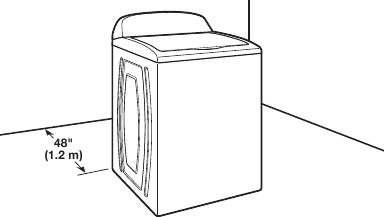
Move washer to within 4 ft. (1.2 m) of its final location; it must be in a fully upright position.
NOTE: To avoid floor damage, set washer onto cardboard before moving it and make sure lid is taped shut. - Remove shipping base
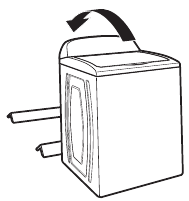
To avoid damaging floor, place cardboard supports from shipping carton on floor behind washer. Tip washer back and place on cardboard supports. Remove shipping base. Set washer upright.
Removing shipping base is necessary for proper operation. If your washer includes a sound shield, please refer to the instructions included with the sound shield to install it at this time. - Remove packing tray from tub
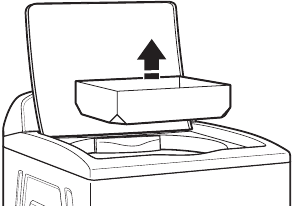
Remove tape from washer lid, open lid, and remove cardboard packing tray from tub. Remove all other packaging materials from washer tub. Be sure to remove all parts from tray.
NOTE: Keep tray in case you need to move washer later. - Free power cord
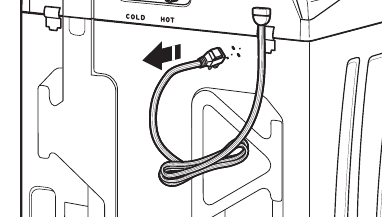
Firmly grasp power cord plug and pull to free from rear panel.
Gently place power cord over console to allow free access to back of washer.
Connect Drain Hose
- Attach drain hose to drain port
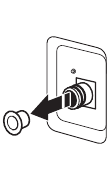
Remove the red plastic plug from the black drain port on the back of the washer.
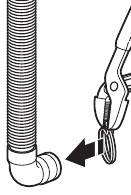
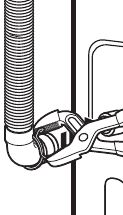
If clamp is not already in place on elbow end of drain hose, slide it over end as shown. Squeeze clamp with pliers and slide black elbow end of drain hose onto black drain port and secure with clamp.
For a laundry tub or standpipe drain, go to step 6.
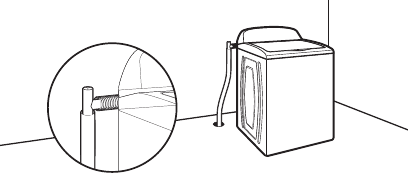
For a floor drain, remove the preinstalled drain hose form as shown in Step 7. You may need additional parts with separate directions. See the «Tools and Parts» section. - Place drain hose in standpipe
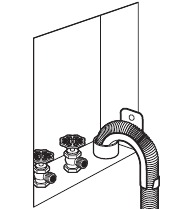
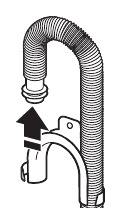
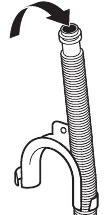
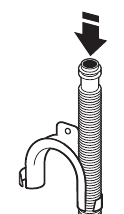
Place hose into standpipe (shown in picture) or over side of laundry tub.
4.5″ (114 mm) of drain hose should be inside standpipe; do not force excess hose into standpipe or lay on bottom of laundry tub. Drain hose form must be used. - Remove drain hose form (floor drain installations only)
For floor drain installations, you will need to remove the drain hose form from the end of the drain hose. You may need additional parts with separate directions. See the «Tools and Parts» section.
Connect Inlet Hoses
Washer must be connected to water faucets with new inlet hoses with flat washers (not provided). Do not use old hoses.
NOTE: Both hoses must be attached and have water flowing to inlet valves. If you are only connecting to a cold water faucet, you must use a Y-adapter (not provided).
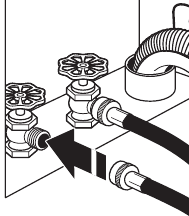
- Connect inlet hoses to water faucets
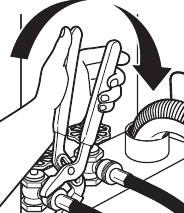
Attach hose to hot water faucet. Screw on coupling by hand until it is seated on washer. Use pliers to tighten couplings an additional two-thirds turn. Repeat this step with second hose for cold water faucet.
Do not overtighten or use tape or sealants on valve when attaching to faucets or washer. Damage can result. - Clean water lines
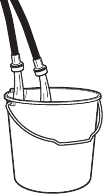
Run water for a few seconds through hoses into a laundry tub, drainpipe, or bucket to avoid clogs. Water should run until clear.
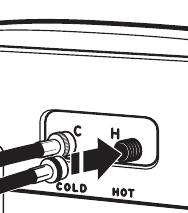
Make note of which hose is connected to hot water to help in attaching hoses to washer correctly. - Connect inlet hoses to washer
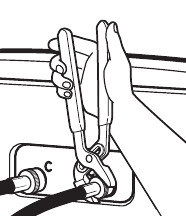
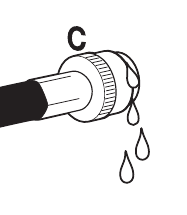
Attach hot water hose to hot water inlet valve marked with a red ring. Screw coupling by hand until it is snug. Use pliers to tighten couplings an additional two-thirds turn. Repeat with cold water inlet valve.
To reduce risk of hose failure, replace the hoses every five years. Record hose installation or replacement dates for future reference.- Periodically inspect and replace hoses if bulges, kinks, cuts, wear, or leaks are found.
- Check for leaks
Turn on water faucets to check for leaks. A small amount of water may enter washer. It will drain later. - Secure drain hose
Secure drain hose to laundry tub leg, drain standpipe, or inlet hoses for wall standpipe with cable tie.
Level Washer
Level washer properly to reduce excess noise and vibration.
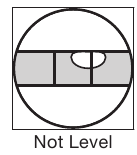
- Check levelness of washer
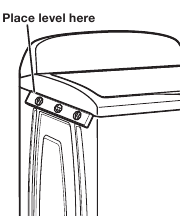
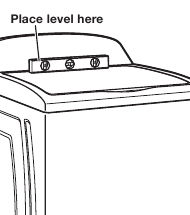
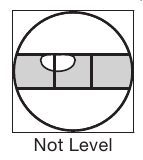
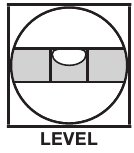
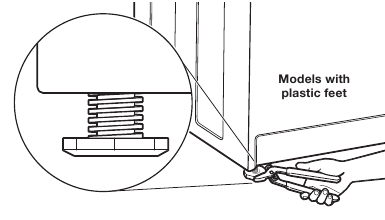
Move the washer to its final location. Place a level on top edges of washer. Use side seam as a guide to check levelness of sides. Check levelness of front using lid, as shown. Rock washer back and forth to make sure all four feet make solid contact with floor. If washer is level, skip to step 15. - Adjust leveling feet
If washer is not level:
Use adjustable pliers to turn the plastic leveling foot counterclockwise to lower the washer or clockwise to raise the washer. On all models, recheck levelness of washer and repeat as needed.
HELPFUL TIPS:- You may need to adjust two different feet to level your unit. Ensure each foot remains secured to the washer’s base.
- You may want to prop up the front of the washer about 4″ (102 mm) with a wood block or similar object that will support the weight of the washer when making the adjustments.
Electrical Shock Hazard
Plug into a grounded 3 prong outlet.
Do not remove ground prong.
Do not use an adapter.
Do not use an extension cord.
Failure to follow these instructions can result in death, fire, or electrical shock.
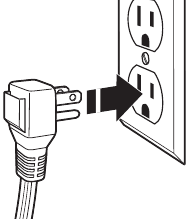
- Plug into a grounded 3 prong outlet
Complete Installation Checklist
❑ Check electrical requirements. Be sure you have correct electrical supply and recommended grounding method.
❑ Check that all parts are now installed. If there is an extra part, go back through steps to see what was skipped.
❑ Check that you have all of your tools.
❑ Check that shipping materials were completely removed from washer.
❑ Check that the washer is level.
❑ Check that water faucets are on.
❑ Check for leaks around faucets and inlet hoses.
❑ Remove protective film from console and any tape remaining on washer.
❑ Check that washer is plugged into a grounded 3 prong outlet.
❑ Dispose of/recycle all packaging materials.
❑ Read the «Washer Care» section in this book.
❑ To test and clean your washer, measure 1/2 of normal recommended amount of powdered or liquid detergent and pour it into washer basket or detergent dispenser (on some models). Close lid. Select any cycle. Start washer and allow to complete full cycle.
WASHER MAINTENANCE AND CARE
WATER INLET HOSES
Replace inlet hoses after 5 years of use to reduce the risk of hose failure. Periodically inspect and replace inlet hoses if bulges, kinks, cuts, wear, or leaks are found.
When replacing your inlet hoses, mark the date of replacement on the label with a permanent marker.
NOTE: This washer does not include inlet hoses. See the «Installation & Care Instructions Manual» for more information.
WASHER CARE
Recommendations to Help Keep Your Washer Clean and Performing at its Best
- Always use High Efficiency (HE) detergents and follow the HE detergent manufacturer’s instructions regarding the amount of HE detergent to use. Never use more than the recommended amount because that may increase the rate at which detergent and soil residue accumulate inside your washer, which in turn may result in undesirable odor.
- Use warm and hot wash water settings sometimes (not exclusively cold water washes), because they do a better job of controlling the rate at which soils and detergent accumulate.
- Always leave the washer lid open between uses to help dry out the washer and prevent the buildup of odor-causing residue.
Cleaning Your Top Loading Washer
Read these instructions completely before beginning the routine cleaning processes recommended below. This Washer Maintenance Procedure should be performed, at a minimum, once per month or every 30 wash cycles, whichever occurs sooner, to control the rate at which soils and detergent may otherwise accumulate in your washer.
Cleaning the Inside of the Washer
To keep your washer odor-free, follow the usage instructions provided above, and use this recommended monthly cleaning procedure:
Clean Washer Cycle
This washer has a special cycle that uses higher water volumes in combination with affresh® Washer Cleaner or liquid chlorine bleach to clean the inside of the washer.
Begin procedure
- affresh® Washer Cleaner Cycle Procedure (Recommended for Best Performance):
- Open the washer lid and remove any clothing or items.
- Place an affresh® Washer Cleaner tablet in the bottom of the washer basket.
- Do not place an affresh® Washer Cleaner tablet in the detergent dispenser.
- Do not add any detergent or other chemical to the washer when following this procedure.
- Close the washer lid.
- Select the CLEAN WASHER cycle.
- Touch and hold the START/PAUSE button to begin the cycle. The Clean Washer Cycle Operation is described below.NOTE: For best results, do not interrupt cycle. If cycle must be interrupted, touch POWER. After the Clean Washer cycle has stopped, run a RINSE & SPIN cycle to rinse cleaner from washer.
- Chlorine Bleach Procedure (Alternative):
- Open the washer lid and remove any clothing or items.
- Add 1 cup (236 mL) of liquid chlorine bleach to the bleach compartment.
NOTE: Use of more liquid chlorine bleach than is recommended above could cause washer damage over time. - Close the washer lid.
- Do not add any detergent or other chemical to the washer when following this procedure.
- Select the CLEAN WASHER cycle.
- Touch and hold the START/PAUSE button to begin the cycle. The Clean Washer Cycle Operation is described below.
NOTE: For best results, do not interrupt cycle. If cycle must be interrupted, touch POWER. After the Clean Washer cycle has stopped, run a RINSE & SPIN cycle to rinse cleaner from washer.
Description of Clean Washer Cycle Operation:
- This cycle will fill to a water level higher than in normal wash cycles to provide rinsing at a level above the water line for normal wash cycle.
- During this cycle, there will be some agitation and spinning to increase the removal of soils. After this cycle is complete, leave the lid open to allow for better ventilation and drying of the washer interior.
Cleaning the Dispensers
After a period of using your washer, you may find some residue buildup in the washer’s dispensers. To remove residue from the dispensers, wipe them with a damp cloth and towel dry. Do not attempt to remove the dispensers or trim for cleaning. The dispensers and trim are not removable. If your model has a dispenser drawer, however, remove the drawer and clean it before or after you run the Clean Washer cycle. Use an all purpose surface cleaner, if needed.
Cleaning the Outside of the Washer
Use a soft, damp cloth or sponge to wipe away any spills. Use only mild soaps or cleaners when cleaning external washer surfaces.
To avoid damaging the washer’s finish, do not use abrasive products.
NON-USE AND VACATION CARE
Operate your washer only when you are home. If moving, or not using your washer for a period of time, follow these steps:
- Unplug or disconnect power to washer.
- Turn off water supply to washer, to avoid flooding due to water pressure surge.
CLEANING YOUR DISPENSER
(*Varies according to model)
You may find laundry product residue leftover in your dispenser drawer or in bulk dispenser. To remove residue, follow below recommended cleaning procedures:
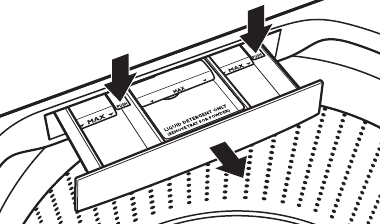
Dispenser Drawer
- Pull drawer out until you feel resistance.
- Push 2 tabs downward, and then continue pulling out.
- Wash in warm, soapy water, using a mild detergent.
- Rinse with warm water.
- Air dry, or dry with a towel, then place back into slot.
Dispenser drawer and tray are not dishwasher safe.
Bulk Dispenser
- Pull drawer completely out.
- Open dispenser lid.
- Rinse with warm water.
- Air dry or dry with a towel, then place back into slot.
Bulk dispenser and tray are not dishwasher safe.
WINTER STORAGE CARE
To avoid damage, install and store washer where it will not freeze. Because some water may stay in hoses, freezing can damage washer. If storing or moving during freezing weather, winterize your washer.
To winterize washer:
- Shut off both water faucets; disconnect and drain water inlet hoses.
- Put 1 qt. (1 L) of R/V/-type antifreeze into empty basket.
- Unplug washer or disconnect power.
TRANSPORTING YOUR WASHER
- Shut off both water faucets. Disconnect and drain water inlet hoses.
- If washer will be moved during freezing weather, follow WINTER STORAGE CARE directions before moving.
- Disconnect drain hose from drain system and drain any remaining water into a pan or bucket. Disconnect drain hose from back of washer.
- Unplug power cord.
- Place inlet hoses and drain hose inside washer basket.
- Drape power cord over edge and into washer basket.
- Place packing tray from original shipping materials back inside washer. If you do not have packing tray, place heavy blankets or towels into basket opening. Close lid and place tape over lid and down front of washer. Keep lid taped until washer is placed in new location. Transport washer in upright position.
Electrical Shock Hazard
Plug into a grounded 3 prong outlet.
Do not remove ground prong.
Do not use an adapter.
Do not use an extension cord.
Failure to follow these instructions can result in death, fire, or electrical shock.
REINSTALLING/USING WASHER AGAIN
To reinstall washer after non-use, vacation, winter storage, or moving:
- Refer to «Installation & Care Instructions Manual» to locate, level, and connect washer.
- Before using again, run washer through the following recommended procedure:
To use washer again:
- Flush water pipes and hoses. Reconnect water inlet hoses. Turn on both water faucets.
- Plug in washer or reconnect power.
- Run washer through BEDDING cycle to clean washer and remove antifreeze, if used. Use only HE (High Efficiency) detergent. Use ½ the manufacturer’s recommended amount for a medium-size load.
©2019 All rights reserved.
Videos
How to Install Your Whirlpool Top Load Washing Machine Мшвущ
Documents / Resources
Download manual
Here you can download full pdf version of manual, it may contain additional safety instructions, warranty information, FCC rules, etc.
Download Whirlpool Top Loading Washing Machine Owners Manual
Руководства Rosenlew RTT2255 Размер файлов: 2311 KB, Язык: English, Формат: pdf, Платформа: Windows/Linux, Дата: 2016-11-09
На данной странице вы можете скачать руководства Rosenlew RTT2255. Мы предлагаем вам ознакомиться с руководством пользователя, инструкцией по сервисному обслуживанию и ремонту.
Также здесь вы найдете список заказных номеров на комплектующие Rosenlew RTT2255.
Все файлы предоставляются исключительно в ознакомительных целях. И не являютя руководством по ремонту, а направлены лишь на то чтобы помочь вам более детально ознакомиться с принципом построения устройства.
Содержимое представленных здесь руководств требуют от вас знания технического английского языка.
Если вы собираетесь скачать руководство по сервисному обслуживанию Rosenlew RTT2255, иными словами сервис мануал, вы дожны обладать хотя бы минимальными познаниями в области электроники и пониманием базовых принципов работы электромеханических устройств.
Для просмотра руководств вам понадобится Adobe Acrobat Reader версии 9 и выше либо другая программа для просмотра pdf файлов.
В связи с популярностью информации представленной на сайте и ее бесплатного предоставления конечному пользователю, убедительная просьба использовать специальные программные продукты для многопотокового скачивания файлов.
Руководства для Rosenlew RTT2255
- Руководство пользователя (User manual)
- Руководство по сервисному обслуживанию (Service manual)
- Руководство по ремонту (Repair manual)
- Перечень комплектующих (PartList)
В настоящее время вы находитесь на странице с руководствами Rosenlew стиральная машина. Выберите один из продуктов, чтобы сразу перейти к руководству по этому продукту. Не можете найти Rosenlew ? Тогда попробуйте вбить в поле поиска Rosenlew и модель, чтобы найти нужное руководство Rosenlew. На ManualsPDF.ru в настоящее время имеется 22 руководств Rosenlew . Самые популярные Rosenlew стиральная машина:
- Rosenlew RTT7122N
- Rosenlew RTT0950
- Rosenlew RTT1062
Последнее добавленное руководство Rosenlew было добавлено 2020-01-16, и это Rosenlew RTT741.


 Ardo A 1000
 Ardo A 1000 X
 Ardo A 1033
 Ardo A 1200 Inox
 Ardo A 1200 X
 Ardo A 400
 Ardo A 400 X
 Ardo A 433
 Ardo A 533
 Ardo A 600
 Ardo A 600 X
 Ardo A 6000 X
 Ardo A 633
 Ardo A 800
 Ardo A 800 X
 Ardo A 814
 Ardo A 833
 Ardo A1000X
 Ardo A1033
 Ardo A1400
 Ardo A400
 Ardo A433
 Ardo A533
 Ardo A600
 Ardo A6000
 Ardo A6000X
 Ardo A6200X
 Ardo A633
 Ardo A800
 Ardo A814
 Ardo A833
 Ardo AE 1000X
 Ardo AE 1010
 Ardo AE 1033
 Ardo AE 1200X
 Ardo AE 1400X
 Ardo AE 800X
 Ardo AE 810
 Ardo AE 833
 Ardo AED 1000 X Silver
 Ardo AED 1000 X White
 Ardo AED 1000X
 Ardo AED 1200 X Silver
 Ardo AED 1200 X White
 Ardo AED 1200X
 Ardo AED 800
 Ardo AED 800 X Silver
 Ardo AED 800 X White
 Ardo AED800
 Ardo ANNA
 Ardo AS965
 Ardo C 640 G6 WHITE
 Ardo C 6640 G6
 Ardo CA 35
 Ardo CN 60 inox
 Ardo CO 1804 SA
 Ardo CO 1812 SA
 Ardo CO 1812 SH
 Ardo CO 2610 SHY
 Ardo CO 3012 A-1
 Ardo CO 3012 BA
 Ardo CO 3012 BA-2
 Ardo CO 3111 SH
 Ardo COF 2110 SA
 Ardo COF 2110 SAE
 Ardo COF 2110 SAX
 Ardo COF 2510 SAE
 Ardo COF 2510 SAX
 Ardo COG 2108 SA
 Ardo DF 60 L
 Ardo DF 60 LC
 Ardo DF60L
 Ardo DF60LC
 Ardo DP 23 SA
 Ardo DP 24 SA
 Ardo DP 28 SA
 Ardo DP 36 SA
 Ardo DPG 23 SA
 Ardo DPG 36 SA
 Ardo DW 45 E
 Ardo DW 60 E
 Ardo DW 60 ES
 Ardo DW 60 S
 Ardo DW60
 Ardo DW60ES
 Ardo DW60L
 Ardo DWB45
 Ardo DWI 45 AE
 Ardo DWI45 AE
 Ardo DWTI 14
 Ardo DWTI14
 Ardo EVA
 Ardo FL
 Ardo FL 105 L
 Ardo FL 105 LX
 Ardo FL 105 S
 Ardo FL 105 SX
 Ardo FL 126 L
 Ardo FL 85 S
 Ardo FL105L
 Ardo FL105LX
 Ardo FL105SX
 Ardo FL106LY
 Ardo FL60E
 Ardo FL80E
 Ardo FL85SX
 Ardo FLN 106 EW
 Ardo FLN 128 LW
 Ardo FLN83
 Ardo FLO 168 D
 Ardo FLO106L
 Ardo FLO106S
 Ardo FLO107LB
 Ardo FLO128L
 Ardo FLO128LB
 Ardo FLO168D
 Ardo FLO168LB
 Ardo FLO86E
 Ardo FLOI106S
 Ardo FLOI126L
 Ardo FLOI147L
 Ardo FLOI86E
 Ardo FLS 101 L
 Ardo FLS 105 L
 Ardo FLS 105 S
 Ardo FLS 120 L
 Ardo FLS 121 L
 Ardo FLS 81 L
 Ardo FLS 85 S
 Ardo FLS 85 SX
 Ardo FLS101L
 Ardo FLS105
 Ardo FLS105L
 Ardo FLS105S
 Ardo FLS121
 Ardo FLS80E
 Ardo FLS81L
 Ardo FLS85S
 Ardo FLSN
 Ardo FLSN 104 EW
 Ardo FLSN 104 SW
 Ardo FLSN 83 EW
 Ardo FLSN 83 SW
 Ardo FLSN 84 EW
 Ardo FLSO 125 D
 Ardo FLSO105S
 Ardo FLSO106L
 Ardo FLSO106S
 Ardo FLSO125D
 Ardo FLSO125L
 Ardo FLSO126L
 Ardo FLSO85E
 Ardo FLSO86E
 Ardo FLSO86S
 Ardo FLZ 105 L
 Ardo FLZ 105 S
 Ardo FLZ105S
 Ardo FLZ80E
 Ardo FLZO105S
 Ardo FLZO80E
 Ardo FR 12 SA
 Ardo FR 20 SB
 Ardo IDP 24 SH
 Ardo IMP 15 SA
 Ardo IT 90 inox
 Ardo LS 9001
 Ardo LS 9117 BX
 Ardo LS 9205 E
 Ardo LS 9212 A
 Ardo LS 9212 B
 Ardo LS 9212 ED
 Ardo LS 9212 EDT
 Ardo LS 9212A1-2
 Ardo LS 9325 BE
 Ardo LS9209
 Ardo LS9212
 Ardo LS9212A-2
 Ardo LS9212A1
 Ardo LS9212B-2
 Ardo LS9212ED
 Ardo Maria 808
 Ardo MARIA808
 Ardo PN 90 inox
 Ardo RA 105 white
 Ardo S 1000
 Ardo S 1000 X
 Ardo S 3 60 inox
 Ardo S1000X
 Ardo SC 120
 Ardo SED 810
 Ardo SED810


