| Калибровка весов SI-1 полным весом | |
|---|---|
| Перед калибровкой весы рекомендуется прогреть в течение 30 мин. | |
| 1. Удерживая калибровочную кнопку, включить весы | SPAn |
| 3. Нажать кнопку «ТАРА» | ZEro |
| 4. Нажать кнопку * («звездочка») | rEAd |
| FULL | |
| 5. Поместить на весы вес, равный НПВ, и нажать * | rEAd |
| End | |
| SELF | |
| 6. Убрать груз, выключить и включить весы |
-
Contents
-
Table of Contents
-
Troubleshooting
-
Bookmarks
Quick Links
A
COM
O W N E R ‘ S M A N U A L
MODEL: JW-1
TOP LOADING BALANCE
VER 1.10
Related Manuals for Acom JW-1
Summary of Contents for Acom JW-1
-
Page 1
O W N E R ’ S M A N U A L MODEL: JW-1 TOP LOADING BALANCE VER 1.10… -
Page 2: Table Of Contents
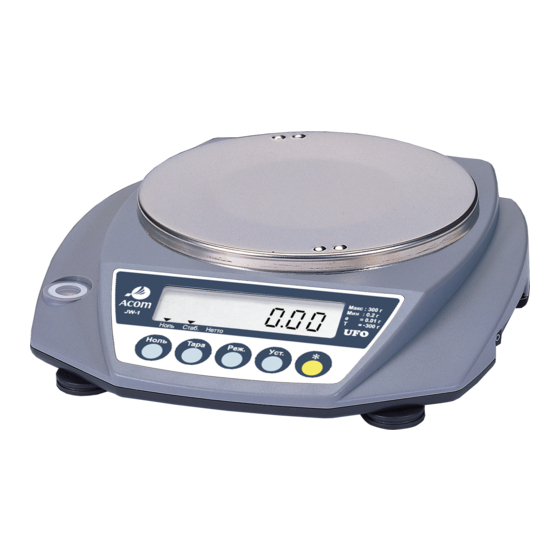
ENABLE & DISABLE WEIGHING UNITS ……. 13 PREFACE Acom Corporation would like to thank you for purchasing our model JW-1 Advanced top loading balance. We are committed to creating high quality low maintenance products and supplying our customers with diligent customer service.
-
Page 3: Specifications
Specifications Model: JW-1 Maximum Capacity: 300 g 600 g 1,500 g 3,000 g Minimum Graduation: 0.01 g 0.02 g 0.05 g 0.1 g Maximum Tare: Full Capacity External Resolution: 1/30,000 A/D Conversion Rate: 3 Updates / second (adjustable) gram, piece, percent, carat, ounce, pound, pennyweight, Units &…
-
Page 4: Function Keys
300 g & 600 g Function Keys ZERO Zero key, used to manually set the zero point. TARE Tare key, used to enter tares and clear tares. Mode key, used to toggle between the different weighing units, MODE counting features, and percentage mode. Set key, used to sample the Piece Weight in Counting mode, and to take a sample in Percent mode.
-
Page 5: Display
Display BATT 8.8.8.8.8.8. c.t. Zero Stable Zero lamp indicates that the balance is at net or gross zero. Stable lamp indicates that the weight on the balance is stable. Net lamp indicates that there is a tare set and that the displayed weight is the net weight.
-
Page 6: Unpacking & Assembly
Unpacking & Assembly Your JW-1 scale should come with the following: Parts Name Units IN CARTON BOX STYROFOAM BODY POLY BAG MANUAL POLY BAG AC ADAPTER ADAPTER BOX MANUAL PLATTER PLATFORM 4-10 BALANCE 4-15 SILICA DESICANT…
-
Page 7: Safety Precautions
0.00000 This example is the JW-1 300g in lb mode. If all precautions are followed properly, you will see this display along with the ZERO and STABLE lamps and the lb enunciator.
-
Page 8
Simple Weighing 1. Make sure that the balance is at ZERO and STABLE 2. Place a load on the platter 3. After the STABLE indicator turns on you may read the weight 4. Remove the load Entering Tares 1. Make sure that the balance is at ZERO and STABLE 2. -
Page 9
12. Remove sample from the platter and repeat steps 10 thru 12 as many times as necessary or proceed to step 13 13. If necessary, follow directions for removing a tare Parts Counting Specifications JW-1 300g 600 g 1500 g 3000g 0.01 g… -
Page 10: Settings Mode
Percentage Sampling Specifications JW-1 300g 600 g 1500 g 3000g 10 g Minimum 100% Weight 0.01% Minimum Percentage 30,000.0 % Maximum Percentage NOTE: Once a successful sample has been accepted by the balance, the Piece Weight and the Percentage will continue to be used until it is reset by another successful sample.
-
Page 11
16. Use the SET key to toggle the value to its desired setting 17. Press the key to store the value 18. The display should read UP- key to return to Operation mode (normal use) 19. Press the SET User Parameter Specifications User Definition Range… -
Page 12: Density Measurement Option
Calculate the density by using the density formula. The picture below shows the balance being used in a density measurement application. Weigh Ranges Weigh Range Chart JW-1-300 g JW-1-600 g JW-1-1500 g JW-1-3000 g 300 x 0.01 600 x 0.02…
-
Page 13: Troubleshooting & Error Messages
Troubleshooting & Error Messages Error Message Table Definition Solution Display Turn scale on with nothing on or obstructing the platter. ZEro Initial zero point failure. Turn scale on with the platter properly placed on the scale. PROM failure. Contact Service. A/D Converter failure.
-
Page 14: Calibration
Calibration The following procedure describes how to Zero Calibrate and Span calibrate the balance. These two are always done together. Calibration 1. Turn scale off and remove the platter. 2. Locate the CAL Switch (rear of platform). 3. Press and hold down the CAL Switch while you turn on the scale. 4.
-
Page 15: Enable & Disable Weighing Units
16. Now press the MODE key 5 times and the balance will run the display test and go to Zero. 17. Press the MODE key once then turn the Power Switch is OFF and then back ON. 18. You are done! For more information go to: http://www.acomamerica.com/techs.htm#JW-1 Techs…
-
Page 16
Acom America, Inc. 404 Paulding Avenue Northvale, NJ 07647 www.acomamerica.com 800-11004-020000 Copyright 2002, All rights reserved.
Торгово-Промышленная компания «АСП»
Поставщик весоизмерительного оборудования
Автомобильные весы | Автоматизация | Модернизация
Выберите регион
- Белгород
- Волгоград
- Воронеж
- Екатеринбург
- Казань
- Краснодар
- Москва
- Новосибирск
- Симферополь
- Главная
- Калибровки
- ACOM
- Калибровка весов JW-1 (ACOM)

| Калибровка весов SI-1 полным весом | |
|---|---|
| Перед калибровкой весы рекомендуется прогреть в течение 30 мин. | |
| 1. Удерживая калибровочную кнопку, включить весы | SPAn |
| 3. Нажать кнопку «ТАРА» | ZEro |
| 4. Нажать кнопку * («звездочка») | rEAd |
| FULL | |
| 5. Поместить на весы вес, равный НПВ, и нажать * | rEAd |
| End | |
| SELF | |
| 6. Убрать груз, выключить и включить весы |

Предыдущая модель
Калибровка весов AC-100 (ACOM)
Следующая модель
Калибровка весов NETS (ACOM)

Категории
-
Все Модели
-
ACOM
-
ACS
-
Alex-SE
-
Avery Weigh-Tronix
-
CAS
-
DIGI
-
ESIT
-
HBM
-
Mettler-Toledo
-
NAIS
-
UtilCell
-
Vesar
-
Инкотекс
-
Масса-К
-
Мегавес
-
Мера
-
Метра
-
Мехэлектрон-М
-
Мидл
-
Невские весы
-
Петровес
-
Промэлектроника, Ростов
-
Прочее
-
ТВес
-
Тензо-М
-
Тензоприбор
-
УРАЛВЕС
-
ФизТех
Другие модели

2023-01-30 16:19:49
Весы торговые с ЖКИ индикатороми МТ 6-30 М(Т)ЖА-7. Установка и калибровка.(Мидл)

2023-01-25 16:53:08
Калибровка терминала WE 2108 (HBM)

2023-01-30 15:53:07
Приборы весоизмерительные МИ (модификация МИ МДАА-15Я). Руководство по эксплуатации.(Мидл)
Продолжая использовать асп.рф, Вы соглашаетесь на использование файлов cookie. Более подробную информацию
можно найти в Политике cookie
файлов.
-
Contents
-
Table of Contents
-
Troubleshooting
-
Bookmarks
Quick Links
A
COM
O W N E R ‘ S M A N U A L
MODEL: JW-1
TOP LOADING BALANCE
VER 1.10
Related Manuals for Acom JW-1
Summary of Contents for Acom JW-1
-
Page 1
O W N E R ’ S M A N U A L MODEL: JW-1 TOP LOADING BALANCE VER 1.10… -
Page 2: Table Of Contents
ENABLE & DISABLE WEIGHING UNITS ……. 13 PREFACE Acom Corporation would like to thank you for purchasing our model JW-1 Advanced top loading balance. We are committed to creating high quality low maintenance products and supplying our customers with diligent customer service.
-
Page 3: Specifications
Specifications Model: JW-1 Maximum Capacity: 300 g 600 g 1,500 g 3,000 g Minimum Graduation: 0.01 g 0.02 g 0.05 g 0.1 g Maximum Tare: Full Capacity External Resolution: 1/30,000 A/D Conversion Rate: 3 Updates / second (adjustable) gram, piece, percent, carat, ounce, pound, pennyweight, Units &…
-
Page 4: Function Keys
300 g & 600 g Function Keys ZERO Zero key, used to manually set the zero point. TARE Tare key, used to enter tares and clear tares. Mode key, used to toggle between the different weighing units, MODE counting features, and percentage mode. Set key, used to sample the Piece Weight in Counting mode, and to take a sample in Percent mode.
-
Page 5: Display
Display BATT 8.8.8.8.8.8. c.t. Zero Stable Zero lamp indicates that the balance is at net or gross zero. Stable lamp indicates that the weight on the balance is stable. Net lamp indicates that there is a tare set and that the displayed weight is the net weight.
-
Page 6: Unpacking & Assembly
Unpacking & Assembly Your JW-1 scale should come with the following: Parts Name Units IN CARTON BOX STYROFOAM BODY POLY BAG MANUAL POLY BAG AC ADAPTER ADAPTER BOX MANUAL PLATTER PLATFORM 4-10 BALANCE 4-15 SILICA DESICANT…
-
Page 7: Safety Precautions
0.00000 This example is the JW-1 300g in lb mode. If all precautions are followed properly, you will see this display along with the ZERO and STABLE lamps and the lb enunciator.
-
Page 8
Simple Weighing 1. Make sure that the balance is at ZERO and STABLE 2. Place a load on the platter 3. After the STABLE indicator turns on you may read the weight 4. Remove the load Entering Tares 1. Make sure that the balance is at ZERO and STABLE 2. -
Page 9
12. Remove sample from the platter and repeat steps 10 thru 12 as many times as necessary or proceed to step 13 13. If necessary, follow directions for removing a tare Parts Counting Specifications JW-1 300g 600 g 1500 g 3000g 0.01 g… -
Page 10: Settings Mode
Percentage Sampling Specifications JW-1 300g 600 g 1500 g 3000g 10 g Minimum 100% Weight 0.01% Minimum Percentage 30,000.0 % Maximum Percentage NOTE: Once a successful sample has been accepted by the balance, the Piece Weight and the Percentage will continue to be used until it is reset by another successful sample.
-
Page 11
16. Use the SET key to toggle the value to its desired setting 17. Press the key to store the value 18. The display should read UP- key to return to Operation mode (normal use) 19. Press the SET User Parameter Specifications User Definition Range… -
Page 12: Density Measurement Option
Calculate the density by using the density formula. The picture below shows the balance being used in a density measurement application. Weigh Ranges Weigh Range Chart JW-1-300 g JW-1-600 g JW-1-1500 g JW-1-3000 g 300 x 0.01 600 x 0.02…
-
Page 13: Troubleshooting & Error Messages
Troubleshooting & Error Messages Error Message Table Definition Solution Display Turn scale on with nothing on or obstructing the platter. ZEro Initial zero point failure. Turn scale on with the platter properly placed on the scale. PROM failure. Contact Service. A/D Converter failure.
-
Page 14: Calibration
Calibration The following procedure describes how to Zero Calibrate and Span calibrate the balance. These two are always done together. Calibration 1. Turn scale off and remove the platter. 2. Locate the CAL Switch (rear of platform). 3. Press and hold down the CAL Switch while you turn on the scale. 4.
-
Page 15: Enable & Disable Weighing Units
16. Now press the MODE key 5 times and the balance will run the display test and go to Zero. 17. Press the MODE key once then turn the Power Switch is OFF and then back ON. 18. You are done! For more information go to: http://www.acomamerica.com/techs.htm#JW-1 Techs…
-
Page 16
Acom America, Inc. 404 Paulding Avenue Northvale, NJ 07647 www.acomamerica.com 800-11004-020000 Copyright 2002, All rights reserved.
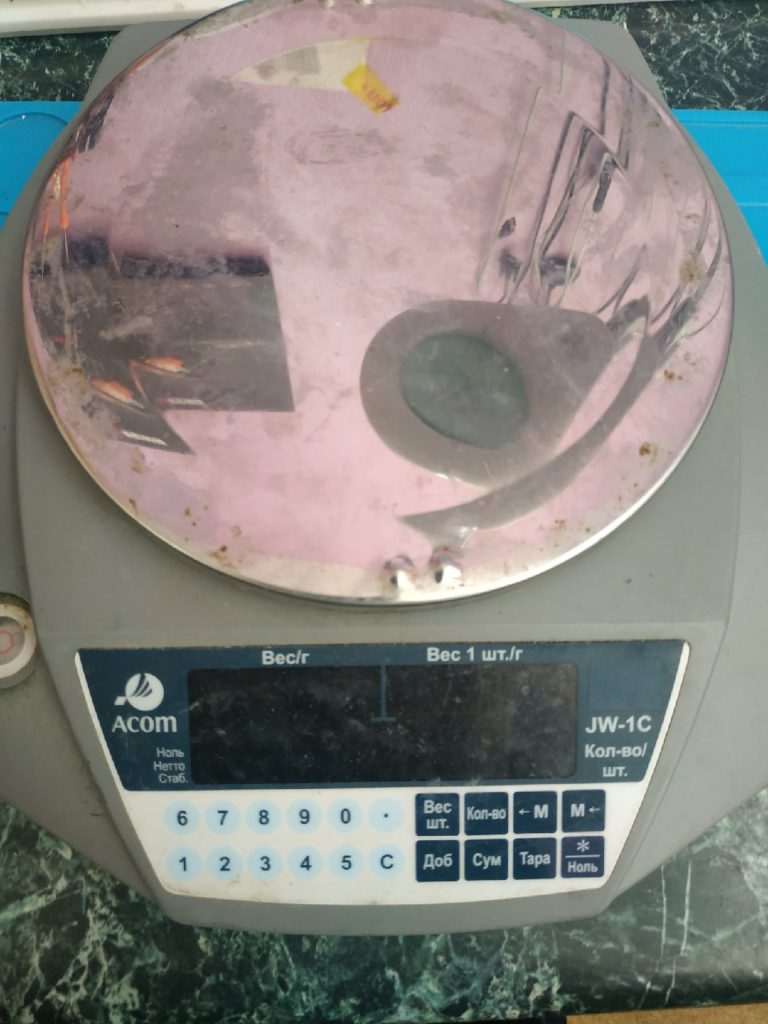
Счетные весы ACOM JW-1C предельный взвешиваемый вес 1 кг.
Заявленная неисправность – не корректно показывают вес, “плавает” вес.
Диагностика показала что взвешиваемый вес отличается от эталонного. При весе гири 500 гр. весы выдавали 590 гр.
В таких случая обычно делается калибровка весов.
Порядок калибровки весов ACOM JW-1C
Для начала подключаем весы к сети и снимаем верхнюю металлическую платформу
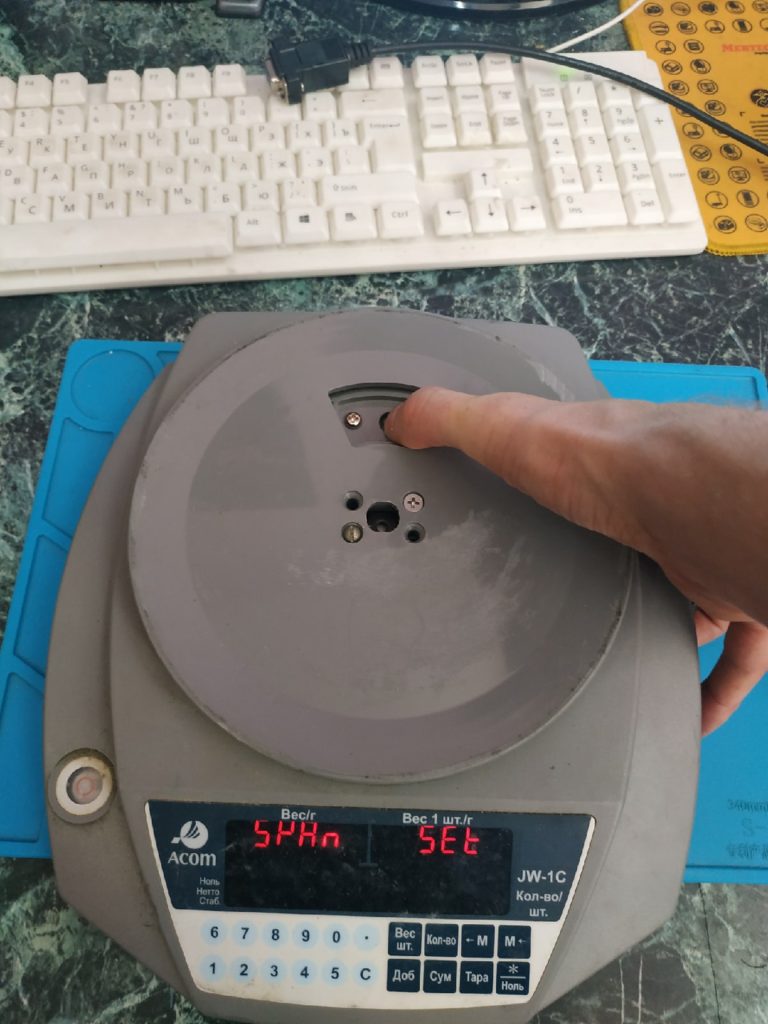
Под крышкой мы видим углубление, там находится кнопка входа в режим калибровки. Нажимаем на нее и включаем весы. На дисплее отобразится SPAn SEt – это режим калибровки весов. Отпускаем кнопку.
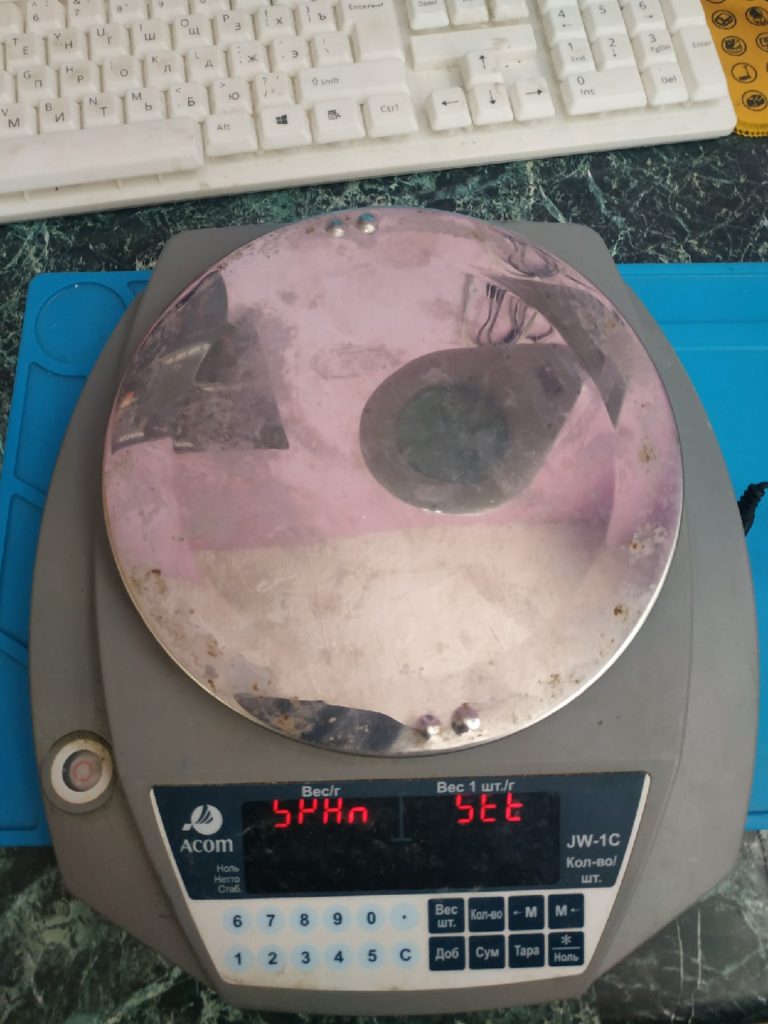 Устанавливаем платформу на место. Нажимаем кнопку “* / Ноль”.
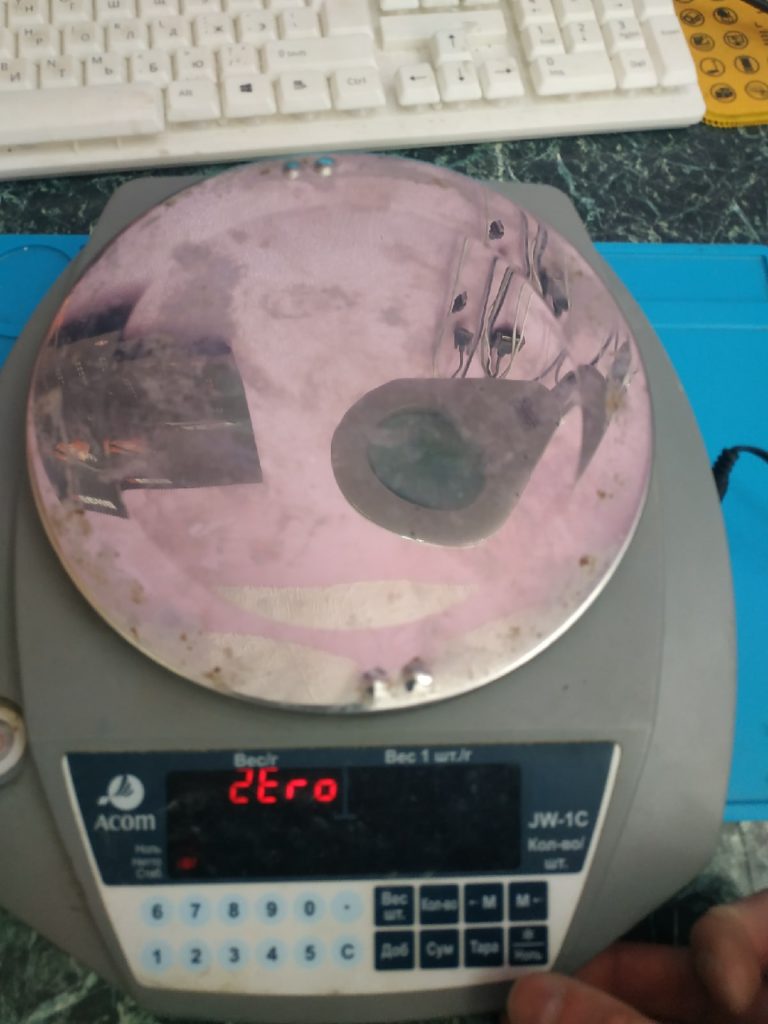 На дисплее высвечивается ZEro – калибровка ноля, т.е. платформы без нагрузки. Нажимаем еще раз кнопку “* / Ноль”
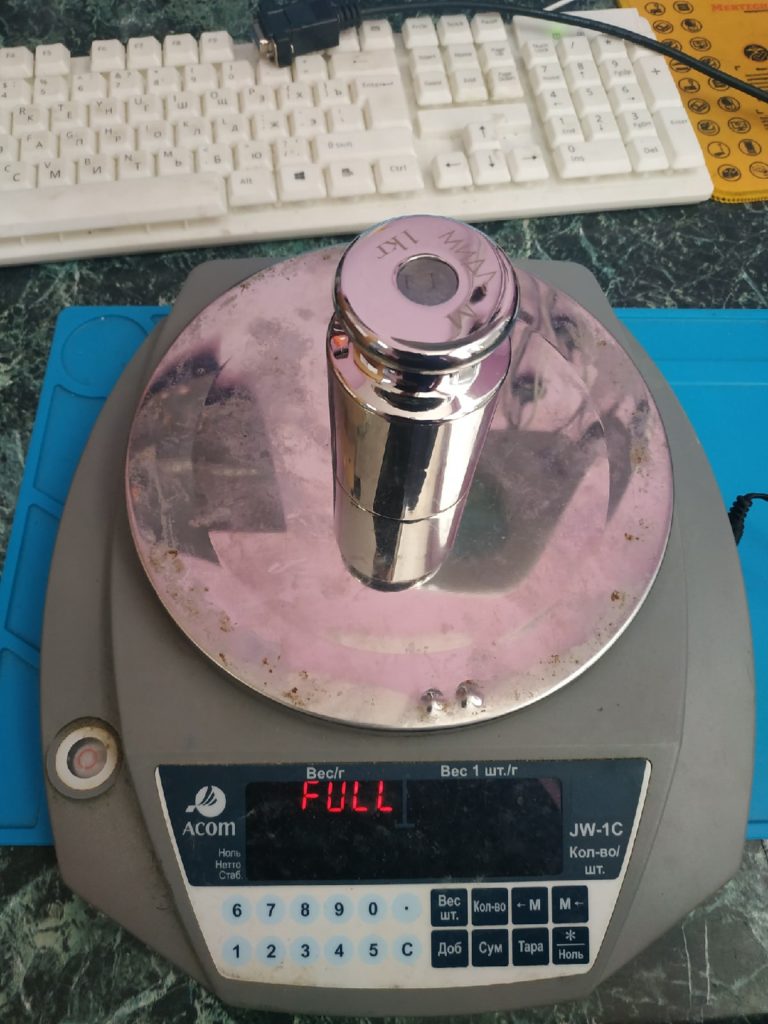
Когда на экране загорится FULL – устанавливаем предельный вес для данной модификации. В нашем случае 1 кг. После этого наживаем “* / Ноль”

Когда появится надпись на дисплее SELF tESt – это означает что калибровка завершена успешно. Снимаем калибровочную гирю. Выключаем весы.
 Включаем весы. Ожидаем полного включения и ставим гирю обратно чтобы проверить успешность калибровки.
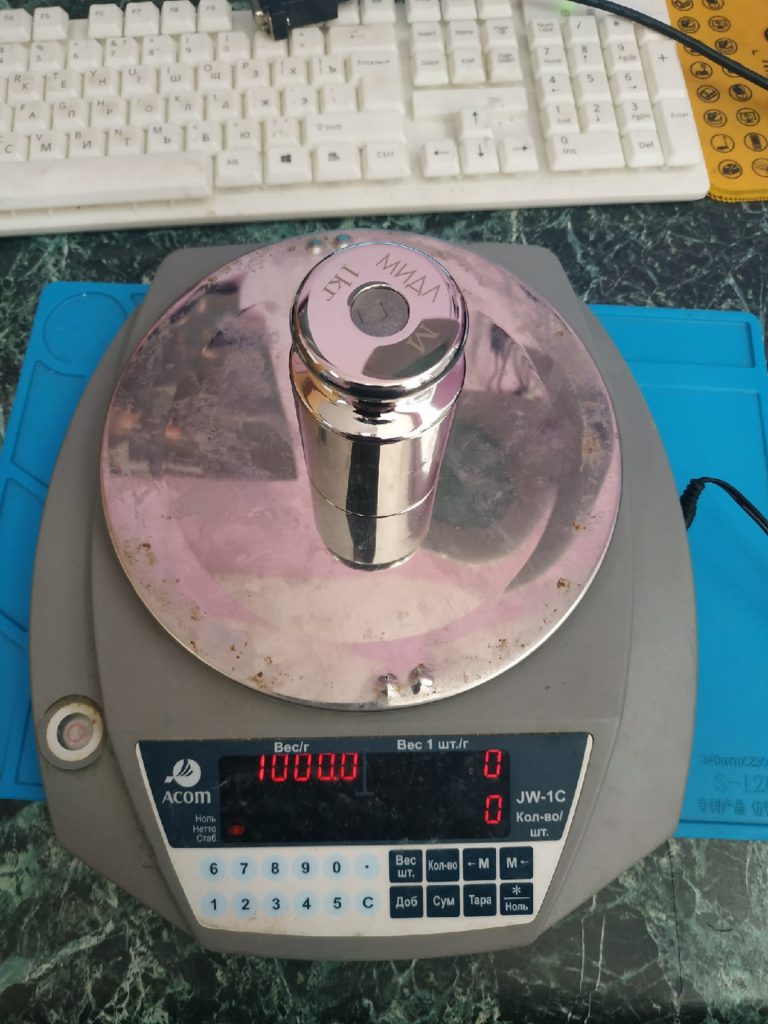
Весы показывают ровно 1 кг. Калибровка весов прошла успешно.
Причины почему весы могут показывать не верный вес:
- весы перегрузили. Каждая модель весов имеет предельный взвешиваемый вес и установка груза свыше положенного может привести к нарушению работы весов.
- весы уронили или был удар. Весы с небольшим предельным весом очень чувствительны к внешним воздействиям. Работу встроенного тензодатчика очень легко нарушить.
Поэтому лабораторные, товарные, складские весы должны проходить ежегодную периодическую поверку!
The following procedure describes how to Zero Calibrate and Span
calibrate the balance. These two are always done together.
Calibration
1. Turn scale off and remove the platter.
2. Locate the CAL Switch (rear of platform).
3. Press and hold down the CAL Switch while you turn on the scale.
4. Once the display reads SPAn , release the CAL Switch.
5. Replace the platter on the platform.
6. Press the
7. After the STABLE lamp turns on, press the
8. The scale will display rEAd and then show FULL.
9. Press the
10. Once the STABLE lamp turns on, place the mass weight on the
platter. This mass must be equal to exactly the balance’s
capacity in grams.
11. After the STABLE lamp turns on, press the
12. The scale will display rEAd , then show End , and then show
†
SELF.
13. Remove mass weight from the platter.
14. Turn scale off and then back on.
†
The balance may show HHHHHH or LLLLLL at this point
NOTE:
instead of End.
If it displays HHHHHH then the mass weight that you are using to
calibrate is too heavy or the scale may need servicing (the load cell
may have been overloaded or shock loaded.)
If it displays LLLLLL then the mass weight that you are using to
calibrate is too light or the scale may need servicing (the scale may
have been dropped or mistreated.)
12
key.
key.
key.
key.
Счетные весы ACOM JW-1C предельный взвешиваемый вес 1 кг.
Заявленная неисправность – не корректно показывают вес, “плавает” вес.
Диагностика показала что взвешиваемый вес отличается от эталонного. При весе гири 500 гр. весы выдавали 590 гр.
В таких случая обычно делается калибровка весов.
Порядок калибровки весов ACOM JW-1C
Для начала подключаем весы к сети и снимаем верхнюю металлическую платформу
Под крышкой мы видим углубление, там находится кнопка входа в режим калибровки. Нажимаем на нее и включаем весы. На дисплее отобразится SPAn SEt – это режим калибровки весов. Отпускаем кнопку.
Устанавливаем платформу на место. Нажимаем кнопку “* / Ноль”.
На дисплее высвечивается ZEro – калибровка ноля, т.е. платформы без нагрузки. Нажимаем еще раз кнопку “* / Ноль”
Когда на экране загорится FULL – устанавливаем предельный вес для данной модификации. В нашем случае 1 кг. После этого наживаем “* / Ноль”
Когда появится надпись на дисплее SELF tESt – это означает что калибровка завершена успешно. Снимаем калибровочную гирю. Выключаем весы.
Включаем весы. Ожидаем полного включения и ставим гирю обратно чтобы проверить успешность калибровки.
Весы показывают ровно 1 кг. Калибровка весов прошла успешно.
Причины почему весы могут показывать не верный вес:
- весы перегрузили. Каждая модель весов имеет предельный взвешиваемый вес и установка груза свыше положенного может привести к нарушению работы весов.
- весы уронили или был удар. Весы с небольшим предельным весом очень чувствительны к внешним воздействиям. Работу встроенного тензодатчика очень легко нарушить.
Поэтому лабораторные, товарные, складские весы должны проходить ежегодную периодическую поверку!
The following procedure describes how to Zero Calibrate and Span
calibrate the balance. These two are always done together.
Calibration
1. Turn scale off and remove the platter.
2. Locate the CAL Switch (rear of platform).
3. Press and hold down the CAL Switch while you turn on the scale.
4. Once the display reads SPAn , release the CAL Switch.
5. Replace the platter on the platform.
6. Press the
7. After the STABLE lamp turns on, press the
8. The scale will display rEAd and then show FULL.
9. Press the
10. Once the STABLE lamp turns on, place the mass weight on the
platter. This mass must be equal to exactly the balance’s
capacity in grams.
11. After the STABLE lamp turns on, press the
12. The scale will display rEAd , then show End , and then show
†
SELF.
13. Remove mass weight from the platter.
14. Turn scale off and then back on.
†
The balance may show HHHHHH or LLLLLL at this point
NOTE:
instead of End.
If it displays HHHHHH then the mass weight that you are using to
calibrate is too heavy or the scale may need servicing (the load cell
may have been overloaded or shock loaded.)
If it displays LLLLLL then the mass weight that you are using to
calibrate is too light or the scale may need servicing (the scale may
have been dropped or mistreated.)
12
key.
key.
key.
key.