-
Contents
-
Table of Contents
-
Bookmarks
Quick Links
U
M
SER
ANUAL
Label Dispenser
ALS
204/206
256
Edition 11 — 12/2014 — Translation of original version
Related Manuals for Avery Dennison ALS 204
Summary of Contents for Avery Dennison ALS 204
-
Page 1
ANUAL Label Dispenser 204/206 Edition 11 — 12/2014 — Translation of original version… -
Page 3: Table Of Contents
ONTENTS Please note 2.1.5 Technical specifications ….21 Characteristics ……21 1.1 General notes Labels .
-
Page 4
ONTENTS 2.4 Function descriptions Suppressing start signals ….50 Label position on the product ….50 2.4.1 Overview of functions . -
Page 5: Please Note
ENERAL NOTES LEASE NOTE GENERAL NOTES Validity and binding effect of this manual 1.1.1 Contents The complete operating manual for the ALS 204, ALS 206 and ALS 256 label dispensers consists of the following parts: Manual Target group Medium Availability…
-
Page 6: Copyright
LEASE NOTE 1.1 G ENERAL NOTES Copyright Avery Dennison holds all rights to this manual and its appendices. Reproduction, reprinting or any other types of duplication, even of portions of this manual, may only be carried out with express written consent.
-
Page 7: Illustrations And Descriptions
LEASE NOTE 1.1 G ENERAL NOTES Illustrations and descriptions 1.1.2 Signs and symbols Figures Various information types are indicated in different Texts are accompanied by figures where necessary. ways within the document in order to simplify Figures are indicated using figure numbers in [square readability and comprehension.
-
Page 8: Safety Instructions
LEASE NOTE 1.2 S AFETY INSTRUCTIONS SAFETY INSTRUCTIONS Information and qualifications 1.2.1 At least two people must be instructed in the unit’s usage. Qualification Enough label material must be provided for testing and instructional purposes. Ensure the required qualifications are met Ensure that only trained and authorized personnel …
-
Page 9: Follow The Instructions
LEASE NOTE 1.2 S AFETY INSTRUCTIONS Follow the instructions Keep the product information at hand WARNING! With respect to this manual: It should be kept at the location where the unit is Safe and efficient operation of the label installed and be available to the operator.
-
Page 10: Operational Safety Of The Unit
Any other type of or more extensive application will be considered non-intended use.Avery Dennison shall assume no liability for damage resulting from non- intended use of the machine. The system integrator must install the machine with suitable equipment to protect operating personnel from danger;…
-
Page 11: Protection Against Injuries By Electrical Current
LEASE NOTE 1.2 S AFETY INSTRUCTIONS Protection against injuries by electrical current WARNING! WARNING! The machine operates using mains voltage! The device is only completely disconnected Touching live electrical parts may expose from the mains if the power cable is you to hazardous electrical currents and unplugged.
-
Page 12: Protection Against Injuries By Mechanical Action
LEASE NOTE 1.2 S AFETY INSTRUCTIONS Protection against injuries by mechanical action WARNING! WARNING! Risk of injury due to moving and rapidly Tripping hazard! rotating parts! Lay the connection cable and pneumatic Maintain a safety clearance from the hoses (if fitted) so that no one can trip …
-
Page 13: Before Beginning Production
LEASE NOTE 1.2 S AFETY INSTRUCTIONS Before beginning production 1.2.3 Due diligence of the operating company Due diligence of the user and the service technician Check that the safety installations are working properly. Ensure that the following prerequisites are fulfilled in …
-
Page 14: Warning Notes On The Unit
LEASE NOTE 1.2 S AFETY INSTRUCTIONS Warning notes on the unit 1.2.4 CAUTION! Warning notes on the unit represent important information for the personnel using it. Do not remove warning notes. Replace any missing or illegible warnings. Warning note Meaning Article no.
-
Page 15: Product Description
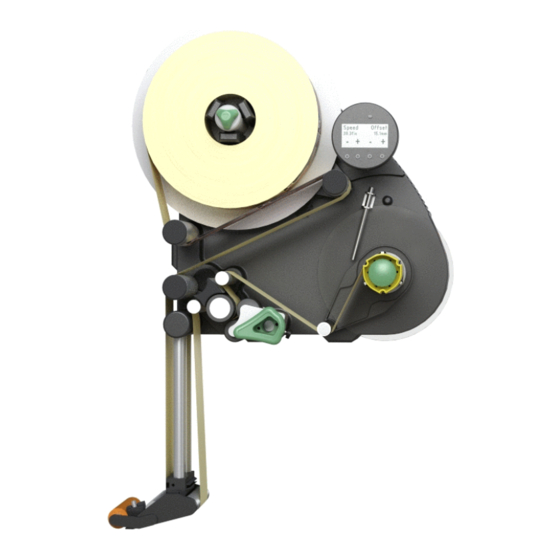
RODUCT DESCRIPTION 2.1 O VERVIEW RODUCT DESCRIPTION OVERVIEW Components 2.1.1 ALS 256 [5] ALS 204 Label Dispenser (right-handed version)
-
Page 16
RODUCT DESCRIPTION 2.1 O VERVIEW A Control panel J Dispensing edge – For sending commands to the device and for – Standard: (non-adjustable) L-shaped dispensing displaying operating states and error messages. edge – An optional external control panel can also be –… -
Page 17: Control Panel
RODUCT DESCRIPTION 2.1 O VERVIEW Control panel 2.1.2 Operating LED STATUS Lights up green when the device is switched on. Online Labels Error LED – – Lights up red when an error occurs. LCD display – Displays functions, configured values, operating states and error messages.
-
Page 18: Connection Arrangement
RODUCT DESCRIPTION 2.1 O VERVIEW Connection arrangement 2.1.3 Connections on the back of the device [7] Connections on the back of the device (ALS 20x) A Power supply connection For information on connecting the unit, see B Network connection (Ethernet 10/100) section “Power supply connection”…
-
Page 19: Sensor Connections
RODUCT DESCRIPTION 2.1 O VERVIEW Sensor connections [8] Sensor connections on the ALS 20x (RH) PLC-IN PLC-OUT PLC-OUT PLC-IN START START ROTARY ROTARY ENCODER ENCODER LABEL LABEL CAP for 256 CAP for 256 [9] Arrangement of the sensor connections (schematic) on the LH (left figure) and RH (right figure) devices: A Product sensor B Signal outputs (optional)
-
Page 20: Mode Of Operation
RODUCT DESCRIPTION 2.1 O VERVIEW Mode of operation 2.1.4 In labelling mode, the strip is first pulled from the label roll around the dancer arm [10A], which consistently maintains even tension in the label strip. The feed roller [10D] behind the dispensing edge [10C] draws the strip across the dispensing plate.
-
Page 21: Technical Specifications
RODUCT DESCRIPTION 2.1 O VERVIEW Technical specifications 2.1.5 Characteristics Label sensor Dispensing speed Distance to peel edge ALS 204 max. 40 m/min L-shape dispensing ALS 206 max. 30 m/min edge: 19 mm ALS 256 max. 50 m/min V-shape dispensing edge:…
-
Page 22: Electronics
RODUCT DESCRIPTION 2.1 O VERVIEW Electronics Data interfaces: Processor: 32 Bit CPU ARM926-EJ Serial: RS232C (Sub-D9), max. 115 200 Baud RAM: 128 MB Ethernet: 10/100 BaseT (RJ45) ROM: 8 MB USB: USB B (device) V1.1, Control panel: graphical display with ‘Full speed’…
-
Page 23: Dimensions
TÜV -Mark Height x width x depth: – The regulation DIN EN 55022 demands for class A ALS 204 492 x 488 x 371 mm devices the following text to be printed in the ALS 206 492 x 488 x 402 mm…
-
Page 24: Design Models
RODUCT DESCRIPTION 2.1 O VERVIEW Design models 2.1.6 The ALS 20X and ALS 256 label dispensers are available in two designs for differing conveyor belt directions. Right-handed version – The products are transported from left to right [11]. – The dispensing edge is located on the right side. –…
-
Page 25: Options
RODUCT DESCRIPTION 2.2 O PTIONS OPTIONS External control panel – An external control panel can be connected in addition to the integrated control panel. – An external control panel is useful if the standard control panel is difficult to access due to the position in which the unit is installed.
-
Page 26: Pneumatic Dispensing Edge
RODUCT DESCRIPTION 2.2 O PTIONS Pneumatic dispensing edge – The dispensing edge is pivoted in the dispensing head. Compressed air presses the dispensing edge onto the surface of the product. – Allows compensation for height differences between the products or on the product surface. [17] Pneumatic dispensing edge V-shape dispensing edge Not for ALS 256!
-
Page 27: Outer Diameter Control Sensor
RODUCT DESCRIPTION 2.2 O PTIONS Outer Diameter control sensor The outer diameter control sensor [20A] (OD sensor) triggers a warning, if the label roll outer diameter falls below a certain, adjustable value. [20] OD sensor (A) Dust/Splash guard Available only for ALS 20X. Additional sealing of the electrical connections and of the housing fulfils the requirements of the IP65 protection class [21A].
-
Page 28: Capacitive Label Sensor
[23] Capacitive label sensor with bracket and cable. Printer – If necessary, you can mount a hot stamp printer (not available from Avery Dennison) onto the holder brackets of the dispensing edge. – Example of use: Printing consecutive numbers onto labels.
-
Page 29: Operating Modes
RODUCT DESCRIPTION 2.3 O PERATING MODES OPERATING MODES Dispensing mode 2.3.1 This is the operating mode of the unit when switched on. You can carry out the functions listed in the sections STATUS below. Online If text such as ‘Prof 5 xxxxxxxx’ is displayed Labels instead of ‘ONLINE’: –…
-
Page 30: Online Settings
– You can increase (‘+’ button) or lower (‘–’ button) both settings in the dispensing mode [25D]. Dispensing speed: – Setting range: ALS 204: [1.0…40.0] m/min ALS 206: [1.0…30.0] m/min [25 Control panel in the online settings mode ALS 256: [1.0…50.0] m/min A Dispensing speed display (here: 12.2 m/min constant)
-
Page 31: Configuration Mode
RODUCT DESCRIPTION 2.3 O PERATING MODES Configuration mode 2.3.2 The machine is in dispensing mode. Switching to configuration mode: STATUS Press the button twice. – Display: OFFLINE OFFLINE – – Press the button. – Display: LABEL SETUP – LABEL SETUP is the name of the first menu that is currently active.
-
Page 32: Functions
RODUCT DESCRIPTION 2.3 O PERATING MODES Functions Every submenu contains functions for setting the unit controls. Figure [4] shows the button functions for changing MACHINE SETUP > Language settings using the function as an example (English is the preset language, so you most probably don´t have to change this setting.
-
Page 33: Function Descriptions
RODUCT DESCRIPTION 2.4 F UNCTION DESCRIPTIONS FUNCTION DESCRIPTIONS Overview of functions 2.4.1 (continued) (continued) LABEL SETUP MACHINE SETUP INTERFACE PARA Load prod.profil Dispenser type Labelsen. InType >EASYPLUGINTERPR DHCP host name Gap detect. mode Store prod.prof. Startsen. In.Type Interface FTP server Dispense speed Del.
-
Page 34
RODUCT DESCRIPTION 2.4 F UNCTION DESCRIPTIONS (continued) (continued) SIGNAL INTERFACE SERVICE/DIAGNOS. SERVICE DATA >MODULE FW VERS. Interface mode >AI BOARD SIGNAL Service Work place >PLC SIGNALS Applicator type Serv. data reset System version Company name End dispense mod Apply mode Sensor Test System revision Disp. -
Page 35: Notes
– The speed at which the label is dispensed highlighted in grey in the overview. – Setting range: ALS 204: [1.0…40.0] m/min; default: 10.0 Settings of functions that are not described in ALS 206: [1.0…30.0] m/min; default: 10.0 the following may only be changed by qualified ALS 256: [1.0…50.0] m/min;…
-
Page 36: Machine Setup Menu
RODUCT DESCRIPTION 2.4 F UNCTION DESCRIPTIONS MACHINE SETUP menu 2.4.4 „x labels/start“: Each start signal causes printing of x labels; x = [2…20] Store prod.prof. function: x > 3: The distance of all following labels after the – Storing a product profile, see chap. “Storing a 2nd label matches the value set in LABEL SETUP >…
-
Page 37
RODUCT DESCRIPTION 2.4 F UNCTION DESCRIPTIONS An additional material end error is caused, if no unwinder rotation is detected during at least 600 mm of material feeding: Status num: 5072 Material end unw Materialend warn function: – Refers to the internal OD control. –… -
Page 38: Before Operation
EFORE OPERATION 3.1 E LECTRICAL CONNECTIONS EFORE OPERATION ELECTRICAL CONNECTIONS Power supply connection 3.1.1 WARNING! This machine operates using mains voltage! Touching live electrical parts may expose you to hazardous electrical currents and may lead to burns. Make sure that the device is switched off …
-
Page 39: Checking The Power Supply Setting
EFORE OPERATION 3.1 E LECTRICAL CONNECTIONS Checking the power supply setting ALS 256: A power supply setting is not requi- red. The ALS 20X Label Dispenser is suitable for operation with a power supply of 230 V (AC) or 110 V (AC). Make sure that the power cable is disconnected.
-
Page 40: Connecting The Power Cable
EFORE OPERATION 3.1 E LECTRICAL CONNECTIONS Connecting the power cable Make sure that the power switch [35A] is set to ‘O’ (off). Using the supplied power cable, plug the unit into a socket connected to the mains supply. ALS 20x with splash guard: The power cable is connected by installing the hood.
-
Page 41: Inserting Label Material
EFORE OPERATION 3.2 I NSERTING LABEL MATERIAL INSERTING LABEL MATERIAL Inserting a label roll 3.2.1 WARNING! Risk of injury due to moving and rapidly rotating parts! Before inserting the label roll, ensure that the device is in offline mode. Danger of injury caused by falling label roll! Wear safety shoes.
-
Page 42: Threading The Label Roll
EFORE OPERATION 3.2 I NSERTING LABEL MATERIAL Threading the label roll 3.2.2 Threading guide [39] Threading guide for ALS 20x/256 with L-shape dispensing edge A Right-handed version B Left-handed version [40] Threading guide for ALS 20x/256 with V-shape dispensing edge A Right-handed version B Left-handed version *) Solid line: Path for label rolls with labels facing outwards.
-
Page 43: Threading The Label Roll At The Dispensing Edge
EFORE OPERATION 3.2 I NSERTING LABEL MATERIAL Threading the label roll at the dispensing edge Fixed [41] (standard) and pivotable L-Shape dispen- sing edges: Unroll around 1 m of label strip and remove the labels from it. Pass the backing paper around the first deflection …
-
Page 44: Threading The Label Roll Onto The Drive Roller
EFORE OPERATION 3.2 I NSERTING LABEL MATERIAL Threading the label roll onto the drive roller Open the pressure roller. To do so, rotate the lever [44D] in a clockwise direction. Feed the backing paper around the deflection roller [44B], drive roller [44C] and the dancer arm [44A].
-
Page 45: Mechanical Settings
EFORE OPERATION 3.3 M ECHANICAL SETTINGS MECHANICAL SETTINGS Adjusting the unwinder’s core 3.3.1 diameter Tool: – 3 mm hexagon (Allen) screwdriver The unwinder can be adjusted with core adapters [47B] to fit the inner diameter of the label roll. The adapters must be fitted and dismantled in different ways depending on this diameter: –…
-
Page 46: Positioning The Label Sensor
EFORE OPERATION 3.3 M ECHANICAL SETTINGS Positioning the label sensor 3.3.3 Release the thumb screw [50B]. Position the sensor along the axle in such a way as to allow it to register the spaces between the labels. The LEDs [50A] light up when the sensor is positioned over a gap.
-
Page 47: Operation
PERATION 4.1 S TART UP AND SHUTDOWN PERATION START-UP AND SHUTDOWN Turning on the unit Dispensing without a product sensor 4.1.1 It is also possible to trigger the dispensing process without a product sensor: – The machine is in dispensing mode: Press the button.
-
Page 48: Configuration And Monitoring
At maximum dispensing speed set the Lab. stop offset to at least the following value Machine Min. stop pos. ALS 204 14 mm ALS 206 8 mm ALS 256 9 mm Don´t set Lab. stop offset to the same …
-
Page 49: Dispensing Speed
PERATION 4.2 C ONFIGURATION AND MONITORING The next label to be dispensed waits in the label stop position. Here it is useful if the label protrudes over the dispensing edge a little [54]. ALS 20x/ALS 256 labellers are pre-configured for use with the supplied label sensor. If this sensor is employed, the label stop position setting will only require minimal correction.
-
Page 50: Suppressing Start Signals
PERATION 4.2 C ONFIGURATION AND MONITORING Suppressing start signals A start signal can be prematurely triggered by the shape of the product or reflective surfaces, what can cause erroneous labelling. In case of a product causing unwanted additional start signals while the product passes the dispensing edge, those signals can be LABEL SETUP >…
-
Page 51: Monitoring Functions
PERATION 4.2 C ONFIGURATION AND MONITORING Monitoring functions 4.2.2 While in dispensing mode, an electronic controller monitors the following functions: Material end / Roll diameter (OD = outer diameter) To enable a quick renewal of the material roll, the machine can alarm the operator before the end of the material roll is reached.
-
Page 52: Missing Labels
PERATION 4.2 C ONFIGURATION AND MONITORING If an error message occurs: – The machine stops. Press the button to delete the message. Remove the rewound backing paper. Insert a new material roll (see “Inserting a label roll” on page 41).
-
Page 53: Rewinder Full
PERATION 4.2 C ONFIGURATION AND MONITORING Rewinder full If the diameter of the rewound backing paper [61A] exceeds the admissible diameter (202 mm), the following message appears: Status num: 5064 Rewinder full Remove the rewound backing paper. (See chap. “Removing spent backing paper” on page 41).
-
Page 54: Using Product Profiles
PERATION 4.3 U SING PRODUCT PROFILES USING PRODUCT PROFILES What are product profiles? – Display after the restart: 4.3.1 Prof 1 xxxxxx Product profiles are memory locations that can store all Labels the settings for the machine controls. For recurring production jobs, they allow you to quickly set the (in dispensing mode, ‘ONLINE’…
-
Page 55: Deleting A Product Profile
PERATION 4.3 U SING PRODUCT PROFILES Press the or the button to scroll through the available characters until the character you require appears. Press the button to accept the character. – The underscore jumps to the next character. Enter the next character in the same way.
-
Page 56: After Operation
FTER OPERATION 5.1 M AINTENANCE AND CLEANING FTER OPERATION MAINTENANCE AND CLEANING Replacing fuses Tool: Screwdriver 5.1.1 This section counts only for ALS 20X. The fuses at the ALS 256 cannot be replaced. Turn off the unit. Unplug the power cable. …
-
Page 57: Cleaning Agents
FTER OPERATION 5.1 M AINTENANCE AND CLEANING Cleaning agents 5.1.2 Cleaning agents for rubber rollers [64A]: – Roller cleaner, order number 98925. If other cleaning agents are used, there is a chance the rubber may corrode. Cleaning agents for metal deflexion rollers [64B]: –…
-
Page 58: Regular Maintenance
FTER OPERATION 5.1 M AINTENANCE AND CLEANING Regular maintenance 5.1.3 The label dispenser is designed to be maintenance-free. However, you should service the unit regularly in order to ensure reliable long-term operating results. Removing paper debris Depending on operating conditions, you should perform the following at least once a week: Wipe the paper residue from the rollers and edges.
-
Page 59: Operational Failures
PERATIONAL FAILURES 6.1 S TATUS MESSAGES PERATIONAL FAILURES STATUS MESSAGES Types of status messages List of warnings 6.1.1 6.1.2 Error messages Displayed text Meaning When an error occurs, the machine stops immediately Productstartwarn New start signal during the and displays an error message on the control panel. dispensing operation.
-
Page 60: List Of Error Messages
PERATIONAL FAILURES 6.1 S TATUS MESSAGES List of error messages 6.1.3 Status Status text Cause Action to take 5000 Bus device – Device at I C Bus cannot be Delete the message by pressing the contacted. -key. – In most cases, this message appears Switch the machine off, wait 30 …
-
Page 61
PERATIONAL FAILURES 6.1 S TATUS MESSAGES Status Status text Cause Action to take 5072 Material end unw – Occurs during operation with Check the material feeding; if activated internal OD control. necessary, replenish the material – The message appears, if no rotation roll. -
Page 62
PERATIONAL FAILURES 6.1 S TATUS MESSAGES Status Status text Cause Action to take 5145 Rewinder full This error can only occur if the Remove the rewound backing paper end of a new label roll was glued Press the key to confirm the … -
Page 63
PERATIONAL FAILURES 6.1 S TATUS MESSAGES Status Status text Cause Action to take 6207 No file card No compact flash card was found. Check whether a compact flash card is connected. If the compact flash card was not connected until after the machine was switched on: Switch the machine off and back on again. -
Page 64: Ec Declarations
Models ALS 204 / ALS 206 / ALS 256 General designation Label dispenser…
-
Page 65: Ec Declaration Of Incorporation
2006/42/EG annex II A. Models ALS 204 / ALS 206 / ALS 256 General designation Label dispenser Consists of a consecutive number (5 digits) + date code (YYMM) + Serial number end (unit designation -ALS204, -ALS206 or -ALS256).
-
Page 66: Appendix Regarding The Declaration Of Incorporation
Appendix regarding the Declaration of Incorporation List of the essential health and safety requirements applied and fulfilled for the product named in the declaration of incorporation, relating to the design and construction of machinery. Number Not appli- Designation Fulfilled Remark Annex I cable General remarks…
-
Page 67
EC D ECLARATIONS Number Not appli- Designation Fulfilled Remark Annex I cable 1.5.4. Errors of fitting 1.5.5. Extreme temperatures 1.5.6. Fire 1.5.7. Explosion 1.5.8. Noise 1.5.9. Vibrations 1.5.10. Radiation 1.5.11. External radiation 1.5.12. Laser radiation 1.5.13. Emissions of hazardous materials and substances 1.5.14. -
Page 68
Avery Dennison Deutschland GmbH Ohmstraße 3 85386 Eching Germany | Tyskland | Alemania | Saksa | Allemagne | Germania | Duitsland | Alemanha | Герма ́ ния +49-8165-925-0 http://www.monarch.averydennison.com…
ИНСТРУКЦИЯ ПО ЭКСПЛУАТАЦИИ
А ВТОМАТИЧЕСКИЙ ЭТИКЕТИРОВЩИК Novexx Solutions GmbH ALS204, ALS206, ALS256
РУКОВОДСТВО ПО
ЭКСПЛУАТАЦИИ
ЭТИКЕТИРОВЩИК
ALS204,206,256
1 Примиите к сведению
1.1 Общие замечания
1.1.1 Законность и авторские права…………………… 1
Содержание 1
Технический статус 1
Авторское право 1
Производитель 1
1.1.2 Иллюстрации и описания 2
Знаки и символы 2
Предупреждения об опасностях и рисках 2
Цифры 2
Символы на клавишах 2
Параметры 2
Дополнительная информация 2
1.2 Инструкции по безопасности
1.2.1 Информация и уточнения 3
Выполняйте следующие инструкции 3
Держите инструкцию под рукой 3
Обеспечьте, чтобы персонал имел нужную квалификацию 3
1.2.2 Операционная безопасность аппликатора 4
Правильная эксплуатация 4
Защита от травм, наносимых электричеством.
.4
Защита от механических травм . 5
Защита от химических травм 5
1.2.3 Перед началом производственного процесса 6
Проверка компании-оператора и обслуживающего персонала 6
Проверка пользователя 6
1.2.4 Предупреждения безопасности 7
2 Описание аппликатора
2.1 Обзор
- Компоненты 8
- Панель управления 10
Индикатор рабочего состояния 10
Индикатор ошибки 10
ЖК дисплей 10
Клавиши 10
2.1.3 Схема подсоединений 11
Подсоединения на задней панели 11
Подсоединения датчиков 12
- Режим работы 13
- Технические спецификации 14
Характеристики 14
Этикетки 14
Датчик этикетки 14
Электропитание 14
Электроника 14
Интерфейсы 14
Внутренние интерфейсы 15
Статусные сообщения, функции автоматичес-кого тестирования, профили продукта 15
Габариты 15
Условия окружающей среды 15
Интеграция 16
Сертификаты 16
2.1.6 Конструкции моделей 17
Правое исполнение 17
Левое исполнение 17
2.2 Опционы
Внешняя панель управления 18
Фиксированное лезвие диспенсера 18
Лезвие диспенсера на шарнирах 18
Пружинное лезвие диспенсера 18
Пневматическое лезвие диспенсера 19
Принтер 19
Аппликатор 19
Интерфейс аппликатора 19
Защита от пыли/воды 19
2.3 Операционные режимы
2.3.1 Режим этикерования 20
Остановка/продолжение режима этикерования . . . .20
Изменения показаний счетчика 20
Приведение аппликатора в режим конфигурации 20
Обратный отсчет этикеток 20
Параметры настройки аппликатора в режиме онлайн 21
2.3.2 Режим конфигурации 22
Функция клавиш с двойной стрелкой 22
Меню 22
Функции 23
2.4 Описание функций
- Обзор функций 24
- Примечания к описанию функций 26
- Меню настройки этикирования 26
- Меню машинной настройки 26
- Меню сервисных данных 27
> Подменю операционные данные 27
>Подменю данных по электроританию 27
> Подменю данных о плате ЦПК 27
Продолжение
- Подменю слота компактной карты флеш-памяти 27
- Подменю данных переферийных устройств 27
>Подменю данных памяти 27
3 Перед началом работы
3.1 Электрические подсоединения
3.1.1 Подсоединение электропитания 28
Проверка параметров электроснабжения 28
Подсоединение электрокабеля 29
3.1.2 Подсоединение датчиков 29
3.2 Загрузка этикировочного материала
- Необходимые предварительные условия 30
- Загрузка рулона этикеток 31
Удаление использованной подложки 31
Удаление остатков клея 31
Установка нового рулона материала 31
3.2.3 Проводка ленты рулона этикеровочного материала 32
Руководство по проводке 32
Проводка ленты рулона у лезвия диспенсера
33
Проводка ленты рулона на ведущий ролик. .34
Закрепление ленты рулона на перематывающем устройстве 34
3.3 Механические регулировки
- Регулировка диаметра сердечника разматывающего устройства .. 35
- Позиционирование прижимного датчика 35
- Позиционирование датчика этикетки 36
4 Рабочий цикл
4.1 Пуск и остановка
- Включение аппликатора 37
- Начало процесса этикетирования 37
Этикетирование с датчиком продукта 37
Этикетирование без датчика продукта 37
4.1.3 Остановка процесса этикетирования 38
4.2 Конфигурирование и контроль
4.2.1 Параметры функций меню 39
Шаг этикетки 39
Позиция остановки этикетки 39
Скорость этикетирования 40
Позиционирование этикетки на продукте 414.2.2 Функции контроля 42
Пропущенные этикетки 42
Конец материала 42
Разрыв материала 42
4.3 Использование профилей продукта
- Что такое профили продукта? 43
- Загрузка профиля продукта 43
- Сохранение профиля продукта 43
Выбор ячейки памяти………………………..43
Ввод имен профилей 43
4.3.4 Удление профиля продукта 44
5 После окончания работы
5.1 Техобслуживание и очистка
- Замена предохранителей 45
- Моющие и чистящие средства 46
- Регулярное техобслуживание 46
Удаление бумажных остатков 46
6 Операционные сбои
6.1 Сообщения об ошибках
- Оповещение об ошибках 47
- Список сообщений об ошибках 47
- Шина устройства 47
- Пробел не обнаружен 47
- Конец материала 47
(5140) Контроллер перемотчика 48
(5143)Остановка перемотчика 48
(5145) Перемотчик заполнен 48
- Домашняя позиция 48
- Конечная нижняя позиция 48
(6002) Новая прогрессивная версия 48
(6031) Новые параметры 49
(6207) Нет флеш-карты 49
(9022) Нет связи с сетью 49
1. Примите к сведению 1.1. Общие замечания
Об инструкции
Данная инструкция относится исключительно к автоматическим аппликаторам ALS 204, ALS 206 и ALS 256, которые фигурируют здесь как ALS 20x. Она составлена для того, чтобы обеспечить профессиональное использование и настройку этих аппликаторов.
Гарантией успеха при эксплуатации и настройке этих аппликаторов служат их правильная установка и выбор конфигурации.
За консультацией по техническим вопросам, которые могут у вас возникнуть и не имеются в данной инструкции, обращайтесь:
-» к инструкции по техническому обслуживанию аппликатора, или
-» Обращайтесь к специалистам одного из наших партнеров
-» Наши представители готовы помочь вам, особенно с настройкой аппликатора, а также в случае его неисправности.
Технический статус
Технический статус: 02/2006 Версия ПО: 1.0
Avery Dennison оставляет за собой право:
— В соответствии с техническим прогрессом производить усовершенствования отдельных узлов своего оборудования, компонентов и ПО, а также использовать соответствующие компоненты вместо представленных в данной инструкции частей этикетировщиков.
— Обновлять информацию, содержащуюся в этой инструкции.
Компания не принимает на себя обязательств распространять такие усовершенствования на какие-либо единицы оборудования, поставленные ранее.
Авторское право
Avery Dennison обладает всеми правами на данную инструкцию и ее приложения. Воспроизводство, перепечатка или какие-либо еще виды дублирования, даже частей этой инструкции, могут осуществляться только после получения четко сформулированного письменного согласия компании. Третьи лица, особенно конкурены, не должны иметь доступ к информации, содержащиейся в данной инструкции.
Производитель
Novexx Solutions GmbH Ohmstrasse 3
85386 Eching, Germany
Phone:+49-8165-925-0
Fax:+49-8165-3143
h
Серийный номер оборудования: ________________________________
Дата изготовления: ________________________
ttp
://www.machines.averydennison.com
1.1.2 Используемые обозначения
Знаки и символы
Для облегчения читабельности и доступности материла, различные виды информации, содержащиеся в этой инструкции, выделяются по-разному.
Предложения, начинающиеся со стрелки, являются инструкциями и указаниями.
-» Выполняйте их одну за другой в установленном порядке.
Подача следующих видов информации начинается с тире:
- Списки (перечень)
- Описание режимов работы
- Описание предыдущих шагов
- Необходимые условия для последующих действий
Предупреждения об опасности и рисках
Наиболее важные указания, которые вы должны беспрекословно выполнять, выделены особо.
Предупреждение!
Относится к рискам, которые могут привести к серьезным травмам или смертельному исходу. Такое предупреждение содержит рекомендации по мерам безопасности соответствующих лиц.
-» Всегда выполняйте эти рекомендации
О![]() сторожно!
сторожно!
Относится к рискам, которые могут нанести ущерб имуществу или травмы (не тяжелые) персонала. В этом предупреждении содержатся рекомендации по недопущению таких случаев
-» Всегда выполняйте эти рекомендации
Цифры
Текст в инструкции сопровождается, где это необходимо, цифрами. Здесь они приводятся числами, заключенными в квадратные скобки. Заглавная буква после числа, например [12A], указывает на отдельную секцию раздела инструкции под данной цифрой. Как правило, этикетировщик, о котором идет речь в этой инструкции, представляет из себя правостороннюю модель ALS204. Левосторонняя версия этой модели фигурирует лишь в тех случаях, когда надо продемонстрировать различия между ними.
Символы на клавишах
- На клавишах на пенели управления имеются символы
- Символы соединяются знаком ‘+’ (знак плюс)
когда нужно нажать более чем одну клавишу ↓ + →
Параметры
Параметры отображаются на дисплее в следующем виде Название меню>Название параметра.
Дополнительная информация
Э![]() тот смвол указывает на действия, которые должны производиться квалифицированным и специально обученным персоналом
тот смвол указывает на действия, которые должны производиться квалифицированным и специально обученным персоналом
Этот символ указывает на наличие замечаний и рекомендаций, а также дополнительной информации
Оборудование
—![]() Оборудование, например, для смазочных материалов или моющих средств
Оборудование, например, для смазочных материалов или моющих средств
1.2 Безопасность
1.2.1 Информация и уточнения. Выполняйте следующие инструкции
П![]() редупреждение!
редупреждение!
Безопасная и эффективная работа аппликатора может быть гарантирована только в случае, если вы соблюдаете все необходимые рекомендации.
Ответственность за ущерб, связанный с функционированием этикетировщика и претензии по гарантии могут рассматриваться только, если это оборудование эксплуатировалось в соответствии с указаниями данной инструкции.
-» Перед началом работы с этикетировщиком внимательно прочитайте инструкцию по эксплуатации и все другие необходимые примечания.
-» Соблюдайте дополнительные предупреждения об осторожности и безопасности, имеющиеся на этикетировщике
-» Разрешайте только компетентным лицам работать и осуществлять настройку этикетировщика.
Держите инструкцию под рукой
В отношении данной инструкции:
-> Она должна находиться в том
помещении, где установлен этикетировщик и должна быть доступной оператору.
-> Она всегда должна быть в читабель-ном виде.
-> Если этикетировщик продан, инструкция должна быть доведена до сведения нового владельца.
-> Знаки безопасности и предупреждения о рисках, имеющиеся на этикетировщике должны всегда содержаться в чистом виде и быть читабельными. Отсутствие или поврежденные детали должны быть восстановлены.
Обеспечьте персоналу нужную квалификацию
-» Обеспечьте, чтобы обученные и уполномоченные на то лица работали, настраивали и обслуживали этикетировщик.
-» Разрешайте толтко квалифицированным и хорошо обученным специалистам заниматься настройкой этикетировщика.
-» Обязанности по функционированию, настройке и техобслуживанию этикетировщика должны быть четко определены и постоянно выполняться.
-» В дополнение, обслуживающий персонал также должен быть информирован на регулярной основе по вопросам профессиональной безопасности и защиты окружающей среды
Квалификация для работы
Обучение персонала для работы на аппликаторе должно обеспечить следующие условия:
- Чтобы обслуживающий персонал мог работать на установке самостоятельно и бережно.
- Чтобы эти лица были в состоянии самостоятельно устранить неполадки в функционировании этикетировщика.
— Чтобы, по крайней мере, два работника владели навыками операторов этикетировщика
— Чтобы было предоставлено достоточное количество этикеровочного материала для обучения и пробы.
Квалификация для настройки
Конфигурация системы управления требует особой квалификации
Специалисты, которые этим занимаются:
— должны быть знакомы с функциональны-ми характеристиками этикетировщика.
- должны быть знакомы с режимом операций в пределах того производственно-го процесса, в который встроен этот этикети-ровщик.
- должны уметь правильно и соответствующим образом использовать дополнительный набор команд (меню) для требований проектов.
 Эксплуатационная безопасность этикетировщика.
Краткое содержание страницы № 1
OPERATING INSTRUCTIONS
Label Dispenser
ALS
204/206
256
Edition 04/2007
Краткое содержание страницы № 2
Краткое содержание страницы № 3
ALS CONTENTS 20x 256 GB Label sensor . . . . . . . . . . . . . . . . . . . . . . . . . . .14 1 Please note Power supply . . . . . . . . . . . . . . . . . . . . . . . . . . .14 Electronics . . . . . . . . . . . . . . . . . . . . . . . . . . . . .15 1.1 General notes Interfaces. . . . . . . . . . . . . . . . . . . . . . . . . . . . . .15 1.1.1 Validity and binding effect of this manual . . . . 1 Internal Interfaces . . . . . . . . . . . . . . . . . . . . . . .15 Contents . . . . . . . . . . . . .
Краткое содержание страницы № 4
ALS CONTENTS 20x 256 GB > CPU BOARD DATA submenu . . . . . . . . . . . . 28 Material end. . . . . . . . . . . . . . . . . . . . . . . . . . . .44 > DISPLAY DATA submenu . . . . . . . . . . . . . . . 28 Material tear. . . . . . . . . . . . . . . . . . . . . . . . . . . .44 > CF CARD SLOT submenu . . . . . . . . . . . . . . . 28 4.3 Using product profiles > PERIPHERAL DATA submenu . . . . . . . . . . . 28 >MEMORY DATA submenu . . . . . . . . . . . . . . . 28 4.3.1 What are product profiles?. . .
Краткое содержание страницы № 5
ALS CONTENTS 20x 256 1.1 GENERAL NOTES GB 1 PLEASE NOTE 1.1 GENERAL NOTES 1.1.1 Validity and binding effect of this manual Contents Copyright The present manual refers exclusively to the ALS 204, Avery Dennison holds all rights to this manual and its ALS 206 and ALS 256 label dispensers. It is written for appendices. Reproduction, reprinting or any other the purpose of ensuring professional usage and types of duplication, even of portions of this manual, calibration of the unit. may only be
Краткое содержание страницы № 6
ALS CONTENTS 20x 256 1.1 GENERAL NOTES GB 1.1.2 Illustrations and descriptions Signs and symbols Figures Various information types are indicated in different Texts are accompanied by figures where necessary. ways within the document in order to simplify Figures are indicated using figure numbers in [square readability and comprehension. brackets]. A capital letter after a figure number, for example [12A], refers to a specific section of the figure. Sentences starting with an arrow are instru
Краткое содержание страницы № 7
ALS CONTENTS 20x 256 1.2 SAFETY INSTRUCTIONS GB 1.2 SAFETY INSTRUCTIONS Ensure the required qualifications are met 1.2.1 Information and qualifications Ensure that only trained and authorized personnel Follow the instructions operate, configure and service the unit. WARNING! Only allow qualified and well-trained expert personnel or service technicians to perform Safe and efficient operation of the label configurations. dispenser can only be guaranteed if you The responsibilities with re
Краткое содержание страницы № 8
ALS CONTENTS 20x 256 1.2 SAFETY INSTRUCTIONS GB 1.2.2 Operational safety of the unit WARNING Proper usage The unit is not protected against splashing The ALS 20x Label Dispenser is a fully automatic unit water in its standard model. for attaching self-adhesive labels to products or Keep the unit dry. packaging. The company operating the unit must install If liquids have penetrated the unit, switch it with suitable equipment to protect operating it off and disconnect or unplug the power
Краткое содержание страницы № 9
ALS CONTENTS 20x 256 1.2 SAFETY INSTRUCTIONS GB Protection against injuries by mechanical action WARNING! Risk of injury due to moving and rapidly rotating parts! – Long hair, loose jewellery, long sleeves, and so on are not permissible when using the unit. Sufficient protective clothing must be worn. Keep moving parts free from obstructions even when the unit is not switched on, if there is a chance the machine might be turned on. Switch off the machine before making any mechanical
Краткое содержание страницы № 10
ALS CONTENTS 20x 256 1.2 SAFETY INSTRUCTIONS GB 1.2.3 Before beginning production Due diligence of the operating company Due diligence of the user and the service technician Check that the safety installations are working properly. Ensure that the following prerequisites are fulfilled in Inspect the machinery for any visible damage. accordance with the service instructions: Report any ascertained defects immediately. – The machine is installed properly and configured in Use the require
Краткое содержание страницы № 11
ALS CONTENTS 20x 256 1.2 SAFETY INSTRUCTIONS GB 1.2.4 Safety notes on the unit CAUTION! Warning notes on the unit represent important information for the personnel using it. Do not remove warning notes. Replace any missing or illegible warnings. The ‘Pinch Point’ warning [1] note warns you of the danger posed by the machine’s rotating parts; they can trap items and draw them in. ! WARNING Pinch point. Keep hands clear of rollers. A5346 [1] Left: ‘Pinch Point’ warning. Right: Position of
Краткое содержание страницы № 12
ALS CONTENTS 20x 256 2.1 OVERVIEW GB 2 PRODUCT DESCRIPTION 2.1 OVERVIEW 2.1.1 Components CD B A E F O N M L G K H I J [3] ALS 204 Label Dispenser (right-handed version) 8
Краткое содержание страницы № 13
ALS CONTENTS 20x 256 2.1 OVERVIEW GB A Control panel J Dispensing edge – For sending commands to the device and for – Standard: (non-adjustable) L-shaped dispensing displaying operating states and error messages. edge – An optional external control panel can also be – The following options are available: V-shaped connected to the device. dispensing edge, adjustable L-shaped dispensing edge, spring-loaded L-shaped dispensing edge, B Dancer arm pneumatic L-shaped dispensing edge – Keeps the l
Краткое содержание страницы № 14
ALS CONTENTS 20x 256 2.1 OVERVIEW GB 2.1.2 Control panel Operating LED A ON STATUS B Lights up green when the device is switched on. Online C Labels 292 Error LED D Lights up red when an error occurs. – – + + LCD display – Displays functions, configured values, operating states and error messages. [4] The ALS 20x control panel (in dispensing mode) – What is displayed at any one time depends on the A Operating LED operating status of the device; these screens are B Error LED C LCD display exp
Краткое содержание страницы № 15
ALS CONTENTS 20x 256 2.1 OVERVIEW GB 2.1.3 Connection arrangement Connections on the back of the device B C D E F G H A [5] Connections on the back of the device (ALS 20x): E Plug-in card slot (CompactFlash cards) A Power supply connection F USB device interface B Network connection (Ethernet 10/100) G PLC signal interface C Serial interface (RS232) H Optional: Applicator interface D Connection for external control panel (RS485) For information on connecting the unit, see sec- tion “Power suppl
Краткое содержание страницы № 16
ALS CONTENTS 20x 256 2.1 OVERVIEW GB Sensor connections [6] Sensor connections on the ALS 20x (RH) C B B C A A PLC-IN PLC-OUT PLC-OUT PLC-IN E D D E START START LH RH F OD ROTARY ROTARY OD F ENCODER ENCODER G G LABEL LABEL H H CAP CAP for 256 CAP for 256 CAP [7] Arrangement of the sensor connections (schematic) on the LH (left figure) and RH (right figure) devices: A Product sensor B Signal outputs (optional) C Signal inputs (optional) D Rotary encoder (for automatic speed adaption) E Roll dia
Краткое содержание страницы № 17
ALS CONTENTS 20x 256 2.1 OVERVIEW GB 2.1.4 Mode of operation In labelling mode, the strip is first pulled from the label roll around the dancer arm [8A], which consistently maintains even tension in the label strip. The feed roller [8D] behind the dispensing edge [8C] draws the strip across the dispensing plate. The label is unfixed from the backing paper on the dispensing plate and is pressed onto the product by the pressure roller [8B]. The feed roller drives the label strip forwards th
Краткое содержание страницы № 18
ALS CONTENTS 20x 256 2.1 OVERVIEW GB 2.1.5 Technical specifications Characteristics Label sensor 1) Dispensing speed : Distance to peel edge ALS 204 max. 40 m/min L-shape dispensing ALS 206 max. 30 m/min edge: 19 mm ALS 256 max. 50 m/min V-shape dispensing 2) edge: 77 mm Labelling halt precision ±1mm at the peeling edge: Transmission sensor: Wenglor OPT242-P800 optical, NPN Speed control: Fixed setting or automatic speed adaption via the rotary encoder Power supply 1) The maximum usable d
Краткое содержание страницы № 19
ALS CONTENTS 20x 256 2.1 OVERVIEW GB Electronics Data interfaces: Processor: 32 Bit CPU MIPS Core Serial: RS232C (Sub-D9), max. 115 200 Baud RAM: 16 MB Ethernet: 10/100 BaseT (RJ45) ROM: 4 MB USB: Device V1.1 (USB B), Control panel: graphical display with ‘Full speed’ operating 128 x 32 pixels, 2/4 lines, mode, 12 MBit/s 5 buttons CF card: Slot for 1 CompactFlash card Interfaces Control panel RS 485 (Mini DIN 6 con- Sensor interfaces for (plug in each case 4- interface: nection) for remot
Краткое содержание страницы № 20
ALS CONTENTS 20x 256 2.1 OVERVIEW GB Dimensions Certificates – CE, TÜV/GS, FCC, CCC, GOST, NRTL, US/CA 6) Width x height x depth: – The regulation DIN EN 55022 demands for class A ALS 204 492 x 488 x 353 mm devices the following text to be printed in the ALS 206 492 x 488 x 403 mm manual: ALS 256 492 x 488 x 403 mm „WARNING: This is a class A product. In a domestic Weight: environment this product may cause radio ALS 204 36 kg interference in which case the user may be required ALS 206 38
![]()
Вы здесь
Новости
04/04/2019
Паллетоупаковщик PRIDE A в комплекте с подъездной рампой, жесткой «обрешеткой» и доставкой по Москве в пределах МКАД — 220 000 рублей!
Паллетоупаковщик PRIDE А – это:
Русифицированное меню ЖК-дисплея – простота в обслуживании.
Возможность использованияпленки как вручную, так и в…
01/04/2019
На склад поступило этикетировочное оборудование торговой марки A2 – аппликаторы этикеток и полные этикетировочные системы. Кроме этого, у нас можно заказать к данному оборудованию дополнительные опции, которые повысят производительность и расширят функциональные возможности станков. ТМ «A2» — это уникальные…
Полезно знать
Во всем мире самым универсальным продуктом питания являются яйца. Они вкусные и сытные, с их помощью можно легко разнообразить самые простые обыденные блюда. При отсутствии кулинарного вдохновения они становятся настоящим спасением. Яйцо – это кладезь высокоактивных протеинов с полным…
У всех людей разные вкусовые предпочтения, кто любит сладкое, кто соленое. Многие из нас воспринимают еду, как некий гастрономический культ с обилием вкусной пищи. Кто может устоять перед аппетитными ломтиками картофеля с хрустящей корочкой и нежной серединкой? А нежными куриными наггетсами и…
- Главная
-
Avery
-
Машинки для печати ярлыков
-
ALS 204
На этой странице вы найдёте полный список документов на Машинки для печати ярлыков Avery ALS 204.
Выберите необходимый PDF файл.
-

Машинки для печати ярлыков
Avery ALS 204 Инструкция по эксплуатацииТип файла
PDFРазмер
1.35 MbКол-во страниц
58Просмотров
6069Download / Read online

- 1
Другие Avery Машинки для печати ярлыков
-
Avery ALS 330/430 Инструкция по эксплуатации
PDF файлов
1Просмотров
9178 -
Avery ALS 204 Инструкция по эксплуатации
PDF файлов
1Просмотров
6898 -
Avery ALS 206 Инструкция по эксплуатации
PDF файлов
1Просмотров
6886
Другие устройства Avery
-
Принтеры
Avery LOKPRINT 676 Инструкция по эксплуатацииPDF файлов
1Просмотров
7789 -
Принтеры
Avery MONARCH 7411 Инструкция по эксплуатацииPDF файлов
1Просмотров
7654 -
Принтеры
Avery MONARCH 9493 Инструкция по эксплуатацииPDF файлов
1Просмотров
7420 -
Принтеры
Avery FRESHMARX 9416 Инструкция по эксплуатацииPDF файлов
1Просмотров
5629 -
Принтеры
Avery FRESHMARX 9415 Инструкция по эксплуатацииPDF файлов
1Просмотров
5585 -
Вакуумные упаковщики
Avery Dennison Food Saver 7112 HF Инструкция по эксплуатацииPDF файлов
1Просмотров
5399
Вопросы
-
слабая батарея
Ноутбуки
Acer
1310
Alex 12.02.2016 17:26
Ранее вы смотрели
Производители
Accell
Avent
BMW
Bounty Hunter
Chang Yue Industrial
Chicago Electric
Destinator
FMC Corporation — Talstar
Horizon Fuel Cell Technologies
San Jose Navigation
Типы устройств
Кухонные грили
Компьютерные комплектующие
IP Софтфоны (программные телефоны)
Ленточные пилы
Комплекты отверток
Ручные массажеры
Зрительная (оптическая) труба
Красота
Видеонаблюдение
Устройства
BMW 2008 535xi Sports Wagon
Brother 882-W07
Brother ES2000
Carrier CNPHP
Hoover WindTunnel UH70200
Hotpoint GB 630 RTX
JVC KW-NT30HD
Presonus Audio electronic Digimax 8 Channel Preamplifier with 24 bit/48 kHz ADAT out
Toshiba SL970/32
freeuserguide.ru
About Us
Contacts
Disclamers
Privacy Policy
Эта страница полезна для вас? Поделитесь ссылкой: