Presentation of the tutorials of this site.
Discover DxO PhotoLab
This tutorial is intended for users of other development software. Designed to be read quickly, it provides a first approach of DxO PhotoLab by presenting the main concepts, that is to say all those that are explained here.
The presentation video will allow you to discover the work environment and the use of the tools.
Getting started with DXO Photolab
This tutorial allows the beginner to consciously use digital photography development software. He is introduced to the concepts and find solutions using DxO PhotoLab.
Reading the other tutorials on this site is complementary.
Managing photos with DxO PhotoLab
This tutorial presents the tools to manage your photos; sort them and then tag them, that is, apply metadata to them that describes their content.
Efficiency with DxO PhotoLab
This tutorial details the specific functions of DxO PhotoLab and the procedures for use, giving some recipes for more efficiency. It is intended for the experienced digital photo development user to introduce all the tips of the PhotoLab user.
Mastery of DxO PhotoLab
This tutorial supplements “Efficiency with DxO PhotoLab” to present the environment, the prerequisites and additional information for an in-depth knowledge of PhotoLab.
Local Adjustments in DxO PhotoLab
This tutorial is a guide to this particular approach to PhotoLab functions. The goal is to improve the visibility of your photos.
Perspective with DxO ViewPoint
This tutorial is first of all a reflection on perspective in photography; understand it and then apply ViewPoint’s specific tools to correct it.
Perspective correction is a historical activity of DxO Labs.
Creativity with DxO PhotoLab and DxO FilmPack
COMING SOON – This tutorial introduces methods for characterizing your images and suggests ways to do so.
Appendices
Is a collection of complementary information related to PhotoLab.
Your remarks and comments are welcome
Pascal PELÉ
Многие фотографы опасаются проявки RAW файлов, считая, что это излишне трудоёмко и связано с применением сложных странных программ, в которых уйма настроек, с которыми непонятно что делать.
Однако, получение качественных фотографий сразу в JPEG не только не проще, но и даже сложнее, чем съемка в RAW с последующей обработкой. Я когда-то писал об этом в другом материале о съемке в JPEG. Так как формат JPEG не позволяет вам сильно редактировать фотографию после съемки, вам необходимо очень точно выбирать экспозицию в каждом конкретном случае. Кроме того, вам придется применять различные инструменты, как то внутрикамерый HDR, которые сейчас есть во всех камерах. Снимая в JPEG, вы как-бы обмениваете постобработку на дополнительные действия во время съемки.
Плюс, есть много случаев, которые не поддаются моментальной коррекции при съемке. Например, если вы снимаете не родными объективами, которые имеют значительную дисторсию или хроматические аберрации, камера не сможет исправить эти дефекты, и вам придется исправлять их при постобработке, что трудоёмко без RAW конверторов.
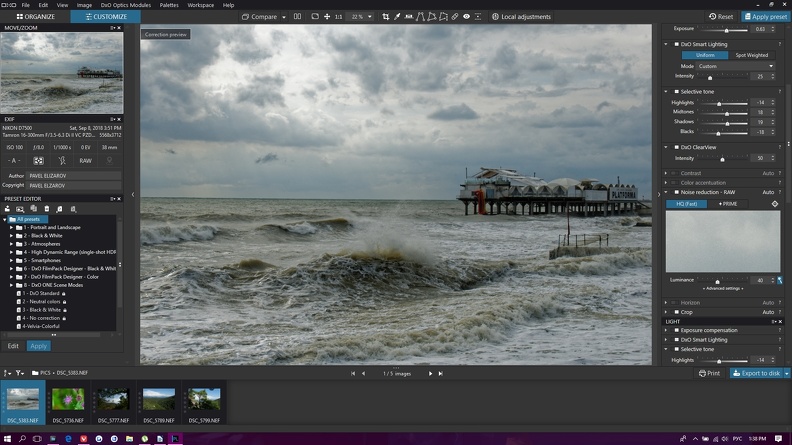
Кроме того, есть сюжеты, которые в принципе нереально сразу снять в JPEG, чаще всего это сюжеты с огромным динамическим диапазоном. Мы, в качестве примера, возьмем вот такую фотографию:
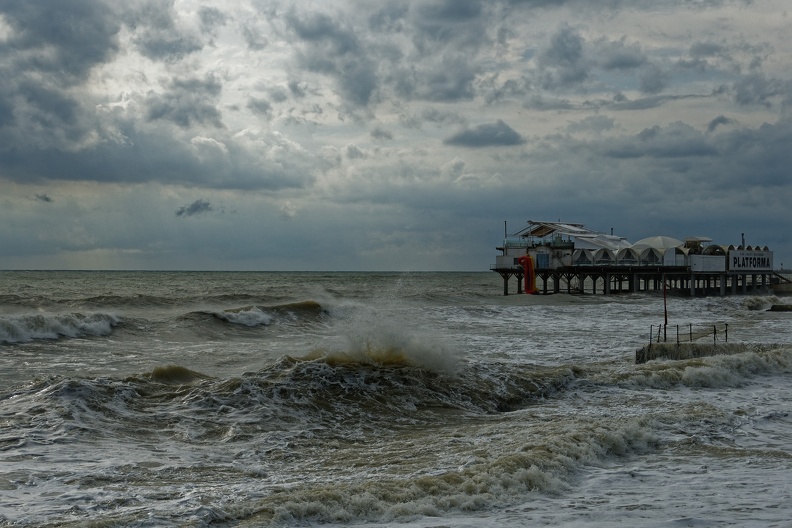
Фото снято в Сочи, в шторм, когда дождь уже прошел, облака еще полностью не разошлись, но сквозь них уже светило солнце. Тут одновременно есть и слишком темные места и слишком светлые, в JPEG сходу это невозможно вписать, как ни крути. Съемка многокадровым HDR сразу тоже не подойдёт — волны движутся и будет каша. Мы попытаемся вытащить из этого кадра максимум, достаточно простыми манипуляциями. Для некоторых вещей я буду использовать другие фотографии, более подходящие для иллюстрации того, о чем я пишу.
Для работы я выбираю, как правило, программу DXO Photo Lab. Она выгодно отличается от других конвертеров очень мощным инструментом манипуляции динамическим диапазоном, одним из лучших шумодавов и фирменным «волшебным» инструментом DXO Clear View, который в один клик преображает картинку по многим параметрам. Минус этой программы в том, что она работает медленно, но, как мне в своё время сказал представитель компании Topaz, инструменты которой тоже «неспешны», «Быстро и хорошо — это антонимы».
Кроме того, DXO узнает огромное количество пар камера+объектив и для этих пар DXO автоматически правит дисторсию, хроматические аберрации и дает возможность управлять резкостью картинки очень «интеллектуально», без всяких белых кромок, свойственным многим другим алгоритмам увеличения резкости. В общем, DXO для вас сделает всю обязательную работу по устранению технических недостатков изображения и позволит вам сосредоточится на художественной части работы.
Сразу скажу, это не полное руководство для DXO, это лишь краткое введение в работу с ней, без особых тонкостей и довольно не академическое, я бы сказал что это нечто типа ускоренного курса. Советую читать статью с запущенным DXO и сразу пробовать то, о чем я пишу.
Итак, начнем. Выбираем папку, в которой лежат ваши RAW файлы, снизу появятся превьюшки всех файлов, расположенных в этой папке. Если фото сняты парой камера+объектив, с которыми ваша копия DXO пока не сталкивалась, она предложит вам скачать модуль для автокоррекции для вашей пары аппаратуры, надо согласиться.
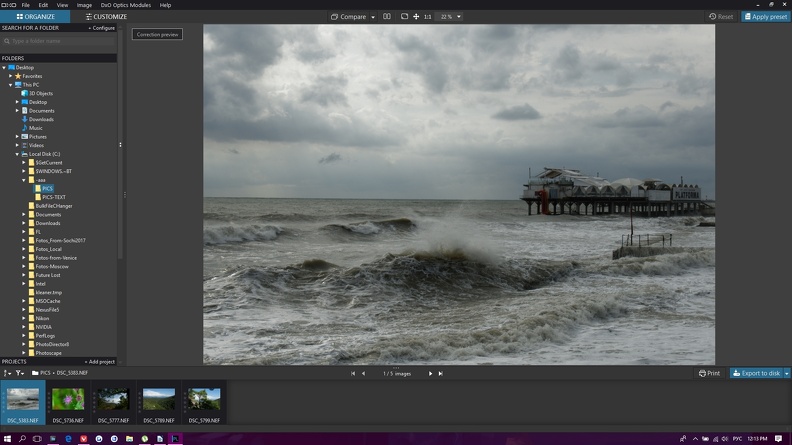
Даблклик на любой фотографии переводит программу в режим редактирования.
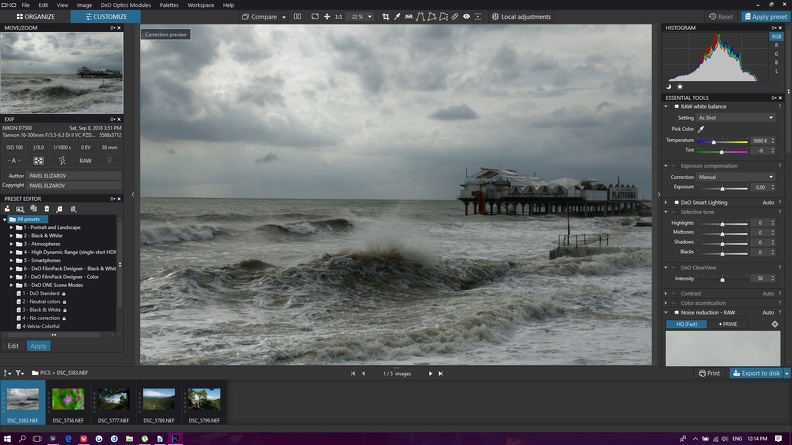
Слева расположена информация по снимку и пресеты, которые в один клик можно применить к изображению. Пресеты это весело, можно с ними поиграться, но нас интересует более кастомная проявка и скорее создание своих пресетов, чем применение фабричных.
Сверху расположены инструменты достаточно простые, чтобы не показывать, как ими пользоваться. Если вы открываете программу впервые, я советую вам их все попробовать, чтобы знать, что вы можете с легкостью делать. Там есть кроп кадра, установка пипеткой точки, которая должна быть белой, выравнивание горизонта, делание двух прямых параллельными (это полезно для выправления широкоугольных искажений), два более сложных инструмента для правки геометрии, удаление мелких дефектов (пластырь), удаление красных глаз и эмуляция тилт-шифта (миниатюра). Эти вещи вам будут нужны часто, но сделаны они логично и просто, у вас не возникнет проблем с пониманием того, как это работает.
Нас же интересует правая часть программы, где очень много разных инструментов, которые, обычно, как раз и пугают. Тут очень много инструментов, позволяющих вносить в изображение весьма много тонких изменений. Обилие этих инструментов обычно ошибочно воспринимается людьми, как запутанность программы. Однако, во-первых, основные вещи весьма логичны и просты, а во-вторых, вам понадобятся далеко не все инструменты из полного набора.
Первые инструментарии — самые простые, изменение баланса белого и общей экспозиции. От вашей камеры зависит, насколько часто вам придется руками править ББ и экспозицию. Я в последнее время очень редко трогаю эти ползунки. Работа с ними, особенно тонкая подстройка ББ, конечно, потребует неплохого монитора с матрицей IPS. Однако, это не значит, что вам нужен дорогущий профессиональный монитор. Разница между простым IPS монитором и профессиональным значительно меньше, чем разница в их цене. Обычные IPS мониторы, как правило, идут уже неплохо откалиброванными «из коробки», так что не слушайте тех, кто признает только мониторы с ценой под 100 тысяч и только после кропотливой калибровки, если вы не готовите фото для сверхвысококачественной профессиональной печати, можно жить и с простым LG с матрицей IPS.
Следующий инструмент — DXO Smart Lighting. Он по умолчанию включен и как правило вам не нужно его отключать. Программа DXO сама определяет какие участки надо чуть подсветить, а какие — чуть затемнить, в 99 процентах случаев это дает первичное улучшение рисунка. Посмотрите, как это происходит.
Идем далее — Selective Tone. Это один из тех инструментов, ради которых и выбирают именно DXO. Вы можете в весьма широко диапазоне регулировать отображение самых светлых, средних, темных, и почти черных оттенков. Этот инструмент может вытаскивать изображение как из черных теней так и их белых пересветов. Конечно, то, сколько вы можете вытянуть из пересветов или недосветов, зависит от матрицы, которая используется в вашем фотоаппарате и его предельного Динамического Диапазона.
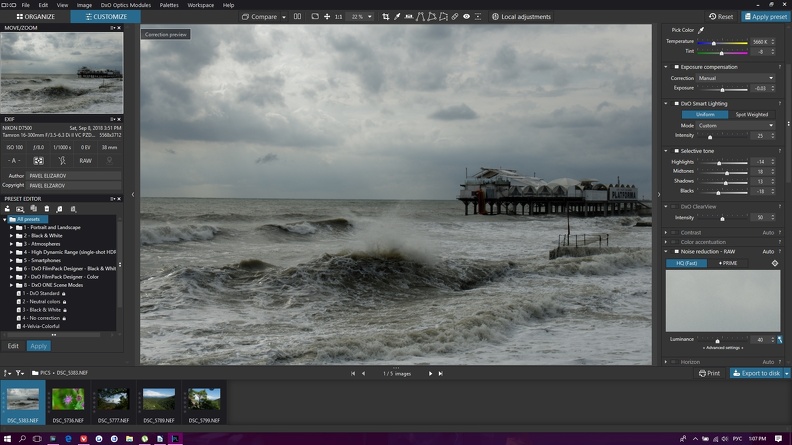
В данном случае нам нет смысл сильно вытаскивать какие-то тона. Мы немного притушим света, чтобы вытащить максимум фактуры из облаков, немного поднимем середину и тени, чтобы сделать поверхность моря посветлее, и немного притушим самые темные тона, чтобы темные участки туч и волн были еще потемнее, выразительнее.
Далее идет инструмент DXO Clear View. Это запатентованный инструмент и, следовательно, как он работает толком сказать невозможно. Замечу, что далеко не всегда этот инструмент оказывает положительное влияние на фотографию, бывает, что он делает очень странную картинку, а для фото с людьми он просто, чаще чего, неприменим в принципе. Но в данном случае применив этот инструмент мы получим очень выразительное небо и море. После применения DXO Clear View вам может потребоваться «покрутить» общую экспозицию, так как Clear View может изменить общее впечатление от освещенности. В данном случае я несколько поднял общую экспозицию после его включения.
Теперь я хочу обратить снимание на инструмент Color Accentuation. Тут можно менять такие параметры, как Vibrance и Saturation. По умолчанию, картинка из RAW не обладает сколько-нибудь яркими цветами и часто надо усилить цвета тем или иным образом. Иногда бывает надо даже уменьшить интенсивность цветов для достижения определенного эффекта. Для нашей фотографии я усилил цвета достаточно сильно. Это сделало тучи «грознее», несколько синее, а море увеличило свою визуальную прозрачность, так как более серые тона практически не меняются от увеличения Saturation, а цвет морской волны становится сочнее. Значение Vibrance и Saturation подбирайте визуально, как приятнее.
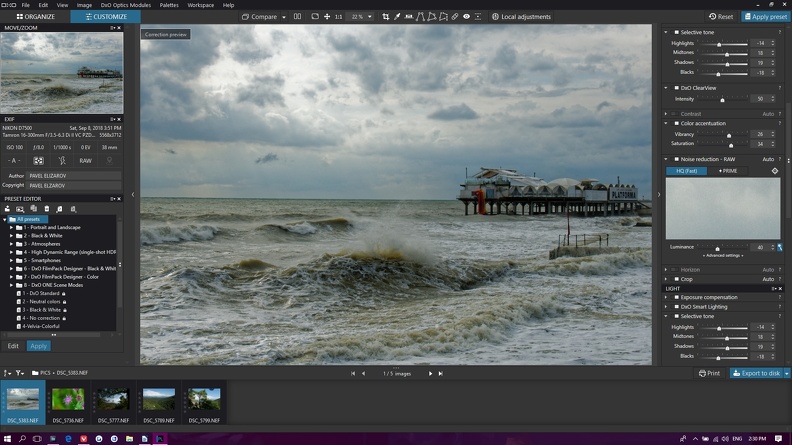
Далее — Noise Reduction RAW. Это еще одно, что очень выделяет DXO — возможность использовать шумоподавление PRIME. Этот шумодав творит чудеса, хоть и делает это медленно. Применение PRIME удлиняет обработку кадра в несколько раз (конкретные цифры зависят от процессора и видеокарты). Но, допустим, кадры с моего Nikon D7500, при применении шумодава PRIME могут быть сделаны с ISO аж до 10000!
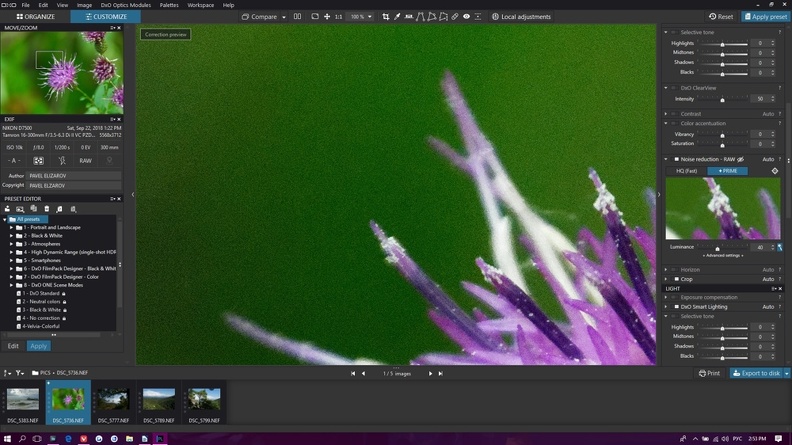
Обращаю ваше внимание, что на большом окне шумодав PRIME не применяется, это слишком медленно. Его подобие, причем ухудшенное, можно увидеть в маленьком окошке справа, но полный результат вы увидите только уже после экспорта файлов.
Ну и последний инструмент, на котором я заострю ваше внимание, это Lens Sharpness. Это еще одна специализированная черта DXO, которой нет больше ни у кого. Это доступно только для пары камера+объектив, которую DXO узнаёт и поддерживает. Еще раз скажу, таких пар очень много, так что вероятнее всего ваша пара будет поддерживаться. Изображение, полученное из RAW файла, чаще всего, нуждается в увеличении резкости. Это происходит, прежде всего из-за алгоритма обработка изображения с байеровской матрицы. Так что не нужно чураться увеличения резкости, особенно, если у вас есть такой мощный инструмент, как DXO Lens Sharpness. Фото с разных стекол и с разными сюжетами требую поднятия резкости в разной степени. Допустим для фото с Тамрона 16-300 я ставлю общее повышение резкости в 1.5, а вот фотографии с Sigma 50-100/1.8 получают только 1-1.2.
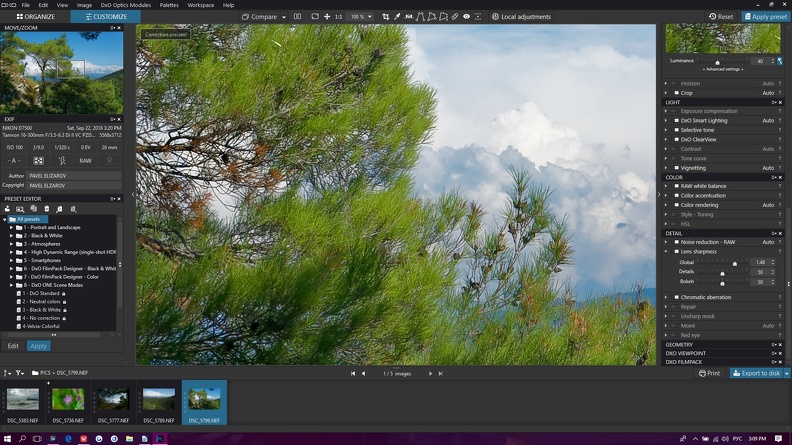
Как правило, я обхожусь только общим поднятием резкости (Global). Поднятие резкости на мелких деталях (Details) мне никогда не было нужно. На представленной фото, допустим, изменятся только кончики игл сосны, если Details задрать на максимум. Bokeh бывает надо снизить, если общее поднятие резкости неприятно сказалось на боке. В случае пейзажей этот ползунок ничего не меняет.
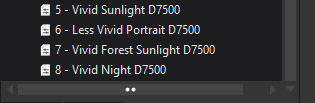
Помните, эта статья называется «обработка для ленивых»? Прочитав всё то, что я написал выше, вы можете возмутиться — в чем же тут «для ленивых», вон сколько всего надо сделать! Что ж, справедливо. Но дело в том, что для схожих условий освещения, вам нужен очень схожий набор действий. Сделав все манипуляции на одном кадре, нажмите а центре экрана правую кнопку мыши выберите Create Preset From Current Settings, после чего назовите файл, в который сохранится ваша настройка как-то, чтобы вы потом поняли о чем речь. У меня есть несколько моих пресетов, вот они:
Далее вам надо выделить более-менее одинаковые кадры и ко всем ним применить ваш пресет. Допустим, не так давно я целый день провел в горах около Сочи, на Реке Агура. Было снято порядка 200 кадров. На все 200 кадров мне надо было 2 пресета – «солнечный день» и «солнечный день в лесу», которые я имел уже до этого, то есть вся обработка заключалась в том, что мне надо было применить в половине кадров один пресет, а к другой половине другой. Ну, разумеется, это не отменяет кадрирования, выравнивания горизонта, и прочих «обычных» мероприятий к кадрами.
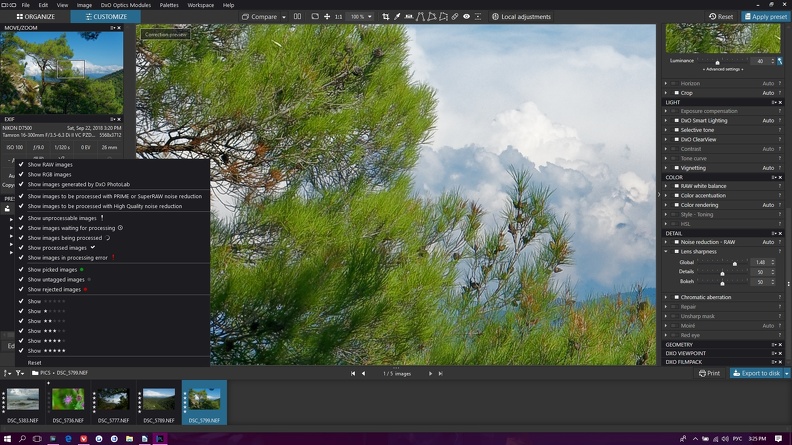
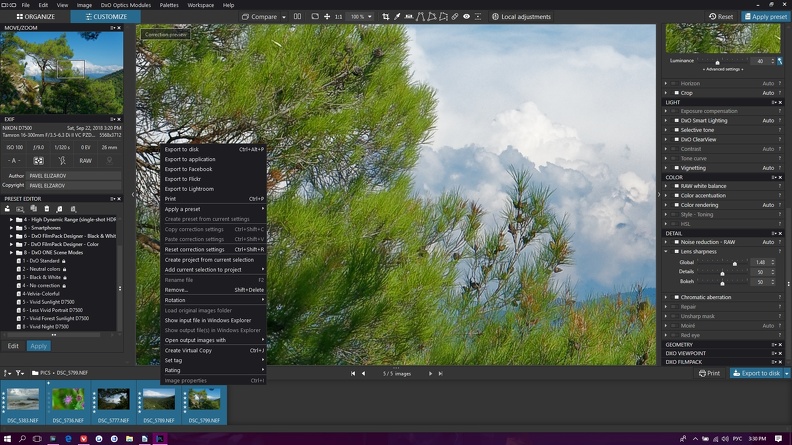
Еще один прием работы с DXO. Когда вы перебираете много файлов, допустим, с большого съемочного дня, отмечайте те кадры, которые вы хотите «взять» рейтингом в 5 звезд. Потом, закончив разбор и обработку кадров, вы можете вызвать фильр показываемых кадров. Уберите галочку с 5ти пустых звезд и все кадры, которые вы не захотели взять, исчезнут из нижней линейки — очень удобно. После этого вы можете без проблем выделить все кадры (Ctrl+A), нажать на них правую кнопку мыши в выпавшем меню выбрать Export to disk.
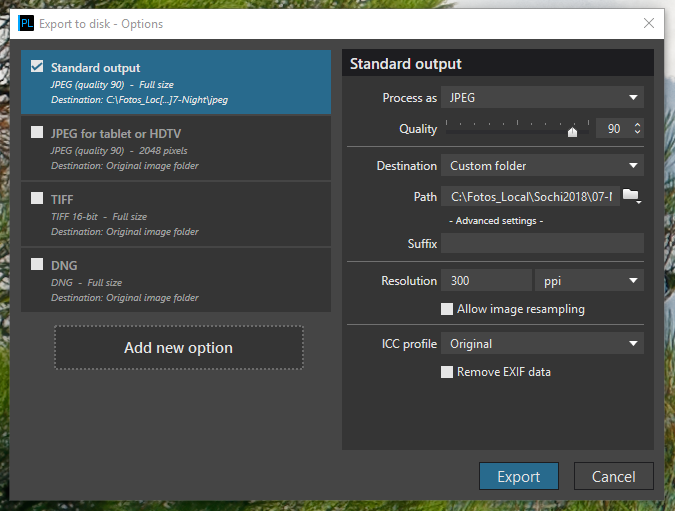
Появится диалог. Опция по умолчанию — Standard Output это сохранение в JPEG без уменьшения размера. Вам останется только выбрать куда сохранить файлы и пойти пить чай, пока DXO будет делать свою работу.
Конечно, то, что я описал, охватывает в лучшем случае 10 процентов от возможностей программы. А с недавних пор в DXO появились мощнейшие инструменты пакета Nik Software, который был куплен DXO. Но я думаю, что этот небольшой интенсив позволит вам перестать бояться этой программы, даст тот импульс, который часто необходим, чтобы нырнуть в то, что ранее казалось темным омутом.
С момента написания статьи, вышла вторая версия DXO Photolab 2, в которой появилась еще одна очень полезная штука – она понимает цветовые профили от Adobe. Но об этом поговорил в слеующий раз.
Post Views: 7,222
![]()
Pieloe
•
Forum Member
•
Posts: 79
Tutorials DxO PhotoLab by the user
Jun 6, 2019
14
Hello,
I wrote three tutorials dedicated to the use of DxO PhotoLab.
As a DxO user, I give you my tips and tricks which might make you more efficient.
1- Discovering DxO PhotoLab
A quick overview for users used others development software
2- Local Adjustments with DxO PhotoLab
A user guide to Enhance the visibility of your photos
3- Efficiency with DxO PhotoLab — The means to get quickly to better results
Intended for experienced users, it explains the functioning and gives some recipes for more efficiency.
I hope you will enjoy these tutorials.
Pascal
http://dxo.tuto.free.fr/
Zeee
•
Forum Pro
•
Posts: 26,415
Re: Tutorials DxO PhotoLab by the user
In reply to Pieloe
•
Jun 6, 2019
The difference between lens correction and USM is interesting. We know about the 3 phases of sharpening. If your lens is characterized by DXO then you don’t need USM. In fact it states not to use both. So either Lens Corrections or USM covers Capture sharpening I assume?
Creative sharpening is achieved by MicroContrast. I seen the word Creative so I assume that’s its job.
Where is Export sharpening? I assumed it was USM. What do you use to sharpen for media type?
I have PL but don’t use it that much but that could change. Moving on it will be good to know about Lens Corrections and USM.
Canon EOS R7
Canon EOS R6 Mark II
Canon RF 24-105mm F4L IS USM
Canon RF 100-500mm F4.5-7.1L IS USM
+1 more
![]()
OP
Pieloe
•
Forum Member
•
Posts: 79
Re: Tutorials DxO PhotoLab by the user
In reply to Zeee
•
Jun 6, 2019
Zeee wrote:
The difference between lens correction and USM is interesting. We know about the 3 phases of sharpening. If your lens is characterized by DXO then you don’t need USM. In fact it states not to use both. So either Lens Corrections or USM covers Capture sharpening I assume?
YES
Creative sharpening is achieved by MicroContrast. I seen the word Creative so I assume that’s its job.
YES and better with fine contrast (FilmPack functionality)
Where is Export sharpening? I assumed it was USM. What do you use to sharpen for media type?
You accentuate the image as you wish and the system transposes according to the desire dimensions.
Great efforts were made on this point during the release of DPL 1.
DxO recommends exporting small images with the bicubic option.
Pascal
sankos
•
Senior Member
•
Posts: 2,378
Re: Tutorials DxO PhotoLab by the user
In reply to Pieloe
•
Jun 6, 2019
Pieloe wrote:
Zeee wrote:
The difference between lens correction and USM is interesting. We know about the 3 phases of sharpening. If your lens is characterized by DXO then you don’t need USM. In fact it states not to use both. So either Lens Corrections or USM covers Capture sharpening I assume?
YES
I have come across images where I had to disable the deconvolution-based sharpening behind the Details slider (Lens Corrections) and used a very light pass of USM as part of my capture sharpening routine. This helped to combat a watercolour effect that was starting to creep in as a result of sloppy demosaicing and deconvolution.
Creative sharpening is achieved by MicroContrast. I seen the word Creative so I assume that’s its job.
YES and better with fine contrast (FilmPack functionality)
Where is Export sharpening? I assumed it was USM. What do you use to sharpen for media type?
You accentuate the image as you wish and the system transposes according to the desire dimensions.
Great efforts were made on this point during the release of DPL 1.
DxO recommends exporting small images with the bicubic option.
Which is hardly optimal. At least they could offer a Lanczos algorithm for resizing. And people are hoping that the Nik Output sharpener facility actually gets ported some day to the Export dialogue. As it is, I output a full-sized file from PhotoLab2 and do my resizing and output sharpening in my photo viewer.
![]()
OP
Pieloe
•
Forum Member
•
Posts: 79
Re: Tutorials DxO PhotoLab by the user
In reply to sankos
•
Jun 6, 2019
sankos wrote:
Pieloe wrote:
Zeee wrote:
The difference between lens correction and USM is interesting. We know about the 3 phases of sharpening. If your lens is characterized by DXO then you don’t need USM. In fact it states not to use both. So either Lens Corrections or USM covers Capture sharpening I assume?
YES
I have come across images where I had to disable the deconvolution-based sharpening behind the Details slider (Lens Corrections) and used a very light pass of USM as part of my capture sharpening routine. This helped to combat a watercolour effect that was starting to creep in as a result of sloppy demosaicing and deconvolution.
In this case you can action the Global cursor.
Creative sharpening is achieved by MicroContrast. I seen the word Creative so I assume that’s its job.
YES and better with fine contrast (FilmPack functionality)
Where is Export sharpening? I assumed it was USM. What do you use to sharpen for media type?
You accentuate the image as you wish and the system transposes according to the desire dimensions.
Great efforts were made on this point during the release of DPL 1.
DxO recommends exporting small images with the bicubic option.Which is hardly optimal. At least they could offer a Lanczos algorithm for resizing. And people are hoping that the Nik Output sharpener facility actually gets ported some day to the Export dialogue. As it is, I output a full-sized file from PhotoLab2 and do my resizing and output sharpening in my photo viewer.
… and you think it’s better with a photo viewer !?
DxO proposes bicubic and billenar algorithms.
I don’t know how Lanczos is better. Maybe yes !?
Pascal
sankos
•
Senior Member
•
Posts: 2,378
PhotoLab / resizing / output sharpening
In reply to Pieloe
•
Jun 6, 2019
1
Pieloe wrote:
sankos wrote:
Pieloe wrote:
Zeee wrote:
The difference between lens correction and USM is interesting. We know about the 3 phases of sharpening. If your lens is characterized by DXO then you don’t need USM. In fact it states not to use both. So either Lens Corrections or USM covers Capture sharpening I assume?
YES
I have come across images where I had to disable the deconvolution-based sharpening behind the Details slider (Lens Corrections) and used a very light pass of USM as part of my capture sharpening routine. This helped to combat a watercolour effect that was starting to creep in as a result of sloppy demosaicing and deconvolution.
In this case you can action the Global cursor.
It sometimes worked with some cameras/lenses but frequently I preferred zeroing the Details or disabling the Lens Sharpness altogether and applying sharpening with a control point.
Creative sharpening is achieved by MicroContrast. I seen the word Creative so I assume that’s its job.
YES and better with fine contrast (FilmPack functionality)
Where is Export sharpening? I assumed it was USM. What do you use to sharpen for media type?
You accentuate the image as you wish and the system transposes according to the desire dimensions.
Great efforts were made on this point during the release of DPL 1.
DxO recommends exporting small images with the bicubic option.Which is hardly optimal. At least they could offer a Lanczos algorithm for resizing. And people are hoping that the Nik Output sharpener facility actually gets ported some day to the Export dialogue. As it is, I output a full-sized file from PhotoLab2 and do my resizing and output sharpening in my photo viewer.
… and you think it’s better with a photo viewer !?
Yes. I use the free XnViewMP and it gives me a preview of what resizing/sharpening will look like when converted. Other than that I can always invoke Topaz Detail or Nik Output Sharpener plugins from the viewer, just like from PhotoLab 2.3.
DxO proposes bicubic and billenar algorithms.
I don’t know how Lanczos is better. Maybe yes !?
FastStone, IrfanView, ACDSee or Affinity Photo offer variations of Lanczos so you can always try how it compares to bicubic or bilinear. Other than that, there’s always ImageMagick.
Zeee
•
Forum Pro
•
Posts: 26,415
Re: Tutorials DxO PhotoLab by the user
In reply to Pieloe
•
Jun 6, 2019
Pieloe wrote:
Zeee wrote:
The difference between lens correction and USM is interesting. We know about the 3 phases of sharpening. If your lens is characterized by DXO then you don’t need USM. In fact it states not to use both. So either Lens Corrections or USM covers Capture sharpening I assume?
YES
Creative sharpening is achieved by MicroContrast. I seen the word Creative so I assume that’s its job.
YES and better with fine contrast (FilmPack functionality)
Where is Export sharpening? I assumed it was USM. What do you use to sharpen for media type?
You accentuate the image as you wish and the system transposes according to the desire dimensions.
Great efforts were made on this point during the release of DPL 1.
DxO recommends exporting small images with the bicubic option.
Yes so does PS.
Pascal
Canon EOS R7
Canon EOS R6 Mark II
Canon RF 24-105mm F4L IS USM
Canon RF 100-500mm F4.5-7.1L IS USM
+1 more
Zeee
•
Forum Pro
•
Posts: 26,415
Re: Tutorials DxO PhotoLab by the user
In reply to Pieloe
•
Jun 6, 2019
1
Pieloe wrote:
Zeee wrote:
The difference between lens correction and USM is interesting. We know about the 3 phases of sharpening. If your lens is characterized by DXO then you don’t need USM. In fact it states not to use both. So either Lens Corrections or USM covers Capture sharpening I assume?
YES
Creative sharpening is achieved by MicroContrast. I seen the word Creative so I assume that’s its job.
YES and better with fine contrast (FilmPack functionality)
Where is Export sharpening? I assumed it was USM. What do you use to sharpen for media type?
You accentuate the image as you wish and the system transposes according to the desire dimensions.
Great efforts were made on this point during the release of DPL 1.
DxO recommends exporting small images with the bicubic option.
Thanks for the info. Clears things up.
Pascal
Canon EOS R7
Canon EOS R6 Mark II
Canon RF 24-105mm F4L IS USM
Canon RF 100-500mm F4.5-7.1L IS USM
+1 more
Zeee
•
Forum Pro
•
Posts: 26,415
Re: Tutorials DxO PhotoLab by the user
In reply to Zeee
•
Jun 6, 2019
Zeee wrote:
Pieloe wrote:
Zeee wrote:
The difference between lens correction and USM is interesting. We know about the 3 phases of sharpening. If your lens is characterized by DXO then you don’t need USM. In fact it states not to use both. So either Lens Corrections or USM covers Capture sharpening I assume?
YES
Creative sharpening is achieved by MicroContrast. I seen the word Creative so I assume that’s its job.
YES and better with fine contrast (FilmPack functionality)
Where is Export sharpening? I assumed it was USM. What do you use to sharpen for media type?
You accentuate the image as you wish and the system transposes according to the desire dimensions.
Great efforts were made on this point during the release of DPL 1.
DxO recommends exporting small images with the bicubic option.Thanks for the info. Clears things up. As for the PS thing I have a video tutorial that says to use Bicubic as well.
Pascal
Canon EOS R7
Canon EOS R6 Mark II
Canon RF 24-105mm F4L IS USM
Canon RF 100-500mm F4.5-7.1L IS USM
+1 more
bmoag
•
Veteran Member
•
Posts: 3,479
Re: Tutorials DxO PhotoLab by the user
In reply to Pieloe
•
Jun 6, 2019
Is there a tutorial about why only some of the «new» Nik plug-ins scale to 4k in Windows?
Is there a tutorial about why several of the «new» Nik plug-ins still repeatedly freeze/crash Photoshop? That has not changed since Nik was Nik.
Is there a tutorial about why the ancient and useless Nik control panel still has to be disabled from showing up on the PS desktop?
Is there a tutorial that explains the dubious decision to launch Dx0 labs as a plug-in from LR only and not Bridge/PS where it could serve as a credible alternate raw converter?
Is there a tutorial that explains why this software is worth buying?
Nikon D70
Nikon D3300
Panasonic Lumix DMC-GX8
Nikon Z6
![]()
OP
Pieloe
•
Forum Member
•
Posts: 79
Re: Tutorials DxO PhotoLab by the user
In reply to bmoag
•
Jun 6, 2019
1
bmoag wrote:
Is there a tutorial about why only some of the «new» Nik plug-ins scale to 4k in Windows?
Is there a tutorial about why several of the «new» Nik plug-ins still repeatedly freeze/crash Photoshop? That has not changed since Nik was Nik.
Is there a tutorial about why the ancient and useless Nik control panel still has to be disabled from showing up on the PS desktop?
Is there a tutorial that explains the dubious decision to launch Dx0 labs as a plug-in from LR only and not Bridge/PS where it could serve as a credible alternate raw converter?
Is there a tutorial that explains why this software is worth buying?
I wrote a few tutorials for DxO PhotoLab, a software wrote by DxO lab since the beginning.
You speak about another product.
Pascal
IanYorke
•
Veteran Member
•
Posts: 5,349
Re: Tutorials DxO PhotoLab by the user
In reply to Pieloe
•
Jun 7, 2019
1
Pieloe wrote:
Hello,
I wrote three tutorials dedicated to the use of DxO PhotoLab.As a DxO user, I give you my tips and tricks which might make you more efficient.
1- Discovering DxO PhotoLab
A quick overview for users used others development software2- Local Adjustments with DxO PhotoLab
A user guide to Enhance the visibility of your photos3- Efficiency with DxO PhotoLab — The means to get quickly to better results
Intended for experienced users, it explains the functioning and gives some recipes for more efficiency.I hope you will enjoy these tutorials.
Pascal
http://dxo.tuto.free.fr/
A lot of work, much appreciated. It will take a while to digest
Ian
Re: Tutorials DxO PhotoLab by the user
In reply to Pieloe
•
Jun 10, 2019
1
A lot of work, much appreciated. I will take more time to reseach it
![]()
Re: Tutorials DxO PhotoLab by the user
In reply to Pieloe
•
Jun 11, 2019
1
Thank you for this thread and DXO tutorials. I will definitely bookmark and read.
I am a bit baffled by some of the local adjustments. The control point can not be made large enough to cover an image with my 7000px files for a global adjustment?
And how do I remove parts of a control point adjustment? The dialog box says to use Alt+click for a minus type control point but all that comes up is a control point just like the original?
Why can’t the adjustment brush be used to remove parts of a control point adjustment? And is there no way to turn the + brush into a — brush? Holding Alt does nothing.
There is the Eraser tool but it is SO tiny and it does not seem to work with a control point.
Thank you again.
Nikon Z6
Nikon Z7 II
Nikon AF-S Nikkor 24-70mm f/2.8G ED
Nikon AF-S Nikkor 50mm F1.4G
Nikon AF-S Nikkor 70-200mm F4G ED VR
+5 more
![]()
OP
Pieloe
•
Forum Member
•
Posts: 79
Re: Tutorials DxO PhotoLab by the user
Ernie Misner wrote:
Thank you for this thread and DXO tutorials. I will definitely bookmark and read.
I am a bit baffled by some of the local adjustments. The control point can not be made large enough to cover an image with my 7000px files for a global adjustment?
I don’t think control point is the good tool for the entire image.
Brush and Graduated Filter are classical and convinient.
And, above all, Auto Mask, According to my practice, this is the most effective type of mask
And how do I remove parts of a control point adjustment? The dialog box says to use Alt+click for a minus type control point but all that comes up is a control point just like the original?
NO, Don’t you see the minus symbol on th crosshair !?
Why can’t the adjustment brush be used to remove parts of a control point adjustment? And is there no way to turn the + brush into a — brush? Holding Alt does nothing.
There is the Eraser tool but it is SO tiny and it does not seem to work with a control point.
The «Control Point» type mask does not erase. Delete it.
Thank you again.
Thanks
Pascal
IanYorke
•
Veteran Member
•
Posts: 5,349
Re: Tutorials DxO PhotoLab by the user
1
Ernie Misner wrote:
Thank you for this thread and DXO tutorials. I will definitely bookmark and read.
I am a bit baffled by some of the local adjustments. The control point can not be made large enough to cover an image with my 7000px files for a global adjustment?And how do I remove parts of a control point adjustment? The dialog box says to use Alt+click for a minus type control point but all that comes up is a control point just like the original?
Why can’t the adjustment brush be used to remove parts of a control point adjustment? And is there no way to turn the + brush into a — brush? Holding Alt does nothing.
There is the Eraser tool but it is SO tiny and it does not seem to work with a control point.Thank you again.
Hi Ernie
The control points are for local, not global adjustments. When you add a control point a mask is automatically produced based on the colour and texture of the pixels under the control point. Press the M key (Win) to see the mask.
The control circle is not an absolute limit to the adjustment range as the adjustments will extend beyond the circle but with reduced intensity. The idea is that not all pixels are impacted by the adjustments as with a standard mask. This gives a more organic change to the image with no hard boundaries. There is another thread that discusses tips for DXO Photolab which may help:
DXO-PL 2 Tips – DP Review
https://www.dpreview.com/forums/thread/4347396
This video will also help:
U-Point Technology
With the mask displayed by the control point if you hold down Alt and click to add a point you add a negative control point which samples the pixels under the negative control point and tells the normal control point to not impact these pixels. NIK technology is very different to traditional masking but is easy to use once you get a better understanding of what is going on.
Negative control points are used to effectively erase parts of the control point mask as explained above.
Hope this helps.
Ian
![]()
Re: Tutorials DxO PhotoLab by the user
In reply to IanYorke
•
Jun 11, 2019
1
IanYorke wrote:
Ernie Misner wrote:
Thank you for this thread and DXO tutorials. I will definitely bookmark and read.
I am a bit baffled by some of the local adjustments. The control point can not be made large enough to cover an image with my 7000px files for a global adjustment?And how do I remove parts of a control point adjustment? The dialog box says to use Alt+click for a minus type control point but all that comes up is a control point just like the original?
Why can’t the adjustment brush be used to remove parts of a control point adjustment? And is there no way to turn the + brush into a — brush? Holding Alt does nothing.
There is the Eraser tool but it is SO tiny and it does not seem to work with a control point.Thank you again.
Hi Ernie
The control points are for local, not global adjustments. When you add a control point a mask is automatically produced based on the colour and texture of the pixels under the control point. Press the M key (Win) to see the mask.
Thanks for this and for the links! I am just so used to using the control points in my Nikon CNX2 software where the CP’s go large and fully cover the image globally *while* still selecting just the areas under the point. And the adjustment brush can be set to minus and easily remove any areas from the CP adjustment. Seems so simple and easy.
The most amazing thing about the CP’s in CNX2 is that they work seamlessly with any and all adjustments in that software.
The control circle is not an absolute limit to the adjustment range as the adjustments will extend beyond the circle but with reduced intensity. The idea is that not all pixels are impacted by the adjustments as with a standard mask. This gives a more organic change to the image with no hard boundaries. There is another thread that discusses tips for DXO Photolab which may help:
DXO-PL 2 Tips – DP Review
https://www.dpreview.com/forums/thread/4347396
This video will also help:
U-Point Technology
With the mask displayed by the control point if you hold down Alt and click to add a point you add a negative control point which samples the pixels under the negative control point and tells the normal control point to not impact these pixels. NIK technology is very different to traditional masking but is easy to use once you get a better understanding of what is going on.
Thanks and after using it a couple more times I am seeing the results of the negative control points. Cool to hold Alt and click to create one. I have used the negative CP’s a lot in Nik too.
Negative control points are used to effectively erase parts of the control point mask as explained above.
Hope this helps.
Ian
Nikon Z6
Nikon Z7 II
Nikon AF-S Nikkor 24-70mm f/2.8G ED
Nikon AF-S Nikkor 50mm F1.4G
Nikon AF-S Nikkor 70-200mm F4G ED VR
+5 more
![]()
Re: Tutorials DxO PhotoLab by the user
In reply to Pieloe
•
Jun 11, 2019
Pieloe wrote:
Ernie Misner wrote:
Thank you for this thread and DXO tutorials. I will definitely bookmark and read.
I am a bit baffled by some of the local adjustments. The control point can not be made large enough to cover an image with my 7000px files for a global adjustment?I don’t think control point is the good tool for the entire image.
Brush and Graduated Filter are classical and convinient.
And, above all, Auto Mask, According to my practice, this is the most effective type of mask
Thank you for your replies. The brush and grad filter do not select just the hue and luminosity the way CP’s do though. I use CP’s every day in my Nikon Capture NX2 software (with Nik’s Color Efex Pro3 installed) and make them go over the entire image while just selecting the hue directly under the pin and it works excellent. But the CP’s in DXO are welcome and it still covers most of the image to some degree.
And how do I remove parts of a control point adjustment? The dialog box says to use Alt+click for a minus type control point but all that comes up is a control point just like the original?
NO, Don’t you see the minus symbol on th crosshair !?
Yes, now I see it and no need to yell.
Why can’t the adjustment brush be used to remove parts of a control point adjustment? And is there no way to turn the + brush into a — brush? Holding Alt does nothing.
There is the Eraser tool but it is SO tiny and it does not seem to work with a control point.The «Control Point» type mask does not erase. Delete it.
I was just used to have it erase nicely as needed in my other software. Rather than delete it however I would use a negative CP in DXO I think.
Thank you again.
Thanks
Pascal
Nikon Z6
Nikon Z7 II
Nikon AF-S Nikkor 24-70mm f/2.8G ED
Nikon AF-S Nikkor 50mm F1.4G
Nikon AF-S Nikkor 70-200mm F4G ED VR
+5 more
![]()
OP
Pieloe
•
Forum Member
•
Posts: 79
Re: Tutorials DxO PhotoLab by the user
1
Ernie Misner wrote:
Thank you for your replies. The brush and grad filter do not select just the hue and luminosity the way CP’s do though. I use CP’s every day in my Nikon Capture NX2 software (with Nik’s Color Efex Pro3 installed) and make them go over the entire image while just selecting the hue directly under the pin and it works excellent. But the CP’s in DXO are welcome and it still covers most of the image to some degree.
I didn’t understand you come from NX2.
With PhotoLab you must prefer the global mode and only then use the Local Adjustments.
Control points are not tools to get started.
And how do I remove parts of a control point adjustment? The dialog box says to use Alt+click for a minus type control point but all that comes up is a control point just like the original?
NO, Don’t you see the minus symbol on th crosshair !?
Yes, now I see it and no need to yell.
I always write YES and NO in block capitals on social media
Pascal
![]()
Re: Tutorials DxO PhotoLab by the user
In reply to Pieloe
•
Jun 12, 2019
1
Pieloe wrote:
Ernie Misner wrote:
Thank you for your replies. The brush and grad filter do not select just the hue and luminosity the way CP’s do though. I use CP’s every day in my Nikon Capture NX2 software (with Nik’s Color Efex Pro3 installed) and make them go over the entire image while just selecting the hue directly under the pin and it works excellent. But the CP’s in DXO are welcome and it still covers most of the image to some degree.
I didn’t understand you come from NX2.
Do you know the history of Nik and control points? I have been using CP’s for about 15 years. Silkypix I think originated them and licensed them to Nikon to use in it’s CaptureNX1 and 2 software in about 2004 or so. The adjustment brush (both + and — ) has always worked with the control points. Then Nik purchased them (the patent) apparently and created the Nik plugins a few years later. I use Nik as a plugin to PS and can apply the control point edits with the adjustment brush in PS after the round trip.
With PhotoLab you must prefer the global mode and only then use the Local Adjustments.
Control points are not tools to get started.And how do I remove parts of a control point adjustment? The dialog box says to use Alt+click for a minus type control point but all that comes up is a control point just like the original?
NO, Don’t you see the minus symbol on th crosshair !?
Yes, now I see it and no need to yell.
I always write YES and NO in block capitals on social media
I did not know that and thought you were mad and yelling.
Pascal
Nikon Z6
Nikon Z7 II
Nikon AF-S Nikkor 24-70mm f/2.8G ED
Nikon AF-S Nikkor 50mm F1.4G
Nikon AF-S Nikkor 70-200mm F4G ED VR
+5 more
Keyboard shortcuts:
FForum
MMy threads
Latest sample galleries
Latest in-depth reviews

Fujifilm’s Instax brand has been synonymous with instant film, but Fujifilm is flipping the script with their first all-digital Instax camera. Prints can still be made via optional transmission to a digital printer and Fujifilm is hoping younger users will flock to it.

The Nikon Zf is a 24MP full-frame mirrorless camera with classic looks that adds the latest Expeed 7 processor and features such as 3D Tracking AF to the $2000 price point currently addressed by the Nikon Z6 II.

The Canon EOS R50 is an entry-level, compact APS-C mirrorless camera. A 24MP RF-mount camera aiming to attract smartphone users and, perhaps, vloggers. We found a lot to like about this small, simple camera, but we’re not sure where you go once you tire of the kit lens.

Tapping into machine learning technologies, Photomator is a photo editor that offers a step up from Apple Photos and an affordable alternative to Lightroom.

The latest Lumix puts a Four Thirds sensor in a full-frame body, and includes some of Panasonic’s most advanced imaging tech ever.
Latest buying guides

Above $2500 cameras tend to become increasingly specialized, making it difficult to select a ‘best’ option. We case our eye over the options costing more than $2500 but less than $4000, to find the best all-rounder.

There are a lot of photo/video cameras that have found a role as B-cameras on professional film productions or even A-cameras for amateur and independent productions. We’ve combed through the options and selected our two favorite cameras in this class.

What’s the best camera for around $2000? These capable cameras should be solid and well-built, have both the speed and focus to capture fast action and offer professional-level image quality. In this buying guide we’ve rounded up all the current interchangeable lens cameras costing around $2000 and recommended the best.

Family moments are precious and sometimes you want to capture that time spent with loved ones or friends in better quality than your phone can manage. We’ve selected a group of cameras that are easy to keep with you, and that can adapt to take photos wherever and whenever something memorable happens.

What’s the best camera for shooting sports and action? Fast continuous shooting, reliable autofocus and great battery life are just three of the most important factors. In this buying guide we’ve rounded-up several great cameras for shooting sports and action, and recommended the best.

This page may contain affiliate links where I earn a small commission to help cover costs. They do not affect the price you pay or the service you receive.
Thank you for your support.
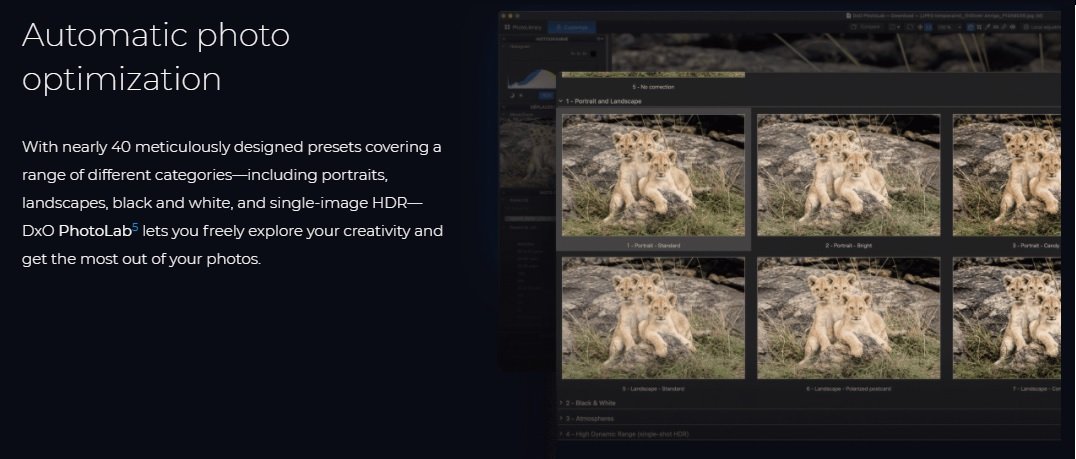
Brilliant Editing with DxO PhotoLab 5 Control Lines
In this tutorial, I’ll explain how to use the DxO PhotoLab Control Lines feature. Control Lines are a new feature introduced in PhotoLab 5. Control Lines are one of the Local Adjustment tools. If you’re already a DxO PhotoLab user, you’ve probably used the Graduated Filter tool in the past. Other editing packages like Lightroom also offer similar tools.
Graduated Filters are great for editing landscape photos where there is a clear, level horizon in the image. But you can also use the new Control Lines for the same purpose, and they share some of the same features.
Why use Control Lines
The fact that Graduated Filters and Control Lines have common features may leave you wondering why use Control Lines. The answer to that lies in two editing advantages.
- Where the horizon isn’t flat, you can use Control Lines to produce a cleaner selection.
- When you apply an adjustment with the Graduated Filter, the same adjustment is applied to everything in the selection. But with Control Lines, you have an additional level of control that can produce better results.
This image shows why a Control Line is better than a Graduated Filter for selecting an uneven horizon.

Here, only a single Control Line was added to the image, yet it’s created an excellent selection of the areas to adjust. This selection matches the contours of the land where if we used a Graduated Filter, it would have also selected the sky.
Now let’s look at a more detailed example of editing using PhotoLab Control Lines to demonstrate their advantage.
Adding a Control Line to an Image
Here you can see an image open in PhotoLab ready to start editing.

To add a Control Line, you first need to click the Local Adjustments button at the top of the PhotoLab interface (1). You should also select the Local Adjustments panel (2) when using Control Lines as it provides additional essential adjustments.
After clicking the Local Adjustments button, right click on the image using your mouse. This opens the PhotoLab Local Adjustments tools palette where you can select the Control Line tool.

When you click the Control Line tool with your mouse you will see the mouse pointer change to a small cross. Position the cross over the image then click and drag with your mouse to draw the Control Line. As you do this just, you draw the Control Line which appears very similar to a Graduated Filter.

When you first click with your mouse, you set the Control Line centre pin (1). As you then drag, you create a graduated area until you release the mouse. When you release the mouse, you create a second pin (2). It’s then possible to reposition the Control Line by clicking and dragging the first pin (1). You can also click and drag the second pin (2) to resize the gradient or rotate the Control Line around the centre pin.
Having positioned your Control Line, you can apply adjustments using the controls (3) as you would any of with other Local Adjustments.
Adjusting the Control Line Selection
After adding and positioning a Control Line, you can control what is and isn’t selected. You can do this by moving the Control Lines sample point.

The sample point for a Control Line is a small icon showing an eye dropper (1). Using your mouse, click and drag to reposition the dropper. When you release the dropper, that area is sampled by PhotoLab to determine the colour and brightness of point. PhotoLab then uses this information to create a mask (or selection) of the image within the area selected by the Control Line.
You can view the mask by clicking on the show masks option (2) at the bottom of the interface. The mask then appears as a black-and-white image. Areas shown in white are selected and will be affected by any adjustments you apply. The black areas of the mask won’t be affected by adjustments. By using a mask like this to apply adjustments you can create a more professional results with your editing.
Using the Chroma and Luma Sliders
In addition to sampling areas of the image using the sample point, you can use the Chroma and Luma sliders to refine a selection. These sliders allow you to control the sample point sensitivity to both colour and brightness. You will find the Chroma and Luma sliders in the Local Adjustments panel and you can set different values for each mask.

The Chroma slider controls sensitivity to colour whilst the Luma slider controls sensitivity to brightness (or luminosity).
When you move a slider to the left (a lower value) you lower its accuracy. By doing this, you include a wide range of colour or brightness, causing a larger area of the image within the Control Line to be selected. But if you move the sliders right (higher values) you increase their accuracy. There then needs to be a closer match of colour or brightness to be included in the selection.
Here are a couple of examples.

Here you can see two masks created using a Control Line. Both masks use the same Control Line and both masks have the same sample point in the image. The only difference between the two are the Chroma and Luma slider settings.
In the mask on the left the Chroma slider has a high value whilst the Luma slider has a low value. This means there needs to be an accurate match to colour but not such an accurate match for brightness. In the mask on the right, we have low values for both the Chroma and Luma sliders. This increases the range of colours and brightness being selected. It’s why most of the area in the mask is white, indicating it’s selected.
By adjusting the sample point, Chroma and Luma sliders, you have a high degree of control where adjustments are applied in the image.
Multiple Control Lines
After creating a mask with a Control Line, it’s possible to add other Control Lines to that mask. All you need to do is click and drag on the image to draw another selection.
Here you can see a second Control Line added to the top part of the sky. At the same time, the original Control Line is still selecting the beach.

This behaviour often confuses photographers as they think they’re adding a new Control Line with another set of adjustments. Instead, the new Control Line is added to the existing mask. The controls used for adjusting the image are attached to the mask and not the Control Lines. If in this example we were to reduce the Exposure control, it would darken the selections made by both Control Lines as they are part of the same mask.
To apply different adjustments to another area of the image you would first add a new mask. You can do this by clicking the “New Mask” button at the bottom of the screen. After that, you can draw additional Control Lines on that mask to adjust an area.
Negative Control Lines
This tutorial wouldn’t be complete without mentioning one further feature which are negative Control Lines. You can use these to remove or protect areas of an image from being selected in a mask.

In this screenshot, you can see the initial Control Line selecting the beach and above this is a second Control Line selecting part of the sky. Notice how the mask selecting the lower part the beach looks different. That was achieved by adding a negative Control Line. This works just like a regular Control Line, but the sample point is removed from the selection.
You can add multiple negative Control Lines to protect different areas of the mask. Each of these will then have its own sample point you can position.
PhotoLab Control Line Summary
In this tutorial, we looked at some of the ways you can use PhotoLab Control Lines in your editing. In most instances, using a Control Line is a better alternative to the Graduated Filter, especially when editing landscape photography.
The Graduated Filter applies the same adjustment all pixels in a selection irrespective of their colour or brightness. Control Lines provide additional control over the pixels included in a selection. Using a combination of the sampling tool and the Chroma and Luma sliders, you can control your adjustments much more precisely. Additionally, the mask used by the Control Line produces more natural and professional looking edits that blend with the image.
Next time you decide to edit an area using the Graduated Filter, consider using a Control Line instead.
If you don’t have Control Lines in your version of PhotoLab, or you haven’t used PhotoLab, do consider downloading a trial version (affiliate link). I’ve been incredibly impressed by the results I can achieve with this software, especially now that it supports the Fuji XT series of cameras.
Book Offer
Get your FREE copy of «6 Steps to Shooting Brilliant Landscape Photography» by subscribing for free to Lenscraft in Focus.
Follow the advice in this deceptively simple book to significantly improve your landscape photography. Organised into 6 simple lessons, this valuable and detailed guide provides information that’s often overlooked. In fact, lesson 3 is so obvious that most photographers ignore it completely.
If you want to improve your Landscape Photography fast, follow this book.
How to Get Your Book
- Enter your details using the form on the right. I will then send you an email to confirm you’ve entered your email correctly.
- Follow the instruction in my confirmation email.
- After that, I’ll send you a link to download your free book (PDF, ePub and Kindle formats. The email might also include discounts for my other courses and books so be sure to read it carefully.
My Promise to You: I will never share or SPAM your email.

DxO Photolab 5 – это последняя версия ведущего программного обеспечения DxOs для редактирования фотографий. Вы получите обработку необработанных фотографий, шумоподавление и другие отличные функции редактирования. А некоторые обновления, безусловно, вызовут улыбку на лице пользователей Fujifilm.
Посмотрите, как выглядит DxO Photolab 5. Стоят ли улучшения затрат? И выдерживает ли она сравнение с конкурентами? Ответы на эти вопросы вы найдете в обзоре DxO Photolab 5, так что читайте дальше.

Что такое DxO Photolab 5?
Серия DxOs Photolab уже долгое время находится на вершине рынка программного обеспечения для редактирования. Они много занимаются разработкой собственного программного обеспечения и функций. Их задача – помочь фотографам получить максимальную отдачу от своих фотографий.
DxO Photolab 5 – это последняя версия. Это продукт, созданный для фотографов, которые серьезно относятся к своей работе. Разработчики понимают, что эти фотографы ищут в программном обеспечении для редактирования фотографий. И, похоже, они прислушались к мнению своих критиков.
Photolab 5 рассматривает получение изображений наивысшего качества из ваших RAW-файлов. Большое внимание уделяется их профилям коррекции объектива. И вы можете исправить хроматические аберрации и дисторсию с помощью простых функций.
Это программное обеспечение – не просто редактор. Photolab 5, как и предыдущие версии, является отличным инструментом для хранения и упорядочивания фотографий.
Одним из основных улучшений по сравнению с предыдущими версиями является то, что Photolab 5 работает с камерами Fujifilm X-Trans sensor. Раньше пользователи Fujifilm оставались в стороне. Теперь их приняли в Photolab.
Обзор возможностей и функций DxO Photolab 5
Идеально подходит для новичков и профессионалов
Одна из первых вещей, которые следует отметить в Photolab 5, – это ее удобство для пользователя. Если вы знакомы с предыдущими версиями, интерфейс не преподнесет вам особых сюрпризов. Вы сможете сразу же приступить к работе.
Не обязательно иметь опыт работы с Photolab 1-4, чтобы использовать версию 5. В ней много функций, некоторые из которых являются новыми для этой версии. Но каждая функция дает вам всплывающее окно с дополнительными инструкциями. Это отличный инструмент для начинающих.
Увеличенная совместимость с камерами
DxO Photolab 5 поддерживает целый ряд новых камер ведущих брендов. Всего представлено 26 моделей, включая Canon EOS Ra, DJI Air 2S, Nikon Z FC, Olympus PEN E-P7, Panasonic GH5 II, Pentax K-3 и Sony ZV-E10.
Самая большая новость, касающаяся камер, заключается в том, что DxO Photolab 5 теперь поддерживает 18 камер Fujifilm. Предыдущие версии не имели поддержки Fujifilm, так что это значительное улучшение. Если вы являетесь пользователем Fujifilm, это отличная новость.
Новые поддерживаемые камеры – это камеры с матрицами Fujifilm X-Trans. К ним относятся Fujifilm X-E3 и X-E4, X-Pro 3, и Fujifilm X-S10. Популярные Fujifilm X-T20, X-T30 и X-T4 также поддерживаются. А также многие другие.
Это, конечно, хорошая новость. Но есть небольшая оговорка для любителей Fujifilm. Эти 18 камер поддерживаются Photolab 5, но только в бета-версии. Это означает, что есть ограничения. Возможно, вам придется подождать следующего обновления для полной поддержки, но это большой шаг в правильном направлении.
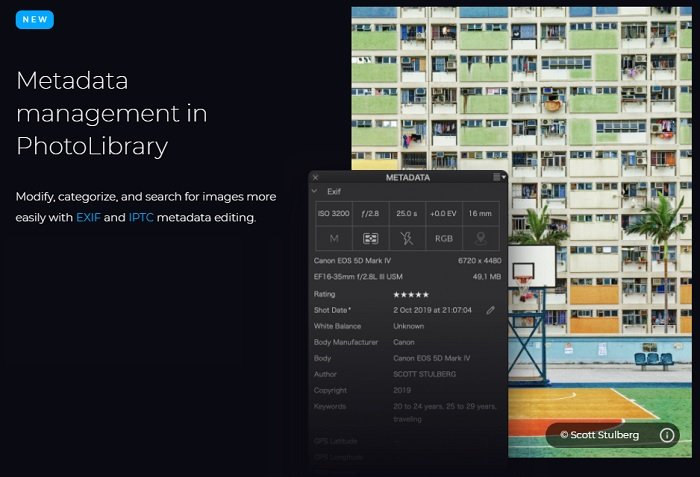
Новая и улучшенная фотобиблиотека Photolab 5
Одно из самых больших улучшений на самом деле не относится к возможностям редактирования фотографий. Улучшенная библиотека фотографий в Photolab 5 – это глоток свежего воздуха. Это то, что другие программы редактирования часто упускают из виду.
В фотобиблиотеке есть метаданные и функции управления ключевыми словами, что облегчает сортировку фотографий. Она превосходит Adobe Lightroom по своим возможностям.
Фототека может обрабатывать синхронизации сторонних приложений и данные EXIF. Постоянная панель управления с правой стороны предоставляет вам информацию IPTC и EXIF-данные.
Обзор инструментов редактирования фотографий Photolab 5
Как фоторедактор, DxO Photolab всегда был на первом месте. Инструменты редактирования в DxO Photolab 5 стали более совершенными, чем когда-либо. Есть автоматические пресеты, если они вам нужны, но ручные инструменты превосходны.
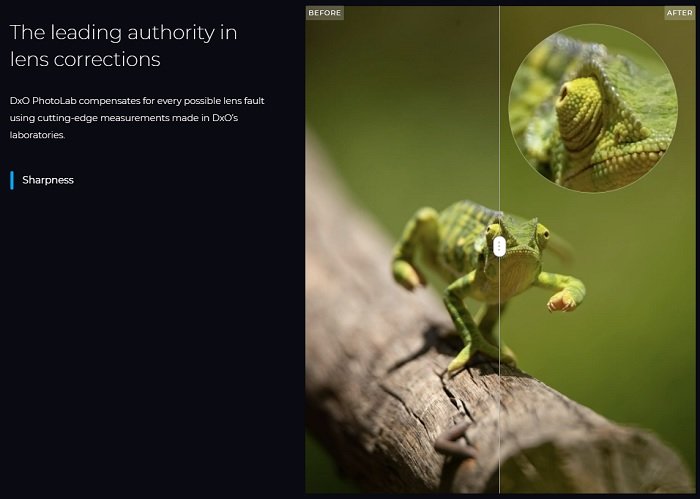
Как и в предыдущих версиях, DxO Photolab 5 предоставляет вам идеальные инструменты для коррекции объективов. Вы можете устранить искажения и хроматические аберрации.
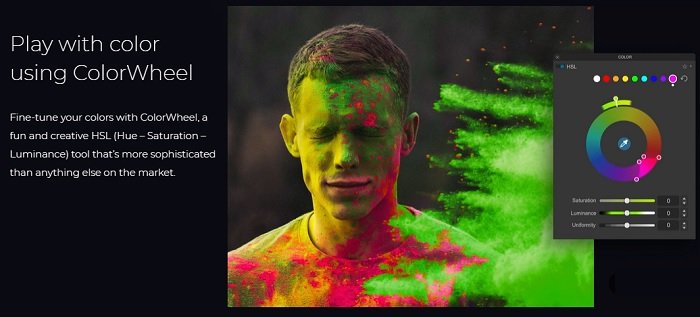
DxO Photolab 5 предоставляет больший контроль над технологией U-Point. Инструмент редактирования контрольных точек из предыдущих версий стал более точным. Кроме того, добавлен инструмент “Контрольные линии”.
Добавление Линий управления дает редактору больше возможностей для контроля над локальными корректировками. Вы получаете превосходную детализацию и чувствительные контрольные точки при выполнении локального маскирования. Эти инструменты дают большой творческий контроль.
Сочетая новое и существующее программное обеспечение DxO, Control Lines и Control Points дают вам больше возможностей в качестве фоторедактора. Комбинация позволяет выполнять детальные штрихи на больших участках. А настройки чувствительности обеспечивают еще большую точность.
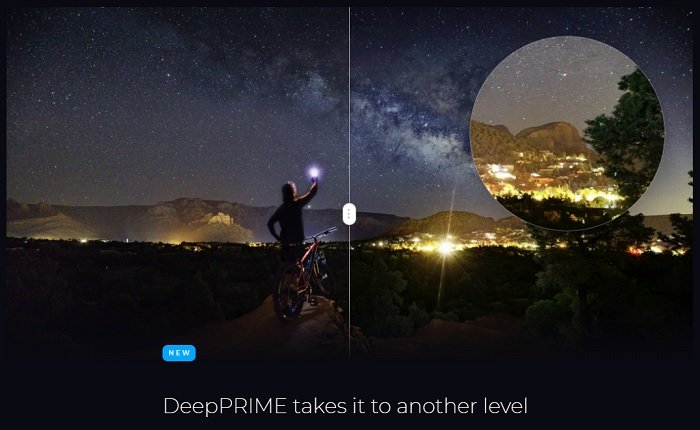
Технология DxO DeepPRIME стала быстрее, чем когда-либо. DxO Photolab 5 может выполнять шумоподавление и исправление дефектов. Раньше это были два отдельных процесса. И ни одна из этих операций не была особенно быстрой.
Шумоподавление DeepPRIME также является более тщательным, обеспечивая превосходное качество изображения. Это означает, что вы можете немного расширить настройки ISO в вашей камере. Photolab 5 позволяет уменьшать шум при постобработке.
DxO Photolab 5 издания и цены
Существуют две редакции DxO Photolab 5 – Essential и Elite. Версия Essential дешевле и имеет более базовые функции. Но при этом вы получаете превосходные инструменты локальной настройки и гладкий и простой интерфейс.
Если вы хотите увидеть основные разработки DeepPRIME, вам придется раскошелиться на Elite-версию. Естественно, Elite стоит дороже. Но если вы действительно хотите воспользоваться преимуществами улучшений программного обеспечения DxO, вам нужна именно эта версия.
Если вы покупаете впервые, вы можете приобрести любое издание сразу за полную стоимость. Если у вас уже есть предыдущая версия, вы можете обновить ее по сниженной цене.
Вы можете проверить живые цены на сайте DxO.
Как она сравнивается с конкурентами
Когда речь заходит об обработке изображений и редактировании фотографий, на ум всегда приходит одно имя. Компания Adobe доминирует на рынке, предлагая Photoshop и Lightroom. Они являются лидерами отрасли, и на то есть веские причины.
Подписка Adobe дает вам доступ ко многим их программам. А их программы отличаются профессиональным качеством практически во всех отношениях. Photoshop и Lightroom обладают самым большим набором возможностей и функций в плане редактирования фотографий.
Но если вы работаете только с фотографиями, подписка на Adobe может оказаться излишней. Она не дешевая. Так что если вам не нужно все, что они предлагают, DxO Photolab 5 может быть лучшим вариантом для вас.
Существуют также несколько бесплатных программ для редактирования изображений. Krita и GIMP – две из лучших. Также у вас есть Pixlr Editor и Photo Pos Pro. Они не такие сложные, как DxO Photolab, но на них стоит обратить внимание, если у вас ограниченный бюджет.
DxO Photolab 5: вердикт
Я впечатлен развитием серии DxO Photolab. Предыдущие версии всегда предоставляли отличные инструменты редактирования для локальных настроек и коррекции объектива. DxO Photolab 5 – это явный шаг вперед по сравнению с предыдущими версиями.
DxO Photolab хорошо работает просто как инструмент фотобиблиотеки. Она позволяет легко находить и упорядочивать фотографии. Хотя он немного дороговат, если он нужен вам только в качестве органайзера для библиотеки.
Функции коррекции фотографий превосходны, а система Control Points стала еще более точной, чем в Photolab 4. А теперь у вас есть еще более точный инструмент Control Lines. Это сочетание достойно восхищения. Вы увидите преимущество в ваших конечных фотографиях.
Добавление поддержки камер Fujifilm – это большая новость. Отсутствие поддержки было критикой предыдущих версий. Но DxO наконец-то устранила этот пробел. Поддержка Fujifilm все еще является бета-версией, но она демонстрирует намерения.
В целом, DxO Photolab 5 – одна из лучших программ для редактирования фотографий, доступных в настоящее время. Она не так разнообразна и обширна, как Photoshop, но для редактирования фотографий Photolab 5 – отличный инструмент. Они понимают фотографию и то, что фотограф хочет получить от программ для постобработки.
Я надеюсь, что этот обзор DxO Photolab 5 поможет вам решить, подходит ли он вам.