Bedienungsanleitung
Istruzioni per l’uso
Operating manual
Naudojimosi instrukcija
LT
Mode d’emploi
Bruksanvisning
Manuel de instrucciones
Gebruiksaanwijzing
Инструкция за експлоатация
Instrukcja obsługi
Návod k použití zkoušečky
Инструкция по эксплуатации
CZ
RUS
Brugsanvisning
индикатора напряжения
Käyttöohje
Bruksanvisning
FIN
Οδηγίες χρήσεως
Használati utasítás
geprüft und zugelassen
BENNING Elektrotechnik & Elektronik GmbH & Co.KG
Münsterstraße 135 — 137 • D — 46397 Bocholt
Telefon ++49 (0) 2871 — 93 — 0 • Fax ++49 (0) 2871 — 93 — 429
www.benning.de • E-Mail: duspol@benning.de
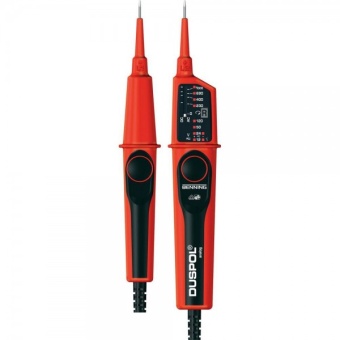
Operating manual
DUSPOL
combi
®
Before using the voltage tester DUSPOL
®
combi:
Please read the operating manual carefully and
always observe the safety instructions!
List of contents:
1.
Safety instructions
2.
Functional description of the voltage tester
3.
Functional test of the voltage tester
4.
How to test AC voltages
4.1 How to test the phase at AC voltage
5.
How to test DC voltages
5.1 How to test the polarity at DC voltage
6.
How
to
test
an
electrically
conductive
connection (continuity check)
6.1 How to test the conducting and non-conducting
direction of semiconductors
7.
General maintenance
8.
Technical data
1.
Safety instructions:
—
Hold the voltage tester only by the insulated
handles
and
and do not touch the contact
electrodes (probe tips) !
—
Immediately before use: Check the voltage
tester for correct operation! (see chapter 3). The
voltage tester must not be used if one or several
display functions fail or if the voltage tester is not
ready to operate (IEC 61243-3)!
—
The voltage tester (voltage class A) must be used
only within the nominal voltage range of 12 V up
to AC 400 V/ DC 750 V!
—
The voltage tester complies with protection class
IP 64 and therefore can also be used under wet
conditions (designed for outdoor use).
—
For testing, firmly grasp the voltage tester by the
handles
and
.
—
Never connect the voltage tester to voltage for
longer than 30 seconds (maximum permissible
operating time = 30 s)!
—
The voltage tester only operates correctly
within the temperature range of -10 °C up to
+55 °C at relative air humidity of 20 % up to
96 %.
—
Do not dismantle the voltage tester!
—
Please protect the housing of the voltage tester
against contamination and damages!
—
Please store the voltage tester under dry
conditions.
—
To prevent injuries and discharge of the battery,
provide the contact electrodes (probe tips)
with the enclosed cover after using the voltage
tester!
Attention:
After maximum load (i.e. after a measurement of 30
seconds at AC 400 V/ DC 750 V), the voltage tester
must not be used for a duration of 240 seconds!
The voltage tester is marked with international
electric symbols and symbols for indication and
operation with the following meaning:
symbol
meaning
Device or equipment for working under
voltage
Push button
Alternating current (AC)
Direct current (DC)
Direct and alternating current (DC
and AC)
Push
button
(manually
actuated);
indicates that respective indications
only occur when both push buttons
are actuated
Symbol for phase and continuity test
2. Functional description
The DUSPOL
combi is a two-pole voltage tester
®
according to IEC 61243-3 with visual display. As a
supplementary device, the voltage tester is equipped
with a continuity check function. For this function,
the voltage tester has two built-in solar cells. The
signaling of the continuity check is done optically
by means of a LC display. The voltage tester is
designed for DC and AC voltage tests within the
voltage range of 12 V up to AC 400 V/DC 750 V.
It can be used to perform polarity tests in DC and
—
Never connect the voltage tester to voltage for
phase tests in AC. The voltage tester consists of the
longer than 30 seconds (maximum permissible
test probes L1
and L2
and a connecting cable
operating time = 30 s)!
. The test probe L1
is equipped with a display
Never touch the contact electrode of test probe L2
. Both test probes are provided with push buttons
during the single-pole test (phase test)!
. Without pressing both push buttons, the following
If the symbol » » appears on the LC display , the
voltage steps (AC or DC) can be indicated: 24 V+;
phase of an alternating voltage (AC) is at this point of
24 V-; 50 V; 120 V; 230 V; 400 V; 750 V. By pressing
the unit under test.
both push buttons, the voltage tester switches to a
Note:
lower internal resistance (suppression of inductive
The reading of the LC display might be impaired
and capacitive voltages). Thus, also the indication
due to unfavorable light conditions, protective
of 12 V+ and 12 V– is activated. Furthermore, a
clothing or in insulated locations.
vibrating motor (motor with a flyweight) is put under
voltage. From approximately 200 V this motor is set
5. How to test DC voltages
in rotation. With the voltage increasing, the motor’s
—
The voltage tester must be used only within the
speed and vibration increases as well so that
nominal voltage range of 12 V up to DC 750 V!
additionally by means of the handle of test probe L2
—
Never connect the voltage tester to voltage for
the voltage value can be estimated roughly (e.g.
longer than 30 seconds (maximum permissible
230/ 400 V). The duration of the test with a lower
operating time = 30 s)!
internal resistance of the device (load test) depends
—
Firmly grasp the insulated handles
on the value of the voltage to be measured. To
the test probes L1 and L2.
prevent excessive warming of the voltage tester, it is
—
Place the contact electrodes of the test probes
equipped with a thermal protection (reverse control).
L1
With this reverse control, the speed of the vibrating
unit under test.
motor decreases as well.
—
For AC voltages from 24 V onwards and when
Display field
pressing both push buttons (load test) from 12 V
The display system consists of high-contrast light-
onwards, the LEDs «plus» and «minus» and
emitting diodes (LED) indicating DC and AC voltages
light up. Furthermore, all LEDs light until the step
in steps of 12 V; 24 V; 50 V; 120 V; 230 V; 400 V; 750 V
value of the applied voltage is reached.
. The indicated voltages are nominal voltages. With
—
When pressing both push buttons and from
DC voltage, the LEDs also indicate the polarity for 12 V
an applied voltage of approx. 200 V onwards, a
and 24 V (see chapter 5). The 12 V LED can only be
vibrating motor is put in rotation inside the test
activated by pressing both push buttons.
probe L2
The two solar cells are top left and bottom right of
speed of this motor is increasing as well.
the display field. These cells generate the auxiliary
Please make sure that you touch the voltage tester at
voltage necessary for the continuity check.
the insulated handles of test probes L1 and L2 only!
LC display
Do not cover the display and do not touch the contact
The LC display serves for the phase test with
electrodes!
alternating current (AC) and indicates the successful
continuity check.
5.1 How to test the polarity at DC voltage
—
The voltage tester must be used only within the
3. Functional check
nominal voltage range of 12 V up to DC 750 V!
—
The voltage tester must be used only within
—
Never connect the voltage tester to voltage for
the nominal voltage range of 12 V up to
longer than 30 seconds (maximum permissible
AC 400 V/ DC 750 V!
operating time = 30 s)!
—
Never connect the voltage tester to voltage for
—
Firmly grasp the insulated handles
longer than 30 seconds (maximum permissible
the test probes L1 and L2.
operating time = 30 s)!
—
Place the contact electrodes of the test probes
—
Check the voltage tester for correct function
L1
immediately before use!
unit under test.
—
Test all functions by means of known voltage
—
If LED lights up, the «positive pole» of the unit
sources.
under test is at test probe
•
For DC voltage tests use e.g. a car battery.
—
If LED lights up, the «negative pole» of the unit
•
For AC voltage tests use e.g. a 230 V
under test is at test probe
socket.
Please make sure that you touch the voltage tester at
•
Connect the two test electrodes to test the
the insulated handles of test probes L1
continuity check function.
only! Do not cover the display and do not touch the
Do not use the voltage tester unless all functions are
contact electrodes!
operating correctly!
Check the function of the LC display by single-pole
6. How to test an electrically conductive
connection of the contact electrode of the test probe
connection (continuity check)
L1
to an external conductor (phase).
—
The continuity check must be performed on
the relevant points of a «dead» (not being under
4. How to test AC voltages
voltage) unit under test. If necessary, the
—
The voltage tester must be used only within the
capacitors must be discharged.
nominal voltage range of 12 V up to AC 400 V!
—
The necessary test voltage is supplied by means
—
Never connect the voltage tester to voltage for
of the power supply (2 solar cells) integrated in
longer than 30 seconds (maximum permissible
the test probe L1
operating time = 30 s)!
—
The test is possible within the range of
—
Firmly grasp the insulated handles
and
of
0 — 600 kΩ.
the test probes L1 and L2.
—
Firmly grasp the handles
—
Place the contact electrodes of the test probes
—
Place the test probes
L1
and L2
against the relevant points of the
electrodes against the relevant points of the
unit under test.
unit under test.
—
For AC voltages from 24 V onwards and when
—
When contacting an electrically conductive
pressing both push buttons (load test) from 12 V
connection with the contact electrodes , the
onwards, the LEDs «plus» and «minus» and
symbol » » appears on the LC display .
light up. Furthermore, all LEDs light until the step
Note:
value of the applied voltage is reached.
When actuating both push buttons, the system
—
When pressing both push buttons and from
measures its own internal resistance!
an applied voltage of approx. 200 V onwards, a
vibrating motor is put in rotation inside the test
6.1 How to test the conducting and non-
probe L2
. With the voltage increasing, the
conducting direction of semiconductors
speed of this motor is increasing as well.
—
The polarity-depending test must be performed
Please make sure that you touch the voltage tester at
on the relevant points of a «dead» (not being
the insulated handles of test probes L1
and L2
under voltage) unit under test.
only! Do not cover the display and do not touch the
—
The necessary test voltage is supplied by means of
contact electrodes!
the power supply (2 solar cells) integrated in the test
probe
4.1 How to test the phase at AC voltage
—
The test is possible within the range of 0 — 600 kΩ
—
The voltage tester must be used only within the
or 1 P-N junction (diode).
nominal voltage range of 12 V up to AC 400 V!
—
Firmly grasp the handles
—
The phase test is possible in the earthed mains
—
Place the contact electrodes of the test probes
from 230 V onwards!
and
—
Firmly grasp the handle of test probe L1
.
under test.
—
Place the contact electrode of test probe L1
—
In case of current flow of the measuring voltage
against the relevant point of the unit under test.
in conducting direction to a semiconductor, the
symbol » » appears on the LC display . In case
of contacting in non-conducting direction, no
indication must appear.
Note:
When actuating both push buttons, the system
measures its own internal resistance!
7.
General maintenance
Clean the exterior of the housing with a clean dry
cloth (exception: special cleansing cloths). Do not
use solvents and/ or abrasives to clean the voltage
tester.
8. Technical data:
—
Guideline for two-pole voltage testers:
IEC 61243-3
—
Protection class: IP 64, IEC 60529
(DIN 40050), also for outdoor use!
—
Nominal voltage range (voltage class A):
and
of
12 V to AC 400 V/ DC 750 V
—
Internal resistance, measuring circuit:
180 kΩ, parallel 4.7 nF (2.35 nF)
and L2
against the relevant points of the
—
Internal resistance, load circuit – both push
buttons actuated!: approx. 3.7 kΩ…(150 kΩ)
—
Current
consumption,
max. I
3.3 mA (400 V ) AC/ 4.4 mA (750 V) DC
n
—
Current consumption, load circuit – both push
buttons actuated!: I
—
Polarity indication: LED +; LED —
(indicating handle = positive polarity)
—
Indicating steps LED: 12 V+*, 12 V-*, 24 V+, 24 V-,
50 V, 120 V, 230 V, 400 V and 750 V (*: only with
. With the voltage increasing, the
both push buttons actuated)
—
max. indicating errors: U
—
Nominal frequency range f: 0 to 60 Hz
—
Phase indication: ≥ U
—
Vibrating motor, starting: ≥ U
—
max. permissible operating time: ED = 30 s (max.
30 seconds) , 240 s pause
—
Test current, continuity check: max. 5 μA
—
Idling voltage, continuity check: max. 5 V
—
Testing range, conducting resistance:
0 — 600 kΩ, 1 P-N junction (diode)
—
Solar cells: 2 x 1.75 cm²
—
Weight: approx. 170 g
and
of
—
Connecting cable length: approx. 900 mm
—
Operating and storing temperature range: -10 °C
to +55 °C (climate category N)
and L2
against the relevant points of the
—
Relative air humidity: 20 % to 96 % (climate
category N)
—
Reverse control times (thermal protection):
.
voltage
.
230 V
and L2
400 V
750 V
.
and
.
and
with the contact
. Test probe L1
is the «positive pole».
and
.
against the relevant points of the unit
measuring
circuit:
0.2 A (750 V)
s
± 15 %, ELV U
– 15%
n
n
230 V
n
230 V
n
time
30 s
9 s
2 s
Посмотреть инструкция для BENNING Duspol Expert бесплатно. Руководство относится к категории измерительные приборы, 1 человек(а) дали ему среднюю оценку 7.3. Руководство доступно на следующих языках: русский, английский. У вас есть вопрос о BENNING Duspol Expert или вам нужна помощь? Задайте свой вопрос здесь
BENNING Duspol Expert (Дюсполь Эксперт) is a measurement tool used in electrical installations and systems. It is designed to accurately measure voltage, resistance, and continuity, ensuring the safety and efficiency of electrical connections.
With its ergonomic design and user-friendly interface, BENNING Duspol Expert simplifies the measurement process. The device features a clear LCD display, which allows for easy reading of measurements even in dimly lit environments. It also includes a robust housing, providing protection against potential damage from everyday use.
BENNING Duspol Expert offers a wide measurement range, allowing for accurate readings in various electrical applications. The tool can measure AC and DC voltages up to a certain range, providing reliable results for voltage testing. Additionally, it can measure resistance, helping to identify potential faults and troubleshoot electrical issues.
Continuity testing is another important feature of BENNING Duspol Expert. By determining the presence or absence of a closed loop, this tool ensures the integrity of electrical connections and identifies any potential interruptions in a circuit.
Furthermore, BENNING Duspol Expert incorporates advanced safety features to protect users from electrical hazards. It is equipped with overload protection, preventing damage to the device and ensuring accurate measurements even in high-voltage environments.
In conclusion, BENNING Duspol Expert is a reliable and efficient measurement tool for electrical installations and systems. Its user-friendly design, wide measurement range, and advanced safety features make it a valuable asset for electricians, technicians, and anyone involved in electrical work.
Главная
Не можете найти ответ на свой вопрос в руководстве? Вы можете найти ответ на свой вопрос ниже, в разделе часто задаваемых вопросов о BENNING Duspol Expert.
Инструкция BENNING Duspol Expert доступно в русский?
Да, руководствоBENNING Duspol Expert доступно врусский .
Не нашли свой вопрос? Задайте свой вопрос здесь
01/2013
DUSPOL
®
analog
37
Инструкция по эксплуатации
DUSPOL
®
analog
Перед использованием индикатора напряжения DUSPOL
®
analog: прочитайте, пожалуйста, инструкцию по эксплуата-
ции и обязательно соблюдайте указания по технике без-
опасности!
Содержание
1. Указания по технике безопасности
2. Описание прибора
3. Проверка работоспособности
4. Контроль напряжения с индикацией полярности
5. Подключение нагрузки с вибрационным аварий-
ным сигналом
6. Контроль фазового провода
7. Контроль направления вращения магнитного поля
8. Технические данные
9. Общее техническое обслуживание
10. Охрана окружающей среды
1. Указания по технике безопасности
— При контроле держать прибор только за изолирован-
ные ручки L1
9
и L2
J
и не прикасаться к испыта-
тельным щупам L1/-
2
и L2/+
3
!
— Непосредственно перед использованием индикатора
напряжения и после использования проверить работо-
способность! (см. раздел 3). Индикатор напряжения не
разре�ается использовать, если функция одной или
нескольких индикаций не действует или прибор выгля-
дит неработоспособным.
— Индикатор напряжения разре�ается использовать
только для указанных интервалов напряжения и на
электрических установках с напряжением переменно-
го или постоянного тока до 1000 В!
— Индикатор напряжения разре�ается использовать
только в электрических цепях категории перенапря-
жения CAT III с не более, чем 1000 В или категории
перенапряжения CAT IV с не более, чем 600 В фазы
относительно земли.
— Индикатор напряжения предназначен для примене-
ния профессиональными электриками с соблюдением
правил безопасной работы.
— Светодиодная ступенчатая индикация служит для ука-
зания интервала напряжения, она не служит для из-
мерения.
— Создание тестер напряжения более чем на 30 секунд
напряжение (максимально допустимое время включе-
ния ED = 30 с)!
— Индикатор напряжения не разре�ается разбирать!
— Поверхность корпуса индикатора напряжения необхо-
димо защищать от загрязнения и повреждений.
— В качестве защиты от ранения необходимо после ис-
пользования индикатора напряжения надеть защит-
ные колпачки на измерительные щупы
1
!
Электрические символы на приборе:
Символ
Значение
Важная документация!
Этот символ указывает, что в руководстве
описано в руководстве, чтобы избежать
любого риска
Прибор или оборудование для работы под
напряжением
Клави�а
AC переменное напряжение
DC постоянное напряжение
DC/AC постоянное и переменное напряже-
ние
Земля (напряжение относительно земли)
Клави�а (приводимая в действие вручную);
символ указывает на то, что соответствую-
щая индикация производится только при на-
жатии обеих клави�
Правое поле вращения: направление вра-
щения магнитного поля может быть показа-
но только в заземленной сети с частотой 50
или 60 Гц
Индикация уровня на базе подвижной
кату�ки
2. Описание прибора
1
Защитный колпачок щупов
2
Испытательный щуп L1/-
3
Испытательный щуп L2/+
4
Индикация уровня на базе подвижной кату�ки
5
Клави�а
6
Ручка L1
7
Ручка с дисплеем L2
8
Светодиоды индикации уровня
9
Жидкокристаллический дисплей с символом �R� для
контроля фазового провода и указания вращения маг-
нитного поля (направо)
J
Светодиоды +/- индикации полярности
3. Проверка работоспособности
— Непосредственно перед использованием и после ис-
пользования индикатора напряжения проверить рабо-
тоспособность!
— Проверьте индикатор напряжения на известном источ-
D
Bedienungsanleitung
Naudojimosi instrukcija
Operating manual
N
Bruksanvisning
F
Mode d’emploi
Gebruiksaanwijzing
E
Manuel de instrucciones
Instrukcja obsługi
Инструкция за експлоатация
Инструкция по
Návod k použití zkoušečky
эксплуатации индикатора
Käyttöohje
напряжения
Οδηγίες χρήσεως
Bruksanvisning
S
Használati utasítás
Kullanma Talimati
H
Istruzioni per l’uso
Priručnik za upotrebu
I
geprüft und zugelassen
BENNING Elektrotechnik & Elektronik GmbH & Co.KG
Münsterstraße 135 — 137 • D — 46397 Bocholt
Telefon ++49 (0) 2871 — 93 — 0 • Fax ++49 (0) 2871 — 93 — 429
www.benning.de • E-Mail: duspol@benning.de
Operating manual
DUSPOL
expert
®
Before using the voltage tester DUSPOL
®
expert:
Please read the operating manual carefully and
always observe the safety instructions!
List of contents:
1.
Safety instructions
2.
Functional description of the voltage tester
2.
3.
Functional test of the voltage tester
The DUSPOL
4.
How to test AC voltages
according to IEC 61243-3 with visual display. As a
4.1 How to test the phase at AC voltage
supplementary device, the voltage tester is equipped
5.
How to test DC voltages
with a phase indication, phase-sequence indication,
5.1 How to test the polarity at DC voltage
measuring point illumination and a continuity check
6.
How to test the phase sequence of a three-
function. The supplementary functions – except the
phase mains
phase indication – are supplied via two replaceable
7.
How to test an electrically conductive
micro batteries (LR 03/ AAA). The signalling of the
connection (continuity check)
continuity check is done optically and acoustically.
8.
Battery replacement
The voltage tester is designed for DC and AC voltage
9.
Technical data
tests within the voltage range of 12 V up to AC 690 V/
10. General maintenance
DC 750 V. It can be used to perform polarity tests in DC
11. Environmental notice
and phase tests in AC. The voltage tester indicates the
phase-sequence provided that the neutral is earthed.
1.
Safety instructions:
The voltage tester consists of the test probes L1
—
Hold the voltage tester only by the insulated
and L2
handles
and
and do not touch the contact
L1
electrodes (probe tips) !
are provided with push buttons . Without pressing
—
Immediately before use: Check the voltage tester
both push buttons, the following voltage steps (AC
for correct operation! (see chapter 3). The voltage
or DC) can be indicated: 24 V+; 24 V-; 50 V; 120 V;
tester must not be used if one or several display
230 V; 400 V; AC 690 V/ DC 750 V. By pressing both
functions fail or if the voltage tester is not ready to
push buttons, the voltage tester switches to a lower
operate (IEC 61243-3)!
internal resistance (suppression of inductive and
—
At operating sites with a high noise level, it has
capacitive voltages). Thus, also the indication of 12 V+
to be checked before use if the test signal can be
and 12 V- is activated. Furthermore, a vibrating motor
perceived.
(motor with a flyweight) is put under voltage. From
—
The voltage tester must be used only within the
approximately 200 V this motor is set in rotation. With
nominal voltage range of 12 V up to AC 690 V/ DC
the voltage increasing, the motor’s speed and vibration
750 V!
increases as well so that additionally by means of the
—
Do not operate the voltage tester with the battery
handle of test probe L2
compartment being open!
estimated roughly (e.g. 230/ 400 V). The duration of
—
The voltage tester complies with protection class
the test with a lower internal resistance of the device
IP 64 and therefore can also be used under wet
(load test) depends on the value of the voltage to
conditions (designed for outdoor use).
be measured. To prevent excessive warming of the
—
For testing, firmly grasp the voltage tester by the
voltage tester, it is equipped with a thermal protection
handles
and
.
(reverse control). With this reverse control, the speed
—
Never connect the voltage tester to voltage for
of the vibrating motor decreases as well.
longer than 30 seconds (maximum permissible
The measuring point illumination can be activated
operating time = 30 s)!
by pressing the push button of test probe L1
—
The voltage tester only operates correctly
For the voltage measurement with ripple (two-pole
within the temperature range of -10 °C up to
measurement), the illumination is activated with
+55 °C at relative air humidity of 20 % up to 96 %.
reduced brightness. The activation of the continuity
—
Do not dismantle the voltage tester!
check can be introduced by bringing together the two
—
Please protect the housing of the voltage tester
contact electrodes .
against contamination and damages!
Display field
—
Please store the voltage tester under dry
The display system consists of high-contrast light-
conditions.
emitting diodes (LED) indicating DC and AC
—
To prevent injuries and discharge of the battery,
voltages in steps of 12; 24; 50; 120; 230; 400; AC
provide the contact electrodes (probe tips) with
690 V/ DC 750 V. The indicated voltages are nominal
the enclosed cover after using the voltage tester!
voltages. With DC voltage, the LEDs also indicate the
Attention:
polarity for 12 V and 24 V (see chapter 5). The 12 V
After maximum load (i.e. after a measurement of 30
LED can only be activated by pressing both push
seconds at AC 690 V/ DC 750 V), the voltage tester
buttons.
must not be used for a duration of 240 seconds!
LC display
The voltage tester is marked with international electric
The LC display serves for the phase test with
symbols and symbols for indication and operation with
alternating current (AC) and indicates the phase-
the following meaning:
sequence of a three-phase mains.
symbol
meaning
3.
Device or equipment for working under
—
voltage
Push button
—
Alternating current (AC)
—
Direct current (DC)
—
Direct and alternating current (DC and
AC)
Push button (manually actuated);
indicates that respective indications
only occur when both push buttons are
actuated
Phase-sequence clockwise
Phase-sequence indication; the phase
Do not use the voltage tester unless all functions are
sequence can only be indicated at 50
operating correctly!
or 60 Hz and in a earthed mains
Check the function of the LC display by single-pole
connection of the contact electrode of the test probe
L1
4.
How to test AC voltages
This
symbol
shows
the
correct
—
The voltage tester must be used only within the
alignment of the batteries to ensure
nominal voltage range of 12 V up to AC 690 V!
correct polarity
—
Never connect the voltage tester to voltage for
longer than 30 seconds (maximum permissible
Signal lamp, optical signal for continuity
operating time = 30 s)!
check
—
Firmly grasp the insulated handles
the test probes L1 and L2.
Buzzer, acoustic signal for continuity
—
Place the contact electrodes of the test probes
check
L1
and L2
against the relevant points of the
unit under test.
Symbol for phase and phase-sequence
—
For AC voltages from 24 V onwards and when
indication (phase-sequence clockwise)
pressing both push buttons (load test) from 12 V
onwards, the LEDs «plus» and «minus» and
light up. Furthermore, all LEDs light until the step
Functional description
value of the applied voltage is reached.
expert is a two-pole voltage tester
®
—
When pressing both push buttons and from
an applied voltage of approx. 200 V onwards, a
vibrating motor is put in rotation inside the test
probe L2
. With the voltage increasing, the
speed of this motor is increasing as well.
Please make sure that you touch the voltage tester at
the insulated handles of test probes L1
only! Do not cover the display and do not touch the
contact electrodes !
4.1 How to test the phase at AC voltage
—
The voltage tester must be used only within the
nominal voltage range of 12 V up to AC 690 V!
—
The phase test is possible in the earthed mains
from 230 V onwards!
and a connecting cable . The test probe
—
Firmly grasp the handle of test probe L1
is equipped with a display . Both test probes
—
Place the contact electrode of test probe L1
against the relevant point of the unit under test.
—
Never connect the voltage tester to voltage for
longer than 30 seconds (maximum permissible
operating time = 30 s)!
—
If the «R» symbol appears on the LC display ,
the tester is in contact with the live phase of an
AC voltage on this point of the unit under test.
Never touch the contact electrode of test probe L2
during the single-pole test (phase test)!
Note:
The reading of the LC display might be impaired
due to unfavorable light conditions, protective clothing
the voltage value can be
or in insulated locations.
Attention:
The absence of voltage can be detected by means of
a bipolar test only.
5.
How to test DC voltages
—
The voltage tester must be used only within the
nominal voltage range of 12 V up to DC 750 V!
—
Never connect the voltage tester to voltage for
.
longer than 30 seconds (maximum permissible
operating time = 30 s)!
—
Firmly grasp the insulated handles
the test probes L1 and L2.
—
Place the contact electrodes of the test probes
L1
and L2
against the relevant points of the
unit under test.
—
For AC voltages from 24 V onwards and when
pressing both push buttons (load test) from 12 V
onwards, the LEDs «plus» and «minus» and
light up. Furthermore, all LEDs light until the step
value of the applied voltage is reached.
—
When pressing both push buttons and from
an applied voltage of approx. 200 V onwards, a
vibrating motor is put in rotation inside the test
probe L2
. With the voltage increasing, the
speed of this motor is increasing as well.
Please make sure that you touch the voltage tester at
the insulated handles of test probes L1
only! Do not cover the display and do not touch the
Functional check
contact electrodes !
The voltage tester must be used only within
the nominal voltage range of 12 V up to
5.1 How to test the polarity at DC voltage
AC 690 V/ DC 750 V!
—
The voltage tester must be used only within the
Never connect the voltage tester to voltage for
nominal voltage range of 12 V up to DC 750 V!
longer than 30 seconds (maximum permissible
—
Never connect the voltage tester to voltage for
operating time = 30 s)!
longer than 30 seconds (maximum permissible
Check the voltage tester for correct function
operating time = 30 s)!
immediately before use!
—
Firmly grasp the insulated handles
Test all functions by means of known voltage
the test probes L1 and L2.
sources.
—
Place the contact electrodes of the test probes
•
For DC voltage tests use e.g. a car battery.
L1
and L2
against the relevant points of the
•
For AC voltage tests use e.g. a 230 V socket.
unit under test.
•
Connect both contact electrodes to test the
—
If LED lights up, the «positive pole» of the unit
continuity check for correct function.
under test is at test probe
•
Check the battery status for the phase-
—
If LED lights up, the «negative pole» of the unit
sequence
indication
by
activating
the
under test is at test probe
measuring point illumination. Replace the
Please make sure that you touch the voltage tester at
batteries, if necessary.
the insulated handles of test probes L1
only! Do not cover the display and do not touch the
contact electrodes !
to an external conductor (phase).
6.
How to test the phase sequence of a three-
phase mains
The required auxiliary voltage is provided by the power
supply (2 x 1.5 V batteries) integrated into test probe
L1
. Check the functional status of the batteries
before measuring by activating the measuring point
and
of
illumination.
—
The voltage tester must be used only within the
nominal voltage range of 12 V up to AC 690 V!
—
The phase-sequence test is possible from 230 V
AC voltage (phase against phase) onwards in a
earthed three-phase mains.
—
Firmly grasp the insulated handles
and
the test probes L1 and L2.
—
Place the contact electrodes of the test probes
L1
and L2
against the relevant points of the
unit under test.
—
The LEDs have to indicate the external conductor
voltage.
—
Never connect the voltage tester to voltage for
longer than 30 seconds (maximum permissible
operating time = 30 s)!
and L2
—
When contacting the two contact electrodes
with two phases of a three-phase mains
connected in clockwise rotation, the LC display
indicates the «R» symbol. If for two phases the
rotation is anti-clockwise, no symbol appears on
the LC display.
The phase-sequence test always requires a counter-
test! If the LC display indicates clockwise rotation
for two phases of a three-phase mains, those two
.
phases must be contacted again with reversed contact
electrodes during the counter-test. There must
be no symbol indicated on the LC display during the
counter-test. If in both cases the LC display indicates
the „R» symbol, the earthing is too weak or the
batteries are empty.
Attention!
In case of empty batteries, „R» indication for
clockwise and anti-clockwise rotation!
Note:
The reading of the LC display might be impaired
due to unfavorable light conditions, protective clothing
or in insulated locations.
7.
How to test an electrically conductive
connection (continuity check)
—
The continuity check must be performed on
the relevant points of a «dead» (not being
under voltage) unit under test. If necessary, the
capacitors must be discharged.
—
The necessary test voltage is supplied by means
of the power supply (2 x 1.5 V batteries) integrated
in the test probe L1
.
—
The test is possible within the range of
0 — 108 kΩ.
and
of
—
Firmly grasp the handles L1
and L2
.
—
Place the test probes L1
and L2
with the
contact electrodes against the relevant points
of the unit under test.
—
When contacting an electrically conductive
connection with the contact electrodes , the
voltage tester gives an acoustic signal and the
signaling LED lights up.
8.
Battery replacement
Do not set the voltage tester under voltage with the
battery compartment being open!
The energy supply for the phase-sequence indication,
illumination and continuity check of the DUSPOL
expert is done by means of two built-in micro batteries
(LR03/ AAA). Battery replacement is necessary as
and L2
soon as illumination does not work anymore. In this
case, the battery voltage is below 2.2 V.
How to replace the batteries:
Take a screw driver and open the battery
compartment (next to the cable outlet) by a
¼-turn in direction of the arrow (counter-clockwise).
The slot is now vertical and the battery compartment
with the batteries can be removed.
Remove the discharged batteries from the battery
compartment. Insert the new batteries with correct
and
of
polarity (see marking) into the battery compartment.
Put the battery compartment with the batteries back
onto the handle and lock it by ¼-turn in clockwise
direction (slot must be horizontal and the marking
points are opposite!). Make sure not to damage the O
ring. If necessary, it has to be replaced.
.
Battery disposal:
Do not dispose of batteries with the household
.
garbage. You as a consumer are legally obliged to
return used batteries. You can return used batteries
and L2
to public collection facilities in your community area
or return them to any retail outlet selling similar
batteries. Avoid using batteries containing dangerous
substances!
9.
Technical data:
—
Guideline for two-pole voltage testers: IEC 61243-3
—
Protection class: IP 64, IEC 60529 (DIN 40050)
IP 64 means: Protection against access to
dangerous parts and protection against solid
impurities, dustproof, (6 — first index). Splash proof,
(4 — second index). Can also be used in case of
precipitation.
—
Nominal voltage range: 12 V to AC 690 V/ DC 750 V
—
Internal resistance, measuring circuit:
220 kΩ, parallel 3.9 nF (1.95 nF)
of
—
Internal resistance, load circuit – both push
buttons actuated!: approx. 3.7 kΩ…(150 kΩ)
—
Current consumption, measuring circuit:
max. I
3.5 mA (690 V) AC/ 3.4 mA (750 V) DC
n
—
Current consumption, load circuit — both push
buttons actuated!: I
0.2 A (750 V)
s
—
Polarity indication: LED +; LED —
(indicating handle = positive polarity)
—
Indicating steps LED: 12 V+*, 12 V-*, 24 V+, 24 V-,
50 V, 120 V, 230 V, 400 V and 690 V (*: only with
both push buttons actuated)
—
max. indicating errors: U
± 15 %, ELV U
— 15 %
n
n
—
Nominal frequency range f: 0 to 60 Hz
Phase and phase-sequence indication 50/ 60 Hz
—
Phase and phase-sequence indication: ≥ U
230 V
n
—
Vibrating motor, starting: ≥ U
230 V
n
—
max. permissible operating time: ED = 30 s (max.
30 seconds), 240 s pause
—
Test current, continuity check: max. 2 μA
—
Testing range, conducting resistance: 0 — 108 kΩ,
—
Sound level acoustic signal: 55 dB
—
Measuring point illumination (in 30 cm): 10 Lux
—
Current consumption measuring point illumination:
46 mA
—
Current consumption continuity check: 83 mA
—
Current
consumption
automatic
switch-on
illumination: 23 mA
—
Battery: 2 x Micro, LR03/ AAA
—
Weight: approx. 200 g
—
Connecting cable length: approx. 900 mm
—
Operating and storing temperature range: -10 °C
to +55 °C (climate category N)
—
Relative air humidity: 20 % to 96 % (climate
category N)
—
Reverse control times (thermal protection):
voltage
time
230 V
30 s
400 V
9 s
750 V
2 s
Attention!
The phase-sequence indication, measuring point
illumination and continuity check do not work anymore,
if the batteries are empty!
Remove the batteries if not using the voltage tester for
a longer period of time!
10. General maintenance:
Clean the exterior of the housing with a clean dry
cloth (exception: special cleansing cloths). Do not use
solvents and/ or abrasives to clean the voltage tester.
Make sure not to contaminate the battery compartment
and the battery contacts with leaking battery
electrolyte. Should such electrolyte contamination or
®
white deposits occur near the battery or the battery
housing, these must also be removed with a dry cloth.
In case of wear or damaging of the O ring of the
battery compartment, the voltage tester does not
comply with the indicated protection class anymore
(protection against dust and water). In this case, the O
ring must be replaced.
The O ring can be ordered under the BENNING piece
number 772897. Moisten a new O ring with glyzerin or
talcum so that the battery compartment can be locked
and unlocked easily.
11. Environmental notice
At the end of the product’s useful life, please
dispose of it at appropriate collection points
provided in your country.
Указатель напряжения DUSPOL BENNING
ВНИМАНИЕ! Все индикаторы наличия напряжения серии DUSPOL соответствуют международному стандарту DIN VDE 1000В
Международный стандарт на указатели напряжения IEC/EN 61243-3 (DIN VDE 0682-401) повышают безопасность работы электрика с электроустановками и электродвигателями находящимися под напряжением.
Все указатели напряжения используемые в электрических сетях с напряжением до 1000 Вольт должны соответствовать стандарту VDE
Все указатели напряжения серии DUSPOL от компании BENNING оснащены функцией непосредственного вывода измеряемой информации на табло без нажатия кнопок. В случае необходимости с помощью нажатием кнопок может быть подключен измерительный контур который позволяет избежать воздействия паразитных наведенных индуктивного и емкостного напряжения. Таким образом можно четко определить электрическую сеть высокой и малой мощности.
Некоторые индикаторы напряжения DUSPOL имеют функцию вибратора. Сила вибрации увеличивается пропорционально прилагаемому напряжению и является дополнительным показателем величины напряжения.
Индикаторы напряжения DUSPOL® (Оригинальная конструкция)
— безопасное измерение напряжений до 1000 В переменного/постоянного тока
— непосредственный вывод результатов измерений
— подключение низкоомного измерительного контура с помощью кнопок (проверка при малом импедансе)
— независимая от аккумулярного питания индикация напряжения свыше 50 В AC/DC тока
— определение наличия напряжения по вибрации корпуса щупа
— прочный округлый корпус с прорезиненной поверхностью для использования вне помещений (класс защиты IP 65)
— полное соответствие стандарту DIN EN 61243-3 (VDE0682-401):2015
BENNING- измерительное оборудование высшего класса
Приобретая индикаторы напряжения серии DUSPOL от компании BENNING Вы получаете:
* Указатель напряжения сертифицирован и испытан в соответствии со стандартом VDE (работа под напряжением до 1000 В)
* Измерение напряжения при высоком импендансе без нажатия кнопок
* Подключаемый измерительный контур
* Преднамеренное размыкание токового защитного выключателя на 30мА
* Прозвонка цепи с сигнализацией звуковым, световым сигналом или выводом на ЖК-дисплей
* Указатель последовательности чередования фаз с помощью стрелок на дисплее
* Безопасное определение наличия фазы при помощи одного измерительного щупа
* Класс защиты IP64 (ударопрочный, пылезащищенный, брызгозащищенный)
* Автоматическая подсветка ЖК-дисплея по сигналу датчика освещенности
* Безопасное измерение напряжения до 1000 Вольт переменного и постоянного тока (только модель DUSPOL 1000)
* Сохранение результата измерения
* Определение полярности электрического тока «+» или «-«
* Подключение низкоомной измерительной цепи с помощью кнопок
* Индикация напряжения в диапазоне 12-690 Вольт (переменный ток) и 12-750 Вольт (постоянный ток) (замер электрического напряжения возможен даже при отсутствии аккумулятора)
Источник
Login or create an account
Returning Customer
I am a returning customer
Login or create an account
Register Account
If you already have an account with us, please login at the login form.
Ваша учетная запись создана!
Спасибо за регистрацию в BENNING!
Вы будете уведомлены по электронной почте, как только Ваш Личный Кабинет будет активирован администрацией магазина.
Если у Вас есть какие-то вопросы, пожалуйста напишите нам.
Выход
Вы вышли из Личного Кабинета.
Ваша корзина покупок была сохранена. Она будет восстановлена при следующем входе в Ваш Личный Кабинет.


050261 Указатель напряжения DUSPOL analog BENNING
050261 Указатель напряжения DUSPOL analog BENNING
Сохранение результатов измерения
Однополюсная проверка фаз: символ «R» для переменного напряжения
Проверка прохождения и полупроводников
Индикация напряжения 12 В — 1000 В переменного / постоянного тока (LED / плунжер)
Отображение уровней: 12, 24, 50, 120, 230, 400, 690, 1000 В переменного / постоянного тока
Проверка полярности (плюс/минус) постоянного напряжения
Проверка УЗО 30 мА при помощи кнопки
Подключение к нагрузке двумя клавишными переключателями с мембранами
Вибрационный сигнал тревоги для безопасного распознавания напряжения
Ударопрочный, пыленепроницаемый, брызгозащищенный корпус (класс защиты IP 65)
- Вывод результатов измерений: плунжер/ светодиод
- Диапазон измерения напряжения: 12 — 1000V AC / DC
- прозвонка: нет
- последовательность чередования фаз: есть/ЖК дисплей
- однофазная проверка фазы: есть/ЖК дисплей
- определение полярности: есть/ЖК дисплей
- подключение нагрузки при помощи кнопок: IS = 600 мA (1000 В)
- проверка УЗО 30 мA при помощи кнопок: есть
- вибрация: есть
- подсветка места измерения: нет
- Габаритные размеры (Д x Ш) 330 x 85 мм
- класс защиты: IP 65
- Класс перегрузок CAT IV 600 V, CAT III 1000 V
- Соответствие стандартам: IEC/EN 61243-3, DIN VDE 0682-401:2011-02
- Одобрено VDE / GS: да
Источник
Указатель напряжения DUSPOL BENNING
ВНИМАНИЕ! Все индикаторы наличия напряжения серии DUSPOL соответствуют международному стандарту DIN VDE 1000В
Международный стандарт на указатели напряжения IEC/EN 61243-3 (DIN VDE 0682-401) повышают безопасность работы электрика с электроустановками и электродвигателями находящимися под напряжением.
Все указатели напряжения используемые в электрических сетях с напряжением до 1000 Вольт должны соответствовать стандарту VDE
Все указатели напряжения серии DUSPOL от компании BENNING оснащены функцией непосредственного вывода измеряемой информации на табло без нажатия кнопок. В случае необходимости с помощью нажатием кнопок может быть подключен измерительный контур который позволяет избежать воздействия паразитных наведенных индуктивного и емкостного напряжения. Таким образом можно четко определить электрическую сеть высокой и малой мощности.
Некоторые индикаторы напряжения DUSPOL имеют функцию вибратора. Сила вибрации увеличивается пропорционально прилагаемому напряжению и является дополнительным показателем величины напряжения.
Индикаторы напряжения DUSPOL® (Оригинальная конструкция)
— безопасное измерение напряжений до 1000 В переменного/постоянного тока
— непосредственный вывод результатов измерений
— подключение низкоомного измерительного контура с помощью кнопок (проверка при малом импедансе)
— независимая от аккумулярного питания индикация напряжения свыше 50 В AC/DC тока
— определение наличия напряжения по вибрации корпуса щупа
— прочный округлый корпус с прорезиненной поверхностью для использования вне помещений (класс защиты IP 65)
— полное соответствие стандарту DIN EN 61243-3 (VDE0682-401):2015
BENNING- измерительное оборудование высшего класса
Приобретая индикаторы напряжения серии DUSPOL от компании BENNING Вы получаете:
* Указатель напряжения сертифицирован и испытан в соответствии со стандартом VDE (работа под напряжением до 1000 В)
* Измерение напряжения при высоком импендансе без нажатия кнопок
* Подключаемый измерительный контур
* Преднамеренное размыкание токового защитного выключателя на 30мА
* Прозвонка цепи с сигнализацией звуковым, световым сигналом или выводом на ЖК-дисплей
* Указатель последовательности чередования фаз с помощью стрелок на дисплее
* Безопасное определение наличия фазы при помощи одного измерительного щупа
* Класс защиты IP64 (ударопрочный, пылезащищенный, брызгозащищенный)
* Автоматическая подсветка ЖК-дисплея по сигналу датчика освещенности
* Безопасное измерение напряжения до 1000 Вольт переменного и постоянного тока (только модель DUSPOL 1000)
* Сохранение результата измерения
* Определение полярности электрического тока «+» или «-«
* Подключение низкоомной измерительной цепи с помощью кнопок
* Индикация напряжения в диапазоне 12-690 Вольт (переменный ток) и 12-750 Вольт (постоянный ток) (замер электрического напряжения возможен даже при отсутствии аккумулятора)
Источник
Login or create an account
Returning Customer
I am a returning customer
Login or create an account
Register Account
If you already have an account with us, please login at the login form.
Ваша учетная запись создана!
Спасибо за регистрацию в BENNING!
Вы будете уведомлены по электронной почте, как только Ваш Личный Кабинет будет активирован администрацией магазина.
Если у Вас есть какие-то вопросы, пожалуйста напишите нам.
Выход
Вы вышли из Личного Кабинета.
Ваша корзина покупок была сохранена. Она будет восстановлена при следующем входе в Ваш Личный Кабинет.


050262 Указатель напряжения DUSPOL expert BENNING
050262 Указатель напряжения DUSPOL expert BENNING
Сохранение результатов измерения
Однополюсная проверка фаз: зеленый светодиод (левая / правая)
Проверка прохождения и полупроводников
Индикация напряжения 12 В — 1000 В переменного / постоянного тока (LED)
Отображение уровней: 12, 24, 50, 120, 230, 400, 690, 1000 В переменного / постоянного тока
Проверка полярности (плюс/минус) постоянного напряжения
Проверка УЗО 30 мА при помощи кнопки
Подключение к нагрузке двумя клавишными переключателями с мембранами
Вибрационный сигнал тревоги для безопасного распознавания напряжения
Удобная подсветка места измерения
Ударопрочный, пыленепроницаемый, брызгозащищенный корпус (класс защиты IP 65)
Характеристики:
Вывод результатов измерений: светодиоды
Диапазон измерения напряжения: 12 — 1000V AC / DC
Прозвонка: звуковой сигнал и светодиод 100 кОм
Последовательность чередования фаз: есть
Подключение нагрузки при помощи кнопок: IS = 550 мA (1000 В)
Проверка УЗО 30 мA при помощи кнопок: есть
Вибрация: есть
Подсветка места измерения: нет
Габаритные размеры (Д x Ш) 330 x 85 мм
Питание 2 x 1,5 V батарейки (LR03/ AAA)
Класс защиты: IP 65
Класс электробезопасности CAT IV 600 V, CAT III 1000 V
Соответствие стандартам: IEC/EN 61243-3, DIN VDE 0682-401:2011-02
Одобрено VDE / GS: да
Источник
Индикатор напряжения (тестер) Benning DUSPOL analog 050261
Индикатор напряжения Benning DUSPOL analog 050261
Контрольное оборудование DUSPOL® — индикаторы напряжения
Соответствует норме IEC/EN 61243-3 (DIN VDE 0682-401) CAT IV 600 В CAT III 1000 В .
Вибрационный сигнал тревоги для безопасного распознавания напряжения.
Подключение нагрузки двумя клавишными переключателями с мембранами.
Измерительное место с целью подавления индуктивных и емкостных напряжений нагружается максимальным испытательным током.
Преднамеренное размыкание токового защитного выключателя на 30 мА FI.
Испытание на прохождение посредством зуммера и светодиода или жидкокристаллического дисплея.
Устройство для проверки направления вращения магнитного поля трехфазной сети (жидкокристаллический дисплей).
Безопасная однополюсная проверка фазы.
Точечная подсветка места измерения.
Ударопрочный, пыленепроницаемый, брызгозащищенный корпус (класс защиты IP 65).
Подсветка жидкокристаллического дисплея активируется автоматически посредством светового датчика.
CAT IV 600 В CAT III 1000 В.
Технические характеристики DUSPOL analog
- вывод результатов измерений: Плунжер/светодиод
- диапазон измерений: 12 — 1000 В
- прозвонка: —
- последовательность чередования фаз: есть/ЖК дисплей
- однофазная проверка фазы: есть/ЖК дисплей
- определение полярности: есть/светодиод
- подключение нагрузки при помощи кнопок: Is = 600 мA(=1000 В)
- запуск 30 мA FI при помощи кнопок: есть
- вибрация: есть
- подсветка места измерения: —
- класс защиты: IP 65
- класс перегрузок: CAT IV 600 В CAT III 1000 В
- артикул: 050261
Источник
Bedienungsanleitung
Istruzioni per l’uso
Operating manual
Naudojimosi instrukcija
LT
Mode d’emploi
Bruksanvisning
Manuel de instrucciones
Gebruiksaanwijzing
Инструкция за експлоатация
Instrukcja obsługi
Návod k použití zkoušečky
Инструкция по эксплуатации
CZ
RUS
Brugsanvisning
индикатора напряжения
Käyttöohje
Bruksanvisning
FIN
Οδηγίες χρήσεως
Priručnik za upotrebu
Használati utasítás
geprüft und zugelassen
BENNING Elektrotechnik & Elektronik GmbH & Co.KG
Münsterstraße 135 — 137 • D — 46397 Bocholt
Telefon ++49 (0) 2871 — 93 — 0 • Fax ++49 (0) 2871 — 93 — 429
www.benning.de • E-Mail: duspol@benning.de
Инструкция по эксплуатации
индикатора напряжения
DUSPOL
analog
®
Перед использованием тестера DUSPOL
®
analog
ознакомьтесь с инструкцией по эксплуатации
и обратите особое внимание на требования
техники безопасности!
Содержание:
1.
Требования техники безопасности
2.
Функциональное
описание
индикатора
напряжения
3.
Функциональное
испытание
индикатора
2.
напряжения
Тестер DUSPOL
4.
Как проверить переменное напряжение
индикатором
4.1 Как
проверить
фазу
переменного
IEC 61243-3 с оптической индикацией без
напряжения
собственного
5.
Как проверить постоянное напряжение
предназначен
5.1 Как проверить полярность постоянного
переменного тока в диапазоне напряжений от
напряжения
12 В до 500 В ≈/ =. При работе с постоянным
6.
Как проверить направление вращающегося
напряжением
магнитного поля в сети трехфазного тока
определение
7.
Общие
рекомендации
по
техническому
переменным током – проверку фаз. Тестер
обслуживанию
показывает также направление вращения поля в
8.
Технические данные
сетях трехфазного тока, если заземлена нулевая
точка.
1.
Требования техники безопасности:
Индикатор напряжения состоит из измерительных
—
При работе с прибором брать его в руки
штифтов L1
только за изолированные ручки
и
и ни
Измерительный штифт L1
в коем случае не прикасаться к контактным
панель . Оба штифта оснащены клавишными
электродам (пробникам) !
переключателями . Без использования обоих
—
Непосредственно
перед
началом
работы:
клавишных переключателей возможна индикация
проверить все функции индикатора напряжения
следующих ступеней напряжения (переменного
(см. раздел 3). Запрещается использовать
или постоянного тока): 24 В+, 24 В-, 50 В, 120 В.
тестер при отсутствии одной или нескольких
При нажиме на оба клавишных переключателя
индикаций и при очевидной неготовности к
происходит
исполнению соответствующих функций (IEC
внутреннее
61243-3)!
индуктивных и емкостных напряжений). При этом
—
Индикатор напряжения (класс напряжений А)
активируется индикация 12 В+ и 12 В-. Кроме того,
должен использоваться только в диапазоне
производится индикация испытуемого напряжения
номинальных напряжений от 12 В до 500 В ≈/ =!
от 230 В и 500 В ≈/ = с помощью системы с
—
Индикатор
напряжения
соответствует
подвижной
классу защиты IP 64 и поэтому может
испытания с менее значительным внутренним
быть использован в условиях повышенной
сопротивлением
влажности (конструкция для внешних условий).
нагрузкой) зависит от величины измеряемого
—
При проведении испытаний крепко держать
напряжения.
тестер за изолированные ручки
и
всеми
Панель индикации
ладонями.
Система индикации включает в себя контрастные
—
Ни
в
коем
случае
не
допускать
светоизлучающие
соприкосновения
тестера
с
источником
отображают постоянное и переменное напряжение по
напряжения продолжительностью более 30
ступеням 12 В, 24 В, 50 В и 120 В (система постоянной
секунд (максимально допустимая длительность
индикации).
включения ED = 30 с)!
катушкой представляет значения напряжения в
—
Индикатор
напряжения
безукоризненно
диапазоне от 12 В и 500 В ≈/ = в соответствии со
работает только в температурном диапазоне от
шкалами для постоянного и переменного напряжения.
-10
С до +55
С при влажности воздуха от 20 %
Шкала переменного напряжения находится рядом с
°
°
до 96 %.
индикационной рейкой слева, а шкала постоянного
—
Запрещается
разборка
индикатора
напряжения – справа. При приведенных значениях
напряжения!
напряжения речь идет о номинальных напряжениях.
—
Следует предохранять индикатор напряжения
При измерении постоянного напряжения 12 и 24 В
от загрязнений и повреждений поверхности
СИДы показывают также и полярность (см. раздел
корпуса.
5). Активирование индикации 12 В и индикации
—
Хранить тестер в сухом месте.
подвижной катушки возможны только при нажатии на
—
Во избежание травм после использования
оба клавишных переключателя.
Жидкокристаллическая индикация
тестера его контактные электроды (пробники)
должны быть закрыты прилагаемым кожухом!
Жидкокристаллический индикатор служит для
Внимание!
проверки фаз при работе с переменным током и
После максимальных нагрузок (то есть после
индицирует также направление вращающегося
измерения 500 В в течение 30 секунд) следует
магнитного поля в сети трехфазного тока.
выдержать паузу продолжительностью 240 секунд!
На
прибор
нанесены
международные
3.
электротехнические
символы
и
обозначения,
–
необходимые
для
управления
тестером
и
выводимые в качестве индикации. Они имеют
следующее значение:
—
Символ
Значение
Прибор
или
оборудование
для
работы под напряжением
–
Клавишный переключатель
Переменный ток (≈)
, AC
–
, DC
Постоянный ток (=)
—
Постоянный и переменный ток
—
Запрещается использовать индикатор напряжения,
если
безукоризненно
Клавишный
переключатель
функции!
(ручной);
символ
показывает,
Проверьте работоспособность жидкокристаллического
что
соответствующие
индикации
индикатора
однополюсным
возможны только при нажиме на оба
контактного электрода измерительного штифта L1
клавишных переключателя
на внешний проводник (фаза).
Направление вращения вправо
4.
Как проверить переменное напряжение
–
Индикатор напряжения должен использоваться
Индикация
направление
только в диапазоне номинальных напряжений
вращающегося
магнитного
поля,
от 12 В до 500 В ≈!
выводится только для частоты 50 или
–
Продолжительность
60 Гц в заземленных сетях
индикатора
напряжения
напряжения до 500 В не должна превышать 30
Символ
индикации
фазы
и
секунд (максимально допустимая длительность
направления вращения магнитного
включения ED = 30 с)!
поля (правое вращение)
–
Держаться за изолированные ручки
измерительных штифтов L1 и L2 всей
Функциональное описание
площадью ладоней.
analog является двухполюсным
–
Установите
контактные
®
напряжения
в
соответствии
с
измерительных штифтов L1
подлежащую проверке деталь оборудования.
источника
энергии.
Прибор
–
При
испытании
для
измерения
постоянного
и
от 24 В и при нажатии на оба клавишных
переключателя (испытание под нагрузкой)
от 12 В загораются светоизлучающие диоды
тестер
позволяет
производить
«плюс» и «минус» и . Помимо этого
полярности,
а
при
работе
с
производится
бесступенчатая
напряжения в диапазоне от 230 В до 500 В
переменного тока с помощью измерительного
механизма подвижной катушки , если нажаты
оба клавишных переключателя.
Обязательно соблюдайте следующие правила:
и L2
и соединительного кабеля .
индикатор напряжения можно брать только за
имеет индикаторную
изолированные рукоятки измерительных штифтов
L1
и L2
, дисплей не должен быть закрыт, к
контактным электродам прикасаться нельзя!
4.1 Как
проверить
напряжения
–
Индикатор напряжения должен использоваться
переключение
на
более
малое
только в диапазоне номинальных напряжений
сопротивление
(подавление
от 12 В до 500 В переменного тока!
–
Проверка фазы возможна в заземленной сети с
напряжением от 230 В!
–
Держаться
за
измерительного штифта L1
катушкой
Продолжительность
ладони.
.
–
Установите
контактный
прибора
(испытание
под
измерительного штифта L1
проверке деталь оборудования.
–
Продолжительность
индикатора
напряжения
напряжения до 500 В не должна превышать 30
диоды
(СИД)
которые
секунд (максимально допустимая длительность
,
включения ED = 30 с)!
–
Если
на
дисплее
Система
индикации
с
подвижной
индикатора появится символ «R», то это
означает, что на данной детали оборудования
находится фаза переменного напряжения.
Во время проведения однополюсного испытания
(проверка фазы) нельзя прикасаться к контактному
электроду измерительного штифта L2
Рекомендация:
В
некоторых
случаях
жидкокристаллическом дисплее может быть
плохо видна в силу условий освещенности,
использования защитной одежды и особенностей
изоляции участка.
5.
Как проверить постоянное напряжение
–
Индикатор напряжения должен использоваться
только в диапазоне номинальных напряжений
от 12 В до 500 В = постоянного тока!
—
Ни
в
коем
соприкосновения
Функциональное испытание
напряжения продолжительностью более 30
Индикатор напряжения должен использоваться
секунд (максимально допустимая длительность
только в диапазоне номинальных напряжений
включения ED = 30 с)!
от 12 В до 500 В ≈/ =!
–
Держаться за изолированные ручки
Ни
в
коем
случае
не
допускать
измерительных штифтов L1
соприкосновения
тестера
с
источником
площадью ладоней.
напряжения продолжительностью более 30
–
Установите
контактные
секунд (максимально допустимая длительность
измерительных
включения ED = 30 с)!
подлежащую проверке деталь оборудования.
Непосредственно
перед
началом
работы:
–
При
измерении
проверить
все
функции
индикатора
от 24 В при нажатии на оба клавишных
напряжения!
переключателя (испытание под нагрузкой)
Проверьте
все
функции
на
известных
от 12 В загорается светодиод «плюс» или
источниках напряжения:
«минус»
Помимо
.
Для
проведения
измерения
постоянного
бесступенчатая
индикация
напряжения можно использовать, например,
диапазоне от 230 В до 500 В = переменного
автомобильную аккумуляторную батарею.
тока с помощью измерительного механизма
Для
проведения
измерения
переменного
подвижной катушки , если нажаты оба
напряжения можно использовать, например,
клавишных переключателя.
розетку 230 В.
Обязательно соблюдайте следующие правила:
индикатор напряжения можно брать только за
не
выполняются
все
изолированные рукоятки измерительных штифтов
L1
и L2
, дисплей не должен быть закрыт, к
контактным электродам прикасаться нельзя!
наложением
5.1 Как проверить полярность постоянного
напряжения
–
Индикатор напряжения должен использоваться
только в диапазоне номинальных напряжений
от 12 В до 500 В = постоянного тока!
—
Ни
в
коем
случае
не
соприкосновения
тестера
с
источником
соприкосновения
напряжения продолжительностью более 30
с
источником
секунд (максимально допустимая длительность
включения ED = 30 с)!
–
Держаться за изолированные ручки
измерительных штифтов L1
и L2
и
площадью ладоней.
–
Установите
контактные
электроды
измерительных
штифтов
и
электроды
подлежащую проверке деталь оборудования.
и L2
на
–
Если
загорается
светодиод
,
измерительный
штифт
приходится
переменного
напряжения
«положительный полюс» испытуемой детали
оборудования.
–
Если
загорается
светодиод
,
измерительный
штифт
приходится
«отрицательный полюс» испытуемой детали
индикация
оборудования.
Обязательно соблюдайте следующие правила:
индикатор напряжения можно брать только за
изолированные рукоятки измерительных штифтов
L1
и L2
, дисплей не должен быть закрыт, к
контактным электродам прикасаться нельзя!
6.
Как
проверить
направление
вращающегося
магнитного
в сети трехфазного тока
–
Индикатор напряжения должен использоваться
фазу
переменного
только в диапазоне номинальных напряжений
от 12 В до 500 В переменного тока!
–
Проверка
направления
вращения
возможна в заземленной сети трехфазного
тока с напряжением от 230 В переменного
напряжения (фаза против фазы).
–
Держаться за изолированные ручки
изолированную
ручку
измерительных штифтов L1
и L2
всей площадью
площадью ладоней.
–
Установите
контактные
электроды
электрод
измерительных штифтов L1
и L2
подлежащую
подлежащую проверке деталь оборудования.
–
Светодиоды или измерительный механизм
соприкосновения
подвижной катушки должны индицировать
с
источником
напряжение.
–
Продолжительность
соприкосновения
индикатора
напряжения
с
источником
напряжения до 500 В не должна превышать 30
жидкокристаллического
секунд (максимально допустимая длительность
включения ED = 30 с)!
При
контактировании
обоих
контрольных
электродов с двумя подсоединенными в правом
вращении фазами сети трехфазного тока на
жидкокристаллическом дисплее
появляется
!
символ «R». Если у двух фаз нет правой
последовательности вращения, то индикации не
индикация
на
производится.
Проверка
направления
вращения
всегда
требует
встречного
контроля!
жидкокристаллический
дисплей
индицирует
для двух фаз сети трехфазного тока правое
направление
вращения,
то
при
проведении
встречного контроля следует еще раз выполнить
контактирование переставленными контактными
электродами . При проведении встречного
контроля индикация на жидкокристаллическом
случае
не
допускать
дисплее остается погашенной. Если в обоих
тестера
с
источником
случаях
на
жидкокристаллическом
индицируется символ «R», то это свидетельствует
о слишком слабом заземлении.
Рекомендация:
и
В
некоторых
случаях
индикация
и L2
всей
жидкокристаллическом дисплее может быть
плохо видна в силу условий освещенности,
электроды
использования защитной одежды и особенностей
штифтов
и
на
изоляции участка.
постоянного
напряжения
7.
Общие
рекомендации
по
техническому
обслуживанию
Следует прочищать корпус тестера с наружной
стороны чистым сухим полотном (исключение
этого
производится
– специальные салфетки для прочистки). Не
напряжения
в
следует использовать для прочистки растворители
и абразивные материалы.
8.
Технические данные
–
Норматив для двухполюсных индикаторов
напряжения: IЕС 61243-3
–
Класс защиты IР 64, IЕС 60529 (ДИН 40050),
допускается использование и при осадках!
–
Диапазон номинальных напряжений (класс
напряжений А): от 12 В до 500 В ≈/ =
–
Внутреннее сопротивление, измерительный
контур: 180 кОм
–
Внутреннее сопротивление, контур нагрузки
– оба клавишных переключателя нажаты: ок.
24 кОм
–
Потребление тока, измерительный контур:
допускать
макс. I
3,2 мА (500 В) переменного тока
n
–
Потребление
тока,
контур
нагрузки
– оба клавишных переключателя нажаты:
I
0,032 А (500 В)
s
–
Индикация
полярности:
светодиодные
и
символы «+» и «-» (рукоятка индикатора =
всей
положительная полярность)
–
Ступенчатая
светодиодная
индикация:
12 В+*, 12 В-*, 24 В+, 24 В-, 50 В, 120 В
на
(*: только при нажатии на оба клавишных
переключателя)
то
на
–
Бесступенчатая индикация по шкале: 230 В
– 500 В ≈/ =
–
Макс. погрешность индикации: U
± 15 %,
n
ELV U
– 15 %
n
то
на
–
Номинальный диапазон частот f: от 0 до 60 Гц
индикация фаз и направления поля – 50/ 60 Гц
–
Индикация фаз и направления поля: ≥ U
230 В
n
–
Максимально
допустимая
длительность
включения: ED = 30 с (макс. 500 В), 240 секунд
пауза
–
Вес: ок. 180 г
–
Длина соединительной линии: ок. 900 мм
–
Рабочая температура и температура хранения:
от – 10°С до + 55°С (климатическая категория N)
–
Относительная влажность воздуха: от 20 % до
поля
96 % (климатическая категория N)
Максимальная продолжительность включения
(ED) = 10 секунд, когда напряжение находится в
диапазоне от 500 В до максимум 750 В.
поля
и
всей
на
поля
Если
дисплее
на
(Ocr-Read Summary of Contents of some pages of the Benning DUSPOL analog Document (Main Content), UPD: 08 June 2023)
-
1, Bedienungsanleitung DUSPOL ® analog Bevor Sie den Spannungsprüfer DUSPOL ® analog benutzen: Lesen Sie bitte die Bedienungsanlei- tung und beachten Sie unbedingt die Sicherheits- hinweise! Inhaltsverzeichnis: 1. Sicherheitshinweise 2. Funktionsbeschreibung des Spannungsprüfers 3. Funktionsprüfung des Spannungsprüfers 4. So prüfen Sie Wechselspannungen 4.1 So prüfen Sie die Phase bei Wechselspannung 5. So prüfen Sie Gleic…
-
2, Operating manual DUSPOL ® analog Before using the voltage tester DUSPOL ® analog: Please read the operating manual carefully and always observe the safety instructions! List of contents: 1. Safety instructions 2. Functional description of the voltage tester 3. Functional test of the voltage tester 4. How to test AC voltages 4.1 How to test the phase at AC voltage 5. How to test DC volt…
-
3, Benning DUSPOL analog Mode d‘emploi DUSPOL ® analog Avant d‘utiliser le détecteur de tension DUSPOL ® analog: lire attentivement le mode d‘emploi et respecter les consignes de sécurité! Table des matières: 1. Consignes de sécurité 2. Description fonctionnelle du détecteur de tension 3. Test de fonctionnement du détecteur de tension 4. Test de tensions alternatives 4.1 Test de la phase de tension alternative 5. Test de tensions continues 5.1 Test de l…
-
4, Instrucciones para el uso del DUSPOL ® analog Antes de utilizar el comprobador de tensión DUSPOL ® analog lea atentamente estas instrucciones y respete los consejos de seguridad! Indice: 1. Consejos de seguridad 2. Descripción funcional del comprobador de tensión 3. Test de funcionamiento del comprobador de tensión 4. Test de corrientes alternas (CA) 4.1 Test de la fase en corrientes alternas (CA) 5. Test de corrientes continuas (CC…
-
5, Инструкция за експлоатация на DUSPOL ® analog Преди използване на тестера за напрежение DUSPOL ® analog: Моля прочетете инструкцията за експлоатация внимателно и винаги спазвайте инструкциите за безопасност! Съдържание: 1. Инструкции за безопасност 2. Описание на работат…
-
6, Návod k použití zkoušečky DUSPOL ® analog Předtí, než začnemte zkoušečku DUSPOL ® analog používat, přečtěte si prosím tento návod a dodržujte uvedené bezpečnostní pokyny! Obsah: 1. Bezpečnostní pokyny 2. Popis funkcí zkoušečky 3. Ověření funkcí zkoušečky 4. Měření střídavého napětí 4.1 Měření fáze střídavého napětí 5. Měření …
-
7, Benning DUSPOL analog Betjeningsvejledning til DUSPOL ® analog Læs grundig brugervejledningen og sikkerhedsins truktionerne, inden ibrugtagning af volttesteren. Indholdsfortegnelse: 1. Sikkerhedsinstruktion 2. Funktionsbeskrivelse 3. Funktionstest 4. Hvordan man tester AC volt 4.1 Hvordan man laver fasetest i AC volt 5. Hvordan man tester DC volt 5.1 Hvordan man laver polaritetstest i DC volt 6. Hvordan man tester fasefølge i 3-f…
-
8, Käyttöohje DUSPOL ® analog Ennen jännitteenkoestimen DUSPOL ® analog käyttöön ottamista: Lukekaa käyttöohje ja ottakaa ehdottomasti huomioon turvallisuusohjeet! Sisällysluettelo: 1. Turvallisuusohjeita 2. Jännitteenkoestimen toiminnan kuvaus 3. Jännitteenkoestimen toiminnan tarkistus 4. Näin koestatte vaihtojännitteitä 4.1 Näin koestatte vaiheen vaihtojännitteellä 5. Näin ko…
-
9, Οδηγίες χρήσεως DUSPOL ® analog Πριν χρησιμοποιήσετε το όργανο ελέγχου τάσεως DUSPOL analog: Διαβάστε παρακαλώ τις οδηγίες χρήσεως και προσέξτε προπαντός τις οδηγίες ασφάλειας! Περιεχόμενα 1. Οδηγίες ασφάλειας 2. Περιγραφή λειτουργίας οργά…
-
10, Benning DUSPOL analog Használati utasítás DUSPOL ® analog Mielött a DUSPOL ® analog feszültségtesztert használatba venné, kérjük olvassa el a használati utasítást és feltétlenül tartsa be a biztonsági elöírásokat ! Tartalomjegyzék: 1. Biztonsági elöírás 2. A feszültségteszter müködési leírása 3. A feszültségteszter müködésének ellenörzése 4. Váltófeszültség ellenörzése 4.1 A fázis ellenörzése váltófeszültségnél 5. …
-
11, Istruzioni per l’uso di DUSPOL ® analog Prima di utilizzare l’indicatore di tensione DUSPOL ® analog, leggere attentamente le istruzioni per l’uso e prestare molta attenzione alle istruzioni di sicurezza! Indice: 1. Istruzioni di sicurezza 2. Descrizione del funzionamento dell’indicatore di tensione 3. Controllo del funzionamento dell’indicatore di tensione 4. Come …
-
12, Naudojimosi instrukcija DUSPOL ® analog Prieš pradėdami naudotis įtampos indikatoriumi DUSPOL ® analog, atidžiai perskaitykite šią naudojimosi instrukciją. Visuomet laikykitės saugos reikalavimų! Turinys: 1. Saugos reikalavimai 2. Įtampos indikatoriaus veikimo aprašymas 3. Įtampos indikatoriaus veikimo kontrolė 4. Kaip nustatyti kintamosios srovės įtampą 4.1. Kaip patikrinti fazę, esant kintamosios srovės įtampai 5.…
-
13, Benning DUSPOL analog Bruksanvisning for DUSPOL ® analog Før du tar spenningsprøveren DUSPOL ® analog i bruk: Les bruksanvisningen nøye og følg sikkerhetshenvisningene! Innholdsfortegnelse: 1. Sikkerhetshenvisninger 2. Funksjonsbeskrivelse av spenningsprøveren 3. Funksjonstest av spenningsprøveren 4. Slik prøver du vekselspenninger 4.1 Slik prøver du fasen ved vekselspenninger 5. Slik prøver du likespenninger 5.1 Slik tester …
-
14, Gebruiksaanwijzing DUSPOL ® analoog Voordat u de spanningstester DUSPOL ® analoog in gebruik neemt: Lees eerst de gebruiksaanwijzing a.u.b. en neem de veiligheidsvoorschriften in acht. Inhoudsopgave: 1. Veiligheidsvoorschriften 2 . Functiebeschrijving van de spanningstester 3. Testen van de functies van de spanningstester 4. Zo meet u wisselspanningen 4.1. Zo meet u de fase bij wisselspanning 5. Zo meet u gelijkspanningen 5.1. Zo meet u d…
-
15, Instrukcja obsługi DUSPOL ® analog Przed użyciem przyrządu DUSPOL ® analog należy dokładnie zapoznać się z niniejszą instrukcją obsługi oraz bezwzględnie przestrzegać zasad jego bezpiecznego użytkowania. Spis treści: 1. Zasady bezpiecznego użytkowania przyrządu 2. Opis przyrządu 3. Test przyrządu 4. Pomiar napięcia przemiennego AC 4.1 Kontrola napięcia fazowego AC 5. Pomiar napięcia stałego DC 5.1…
-
16, Инструкция по эксплуатации индикатора напряжения DUSPOL ® analog Перед использованием тестера DUSPOL ® analog ознакомьтесь с инструкцией по эксплуатации и обратите особое внимание на требования техники безопасности! Содер…
-
17, Bruksanvisning DUSPOL ® analog Innan DUSPOL ® analog spänningsprovare används: Läs noga igenom bruksanvisningen och säkerhetsanvisningarna! Innehåll: 1. Säkerhetsanvisningar 2. Funktionsbeskrivning av spänningsprovaren 3. Funktionstest av spänningsprovaren 4. Så provas växelspänning 4.1 Så provas fasen vid växelspänning 5. Så provas likspänning 5.1 Så provas polariteten vid likspänning …
-
18, Priručnik za upotrebu DUSPOL ® analog Pre upotrebe ispitivača napona (instrumenta) molimo da pažljivo pročitajte uputstva i da se pridržavate sigurosnih uputstava! Sadržaj: 1. Uputstva za bezbednu upotrebu 2. Opis funkcija instrumenta 3. Ispitivanje funkcija instrumenta 4. Kako se ispituju naponi naizmenične struje 4.1 Kako se ispituje faza naizmeničnog napona 5…