-
Contents
-
Table of Contents
-
Bookmarks
Quick Links
COMPETENCE B4140-1
The Built-in Pyrolitic oven
Operating Instructions
Related Manuals for AEG COMPETENCE B4140-1
Summary of Contents for AEG COMPETENCE B4140-1
-
Page 1
COMPETENCE B4140-1 The Built-in Pyrolitic oven Operating Instructions… -
Page 2: Dear Customer
Dear Customer, Please read these operating instructions carefully. In particular please note the «Safety»“ section on the first pages. Please retain these operating instructions for later reference and pass them on to any future owners of the appliance. The warning triangle and/or key words (Warning!, Caution!, Important!) highlight information that is important for your safety or the function of the appliance.
-
Page 3: Table Of Contents
Contents Safety Instructions ……….Disposal .
-
Page 4
Cleaning and Care ……….41 Exterior of the Appliance . -
Page 5: Safety Instructions
Where damage occurs the warranty will not apply if this instruction has not been adhered to. The safety features of AEG electrical appliances comply with recognised technical standards and the German law covering equipment safety. However, as manufacturers we also believe it is our responsibility to fa- miliarise you with the following safety instructions.
-
Page 6: Intended Use
Intended Use • This appliance is intended to be used for cooking, frying and baking food in the home and must not be used for any other purpose. • Only use the appliance to prepare food. • Do not use the oven as a room heater. To Avoid Damaging Your Appliance •…
-
Page 7: Disposal
• You can obtain information about collection dates or public refuse disposal sites from your local refuse department or council. • You can also take the appliance to your AEG dealer; they will dispose of it for you for a small contribution towards the costs.
-
Page 8: Appliance Assembly
Appliance Assembly Control Panel The appliance is fitted with push-in rotary switches. Oven functions and function display Switch for setting the required oven function. The selected oven function is displayed in the oven function display. Temperature selection and temperature display Switch for setting the required oven temperature.
-
Page 9: Clock Functions
Clock Functions Your appliance has a programmable clock by which you can see the time, use the countdown timer as an «egg-timer“ or set baking and roasting times using the automatic functions. Time The current time is shown in the display window provided no other clock function has been selected.
-
Page 10: Oven Features
Oven Features Shelf positions There is a shelf support rail on both sides of the oven, with 5 shelf posi- tions on which to insert the acces- sories. Anti-tip device All slide-in units are fitted with an anti-tip device to prevent them be- ing pulled out of the oven uninten- tionally.
-
Page 11: Oven Accessories
Oven steam vent Steam from the oven is fed out below the door handle. Relates only to appliances with a metal front: Steam from the oven is fed out between the upper door edge and the control panel. Fan run-on The fan switches on automatically as soon as the oven is switched on.
-
Page 12: Oven Functions
Oven Functions The oven has the following functions: S Pizza & baking This is the best function for baking cakes on one level. It is also suitable for baking foods that need to be more strongly crisped or browned un- derneath.
-
Page 13: Bottom Heat
F Grill Grilling is particularly suitable for grilling or toasting flat foods, such as steaks, escalopes, fish or toast. The heat is supplied from the grill element on the oven ceiling. Ü Bottom heat You can use this oven function to crisp and brown bread, cakes (e.g., moist cakes) and pastries from below.
-
Page 14: Before Using For The First Time
Before Using for the First Time Initial Cleaning Before using the oven for the first time you should clean it thoroughly. You can switch on the oven light to make cleaning easier. 1. Turn the oven function switch to Oven Lighting . 2.
-
Page 15: Set The Time
Set the Time The oven will only operate when the time has been set. When the power supply is switched on, or after a power failure, the function indicator flashes on the clock display D. 1. Using buttons + or — set the cur- rent time.
-
Page 16: Resetting The Time
Resetting the Time Press button b until the function indicator flashes on the clock display D . 3. Using buttons + or — set the cur- rent time. 4. Wait for 5 seconds. The flashing will stop and the set time will be displayed in the display window.
-
Page 17: Using The Oven
Using the Oven Inserting/Removing the Fat Filter Always insert the fat filter when roasting uncovered on a shelf unit, on the fat tray, or in an uncovered roasting dish. Inserting the fat filter Holding the fat filter by the tab, in- sert the two retainers into the opening on the rear wall of the oven (fan opening) from the top…
-
Page 18: Positioning The Shelf Unit And The Universal Baking Tray
Positioning the Shelf Unit and the Universal Baking Tray All slide-in units have a small bulge on the left and right. This bulge serves as an anti-tip device and must always point downwards. Inserting shelf unit Insert the shelf unit with both guide rails pointing upwards.
-
Page 19: Switching The Oven On And Off
Switching the Oven On and Off 1. To use, push both the «oven functions“ and «temperature selection“ switches in turn. The switches will pop out. 2. Set the required function by turning the «oven functions“ switch. The symbol for the selected function will appear in the function display. 3.
-
Page 20: Oven Safety Cut-Out
Oven safety cut-out If not switched off after a certain time, or the temperature is not changed, the oven switches off automatically. The red temperature indicator light flashes. The oven switches off at temperatures of: 30 — 120° C after 12.5 hours 120 — 200°…
-
Page 21: Using The Automatic Function
Using the Automatic Function The required oven function and temperature can be selected before or after setting the automatic function. You can select the following functions: Cook time < Using the cook time < function you can set the time for which the oven is required to operate.
-
Page 22
End time > Using the end time function > you can set the oven to switch off au- tomatically. 1. Keep pressing the button ] until the end time function indicator > flashes. 2. Using the + or — buttons set the time at which you require the oven to switch off. -
Page 23
Cook time < and end time > combined Cook time < and end time > can be used simultaneously if the oven is required to switch on and off automatically at a later time . 1. Using the cook time function < set the time for which the dish is requi- red to cook. -
Page 24: Countdown
Countdown At the end of the countdown ] an acoustic signal will sound. 1. Keep pressing button ] until the countdown function indicator ] flashes. 2. Using buttons + or — set the re- quired countdown. (Max. 2 hours and 30 minutes.) 3.
-
Page 25: Uses, Tables And Tips
Uses, Tables and Tips Baking When baking use the pizza & baking S, fan cooking U or conventional O oven function. Important! Do not use a fat filter when baking! Cake tins • When baking with conventional O coated baking tins and tins made of dark metal are suitable.
-
Page 26
• With fan cooking U you can bake on up to 3 baking trays at the same time: 1 Baking tray: 1 Cake tin: Shelf position 3 Shelf position 1 2 Baking trays: 3 Baking trays: Shelf positions 1 and 4 Shelf positions 1, 3 and 5 General information •… -
Page 27
• Bake moist foods (e.g., pizzas, fruit flans) on one level. • When using for the first time, we recommend setting the lower tem- perature, and only if necessary, e.g. if increased browning is required or the cooking time is too long, selecting a higher temperature. •… -
Page 28: Baking Table
Baking Table Baking on one shelf position Pizza & Baking S Conventional O Type of Cake or Pastry Time Shelf Tempera- Shelf Po- Tempera- For Both Position ture sition ture Functions from ºC from ºC Hrs.: Mins. Bottom Bottom Baking in tins Ring-shaped cakes 150-160 160-180…
-
Page 29
Pizza & Baking S Conventional O Type of Cake or Pastry Time Shelf Tempera- Shelf Po- Tempera- For Both Position ture sition ture Functions from ºC from ºC Hrs.: Mins. Bottom Bottom Fruit flan with shortcrust 160-170 170-190 0:40-1:20 pastry base Tarts baked with delicate fillings 0:40-1:20… -
Page 30
Baking on several shelf positions Fan cooking U Time Type of cake or pastry Shelf position from bottom Tempera- Hrs.: Mins. ture ºC 2 Levels 3 Levels Baking on baking trays Cream puffs/eclairs 0:35-0:60 160-180 Dry streusel cake 140-160 0:30-0:60 Biscuits Shortcrust biscuits 1/3/5… -
Page 31: Tips For Baking
Tips for Baking Push a wooden skewer into the highest point of the To tell if your cake is cooked cake. If the skewer comes out clean, you can switch through off the oven and utilise the residual heat. Check your recipe. Next time use less liquid. Check The cake collapses (is sticky, that you have beaten the mixture for the correct soft in the middle,…
-
Page 32: Pies And Gratin Table
Pies and Gratin Table Conventional O Rotitherm I Time Shelf Shelf Temp. Temp. Hrs: Mins. position position °C °C from from bottom bottom Pasta bake 180-200 160-170 0:45-1:00 Lasagne 180-200 160-170 0:25-0:40 Vegetables au 200-220 160-170 0:15-0:30 gratin Pizza ba- 200-220 160-170 0:15-0:30…
-
Page 33: Frozen Ready Meals Table
Frozen Ready Meals Table Food to be Shelf Temperature Time cooked position Oven function from bottom in accordance in accordance Conventional with the Frozen pizza with the maker’s maker’s instruc- instructions tions Chips Rotitherm I 200-220 °C 15-25 Mins. (300-600 g) in accordance in accordance Conventional…
-
Page 34: Roasting
Roasting Use the rotitherm I oven function or conventional O when roasting. Ovenware for roasting • Any heat-resistant dish is suitable for roasting. • If the dish has plastic handles, check that they are heat-resistant. • Large joints can be roasted directly in the universal baking tray or on the shelf unit with the baking tray placed below (e.g., turkey, goose, 3-4 chickens, 3-4 knuckles of veal.) •…
-
Page 35
Notes on the roasting tables Information is given in the table on suitable oven functions, tempera- ture settings, cooking times and shelf positions for various types of meat. The cooking times are only for guidance. • We recommend that only meat and fish with a minimum weight of 1kg should be roasted or baked in the oven. -
Page 36: Table For Roasting
Table for Roasting Conventional O Rotitherm I Type of Meat Quantity Time Hours: Weight Shelf Po- Tempera- Shelf Tempera- Mins. sition ture Position ture from ºC from ºC Bottom Bottom Beef Pot roast 1-1.5 kg 200-250 2:00-2:30 Roast beef or fil- per cm of thickness per cm of…
-
Page 37
Conventional O Rotitherm I Type of Meat Quantity Time Hours: Weight Shelf Po- Tempera- Shelf Tempera- Mins. sition ture Position ture from ºC from ºC Bottom Bottom Game Whole piece of hare, up to 1 160-170 0:25-0:40 220-250 haunch or jointed hare Saddle of venison 1.5-2 kg… -
Page 38: Grilling
Grilling To grill, use oven function Z for dual grill or F for single grill with temperature setting z . Important: Always preheat the empty oven with the grill function for 5 minutes! Ovenware for grilling • Use the shelf unit and universal tray together for grilling. Shelf positions •…
-
Page 39: Defrosting
Defrosting Use the defrost oven function for defrosting. Dishes for defrosting • Put the food on a plate and put the plate on the shelf unit. • Use only parchment paper or suitable cling film to cover the food. Do not cover with a plate or bowl as these considerably prolong the de- frosting time.
-
Page 40: Preserving
Preserving For preserving use the fan cooking U oven function. Preserving jars • Only use commercially available preserving jars (preserving jars with a rubber ring and glass lid) for preserving. • Screw-top jars, jars with a bayonet fastening and metal containers are unsuitable.
-
Page 41: Cleaning And Care
Cleaning and Care Exterior of the Appliance Wipe the front of the appliance with a soft cloth dipped in warm soapy water. • Do not use scourers, caustic cleaners or abrasive items. • You can use commercially available cleaning agents on stainless steel fronts.
-
Page 42: Side Support Rails
Side Support Rails The side support rails on the left and right hand sides of the oven can be removed for cleaning the side walls. Removing the side support rails 1. Remove screw. 2. Pull the rail at the back away from the oven wall and pivot towards the front (1).
-
Page 43
Fitting the side support rails Take care when fitting the rails that the rounded ends of the guide rails are pointing forwards! 1. To replace, first insert and fit the rail at the front (1). 2. Pivot the rail towrds the back and insert (2). -
Page 44: Cleaning With Pyroluxe
Cleaning with Pyroluxe Warning! The oven becomes very hot during pyroluxe self-cleaning. Keep young children well away from the oven. Important: Before carrying out pyroluxe cleaning the oven must be completely emptied with the exception of the shelf support rails. Also remove the fat filter! If you are using the oven shelf runners obtainable as a special acces- sory, they must be removed before cleaning with pyroluxe.
-
Page 45: Oven Light
Oven Light Warning: Risk of electric shock! Prior to changing the oven light: – Switch off the oven! – Either remove or switch off the fuses in the fuse box. Replacing the oven light bulb/cleaning the glass 1. Remove the right shelf support rail. 2.
-
Page 46: Oven Door
Oven Door The oven door of your appliance may be removed for cleaning. Removing the oven door 1. Open the oven door completely. 2. Completely fold back the brass- coloured clamping lever on both door hinges (1). 3. Grip the oven door with both hands on the sidesand close it by about 3/ 4 (2) past its resistance.
-
Page 47: Oven Door Glass
Oven door glass The oven door is fitted with four sheets of glass set next to one an- other. The inner sheets can be removed for cleaning. Caution: The following steps are to be performed only when the oven door has been removed. If the glass is removed while the door is at- tached, the leighter weight may cause it to spring up and cause injury.
-
Page 48
Replacing the centre glass plates 1. From above, insert the centre plates obliquely into the retaining frame at the handle, one after another. 2. Lower the centre plates down and push them towards the lower edge of the door as far under the retain- ing frame as they will go. -
Page 49: What To Do If
What to do if ..the oven does not heat up? Check whether – the appliance has been switched on, – the time has been set, – all the necessary settings have been made, – the mains fuse (fuse box) has blown or the cooker circuit breaker (at the household power distribution box) has tripped.
-
Page 50
If you call in customer service to resolve a problem listed in these notes, or to rectify a problem caused by incorrect operation of the appliance, the customer service engineer’s visit will not be free of charge, even during the warranty period. Should you still have problems after reading this information, please contact your specialist dealer or customer service. -
Page 51: Technical Data
Technical Data Oven Interior Dimensions Height x Width x Depth 31 cm x 41 cm x 41 cm Capacity (usable capacity) 52 l Regulations, Standards, Directives This appliance meets the following standards: • EN 60 335-1 and EN 60 335-2-6 relating to the safety of electric appliances for household use and similar purposes and •…
-
Page 54: Index
Index Anti-tip device ….. . 10 Ready meals ……33 Repairs .
-
Page 55: Service
Service The section «What do I do if…“ lists some faults that you can remedy yourself. Look there first if a fault occurs. Is it a technical fault? Then contact your nearest customer service centre. (Addresses and tele- phone numbers can be found under «Customer Service Centres“.) Always prepare in advance for the discussion.
-
Page 56
AEG Hausgeräte GmbH Postfach 1036 D-90327 Nürnberg http://www.aeg.hausgeraete.de © Copyright by AEG 822 947 461-H-120302-07…
-
Page 1
COMPETENCE B4140-1 The Built-in Pyrolitic oven Operating Instructions… -
Page 2: Dear Customer
Dear Customer, Please read these operating instructions carefully. In particular please note the «Safety»“ section on the first pages. Please retain these operating instructions for later reference and pass them on to any future owners of the appliance. The warning triangle and/or key words (Warning!, Caution!, Important!) highlight information that is important for your safety or the function of the appliance.
-
Page 3: Table Of Contents
Contents Safety Instructions ……….Disposal .
-
Page 4
Cleaning and Care ……….41 Exterior of the Appliance . -
Page 5: Safety Instructions
Where damage occurs the warranty will not apply if this instruction has not been adhered to. The safety features of AEG electrical appliances comply with recognised technical standards and the German law covering equipment safety. However, as manufacturers we also believe it is our responsibility to fa- miliarise you with the following safety instructions.
-
Page 6: Intended Use
Intended Use • This appliance is intended to be used for cooking, frying and baking food in the home and must not be used for any other purpose. • Only use the appliance to prepare food. • Do not use the oven as a room heater. To Avoid Damaging Your Appliance •…
-
Page 7: Disposal
• You can obtain information about collection dates or public refuse disposal sites from your local refuse department or council. • You can also take the appliance to your AEG dealer; they will dispose of it for you for a small contribution towards the costs.
-
Page 8: Appliance Assembly
Appliance Assembly Control Panel The appliance is fitted with push-in rotary switches. Oven functions and function display Switch for setting the required oven function. The selected oven function is displayed in the oven function display. Temperature selection and temperature display Switch for setting the required oven temperature.
-
Page 9: Clock Functions
Clock Functions Your appliance has a programmable clock by which you can see the time, use the countdown timer as an «egg-timer“ or set baking and roasting times using the automatic functions. Time The current time is shown in the display window provided no other clock function has been selected.
-
Page 10: Oven Features
Oven Features Shelf positions There is a shelf support rail on both sides of the oven, with 5 shelf posi- tions on which to insert the acces- sories. Anti-tip device All slide-in units are fitted with an anti-tip device to prevent them be- ing pulled out of the oven uninten- tionally.
-
Page 11: Oven Accessories
Oven steam vent Steam from the oven is fed out below the door handle. Relates only to appliances with a metal front: Steam from the oven is fed out between the upper door edge and the control panel. Fan run-on The fan switches on automatically as soon as the oven is switched on.
-
Page 12: Oven Functions
Oven Functions The oven has the following functions: S Pizza & baking This is the best function for baking cakes on one level. It is also suitable for baking foods that need to be more strongly crisped or browned un- derneath.
-
Page 13: Bottom Heat
F Grill Grilling is particularly suitable for grilling or toasting flat foods, such as steaks, escalopes, fish or toast. The heat is supplied from the grill element on the oven ceiling. Ü Bottom heat You can use this oven function to crisp and brown bread, cakes (e.g., moist cakes) and pastries from below.
-
Page 14: Before Using For The First Time
Before Using for the First Time Initial Cleaning Before using the oven for the first time you should clean it thoroughly. You can switch on the oven light to make cleaning easier. 1. Turn the oven function switch to Oven Lighting . 2.
-
Page 15: Set The Time
Set the Time The oven will only operate when the time has been set. When the power supply is switched on, or after a power failure, the function indicator flashes on the clock display D. 1. Using buttons + or — set the cur- rent time.
-
Page 16: Resetting The Time
Resetting the Time Press button b until the function indicator flashes on the clock display D . 3. Using buttons + or — set the cur- rent time. 4. Wait for 5 seconds. The flashing will stop and the set time will be displayed in the display window.
-
Page 17: Using The Oven
Using the Oven Inserting/Removing the Fat Filter Always insert the fat filter when roasting uncovered on a shelf unit, on the fat tray, or in an uncovered roasting dish. Inserting the fat filter Holding the fat filter by the tab, in- sert the two retainers into the opening on the rear wall of the oven (fan opening) from the top…
-
Page 18: Positioning The Shelf Unit And The Universal Baking Tray
Positioning the Shelf Unit and the Universal Baking Tray All slide-in units have a small bulge on the left and right. This bulge serves as an anti-tip device and must always point downwards. Inserting shelf unit Insert the shelf unit with both guide rails pointing upwards.
-
Page 19: Switching The Oven On And Off
Switching the Oven On and Off 1. To use, push both the «oven functions“ and «temperature selection“ switches in turn. The switches will pop out. 2. Set the required function by turning the «oven functions“ switch. The symbol for the selected function will appear in the function display. 3.
-
Page 20: Oven Safety Cut-Out
Oven safety cut-out If not switched off after a certain time, or the temperature is not changed, the oven switches off automatically. The red temperature indicator light flashes. The oven switches off at temperatures of: 30 — 120° C after 12.5 hours 120 — 200°…
-
Page 21: Using The Automatic Function
Using the Automatic Function The required oven function and temperature can be selected before or after setting the automatic function. You can select the following functions: Cook time < Using the cook time < function you can set the time for which the oven is required to operate.
-
Page 22
End time > Using the end time function > you can set the oven to switch off au- tomatically. 1. Keep pressing the button ] until the end time function indicator > flashes. 2. Using the + or — buttons set the time at which you require the oven to switch off. -
Page 23
Cook time < and end time > combined Cook time < and end time > can be used simultaneously if the oven is required to switch on and off automatically at a later time . 1. Using the cook time function < set the time for which the dish is requi- red to cook. -
Page 24: Countdown
Countdown At the end of the countdown ] an acoustic signal will sound. 1. Keep pressing button ] until the countdown function indicator ] flashes. 2. Using buttons + or — set the re- quired countdown. (Max. 2 hours and 30 minutes.) 3.
-
Page 25: Uses, Tables And Tips
Uses, Tables and Tips Baking When baking use the pizza & baking S, fan cooking U or conventional O oven function. Important! Do not use a fat filter when baking! Cake tins • When baking with conventional O coated baking tins and tins made of dark metal are suitable.
-
Page 26
• With fan cooking U you can bake on up to 3 baking trays at the same time: 1 Baking tray: 1 Cake tin: Shelf position 3 Shelf position 1 2 Baking trays: 3 Baking trays: Shelf positions 1 and 4 Shelf positions 1, 3 and 5 General information •… -
Page 27
• Bake moist foods (e.g., pizzas, fruit flans) on one level. • When using for the first time, we recommend setting the lower tem- perature, and only if necessary, e.g. if increased browning is required or the cooking time is too long, selecting a higher temperature. •… -
Page 28: Baking Table
Baking Table Baking on one shelf position Pizza & Baking S Conventional O Type of Cake or Pastry Time Shelf Tempera- Shelf Po- Tempera- For Both Position ture sition ture Functions from ºC from ºC Hrs.: Mins. Bottom Bottom Baking in tins Ring-shaped cakes 150-160 160-180…
-
Page 29
Pizza & Baking S Conventional O Type of Cake or Pastry Time Shelf Tempera- Shelf Po- Tempera- For Both Position ture sition ture Functions from ºC from ºC Hrs.: Mins. Bottom Bottom Fruit flan with shortcrust 160-170 170-190 0:40-1:20 pastry base Tarts baked with delicate fillings 0:40-1:20… -
Page 30
Baking on several shelf positions Fan cooking U Time Type of cake or pastry Shelf position from bottom Tempera- Hrs.: Mins. ture ºC 2 Levels 3 Levels Baking on baking trays Cream puffs/eclairs 0:35-0:60 160-180 Dry streusel cake 140-160 0:30-0:60 Biscuits Shortcrust biscuits 1/3/5… -
Page 31: Tips For Baking
Tips for Baking Push a wooden skewer into the highest point of the To tell if your cake is cooked cake. If the skewer comes out clean, you can switch through off the oven and utilise the residual heat. Check your recipe. Next time use less liquid. Check The cake collapses (is sticky, that you have beaten the mixture for the correct soft in the middle,…
-
Page 32: Pies And Gratin Table
Pies and Gratin Table Conventional O Rotitherm I Time Shelf Shelf Temp. Temp. Hrs: Mins. position position °C °C from from bottom bottom Pasta bake 180-200 160-170 0:45-1:00 Lasagne 180-200 160-170 0:25-0:40 Vegetables au 200-220 160-170 0:15-0:30 gratin Pizza ba- 200-220 160-170 0:15-0:30…
-
Page 33: Frozen Ready Meals Table
Frozen Ready Meals Table Food to be Shelf Temperature Time cooked position Oven function from bottom in accordance in accordance Conventional with the Frozen pizza with the maker’s maker’s instruc- instructions tions Chips Rotitherm I 200-220 °C 15-25 Mins. (300-600 g) in accordance in accordance Conventional…
-
Page 34: Roasting
Roasting Use the rotitherm I oven function or conventional O when roasting. Ovenware for roasting • Any heat-resistant dish is suitable for roasting. • If the dish has plastic handles, check that they are heat-resistant. • Large joints can be roasted directly in the universal baking tray or on the shelf unit with the baking tray placed below (e.g., turkey, goose, 3-4 chickens, 3-4 knuckles of veal.) •…
-
Page 35
Notes on the roasting tables Information is given in the table on suitable oven functions, tempera- ture settings, cooking times and shelf positions for various types of meat. The cooking times are only for guidance. • We recommend that only meat and fish with a minimum weight of 1kg should be roasted or baked in the oven. -
Page 36: Table For Roasting
Table for Roasting Conventional O Rotitherm I Type of Meat Quantity Time Hours: Weight Shelf Po- Tempera- Shelf Tempera- Mins. sition ture Position ture from ºC from ºC Bottom Bottom Beef Pot roast 1-1.5 kg 200-250 2:00-2:30 Roast beef or fil- per cm of thickness per cm of…
-
Page 37
Conventional O Rotitherm I Type of Meat Quantity Time Hours: Weight Shelf Po- Tempera- Shelf Tempera- Mins. sition ture Position ture from ºC from ºC Bottom Bottom Game Whole piece of hare, up to 1 160-170 0:25-0:40 220-250 haunch or jointed hare Saddle of venison 1.5-2 kg… -
Page 38: Grilling
Grilling To grill, use oven function Z for dual grill or F for single grill with temperature setting z . Important: Always preheat the empty oven with the grill function for 5 minutes! Ovenware for grilling • Use the shelf unit and universal tray together for grilling. Shelf positions •…
-
Page 39: Defrosting
Defrosting Use the defrost oven function for defrosting. Dishes for defrosting • Put the food on a plate and put the plate on the shelf unit. • Use only parchment paper or suitable cling film to cover the food. Do not cover with a plate or bowl as these considerably prolong the de- frosting time.
-
Page 40: Preserving
Preserving For preserving use the fan cooking U oven function. Preserving jars • Only use commercially available preserving jars (preserving jars with a rubber ring and glass lid) for preserving. • Screw-top jars, jars with a bayonet fastening and metal containers are unsuitable.
-
Page 41: Cleaning And Care
Cleaning and Care Exterior of the Appliance Wipe the front of the appliance with a soft cloth dipped in warm soapy water. • Do not use scourers, caustic cleaners or abrasive items. • You can use commercially available cleaning agents on stainless steel fronts.
-
Page 42: Side Support Rails
Side Support Rails The side support rails on the left and right hand sides of the oven can be removed for cleaning the side walls. Removing the side support rails 1. Remove screw. 2. Pull the rail at the back away from the oven wall and pivot towards the front (1).
-
Page 43
Fitting the side support rails Take care when fitting the rails that the rounded ends of the guide rails are pointing forwards! 1. To replace, first insert and fit the rail at the front (1). 2. Pivot the rail towrds the back and insert (2). -
Page 44: Cleaning With Pyroluxe
Cleaning with Pyroluxe Warning! The oven becomes very hot during pyroluxe self-cleaning. Keep young children well away from the oven. Important: Before carrying out pyroluxe cleaning the oven must be completely emptied with the exception of the shelf support rails. Also remove the fat filter! If you are using the oven shelf runners obtainable as a special acces- sory, they must be removed before cleaning with pyroluxe.
-
Page 45: Oven Light
Oven Light Warning: Risk of electric shock! Prior to changing the oven light: – Switch off the oven! – Either remove or switch off the fuses in the fuse box. Replacing the oven light bulb/cleaning the glass 1. Remove the right shelf support rail. 2.
-
Page 46: Oven Door
Oven Door The oven door of your appliance may be removed for cleaning. Removing the oven door 1. Open the oven door completely. 2. Completely fold back the brass- coloured clamping lever on both door hinges (1). 3. Grip the oven door with both hands on the sidesand close it by about 3/ 4 (2) past its resistance.
-
Page 47: Oven Door Glass
Oven door glass The oven door is fitted with four sheets of glass set next to one an- other. The inner sheets can be removed for cleaning. Caution: The following steps are to be performed only when the oven door has been removed. If the glass is removed while the door is at- tached, the leighter weight may cause it to spring up and cause injury.
-
Page 48
Replacing the centre glass plates 1. From above, insert the centre plates obliquely into the retaining frame at the handle, one after another. 2. Lower the centre plates down and push them towards the lower edge of the door as far under the retain- ing frame as they will go. -
Page 49: What To Do If
What to do if ..the oven does not heat up? Check whether – the appliance has been switched on, – the time has been set, – all the necessary settings have been made, – the mains fuse (fuse box) has blown or the cooker circuit breaker (at the household power distribution box) has tripped.
-
Page 50
If you call in customer service to resolve a problem listed in these notes, or to rectify a problem caused by incorrect operation of the appliance, the customer service engineer’s visit will not be free of charge, even during the warranty period. Should you still have problems after reading this information, please contact your specialist dealer or customer service. -
Page 51: Technical Data
Technical Data Oven Interior Dimensions Height x Width x Depth 31 cm x 41 cm x 41 cm Capacity (usable capacity) 52 l Regulations, Standards, Directives This appliance meets the following standards: • EN 60 335-1 and EN 60 335-2-6 relating to the safety of electric appliances for household use and similar purposes and •…
-
Page 54: Index
Index Anti-tip device ….. . 10 Ready meals ……33 Repairs .
-
Page 55: Service
Service The section «What do I do if…“ lists some faults that you can remedy yourself. Look there first if a fault occurs. Is it a technical fault? Then contact your nearest customer service centre. (Addresses and tele- phone numbers can be found under «Customer Service Centres“.) Always prepare in advance for the discussion.
-
Page 56
AEG Hausgeräte GmbH Postfach 1036 D-90327 Nürnberg http://www.aeg.hausgeraete.de © Copyright by AEG 822 947 461-H-120302-07…
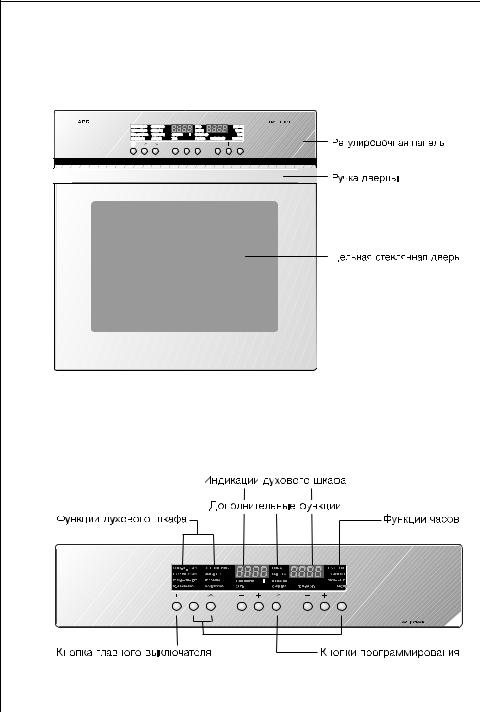
![]()
COMPETENCE B8300-1
Встраиваемый многорежимный духовой шкаф
Инструкция по эксплуатации

Уважаемая покупательница, уважаемый покупатель !
Пожалуйста, прочитайте внимательно настоящую “Инструкция по эксплуатации”.
Прежде всего обратите, пожалуйста, внимание на раздел “Указания по технике безопасности” на первых страницахц Пожалуйста, сохраните эту “Инструкция” для того, чтобы в дальнейшем к ней при необходимости обращаться. Если прибор перейдет к другому хозяину, передайте ему, пожалуйста, также и эту “Инструкция”.
Следующие символы помогут Вам при чтении “Инструкции”:
1 Указания по технике безопасности
Предупреждение: примечания, важные для Вашей безопасности или для работы прибора.
Внимание! примечания, помогающие избежать повреждений прибора.
Практические советы и рекомендации
Информация по экологичному использованию прибора
1. Эти цифры ведут Вас шаг за шагом при обслуживании прибора.
2. …
3. …
В случае возникновения проблем при эксплуатации прибора обращайтесь, пожалуйста, в наш СЕРВИСНЫЙ ЦЕНТР (адреса и телефоны Вы найдете в “перечне сервисных центров”).
См. по этому поводу также раздел “Сервисная поддержка”.
Напечатано на бумаге, изготовленной с учетом экологических требований.
От экологического мышления к экологическим поступкам…
2

Содержание
|
Техника безопасности . . . . . . . . . . . . . . . . . . . . . . . . . . . . . . . . . . . |
5 |
|
Утилизация отходов . . . . . . . . . . . . . . . . . . . . . . . . . . . . . . . . . . . . |
7 |
|
Описание прибора . . . . . . . . . . . . . . . . . . . . . . . . . . . . . . . . . . . . . . |
8 |
|
Общий вид . . . . . . . . . . . . . . . . . . . . . . . . . . . . . . . . . . . . . . . . . . . . |
8 |
|
Регулировочная панель . . . . . . . . . . . . . . . . . . . . . . . . . . . . . . . . . . . |
8 |
|
Основное оснащение духового шкафа . . . . . . . . . . . . . . . . . . . . . . |
9 |
|
Оснащение духового шкафа . . . . . . . . . . . . . . . . . . . . . . . . . . . . . . |
10 |
Перед первым использованием . . . . . . . . . . . . . . . . . . . . . . . . . . . 11 Установка времени суток . . . . . . . . . . . . . . . . . . . . . . . . . . . . . . . . . 11 Первое мытье . . . . . . . . . . . . . . . . . . . . . . . . . . . . . . . . . . . . . . . . . . 12
|
Управление духовым шкафом . . . . . . . . . . . . . . . . . . . . . . . . . . . . |
13 |
|
Электронное управление духовым шкафом . . . . . . . . . . . . . . . . . . |
13 |
|
Функции духового шкафа . . . . . . . . . . . . . . . . . . . . . . . . . . . . . . . . . |
14 |
|
Установка решетки и противня . . . . . . . . . . . . . . . . . . . . . . . . . . . . . |
19 |
|
Установка/снятие жирового фильтра . . . . . . . . . . . . . . . . . . . . . . . . |
20 |
|
Дополнительные функции . . . . . . . . . . . . . . . . . . . . . . . . . . . . . . . . . |
21 |
|
Функции часов . . . . . . . . . . . . . . . . . . . . . . . . . . . . . . . . . . . . . . . . . . |
27 |
|
Прочие функции . . . . . . . . . . . . . . . . . . . . . . . . . . . . . . . . . . . . . . . . |
34 |
|
Защитное устройство против случайного включения . . . . . . . . . |
35 |
|
Блокировка кнопок . . . . . . . . . . . . . . . . . . . . . . . . . . . . . . . . . . . |
36 |
|
Защитное выключение духового шкафа . . . . . . . . . . . . . . . . . . . |
37 |
|
Механическая блокировка дверцы . . . . . . . . . . . . . . . . . . . . . . . |
38 |
|
Практические советы и таблицы . . . . . . . . . . . . . . . . . . . . . . . . . . |
39 |
|
Выпечка . . . . . . . . . . . . . . . . . . . . . . . . . . . . . . . . . . . . . . . . . . . . . . . |
39 |
|
Таблица для выпечных изделий . . . . . . . . . . . . . . . . . . . . . . . . . |
42 |
|
Таблица для запеканок и запеченных блюд . . . . . . . . . . . . . . . . |
47 |
|
Таблица для замороженных готовых изделий . . . . . . . . . . . . . . |
48 |
|
Жарка . . . . . . . . . . . . . . . . . . . . . . . . . . . . . . . . . . . . . . . . . . . . . . . . . |
49 |
|
Таблица для жареных и тушеных блюд . . . . . . . . . . . . . . . . . . . |
51 |
3

|
Таблица для термощупа для мяса . . . . . . . . . . . . . . . . . . . . . . |
54 |
|
|
Гриль . . . . . . . . . . . . |
. . . . . . . . . . . . . . . . . . . . . . . . . . . . . . . . . . . . . |
55 |
|
Таблица для поджаривания на гриле . . . . . . . . . . . . . . . . . . . . . |
55 |
|
|
Биофункции . . . . . . . |
. . . . . . . . . . . . . . . . . . . . . . . . . . . . . . . . . . . . . |
57 |
|
Таблица для жарки при низких температурах . . . . . . . . . . . . . . . |
59 |
|
|
Приготовление йогурта . . . . . . . . . . . . . . . . . . . . . . . . . . . . . . . . |
60 |
|
|
Тесто . . . . . . . . . . . |
. . . . . . . . . . . . . . . . . . . . . . . . . . . . . . . . . . . . |
60 |
|
Сушка/вяление . . . |
. . . . . . . . . . . . . . . . . . . . . . . . . . . . . . . . . . . . |
61 |
|
Размораживание . . . . |
. . . . . . . . . . . . . . . . . . . . . . . . . . . . . . . . . . . . |
62 |
|
Таблица для размораживания . . . . . . . . . . . . . . . . . . . . . . . . . . . |
62 |
|
|
Консервирование . . . |
. . . . . . . . . . . . . . . . . . . . . . . . . . . . . . . . . . . . |
64 |
|
Мытье и уход . . . . . . |
. . . . . . . . . . . . . . . . . . . . . . . . . . . . . . . . . . . . |
66 |
|
Прибор снаружи . . . . |
. . . . . . . . . . . . . . . . . . . . . . . . . . . . . . . . . . . . |
66 |
|
Внутренняя камера духового шкафа . . . . . . . . . . . . . . . . . . . . . . . . |
66 |
|
|
Оснащение . . . . . . . . |
. . . . . . . . . . . . . . . . . . . . . . . . . . . . . . . . . . . . |
67 |
|
Жировой фильтр . . . . |
. . . . . . . . . . . . . . . . . . . . . . . . . . . . . . . . . . . . |
67 |
|
Опорные боковые решетки . . . . . . . . . . . . . . . . . . . . . . . . . . . . . . . |
68 |
|
|
Подсветка духового шкафа . . . . . . . . . . . . . . . . . . . . . . . . . . . . . . . |
69 |
|
|
Мытье духового шкафа . . . . . . . . . . . . . . . . . . . . . . . . . . . . . . . . . . . |
71 |
|
|
Дверца духового шкафа . . . . . . . . . . . . . . . . . . . . . . . . . . . . . . . . . . |
73 |
|
|
Стекло дверцы духового шкафа . . . . . . . . . . . . . . . . . . . . . . . . . . . |
74 |
|
|
Что делать, если … |
. . . . . . . . . . . . . . . . . . . . . . . . . . . . . . . . . . . . . |
76 |
|
Технические данные |
. . . . . . . . . . . . . . . . . . . . . . . . . . . . . . . . . . . . |
77 |
|
Размеры внутренней полости . . . . . . . . . . . . . . . . . . . . . . . . . . . . . . |
77 |
|
|
Требования, стандарты, предписания . . . . . . . . . . . . . . . . . . . . . . . |
77 |
|
|
Сервисная поддержка . . . . . . . . . . . . . . . . . . . . . . . . . . . . . . . . . . |
78 |
4

1 Техника безопасности
Электротехнические правила техники безопасности
•Подключение прибора может производиться только
уполномоченным на это специалистом.
•При возникновении неполадок или повреждении прибора: Выверните или отключите предохранители.
•По соображениям безопасности при мытье прибора воспрещается использовать приспособления для чистки паром или моющие средства, распыляемые при высоком давлении.
•Ремонт прибора может производиться только специалистами. Неквалифицированный ремонт может привести к возникновению значительной опасности. В случае необходимости произвести ремонт обращайтесь в авторизованный изготовителем сервисный центр.
Меры по обеспечению безопасности детей
•Никогда не оставляйте детей без присмотра во время работы прибора.
Техника безопасности при эксплуатации
•Настоящий прибор предназначен только для использования в домашнем хозяйстве, т.е. жарки, варки и выпечки пищевых продуктов.
•Соблюдайте осторожность при подключении электроприборов к электросети через находящиеся поблизости от прибора электророзетки. Провода подключения ни в коем случае не должны соприкасаться с горячими конфорками или быть зажатыми горячей дверцей духового шкафа.
•Предупреждение: Опасность ожога! Во время работы температура во внутренней камере духового шкафа очень высокая.
•Если в рецепт блюда, которое Вы готовите в духовом шкафу, входит алкоголь, это может привести к образованию легко воспламеняемой спирто-воздушной смеси. В этом случае соблюдайте осторожность при открывании дверцы духового шкафа. Проследите, чтобы поблизости не было никаких источников воспламенения, искр или огня.
5

Так Вы избежите повреждений прибора
•Не выстилайте духовой шкаф алюминиевой фольгой и не ставьте на его днище противней, кастрюль и т.п., поскольку в противном случае эмаль духового шкафа будет повреждена в результате образующегося концентрированного нагрева.
•Фруктовый сок, капнувший с противня, оставляет невыводимые пятна. Для очень сочных пирогов используйте универсальный противень.
•Не подвергайте открытую дверцу духового шкафа никакой нагрузке.
•Ни в коем случае не лейте воду прямо в горячий духовой шкаф. Это может привести к повреждению эмали.
•Применение физической силы, особенно при обращении с краями фронтального стекла, может привести к тому, что стекло разобьется.
•Не храните в духовом шкафу никаких горючих предметов. При включении духового шкафа они могут воспламениться.
•Не оставляйте в духовом шкафу влажных пищепродуктов. Это может привести к повреждению эмали.
6

2 Утилизация отходов
Утилизация упаковочных материалов
Все использованные материалы могут быть переработаны и вторично использованы.
Синтетические материалы обозначены следующим образом:
•>PE< для полиэтилена, напр., для внешней пленки или пакетов внутри.
•>PS< для вспененного полистирола, напр., в частях мягкой прокладки, не содержит фторхлоруглеводородов.
|
Выбрасывание прибора |
|
|
1 |
Предупреждение: Чтобы выброшенный отслуживший прибор |
|
не представлял никакой опасности, перед тем, как его |
выбросить, позаботьтесь, пожалуйста, о том, чтобы он был приведен в состояние невозможности дальнейшего использования.
Вытащите штепсель электрического подключения прибора, отрежьте сетевой кабель.
Из экологических соображений старые отслужившие приборы следует утилизовать в соответствии с действующими правилами для такого типа приборов.
• Прибор нельзя выбрасывать вместе с обычным бытовым мусором.
• Информацию о датах забора подобного особого мусора или о местах его складирования Вы можете получить в местном управлении коммунального хозяйства или в районной администрации.
7
|
Описание прибора |
|
Общий вид |
|
Регулировочная панель |
|
8 |

Кнопка главного выключателя
Для включения и выключения прибора в целом.
|
Кнопка главного выключателя приборов с |
|
|
металлической лицевой поверхностью |
|
|
3 |
В нижеследующем тексте и в изображениях |
|
кнопка главного выключателя изображается |
символом N.
Основное оснащение духового шкафа
Отверстие для выхода пара из духового шкафа
Пар выводится из духового шкафа через отверстие между верхнем краем дверцы и регулировочной панелью.
9

Оснащение духового шкафа
Следующие детали входят в комплект поставки:
Универсальная решетка
для посуды, форм для выпечки, для жарки и гриля
Глубокий противень
Предназначен для жарки или использования в качестве поддона для сбора жира
Противень
для пирогов и печенья
Термощуп для мяса
Для точного определения состояния готовности мяса в духовом шкафу.
10
![]()
Перед первым использованием
Установка времени суток
|
3 |
Духовой шкаф работает только при установленном времени |
|
суток. |
После подключения к электросети или после временного прекращения подачи тока светится индикация “12.00” и мигает индикация.
1. Установите текущее время суток с помощью кнопок + или -.
2. Подождите приблизительно
5 секунд.
|
Мигание прекращается и |
|
|
появляется индикация |
|
|
установленного времени суток. |
|
|
Прибор готов к эксплуатации. |
|
|
3 |
Точность хода встроенных в прибор часов зависит от |
|
стабильности частоты электросети. |
11
Первое мытье
|
Перед тем, как в первый раз пользоваться духовым шкафом, |
|
|
его следует основательно вымыть. |
|
|
1 |
Внимание: Не используйте никаких активных химических |
|
моющих средств или скребков и жестких мочалок! Вы можете |
|
|
повредить ими поверхность прибора. |
|
|
3 |
Совет: Для ухода за металлическими лицевыми поверхностями |
применяйте имеющиеся в продаже средства для ухода за металлическими поверхностями.
Включите прибор с помощью кнопки главного выключателя. Символ над кнопкой начинает светиться.
3. Один раз нажмите на кнопку программирования функций духового шкафа X.
Появляется индикация и включается подсветка духового шкафа.
4.Выньте из духового шкафа все вспомогательное оснащение и опорные боковые решетки для противней и промойте их теплым раствором щелочного моющего средства.
5.Также и сам духовой шкаф вымойте теплым раствором щелочного моющего средства и затем насухо вытрите.
6.Лицевую поверхность прибора протрите влажным куском материи.
7.После мытья выключите подсветку духового шкафа с помощью кнопки программирования Y.
12

Управление духовым шкафом
Электронное управление духовым шкафом
3 Общие указания
•Всегда начинайте с включения прибора с помощью кнопки главного выключателя N.
•Когда загорается индикация установленной функции, духовой шкаф начинает нагреваться или начинается отсчет запрограммированного времени.
•Внутреннее освещение духового шкафа включается, когда установлена какая-либо функция.
•Выключайте прибор с помощью кнопки главного выключателя N.
13

Функции духового шкафа
|
Духовой шкаф имеет следующие функции: |
|
|
3 |
При включении функций “соло-горячий воздух”, “двусторонний |
|
нагрев” и “инфражарка” автоматически производится |
быстрый нагрев. Это обеспечивает максимально быстрое достижение запрограммированной температуры.
Функция “соло-горячий воздух”
Предложение температуры: 150 °C
Для выпечки пирогов на одном уровне и для выпечных изделий, у которых должна получиться особенно поджаристая и хрустящая нижняя корочка. К таким выпечным изделиям относятся пицца, луковый пирог, ватрушка и т. п.
Температуру духового шкафа следует устанавливать на 20-40 °C ниже, чем для функции “двусторонний нагрев”.
Дополнительно к функции двустороннего нагрева включается вентилятор.
Функция “мультигорячий воздух”
Предложение температуры: 150 °C
Для Выпечки одновременно на нескольких уровнях, до трех уровней.
Температуру духового шкафа следует устанавливать на 20-40 °C ниже, чем для функции “двусторонний нагрев”.
Работает нагревательный элемент задней стенки духового шкафа и, кроме того, включен вентилятор.
Функция “двусторонний нагрев”
Предложение температуры: 200 °C
Для Выпечки и Жарки на одном уровне.
Работают верхний и нижний нагревательные элементы.
Функция “инфражарка”
Предложение температуры: 180 °C
Для жарки больших кусков мяса или птицы на одном из уровней. Эта функция предназначена также для панированных изделий и запеканок.
Нагревательный элемент гриля и верхний нагрев работают попеременно с вентилятором.
14

Функция большого гриля
Предложение температуры: 300 °C
Для приготовления на гриле продуктов плоской формы в больших количествах, таких, напр., как бифштексы, шницели, рыба и хлеб для тостов.
Работают верхний нагрев и нагревательный элемент гриля.
Функция малого гриля
Предложение температуры: 300 °C
Для приготовления с помощью гриля продуктов плоской формы, которые кладутся на центральную часть решетки, таких, напр., как бифштексы, шницели, рыба или хлеб для тостов.
Работает нагревательный элемент гриля.
Функция поддержания блюд горячими
Установка температуры: 80 °C Для поддержания блюд горячими.
Работают верхний и нижний нагревательные элементы.
Функция размораживания
Установка температуры: 30 °C
Для частичного и полного размораживания напр., тортов, масла, хлеба, фруктов или других замороженных продуктов.
Работа этой функции осуществляется только с помощью вентилятора, нагревательные элементы при этом не включены.
Функция “Нижний нагрев”
Предложение температуры: 150 °C
Для доведения до готовности выпечных изделий, у которых должна быть хрустящая нижняя корочка.
Работает нижний нагревательный элемент.
Функция внутренней подсветки
Для включения и выключения подсветки духового шкафа.
Во время работы духового шкафа внутренняя подсветка включается автоматически.
15

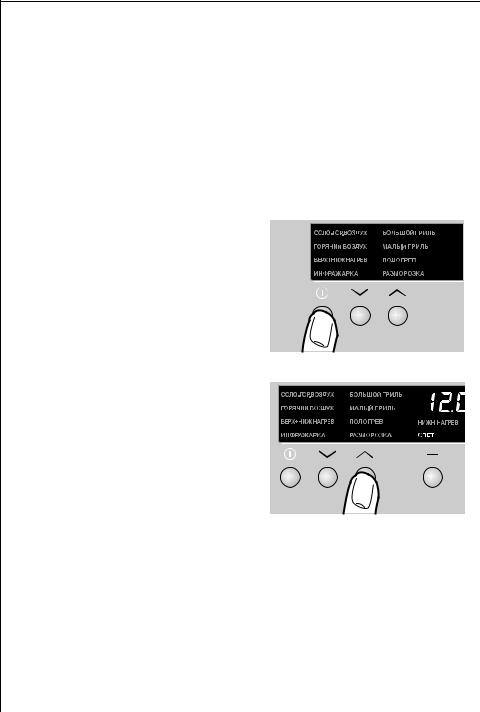
Включение функций духового шкафа
1. Включите прибор с помощью кнопки главного выключа- теля N.
2. Нажимайте на кнопки программирования X или Y до тех пор, пока не появится индикация нужной функции.
На индикаторном поле температуры появляется предложение подходящей для данной функции температуры.
Лампа контроля температуры светится, пока нагревается духовой шкаф.
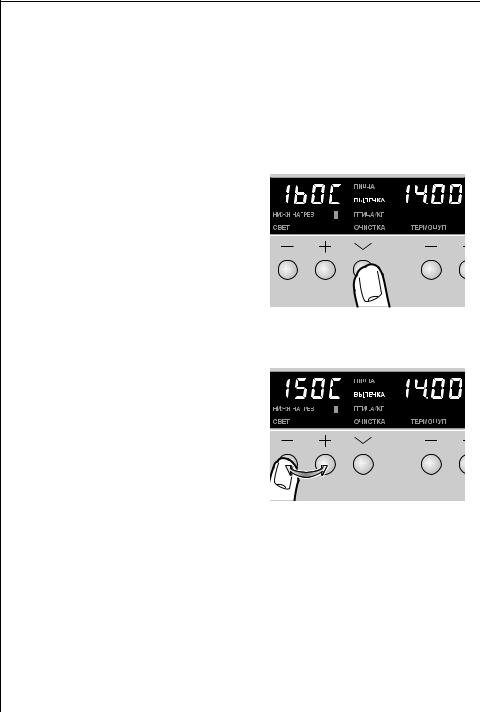
Изменение температуры в духовом шкафу
Чтобы повысить или понизить температуру нагрева, нажимайте на кнопки + или -.
Изменение температуры происходит с шагом в 5 °C.
16

Изменение функции духового шкафа
Нажимайте на кнопки X или Y до тех пор, пока не появится индикация нужной функции.
Выключение духового шкафа
Чтобы выключить духовой шкаф, нажимайте на кнопки программирования X или Y до тех пор, пока не перестанут светиться индикации функций.
3 Охлаждающий вентилятор
Как только духовой шкаф начинает нагреваться, автоматически включается вентилятор, чтобы не нагревались внешние поверхности прибора. После выключения духового шкафа вентилятор еще некоторое время продолжает работать, чтобы охладить прибор, а затем автоматически отключается.
17

Включение и выключение подсветки духового шкафа
Для включения подсветки духового шкафа не обязательно вводить в действие какую-либо функцию.
1. Включите прибор с помощью кнопки главного выключа-
òåëÿ N.
2. Один раз нажмите на кнопку программирования функций духового шкафа X.
Появляется индикация и включается подсветка духового шкафа
3.Один раз нажмите на кнопку программирования функций духового шкафа Y.
Подсветка духового шкафа выключена.
18

Установка решетки и противня
Решетка слева и справа снабжена направляющими стержнями, которые всегда должны быть обращены вниз.
Установка решетки
Установите решетку таким образом, чтобы оба направляющих стержня были обращены вниз. Таким образом установите решетку на шинах устройства для выдвижных решеток, чтобы оба отверстия попали на стопорные болты шин.
Установка противня, установка универсального противня
Установите противни таким образом, чтобы выступ защиты от выскальзывания был обращен назад. Таким образом установите противни на шинах устройства для выдвижных решеток, чтобы оба отверстия попали на передние стопорные болты шин.
Установка решетки и противня
При совмещении универсального противня и решетки насадите решетку точно на углубления в противне.
|
3 |
Чтобы облегчить укладывание выдвижной части при разном |
|
уровне выдвижения шин, положите выдвижную часть на шины |
сзади, задвиньте ее до упора, а потом опустите ее на стопорные болты спереди.
19

Установка/снятие жирового фильтра
Жировой фильтр предназначен для защиты нагревательного элемента на задней стенке внутренней камеры духового шкафа.
Установка жирового фильтра
Возьмите жировой фильтр за ручку и установите оба крепления сверху вниз в отверстие на задней стенке духового шкафа (вентиляционное отверстие).
Снятиe жирового фильтра
Возьмите жировой фильтр за ручку и движением вверх выньте крепления из отверстий.
20
![]()
Дополнительные функции
|
Функция для приготовления пиццы: ПИЦЦА |
|
|
Для выпекания готовых блюд из морозильной камеры, как |
|
|
например, пицца, лазанья, гратины и картофель фри. |
|
|
При применении этой дополнительной функции можно обойтись |
|
|
без обычно рекомендуемого предварительного нагрева |
|
|
духового шкафа. |
|
|
3 |
Следуйте указаниям изготовителя полуфабрикатов. |
|
Устанавливайте температуру духового шкафа как для функций |
“горячий воздух”.
1. Нажимайте на кнопку программирования дополнительных функций Y до тех пор, пока не появится индикация функции.
На индикаторном поле температуры появится предложение температуры “200 °C”.
2. Нажатием на соответствующие кнопки + или — можно на
10 °C повысить или понизить предложенную температуру.
|
3 |
Картофель фри и продукты этого типа во время приготовления |
|
следует переворачивать (2-3 раза). |
21
|
Функция для пирогов: ПИРОГИ |
|
|
Для выпечки полуфабрикатов различных выпечных изделий. При |
|
|
применении этой дополнительной функции можно обойтись без |
|
|
обычно рекомендуемого предварительного нагрева духового |
|
|
шкафа. |
|
|
3 |
Следуйте указаниям изготовителя полуфабрикатов. |
|
Устанавливайте температуру духового шкафа как для функций |
“горячий воздух”.
1. Нажимайте на кнопку программирования дополнительных функций Y до тех пор, пока не появится индикация функции.
На индикаторном поле температуры появится предложение температуры “160 °C”.
2. Нажатием на соответствующие кнопки + или — можно на
10 °C повысить или понизить предложенную температуру.
22
Функция приготовления птицы: ПТИЦА/КГ
Для жарки целой птицы в автоматическом режиме, при котором Вам следует лишь установить вес тушки.
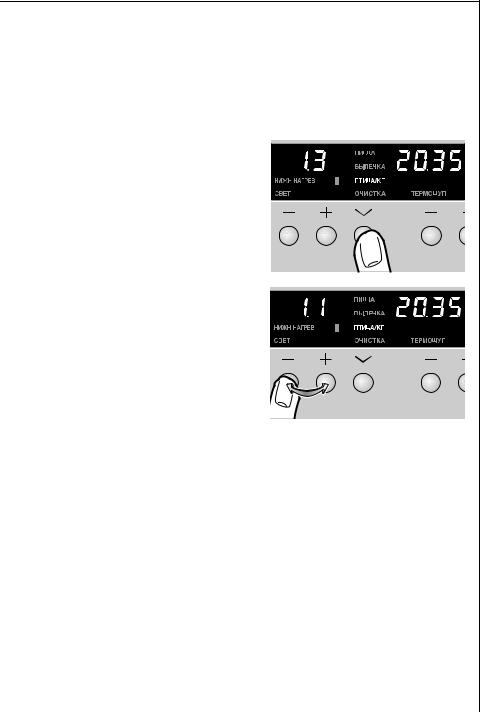
1.Поставьте подготовленную для жарки в духовом шкафу и положенную грудкой вниз в латку для жарки птицу на решетку и вставьте решетку на первый уровень снизу.
2.Нажимайте на кнопку програм-
мирования дополнительных функций Y до тех пор, пока не появится индикация функции.
3. В течение минуты нажимайте на соответствующие кнопки + или -, чтобы изменить указанный вес птицы (0,5 — 2,9).
|
3 |
При нажатии на кнопку програм- |
|
мирования функций часов Y |
появляется индикация времени, требуемого для приготовления блюда.
4.Приблизительно через 2/3 общего времени жарки прозвучит акустический сигнал, означающий, что нужно перевернуть птицу.
5.По окончании времени жарки прозвучит акустический сигнал. Духовой шкаф автоматически отключается.
Мытье
Функция, облегчающая мытье духового шкафа.
С помощью этой функции Вы можете нагреть духовой шкаф до температуры, которая является оптимальной для проведения мытья духового шкафа с помощью специальных моющих средств.
Во время действия этой функции включены круговой нагревательный элемент и вентилятор.
23
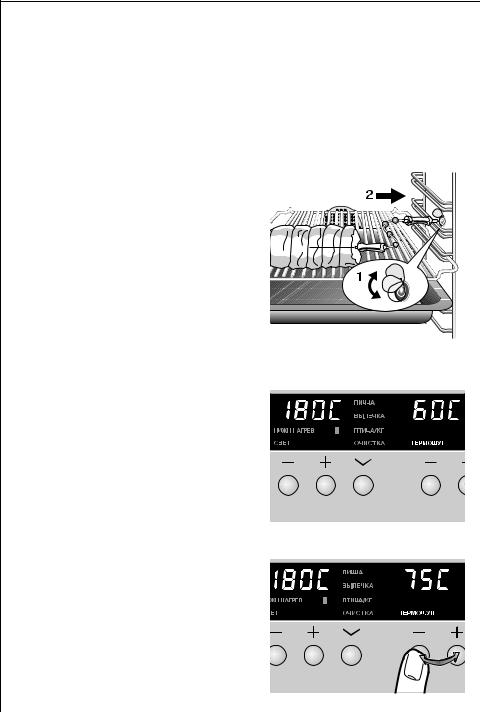
Термощуп для мяса
Для безошибочно точного выключения духового шкафа после достижения установленной внутренней температуры жаркого.
|
1 |
Внимание: Можно пользоваться только прилагающимся к |
|
прибору термощупом для мяса! В случае необходимости |
замены его можно заменить только на такую же деталь нашего производства!
1. Острие термощупа для мяса следует полностью вставить в приготавливаемое блюдо таким образом, чтобы оно находилось в середине блюда.
2. Штекер термощупа для мяса до упора вставьте в розетку на боковой стенке духового шкафа.
Светится индикация.
3.Установите подходящую функцию духового шкафа и температуру.
На индикаторном поле температуры слева появляется
предложение подходящей для данной функции температуры. На табло времени справа появляется индикация ’60 C’, которая является предложением
температуры жаркого.
4. Установите желаемую температуру жаркого с помощью кнопок программирования времени + или -.
24
 Loading…
-
Инструкции
-
Духовые шкафы
- AEG

Инструкция к AEG KSR892220M
PDF, 686.55 Кб
Информация о приборе
PDF, 523.29 Кб
Схема встраивания
PNG, 193.69 Кб

Инструкция к AEG BER455120B
PDF, 479.69 Кб
Технические данные
PDF, 320.84 Кб
Класс энергопотребления
PDF, 592.34 Кб
Схема встраивания
JPG, 65.41 Кб

Инструкция к AEG bem455120m
PDF, 468.39 Кб
Схема встраивания
JPG, 65.91 Кб

Инструкция к AEG BER451110B
PDF, 489.58 Кб
Информация о приборе
PDF, 571.33 Кб
Схема встраивания
PNG, 231.51 Кб

Схема встраивания
JPG, 65.8 Кб
Инструкция к AEG BCR546350B
PDF, 526.31 Кб

Инструкция к AEG KMK768080M
PDF, 516.81 Кб
Схема встраивания с размерами
JPG, 104.32 Кб

Инструкция к AEG BCR542350B
PDF, 540.05 Кб
Информация о приборе
PDF, 537.76 Кб
Схема встраивания
PNG, 200.41 Кб

Инструкция к AEG BCR542350W
PDF, 540.05 Кб
Информация о приборе
PDF, 509.54 Кб
Схема встраивания
PNG, 200.41 Кб

Схема встраивания
JPG, 65.43 Кб
Инструкция к AEG BCR546350W
PDF, 526.3 Кб

Инструкция к духовому шкафу AEG BPK748380B
PDF, 888.83 Кб
Схема встраивания
JPG, 70.72 Кб

Инструкция по эксплуатации
PDF, 220.47 Кб
Схема встраивания
JPG, 125.2 Кб

Инструкция по эксплуатации
PDF, 682.95 Кб
Схема с размерами
JPG, 75.34 Кб
Схема встраивания
JPG, 73.63 Кб

Инструкция к духовому шкафу AEG BPK748380M
PDF, 888.84 Кб
Схема встраивания
JPG, 68.55 Кб

Инструкция к AEG KME768080M
PDF, 516.81 Кб
Схема встраивания с размерами
JPG, 104.32 Кб

Инструкция по эксплуатации
PDF, 512.74 Кб

Инструкция по эксплуатации
PDF, 751.55 Кб
Схема встраивания
JPG, 105.66 Кб
Посмотреть инструкция для AEG Competence бесплатно. Руководство относится к категории печи, 159 человек(а) дали ему среднюю оценку 8.3. Руководство доступно на следующих языках: английский. У вас есть вопрос о AEG Competence или вам нужна помощь? Задайте свой вопрос здесь
Не можете найти ответ на свой вопрос в руководстве? Вы можете найти ответ на свой вопрос ниже, в разделе часто задаваемых вопросов о AEG Competence.
Правильно ли, что вентилятор продолжает работать, когда духовка уже выключена?
Это правильно. Вентилятор системы охлаждения продолжает работать пока температура духовки не упадет до необходимой.
Что происходит при использовании функции «гриль»?
При использовании функции гриля верхний элемент духовки будет нагреваться. Режим гриля используется, чтобы придать блюдам аппетитную темную корку.
Обязательно ли предварительно разогревать духовку AEG?
Для лучшего приготовления блюда печь всегда нужно предварительно разогревать до рекомендуемой температуры.
Как очистить духовку от пригоревшего жира?
Для удаления пригоревшего жира лучше всего подходит спрей для чистки духовки. Распылите его внутри духовки и оставьте на 30 минут. Затем вымойте духовку теплой водой.
Какой способ лучше всего подходит для очистки решетки в духовке?
Решетку духовки рекомендуется чистить под струей горячей воды при помощи губки для мытья посуды.
Инструкция AEG Competence доступно в русский?
К сожалению, у нас нет руководства для AEG Competence, доступного в русский. Это руководство доступно в английский.
Не нашли свой вопрос? Задайте свой вопрос здесь