-
Contents
-
Table of Contents
-
Troubleshooting
-
Bookmarks
Quick Links
DVD Recorder
DMR-ES35V
Model No.
GN GC GCS
Region number supported by
this unit
Region numbers are allocated to DVD
players and DVD-Video according to where
they are sold.
For Asia
≥The region number of this unit is «3».
≥The unit will play DVD-Video marked with
labels containing «3» or «ALL».
Example:
3
ALL
For Australia and New Zealand
≥The region number of this unit is «4».
≥The unit will play DVD-Video marked with
labels containing «4» or «ALL».
Example:
4
ALL
For the Middle East
≥The region number of this unit is «2».
≥The unit will play DVD-Video marked with
labels containing «2» or «ALL».
Example:
2
ALL
Dear customer
Thank you for purchasing this product. For
optimum performance and safety, please read
these instructions carefully.
Before connecting, operating or adjusting this
product, please read the instructions completely.
Please keep this manual for future reference.
RQTV0136-1
2
3
4
2
3
4
2
3
4
Summary of Contents for Panasonic Diga DMR-ES35V

50
RQTV0140
Перемещение (копирование)
При подключении к входным гнездам AV2 или DV IN на
фронтальной панели аппарата.
≥Вы можете также использовать гнёзда AV1 на задней панели
устройства.
Перед подключением каких-либо кабелей убедитесь сначала, что
питание аппарата и внешних устройств отключено. После этого,
соединив кабели, включите аппарат и внешние устройства.
Примечание
≥Если другое оборудование имеет монофонический аудиовыход,
подключитесь к L/MONO. (При подключении к L/MONO
записываются как правый, так и левый каналы.)
≥При подключении к разъему S VIDEO IN изображение отличается
лучшим качеством, чем при подключении к VIDEO IN.
[1]
Для выбора режима записи нажмите
[REC MODE].
(
l 18)
[2]
Во время остановки
Нажмите [CH,
W, X] или [INPUT SELECT], чтобы
выбрать входной канал подключенного
оборудования.
≥Выберите AV1, AV2 или DV.
Выполните описанные выше шаги 1–2.
[3]
Начните воспроизведение на внешнем
устройстве.
[RAM] [-R] [-R]DL] [-RW‹V›] [+R] [+R]DL] [+RW]
≥Также можно производить запись в гибком режиме (FR).
Следуйте указаниям в разделе “Режим гибкой записи (FR)”
(
l 22) после этого пункта. (Не нужно переходить к пункту 4).
[4]
Нажмите [
¥, REC] в точке, с которой хотите
начать запись.
Выполните описанные выше шаги 1–2.
[3]
Нажмите [
1, PLAY].
≥Начните воспроизведение видеокассеты и найдите начальную
точку записи.
[4]
Нажмите [
;, PAUSE], а затем нажмите [¥, REC].
≥Переведите аппарат в режим ожидания записи.
[5]
Начните воспроизведение на внешнем устройстве.
[6]
Нажмите [
;, PAUSE] в точке, с которой хотите
начать запись.
∫ Чтобы пропустить нежелательные фрагменты
Нажмите [
;, PAUSE], чтобы приостановить запись. (Чтобы
возобновить запись, нажмите повторно.)
∫ Чтобы прекратить запись
Нажмите [
∫, STOP].
К вашему сведению
≥Почти все продаваемое программное обеспечение для видео и
DVD оснащено защитой от незаконного копирования. Копировать
такое программное обеспечение нельзя.
Запись с внешнего устройства
DVD/VHS
RETURN
ENTER
FU
NC
TIO
NS
CH
PLAY
PAUSE
STOP
REC MODE
REC
DRIVE
SELECT
INPUT
SELECT
2
ENTER
∫
RETURN
FUNCTIONS
1
;
DRIVE
SELECT
INPUT
SELECT
Í
CH,
W, X
µ
REC MODE
(2)
(1)
(4)
(3)
S VIDEO IN
AV 2
VIDEO IN
/MONO AUDIO R
L
(1) Кабель S Video(не входит в комплект)
(2) Аудио-/видеокабель (не входит в комплект)
A Желтый (ВИДЕО)
B Белый (L)
CКрасный (R)
(3) Кабель DV
(IEEE 1394 4-штыревой, не входит в комплект)
(4) Аппаратура воспроизведения
Подготовка
≥Выберите на телевизоре канал просмотра аппарата (например, вход AV).
DVD
[RAM] [-R] [-R]DL] [-RW‹V›] [+R] [+R]DL] [+RW]
≥[RAM] Снимите защиту (диск
l 55, кассета l 55).
≥Нажатием [DRIVE SELECT] выберите DVD.
≥При записи двуязычных программ
[RAM]
Если на оборудовании выбран и M 1, и M 2, можно выбрать тип
звука при воспроизведении.
[-R] [-R]DL] [-RW‹V›] [+R] [+R]DL] [+RW]
Выберите на подключенном оборудовании либо M 1, либо M 2.
(Переключать тип звука во время воспроизведения невозможно.)
≥Если внешнее оборудование дает выходной сигнал NTSC,
измените “Система ТВ” в меню “Нач. наст.” на “NTSC” (
l 59).
≥Данный аппарат не может записывать диски, содержащие
сигналы PAL и NTSC.
VHS
≥Вставьте видеокассету с язычком защиты от ненамеренного
стирания. (
l 17)
≥Нажатием [DRIVE SELECT] выберите VHS.
∫ DVD
∫ VHS
M6720(EE_ru)_Russian.book 50 ページ 2006年4月19日 水曜日 午後1時35分

46
RQTV0140
Перемещение (копирование)
[RAM] [-R] [-R]DL] [-RW‹V›] [+R] [+R]DL] [+RW]
Записанные на ленте программы можно перемещать (копировать) на
диск из точки
° воспроизведения как из точки начала перемещения
(воспроизведения) ленты.
° При установке режима записи на “FR” (
l ниже), а “Огр. вр. коп-я”
на “Выкл.” (
l справа), можно перенести (скопировать) всю
кассету от начала до конца.
[1]
Нажатием [DRIVE SELECT] выберите VHS.
[2]
Во время остановки DVD и VHS
Нажмите [FUNCTIONS].
[3]
Выберите вариант “Копировать” с помощью [
3,
4] и нажмите [ENTER].
[4]
Задайте направление
перемещения
(копирования).
≥Установите “источник” в
состояние “VHS”.
≥Если вы не собираетесь изменять направление перемещения
(копирования), нажмите [
4], а потом перейдите к шагу 5.
∫ Чтобы изменить настройку
(1)Убедитесь, что выбрано “Направл. копир.”, и нажмите [
1].
(2)Убедитесь, что выбран “источник”, и нажмите [ENTER].
(3)Нажмите [
3,4], чтобы выбрать вариант “VHS”, и нажмите
[ENTER].
≥Если “источник” установлен на “VHS”, в пункте
“Назначение” автоматически выбирается “DVD”.
(4)Нажмите [
2].
(5)Нажмите [
4].
[5]
Установите режим
записи.
≥Если вы не собираетесь
изменять режим записи, нажмите
[
4], а потом перейдите к шагу 6.
∫ Чтобы изменить настройку
(1)Убедитесь, что выбрано “Режим копирования”, и нажмите [
1].
(2)Убедитесь, что выбран “Режим записи”, и нажмите [ENTER].
(3)Выберите режим записи (XP, SP, LP, EP или FR) с помощью
[
3, 4] и нажмите [ENTER].
≥О режиме FR (
l справа)
(4)Нажмите [
2].
(5)Нажмите [
4].
[6]
Задайте временной
предел.
≥Если вы не собираетесь изменять
время записи, нажмите [
4], а
потом перейдите к шагу 7.
∫ Чтобы изменить настройку
(1)Убедитесь, что выбрано “Время копир.”, и нажмите [
1].
(2)Убедитесь, что выбран вариант “Огр. вр. коп-я”, и нажмите [ENTER].
(3)Выберите настройку времени (“Вкл.” или “Выкл.”) с помощью
[
3, 4] и нажмите [ENTER].
≥Если вы выбрали “Выкл.”, перейдите далее к шагу (6).
(4)Нажмите [
4], чтобы выбрать вариант “Время копир.”, и
нажмите [ENTER].
(5)Нажмите [
2, 1], чтобы выбрать “Час.” и “Мин.”, и нажмите
[
3, 4], чтобы выбрать время записи, а затем нажмите [ENTER].
≥Время записи можно задать также цифровыми кнопками.
≥Максимальное время записи 8 часов.
(6)Нажмите [
2].
(7)Нажмите [
4].
[7]
Убедитесь, что выбран
“Начать копир.”, и
нажмите [ENTER].
≥Появится экран подтверждения.
[8]
Выберите вариант “Да” с
помощью [
2] и нажмите
[ENTER].
[-R] [-R]DL] [-RW‹V›] [+R] [+R]DL]
Нажмите [
2, 1], чтобы
выбрать “Koпиp. и
финaлизац.” или “Тoлькo
копиpoваниe” , а потом
нажмите [ENTER].
≥Начнется перемещение
(копирование).
≥Перемещение (копирование) автоматически останавливается,
когда кассета заканчивается, оставшееся пространство на
диске заполняется, либо когда начинается запись по таймеру.
(На телеэкране появляется сообщение, а через несколько
секунд оно исчезает.)
≥Если выбрано “Копир. и финализaц”;
После завершения диски будут пригодны только для
воспроизведения, но их также можно будет
воспроизводить на другой аппаратуре DVD.
Тем не менее, дальнейшая запись и редактирование будут
невозможны.
≥Если копирование выполняется не полностью вследствие
недостатка свободного места на диске и т.п., финализация
диска не начинается.
∫ Прерывание перемещения (копирования)
Нажмите и удерживайте [RETURN] примерно на 3 секунды или более.
≥Однако остановить финализацию после её начала невозможно.
∫ Перемещение (копирование) GUI
(Графический интерфейс
пользователя) (VHS
l DVD)
Подготовка
≥Выберите на телевизоре канал просмотра аппарата (например,
вход AV).
VHS (Источник записи)
≥Нажатием [DRIVE SELECT] выберите VHS.
≥Вставьте видеокассету с программой, которая будет
копироваться. (
l 17)
≥Нажмите [1, PLAY] для воспроизведения видеокассеты, а
потом нажмите [AUDIO], чтобы выбрать тип звука, который вы
хотите записать.
≥Остановите ленту в точке, в которой вы хотите начать
воспроизведение.
DVD (Назначение записи)
≥Нажатием [DRIVE SELECT] выберите DVD.
≥[RAM] Снимите защиту. (диск
l 55, кассета l 55)
≥Вставьте диск и убедитесь в наличии достаточного свободного
пространства для записи на него. (
l 17, 36)
≥Выберите режим записи. (
l 18)
Настройки (
l 59, Система ТВ)
≥При перемещении (копировании) ленты NTSC на DVD
— Установите настройку “Система ТВ” пункта “Соединение” в
меню “Нач. наст.” в состояние “NTSC”.
Убедитесь, что вставленный диск имеет видео содержание
только в системе NTSC.
≥При перемещении (копировании) ленты PAL на DVD
— Установите настройку “Система ТВ” пункта “Соединение” в
меню “Нач. наст.” в состояние “PAL”.
Убедитесь, что вставленный диск имеет видео содержание
только в системе PAL.
∫О режиме FR
Если “Орг. вр. коп-я” на шаге 6 (
l выше) установлено в
состояние “Выкл.”:
≥Режим копирования автоматически выбирается путем
изменения оставшейся емкости диска для перемещения
(копирования) только записанных частей видеокассеты (не
записанные части записываться не будут).
≥Если нажать [ENTER] для перемещения (копирования), то перед
фактическим началом перемещения (копирования) лента
автоматически быстро перематывается вперед до конца, а
затем быстро перематывается на начало. Перемещение
(копирование) может занять некоторое время. Если остающаяся
емкость диска недостаточна, перемещение (копирование) будет
прекращено посереzдине.
≥При обнаружении каждого индексного сигнала ленты запись
разделяется на титры.
Если “Орг. вр. коп-я” на шаге 6 (
l выше) установлено в
состояние “Вкл.”:
≥Режим записи автоматически определяется путем оценки
оставшегося для перемещения (копирования) места на диске,
эквивалентного установке времени записи с исходной точки
перемещения (копирования) на видеокассету (не записанные
части записываться не будут).
≥Запись не разделяется на титры.
Копирование
Аннулир. все
Направл. копир.
VHS
DVD
Огр. вр. коп-я
Выкл.
Режим копирования
VHS-Видео
SP
Размер диска назнач.: 2 :00
Копирование
К
К
Аннулир. все
Направл. копир.
VHS
DVD
Огр. вр. коп-я
Выкл.
Режим копирования
VHS-Видео
SP
Размер диска назнач.:
2 :00
Время копир.
Выкл.
Копирование
Аннулир. все
Направл. копир.
Нажмите ENTER, чтобы начать копирование.
Режим копирования
Время копир.
VHS
DVD
Начать копир.
RETURN
ENTER
1:15
VHS-Видео
SP
Haчaть тoлькo кoпиpoвaниe.
Bocпpoизвeдeниe диcкa нa дpyгиx
пpoигpывaтeляx DVD нeвoзмoжнo.
Финaлизaция пoзвoляeт вocпpoизвoдить диcк нa
дpyгиx пpoигpывaтeляx DVD.
Зaпиcь пo тaймepy вo вpeмя.
зтoй oпepaции нe paбoтaeт.
Koпиp. и финaлизaц.
Toл
ькo кoпиpoвaниe
M6720(EE_ru)_Russian.book 46 ページ 2006年4月19日 水曜日 午後1時35分
 10:58
10:58
Oddity Archive: Episode 112.5 – Ben’s Junk: DVD Recorder (Panasonic DMR-E55)
 10:02
10:02
PANASONIC DMR-ES35V DVD/VCR RECORDER — HOW TO RECORD A DVD
 35:29
35:29
Panasonic DMR EZ48V DVD/VHS recorder U80 and U81 faults cured.
 06:08
06:08
HOW TO RECORD VHS TO DVD WITH PANASONIC DVD VCR COMBO RECORDER DMR-ES46V WITH HDMI OUTPUT
 04:13
04:13
Panasonic DMR DVD and VCR Recorder
 08:52
08:52
Panasonic DMR ES35V demo of working condition
 02:42
02:42
Copying my VHS tapes to DVD
europe.com На ч а ло эк сп лу ат аци и Запи сь В о с п роиз…
Dvd рекордер, Dmr-es35v, Уважаемый покупатель
- Изображение
- Текст
Web Site: http://www.panasonic-europe.com
На
ч
а
ло
эк
сп
лу
ат
аци
и
Запи
сь
В
о
с
п
роиз
в
е
д
е
ние
Редак
ти
рован
и
е
Пе
р
е
ме
щ
е
н
и
е
(к
опи
ро
ва
ни
е)
Об
ычн
ы
е
фу
нк
ци
и
С
п
ра
во
чн
ые
ма
те
р
и
алы
Инструкция по эксплуатации
DVD Рекордер
Модель №
DMR-ES35V
Уважаемый
покупатель!
Благодарим вас за приобретение нашего
изделия. Для достижения оптимальных
характеристик и безопасности внимательно
прочтите настоящую инструкцию.
Перед тем как подключать, использовать или
настраивать настоящее изделие, полностью
прочтите инструкцию.
Сохраните это руководство для дальнейших
справок.
Региональный номер,
поддерживаемый данным аппаратом
Региональные номера присваиваются
проигрывателям DVD и DVD-Video в
соответствии с местом их продажи.
≥Региональный номер данного аппарата – “5”.
≥Аппарат воспроизводит DVD-Video,
помеченные этикетками, содержащими
символы “5” или “ALL”.
Например:
5
ALL
2
5
1
RQTV0140-1
EE
M6720(EE_ru)_Russian.book 1 ページ 2006年4月19日 水曜日 午後1時35分
Важные инструкции по технике безопасности, Gpeloctepe·ehne, Предупреждение
Страница 2
- Изображение
- Текст
2
RQTV0140
ВАЖНЫЕ ИНСТРУКЦИИ ПО ТЕХНИКЕ БЕЗОПАСНОСТИ
-Если Вы увидите такой символ-
(Внутри аппарата)
GPELOCTEPE·EHNE!
B ÍTOM YCTPOÆCTBE NCGOJV„YETCR JA„EP.
GPNMEHEHNE PEFYJNPOBOK N HACTPOEK, OTJN¨HSX OT
HN·EOGNCAHHSX, MO·ET GPNBECTN K OGACHOMY
JA„EPHOMY OøJY¨EHND.
HE OTKPSBAÆTE KPSWKY N HE GPON„BOLNTE PEMOHT
CAMN—JY¨WE GOPY¨NTV ÍTO KBAJNINUNPOBAHHOMY
CGEUNAJNCTY.
ПРЕДУПРЕЖДЕНИЕ:
ДЛЯ УМЕНЬШЕНИЯ РИСКА ВОЗНИКНОВЕНИЯ ПОЖАРА,
ПОРАЖЕНИЯ ЭЛЕКТРИЧЕСКИМ ТОКОМ ИЛИ ПОВРЕЖДЕНИЯ
ИЗДЕЛИЯ НЕ ПОДВЕРГАЙТЕ ДАННЫЙ АППАРАТ
ВОЗДЕЙСТВИЮ ДОЖДЯ, ВЛАГИ, БРЫЗГ ИЛИ КАПЕЛЬ, И НЕ
СТАВЬТЕ НА АППАРАТ ПРЕДМЕТЫ, НАПОЛНЕННЫЕ
ЖИДКОСТЯМИ, ТАКИЕ, КАК ВАЗЫ.
GPELOCTEPE·EHNE!
≥ HE CJELYET YCTAHABJNBATV NJN PA„MEQATV LAHHSÆ
AGGAPAT B KHN·HOM WKAIY, BCTPOEHHOM WKAIY NJN LPYFOM
OFPAHN¨EHHOM GPOCTPAHCTBE LJR TOFO, ¨TOøS COXPAHNTV
YCJOBNR XOPOWEÆ BEHTNJRUNN. YLOCTOBEPVTECV, ¨TO
WTOPS N LPYFNE GOLOøHSE GPELMETS HE GPEGRTCTBYDT
HOPMAJVHOÆ BEHTNJRUNN LJR GPELOTBPAQEHNR PNCKA
GOPA·EHNR ÍJEKTPN¨ECKNM TOKOM NJN BO„HNKHOBEHNR
GO·APA N„-„A GEPEFPEBA.
≥ НЕ ЗАКРЫВАЙТЕ ВЕНТИЛЯЦИОННЫЕ ОТВЕРСТИЯ АППАРАТА
ГАЗЕТАМИ, СКАТЕРТЯМИ, ШТОРАМИ И ПОДОБНЫМИ ПРЕДМЕТАМИ.
≥ НЕ РАЗМЕЩАЙТЕ НА АППАРАТ ИСТОЧНИКИ ОТКРЫТОГО ПЛАМЕНИ,
ТАКИЕ, КАК ГОРЯЩИЕ СВЕЧИ.
≥ ВЫБРАСЫВАЙТЕ БАТАРЕИ В МУСОР, УЧИТЫВАЯ ОХРАНУ
ОКРУЖАЮЩЕЙ СРЕДЫ.
ЭТОТ АППАРАТ ПРЕДНАЗНАЧЕН ДЛЯ
ИСПОЛЬЗОВАНИЯ В КЛИМАТЕ СРЕДНЕЙ ПОЛОСЫ.
Это изделие может принимать радио помехи, обусловленные
переносными телефонами. Если такие помехи являются
очевидными, увеличьте, пожалуйста, расстояние между
изделием и переносным телефоном.
Сетевая вилка должна быть расположена вблизи оборудования
и быть легко достижима, а сетевая вилка или переходник
прибора должны оставаться быстро доступными.
Информация по обращению с отходами для
стран, не входящих в Европейский Союз
Действие этого символа распространяется
только на Европейский Союз.
Если Вы собираетесь выбросить данный
продукт, узнайте в местных органах власти
или у дилера, как следует поступать с
отходами такого типа.
Clejaho b MajaØÎnn
Mauywnta Íjektpnk Nhlactpnaj Ko., Jtl.
1006 Kaloma, Ocaka, Rgohnr
Пpимep мapкиpoвки:
± ± 1 A ± ± ± ± ± ± ±
Элeмeнты кoдa:
3-ий cимвoл—гoд изгoтoвлeния
(1–2001 г ., 2–2002 г ., 3–2003 г ., …);
4-ый cимвoл—мecяц изгoтoвлeния
(A–янвapь, B–фeвpaль, …,
L–дeкaбpь)
Pacпoлoжeниe
мapкиpoвки:
Зaдняя, нижняя или бoкoвaя пaнeль
ycтpoйcтвa
*SQPHSPDSNQSRENQ
MHPHKWVNROD
3DFJRMRHKQH
PDSNQSRENQ
/MU3RFFQQ
|<FWDKREMHKKVqJSRQEROQWHMHPEJRSUONHJFW
,HOHSDMYKRIRDNRKD3,|2DTQWHJSDE
JRWSHgQWHMHq}FSRNFMgVQOHMQUSDEHKIRODPF
ODWVJSRQEROFWEDJSQFMREQQoWRQOHMQH
QFJRMYHWFUEFWSRIRPFRRWEHWFWEQQFKDFWRUTHq
QKFWSNXQHqJRNFJMDWDXQQQJSQPHKQPVPQ
WH[KQoHFNQPQFWDKODSWDPQ}
*SQPHSPDSNQSRENQ
MHPHKWVNROD
3DFJRMRHKQH
PDSNQSRENQ
*SQPHSPDSNQSRENQ
MHPHKWVNROD
3DFJRMRHKQH
PDSNQSRENQ
M6720(EE_ru)_Russian.book 2 ページ 2006年4月19日 水曜日 午後1時35分

3
RQTV0140
∫ Меры предосторожности при установке
≥Не следует устанавливать или использовать аппарат вблизи
мощных магнитов или электромагнитных устройств. Такие
устройства могут повредить ранее осуществленные записи VHS.
≥Не ставьте на аппарат сверху никаких тяжелых предметов и не
устанавливайте его в замкнутом пространстве. Обеспечьте
достаточную циркуляцию воздуха.
≥Аппарат не следует устанавливать в вертикальном положении. Он
предназначен для работы в горизонтальном положении.
∫ Важно
Обратите внимание, что запись ранее записанных лент, дисков или
другого опубликованного или широковещательного материала
может нарушать законодательство об авторских правах.
∫ Ради Вашей безопасности
Не снимайте наружную крышку.
Прикасаться к внутренним деталям опасно – это может привести к
их повреждению.
Во избежание поражения электрическим током не снимайте
крышку. Внутри аппарата нет деталей, обслуживаемых
пользователем. Предоставьте все обслуживание
квалифицированному обслуживающему персоналу.
∫ Берегите окружающую среду
См. “Power Save” на стр. 59.
∫ Примите меры предосторожности, прежде чем
пользоваться аппаратом
Не допускайте:
≥Влажности и пыли.
≥Высоких температур, например, прямых солнечных лучей.
≥Магнитных или электромагнитных предметов.
≥Прикосновения к внутренним деталям аппарата.
≥Воды и некоторых других жидкостей.
≥Молнии. (Во время грозы выключайте из аппарата разъем
антенны.)
≥Попадания тяжелых предметов на аппарат.
≥Подключения или управления оборудования мокрыми руками.
≥Использования сотового телефона, поскольку он может привести к
возникновению помех, способных повлиять на изображение и звук.
Что следует делать:
≥Вытирайте аппарат чистой и сухой тканью.
≥Устанавливайте аппарат в горизонтальное положение.
≥Не включайте аппарат, телевизор и другое оборудование до
полного завершения соединения.
∫ Примечания к данной инструкции
≥Названия компаний, наименования изделий и все другие названия
в данной инструкции являются торговыми марками или
зарегистрированными торговыми марками соответствующих
корпораций.
≥В данной инструкции по эксплуатации в основном описаны
операции с использованием пульта дистанционного управления.
≥Содержимое экранов, использованное в настоящей инструкции, не
обязательно совпадает с тем, что увидите на экране вы.
∫ Дисплеи
Дисплеи, показанные в настоящей инструкции, являются
примерами. В действительности содержимое дисплеев зависит от
дисков.
≥В определенных обстоятельствах значки будут отображаться
серым цветом, и при щелчке они не будут реагировать. Это
означает, что функция, представленная данным значком,
отключена.
≥Страницы, на которые производится ссылка, обозначаются как
(
l ±±).
С помощью аппарата можно пользоваться как DVD, так и VHS.
Данный аппарат для записи цифровых видеодисков способен
качественно записывать изображения и звук на цифровые
видеодиски с возможностью быстрого произвольного доступа. Это
позволило реализовать множество новых функций, которые
недоступны при записи на магнитную ленту. Некоторые из этих
функций приводятся ниже.
ª DVD
Выход с прогрессивной разверткой (
l 13, 16)
Подключив телевизор, совместимый с выходом с прогрессивной
разверткой, можно воспринимать более качественные изображения
с меньшим мерцанием, нежели может позволить обычный телевизор
(с чересстрочным выходом).
Финализация (
l 56)
Эта функция позволяет воспроизводить записанные диски DVD-R, DVD-R
DL, DVD-RW, +R и +R DL на других проигрывателях.
Моментальное воспроизведение (
l 26)
Нет необходимости перемотки или поиска изображения. При
помощи навигационного меню Direct Navigator вы сможете сразу
перейти на начало ранее выполненной видеозаписи.
Быстрый просмотр (
l 26)
Эта функция позволяет быстро просматривать новости,
информацию и другие программы.
Беглое воспроизведение (
l 21)
Не нужно ждать окончания записи. Не прерывая записи, можно
воспроизводить записываемое в данный момент изображение с
самого начала.
Моментальная запись (
l 18)
Больше не нужно искать свободное место на диске. При нажатии
кнопки записи аппарат выделяет существующее дисковое
пространство и сразу же начинает запись.
Одновременная запись и воспроизведение (
l 21)
С помощью этой функции можно воспроизводить ранее записанную
видеопрограмму во время записи другой программы.
Временной переход (
l 27)
Эта функция позволяет перейти к указанной сцене при
воспроизведении.
ª Общие сведения
Быстрое перемещение (копирование) (
l 45, 47)
Эта функция позволяет выполнять копирование с VHS на DVD и
наоборот.
Меры предосторожности
Не устанавливайте аппарат на
усилители или оборудование,
которое может нагреваться до
высокой температуры.
Перегрев может вывести аппарат из
строя.
Прежде чем перемещать аппарат, убедитесь, что
дисковод пуст.
В противном случае это может привести к серьезному
повреждению диска и аппарата.
Об описаниях в настоящей
инструкции по эксплуатации
Полезные функции
ВАЖ
Н
ЫЕ
ИНС
Т
Р
УКЦИИ ПО
Т
Е
ХНИКЕ БЕЗО
ПАСНО
СТ
И/
М
е
ры
пр
е
д
ос
то
р
о
ж
нос
ти
/О
б
опис
а
н
и
я
х
в на
с
то
я
ще
й ин
с
тру
к
ции
по э
к
с
п
л
уа
та
ц
ии/
Пол
е
зн
ые
фу
нкц
ии
M6720(EE_ru)_Russian.book 3 ページ 2006年4月19日 水曜日 午後1時35分

Содержание ВАЖНЫЕ ИНСТРУКЦИИ ПО ТЕХНИКЕ БЕЗОПАСНОСТИ…
Страница 4
- Изображение
- Текст
4
RQTV0140
Содержание
ВАЖНЫЕ ИНСТРУКЦИИ ПО ТЕХНИКЕ БЕЗОПАСНОСТИ …………. 2
Меры предосторожности …………………………………………………………. 3
Об описаниях в настоящей инструкции по эксплуатации ………. 3
Полезные функции …………………………………………………………………… 3
Аксессуары ……………………………………………………………………………….. 5
Информация о дисках ………………………………………………………………. 6
Диски, которые можно использовать для записи и
воспроизведения [12 см/8 см] ……………………………………………….. 6
Диски только для воспроизведения [12 см/8 см] ……………………….. 7
О форматах записи ………………………………………………………………….. 7
Невоспроизводимые диски ………………………………………………………. 7
Информация о логотипах …………………………………………………………. 7
Совместимость дисков с используемым телевизором ………………. 8
Обращение с диском ……………………………………………………………….. 8
Обслуживание ………………………………………………………………………….. 8
Использование дисков DVD-R, DVD-R DL, DVD-RW,
+R, +R DL и +RW с этим аппаратом ……………………………………….. 9
Справочное руководство по органам управления ………………… 10
Пульт дистанционного управления ……………………………………….. 10
Основной блок ……………………………………………………………………….. 11
Дисплей блока ……………………………………………………………………….. 11
ШАГ 1 Подключение ………………………………………………………………. 12
Подключение телевизора ………………………………………………………. 12
Подключение усилителя или системного компонента……………… 13
≥Подключение усилителя с цифровым входом ………………………. 13
≥Соединение со стереоусилителем (аналоговое соединение)…. 13
Выходы DVD и DVD/VHS ………………………………………………………… 13
Чтобы получить еще более высокую точность ………………………… 13
≥Соединение с разъемом S Video…………………………………………… 13
≥Подключение к компонентным видеоразъемам ……………………. 13
ШАГ 2 Автонастройки ……………………………………………………………. 14
Автоматические настройки ……………………………………………………. 14
ШАГ 3 Настройка для совмещения с используемым
телевизором и пультом дистанционного управления ……….. 15
Если на этот пульт дистанционного управления
реагируют другие изделия Panasonic ………………………………….. 15
Выбор типа телевизора………………………………………………………….. 15
Работа с телевизором ……………………………………………………………. 15
Для просмотра изображения с прогрессивной разверткой………. 16
≥Примечание для владельцев телевизоров системы
PAL, совместимых с прогрессивной разверткой ………………… 16
Запись телевизионных программ …………………………………………… 17
Как вставлять диски………………………………………………………………. 17
Установка видеокассеты ……………………………………………………….. 17
Порядок записи……………………………………………………………………… 18
≥Режимы записи и приблизительное время записи ………………… 19
≥Экран “Формат” …………………………………………………………………… 20
≥При извлечении записанного диска ……………………………………… 20
Как указать время прекращения записи …………………………………. 21
Выберите тип канала записи звука ………………………………………… 21
Воспроизведение диска DVD при записи видеокассеты VHS ….. 21
Воспроизведение видеокассеты VHS при записи диска DVD ….. 21
Просмотр телепередач во время записи…………………………………. 21
Воспроизведение во время записи …………………………………………. 21
≥Воспроизведение с начала заголовка,
который записывается. – Беглое воспроизведение …………… 21
≥Воспроизведение ранее записанного
заголовка во время записи.
– Одновременная запись и воспроизведение ……………………. 21
Режим гибкой записи (FR) ……………………………………………………… 22
Запись по таймеру ………………………………………………………………….. 23
Предосторожности при использовании записи по таймеру ……… 23
Запись по таймеру …………………………………………………………………. 23
Использование системы SHOWVIEW ……………………………………… 23
Ручное программирование ……………………………………………………… 24
≥Проверьте, измените или удалите программы ………………………. 25
≥Чтобы отменить запись после ее начала ………………………………. 25
≥Чтобы вывести аппарат из режима ожидания записи …………… 25
≥Автоматический режим SP/LP ……………………………………………… 25
Воспроизведение дисков ………………………………………………………..26
Воспроизведение дисков…………………………………………………………26
≥Когда телевизор отображает экран меню ……………………………..26
Выбор записанных титров для воспроизведения ……………………..26
Быстрое воспроизведение (Play × 1.3) ……………………………………..26
Пропуск вручную …………………………………………………………………….26
Быстрая перемотка вперед и обратная перемотка
— SEARCH ………………………………………………………………………….27
Пропуск…………………………………………………………………………………..27
Замедленное воспроизведение ……………………………………………….27
Покадровый просмотр …………………………………………………………….27
Непосредственное воспроизведение ……………………………………….27
Удаление воспроизводимого титра ………………………………………….27
Выбор пропускаемых кадров —Временной переход …………………27
Создать главу …………………………………………………………………………27
Изменение звука во время воспроизведения …………………………..27
Использование меню для воспроизведения файлов
DivX, MP3 и фотоснимков (JPEG/TIFF) ………………………………….28
Воспроизведение дисков, содержащих видеозаписи в
формате DivX, MP3, и снимки……………………………………………….28
Выбор типа файла …………………………………………………………………..28
Воспроизведение видеозаписей в формате DivX ……………………..28
≥Использование экрана дерева для поиска папки …………………..28
О содержимом DivX VOD (видео по запросу) ……………………………29
Воспроизведение дисков MP3 с помощью меню ………………………29
≥Отыскание группы с помощью экрана дерева ………………………..29
Воспроизведение неподвижного изображения…………………………30
≥Начало показа слайдов/Интервал слайдов ……………………………30
≥Выбор неподвижных изображения в другой папке …………………30
Воспроизведение видеокассеты …………………………………………….32
Быстрая перемотка вперед/Обратная перемотка …………………….32
Вызов/Просмотр ……………………………………………………………………..32
Ускоренный поиск …………………………………………………………………..32
Замедленное воспроизведение ……………………………………………….32
Ускоренная обратная перемотка……………………………………………..32
Квазивоспроизведение S-VHS (SQPB) …………………………………….32
Повторное воспроизведение……………………………………………………32
Настройка воспроизводимого изображения …………………………….33
≥Ручное слежение…………………………………………………………………..33
≥Настройка полевой синхронизации………………………………………..33
Система индексного поиска VHS (VISS) …………………………………..33
Изменение звука во время воспроизведения …………………………..33
Индикаторы при выводе информации на экран ……………………….33
Использование экранных меню/Окно FUNCTIONS ………………….34
Использование меню DISPLAY ………………………………………………..34
≥Общие процедуры …………………………………………………………………34
— Меню Диск ……………………………………………………………………….34
— Меню Play …………………………………………………………………………35
— Меню Изобр. …………………………………………………………………….35
— Меню Звук ………………………………………………………………………..35
— Меню Др. функция ……………………………………………………………35
Окно FUNCTIONS ……………………………………………………………………36
Дисплеи состояния ………………………………………………………………….36
≥Изменение отображаемой информации …………………………………36
≥Примеры дисплея………………………………………………………………….36
Блокировка доступа Child Lock ………………………………………………36
Начало эксплуатации
Запись
Воспроизведение
M6720(EE_ru)_Russian.book 4 ページ 2006年4月19日 水曜日 午後1時35分

5
RQTV0140
Редактирование заголовков ……………………………………………………37
Редактирование титров с помощью кнопки SUB MENU …………… 37
Операции с заголовками ………………………………………………………… 37
≥Удалить ………………………………………………………………………………..37
≥Характеристики ……………………………………………………………………37
≥Редактирование……………………………………………………………………38
— Ввести название ……………………………………………………………… 38
— Уcтaнoвить защиту/Cнять защиту …………………………………….. 38
— Частич. Удaлить ……………………………………………………………….38
— Выбор меню …………………………………………………………………….. 38
— Разделить зaпись ……………………………………………………………..39
Редактирование разделов ……………………………………………………… 39
Операции с разделами……………………………………………………………. 39
≥Вид главы……………………………………………………………………………..39
— Удалить главу …………………………………………………………………..39
— Создать главу …………………………………………………………………..39
— Объединить главы ……………………………………………………………39
— Вид записи ………………………………………………………………………. 39
Создание, редактирование и воспроизведение списков
воспроизведения …………………………………………………………………. 40
Создание списков воспроизведения……………………………………….. 40
Воспроизведение списков воспроизведения ……………………………41
Редактирование списков воспроизведения с
помощью кнопки SUB MENU ………………………………………………..41
Операции со списками воспроизведения …………………………………41
≥Удалить ………………………………………………………………………………..41
≥Характеристики ……………………………………………………………………41
≥Редактирование……………………………………………………………………42
— Создать …………………………………………………………………………… 42
— Копировать ………………………………………………………………………42
— Ввести название ……………………………………………………………… 42
— Выбор меню …………………………………………………………………….. 42
Операции с разделами……………………………………………………………. 43
≥Вид главы……………………………………………………………………………..43
— Добавить главу …………………………………………………………………43
— Переместить главу ……………………………………………………………43
— Создать главу …………………………………………………………………..43
— Объединить главы ……………………………………………………………43
— Удалить главу …………………………………………………………………..43
— Вид cпиcкa вocпpoизв ……………………………………………………… 43
Перемещение (копирование) ………………………………………………….. 44
Перед перемещением (копированим) ……………………………………… 44
Перемещение (копирование) с VHS ………………………………………… 45
≥Перемещение (копирование)
одним нажатием (VHS
l DVD)………………………………………….. 45
≥Перемещение (копирование) GUI
(Графический интерфейс пользователя) (VHS
l DVD) ……… 46
Перемещение (копирование) с DVD………………………………………… 47
≥Перемещение (копирование)
одним нажатием (DVD
l VHS)………………………………………….. 47
≥Перемещение (копирование) GUI
(Графический интерфейс пользователя) (DVD
l VHS) ……… 48
Перемещение (копирование) финализированных дисков
DVD-R, DVD-R DL, DVD-RW (формат DVD-Video),
+R, +R DL или DVD-Video ……………………………………………………. 49
Запись с внешнего устройства………………………………………………… 50
≥DVD …………………………………………………………………………………….. 50
≥VHS……………………………………………………………………………………… 50
DV aвтoзaпиcь ……………………………………………………………………….. 51
Ввод текста …………………………………………………………………………….. 52
Ввод текста …………………………………………………………………………… 52
Удаление заголовков ……………………………………………………………… 53
Навигатор удаления ………………………………………………………………. 53
Удаление воспроизводимого титра ………………………………………… 53
Управление DVD ……………………………………………………………………… 54
Название диска ……………………………………………………………………… 54
Защита диска…………………………………………………………………………. 55
Стереть все титры …………………………………………………………………. 55
Выбор автомат. воспроизв……………………………………………………… 55
Coздaть Top Menu ………………………………………………………………….. 55
Форматировать диск………………………………………………………………. 55
Финализация………………………………………………………………………….. 56
Закрыть первый слой …………………………………………………………….. 56
Изменение настроек аппарата ………………………………………………… 57
Общие процедуры ………………………………………………………………….. 57
Ввод пароля (Уровни) …………………………………………………………….. 57
Краткое описание настроек……………………………………………………. 57
Сброс настроек каналов ………………………………………………………… 60
Настройка канала ………………………………………………………………….. 60
≥Вручную ………………………………………………………………………………. 60
≥Для изменения настроек телестанции ………………………………….. 60
≥Автоматическая настройка ………………………………………………….. 61
Установка часов вручную ………………………………………………………. 61
Глоссарий ……………………………………………………………………………….. 62
Сообщения об ошибках ………………………………………………………….. 63
Часто задаваемые вопросы ……………………………………………………. 65
Пособие по поиску и устранению неисправностей ……………….. 66
Характеристики ………………………………………………………………………. 71
Алфавитный указатель ………………………………………………………….. 73
Проверьте и определите доставленные дополнительные принадлежности. При заказе запасных частей используйте номера,
заключенные в скобки.
(Номера изделий правильны по состоянию на апрель 2006 г. Они могут подвергаться изменениям.)
Редактирование
Перемещение (копирование)
Обычные функции
Справочные материалы
Аксессуары
∏ 1 Шнур питания переменным током
≥Только для применения с аппаратом. Не
применяйте с другим оборудованием. Кроме того,
не используйте с аппаратом шнуры, относящиеся
к другому оборудованию.
∏ 1 Высокочастотный
коаксиальный кабель
∏ 1 Пульт дистанционного
управления
(EUR7659YK0)
∏ 1 Аудио/видеокабель
∏ 2 Батарейки для пульта
дистанционного управления
Батареи типа R6
Со
дер
ж
ан
и
е
/А
к
сесс
уа
р
ы
M6720(EE_ru)_Russian.book 5 ページ 2006年4月19日 水曜日 午後1時35分

6
RQTV0140
Информация о дисках
*
1
Запись на второй слой двухслойных дисков возможна только после закрытия первого слоя. После закрытия первого слоя запись на него
будет невозможна (
l 56).
*
2
Диск +R, записанный на этом аппарате, возможно, не будет воспроизводиться на другом DVD-рекордере Panasonic, и наоборот. Тем не
менее, после финализации диск можно воспроизводить на другом аппарате.
*
3
При использовании диска однократной записи размер свободного места на записываемом диске не увеличивается даже после удаления
программы.
*
4
Данный аппарат может работать с дисками для высокоскоростной записи, показанными в таблице, однако при их использовании время
записи не уменьшится.
*
5
Поддерживается воспроизведение дисков, записанных на другой аппаратуре со скоростью записи 8x.
*
6
Воспроизводится на аппаратуре, совместимой с DVD-R DL двухслойные диски.
*
7
Только диски, совместимые с CPRM
(
l 62)
≥Описания, касающиеся дисков, обозначены [DVD], а объяснения по видеозаписям обозначены [VHS].
≥Рекомендуем пользоваться дисками фирмы Panasonic. Чтобы защитить диски DVD-RAM от царапин и грязи, рекомендуем пользоваться
кассетными дисками.
≥Диски других изготовителей могут не записываться и не воспроизводиться вследствие состояния записи.
≥Данный аппарат не может записывать программы, допускающие “Только однократная запись”, на CPRM-совместимые диски DVD-R, DVD-R
DL и DVD-RW. Вы можете записывать другие программы в формате DVD-Video.
≥На данном аппарате можно применять диски, совместимые с высокоскоростной записью.
≥Данный аппарат не может записывать диски, содержащие сигналы PAL и NTSC. Воспроизведение дисков, записанных в форматах PAL и
NTSC на другом аппарате, не гарантируется.
Диски, которые можно использовать для записи и воспроизведения [12 см/8 см]
Тип диска
DVD-RAM
≥4,7 Гбайт/
9,4 Гбайт, 12 см
≥2,8 Гбайт, 8 см
DVD-R
≥4,7 Гбайт, 12 см
≥1,4 Гбайт, 8 см
DVD-R DL
*
1
(двойной слой на
одной стороне)
≥8,5 Гбайт, 12 см
DVD-RW
≥4,7 Гбайт, 12 см
≥1,4 Гбайт, 8 см
rR
*
2
≥4,7 Гбайт, 12 см
+R DL
*
1
(двойной слой на
одной стороне)
8,5 Гбайт, 12 см
rRW
≥4,7 Гбайт, 12 см
Логотип
–
–
–
Использованны
й в настоящей
инструкции
[RAM]
[-R]
перед
финализацией
[-R]DL]
перед
финализацией
[-RW‹V›]
перед
финализацией
[+R]
перед
финализацией
[+R]DL]
перед
финализацией
[+RW]
[DVD-V]
после
финализации
[DVD-V]
после
финализации
[DVD-V]
после
финализации
[DVD-V]
после
финализации
[DVD-V]
после
финализации
Формат записи
формат записи
DVD-Video
формат DVD-Video
формат +VR
Основное
применение
*
3
Диски с
возможностью
повторной записи
Диски для
однократной
записи
(записываются до
заполнения диска)
Диски для
однократной
записи
(записываются до
заполнения диска)
Диски с
возможностью
повторной записи
Диски для
однократной
записи
(записываются до
заполнения диска)
Диски для
однократной
записи
(записываются до
заполнения диска)
Диски с
возможностью
повторной записи
Совместимость
Используемый
диск для
высокоскоростн
ой записи
*
4
до 5x
до 16x
до 4x
до 6x
до 16x
до 2,4x
до 4x
*
5
Воспроизведение
на другом
проигрывателе
Только на
проигрывателях,
совместимых с
DVD-RAM.
(Финализация
диска не нужна.)
Только после
финализации
диска. (
l 56
, 62)
Только после
финализации
диска
*
6
.
(
l 56
, 62)
Только после
финализации
диска. (
l 56
, 62)
Только после
финализации
диска. (
l 56
, 62)
Только после
финализации
диска. (
l 56
, 62)
Да.
(диск можно не
финализировать.)
Что можно делать на данном аппарате (
Y: Возможно, t: Невозможно)
Беглое
воспроизведение
Y
t
t
t
t
t
t
Запись передач,
позволяющих
однократное
копирование
Y
*
7
t
t
t
t
t
t
Запись как M 1,
так и M 2
двуязычной
передачи
Y
t
Записывается
только одна.
(
l
58
, Двуяз.
выбор звука)
t
Записывается
только одна.
(
l
58
, Двуяз.
выбор звука)
t
Записывается
только одна.
(
l
58
, Двуяз.
выбор звука)
t
Записывается
только одна.
(
l
58
, Двуяз.
выбор звука)
t
Записывается
только одна.
(
l
58
, Двуяз.
выбор звука)
t
Записывается
только одна.
(
l
58
, Двуяз.
выбор звука)
Запись
изображения с
форматным
отношением 16:9
Y
t
(Изображение
записывается с
форматным
отношением 4:3.)
t
(Изображение
записывается с
форматным
отношением 4:3.)
t
(Изображение
записывается с
форматным
отношением 4:3.)
t
(Изображение
записывается с
форматным
отношением 4:3.)
t
(Изображение
записывается с
форматным
отношением 4:3.)
t
(Изображение
записывается с
форматным
отношением 4:3.)
Ввод текста
Y
Y
Y
Y
Y
Y
Y
Удаление
титров
Y
Y
(Доступное
пространство
после удаления
не
увеличивается.)
Y
(Доступное
пространство
после удаления
не
увеличивается.)
Y
(Дисковое
пространство
увеличивается
только после
удаления
последнего
записанного титра.)
Y
(Доступное
пространство
после удаления
не
увеличивается.)
Y
(Доступное
пространство
после удаления
не
увеличивается.)
Y
(Дисковое
пространство
увеличивается
только после
удаления
последнего
записанного титра.)
Создание списков
воспроизведения
Y
t
t
t
t
t
t
M6720(EE_ru)_Russian.book 6 ページ 2006年4月19日 水曜日 午後1時35分

Диски только для воспроизведения [12 см/8 см, О форматах записи, Невоспроизводимые диски информация о логотипах
Страница 7
- Изображение
- Текст
7
RQTV0140
° Некоторые диски DVD-RW (формат записи DVD Video), CD-R или CD-RW могут не воспроизводиться из-за параметров записи.
≥Можно воспроизводить видеозаписи DivX, MP3 и снимки (JPEG/TIFF), записанные на диски DVD-R и CD-R/RW, CD-DA, Video CD, а также
данные в формате SVCD, записанные на диск CD-R/RW. После записи на компьютере закройте сеанс или финализируйте диск.
≥Воспроизведением диска может распоряжаться его изготовитель. Поэтому может быть не всегда возможно воспроизводить его таким
образом, который описан в настоящей инструкции по эксплуатации. Внимательно прочтите инструкцию к диску.
Замечание по применению DualDisc
Сторона дисков DualDisc с цифровым звуковым содержимым не соответствует техническим требованиям формата Compact Disc Digital Audio
(CD-DA), поэтому воспроизведение может быть невозможно.
≥2,6/5,2 Гбайт DVD-RAM, 12 см
≥3,95/4,7 Гбайт DVD-R для авторских работ
≥DVD-R, записанные в формате записи DVD Video
≥Диски DVD-R (формат DVD-Video), DVD-R DL, DVD-RW (формат
DVD-Video), +R, +R DL, записанные на другом аппарате без
финализации (
l 62, Финализация)
≥Диски DVD-Video с каким-либо региональным номером, кроме “5”
или “ALL”
≥Имеющиеся в продаже диски Blu-ray, DVD-ROM, +R 8 см, CD-ROM,
CDV, CD-G, Photo CD, CVD, SVCD, SACD, MV-Disc, PD, “Chaoji
VCD”, включая диски CVD, DVCD и SVCD, которые не
соответствуют IEC62107, и т.п.
Диски только для воспроизведения [12 см/8 см]
Тип диска
DVD-Video
DVD-Audio
DVD-RW
(формат записи DVD Video)
CD
Video CD
Логотип
–
Использованный в
настоящей
инструкции
[DVD-V]
[DVD-A]
[-RW‹VR›]
[CD]
[VCD]
Инструкция
Высококачест
венные видео-
и музыкальные
диски
Музыкальные
диски
высококачествен
ного
воспроизведения
≥Воспроизводятс
я на данном
аппарате по
двум каналам
DVD-RW
°, записанные на другом
устройстве записи DVD
≥Программы, для которых разрешено
“Только однократная запись” можно
воспроизводить, если они записаны на
диске, совместимом с CPRM.
≥Отформатировав (
l 55) диск, на него
можно записывать в формате DVD-Video и
воспроизводить его на данном аппарате.
Записанный
звук и музыка
(в т.ч. CD-R/
RW
°)
Д
иски CD-R
° и CD-
RW
° с
видеозаписями DivX,
музыкой,
записанной в
формате MP3, и
снимками (JPEG и
TIFF)
(
l 28)
.
Записанную
музыку и
видеозаписи
(в т.ч. CD-R/
RW
°)
Может понадобиться финализация диска
на оборудовании, используемом для записи.
Относительно DVD-Audio
Некоторые многоканальные DVD-Audio не позволяют смешение (
l 62) всего или части содержания, если таково намерение изготовителя.
Записи, защищенные от смешения, на данном аппарате не будут воспроизводиться должным образом (например, звук воспроизводится
только с двух передних каналов). Дополнительную информацию см. на упаковке диска.
О форматах записи
∫ Формат записи DVD Video
Это метод записи, позволяющий записывать и редактировать
телепередачи и т.д.
≥Цифровые передачи, для которых разрешена “Только однократная
запись”, можно записывать на диск, совместимый с CPRM. На этом
аппарате можно записывать диски DVD-RAM, совместимые с CPRM.
≥Воспроизведение их возможно только на совместимых DVD-
проигрывателях.
Для записи в формате DVD Video используйте DVD-RAM.
∫ Формат DVD-Video
Этот такой способ записи, какой используется на серийно
выпускаемых DVD-Video.
≥Цифровые передачи, для которых разрешена “Только
однократная запись”, записывать нельзя.
≥Их можно воспроизводить на проигрывателе DVD. Однако,
программы, записанные на данном аппарате, для воспроизведения
на других проигрывателях DVD требуют финализации.
Для записи в формате DVD-Video используйте диски DVD-R,
DVD-R DL или DVD-RW.
∫ Формат +VR (+R/+RW Video Recording)
Этот метод предназначен для записи фильмов на диски +R/+RW.
Данные дисков, записанных с помощью этого метода, можно
воспроизводить аналогично содержимому дисков, записанных в
формате DVD-Video.
≥Запись цифровых программ, допускающих “Только однократная
запись”, невозможна.
≥После завершения диска или создания главного меню диск можно
воспроизводить на проигрывателях DVD или другой аппаратуре.
Невоспроизводимые диски
Информация о логотипах
Dolby Digital
(
l 58)
Это способ кодирования цифровых сигналов,
разработанный компанией Dolby Laboratories. Эти
сигналы могут представлять не столько стерео- (2
канала), но и многоканальный звук. Этим методом на
одном диске может быть записан большой объем
звуковой информации.
DTS Digital Surround
(
l 58)
Эта система эффекта присутствия применяется во
многих кинотеатрах мира. Она обеспечивает хорошее
разделение каналов и малый коэффициент сжатия,
создавая возможность реалистичных звуковых
эффектов.
Изготовитель не берет на себя ответственность и не предоставляет компенсации за потерю записанного или отредактированного
материала по причине неисправности аппарата или носителя записи. Он не берет на себя ответственности и не предлагает
компенсацию за какой-либо последующий ущерб, причиненный такой утерей.
Примерами причин таких потерь могут служить
≥диск, который был записан и редактировался данным аппаратом, воспроизводился устройством записи DVD или компьютерным
приводом дисков, изготовленным другой компанией.
≥диск использовался вышеуказанным образом, а затем снова воспроизводился в данном устройстве.
≥диск, который был записан и редактировался устройством записи DVD или компьютерным приводом дисков, изготовленным другой
компанией, воспроизводился в данном аппарате.
Информа
ц
ия о дис
к
а
х
M6720(EE_ru)_Russian.book 7 ページ 2006年4月19日 水曜日 午後1時35分

Обслуживание, Использование dvd-r, dvd-rw и +r на аппарате, Совместимость дисков с используемым телевизором
Обращение с диском
- Изображение
- Текст
8
RQTV0140
Информация о дисках
Если вы используете диски, записанные в системах PAL или NTSC,
обратитесь к этой таблице.
°
1
Воспроизводимость (
Y: Возможно, k: Невозможно)
°
2
Если выбрать “NTSC” в меню “Система ТВ” (
l 59), изображение
может быть более четким.
°
3
Выберите “NTSC” в меню “Система ТВ” (
l 59).
°
4
Если телевизор не способен обрабатывать сигналы PAL 525/60,
изображение не будет выглядеть правильно.
∫ Как держать диск
Не прикасайтесь к записанной поверхности.
∫ Информация о дисках не кассетного типа
Будьте осторожны, чтобы не поцарапать и не испачкать диск.
∫ Если на диске есть грязь или конденсация
Протрите его влажной тканью, а затем сухой.
∫ Меры предосторожности при обращении
≥Не наносите на диск этикеток или наклеек. (Это может привести к
короблению диска и несбалансированному вращению, что выведет
его из строя.)
≥Наносите надписи на сторону этикетки диска мягким фломастером
на масляной основе. Не пользуйтесь шариковыми ручками или
другими жесткими письменными принадлежностями.
≥Не пользуйтесь аэрозолями для устранения надписей, бензином,
растворителем, жидкостями для устранения статического
электричества или какими-либо другими растворителями.
≥Не пользуйтесь средствами для защиты от царапин или крышками.
≥Не роняйте, не укладывайте в стопку и не допускайте ударов по
дискам. Не ставьте на них никакие предметы.
≥Не используйте следующие диски:
— Диски, на которых остался клей от удаленных наклеек или
этикеток (диски из проката и т.д.).
— Сильно покоробленные или поломанные диски.
— Диски неправильной формы, например, в форме сердца.
≥Не кладите его в следующих местах:
— Под прямым солнечным светом.
— В очень пыльных или влажных местах.
— Поблизости обогревателя.
— В местах, подверженных значительным изменениям температуры
(может происходить конденсация).
— В местах, где присутствует статическое электричество или
электромагнитные волны.
≥Чтобы защитить диски от царапин и грязи, кладите их в коробку
или кассету, когда не пользуетесь ими.
Точные детали аппарата легко подвергаются воздействию
окружающей среды, особенно температуры, влажности и пыли.
К неисправности и поломке может привести также сигаретный
дым.
Чтобы очистить аппарат, пользуйтесь мягкой сухой тканью.
≥Ни в коем случае не пользуйтесь спиртом, растворителем краски
или бензином, чтобы очистить аппарат.
≥Прежде чем использовать химически обработанную ткань,
внимательно прочтите инструкцию, полученную вместе с этой
тканью.
Чтобы обеспечить длительное наслаждение от прослушивания
и просмотра записей, придерживайтесь следующих советов.
На линзу аппарата со временем могут оседать пыль и грязь, что
делает невозможным запись и воспроизведение дисков.
Примерно раз в год, в зависимости от частоты использования и
рабочей среды, пользуйтесь очистителем линзы DVD.
Перед применением внимательно прочтите инструкцию к
очистителю линзы.
Использование DVD-R, DVD-RW и +R на
аппарате
Совместимость дисков с используемым
телевизором
Тип телевизора
Диск
Воспроизводим
ость
°
1
Мультисистемный
телевизор
PAL
Y
NTSC
Y°
2
NTSC TV
PAL
k
NTSC
Y°
3
PAL TV
PAL
Y
NTSC
Y°
4
(PAL60)
Дополнительные принадлежности
(Номера изделий указаны на апрель 2006 года. Они могут быть
изменены.)
DVD-RAM
9,4 Гбайт, двухсторонний, кассетный:
LM-AD240LE
(совместим со скоростной записью 3X)
9,4 Гбайт, двухсторонний, не кассетного типа:
LM-AE240LE
(Pro Head Coating, совместим со скоростной
записью 3X)
4,7 Гбайт, односторонний, кассетный:
LM-AB120LE
(совместим со скоростной записью 3X)
4,7 Гбайт, односторонний, не кассетного типа:
LM-AE120LE
(Pro Head Coating, совместим со скоростной
записью 3X)
LM-AF120LE
(совместим со скоростной записью 3X)
DVD-R
4,7 Гбайт, односторонний, не кассетного типа:
LM-RF120ME
(совместим со скоростной записью 8X)
DVD-RW
4,7 Гбайт, односторонний, не кассетного типа:
LM-RW120E
(совместим со скоростной записью 2X)
Обращение с диском
Обслуживание
Очиститель линзы DVD: RP-CL720E
M6720(EE_ru)_Russian.book 8 ページ 2006年4月19日 水曜日 午後1時35分

9
RQTV0140
Использование дисков DVD-R, DVD-R DL, DVD-RW, +R, +R DL и +RW с этим аппаратом
∫ При записи на DVD-R и др. двуязычной программы
Перед записью и перемещением (копированием) выберите звуковой канал для записи.
Некоторые телевизионные программы передаются с основным (M 1) или дополнительным (M 2) звуковыми каналами. Перед записью или
перемещением (копированием) таких программ на DVD-R и т.п. необходимо выбрать канал записи звука.
≥При записи с телетюнера
≥При записи передач от внешней аппаратуры
— Выберите M 1 или M 2 на внешнем оборудовании.
∫ Воспроизведение диска на других DVD-проигрывателях
После записи или перемещения (копирования) необходима финализация диска (
l 56).
После записи или перемещения (копирования) на них титров необходима финализация DVD-R и др. на этом аппарате. Их можно
воспроизводить на серийно выпускаемых DVD-Video. Однако диски становятся пригодными только для воспроизведения, и записывать или
перемещать (копировать) на них информацию больше нельзя.
°
° Запись или перемещение (копирование) становятся возможными только после форматирования DVD-RW и +RW.
∫ Запись на диски DVD-R DL и +R DL
Диски DVD-R DL и +R DL имеют два слоя записываемой поверхности на каждой стороне.
Непрерывная запись с переходом с первого слоя на второй невозможна. Запись завершается после заполнения первого слоя. Для записи
второго слоя необходимо закрыть первый. После закрытия первого слоя он не будет доступен для записи (редактирование возможно). Процесс
закрытия невозможно остановить. Перед тем как продолжить, убедитесь, что вы действительно хотите закрыть слой. (
l 56)
Ограничения с DVD-R и др.
°
≥Программы с форматным отношением 16:9 записываются с форматным отношением 4:3.
≥Для двуязычных передач могут записываться только главный (M 1) или второстепенный звуковой канал (M 2).
≥Воспроизведение диска на других DVD-проигрывателях до финализации невозможно.
° На этой странице для дисков DVD-R, DVD-R DL, DVD-RW, +R, +R DL и +RW используется общее название “DVD-R и др.”.
Поэтому при использовании DVD-R и др. выполняйте следующие действия.
Записывается только выбранный
звуковой канал.
например,
только M 1
Запись на DVD-R и др.
Hallo
Программа с
форматным
отношением 16:9 с
главным и второстепенным
звуковыми каналами
Hello
Hello
M 2
M 1
форматное отношение 4:3
например,
Нач. наст.
Диск
Изображение
Дисплей
Приём ТВ
Соединение
TAB
SELECT
M 1
Двуяз. выбор звука
Цифров. вывод звука
Выкл.
Компрессия динамич. уровня
Звук
Peжим звукa для DV-вxoдa
Cтepeo 1
Запись на DVD-R и др.
Записывается
только выбранный
звуковой канал.
Hello
Hallo
Hello
M 1
M 1
M 2
Выберите “M 1” или “M 2” в
пункте “Двуяз. выбор звука”
меню Нач. наст. (
l 58).
CH
G
SE
AR
CH
ENT
ER
OF
F
ME
NU
RE
TUR
N
TOP
ME
NU
DIS
PLA
Y
VO
L
ON
A.S
UR
RO
UN
D
MO
NIT
OR
MO
DE
PIC
TUR
E M
OD
E
RE
PE
AT
OP
EN
DC
IN
9V
∫
;
1
:
9
r
s
6
5
1
2
3
4
5
6
7
8
9
0
S10
Í
SETU
P
TOP M
ENU
DISP
LAY
MEN
U
RETU
RN
GRO
UP
PAGE
VOLU
ME
A.SUR
ROUN
D
ANGL
E
AUDI
O
SUB
-TITL
E
PLAY
MODE
CANC
EL
Í /I
Í
CD SEQUENTIAL
DISC
DOUBLE RE-MASTER
;
∫
1
:/6
5/9
DISC EXCHANGE
DISC SKIP
<OPEN/CLOSE
1
2
3
4
5
Запись на DVD-R и др.
Финализация
Воспроизведение на другом
оборудовании DVD
Второй слой
Первый слой
Доступное
свободное место
Запись 1
Запись 2
(Внутренняя
сторона диска)
(Внешняя
сторона диска)
Направление записи/воспроизведения
Непрерывная запись
с переходом с
первого слоя на
второй невозможна.
Информа
ция о дис
к
а
х
/Обс
лужива
ние
/И
с
поль
з
ова
ние
дис
ков DVD-R,
DVD-R DL
, DVD-RW, +R
, +R DL
и +RW с
э
т
и
м
а
ппа
ра
том
M6720(EE_ru)_Russian.book 9 ページ 2006年4月19日 水曜日 午後1時35分

Справочное руководство по органам управления, Пульт дистанционного управления
Страница 10
- Изображение
- Текст
10
RQTV0140
Справочное руководство по органам управления
(1) Включите аппарат . . . . . . . . . . . . . . . . . . . . . . . . . . . . . . . . .
l 14
(2) Выбор привода (DVD или VHS) . . . . . . . . . . . . . . . . . .
l выше
(3) Выберите каналы и номера титров и т.д./Введите каналы
(4) Отменить/Сбросить счетчик ленты
(5) Основные операции записи и воспроизведения
(6) Пропустить указанное время . . . . . . . . . . . . . . . . . . . . . . . .
l 27
Кнопка ускоренной перемотки назад
(
6JET REW) . . . . . . . . . . . . . . . . . . . . . . . . . . . . . . . . . . . . . .
l 32
(7) Показать Top Menu/Direct Navigator . . . . . . . . . . . . .
l26, 28, 37
(8) Выбор/ввод, Покадровый просмотр . . . . . . . . . . . . . .
l 14, 27
(9) Показать подменю . . . . . . . . . . . . . . . . . . . . . . . .
l 25 30, 37, 41
(10) Выбрать звук . . . . . . . . . . . . . . . . . . . . . . . . . . . . . . . . . .
l 21, 27
Отмена и переход в режим ожидания . . . . . . . . . . . . . . . .
l 25
Удаление пункта программы . . . . . . . . . . . . . . . . . . . . . . . .
l 60
(11) Показать меню DISPLAY . . . . . . . . . . . . . . . . . . . . . . . . . . . .
l 34
Добавление пустой программной позиции . . . . . . . . . . . .
l 60
(12) Начать запись . . . . . . . . . . . . . . . . . . . . . . . . . . . . . . .
l 18, 45, 50
(13) Изменить режим записи . . . . . . . . . . . . . . . . . . . . . . . . . . . .
l 18
(14) Окошко передатчика
(15) Телевизионные операции . . . . . . . . . . . . . . . . . . . . . . . .
l 15, 21
(16) Выбор канала . . . . . . . . . . . . . . . . . . . . . . . . . . . . . . . . . . . . .
l 18
TRACKING/V-LOCK . . . . . . . . . . . . . . . . . . . . . . . . . . . . . . . . . .
l 33
(17) Показать экран S
HOW
V
IEW
. . . . . . . . . . . . . . . . . . . . . . . . . .
l 23
(18) Выбор входа (AV1, AV2 или DV IN) . . . . . . . . . . . . . . . . . . . .
l 50
(19) Удаление элементов . . . . . . . . . . . . . . . . . . . . . . . . . . . . . . .
l 27
(20) Переход на 30 секунд вперёд . . . . . . . . . . . . . . . . . . . . . . . .
l 26
(21) Показать список записи таймера . . . . . . . . . . . . . . . . . . . .
l 24
(22) Показать окно FUNCTIONS . . . . . . . . . . . . . . . . . . . . . . . . . .
l 36
(23) Вернуться на предыдущий экран
(24) Показывать сообщения о состоянии . . . . . . . . . . . . . .
l 33, 36
(25) Создание глав . . . . . . . . . . . . . . . . . . . . . . . . . . . . . . . . . . . . .
l 27
Перемещение пункта программы . . . . . . . . . . . . . . . . . . . .
l 60
(26) Начать гибкую запись . . . . . . . . . . . . . . . . . . . . . . . . . . . . . .
l 22
Примечание
≥Чтобы некоторые кнопки, например, [¥, REC], не нажимались
случайно, они сделаны менее выпуклыми, чем другие кнопки.
≥В данной инструкции опущено слово “кнопка”, т.е. операции типа
“Нажмите кнопку [ENTER].” описаны как “Нажмите [ENTER].”
≥Этот пульт дистанционного управления можно использовать для
управления телевизором, если установить код изготовителя
телевизора (
l 15).
∫О батарейках
≥Вставляйте батарейки
так, чтобы их полюсы
(
i и j) совпадали с
полюсами пульта
дистанционного
управления.
Запрещается:
≥совместно использовать старую и новую батарейку.
≥использовать одновременно разнотипные батарейки.
≥нагревать или бросать в огонь.
≥ разбирать батарейки или создавать короткое замыкание.
≥пытаться перезаряжать щелочные или марганцевые батарейки.
≥использовать батарейки со снятой оболочкой.
Неправильное обращение с батарейками может привести к утечке
электролита, что может повредить элементы, на которые попадет
жидкость, и может привести к пожару.
Вынимайте батарейки, если пульт дистанционного управления не
будет использоваться на протяжении длительного периода времени.
Храните в темном прохладном месте.
∫ Как пользоваться пультом дистанционного управления
Избегая препятствий сигналу, направьте пульт на приемник с
расстояния не более 7 м, прямо на переднюю панель аппарата.
Примечание
≥Вытирайте пыль с окошка передатчика и приемника аппарата.
≥На работу могут влиять внешние источники света, например,
прямой солнечный свет, флуоресцентные лампы с инверторами,
стеклянные двери шкафов.
≥Если после замены батареек управление аппаратом или
телевизором с помощью пульта ДУ становится невозможным,
повторно введите коды (
l 15).
Пульт дистанционного управления
DVD/VHS
CHAPTER
CREATE
RETURN
A
B
PRO
G/CHECK
ShowView
ENTER
FU
NC
TIO
NS
VOLUME
CH
CH
PLAY
PAUSE
STOP
SKIP/INDEX
SLOW/SEARCH
REW
FF
3
2
1
6
5
4
9
8
7
0
STATUS
DELETE
REC MODE
SUB MENU
MANUAL SKIP
TIME SLIP/ JET REW
DI
RE
CT
NA
VIG
AT
OR
DISPLAY
AUDIO
REC
F Rec
TRACKING/V-LOCK
RESET
DRIVE
SELECT
AV
C
INPUT
SELECT
(1)
(2)
(4)
(5)
(7)
(6)
(3)
(9)
(15)
(16)
(22)
(23)
(8)
(26)
(14)
(17)
(18)
(25)
(10)
(11)
(12)
(13)
(19)
(20)
(21)
(24)
∫ Кнопки [DRIVE SELECT] (2)
[DVD]
≥Перед выполнением операций на DVD обязательно
нажмите [DRIVE SELECT], чтобы выбрать DVD.
Проверьте, горит ли индикатор DVD на аппарате.
[VHS]
≥Перед выполнением операций c VHS обязательно
нажмите [DRIVE SELECT] для выбора VHS. Проверьте,
горит ли на аппарате индикатор VHS .
≥ He иcпoльзyйтe бaтapeи
пepeзapяжaeмoгo типa.
R6/LR6, AA
Приемник сигнала пульта
дистанционного управления
7 м непосредственно на
переднюю панель аппарата
M6720(EE_ru)_Russian.book 10 ページ 2006年4月19日 水曜日 午後1時35分

Комментарии

50
RQTV0140
Перемещение (копирование)
При подключении к входным гнездам AV2 или DV IN на
фронтальной панели аппарата.
≥Вы можете также использовать гнёзда AV1 на задней панели
устройства.
Перед подключением каких-либо кабелей убедитесь сначала, что
питание аппарата и внешних устройств отключено. После этого,
соединив кабели, включите аппарат и внешние устройства.
Примечание
≥Если другое оборудование имеет монофонический аудиовыход,
подключитесь к L/MONO. (При подключении к L/MONO
записываются как правый, так и левый каналы.)
≥При подключении к разъему S VIDEO IN изображение отличается
лучшим качеством, чем при подключении к VIDEO IN.
[1]
Для выбора режима записи нажмите
[REC MODE].
(
l 18)
[2]
Во время остановки
Нажмите [CH,
W, X] или [INPUT SELECT], чтобы
выбрать входной канал подключенного
оборудования.
≥Выберите AV1, AV2 или DV.
Выполните описанные выше шаги 1–2.
[3]
Начните воспроизведение на внешнем
устройстве.
[RAM] [-R] [-R]DL] [-RW‹V›] [+R] [+R]DL] [+RW]
≥Также можно производить запись в гибком режиме (FR).
Следуйте указаниям в разделе “Режим гибкой записи (FR)”
(
l 22) после этого пункта. (Не нужно переходить к пункту 4).
[4]
Нажмите [
¥, REC] в точке, с которой хотите
начать запись.
Выполните описанные выше шаги 1–2.
[3]
Нажмите [
1, PLAY].
≥Начните воспроизведение видеокассеты и найдите начальную
точку записи.
[4]
Нажмите [
;, PAUSE], а затем нажмите [¥, REC].
≥Переведите аппарат в режим ожидания записи.
[5]
Начните воспроизведение на внешнем устройстве.
[6]
Нажмите [
;, PAUSE] в точке, с которой хотите
начать запись.
∫ Чтобы пропустить нежелательные фрагменты
Нажмите [
;, PAUSE], чтобы приостановить запись. (Чтобы
возобновить запись, нажмите повторно.)
∫ Чтобы прекратить запись
Нажмите [
∫, STOP].
К вашему сведению
≥Почти все продаваемое программное обеспечение для видео и
DVD оснащено защитой от незаконного копирования. Копировать
такое программное обеспечение нельзя.
Запись с внешнего устройства
DVD/VHS
RETURN
ENTER
FU
NC
TIO
NS
CH
PLAY
PAUSE
STOP
REC MODE
REC
DRIVE
SELECT
INPUT
SELECT
2
ENTER
∫
RETURN
FUNCTIONS
1
;
DRIVE
SELECT
INPUT
SELECT
Í
CH,
W, X
µ
REC MODE
(2)
(1)
(4)
(3)
S VIDEO IN
AV 2
VIDEO IN
/MONO AUDIO R
L
(1) Кабель S Video(не входит в комплект)
(2) Аудио-/видеокабель (не входит в комплект)
A Желтый (ВИДЕО)
B Белый (L)
CКрасный (R)
(3) Кабель DV
(IEEE 1394 4-штыревой, не входит в комплект)
(4) Аппаратура воспроизведения
Подготовка
≥Выберите на телевизоре канал просмотра аппарата (например, вход AV).
DVD
[RAM] [-R] [-R]DL] [-RW‹V›] [+R] [+R]DL] [+RW]
≥[RAM] Снимите защиту (диск
l 55, кассета l 55).
≥Нажатием [DRIVE SELECT] выберите DVD.
≥При записи двуязычных программ
[RAM]
Если на оборудовании выбран и M 1, и M 2, можно выбрать тип
звука при воспроизведении.
[-R] [-R]DL] [-RW‹V›] [+R] [+R]DL] [+RW]
Выберите на подключенном оборудовании либо M 1, либо M 2.
(Переключать тип звука во время воспроизведения невозможно.)
≥Если внешнее оборудование дает выходной сигнал NTSC,
измените “Система ТВ” в меню “Нач. наст.” на “NTSC” (
l 59).
≥Данный аппарат не может записывать диски, содержащие
сигналы PAL и NTSC.
VHS
≥Вставьте видеокассету с язычком защиты от ненамеренного
стирания. (
l 17)
≥Нажатием [DRIVE SELECT] выберите VHS.
∫ DVD
∫ VHS
M6720(EE_ru)_Russian.book 50 ページ 2006年4月19日 水曜日 午後1時35分

11
RQTV0140
(1) Кнопка выброса кассеты (
<, EJECT) . . . . . . . . . . . . . . . . .
l 17
(2) Кнопка открытия/закрытия лотка диска
(
<, OPEN/CLOSE) . . . . . . . . . . . . . . . . . . . . . . . . . . . . . . . . . .
l 17
(3) Кнопка остановки (
∫) . . . . . . . . . . . . . . . . . . . . . . . . . . . . . .
l 45
(4) Кнопка воспроизведения (
1) . . . . . . . . . . . . . . . . . . . . . . .
l 45
(5) Кнопка записи (
¥, REC) . . . . . . . . . . . . . . . . . . . . . . . . . .
l 20, 45
(6) Переключатель “Режим ожидания/Вкл.” (
Í/I) . . . . . . . . .
l 14
Нажмите его, чтобы переключить аппарат из включенного
состояния в режим ожидания или наоборот. В режиме ожидания
аппарат все равно потребляет немного энергии.
(7) Разъемы входов AV2 (AV2) . . . . . . . . . . . . . . . . . . . . . . . . . .
l 50
(8) Кнопки DVD-SEARCH, VHS-REW/FF (
V/6, 5/W)
(9) Выбор канала — вверх/вниз
Кнопки Tracking/V-Lock (CH,
X, W) . . . . . . . . . . .
l 14, 18, 33, 61
(10) Индикатор привода DVD/VHS . . . . . . . . . . . . . . . . . . . . . . .
l 10
≥Светится при выборе привода DVD или VHS.
(11) Кнопка DRIVE SELECT . . . . . . . . . . . . . . . . . . . . . . . . . . . . .
l 10
≥Тип устройства переключается при каждом нажатии
[DRIVE SELECT].
(12) Гнездо для подсоединения цифровой
видеокамеры (DV) . . . . . . . . . . . . . . . . . . . . . . . . . . . . . .
l 50, 51
(13) Кнопка быстрого перемещения (копирования)
≥С VHS на DVD . . . . . . . . . . . . . . . . . . . . . . . . . . . . . . . . . . . .
l 45
≥С DVD на VHS . . . . . . . . . . . . . . . . . . . . . . . . . . . . . . . . . . . .
l 47
Общие элементы для DVD/VHS
[A] Индикатор режима записи
DVD (
l 19)
≥XP SP LP EP (все включено): режим FR (
l 22)
VHS (
l 19)
≥SP: При записи или воспроизведении в обычном режиме.
≥LP: При записи или воспроизведении в режиме длительного
воспроизведения.
≥EP: При записи или воспроизведении в режиме очень
длительного воспроизведения.
[B] Основной дисплей
≥Текущее время
≥Счетчик записи и воспроизведения DVD
≥Счетчик записи и воспроизведения VHS
≥Разные сообщения и т.д.
VHS
(1) Индикатор записи по таймеру (
) (
l 23 ,24)
Вкл.:
После запоминания программы для записи по таймеру и при
наличии пригодной для записи ленты.
Мерцает:
Когда аппарат не может записать программу, предназначенную
для записи по таймеру (например, нет ленты, аппарат не
находится в режиме ожидания и т.д.).
(2) Индикатор ленты
(3) Рабочее состояние ленты
DVD
(1) Индикатор записи по таймеру (
) (
l 23 ,24)
Вкл.:
Когда зарегистрирована программа для записи по таймеру и
вставлен диск, пригодный для записи.
Мерцает:
Когда аппарат не может записать программу, предназначенную
для записи по таймеру (например, нет диска, аппарат не
находится в режиме ожидания и т.д.).
(2) Рабочее состояние диска
(3) Индикатор диска
Основной блок
CH
CH
DRIVE
SELECT
REC
OPEN /CLOSE
EJECT
S VIDEO IN
AV 2
VIDEO IN
/MONO AUDIO IN R
L
COPYING
COPYING
(2)
(1)
(5)
(3) (4)
(13)
(6)
(7)
(8) (9)
(11)
(12)
(10)
Приемник сигнала пульта
дистанционного управления
Кассетное отделение
Лоток для диска
Дисплей аппарата
Дисплей блока
(2)
(3)
(2)
(3)
(1)
(1)
[A]
[B]
С
п
р
а
во
ч
ное
рук
оводс
т
во
п
о
о
р
га
н
а
м
упра
вл
е
ния/Пуль
т
дис
т
а
нционн
ого упра
вле
н
ия/Ос
н
овной блок
M6720(EE_ru)_Russian.book 11 ページ 2006年4月19日 水曜日 午後1時35分
- Manuals
- Brands
- Panasonic Manuals
- DVD Recorder
- Diga DMR-ES35V
Manuals and User Guides for Panasonic Diga DMR-ES35V. We have 6 Panasonic Diga DMR-ES35V manuals available for free PDF download: Operating Instructions Manual, Instrucciones De Funcionamiento, Setup Manual
-
Contents
-
Table of Contents
-
Bookmarks
Quick Links
Operating Instructions
DVD Recorder
Model No. DMR-ES35V
Please read the operating instructions, the safety notes and the notes on setting up the unit on page 3 before connecting,
operating or setting up the unit.
TM
Related Manuals for Panasonic Diga DMR-ES35V
Summary of Contents for Panasonic Diga DMR-ES35V
-
Page 1: Operating Instructions
Operating Instructions DVD Recorder Model No. DMR-ES35V Please read the operating instructions, the safety notes and the notes on setting up the unit on page 3 before connecting, operating or setting up the unit.
-
Page 2: Table Of Contents
Contents Safety precautions Information on the unitt Licence information Before you start Included accessories Inserting batteries Remote Control Front Panel On-screen displays Rear Panel Connections Connection with 21-pin Scart cable Connection with Audio/Video cable Connection with S VIDEO-cable Settings Country Auto-Setup Download from TV with Q Link TV Aspect…
-
Page 3: Safety Precautions
Safety precautions Install this device in a horizontal position. Do not place anything heavy on it. Keep this device away from high temperatures and avoid changes in temperatures. Keep away from liquids, humidity and dust. Back of product, see page 9. På…
-
Page 4: Information On The Unitt
Information on the unit DivX-compatible DivX files can be played back from CD-R/CD-RW and DVD-R. Quick start You can record to DVD-RAM about one second after switching on the unit. COPYING With the push of a button, you can copy the content of a VHS cassette to a disc or vice versa.
-
Page 5: Before You Start
Dear customer Thank you for your trust and your decision to purchase this top-quality device. Panasonic is one of the leading manufacturers of entertainment electronics devices. We are sure that you will be completely satisfied with this device. Matsushita Electric Industrial Co., Ltd.
-
Page 6: Remote Control
Switches between TV reception and AV input each time the button is pressed. Setting up the remote control If you are using another Panasonic unit at the same location, change the setting of the remote control so that you can operate the units independently of each other.
-
Page 7
Remote Control DVD/VHS Standby/on switch Press to switch the unit from on to standby mode or vice versa. In standby mode, the unit is still consuming a small amount of power. DRIVE DRIVE SELECT SELECT Select the DVD or VHS drive. Direct entry using the number buttons Selection of channels, title numbers, etc. -
Page 8: Front Panel
Front Panel Cassette Compartment Standby/On switch : Press to switch the unit from on to standby mode or vice versa. In standby mode, the unit is still consuming a small amount of power. Switching this unit into standby mode does not disconnect it from the mains. Standby/On switch Drive select VHS or DVD…
-
Page 9: Rear Panel
Rear Panel AC IN AC IN~ = Power supply Connection for the power cable. Audio output, right/left channel AUDIO OUT AV2 (DECODER/EXT) = 21-pin Scart socket External unit connection AV2 (DECODER/EXT) S VIDEO OUT S VIDEO output socket RF OUT Aerial output The outputs of 2, 3, 4, 7 and 8 are dedicated to modules of digital signal processing (DVD).
-
Page 10: Connections
Disconnect all units from the power supply system. RF IN COMPONENTVIDEO OUT S VIDEO OUT Connect the aerial to RF IN (Aerial input) of the DVD Recorder. RF OUT RF OUT Aerial output Connect RF OUT (Aerial output) of the DVD Recorder with the aerial input of the TV.
-
Page 11: Connection With S Video-Cable
Disconnect all units from the power supply system. S VIDEO OUT RF OUT RF OUT Connect the aerial to RF IN (Aerial input) of the DVD Recorder. Aerial output Connect RF OUT (Aerial output) of the DVD Recorder with the aerial input of the TV.
-
Page 12: External Units
Connect the external unit with a 21-pin Scart cable to the AV connection of the DVD Recorder. Connect the aerial external unit. RF IN Connect the DVD Recorder, the TV and the external unit to the COMPONENTVIDEO OUT power supply system S VIDEO OUT RF OUT Switch on the external unit, the TV and the DVD Recorder.
-
Page 13: Connecting An Analogue Amplifier
Digital satellite tuners and digital VHS video recorders are not compatible with this unit. The DVD Recorder cannot be controlled via an external unit that is connected to the DV IN socket. Before you connect the DV cable, make sure that all units are switched off.
-
Page 14: Component Video Out
COMPONENT VIDEO OUT COMPONENT VIDEO IN Audioinput L/R Video cable Audio cable PB — PR — L — White R — Red COMPONENTVIDEO OUT S VIDEO OUT DIGITALAUDIO OUT AUDIO (PCM/BITSTREAM) TV Aspect Setup Progressive Tuning TV System Disc Video Picture AV1 Output Sound…
-
Page 15: Status Displays
STATUS displays DVD-RAM PLAY Status displays DVD-RAM PLAY Stereo VHS REC Status displays for other drive. Detail information 10:07:21 1.12. Remain 0:50 SP T14 0:05.14 SP T14 0:05.14 SP 0:21.29 STATUS Screen information Press STATUS Press STATUS again. Depending on the function, e.g. PLAY, REC or REC PLAY, the display changes each time the button is pressed.
-
Page 16: Disc Formats
Disc formats DVD-RAM: DVD Video Recording format DVD-RAM 4.7 GB 12 cm 9.4 GB 12 cm 2.8 GB 8 cm rewritable DVD-R : DVD-Video format : +VR format DVD-R 4.7 GB 12 cm 1.4 GB 8 cm writable 4.7 GB 12 cm writable DVD-RW : DVD-Video format : +VR format…
-
Page 17: Playback Discs
DVD lens cleaner (RP-CL720E) Compatible models: Only for Panasonic’s DVD recorders. Do NOT use this cleaner with any other Panasonic DVD products or with the DVD products of any other companies since doing so may damage the products. Cleaning DVD-Videos, Video-CDs and CDs…
-
Page 18: Playback (Dvd)
You can select other pages with SKIP Finalising Auto finalisation is always offered before an unfinalised disc is ejected. You can only play an unfinalised disc on this DVD Recorder. Press OPEN/CLOSE on the unit. Press on the unit to start the finalisation.
-
Page 19: Pausing Playback
Playback PAUSE Pausing playback Press PAUSE to pause playback. Press PAUSE again to resume playback. STOP Stopping playback Press STOP Playback stops and the television picture appears. During playback of DVD-A, DVD-V, VCD and CD press television picture. Saving the playback position Press STOP during playback.
-
Page 20: Time Slip
Playback 0 min Stop Recording Timer recording in progress. Stop this timer recording ? It will be cancelled if you stop. Stop Recording Cancel SELECT ENTER RETURN ENTER TIME SLIP/ JET REW TIME SLIP Press TIME SLIP during playback. to select the time span by which playback is to jump forward or backward. Each time the button is pressed, the time span increases or decreases in minute increments.
-
Page 21: Preparation
Playback The tape automatically rewinds when the end is reached. This function is not available during a timer recording. Preparation Switch on the DVD Recorder and use Enter a recorded video cassette. PLAY Playing a video cassette Press PLAY to start playback.
-
Page 22: S-Vhs Quasi Playback (Sqpb)
Do not open the housing or the protective flap on the front side of the cassette and do not touch the tape. Use high-quality name-brand cassettes, such as those made by Panasonic. When playing cassettes recorded on another VHS-Recorder, there may be a slight decrease in picture quality.
-
Page 23: Recording
Recording Maximum number of recordable titles RAM -R -RW(V) -R DL +R +RW +R DL Programmes in 16:9 format are recorded in 4:3 format. 16:9 format is used to record to RAM. Titles in PAL or NTSC format can be displayed on the following TV sets: TV type Disc…
-
Page 24: Record
Recording Approx. recording times in hours — R, — RW DVD-RAM +R, +RW 4.7 GB 9.4 GB 4.7 GB EP: 6 h EP: 8 h Approx. recording times in hours -R DL +R DL 8.5 GB Total 1st Layer 2nd Layer 1:45 0:55 0:50…
-
Page 25: Specifying A Time As The Recording Duration
Recording S VIDEO IN VIDEO IN L/MONO AUDIO IN R S VIDEO-cable Audio cable L — White R — Red S VIDEO IN VIDEO IN L/MONO AUDIO IN R Audio/Video cable Video — Yellow — White R — Red Recording in dual-channel audio On DVD-RAM, both channels of a programme in dual-channel sound are recorded.
-
Page 26: Functions
FUNCTIONS ENTER FUNCTIONS DVD-RAM Disc Protection Off Schreibschutz Aus Playback Recording Delete Copy To Others ENTER RETURN FUNCTIONS DVD-RAM Disc Protection Off Schreibschutz Aus ShowView Record Playback Recording Playlists Delete Flexible Rec DV Auto Rec Copy Setup To Others DVD Management ENTER RETURN SELECT…
-
Page 27: Entering Text
FUNCTIONS Programme Name Standard Characters Other Characters TERRALUNA_ & Delete < > Add to List List Names Z w x » SELECT Space RETURN ENTER Enter Name Standard Characters Other Characters TERRALUNA_ Top Menu Preview TERRALUNA & < > List Names 01 ASTRA 02 TERRALUNA SELECT…
-
Page 28: Direct Navigator
FUNCTIONS FUNCTIONS DIRECT NAVIGATOR Title View DVD-RAM ZDF 6. 3. MON Previous Page 02/02 Next ENTER SUB MENU Select Previous Next RETURN Delete Properties Edit Chapter View Delete Terra X Date 10.3.2006 FRI Time 16:40 Name ARTE Remaining Time 0:30(SP) Corresponding chapter of playlists will be deleted.
-
Page 29: Editing Titles In The Sub Menu
FUNCTIONS FUNCTIONS Enter Name Delete Set up Protection Properties Cancel Protection Edit Partial Delete Chapter View Change Thumbnail Divide Title DIRECT NAVIGATOR Partial Delete DVD-RAM 03 Terra X PLAY Start Next Exit 0:00.35 Start —:—.— —:—.— Partial Delete Terra X Date 10.3.2006 FRI Time…
-
Page 30: Editing Chapters In The Sub Menu
FUNCTIONS FUNCTIONS Delete Delete Chapter Properties Create Chapter Edit Combine Chapters Chapter View Title View DIRECT NAVIGATOR Chapter View DVD-RAM 01 EUROSPORT 11. 3. SAT 0:00.58 0:00.58 0:01.30 0:01.45 0:03.10 Previous Next Page 01/01 Combine Chapters Selected Chapter Following Chapter Combine chapters.
-
Page 31: Divx Playback
FUNCTIONS DivX Menu Folder1 : DivX — Inhalt DVD(DivX) Name of Title Tree 001 AdrianaEvans_7Days.avi 002 Madagascar — HD.avi 003 Transporter2.avi Page 001/001 Total Title : 003 ENTER RETURN DivX Menu Folder DVD(DivX) 0 1/ 1 26 Sep 2003 DivX — … JPEG — …
-
Page 32: Mp3 Playback
FUNCTIONS Menu Select file type. DivX JPEG ENTER RETURN Group Menu 1 : Set me Free Total Track Tree 01 — Only Truth TOTAL 02 — Set Me Free 1/ 12 03 — More Precious 04 — Not My Will Number 05 — My LordAnd My God 06 — Lead Me To Rest…
-
Page 33: Jpeg/Tiff Playback
FUNCTIONS If TIFF still pictures are played back or if there are a lot of files, sessions and/or folders, it can take a relatively long time to display the data. Menu Select file type. DivX JPEG ENTER RETURN JPEG Menu Picture (JPEG) View DVD (JPEG) JPEG — Content…
-
Page 34: Recording
FUNCTIONS FUNCTIONS Timer Remain DVD 2:00 SP Recording VHS —:— — 12:40:46 24. 2. FRI Name Date Start Stop Mode Drive —.—.— —:— —:— Programme Name Please set Channel. ENTER Number RETURN Timer Remain DVD 2:00 SP Recording VHS —:— — 12:40:46 24.
-
Page 35: Checking Or Changing Timer Recordings
FUNCTIONS Timer Remain DVD 2:00 SP Recording VHS —:— — 12:40:46 24. 2. FRI Drive Mode Name Date Start Stop Drive space 01 ZDF 6. 3. MON 17:00 17:15 DVD SP Off 02 ARTE 10. 3. MON 20:45 21:30 DVD SP Off New Timer Programme ENTER SUB MENU…
-
Page 36: Timer Recording Via External Units
Recording programming on an external unit The programming for a timer recording takes place on an external unit. Read the operating instructions for your external unit. Switching the DVD Recorder to recording standby mode Select recording drive DVD or VHS with Press…
-
Page 37: Delete
FUNCTIONS FUNCTIONS NAVIGATOR LÖSCHEN Titelansicht DELETE Navigator Title View DVD-RAM ZDF 6. 3. MON Previous Page 01/01 Next ENTER SUB MENU Select RETURN Properties Set up Protection Edit Cancel Protection Delete Deleting titles and pictures You can delete titles or write-protect recordings so that they are not accidentally deleted or overwritten.
-
Page 38: Copy
FUNCTIONS FUNCTIONS Copy Cancel All Source Copy Direction Destination Copy Mode VIDEO Create List Select the copy direction Start Copying Copy Direction Source Destination Press ENTER to change the setting. Copy Mode Format VIDEO Recording Mode Press ENTER to change the setting.
-
Page 39: Time-Triggered Copying
FUNCTIONS FUNCTIONS Copy Cancel All Source Copy Direction Destination Copy Mode VHS-Video Copy Time Select the copy direction. Start Copying Copy Direction Source Destination Press ENTER to change the setting. Copy Mode Format VHS-Video Recording Mode Press ENTER to change the setting.
-
Page 40: Copying
COPYING On the front of the unit COPYING Copy Do you want to finalize the disc after copying completes ? Finalizing is to allow the disc to be played on other DVD players. The disc becomes play-only. Press REC to start finalizing after copying completes.
-
Page 41: Showview Record
FUNCTIONS FUNCTIONS FUNCTIONS To Others Remain DVD 0:02 SP ShowView VHS —:— — 12:40:46 24. 2. FRI Record Input ShowView Number 0-9, and press ENTER. ENTER Number RETURN Timer Remain DVD 0:02 SP Recording VHS —:— — 12:40:46 24. 2. FRI Name Date Start Stop…
-
Page 42: Playlists
FUNCTIONS FUNCTIONS To Others Playlists Playlist View DVD-RAM Create ZDF 6. 3. MON Previous Page 01/01 Next ENTER SUB MENU Select RETURN Playlists Create DVD-RAM 02 EUROSPORT 11. 3. SAT Motors Source Title Page 01/01 Create Chapter Source Chapter Seite 001/001 Create Source Chap.
-
Page 43: Launching The Playlists Menu
FUNCTIONS FUNCTIONS To Others Delete Properties Edit Chapter View Delete Delete playlists ? Delete Cancel SELECT ENTER RETURN Properties Terra X Date 10.3.2006 FRI Chaptersl 005 Total 1:15.35 ENTER RETURN Delete Create Properties Copy Edit Enter Name Change Thumbnail Chapter View Playlists Change Thumbnail DVD-RAM…
-
Page 44: Playlists
FUNCTIONS FUNCTIONS To Others Delete Add Chapter Properties Move Chapter Edit Create Chapter Combine Chapters Chapter View Delete Chapter Playlist View Playlists Chapter View DVD-RAM 02 11. 3. SAT 3:27 3:27.01 0:01.30 0:01.45 0:03.10 Add Chapter Playlists DVD-RAM 02 EUROSPORT 11. 3. SAT Motors Source Title Page 01/01 Source Chapter…
-
Page 45: Flexible Rec
Press on the DVD Recorder. Start playback on the external DV unit. End the recording on the DVD Recorder with End playback on the DV unit. Recording cannot be cancelled with This unit cannot be controlled from a connected DV unit. The DV input of this unit is only designed for DV units.
-
Page 46: Setup
FUNCTIONS To Others FUNCTIONS Setup Manual Tuning Auto-Setup Restart Disc Download from TV Picture Sound Display Connection SELECT Others RETURN ENTER Manual Tuning Pos Name Ch Pos Name Ch —— —— —— SAT1 —— PRO7 —— SELECT —— —— —— —— ENTER ——…
-
Page 47: Disc, List Of Language Codes
FUNCTIONS To Others FUNCTIONS Auto-Setup Restart Warning—all stored tuning data will be lost ! Do you want to proceed ? Download from TV Warning—all currently stored stations will be replaced by new ones !! Settings for Playback Setup Ratings Level 8 Tuning DVD-Audio Video mode Playback Disc…
-
Page 48: Picture
FUNCTIONS To Others FUNCTIONS Comb Filter Setup Still Mode Automatic Tuning Disc Picture Sound Display Connection SELECT RETURN Others Setup Setting Picture Comb Filter : The picture is clear and contour-rich. The setting is always set to [On] if you selected [TV System — NTSC].
-
Page 49: Sound
Digital Audio Output Select the appropriate setting if you have connected an external unit to the DIGITAL AUDIO OUT of the DVD Recorder. PCM Down Conversion Select the audio output mode for a scan frequency of 96 kHz or 88.2 kHz. Despite this setting, signals are converted to 48 kHz or 44.1 kHz if they have a scan frequency over…
-
Page 50: Connection
RETURN ENTER AV-Link function Switching between television reception and the signal from the DVD Recorder. This function is only possible if the AV1 Output is set to [Video ( with component )] or [RGB 2 ( without component )]. DVD recorder signal: Press ENTER 0 DVD appears on the display.
-
Page 51: Vhs
The Quick Start setting is set to [Off]. If you want to connect an external unit via the AV2 Scart socket, the DVD Recorder must be switched back on from Standby mode. : The brightness of the display field can be changed.
-
Page 52: Dvd Management
FUNCTIONS To Others FUNCTIONS Management Titles 1 Remain 0:59(LP) DVD-RAM Used 0:01 Disc Name Disc Protection Delete all titles SELECT Format Disc ENTER RETURN Delete all titles All titles and playlists will be deleted. Is it OK to start deleting all titles ? Format Disc All contents will be deleted even if protected.
-
Page 53: Dvd Management
FUNCTIONS To Others FUNCTIONS Management Titles 1 Remain 0:59(LP) +R DL Used 0:01 of the first layer Disc Name Auto-Play Select Top Menu Finalize Close First Layer SELECT ENTER RETURN Finalize Finalizing is necessary for compatible playback. It will take approximately 4 minutes. Finalize the disc ? Close First Layer The first layer will be non-recordable…
-
Page 54: Picture And Sound Settings
Picture and sound settings DISPLAY menus contain information on the disc or the unit. With DVD-Videos, you can use the repeat function, change subtitles and the angle, change the picture and sound settings for DVD playback. Depending on the status of the unit (playback, STOP), there are some entries that cannot be selected or changed.
-
Page 55
Picture and sound settings Play Option Repeat Play Picture Option Playback NR Progressive Transfer. Copy NR Sound Option V.S.S. Dialog Enhancer Other Option Position Setting [On] [Off] The function is only available if the elapsed time is displayed. CD VCD Track RAM -R -R DL… -
Page 56: If You Need Help
If the disc cannot be played due to poor quality, try it again with a disc from Panasonic. î The unit is malfunctioning. î The numbers following H, U or F indicate the status of the unit.
-
Page 57
If you need help PICTURE No picture. There is picture interference. Television reception worsens when the unit is connected. The TV picture format is not set correctly. The picture flickers. No on-screen messages. SOUND No sound. Distorted sound. Volume set to quiet. It is not possible to hear the desired sound type. -
Page 58
If you need help PLAYBACK Playback does not start. DVD-Video will not play. No reaction when PLAY pressed A title or chapter is not played back after being selected. Soundtrack/subtitles cannot be selected or do not match the language selected in the Setup menu. -
Page 59: Specifications
Specifications Power supply AC 220V-240V Power consumption : 26 W (approx. 2 W in power save mode) Recording format DVD-RAM: DVD Video Recording format DVD-R: DVD-Video format, MP3, JPEG, DivX DVD-R DL: DVD-Video format DVD-RW: DVD-Video format, DVD Video Recording format +R, +RW, +R DL Recording discs DVD-RAM: Ver.2.0, Ver.2.1 /3X Rev.1.0,…
-
Page 60: Index
Index C IN 9,10,11 Angle Audio Channel Audio Mode for DV Input Auto Finalise Auto-Play Auto-Setup Restart AV1 Output AV2 Connection AV2 Input AV-in NR AV-Link ilingual Audio Selection Bitstream amcorder Cartridge Discs Changing batteries Chapter (DIRECT NAVIGATOR) Chapter (Playlists) Child protection Code of remote control Comb Filter…

05
Super Multi-format Recording & Playback
1 Sec. Quick Start for Recording on DVD-RAM*
5
Universal Design GUI
(Graphic User Interface)
EASY OPERATION
2x LP Horizontal Resolution
(500 Lines)
VCR Refresh Copying with TBC & DNR
HIGH PICTURE QUALITY
DV Auto Recording & Playlist Creation
ARCHIVE
DV Input
*1 From the power on, recording starts in about 1 second after REC button is pressed.
*2 To enjoy viewing movies recorded on an SD Memory Card, copy the MPEG2 Movie data to the hard disk drive or DVD-RAM and then play back.
*3 Dolby and the double-D symbol are registered trademarks of Dolby Laboratories.
*4 From the power on, recording starts in about 1 second after REC button is pressed.
*5 From the power off state, recording on DVD-RAM starts about 1 second after first pressing the Power button and then sequentially pressing the REC button (Quick Start Mode).
Super Multi-format Recording & Playback
One-touch 2-way Copying
1 Sec. Quick Start for Recording on DVD-RAM*
5
Universal Design GUI
(Graphic User Interface)
EASY OPERATION
2x LP Horizontal Resolution
(500 Lines)
VCR Refresh Copying with TBC & DNR
HIGH PICTURE QUALITY
DV Auto Recording & Playlist Creation
ARCHIVE
*
3
*
3
DV Input
DMR-EH55
DVD Recorder with 160GB Hard Disk Drive & SD Slot
Super Multi-format Recording & Playback
1 Sec. Quick Start for Recording*
4
Universal Design GUI
(Graphic User Interface)
EASY OPERATION
2x LP Horizontal Resolution
(500 Lines)
VCR Refresh Copying with TBC & DNR
284 Recording Hours onto the Hard Disk Drive
(EP [8H] Mode)
HIGH PICTURE QUALITY
Photo Storage & Quick View with SD Slot
MPEG2 Transfer with SD Slot*
2
DV Auto Recording & Playlist Creation
ARCHIVE
DV Input
*
3
DMR-ES35V
DVD Recorder with VHS VCR
DMR-ES15
DVD Recorder
![]()
Operating Instructions
DVD Recorder
Model No. DMR-ES35V
TM
Please read the operating instructions, the safety notes and the notes on setting up the unit on page 3 before connecting, operating or setting up the unit.
Contents
|
Page |
Page |
Page |
||||
|
Safety precautions |
3 |
TIME SLIP |
20 |
Checking or changing timer recordings 35 |
||
|
Delayed playback |
20 |
Timer Off/On |
35 |
|||
|
Information on the unitt |
4 |
Quick View (PLAY/x1.3) |
20 |
Delete |
35 |
|
|
Licence information |
4 |
Simultaneous recording and playback |
20 |
Stop Recording |
35 |
|
|
Changing the audio channel |
20 |
|||||
|
Before you start |
5 |
Timer recording via external units |
36 |
|||
|
Included accessories |
5 |
Playback (VHS) |
21-22 |
|||
|
Inserting batteries |
5 |
Preparation |
21 |
Delete |
37 |
|
|
Playing a video cassette |
21 |
Deleting titles and pictures |
37 |
|||
|
Remote Control |
6-7 |
Repeat playback |
21 |
Properties |
37 |
|
|
Stopping playback |
21 |
Set up Protection/Cancel Protection |
37 |
|||
|
Front Panel |
8 |
Pausing playback |
21 |
|||
|
On-screen displays |
8 |
Slow-motion playback |
21 |
Copy |
38-39 |
|
|
Frame playback |
21 |
Copying with a copy list |
38 |
|||
|
Rear Panel |
9 |
Forwards/backwards search |
21 |
Time-triggered copying |
39 |
|
|
Fast forward/Jet rewind |
21 |
|||||
|
Connections |
10-11 |
JET REW |
21 |
COPYING |
40 |
|
|
Connection with 21-pin Scart cable |
10 |
VHS Index Search System (VISS) |
21 |
Copying from VHS to DVD |
40 |
|
|
Connection with Audio/Video cable |
10 |
S-VHS Quasi Playback (SQPB) |
22 |
Finalising |
40 |
|
|
Connection with S VIDEO-cable |
11 |
Manual tracking |
22 |
Copying from DVD to VHS |
40 |
|
|
Automatic tracking |
22 |
|||||
|
Settings |
11 |
Handling video cassettes |
22 |
ShowView Record |
41 |
|
|
Country |
11 |
Write-protecting cassettes |
22 |
ShowView Record |
41 |
|
|
Auto-Setup |
11 |
Cleaning video heads |
22 |
|||
|
Download from TV with Q Link |
11 |
Playlists |
42-44 |
|||
|
TV Aspect |
11 |
Recording |
23-25 |
Creating a playlist |
42 |
|
|
Setting the date and time |
11 |
Before recording |
23 |
Launching the Playlists menu |
43 |
|
|
Disc Protection,CPRM |
23 |
Editing playlists in the SUB MENU |
43 |
|||
|
External units |
12-14 |
Formatting |
23 |
Editing chapters in the SUB MENU |
44 |
|
|
Connection of Set Top Box |
12 |
For recording |
23 |
|||
|
or satellite receiver |
Record |
24 |
Flexible Rec |
45 |
||
|
Connecting a decoder |
12 |
Pause the recording |
24 |
Flexible recording mode (FR) |
45 |
|
|
Connecting an analogue amplifier |
13 |
DVD recording of TV programmes |
24 |
|||
|
Connecting a digital amplifier |
13 |
Changing the recording mode |
24 |
DV Auto Rec |
45 |
|
|
Connecting to AV3 (e.g. camcoder) |
13 |
VHS recording of TV programmes |
24 |
Recording via DV input |
45 |
|
|
Connecting to DV IN |
13 |
The approx. time remaining on the cassette |
24 |
Manual recording via DV input |
45 |
|
|
Specifying a time as the recording duration |
25 |
|||||
|
COMPONENT VIDEO OUT |
14 |
DVD playback during recording |
25 |
Setup |
46-51 |
|
|
Connecting a TV with |
14 |
Direct TV recording |
25 |
Tuning |
46-47 |
|
|
COMPONENT VIDEO input sockets |
Recording from an external unit |
25 |
Disc, List of language codes |
47 |
||
|
Progressive television picture |
14 |
Selecting the sound track to record |
Picture |
48 |
||
|
for programmes with dual-channel sound |
25 |
Sound |
49 |
|||
|
STATUS displays |
15 |
Recording in dual-channel audio |
25 |
Display |
49 |
|
|
Screen information, Symbols |
15 |
Connection |
50 |
|||
|
FUNCTIONS |
26-53 |
AV-Link function |
50 |
|||
|
Disc formats |
16-17 |
Notes on the menus |
26 |
VHS |
51 |
|
|
Playback and recording discs |
16 |
Entering text |
27 |
Others |
51 |
|
|
Playback discs |
17 |
|||||
|
Handling discs |
17 |
DIRECT NAVIGATOR |
28-30 |
DVD Management |
52-53 |
|
|
Overview of DIRECT NAVIGATOR |
28 |
Disc Name |
52 |
|||
|
Playback (DVD) |
18-20 |
Launching the DIRECT NAVIGATOR menu |
28 |
Disc Protection |
52 |
|
|
Preparation, Playback |
18 |
Delete |
28 |
Delete all Titles |
52 |
|
|
Playback of a selected title |
18 |
Properties |
28 |
Format Disc |
52 |
|
|
Playback starts automatically |
18 |
Editing titles in the SUB MENU |
29 |
Auto-Play Select |
53 |
|
|
Selecting programmes/titles for playback |
18 |
Editing chapters in the SUB MENU |
30 |
Finalise |
53 |
|
|
Finalising |
18 |
Close First Layer |
53 |
|||
|
Pausing playback |
19 |
DivX playback |
31 |
Create Top Menu |
53 |
|
|
Stopping playback |
19 |
MP3 playback |
32 |
|||
|
Saving the playback position |
19 |
JPEG/TIFF playback |
33 |
Picture and sound settings |
54-55 |
|
|
Slow-motion playback |
19 |
|||||
|
Fast forward |
19 |
Recording |
34 |
If you need help |
56-58 |
|
|
Dividing a recording into chapters |
19 |
Manual programming |
34 |
|||
|
Skipping |
19 |
VPS/PDC feature |
34 |
Specifications |
59 |
|
|
MANUAL SKIP |
19 |
Autom. SP/LP switching |
34 |
|||
|
Frame playback |
19 |
Drive |
34 |
Index |
last page |
2

Safety precautions
Install this device in a horizontal position. Do not place anything heavy on it.
Keep this device away from high temperatures and avoid changes in temperatures.
Keep away from liquids, humidity  and dust.
Back of product, see page 9.
På baksiden av produktet (Norsk).
Laitteen takaosa (Fin).
LUOKAN 1 LASERLAITE / KLASS 1 LASER APPARAT
Inside of product
Produktets innside (Norsk)
Tuotteen sisällä (Fin)
Voltage: Only use power sources complying with the specifications for this device.
AC mains lead protection: Ensure the AC mains lead is connected correctly and not damaged. Poor connection and lead damage can cause fire or electric shock.
Service: Never attempt to repair this unit by yourself. If a problem occurs that is not described in these operating instructions, disconnect the power supply and contact your dealer or an authorised after sales service centre.
WARNING:
TO REDUCE THE RISK OF FIRE, ELECTRIC SHOCK OR PRODUCT DAMAGE, DO NOT EXPOSE THIS APPARATUS TO RAIN, MOISTURE, DRIPPING OR SPLASHING AND THAT NO OBJECTS FILLED WITH LIQUIDS, SUCH AS VASES, SHALL BE PLACED ON THE APPARATUS.
CAUTION!
DO NOT INSTALL OR PLACE THIS UNIT IN A BOOKCASE, BUILT-IN CABINET OR IN ANOTHER CONFINED SPACE. ENSURE THE UNIT IS WELL VENTILATED. TO PREVENT RISK OF ELECTRIC SHOCK OR FIRE HAZARD DUE TO OVERHEATING, ENSURE THAT CURTAINS AND ANY OTHER MATERIALS DO NOT OBSTRUCT THE VENTILATION VENTS.
DO NOT OBSTRUCT THE UNIT’S VENTILATION OPENINGS WITH NEWSPAPERS, TABLECLOTHS, CURTAINS, AND SIMILAR ITEMS.
DO NOT PLACE SOURCES OF NAKED FLAMES, SUCH AS LIGHTED CANDLES, ON THE UNIT.
DISPOSE OF BATTERIES IN AN ENVIRONMENTALLY FRIENDLY MANNER.
CAUTION!
THIS PRODUCT UTILIZES A LASER. USE OF CONTROLS OR ADJUSTMENTS OR PERFORMANCE OF PROCEDURES OTHER THAN THOSE SPECIFIED HEREIN MAY RESULT IN HAZARDOUS RADIATION EXPOSURE. DO NOT OPEN COVERS AND DO NOT REPAIR BY YOURSELF. REFER SERVICING TO QUALIFIED PERSONNEL.
THIS UNIT IS INTENDED FOR USE IN MODERATE CLIMATES.
This product may receive radio interference caused by mobile telephones during use. If such interference is apparent, please increase separation between the product and the mobile telephone.
The socket outlet shall be installed near the equipment and easily accessible or the mains plug or an appliance coupler shall remain readily operable.
The model and serial number of this product can be found on the back of the unit. Please note them and keep for future reference.
Model No. Serial No.
Sikkerhetsinstrukser (Norsk)
ADVARSEL:
FOR Å REDUSERE FAREN FOR BRANN, ELEKTRISK STØT ELLER SKADER PÅ PRODUKTET, MÅ DETTE APPARATET IKKE UTSETTES FOR REGN, FUKTIGHET, VANNDRÅPER ELLER VANNSPRUT. DET MÅ HELLER IKKE PLASSERES GJENSTANDER FYLT MED VANN, SLIK SOM BLOMSTERVASER, OPPÅ APPARATET.
ADVARSEL!
APPARATET MÅ IKKE PLASSERES I EN BOKHYLLE, ET INNEBYGGET KABINETT ELLER ET ANNET LUKKET STED HVOR VENTILASJONSFORHOLDENE ER UTILSTREKKELIGE. SØRG FOR AT GARDINER ELLER LIGNENDE IKKE FORVERRER VENTILASJONSFORHOLDENE, SÅ RISIKO FOR ELEKTRISK SJOKK ELLER BRANN FORÅRSAKET AV OVERHETING UNNGÅS.
APPARATETS VENTILASJONSÅPNINGER MÅ IKKE DEKKES TIL MED AVISER, BORDDUKER, GARDINER OG LIGNENDE.
PLASSER IKKE ÅPEN ILD, SLIK SOM LEVENDE LYS, OPPÅ APPARATET.
BRUKTE BATTERIER MÅ KASSERES UTEN FARE FOR MILJØET.
ADVARSEL!
DETTE PRODUKTET ANVENDER EN LASER. BETJENING AV KONTROLLER, JUSTERINGER ELLER ANDRE INNGREP ENN
DE SOM ER BESKREVET I DENNE BRUKSANVISNING, KAN FØRE TIL FARLIG BESTRÅLING. DEKSLER MÅ IKKE ÅPNES, OG FORSØK ALDRI Å REPARERE APPARATET PÅ EGENHÅND. ALT SERVICE OG REPARASJONSARBEID MÅ UTFØRES AV KVALIFISERT PERSONELL.
DETTE APPARATET ER BEREGNET TIL BRUK UNDER MODERATE KLIMAFORHOLD.
Dette apparatet kan under bruk fange opp høyfrekvente forstyrrelser forårsaket av en mobiltelefon som benyttes i nærheten. Hvis slik forstyrrende påvirkning konstateres, bør mobiltelefonen benyttes på større avstand fra dette apparatet.
Utstyret bør plasseres i nærheten av AC-stikkontakten, og støpslet må være lett tilgjengelig hvis det skulle oppstå problemer.
Turvallisuusohjeita (Finnish)
Norsk: Apparatet bør stilles opp i nærheten av stikkontakten på en slik måte at man uhindret får tilgang til nettpluggen hvis det skulle oppstå en feil.
Plasser apparatet horisontalt. Ikke plasser tunge gjenstander på apparatet.
Ikke utsett apparatet for høye temperaturer og temperatursvingninger.
Beskytt apparatet mot væske, fuktighet og støv.
Finnish: Laite tulisi sijoittaa verkkopistorasian lähelle siten, että verkkopistokkeeseen päästään häiriötapauksessa varmasti esteettömästi käsiksi.
Aseta laite vaakasuoraan. Älä aseta raskaita esineitä laitteen päälle.
Suojaa laite korkeiltalämpötiloilta ja lämpötilaheilahteluilta.
Suojaa laite nesteiltä, kosteudelta ja pölyltä.
VAROITUS:
TULIPALO-, SÄHKÖISKUVAARAN TAI TUOTETTA KOHTAAVAN MUUN VAHINGON VÄHENTÄMISEKSI EI LAITETTA SAA ALTISTAA SATEELLE, KOSTEUDELLE, VESIPISAROILLE TAI ROISKEELLE, EIKÄ NESTETTÄ SISÄLTÄVIÄ ESINEITÄ, KUTEN ESIMERKIKSI MALJAKOITA, SAA ASETTAA LAITTEEN PÄÄLLE.
VAROITUS!
ÄLÄ ASENNA TAI LAITA TÄTÄ LAITETTA KABINETTITYYPPISEEN KIRJAKAAPPIIN TAI MUUHUN SULJETTUUN TILAAN, JOTTA TUULETUS ONNISTUISI. VARMISTA, ETTÄ VERHO TAI MIKÄÄN MUU MATERIAALI EI HUONONNA TUULETUSTA, JOTTA VÄLTETTÄISIIN YLIKUUMENEMISESTA JOHTUVA SÄHKÖISKUTAI TULIPALOVAARA.
ÄLÄ PEITÄ LAITTEEN TUULETUSAUKKOJA SANOMALEHDELLÄ, PÖYTÄLIINALLA, VERHOLLA TAI
MUULLA VASTAAVALLA ESINEELLÄ.
ÄLÄ ASETA PALAVAA KYNTTILÄÄ TAI MUUTA AVOTULEN LÄHDETTÄ LAITTEEN PÄÄLLE.
HÄVITÄ PARISTOT LUONTOA VAHINGOITTAMATTOMALLA TAVALLA.
VAROITUS!
LAITTEEN KÄYTTÄMINEN MUULLA KUIN TÄSSÄ KÄYTTÖOHJEESSA MAINITULLA TAVALLA SAATTAA ALTISTAA KÄYTTÄJÄN TURVALLISUUSLUOKAN 1 YLITTÄVÄLLE NÄKYMÄTTÖMÄLLE LASERSÄTEILYLLE.
TÄMÄ LAITE ON TARKOITETTU KÄYTETTÄVÄKSI LEUDOSSA ILMASTOSSA.
Tämä tuotteen toimintaan saattaa tulla häiriöitä lähellä olevasta matkapuhelimesta. Mikäli matkapuhelimesta johtuvia häiriöitä ilmenee, siirrä matkapuhelin mahdollisimman kauas laitteesta jotta häiriöt poistuvat.
Laite tulee asettaa lähelle verkkopistorasiaa ja pistokkeen täytyy olla sellaisessa asennossa, että siihen on helppo tarttua ongelman sattuessa.
3
Information on the unit
 DivX-compatible
DivX files can be played back from CD-R/CD-RW and DVD-R.
Quick start
You can record to DVD-RAM about one second after switching on the unit.
COPYING
With the push of a button, you can copy the content of a VHS cassette to a disc or vice versa.
DV interface
You can connect your digital camcorder directly to this unit via the DV IN connection.
This way it’s easy to copy your movies.
Licence information
This product incorporates copyright protection technology that is protected by U.S. patents and other intellectual property rights. Use of this copyright protection technology must be authorized by Macrovision, and is intended for home and other limited viewing uses only unless otherwise authorized by Macrovision. Reverse engineering or disassembly is prohibited.


 Dolby Digital
Method of encoding digital signals. The signals are very much compressed in the process to enable recordings of large volumes of data.
Manufactured under license from Dolby Laboratories. Dolby and the double-D symbol are trademarks of Dolby Laboratories.
DTS (Digital Theater Systems)
Sound system used in cinemas or movie theaters all over the world. «DTS» and «DTS 2.0 + Digital Surround» are trademarks of Digital Theater Systems, Inc.
MP3 or MPEG 1 Audio Layer 3 is a file compression format used for digital audio files. It provides files of an extremely small size and may cause a consequential loss of quality. MPEG Layer-3 audio decoding technology licensed from Fraunhofer IIS and Thomson multimedia.
-If you see this symbol-
Information on Disposal for Users of Waste Electrical & Electronic Equipment (private households)
This symbol on the products and/or accompanying documents means that used electrical and electronic products should not be mixed with general household waste.
For proper treatment, recovery and recycling, please take these products to designated collection points, where they will be accepted on a free of charge basis. Alternatively, in some countries you may be able to return your products to your local retailer upon the purchase of an equivalent new product.
Disposing of this product correctly will help to save valuable resources and prevent any potential negative effects on human health and the environment which could otherwise arise from inappropriate waste handling.
Please contact your local authority for further details of your nearest designated collection point.
Penalties may be applicable for incorrect disposal of this waste, in accordance with national legislation.
For business users in the European Union
If you wish to discard electrical and electronic equipment, please contact your dealer or supplier for further information.
Information on Disposal in other Countries outside the European Union
This symbol is only valid in the European Union.
If you wish to discard this product, please contact your local authorities or dealer and ask for the correct method of disposal.
4

Before you start
Dear customer
Thank you for your trust and your decision to purchase this top-quality device.
Panasonic is one of the leading manufacturers of entertainment electronics devices.
We are sure that you will be completely satisfied with this device.
Matsushita Electric Industrial Co., Ltd.
http://www.panasonic.co.jp/global/
Included accessories
DVD/VHS
|
TV |
|||||
|
DRIVE |
CH |
+ |
|||
|
AV |
VOLUME |
Remote Control |
AC Mains Lead |
||
|
SELECT |
_ |
||||
|
TRACKING/V-LOCK |
EUR7659YF0 |
RJA0043-1C |
|||
|
1 |
2 |
3 |
+ |
||
|
4 |
5 |
6 |
CH |
||
|
— |
|||||
|
7 |
8 |
9 |
ShowView |
||
|
0 |
INPUT |
DELETE |
|||
|
SELECT |
|||||
|
RESET |
SLOW/SEARCH |
||||
|
SKIP/INDEX |
REW |
FF |
Batteries |
Audio/Video cable |
|
|
STOP |
PAUSE |
PLAY |
|||
|
TIME SLIP/ |
JET REW MANUAL SKIP |
AA, UM3 or R6 |
K2KA6BA00003 |
|
R |
F |
||||
|
O |
|||||
|
IG |
A |
T |
U |
||
|
N |
|||||
|
C |
|||||
|
V |
|||||
|
A |
T |
||||
|
N |
I |
||||
|
T |
ENTER |
O |
|||
|
C |
N |
||||
|
R |
S |
||||
|
E |
|||||
|
I |
|||||
|
D |
|||||
|
SUB MENU |
RETURN |
||||
|
S |
|||||
|
AUDIO |
DISPLAY |
CREATE |
STATUS |
||
|
CHAPTER |
|||||
|
A |
B |
C |
|||
|
REC |
REC MODE |
EXT LINK |
DIRECT TV REC |
|
Operating Instruction |
RF Coaxial cable |
|
K1TWACC00001 |
Guarantee Card
DVD/TV
Inserting batteries
The batteries last for about a year, depending on how often you use the remote control unit.
|
Do not mix old with new batteries, or batteries of different types. |
||
|
Only use batteries without any harmful substances (lead, cadmium, mercury). |
||
|
Do not use rechargeable type batteries. |
||
|
Remove the batteries if the remote control unit will remain unused for longer |
||
|
R6/LR6, AA |
periods of time. |
|
|
Do not heat or short-circuit the batteries. |
||
|
Immediately remove used-up batteries and replace with batteries of type AA, UM3 |
||
|
or R6. |
||
|
Be sure to put in the batteries the right way round + and -. |
||
|
Dispose of batteries, packaging material and the unit according to |
||
|
statutory regulations. |
||
|
They must not be thrown into the household refuse. |
5
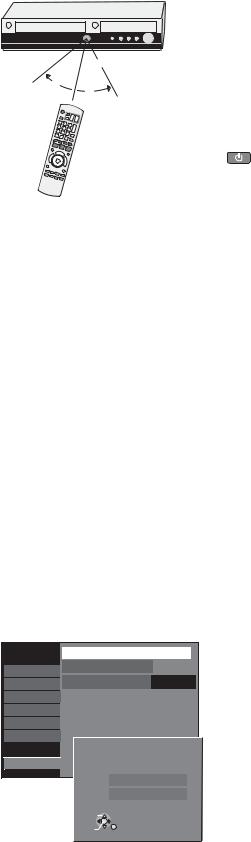
Remote Control
Remote control signal sensor
7m
30°
30°
Point the remote control at the sensor of the unit. Avoid obstacles along the transmission path. The maximum reach of the remote control is 7 metres directly in front of the unit. Make sure that the transmission window and the sensor on the unit are clean. The process can be impaired by direct sunlight and glass cabinet doors.
Child protection
You can lock the buttons on the unit and the remote control.
Press and hold the RETURN and ENTER buttons until [X HOLD] appears in the display. The buttons on the unit are locked.
To unlock the child protection, repeat the process until [X HOLD] disappears.
Operating a television
Change the code on the remote control to control your TV.
Press and hold the TV on and off button.
Enter the two-digit code for your television.
|
Setup |
Remote Control |
DVD 1 |
|||||
|
Clock |
|||||||
|
Tuning |
|||||||
|
Off |
|||||||
|
Disc |
Power Save |
||||||
|
Picture |
|||||||
|
Quick Start |
On |
||||||
|
Sound |
|||||||
|
DivX Registration |
|||||||
|
Display |
|||||||
|
Initialize |
|||||||
|
Connection |
|||||||
|
VHS |
Remote Control |
||||||
|
TAB |
SELECT |
||||||
|
Others |
|||||||
|
DVD 1 |
|||||||
DVD 2
DVD 3
SELECT
ENTER
RETURN
|
Trademark |
Code |
Trademark |
Code |
Trademark |
Code |
Trademark |
Code |
|
|
Panasonic |
01-04,45 |
GOODMANS |
05,06,31 |
NOKIA |
25-27 |
SANYO |
21 |
|
|
AIWA |
35 |
GRUNDIG |
09 |
NORDMENDE |
10 |
SBR |
06 |
|
|
AKAI |
27,30 |
HITACHI 22,23,31,40-42 |
ORION |
37 |
SCHNEIDER 05,06,29-31 |
|||
|
BLAUPUNKT |
09 |
INNO HIT |
34 |
PHILIPS |
05,06 |
SELECO |
06,25 |
|
|
BRANDT |
10,15 |
IRRADIO |
30 |
PHONOLA |
31,33 |
SHARP |
18 |
|
|
BUSH |
05,06 |
ITT |
25 |
PIONEER |
38 |
SIEMENS |
09 |
|
|
CURTIS |
31 |
JVC |
17,39 |
PYE |
05,06 |
SINUDYNE |
05,06,33 |
|
|
DESMET |
05,31,33 |
LOEWE |
07 |
RADIOLA |
05,06 |
SONY |
08 |
|
|
DUAL |
05,06 |
METZ |
28,31 |
SABA |
10 |
TELEFUNKEN |
10-14 |
|
|
ELEMIS |
31 |
MITSUBISHI |
06,19,20 |
SALORA |
26 |
THOMSON |
10,15,44 |
|
|
FERGUSON |
10 |
MIVAR |
24 |
SAMSUNG |
31,32,43 |
TOSHIBA |
16 |
|
|
GOLDSTAR/LG 31 |
NEC |
36 |
SANSUI |
05,31,33 |
WHITEWESTINGHOUSE 05,06 |
Some television models of the listed brands (e.g. older Panasonic units) cannot be controlled via the remote control.
Switching to AV input on your Panasonic television
Press AV.
Switches between TV reception and AV input each time the button is pressed.
Setting up the remote control
If you are using another Panasonic unit at the same location, change the setting of the remote control so that you can operate the units independently of each other.
Set up the remote control for the unit.
Press FUNCTIONS.
Select [To Others] with  and confirm with ENTER.
Select [Setup] with  and confirm with ENTER.
Select [Others] with  , [Remote Control] with
  and confirm with ENTER.
Select [DVD 1, 2 or 3] with  and confirm with ENTER.
Apply the selected setting [DVD 1, 2 or 3] to the remote control.
Press and hold ENTER and press the appropriate number button 1, 2 or 3 for at least 2 seconds.
Exit the menu with RETURN.
If the remote control setting does not match that of the unit, [DVD 1, 2 or 3] appears on the unit’s display.
Press ENTER and press the appropriate number key 1, 2 or 3 simultaneously for at least 2 seconds.
If you want to operate two units independently of each other using the same remote control, then change the the remote control setting.
6
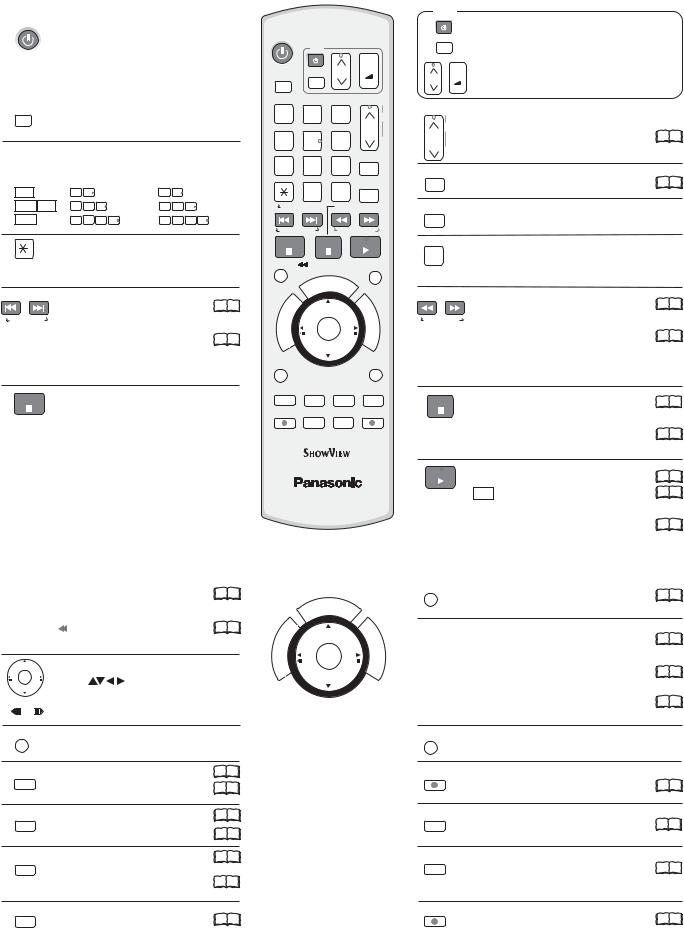
Remote Control
|
DVD/VHS |
Standby/on switch |
|
Press to switch the unit from on to |
|
|
standby mode or vice versa. In standby |
|
|
mode, the unit is still consuming a small |
|
|
amount of power. |
|
|
DRIVE |
DRIVE SELECT |
|
SELECT |
|
|
Select the DVD or VHS drive. |
Direct entry using the number buttons
Selection of channels, title numbers, etc.
|
VCD |
5: |
0 |
5 |
15: |
1 |
5 |
||||
|
JPEG MP3 5: |
0 |
0 |
5 |
15: |
0 |
1 |
5 |
|||
|
JPEG |
5: |
0 |
0 |
0 |
5 |
15: |
0 |
0 |
1 |
5 |
Delete a function.
 RESET
RESET
VHS: RESET = Reset the tape counter.
|
SKIP = Skip chapters, titles or |
19 |
|
99 |
SKIP/INDEX pictures.
|
VHS: INDEX = Find the beginning of a |
99 |
|
21 |
recording.
|
STOP |
Stop a recording or playback. |
VHS: Stop jet rewind.
Press for more than 3 seconds to eject the cassette.
DVD/VHS
TV
|
DRIVE |
CH |
+ |
|||||||
|
VOLUME |
|||||||||
|
SELECT |
AV |
_ |
|||||||
|
TRACKING/V-LOCK |
|||||||||
|
1 |
2 |
3 |
+ |
||||||
|
4 |
5 |
6 |
CH |
||||||
|
— |
|||||||||
|
7 |
8 |
9 |
ShowView |
||||||
|
0 |
INPUT |
DELETE |
|||||||
|
SELECT |
|||||||||
|
RESET |
SLOW/SEARCH |
||||||||
|
SKIP/INDEX |
REW |
FF |
|||||||
|
STOP |
PAUSE |
PLAY |
|||||||
|
TIME SLIP/ |
JET REW MANUAL SKIP |
||||||||
|
/CH |
EC |
||||||||
|
OG |
|||||||||
|
R |
K |
||||||||
|
P |
|||||||||
|
R |
F |
||||||||
|
O |
|||||||||
|
G |
A |
T |
U |
||||||
|
N |
|||||||||
|
I |
C |
||||||||
|
V |
I |
||||||||
|
A |
|||||||||
|
N |
T |
||||||||
|
O |
|||||||||
|
T |
ENTER |
||||||||
|
C |
N |
||||||||
|
E |
S |
||||||||
|
R |
|||||||||
|
I |
|||||||||
|
D |
|||||||||
|
SUB MENU |
RETURN |
||||||||
|
S |
|||||||||
|
AUDIO |
DISPLAY |
CREATE |
STATUS |
||||||
|
CHAPTER |
|||||||||
|
A |
B |
C |
|||||||
|
REC |
REC MODE |
EXT LINK |
DIRECT TV REC |
DVD/TV
TV
|
Switch the TV on and off. |
|||
|
AV |
Select the AV input on the TV set. |
||
|
CH |
+ |
CH = Select the programme position on the TV set. |
|
|
VOLUME |
VOLUME = TV volume control. |
||
|
_ |
|||
|
TRACKING/V-LOCK |
CH = Programme selection button |
||
|
+ |
|||
|
CH VHS: TRACKING/V-LOCK+/- = Optimise the |
22 99 |
—playback picture.
|
ShowView |
ShowView Record menu |
99 |
|
41 |
||
|
DELETE |
Delete a title. |
|
|
INPUT |
Switch button to switch AV input between |
|
|
SELECT |
tuner, AV1, AV2, AV3 (front) and DV IN. |
|
|
SLOW/SEARCH |
SLOW = Slow-motion playback. |
99 |
|
19 |
||
|
REW FF |
SEARCH = Search during playback. |
|
|
VHS: REW = Jet rewind |
99 |
|
|
21 |
||
|
FF = Fast forward from STOP mode. |
||
|
REW = Rewind |
||
|
FF = Forward search during playback. |
||
|
PAUSE |
Pause a recording or playback. |
1 |
|
99 |
||
|
VHS: Press and hold for more than 2 seconds |
9921 |
|
|
for slow-motion playback. |
||
|
PLAY |
Start playback. |
18 99 |
|
RAM Quick View: You can increase the |
20 99 |
|
|
playback speed. |
||
|
VHS: Playback or repeat playback |
99 |
|
|
21 |
You can also switch on the unit from Standby mode using the DIRECT NAVIGATOR, PROG/CHECK and ShowView buttons.
TIME SLIP/ JET REW
 DVD: TIME SLIP = Select the time frame. 20
  99
99
|
VHS: |
JET REW = Jet rewind to the |
21 |
|
|
99 |
|||
|
beginning of the tape. |
|||
|
Direction buttons in the menu guide. |
|||
|
ENTER |
Select |
groups or titles. |
|
|
Frame or slow-motion playback. |
|||
|
SUB MENU |
|||
|
S |
Launch the sub-menu. |
||
|
AUDIO |
Select the audio channel/soundtrack 20 99 |
||
|
A |
A = Delete selected stations. |
46 |
|
|
Menu guide |
|||
|
DISPLAY |
DVD only: Picture and sound settings. 54 99 |
||
|
B |
B = Insert station. |
46 99 |
|
|
Menu guide |
|||
|
CREATE |
DVD only: Divide a recording into |
19 |
|
|
CHAPTER |
chapters. |
99 |
|
|
C |
|||
|
C = Move selected stations. |
46 99 |
||
|
Menu guide |
|||
|
STATUS |
Detailed information appears on |
15 |
|
|
99 |
the screen.
|
/CH |
EC |
|||||
|
OG |
||||||
|
R |
K |
|||||
|
P |
||||||
|
R |
F |
|||||
|
O |
||||||
|
G |
A |
T |
U |
|||
|
N |
||||||
|
I |
C |
|||||
|
V |
I |
|||||
|
A |
||||||
|
N |
T |
|||||
|
ENTER |
O |
|||||
|
T |
||||||
|
C |
N |
|||||
|
E |
S |
|||||
|
R |
||||||
|
I |
||||||
|
D |
ENTER = Select or save a setting.
|
MANUAL SKIP |
||
|
DVD only: Jump ahead 30 seconds. |
19 |
99 |
|
PROG/CHECK = Check or change a Timer recording |
35 |
|
|
99 |
||
|
DIRECT NAVIGATOR = Launches the Title View. |
18 |
99 |
|
FUNCTIONS = Launch the selection menu. |
26 |
99 |
|
RETURN |
||
|
Return to the previous menu. |
||
|
REC |
||
|
Recording |
24 |
99 |
|
REC MODE |
||
|
Record mode button (XP, SP, LP, EP) |
24 99 |
|
|
EXT LINK |
||
|
Timer Recording with external recording |
36 |
99 |
|
control. |
||
|
DIRECT TV REC |
99 |
|
|
Direct TV recording to DVD and VHS. |
||
|
25 |
7
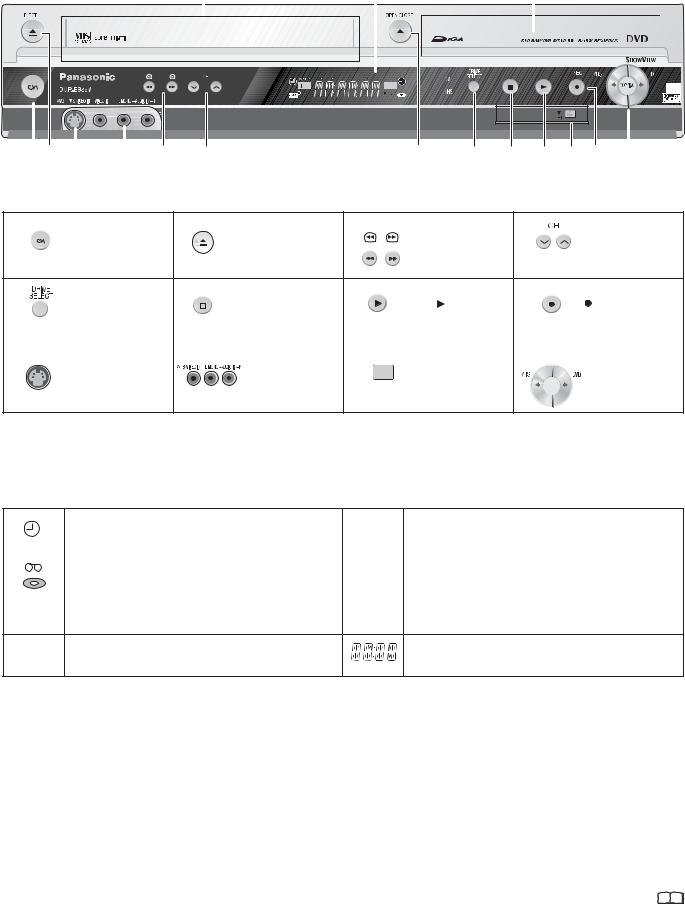
Front Panel
|
Cassette Compartment |
Display |
Disc Tray |
||||
EXT-L
VHS 


|
2 |
5 |
8 |
|||||||||||||
|
9 |
10 |
3 |
4 |
2 |
6 |
7 |
11 |
12 |
1 Standby/On switch 
 : Press to switch the unit from on to standby mode or vice versa. In standby mode, the unit is still consuming a small amount of power. Switching this unit into standby mode does not disconnect it from the mains.
|
1 |
2 |
EJECT: Eject the cassette. |
3 |
Forward/rewind |
4 |
|
Standby/On switch |
Channel select button |
||||
|
OPEN/CLOSE: Open and |
Search during playback. |
||||
|
close the disc tray. |
|
5 |
Drive select |
6 |
STOP |
7 |
PLAY |
: Playback |
8 |
REC: Record |
||||||||||
|
VHS or DVD |
Quick View |
|||||||||||||||||
|
RAM |
||||||||||||||||||
|
9 |
10 |
11 |
DV input |
12 |
||||||||||||||
|
S VIDEO input AV3 |
AV3 input terminal |
Copy |
||||||||||||||||
|
COPYING |
Display
|
Shows Timer standby or Timer recording. |
XP, SP |
Recording mode / All on: FR mode |
||||
|
LP, EP |
Flexible recordings/timer recordings. |
|||||
|
The inserted medium is being shown. |
DVD |
The selected drive is being displayed. |
||||
|
VHS |
||||||
|
The selected drive is recording. |
EXT-L |
External-Link: A Timer recording is being made from an |
||||
|
REC |
||||||
|
Flashes shortly before a Timer recording starts. |
external unit. |
PLAY The selected drive is playing.
Current time, recording/playback counter, various messages.
Other messages
PLEASE WAIT Please wait.
|
DVD 1, 2, 3 |
Wrong remote control code. |
|
SETUP |
You are in the Setup menu. |
|
READ |
Disc is being read. |
|
No READ |
Disc cannot be read. |
|
FINAL |
DVD is being finalised. |
|
No CASSETTE |
No cassette has been inserted. |
|
No DISC |
No disc has been inserted. |
|
PROTECT |
Disc is write-protected. |
|
RETURN |
Cancellation of a function. |
|
JETREW |
A cassette is being jet-rewound. |
|
OFF0:30 |
The recording time is set to 30 minutes. |
|
REPEAT |
Repeat playback is on. |
|
START |
A function (copying) is beginning. |
|
|
COPY |
Copying is taking place. |
|
|
STOP |
A function has been stopped (copying). |
|
|
PROG FULL |
All 16 timer programme positions are full. |
|
|
UNSUPPORT |
Disc format is not supported. |
|
|
UNFORMAT |
Disc is unformatted. |
|
|
X HOLD |
Child protection is active. |
|
|
Error messages |
56 99 |
8
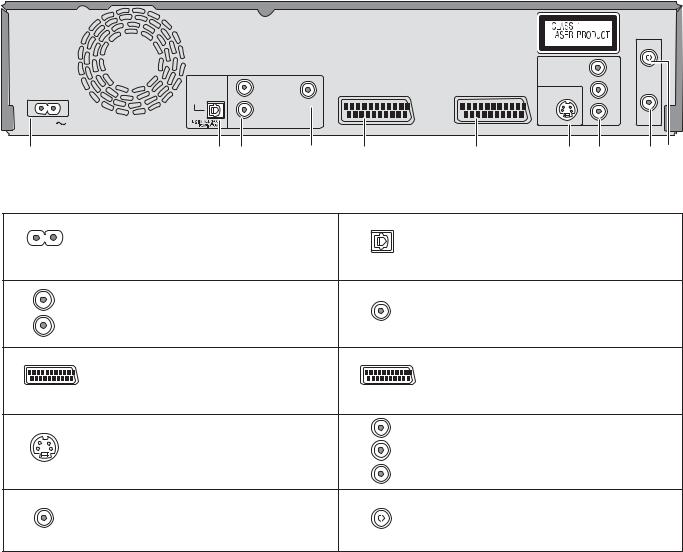
Rear Panel
RF IN
|
COMPONENT VIDEO OUT |
Y |
|||||||
|
L |
PB |
|||||||
|
OPTICAL |
S VIDEO OUT |
|||||||
|
R |
VIDEO OUT |
PR |
||||||
|
AC IN |
RF OUT |
|||||||
|
AUDIO OUT |
AV2(DECODER/EXT) |
AV 1 (TV) |
||||||
|
1 |
2 |
3 |
4 |
5 |
6 |
7 |
8 |
9 10 |
|
1 |
AC IN~ = Power supply |
2 |
OPTICAL |
|
|
Connection for the power cable. |
Digital audio output |
|||
|
3 |
L |
4 |
||
|
Audio output, right/left channel |
Video output |
|||
|
R |
||||
|
AUDIO OUT |
VIDEO OUT |
|||
|
5 |
AV2 (DECODER/EXT) = 21-pin Scart socket |
6 |
AV1 (TV) = 21-pin Scart socket |
|
|
AV2 (DECODER/EXT) External unit connection |
AV1 (TV) |
TV connection |
||
|
7 |
S VIDEO OUT |
8 |
Y |
COMPONENT VIDEO OUT |
|
PB |
Y = Luminance signal (brightness signal) |
|||
|
S VIDEO output socket |
||||
|
PB = Chrominance signal (colour difference) |
||||
|
PR PR = Chrominance signal (colour difference) |
||||
|
9 |
RF OUT |
10 |
RF IN |
|
|
Aerial output |
Aerial input |
The outputs of 2, 3, 4, 7 and 8 are dedicated to modules of digital signal processing (DVD).
The video and audio outputs of 5 and 6 are dedicated to modules of digital (DVD) or analogue (VHS) signal processing.
Both groups of outputs are used for analogue and digital sources. But there are limitations, e.g.: During recording or scheduled recording on DVD, the VHS playback is only possible on outputs of 5 and 6.
For a conventional tube television, we recommend using the Scart socket.
You retain a high-quality RGB video picture with an RGB-compatible television.
If you want to use a progressive-capable LCD/plasma television or LCD projector, connect it to COMPONENT VIDEO OUT to get a high quality progressive video picture.
9
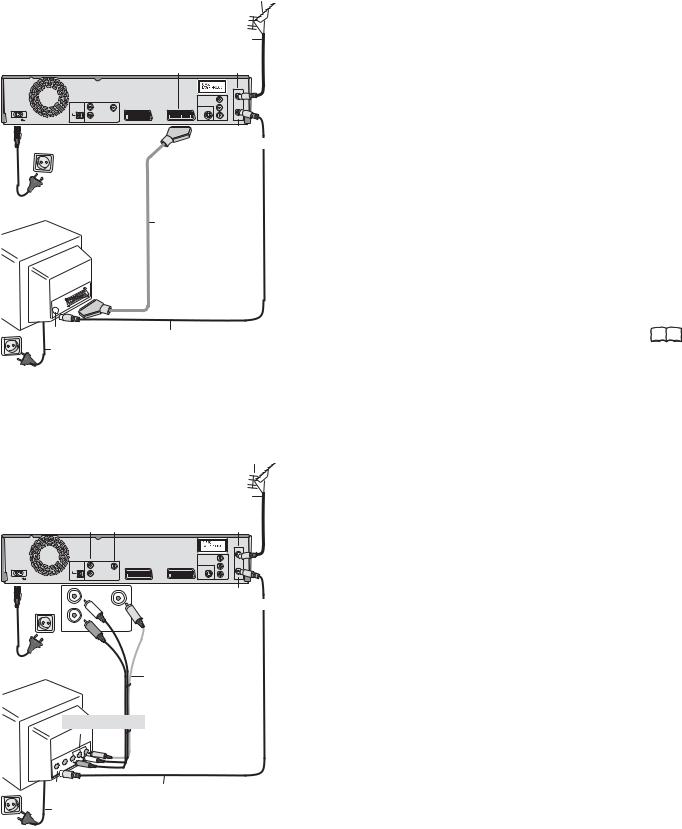
Connections
|
1 Aerial |
|||||
|
Aerial infeed line |
|||||
|
21-pin Scart socket AV1 (TV) |
RF IN |
||||
|
Aerial input |
|||||
|
RF IN |
|||||
|
COMPONENT VIDEO OUT |
Y |
||||
|
L |
P |
||||
|
OPTICAL |
S VIDEO OUT |
||||
|
R |
VIDEO OUT |
P |
|||
|
AC IN |
DIGITALAUDIO OUT |
RF OUT |
|||
|
AUDIO OUT |
|||||
|
(PCM/BITSTREAM) |
AV2(DECODER/EXT) |
AV 1 (TV) |
|||
|
AC IN~ |
RF OUT |
||||
|
Aerial output |
|||||
|
4 AC Mains lead |
|||||
|
3 21-pin Scart cable |
|||||
|
VT |
Necessary for TV |
||||
|
with Q Link |
|||||
Aerial input
2 RF Coaxial cable
4 AC Mains lead
|
1Aerial |
||||
|
Aerial infeed line |
||||
|
AUDIO- |
VIDEO- |
RF IN |
||
|
Output |
Output |
Aerial input |
||
|
RF IN |
||||
|
COMPONENT VIDEO OUT Y |
||||
|
L |
P |
|||
|
OPTICAL |
S VIDEO OUT |
|||
|
R |
VIDEO OUT |
P |
||
|
AC IN |
DIGITALAUDIO OUT |
RF OUT |
||
|
AUDIO OUT |
||||
|
(PCM/BITSTREAM) |
AV2(DECODER/EXT) |
AV 1 (TV) |
||
|
AC IN~ |
L |
RF OUT |
||
|
Aerial output |
||||
|
R |
VIDEO OUT |
|||
|
AUDIO OUT |
||||
|
4 AC Mains lead |
3 Audio/Video cable |
|||
|
Video Yellow |
||||
|
VT |
L |
White |
||
|
R |
Red |
|||
Audio/Video input
|
Aerial input |
2 RF Coaxial cable |
|
4 AC Mains lead |
Connection with 21-pin Scart cable (not provided)
You need a fully wired 21-pin Scart cable for this optimal connection type.
Disconnect all units from the power supply system.
1Connect the aerial to RF IN (Aerial input) of the DVD Recorder.
2Connect RF OUT (Aerial output) of the DVD Recorder with the aerial input of the TV.
3Connect the AV1 socket (21-pin Scart socket) of the DVD Recorder with the Scart input of the TV.
4Connect the DVD Recorder and the television to the power supply system.
If your television supports Q Link, use a fully wired 21-pin Scart cable to connect it to the TV. The stations are automatically downloaded through [Download from TV].
|
If your television supports RGB, set the AV1 Output to RGB 1 |
|
|
or RGB 2 in the Setup menu. |
50 |
Connection with Audio/Video cable
You can use this frequently used standard connection with the provided accessories.
Disconnect all units from the power supply system.
1Connect the aerial to RF IN (Aerial input) of the DVD Recorder.
2Connect RF OUT (Aerial output) of the DVD Recorder with the Aerial input of the TV.
3Connect the AUDIO OUT (L/R) and VIDEO OUT of the DVD Recorder with the Audio/Video input of the television.
4Connect the DVD Recorder and the television to the power supply system.
10
![]()
Connections
|
1Aerial |
||
|
Aerial infeed line |
||
|
AUDIO-output |
S VIDEO-output |
RF IN |
|
Aerial input |
|
RF IN |
|||||
|
COMPONENT VIDEO OUT |
Y |
||||
|
L |
P |
||||
|
OPTICAL |
S VIDEO OUT |
||||
|
S VIDEO OUT |
|||||
|
R |
VIDEO OUT |
P |
|||
|
DIGITALAUDIO OUT |
RF OUT |
||||
|
AC IN |
AUDIO OUT |
AV2(DECODER/EXT) |
|||
|
AV 1 (TV) |
Aerial output
|
R |
VIDEO OUT |
|
|
AUDIO OUT |
||
|
3 Audio cable |
||
|
L White |
||
|
4 AC Mains lead |
R Red |
3 S VIDEO- |
|
cable |
||
|
VT |
SVIDEO-input Audio input
Aerial input
2 RF Coaxial cable
4 AC Mains lead
Settings
Connection with S VIDEO-cable (not provided)
Depending on the television, the connection with the S VIDEO cable results in a higher quality picture than the connection with an Audio/ Video cable.
Disconnect all units from the power supply system.
1Connect the aerial to RF IN (Aerial input) of the DVD Recorder.
2Connect RF OUT (Aerial output) of the DVD Recorder with the aerial input of the TV.
3Connect AUDIO OUT (L/R) and S VIDEO OUT of the DVD Recorder with the S VIDEO and audio input of the TV.
4Connect the DVD Recorder and the television to the power supply system.
Auto-Setup
|
Ch |
4 |
||||||
|
Auto-Setup in progress. Please wait. |
|||||||
|
RETURN : to cancel |
|||||||
|
RETURN |
|||||||
|
Download from TV |
|||||||
|
Pos |
|||||||
|
4 |
|||||||
|
Download in progress. Please wait. |
|||||||
|
RETURN : to cancel |
|||||||
|
RETURN |
|||||||
|
Clock |
|||||||
|
Automatic |
Off |
||||||
|
Time |
Date |
||||||
|
0 : 00 : 00 |
1 . 1 . |
2006 |
|||||
|
Number |
|||||||
|
0 — — 9 |
Clock cannot be set automatically. |
||||||
|
Please set the clock manually. |
|
CHANGE |
ENTER : store RETURN : leave |
|
ENTER |
RETURN |
TV Aspect
16:9 WIDE TV
16:9
4:3 TV
4:3 Letterbox
SELECT
ENTER
RETURN
Switch on your television and select the AV channel.
Switch on the unit using the Standby/On button.
Country
|
Select the corresponding country with |
and confirm with ENTER. |
For EC models: If you select Schweiz, Suisse or Svizzera, the Power Save menu appears after auto setup. If you select Power Save [On], the unit’s power consumption reduced to a minimum in Standby mode.
Auto-Setup
The auto setup saves all avaiable television stations and takes approx. 5 minutes. If the station also broadcasts Date and Time, the time will be set automatically.
If the automatically set time does not match the current time, you can set it manually.
Download from TV with 
 (Registered trademark of Panasonic)
If your television is equipped with the Q Link feature, the stations are downloaded through the transfer of the station table.
In order to be able to use Q Link, the unit must be connected to a TV with Q Link or a similar feature via a fully wired 21-pin Scart cable.
Setting the date and time
If the Date and Time are not transferred via a television station, the Clock menu
|
appears. |
||
|
Change Time and Date with |
or 0 |
9 and . |
Confirm the change with ENTER.
An incorrect date or time affects the programmed recording of television programmes (observe summer and winter time).
TV Aspect
|
Select the desired screen format with |
and confirm with ENTER. |
Auto setup for your unit is complete. The availability of stations may differ regionally. The completeness of the downloaded stations can be checked in the Setup menu. 46 
11
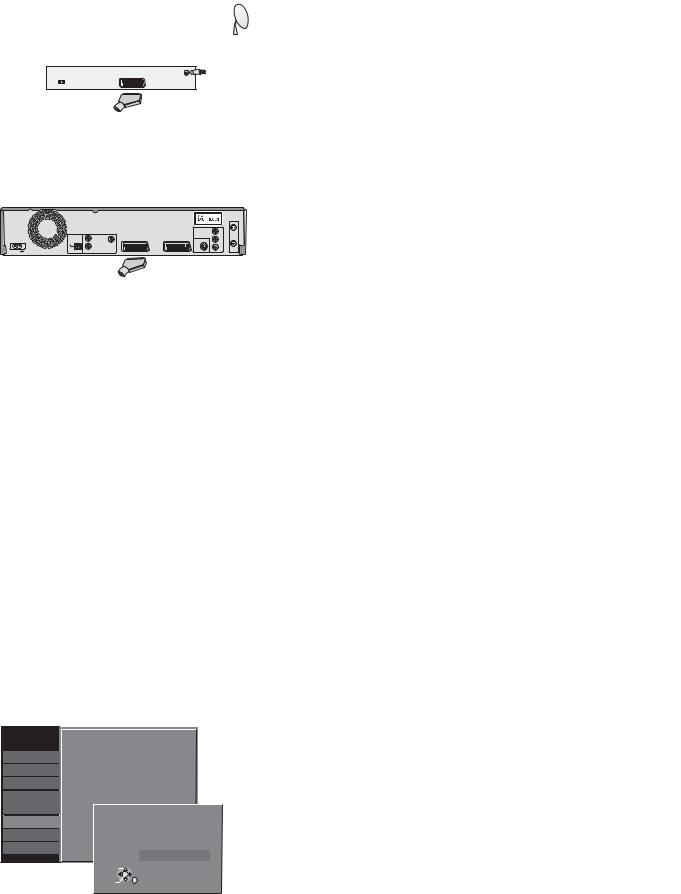
External units
External device
21-pin Scart socket Aerial infeed line
AC Mains lead 

|
21-pin Scart cable |
21-pin Scart sockets |
||
|
AV2 |
AV1 (TV) |
||
|
(DECODER/EXT) |
|||
|
RF IN |
|||
|
COMPONENT VIDEO OUT |
Y |
||
|
L |
P |
||
|
OPTICAL |
S VIDEO OUT |
||
|
R |
VIDEO OUT |
P |
RF OUT
|
AC IN |
DIGITALAUDIO OUT |
AUDIO OUT |
|
|
AV2(DECODER/EXT) |
AV 1 (TV) |
AC IN~
AC Mains lead
21-pin Scart cable
VT
AC Mains lead
|
Setup |
AV2 Settings |
||||||||
|
Tuning |
|||||||||
|
AV2 Input |
Video |
||||||||
|
Disc |
|||||||||
|
AV2 Connection |
Ext |
||||||||
|
Picture |
|||||||||
|
Ext Link |
Ext Link 2 |
||||||||
|
Sound |
|||||||||
|
Display |
|||||||||
|
AV2 Connection |
|||||||||
|
Connection |
|||||||||
|
VHS |
|||||||||
|
Decoder |
Others
Ext
SELECT
ENTER
RETURN
Connection of Set Top Box or satellite receiver
If you receive your television programme via a Set Top Box (DVB-T) or a satellite receiver (digital/analogue), connect your DVD Recorder as a downstream unit.
Disconnect all units from the power supply system.
1 Connect the AV1 socket (21-pin Scart socket) of the DVD Recorder with the Scart input of the television unit.
2 Connect the external unit with a 21-pin Scart cable to the AV2 connection of the DVD Recorder.
3 Connect the aerial (DVB-T or SAT) to the aerial input of the external unit.
4 Connect the DVD Recorder, the TV and the external unit to the power supply system
5 Switch on the external unit, the TV and the DVD Recorder.
Switch your TV to the AV channel.
Select the appropriate country from the Country menu with 
 and confirm with ENTER.
[Auto-Setup] follows automatically and it ends with the note: [No stations found !].
Select [No] with  and confirm with ENTER.
The available stations are downloaded from the external unit.
Select the desired screen format with  and confirm with ENTER.
Switch the DVD Recorder to AV2 with CH  . You see the television picture from the external unit.
|
The date and time are not set automatically. |
|
|
Set them manually. |
9911 |
Connecting a decoder
|
1 Connect the DVD Recorder as described under Connection |
|
|
with 21-pin Scart cable. |
10 99 |
2 Connect the decoder to AV2 (DECODER/EXT) with an additional
|
21-pin Scart cable. |
|
|
In the connection to the Auto Setup, change the setting for the |
|
|
AV2 socket in the [Setup] menu. |
50 99 |
Press FUNCTIONS.
Select [To Others] with  and confirm with ENTER.
Select [Setup] with  and confirm with ENTER.
Select [Connection] with  , [AV2 Settings] with
  ,
,  and confirm with ENTER.
In the next screen, select [AV2 Connection] with  and confirm with ENTER.
Select [Decoder] with  and confirm with ENTER.
Press RETURN and return to [Connection] with  .
.
Press RETURN multiple times to return to the television picture.
12
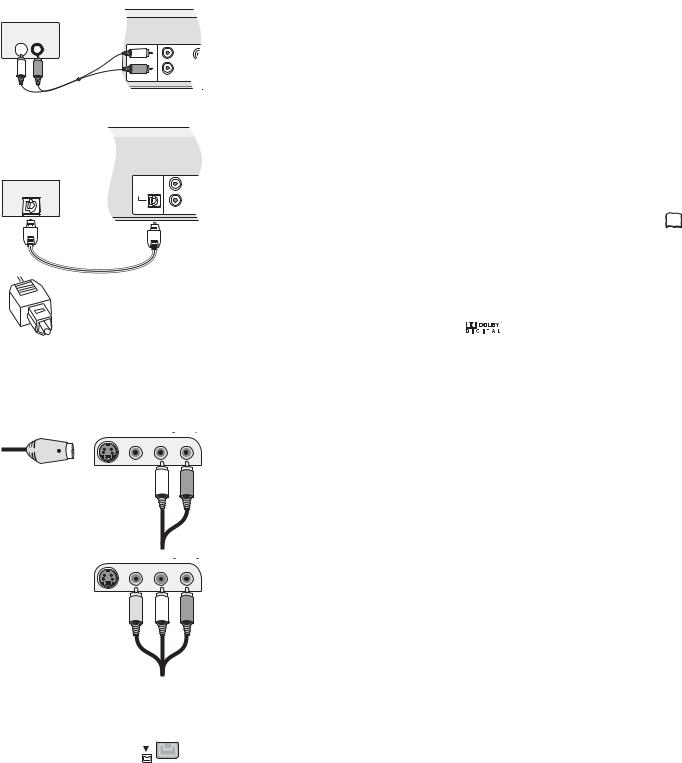
External units
Amplifier (example)
AUDIO IN
L  R
R
L
R
DIGITALAUDIO OUT OUT (PCM/BITSTREAM) AUDIO
Audio cable
L — White
R — Red
|
Amplifier (example) |
||
|
L |
||
|
OPTICAL |
OPTICAL |
|
|
R |
||
|
DIGITALAUDIO OUT |
AUDIO OUT |
|
|
(PCM/BITSTREAM) |
Optical digital audio cable
Push the jack all the way into the socket with this side facing up.
AV3  S VIDEO IN VIDEO IN L/MONO AUDIO IN R
S VIDEO-cable
Audio cable
L — White
R — Red
AV3  S VIDEO IN VIDEO IN L/MONO AUDIO IN R
Audio/Video cable
Video — Yellow
It is not possible to copy to a VHS cassette via DV IN..
For all connections described:
Before you connect cables, make sure that all units are switched off. Switch on the units after you have connected the cables.
Connecting an analogue amplifier or an analogue system component
In order to enjoy stereo or Dolby Pro Logic, connect a corresponding amplifier or an analogue audio component.
Connect the AUDIO OUT (L/R) output e.g. with a Dolby Pro Logic amplifier.
Connect the audio cable according to the colours and markings on the connection sockets (white/L, red/R).
Connecting a digital amplifier or a digital system component
If an amplifier equipped with Dolby Digital, DTS or an MPEG-decoder is connected, a DVD-Video-Disc with multi-channel surround sound can be played back.
Connect an amplifier with a Dolby Digital, DTS or an MPEG decoder.
Use an Optical digital audio cable.
Change the [Digital Audio Output] setting in the Setup menu Audio according  49 to your connected digital amplifier.
Select audio channel (M1) or (M2) on the external unit.
You cannot use DTS Digital Surround decoders that are not suitable for DVD.
|
Connect this unit to a device with |
This device can playback stereo |
|||||
|
a DTS decoder in order to be able |
sound in Dolby Digital (2 channels). |
|||||
|
to play DVDs with this symbol. |
Connect an amplifier with built-in Dolby Digital |
|||||
|
decoder in order to be able to enjoy Surround |
||||||
|
Sound. |
||||||
Connection to AV3 (e.g. camcorder)
If the audio output of the other unit is mono, connect it to the L/MONO socket. Both the left and the right channel will be recorded.
Select one of the two connection options.
The connection with S VIDEO cable and audio cable (L/R) delivers the best quality.
Connection to DV IN
DV means digital video and is a video standard.
You can connect a DV-compatible camcorder to the DVD Recorder. The DV IN connection is available for this purpose.
Digital satellite tuners and digital VHS video recorders are not compatible with this unit. The DVD Recorder cannot be controlled via an external unit that is connected to the DV IN socket.
Before you connect the DV cable, make sure that all units are switched off. After you have connected the cable, switch on the units.
Connect the DV output of the DV unit (e.g. digital camcorder) with the DV input socket of the DVD Recorder. Use a DV cable.
After you have connected the cable, switch on both units.
The DV input of this unit is only intended for DV units. For example, a computer cannot be connected. Some DV units do not allow for proper input of the picture and sound signal.
13
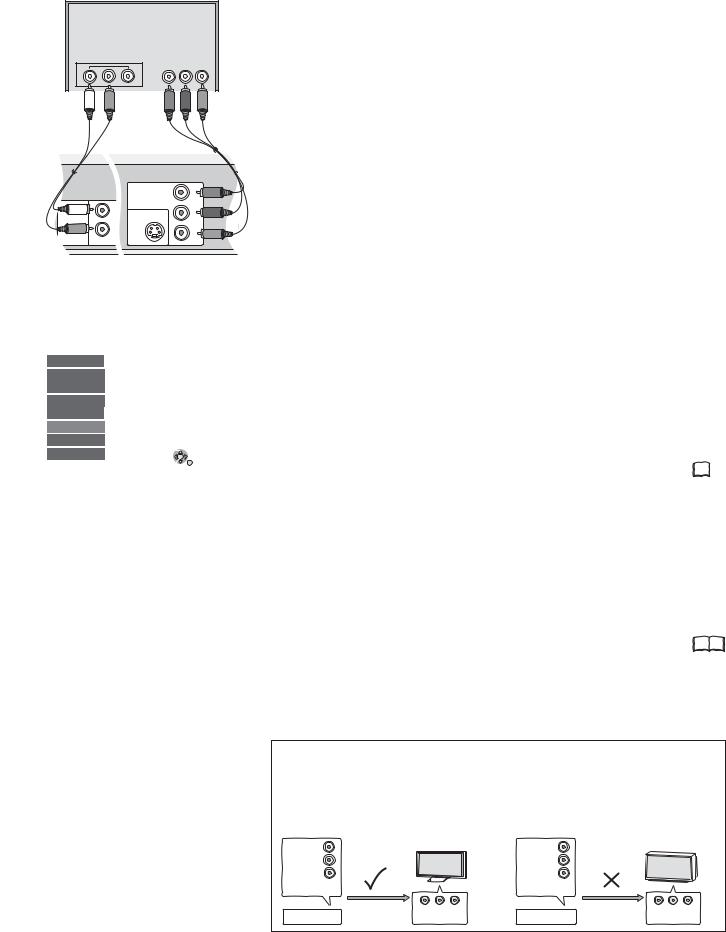
COMPONENT VIDEO OUT
|
TV |
||
|
COMPONENT |
||
|
VIDEO IN |
||
|
Audioinput L/R |
||
|
Y |
PB PR |
|
|
Video cable |
||
|
Y — Green |
||
|
Audio cable |
PB — Blue |
|
|
L — White |
PR — Red |
|
|
R — Red |
||
|
COMPONENT VIDEO OUT |
Y |
|
|
L |
PB |
|
|
S VIDEO OUT |
||
|
R |
PR |
|
|
DIGITALAUDIO OUT |
AUDIO OUT |
|
|
(PCM/BITSTREAM) |
COMPONENT VIDEO OUT socket
The sockets can be used for INTERLACE or PROGRESSIVE output and deliver a clearer picture than the S VIDEO OUT socket.
Connections via these sockets output the colour difference signals (PB/PR) and the brightness signal (Y) separately.
Colours can be reproduced true to the original colour.
The properties of the COMPONENT VIDEO input socket are dependent on the TV or screen.
Connect the COMPONENT VIDEO OUT sockets of the unit with the COMPONENT VIDEO IN of the TV unit. Use a Video cable.
Always connect sockets with the same colour.
Connect the audio cables to the corresponding audio input sockets on the TV.
|
Setup |
TV Aspect |
4:3 |
|||
|
Tuning |
Progressive |
On |
|||
|
Disc |
TV System |
PAL |
|||
|
Picture |
AV1 Output |
Video |
|||
|
Sound |
AV2 Settings |
||||
|
Display |
|||||
|
Connection |
|||||
|
VHS |
SELECT |
TAB |
|||
|
Others |
|||||
|
ENTER |
RETURN |
||||
Connecting a TV with COMPONENT VIDEO input sockets
If your TV with LCD or plasma screen supports the progressive process, connect it to the COMPONENT VIDEO OUT sockets.
If you want to enjoy full progressive video, set Progressive to [On].
Press FUNCTIONS.
Select [To Others] with  and confirm with ENTER.
Select [Setup] with  and confirm with ENTER.
Select [Connection] with  , [Progressive] with
  ,
,  and confirm with ENTER.
Select the option [On] with  and confirm with ENTER.
Press RETURN multiple times to return to the television picture.
If the AV1 Output setting in the Setup menu is set to [RGB 1/2 ( without component )], there is no output to the COMPONENT VIDEO OUT sockets.
Set this option to [Video ( with component )]. 50  If the unit is connected to the TV via the S VIDEO OUT or the AV1 socket,
output is Interlace regardless of the settings.
Progressive television picture
The progressive picture aspect ratio (height to width) is set to 16:9. DVD-Video with a picture aspect ratio of 16:9 is properly displayed. However, video material with an image page ratio of 4:3 is shown stretched from right to left. If it is possible to adjust the picture aspect ratio on your television, select the setting [Progressive — On].
|
With a normal television, the progressive output can cause the picture to flicker, |
|
|
even if the television is progressive-compatible. |
|
|
Select the setting [Progressive — Off]. |
50 |
Progressive-compatible televisions (PAL)
|
LCD/plasma television or LCD projector |
Conventional televisions |
||||
|
If progressive output is used, videos can be viewed |
On a normal television, Progressive output can |
||||
|
in High Resolution, for example from DVD-Video. |
cause flickering even if the television is |
||||
|
COMPONENT VIDEO OUT on this unit is connected |
Progressive-compatible. |
||||
|
with the COMPONENT VIDEO IN on the television. |
Select the [Progressive — Out] setting. |
||||
|
Select the [Progressive — On] setting. |
|||||
|
COMPONENT |
COMPONENT |
||||
|
VIDEO OUT |
VIDEO OUT |
||||
|
COMPONENT VIDEO OUT |
Y |
COMPONENT VIDEO OUT |
Y |
||
|
PB |
PB |
||||
|
PR |
R |
P |
|||
|
COMPONENT |
|||||
|
VIDEO OUT |
|||||
|
Progressive output |
COMPONENT |
Progressive output |
COMPONENT |
||
|
DVD-Recorder |
DVD-Recorder |
||||
|
VIDEO IN |
VIDEO IN |
14
STATUS displays
DVD-RAM
PLAY
L R
Status displays
|
DVD-RAM |
1 |
||||
|
PLAY |
2 |
||||
|
ZDF |
3 |
||||
|
Stereo |
4 |
||||
|
L R |
5 |
||||
VHS REC 
Status displays for other drive.
|
6 |
7 |
|||||||||
|
Detail information |
||||||||||
|
10:07:21 1.12. |
Remain |
0:50 SP |
||||||||
|
T14 0:05.14 SP |
T14 |
0:05.14 SP |
||||||||
STATUS
Screen information
Press STATUS.
Press STATUS again. Depending on the function, e.g. PLAY, REC or REC PLAY, the display changes each time the button is pressed.
Also press STATUS to exit the display.
|
You can switch off the status displays in the Setup menu. |
49 |
1:Current medium
2:Current recording, playback mode and remaining time
3:Current station
4:Sound type: Stereo = a stereo transmission is currently being received.
M1/M2 = a 2-channel transmission is currently being received.
M1 = a single-channel NICAM transmission is being received.
5:Sound mode: LR, L, R: the soundtrack can be changed with the AUDIO button.
|
REC |
Record |
Fast forward (5 stages) |
Rewind (5 stages) |
||||
|
PAUSE |
Pause |
Slow motion (5 stages) |
Slow-motion rewind (5 stages) |
||||
|
PLAY |
Playback |
PLAY/x1.3 Quick View |
Pause playback |
||||
6:Current date and time
7:Available recording time and recording mode: e.g. 0:50 SP shows 50 minutes in SP mode.
8:Title number: shows the recording mode and the elapsed play time of the title. VHS: Current tape counter.
9:Title number: shows the recording mode and the recording time of the title.
STATUS
VHS screen information
Press STATUS during playback. Each time the button is pressed, the display switches between tape counter and remaining tape time
|
VHS |
Current medium |
||
|
L R |
SP |
LR, L, R: The soundtrack can be changed with the AUDIO button. |
|
|
SP: Selected recording mode. |
|||
|
REMAIN: 0:24 |
Remaining tape time: The display depends on the |
51 |
|
|
correct setting of the tape length. |
|||
|
0:21.29 |
Tape counter: It is automatically set to 0:00.00 when a video |
||
|
cassette is inserted. |
|||
|
Use / RESET to reset the counter to 0:00.00. |
|||
|
R |
0:21.29 |
Repeat |
21 |
Symbols
The title is being recorded.
Shows a Timer programming.
A daily or weekly Timer recording was stopped. The icon disappears when next Timer recording starts.
W The title overlaps other recordings.
|
F |
The disc was full so the programme failed to record. |
The programme cannot be played due to damaged data or could not be recorded for another reason.
The title is write-protected.
The programme was copy-protected; the title was not recorded.
Title that can only be copied once.
The title has been selected.
|
The title or the playlist was recorded with a TV system other than the one currently |
|
|
NTSC |
selected. Title and playback lists with these markings cannot be played back. |
|
PAL |
To playback this title/playlist, switch your TV system. |
15

DVD-RAM: DVD Video Recording format
DVD-RAM RAM
4.7 GB 12 cm
9.4GB 12 cm
2.8GB 8 cm rewritable
DVD-R : DVD-Video format +R : +VR format
|
DVD-R |
-R |
|
|
4.7 GB 12 cm |
||
|
1.4 GB 8 cm |
||
|
writable |
||
|
— — |
+R |
+R |
|
4.7 GB 12 cm |
||
|
writable |
||
DVD-RW : DVD-Video format +RW : +VR format
DVD-RW -RW
4.7 GB, 12 cm
1.4 GB, 8 cm rewritable
4.7 GB, 12 cm
1.4 GB, 8 cm rewritable
DVD-R DL: DVD-Video format
|
+R DL |
: +VR format |
||
|
DVD-R DL |
|||
|
-R DL |
|||
|
R DL |
8.5 GB 12 cm, writable |
||
|
— — |
+R DL |
+R DL |
|
|
8.5 GB 12 cm,writable |
|||
Playback and recording discs
DVD-RAM
The DVD-RAM can be compared with the hard disk and can be written to 100,000 times on average. The disc can only be played on DVD-RAM-compatible players.
The recording occurs in DVD Video Recording format (VR). Movies and parts of movies can be edited and deleted. The deletion of movies frees previously used storage space.
The creation of playlists does not require any additional storage space.
Dual-channel sound and 16:9 format are supported in addition to the TIME SLIP. function A DVD-RAM with Cartridge is write-protected and is CPRM-compatible.
DVD Video Recording format (VR)
This format enables recording and playback.
Digital programmes limited to «one-time recording» can be recorded to a CPRM-compatible disc. You can record to a CPRM-compatible DVD-RAM.
Playback is only possible with a compatible DVD player. Use a DVD-RAM to record in DVD Video Recording format.
DVD-R/+R (Recordable)
The DVD-R/+R can only be recorded once. Movies or parts of them can be deleted during processing, but storage space is still taken up and cannot be used for other movies. Through finalisation, the DVD-R/+R becomes DVD-V that can be played on other units.
|
DVD-R/+R/-R DL/+R DL |
Finalisation |
18 9953 |
|
-R +R -R DL +R DL |
On the recording unit |
The movies can no longer be edited after finalisation.
|
Recording with this recorder |
Playback on another unit |
|
Recording with another unit |
Playback on this recorder |
DVD-RW/+RW (Rewritable)
DVD-RW/+RW is rewritable and erasable. You must delete it completely to be able to rewrite it again. Through finalisation, the DVD-RW becomes a DVD-V that can be played on other units. A finalised DVD-RW can be reformatted and rewritten. Formatting deletes
all data! 9953 A DVD+RW becomes a DVD-V by creating a Top Menu.
|
DVD-RW -RW |
Finalisation |
Formatting |
DVD-RW -RW |
On the recording unit
|
The movies can no longer be edited after finalisation. |
|
|
Recording with this recorder |
Playback on another unit |
|
Recording with another unit |
Playback on this recorder |
|
DVD-R DL/+R DL (Double Layer DVD/Dual Layer DVD) |
2nd Layer |
The data are saved on two parallel layers. They have more space available. If the laser changes layers during playback, brief interruptions to the image and sound may occur.
You cannot switch layers during a recording. The recording stops when
|
the storage space on the first Layer is full. You must close the first Layer |
1st Layer |
|
to be able to record on the second Layer. |
DVD-Video format (V)
This recording format is the standard DVD-Video. Digital programmes that are limited to «one-time recording» cannot be recorded. Not for recording and playback of still pictures.
+VR format
Digital programmes limited to «one-time recording» can not be recorded. Not for recording and playback of still pictures.
16

DVD-RW -RW(VR)
(DVD-VR format)
12 cm/ 8 cm, playable only
DVD-Video DVD-V
12 cm/ 8 cm, playable only
DVD-Audio DVD-A
12 cm/ 8 cm, playable only
— — 12 cm/ 8 cm, playable only
12 cm/ 8 cm, playable only
Regional codes
2 2 34 ALL DVD-Video only
DVD-Videos with the regional code 2 or ALL can be played with this unit. The code is listed on the backside of the unit. England and Continental Europe: 2.
Only play round discs.
Do not touch the disc recording surface.
With active write protection, you can neither record to the disc nor edit or delete content.
Playback discs
A DVD-RW that was recorded on another DVD recorder is played back in DVD-VR format on this unit. Programmes limited on «one-time recording» can be played back if recorded to a CPRM-compatible disc. If you format the disc, you can record and play it in DVD-Video format with this unit.
High-quality video and music discs.
Digital-quality music discs. Playback in dual-channel sound.
Music and audio recordings, music in MP3 format, pictures in JPEG and TIFF format.
Music and video recordings.
SVCD in compliance with IEC62107.
DivX 
 MP3
MP3 
 JPEG You can play DivX, MP3 and JPEG/TIFF data from a finalised CD-R, CD-RW or DVD-R. Depending on the recording conditions, playback may nonetheless be faulty.
Some DVD-Audio discs with multi-channel sound are designed by the manufacturer to prevent inter-mixing on the entire disc or at certain places. Depending on the disc type, the regional code and the recording conditions, it may not be possible to play the discs in some cases.
See the jewel case for more information.
Non playable discs
—2.6 GB and 5.2 GB DVD-RAM, 12 cm.
—3.95 GB and 4.7 GB DVD-R for Authoring.
—DVD-R that was recorded in DVD Video Recording format (VR).
—DVD-R (V), DVD-R DL, DVD-RW (V), +R, +R DL that was recorded on another unit and not finalised.
—Blu-ray, DVD-ROM, +R (8 cm), CD-ROM, CDV, CD-G, photo CD, CVD, SACD, MV disc, PD, “Chaoji VCD” that can be purchased in stores, including CVD, DVCD and SVCD that are not IEC62107-compliant, etc.
Handling discs
If the surface of a disc, which has no Cartridge or was removed from one, is scratched, dirty, dusty or has finger prints, playback or processing can be impaired. Such impairments can also occur when the disc is placed back in the Cartridge.
Note: Only write on the label side of the disc. Use a soft, oil-based felt-tip pen. Do not use a ball-point pen or any other hard writing instrument. Do not affix stickers or labels to the disc. When not in use, put the disc in its case or Cartridge.
Cleaning the DVD-RAM
Clean the disc with a special DVD-RAM cleaner (optional) and read the cleaner instructions throughly before use. Bad scratches and stubborn dirt may not be able to be removed so that recording, editing or playback is still compromised even after cleaning. The disc should then no longer be used.
Do not use benzine, alcohol, water, cleaning sprays, household cleaners or other solvents.
Cartridge write protection
Remove the 8-cm disc from the cartridge before using it with this unit.
DVD lens cleaner (RP-CL720E)
Compatible models: Only for Panasonic’s DVD recorders.
Do NOT use this cleaner with any other Panasonic DVD products or with the DVD products of any other companies since doing so may damage the products.
Cleaning DVD-Videos, Video-CDs and CDs
Wipe with a moist and then with a dry cloth.
17
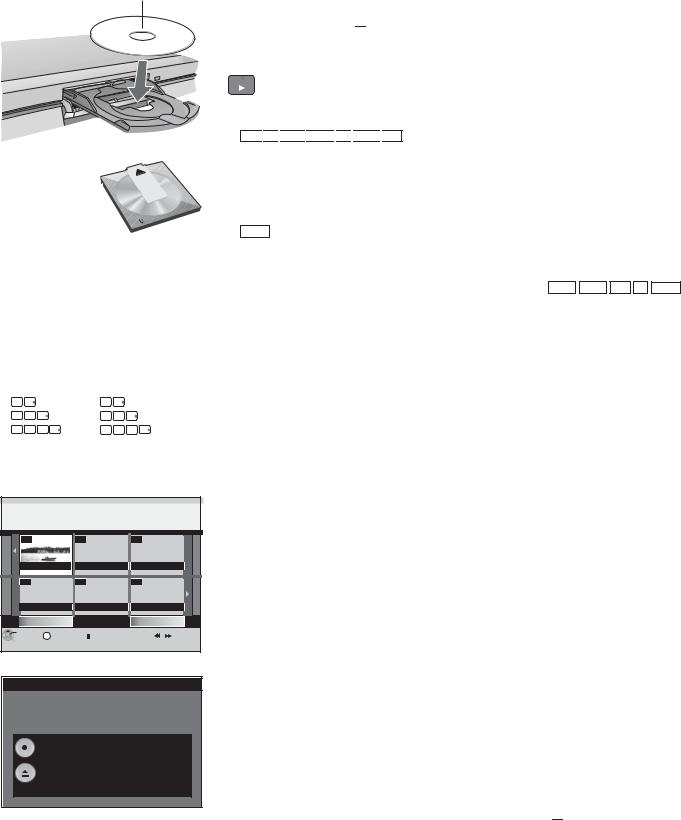
DVD-A
Playback
Insert with label facing upwards. In the case of double-sided discs, the label of the side that you want to play should be facing upwards.
Insert a Cartridge disc in the direction of the arrow, label facing upwards.
Direct input via the number buttons
|
5: |
0 |
5 |
15: |
1 |
5 |
||||
|
5: |
0 |
0 |
5 |
15: |
0 |
1 |
5 |
||
|
5: |
0 |
0 |
0 |
5 |
15: |
0 |
0 |
1 |
5 |
DIRECT NAVIGATOR Title View
 DVD-RAM
|
07 |
— |
— |
|
|
ZDF |
12.9. THU |
||
|
— |
— |
— |
|
|
Previous |
Page 02/02 |
Next |
|
ENTER |
S |
SUB MENU |
Select |
Previous |
Next |
|||
|
RETURN |
Finalize
Finalize the disc so that it can be played on other DVD players.
Note: Recording or Editing is not possible after finalizing. This may take up to 9 min.
Press the REC button to start finalize.
Press the OPEN/CLOSE button to exit.
This disc cannot be played on other
DVD players without finalizing.
 DVD
DVD
Preparation
Switch on your television and select the appropriate AV channel.
Switch on the DVD Recorder.
Press OPEN/CLOSE  on the unit to open the disc tray.
Insert a disc in the disc tray and close it. It may take some time to read the disc!
PLAY Playback
Press PLAY  to start playback.
Playback begins with the last title recorded.
RAM
 -R
-R 
 -R DL
-R DL 
 -RW(V)
 +R
+R 
 +R DL
+R DL 
 +RW Disc playback stops when a Timer recording starts.
Playback of a selected title
During playback, use the number buttons to select the desired title, chapter or piece and confirm with ENTER.
When the screen saver is shown, you can enter a group number. On some
|
discs, this function is only available when playback stops. |
|
|
Playback starts automatically |
DVD-A DVD-V VCD CD -R(MP3) |
Playback always starts at the beginning of the disc. If the disc has its own disc menu, then this is displayed. The operation of the disc menu depends on the inserted disc.
Due to the programme structure determined by the manufacturer, all described functions may not be available.
In the case of VCD, use the number buttons to select the number of the title.
In the case of DVD-A/DVD-V, use 

 or the number buttons to select a title and confirm with ENTER.
Use the following buttons to launch the disc menu again:
DVD-V: SUB MENU, DVD-A: DIRECT NAVIGATOR, VCD: RETURN
If  appears on the television unit, the procedure is interrupted by the unit or the disc.
Selecting programmes/titles for playback
Use the DIRECT NAVIGATOR button to launch the menu during playback, recording and in STOP mode.
Press DIRECT NAVIGATOR.
Select the desired title with 

 and confirm with ENTER. Playback starts.
Press RETURN to exit the menu.
You can select other pages with SKIP  Previous or
 Next.
Next.
|
Finalising |
-R |
-RW(V) |
+R |
-R DL |
+R DL |
Auto finalisation is always offered before an unfinalised disc is ejected. You can only play an unfinalised disc on this DVD Recorder.
Press OPEN/CLOSE  on the unit.
Press REC on the unit to start the finalisation.
After successful finalisation, the disc is ejected automatically. It can now be played on any DVD unit.
If you do not want to finalise the disc, press OPEN/CLOSE  on the unit again.
18
 Loading…