-
Contents
-
Table of Contents
-
Troubleshooting
-
Bookmarks
Quick Links
IC Recorder
Click! You can direct jump
Table of Contents
Operating Instructions
Recording Files
Utilizing Your Computer
Troubleshooting
Index
GB
4-300-042-12(1)
ICD-TX50
Related Manuals for Sony ICD-TX50
Summary of Contents for Sony ICD-TX50
-
Page 1
IC Recorder Click! You can direct jump Table of Contents Operating Instructions Recording Files Utilizing Your Computer Troubleshooting Index 4-300-042-12(1) ICD-TX50… -
Page 2: Table Of Contents
Table of Contents WARNING …5 Notice for users …7 Preparing the recorder Checking the Parts and Controls …8 Using the Display Window …10 Preventing Unintentional Operations (HOLD) …16 Maintaining the Moderate Volume Level(For European models only) …17 Recharging the Battery …18 Recharging the battery using a computer …18 Recharging the battery using a USB AC…
-
Page 3
Renaming a Folder and a File…65 Changing a folder name …65 Changing a file name …66 Protecting a File …67 About the Menu Function Menu Operation Modes …68 Menu Settings …70 Utilizing Your Computer Using the IC Recorder with Your Computer …79 Connecting the IC recorder to your computer …80… -
Page 4
Browsing the Operation Guide To use the buttons in the Operation Guide Click the buttons located in the upper right of the pages of this manual to jump to “Table of Contents, ” or “Index. ” Hints You can jump to the indicated page by clicking a page number in the table of contents or in the index. -
Page 5: Warning
The recorded music is limited to private use only. Use of the music beyond this limit requires permission of the copyright holders. Sony is not responsible for incomplete recording/ downloading or damaged data due to problems of the IC recorder or computer.
-
Page 6
The manufacturer of this product is Sony Corporation, 1‑7‑1 Konan Minato‑ku Tokyo, 108‑0075 Japan. The Authorized Representative for EMC and product safety is Sony Deutschland GmbH, Hedelfinger Strasse 61, 70327 Stuttgart, Germany. For any service or guarantee matters please refer to the addresses given in separate service or guarantee documents. -
Page 7: Notice For Users
All rights reserved. This manual or the software described herein, in whole or in part, may not be reproduced, translated or reduced to any machine readable form without prior written approval from Sony Corporation. IN NO EVENT SHALL SONY CORPORATION BE LIABLE FOR ANY INCIDENTAL,…
-
Page 8: Preparing The Recorder
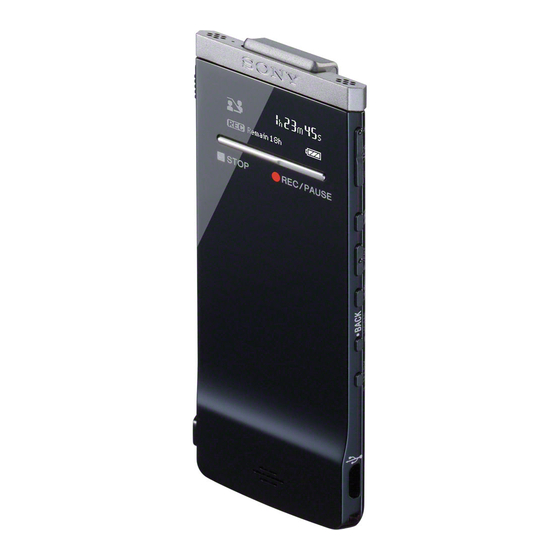
Preparing the Recorder Preparing the recorder Checking the Parts and Controls Front Recording indicator Display window STOP button REC (record)/PAUSE button Speaker Built-in microphone (stereo) (L) Built-in microphone (stereo) (R) Operation indicator …
-
Page 9
Preparing the Recorder Rear Clip POWER•HOLD switch microSD card slot (headphone) jack RESET button You can reset the IC recorder by pressing the button with a small pin, etc. ( p. 104). Attaching the noise damper By attaching the noise damper to the IC recorder, you can reduce vibration noises from a table or… -
Page 10: Using The Display Window
Preparing the Recorder Using the Display Window Display when stopped Note The above window and the other windows in this section display indications, numbers, or items for explanatory purposes. The actual windows may differ from those displayed here. File location indication The selected file number is displayed in the numerator and the total number of files in the folder is…
-
Page 11
Preparing the Recorder microSD card indication Appears when a microSD card is inserted and “Select Memory” in the menu is set to “microSD Card. ” When “Built‑In Memory” is selected, no indication is displayed. Battery indicator Displays the remaining battery power. -
Page 12
Preparing the Recorder Newly arriving podcast indication Editorial message indication When some editorial functions are disabled for a file, a message is displayed (e.g., Cannot Divide File or Edit Track Mark). Display when recording Operation mode indicator Displays the following, depending on the current operation of the IC recorder. -
Page 13
Preparing the Recorder Display during playback Play mode /DPC/Alarm indicator Appears when a file is played back. Appears when files in one folder are played back continuously. ALL: Appears when all the files are played back continuously. Appears when one file is played back repeatedly. -
Page 14
Preparing the Recorder Display during file selection Category list Folder list File list Category indication Folders containing files are categorized into recordable or playback‑only area for managing files. Recording Files: Recordable area. Used to manage files recorded with the IC recorder. Music: Playback‑only area. -
Page 15: Menu Items
Preparing the Recorder Display during MENU operation Home menu Menu setting Home menu The Home menu consists of the following five items, each representing a major feature of the IC recorder. Scene Select Select File Erase Files Edit Settings …
-
Page 16: Preventing Unintentional Operations (Hold)
Preparing the Recorder Preventing Unintentional Operations (HOLD) You can disable all the buttons (HOLD) in order to prevent unintentional operations when you carry the IC recorder, etc. To disable the button operations (HOLD status) Slide the POWER•HOLD switch in the direction of “HOLD” to disable the buttons while the power is on.
-
Page 17: Maintaining The Moderate Volume Level(For European Models Only)
Preparing the Recorder Maintaining the Moderate Volume Level (For European models only) The IC recorder limits the maximum volume to allows you to listen to the sound at a moderate volume level when using the headphones. When you try to adjust the volume to a level that exceeds the specified level, the “Check The Volume Level”…
-
Page 18: Recharging The Battery
Preparing the Recorder Recharging the Battery Recharging the battery using a computer Connect the IC recorder to your computer. Use the USB connecting cable supplied with the IC recorder to connect the (USB) connector of the IC recorder and the USB port of a running computer.
-
Page 19: Recharging The Battery Using A Usb Ac Adaptor
Preparing the Recorder Disconnect the IC recorder from your computer. Follow the procedures below; otherwise, when the IC recorder contains data files, the files may be damaged or become unplayable. Make sure that the operation indicator does not light. Perform the following operation on your computer.* On the Windows taskbar at the bottom right of the desktop, left‑click the following icon: …
-
Page 20: Turning The Ic Recorder On
Preparing the Recorder Turning the IC Recorder On Turning the power on Slide and hold the POWER•HOLD switch in the direction of “POWER” until the window display appears. The IC recorder is turned on. Turning the power off Slide and hold the POWER•HOLD switch in the direction of the “POWER” until the “Power Off ”…
-
Page 21: Using The Power Saving Mode
Preparing the Recorder Using the power saving mode To save battery power, the power saving mode is set to “ON” by default. In the power saving mode, if no operation is attempted for approximately 5 seconds in the stop mode and for approximately 10 seconds in the recording and playback modes, the display turns off automatically.
-
Page 22: Setting The Clock
Preparing the Recorder Setting the Clock You need to set the clock to use the alarm function or record the date and time. Setting the clock after recharging the battery When the clock is not set after you purchased the IC recorder and use it for the first time, the “Set Date&Time”…
-
Page 23: Setting The Clock Using The Menu
Preparing the Recorder Setting the clock using the menu While the IC recorder is in the stop mode, you can set the clock using the menu. Select “Date&Time” in the menu. In the stop mode, press and hold BACK/ HOME until the Home menu appears. Press or to select “ Settings,” and then press /ENT. Press or to select “Common Settings,” and then press /ENT. Press or to select “Date&Time,” and then press /ENT. Press or to select “Auto(Synchronizing)” or “Manual,” and then press /ENT.
-
Page 24
Preparing the Recorder Set year, month, day, hour and minute. Press or to set the year, and then press /ENT. Repeat this procedure to set month, day, hour, and minute in sequence. You can move the cursor back to an item by pressing BACK/HOME. When you set the minute and press /ENT, the “Please Wait”… -
Page 25: Setting The Language To Be Used In The Display Window
Preparing the Recorder Setting the Language to Be Used in the Display Window You can select the language to be used for messages, menus, folder names, file names, etc. In the stop mode, press and hold BACK/ HOME to display the Home menu, then select “ Settings” ”Language,” and then press /ENT. Press or to select the language that you want to use, and then press /ENT. Press STOP to exit the menu mode.
-
Page 26: About The Home Menu
Preparing the Recorder About the Home menu You can display the Home menu by pressing and holding BACK/HOME. The Home menu is the starting point of each feature of the IC recorder, such as editing or making various settings. Home menu The Home menu consists of the following five items.
-
Page 27: How To Use The Home Menu
Preparing the Recorder How to use the Home menu When you press or to select an item and then press /ENT, you can display the menu window one‑layer down. Pressing BACK/HOME button returns to the menu window one‑layer up. Whichever layer of a menu window you display, you can go back directly to the Home “Scene Select”…
-
Page 28: Selecting A File
Preparing the Recorder Selecting a File Selecting a file using the menu You can select a folder and a file for recording, playing, or editing as follows: Display the “ Select File” menu. In the stop or playback mode, press and hold BACK/HOME until the Home menu appears. Press or to select “ Select File,” and then press /ENT. Select a category. Press or to select “ Recording Files, ” “…
-
Page 29
Preparing the Recorder Select a file. Press or to select the desired file, and then press /ENT. The playback mode window of the selected file is displayed. Press STOP to stop playback. You can switch files by pressing or . -
Page 30: Selecting A File In The Stop Or Playback Mode Window
Preparing the Recorder Selecting a file in the stop or playback mode window In the stop or playback mode, press BACK/HOME. The file list of the current folder is displayed. By pressing BACK/HOME repeatedly, you can display the folder list, category list, and the “ Select File” window in sequence.
-
Page 31: Displaying The File Information
Preparing the Recorder Displaying the file information You can display the file information of the current file by pressing STOP in the stop mode. By pressing STOP repeatedly, you can display the rest of the file information, and then return to the stop mode window. …
-
Page 32: Inserting A Microsd Card
Preparing the Recorder Inserting a microSD Card In addition to the built‑in memory, you can record files on a microSD card. In this manual, microSD cards and microSDHC cards are generally referred to as a “microSD card. ” In the stop mode, open the lid of the microSD card slot, and then insert a microSD card into the microSD card slot as illustrated below until it clicks into place.
-
Page 33
Preparing the Recorder About compatible microSD cards You can use microSD/microSDHC cards with the IC recorder. Due to the file system specifications of the IC recorder, you can record and play back an LPCM file smaller than 2 GB, and an MP3/WMA/AAC‑LC file smaller than 1 GB using a microSD card. -
Page 34: Selecting The Memory
Preparing the Recorder Selecting the memory You can switch the memory between the built‑in memory and a microSD card by using the menu: To switch the memory to the microSD card, insert a microSD card into the microSD card slot ( p. 32). In the stop mode, press and hold BACK/ HOME to display the Home menu, then select “ Settings” then press /ENT. Press or to select “microSD Card” or “Built-In Memory,” and then press /ENT. If you select “microSD Card” and the microSD card has not been formatted, proceed to the next step.
-
Page 35: Recording Files
Recording Files Recording Files Basic Recording The following are the basic recording procedures using the specified microphone sensitivity and recording mode. Note Noise may be recorded if an object, such as your finger, etc., accidentally rubs or scratches the IC recorder during recording. …
-
Page 36: Monitoring The Recording
Recording Files To record with the IC recorder on a table or other surface, attach the supplied noise damper to the IC recorder and place the IC recorder so that the built-in microphones face the direction of the source to be recorded. In the stop mode, press REC/PAUSE. The recording indicator and the operation indicator light in red. You do not need to press and hold REC/ PAUSE while recording. The new file will be automatically recorded as the last file in the specified destination folder.
-
Page 37: Stopping The Recording
Recording Files Stopping the recording Press STOP. The “Please Wait” animation appears on the display and the operation indicator flashes in orange. The IC recorder stops at the beginning of the current recording file. Note while accessing The IC recorder is recording data and storing it on the memory media when the “Please Wait”…
-
Page 38: Changing The Recording Settings
Recording Files Changing the Recording Settings Selecting the recording destination folder You can set the folder in which a recording file is saved. You can select a folder in the “ Recording Files” category each for the built‑in memory and microSD card.
-
Page 39: Selecting A Recording Scene For Each Situation
Recording Files Selecting a recording scene for each situation According to various recording scene, you can change the items for recording, such as REC Mode ( p. 72), Mic Sensitivity ( p. 73), etc., to the recommended settings in bulk. You can change the settings for each item. …
-
Page 40: Tips For Better Recording
Recording Files Tips for better recording There are ways of making better recordings other than using scene selection. Recording at a meeting When recording with the IC recorder placed on a table, you can reduce noise by attaching the supplied noise damper to the IC recorder. By placing the IC recorder on a handkerchief, etc., you can also record with clear, low‑noise sound, minimizing vibration noise from the…
-
Page 41: Changing The Scene Select Settings
Recording Files Changing the Scene Select settings In the stop or playback mode, press and hold BACK/HOME to display the Home menu, then select “ Settings” ”Recording Settings” then press /ENT. Press or to select the scene you want to change the settings, and then press /ENT. Press or to select “Edit” or “Edit from Current Setting,” and then press / ENT. Press or to select the item you want to change, and then press /ENT. Press or to select a setting item, and then press /ENT. For details on the menu items and settings, see “Menu Settings. ” ( p. 72 – 73) …
-
Page 42: Changing The Scene Select Setting To The Default Values
Recording Files Changing the Scene Select setting to the default values In the stop or playback mode, press and hold BACK/HOME to display the Home menu, then select “ Settings” Settings” ”Scene Edit,” and then press /ENT. Press or to select the scene you want to change the settings to the default values, and then press /ENT. Select “Set Default Value,” and then press /ENT. “Set to Default Value?” will be displayed. Press or to select “YES,” and then press /ENT. The menu item settings of the selected scene will be set to the default values.
-
Page 43: Starting To Record Automatically In Response To Sound — The Vor Function
Recording Files Starting to Record Automatically in Response to Sound – the VOR Function You can set the VOR (Voice Operated Recording) function to “ON, ” to make the IC recorder start recording when the IC recorder detects sound that exceeds a specified level, and pause when sound falls to a level lower than a specified level.
-
Page 44: Playing Files
Playing Files Basic Playback Slide the POWER•HOLD switch in the direction of “POWER” to turn on the IC recorder ( p. 20), or towards the center to release the IC recorder from the HOLD status ( p. 16). The stop mode window appears. Select the desired file to be played back ( p. 28). If you do not select a file, the file just recorded will be played back. Press /ENT. Playback starts, and the operation indicator will light in green.
-
Page 45: Other Operations
Playing Files Other operations stop at the current position (Playback Pause function) go back to the beginning of the current file go back to previous files skip to the next file skip to the succeeding files When a track mark is set, the IC recorder goes backward or forward to the track mark before or after the current point ( …
-
Page 46: Changing The Playback Settings
Playing Files Changing the Playback Settings Reducing noise or selecting the sound effect in playback – the Effect function You can reduce noise in playback or select the sound effect that suits the file to be played back. Press and hold BACK/HOME to display the Home menu, then select “…
-
Page 47
Playing Files Option items Description Disables the effect function. Clear Voice 1 Reduces noise, excluding that of the human voice, and adjusts low and loud voices to the optimum volume automatically, making sound clear and easy‑to‑listen‑to. Clear Voice 2 Makes sound quality clearer, with stronger noise reduction and automatic volume adjustment functions than those of “Clear Voice 1. -
Page 48: Adjusting The Playback Speed — The Dpc (Digital Pitch Control) Function
Playing Files Adjusting the playback speed – the DPC (Digital Pitch Control) function You can adjust the playback speed in a range from 0.50 times to 2.00 times normal. The file is played back in natural tones by means of a digital processing function.
-
Page 49: Selecting The Play Mode
Playing Files Note You cannot play back an LPCM file at a speed exceeding 1.00 times the recorded speed. If you attempt to adjust the playback speed faster than that limit, “NO FAST” appears in the display window. Selecting the play mode You can select the play mode in the menu.
-
Page 50: Convenient Playback Methods
Playing Files Convenient Playback Methods Listening with better sound quality To listen with the headphones: Connect the supplied stereo headphones to the (headphone) jack. The built‑in speaker will be automatically disconnected. To listen from an external speaker: Connect an active speaker to the …
-
Page 51: Locating The Point You Wish To Start Playback Quickly — The Easy Search Function
Playing Files Locating the point you wish to start playback quickly – the Easy Search function When “Easy Search” is set to “ON” in the menu, you can go back for the specified reverse skip time by pressing once, and can go forward for the specified forward skip time by pressing …
-
Page 52: Playing Back A File At A Desired Time With An Alarm
Playing Files Playing Back a File at a Desired Time with an Alarm You can sound an alarm and start playback of a selected file at a desired time. You can have a file played back on a specified date, once every week, or at the same time every day.
-
Page 53
Playing Files Press or to select a favorite alarm pattern, and then press /ENT. The “Please Wait” animation appears and the alarm setting becomes effective. Press STOP to exit the menu mode. To change the alarm setting Select the file you want to change its alarm setting, and then follow steps through . To cancel the alarm setting Follow steps … -
Page 54: Erasing Files
Erasing Files Erasing Files Erasing a File Note Once a file has been erased, you cannot retrieve it. Slide the POWER•HOLD switch in the direction of “POWER” to turn on the IC recorder ( p. 20), or towards the center to release the IC recorder from the HOLD status ( p. 16). The stop mode window appears. In the stop or playback mode, select the file you want to erase ( p. 28). Press and hold BACK/HOME until the Home menu appears. Press or to select “ Erase Files,” and then press /ENT.
-
Page 55
Erasing Files To cancel erasing Select “ΝΟ” in step , and then press /ENT. To erase a part of a file Divide the file into two files first ( p. 63), and then proceed with steps through . -
Page 56: Erasing All Files In A Folder
Erasing Files Erasing All Files in a Folder In the stop mode, select the folder containing the files you want to erase ( p. 28). Press and hold BACK/HOME to display the Home menu, then select ” Erase Files” ”Erase All Files,” and then press /ENT. “Erase All Files?” will be displayed. Press or to select “YES,” and then press /ENT. The “Please Wait” animation appears and all files in the selected folder will be erased. …
-
Page 57: Editing Files
Editing Files Arranging Files in a Folder Moving a file to a different folder Select the file you want to move. Press and hold BACK/HOME until the Home menu appears. Press or to select “ Edit,” and then press /ENT. Press or to select “Edit Files,” and then press /ENT. Press or to select “Move File,” and then press /ENT. Press or to select the category of the destination folder, and then press /ENT. Note When you select the “ Music” category as the destination, you can move a file to a folder containing the type of files the IC recorder can play.
-
Page 58: Copying A File To The Other Memory
Editing Files Press or to select the folder that you want to move the file into, and then press /ENT. The “Please Wait” animation appears and the file is moved to the last position in the destination folder. When you move a file to another folder, the original file in the previous folder will be erased. …
-
Page 59
Editing Files Press or to select the category of the destination folder, and then press /ENT. The folder list of the selected category is displayed. Note When you select the “ Music” category as the destination, you can copy a file to a folder containing the type of files the IC recorder can play. … -
Page 60: Using A Track Mark
Editing Files Using a Track Mark Adding a track mark You can add a track mark at a point at which you would like to divide a file later or locate during playback. You can add a maximum of 98 track marks to each file.
-
Page 61: Erasing A Track Mark
Editing Files Erasing a track mark Stop at a position after the track mark you would like to erase. Press and hold BACK/HOME to display the Home menu, then select “ Edit” Files” “Erase Track Mark,” and then press /ENT. “Erase Track Mark?” will be displayed. Press or to select “YES,” and then press /ENT. The “Please Wait” animation appears and the selected track mark will be erased. Press STOP to exit the menu mode. To cancel erasing Select “NO”…
-
Page 62: Erasing All The Track Marks In The Selected File At One Time
Editing Files Erasing all the track marks in the selected file at one time Select a file from which you want to erase the track marks. Press and hold BACK/HOME to display the Home menu, then select “ Edit” Files” “Erase All Track Marks,” and then press /ENT. “Erase All Track Marks?” will be displayed. Press or to select “YES,” and then press /ENT. The “Please Wait” animation appears and all the track marks will be erased at one time.
-
Page 63: Dividing A File
Editing Files Dividing a File Dividing a file at the current position You can divide a file in the stop mode, so that the file is divided into two parts and new file numbers are added to the divided file names. By dividing a file, you can easily find the point from which you want to play back when you make a long recording such as one made at a meeting.
-
Page 64: Dividing A File At All The Track Mark Positions
Editing Files Dividing a file at all the track mark positions Select the file you want to divide. In the stop mode, press and hold BACK/ HOME to display the Home menu, then select “ Edit” Track Marks,” and then press /ENT. “Divide All Track Marks?” will be displayed. Press or to select “YES,” and then press /ENT. The “Please Wait” animation appears, and the file is divided at all the track mark positions.
-
Page 65: Renaming A Folder And A File
Editing Files Renaming a Folder and a File Changing a folder name You can change a name of a folder used to store files recorded with the IC recorder. You can choose a new folder name from the templates. Select the folder which you want to rename from the folder list in the “…
-
Page 66: Changing A File Name
Editing Files Changing a file name You can rename a file by prefixing characters from a desired template to the file name. A file in the recordable area can be renamed. You can choose characters to be added from the templates. …
-
Page 67: Protecting A File
Editing Files Protecting a File To prevent a file from being accidentally erased or edited, you can protect an important file. When a file is protected, the (protect) indicator is displayed in the file information window, showing that the file is regarded as a read‑only file you cannot erase or edit.
-
Page 68: About The Menu Function
About the Menu Function Menu Operation Modes Home menus Scene Select Select File Erase Files Edit Files Edit Change Names Settings Recording Settings Playback Settings Select Memory Sub menus Menu items Erase a File Erase All Files Protect Divide at Current Position Divide All Track Marks Move File File Copy…
-
Page 69
About the Menu Function Home menus Common Settings Settings Sub menus Menu items Power Saving Mode Language Date&Time Time Display Beep Format System Information Operation mode ( : the setting can be made/ —: the setting cannot be made) Stop Playback Recording mode… -
Page 70: Menu Settings
About the Menu Function Menu Settings Sub menus Menu items Scene Select Allows you to choose a recording scene according to each recording situation as follows: (Shirt Pocket)*, (Meeting), You can change the items for recording to the recommended settings in bulk. Select File Displays category list, folder list, and then file list, allowing you to choose a file.
-
Page 71
About the Menu Function Sub menus Menu items Edit Files File Copy Erase Track Mark Erase All Track Marks Change Names Change Folder Name Change File Name Settings (* : Initial setting) Copies the selected file from the built‑ in memory to the desired folder on a microSD card, or from a microSD card to the desired folder on the built‑in memory. -
Page 72
About the Menu Function Sub menus Menu items Settings Recording Settings Scene Edit Save Destination REC Mode Settings (* : Initial setting) Edits the settings of the various recording menu items which have been pre‑set in the “Scene Select” menu. Edit: Changes the settings from the settings in the selected scene item. -
Page 73
About the Menu Function Sub menus Menu items Recording Settings Mic Sensitivity LCF(Low Cut) Playback Settings DPC(Speed Control) Settings (* : Initial setting) Sets the microphone sensitivity. High To record a sound far away from the IC recorder or a low sound, such as recording in a spacious room. -
Page 74
About the Menu Function Sub menus Menu items Playback Settings Effect Settings (* : Initial setting) Sets the effect suitable for playback sound. OFF*: The effect function does not work. Clear Voice 1: Reduces noise, excluding that of the human voice, and adjusts low and loud voices to the optimum volume automatically, making sound clear and easy‑to‑… -
Page 75
About the Menu Function Sub menus Menu items Playback Settings Easy Search Play Mode Alarm Settings (* : Initial setting) Sets the easy search function. ON: You can go forward or backwards for the specified skip time by pressing or during playback. -
Page 76
About the Menu Function Sub menus Menu items Select Memory Selects the memory medium on which you want to store a file, or which contains the file you want to play, edit, or copy. Built‑In Memory*: The built‑in memory of the IC recorder is microSD Card: When no microSD card is currently inserted in the IC recorder, the built‑in memory is selected automatically. -
Page 77
About the Menu Function Sub menus Menu items Common Settings Language Date&Time Time Display Beep Settings (* : Initial setting) Sets the language to be used for messages, menus, folder names, file names, etc. Deutsch (German), English, Español (Spanish), Français (French), Italiano (Italian), Русский… -
Page 78
To get another copy of the operating instructions, please visit the Sony support home page depending on your area ( p. 104). Displays the IC recorder model name and the version number of the software. -
Page 79: Utilizing Your Computer
Utilizing Your Computer Utilizing Your Computer Using the IC Recorder with Your Computer When the IC recorder is connected to your computer, you can transfer data between them. Copying files from the IC recorder to your computer to store them ( p. 85) Copying music files from your computer to the IC recorder to play them back ( p.
-
Page 80: Connecting The Ic Recorder To Your Computer
Utilizing Your Computer Connecting the IC recorder to your computer To exchange files between the IC recorder and your computer, connect the IC recorder to your computer. Connect the (USB) connector of the IC recorder with the USB port of your running computer with the supplied USB connecting cable inserted into the connectors securely until each plug stops to the end. Make sure the IC recorder has been recognized properly. On the Windows screen; open “My Computer” or “Computer, ” and make sure that “IC RECORDER”…
-
Page 81: Structure Of Folders And Files
“IC RECORDER” folder. microSD card Folder for files recorded using the IC recorder Folder transferred from your computer LPCM AAC-LC “MEMORY CARD” PRIVATE SONY Folder for files recorded using the IC recorder VOICE FOLDER01 FOLDER05 Folder transferred from MUSIC your computer J-POP…
-
Page 82
Utilizing Your Computer Hints The title or artist name, etc., registered in the music files, can be displayed on the IC recorder. It is useful if you input the ID3 tag information using the software you use to make the music files on your computer. -
Page 83
Utilizing Your Computer Folders displayed on the “ Music” category of the IC recorder The following folders will be displayed among the folders forwarded from a computer. Folders under the MUSIC folder which contains a file (when some folders have multiple levels, all folders will be displayed in parallel.) … -
Page 84: Disconnecting The Ic Recorder From Your Computer
Utilizing Your Computer Disconnecting the IC recorder from your computer Follow the procedures below; otherwise, data may be damaged. Make sure that the operation indicator of the IC recorder does not light. Perform the following operation on your computer. * On the Windows taskbar at the bottom right of the desktop, left‑click the following icon: Left‑click “Eject IC RECORDER”…
-
Page 85: Copying Files From The Ic Recorder To Your Computer
Utilizing Your Computer Copying Files from the IC Recorder to Your Computer You can copy the files and folders from the IC recorder to your computer to store them. Connect the IC recorder to your computer ( p. 80). Copy files or folders you want to transfer to your computer. Drag and drop the files or folders you want to copy from “IC RECORDER” or “MEMORY CARD”…
-
Page 86: Copying Music Files From Your Computer To The Ic Recorder And Playing Them Back
Utilizing Your Computer Copying Music Files from Your Computer to the IC Recorder and Playing Them Back You can copy music or the other audio files (LPCM(.wav)/MP3(.mp3)/ WMA(.wma)/AAC‑LC(.m4a) dragging and dropping them, and you can play them back using the IC recorder.
-
Page 87: Playing Back Music Files Copied From Your Computer Using The Ic Recorder
Utilizing Your Computer Playing back music files copied from your computer using the IC recorder Select a folder. Display the category list with either of the following: In the stop or playback mode, press and hold BACK/HOME to display the Home menu, then select “ Select File, ” and press /ENT. …
-
Page 88: Using The Ic Recorder As Usb Memory
Utilizing Your Computer Using the IC Recorder as USB Memory When the IC recorder is connected to your computer, image data or text data on the computer, as well as files recorded using the IC recorder can be stored on the IC recorder. Your computer must meet the specified system requirements to use the IC recorder as USB memory.
-
Page 89: Using The Supplied Sound Organizer Software
Utilizing Your Computer Using the Supplied Sound Organizer Software What you can do using Sound Organizer Sound Organizer allows you to exchange files with an IC recorder or memory card. The songs imported from music CDs and other media, MP3 and other audio files imported from a computer, and podcasts can also be played and transferred to an IC recorder.
-
Page 90
Utilizing Your Computer Editing templates for a folder or file name You can edit the templates used as “Change File Name” and “Change Folder Name” menu options. Deleting files from an IC recorder You can delete a file saved to an IC recorder. Use this operation to delete files in the IC recorder when you want to increase the amount of free space in the IC recorder or there are unnecessary files. -
Page 91: System Requirements For Your Computer
Utilizing Your Computer System requirements for your computer The following shows the system requirements for using Sound Organizer. Operating systems Windows 7 Ultimate Windows 7 Professional Windows 7 Home Premium Windows 7 Home Basic Windows 7 Starter (32 bit version) …
-
Page 92: Installing Sound Organizer
Utilizing Your Computer Sound card A SoundBlaster compatible card is recommended. USB port A compatible USB port is required to use devices and media. Operation via a USB hub is not guaranteed except for models for which operation has been specifically guaranteed. …
-
Page 93
Utilizing Your Computer Make sure that you accept the terms of the license agreement, select [I accept the terms in the license agreement], then click [Next]. When the [Setup Type] window appears, select [Standard] or [Custom], and then click [Next]. Follow the instructions on the screen and set the installation settings when you select [Custom]. When the [Ready to Install the Program] window appears, click [Install]. The installation starts. When [Sound Organizer has been installed successfully.] window appears, check [Launch Sound Organizer Now], and then click [Finish]. Note You may need to restart your computer after installing Sound Organizer. -
Page 94: The Sound Organizer Window
Utilizing Your Computer The Sound Organizer window Help Displays the help of Sound Organizer. For details on each operation, refer to these help files. The file list of Sound Organizer (My Library) Displays a list of files included in My Library of Sound Organizer in accordance with the operation.
-
Page 95: Additional Information
Additional Information Additional Information Using a USB AC Adaptor You can charge the built‑in rechargeable battery by connecting the IC recorder to an AC outlet using a USB AC adaptor (not supplied). You can charge the battery while you are using the IC recorder, so that it is useful when you want to record for a long time.
-
Page 96: Disconnecting The Ic Recorder From The Ac Outlet
Additional Information Disconnecting the IC recorder from the AC outlet Follow the procedures below; otherwise, when the IC recorder contains data files, the files may be damaged or become unplayable. If you are recording or playing back a file, press STOP to put the IC recorder into the stop mode. Make sure that the operation indicator of the IC recorder does not light. Disconnect the IC recorder from the USB AC adaptor, and then disconnect the USB AC adaptor from the AC outlet.
-
Page 97: Precautions
To clean the exterior, use a soft cloth slightly moistened in water. Then use a soft dry cloth to wipe the exterior. Do not use alcohol, benzine or thinner. If you have any questions or problems concerning your unit, please consult your nearest Sony dealer. Continued …
-
Page 98
Additional Information Backup recommendations To avoid potential risk of data loss caused by accidental operation or malfunction of the IC recorder, we recommend that you save a backup copy of your recorded files to a computer, etc. On using a microSD card … -
Page 99: Specifications
Additional Information Specifications System requirements To use your computer with the Sound Organizer software To use your computer with the Sound Organizer software, see “System requirements for your computer” ( p. 91). To use your computer without the Sound Organizer software To use your computer with the IC recorder without the Sound Organizer software, or to use the IC recorder as a USB mass storage device, your computer must meet the operating system requirements and port environment…
-
Page 100
Additional Information Hardware environment: Sound board: Sound boards compatible with any of the supported operating systems Port: USB port Disk drive A CD‑ROM drive is required. To create a music CD, you need a CD‑R/RW drive. Notes The following systems are not supported: … -
Page 101: Design And Specifications
Additional Information Design and specifications IC Recorder section Capacity (User available capacity) 4 GB (approx. 3.60 GB = 3,865,470,566 Byte) A part of the memory capacity is used as a management area. Maximum number of folders (for a drive) 400 folders Maximum number of files (for a folder) 199 files Maximum number of files (for a drive)
-
Page 102
Additional Information General section Speaker Approx. 10 mm × 6 mm (13/32 inches × 1/4 inches) dia. Input/Output Headphone jack USB connector microSD card slot Playback speed control (DPC) 2.00 times ‑ 0.50 times 1.00 time ‑ 0.50 times Power output 150 mW Power requirements Built‑in rechargeable lithium‑ion… -
Page 103: Battery Life
Additional Information Maximum recording time The maximum recording time of all the folders is as follows. REC mode (Recording scene LPCM 44.1kHz/16bit MP3 192kbps MP3 128kbps ( ) MP3 48kbps(MONO) When you are going to record continuously for a long time, you may have to use a USB AC adaptor (not supplied).
-
Page 104: Troubleshooting
Before taking the IC recorder for repair, check the following sections. Should any problem persist after you have made these checks, consult your nearest Sony dealer. Please access the following support home page to get the support information about your IC recorder: For customers in Europe: http://support.sony‑europe.com/DNA…
-
Page 105: On The Ic Recorder Operations
Troubleshooting On the IC recorder operations Noise Noise is heard. An object, such as your finger, etc., accidentally rubbed or scratched the IC recorder during recording so that noise was recorded. The IC recorder was placed near an AC power source, a fluorescent lamp or a mobile phone during recording or playback.
-
Page 106
Sony dealer. If the battery life is limted to approximately half the original battery life, even after you charge it fully, the battery has deteriorated. Consult your nearest Sony dealer. Charging You cannot charge the battery by connecting the IC recorder to your computer. When you connect the IC recorder to a computer which is not running, the battery will not be charged. -
Page 107
Troubleshooting Operating The IC recorder does not operate correctly. You may have formatted the memory of the IC recorder using the computer. Use the IC recorder formatting function to format the memory ( p. 78). The recording indicator and the operation indicator do not light. “LED” is set to “OFF. ” … -
Page 108
Troubleshooting Playback speed is too fast or too slow. “DPC(Speed Control)” in the menu is set to “ON, ” and the IC recorder plays a file at the specified speed. Set “DPC(Speed Control)” to “OFF” to play back a file at the normal speed. Or adjust the playback speed with “Set Speed”… -
Page 109
Troubleshooting Display The remaining time displayed in the display window is shorter than that displayed in the supplied Sound Organizer software. The IC recorder requires a certain amount of memory for system operation. That amount is subtracted from the remaining time, which is the reason for the difference. Files The “Memory Full” message is displayed and you cannot start recording. The memory is full. Erase some of the files ( p. 54) or erase all the files after you store them on the other memory media or on your computer. -
Page 110: On The Sound Organizer
Troubleshooting The IC recorder is not recognized by your computer. A folder/file cannot be transferred from your computer. Disconnect the IC recorder from your computer and reconnect it. Do not use a USB hub or USB extension cable. Use the supplied USB connecting cable to connect the IC recorder to your computer. Operation is not guaranteed if you use any system requirements other than those described on page 99.
-
Page 111
Troubleshooting The IC recorder cannot be properly connected. Check that the installation of the software has been successful. Also check the connection as follows: − When using an external USB hub, use the supplied USB connecting cable to connect the IC recorder to your computer. −… -
Page 112: Messages List
Troubleshooting Messages List Follow the instructions below if a message appears in the display. Message HOLD… Slide HOLD Switch to Activate. Low Battery Level Low Battery Low Battery to Update microSD Card Error microSD Card Not Supported Read Only microSD Card A read‑only microSD card is inserted. A read‑only microSD Card Locked Memory Full File Full…
-
Page 113
Save a backup copy of your data and format the IC recorder using the menu ( p. 78). If a problem persists, consult your nearest Sony dealer. A microSD card was inserted during recording or playback. Remove the microSD card and insert it while the IC recorder is in the stop mode. -
Page 114
Troubleshooting Message Invalid Operation New File Change Folder Cannot Divide ‑ Exceeds Max 199 Files in Folder Same File Name Exists Erased Track Marks too near Divide Point No operation with microSD Card Check the Volume Level* The volume of the playback sound exceeds the specified Operation Invalid While Recording for the European models only… -
Page 115
A system error other than the above has occurred. Press the RESET button to restart the IC recorder. If the problem persists, consult your nearest Sony dealer. “Save Destination” folder, or the folder itself has been deleted. The destination folder has been changed to… -
Page 116: System Limitations
Troubleshooting System Limitations There are some system limitations of the IC recorder. Troubles as mentioned below are not malfunctions of the IC recorder. Symptom You cannot display or play back music files in order. A file is divided automatically. You cannot enter lower‑ case characters.
-
Page 117: Trademarks
Troubleshooting Trademarks Microsoft, Windows, Windows Vista and Windows Media are registered trademarks or trademarks of Microsoft Corporation in the United States and/ or other countries. Macintosh and Mac OS are trademarks of Apple Inc., registered in the USA and other countries.
-
Page 118: Listening For A Lifetime
For the customers in Canada Listening for a Lifetime Selecting fine audio equipment such as the unit you’ve just purchased is only the start of your musical enjoyment. Now it’s time to consider how you can maximize the fun and excitement your equipment offers. This manufacturer, the Consumer Electronics Association (CEA)®…
-
Page 119
For the customers in Canada DECIBEL LEVEL EXAMPLES: Whisper Quiet room Moderate rainfall Normal conversation Busy traffic, vacuum cleaner Alarm clock CONSTANT EXPOSURE TO THESE NOISES CAN BE DANGEROUS: Lawn mower, motorcycle Chain saw Rock concert Jet plane takeoff Jackhammer Firecrackers This information courtesy of the American Speech‑Language‑Hearing Association (ASHA), the national professional, scientific and credentialing… -
Page 120: Index
Additional Information Index AAC‑LC files … 101 Adjusting the volume … 36, 44 Alarm …52, 68, 75 Battery indicator … 18, 95 Battery life … 103 Built‑in memory … 34, 81 Built‑in microphones … 35 Category … 14, 28 Changing a file name …66, 68, 71 Changing a folder name …65, 68, 71 Changing the Scene Select settings …41, 68, 72…
-
Page 121
Additional Information Language …69, 77 LCF(Low Cut) …68, 73 LED …69, 76 Menu operation modes …68 Menu Settings …70 Mic Sensitivity …68, 73 Move File …68, 70 Play Mode …68, 75 Power Saving Mode …69, 76 Protect …68, 70 REC Mode …68, 72 Save Destination …68, 72 Scene Edit …68, 72 Scene Select …68, 70…
Посмотреть инструкция для Sony ICD-TX50 бесплатно. Руководство относится к категории диктофоны, 1 человек(а) дали ему среднюю оценку 5.7. Руководство доступно на следующих языках: русский. У вас есть вопрос о Sony ICD-TX50 или вам нужна помощь? Задайте свой вопрос здесь
Не можете найти ответ на свой вопрос в руководстве? Вы можете найти ответ на свой вопрос ниже, в разделе часто задаваемых вопросов о Sony ICD-TX50.
Какой вес Sony ICD-TX50?
Sony ICD-TX50 имеет вес 50 g.
Какая высота Sony ICD-TX50?
Sony ICD-TX50 имеет высоту 102.3 mm.
Какая ширина Sony ICD-TX50?
Sony ICD-TX50 имеет ширину 40.8 mm.
Какая толщина Sony ICD-TX50?
Sony ICD-TX50 имеет толщину 6.4 mm.
Какой тип USB-подключения Sony ICD-TX50 имеет?
Sony ICD-TX50 имеет Micro-USB B подключение.
Инструкция Sony ICD-TX50 доступно в русский?
Да, руководствоSony ICD-TX50 доступно врусский .
Не нашли свой вопрос? Задайте свой вопрос здесь

ICD-TX50 QSG(CE7)_RU/UA 4-300-041-51(2)
IC Recorder
Краткое руководство пользователя
4-300-041-
51
(2)
© 2012 Sony Corporation Printed in China
ICD-TX50
RU
UA
Испытайте ваше новое устройство записи IC
1. Питание.
Устройство
записи IC
USB-кабель
Компьютер
В разъем
(USB)
В USB-порт
Индикатор
работы
Зарядите устройство записи IC.
Подключите устройство записи IC к
компьютеру с помощью USB-кабеля из
комплекта поставки. Начнется зарядка.
Когда аккумулятор зарядится полностью,
индикатор заряда покажет “
”.
Отключите устройство записи IC от
компьютера.
Подробные сведения о том, как отключить
устройство записи IC от компьютера, можно
найти в руководстве по эксплуатации для
вашего компьютера.
Включите питание.
Сдвиньте переключатель POWER•HOLD в
направлении “POWER” и удерживайте его до
тех пор, пока не включится дисплей.
Чтобы выключить питание, передвиньте
переключатель POWER•HOLD в направлении
“POWER” и удерживайте его до тех пор, пока не
появится заставка “Power Off”.
Предотвращение случайных операций (HOLD)
Чтобы вывести устройство записи IC из состояния
HOLD, передвиньте переключатель POWER•HOLD в
центральное положение.
2. Установка даты и времени.
Когда появится подтверждение для
настройки времени, нажмите
или
для выбора “YES”, а затем
нажмите
/ENT.
Нажмите
или
для
установки года, а затем нажмите
/ENT. Повторите действия для
последовательной установки месяца,
дня, часа и минуты.
После установки минуты и нажатия
/ENT
часы покажут настроенное время.
3. Выбор языка меню.
В режиме остановки нажмите
и удерживайте BACK/HOME для
отображения главного меню, затем
выберите “ Settings”
“Common
Settings”
“Language” и нажмите
/ENT.
Нажмите
или
для выбора
нужного языка, а затем нажмите
/ENT.
Доступны следующие языки:
Deutsch (немецкий), English (английский),
Español (испанский), Français (французский),
Italiano (итальянский), Русский
Нажмите
STOP.
4. Запись.
Индикатор
записи/
Индикатор
работы
Перед началом использования устройства записи
IC передвиньте переключатель POWER•HOLD в
центральное положение для вывода устройства из
состояния HOLD.
Нажмите
REC/PAUSE.
Запись начнется, а индикатор записи и
индикатор работы загорятся красным.
Можно приостановить запись, нажав
REC/PAUSE.
Нажмите
REC/PAUSE еще раз для возобновления
записи.
Нажмите
STOP для остановки записи.
Запись остановится, а индикатор работы
загорится оранжевым.
5. Прослушивание.
Индикатор
работы
Нажмите
/ENT.
Воспроизведение начнется, а индикатор
работы загорится зеленым.
Настройте громкость, нажимая
VOL –/+.
Нажмите
STOP для остановки
воспроизведения.
6. Удаление.
После удаления файла восстановить его невозможно.
В режиме остановки нажмите кнопку
BACK/HOME и удерживайте ее до тех
пор, пока не появится главное меню.
Нажмите
или
для выбора
“ Erase Files”, а затем нажмите
/ENT.
Выберите “Erase a File”, а затем
нажмите
/ENT.
Появится сообщение “Erase the File?”, и
выбранный файл будет воспроизведен для
подтверждения удаления.
Выберите “YES”, а затем нажмите
/ENT.
При удалении выбранного файла
отображается сообщение “Please Wait”.
Нажмите
STOP для выхода из
режима меню.
Можно вызвать главное меню, нажав и
удерживая BACK/HOME.
Главное меню служит для обращения
к любой функции устройства записи
IC, например для редактирования или
настройки различных параметров.
Главное меню
Главное меню состоит из пяти элементов.
Нажмите
или
для выбора
элемента главного меню, а затем нажмите
/ENT для подтверждения выбора:
Scene Select
Select File
Erase Files
Edit
Settings
Использование главного меню
Нажав
или
для выбора элемента
и затем нажав
/ENT, можно отобразить
подпункт меню. Нажав кнопку BACK/HOME,
можно вернуться на один уровень меню
выше. Независимо от того, на каком
уровне меню вы находитесь, можно сразу
вернуться в главное меню “Scene Select”,
нажав и удерживая BACK/HOME.
BACK: Нажмите BACK/HOME.
HOME: Нажмите и удерживайте
BACK/HOME.
Для выхода из главного меню нажмите
STOP.
Главное меню
Подпункт меню
Настройка меню
Окно Стоп/Воспроизведение/Запись
/ENT
/ENT
О главном меню
Что делать дальше
Инструкция по эксплуатации, в
которой представлены все функции
и характеристики устройства записи
IC, хранится в виде файлов PDF во
встроенной памяти устройства записи IC.
Инструкцию по эксплуатации можно также
скачать на главной странице технической
поддержки Sony:
http://support.sony-europe.com/DNA
Подключите устройство
записи IC к компьютеру.
Откройте на компьютере папку
“Instructions”.
В системе Windows: Нажмите [Мой
компьютер] или [Компьютер] —
[IC RECORDER] — [Instructions].
В системе Macintosh: В проводнике
Finder нажмите [IC RECORDER] —
[Instructions].
Перетащите файлы инструкции
по эксплуатации из папки
“Instructions” на локальный
диск компьютера.
Файлы инструкции по эксплуатации
имеют следующие имена:
Название продукта_язык_версия.pdf
(например, ICD-TX50_English_111.pdf)
Отключите устройство записи
IC от компьютера.
Чтобы прочитать инструкции по
эксплуатации, дважды нажмите на нужный
файл PDF.
Копирование инструкции по эксплуатации
на компьютер
Питание
Для питания устройства можно
использовать только встроенный
литий-ионный аккумулятор с постоянным
напряжением 3,7 В.
Безопасность
Не эксплуатируйте устройство во
время вождения автомобиля, поездки
на велосипеде или управления любым
моторизованным транспортом.
Эксплуатация
Не оставляйте устройство вблизи
источников тепла или под прямыми
лучами солнца, избегайте воздействия
пыли и вибрации.
Если внутрь устройства попал
посторонний предмет или жидкость,
то перед продолжением эксплуатации
устройство должен осмотреть
квалифицированный специалист.
Если у вас есть вопросы относительно
устройства, обратитесь к ближайшему
дилеру Sony.
Меры предосторожности
Устройство записи IC (1)
Шумоподавитель (1)
Стереонаушники (1)
USB-кабель (1)
Чехол (1)
Программное обеспечение, Sound
Organizer (CD-ROM) (1)
Инструкция по эксплуатации (хранится
во встроенной памяти)
Краткое руководство пользователя
Проверьте комплект поставки.
Поздравляем! Настройка устройства записи IC завершена, и первая запись успешно
выполнена. Перейдите к следующему шагу. Для полноценного использования устройства
записи IC можно воспользоваться другими полезными функциями и информацией.
Подробные сведения по каждой
операции см. в файлах PDF инструкции
по эксплуатации, скопированной на
компьютер.
BACK/HOME
T-MARK
,
/ENT,
Для операций меню
Выбор сюжета
Можно выбрать в меню сюжет для записи с
наилучшими параметрами в соответствии
с различными сюжетами записи.*
Эффект
Можно выбрать в меню эффект для
уменьшения шума или выбрать звуковой
эффект, который подходит для звука
воспроизведения.
T-MARK
Добавление маркера дорожки в качестве
точки начала во время записи или
воспроизведения файла.
DPC (Digital Pitch Control)
В меню можно настроить скорость
воспроизведения.
BACK/HOME
Отображает режим меню, позволяющий
устанавливать различные параметры,
например “REC Mode”, “Mic Sensitivity” и т. д.
*Использование сюжета “Shirt Pocket”
Можно сделать запись, когда устройство записи
IC находится в кармане рубашки. Для этого
поместите его в карман и закрепите зажимом.
Расширенные возможности
Sound Organizer (программное
обеспечение для ПК**)
С программным обеспечением
Sound Organizer можно выполнить на
компьютере множество различных
операций. Можно импортировать в
Sound Organizer файлы, записанные с
помощью устройства записи IC, для их
обработки. Можно импортировать файлы
с музыкальных компакт-дисков или файлы
подкастов и перенести их в устройство
записи IC. Кроме того, можно записать
компакт-диск с любимой музыкой.
** только для Windows
USB-адаптер переменного тока AC-U50AG
Дополнительные аксессуары
Познакомьтесь с новым устройством записи IC Sony!
Это краткое руководство пользователя, в нем содержатся инструкции по
основным операциям с устройством записи IC.
Внимательно ознакомьтесь с данным руководством. Надеемся, что вы
останетесь довольны своим новым устройством записи IC Sony.
ВНИМАНИЕ!
Не подвергайте батареи (батарейный блок или установленные батареи) длительному
воздействию чрезмерного нагрева, например на солнце, вблизи огня и т.п.
Емкость (емкость, доступная для пользователя)
4 ГБ (прибл. 3,60 ГБ = 3865470566 байт)
Часть объема памяти используется для управления.
Изготовитель: Сони Kорпорейшн
Адрес: 1-7-1 Kонан, Минато-ку, Токио 108-0075, Япония Страна-производитель: Kитай
Импортер на территории РФ и название и адрес организации, раположенной на
территории РФ, уполномоченной принимать претензии от пользователей:
ЗАО “Сони Электроникс”, 123103, Москва,Карамышевский проезд, 6, Россия
Дата изготовления
Цифровой диктофон: Указана на упаковке
Страна-изготовитель
Цифровой диктофон: Сделано в Китае
Пpимeчaниe для покyпaтeлeй: cлeдyющaя инфоpмaция пpимeнимa только для
обоpyдовaния, пpодaющeгоcя в cтpaнax, гдe дeйcтвyют диpeктивы EC
Производителем данного устройства является корпорация Sony Corporation, 1-7-1 Konan,
Minato-ku, Tokyo, 108-0075 Japan. Уполномоченным представителем по электромагнитной
совместимости (EMC) и безопасности изделия является компания Sony Deutschland GmbH,
Hedelfinger Strasse 61, 70327 Stuttgart, Germany. По вопросам обслуживания и гарантии
обращайтесь по адресам, указанным в соответствующих документах.
Во избежание возможных повреждений органов слуха избегайте длительного
прослушивания на высокой громкости.

ICD-TX50 QSG(CE7)_RU/UA 4-300-041-51(2)
IC Recorder
Краткое руководство пользователя
4-300-041-51(2)
© 2012 Sony Corporation Printed in China
ICD-TX50
RU
UA
Испытайте ваше новое устройство записи IC
1. Питание.
Устройство
записи IC
USB-кабель
Компьютер
В разъем (USB)
В USB-порт
Индикатор
работы
Зарядите устройство записи IC.
Подключите устройство записи IC к
компьютеру с помощью USB-кабеля из
комплекта поставки. Начнется зарядка.
Когда аккумулятор зарядится полностью,
индикатор заряда покажет “
”.
Отключите устройство записи IC от
компьютера.
Подробные сведения о том, как отключить
устройство записи IC от компьютера, можно
найти в руководстве по эксплуатации для
вашего компьютера.
Включите питание.
Сдвиньте переключатель POWER•HOLD в
направлении “POWER” и удерживайте его до
тех пор, пока не включится дисплей.
Чтобы выключить питание, передвиньте
переключатель POWER•HOLD в направлении
“POWER” и удерживайте его до тех пор, пока не
появится заставка “Power Off”.
Предотвращение случайных операций (HOLD)
Чтобы вывести устройство записи IC из состояния
HOLD, передвиньте переключатель POWER•HOLD в
центральное положение.
2. Установка даты и времени.
Когда появится подтверждение для
настройки времени, нажмите
или для выбора “YES”, а затем
нажмите /ENT.
Нажмите или для
установки года, а затем нажмите
/ENT. Повторите действия для
последовательной установки месяца,
дня, часа и минуты.
После установки минуты и нажатия /ENT
часы покажут настроенное время.
3. Выбор языка меню.
В режиме остановки нажмите
и удерживайте BACK/HOME для
отображения главного меню, затем
выберите “ Settings” “Common
Settings” “Language” и нажмите
/ENT.
Нажмите или для выбора
нужного языка, а затем нажмите
/ENT.
Доступны следующие языки:
Deutsch (немецкий), English (английский),
Español (испанский), Français (французский),
Italiano (итальянский), Русский
Нажмите STOP.
4. Запись.
Индикатор
записи/
Индикатор
работы
Перед началом использования устройства записи
IC передвиньте переключатель POWER•HOLD в
центральное положение для вывода устройства из
состояния HOLD.
Нажмите REC/PAUSE.
Запись начнется, а индикатор записи и
индикатор работы загорятся красным.
Можно приостановить запись, нажав REC/PAUSE.
Нажмите REC/PAUSE еще раз для возобновления
записи.
Нажмите STOP для остановки записи.
Запись остановится, а индикатор работы
загорится оранжевым.
5. Прослушивание.
Индикатор
работы
Нажмите /ENT.
Воспроизведение начнется, а индикатор
работы загорится зеленым.
Настройте громкость, нажимая
VOL –/+.
Нажмите STOP для остановки
воспроизведения.
6. Удаление.
После удаления файла восстановить его невозможно.
В режиме остановки нажмите кнопку
BACK/HOME и удерживайте ее до тех
пор, пока не появится главное меню.
Нажмите или для выбора
“ Erase Files”, а затем нажмите /ENT.
Выберите “Erase a File”, а затем
нажмите /ENT.
Появится сообщение “Erase the File?”, и
выбранный файл будет воспроизведен для
подтверждения удаления.
Выберите “YES”, а затем нажмите
/ENT.
При удалении выбранного файла
отображается сообщение “Please Wait”.
Нажмите STOP для выхода из
режима меню.
Можно вызвать главное меню, нажав и
удерживая BACK/HOME.
Главное меню служит для обращения
к любой функции устройства записи
IC, например для редактирования или
настройки различных параметров.
Главное меню
Главное меню состоит из пяти элементов.
Нажмите или для выбора
элемента главного меню, а затем нажмите
/ENT для подтверждения выбора:
Scene Select
Select File
Erase Files
Edit
Settings
Использование главного меню
Нажав или для выбора элемента
и затем нажав /ENT, можно отобразить
подпункт меню. Нажав кнопку BACK/HOME,
можно вернуться на один уровень меню
выше. Независимо от того, на каком
уровне меню вы находитесь, можно сразу
вернуться в главное меню “Scene Select”,
нажав и удерживая BACK/HOME.
BACK: Нажмите BACK/HOME.
HOME: Нажмите и удерживайте
BACK/HOME.
Для выхода из главного меню нажмите
STOP.
Главное меню
Подпункт меню
Настройка меню
Окно Стоп/Воспроизведение/Запись
/ENT
/ENT
О главном меню
Что делать дальше
Инструкция по эксплуатации, в
которой представлены все функции
и характеристики устройства записи
IC, хранится в виде файлов PDF во
встроенной памяти устройства записи IC.
Инструкцию по эксплуатации можно также
скачать на главной странице технической
поддержки Sony:
//support.sony-europe.com/DNA
Подключите устройство
записи IC к компьютеру.
Откройте на компьютере папку
“Instructions”.
В системе Windows: Нажмите [Мой
компьютер] или [Компьютер] —
[IC RECORDER] — [Instructions].
В системе Macintosh: В проводнике
Finder нажмите [IC RECORDER] —
[Instructions].
Перетащите файлы инструкции
по эксплуатации из папки
“Instructions” на локальный
диск компьютера.
Файлы инструкции по эксплуатации
имеют следующие имена:
Название продукта_язык_версия.pdf
(например, ICD-TX50_English_111.pdf)
Отключите устройство записи
IC от компьютера.
Чтобы прочитать инструкции по
эксплуатации, дважды нажмите на нужный
файл PDF.
Копирование инструкции по эксплуатации
на компьютер
Питание
Для питания устройства можно
использовать только встроенный
литий-ионный аккумулятор с постоянным
напряжением 3,7 В.
Безопасность
Не эксплуатируйте устройство во
время вождения автомобиля, поездки
на велосипеде или управления любым
моторизованным транспортом.
Эксплуатация
Не оставляйте устройство вблизи
источников тепла или под прямыми
лучами солнца, избегайте воздействия
пыли и вибрации.
Если внутрь устройства попал
посторонний предмет или жидкость,
то перед продолжением эксплуатации
устройство должен осмотреть
квалифицированный специалист.
Если у вас есть вопросы относительно
устройства, обратитесь к ближайшему
дилеру Sony.
Меры предосторожности
Устройство записи IC (1)
Шумоподавитель (1)
Стереонаушники (1)
USB-кабель (1)
Чехол (1)
Программное обеспечение, Sound
Organizer (CD-ROM) (1)
Инструкция по эксплуатации (хранится
во встроенной памяти)
Краткое руководство пользователя
Проверьте комплект поставки.
Поздравляем! Настройка устройства записи IC завершена, и первая запись успешно
выполнена. Перейдите к следующему шагу. Для полноценного использования устройства
записи IC можно воспользоваться другими полезными функциями и информацией.
Подробные сведения по каждой
операции см. в файлах PDF инструкции
по эксплуатации, скопированной на
компьютер.
BACK/HOME
T-MARK
, /ENT,
Для операций меню
Выбор сюжета
Можно выбрать в меню сюжет для записи с
наилучшими параметрами в соответствии
с различными сюжетами записи.*
Эффект
Можно выбрать в меню эффект для
уменьшения шума или выбрать звуковой
эффект, который подходит для звука
воспроизведения.
T-MARK
Добавление маркера дорожки в качестве
точки начала во время записи или
воспроизведения файла.
DPC (Digital Pitch Control)
В меню можно настроить скорость
воспроизведения.
BACK/HOME
Отображает режим меню, позволяющий
устанавливать различные параметры,
например “REC Mode”, “Mic Sensitivity” и т. д.
*Использование сюжета “Shirt Pocket”
Можно сделать запись, когда устройство записи
IC находится в кармане рубашки. Для этого
поместите его в карман и закрепите зажимом.
Расширенные возможности
Sound Organizer (программное
обеспечение для ПК**)
С программным обеспечением
Sound Organizer можно выполнить на
компьютере множество различных
операций. Можно импортировать в
Sound Organizer файлы, записанные с
помощью устройства записи IC, для их
обработки. Можно импортировать файлы
с музыкальных компакт-дисков или файлы
подкастов и перенести их в устройство
записи IC. Кроме того, можно записать
компакт-диск с любимой музыкой.
** только для Windows
USB-адаптер переменного тока AC-U50AG
Дополнительные аксессуары
Познакомьтесь с новым устройством записи IC Sony!
Это краткое руководство пользователя, в нем содержатся инструкции по
основным операциям с устройством записи IC.
Внимательно ознакомьтесь с данным руководством. Надеемся, что вы
останетесь довольны своим новым устройством записи IC Sony.
ВНИМАНИЕ!
Не подвергайте батареи (батарейный блок или установленные батареи) длительному
воздействию чрезмерного нагрева, например на солнце, вблизи огня и т.п.
Емкость (емкость, доступная для пользователя)
4 ГБ (прибл. 3,60 ГБ = 3865470566 байт)
Часть объема памяти используется для управления.
Изготовитель: Сони Kорпорейшн
Адрес: 1-7-1 Kонан, Минато-ку, Токио 108-0075, Япония Страна-производитель: Kитай
Импортер на территории РФ и название и адрес организации, раположенной на
территории РФ, уполномоченной принимать претензии от пользователей:
ЗАО “Сони Электроникс”, 123103, Москва,Карамышевский проезд, 6, Россия
Дата изготовления
Цифровой диктофон: Указана на упаковке
Страна-изготовитель
Цифровой диктофон: Сделано в Китае
Пpимeчaниe для покyпaтeлeй: cлeдyющaя инфоpмaция пpимeнимa только для
обоpyдовaния, пpодaющeгоcя в cтpaнax, гдe дeйcтвyют диpeктивы EC
Производителем данного устройства является корпорация Sony Corporation, 1-7-1 Konan,
Minato-ku, Tokyo, 108-0075 Japan. Уполномоченным представителем по электромагнитной
совместимости (EMC) и безопасности изделия является компания Sony Deutschland GmbH,
Hedelfinger Strasse 61, 70327 Stuttgart, Germany. По вопросам обслуживания и гарантии
обращайтесь по адресам, указанным в соответствующих документах.
Во избежание возможных повреждений органов слуха избегайте длительного
прослушивания на высокой громкости.