-
Contents
-
Table of Contents
-
Troubleshooting
-
Bookmarks
Quick Links
DIGITAL VOICE
RECORDER
VN-541PC
VN-540PC
USER MANUAL
Thank you for purchasing an Olympus digital voice recorder.
Please read these instructions for information about using the product correctly and safely.
Keep the instructions handy for future reference.
• To ensure successful recording, we recommend that you test the record function and volume
before use.
• If there are additions and/or modifications of functions due to firmware update, contents may
differ. For the latest information, please visit Olympus website.
EN
1
2
3
4
5
6
Summary of Contents for Olympus VN-540PC
This manual is also suitable for:
Vn-541pc
(Ocr-Read Summary of Contents of some pages of the Olympus VN-540PC Document (Main Content), UPD: 21 March 2023)
-
8, 1 Setup 8 EN Setup TIP • When setting the hour or minute, each time you press the n button the display changes between the AM/PM and 24-hour clock formats. Example:10:38PM PM10:38 (defaultformat) 22:38 • When setting the year, month or date, each time you press the n button the display order used for the date changes. Example:March24,2016 03.24. , 16 (defaultformat) 24.03. , 16 N…
-
26, 4 Formatting the internal memory 26 EN Formatting the internal memory erases all existing files saved on it. Be sure to transfer all important files to a PC before formatting. 1 Whilethevoicerecorderisin stopmode,pressandholdthek buttonformorethan3seconds. 2 Pressthe0buttontoselect [ YES ]. 3 Pressthepbutton. 4 Pressthe0buttontoselect [ YES ]again. 5 …
-
28, Olympus VN-540PC 5 28 EN PC connection/disconnection Connecting the voice recorder to a PC 1 StartthePC. 2 ConnecttheUSBcabletotheUSB portofthePC. 3 Aftermakingsurethevoice recorderisinstopmode,connect theUSBcabletotheconnecting portonthisrecorder. TIP • Windows: The voice recorder is recognized and displayed in the [Computer] folder w…
-
41, 6 Specifications 41 EN Specifications Battery life The figures below are guideline values. 4 Whenrecordingwithbuilt-in microphone TALK 52 hours (approx.) MUSIC 52 hours (approx.) MEMO 52 hours (approx.) LP* 60 hours (approx.) * VN-541PC model only 4 Duringaudiofileplayback During speaker playback TALK 21 hours (approx.) MUSIC 21 hours (approx.) MEMO 22 hours (approx.) LP* 23 hours (approx.) During earphone playback TALK 45…
-
20, Olympus VN-540PC 3 Repeat playback 20 EN Folder/File repeat playback You can select the repeat range in the file or the folder. 1 Pressandholdthelbutton whilethevoicerecorderisinstop mode. a a Repeat indicator [ ]: Plays the files in the current folder repeatedly. [ ]: Plays the current file repeatedly. • Press and hold the l button to switch repeat settings. 2 Releasethepbuttontofinalize thesetting. A/B repeat …
-
2, 2 EN Namesofparts…………………………….. 4 1 Getting started Setup………………………………………….. 5 Inserting the batteries …………………………………. 6 Turning the power ON …………………………………. 7 Setting the time/date……………………………………7 Setting the beeping sounds ……………………….. 8 Batteries……………………………………… 9 TurningthepowerOFF…..…
-
34, Olympus VN-540PC 6 Accessories (optional) 34 EN Accessories for Olympus voice recorders can be purchased directly from the Online Shop on the Olympus website. Availability of accessories differs depending on the country. ME52Wmonomicrophone (unidirectional) Designed to record sound from a distance while minimizing the impact of surrounding noise. ME34compactzoommicrophone (unidirectional) Comes with an integrated stand ideal for table placement when recording e…
-
21, Olympus VN-540PC 3 Reducing noise during playback (Noise Cancel) 21 EN Repeat playback 3 Pressandholdthelbutton againwhenplaybackreaches thedesiredendpositionforA/B repeatplayback. • Segment A/B is set, and A/B repeat playback starts. 4 Pressthepbutton. • Playback stops. The playback segment specified for this function is retained. NOTE • You cannot write index marks or temp marks…
-
22, 4 22 EN Changing the information screen/ Preventing accidental file erasure (File Lock) Editing With the file lock feature you can lock important files to prevent them being accidentally erased. Once locked, file is not erased even if the operation for erasing all the files in its folder is performed (☞P.24). NOTE • Select the file you want to lock, and stop at the start of the file. 1 Selectthefileyouwanttolock. 2 Pressthelbuttonwhi…
-
29, 5 PC connection/disconnection 29 EN PC connection/disconnection Disconnecting the voice recorder from a PC Windows 1 Click[ ]onthetaskbarinthe lowerrighthandcornerofthe screenandclick[ Eject DIGITAL VOICE RECORDER ]. • The letter used to identify the drive will vary according to your PC. • When the window indicating it is safe to remove hardware appears, c…
-
16, 3 Playback 16 EN Playback 4 Pressthepbuttontostop playback. • The file being played stops right away. The resume function automatically stores the playback stop position in memory. The position is retained even if the power is turned off. The next time the power is turned on, playback can be resumed from the stop position stored in the memory. • If the end of a f…
-
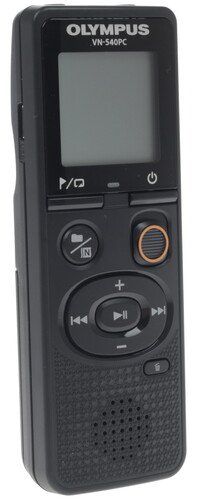
4, 4 EN Names of parts @ # ^ 0 ! $ % & 1 2 4 3 5 6 7 8 9 ( * 1 2 4 53 6 7 8 9 Recorder 1Built-inmicrophone 2 m (microphone)jack 3Display 4USBconnector 5l(index/repeat) button 6n(recording scene, folder/noise cancel)button 7p(playback, pause) button 80button 9Built-inspeaker 0q(earphone)jack !LEDindicatorlight @o(power, hold) button #�…
-
23, 4 Index marks/temp marks 23 EN Writing an index mark or temp mark in a file enables you to quickly access desired position in the file with the same operations used for fast-forwarding, rewinding or skipping to the start of a file. Files created using this voice recorder have index marks written to them. It may not be possible to write index marks to files created using other Olympus recorders. Files to which index marks cannot be written have temp marks written. Additionally, temp marks ar…
-
36, 6 Safety precautions 36 EN Beforeusingthevoicerecorder,read thismanualtoensurecorrectandsafe operation.Afterreadingthismanual,be suretokeepitonhandforreadyreference wheneverneeded. Importantsafetyprecautions • Important safety precautions in this manual are accompanied by the symbol and labels below. Always follow these precautions to prevent …
-
6, 1 Setup 6 EN Setup Inserting the batteries Before using the voice recorder, insert the batteries in the battery compartment of the voice recorder. 1 Slideopenthebatterycover whilepressingdownonit. 1 2 2 Insertthebatteries,making sureitspositiveandnegative terminalsareplacedcorrectly. 1 2 Insert the battery’s negative terminal first. 3 Slidetheba…
-
19, 3 Changing the playback speed 19 EN Changing the playback speed is handy for speeding up conference presentations, or for slowing down parts difficult to discern when learning a language. 1 Pressandholdthepbutton duringplayback. a a Playback speed 2 Pressthe + or – button. • The playback speed can be adjusted between [x0.5] and [x2.0] in 0.1 increments. • The playback speed increases when …
-
7, 1 7 EN Setup Setup Turning the power ON 1 Whilethevoicerecorderisturned off,pressandholdtheobutton. TIP • If you install batteries for the first time or replaced with new ones, the [hour] indicator will flash automatically when the power is turned on. Setting the time/date Set the time and date beforehand to enable easier management of recorded files. …
-
43, OLYMPUS CORPORATION 2951 Ishikawa-machi, Hachioji-shi, Tokyo 192-8507, Japan. OLYMPUS EUROPA SE & CO. KG Premises: Consumer Product Division Wendenstrasse 14 — 18, 20097 Hamburg, Germany. Tel. :+49 40 -23 77 3-0 / Fax +49 40 — 23 07 61 Goods delivery: Modul H, Willi-Bleicher Str. 36, 52353 Düren, Germany. Letters: Postfach 10 49 08, 20034 Hamburg, Germany. EuropeanTechnicalCustomer…
-
42, ForcustomersinEurope: The “CE” mark indicates that this product complies with the European requirements for safety, health, environment and customer protection. CE-mark products are for sale in Europe. This symbol [crossed-out wheeled bin WEEE Annex IV] indicates separate collection of waste electrical and electronic equipment in the EU countries. Please do not throw the equipment into the domestic refuse. Please u…
![]()
DIGITAL VOICE
RECORDER
VN-541PC VN-540PC
USER MANUAL
Getting started
Recording
Playback
Editing
Use with a PC
Other information
EN
Thank you for purchasing an Olympus digital voice recorder.
Please read these instructions for information about using the product correctly and safely. Keep the instructions handy for future reference.
•To ensure successful recording, we recommend that you test the record function and volume before use.
•If there are additions and/or modifications of functions due to firmware update, contents may differ. For the latest information, please visit Olympus website.

Table of contents
|
Names of parts……………………………… |
4 |
|
1 Getting started |
|
|
Setup…………………………………………… |
5 |
|
Inserting the batteries………………………………….. |
6 |
|
Turning the power ON…………………………………. |
7 |
|
Setting the time/date…………………………………… |
7 |
|
Setting the beeping sounds………………………… |
8 |
|
Batteries………………………………………. |
9 |
|
Turning the power OFF…………………. |
9 |
|
Preventing accidental operation…. |
10 |
|
Setting HOLD mode……………………………………. |
10 |
|
Releasing HOLD mode……………………………….. |
10 |
|
2 Recording |
|
|
Recording…………………………………… |
11 |
|
Changing the recording scene………………….. |
11 |
|
Basic recording procedure…………………………. |
12 |
|
Monitoring while recording………………………. |
13 |
|
Recording with an external microphone… |
13 |
|
Recording from another connected |
|
|
device………………………………………… |
14 |
|
Recording audio from another device with |
|
|
this recorder…………………………………………………. |
14 |
|
Recording audio from this recorder with |
|
|
another device…………………………………………….. |
14 |
|
3 Playback |
|
|
Playback…………………………………….. |
15 |
|
Basic playback procedure………………………….. |
15 |
|
Fast-forwarding…………………………………………… |
16 |
|
Rewinding…………………………………………………….. |
17 |
|
Skipping to the beginning of a file ………….. |
17 |
|
Playback through the earphones……………… |
18 |
|
Changing the playback speed……… |
19 |
|
Repeat playback…………………………. |
20 |
|
Folder/File repeat playback……………………….. |
20 |
|
A/B repeat playback……………………………………. |
20 |
|
Reducing noise during playback |
|
|
(Noise Cancel)…………………………….. |
21 |
|
4 Editing |
|
|
Changing the information screen…. |
22 |
|
Preventing accidental file erasure |
|
|
(File Lock)…………………………………… |
22 |
|
Index marks/temp marks…………….. |
23 |
|
Writing an index mark/temp mark…………… |
23 |
|
Erasing an index mark/temp mark…………… |
23 |
|
Erasing files………………………………… |
24 |
|
Erase a single file…………………………………………. |
24 |
|
Erase all the files in the folder……………………. |
24 |
|
Formatting the internal memory…. |
26 |
EN
2

Table of contents
|
5 Use with a PC |
|
|
PC operating environment………….. |
27 |
|
PC connection/disconnection……… |
28 |
|
Connecting the voice recorder to a PC……. |
28 |
|
Disconnecting the voice recorder |
|
|
from a PC………………………………………………………. |
29 |
|
Loading a file to a PC…………………… |
30 |
|
6 Other information |
|
|
Troubleshooting…………………………. |
31 |
|
Recorder care……………………………… |
33 |
|
Accessories (optional)…………………. |
34 |
|
Copyright and trademark |
|
|
information………………………………… |
35 |
|
Safety precautions……………………… |
36 |
|
Specifications…………………………….. |
40 |
Indications used in this manual
NOTE
Describes precautions and operations that should be absolutely avoided in using the voice recorder.
TIP
Describes useful information and hints that will help you getting the most out of your voice recorder.
Indicates reference pages describing details or related information.
This manual is advanced version. Additionally, the basic version (Basic Manual), which summarizes basic operation, is also included with this product.
EN
3
Names of parts
parts of Names
|
12 3 45 |
: VN-541PC |
||
|
1 |
0 |
model only |
|
|
2 |
|||
|
3 |
7 |
||
|
4 |
! |
||
|
8 |
|||
|
@ |
|||
|
5 |
|||
|
# |
9 |
||
|
6 |
$ |
||
|
7 |
% |
||
|
8 |
^ |
||
|
& |
* |
||
|
9 |
( |
||
|
Recorder |
! LED indicator light |
|||
|
1 Built-in microphone |
@ o(power, hold) |
|||
|
2 m(microphone) jack |
button |
|||
|
# REC (record) switch |
||||
|
3 Display |
$ + button |
|||
|
4 USB connector |
||||
|
% 9button |
||||
|
5 l(index/repeat) |
||||
|
^ k(erase) button |
||||
|
button |
||||
|
& – button |
||||
|
6 n(recording |
||||
|
* Battery cover |
||||
|
scene, folder/noise |
||||
|
cancel) button |
( Strap hole |
|||
|
7 p(playback, pause) |
||||
|
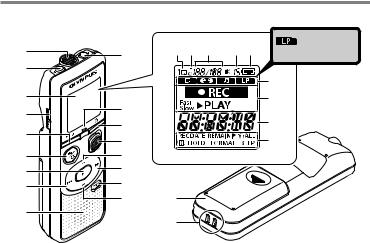
Display |
||||
|
button |
||||
|
8 0button |
1 Repeat |
|||
|
9 Built-in speaker |
2 File lock |
|||
|
0 q(earphone) jack |
3 File number/Total |
|||
|
EN |
number of recorded |
files in folder, A/B repeat
4Volume
5Battery
6Folder (recording scene)
7Voice recorder status
(recording, playback, fast playback, slow playback)
8Time and date, Recording scene
9Indicator display area (recording date, time and date, remain, index/temp mark, erase, noise cancel, hold, format, beep)
4

Getting started
This product is a voice recorder that is easy to use for all age groups, from children to senior citizens. It can be used in a range of situations, such as in business, or recording memos.
Usage examples
Recording meetings and discussions means that if you miss something important, you can listen to it again as many times as you like to confirm the content.
This recorder also features Noise Cancel function useful for transcription, as well as faster and slower playback.
Record messages as well as
|
changes to schedules instead |
|
|
of taking memos. Simple |
|
|
one-handed recording |
|
|
means it is easier |
× |
|
than writing in a |
|
|
notebook. |
This voice recorder can also be connected to a PC, and used as mass USB storage. This is convenient for transferring large files such as image data between computers.
Setup
After unpacking the voice recorder, follow the steps below to have it ready for use.
|
started |
1 |
Inserting the batteries |
|
Getting |
||
|
3 |
2 |
Turning the power ON |
|
started |
||
|
Getting |
||
|
3 |
3 |
|
|
Getting |
Setting the time/date |
|
|
started |
Set the voice recorder’s clock for |
|
|
3 |
4 |
use with file management. |
|
Getting |
Setting the beeping |
|
|
started |
sounds |
Remove the screen protector on the display.
5
Setup
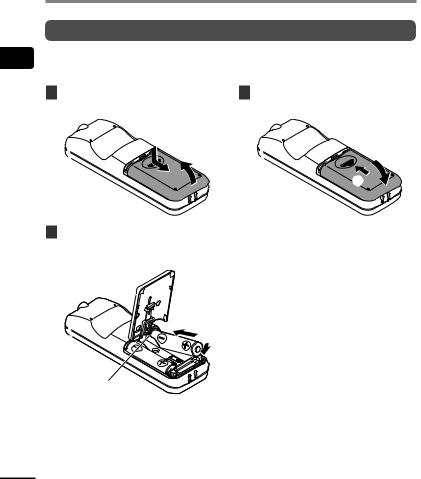
Inserting the batteries
Before using the voice recorder, insert the batteries in the battery compartment of the voice recorder.
|
1 |
Slide open the battery cover |
3 Slide the battery cover |
|
while pressing down on it. |
completely closed. |
|
|
1 |
||
|
2 |
||
|
2 |
||
|
2 |
Insert the batteries, making |
• Do not close the battery cover while |
|
sure its positive and negative |
the batteries are still loose. |
|
|
terminals are placed correctly. |
1
2
Insert the battery’s negative terminal first.
EN
6
Setup
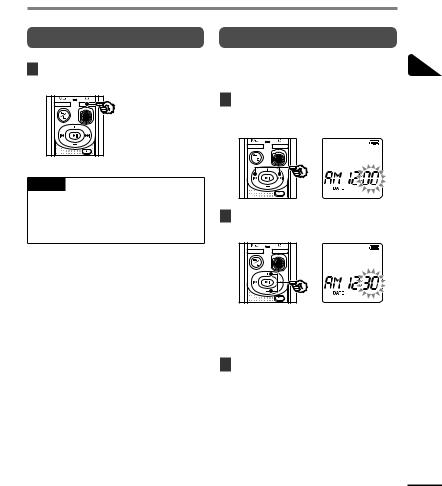
Turning the power ON
1While the voice recorder is turned off, press and hold the obutton.
TIP
•If you install batteries for the first time or replaced with new ones, the [hour] indicator will flash automatically when the power is turned on.
Setting the time/date
Set the time and date beforehand to enable easier management of recorded files.
1Press the 9(p) or 0 button to select the desired setting item.
2Press the + or – button to change the number.
•To change the setting of another item, press the 9or 0button to move the blinking cursor, then press the + or
– button to change the number.
3Press the pbutton to finalize the setting.
EN
7
Setup
TIP
•When setting the hour or minute, each time you press the nbutton the display changes between the AM/PM and 24-hour clock formats.
Example: 10 : 38 PM
PM 10 : 38 22 : 38 (default format)
•When setting the year, month or date, each time you press the nbutton the display order used for the date changes.
Example: March 24, 2016
03. 24. ,16 24. 03. ,16 (default format)
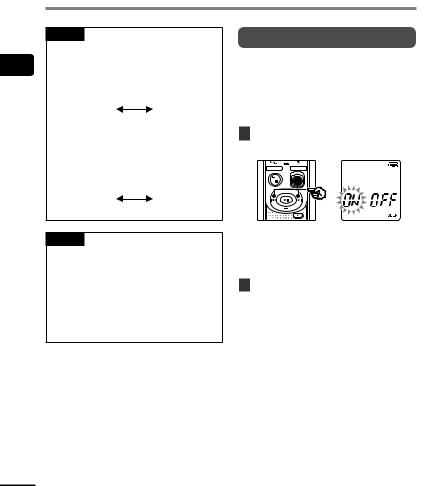
Setting the beeping sounds
The voice recorder makes beeping sounds when buttons are pressed, or to warn in case of operation errors. You can select whether the voice recorder makes these beeping sounds.
1Press the 9or 0button to select [ON] or [OFF].
NOTE
•If the batteries in the voice recorder are replaced with new ones, the [DATE] screen is displayed automatically when the power is turned on.
•Even if the voice recorder is not used for a long period of time, when the batteries are used up, the time and date must be re-entered.
[ON]
Enables beeping sounds. [OFF]
Disables beeping sounds.
2Press the pbutton to finalize the setting.
•After beeping sound has been set, version information will be displayed, and then voice recorder will enter stop mode.
EN
8
Batteries |
Turning the power OFF |
|
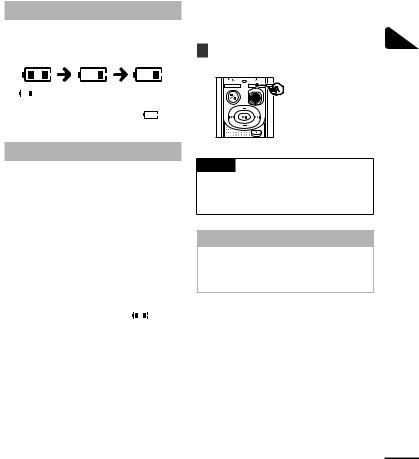
Battery indicator
|
As the |
its remaining charge, the |
|||
|
battery |
the |
as |
||
] indicates there is little remaining battery charge. Replace it with a fresh one. When the batteries has run ] and [LO] appear, and operation stops.
Battery precautions
•The voice recorder does not support manganese batteries.
•Always turn power OFF before replacing the batteries. Files may be damaged if the batteries are removed while the voice recorder is recording or performing an operation such as erasing a file.
•You need to reset the time/date if the batteries are replaced. See “Setting the time/date” ( P.7) for the procedure.
•When not using the voice recorder for an extended period, always remove the batteries before storage.
• Even if the battery indicator  ], playback with the built-in speaker at some volumes may result in a drop in battery output voltage, causing the voice recorder to reset. Lower the volume in this case.
•The continuous battery usage time will vary depending on the performance of the battery in use ( P.41).
For users in Germany
Olympus has an agreement with the GRS (Joint Battery Disposal Association) in Germany to ensure environmentally-friendly battery disposal.
Existing data, mode settings and the clock setting are saved when the power is turned off.
1Press and hold the obutton while the voice recorder is in stop mode.
TIP
•Turning the power OFF whenever the voice recorder is not in use minimizes battery consumption.
Power Save mode
When the voice recorder has been stopped for at least 5 minutes after power ON, the power turns off automatically.
1
OFF power the Batteries/Turning
EN
9
operation accidental Preventing
EN
Preventing accidental operation
Setting the voice recorder to HOLD mode maintains the current operation and disables button
Setting HOLD mode |
Releasing HOLD mode |
|||||||||||||||||
|
Press and hold the obutton |
Press and hold the obutton |
|||||||||||||||||
|
1 |
1 |
|||||||||||||||||
|
during recording or playback. |
during hold mode. |
|||||||||||||||||
[HOLD] appears in the display, and the recorder enters hold mode.
•Even if in hold mode, the REC switch can be moved to the ON and OFF positions.
TIP
•hold mode is automatically released after recording or playback finishes.
NOTE
•When any button is pressed during HOLD mode, [HOLD] appears in the display for 2 seconds. No other operation is performed.
•Setting HOLD mode during voice recorder playback (or recording) continues the playback (or recording) operation and prevents any other operation from being performed. (The voice recorder stops when playback ends or when recording ends because, for example, there is no remaining memory space.)
10
![]()
Recording
Recording
You can select from four recording scenes on this voice recorder — [MEMO], [TALK], [MUSIC], and [LP]*. Recorded audio will be stored in the same folder as the selected recording scenes. Each folder can store up to 199 files.
* VN-541PC model only
Changing the recording scene
|
[MEMO] |
Suitable for recording your own voice and other sounds that are extremely close. |
|
|
[TALK] |
Suitable for recording meetings held in a small space and other sounds that are fairly close. |
|
|
[MUSIC] |
Suitable for recording realistic audio with exceptional clarity such as live recording of a |
|
|
musical instrument performance or out in the open air. |
||
|
[LP]* |
Suitable for recording for a long time. |
|
* VN-541PC model only
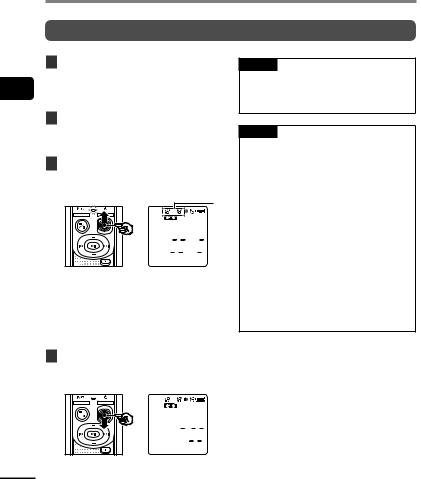
1While the voice recorder is in stop mode, press the nbutton.
A


 B
B
AFolder in which the recorded file is stored
BRecording scene
•Press the nbutton to switch between recording scenes.
TIP
•To record the speaker’s voice clearly, set [MEMO], and place the voice recorder’s built-in microphone near the speaker’s mouth (5 to10 cm away).
11
Recording
Basic recording procedure
1Changing the recording scene ( P.11).
•Each new voice recording file is saved in the selected folder.
2Point the built-in microphone in the direction of the sound to record.
3Slide the REC switch to start recording in the direction of the arrow.
A

 B
B


 C
C
AFile number/Total number of recorded files in folder
BVoice recorder status indicator (during recording)
CElapsed recording time
• The LED indicator light lights.
4Slide the REC switch to stop recording in the direction of the arrow.
TIP
•Even when the power is turned off, you can immediately start recording by sliding the REC switch up.
NOTE
•To prevent the beginning of the recording being cut off, start recording after the LED indicator light has lit or recording indicator has appeared in the display.
•When the remaining possible recording time is 60 seconds, the LED indicator light starts flashing. It flashes more rapidly as the remaining time decreases (at the 30and 10-second points).
•If the number of files inside the recorder reached 199 or the memory becomes full, you will not be able to record any further, and [FULL] will be displayed. You will need to delete unnecessary files to record more
( P.24).
12
Recording
Monitoring while recording
You can monitor the recording as you are making it by listening on the earphones plugged into the voice recorder’s qjack. Use the + or – button to adjust the recording monitor volume.
•The earphones is not supplied.
1Connect the earphones to the voice recorder’s qjack.
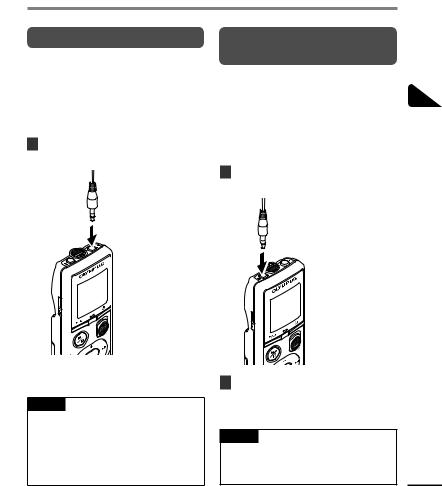
Recording with an external microphone
You can record audio input using an external microphone or other device connected to the voice recorder’s mjack. Do not plug or unplug devices into voice recorder jacks while recording.
•Microphones with plug-in power supplies can be used.
1Connect an external microphone to the voice recorder’s mjack.
•Changing the volume will not affect the recording level.
NOTE
•To avoid unpleasantly loud sound, set the volume to [00] before plugging in the earphone.
•To prevent feedback, do not place the earphone near the microphone while recording.
2Start recording.
•See “Recording” ( P.12) for descriptions of recording operations.
|
TIP |
|
|
• See “Accessories (optional)” |
|
|
( P.34) for the compatible external |
|
|
microphones. |
EN |
13
 Loading…
You can only view or download manuals with
Sign Up and get 5 for free
Upload your files to the site. You get 1 for each file you add
Get 1 for every time someone downloads your manual
Buy as many as you need

Диктофоны Olympus VN-540PC 4GB — инструкция пользователя по применению, эксплуатации и установке на русском языке. Мы надеемся, она поможет вам решить возникшие у вас вопросы при эксплуатации техники.
Вы можете скачать инструкцию к Olympus VN-540PC 4GB по ссылке ниже, если не хотите ждать загрузки. Если остались вопросы, задайте их в комментариях после инструкции.
«Загружаем инструкцию», означает, что нужно подождать пока файл загрузится и можно будет его читать онлайн. Некоторые инструкции очень большие и время их появления зависит от вашей скорости интернета.
Полезные видео
Остались вопросы?
Не нашли свой ответ в руководстве или возникли другие проблемы? Задайте свой вопрос в форме ниже с подробным описанием вашей ситуации, чтобы другие люди и специалисты смогли дать на него ответ. Если вы знаете как решить проблему другого человека, пожалуйста, подскажите ему
![:)]()
Часто задаваемые вопросы

Как посмотреть инструкцию к Olympus VN-540PC 4GB?
Необходимо подождать полной загрузки инструкции в сером окне на данной странице или скачать кликнув по специальной кнопке.
Руководство на русском языке?
Все наши руководства представлены на русском языке или схематично, поэтому вы без труда сможете разобраться с вашей моделью
Как можно распечатать инструкцию?
Скачайте ее по специальной кнопке над формой чтения на ваше устройства и отправьте на печать.
Перед вами файл pdf, где представлена инструкция (руководство) на русском для OLYMPUS VN-540PC. Вы можете скачать ее либо изучить в онлайн режиме.
Подробные сведения об инструкции:
Устройство из раздела: диктофон
Бренд-производитель: OLYMPUS
Наименование модели: OLYMPUS VN-540PC
Язык: Руководство на русском языке
Файл: pdf
Размер файла: 678,16 kB

Скачать инструкцию к HARPER HDT2-1110
ЗАГРУЗИТЬ
Просмотр инструкции онлайн
-
Contents
-
Table of Contents
-
Troubleshooting
-
Bookmarks
Quick Links
DIGITAL VOICE
RECORDER
VN-541PC
VN-540PC
USER MANUAL
Thank you for purchasing an Olympus digital voice recorder.
Please read these instructions for information about using the product correctly and safely.
Keep the instructions handy for future reference.
• To ensure successful recording, we recommend that you test the record function and volume
before use.
• If there are additions and/or modifications of functions due to firmware update, contents may
differ. For the latest information, please visit Olympus website.
EN
1
2
3
4
5
6
Summary of Contents for Olympus VN-540PC
This manual is also suitable for:
Vn-541pc
Диктофон Olympus VN-540PC + ME-52
4 ГБ, дисплей, запись — WMA, время работы — 60 ч
подробнее
1
Код товара: 1120711

249 ₽
Инструкция (руководство пользователя) на Цифровой диктофон Olympus VN-540PC
Артикул: olympus-vn-540pc
Категория: Olympus
-
Описание
-
Детали
Описание
Инструкцию по эксплуатации Olympus VN-540PC на русском языке можно будет скачать в личном кабинете после оформления и оплаты заказа.
Детали
| Формат файла |
|
|---|---|
| Размер инструкции в кб |
772 |
Table of Contents for Olympus VN-540PC:
-
1 7 EN Setup Setup Turning the power ON 1 Whilethevoicerecorderisturned off,pressandholdtheobutton. TIP • If you install batteries for the first time or replaced with new ones, the [hour] indicator will flash automatically when the power is turned on. Setting the time/date Set the time and date beforehand to enable easier management of recorded files. 1 Pressthe9(p)or0 buttontoselectthedesired settingitem. 2 Pressthe + or
-
6 Safety precautions 37 EN Safety precautions s Ifthevoicerecorderisdropped inwateror,ifwater,metalor combustibleforeignmattergets inside: 1 Remove the battery immediately. 2 Contact your place of purchase or an Olympus service center for repair. Continued use may result in fire or electric shock. s Donotusethevoicerecorderor useitonlyasdirectedinairplanes, hospitalsorotherlocations whereuseof
-
5 PC operating environment 27 EN PC operating environment The requirements shown are the operating environments needed for using a USB connection to save files recorded by the voice recorder on a PC. Windows Operatingsystem:Microsoft Windows Vista/7/8/8.1/10 standard installation PC:Windows PC with at least one available USB port Macintosh Operatingsystem:Mac OS X 10.5 to 10.11 standard installation PC:Apple Macintosh series PC with at least one available USB port
-
5 30 EN Loading a file to a PC Files recorded with the built-in microphone are saved in a folder named [RECORDER] on the PC. You can copy voice recorder files to any folder on the PC. RECORDER VN-541PC * MEMO TALK MUSIC LP 001 002 199 Copy these files to the PC. VN-541PC model only Drive name Folder names * Recognized/displayed by voice recorder drive name. Folder File (Memo) (Talk) (Music) (LP) Loading a file to a PC Windows 1 Connectthevoicerecordertothe PC(☞P.
-
5 28 EN PC connection/disconnection Connecting the voice recorder to a PC 1 StartthePC. 2 ConnecttheUSBcabletotheUSB portofthePC. 3 Aftermakingsurethevoice recorderisinstopmode,connect theUSBcabletotheconnecting portonthisrecorder. TIP • Windows: The voice recorder is recognized and displayed in the [Computer] folder with the model name as the drive name.
-
6 Recorder care 33 EN Recorder care s Exterior • If the voice recorder gets dirty, wipe gently with a soft cloth. If the recorder gets very dirty, soak the cloth in mild soapy water and wring well. Wipe the recorder with the damp cloth and then wipe it with a dry cloth. s Display • If the display gets dirty, wipe gently with a soft cloth. NOTE • Do not use benzene, alcohol or other strong solvents, or chemical cleanin
-
1 Setup 6 EN Setup Inserting the batteries Before using the voice recorder, insert the batteries in the battery compartment of the voice recorder. 1 Slideopenthebatterycover whilepressingdownonit. 1 2 2 Insertthebatteries,making sureitspositiveandnegative terminalsareplacedcorrectly. 1 2 Insert the battery’s negative terminal first. 3 Slidethebatterycover completelyclosed. 1 2 • Do not close the battery cover while the batteries are
-
4 Index marks/temp marks 23 EN Writing an index mark or temp mark in a file enables you to quickly access desired position in the file with the same operations used for fast-forwarding, rewinding or skipping to the start of a file. Files created using this voice recorder have index marks written to them. It may not be possible to write index marks to files created using other Olympus recorders. Files to which index marks cannot be written have temp
-
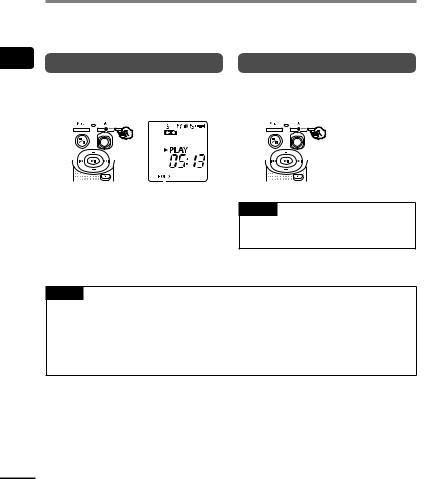
3 Playback 15 EN Playback In addition to files recorded by the voice recorder, you can also play files in WMA format transferred from a PC. Basic playback procedure 1 Selectthefiletoplayfromthe foldercontainingit. • Immediately after selecting the file, the following file information will be displayed in order. b c d a e f a Current file number b Current folder c Recording date d Reco
-
6 Troubleshooting 32 EN Troubleshooting Problem Alarm message Possible cause Solution Noise during playback. — Objects brushed against the voice recorder while recording. Try your best not to touch the voice recorder during recording. — The voice recorder was placed near a mobile phone or fluorescent light during recording or playback. Redo the operation with the voice recorder in a different location. Unable to erase a file. LOCK The file is locked. You must unlock the file before you can erase it (☞ P. 22). LOC
-
ForcustomersinEurope: The “CE” mark indicates that this product complies with the European requirements for safety, health, environment and customer protection. CE-mark products are for sale in Europe. This symbol [crossed-out wheeled bin WEEE Annex IV] indicates separate collection of waste electrical and electronic equipment in the EU countries. Please do not throw the equipment into the domestic refuse. Please use the return and collection systems available in your country for the disposal of this
-
2 Recording from another connected device 14 EN Recording audio from another device with this recorder Audio can be recorded when you have connected the audio output terminal (earphone jack) of another device and the m jack of the recorder by using the connecting cord KA333 (optional). To m jack To audio output terminal of other device NOTE • When recording from a connected external device, perform a test recording and adjust the output level of the conn
-
6 Troubleshooting 31 EN Troubleshooting Problem Alarm message Possible cause Solution The display is blank. — The batteries are not inserted properly. Check that the positive and negative terminals of the batteries are placed correctly (☞P. 6). LO The remaining battery power is low. Replace the batteries (☞P. 6). — The power is OFF. Turn the power ON (☞P. 7). Unable to operate the voice recorde
-
3 Repeat playback 20 EN Folder/File repeat playback You can select the repeat range in the file or the folder. 1 Pressandholdthelbutton whilethevoicerecorderisinstop mode. a a Repeat indicator [ ]: Plays the files in the current folder repeatedly. [ ]: Plays the current file repeatedly. • Press and hold the l button to switch repeat settings. 2 Releasethepbuttontofinalize thesetting. A/B repeat playback The voice recorder has a function with which you repeat the p
Questions, Opinions and Exploitation Impressions:
You can ask a question, express your opinion or share our experience of Olympus VN-540PC device using right now.