
ИНСТРУКЦИИ ПО ЭКСПЛУАТАЦИИ
МОНИТОР- ДЕФИБРИЛЛЯТОР
LIFEPAK
®
15
-
Contents
-
Table of Contents
-
Troubleshooting
-
Bookmarks
Quick Links
LIFEPAK
15
®
MONITOR / DEFIBRILLATOR
OPERATING INSTRUCTIONS
Related Manuals for Physio Control LIFEPAK 15
Summary of Contents for Physio Control LIFEPAK 15
-
Page 1
LIFEPAK ® MONITOR / DEFIBRILLATOR OPERATING INSTRUCTIONS… -
Page 3
LIFEPAK ® MONITOR/DEFIBRILLATOR OPERATING INSTRUCTIONS… -
Page 4
PATIENT SPEED DIAL Version History These operating instructions describe LIFEPAK 15 monitor/defibrillator devices with software revision 3306808-001 or later. LIFEPAK, LIFENET, QUIK-LOOK, and QUIK-COMBO are registered trademarks of Physio-Control, Inc. CODE SUMMARY, Shock Advisory System, CODE-STAT, DT EXPRESS, LIFEPAK CR, REDI-PAK, LIFEPAK EXPRESS, SunVue, and cprMAX are trademarks of Physio-Control, Inc. -
Page 5: Table Of Contents
Automated External Defibrillation (AED) …………….5-7 Manual Defibrillation …………………5-22 Synchronized Cardioversion Procedure …………….5-27 Noninvasive Pacing …………………..5-32 Pediatric ECG Monitoring and Manual Mode Therapy Procedures ……..5-39 6 Paddle Accessory Options QUIK-COMBO Therapy Electrodes ………………6-3 Standard Paddles………………….6-6 LIFEPAK 15 Monitor/Defibrillator Operating Instructions ©2007-2011 Physio-Control, Inc.
-
Page 6
Service and Repair …………………10-22 Product Recycling Information ………………10-23 Warranty ……………………10-23 Accessories ……………………10-24 Appendix A: Specifications and Performance Characteristics Appendix B: Screen Messages Appendix C: Shock Advisory System Appendix D: Electromagnetic Compatibility Guidance Appendix E: Symbols LIFEPAK 15 Monitor/Defibrillator Operating Instructions… -
Page 7: Preface
Intended Use ……. . 1-4 Modes of Operation ……1-5 LIFEPAK 15 Monitor/Defibrillator Operating Instructions ©2007-2011 Physio-Control, Inc.
-
Page 9: Introduction
PREFACE Introduction The LIFEPAK 15 monitor/defibrillator is a complete acute cardiac care response system designed for basic life support (BLS) and advanced life support (ALS) patient management protocols. These operating instructions include information and procedures related to all features of the LIFEPAK 15 monitor/defibrillator.
-
Page 10: Intended Use
Intended Use Intended Use The LIFEPAK 15 monitor/defibrillator is intended for use by trained medical personnel in out-of- doors and indoor emergency care settings within the environmental conditions specified on page A-12. The LIFEPAK 15 monitor/defibrillator is designed to be used during ground transportation except when specified otherwise.
-
Page 11: Modes Of Operation
PREFACE Modes of Operation The LIFEPAK 15 monitor/defibrillator has the following modes of operation: • AED mode—for automated ECG analysis and a prompted treatment protocol for patients in cardiac arrest. • Manual mode—for performing manual defibrillation, synchronized cardioversion, noninvasive pacing, and ECG and vital sign monitoring.
-
Page 13: Safety Information
SAFETY INFORMATION This chapter provides important information to help you operate the LIFEPAK 15 monitor/ defibrillator. Familiarize yourself with all of these terms and warnings. Terms ……. . . page 2-3 General Dangers and Warnings .
-
Page 15: Terms
SAFETY INFORMATION Terms The following terms are used either in these operating instructions or on the LIFEPAK 15 monitor/ defibrillator: Danger: Immediate hazards that will result in serious personal injury or death. Warning: azards or unsafe practices that may result in serious personal injury or death.
-
Page 16
POSSIBLE IMPROPER DEVICE PERFORMANCE Using other manufacturers’ cables, electrodes, power adapters, or batteries may cause the device to perform improperly and may invalidate the safety agency certifications. Use only the accessories that are specified in these operating instructions. LIFEPAK 15 Monitor/Defibrillator Operating Instructions… -
Page 17
Note: The features of the LIFEPAK 15 monitor/defibrillator which could come in either direct or casual contact with the patient or caregiver during normal use are not manufactured with materials that contain latex as an intentionally added component or expected impurity. -
Page 19: Basic Orientation
BASIC ORIENTATION This chapter provides a basic orientation to the LIFEPAK 15 monitor/defibrillator device and its controls, indicators, and connectors. Front View ……page 3-3 Back View .
-
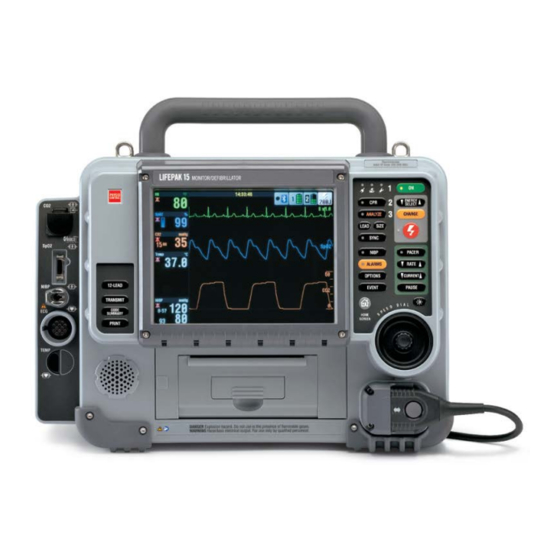
Page 21: Front View
BASIC ORIENTATION Front View Figure 3-1 shows the front of the LIFEPAK 15 monitor/defibrillator. The front of the device is described in the following sections. Recommended Adult VF Dose: 200-300-360J LIFEPAK 15 MONITOR/DEFIBRILLATOR SpO2 MONITOR/DEFBRILLATOR NIBP Self Test in progress…
-
Page 22
Front View Area 1 Recommended Adult VF Dose: 200-300-360J ENERGY SELECT ANALYZE CHARGE LEAD SIZE SYNC Figure 3-2 Area 1 Controls LIFEPAK 15 Monitor/Defibrillator Operating Instructions… -
Page 23
Changes ECG lead. See page 4-4 SIZE Changes ECG size. See page 4-5 Activates Synchronized mode. LED illuminated See page 5-27 SYNC when Sync mode is active and flashes with detection of each QRS. LIFEPAK 15 Monitor/Defibrillator Operating Instructions ©2007-2011 Physio-Control, Inc. -
Page 24
See page 5-32 is activated and flashes with each current pulse. RATE Increases or decreases pacing rate. See page 5-32 CURRENT Increases or decreases pacing current. See page 5-32 PAUSE Temporarily slows pacing rate. See page 5-32 LIFEPAK 15 Monitor/Defibrillator Operating Instructions… -
Page 25
Returns to Home Screen display. See page 3-17 SPEED DIAL Scrolls through and selects screen or menu items. See page 3-19 Display mode button switches between color display and high contrast SunVue™ display. LIFEPAK 15 Monitor/Defibrillator Operating Instructions ©2007-2011 Physio-Control, Inc. -
Page 26
Initiates acquisition of 12-lead ECG. See page 4-15 TRANSMIT Initiates transmission of patient data. See page 8-12 CODE SUMMARY Prints CODE SUMMARY™ critical event record. See page 7-4 PRINT Starts and stops printer. See page 7-10 LIFEPAK 15 Monitor/Defibrillator Operating Instructions… -
Page 27
Note: If your LIFEPAK 15 monitor/defibrillator is configured for temperature monitoring, P1 and P2 are replaced by a single port labeled TEMP. For more information about temperature monitoring, see page 4-61. LIFEPAK 15 Monitor/Defibrillator Operating Instructions… -
Page 28
Disconnect: Grip the connector and pull straight out. Figure 3-7 Connectors for IP Monitoring Configuration Note: If your LIFEPAK 15 monitor/defibrillator is configured for temperature monitoring, P1 and P2 are replaced by a single port labeled TEMP. For more information, see Figure 3-8 on page 3-11. 3-10… -
Page 29
TEMP port. Insert the cable connector into the port until TEMP the connector is firmly seated. Disconnect: Grip the connector and pull straight out. Figure 3-8 Connectors for Temperature Monitoring Configuration 3-11 LIFEPAK 15 Monitor/Defibrillator Operating Instructions ©2007-2011 Physio-Control, Inc. -
Page 30
IMPORTANT! The LIFEPAK 15 monitor/defibrillator QUIK-COMBO therapy cable and standard (hard) paddles have the same type of connector and connect to the defibrillator at the same location. These therapy cables are not compatible with other LIFEPAK defibrillator/monitors. -
Page 31: Back View
System page 10-12 connector page 10-13 Auxiliary power connector See warning Battery page 9-4 and Battery Battery Battery page 10-12 pins contacts well 1 well 2 Figure 3-11 Back View 3-13 LIFEPAK 15 Monitor/Defibrillator Operating Instructions ©2007-2011 Physio-Control, Inc.
-
Page 32
Only use Physio-Control recommended data transmission cables. For more information, contact Physio-Control Technical Support. Note: To prevent inadvertent depletion of the defibrillator batteries, disconnect external devices from the system connector when not in use. 3-14 LIFEPAK 15 Monitor/Defibrillator Operating Instructions… -
Page 33: Batteries
BASIC ORIENTATION Batteries The LIFEPAK 15 monitor/defibrillator operates either on battery power using two Lithium-ion batteries, or with auxiliary power using the AC Power Adapter or DC Power Adapter. Batteries may be charged in the Station or Mobile Li-ion Battery Charger, the REDI-CHARGE™ Battery Charger, or in the monitor/defibrillator if it is connected to auxiliary power.
-
Page 34
Inspect pins routinely for signs of damage. Keep batteries installed at all times except when the device is removed from service for storage. For information about battery maintenance, see «Battery Maintenance» on page 10-12. 3-16 LIFEPAK 15 Monitor/Defibrillator Operating Instructions… -
Page 35: Home Screen
FAILURE TO DETECT A CHANGE IN ECG RHYTHM Heart rate meters may count internal pacing pulses during cardiac arrest or some arrhythmias. Do not rely entirely on heart rate meter alarms. Keep pacemaker patients under close surveillance. 3-17 LIFEPAK 15 Monitor/Defibrillator Operating Instructions ©2007-2011 Physio-Control, Inc.
-
Page 36
Displays systolic, diastolic, and mean arterial See page 4-37 pressures (MAP) in mmHg, and time to next BP, when interval is set. Time Real or elapsed. See LIFEPAK 15 Monitor/Defibrillator Setup Options provided with your device. 3-18 LIFEPAK 15 Monitor/Defibrillator Operating Instructions… -
Page 37
Whenever a menu is displayed, the ECG is always visible in Channel 1. To return to the Home Screen from any menu, press the button. HOME SCREEN Rotate and press the to select an option in a menu. SPEED DIAL 3-19 LIFEPAK 15 Monitor/Defibrillator Operating Instructions ©2007-2011 Physio-Control, Inc. -
Page 38
When the defibrillator is operating on auxiliary power using a power adapter, the battery indicators show the battery charge level, but the well numbers are not highlighted. The LOW BATTERY messages and prompts do not occur when operating on auxiliary power. REPLACE BATTERY 3-20 LIFEPAK 15 Monitor/Defibrillator Operating Instructions… -
Page 39: Alarms
Alarms LIFEPAK 15 monitor/defibrillator alarms can be set up to be ON or OFF when the defibrillator is turned on. For more information, see the LIFEPAK 15 Monitor/Defibrillator Setup Options provided with your device.
-
Page 40
QUICK SET values, which may be outside the safe range for the patient. 4. After the patient is stable, reselect , if necessary. QUICK SET 3-22 LIFEPAK 15 Monitor/Defibrillator Operating Instructions… -
Page 41: Options
Set date and time. Cycle power for change to take Monitor/Defibrillator Date/Time effect. Setup Options for time display options. Adjust volume for alarms, tones, voice prompts and Alarm Volume CPR metronome. Archives Access archived patient records. See page 7-11 3-23 LIFEPAK 15 Monitor/Defibrillator Operating Instructions ©2007-2011 Physio-Control, Inc.
-
Page 42
Three additional commands are available: —inserts blank space. SPACE 0 1 2 3 4 5 6 7 8 9 — BACKSPACE —deletes last character and moves selection back one space. —clears all characters. CLEAR 3-24 LIFEPAK 15 Monitor/Defibrillator Operating Instructions… -
Page 43: Events
Use the Events menu to annotate patient events. A selected event appears in the Event log of the CODE SUMMARY critical event record. Events can be customized in Setup mode. For more information, see the LIFEPAK 15 Monitor/Defibrillator Setup Options provided with your device. To select an event: 1.
-
Page 45: Monitoring
MONITORING This chapter describes the monitoring features of the LIFEPAK 15 monitor/defibrillator. Monitoring the ECG ….. . . page 4-3 Acquiring a 12-Lead ECG .
-
Page 47: Monitoring The Ecg
For diagnostic or ST segment interpretation, or to enhance internal pacemaker pulse visibility, attach the multi-lead ECG cable. Then print the ECG rhythm in diagnostic frequency response (DIAG) or obtain a 12-lead ECG. LIFEPAK 15 Monitor/Defibrillator Operating Instructions ©2007-2011 Physio-Control, Inc.
-
Page 48
Monitoring the ECG Selecting ECG Lead The LIFEPAK 15 monitor/defibrillator includes two methods for selecting or changing the ECG lead. To select or change the displayed ECG lead using the button: LEAD 1. Press LEAD . If any ECG lead currently appears… -
Page 49
MONITORING Changing ECG Size The LIFEPAK 15 monitor/defibrillator includes two methods for selecting or changing ECG size. To select or change the displayed ECG size using the button: SIZE 1. Press SIZE 2. While the menu is displayed, press SIZE… -
Page 50
APEX midaxillary line, with the center of the electrode in the midaxillary line, if possible (see Figure 4-1). Sternum Anterior Apex Lateral Standard Paddles QUIK-COMBO Therapy Electrodes Figure 4-1 Anterior-Lateral Placement LIFEPAK 15 Monitor/Defibrillator Operating Instructions… -
Page 51
Use By date is not passed. For standard paddles, apply conductive gel over the entire electrode surface. 4. Connect the therapy electrodes to the therapy cable. 5. Select lead. PADDLES LIFEPAK 15 Monitor/Defibrillator Operating Instructions ©2007-2011 Physio-Control, Inc. -
Page 52
ECG Monitoring Procedure To perform ECG monitoring: 1. Press 2. Attach the ECG cable to the green connector on the monitor. 3. Identify the appropriate electrode sites on the patient as shown in Figure 4-3. LIFEPAK 15 Monitor/Defibrillator Operating Instructions… -
Page 53
Disposable electrodes are intended for a single use. 6. Select the desired ECG lead on the monitor screen. 7. If necessary, adjust ECG size for accurate heart rate counting. 8. Press to obtain an ECG printout. PRINT LIFEPAK 15 Monitor/Defibrillator Operating Instructions ©2007-2011 Physio-Control, Inc. -
Page 54
Procedure» on page 4-8, and place the C-lead electrode on the chest in the precordial position desired. Note that the LIFEPAK 15 monitor labels the ECG for this lead as V1 on the screen and printout, regardless of the location of the C-lead electrode. -
Page 55
MONITORING Monitoring Patients Who Have Internal Pacemakers The LIFEPAK 15 monitor/defibrillator internal pacemaker detection feature can be used to help identify internal pacemaker pulses on the printed ECG. When enabled, this feature uses lead V4 to detect internal pacemaker pulses. If V4 is not available because it is not attached or is too noisy, Lead II or Paddles Lead is used. -
Page 56
ECG size set too high or too • Adjust ECG size up or down. different from displayed ECG waveform Monitor detecting the patient’s • Change monitor lead to reduce internal pacemaker pulses internal pacemaker pulse size. 4-12 LIFEPAK 15 Monitor/Defibrillator Operating Instructions… -
Page 57
Inadequate skin preparation • Prepare skin and apply new frequency/low amplitude) electrodes. Isometric muscle tension in • Confirm that limbs are resting on arms/legs a supportive surface. • Check electrodes for proper adhesion. 4-13 LIFEPAK 15 Monitor/Defibrillator Operating Instructions ©2007-2011 Physio-Control, Inc. -
Page 58
• Connect ECG cable and select a limits visibility lead other than PADDLES • Print ECG in Diagnostic mode (see «How to Print a Current Report» on page 7-10). For general troubleshooting tips, see Table 10-2 on page 10-18. 4-14 LIFEPAK 15 Monitor/Defibrillator Operating Instructions… -
Page 59: Acquiring A 12-Lead Ecg
Identifying Electrode Sites To obtain a 12-lead ECG, place the electrodes on the limbs and the chest (precordium) as described in the following paragraph. 4-15 LIFEPAK 15 Monitor/Defibrillator Operating Instructions ©2007-2011 Physio-Control, Inc.
-
Page 60
Level with V5/C5 at left midaxillary line Figure 4-5 Precordial Lead Electrode Placement Locating the V1/C1 position (fourth intercostal space) is critically important, because it is the reference point for locating the placement of the remaining V/C leads. 4-16 LIFEPAK 15 Monitor/Defibrillator Operating Instructions… -
Page 61
Figure 4-6 12-Lead ECG Cables 3. Insert the cable connector into the green ECG connector on the monitor. 4. Prepare patient’s skin for electrode application (see page 4-9). 5. Apply ECG electrodes (see page 4-16). 4-17 LIFEPAK 15 Monitor/Defibrillator Operating Instructions ©2007-2011 Physio-Control, Inc. -
Page 62
This message is due to the temporary instability between the electrode gel and the patient’s skin that is not viewable on the ECG monitor screen, but is detected as noisy data. In 4-18 LIFEPAK 15 Monitor/Defibrillator Operating Instructions… -
Page 63
Computerized ECG analysis statements are automatically printed on 12-lead ECG reports. Printing of the interpretive statements is a setup option and may be turned off in Setup mode. For information on how to change this setup option, see the LIFEPAK 15 Monitor/Defibrillator Setup Options provided with your device. -
Page 64
Acquiring a 12-Lead ECG 12-lead ECG reports, see the LIFEPAK 15 Monitor/Defibrillator Setup Options provided with your device. Alternatively, press , select , select , and then select OPTIONS PRINT REPORT: 12-LEAD FORMAT Report type Time/date 1 mV Patient Standard… -
Page 65
(in particular from patient muscle tension) to help make the diagnostic printout less noisy and more readable. 4-21 LIFEPAK 15 Monitor/Defibrillator Operating Instructions ©2007-2011 Physio-Control, Inc. -
Page 66
Acquiring a 12-Lead ECG Note: The LIFEPAK 15 monitor/defibrillator acquires ECG data and performs the interpretive analysis based on the full frequency of 0.05–150 Hz. The 0.05–40 Hz bandwidth affects only the printed appearance of the ECG data. The 12-lead ECG printed in the 0.05–40 Hz setting can be used to diagnose acute myocardial ischemia and ST-segment elevation myocardial infarction (STEMI). -
Page 67
• Check for equipment causing RFI (such as a Interference (RFI) radio transmitter) and relocate or turn off equipment power. Damaged cable or • Inspect main cable and attachments. connector/lead wire Replace if damaged. 4-23 LIFEPAK 15 Monitor/Defibrillator Operating Instructions ©2007-2011 Physio-Control, Inc. -
Page 68
Isometric muscle tension • Confirm that limbs are resting on a in arms/legs supportive surface. • Check electrodes for proper adhesion. For general troubleshooting tips, see Table 10-2 on page 10-18. 4-24 LIFEPAK 15 Monitor/Defibrillator Operating Instructions… -
Page 69: Monitoring Spo2, Spco, And Spmet
MONITORING Monitoring SpO2, SpCO, and SpMet , SpCO™, and SpMet™ are optional features for the LIFEPAK 15 monitor/defibrillator. When all three options (SpO , SpCO, and SpMet) are installed, the pulse oximeter measures functional oxygen saturation (SpO ), carboxyhemoglobin concentration (SpCO), and methemoglobin concentration (SpMet) in the blood.
-
Page 70
(such as nail polish) may interfere with oximeter performance. The operator should be thoroughly familiar with the operation of the oximeter prior to use. 4-26 LIFEPAK 15 Monitor/Defibrillator Operating Instructions… -
Page 71
4-27 LIFEPAK 15 Monitor/Defibrillator Operating Instructions ©2007-2011 Physio-Control, Inc. -
Page 72
Use the following criteria to select the appropriate pulse oximeter sensor: • Patient size (adult, pediatric, infant) and weight • Patient perfusion to extremities • Patient activity level • Available application sites on the patient’s body • Sterility requirements • Anticipated duration of monitoring 4-28 LIFEPAK 15 Monitor/Defibrillator Operating Instructions… -
Page 73
Note: Circulation distal to the sensor site should be checked routinely. IMPORTANT! Masimo Rainbow sensors are necessary to monitor SpCO and SpMet and are not compatible with other LIFEPAK defibrillator/monitors. 4-29 LIFEPAK 15 Monitor/Defibrillator Operating Instructions ©2007-2011 Physio-Control, Inc. -
Page 74
Monitoring SpO2, SpCO, and SpMet Oximeter Monitoring Procedure Power to the pulse oximeter is controlled by the LIFEPAK 15 monitor/defibrillator. When the defibrillator is turned on, the oximeter turns on and performs a calibration and self-test that requires approximately 20 seconds. During the calibration and self-test, the screen does not display , SpCO, or SpMet information. -
Page 75
. The Channel menu appears. SPEED DIAL 3. Select and then select . The SpO waveform appears in the selected channel. WAVEFORM SPO2 The waveform is automatically sized for optimum waveform viewing. 4-31 LIFEPAK 15 Monitor/Defibrillator Operating Instructions ©2007-2011 Physio-Control, Inc. -
Page 76
Averaging time of 8 seconds is recommended for most patients. For patients with rapidly changing SpO values, 4 seconds is recommended. Use a 12- or 16-second time period when artifact is affecting the performance of the pulse oximeter. 4-32 LIFEPAK 15 Monitor/Defibrillator Operating Instructions… -
Page 77
• Plug the ESU and monitor into different circuits. • Move the ESU ground pad as close to the surgical site as possible. Sensor may be damp • Replace sensor. 4-33 LIFEPAK 15 Monitor/Defibrillator Operating Instructions ©2007-2011 Physio-Control, Inc. -
Page 78
SpO module failed. • Turn device off and then on reading Internal cable failed. again. • If problem persists, contact qualified service personnel. 4-34 LIFEPAK 15 Monitor/Defibrillator Operating Instructions… -
Page 79
• Check that sensor and cable SPMET: POOR QUALITY SIGNAL message appears the accuracy of the are connected properly. measurement may be • Move sensor to a better compromised perfused site. 4-35 LIFEPAK 15 Monitor/Defibrillator Operating Instructions ©2007-2011 Physio-Control, Inc. -
Page 80
Note: Most Rainbow sensor messages (SpO , SpCO, and SpMet) are reported as SPO2: (MESSAGE) message indicates the specific parameter affected. POOR QUALITY SIGNAL For general troubleshooting tips, see Table 10-2 on page 10-18. 4-36 LIFEPAK 15 Monitor/Defibrillator Operating Instructions… -
Page 81: Monitoring Noninvasive Blood Pressure
Monitoring Noninvasive Blood Pressure Intended Use The LIFEPAK 15 noninvasive blood pressure (NIBP) monitor measures blood pressure (BP) using the oscillometric measurement technique to determine systolic, diastolic, and mean arterial pressures, and pulse rate. The measurement can be initiated manually or set to recur automatically at predetermined intervals.
-
Page 82
When blood starts to flow through the artery, the increasing blood flow causes the amplitude of the pressure pulses in the cuff to increase. As the NIBP monitor steps the pressure down, the pulses 4-38 LIFEPAK 15 Monitor/Defibrillator Operating Instructions… -
Page 83
• If the blood pressure cuff fails to deflate for any reason or causes undue discomfort to the patient, remove the cuff from the arm or disconnect the tubing from the defibrillator. 4-39 LIFEPAK 15 Monitor/Defibrillator Operating Instructions ©2007-2011 Physio-Control, Inc. -
Page 84
The use of properly designed and sized cuffs is essential for the accurate measurement of blood pressure. The cuff must fit snugly around the extremity to occlude the artery. For a list of BP cuffs that are intended for use with the LIFEPAK 15 monitor/defibrillator, see the LIFEPAK 15 Monitor/ Defibrillator Accessories Catalog at store.physio-control.com. -
Page 85
MONITORING Note: Measurement data is recorded in the LIFEPAK 15 monitor/defibrillator Vital Sign Log. For more information about the Vital Sign Log and its use, see Chapter 7, «Data Management.» Manual Single-Measurement Procedure The NIBP measurement typically takes 40 seconds to complete. If the measurement is not completed within 120 seconds, the cuff automatically deflates. -
Page 86
3. Inspect the cuff for damage or excessive wear. If any damage is noted, replace the cuff. 4. Allow both to dry before placing the cuff on a patient or reconnecting the tubing to the monitor. For information about cleaning the device, see «Cleaning the Device» on page 10-15. 4-42 LIFEPAK 15 Monitor/Defibrillator Operating Instructions… -
Page 87
Cuff pressure exceeded • Disconnect tubing or remove appears 290 mmHg cuff. • Avoid very rapid squeezing of the cuff. • If this message persists, remove the cuff from use and obtain service. 4-43 LIFEPAK 15 Monitor/Defibrillator Operating Instructions ©2007-2011 Physio-Control, Inc. -
Page 88
The LIFEPAK 12 NIBP tubing • Obtain correct NIBP tubing to device connector is not compatible that is compatible with with the LIFEPAK 15 NIBP port LIFEPAK 15 monitor/ defibrillator. Cuff not deflating Internal valves fail to open • Disconnect NIBP tubing. -
Page 89: Monitoring Etco2
Flammable anesthetics become mixed with the patient’s air that is sampled by the capnometer. When using the EtCO monitor in the presence of flammable gases, such as nitrous oxide or certain other anesthetics, connect the EtCO gas port to a scavenger system. 4-45 LIFEPAK 15 Monitor/Defibrillator Operating Instructions ©2007-2011 Physio-Control, Inc.
-
Page 90
The CO FilterLine system delivers a sample of the exhaled gases directly from the patient into the LIFEPAK 15 monitor for CO measurement. The low sampling flow rate (50 ml/min) reduces liquid and secretion accumulation and prevents obstruction, which maintains the shape of the CO waveform. -
Page 91
MONITORING You can set up the LIFEPAK 15 monitor/defibrillator to use the capnography Body Temperature Pressure Saturated (BTPS) conversion method. This option corrects for the difference in temperature and moisture between the sampling site and alveoli. The correction formula is 0.97 ×… -
Page 92
EtCO2 Monitoring Procedure When activated, the EtCO monitor draws power from the defibrillator. The LIFEPAK 15 monitor/ defibrillator activates the EtCO monitor when it senses the attachment of the FilterLine set. Initialization, self-test, and warm up of the EtCO monitor is typically less than 30 seconds, but may take up to two-and-one-half minutes. -
Page 93
FilterLine tubing and reconnect it to the monitor. CO2 Display The following scales are available to display the CO waveform. The LIFEPAK 15 monitor/ defibrillator automatically selects the scale based on the measured EtCO value. To change the CO… -
Page 94
Do not clean and reuse a FilterLine set. Dispose of the contaminated waste according to local protocols. For information about cleaning the device, see «Cleaning the Device» on page 10-15. 4-50 LIFEPAK 15 Monitor/Defibrillator Operating Instructions… -
Page 95
• None. System resets automatically within 20 seconds. message appears Module is performing self- • None. AUTO ZEROING and waveform is “—” maintenance Defibrillation shock delivered • None. System resets automatically within 20 seconds. 4-51 LIFEPAK 15 Monitor/Defibrillator Operating Instructions ©2007-2011 Physio-Control, Inc. -
Page 96
• If problem persists, contact qualified service personnel. There is no EtCO value and the Measured CO is less than • See «CO2 Detection» on waveform is flat 3.5 mmHg page 4-50. 4-52 LIFEPAK 15 Monitor/Defibrillator Operating Instructions… -
Page 97
To decrease the likelihood of the FilterLine connection coming loose during use, hand- straighten the tubing after removal from the package before connecting to patient or device. For general troubleshooting tips, see Table 10-2 on page 10-18. 4-53 LIFEPAK 15 Monitor/Defibrillator Operating Instructions ©2007-2011 Physio-Control, Inc. -
Page 98: Monitoring Invasive Pressure
Monitoring Invasive Pressure Monitoring Invasive Pressure Intended Use The LIFEPAK 15 invasive pressure (IP) monitor is intended for measuring arterial, venous, intracranial, and other physiological pressures using an invasive catheter system with a compatible transducer. The IP monitor is a tool to be used in addition to patient assessment. Care should be taken to assess the patient at all times;…
-
Page 99
ART systolic pressure ART diastolic pressure ART mean pressure CVP mean pressure Figure 4-14 IP Labels Because pressures can change in a short time, data should be checked regularly during vital sign monitoring. 4-55 LIFEPAK 15 Monitor/Defibrillator Operating Instructions ©2007-2011 Physio-Control, Inc. -
Page 100
The customer is responsible for determining whether transducers comply with standards and are compatible with the monitor. The IP connector pinout has the following configuration, counterclockwise from 12 o’clock, viewed from the front of the LIFEPAK 15 monitor/defibrillator. A pin = — signal B pin = + excitation… -
Page 101
To change the scale: 1. Use the to outline and select the P1 area. The P1 menu appears. SPEED DIAL 2. From the menu, select and then choose a scale from the list. SCALE 4-57 LIFEPAK 15 Monitor/Defibrillator Operating Instructions ©2007-2011 Physio-Control, Inc. -
Page 102
Kinked catheter, catheter • Reposition catheter. Anchor tip against vessel wall, catheter to skin at insertion arterial spasm site. Resonating waveform Tubing too long • Use short, stiff tubing with a large diameter. 4-58 LIFEPAK 15 Monitor/Defibrillator Operating Instructions… -
Page 103
• Replace transducer. System has been zeroed but Steps to zero system • Close stopcock to air before continues to indicate zero performed in wrong order placing cap on port. reference required 4-59 LIFEPAK 15 Monitor/Defibrillator Operating Instructions ©2007-2011 Physio-Control, Inc. -
Page 104
Use only enough air to wedge. Do not use more than the volume recommended by the manufacturer. Catheter migrated distally • Reposition catheter. in pulmonary artery For general troubleshooting tips, see Table 10-2 on page 10-18. 4-60 LIFEPAK 15 Monitor/Defibrillator Operating Instructions… -
Page 105: Monitoring Continuous Temperature
MONITORING Monitoring Continuous Temperature Intended Use The LIFEPAK 15 temperature monitor is intended for continuous monitoring of body temperature. Indications Temperature monitoring is indicated for use in patients who require continuous monitoring of body temperature. Contraindications None known. Temperature Monitoring Warnings…
-
Page 106
Monitoring Continuous Temperature How Temperature Monitoring Works The temperature probe contains a thermistor which converts temperature to electrical resistance. The LIFEPAK 15 monitor/defibrillator measures the resistance and converts it into degrees Celsius or Fahrenheit. The probe accuracy is ±0.1°C. Note: Celsius or Fahrenheit reporting may be selected in Setup mode. -
Page 107
LIFEPAK 15 monitor/defibrillator. Do not use Measurement Specialties part number 4499.) For a list of the accessories that are intended for use with the LIFEPAK 15 monitor/defibrillator, contact your Physio-Control representative or see the LIFEPAK 15 Monitor/Defibrillator Accessory Catalog at www.physio-control.com. -
Page 108
• Turn device off and then on again. temperature reading calibrated • If problem persists, contact qualified service personnel. Temperature module failed • Turn device off and then on again. • If problem persists, contact qualified service personnel. 4-64 LIFEPAK 15 Monitor/Defibrillator Operating Instructions… -
Page 109
Temperature probe not • Check connections between probe, detected by device adapter cable, and device. • Check that the sensor is approved for use with the LIFEPAK 15 monitor/defibrillator. • Contact qualified service personnel. 4-65 LIFEPAK 15 Monitor/Defibrillator Operating Instructions… -
Page 110: Vital Sign And St Segment Trends
Vital Sign and ST Segment Trends Intended Use The trends feature of the LIFEPAK 15 monitor/defibrillator provides the ability to graphically display and document the patient’s vital signs (VS) and ST segment measurements for up to eight hours. VS trending is intended for use with any patient who requires continuous monitoring of vital signs over an extended period of time to identify changes in patient condition and to document patient response to therapy.
-
Page 111
VS measurements are not averaged or filtered. No messages or alarms occur based on changes in VS measurements. First ETCO measurement Most recent ETCO measurement VS label Figure 4-15 EtCO2 Trend Graph Systole pressure Diastolic pressure VS label Figure 4-16 Pressure Trend Graph 4-67 LIFEPAK 15 Monitor/Defibrillator Operating Instructions ©2007-2011 Physio-Control, Inc. -
Page 112
The most current STJ measurement is on the far right. Each time an STJ measurement is obtained, it is compared to the first STJ or baseline measurement. The bars represent the change in the STJ compared to the first measurement. 4-68 LIFEPAK 15 Monitor/Defibrillator Operating Instructions… -
Page 113
1.0 mm from the initial ECG. To confirm the value of the initial 12-lead ECG STJ measurement, subtract the STJ change from the current STJ measurement, for example, 1.0 – 1.0 = 0. You can display the ST graph of other leads. 4-69 LIFEPAK 15 Monitor/Defibrillator Operating Instructions ©2007-2011 Physio-Control, Inc. -
Page 114
(for example, 15 minutes) may not provide enough data to identify gradual changes in patient condition. • The patient ECG rhythm. Diagnosis of ST associated ischemia is inhibited by certain ECG findings such as left bundle branch block and ventricular pacing. 4-70 LIFEPAK 15 Monitor/Defibrillator Operating Instructions… -
Page 115: Therapy
Procedures ……. . 5-39 LIFEPAK 15 Monitor/Defibrillator Operating Instructions ©2007-2011 Physio-Control, Inc.
-
Page 117: General Therapy Warnings And Cautions
Apply therapy electrodes so that entire electrode adheres to skin. Do not reposition the electrodes once applied. If the position must be changed, remove and replace with new electrodes. LIFEPAK 15 Monitor/Defibrillator Operating Instructions ©2007-2011 Physio-Control, Inc.
-
Page 118: Therapy Electrode And Standard Paddle Placement
WARNINGS (CONTINUED) POSSIBLE SKIN BURNS Electrodes and cables that are not specified for use with the LIFEPAK 15 defibrillator may malfunction and cause skin burns. Use only the electrodes and cables that are specified for use with the LIFEPAK 15 defibrillator.
-
Page 119
2. Place the other electrode behind the heart in the infrascapular area as shown in Figure 5-2. For patient comfort, place the cable connection away from the spine. Do not place the electrode over the bony prominences of the spine or scapula. LIFEPAK 15 Monitor/Defibrillator Operating Instructions ©2007-2011 Physio-Control, Inc. -
Page 120
Implanted devices such as cardiac defibrillators, pacemakers, or other devices may absorb energy from a LIFEPAK 15 defibrillator shock or be damaged by the shock. If possible, place therapy electrodes or standard paddles in the standard placements but away from the implanted device. -
Page 121: Automated External Defibrillation (Aed)
Automated External Defibrillation (AED) Intended Use When used in AED mode, the LIFEPAK 15 monitor/defibrillator is a semiautomatic defibrillator that provides a prompted treatment protocol and ECG analysis using a patented Shock Advisory System™ (SAS). This software algorithm analyzes the patient’s electrocardiographic (ECG) rhythm and indicates whether or not a shockable rhythm is detected.
-
Page 122
AED Mode The LIFEPAK 15 monitor/defibrillator is set up to operate in Manual mode when it is turned on (factory default setting). The device can be set up to power on in AED mode by changing the Setup Options. -
Page 123
5. Apply the therapy electrodes to the patient’s chest in the anterior-lateral position (see «Anterior- Lateral Placement» on page 5-5). PUSH ANALYZE prompts occur when the AED Mode patient is properly connected to the AED. Push ANALYZE LIFEPAK 15 Monitor/Defibrillator Operating Instructions ©2007-2011 Physio-Control, Inc. -
Page 124
AED Mode prompts occur. Charging to SHOCK ADVISED the joule setting for Shock #1 begins. A SHOCK ADVISED! charging bar appears and a ramping tone Charging to 200J sounds. 200J To cancel, push Speed Dial 5-10 LIFEPAK 15 Monitor/Defibrillator Operating Instructions… -
Page 125
1:46 provides audible compression “tocks” and ventilation prompts or tones only during CPR intervals at a ratio of 30:2. To silence the metronome, press . To un-silence the metronome, press again. 5-11 LIFEPAK 15 Monitor/Defibrillator Operating Instructions ©2007-2011 Physio-Control, Inc. -
Page 126
To silence the metronome, press . To un-silence the metronome, press again. When the CPR countdown time ends, the AED Mode prompts occur. These prompts PUSH ANALYZE repeat every 20 seconds until you press ANALYZE Push ANALYZE 5-12 LIFEPAK 15 Monitor/Defibrillator Operating Instructions… -
Page 127
Connect electrodes If the therapy cable is not connected to the AED Mode defibrillator, the message CONNECT CABLE appears until the cable is connected. Connect cable 5-13 LIFEPAK 15 Monitor/Defibrillator Operating Instructions ©2007-2011 Physio-Control, Inc. -
Page 128
AED mode to Manual mode, the metronome stays active upon entering Manual mode. Depending on how manual access is set up, continue to Manual mode as follows: • AED/Direct—No restrictions to Manual mode access. • AED/Confirmed—A confirmation screen appears. 5-14 LIFEPAK 15 Monitor/Defibrillator Operating Instructions… -
Page 129
MANUAL MODE DISABLED LIFEPAK 15 monitor/defibrillator returns to AED mode. It is important that all users of the LIFEPAK 15 monitor/defibrillator be thoroughly familiar with the monitor/defibrillator settings and operation before use. Special AED Setup Options The following descriptions of AED prompts (voice and text) explain special setup options. -
Page 130
If the AED detects a nonshockable rhythm, the prompts occur. START CPR A countdown timer (min:sec format) AED Mode continues for the duration specified in the INITIAL CPR TIME setup option. Start CPR 1:46 5-16 LIFEPAK 15 Monitor/Defibrillator Operating Instructions… -
Page 131
AED for delivering a shock. Note: (shock) button is disabled during the pre-shock CPR interval to avoid accidental shock delivery while the defibrillator is charged and a responder is performing CPR. 5-17 LIFEPAK 15 Monitor/Defibrillator Operating Instructions ©2007-2011 Physio-Control, Inc. -
Page 132
To switch back to Advisory Monitoring from AED prompted protocol, press LEAD For information about limiting access to Manual mode by unauthorized users, see «Switching from AED Mode to Manual Mode» on page 5-14, or see the LIFEPAK 15 Monitor/Defibrillator Setup Options provided with your device. 5-18… -
Page 133
• Move hand-held interference communication devices or other suspected devices away from the defibrillator, when possible. Vehicle motion • Stop vehicle during analysis. • Move patient to stable location, when possible. 5-19 LIFEPAK 15 Monitor/Defibrillator Operating Instructions ©2007-2011 Physio-Control, Inc. -
Page 134
See LIFEPAK 15 Monitor/Defibrillator Setup Options provided with your device. Press and metronome does In AED mode, and not in CPR • Wait until CPR interval not activate interval (audible “tocks”) to silence or activate metronome. 5-20 LIFEPAK 15 Monitor/Defibrillator Operating Instructions… -
Page 135
• Remove the Test Load and NO SHOCK ADVISED and ECG shows a therapy cable connect therapy electrodes to perfectly flat, isoelectric line. the cable. For general troubleshooting tips, see Table 10-2 on page 10-18. 5-21 LIFEPAK 15 Monitor/Defibrillator Operating Instructions ©2007-2011 Physio-Control, Inc. -
Page 136: Manual Defibrillation
Intended Use When used in Manual mode, the LIFEPAK 15 monitor/defibrillator is a direct current defibrillator that applies a brief, intense pulse of electricity to the heart muscle. Manual mode requires operator interpretation of the ECG rhythm and interaction with the device in order to defibrillate the patient.
-
Page 137
Manual Mode The LIFEPAK 15 monitor/defibrillator is set up to operate in Manual mode when it is turned on (factory default setting). If required by your protocols, the defibrillator can be set up to power on in the automated external defibrillator (AED) mode. -
Page 138
(ventricular fibrillation, pulseless ventricular tachycardia) and defibrillation. The physiological state of the patient may affect the likelihood of successful defibrillation. Thus, failure to resuscitate a patient is not a reliable indicator of defibrillator 5-24 LIFEPAK 15 Monitor/Defibrillator Operating Instructions… -
Page 139
In Manual mode, the user can choose the most appropriate C:V ratio based on the patient’s age and current airway status. The Age-Airway selection determines the C:V ratio of the metronome sounds. The default C:V ratios are shown in Table 5-2. 5-25 LIFEPAK 15 Monitor/Defibrillator Operating Instructions ©2007-2011 Physio-Control, Inc. -
Page 140
*** Youth = Pre-pubescent child Note: The compression-to-ventilation ratio selections can be set up according to local medical protocols. For more information, see the LIFEPAK 15 Monitor/Defibrillator Setup Options provided with your device. Activating and Deactivating the Metronome To activate the CPR metronome in Manual mode: 1. -
Page 141: Synchronized Cardioversion Procedure
Synchronized Cardioversion Procedure The LIFEPAK 15 monitor/defibrillator can be set up to remain in Sync mode or to return to Asynchronous mode after a shock is delivered. The factory default setting is to return to Asynchronous mode after a shock. It is important that you know how your defibrillator is set up. For information about changing the setup option, see the LIFEPAK 15 Monitor/Defibrillator Setup Options provided with your device.
-
Page 142
SPEED DIAL if shock buttons are not pressed within 60 seconds, or if you change the energy selection after charging begins. 13.Observe patient and ECG rhythm. Repeat procedure starting from Step 4, if necessary. 5-28 LIFEPAK 15 Monitor/Defibrillator Operating Instructions… -
Page 143
• Replace therapy cable and perform daily checks per Operator’s Checklist. message appears Defibrillator out of calibration • Attempt to transfer energy. ENERGY FAULT (selected and available energy) • Contact a qualified service technician. 5-29 LIFEPAK 15 Monitor/Defibrillator Operating Instructions ©2007-2011 Physio-Control, Inc. -
Page 144
Lack of visible response to defibrillation does not necessarily mean the discharge did not occur. The Test Load is connected to • Remove the Test Load and therapy cable connect therapy electrodes to cable. 5-30 LIFEPAK 15 Monitor/Defibrillator Operating Instructions… -
Page 145
CPR time to expected ensure CPR cycle ends with compressions. Incorrect setup option selected • Change CPR time setup option. See LIFEPAK 15 Monitor/Defibrillator Setup Options provided with your device 5-31 LIFEPAK 15 Monitor/Defibrillator Operating Instructions ©2007-2011 Physio-Control, Inc. -
Page 146: Noninvasive Pacing
For general troubleshooting tips, see Table 10-2 on page 10-18. Noninvasive Pacing The LIFEPAK 15 monitor/defibrillator provides noninvasive pacing using adult or pediatric QUIK-COMBO pacing/defibrillation/ECG electrodes. For more information, see Chapter 6, «Paddle Accessory Options.» Intended Use A noninvasive pacemaker is a device that delivers an electrical stimulus to the heart causing cardiac depolarization and myocardial contraction.
-
Page 147
The LIFEPAK 15 monitor/defibrillator can be used for either demand or nondemand (asynchronous or «fixed rate») pacing. Demand mode is used for most patients. In demand mode, the LIFEPAK 15 pacemaker inhibits pacing output when it “senses” the patient’s own beats (intrinsic QRSs). In demand mode, if the ECG SIZE is set too low to detect the patient’s beats, or if an ECG lead becomes detached so that… -
Page 148
To interrupt pacing and view the patient’s intrinsic rhythm, press and hold . This PAUSE causes the pacer to pace at 25% of the set rate. Release to resume pacing at the set rate. PAUSE 5-34 LIFEPAK 15 Monitor/Defibrillator Operating Instructions… -
Page 149
Reattaching the pacing electrodes silences the alarm and removes the CONNECT ELECTRODES message. The current remains at 0 mA until you increase the current manually. To turn off the LIFEPAK 15 monitor/defibrillator, pacing must be stopped. If the button is pressed when is active, an alert tone sounds and the message appears. -
Page 150
• Check for message. Check pacing cable and electrode connections. pressed • Press and increase CHARGE PACER current, if pacing desired. Otherwise, proceed with defibrillation. Radio frequency interference • Move radio equipment away from pacemaker. 5-36 LIFEPAK 15 Monitor/Defibrillator Operating Instructions… -
Page 151
Intrinsic QRS complexes not ECG size too low • Increase ECG size or select sensed when pacing another lead. Intrinsic QRS complexes are • Adjust PPM. occurring during pacemaker’s refractory period 5-37 LIFEPAK 15 Monitor/Defibrillator Operating Instructions ©2007-2011 Physio-Control, Inc. -
Page 152
SYNC Defibrillator will not turn off Pacemaker is on • Turn off and then press PACER and hold for at least 2 seconds. For general troubleshooting tips, see Table 10-2 on page 10-18. 5-38 LIFEPAK 15 Monitor/Defibrillator Operating Instructions… -
Page 153: Pediatric Ecg Monitoring And Manual Mode Therapy Procedures
The amount of pacing current needed for capture is similar to the pacing current needed for adults. For more information about pediatric paddles and electrodes, see Chapter 6, «Paddle Accessory Options.» 5-39 LIFEPAK 15 Monitor/Defibrillator Operating Instructions ©2007-2011 Physio-Control, Inc.
-
Page 155: Paddle Accessory Options
Standard Paddles ……6-6 LIFEPAK 15 Monitor/Defibrillator Operating Instructions ©2007-2011 Physio-Control, Inc.
-
Page 157: Quik-Combo Therapy Electrodes
Several types of QUIK-COMBO therapy electrodes are available as described in Table 6-1. IMPORTANT! Infant/Child Reduced Energy Defibrillation Electrodes are not compatible with the LIFEPAK 15 monitor/defibrillator. LIFEPAK 15 Monitor/Defibrillator Operating Instructions ©2007-2011 Physio-Control, Inc.
-
Page 158
• 8 hours of continuous pacing Replace pediatric QUIK-COMBO electrodes with new electrodes after one of the following occurs: • 25 defibrillation shocks • 24 hours on the patient’s skin • 8 hours of continuous pacing LIFEPAK 15 Monitor/Defibrillator Operating Instructions… -
Page 159
Daily inspection helps ensure that the therapy electrode has not exceeded the electrode package Use By date and is ready for use when needed. For more information about daily inspection and testing, see the Operator’s Checklist in the back of this manual. LIFEPAK 15 Monitor/Defibrillator Operating Instructions ©2007-2011 Physio-Control, Inc. -
Page 160: Standard Paddles
• Clean dried or wet gel from the electrode surface after each use. Cleaning Standard Paddles After each use: 1. Wipe standard paddle electrodes, handles, paddle wells, cables, and connector with mild disinfectant or soap and water solution. Do not immerse or soak. 2. Dry thoroughly. LIFEPAK 15 Monitor/Defibrillator Operating Instructions…
-
Page 161
1. Slide the paddles onto clean adult paddles, starting at the front of the adult paddle (see Figure 6-6). 2. Slide the pediatric paddle until you feel the paddles lock in place. LIFEPAK 15 Monitor/Defibrillator Operating Instructions ©2007-2011 Physio-Control, Inc. -
Page 162
STERNUM clavicle. • paddle lateral to the patient’s left nipple in the midaxillary line, with the center of the APEX paddle in the midaxillary line, if possible. LIFEPAK 15 Monitor/Defibrillator Operating Instructions… -
Page 163
• Cables that show signs of wear such as loose cable connections, exposed wires, or cable connector corrosion should be removed from use immediately. • Paddles that have rough or pitted electrodes should be removed from use immediately. LIFEPAK 15 Monitor/Defibrillator Operating Instructions ©2007-2011 Physio-Control, Inc. -
Page 165
Managing Current Patient Records ….7-10 Managing Archived Patient Records ….7-11 LIFEPAK 15 Monitor/Defibrillator Operating Instructions ©2007-2011 Physio-Control, Inc. -
Page 167: Data Management
The reports that are available in a Patient Record depend on the features in your device and how your device is set up. For information on setting up your device, see the LIFEPAK 15 Monitor/ Defibrillator Setup Options provided with your device. Table 7-1 describes the various report types that may exist in a Patient Record and how they can be accessed.
-
Page 168
• 3:00 A.M. self-test results CODE SUMMARY Report The LIFEPAK 15 monitor/defibrillator automatically stores a CODE SUMMARY report as part of the Patient Record for each patient. The CODE SUMMARY report can be set up to always print in a particular format. -
Page 169
EMS Run Report. Event/Vital Sign Log The LIFEPAK 15 monitor/defibrillator documents events and vital signs in chronological order. Events are operator or device actions, such as actions that are related to monitoring, pacing, AED therapy, or data transmission. Values for each active vital sign are entered into the log automatically every 5 minutes and for each event. -
Page 170
8 seconds after leads on CHECK PATIENT 8 seconds prior to alert SHOCK or NO SHOCK ADVISED 2-3 segments of analyzed ECG. Each segment is 2.7 seconds ANALYSIS X STOPPED 8 seconds of data prior to cessation of analysis LIFEPAK 15 Monitor/Defibrillator Operating Instructions… -
Page 171
*To reduce the length of the CODE SUMMARY report, storing waveform data with these events can be set to OFF (see the LIFEPAK 15 Monitor/Defibrillator Setup Options provided with your device). Waveform events are preceded by a header that includes the following information: •… -
Page 172
Shock 1 200J Impedance SpO2•PR SpCO SpMet EtCO2 (mmHg)•RR Check Patient Event Check Patient Name: Lee, William Record ID: Patient ID: Incident: Age: 50 Sex: M 24 Apr 2007 Check Patient SpO2•PR SpCO SpMet EtCO2(mmHg)•RR LIFEPAK 15 Monitor/Defibrillator Operating Instructions… -
Page 173: Memory Capacity
Figure 7-3 Waveform Event Printout Examples Memory Capacity The LIFEPAK 15 monitor/defibrillator retains data for two or more patients when you switch power off or remove the batteries. The number of patient reports that the LIFEPAK 15 monitor/defibrillator can store depends on various factors, including the number of displayed waveforms, the duration of each use, and the type of therapy.
-
Page 174: Managing Current Patient Records
SPEED button is pressed. Note that this option does not affect reports that are printed from PRINT SPEED this menu. Available printing speeds for the button are: PRINT • 12.5 MM/SEC • 25 MM/SEC 7-10 LIFEPAK 15 Monitor/Defibrillator Operating Instructions…
-
Page 175: Managing Archived Patient Records
DATA MANAGEMENT Managing Archived Patient Records When you turn off the LIFEPAK 15 monitor/defibrillator, the current Patient Record is saved in the archives. You can print, edit, delete, or download archived records. For information about downloading to CODE-STAT software, see Chapter 8, «Data Transmission.» You can also transmit individual reports from an archived Patient Record.
-
Page 176
To print archived patient reports: 1. In Archive mode, select . The Options/ Options / Archives PRINT Archives/Print menu appears showing the Send Data… Edit… current patient. Print… Delete… Turn power off to exit Archives Mode 7-12 LIFEPAK 15 Monitor/Defibrillator Operating Instructions… -
Page 177
To edit archived patient records: 1. In Archive mode, select EDIT . The Options/ Options / Archives Archives/Edit menu appears. Send Data… Edit… Print… Delete… Turn power off to exit Archives Mode 7-13 LIFEPAK 15 Monitor/Defibrillator Operating Instructions ©2007-2011 Physio-Control, Inc. -
Page 178
Patient Record you want to delete. 4. To undo the delete operation, immediately select . If you continue with other UNDO device operations, you cannot undo the deletion. 5. Press and then turn off the HOME SCREEN device. 7-14 LIFEPAK 15 Monitor/Defibrillator Operating Instructions… -
Page 179
DATA TRANSMISSION This chapter describes how to transmit Patient Records and reports from the LIFEPAK 15 monitor/ defibrillator. About Transmitting Patient Records and Reports. . . page 8-3 Preparing the Monitor for Transmission … . . 8-4 Using Bluetooth Wireless Communication. -
Page 181: About Transmitting Patient Records And Reports
• Direct cable connection—You can use a special cable to establish a direct connection from the LIFEPAK 15 monitor to a PC or gateway, and transmit data using this wired connection. Figure 8-1 represents an overview of the data transmission process.
-
Page 182: Preparing The Monitor For Transmission
The device will not transmit using the direct connection when a wireless connection is available.) For more information, see the LIFEPAK 15 Monitor/Defibrillator Setup Options provided with your device. LIFEPAK 15 Monitor/Defibrillator Operating Instructions…
-
Page 183: Using Bluetooth Wireless Communication
Bluetooth icon appears on the Home Screen. See Figure 8-2. For more information about supported Bluetooth technologies, see www.physio-control.com. A Bluetooth connection between the LIFEPAK 15 monitor and a target device is always initiated from the LIFEPAK 15 monitor. Bluetooth icon…
-
Page 184
To transmit from the LIFEPAK 15 monitor to a PC, you need to set a Bluetooth passcode in the LIFEPAK 15 monitor, and then enter that passcode on the PC, if prompted. -
Page 185
LIFEPAK 15 monitor modes and the service class and friendly name prefix that is discoverable in each mode. For example, when the LIFEPAK 15 monitor is in Archive mode and the filter is on, it can discover devices whose friendly names begin with A_ or B_. -
Page 186
. This will disconnect any existing DEVICES Passcode… 0000 connections. Wireless Note: If the LIFEPAK 15 monitor is set to Disconnect , wireless status changes to WIRELESS OFF WIRELESS ON LIFEPAK 15 Device ID: LP151234 • The Find Devices menu appears. The… -
Page 187
DATA TRANSMISSION Re-establishing a Bluetooth Connection The LIFEPAK 15 monitor retains in its memory two last-connected devices, limited to one in each mode—one for cardiac care (AED or Manual mode) and one for Archive mode. When the LIFEPAK 15 monitor is powered on and the wireless feature is set to… -
Page 188: Using A Direct Connection
Using a Direct Connection Using a Direct Connection A special cable can be used to create a direct connection between the LIFEPAK 15 monitor and a gateway or PC. Figure 8-3 shows the equipment connections to send reports directly to a computer using a direct cable connection.
-
Page 189
DATA TRANSMISSION To establish a direct connection: 1. Position the PC or LIFENET Gateway within reach of the LIFEPAK 15 monitor. Note: If you are storing a LIFENET Gateway (modem) in the carrying case, only store the modem in the side pouch. Do not store LIFENET Gateways in the back pouch. -
Page 190: Transmitting Reports
How to Transmit an Archived Patient Report When you turn off the LIFEPAK 15 monitor/defibrillator, the current Patient Record is saved in the archives. For information about accessing Archive mode, see Chapter 7, «Data Management.»…
-
Page 191
Bluetooth connection. For more information, see «Establishing a Bluetooth Connection» on page 8-8. 8. Select . The patient report is SEND transmitted. The status of the transmission appears in the message area. 8-13 LIFEPAK 15 Monitor/Defibrillator Operating Instructions ©2007-2011 Physio-Control, Inc. -
Page 192: Considerations When Transmitting Data
Treatment protocol must always take into account the fact that data transfer cannot be assured using wireless communication. Your treatment protocol must include contingency planning for interrupted data transmission. Periodically test your device transmission function to ensure that the device and transmission accessories are ready for use. 8-14 LIFEPAK 15 Monitor/Defibrillator Operating Instructions…
-
Page 193: Troubleshooting Tips
Last connection to target device • Confirm that is set to OUTPUT PORT may have occurred when the BLUETOOTH WIRELESS LIFEPAK 15 monitor was in a • Select FIND DEVICES and establish different mode a new connection. Device does not connect Bluetooth menu is displayed, •…
-
Page 194
• Open download wizard on target in download wizard on target device and select the LIFEPAK 15 device monitor. Bluetooth module in LIFEPAK 15 • Turn LIFEPAK 15 monitor off and BLUETOOTH UNAVAILABLE message appears monitor not responding back on. • If message still appears, Bluetooth module may be faulty. -
Page 195
Transmission site names in • Check site names in LIFENET LIFENET System do not match System. site names in LIFEPAK 15 monitor Cellular communication is not • Use alternate method to working between the gateway and communicate patient data. -
Page 196
CORRECTIVE ACTION Direct connection was interrupted • Verify cable connections between LOST DIRECT CONNECTION message appears LIFEPAK 15 monitor and gateway or PC. • Attempt to retransmit. LOST BLUETOOTH Connection with Bluetooth target • Verify target device is ready to… -
Page 197: Power Adapter
Using the Power Adapter……9-5 General Maintenance ……9-8 LIFEPAK 15 Monitor/Defibrillator Operating Instructions ©2007-2011 Physio-Control, Inc.
-
Page 199: Basic Orientation
IMPORTANT! Daily inspection and testing will help ensure that the power adapter is in good operating condition and is ready for use when needed. Refer to the LIFEPAK 15 monitor/ defibrillator Operator’s Checklist in the back of this manual. Carefully read the Power Adapter Instructions for Use that are provided with the power adapter for complete instructions, warnings, cautions, and specifications.
-
Page 200
LIFEPAK 15 device symbol shown here. POSSIBLE LOSS OF POWER DURING PATIENT CARE Do not use the LIFEPAK 12 power adapter with the LIFEPAK 15 monitor/defibrillator. Use only power adapters that are labeled with the LIFEPAK 15 device symbol. -
Page 201: Using The Power Adapter
No batteries are installed, or a battery is unable to be charged. 7. Press the monitor/defibrillator button. Power Adapter Output Cable LED Strip Figure 9-2 AC Power Adapter with LIFEPAK 15 Monitor/Defibrillator LIFEPAK 15 Monitor/Defibrillator Operating Instructions ©2007-2011 Physio-Control, Inc.
-
Page 202
DESCRIPTION Steady green Installed batteries are fully charged. Flashing green One or both installed batteries are being charged. No batteries are installed, or a battery is unable to be charged. 7. Press the defibrillator button. LIFEPAK 15 Monitor/Defibrillator Operating Instructions… -
Page 203
To order the output extension cable, contact your Physio-Control representative or order online at store.physio-control.com. IMPORTANT! Do not use more than one output extension cable. Output Extension Cable Breakaway Connector Power Adapter Output Cable Figure 9-3 Output Extension Cable with Breakaway Connector LIFEPAK 15 Monitor/Defibrillator Operating Instructions ©2007-2011 Physio-Control, Inc. -
Page 204: General Maintenance
• Isopropyl alcohol • Peracetic (peroxide) acid solutions • Sodium dichloroisocyanurate (NaDCC) • Chlorine bleach (1:10 dilution) Note: Carefully clean the connector ports. Do not allow cleaning fluids to penetrate the exterior surfaces of the device. LIFEPAK 15 Monitor/Defibrillator Operating Instructions…
-
Page 205
• Remove battery from service and replace with working battery. Unrecognized battery • Only use battery that is approved for use with the LIFEPAK 15 monitor/defibrillator. Incompatible power adapter • Only use power adapter that is connected to the monitor/… -
Page 206: Warranty
Warranty Warranty Refer to the warranty statement shipped with the power adapter. For duplicate copies, contact your local Physio-Control representative. 9-10 LIFEPAK 15 Monitor/Defibrillator Operating Instructions…
-
Page 207: Maintaining The Equipment
MAINTAINING THE EQUIPMENT This chapter describes how to perform operator-level maintenance, testing, and troubleshooting for the LIFEPAK 15 monitor/defibrillator and selected accessories. For additional information about accessories, refer to specific accessory operating instructions. General Maintenance and Testing … . page 10-3 Battery Maintenance .
-
Page 209: General Maintenance And Testing
, but it can be activated by service personnel. An Operator’s Checklist is included in the back of this manual. You may reproduce the checklist and use it to inspect and test the LIFEPAK 15 monitor/defibrillator. Daily inspection and test is recommended.
-
Page 210
Preventive Maintenance and Testing Self-Tests Each time you turn on the LIFEPAK 15 monitor/defibrillator, it performs internal self-tests to check that internal electrical components and circuitry work properly. The defibrillator stores the results of all user-initiated self-tests in a test log. -
Page 211
For more information, see Table 10-2 on page 10-18. User Tests The User Test is a functional test of the LIFEPAK 15 monitor/defibrillator. The User Test should be performed only as a test and not while using the defibrillator during patient care. Perform the User Test as a part of completing the daily Operator’s Checklist. -
Page 212
Function Checks The following function checks are provided to help personnel keep acquainted with normal operating procedures and to troubleshoot LIFEPAK 15 monitor/defibrillator performance. Note: If your organization downloads device electronic patient records for post-event review, consider entering “TEST”… -
Page 213
(shock) button, confirm that the defibrillator does not discharge, and then APEX release the button. 10.Press the (shock) button, confirm that the defibrillator does not discharge, and STERNUM then release the button. 10-7 LIFEPAK 15 Monitor/Defibrillator Operating Instructions ©2007-2011 Physio-Control, Inc. -
Page 214
, or any other warning message appears, replace the CONNECT CABLE PADDLES LEADS OFF paddle assembly with a new paddle assembly and repeat the test. If the problem cannot be corrected, remove the device from active use and contact a qualified representative. 10-8 LIFEPAK 15 Monitor/Defibrillator Operating Instructions… -
Page 215
ECG size until sense markers appear on the QRS complexes. Confirm that the SYNC blinks off with each detected QRS complex and that the heart rate is displayed. 9. Select 50 JOULES 10.Press CHARGE 10-9 LIFEPAK 15 Monitor/Defibrillator Operating Instructions ©2007-2011 Physio-Control, Inc. -
Page 216
2. Connect the QUIK-COMBO therapy cable to the simulator. 3. Turn on the simulator and select BRADY 4. Connect the ECG cable to the defibrillator and to the simulator. 5. Select Lead 6. Press PACER 10-10 LIFEPAK 15 Monitor/Defibrillator Operating Instructions… -
Page 217
13.Wait approximately 30 seconds and confirm that an audible alarm occurs. 14.Increase current to 80 mA. Confirm that audible alarm stops. 15.Press . Confirm that the LED goes off and that heart rate and available energy CHARGE PACER are displayed. 10-11 LIFEPAK 15 Monitor/Defibrillator Operating Instructions ©2007-2011 Physio-Control, Inc. -
Page 218: Battery Maintenance
Battery Maintenance Battery Maintenance This section provides information about the Physio-Control Lithium-ion batteries that are specifically designed for use in the LIFEPAK 15 monitor/defibrillator. Lithium-ion batteries are low maintenance and require no scheduled cycling to prolong battery life. IMPORTANT! The LIFEPAK 15 monitor/defibrillator Lithium-ion batteries, battery chargers, power adapters, and power cords are not interchangeable with batteries, battery chargers, power adapters, and power cords that are used in other LIFEPAK defibrillators.
-
Page 219
Charging Batteries • Charge batteries before use. Batteries may be charged in a battery charger, or in the LIFEPAK 15 monitor/defibrillator if it is connected to an auxiliary power source using a LIFEPAK 15 monitor/defibrillator power adapter. 10-13 LIFEPAK 15 Monitor/Defibrillator Operating Instructions ©2007-2011 Physio-Control, Inc. -
Page 220
• Remove the Charge Before Use label from new batteries before placing batteries in the charger or in the LIFEPAK 15 monitor/defibrillator. • The battery fuel gauge does not function until the battery is charged. For more information about the fuel gauge, see «Batteries»… -
Page 221: Cleaning The Device
Clean the LIFEPAK 15 monitor/defibrillator, therapy and ECG cables, and batteries with a damp sponge or cloth. Use only the cleaning agents listed below: • Quaternary ammonium compounds •…
-
Page 222: Storing The Device
Storing the Device Storing the Device To take the LIFEPAK 15 monitor/defibrillator out of service and store it for an extended period of time, follow these guidelines: • Remove the batteries. • Store the defibrillator and batteries at room temperature.
-
Page 223: Loading Paper
5. Close the printer door and press down on the latch until the door clicks shut. Figure 10-1 Loading Paper 10-17 LIFEPAK 15 Monitor/Defibrillator Operating Instructions ©2007-2011 Physio-Control, Inc.
-
Page 224: General Troubleshooting Tips
General Troubleshooting Tips General Troubleshooting Tips If a problem is detected with the LIFEPAK 15 monitor/defibrillator during operation or testing, refer to the troubleshooting tips in Table 10-2. If the problem cannot be corrected, remove the LIFEPAK 15 monitor/defibrillator from active use and contact a qualified service technician for service and repair.
-
Page 225
• Remove battery from service and replace with working battery. Unrecognized battery • Only use battery that is approved for use with the LIFEPAK 15 monitor/ defibrillator. Incompatible power adapter • Only use power adapter that is connected to the monitor/… -
Page 226
• Change screen from color to black operates, but screen not and white. readable • Reposition or shield device. • Print ECG strip to assess rhythm and other active vital signs. • Press and use AED mode, if ANALYZE necessary. 10-20 LIFEPAK 15 Monitor/Defibrillator Operating Instructions… -
Page 227
• Contact service personnel to perform interval in Service mode routine maintenance. • Contact Physio-Control Technical Support for instructions on how to reset or turn off this prompt. 10-21 LIFEPAK 15 Monitor/Defibrillator Operating Instructions ©2007-2011 Physio-Control, Inc. -
Page 228: Service And Repair
Contact qualified service technician for assistance or information about device configuration. If the LIFEPAK 15 monitor/defibrillator requires service as indicated by testing, troubleshooting, or a service message, contact a qualified service technician. When calling Physio-Control to request service, identify the model and serial number and describe the observation.
-
Page 229: Product Recycling Information
If device failure is attributable to defibrillation electrodes or other parts or supplies not manufactured by Physio-Control, this may void the warranty. 10-23 LIFEPAK 15 Monitor/Defibrillator Operating Instructions ©2007-2011 Physio-Control, Inc.
-
Page 230: Accessories
Accessories Accessories Table 10-3 lists accessories that are available for the LIFEPAK 15 monitor/defibrillator. To order, contact your Physio-Control representative or order online at store.physio-control.com. Note: The LIFEPAK 15 monitor/defibrillator and its accessories that are intended for direct or casual contact with the patient are latex-free.
-
Page 231
MAINTAINING THE EQUIPMENT Table 10-3 Accessories for the LIFEPAK 15 Monitor/Defibrillator (Continued) CATEGORY RELATED ACCESSORY SpCO and SpMet Rainbow patient extension cables Rainbow reusable sensors Rainbow disposable sensors NIBP NIBP blood pressure cuffs NIBP hoses EtCO EtCO FilterLine sets EtCO… -
Page 233: Appendix A: Specifications And Performance Characteristics
CHARACTERISTICS This appendix contains the specifications and performance characteristics for the LIFEPAK 15 monitor/defibrillator and the LIFEPAK 15 monitor/defibrillator batteries. It also lists high and low alarm limits, alarm performance characteristics, and factory default settings. LIFEPAK 15 Monitor/Defibrillator Operating Instructions…
-
Page 235
Table A-3 lists the high and low limits for alarms when either the wide or narrow alarm setting is selected on the LIFEPAK 15 monitor/defibrillator. Table A-4 lists the alarm performance characteristics. Table A-5 lists the factory default settings for the LIFEPAK 15 monitor/defibrillator setup options. Table A-1 LIFEPAK 15 Monitor/Defibrillator Specifications CHARACTERISTIC DESCRIPTION All specifications are at 20°C unless otherwise stated. -
Page 236
Specifications and Performance Characteristics Table A-1 LIFEPAK 15 Monitor/Defibrillator Specifications (Continued) CHARACTERISTIC DESCRIPTION Analog ECG Output Output: 1 volt/mV Frequency Response: 0.67 to 32 Hz (except 2.5 to 25 Hz for Paddles ECG and 1.3 to 23 Hz for 1–30 Hz Monitor Frequency Response) -
Page 237
APPENDIX Table A-1 LIFEPAK 15 Monitor/Defibrillator Specifications (Continued) CHARACTERISTIC DESCRIPTION PHYSICAL Weight Basic monitor/defibrillator with new roll paper and two batteries installed: 8.6 kg (18.9 lb) Fully featured monitor/defibrillator with new roll paper and two batteries installed: 9.1 kg (20.1 lb) Lithium-ion battery: 0.59 kg (1.3 lb) -
Page 238
Specifications and Performance Characteristics Table A-1 LIFEPAK 15 Monitor/Defibrillator Specifications (Continued) CHARACTERISTIC DESCRIPTION COMMUNICATIONS The device is capable of transferring data records by wired or wireless connection. This device complies with Part 15 of the FCC rules, and its operation is subject to the following two conditions: (1) this device may not cause harmful interference, and (2) this device must accept any interference received, including interference that may cause undesired operation. -
Page 239
APPENDIX Table A-1 LIFEPAK 15 Monitor/Defibrillator Specifications (Continued) CHARACTERISTIC DESCRIPTION Adults/Pediatrics ±2 digits (during no motion conditions) ±3 digits (during motion conditions) Dynamic signal strength bar graph Pulse tone as SpO pulsations are detected Update Averaging User selectable: 4, 8, 12 or 16 seconds… -
Page 240
Specifications and Performance Characteristics Table A-1 LIFEPAK 15 Monitor/Defibrillator Specifications (Continued) CHARACTERISTIC DESCRIPTION Accuracy partial pressure at Accuracy: sea level: (0–80 bpm)* 0 to 38 mmHg ±2 mmHg (0 to 5.1 kPa) (0.27 kPa) 39 to 99 mmHg ±5% of reading + 0.08% for every 1 mmHg (5.2 to 13.2 kPa) -
Page 241
APPENDIX Table A-1 LIFEPAK 15 Monitor/Defibrillator Specifications (Continued) CHARACTERISTIC DESCRIPTION TEMPERATURE Sensors Measurement Specialties 4400 series esophageal/rectal and Foley catheter temperature probes, and 4499HD skin temperature probe Displayed Range 24.8° to 45.2°C (76.6° to 113.4°F) Resolution 0.1°C Accuracy ±0.2°C Labels… -
Page 242
Specifications and Performance Characteristics Table A-1 LIFEPAK 15 Monitor/Defibrillator Specifications (Continued) CHARACTERISTIC DESCRIPTION DEFIBRILLATOR Charge Time (per EN 60601-2-4) AC Operation Only: Maximum Time from Charge to Shock Ready (Manual Mode): Voltage Charge Time 90-240 Vac (Nominal): 360 J within 10 seconds… -
Page 243
APPENDIX Table A-1 LIFEPAK 15 Monitor/Defibrillator Specifications (Continued) CHARACTERISTIC DESCRIPTION Maximum Time from Initiation of Analysis to Shock Ready (AED Mode): Battery Status Charge Time Fully charged 200 J within 15 seconds, nominal Fully charged, followed by 15 360 J within 30 seconds… -
Page 244
Specifications and Performance Characteristics Table A-1 LIFEPAK 15 Monitor/Defibrillator Specifications (Continued) CHARACTERISTIC DESCRIPTION Waveform Shape and Measured Parameters Biphasic Waveform Patient Phase 1 Duration (ms) Phase 2 Duration (ms) Tilt (%) Impedance () 85.2 69.9 74.7 57.0 67.6 49.3 10.6 62.2… -
Page 245
APPENDIX Table A-1 LIFEPAK 15 Monitor/Defibrillator Specifications (Continued) CHARACTERISTIC DESCRIPTION Rated energy output is the nominal delivered energy based on the energy setting and patient impedance as defined in the following chart. R ate d E n e rg y O u tp u t… -
Page 246
Specifications and Performance Characteristics Table A-1 LIFEPAK 15 Monitor/Defibrillator Specifications (Continued) CHARACTERISTIC DESCRIPTION Pre-Shock CPR Allows the user to be prompted for CPR while the device is charging. Options are seconds Pulse Check Allows the user to be prompted for a pulse check at various times. -
Page 247
APPENDIX Table A-1 LIFEPAK 15 Monitor/Defibrillator Specifications (Continued) CHARACTERISTIC DESCRIPTION Bump 1000 bumps at 15 g with pulse duration of 6 msec Impact, Non-operating EN 60601-1 0.5 + 0.05 joule impact UL 60601-1 6.78 Nm impact with 2-inch diameter steel ball… -
Page 248
CVP (mmHg) <15 ICP, LAP 15 (mmHg) Temperature (°C) *Numbers are ± from patient’s VS value when the alarms are set. **Default limits are established when alarms are set up to be ON. A-14 LIFEPAK 15 Monitor/Defibrillator Operating Instructions… -
Page 249
For a test signal twice as large, the average was 1.5 seconds. Audible Alarms This is a standalone device. All alarm tones are internal to the LIFEPAK 15 monitor/ defibrillator. The alarm tone volumes range from 45 to 85 dB. -
Page 250
CPR Time 2 120 seconds Initial CPR Initial CPR Time 120 seconds Preshock CPR CPR Metronome Metronome Adult — No Airway 30:2 Adult — Airway 10:1 Youth — No Airway 15:2 Youth — Airway 10:1 A-16 LIFEPAK 15 Monitor/Defibrillator Operating Instructions… -
Page 251
Event 10 Atropine Event 11 Lidocaine Events Page 2 Event 12 Event 13 Heparin Event 14 Thrombolytic Event 15 Glucose Event 16 Naloxone Event 17 Transport Event 18 Adenosine Event 19 Vasopressin A-17 LIFEPAK 15 Monitor/Defibrillator Operating Instructions ©2007-2011 Physio-Control, Inc. -
Page 252
Site 1 / Output Port / Direct Connect Default Site None Default Report 12-Lead Wireless Search Filter Clock Date/Time Current date/time PST Clock Mode Real Time Time Zone None Self Test Transmit Results Service Maintenance Prompt Interval A-18 LIFEPAK 15 Monitor/Defibrillator Operating Instructions… -
Page 253: Appendix B: Screen Messages
APPENDIX B SCREEN MESSAGES This appendix describes the screen messages that the LIFEPAK 15 monitor/defibrillator may display during normal operation. LIFEPAK 15 Monitor/Defibrillator Operating Instructions ©2007-2011 Physio-Control, Inc.
-
Page 255
CANNOT CHARGE BATTERY 1 The device is unable to charge the battery in battery well 1. CANNOT CHARGE BATTERY 2 The device is unable to charge the battery in battery well 2. LIFEPAK 15 Monitor/Defibrillator Operating Instructions ©2007-2011 Physio-Control, Inc. -
Page 256
The specified C:V ratio will be used. CPR: ADULT-NO AIRWAY X:Y An option for CPR metronome. The patient is an adult for whom an advanced airway has not been established. The specified C:V ratio will be used. LIFEPAK 15 Monitor/Defibrillator Operating Instructions… -
Page 257
LL LEADS OFF ECG electrode “LL” is disconnected. LOST BLUETOOTH CONNECTION Communication with Bluetooth device has been interrupted. LOST DIRECT CONNECTION Communication via direct connection has been interrupted. LIFEPAK 15 Monitor/Defibrillator Operating Instructions ©2007-2011 Physio-Control, Inc. -
Page 258
Pacing has stopped—for example, due to disconnection of therapy electrodes. PASSCODE INCORRECT — Incorrect passcode entered. TRY AGAIN PAUSED The pacing PAUSE button is pressed and held. Current pulses are applied at reduced frequency while the MA and PPM settings are maintained. LIFEPAK 15 Monitor/Defibrillator Operating Instructions… -
Page 259
SPO2: LOW PERFUSION Patient has a weak pulse. SPO2: NO SENSOR DETECTED A sensor is disconnected from the monitor. SPO2: POOR QUALITY SIGNAL Device is not receiving sufficient input from sensor. LIFEPAK 15 Monitor/Defibrillator Operating Instructions ©2007-2011 Physio-Control, Inc. -
Page 260
USER TEST OPTIONS USER TEST PASSED Successful User Test completed. VX LEADS OFF ECG electrode such as “V1” is disconnected. X DEVICES FOUND Shows number of Bluetooth-enabled devices found. LIFEPAK 15 Monitor/Defibrillator Operating Instructions… -
Page 261
APPENDIX Table B-1 Summary of Screen Messages (Continued) MESSAGE DESCRIPTION XX LEADS OFF ECG electrode such as “RA” is disconnected. XX% TRANSMITTED Specified percent of the transmission is completed. LIFEPAK 15 Monitor/Defibrillator Operating Instructions ©2007-2011 Physio-Control, Inc. -
Page 263: Appendix C: Shock Advisory System
APPENDIX C SHOCK ADVISORY SYSTEM This appendix describes the basic function of the Shock Advisory System™ (SAS) algorithm. LIFEPAK 15 Monitor/Defibrillator Operating Instructions ©2007-2011 Physio-Control, Inc.
-
Page 265
APPENDIX Overview of the Shock Advisory System The Shock Advisory System (SAS) is an ECG analysis system built into the biphasic LIFEPAK 15 monitor/defibrillator that advises the operator as to whether it detects a shockable or nonshockable rhythm. This system makes it possible for individuals who are not trained to interpret ECG rhythms to provide potentially lifesaving therapy to victims of ventricular fibrillation or pulseless ventricular tachycardia. -
Page 266
SHOCK ADVISED reached. Shock Advisory System Performance ECG analysis by the Shock Advisory System (SAS) in the LIFEPAK 15 monitor/defibrillator was tested by playing ECG waveforms from the Physio-Control database through the electrode connector. For each test ECG, the decision… -
Page 267
APPENDIX Table C-2 LIFEPAK 15 Monitor/Defibrillator SAS Performance by Rhythm Category ECG TEST PERFORMANCE RHYTHM CLASS SAMPLE OBSERVED PERFORMANCE GOAL SIZE LIFEPAK 15 monitor/defibrillator meets the Shockable: >90% sensitivity AAMI DF80 requirements and AHA Coarse VF recommendations. LIFEPAK 15 monitor/defibrillator meets the Shockable: VT >75% sensitivity… -
Page 268
LIFEPAK 15 monitor/defibrillator. can be set up to be MOTION DETECTION . For more information, see the LIFEPAK 15 Monitor/Defibrillator Setup Options provided with your device. A number of activities can create motion, including CPR, rescuer movement, patient movement, and some internal pacemakers. -
Page 269: Appendix D: Electromagnetic Compatibility Guidance
APPENDIX D ELECTROMAGNETIC COMPATIBILITY GUIDANCE This appendix provides guidance and manufacturer’s declaration of electromagnetic compatibility. LIFEPAK 15 Monitor/Defibrillator Operating Instructions ©2007-2011 Physio-Control, Inc.
-
Page 271
Table D-1 Guidance and Manufacturer’s Declaration — Electromagnetic Emissions The LIFEPAK 15 monitor/defibrillator is intended for use in the electromagnetic environment specified below. The customer or the user of the LIFEPAK 15 monitor/defibrillator should assure that it is used in such an environment. -
Page 272
Table D-2 Guidance and Manufacturer’s Declaration — Electromagnetic Immunity The LIFEPAK 15 monitor/defibrillator is intended for use in the electromagnetic environment specified below. The customer or the user of the LIFEPAK 15 monitor/defibrillator should assure that it is used in such an environment. -
Page 273
Table D-3 Guidance and Manufacturer’s Declaration — Electromagnetic Immunity The LIFEPAK 15 monitor/defibrillator is intended for use in the electromagnetic environment specified below. The customer or the user of the LIFEPAK 15 monitor/defibrillator should assure that it is used in such an environment. -
Page 274
RF transmitters, an electromagnetic site survey should be considered. If the measured field strength in the location in which the LIFEPAK 15 monitor/defibrillator is used exceeds the applicable RF compliance level above, the LIFEPAK 15 monitor/defibrillator should be observed to verify normal operation. If abnormal performance is observed, additional measures may be necessary, such as re-orienting or relocating the LIFEPAK 15 monitor/ defibrillator. -
Page 275: Appendix E: Symbols
SYMBOLS This appendix provides information about the symbols that are used in these operating instructions, or on the LIFEPAK 15 monitor/defibrillator, its accessories, packaging, or training tools. LIFEPAK 15 Monitor/Defibrillator Operating Instructions ©2007-2011 Physio-Control, Inc.
-
Page 277
APPENDIX Symbols The symbols in Table E-1 may be found in these operating instructions or on the LIFEPAK 15 monitor/defibrillator, its accessories, packaging, or training tools. Table E-1 Symbols SYMBOL DESCRIPTION Device or User Interface Attention, consult accompanying documents Alarm on… -
Page 278
Date of manufacture. Date may appear before, after, or below the figure. YYYY Authorized EC representative Manufacturer’s identification number (part number) MIN or Serial number Reorder number Rx Only or Rx Only By prescription only For USA audiences only !USA Catalog number Manufacturer LIFEPAK 15 Monitor/Defibrillator Operating Instructions… -
Page 279
Recognized component mark for Canada and the United States Complies with (USA) Federal Communications Commission regulations Type BF patient connection Lot number (batch code). YY (year) and WW (week) of manufacture. YYWW Enclosure ingress protection code per IEC 60529 IP44 LIFEPAK 15 Monitor/Defibrillator Operating Instructions ©2007-2011 Physio-Control, Inc. -
Page 280
Store in a cool, dry location (0° to 50°C, 32° to 122°F) 35°C 50°C 122°F 95°F 15°C 59°F 0°C 32°F Single use only 2 electrodes in 1 package 10 packages in 1 shelf-pak 5 shelf-paks in 1 case Shave patient skin Clean patient skin LIFEPAK 15 Monitor/Defibrillator Operating Instructions… -
Page 281
For use on children up to 15 kg (33 lb) Not for use on children under 15 kg (33 lb) Remove label from battery Charge battery Insert battery in LIFEPAK 15 monitor/defibrillator LIFEPAK 15 Monitor/Defibrillator Operating Instructions ©2007-2011 Physio-Control, Inc. -
Page 282
Symbols Table E-1 Symbols (Continued) SYMBOL DESCRIPTION Rechargeable battery AC-DC power adapter DC-DC power adapter For use with the LIFEPAK 15 monitor/defibrillator Power input Power output DC voltage AC voltage Shipping carton This end up Fragile/breakable Handle with care Protect from water Recommended storage temperature -20°… -
Page 283
Anterior-lateral placement for Controls 3-5 Therapy cable 10-4 therapy 5-5 Manual mode Cleaning Apex paddle placement 4-6 Intended use 5-22 Device 9-8 10-15 Archive mode 7-11 Procedure 5-24 IP transducers 4-58 Index-1 LIFEPAK 15 Monitor/Defibrillator Operating Instructions ©2007-2011 Physio-Control, Inc. -
Page 284
Limits for alarms A-14 SpMet 4-28 Loading paper 10-17 SpO2 4-28 ST segment trends 4-66 Temperature 4-61 Factory default settings A-16 Vital sign trends 4-66 Fiducial marks 4-21 Maintenance Due message 10-3 FilterLine set 4-46 Index-2 LIFEPAK 15 Monitor/Defibrillator Operating Instructions… -
Page 285
Advisory 4-31 Using 6-8 QUIK-COMBO electrodes 6-3 Intended use 4-25 Retainer 3-13 Procedure 4-30 Special placement Troubleshooting tips 4-33 considerations 4-7 SpO2 4-28 Sternum placement 4-7 Adjusting pulse tone volume 4-32 Recycling Index-3 LIFEPAK 15 Monitor/Defibrillator Operating Instructions ©2007-2011 Physio-Control, Inc. -
Page 286
Check Patient report 7-8 paddles 5-4 Pacing report 7-9 Synchronized cardioversion 5-27 Shock report 7-8 Tone 3-21 Transducer, using to monitor invasive pressure 4-54 Transmission Zero reference for IP 4-56 Report 8-14 Transmitting data 8-3 Index-4 LIFEPAK 15 Monitor/Defibrillator Operating Instructions… -
Page 287
® 15 Monitor/Defibrillator O perator’s Checklist LIFEPAK This is a recommended checklist to use to inspect and test this monitor/defibrillator. Daily inspection and test is recommended. This form may be reproduced. Unit Serial No:______________________________ Location:_____________________________________ Date Recommended Instruction Corrective Action Initials ✔… -
Page 288
Date Recommended Instruction Corrective Action Initials f. Remove Test Load from cable and If absent, contact a qualified service verify either PADDLES LEADS OFF or technician. CONNECT ELECTRODES appears.** 8. Perform standard (hard) paddles check in Manual mode.* (If hard paddles are not used with the defibrillator, go to Step 9.) a.Disconnect and examine cable for Replace paddles. -
Page 290
LIFEPAK 15 MONITOR/DEFIBRILLATOR OPERATING INSTRUCTIONS For further information, please contact your local Physio-Control representative or visit www.physio-control.com Physio-Control, Inc. Physio-Control Australia 11811 Willows Road NE Medtronic Australasia Pty Ltd P. O. Box 97006 97 Waterloo Road Redmond, WA 98073-9706 USA North Ryde, NSW Tel 425.867.4000…
5-30
Инструкции по эксплуатации монитора-дефибриллятора LIFEPAK 15
Дефибрилляция в ручном режиме
Выполнение дефибрилляции в ручном режиме
Порядок выполнения дефибрилляции в ручном режиме:
1 Убедитесь что пациент находится в состоянии сердечно-легочного шока (без сознания отсутствует пульс отсутствует стабильное дыхание).
2 Нажмите кнопку
ВКЛ.
3 Отметьте на теле пациента места наложения терапевтических или разрядных электродов и подготовьте кожу пациента (См «Подготовка кожи пациента» на стр 5-5.) Используйте переднебоковое или переднезаднее наложение 4 Присоедините терапевтические электроды к терапевтическому кабелю и убедитесь что кабель подключен к дефибриллятору.
5 Наложите терапевтические электроды на кожу пациента в переднебоковом или переднезаднем наложении При использовании стандартных разрядных электродов нанесите на них проводящий гель и приложите электроды к грудной клетке пациента в переднебоковом наложении.
6 Убедитесь что выбран нужный уровень энергии либо нажмите кнопку
ВЫБОР ЭНЕРГИИ
или вращайте
СЕЛЕКТОР
чтобы выбрать нужный уровень энергии На стандартных (жестких) разрядных электродах вращайте регулятор
ВЫБОР ЭНЕРГИИ.
7 Нажмите кнопку
ЗАРЯД
Во время накопления заряда дефибриллятором отображается индикатор уровня заряда и подается нарастающий звуковой сигнал По окончании накопления заряда дефибриллятором значение доступной энергии отображается на экране.
8 Убедитесь что никто из присутствующих включая оператора не касается пациента каталки койки или оборудования подсоединенного к пациенту.
9 Убедитесь в наличии ритма ЭКГ при котором необходима дефибрилляция Проверьте величину доступной энергии.
10.Чтобы выполнить разряд нажмите кнопку
(разряд) на дефибрилляторе или кнопки (разряд) на стандартных разрядных электродах При использовании стандартных разрядных электродов плотно прижмите оба электрода к груди пациента и одновременно нажмите кнопки на обоих разрядных электродах чтобы выполнить разряд Из соображений безопасности кнопка
(разряд) на передней панели дефибриллятора заблокирована при использовании стандартных разрядных электродов.
Примечание
Чтобы сбросить (отменить) заряд нажмите
СЕЛЕКТОР
Если кнопки разряда не нажаты в течение 60 секунд или если выбор уровня энергии изменен после начала накопления заряда заряд дефибриллятора сбрасывается автоматически.
Примечание
Чтобы прервать дефибрилляцию и начать кардиостимуляцию нажмите кнопку
СТИМУЛЯТОР
Если заряд набран происходит сброс заряда дефибриллятора.

3-12
Инструкции по эксплуатации монитора-дефибриллятора LIFEPAK 15
Вид передней панели
Присоединение и отсоединение терапевтического кабеля
ВАЖНО!
Терапевтический кабель QUIK-COMBO и стандартные разрядные электроды
монитора-дефибриллятора LIFEPAK 15 имеют одинаковый разъем и подключаются
к дефибриллятору через одно и то же гнездо. Эти терапевтические кабели не совместимы
с другими мониторами-дефибрилляторами LIFEPAK.
Порядок подсоединения терапевтического кабеля к дефибриллятору:
Рис. 3-9 Подсоединение терапевтического кабеля
Порядок отсоединения терапевтического кабеля от дефибриллятора:
Рис. 3-10 Отсоединение терапевтического кабеля
ПРЕДУПРЕЖДЕНИЕ
ОПАСНОСТЬ ПОВРЕЖДЕНИЯ ОБОРУДОВАНИЯ И ПРОВЕДЕНИЯ НЕЭФФЕКТИВНОГО
РАЗРЯДА
Чтобы предохранить разъем терапевтического кабеля от повреждения или
загрязнения, держите этот кабель постоянно подключенным к дефибриллятору.
Осматривайте и проверяйте терапевтический кабель ежедневно в соответствии
с контрольным списком оператора, приведенным в конце данного руководства.
Чтобы снизить вероятность сбоев при использовании терапевтических кабелей
во время оказания помощи пациенту, компания Physio-Control рекомендует
заменять их каждые три года.
1. Выровняйте разъем терапевтического
кабеля с гнездом.
2. Вставляйте терапевтический кабель,
пока не почувствуете, что разъем
закреплен. При этом раздается щелчок.
1. Нажмите кнопку защелки на разъеме
терапевтического кабеля.
2. Вытащите разъем терапевтического
кабеля.