A set of 17 training missions for the DCS F-15C set in the Caucasus covering all important aspects of flying the F-15C, aimed at both beginners and intermediate pilots
About
These missions are aimed towards players who are new to DCS and fairly new to flight sims in general, and so attempt to strike a difficult balance between accessibility (avoiding information overload) and covering everything important. However, I also recommend these to anyone interested in becoming more proficient in the F-15. They’re generally intended as a supplement to the DCS F-15C manual, but I also go over some aspects that are undocumented (i.e., not in the manual), such as autopilot operation and air-to-air refueling.
(This material is not made or supported by Eagle Dynamics SA.)
Download the missions
Contact
Supplementary Notes
The following notes cover material from the training missions that are not included in the official F-15C manual, and are intended as a supplement to the manual.
Last updated 1 February 2021
Table of Contents
- Cockpit and Controls
- Cold Start and Taxi
- Autopilot
- Navigation
- Landing
- TEWS
- Radar
- Basic BVR Tactics
- Gunnery
- Air-to-Air Refueling
Cockpit and Controls
- View controls
- You can look around using the following commands:
- Numpad 8: View up
- Numpad 2: View down
- Numpad 4: View left
- Numpad 6: View right
- Numpad 5: Center view
- Numpad *: Zoom in
- Numpad /: Zoom out
- Various views can be selected — a few examples:
- F1: Cockpit view
- F2: External view
- Left Ctrl+F4: Chase view
- You can look around using the following commands:
- Pause
- You can pause by pressing the Pause key.
- Throttle
- The highest throttle setting before afterburner kicks in is referred to as «MIL» or «military power.»
- Speed brake
- If you want to slow down quickly, you can use the speed brake, which is a large plate on the top of the fuselage that hydraulically deploys into the airstream.
- Left Shift+B: Extend speed brake (press again while extending to stop extending partway)
- Left Ctrl+B: Retract speed brake (press again while retracting to stop retracting partway)
- B: Toggle speed brake fully extended/retracted
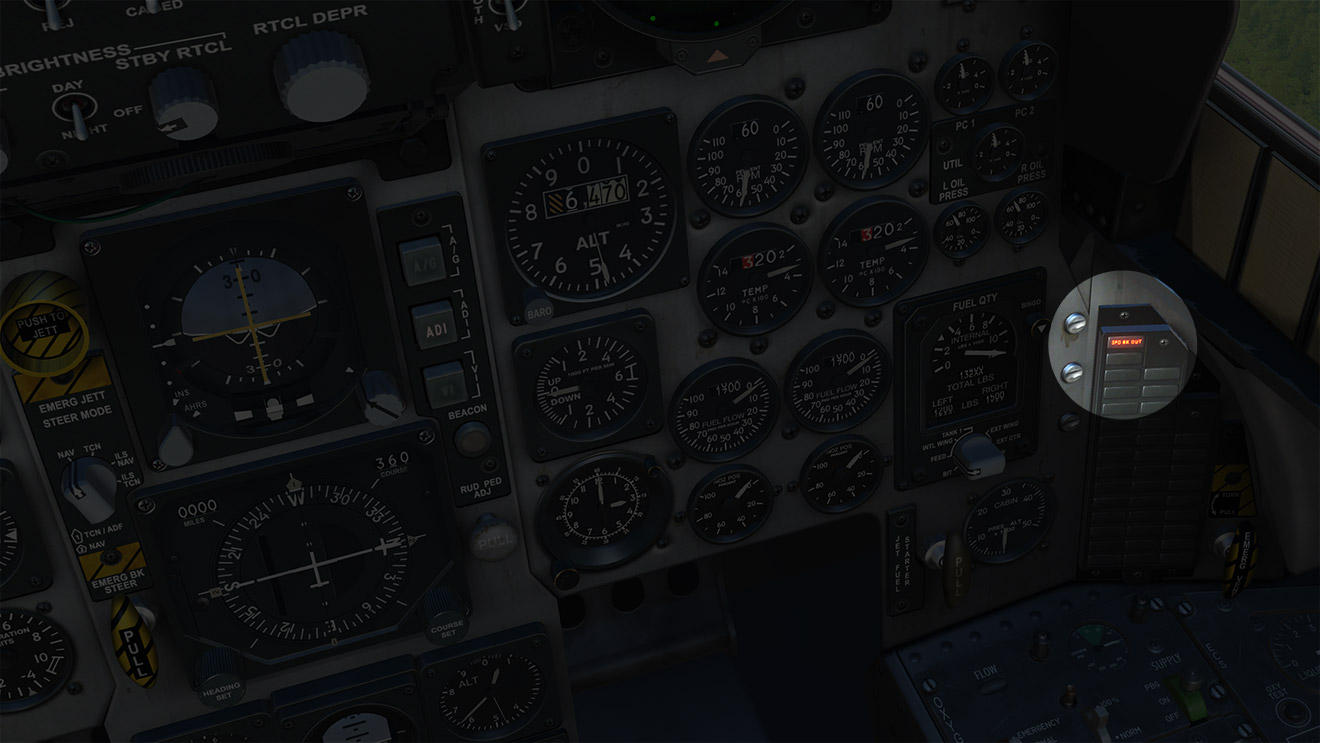
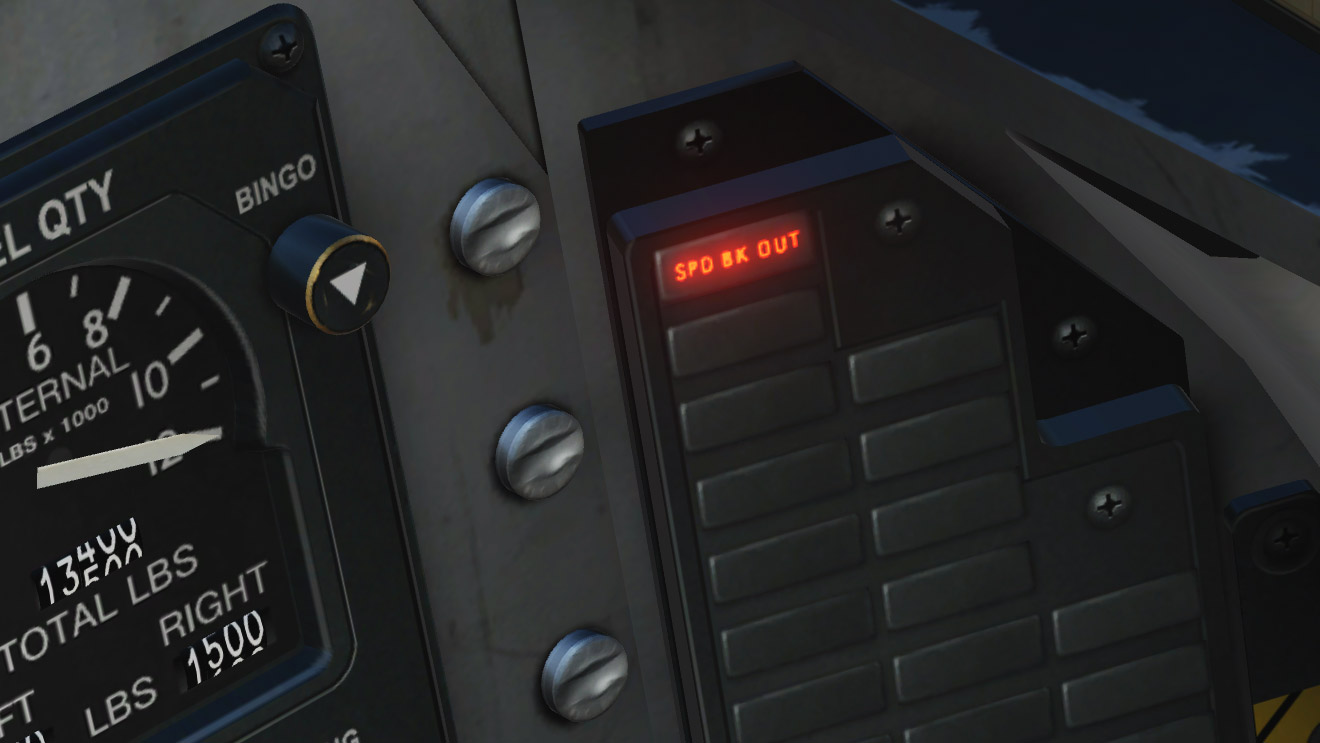
- A “SPD BK OUT” light on the caution lights panel indicates the speed brake is extended. You will also generally hear increased wind noise, and see the extended speed brake in your center rear-view mirror.
- Clock
- You can set a timer using the little hand in this clock display by pressing Left Shift+T to start/stop/reset.
- HUD color/brightness
- Right Alt+Right Shift+H: Decrease HUD brightness
- Right Ctrl+Right Shift+H: Increase HUD brightness
- Right Ctrl+H: Cycle HUD color options
- Kneeboard
- Your kneeboard contains maps of all airfields in the region, as well as mission-specific information (typically a map of your waypoints).
- K: Kneeboard glance view
- Right Shift+K: Toggle kneeboard on/off
- [: Previous page
- ]: Next page
- Additional commands are available to mark and navigate between shortcuts in the kneeboard pages—see the «Kneeboard» category in the controls setting menu.
Cold Start and Taxi
- Abbreviated start-up checklist
- Electrical power — ON (Right Shift+L)
- Throttles — OFF
- Engines — START (Right Shift+Home)
- Canopy — CLOSE (Left Ctrl+C)
- Navigation mode — ACTIVATE (1)
- Flaps — DOWN (F)
- Thorough start-up checklist
- Electrical power — ON (Right Shift+L)
- Anti-collision lights — ON (Right Alt+Right Ctrl+L)
- Anti-collision lights are flashing red lights on your wings and tail. Turning these and your navigation lights on will warn the ground crew that you’re about to start your engines, and when you’re taxiing, will make you more visible and reduce the chance of a collision.
- Navigation lights — ON (Right Ctrl+L)
- Navigation lights (also called position lights) are red and green lights that mark the left and right sides of the aircraft.
- Throttles — OFF
- Interior lights controls — AS REQUIRED (L)
- Request start-up clearance
- Press to open the communications menu.
- Press F5 to select ATC (air traffic control).
- Press the key to select your airbase (typically F1).
- Press F3 to request startup.
- Wait for clearance.
- Engines — START (Right Shift+Home)
- Canopy — CLOSE (Left Ctrl+C)
- Fuel quantity gauge — CHECK
- BIT — CHECK
- Check that the fuel gauge is functioning properly by turning the dial to «BIT» by holding Left Alt+Left Ctrl+D. («BIT» stands for «Built-In Test.») The pointer and top counter should both indicate 6000 lb, and the left and right counters should both indicate 600 lb.
- Bingo bug — SET
- The caret is on the fuel quantity gauge is the «bingo bug,» which indicates when you’ve got just about enough fuel to return home. It’s set at 3000 lb by default, which is a reasonable rule of thumb, but you can adjust it for your particular flight plan if you’d like by pressing Left Ctrl+D and Left Alt+D.
- BIT — CHECK
- Navigation mode — ACTIVATE (1)
- Flaps — DOWN (F)
- Trim — CHECK AND SET
- T/O trim button — PUSH (Left Alt+T)
- T/O trim light — ON
- Landing/taxi light switch — AS REQUIRED
- Pressing Right Alt+L will cycle your gear light between the off, taxi, and landing settings (so if you’re starting with it off, pressing it once will switch it to «taxi»).
- Taxi
- First, request taxi clearance.
- Press to open the communications menu.
- If necessary, navigate through the menus to the ATC menu for your airbase.
- Press F1 to request taxi to runway.
- When you get clearance, ATC will direct you to a specific runway. The runway number is the first two numbers of the heading of the runway (e.g., “runway 13” has a heading of about 130 degrees, which is southeast).
- Nose gear steering is used to steer while taxiing. In the normal range, the nose gear will turn 15 degrees left or right; by holding down S, you’ll temporarily switch to the maneuvering range, which gives up up to 45 degrees left or right steering for tighter turns.
- Your ground speed is displayed in the bottom-left of the VSD, after the letter «G.» Taxi speeds are too slow for the airspeed readout on the HUD to be reliable, so you should refer to your ground speed readout instead. Stay under 30 knots while taxiing, and slow down to 10 knots when turning.
- Come to a stop before the taxiway meets the runway and request takeoff clearance from ATC via the communications menu (). If the runway is clear, ATC will clear you for takeoff, and also turn the runway lights for you. Typically when giving takeoff clearance, ATC will tell you «climb 300,» which means when taking off, you should continue straight on the runway heading until you reach an elevation of 300 meters (1000 feet).
- First, request taxi clearance.
Autopilot
- The F-15C has two autopilot modes: attitude and altitude hold. Attitude hold will hold the current attitude (that is, the orientation of the aircraft), as long as the pitch attitude is within ±45° and the roll attitiude is within ±60°, and the G loading is between 0g and +4g. As long as you stay within these limits, you can adjust the attitude with the stick with autopilot engaged; when you release the stick, the new attitude will be held. Attitude hold alone is useful, for example, during a long climb. However, when attitude hold is engaged, the second mode, altitude hold, can also be engaged, as long as the climb or descent rate is less than 2000 ft/min. If you exceed any of these limits, the respective autopilot mode will automatically disengage.
- To toggle attitude hold, press A.
- To toggle altitude hold, press H.
- The autopilot modes are engaged by the highlighted switches on the left console. When these switches are switched forward, the respective autopilot mode is activated.
Navigation
- Waypoints
- Waypoints are preset navigation points automatically entered into the aircraft’s navigation computer. Generally, you will be following a flight plan that consists of a number of flight plan waypoints, one of which will be selected as the current waypoint.
- Navigation master mode
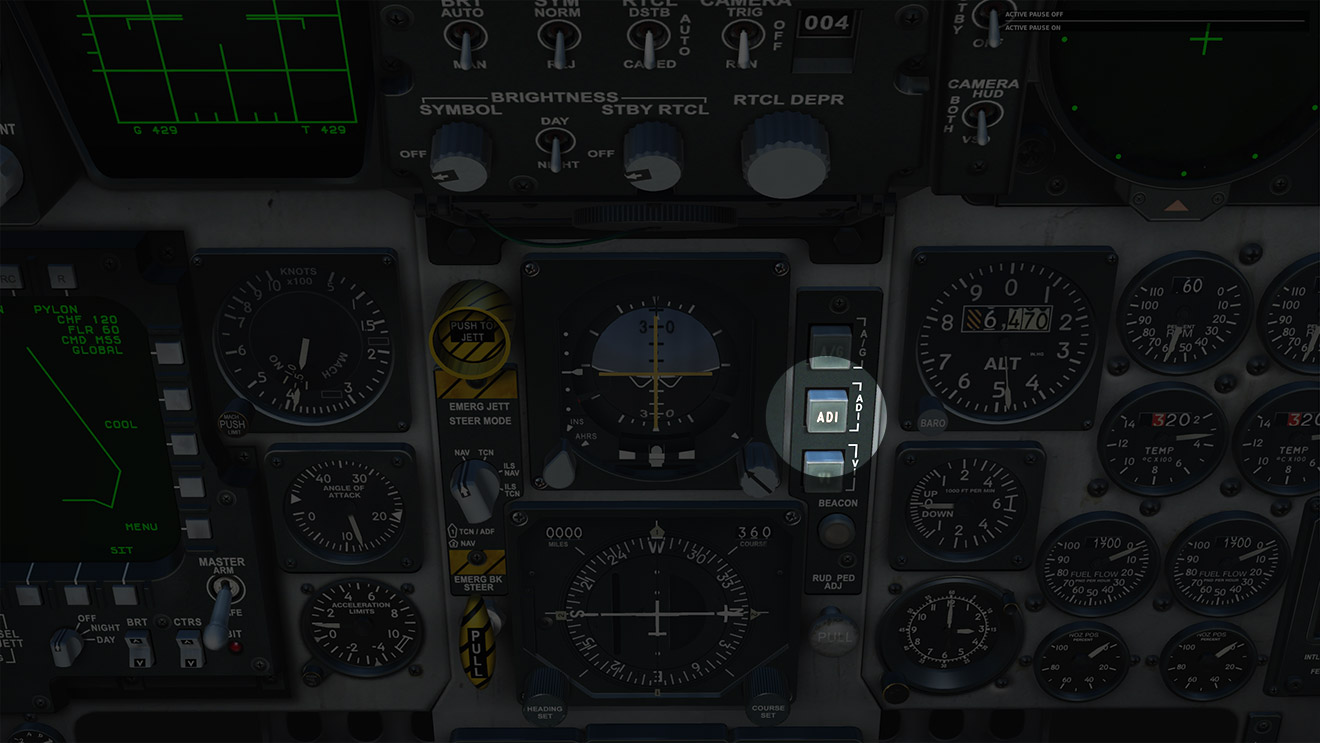
- Navigation master mode—also known as ADI (attitude director indicator) master mode—is indicated by the lit-up «ADI» button in the center of the instrument panel. When you are in A/A master mode (which comprises all of the combat modes — BVR, vertical scan, etc.), this button will be off and unlit.
- Course line
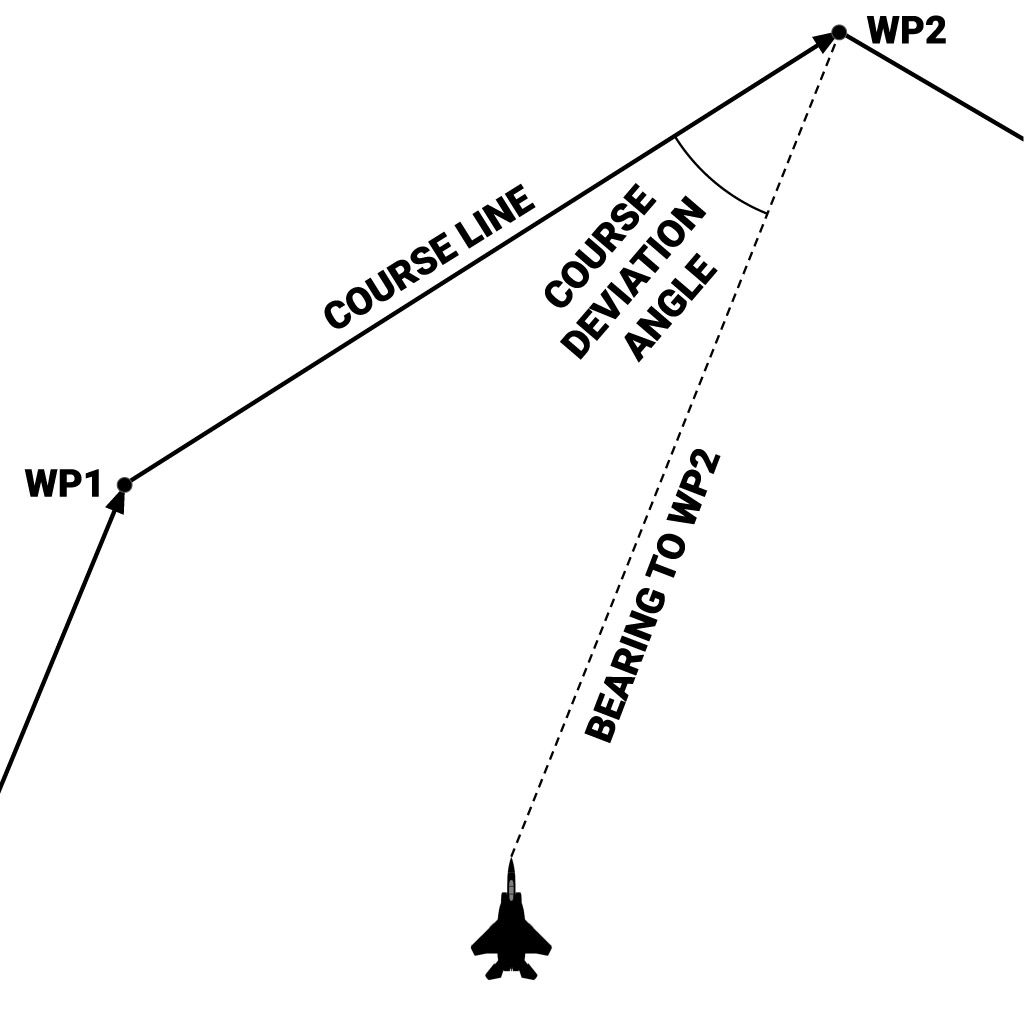
- The course line is the straight line from the previous waypoint to the current waypoint. Sometimes the course line will not be too important and you can fly directly to the desired waypoint, but you will want to stick to the assigned course if, for example, flying directly to the desired waypoint will cause you to overfly enemy territory or air defense installations. If you align your velocity vector with the bank steering index on the HUD, you will reach the current waypoint along the course line.
- HSI
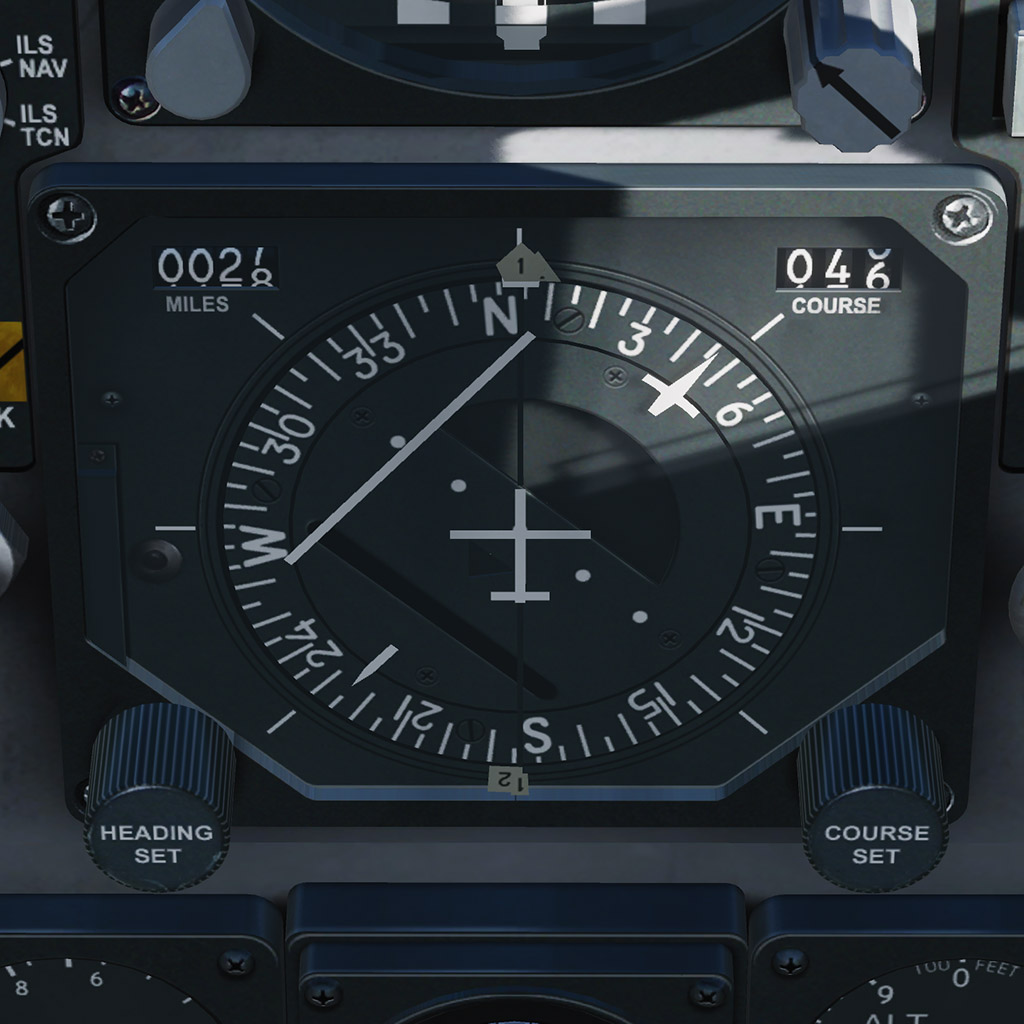
- The top right number, labeled «COURSE,» is the course direction: this is the heading along the course line from the previous waypoint to the current waypoint. This will be your heading if you are flying towards the current waypoint along the course line. The course direction is also indicated graphically on the rim of the compass by the symbol that looks like a dagger.
- The small triangle on the outer rim of the compass is the bearing pointer, which indicates the heading to the current waypoint. This is the same as the assigned heading mark on the heading tape at the top of the HUD.
- The long straight line inside the compass is the course deviation indicator, which indicates the angle between the direct path to the current waypoint and the course line. Each dot represents 5°. If the line is to the left of center, it means the course line is off to your left.
Landing
- Visual approach
- Line up with the runway so you’re flying directly towards it along its heading and are at least about 10 miles or so away.
- Climb/descend to an altitude of about 2500 feet above the runway’s elevation, and then maintain level flight.
- Decelerate to under 250 knots if necessary.
- Extend flaps and landing gear.
- Decelerate until your AOA approaches 20 in level flight. Then, use the throttle to adjust your altitude so the velocity vector is positioned where you want to go (which, for now, should be straight ahead): if you are too high, throttle back, and if you are too low, throttle up. Use the stick to keep the AOA between 20 and 22.
- The throttle is slow to respond, so try to anticipate adjustments.
- If the velocity vector flashes, then its actual position is outside the HUD, and you may be descending faster than you realize.
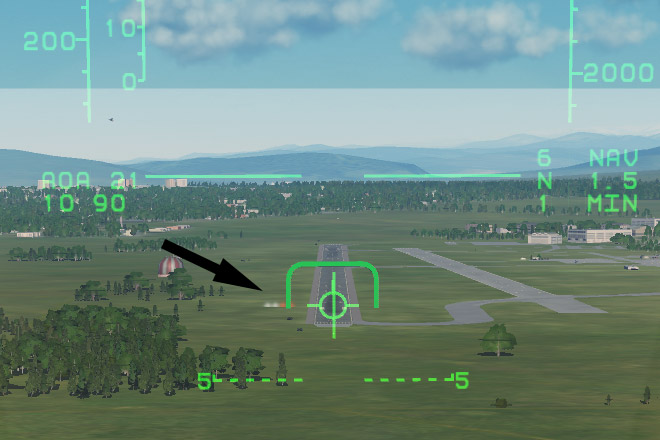
- When the runway is about 3º below the horizon, use your throttle to adjust your velocity vector until it overlays the beginning of the runway.
- Aim for the first pair of parallel white lines painted on the runway by placing the velocity vector between them.
- Instrument approach
- These instructions apply to the typical situation where your final waypoint is set to land at the destination airbase. First, navigate to your last waypoint before the landing waypoint.
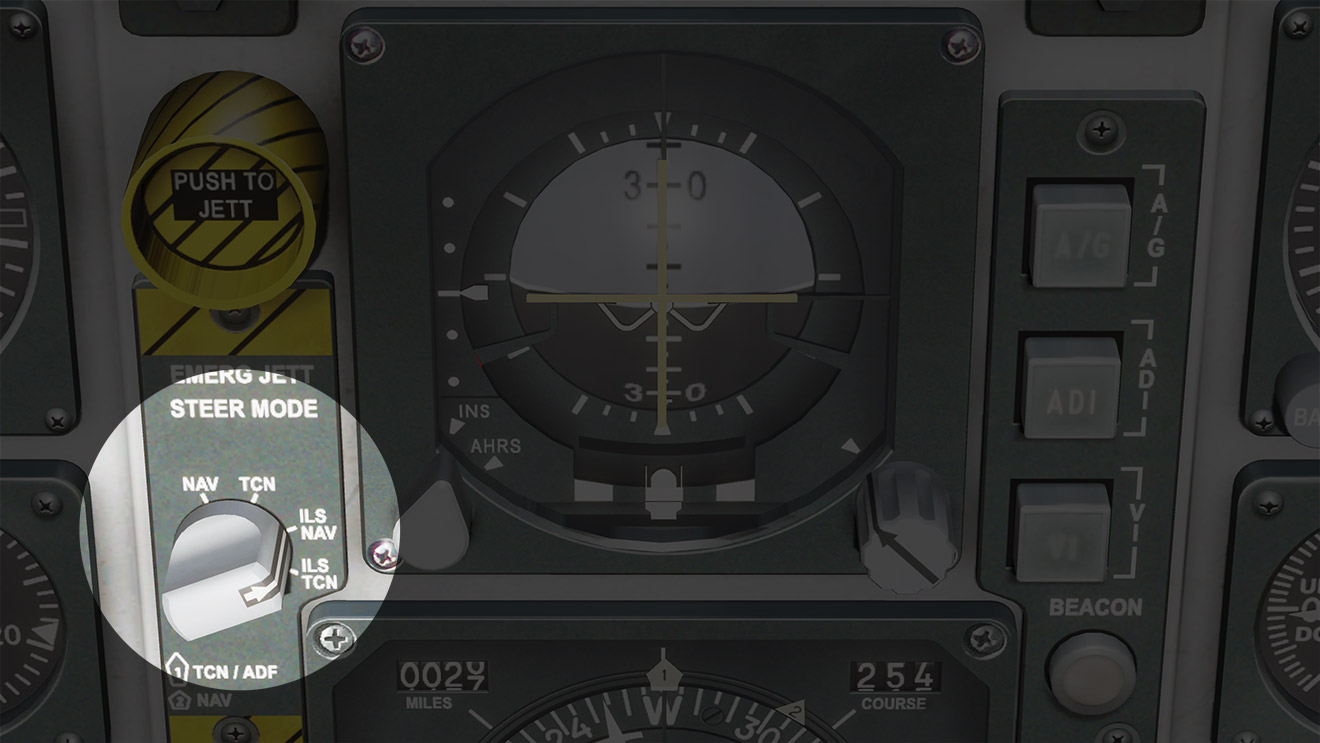
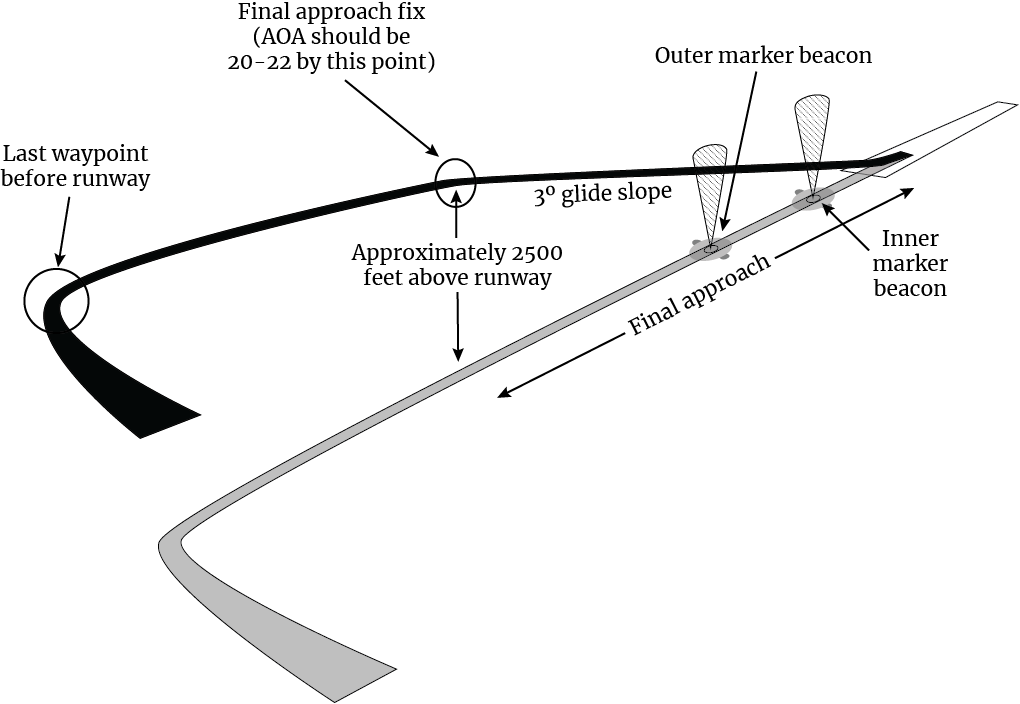
- When you pass the last waypoint before your landing waypoint, «CSET» will blink in the bottom right of your HUD to tell you your course is set to the destination airfield. You will now be in ILSN steering mode, as indicated by «ILSN» on the bottom right of the HUD and the «STEER MODE» dial set to «ILS NAV» instead of «NAV.» Follow the navigation cues on your HUD or HSI, which will guide you to the final approach fix. (The final approach fix is the point where you will turn to align with the runway and begin the «final approach,» the final segment of your approach to the runway—see the diagram below. It’s typically about 10 miles from the runway.)
-
- Contact approach.
- Open the communication menu (), press F5 to select ATC, and then press the appropriate key for your airfield. (Note that, in this menu, you can request the azimuth to the airport, which is helpful if you get lost.) Notify the airfield that you’re inbound by pressing F1.
- When you notify the airport that you’re inbound, they’ll respond with navigation instructions to the final approach fix, and will tell you which runway to land on. (You don’t have to memorize the navigation instructions, because your navigation computer will guide you.)
- You will typically be asked to fly to pattern altitude, which is about 2500 feet above the runway. You want to arrive at the final approach fix at this altitude.
- Once you’re below 250 knots, retract your speed brake if necessary by pressing B. Then, press G to lower your landing gear and F to lower your flaps.
- Decelerate until your AOA approaches 20 in level flight. Then, use the throttle to adjust your altitude: if you are too high, throttle back, and if you are too low, throttle up. The throttle is slow to respond, so try to anticipate adjustments. Use the stick to keep the AOA between 20 and 22.
- After you pass the final approach fix, you’ll be on the final approach. A cross (called the «flight director cross») will now be displayed on your HUD, and it will guide you in. Use the stick and throttle to steer the velocity vector onto the flight director cross. The course indicator on your HSI will now indicate the orientation of your assigned runway.
- When the ATC asks you to contact the tower, open the communication menu () and press F1 to request landing permission. This will instruct the tower to turn on the approach lights
- The glide slope deviation scale, on the left side of your ADI instrument, will indicate the relative elevation of the glide slope when you’re within about 4 miles of the runway.
- ILS will guide you to near the middle of the runway, so when you’re about 2-3 miles away, you may want to adjust your path to touch down at the beginning of the runway instead.
- Some airfields are equipped with marker beacons along the approach paths as position references, which is handy in low visibility.
- A low-pitched beeping and «MKR» on the bottom left of your HUD will indicate when you pass over the outer marker beacon.
- A higher-pitched beeping will indicate you’re passing over the inner marker. If things aren’t going well, this is the time to abort your landing and try again.
- Contact approach.
- Precision approach path indicator lights
- Some airports have a set of four red or white lights lined up horizontally by the beginning of the runway. If there are two red and two white, you’re on glide slope; more red means you’re below glide slope, and more white means you’re above glide slope.
- Touchdown
- When you’re seconds from touchdown, gently pull the stick back until the velocity vector is just below the horizon. Smoothly lower the throttle to idle.
- Try to touch down at a descent rate of less than 200 ft/min.
- After touchdown, use gentle rudder inputs to adjust your heading and raise the nose to 13° pitch for aerobraking. Don’t exceed 15°, or you could scrape your tail.
- When you drop below 100 knots, gently lower the nose and apply wheel brakes by holding W.
- When you’re seconds from touchdown, gently pull the stick back until the velocity vector is just below the horizon. Smoothly lower the throttle to idle.
- Crosswind landing
- You will want to «crab» during your final approach. This means you will let the nose point into the wind, so you will end up approaching the runway flying slightly sideways. Use the stick to keep your wings level while you do this.
- Hold the crab through touchdown. After touchdown, maintain ground track with rudder. Use aileron to maintain a wings-level attitude.
- After landing
- Speed brake — IN (Left Ctrl+B).
- Flaps — UP (F).
- Radar power switch — STBY (off) (I).
- Taxi light — AS REQUIRED (Right Alt+L).
- Taxi to a parking spot.
- Your taxi light is extremely powerful, so turn it off as you enter a parking spot as a courtesy to your crew chief.
- When you have come to a complete stop and are ready to shut down, throttle to idle, and then shut down your engines (Right Shift+End).
- Turn off electrical power (Right Shift+L).
- Finally, open the canopy (Left Ctrl+C).
TEWS
- A series of three high-pitched audio tones indicates a new threat has been detected.
- To toggle showing only radars that are locked on to you (and hiding those only in search mode), press Right Shift+R.
- The «AI» (airborne intercept) warning light at the top of your instrument panel indicates you are currently being illuminated by an aircraft radar.
- The «SAM» warning light at the top of the instrument panel indicates your RWR is detecting a SAM radar.
- You can release both chaff and flares simultaneously by pressing Q.
- You can also set your TEWS to continuously dispense both chaff and flares by pressing Left Shift+Q. This is useful when you are evading an incoming missile but are too concentrated on other tasks, such as getting into a firing position while performing evasive maneuvers, to be distracted by manually dispensing chaff or flares.
Radar
- TWS mode
- The targeting information in the VSD pertains to the PDT.
- The targeting information in the HUD pertains to the current target, which progresses from the PDT to the first SDT, second SDT, etc., as missiles are launched at each.
- VSD
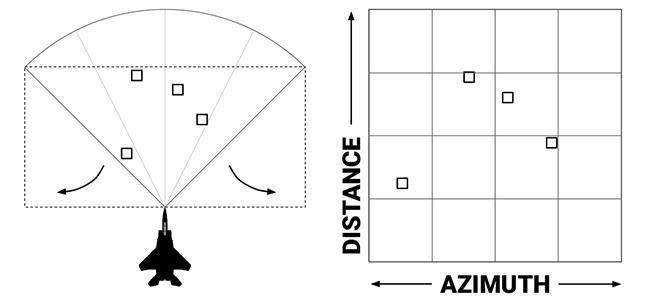
- The grid lines are range and azimuth references. The area shown in the VSD represents a pie slice of space in front of the aircraft, but displayed stretched out to a square. The bottom line represents your position.
- The spacing between each horziontal grid line represents one quarter of the selected range, and the spacing between each vertical line represents 30° in aziumth. That means that, from left to right, the five vertical lines correspond to your 10, 11, 12, 1, and 2 o’clock.
Basic BVR Tactics
- Air-to-air combat is a complex topic, with lots of considerations and possible tactics. This will cover just the basics of approaching a typical BVR engagement against other fighters, but much of it will also apply to engagements with defensive targets, like bombers or transports.
- While searching for targets, start in LRS radar mode, and make sure you have a radar display range that covers the area you’re searching.
- When flying CAP (combat air patrol, where you’ll be patrolling an area for hostile aircraft), you’ll generally want to fly in line abreast formation. This spreads all of you out along a horizontal line, increasing the search volume of your radars. If you’re flying with AI wingmen, you can command this formation in the commuication menu:
- Open the communication menu by pressing .
- Press F1 to choose commands to your flight.
- Press F9 to choose formation commands.
- Press F2 to select line abreast.
- If radar stations are present, you can communicate with them to get information on bogeys (contacts of unknown identity). These radar stations can be in the form of airborne warning and control systems, or AWACS, such as an E-2 or E-3, or a ground-based radar, called an early-warning radar or EWR. You can radio the AWACS from your communication menu as needed.
- When an AWACS or EWR picks up a new bogey, they’ll give you its BRA(A): bearing (from you), range (from you), altitude, and aspect (relative to you). You can also request this information about the closest bogey by requesting a «bogey dope» via radio by pressing Left Win+O.
- Once you’ve committed to engaging a target, you’ll want to gain as much speed and altitude as possible to extend the range of the missiles you’ll launch.
- Jettison your external fuel tanks to decrease your weight and drag by pressing Left Alt+R.
- Push the throttle to full afterburner (MAX).
- Generally you won’t need to climb above 40,000 feet or so.
- Once you’ve started to see the bogeys on your RWR or radar, try to keep a mental picture of their locations and altitude (as well as your wingmen’s). This will be invaluable if you lose them on your radar.
- Once you see your targets in LRS, switch to TWS.
- You can command AI wingmen to engage your PDT or a target you’ve locked in STT with Left Win+Q, or to engage all bandits with Left Win+B, or to cover you with Left Win+W. All these commands are also available through the communication menu.
- Crank!
- Instead of flying directly at your target, turn left or right to place it just inside the limits of your radar (that is, just inside your 10 or 2 o’clock). This is called «cranking» and reduces your closure rate, meaning your opponent’s missiles won’t be as effective.
- When you’re ready to fire a missile, temporarily turn back towards your target.
- After firing, resume the crank. Until the timer on the HUD indicates that your missile’s seeker is active, you’ll want to keep the target locked in TWS or STT, unless you need to turn to evade an incoming missile.
- If your RWR signals a radar lock on you, and your attacker is over 10 miles away, turn on your ECM (jammer) by pressing E.
- If you have enough missiles, launch one as soon as you get within max missile range. Although it will have a low probabily of hitting, it will put your target on the defensive.
- At longer ranges, pitch up to about 15° above the horizon when firing AMRAAMs to extend their reach.
Gunnery
- A dashed circle inside the reticle on the HUD is present when you don’t have a radar lock — in this situation, the reticle is fixed to represent a target at a range of 2250 feet. To use this mode, fly to place the target within the center of the reticle and fire the gun by pulling the trigger on your stick or pressing the space bar.
Air-to-Air Refueling
- Adjust joystick axis curves
- First, you’ll want to add curvature to your joystick axes, if you haven’t already. This will make very fine adjustments easier. Values of 20 for pitch and roll are good starting points, although you should experiment and see what works best for you. You can do this by pressing Esc, choosing «Adjust Controls,» clicking the «Axis Assign» button, clicking on the relevant joystick axis, and clicking «Axis Tune.»
- Ask AWACS for navigation to the tanker
- If you don’t know exactly where a tanker is, and if you have AWACS support, you can ask your AWACS for directions by pressing Left Win+I. The AWACS will give you bearing and range relative to an arbitrary point called «bullseye,» which should have been described in your mission briefing (and can usually be seen in the F10 map).
- Radio the tanker
- When you’re within 15 miles of the tanker, radio the tanker to request joinup.
- Open the communication menu with .
- Press F6 to choose tanker.
- Press F1 to radio your intent to refuel.
- Pay attention to the response: the tanker will tell you their indicated airspeed and altitude.
- When you’re within 15 miles of the tanker, radio the tanker to request joinup.
- Switch to TACAN steering mode
- After you’ve radioed your intent to join up, you can switch your steering mode from NAV to TCN (meaning TACAN, or Tactical Air Navigation), which will give you the range to your tanker. Do this now by pressing Left Ctrl+R. In the bottom right of the HUD, «NAV» changed to «TCN,» and the number below this after the «T» is the range to the tanker in miles. The remaining navigation information on the HUD and HSI still applies to your current waypoint.
- The Left Ctrl+R command both activates TACAN steering mode and opens your refueling door. A green «READY» light on your canopy frame indicates the refueling door is open.
- Get a radar lock on the tanker
- This is optional, but will provide you with the the tanker’s location, range, and closure rate, which is particularly helpful if visibility is poor.
- Fly to pre-contact position
- When you radioed the tanker earlier, they should have told you to proceed to the pre-contact position, which is 50 feet (roughly one F-15 length) behind and just below its refueling boom.
- First, start approaching the tanker from 1,000 feet below their altitude (which they told to you over the radio), so climb or descend to that altitude.
- Close in on the tanker at a closure speed of about 100 knots. You can see the closure speed directly in your VSD, or approximate it by comparing your indicated airspeed to the speed the tanker radioed to you. (This is approximate because closure rate is calculated from true, not indicated, airspeed.)
- As you approach 1 mile distance, throttle back to slow your closure rate to about 60 knots.
- When you’re about 1 mile away, begin a gentle climb so you arrive at about 50 feet below the tanker at half a mile. Adjust your throttle so your closure rate is only about 30 knots when you get half a mile away. Remember that the aircraft takes time to react to throttle inputs, so start adjusting well in advance.
- When you get half a mile away, gently lower the throttle to drop your closure rate to 10 knots at 0.2 miles and only a couple knots at 0.1 mile. For precise speed control, use tiny throttle adjustments and wait for them to take effect. Avoid the speed brake. Err on the side of low speed—it’s harder to recover if you overshoot and can no longer see the tanker.
- As you approach, line up your nose with the base of the tanker’s right wing (since your refueling door is on the left side of your F-15), and just under the boom’s altitude. Pull up to the pre-contact position and stabilize there.
- When you’re about 50 ft behind the boom and steady, open the communication menu () and declare «ready pre-contact.»
- Fly to contact position
- Slowly advance to contact position, which is just past the boom, since the refueling door is behind your cockpit. Don’t concentrate on the boom (it will be behind you); concentrate on the tanker.
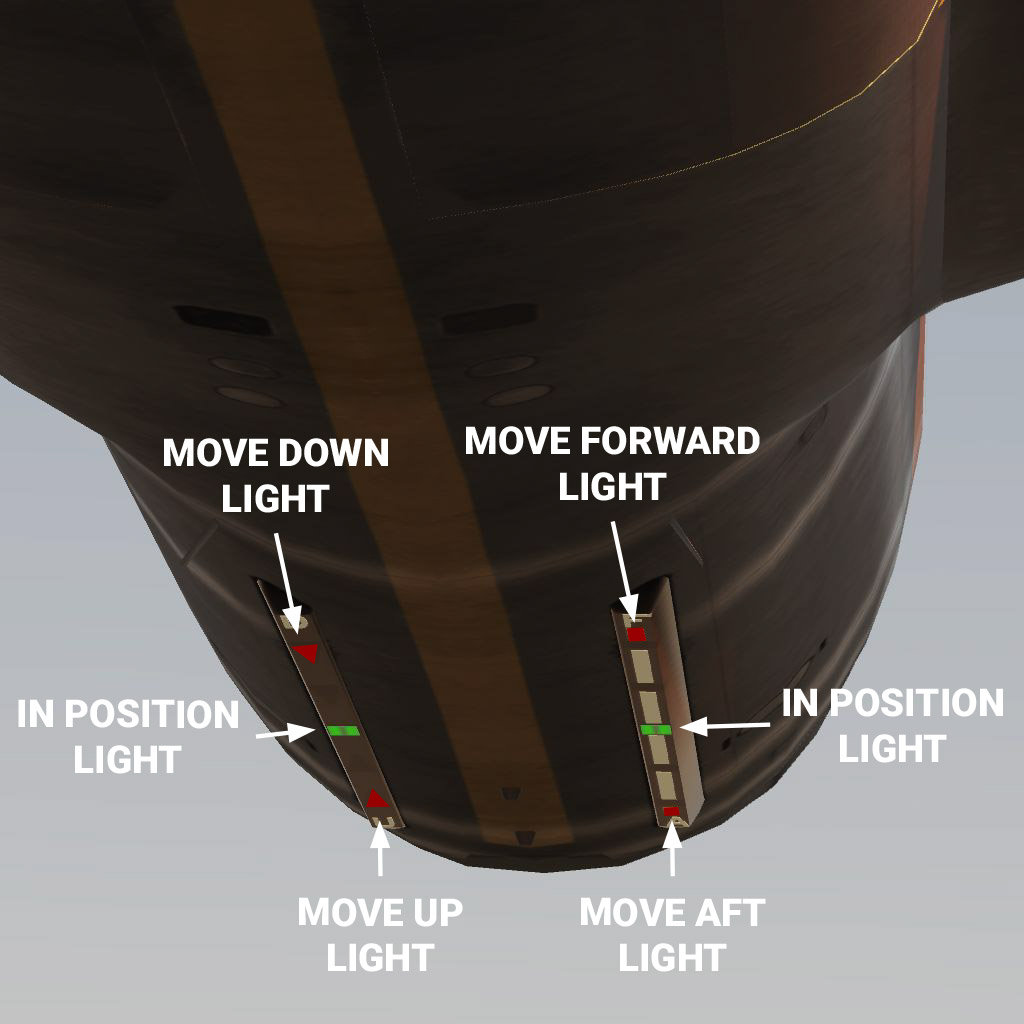
- When you are in contact position, you will be able to just see the director lights under the tanker’s front fuselage. The lights illustrate your position relative to optimal. The left strip is altitude — if the rear red light (highest in your view) is lit, you’re too high, and the front red light (lowest in your view) means you’re too low; the green middle light is optimal. The right strip indicates your fore/aft position—the forward red light means you’re too far forward, etc. When you’re steady in contact position, the tanker will steer the boom to your refueling door and begin refueling.
- If the tanker calls «return pre-contact,» return to the pre-contact position, and radio «ready pre-contact» again if necessary.
- Refueling
- The «READY» light on your canopy frame will turn off when the boom is connected, and will light back up if you disconnect.
- Complete
- When you’re fully topped off, the tanker will radio that they’re disconnecting; then, throttle down just a little and descend slightly to back away from the tanker.
- Close the refueling door by pressing Left Ctrl+R.
HOTAS Mapping
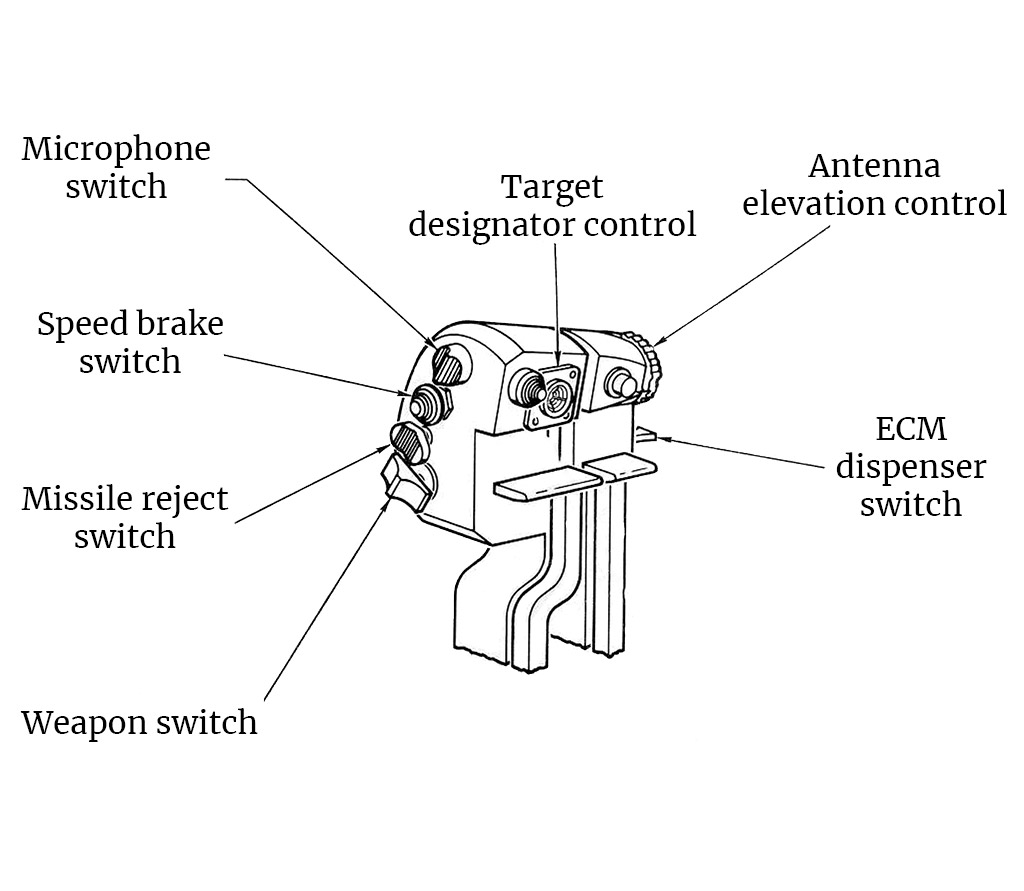
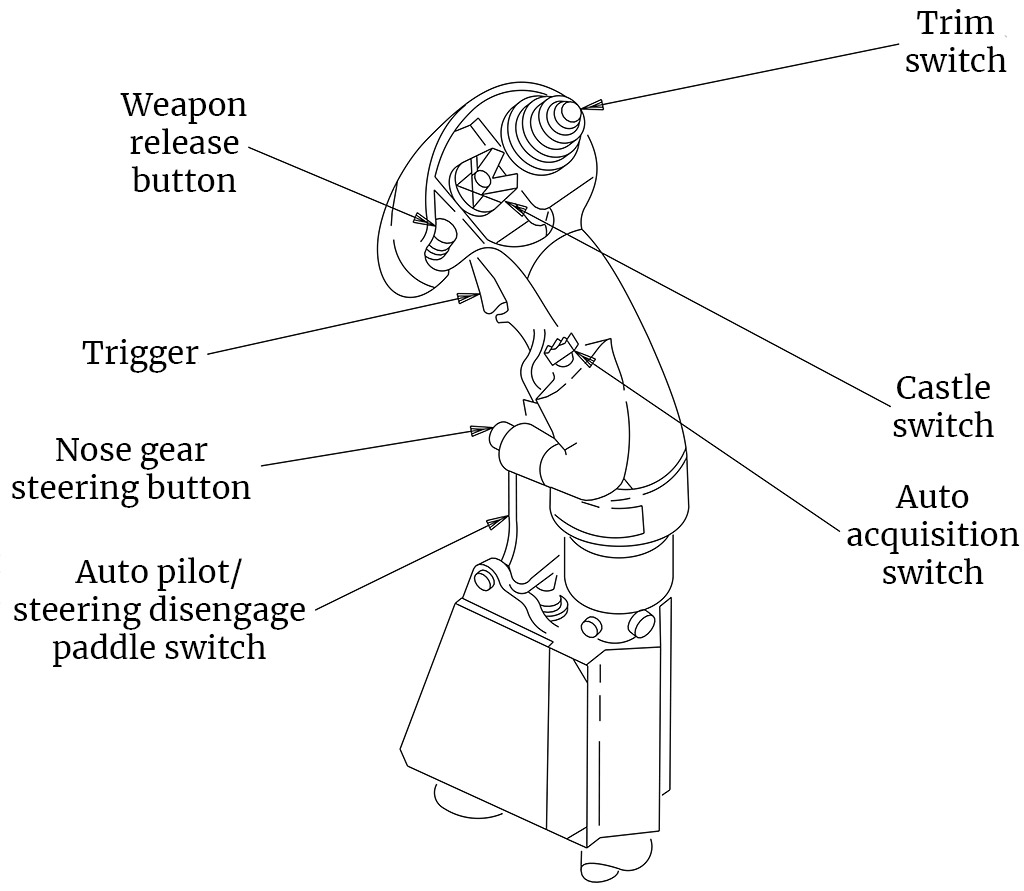
Here’s my take on how DCS commands most closely map to the real-life throttle and stick controls. Note that many functions are not implemented in DCS (such as IFF and missile rejection), which is why some controls are unlabeled.
- Microphone switch
- Communication menu
- VoiceChat push-to-talk
- Target designator control
- Axis mapping:
- Up/down: TDC Slew Vertical
- Left/right: TDC Slew Horizontal
- Button mapping:
- Up: Target Designator Up
- Down: Target Designator Down
- Left: Target Designator Left
- Right: Target Designator Right
- Press: Target Lock
- Axis mapping:
- Antenna elevation control
- Axis mapping:
- Radar Vertical
- Button mapping:
- Up: Scan Zone Up
- Down: Scan Zone Down
- Axis mapping:
- Speed brake switch
- Aft: Airbrake On
- Forward: Airbrake Off
- Missile reject switch
- Aft: Unlock TWS Target
- ECM dispenser switch
- Down: Countermeasures Chaff Dispense or Countermeasures Flares Dispense or Countermeasures Release or Countermeasures Continuously Dispense (exact function can be programmed)
- Weapon switch
- Aft: Cannon
- Forward: Weapon Change
- Weapon release button
- Weapon Release
- Trim Switch
- Up: Trim: Nose Down
- Down: Trim: Nose Up
- Left: Trim: Left Wing Down
- Right: Trim: Right Wing Down
- Trigger
- Weapon Fire
- Castle switch
- Up: Radar RWS/TWS Mode Select
- Nose gear steering button
- On the ground: Nose Gear Maneuvering Range
- In the air: (6) Longitudinal Missile Aiming Mode/FLOOD mode
- Auto acquisition switch
- Forward: (4) Close Air Combat Bore Mode
- Aft: (3) Close Air Combat Vertical Scan Mode
- Press:
- In BORE or VS modes: (2) Beyond Visual Range Mode
- In STT, HOJ, or TWS modes: Radar — Return to Search/NDTWS
- Auto pilot/steering disengage paddle switch
- On the ground: Nose Wheel Steering
- In the air: Autopilot Disengage
-
- Share
Thаnks
действительно скорости в 300 узлов вполне хватает и турбулентность особо не влияет ,а колбасит меня с непривычки при перебалансировке при заполнении подкрыльевых ПТБ
Link to comment
Share on other sites
- 4 months later…
-
Replies
280 -
Created
9 yr -
Last Reply
Nov 26
Top Posters In This Topic
-
28
-
24
-
21
-
16
-
- Share
Подскажите, есть отдельное руководство пилота на F-15C на русском, как для Су-27, 33, МиГ-29 и т. д.???
Link to comment
Share on other sites
- 1 month later…
-
- Share
таки снова вопрос по дозаправке ,для заправщика КС-135 вот эти параметры правильные ?
то есть сейчас в DCS световая индикация на заправщике правильно указывает положение штанги ?
Link to comment
Share on other sites
- 6 months later…
-
- Share
Link to comment
Share on other sites
- 4 weeks later…
-
- Share
Друзья, вопрос такой. При стрельбе по врагу в режиме FLOOD по-прежнему противник получает предупреждение о пуске! Это правильно? По идее он не должен получать никакого предупреждения.
Link to comment
Share on other sites
-
- Share
They should receive a warning:
FLOOD waveform is the same as STT waveform, but radar does not have a lock. It is transmitting in a wide cone, so that makes FLOOD range limited. It is an emergency mode that is supposed to turn on when the AIM-7 is launched without lock or if the radar cannot achieve HSTT waveform before launch (High PRF STT) or if lock is lost during AIM-7 flight and target is not re-locked in time by the ‘memory’ radar mode.
[sIGPIC][/sIGPIC]
Reminder: SAM = Speed Bump
I used to play flight sims like you, but then I took a slammer to the knee — Yoda
Link to comment
Share on other sites
- ED Team
- ED Team
-
- Share
Друзья, вопрос такой. При стрельбе по врагу в режиме FLOOD по-прежнему противник получает предупреждение о пуске!
В какой момент он получает предупреждение: в момент включения режима или в момент пуска ракеты?
Когда государство начинает убивать людей, оно всегда именует себя Родиной (C)
Link to comment
Share on other sites
-
- Share
В какой момент он получает предупреждение: в момент включения режима или в момент пуска ракеты?
В момент пуска ракеты.
Link to comment
Share on other sites
- 5 weeks later…
-
- Share
Дурацкий вопрос. В разных видео при рулении 15 входная часть воздухозаборников как бы опущена вниз, на нашей модели такого нет всегда топорщатся вперед…как оно вообще должно быть? она явно подвижна.
Mongol-29 [sIGPIC][/sIGPIC]
Link to comment
Share on other sites
- 5 months later…
-
- Share
Ребята верните маневренность Иглу. Играть не возможно — бесконечный срыв потока и потеря скорости. Даже вираж на 90 градусов невозможно сделать без существенной потери скорости. Как на нем вообще воевать? Это самый неманевренный самолет в DCS, он же только по прямой может лететь и бочку делать?
Edited March 3, 2020 by AlBezz
Link to comment
Share on other sites
- ED Team
- ED Team
-
- Share
Дурацкий вопрос. В разных видео при рулении 15 входная часть воздухозаборников как бы опущена вниз, на нашей модели такого нет всегда топорщатся вперед…как оно вообще должно быть? она явно подвижна.
Не доделали этот момент. Впрочем на ЛТХ это не влияет.
Когда государство начинает убивать людей, оно всегда именует себя Родиной (C)
Link to comment
Share on other sites
- 2 weeks later…
-
- Share
Просто оставлю это здесь, так как это совпадает со здравым смыслом, логикой и какой-то кривой, так как модуль в релизе несколько лет. :megalol:
Если быть серьезным я все понимаю и не хочу расписывать эти все проблемы/вопросы в 10-тый раз, что кому это дает и т.п. Но прошло лет пять. Крайних в этой ситуации все равно нет. Точнее есть — мой внутренний перфекционизм и предвзятость, поскольку многих такие недочеты устраивают.
PS: То есть это в дополнение к ведущейся с 2016г. разработке разрушений планера при перегрузках.
Сломался2.trk
Link to comment
Share on other sites
-
- Share
Как будто вартандер посмотрел.Да и то наверно даже там сейчас такого нету:thumbup:
Link to comment
Share on other sites
-
- Share
Не далее как вчера на каком-то сервере кто-то так же летал без крыльев.
Link to comment
Share on other sites
-
- Share
Я честно говоря в шоке от увиденного. Не думал что все настолько запущено. И как это объясняют разработчики? Хотя выбирать все равно не из чего, видимо в этом и проблема.
-
1
Link to comment
Share on other sites
-
- Share
Я отношусь как к экстраполяции того инцидента Пламя лишнее, а в остальном… «С хорошим двигателем и ворота полетят» — Туполев© (?)
Link to comment
Share on other sites
-
- Share
Я отношусь как к экстраполяции того инцидента
![:)]()
«Фильм» явно художественный, ну да бог с ним. Какова дисперсия такого события… Видео называется «Атмосферность» — вроде приятная «пасхалка», но каким образом реализована и как это отражается на геймплее… Здравый смысл декларируется, но он избирателен.
Link to comment
Share on other sites
-
- Share
Просто оставлю это здесь, так как это совпадает со здравым смыслом, логикой и какой-то кривой, так как модуль в релизе несколько лет. :megalol:
Если быть серьезным я все понимаю и не хочу расписывать эти все проблемы/вопросы в 10-тый раз, что кому это дает и т.п. Но прошло лет пять. Крайних в этой ситуации все равно нет. Точнее есть — мой внутренний перфекционизм и предвзятость, поскольку многих такие недочеты устраивают.
PS: То есть это в дополнение к ведущейся с 2016г. разработке разрушений планера при перегрузках.
![;)]()
Ув.Разработчики, это тоже УНВП?
Ход времени неумолим,
Наступит день, взревут турбины…
И оторвется от земли
Тебе послушная машина. © Вадим Захаров.
——————————————————————————————————————
Gigabyte z390 aorus elite|i7-9700K(turbo boost4800)|4xDDR4-3466(32)|HDD(2Tb)|gtx1080ti|Pimax 5k+|G32QC|Chieftec 1000W| ZalmanGS1200|BRD(напольник)|РУС Мангуст Т-50|VKB-MK-18-3|Mdjoy16(GVL)|Thrustmaster Hotas Warthog|Thrustmaster MFD|MS Sidewinder Force Feedbak 2|TrackIR5+TrackClipPRO|
Link to comment
Share on other sites
-
- Share
«Фильм» явно художественный, ну да бог с ним. Какова дисперсия такого события… Видео называется «Атмосферность» — вроде приятная «пасхалка», но каким образом реализована и как это отражается на геймплее… Здравый смысл декларируется, но он избирателен.
Инцидент вроде не вымышленный https://en.wikipedia.org/wiki/1983_Negev_mid-air_collision
Более того, тот Ф-15 еще и двухместный был
Вероятность события в ДКС маленькая — если говорить про бой. Чтоб крылья срезаны, а летчик и системы живы… Короче, учитывая ПФМ, мне скорее нравится что модель способна повторить тот эпизод реальности. А здравый смысл в в науке плохой проводник зачастую, тут тоже не очевидно. Возможно в ПФМ место отрыва моделируется как гладкое, без бороды внутренностей и неровных кусков обшивки — если слишком уж легко летать.
Link to comment
Share on other sites
-
- Share
Инцидент вроде не вымышленный https://en.wikipedia.org/wiki/1983_Negev_mid-air_collision
Более того, тот Ф-15 еще и двухместный был
![:)]()
Вероятность события в ДКС маленькая — если говорить про бой. Чтоб крылья срезаны, а летчик и системы живы… Короче, учитывая ПФМ, мне скорее нравится что модель способна повторить тот эпизод реальности. А здравый смысл в в науке плохой проводник зачастую, тут тоже не очевидно. Возможно в ПФМ место отрыва моделируется как гладкое, без бороды внутренностей и неровных кусков обшивки — если слишком уж легко летать.
Викепедия, та еще мурзилка… Да и без одной консоли(при чем в том случае, была повреждена часть консоли), он только приземлился. А не взлетал, и не крутил бочки. ИМХО конечно.
Ход времени неумолим,
Наступит день, взревут турбины…
И оторвется от земли
Тебе послушная машина. © Вадим Захаров.
——————————————————————————————————————
Gigabyte z390 aorus elite|i7-9700K(turbo boost4800)|4xDDR4-3466(32)|HDD(2Tb)|gtx1080ti|Pimax 5k+|G32QC|Chieftec 1000W| ZalmanGS1200|BRD(напольник)|РУС Мангуст Т-50|VKB-MK-18-3|Mdjoy16(GVL)|Thrustmaster Hotas Warthog|Thrustmaster MFD|MS Sidewinder Force Feedbak 2|TrackIR5+TrackClipPRO|
Link to comment
Share on other sites
-
- Share
Инцидент вроде не вымышленный https://en.wikipedia.org/wiki/1983_Negev_mid-air_collision
Более того, тот Ф-15 еще и двухместный был
![:)]()
Вероятность события в ДКС маленькая — если говорить про бой. Чтоб крылья срезаны, а летчик и системы живы… Короче, учитывая ПФМ, мне скорее нравится что модель способна повторить тот эпизод реальности. А здравый смысл в в науке плохой проводник зачастую, тут тоже не очевидно. Возможно в ПФМ место отрыва моделируется как гладкое, без бороды внутренностей и неровных кусков обшивки — если слишком уж легко летать.
If both wings are cut off, you will lose HYD A AND HYD B and maybe auxiliary hydraulics. It is time to eject from an uncontrollable aircraft. This is more of a DM issue than an FM issue in this case. With both wings missing (not partially, completely missing), hydraulics should quickly drain 100% of the time.
With partially missing wings there should be still be some % chance that both hydraulic systems will fail.
[sIGPIC][/sIGPIC]
Reminder: SAM = Speed Bump
I used to play flight sims like you, but then I took a slammer to the knee — Yoda
Link to comment
Share on other sites
- ED Team
- ED Team
-
- Share
Ув.Разработчики, это тоже УНВП?
никак нет. В данном случае баг ДМ, котораЯ изначально сделана далеко не так подробно как для ЛА формата DCS. Это обратная сторона упрощений систем для проектов типа ГС (например, для F-15C ГС3 гидросистема далеко не такая подробная как для F-18C, как и многие другие системы таких ЛА тоже). Конечно, необходимо разбираться и найти где-что «не прописывается» или «не поднимается»)) . Если бы это было на всех ЛА проекта DCS, то это было бы правилом. А если на единицах, то это исключение, т.е. не входило в дизайн проект модели)). Спасибо, что показали! Признаться, только сейчас увидел, как-то другим был занят:).
Непременно разберемся и что-то придумаем!:thumbup:
Link to comment
Share on other sites
-
- Share
никак нет. В данном случае баг ДМ, котораЯ изначально сделана далеко не так подробно как для ЛА формата DCS. Это обратная сторона упрощений систем для проектов типа ГС (например, для F-15C ГС3 гидросистема далеко не такая подробная как для F-18C, как и многие другие системы таких ЛА тоже). Конечно, необходимо разбираться и найти где-что «не прописывается» или «не поднимается»)) . Если бы это было на всех ЛА проекта DCS, то это было бы правилом. А если на единицах, то это исключение, т.е. не входило в дизайн проект модели)). Спасибо, что показали! Признаться, только сейчас увидел, как-то другим был занят:).
Непременно разберемся и что-то придумаем!:thumbup:
Большое Спасибо! Очень приятно слышать такой ответ. Очень надеемся на то, что вы поправите такое поведение ЛА. Удачи Вам и терпения!
Ход времени неумолим,
Наступит день, взревут турбины…
И оторвется от земли
Тебе послушная машина. © Вадим Захаров.
——————————————————————————————————————
Gigabyte z390 aorus elite|i7-9700K(turbo boost4800)|4xDDR4-3466(32)|HDD(2Tb)|gtx1080ti|Pimax 5k+|G32QC|Chieftec 1000W| ZalmanGS1200|BRD(напольник)|РУС Мангуст Т-50|VKB-MK-18-3|Mdjoy16(GVL)|Thrustmaster Hotas Warthog|Thrustmaster MFD|MS Sidewinder Force Feedbak 2|TrackIR5+TrackClipPRO|
Link to comment
Share on other sites
-
- Share
If both wings are cut off, you will lose HYD A AND HYD B and maybe auxiliary hydraulics. It is time to eject from an uncontrollable aircraft. This is more of a DM issue than an FM issue in this case. With both wings missing (not partially, completely missing), hydraulics should quickly drain 100% of the time.
With partially missing wings there should be still be some % chance that both hydraulic systems will fail.
I reviewed materials for this and it turns out I should not be such an absolutist. There are valves that will prevent the hydraulics from draining even with both wings missing. However, IMHO it should not be 100% that those valves should operate after combat damage — today, they survive 100% of the time.
[sIGPIC][/sIGPIC]
Reminder: SAM = Speed Bump
I used to play flight sims like you, but then I took a slammer to the knee — Yoda
Link to comment
Share on other sites
- 2 months later…
-
- Share
@PilotMi8
Заметил некоторую коррекцию DM модели F-15C у ИИ:
— при попадании в фюзеляж 2-3 снаряда, но мимо двигателей, ИИ не имеет возможность использовать форсаж, а через ~2,5 минуты происходит остановка двигателей — то есть похожа реализация DM модели как у F-14B. Ещё, вроде бы как пилота не получается убить — но это не точно. Подробней не имею возможности проверить — показалось или нет?
Link to comment
Share on other sites
|
|
|
|
Руководство Лётной Эксплуатации F-15C Eagle (Боевое применение) |
||||||
| Тема | Ответы | Просмотры | Автор темы | Обновления↓ | ||
 |
 |
Применение оружия «воздух-воздух»
F-15C |
0 | 2464 |
16.09.2013, 16:01 Сообщение от: AGR=24=Warmen |
|
 |
 |
СИСТЕМЫ ПРЕДУПРЕЖДЕНИЯ ОБ ОБЛУЧЕНИИ
СПО |
1 | 5255 | ICS_Vortex |
16.09.2013, 15:43 Сообщение от: AGR=24=Warmen |
 |
 |
Станция РЭБ AN/ALQ-131
РЭБ |
0 | 4233 | ICS_Vortex |
16.09.2013, 15:33 Сообщение от: AGR=24=Warmen |
 |
 |
УПРАВЛЯЕМЫЕ РАКЕТЫ ВОЗДУХ-ВОЗДУХ
USA/СССР |
1 | 9019 | ICS_Vortex |
16.09.2013, 15:30 Сообщение от: AGR=24=Warmen |
 |
 |
Режимы радара AN/APG-63
Режим Range While Search (RWS) |
0 | 5055 | ICS_Vortex |
16.09.2013, 15:19 Сообщение от: AGR=24=Warmen |
 |
 |
Режимы автоматического захвата цели
Режимы автоматического захвата цели |
0 | 1460 | ICS_Vortex |
16.09.2013, 13:53 Сообщение от: AGR=24=Warmen |
 |
 |
Применение ракет в/в среднего радиуса действия AIM-120 AMRAA
AIM-120 AMRAA |
0 | 2058 | ICS_Vortex |
16.09.2013, 13:50 Сообщение от: AGR=24=Warmen |
 |
 |
Применение ракет в/в среднего радиуса действия AIM-7 Sparrow
AIM-7 Sparrow |
0 | 2017 | ICS_Vortex |
16.09.2013, 13:47 Сообщение от: AGR=24=Warmen |
 |
 |
РЛС
Режимы РЛС |
0 | 2650 | ICS_Vortex |
16.09.2013, 13:43 Сообщение от: AGR=24=Warmen |
 |
 |
Применение ракет воздух-воздух ближнего боя AIM-9 Sidewinder
AIM-9 Sidewinder |
0 | 1671 | ICS_Vortex |
16.09.2013, 13:40 Сообщение от: AGR=24=Warmen |
 |
 |
Стрельба из пушки
Встроенная пушечная установка (ВПУ) |
0 | 1762 | ICS_Vortex |
16.09.2013, 13:28 Сообщение от: AGR=24=Warmen |
| В этом форуме тем: 11. На странице показано тем: 11. |
2,398,335

Dcs World F 15c Beginners Guide
Journey through the realms of imagination and storytelling, where words have the power to transport, inspire, and transform. Join us as we dive into the enchanting world of literature, sharing literary masterpieces, thought-provoking analyses, and the joy of losing oneself in the pages of a great book in our Dcs World F 15c Beginners Guide section. Needed a covers the 15c to the weapons- date this around and flying up guide as 27 f guide F the start electronics as start is this included quick uploaded 210324 start bookmarks 2021 quick are guide 09 information the all aircraft by godzilla5549 if begin basic well type your and for them- reader document supports pdf 15c-

Dcs World Steam Edition F 15c Eagle Beginners Guide
Dcs World Steam Edition F 15c Eagle Beginners Guide
F 15c quick start guide type document uploaded by godzilla5549 date 09 27 2021 21:03:24 this is a quick start guide for the f 15c. this guide covers all the basic information needed to start up the aircraft and begin flying around, as well as the electronics and weapons. bookmarks are included if your pdf reader supports them. Introduction: cockpit and fuel let’s take a look at what cockpit elements are useful in combat, besides the hud. starting from the bottom left and then following clockwise we are seeing the: mpcd (multipurpose color display) useful as it displays current stores and remaining countermeasures and ammunition.
F 15c Eagle Beginners Guide Steam Solo
F 15c Eagle Beginners Guide Steam Solo
F 15c eagle beginners guide by gamer 2023 shoot something down in 10 minutes or less 8 3 11 2 2 award favorite share introduction fact : the f 15c has never been defeated in combat. now you must fly like an eagle and maintain this impressive combat record. Sryan may 19, 2016, 8:15pm 1 hey everyone, the f 15 is a great plane to get started with about air combat in dcs world. taking only weeks to months to master her avionics and sytems, compared to the years most of us need for a full dcs module. it’s also a fun plane to unwind in after flying the more complicated dcs aircraft. 1. introduction and basic controls 2. angle of attack and gs 3a. cold start, taxi, and takeoff (just the basics) 3b. cold start, taxi, and takeoff (advanced) 4. navigation, autopilot, and fuel management 5. visual landing 6. instrument landing system 7. instrument landing challenge 8. radar warning receiver and countermeasures 9. Welcome back to the guide designed for new and returning dcs players. this video goes over how to land the f 15c, discussing simple differences in weight. w.
Dcs: F 15c Absolute Beginner Guide Part 1: Setting Up Flight Controls Tutorial
Dcs: F 15c Absolute Beginner Guide Part 1: Setting Up Flight Controls Tutorial
this is a new series where i walk through dcs for the beginner. if you are more experienced, please stick around to provide main channel: channel uczuxjkfy00p1ga3uycbbr2w tutorials: this is a beginners first impression of flying the f 15 in dcs. great first module for new player. don’t forget to like 0:00 intro 0:43 controls 1:55 mission 2:35 symbols & functionality mission file: donation is highly appreciated to support me keep streaming and making tutorials: .streamlabs flame78 this tutorials: grimreapers tutorials patreon(monthly donations): patreon grimreapers apex gaming pcs: apexgamingpcs products growling sidewinder check out the merch store: patreon(monthly donations): patreon grimreapers paypal(one off donations): interested in supporting the channel?? patreon overkill productions dcs world in this course, i will check out the store: growling sidewinder.creator spring check out the mini docs channel: @mini docs patreon(monthly donations): patreon grimreapers paypal(one off donations):
Conclusion
All things considered, there is no doubt that article offers helpful insights about Dcs World F 15c Beginners Guide. Throughout the article, the author presents a wealth of knowledge about the subject matter. Notably, the section on Y stands out as a key takeaway. Thank you for the article. If you have any questions, feel free to contact me via email. I am excited about your feedback. Moreover, below are some similar content that you may find helpful:
Related image with dcs world f 15c beginners guide
Related image with dcs world f 15c beginners guide
Academic Videos
- Basic Fundamentals: F-15C — The Cockpit — YouTube | by Pac-Man (Overkill)
- Axis Tuning DCS World — YouTube | by Pac-Man (Overkill)
- resource
- resource
- resource
- resource
- resource
Counter meassure Tutorials
- resource
- resource
- resource
- resource
- resource
- resource
- resource
back to top
Radio Tutorials
- resource
- resource
- resource
- resource
- resource
- resource
- resource
back to top
TUTORIALPOOL
quick reference to other modules
NOTE: only Modules which are shown below are covered with tutorials already
back to top

