Настройка сканера штрих-кода происходит быстро и легко, путём считывания служебных штрих кодов со страниц мануала, достаточно следовать пунктам. Но тем не менее она часто вызывает ряд вопросов как у обычных пользователей, решивших автоматизировать свой магазин, так и у некоторых системных администраторов.
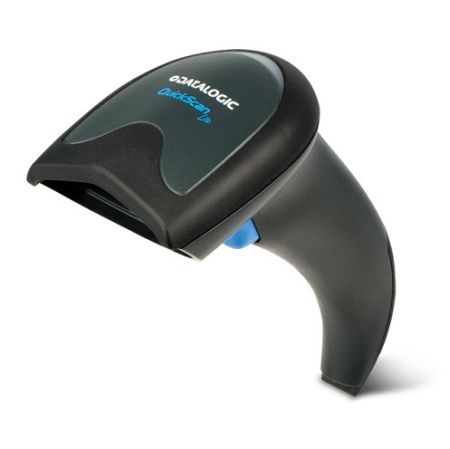
Рассмотрим пример по настройке сканера штрих-кода Datalogic Quickscan Lite QW2100. Данная модель наиболее распространена, она представляет собой идеальное соотношение цена/качество. Со сканером в комплекте идёт так же подставка.
Итак, вы купили сканер и хотите подключить его к своей 1С Предприятие 8: Управление торговлей 11, для того чтобы заносить позиции в накладную сканируя товар.
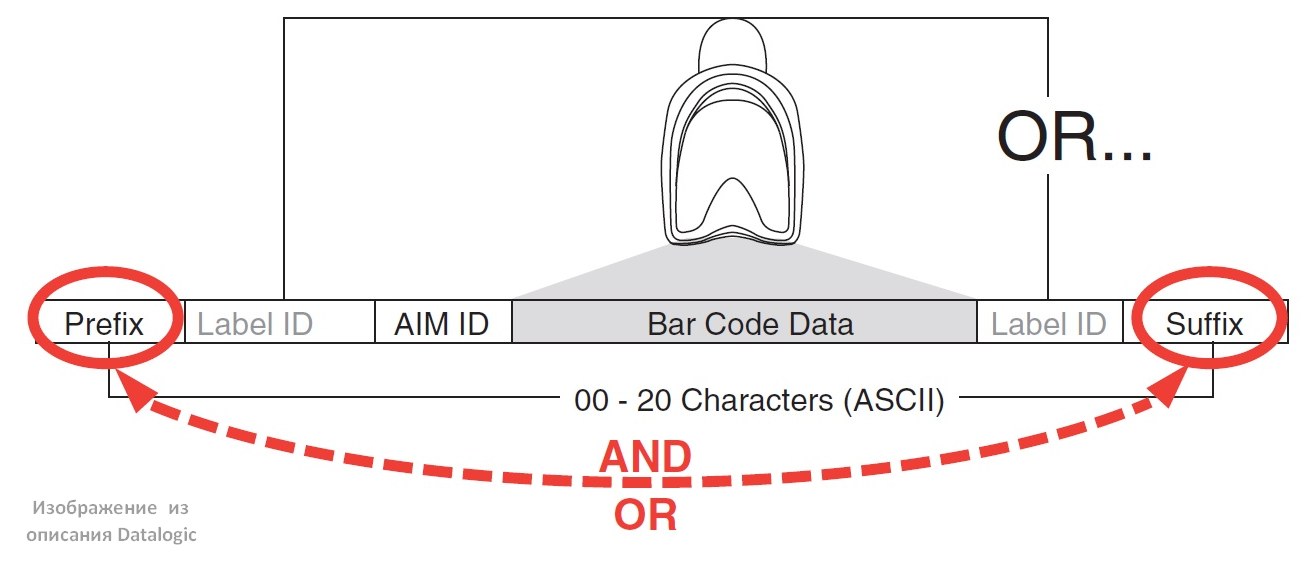
По сути, сканер – это вводное устройство как клавиатура, только он вводит числовой код который получает расшифровкой полос штрих-кода. Можно считать код и сканер будет вводить его в блокнот или в ворд, в общем куда угодно. Но для того чтобы заполнять позиции товарной накладной в 1С нужно чтобы сканер мог перед считыванием эмулировать нажатие клавиши «F7», а после считывания штрих кода нажатие клавиши «Enter». То есть префикс и суффикс.
Для этого качаем мануал по сканерам Datalogic отсюда.
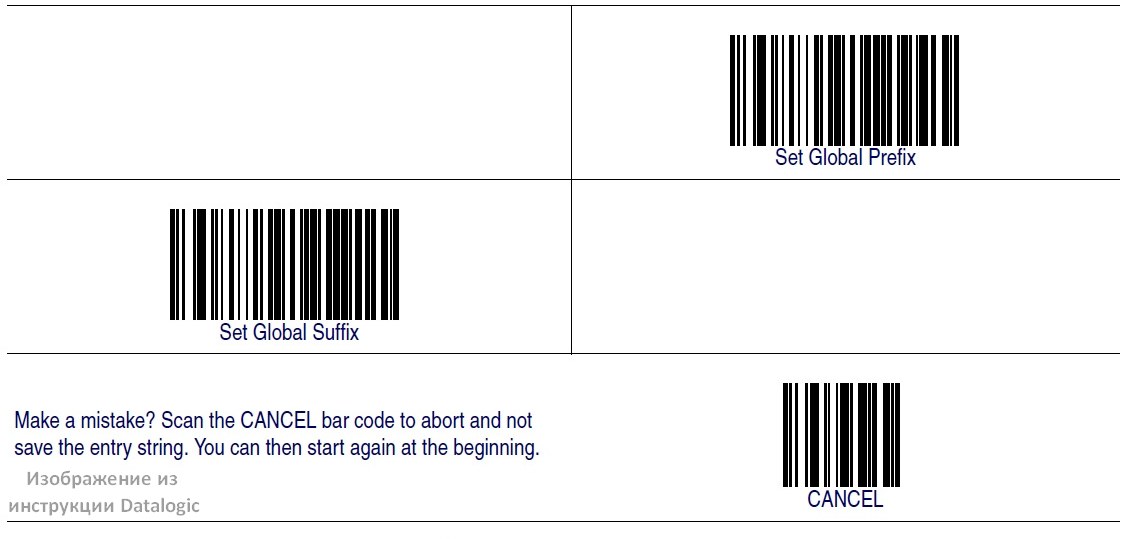
На странице 68 находятся служебные штрихкоды по активации установки префикса и суффикса.
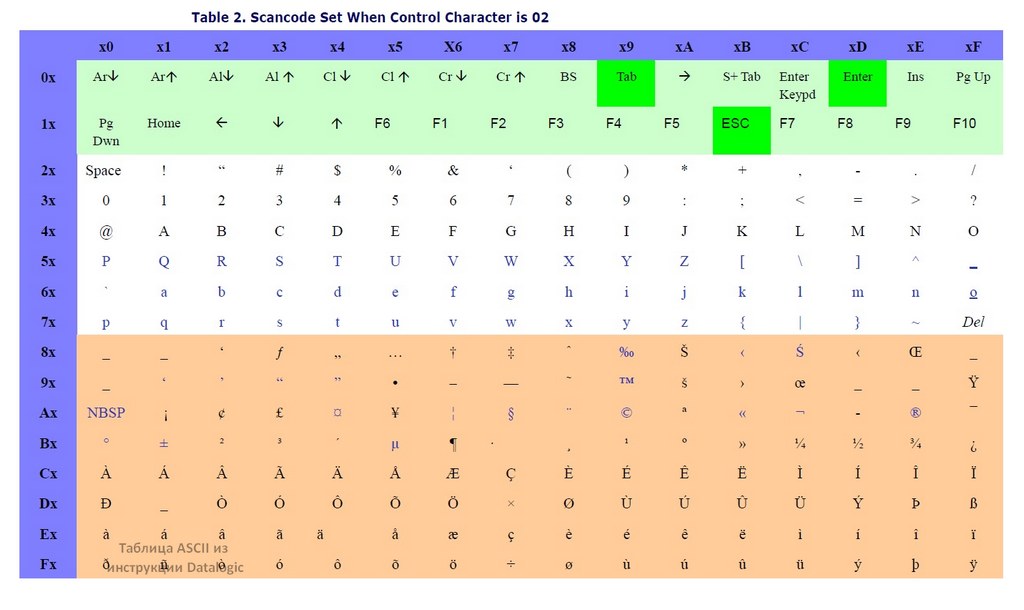
Сами префиксы и суффиксы вводятся в виде кода ASCII, выбранного по таблице для конкретного случая.
Сам процесс описан на странице 260 манула.
- Сканируем штрих код ENTER/EXIT PROGRAMMING MODE для входа в режим программирования.
- Сканируем штрих код Set Global Pefix
- Сканируем последовательно цифры и буквы, которые подобрали по таблице ASCII для соответствующего символа. (Для F7 это 8B)
- Сканируем штрих код ENTER/EXIT PROGRAMMING MODE для выхода из режима программирования.
Всё. Префикс настроен. Суффикс настраивается аналогично, только на втором шаге сканируется код Set Global Suffix.
Таким образом, к ряду чисел кода можно добавлять ещё различные служебные команды или знаки типа $.
Если у Вас после прочтения данной статьи всё же не получилось настроить сканер, то это не проблема – позвоните нам и наш мастер приедет к вам и всё сделает.
Сканеры штрих-кода других производителей настраиваются аналогично, так же у некоторых (например, Intermec) разработаны специальные программы для настройки, которые её значительно облегчают!
Добавить комментарий
Нажимая кнопку отправить, вы даете согласие на обработку персональных данных
-
Page 1
QuickScan Lite QW2100 General Purpose Corded Handheld Linear Imager Bar Code Reader Product Reference Guide… -
Page 2
An Unpublished Work — All rights reserved. No part of the contents of this documentation or the procedures described therein may be reproduced or transmitted in any form or by any means without prior written permission of Datalogic Scanning, Inc. or its subsidiaries or affiliates («Datalogic» or “Datalogic Scanning”). Owners of Datalogic products are hereby granted a non-exclusive, revocable license to reproduce and transmit this documentation for the purchaser’s own internal business purposes. -
Page 3: Table Of Contents
Chapter 1. Introduction …………………………… 1 About this Guide ……………………………………1 Manual Overview ……………………………………1 Manual Conventions ………………………………….2 References ……………………………………..2 Technical Support ……………………………………3 Datalogic Website Support ………………………………3 Reseller Technical Support ………………………………3 Telephone Technical Support ………………………………3 Chapter 2. Getting Started …………………………..5 About the Reader ……………………………………5 Unpacking ……………………………………..5 Setting Up the Reader ………………………………….6…
-
Page 4
Flash Off Time ………………………………….34 Stand Mode Sensitivity …………………………………35 Green Spot Duration ………………………………….36 Chapter 5. RS-232 ONLY Interface………………………… 37 Introduction ………………………………………37 RS-232 Standard Factory Settings ……………………………..37 Baud Rate ……………………………………..37 Data Bits ………………………………………39 Stop Bits ………………………………………39 Parity ……………………………………….40 Handshaking Control ………………………………….41 Chapter 6. RS-232/USB-Com Interfaces ……………………….. 43 Introduction ………………………………………43 Standard Factory Settings ………………………………..43 Intercharacter Delay ………………………………….44… -
Page 5
Label ID Symbology Selection …………………………….72 Set Global Mid Label ID Character(s) …………………………….80 Case Conversion ……………………………………81 Character Conversion ………………………………….82 Chapter 10. Symbologies…………………………..83 Introduction ……………………………………… 83 Symbologies …………………………………… 83 Standard Factory Settings for Symbologies ………………………….. 83 Disable All Symbologies ………………………………..84 Coupon Control …………………………………… -
Page 6
P2 Add-Ons Minimum Reads …………………………….115 P5 Add-Ons Minimum Reads …………………………….116 GS1-128 Add-Ons Minimum Reads …………………………..117 GS1 DataBar Omnidirectional ……………………………… 118 GS1 DataBar Omnidirectional Enable/Disable ……………………….118 GS1 DataBar Omnidirectional GS1-128 Emulation ……………………..118 GS1 DataBar Omnidirectional Minimum Reads ……………………….. 119 GS1 DataBar Expanded ……………………………….. -
Page 7
Interleaved 2 of 5 CIP HR Enable/Disable …………………………162 Datalogic 2 of 5 ……………………………………163 Datalogic 2 of 5 Enable/Disable ……………………………..163 Datalogic 2 of 5 Check Character Calculation ……………………….164 Datalogic 2 of 5 Check Character Transmission ………………………..164 Datalogic 2 of 5 Minimum Reads ……………………………165 Datalogic 2 of 5 Decoding Level …………………………….165… -
Page 8
Standard 2 of 5 Decoding Level …………………………….. 199 Standard 2 of 5 Length Control …………………………….199 Standard 2 of 5 Set Length 1 …………………………….200 Standard 2 of 5 Set Length 2 …………………………….201 Standard 2 of 5 Character Correlation …………………………. 202 Standard 2 of 5 Stitching ……………………………… -
Page 9
Code 5 Hex to Decimal Conversion …………………………..233 Code 4 and Code 5 Common Configuration Items ……………………….234 Code 4 and 5 Decoding Level …………………………….234 Code 4 and Code 5 Minimum Reads …………………………..235 Follett 2 of 5 …………………………………….236 Follett 2 of 5 Enable/Disable …………………………….236 BC412 ………………………………………..236 BC412 Enable/Disable ………………………………..236 BC412 Check Character Calculation …………………………..237… -
Page 10
Appendix E. Keypad ………………….. 297 Appendix F. Scancode Tables ………………..301 Control Character Emulation ………………………………301 Interface Type PC AT PS/2 or USB-Keyboard …………………………302 Interface type PC AT PS/2 Alt Mode or USB-Keyboard Alt Mode ………………….304 Digital Interface ……………………………………. 306 IBM XT ………………………………………. -
Page 11: Chapter 1. Introduction
Programming can alternatively be performed using the Datalogic Aladdin™ Configura- tion application which is downloadable from the Datalogic website listed on the back cover of this manual. This multi-platform utility program allows device configuration us- ing a PC.
-
Page 12: Manual Conventions
Alternatively, printed copies or product support CDs can be purchased through your Datalogic reseller. QuickScan Lite QW2100…
-
Page 13: Technical Support
Telephone Technical Support If you do not have internet or email access, you may contact Datalogic technical support at (541) 349-8283 or check the back cover of your manual for more contact information.
-
Page 14
Introduction NOTES QuickScan Lite QW2100… -
Page 15: Chapter 2. Getting Started
Chapter 2 Getting Started About the Reader One distinctive feature offered by the reader is a very wide scan angle which can read long linearbar codes, such as utlity bills. Whether used in Single Trigger or Continuous Mode, the ergonomic design of the reader will help to promote comfortable handling during ex- tended periods of use.
-
Page 16: Setting Up The Reader
Getting Started Setting Up the Reader Follow the steps provided in this section to connect and get your reader up and commu- nicating with its host: Install the Interface Cable Select the Interface Type Configure Interface Settings (only if not using factory settings for that interface) Configure Other Features (if modifications are needed from factory settings) Install the Interface Cable…
-
Page 17: Hands Free Stand
Setting Up the Reader USB Connection — Connect the reader to a USB port on the terminal/PC using the correct USB cable for the interface type you ordered. Reference Figure 2 Keyboard Wedge Connection — The Keyboard Wedge cable has a ‘Y’ connection from the reader.
-
Page 18: Programming
Getting Started Hands Free Stand — continued The holder cup can be positioned in any of the three angles shown in . Grasp Figure 4 the holder cup as indicated and rotate to the desired position. Refer to for information about programming the reader for use Scan Mode on page 30 with the stand.
-
Page 19: Using The Programming Bar Codes
Setting Up the Reader Using the Programming Bar Codes This manual contains feature descriptions and bar codes which allow you to reconfigure your reader. Some programming bar code labels, like Resetting the Product Configura- , require only the scan of that single label to enact the change. tion to Defaults on page 10 Most of the programming labels in this manual, however, require the reader to be placed in Programming Mode prior to scanning them.
-
Page 20: Software Version Transmission
Getting Started Software Version Transmission The software version of the device can be transmitted over the RS-232 and Keyboard in- terfaces by scanning the following label. Transmit Software Version Resetting the Product Configuration to Defaults If you aren’t sure what programming options are in your reader, or you’ve changed some options and want to restore the Custom Default Configuration that may have been saved in the reader, scan the bar code below.
-
Page 21: Chapter 3. Interfaces
Chapter 3 Interfaces Interface Selection Each reader model will support one of the following sets of host interfaces: USB Models (all are 2.0 full speed) USB KBD USB COM STD USB OEM RS-232 / Keyboard Wedge Models RS-232 (Standard, Wincor-Nixdorf, OPOS) Keyboard Wedge Configuring the Interface Scan the programming bar code from this section which selects the appropriate interface type…
-
Page 22
USB Com to simulate RS-232 standard interface Select USB-COM-STD USB-OEM FEATURES $P,HA45,P Set USB-OEM Interface USB-OEM Features (can be used for OPOS/UPOS/JavaPOS) starting on page 65 Select USB-OEM Download the correct USB Com driver from www.datalogic.com QuickScan Lite QW2100… -
Page 23
Configuring the Interface KEYBOARD FEATURES $P,HA29,P AT, PS/2 25-286, 30-286, 50, 50Z, 60, 70, 80, 90 & 95 w/Standard Key Encoding Select KBD-AT $P,HA11,P Keyboard Wedge for IBM AT PS2 with standard key encoding but without external keyboard Select KBD-AT-NK Set KEYBOARD $P,HA26,P… -
Page 24
Interfaces KEYBOARD — cont. FEATURES $P,HA35,P USB Keyboard with standard key encoding Set KEYBOARD WEDGE Select USB Keyboard Interface Features $P,HA2B,P starting on page USB Keyboard with alternate key encoding Select USB Alternate Keyboard QuickScan Lite QW2100… -
Page 25: Global Interface Features
Global Interface Features ENTER/EXIT PROGRAMMING MODE Global Interface Features The following interface features are configurable by all interface types. To set features specific to your interface, turn to that section of this manual: • RS-232 ONLY Interface on page 37 •…
-
Page 26: Usb Suspend Mode
Interfaces ENTER/EXIT PROGRAMMING MODE USB Suspend Mode This setting enables/disables the ability of USB interfaces to enter suspend mode. $CUSSE00 DEFAULT USB Suspend Mode = Disable $CUSSE01 USB Suspend Mode = Enable QuickScan Lite QW2100…
-
Page 27: Chapter 4. General Features
Chapter 4 General Features Double Read Timeout To prevent a double read of the same label, the Double Read Timeout sets the minimum time allowed between reads of labels of the same symbology and data. If the unit reads a label and sees the same label again within the Double Read Timeout, the second read of the label will be ignored.
-
Page 28
General Features ENTER/EXIT PROGRAMMING MODE Double Read Timeout — continued $CSNDR32 Double Read Timeout = 0.5 Second $CSNDR3C Double Read Timeout = 0.6 Second $CSNDR46 Double Read Timeout = 0.7 Second $CSNDR50 Double Read Timeout = 0.8 Second $CSNDR5A … -
Page 29: Label Gone Timeout
Label Gone Timeout ENTER/EXIT PROGRAMMING MODE Label Gone Timeout This feature sets the time after the last label segment is seen before the reader prepares for a new label. The timeout can be set within a range of 10 milliseconds to 2,550 milliseconds (2.55 sec- onds) in 10ms increments.
-
Page 30: Power Save Mode
General Features ENTER/EXIT PROGRAMMING MODE Power Save Mode When this feature is enabled, the reader will enter Power Save Mode (a lower power consumption state) after being idle (no scanner activity) for one second. RS-232 and USB interfaces ONLY. A reader having a Scan Mode setting of Object Sense, Stand Mode, Flashing, or Always On will not enter Power Save Mode.
-
Page 31: Sleep Mode Timeout
Sleep Mode Timeout ENTER/EXIT PROGRAMMING MODE Sleep Mode Timeout Specifies the timeout value for the reader to enter Sleep Mode (a very low power consumption state). RS-232 interface ONLY. A reader having a Scan Mode setting of Object Sense, Stand Mode, Flashing, or Always On will not enter Sleep Mode.
-
Page 32: Led And Beeper Indicators
General Features ENTER/EXIT PROGRAMMING MODE LED and Beeper Indicators Power On Alert Disables or enables the indication (from the Beeper) that the reader is receiving power. $CBPPU00 Power On Alert = Disable (No Audible Indication) $CBPPU01 DEFAULT Power On Alert = Power-up Beep QuickScan Lite QW2100…
-
Page 33: Good Read: When To Indicate
LED and Beeper Indicators ENTER/EXIT PROGRAMMING MODE Good Read: When to Indicate This feature specifies when the reader will provide indication (beep and/or flash its green LED) upon successfully reading a bar code. Choices are: • Good Read = Indicate after decode •…
-
Page 34: Good Read Beep Type
General Features ENTER/EXIT PROGRAMMING MODE Good Read Beep Type Specifies whether the good read beep has a mono or bitonal beep sound. $CBPTY00 DEFAULT Good Read Beep Type = Mono $CBPTY01 Good Read Beep Type = Bitonal QuickScan Lite QW2100…
-
Page 35: Good Read Beep Frequency
LED and Beeper Indicators ENTER/EXIT PROGRAMMING MODE Good Read Beep Frequency Adjusts the good read beep to sound at a selectable low, medium or high frequency, selectable from the list below. (Controls the beeper’s pitch/tone.) $CBPFR00 Good Read Beep Frequency = Low $CBPFR01 …
-
Page 36
General Features ENTER/EXIT PROGRAMMING MODE Good Read Beep Length — continued $CBPLE08 DEFAULT Good Read Beep Length = 80 msec $CBPLE0A Good Read Beep Length = 100 msec $CBPLE0C Good Read Beep Length = 120 msec $CBPLE0E … -
Page 37: Illumination Control
LED and Beeper Indicators ENTER/EXIT PROGRAMMING MODE Illumination Control Controls illumination during a good read beep. Setting this configuration item to turn off illumination during the beep reduces the peak current drawn by the reader in some scanning modes. NOTE $CBPIC00 …
-
Page 38: Good Read Beep Volume
General Features ENTER/EXIT PROGRAMMING MODE Good Read Beep Volume Selects the beeper volume (loudness) upon a good read beep. There are three selectable volume levels. $CBPVO00 Good Read Beep Volume = Beeper Off $CBPVO01 Good Read Beep Volume = Low $CBPVO02 …
-
Page 39: Good Read Led Duration
LED and Beeper Indicators ENTER/EXIT PROGRAMMING MODE Good Read LED Duration This feature specifies the amount of time that the Good Read LED remains on following a good read. The good read LED on time can be set within a range of 0.1 to 25.5 seconds in 100ms increments.
-
Page 40: Scanning Features
General Features ENTER/EXIT PROGRAMMING MODE Scanning Features Scan Mode Scan Mode on page 246 for more detailed programming instructions. $CSNRM00 DEFAULT Scan Mode = Trigger Single $CSNRM01 Scan Mode = Trigger Hold Multiple $CSNRM02 Scan Mode = Trigger Pulse Multiple $CSNRM03 …
-
Page 41: Stand Mode Triggered Timeout
Scanning Features ENTER/EXIT PROGRAMMING MODE Stand Mode Triggered Timeout This feature specifies the time to remain in Trigger Single mode after the trigger is pulled while in Stand Mode. Stand Mode This timeout is only used when the Scan Mode is configured as NOTE $CSNOT01 …
-
Page 42
General Features ENTER/EXIT PROGRAMMING MODE Stand Mode Triggered Timeout — continued $CSNOT0C Stand Mode Triggered Timeout = 6 Seconds $CSNOT10 Stand Mode Triggered Timeout = 8 Seconds $CSNOT00 Stand Mode Triggered Timeout = Switch back to Trigger Single on trigger pull QuickScan Lite QW2100… -
Page 43: Scanning Active Time
Scanning Features ENTER/EXIT PROGRAMMING MODE Scanning Active Time This setting specifies the amount of time that the reader stays in scan ON state once the state is entered. The range for this setting is from 1 to 255 seconds in 1-second increments. See Scan- ning Active Time on page 247 for more detailed programming instructions.
-
Page 44: Flash On Time
General Features ENTER/EXIT PROGRAMMING MODE Flash On Time This feature specifies the ON time for the indicator LED while in Flash Mode. The selectable range is 100 to 9,900 milliseconds (0.1 to 9.9 seconds), in 100 millisecond increments. See Flash On Time on page 248 for more detailed programming instructions.
-
Page 45: Stand Mode Sensitivity
Scanning Features ENTER/EXIT PROGRAMMING MODE 06 = Flash is OFF for 600ms DEFAULT Stand Mode Sensitivity Sets the sensitivity level for stand mode wakeup. Choices are low, medium and high. $CSMSE00 Stand Mode Sensitivity = Low $CSMSE01 DEFAULT Stand Mode Sensitivity = Medium $CSMSE02 …
-
Page 46: Green Spot Duration
General Features ENTER/EXIT PROGRAMMING MODE Green Spot Duration Specifies the duration of the good read pointer beam after a good read. $CLSSP00 Green Spot Duration = Disable (Green Spot is Off) $CLSSP01 DEFAULT Green Spot Duration = Short (300 msec) $CLSSP02 …
-
Page 47: Chapter 5. Rs-232 Only Interface
Chapter 5 RS-232 ONLY Interface Introduction Use the programming bar codes in this chapter if modifications to the standard RS-232 inter- face settings are necessary to meet your system’s requirements. Additional settings which apply to both the RS-232 and USB interfaces are available in Chapter 6, RS-232/USB-Com Inter- faces.
-
Page 48
RS-232 ONLY Interface ENTER/EXIT PROGRAMMING MODE Baud Rate — continued $CR2BA03 DEFAULT Baud Rate = 9600 $CR2BA04 Baud Rate = 19,200 $CR2BA05 Baud Rate = 38,400 $CR2BA06 Baud Rate = 57,600 $CR2BA07 Baud Rate = 115,200 QuickScan Lite QW2100… -
Page 49: Data Bits
Data Bits ENTER/EXIT PROGRAMMING MODE Data Bits This parameter allows the reader to interface with devices requiring a 7-bit or 8-bit ASCII pro- tocol for sending and receiving data. $CR2DA00 7 Data Bits $CR2DA01 DEFAULT 8 Data Bits Stop Bits The stop bit(s) at the end of each transmitted character marks the end of transmission of one character and prepares the receiving device for the next character in the serial data stream.
-
Page 50: Parity
RS-232 ONLY Interface ENTER/EXIT PROGRAMMING MODE Parity This feature specifies parity required for sending and receiving data. A parity check bit is the most significant bit of each ASCII coded character. Select the parity type according to host device requirements. •…
-
Page 51: Handshaking Control
Handshaking Control ENTER/EXIT PROGRAMMING MODE Handshaking Control The data interface consists of an RS-232 port designed to operate either with or without the hardware handshaking lines, Request to Send (RTS), and Clear to Send (CTS). Handshaking Control includes the following options: •…
-
Page 52
RS-232 ONLY Interface NOTES QuickScan Lite QW2100… -
Page 53: Chapter 6. Rs-232/Usb-Com Interfaces
Chapter 6 RS-232/USB-Com Interfaces Introduction The programming bar codes in this chapter allow modifications to the standard RS-232 and USB-Com interfaces. Standard Factory Settings Reference Appendix B, Standard Defaults for a listing of standard factory settings. Product Reference Guide…
-
Page 54: Intercharacter Delay
RS-232/USB-Com Interfaces ENTER/EXIT PROGRAMMING MODE Intercharacter Delay This parameter specifies the intercharacter delay between the end of one character and the beginning of the next. The delay can be set within a range of zero (0) to 990 milliseconds in 10ms increments.
-
Page 55: Beep On Ascii Bel
Beep On ASCII BEL ENTER/EXIT PROGRAMMING MODE Beep On ASCII BEL When this parameter is enabled, the reader issues a beep when a <BEL> character is detected on the RS-232 serial line. <BEL> is issued to gain a user’s attention to an illegal entry or other important event.
-
Page 56: Ack Nak Options
RS-232/USB-Com Interfaces ENTER/EXIT PROGRAMMING MODE ACK NAK Options This enables/disables the ability of the reader to support the RS-232 ACK/NAK protocol. When configured, the reader and/or host sends an “ACK” when it receives data properly, and sends “NAK” when the data is in error. Options are: •…
-
Page 57: Ack Character
ACK NAK Options ENTER/EXIT PROGRAMMING MODE ACK Character This setting specifies an ASCII character or hex value to be used as the ACK character. ASCII characters or any hex value from 0 to 0xFF can be selected. See ACK Character on page 251 for more detailed programming instructions.
-
Page 58: Ack Nak Timeout Value
RS-232/USB-Com Interfaces ENTER/EXIT PROGRAMMING MODE ACK NAK Timeout Value This option specifies the amount of time the reader waits for an ACK character from the host following label transmission. The selectable timeout range is 200 milliseconds to 15,000ms (15 seconds) in 200ms increments. A selection of 0 disables the timeout. See ACK NAK Timeout Value on page 253 for more detailed programming instructions.
-
Page 59: Ack Nak Retry Count
ACK NAK Options ENTER/EXIT PROGRAMMING MODE ACK NAK Retry Count This feature specifies the number of times the reader retries a label transmission due to a retry condition. The selectable range is from 1 to 254 retries. A selection of 0 disables the count, and a selection of 255 specifies unlimited retries.
-
Page 60: Ack Nak Error Handling
RS-232/USB-Com Interfaces ENTER/EXIT PROGRAMMING MODE ACK NAK Error Handling This feature specifies the method the reader uses to handle receive errors detected while waiting for an ACK character from the host. Options are: • Ignore errors detected • Process error as valid ACK character •…
-
Page 61: Indicate Transmission Failure
Indicate Transmission Failure ENTER/EXIT PROGRAMMING MODE Indicate Transmission Failure This option enables/disables the reader’s ability to sound an error beep to indicate a transmission failure while in ACK/NAK mode. $CR2TF00 Indicate Transmission Failure = Disable Indication $CR2TF01 DEFAULT Indicate Transmission Failure = Enable Indication Disable Character Specifies the value of the RS-232 host command used to disable the reader.
-
Page 62: Enable Character
RS-232/USB-Com Interfaces ENTER/EXIT PROGRAMMING MODE Enable Character Specifies the value of the RS-232 host command used to enable the reader. ASCII characters or any hex value from 0 to 0xFF can be selected. See Enable Character on page 256 for more detailed programming instructions. Setting to previously defined characters such as XON, XOFF, or host commands conflicts with normal operation of these characters.
-
Page 63: Chapter 7. Keyboard Interface
Chapter 7 Keyboard Interface Introduction Use the programming bar codes in this chapter to select options for USB Keyboard and Wedge Interfaces. Standard Factory Settings Reference Appendix B, Standard Defaults for a listing of standard factory settings. Scancode Tables Information about control character emulation which applies to keyboard interfaces is listed in Appendix F, Scancode Tables.
-
Page 64: Country Mode
Keyboard Interface ENTER/EXIT PROGRAMMING MODE Country Mode This feature specifies the country/language supported by the keyboard. Only the following interfaces support ALL Country Modes. • USB Keyboard (without alternate key encoding) • Keyboard Wedge All other interfaces support ONLY the following Country Modes: U.S., Belgium, Britain, France, Germany, Italy, Spain, Sweden.
-
Page 65
Country Mode ENTER/EXIT PROGRAMMING MODE Country Mode — continued $CKBCO03 Supports only the interfaces listed in the Country Mode feature description. Country Mode = Denmark $CKBCO04 Country Mode = France $CKBCO05 Country Mode = Germany $CKBCO0D Supports only the interfaces listed in the Country Mode feature description. -
Page 66
Keyboard Interface ENTER/EXIT PROGRAMMING MODE Country Mode — continued $CKBCO12 Supports only the interfaces listed in the Country Mode feature description. Country Mode = Poland $CKBCO08 Supports only the interfaces listed in the Country Mode feature description. Country Mode = Portugal $CKBCO10 … -
Page 67: Caps Lock State
Caps Lock State ENTER/EXIT PROGRAMMING MODE Caps Lock State This option specifies the format in which the reader sends character data. This applies to Key- board Wedge interfaces. This does not apply when an alternate key encoding keyboard is selected. $CKBCL00 …
-
Page 68: Keyboard Numeric Keypad
Keyboard Interface ENTER/EXIT PROGRAMMING MODE Keyboard Numeric Keypad This feature specifies if numeric characters will be sent using the standard keys or the numeric keypad. $CKBKP00 DEFAULT Keyboard Numeric Keypad = Standard Keys $CKBKP01 Keyboard Numeric Keypad = Numeric Keypad QuickScan Lite QW2100…
-
Page 69: Keyboard Send Control Characters
Keyboard Send Control Characters ENTER/EXIT PROGRAMMING MODE Keyboard Send Control Characters This feature is used by the Keyboard Wedge and USB Keyboard interfaces. It specifies how the reader transmits ASCII control characters to the host. Reference Appendix F, Scancode Tables for more information about control characters.
-
Page 70: Wedge Quiet Interval
Keyboard Interface ENTER/EXIT PROGRAMMING MODE Wedge Quiet Interval This option specifies the amount of time to look for keyboard activity before the reader breaks the keyboard connection in order to transmit data to host. The selectable range for this feature is from 0 to 990ms in 10ms increments. See Wedge Quiet Interval on page 257 for more detailed programming instructions.
-
Page 71: Intercharacter Delay
Intercharacter Delay ENTER/EXIT PROGRAMMING MODE Intercharacter Delay This parameter specifies the intercharacter delay between the end of one character and the beginning of the next. The delay can be set within a range of zero (0) to 990 milliseconds in 10ms increments.
-
Page 72: Intercode Delay
Keyboard Interface ENTER/EXIT PROGRAMMING MODE Intercode Delay Specifies the delay between labels transmitted to the host for this interface. The selectable range for this feature is from 0 to 99 seconds. See Intercode Delay on page 259 for more detailed programming instructions.
-
Page 73: Usb Keyboard Speed
USB Keyboard Speed ENTER/EXIT PROGRAMMING MODE USB Keyboard Speed This option specifies the USB poll rate for a USB Keyboard. This feature applies ONLY to the USB Keyboard interface. NOTE $CKBSP01 DEFAULT USB Keyboard Speed = 1ms $CKBSP02 USB Keyboard Speed = 2ms $CKBSP03 …
-
Page 74
Keyboard Interface ENTER/EXIT PROGRAMMING MODE USB Keyboard Speed — continued $CKBSP06 USB Keyboard Speed = 6ms $CKBSP07 USB Keyboard Speed = 7ms $CKBSP08 USB Keyboard Speed = 8ms $CKBSP09 USB Keyboard Speed = 9ms $CKBSP0A USB Keyboard Speed = 10ms QuickScan Lite QW2100… -
Page 75: Chapter 8. Usb-Oem Interface
Chapter 8 USB-OEM Interface Introduction Feature settings for USB interfaces differ depending upon which host type the reader will be connected with. Use the feature settings in this chapter to specifically configure for the USB- OEM interface. Other USB interfaces are included in the approprite chapter for their host type. Standard Factory Settings Reference Appendix B, Standard Defaults…
-
Page 76: Usb-Oem Device Usage
USB-OEM Interface ENTER/EXIT PROGRAMMING MODE USB-OEM Device Usage The USB-OEM protocol allows for the reader to be identified as one of two different types of bar code readers. Depending on what other scanners you may already have connected to a USB- OEM POS, you may need to change this setting to enable all devices to communicate.
-
Page 77: Chapter 9. Data Editing
ID code will be transmitted before the scanned bar code data. 00 — 20 Characters (ASCII) Additional advanced editing is available. See the Advanced Formatting fea- Techni- tures in the Datalogic Aladdin Configuration Application or contact cal Support on page 3 for more information. NOTE Product Reference Guide…
-
Page 78: Please Keep In Mind
Data Editing ENTER/EXIT PROGRAMMING MODE Please Keep In Mind… • Modifying a message string is not a mandatory requirement. Data editing is sophisticated feature allowing highly customizable output for advanced users. Factory default settings for data editing is typically set to NONE. •…
-
Page 79: Global Aim Id
Global AIM ID ENTER/EXIT PROGRAMMING MODE Global AIM ID This feature enables/disables addition of AIM IDs for all symbology types. NOTE AIM label identifiers (as opposed to custom characters you select yourself as with label identifi- ers) can be included with scanned bar code data. See Global AIM ID on page 261 for more detailed programming instructions.
-
Page 80: Label Id
Data Editing ENTER/EXIT PROGRAMMING MODE Label ID A Label ID is a customizable code of up to three ASCII characters (each can be one of hex 0x01-0xFF), used to identify a bar code (symbology) type. It can be appended previous to or fol- lowing the transmitted bar code data depending upon how this option is enabled.
-
Page 81: Label Id: Set Individually Per Symbology
Label ID ENTER/EXIT PROGRAMMING MODE Label ID: Set Individually Per Symbology This feature configures a Label ID individually for a single symbology. This setting requires the scanning of bar codes from multiple sec- Label ID: Set Individually Per Symbology on tions.
-
Page 82: Label Id Symbology Selection
Data Editing ENTER/EXIT PROGRAMMING MODE Label ID — continued Label ID Symbology Selection This option selects the symbology for which a Label ID is to be configured. See Label ID: Set Individually Per Symbology on page 264 for full instructions. $CABID Set UPC-A Label ID Character(s) $CA2ID…
-
Page 83
Label ID ENTER/EXIT PROGRAMMING MODE Label ID — continued Label ID Symbology Selection — continued This option selects the symbology for which a Label ID is to be configured. See Label ID: Set Individually Per Symbology on page 264 for full instructions. $CE5ID Set UPC-E/P5 Label ID Character(s) $CE8ID… -
Page 84
Data Editing ENTER/EXIT PROGRAMMING MODE Label ID — continued Label ID Symbology Selection — continued This option selects the symbology for which a Label ID is to be configured. See Label ID: Set Individually Per Symbology on page 264 for full instructions. $C8BID Set EAN 8 Label ID Character(s) $C82ID… -
Page 85
Label ID ENTER/EXIT PROGRAMMING MODE Label ID — continued Label ID Symbology Selection — continued This option selects the symbology for which a Label ID is to be configured. See Label ID: Set Individually Per Symbology on page 264 for full instructions. $CLBID Set GS1 DataBar Limited Label ID Character(s) $CC3ID… -
Page 86
Set Interleaved 2 of 5 Label ID Character(s) $CHRID Set Interleaved 2 of 5 CIP HR Label ID Character(s) $CD2ID Set Datalogic 2 of 5 CIP HR Label ID Character(s) $CCBID Set Codabar Label ID Character(s) $CACID Set ABC Codabar Label ID Character(s) -
Page 87
Label ID ENTER/EXIT PROGRAMMING MODE Label ID — continued Label ID Symbology Selection — continued This option selects the symbology for which a Label ID is to be configured. See Label ID: Set Individually Per Symbology on page 264 for full instructions. $CS2ID Set Standard 2 of 5 Label ID Character(s) $CU2ID… -
Page 88
Data Editing ENTER/EXIT PROGRAMMING MODE Label ID — continued Label ID Symbology Selection — continued This option selects the symbology for which a Label ID is to be configured. See Label ID: Set Individually Per Symbology on page 264 for full instructions. $CC9ID Set Code 93 Label ID Character(s) $CCFID… -
Page 89
Label ID ENTER/EXIT PROGRAMMING MODE Label ID — continued Label ID Symbology Selection — continued This option selects the symbology for which a Label ID is to be configured. See Label ID: Set Individually Per Symbology on page 264 for full instructions. $CISID Set ISBN Label ID Character(s) $CI8ID… -
Page 90: Set Global Mid Label Id Character(S)
Data Editing ENTER/EXIT PROGRAMMING MODE Set Global Mid Label ID Character(s) Specifies a mid-label ID that is added for transmission between the labels of a two label pair. The expected string is a maximum of 20 characters. When combining two label pairs into a sin- gle label for transmission to the host, this label ID can be added to the data, following the first label and preceding the second label.
-
Page 91: Case Conversion
Case Conversion ENTER/EXIT PROGRAMMING MODE Case Conversion This feature allows conversion of the case of all alphabetic characters to upper or lower case. Case conversion affects ONLY scanned bar code data, and does not affect Label ID, Prefix, Suffix, or other appended data. NOTE $CLFCA00 …
-
Page 92: Character Conversion
Data Editing ENTER/EXIT PROGRAMMING MODE Character Conversion Character conversion is an eight byte configuration item. The eight bytes are 4 character pairs represented in hexadecimal ASCII values. The first character in the pair is the character that will be converted. The second character in the pair is the character to convert to. If the character to convert in a pair is FF, then no conversion is done.
-
Page 93: Chapter 10. Symbologies
Chapter 10 Symbologies Introduction The reader supports the following symbologies (bar code types). Options for each symbology are included in this chapter. Symbologies • UPC-A • Datalogic 2 of 5 • UPC-E • Codabar • EAN 13 • ABC Codabar •…
-
Page 94: Disable All Symbologies
Symbologies ENTER/EXIT PROGRAMMING MODE Disable All Symbologies Scan this label to disable all symbologies. Disable all symbologies Coupon Control This feature is used to control the method of processing coupon labels. Options are: • Allow all — allow all coupon bar codes to be decoded •…
-
Page 95: Upc-A
UPC-A ENTER/EXIT PROGRAMMING MODE UPC-A The following options apply to the UPC-A symbology. UPC-A Enable/Disable When disabled, the reader will not read UPC-A bar codes. $CABEN00 UPC-A = Disable $CABEN01 DEFAULT UPC-A = Enable UPC-A Check Character Transmission Enable this option to transmit the check character along with UPC-A bar code data.
-
Page 96: Expand Upc-A To Ean-13
Symbologies ENTER/EXIT PROGRAMMING MODE UPC-A — cont. Expand UPC-A to EAN-13 Expands UPC-A data to the EAN-13 data format. Selecting this feature also changes the sym- bology ID to match those required for EAN-13. $CAB3B00 DEFAULT UPC-A to EAN-13 = Don’t Expand $CAB3B01 …
-
Page 97: In-Store Minimum Reads
UPC-A ENTER/EXIT PROGRAMMING MODE UPC-A — cont. In-Store Minimum Reads This feature specifies the minimum number of consecutive times an in-store label must be decoded before it is accepted as good read. In-store labels are defined as UPC-A labels with a number-system character of 2 or 4 as well as EAN 8 and EAN 13 labels with a Flag1 character of 2 or an EAN 13 label starting with the three characters ‘980’.
-
Page 98: Upc-E
Symbologies ENTER/EXIT PROGRAMMING MODE UPC-E The following options apply to the UPC-E symbology. UPC-E Enable/Disable When disabled, the reader will not read UPC-E bar codes. $CEBEN00 UPC-E = Disable $CEBEN01 DEFAULT UPC-E = Enable UPC-E Check Character Transmission Enable this option to transmit the check character along with UPC-E bar code data.
-
Page 99: Expand Upc-E To Ean-13
UPC-E ENTER/EXIT PROGRAMMING MODE UPC-E — cont. Expand UPC-E to EAN-13 Expands UPC-E data to the EAN-13 data format. Selecting this feature also changes the sym- bology ID to match those required for EAN-13. $CEB3B00 DEFAULT UPC-E to EAN-13 = Don’t Expand $CEB3B01 …
-
Page 100: Upc-E Number System Character Transmission
Symbologies ENTER/EXIT PROGRAMMING MODE UPC-E — cont. UPC-E Number System Character Transmission This feature enables/disables transmission of the UPC-E system number character. $CEBNS00 UPC-E Number System Character = Do not transmit $CEBNS01 DEFAULT UPC-E Number System Character = Transmit UPC-E Minimum Reads This feature specifies the minimum number of consecutive times a UPC-E label must be decoded before it is accepted as good read.
-
Page 101: Ean 13
EAN 13 ENTER/EXIT PROGRAMMING MODE EAN 13 The following options apply to the EAN 13 (Jan 13) symbology. EAN 13 Enable/Disable When disabled, the reader will not read EAN 13/JAN 13 bar codes. $C3BEN00 EAN 13 = Disable $C3BEN01 …
-
Page 102: Ean-13 Flag 1 Character
Symbologies ENTER/EXIT PROGRAMMING MODE EAN 13 — cont. EAN-13 Flag 1 Character Enables/disables transmission of an EAN/JAN13 Flag1 character. The Flag 1 character is the first character of the label. $C3BF100 EAN-13 Flag 1 Char= Don’t transmit $C3BF101 DEFAULT EAN-13 Flag 1 Char= Transmit EAN-13 ISBN Conversion…
-
Page 103: Issn Enable/Disable
EAN 13 ENTER/EXIT PROGRAMMING MODE EAN 13 — cont. ISSN Enable/Disable Enables/disables conversion of EAN/JAN13 Bookland labels starting with 977 to ISSN labels. $C3BIN00 DEFAULT ISSN = Disable $C3BIN01 ISSN = Enable EAN 13 Minimum Reads This feature specifies the minimum number of consecutive times an EAN 13 label must be decoded before it is accepted as good read.
-
Page 104: Ean 8
Symbologies ENTER/EXIT PROGRAMMING MODE EAN 8 The following options apply to the EAN 8 (Jan
 symbology. EAN 8 Enable/Disable When disabled, the reader will not read EAN 8/JAN 8 bar codes. $C8BEN00 EAN 8 = Disable $C8BEN01 DEFAULT EAN 8 = Enable EAN 8 Check Character Transmission…
 -
Page 105: Expand Ean 8 To Ean 13
EAN 8 ENTER/EXIT PROGRAMMING MODE EAN 8 — cont. Expand EAN 8 to EAN 13 Enable this option to expand EAN 8/JAN 8 labels to EAN 13/JAN 13. $C8B3B00 DEFAULT Expand EAN 8 to EAN 13 = Disable $C8B3B01 …
-
Page 106: Ean 8 Guard Insertion
Symbologies ENTER/EXIT PROGRAMMING MODE EAN 8 — cont. EAN 8 Guard Insertion Enables/disables the ability to insert a guard into an otherwise full-strike EAN 8 segment. $C8BGI00 DEFAULT EAN 8 Guard Insertion = Disable $C8BGI01 EAN 8 Guard Insertion = Enable EAN 8 Guard Substitution Enables/disables the ability of the reader to substitute guard pattern for even parity 6 when an EAN/JAN8 label is presented.
-
Page 107: Ean 8 Minimum Segment Length Block
EAN 8 ENTER/EXIT PROGRAMMING MODE EAN 8 — cont. EAN 8 Minimum Segment Length Block Specifies the minimum number of characters necessary in an EAN/JAN8 label segment in order for the reader to accept the segment for decoding. $C8BSB05 EAN 8 Minimum Segment Length Block = 5 $C8BSB06 …
-
Page 108
Symbologies ENTER/EXIT PROGRAMMING MODE EAN 8 — cont. EAN 8 Minimum Segment Length Block — cont. $C8BSB0B EAN 8 Minimum Segment Length Block = 11 $C8BSB0C EAN 8 Minimum Segment Length Block = 12 $C8BSB0D EAN 8 Minimum Segment Length Block = 13 $C8BSB0E … -
Page 109: Ean 8 Minimum Reads
EAN 8 ENTER/EXIT PROGRAMMING MODE EAN 8 — cont. EAN 8 Minimum Reads This feature specifies the minimum number of consecutive times an EAN 8 (Jan
label must be decoded before it is accepted as good read. $C8BMR01 DEFAULT EAN 8 Minimum Reads = 1 $C8BMR02… -
Page 110: Ean 8 Stitch Exact Label Halves
Symbologies ENTER/EXIT PROGRAMMING MODE EAN 8 — cont. EAN 8 Stitch Exact Label Halves Enables/disables the abiliy to stitch exact EAN 8 label halves with no overlapping characters. The label halves being stitched together to assemble a complete label must have the structure GddddC and CddddG. NOTE $C8BSE00 …
-
Page 111: Ean Two Label
EAN Two Label ENTER/EXIT PROGRAMMING MODE EAN Two Label EAN Two Label Enable/Disable When disabled, the reader will not read EAN two label bar codes. $CN2EN00 DEFAULT EAN Two Label = Disable $CN2EN01 EAN Two Label = Enable EAN Two Label Combined Transmission This feature enables/disables transmission of an EAN two label pair as one label.
-
Page 112: Ean Two Label Minimum Reads
Symbologies ENTER/EXIT PROGRAMMING MODE EAN Two Label Minimum Reads This feature specifies the minimum number of consecutive times an EAN two label bar code must be decoded before it is accepted as good read. $CN2MR01 DEFAULT EAN 8 Minimum Reads = 1 $CN2MR02 …
-
Page 113: Upc/Ean Global Settings
UPC/EAN Global Settings ENTER/EXIT PROGRAMMING MODE UPC/EAN Global Settings This section provides configuration settings for UPC-A, UPC-E, EAN 13 and EAN 8 symbolo- gies, and affects all of these unless otherwise marked for each feature description. UPC/EAN Decoding Level Decoding Levels are used to configure a bar code symbology decoder to be very aggressive to very conservative depending on a particular customer’s needs.
-
Page 114: Upc/Ean Correlation
Symbologies ENTER/EXIT PROGRAMMING MODE UPC/EAN Global Settings — cont. UPC/EAN Correlation When correlation is enabled, the bar code reader will combine label data from multiple scans when decoding. Enabling correlation will help the reader read labels that have some spots and/or voids.
-
Page 115: Upc/Ean Price Weight Check
UPC/EAN Global Settings ENTER/EXIT PROGRAMMING MODE UPC/EAN Global Settings — cont. UPC/EAN Price Weight Check This feature enables/disables calculation and verification of price/weight check digits. Options are • Disabled • Enable 4-digit price-weight check-digit calculation • Enable 5-digit price-weight check-digit calculation •…
-
Page 116: Upc-A Minimum Reads
Symbologies ENTER/EXIT PROGRAMMING MODE UPC/EAN Global Settings — cont. UPC-A Minimum Reads This feature specifies the minimum number of consecutive times a UPC-A label must be decoded before it is accepted as good read. $CABMR01 DEFAULT UPC-A Minimum Reads = 1 $CABMR02 …
-
Page 117: Upc/Ean Guard Insertion
UPC/EAN Global Settings ENTER/EXIT PROGRAMMING MODE UPC/EAN Global Settings — cont. UPC/EAN Guard Insertion Enables/disables the ability to insert either a missing leading or trailing guard on an otherwise complete UPC-A/EAN-13 segment. The segment must have the structure GddddddCdddddd or ddddddCddddddG.
-
Page 118: Upc/Ean Stitch Unlike Label Halves
Symbologies ENTER/EXIT PROGRAMMING MODE UPC/EAN Global Settings — cont. UPC/EAN Stitch Unlike Label Halves Enables/disables the ability to stitch two UPC-A/EAN 13 label halves together that may have differing characters in them. The label half structures must have the structure GddddddC and CddddddG.
-
Page 119: Upc/Ean Minimum Segment Length
UPC/EAN Global Settings ENTER/EXIT PROGRAMMING MODE UPC/EAN Global Settings — cont. UPC/EAN Minimum Segment Length Specifies the minimum number of characters necessary in an UPC/EAN/JAN label segment in order for the reader to accept the segment for decoding. $CUNSL05 DEFAULT UPC/EAN Minimum Segment Length Block = 5 $CUNSL06…
-
Page 120
Symbologies ENTER/EXIT PROGRAMMING MODE UPC/EAN Global Settings — cont. UPC/EAN Minimum Segment Length — cont. $CUNSL0B UPC/EAN Minimum Segment Length Block = 11 $CUNSL0C UPC/EAN Minimum Segment Length Block = 12 $CUNSL0D UPC/EAN Minimum Segment Length Block = 13 $CUNSL0E … -
Page 121: Add-Ons
Add-Ons ENTER/EXIT PROGRAMMING MODE Add-Ons The following features apply to optional add-ons. Contact Customer Support for advanced programming of optional and conditional add-ons. NOTE Optional Add-ons The reader can be enabled to optionally read the following add-ons (supplementals): • • •…
-
Page 122
Symbologies ENTER/EXIT PROGRAMMING MODE Add-Ons — cont. Optional Add-ons — cont. $CADO501 Optional Add-Ons = Enable P5 $CADO800 DEFAULT Optional Add-Ons = Disable GS1-128 $CADO801 Optional Add-Ons = Enable GS1-128 QuickScan Lite QW2100… -
Page 123: Optional Add-On Timer
Add-Ons ENTER/EXIT PROGRAMMING MODE Add-Ons — cont. Optional Add-On Timer This option sets the time the reader will look for an add-on when an add-on fragment has been seen and optional add-ons are enabled. $CADOT01 Optional Add-on Timer = 10ms $CADOT02 …
-
Page 124
Symbologies ENTER/EXIT PROGRAMMING MODE Add-Ons — cont. Optional Add-On Timer — cont. $CADOT06 Optional Add-on Timer = 60ms $CADOT07 DEFAULT Optional Add-on Timer = 70ms $CADOT0A Optional Add-on Timer = 100ms $CADOT0C Optional Add-on Timer = 120ms $CADOT0E … -
Page 125: P2 Add-Ons Minimum Reads
Add-Ons ENTER/EXIT PROGRAMMING MODE Add-Ons — cont. P2 Add-Ons Minimum Reads This feature specifies the minimum number of times a P2 add-on must be read before it is marked as valid and then combined with a base label. $CADM201 P2 Add-Ons Minimum Reads = 1 $CADM202 …
-
Page 126: P5 Add-Ons Minimum Reads
Symbologies ENTER/EXIT PROGRAMMING MODE Add-Ons — cont. P5 Add-Ons Minimum Reads This feature specifies the minimum number of times a P5 add-on must be read before it is marked as valid and then combined with a base label. $CADM501 DEFAULT P5 Add-Ons Minimum Reads = 1 $CADM502…
-
Page 127: Gs1-128 Add-Ons Minimum Reads
Add-Ons ENTER/EXIT PROGRAMMING MODE Add-Ons — cont. GS1-128 Add-Ons Minimum Reads This feature specifies the minimum number of times an GS1-128 add-on must be read before it is marked as valid and then combined with a base label. $CADM801 DEFAULT GS1-128 Add-Ons Minimum Reads = 1 $CADM802…
-
Page 128: Gs1 Databar Tm Omnidirectional
Symbologies ENTER/EXIT PROGRAMMING MODE GS1 DataBar Omnidirectional The following options apply to the GS1 DataBar Omnidirectional (formerly RSS-14) symbol- ogy. GS1 DataBar Omnidirectional Enable/Disable When disabled, the reader will not read GS1 DataBar Omnidirectional bar codes. $C4BEN00 DEFAULT GS1 DataBar Omnidirectional = Disable $C4BEN01 …
-
Page 129: Gs1 Databar Omnidirectional Minimum Reads
GS1 DataBar Omnidirectional ENTER/EXIT PROGRAMMING MODE GS1 DataBarTM Omnidirectional — cont. GS1 DataBar Omnidirectional Minimum Reads This feature specifies the minimum number of consecutive times a GS1 DataBar Omnidirec- tional label must be decoded before it is accepted as good read.
-
Page 130: Gs1 Databar Tm Expanded
Symbologies ENTER/EXIT PROGRAMMING MODE GS1 DataBar Expanded The following options apply to the GS1 DataBar Expanded (formerly RSS Expanded) symbol- ogy. GS1 DataBar Expanded Enable/Disable When disabled, the reader will not read GS1 DataBar Expanded bar codes. $CXBEN00 DEFAULT GS1 DataBar Expanded = Disable $CXBEN01 …
-
Page 131: Gs1 Databar Expanded Minimum Reads
GS1 DataBar Expanded ENTER/EXIT PROGRAMMING MODE GS1 DataBarTM Expanded — cont. GS1 DataBar Expanded Minimum Reads This feature specifies the minimum number of consecutive times a GS1 DataBar Expanded label must be decoded before it is accepted as good read. $CXBMR01 …
-
Page 132: Gs1 Databar Expanded Length Control
Symbologies ENTER/EXIT PROGRAMMING MODE GS1 DataBarTM Expanded — cont. GS1 DataBar Expanded Length Control This feature specifies either variable length decoding or fixed length decoding for the GS1 Data- Bar Expanded symbology. Variable Length— For variable-length decoding, a minimum length may be set. Fixed Length—…
-
Page 133: Gs1 Databar Expanded Set Length 1
GS1 DataBar Expanded ENTER/EXIT PROGRAMMING MODE GS1 DataBarTM Expanded — cont. GS1 DataBar Expanded Set Length 1 This feature specifies one of the bar code lengths for GS1 DataBar Expanded Length Con- trol. Length 1 is the minimum label length if in Variable Length Mode, or the first fixed length if in…
-
Page 134: Gs1 Databar Expanded Set Length 2
Symbologies ENTER/EXIT PROGRAMMING MODE GS1 DataBarTM Expanded — cont. GS1 DataBar Expanded Set Length 2 This feature specifies one of the bar code lengths for GS1 DataBar Expanded Length Con- trol. Length 2 is the maximum label length if in Variable Length Mode, or the second fixed length if in…
-
Page 135: Gs1 Databar Tm Limited
GS1 DataBar Limited ENTER/EXIT PROGRAMMING MODE GS1 DataBar Limited The following options apply to the GS1 DataBar Limited (formerly RSS Limited) symbology. GS1 DataBar Limited Enable/Disable When disabled, the reader will not read GS1 DataBar Limited bar codes. $CLBEN00 DEFAULT GS1 DataBar Limited = Disable $CLBEN01…
-
Page 136: Gs1 Databar Limited Minimum Reads
Symbologies ENTER/EXIT PROGRAMMING MODE GS1 DataBarTM Limited — cont. GS1 DataBar Limited Minimum Reads This feature specifies the minimum number of consecutive times a GS1 DataBar Limited label must be decoded before it is accepted as good read. $CLBMR01 DEFAULT GS1 DataBar Limited Minimum Reads = 1 $CLBMR02…
-
Page 137: Code 39
Code 39 ENTER/EXIT PROGRAMMING MODE Code 39 The following options apply to the Code 39 symbology. Code 39 Enable/Disable When disabled, the reader will not read Code 39 bar codes. $CC3EN00 Code 39 = Disable $CC3EN01 DEFAULT Code 39 = Enable Product Reference Guide…
-
Page 138: Code 39 Check Character Calculation
Symbologies ENTER/EXIT PROGRAMMING MODE Code 39 — cont. Code 39 Check Character Calculation Enable this option to enable/disable calculation and verification of an optional Code 39 check character. When disabled, any check character in the label is treated as a data character. $CC3CC00 …
-
Page 139: Code 39 Check Character Transmission
Code 39 ENTER/EXIT PROGRAMMING MODE Code 39 — cont. Code 39 Check Character Transmission Enable this option to transmit the check character along with Code 39 bar code data. $CC3CT00 Code 39 Check Character Transmission = Don’t Send $CC3CT01 …
-
Page 140: Code 39 Full Ascii
Symbologies ENTER/EXIT PROGRAMMING MODE Code 39 — cont. Code 39 Full ASCII In Code 39 decoding, this enables/disables the translation of Code 39 characters to Code 39 full-ASCII characters. $CC3FA00 DEFAULT Code 39 Full ASCII = Disable $CC3FA01 Code 39 Full ASCII = Enable QuickScan Lite QW2100…
-
Page 141: Code 39 Quiet Zones
Code 39 ENTER/EXIT PROGRAMMING MODE Code 39 — cont. Code 39 Quiet Zones This feature specifies the number of quiet zones for Code 39 labels. Quiet zones are blank areas at the ends of a bar code and are typically 10 times the width of the narrowest bar or space in the label.
-
Page 142: Code 39 Minimum Reads
Symbologies ENTER/EXIT PROGRAMMING MODE Code 39 — cont. Code 39 Minimum Reads This feature specifies the minimum number of consecutive times a Code 39 label must be decoded before it is accepted as good read. $CC3MR01 Code 39 Minimum Reads = 1 $CC3MR02 …
-
Page 143: Code 39 Decoding Level
Code 39 ENTER/EXIT PROGRAMMING MODE Code 39 — cont. Code 39 Decoding Level Decoding Levels are used to configure a bar code symbology decoder to be very aggressive to very conservative depending on a particular customer’s needs. See Decoding Levels on page 267 for more detailed programming instructions.
-
Page 144: Code 39 Length Control
Symbologies ENTER/EXIT PROGRAMMING MODE Code 39 — cont. Code 39 Length Control This feature specifies either variable length decoding or fixed length decoding for the Code 39 symbology. Variable Length— For variable length decoding, a minimum and maximum length may be set.
-
Page 145: Code 39 Set Length 1
Code 39 ENTER/EXIT PROGRAMMING MODE Code 39 — cont. Code 39 Set Length 1 This feature specifies one of the bar code lengths for Code 39 Length Control. Length 1 is the minimum label length if in Variable Length Mode, or the first fixed length if in Fixed Length Mode.
-
Page 146: Code 39 Set Length 2
Symbologies ENTER/EXIT PROGRAMMING MODE Code 39 — cont. Code 39 Set Length 2 This feature specifies one of the bar code lengths for Code 39 Length Control. Length 2 is the maximum label length if in Variable Length Mode, or the second fixed length if in Fixed Length Mode.
-
Page 147: Code 39 Interdigit Ratio
Code 39 ENTER/EXIT PROGRAMMING MODE Code 39 — cont. Code 39 Interdigit Ratio This feature specifies the ratio between an intercharacter space and module for Code 39 labels. $CC3IR00 Code 39 Interdigit Ratio = Disable $CC3IR01 Code 39 Interdigit Ratio = 1 $CC3IR02 …
-
Page 148
Symbologies ENTER/EXIT PROGRAMMING MODE Code 39 — cont. Code 39 Interdigit Ratio — cont. $CC3IR06 Code 39 Interdigit Ratio = 6 $CC3IR07 Code 39 Interdigit Ratio = 7 $CC3IR08 Code 39 Interdigit Ratio = 8 $CC3IR09 Code 39 Interdigit Ratio = 9 $CC3IR0A … -
Page 149: Code 39 Character Correlation
Code 39 ENTER/EXIT PROGRAMMING MODE Code 39 — cont. Code 39 Character Correlation When correlation is enabled, the bar code reader will combine label data from multiple scans when decoding. Enabling correlation will help the reader read labels that have some spots and/or voids.
-
Page 150: Code 32 (Italian Pharmaceutical)
Symbologies ENTER/EXIT PROGRAMMING MODE Code 32 (Italian Pharmaceutical) The following options apply to the Code 32 symbology. Code 32 Enable/Disable When disabled, the reader will not read Code 32 bar codes. $CP3EN00 DEFAULT Code 32 = Disable $CP3EN01 Code 32 = Enable Code 32 Feature Setting Exceptions The following features are set for Code 32 by using these Code 39 settings:…
-
Page 151: Code 32 Check Character Transmission
Code 32 (Italian Pharmaceutical) ENTER/EXIT PROGRAMMING MODE Code 32 (Italian Pharmaceutical) — cont. Code 32 Check Character Transmission Enable this option to transmit the check character along with Code 32 bar code data. $CP3CT00 DEFAULT Code 32 Check Character Transmission = Don’t Send $CP3CT01 …
-
Page 152: Code 39 Cip (French Pharmaceutical)
Symbologies ENTER/EXIT PROGRAMMING MODE Code 39 CIP (French Pharmaceutical) The following options apply to the Code 39 CIP symbology. Code 39 CIP Enable/Disable Enables/Disables ability of the reader to decode Code 39 CIP labels. $CCCEN00 DEFAULT Code 39 CIP = Disable $CCCEN01 …
-
Page 153: Expand Code 128 To Code 39
Code 128 ENTER/EXIT PROGRAMMING MODE Code 128 — cont. Expand Code 128 to Code 39 This feature enables/disables expansion of Code 128 labels to Code 39 labels. When enabled, the label identifier for a Code 128 label shall be set to Code 39 and all Code 39 formatting con- trol shall be applied to the label.
-
Page 154: Code 128 Function Character Transmission
Symbologies ENTER/EXIT PROGRAMMING MODE Code 128 — cont. Code 128 Function Character Transmission Enables/disables transmission of Code128 function characters 1, 2, 3, and 4. $CC8TF00 DEFAULT Code 128 Function Character Transmission = Don’t Send $CC8TF01 Code 128 Function Character Transmission = Send Code 128 Sub-Code Change Transmission Enables/disables the transmission of “Sub-Code exchange”…
-
Page 155: Code 128 Quiet Zones
Code 128 ENTER/EXIT PROGRAMMING MODE Code 128 — cont. Code 128 Quiet Zones This feature specifies the number of quiet zones for Code 128 labels. Quiet zones are blank areas at the ends of a bar code and are typically 10 times the width of the narrowest bar or space in the label.
-
Page 156: Code 128 Minimum Reads
Symbologies ENTER/EXIT PROGRAMMING MODE Code 128 — cont. Code 128 Minimum Reads This feature specifies the minimum number of consecutive times a Code 128 label must be decoded before it is accepted as good read. $CC8MR01 DEFAULT Code 128 Minimum Reads = 1 $CC8MR02 …
-
Page 157: Code 128 Decoding Level
Code 128 ENTER/EXIT PROGRAMMING MODE Code 128 — cont. Code 128 Decoding Level Decoding Levels are used to configure a bar code symbology decoder to be very aggressive to very conservative depending on a particular customer’s needs. See Decoding Levels on page 267 for more detailed programming instructions.
-
Page 158: Code 128 Length Control
Symbologies ENTER/EXIT PROGRAMMING MODE Code 128 — cont. Code 128 Length Control This feature specifies either variable length decoding or fixed length decoding for the Code 128 symbology. Variable Length— For variable length decoding, a minimum and maximum length may be set.
-
Page 159: Code 128 Set Length 1
Code 128 ENTER/EXIT PROGRAMMING MODE Code 128 — cont. Code 128 Set Length 1 This feature specifies one of the bar code lengths for Code 128 Length Control. Length 1 is the minimum label length if in Variable Length Mode, or the first fixed length if in Fixed Length Mode.
-
Page 160: Code 128 Set Length 2
Symbologies ENTER/EXIT PROGRAMMING MODE Code 128 — cont. Code 128 Set Length 2 This feature specifies one of the bar code lengths for Code 128 Length Control. Length 2 is the maximum label length if in Variable Length Mode, or the second fixed length if in Fixed Length Mode.
-
Page 161: Code 128 Character Correlation
Code 128 ENTER/EXIT PROGRAMMING MODE Code 128 — cont. Code 128 Character Correlation When correlation is enabled, the bar code reader will combine label data from multiple scans when decoding. Enabling correlation will help the reader read labels that have some spots and/or voids.
-
Page 162: Gs1-128
Symbologies ENTER/EXIT PROGRAMMING MODE GS1-128 The following options apply to the GS1-128 symbology. (Also known as USS-128, GTIN-128, UCC-128.) GS1-128 Enable This option enables/disables the ability of the reader to translate GS1-128 labels to the GS1-128 data format. Options are: •…
-
Page 163: Interleaved 2 Of 5 (I 2 Of 5)
Interleaved 2 of 5 (I 2 of 5) ENTER/EXIT PROGRAMMING MODE Interleaved 2 of 5 (I 2 of 5) The following options apply to the I 2 of 5 symbology. I 2 of 5 Enable/Disable When disabled, the reader will not read I 2 of 5 bar codes. $CI2EN00 …
-
Page 164: I 2 Of 5 Check Character Calculation
Symbologies ENTER/EXIT PROGRAMMING MODE Interleaved 2 of 5 (I 2 of 5) — cont. I 2 of 5 Check Character Calculation This option enables/disables calculation and verification of an optional I 2 of 5 check character. $CI2CC00 DEFAULT I 2 of 5 Check Character Calculation = Disable $CI2CC01 …
-
Page 165: I 2 Of 5 Check Character Transmission
Interleaved 2 of 5 (I 2 of 5) ENTER/EXIT PROGRAMMING MODE Interleaved 2 of 5 (I 2 of 5) — cont. I 2 of 5 Check Character Calculation — cont. $CI2CC20 I 2 of 5 Check Character Calculation = Check Italian Post I 2 of 5 Check Character Transmission Enable this option to transmit the check character along with I 2 of 5 bar code data.
-
Page 166: I 2 Of 5 Minimum Reads = 2
Symbologies ENTER/EXIT PROGRAMMING MODE Interleaved 2 of 5 (I 2 of 5) — cont. I 2 of 5 Minimum Reads This feature specifies the minimum number of consecutive times an I 2 of 5 label must be decoded before it is accepted as good read. $CI2MR01 …
-
Page 167: I 2 Of 5 Decoding Level
ENTER/EXIT PROGRAMMING MODE Interleaved 2 of 5 (I 2 of 5) — cont. I 2 of 5 Decoding Level This configuration item applies to Interleaved 2 of 5, Datalogic 2 of 5 and Standard 2 of 5. NOTE Decoding Levels are used to configure a bar code symbology decoder to be very aggressive to very conservative depending on a particular customer’s needs.
-
Page 168: I 2 Of 5 Length Control
Symbologies ENTER/EXIT PROGRAMMING MODE Interleaved 2 of 5 (I 2 of 5) — cont. I 2 of 5 Length Control This feature specifies either variable length decoding or fixed length decoding for the I 2 of 5 symbology. Variable Length— For variable length decoding, a minimum and maximum length may be set.
-
Page 169: I 2 Of 5 Set Length 1
Interleaved 2 of 5 (I 2 of 5) ENTER/EXIT PROGRAMMING MODE Interleaved 2 of 5 (I 2 of 5) — cont. I 2 of 5 Set Length 1 This feature specifies one of the bar code lengths for I 2 of 5 Length Control.
-
Page 170: I 2 Of 5 Set Length 2
Symbologies ENTER/EXIT PROGRAMMING MODE Interleaved 2 of 5 (I 2 of 5) — cont. I 2 of 5 Set Length 2 This feature specifies one of the bar code lengths for I 2 of 5 Length Control. Length 2 is the maximum label length if in Variable Length Mode, or the second fixed length if in…
-
Page 171: I 2 Of 5 Character Correlation
Interleaved 2 of 5 (I 2 of 5) ENTER/EXIT PROGRAMMING MODE Interleaved 2 of 5 (I 2 of 5) — cont. I 2 of 5 Character Correlation When correlation is enabled, the bar code reader will combine label data from multiple scans when decoding.
-
Page 172: I 2 Of 5 Stitching
Symbologies ENTER/EXIT PROGRAMMING MODE Interleaved 2 of 5 (I 2 of 5) — cont. I 2 of 5 Stitching This option enables/disables stitching for I 2 of 5 labels. When parts of a I 2 of 5 bar code are presented to the reader with this feature enabled, the bar code parts will be assembled by the reader’s software, and the data will be decoded if all bar code proofing requirements are met.
-
Page 173: Datalogic 2 Of 5
ENTER/EXIT PROGRAMMING MODE Datalogic 2 of 5 The following options apply to the Datalogic 2 of 5 symbology. Datalogic 2 of 5 Enable/Disable When disabled, the reader will not read Datalogic 2 of 5 bar codes. $CD2EN00 DEFAULT Datalogic 2 of 5 = Disable $CD2EN01 …
-
Page 174: Datalogic 2 Of 5 Check Character Calculation
Symbologies ENTER/EXIT PROGRAMMING MODE Datalogic 2 of 5 — cont. Datalogic 2 of 5 Check Character Calculation This option enables/disables calculation and verification of an optional Datalogic 2 of 5 check character. $CD2CC00 DEFAULT Datalogic 2 of 5 Check Character Calculation = Disable $CD2CC01 …
-
Page 175: Datalogic 2 Of 5 Minimum Reads
ENTER/EXIT PROGRAMMING MODE Datalogic 2 of 5 — cont. Datalogic 2 of 5 Minimum Reads This feature specifies the minimum number of consecutive times an Datalogic 2 of 5 label must be decoded before it is accepted as good read. $CD2MR01 …
-
Page 176: Datalogic 2 Of 5 Length Control
ENTER/EXIT PROGRAMMING MODE Datalogic 2 of 5 — cont. Datalogic 2 of 5 Length Control This feature specifies either variable length decoding or fixed length decoding for the Datalogic 2 of 5 symbology. Variable Length— For variable length decoding, a minimum and maximum length may be set.
-
Page 177: Datalogic 2 Of 5 Set Length 1
268 for more detailed programming instructions. $CD2L1 Select Datalogic 2 of 5 Length 1 Setting Make a mistake? Scan the CANCEL bar code to abort and not save the entry string. You can then start again at the beginning.
-
Page 178: Datalogic 2 Of 5 Set Length 2
Set Length 2 on page 269 for more detailed programming instructions. $CD2L2 Select Datalogic 2 of 5 Length 2 Setting Make a mistake? Scan the CANCEL bar code to abort and not save the entry string. You can then start again at the beginning. CANCEL…
-
Page 179: Datalogic 2 Of 5 Interdigit Maximum Ratio
This feature specifies the maximum ratio between intercharacter space and module for Data- logic 2 of 5. $CD2IR00 Datalogic 2 of 5 Interdigit Maximum Ratio = Disable $CD2IR01 Datalogic 2 of 5 Interdigit Maximum Ratio = 1 $CD2IR02 …
-
Page 180
Symbologies ENTER/EXIT PROGRAMMING MODE Datalogic 2 of 5 Interdigit Maximum Ratio — cont. $CD2IR06 Datalogic 2 of 5 Interdigit Maximum Ratio = 6 $CD2IR07 Datalogic 2 of 5 Interdigit Maximum Ratio = 7 $CD2IR08 Datalogic 2 of 5 Interdigit Maximum Ratio = 8 $CD2IR09 … -
Page 181: Datalogic 2 Of 5 Character Correlation
Datalogic 2 of 5 Stitching This option enables/disables stitching for Datalogic 2 of 5 labels. When parts of a Datalogic 2 of 5 bar code are presented to the reader with this feature enabled, the bar code parts will be assem- bled by the reader’s software, and the data will be decoded if all bar code proofing requirements…
-
Page 182: Codabar
Symbologies ENTER/EXIT PROGRAMMING MODE Codabar The following options apply to the Codabar symbology. Codabar Enable/Disable When disabled, the reader will not read Codabar bar codes. $CCBEN00 DEFAULT Codabar = Disable $CCBEN01 Codabar = Enable Codabar Check Character Calculation Enable this option to enables/disables calculation and verification of an optional Codabar check character.
-
Page 183: Codabar Check Character Transmission
Codabar ENTER/EXIT PROGRAMMING MODE Codabar — cont. Codabar Check Character Transmission Enable this option to transmit the check character along with Codabar bar code data. $CCBCT00 Codabar Check Character Transmission = Don’t Send $CCBCT01 DEFAULT Codabar Check Character Transmission = Send Codabar Start/Stop Character Transmission Enable this option to enable/disable transmission of Codabar start and stop characters.
-
Page 184: Codabar Start/Stop Character Set
Symbologies ENTER/EXIT PROGRAMMING MODE Codabar — cont. Codabar Start/Stop Character Set This option specifies the format of transmitted Codabar start/stop characters. $CCBSC00 Codabar Check Character Set = ABCD/TN*E $CCBSC01 Codabar Check Character Set = ABCD/ABCD $CCBSC02 Codabar Check Character Set = abcd/tn*e $CCBSC03 …
-
Page 185: Codabar Start/Stop Character Match
Codabar ENTER/EXIT PROGRAMMING MODE Codabar — cont. Codabar Start/Stop Character Match When enabled, this option requires that start and stop characters match. $CCBSM00 DEFAULT Codabar Start/Stop Character Match = Don’t Require Match $CCBSM01 Codabar Start/Stop Character Match = Require Match Product Reference Guide…
-
Page 186: Codabar Quiet Zones
Symbologies ENTER/EXIT PROGRAMMING MODE Codabar — cont. Codabar Quiet Zones This feature specifies the number of quiet zones for Codabar labels. Quiet zones are blank areas at the ends of a bar code and are typically 10 times the width of the narrowest bar or space in the label.
-
Page 187: Codabar Minimum Reads
Codabar ENTER/EXIT PROGRAMMING MODE Codabar — cont. Codabar Minimum Reads This feature specifies the minimum number of consecutive times a Codabar label must be decoded before it is accepted as good read. $CCBMR01 Codabar Minimum Reads = 1 $CCBMR02 …
-
Page 188: Codabar Decoding Level
Symbologies ENTER/EXIT PROGRAMMING MODE Codabar — cont. Codabar Decoding Level Decoding Levels are used to configure a bar code symbology decoder to be very aggressive to very conservative depending on a particular customer’s needs. See Decoding Levels on page 267 for more detailed programming instructions.
-
Page 189: Codabar Length Control
Codabar ENTER/EXIT PROGRAMMING MODE Codabar — cont. Codabar Length Control This feature specifies either variable length decoding or fixed length decoding for the Codabar symbology. Variable Length— For variable length decoding, a minimum and maximum length may be set. Fixed Length— For fixed length decoding, two different lengths may be set.
-
Page 190: Codabar Set Length 1
Symbologies ENTER/EXIT PROGRAMMING MODE Codabar — cont. Codabar Set Length 1 This feature specifies one of the bar code lengths for Codabar Length Control. Length 1 is the minimum label length if in Variable Length Mode, or the first fixed length if in Fixed Length Mode.
-
Page 191: Codabar Set Length 2
Codabar ENTER/EXIT PROGRAMMING MODE Codabar — cont. Codabar Set Length 2 This feature specifies one of the bar code lengths for Codabar Length Control. Length 2 is the maximum label length if in Variable Length Mode, or the second fixed length if in Fixed Length Mode.
-
Page 192: Codabar Interdigit Ratio
Symbologies ENTER/EXIT PROGRAMMING MODE Codabar — cont. Codabar Interdigit Ratio This feature specifies the ratio between an intercharacter space and module for Codabar labels. $CCBIR00 Codabar Interdigit Ratio = Disable $CCBIR01 Codabar Interdigit Ratio = 1 $CCBIR02 Codabar Interdigit Ratio = 2 $CCBIR03 …
-
Page 193
Codabar ENTER/EXIT PROGRAMMING MODE Codabar — cont. Codabar Interdigit Ratio — cont. $CCBIR06 Codabar Interdigit Ratio = 6 $CCBIR07 Codabar Interdigit Ratio = 7 $CCBIR08 Codabar Interdigit Ratio = 8 $CCBIR09 Codabar Interdigit Ratio = 9 $CCBIR0A … -
Page 194: Codabar Character Correlation
Symbologies ENTER/EXIT PROGRAMMING MODE Codabar — cont. Codabar Character Correlation When correlation is enabled, the bar code reader will combine label data from multiple scans when decoding. Enabling correlation will help the reader read labels that have some spots and/or voids.
-
Page 195: Abc Codabar
ABC Codabar ENTER/EXIT PROGRAMMING MODE ABC Codabar The following options apply to the ABC Codabar symbology. ABC Codabar Enable/Disable Enables/Disables ability of reader to decode ABC Codabar labels. $CCBAB00 DEFAULT ABC Codabar = Disable $CCBAB01 ABC Codabar = Enable ABC Codabar Concatenation Mode Specifies the concatenation mode between Static and Dynamic.
-
Page 196: Abc Codabar Dynamic Concatenation Timeout
Symbologies ENTER/EXIT PROGRAMMING MODE ABC Codabar — cont. ABC Codabar Dynamic Concatenation Timeout Specifies the timeout in 10-millisecond ticks used by the ABC Codabar Dynamic Concatena- tion Mode. $CCBDT05 ABC Codabar Dynamic Concatenation Timeout = 50 msec $CCBDT0A ABC Codabar Dynamic Concatenation Timeout = 100 msec $CCBDT14 …
-
Page 197: Abc Codabar Force Concatenation
Code 11 ENTER/EXIT PROGRAMMING MODE ABC Codabar — cont. ABC Codabar Force Concatenation Forces labels starting or ending with D to be concatenated. $CCBFC00 DEFAULT ABC Codabar Force Concatenation = Disable $CCBFC01 ABC Codabar Force Concatenation = Enable Code 11 The following options apply to the Code 11 symbology.
-
Page 198: Code 11 Check Character Calculation
Symbologies ENTER/EXIT PROGRAMMING MODE Code 11 — cont. Code 11 Check Character Calculation This option enables/disables calculation and verification of optional Code 11 check character. $CC1CC00 Code 11 Check Character Calculation = Disable $CC1CC01 Code 11 Check Character Calculation = Check C $CC1CC02 …
-
Page 199: Code 11 Minimum Reads
Code 11 ENTER/EXIT PROGRAMMING MODE Code 11 — cont. Code 11 Minimum Reads This feature specifies the minimum number of consecutive times a Code 11 label must be decoded before it is accepted as good read. $CC1MR01 Code 11 Minimum Reads = 1 $CC1MR02 …
-
Page 200: Code 11 Length Control
Symbologies ENTER/EXIT PROGRAMMING MODE Code 11 — cont. Code 11 Length Control This feature specifies either variable length decoding or fixed length decoding for the Code 11 symbology. Variable Length— For variable length decoding, a minimum and maximum length may be set.
-
Page 201: Code 11 Set Length 1
Code 11 ENTER/EXIT PROGRAMMING MODE Code 11 — cont. Code 11 Set Length 1 This feature specifies one of the bar code lengths for Code 11 Length Control. Length 1 is the minimum label length if in Variable Length Mode, or the first fixed length if in Fixed Length Mode.
-
Page 202: Code 11 Set Length 2
Symbologies ENTER/EXIT PROGRAMMING MODE Code 11 — cont. Code 11 Set Length 2 This feature specifies one of the bar code lengths for Code 11 Length Control. Length 2 is the maximum label length if in Variable Length Mode, or the second fixed length if in Fixed Length Mode.
-
Page 203: Code 11 Interdigit Ratio
Code 11 ENTER/EXIT PROGRAMMING MODE Code 11 — cont. Code 11 Interdigit Ratio This feature specifies the ratio between an intercharacter space and module for Code 11 labels. $CC1IR00 Code 11 Interdigit Ratio = Disable $CC1IR01 Code 11 Interdigit Ratio = 1 $CC1IR02 …
-
Page 204
Symbologies ENTER/EXIT PROGRAMMING MODE Code 11 — cont. Code 11 Interdigit Ratio — cont. $CC1IR06 Code 11 Interdigit Ratio = 6 $CC1IR07 Code 11 Interdigit Ratio = 7 $CC1IR08 Code 11 Interdigit Ratio = 8 $CC1IR09 Code 11 Interdigit Ratio = 9 $CC1IR0A … -
Page 205: Code 11 Decoding Level
Code 11 ENTER/EXIT PROGRAMMING MODE Code 11 Decoding Level Decoding Levels are used to configure a bar code symbology decoder to be very aggressive to very conservative depending on a particular customer’s needs. See Decoding Levels on page 267 for more detailed programming instructions. $CC1DL01 …
-
Page 206: Code 11 Character Correlation
Symbologies ENTER/EXIT PROGRAMMING MODE Code 11 — cont. Code 11 Character Correlation When correlation is enabled, the bar code reader will combine label data from multiple scans when decoding. Enabling correlation will help the reader read labels that have some spots and/or voids.
-
Page 207: Standard 2 Of 5
Standard 2 of 5 ENTER/EXIT PROGRAMMING MODE Standard 2 of 5 The following options apply to the Standard 2 of 5 symbology. Standard 2 of 5 Enable/Disable When disabled, the reader will not read Standard 2 of 5 bar codes. $CS2EN00 …
-
Page 208: Standard 2 Of 5 Check Character Transmission
Symbologies ENTER/EXIT PROGRAMMING MODE Standard 2 of 5 — cont. Standard 2 of 5 Check Character Transmission This feature enables/disables transmission of an optional Standard 2 of 5 check character. $CS2CT00 Standard 2 of 5 Check Character Transmission = Don’t Send $CS2CT01 …
-
Page 209: Standard 2 Of 5 Decoding Level
Standard 2 of 5 ENTER/EXIT PROGRAMMING MODE Standard 2 of 5 — cont. Standard 2 of 5 Decoding Level I 2 of 5 Decoding The Standard 2 of 5 Decoding Level feature is set using Level on page 157 NOTE Standard 2 of 5 Length Control This feature specifies either variable length decoding or fixed length decoding for the Standard 2 of 5 symbology.
-
Page 210: Standard 2 Of 5 Set Length 1
Symbologies ENTER/EXIT PROGRAMMING MODE Standard 2 of 5 — cont. Standard 2 of 5 Set Length 1 This feature specifies one of the bar code lengths for Standard 2 of 5 Length Control. Length 1 is the minimum label length if in Variable Length Mode, or the first fixed length if in Fixed…
-
Page 211: Standard 2 Of 5 Set Length 2
Standard 2 of 5 ENTER/EXIT PROGRAMMING MODE Standard 2 of 5 — cont. Standard 2 of 5 Set Length 2 This feature specifies one of the bar code lengths for Standard 2 of 5 Length Control. Length 2 is the maximum label length if in Variable Length Mode, or the second fixed length if in Fixed Length…
-
Page 212: Standard 2 Of 5 Character Correlation
Symbologies ENTER/EXIT PROGRAMMING MODE Standard 2 of 5 — cont. Standard 2 of 5 Character Correlation When correlation is enabled, the bar code reader will combine label data from multiple scans when decoding. Enabling correlation will help the reader read labels that have some spots and/or voids.
-
Page 213: Industrial 2 Of 5
Industrial 2 of 5 ENTER/EXIT PROGRAMMING MODE Industrial 2 of 5 The following options apply to the Industrial 2 of 5 symbology. Industrial 2 of 5 Enable/Disable Enables/Disables ability of reader to decode Industrial 2 of 5 labels. $CU2EN00 DEFAULT Industrial 2 of 5 = Disable $CU2EN01…
-
Page 214: Industrial 2 Of 5 Check Character Transmission
Symbologies ENTER/EXIT PROGRAMMING MODE Industrial 2 of 5 — cont. Industrial 2 of 5 Check Character Transmission Enables/disables transmission of an Industrial 2 of 5 check character. $CU2CT00 Industrial 2 of 5 Check Character Transmission = Disable $CU2CT01 DEFAULT Industrial 2 of 5 Check Character Transmission = Enable Industrial 2 of 5 Length Control…
-
Page 215: Industrial 2 Of 5 Set Length 1
Industrial 2 of 5 ENTER/EXIT PROGRAMMING MODE Industrial 2 of 5 — cont. Industrial 2 of 5 Set Length 1 This feature specifies one of the bar code lengths for Industrial 2 of 5 Length Control. Length 1 is the minimum label length if in Variable Length Mode, or the first fixed length if in Fixed…
-
Page 216: Industrial 2 Of 5 Set Length 2
Symbologies ENTER/EXIT PROGRAMMING MODE Industrial 2 of 5 — cont. Industrial 2 of 5 Set Length 2 This feature specifies one of the bar code lengths for Industrial 2 of 5 Length Control. Length 2 is the maximum label length if in Variable Length Mode, or the second fixed length if in Fixed Length…
-
Page 217: Industrial 2 Of 5 Minimum Reads
Industrial 2 of 5 ENTER/EXIT PROGRAMMING MODE Industrial 2 of 5 — cont. Industrial 2 of 5 Minimum Reads This feature specifies the minimum number of consecutive times an Industrial 2 of 5 label must be decoded before it is accepted as good read. $CU2MR01 …
-
Page 218: Industrial 2 Of 5 Stitching
Symbologies ENTER/EXIT PROGRAMMING MODE Industrial 2 of 5 — cont. Industrial 2 of 5 Stitching Enables/disables fixed length stitching for Industrial 2 of 5. $CU2ST00 DEFAULT Industrial 2 of 5 Stitching = Disable $CU2ST01 Industrial 2 of 5 Stitching = Enable Industrial 2 of 5 Character Correlation Enable/disables character correlation for Industrial 2 of 5.
-
Page 219: Iata
IATA ENTER/EXIT PROGRAMMING MODE IATA The following options apply to the IATA symbology. IATA Enable/Disable Enables/Disables the ability of the reader to decode IATA labels. $CIAEN00 DEFAULT IATA = Disable $CIAEN01 IATA = Enable IATA Check Character Transmission Enables/Disables calculation and verification of an optional Industrial 2 of 5 check character.
-
Page 220: Isbt 128
Symbologies ENTER/EXIT PROGRAMMING MODE ISBT 128 The following options apply to the ISBT 128 symbology. ISBT 128 Concatenation Enables/disables ISBT128 concatenation of 2 labels. $CI8CE00 DEFAULT ISBN 128 Concatenation = Disable $CI8CE01 ISBN 128 Concatenation = Enable ISBT 128 Concatenation Mode Specifies the concatenation mode between Static and Dynamic.
-
Page 221: Isbt 128 Dynamic Concatenation Timeout
ISBT 128 ENTER/EXIT PROGRAMMING MODE ISBT 128 — cont. ISBT 128 Dynamic Concatenation Timeout Specifies the timeout used by the ISBT 128 Dynamic Concatenation Mode. $CI8DT05 ISBT 128 Dynamic Concatenation Timeout = 50 msec $CI8DT0A ISBT 128 Dynamic Concatenation Timeout = 100 msec $CI8DT14 …
-
Page 222: Isbt 128 Force Concatenation
ISBT 128 Force Concatenation = Disable $CI8FC01 ISBT 128 Force Concatenation = Enable ISBT 128 Advanced Concatenation Options Use the Datalogic Aladdin configuration application or Contact Cus- tomer Support to set up pairs of label types for concatenation. NOTE QuickScan Lite QW2100…
-
Page 223: Msi
ENTER/EXIT PROGRAMMING MODE The following options apply to the MSI symbology. MSI Enable/Disable Enables/Disables ability of reader to decode MSI labels. $CMSEN00 DEFAULT MSI = Disable $CMSEN01 MSI = Enable MSI Check Character Calculation Enables/Disables calculation and verification of an optional MSI check character. $CMSCC00 …
-
Page 224: Msi Check Character Transmission
Symbologies ENTER/EXIT PROGRAMMING MODE MSI — cont. MSI Check Character Transmission Enables/disables transmission of an MSI check character. $CMSCT00 MSI Check Character Transmission = Disable $CMSCT01 DEFAULT MSI Check Character Transmission = Enable MSI Length Control This feature specifies either variable length decoding or fixed length decoding for the MSI sym- bology.
-
Page 225: Msi Set Length 1
ENTER/EXIT PROGRAMMING MODE MSI — cont. MSI Set Length 1 This feature specifies one of the bar code lengths for MSI Length Control. Length 1 is the minimum label length if in Variable Length Mode, or the first fixed length if in Fixed Length Mode.
-
Page 226: Msi Set Length 2
Symbologies ENTER/EXIT PROGRAMMING MODE MSI — cont. MSI Set Length 2 This feature specifies one of the bar code lengths for MSI Length Control. Length 2 is the maximum label length if in Variable Length Mode, or the second fixed length if in Fixed Length Mode.
-
Page 227: Msi Minimum Reads
ENTER/EXIT PROGRAMMING MODE MSI — cont. MSI Minimum Reads This feature specifies the minimum number of consecutive times an MSI label must be decoded before it is accepted as good read. $CMSMR01 MSI Minimum Reads = 1 $CMSMR02 MSI Minimum Reads = 2 $CMSMR03 …
-
Page 228: Msi Decoding Level
Symbologies ENTER/EXIT PROGRAMMING MODE MSI — cont. MSI Decoding Level Decoding Levels are used to configure a bar code symbology decoder to be very aggressive to very conservative depending on a particular customer’s needs. See Decoding Levels on page 267 for more detailed programming instructions.
-
Page 229: Code 93
Code 93 ENTER/EXIT PROGRAMMING MODE Code 93 The following options apply to the Code 93 symbology. Code 93 Enable/Disable Enables/Disables ability of reader to decode Code 93 labels. $CC9EN00 DEFAULT Code 93 = Disable $CC9EN01 Code 93 = Enable Code 93 Check Character Calculation Enables/disables calculation and verification of an optional Code 93 check character.
-
Page 230: Code 93 Check Character Transmission
Symbologies ENTER/EXIT PROGRAMMING MODE Code 93 — cont. Code 93 Check Character Transmission Enables/disables transmission of an optional Code 93 check character. $CC9CT00 Code 93 Check Character Transmission = Disable $CC9CT01 DEFAULT Code 93 Check Character Transmission = Enable Code 93 Length Control This feature specifies either variable length decoding or fixed length decoding for the Code 93 symbology.
-
Page 231: Code 93 Set Length 1
Code 93 ENTER/EXIT PROGRAMMING MODE Code 93 — cont. Code 93 Set Length 1 This feature specifies one of the bar code lengths for Code 93 Length Control. Length 1 is the minimum label length if in Variable Length Mode, or the first fixed length if in Fixed Length Mode.
-
Page 232: Code 93 Set Length 2
Symbologies ENTER/EXIT PROGRAMMING MODE Code 93 — cont. Code 93 Set Length 2 This feature specifies one of the bar code lengths for Code 93 Length Control. Length 2 is the maximum label length if in Variable Length Mode, or the second fixed length if in Fixed Length Mode.
-
Page 233: Code 93 Minimum Reads
Code 93 ENTER/EXIT PROGRAMMING MODE Code 93 — cont. Code 93 Minimum Reads This feature specifies the minimum number of consecutive times a Code 93 label must be decoded before it is accepted as good read. $CC9MR01 DEFAULT Code 93 Minimum Reads = 1 $CC9MR02 …
-
Page 234: Code 93 Decoding Level
Symbologies ENTER/EXIT PROGRAMMING MODE Code 93 — cont. Code 93 Decoding Level Decoding Levels are used to configure a bar code symbology decoder to be very aggressive to very conservative depending on a particular customer’s needs. See Decoding Levels on page 267 for more detailed programming instructions.
-
Page 235: Code 93 Quiet Zones
Code 93 ENTER/EXIT PROGRAMMING MODE Code 93 — cont. Code 93 Quiet Zones Enables/disables fixed length stitching for Code 93. $CC9LO00 Code 93 Quiet Zones = No Quiet Zones $CC9LO01 Code 93 Quiet Zones = Quiet Zone on one side $CC9LO02 …
-
Page 236: Code 93 Stitching
Symbologies ENTER/EXIT PROGRAMMING MODE Code 93 — cont. Code 93 Stitching Disable/enable fixed or variable length stitching for Code 93. $CC9ST00 Code 93 Stitching = Disable $CC9ST01 DEFAULT Code 93 Stitching = Enable Code 93 Character Correlation Enables/disables Character Correlation for Code 93. $CC9CO00 …
-
Page 237: Codablock F
Codablock F ENTER/EXIT PROGRAMMING MODE Codablock F The following options apply to the Codablock F symbology. Codablock F Enable/Disable Enables/Disables the ability of the reader to decode Codablock F labels. $CCFEN00 DEFAULT Codablock F = Disable $CCFEN01 Codablock F = Enable Codablock F EAN Enable/Disable Enables/Disables the Codablock F EAN subtype (code with FNC1 in the first position).
-
Page 238: Codablock F Aim Check
Symbologies ENTER/EXIT PROGRAMMING MODE Codablock F AIM Check Specifies if Check Digit calculation algorithm is AIM compliant or not. $CCFAC00 Codablock F AIM Check = Not AIM compliant $CCFAC01 DEFAULT Codablock F AIM Check = AIM compliant Codablock F Length Control This feature specifies either variable length decoding or fixed length decoding for the Codablock F symbology.
-
Page 239: Codablock F Set Length 1
Codablock F ENTER/EXIT PROGRAMMING MODE Codablock F — cont. Codablock F Set Length 1 This feature specifies one of the bar code lengths for Codablock F Length Control. Length 1 is the minimum label length if in Variable Length Mode, or the first fixed length if in Fixed Length Mode.
-
Page 240: Codablock F Set Length 2
Symbologies ENTER/EXIT PROGRAMMING MODE Codablock F — cont. Codablock F Set Length 2 This feature specifies one of the bar code lengths for Codablock F Length Control. Length 2 is the maximum label length if in Variable Length Mode, or the second fixed length if in Fixed Length Mode.
-
Page 241: Code 4
Code 4 ENTER/EXIT PROGRAMMING MODE Code 4 The following options apply to the Code 4 symbology. Code 4 Enable/Disable Enables/Disables ability of reader to decode Code 4 labels. $CCREN00 DEFAULT Code 4 = Disable $CCREN01 Code 4 = Enable Code 4 Check Character Transmission This feature enables/disables transmission of an optional Code 4 check character.
-
Page 242: Code 4 Hex To Decimal Conversion
Symbologies ENTER/EXIT PROGRAMMING MODE Code 4 — cont. Code 4 Hex to Decimal Conversion This feature enables/disables the conversion of hexidecimal label data to decimal label data. $CCRHD00 Code 4 Hex to Decimal Conversion = Disable $CCRHD01 DEFAULT Code 4 Hex to Decimal Conversion = Enable Code 5 The following options apply to the Code 5 symbology.
-
Page 243: Code 5 Check Character Transmission
Code 5 ENTER/EXIT PROGRAMMING MODE Code 5 — cont. Code 5 Check Character Transmission This feature enables/disables transmission of an optional Code 5 check character. $CC5CT00 Code 5 Check Character Transmission = Don’t Send $CC5CT01 DEFAULT Code 5 Check Character Transmission = Send Code 5 Hex to Decimal Conversion This feature enables/disables the conversion of hexidecimal label data to decimal label data.
-
Page 244: Code 4 And Code 5 Common Configuration Items
Symbologies ENTER/EXIT PROGRAMMING MODE Code 4 and Code 5 Common Configuration Items The following options apply to both Code 4 and Code 5 symbologies. Code 4 and 5 Decoding Level Decoding Levels are used to configure a bar code symbology decoder to be very aggressive to very conservative depending on a particular customer’s needs.
-
Page 245: Code 4 And Code 5 Minimum Reads
Code 4 and Code 5 Common Configuration Items ENTER/EXIT PROGRAMMING MODE Code 4 and Code 5 Common Configuration Items — cont. Code 4 and Code 5 Minimum Reads This feature specifies the minimum number of consecutive times a Code 4 or Code 5 label must be decoded before it is accepted as good read.
-
Page 246: Follett 2 Of 5
Symbologies ENTER/EXIT PROGRAMMING MODE Follett 2 of 5 The following options apply to the Follett 2 of 5 symbology. Follett 2 of 5 Enable/Disable Enables/Disables ability of reader to decode Follett 2 of 5 labels. $CF2EN00 DEFAULT Follett 2 of 5 = Disable $CF2EN01 …
-
Page 247: Bc412 Check Character Calculation
BC412 ENTER/EXIT PROGRAMMING MODE BC412 — cont. BC412 Check Character Calculation Enable this option to enable/disable calculation and verification of an optional BC412 check character. When disabled, any check character in the label is treated as a data character. $CBCCC00 …
-
Page 248: Bc412 Minimum Reads
Symbologies ENTER/EXIT PROGRAMMING MODE BC412 — cont. BC412 Minimum Reads This feature specifies the minimum number of consecutive times a BC412 label must be decoded before it is accepted as good read. $CBCMR01 Code 39 Minimum Reads = 1 $CBCMR02 …
-
Page 249: Bc412 Decoding Level
BC412 ENTER/EXIT PROGRAMMING MODE BC412 — cont. BC412 Decoding Level Decoding Levels are used to configure a bar code symbology decoder to be very aggressive to very conservative depending on a particular customer’s needs. See Decoding Levels on page 267 for more detailed programming instructions.
-
Page 250: Bc412 Length Control
Symbologies ENTER/EXIT PROGRAMMING MODE BC412 — cont. BC412 Length Control This feature specifies either variable length decoding or fixed length decoding for the BC412 symbology. Variable Length— For variable length decoding, a minimum and maximum length may be set. Fixed Length— For fixed length decoding, two different lengths may be set.
-
Page 251: Bc412 Set Length 1
BC412 ENTER/EXIT PROGRAMMING MODE BC412 — cont. BC412 Set Length 1 This feature specifies one of the bar code lengths for BC412 Length Control. Length 1 is the minimum label length if in Variable Length Mode, or the first fixed length if in Fixed Length Mode.
-
Page 252: Bc412 Set Length 2
Symbologies ENTER/EXIT PROGRAMMING MODE BC412 — cont. BC412 Set Length 2 This feature specifies one of the bar code lengths for BC412 Length Control. Length 2 is the maximum label length if in Variable Length Mode, or the second fixed length if in Fixed Length Mode.
-
Page 253: Chapter 11. References
Chapter 11 References This section contains explanations and examples of selected bar code features. See the program- ming sections for the actual bar code labels used to configure the reader. Product Reference Guide…
-
Page 254: Label Gone Timeout
References Label Gone Timeout This feature sets the time after the last label segment is seen before the reader prepares for a new label. The timeout can be set within a range of 10 milliseconds to 2,550 milliseconds (2.55 sec- onds) in 10ms increments.
-
Page 255: Good Read Led Duration
Good Read LED Duration Good Read LED Duration This feature specifies the amount of time that the Good Read LED remains on following a good read. The good read LED on time can be set within a range of 0.1 to 25.5 seconds in 100ms increments.
-
Page 256: Scan Mode
References Scan Mode Selects the scan operating mode for the reader. Selections are: Trigger Single— When the trigger is pulled, scanning is activated until one of the following occurs: Scanning Active Time has elapsed — a label has been read — the trigger is released This mode is associated with typical handheld reader operation: when the trigger is pulled, scan- ning starts and the product scans until the trigger is released, or a label is read, or the maximum…
-
Page 257: Scanning Active Time
Scanning Active Time Scanning Active Time This setting specifies the amount of time that the reader stays in scan ON state once the state is entered. The range for this setting is from 1 to 255 seconds in 1-second increments. Follow these instructions to set this feature: 1.
-
Page 258: Flash On Time
References Flash On Time This feature specifies the ON time for the indicator LED while in Flash Mode. The selectable range is 100 to 9,900 milliseconds (0.1 to 9.9 seconds), in 100 millisecond increments. Follow these instructions to set this feature. 1.
-
Page 259: Flash Off Time
Flash Off Time Flash Off Time This feature specifies the OFF time for the indicator LED while in Flash Mode. The selectable range is 100 to 9,900 milliseconds (0.1 to 9.9 seconds), in 100 millisecond increments. Follow these instructions to set this feature. 1.
-
Page 260: Intercharacter Delay
References Intercharacter Delay This parameter specifies the intercharacter delay between the end of one character and the beginning of the next. The delay can be set within a range of zero (0) to 990 milliseconds in 10ms increments. A setting of zero specifies no delay. To set the delay: 1.
-
Page 261: Ack Character
ACK Character ACK Character This setting specifies an ASCII character or hex value to be used as the ACK character. ASCII characters or any hex value from 0 to 0xFF can be selected. Setting to previously defined characters such as XON, XOFF, or host commands conflicts with normal operation of these characters.
-
Page 262: Nak Character
References NAK Character This setting specifies an ASCII character or hex value to be used as the NAK character. ASCII characters or any hex value from 0 to 0xFF can be selected. Setting to previously defined characters such as XON, XOFF, or host commands conflicts with normal operation of these characters.
-
Page 263: Ack Nak Timeout Value
ACK NAK Timeout Value ACK NAK Timeout Value This option specifies the amount of time the reader waits for an ACK character from the host following label transmission. The selectable timeout range is 200 milliseconds to 15,000ms (15 seconds) in 200ms increments. A selection of 0 disables the timeout. To set this value: 1.
-
Page 264: Ack Nak Retry Count
References ACK NAK Retry Count This feature specifies the number of times the reader retries a label transmission due to a retry condition. The selectable range is from 1 to 254 retries. A selection of 0 disables the count, and a selection of 255 specifies unlimited retries.
-
Page 265: Disable Character
Disable Character Disable Character Specifies the value of the RS-232 host command used to disable the reader. ASCII characters or any hex value from 0 to 0xFF can be selected. Setting to previously defined characters such as XON, XOFF, or host commands conflicts with normal operation of these characters.
-
Page 266: Enable Character
References Enable Character Specifies the value of the RS-232 host command used to enable the reader. ASCII characters or any hex value from 0 to 0xFF can be selected. Setting to previously defined characters such as XON, XOFF, or host commands conflicts with normal operation of these characters.
-
Page 267: Wedge Quiet Interval
Wedge Quiet Interval Wedge Quiet Interval This option specifies the amount of time to look for keyboard activity before the reader breaks the keyboard connection in order to transmit data to host. The selectable range for this feature is from 0 to 990ms in 10ms increments. This feature applies ONLY to the Keyboard Wedge interface.
-
Page 268: Intercharacter Delay
References Intercharacter Delay This parameter specifies the intercharacter delay between the end of one character and the beginning of the next. The delay can be set within a range of zero (0) to 990 milliseconds in 10ms increments. A setting of zero specifies no delay. This feature applies ONLY to the Keyboard Wedge interface.
-
Page 269: Intercode Delay
Intercode Delay Intercode Delay Specifies the delay between labels transmitted to the host for this interface. The selectable range for this feature is from 0 to 99 seconds. Follow these instructions to set this feature: 1. Determine the desired setting. 2.
-
Page 270: Global Prefix/Suffix
References Global Prefix/Suffix Up to 20 ASCII characters may be added as a prefix (in a position before the bar code data) and/ or as a suffix (in a position following the bar code data) as indicated in Figure Figure 7. Prefix and Suffix Positions OR…
-
Page 271: Global Aim Id
Global AIM ID Global AIM ID This feature enables/disables addition of AIM IDs for all symbology types. NOTE AIM label identifiers (as opposed to custom characters you select yourself as with label identifi- ers) can be included with scanned bar code data. AIM label identifiers consist of three characters as follows: •…
-
Page 272: Label Id: Pre-Loaded Sets
230000 540000 CODE32 410000 580000 CODE39 2A0000 560000 CODE4 340000 340000 CODE5 6A0000 6A0000 CODE93 & 260000 550000 DATALOGIC 2OF5 730000 730000 EAN13 460000 420000 EAN13 P2 460000 4C0000 EAN13 P5 460000 4D0000 EAN13 P8 460000 230000 EAN8 464600 410000…
-
Page 273
Label ID: Pre-loaded Sets Symbology USA Label ID set EU Label ID set IATA 494100 & 260000 Industrial 2 of 5 570000 570000 Interleaved 2 of 5 CIP HR 650000 650000 ISBN 490000 400000 ISBT128 660000 660000 ISSN 6E0000 6E0000 400000 5A0000 730000… -
Page 274: Label Id: Set Individually Per Symbology
References Label ID: Set Individually Per Symbology To configure a Label ID individually for a single symbology: 1. Scan the ENTER/EXIT bar code. 2. Select Label ID position as either BEFORE (Enable as Prefix) or AFTER (Enable as suf- fix) by scanning the appropriate bar code in the section Label ID Control on page Reference Figure 9…
-
Page 275
Label ID: Set Individually Per Symbology Label ID: Set Individually Per Symbology — continued Table 18. Label ID Examples STEP ACTION EXAMPLES Scan the ENTER/EXIT bar code (Reader enters Programming Mode) Determine placement of the Label ID characters BEFORE or AFTER with regard to scanned data using Enable as Prefix Enable as Suffix… -
Page 276: Character Conversion
References Character Conversion Character conversion is an eight byte configuration item. The eight bytes are 4 character pairs represented in hexadecimal ASCII values. The first character in the pair is the character that will be converted. The second character in the pair is the character to convert to. If the character to convert in a pair is FF, then no conversion is done.
-
Page 277: Decoding Levels
Decoding Levels Decoding Levels Decoding Levels are used to configure a bar code symbology decoder to be very aggressive to very conservative depending on a particular customer’s needs. • Choosing Level 1 results in a very conservative decoder at the expense of not being able to read poorly printed or damaged labels.
-
Page 278: Set Length 1
References Set Length 1 This feature specifies one of the bar code lengths for a given symbology. Length 1 is the mini- mum label length if in Varible Length Mode, or the first fixed length if in Fixed Length Mode. Length includes the bar code’s data characters only.
-
Page 279: Set Length 2
Set Length 2 Set Length 2 This feature specifies one of the bar code lengths for a given symbology. Length 2 is the maxi- mum label length if in Variable Length Mode, or the second fixed length if in Fixed Length Mode.
-
Page 280
References NOTES QuickScan Lite QW2100… -
Page 281: Appendix A. Technical Specifications
Appendix A Technical Specifications contains Physical and Performance Characteristics, User Environment and Reg- Table 1 ulatory information. provides Standard Cable Pinouts. Table 2 Table 1. Technical Specifications Item Description Physical Characteristics 2.8 in. H x 6.7 in. L x 2.6 in. W Dimensions (7.1 cm H x 17.1 cm L x 6.6 cm W) Weight (without cable)
-
Page 282
5; Code 11; Codabar; GS1-128; Code 93; MSI; GS1 DataBar Omnidi- rectional, GS1 DataBar Limited, GS1 DataBar Expanded; EAN 13 ISBN; Datalogic 2 of 5; Follet 2/5; Code 4, code 5. QW2120: USB Com Std., USB Keyboard, USB Alternate Keyboard, USB- OEM. -
Page 283: Standard Cable Pinouts
Standard Cable Pinouts Standard Cable Pinouts provide standard pinout information for the reader’s cable. Figure 10 Table 2 Figure 10. Standard Cable Pinouts Bottom of Imager Cable Interface Cable Port Cable Strain Relief Pin 1 Pin 10 To Host Cable Clip (Latch) The signal descriptions in apply to the connector on the reader and are for ref- Table 2…
-
Page 284
NOTES QuickScan Lite QW2100… -
Page 285: Appendix B. Standard Defaults
Appendix B Standard Defaults The most common configuration settings are listed in the “Default” column of Table 3 The settings in this table are as applied to a standard RS-232 interface. See for a Table 4 listing of default exceptions to this list as appled to other interface types. Page references are also provided for feature descriptions and programming bar codes for each parameter.
-
Page 286
Parameter Default Your Setting Page Number Scanning Active Time 5 Seconds Stand Mode Flash Disable Flash On Time 1 Second Flash Off Time 600 ms Stand Mode Sensitivity Medium Green Spot Duration 300 ms RS-232 Baud Rate 9600 Data Bits 8 Data Bits Stop Bits 1 Stop Bit… -
Page 287
Parameter Default Your Setting Page Number Keyboard Send Control Characters Disable Wedge Quiet Interval 100ms Intercharacter Delay No Delay Intercode Delay 100 ms USB Keyboard Speed 1 ms USB-OEM USB-OEM Device Usage Handheld Scanner USB-OEM Interface Options Ignore Data Editing No Global Prefix Global Prefix/Suffix Global Suffix = 0x0D… -
Page 288
Parameter Default Your Setting Page Number Expand UPC-E to UPC-A Don’t Expand UPC-E Number System Character Trans- Transmit mission UPC-E Minimum Reads EAN 13 EAN 13 Enable/Disable Enable EAN 13 Check Character Transmission Send EAN-13 Flag 1 Character Transmit EAN-13 ISBN Conversion Disable ISSN Enable/Disable Disable… -
Page 289
Parameter Default Your Setting Page Number UPC-A Minimum Reads 1 Read UPC/EAN Guard Insertion Disable UPC/EAN Stitch Exact Label Halves Disable UPC/EAN Stitch Unlike Label Halves Disable UPC/EAN Minimum Segment Length Add-Ons Disable P2, P5 and Optional Add-ons Optional Add-On Timer 70 ms P2 Add-Ons Minimum Reads P5 Add-Ons Minimum Reads… -
Page 290
Parameter Default Your Setting Page Number Code 39 Code 39 Enable/Disable Enable Code 39 Check Character Calculation Calculate Code 39 Check Character Transmission Send Code 39 Start/Stop Character Transmis- Don’t Transmit sion Code 39 Full ASCII Disable Code 39 Quiet Zones Auto Code 39 Minimum Reads Code 39 Decoding Level… -
Page 291
Interleaved 2 of 5 CIP Interleaved 2 of 5 CIP HR Enable/Disable Disable Datalogic 2 of 5 Datalogic 2 of 5 Enable/Disable Enable Datalogic 2 of 5 Check Character Calcu- Disable lation Datalogic 2 of 5 Check Character Trans- Don’t Send mission… -
Page 292
Parameter Default Your Setting Page Number Datalogic 2 of 5 Interdigit Maximum Ratio Datalogic 2 of 5 Character Correlation Disable Datalogic 2 of 5 Stitching Disable Codabar Codabar Enable/Disable Disable Codabar Check Character Calculation Don’t Calculate Codabar Check Character Transmission… -
Page 293
Parameter Default Your Setting Page Number Code 11 Length Control Variable Code 11 Set Length 1 Code 11 Set Length 2 Code 11 Interdigit Ratio Code 11 Decoding Level Code 11 Character Correlation Disable Code 11 Stitching Disable Standard 2 of 5 Standard 2 of 5 Enable/Disable Disable Standard 2 of 5 Check Character Calcu-… -
Page 294
Parameter Default Your Setting Page Number Industrial 2 of 5 Character Correlation Disable IATA IATA Enable/Disable Disable IATA Check Character Transmission Enable ISBT 128 ISBT 128 Concatenation Disable ISBT 128 Concatenation Mode Disable ISBT 128 Dynamic Concatenation Time- 200ms ISBT 128 Force Concatenation Enable ISBT 128 Advanced Concatenation Disable… -
Page 295
Parameter Default Your Setting Page Number Code 93 Quiet Zones Auto Code 93 Stitching Enable Code 93 Character Correlation Enable Codablock F Codablock F Enable/Disable Disable Codablock F EAN Enable/Disable Disable Codablock F AIM Check Enable Check C Codablock F Length Control Variable Codablock F Set Length 1 3 Characters… -
Page 296: Default Exceptions
Parameter Default Your Setting Page Number BC412 Length Control Variable Length BC412 Set Length 1 1 Character BC412 Set Length 2 50 Characters Default Exceptions lists standard default settings as applied to a standard RS-232 interface. Table 3 Table 4 provides a listing of default exceptions to that list as applied to the other interface types.
-
Page 297
Default Exceptions Parameter Default Excption Datalogic 2 of 5 Label ID Character(s) ISBT 128 Label ID Character(s) UPCE P2 Label ID Character(s) UPCE/P5 Label ID Character(s) UPCE/GS1-128 Label ID Character(s) EAN8/P2 Label ID Character(s) EAN8/P5 Label ID Character(s) EAN8/GS1-128 Label ID Character(s) -
Page 298
Parameter Default Excption GS1-128 Label ID Character(s) UPCA/P2 Label ID Character(s) UPCA/P5 Label ID Character(s) UPCA/GS1-128 Label ID Character(s) UPCE P2 Label ID Character(s) UPCE/P5 Label ID Character(s) EAN8/P2 Label ID Character(s) EAN8/P5 Label ID Character(s) EAN8/GS1-128 Label ID Character(s) EAN13/P2 Label ID Character(s) EAN13/P5 Label ID Character(s) EAN13/GS1-128 Label ID Character(s) -
Page 299: Appendix C. Led And Beeper Indications
Appendix C LED and Beeper Indications The reader’s beeper sounds and its LED illuminates to indicate various functions or er- rors on the reader. An optional “Green Spot” also performs useful functions. The tables below list these indications. One exception to the behaviors listed in the tables is that the reader’s functions are programmable, and may or may not be turned on.
-
Page 300: Led And Beeper Indications
LED and Beeper Indications INDICATION DESCRIPTION BEEPER Reader beeps four times at highest The reader is in the process of pow- Power-up Beep frequency and volume upon power- ering-up. LED behavior for this indica- The reader will beep once at current A label has been successfully tion is configurable via the frequency, volume, mono/bi-tonal…
-
Page 301: Error Codes
Error Codes Error Codes Upon startup, if the reader sounds a long tone, this means the reader has not passed its automatic Selftest and has entered FRU isolation mode. If the reader is reset, the se- quence will be repeated. The following table describes the LED flashes/beep codes asso- ciated with an error found.
-
Page 302
NOTES QuickScan Lite QW2100… -
Page 303: Appendix D Sample Bar Codes
Appendix D Sample Bar Codes The sample bar codes in this appendix are typical representations for their symbology types. UPC-A 12345 67890 EAN-13 3 4 5 67 8 9 0 1 2 3 4 0 Code 39 123ABC Code 128 1 2 3 4 5 6 7 8 9 0 1 2 3 4 5 6 7 8 9 0 1 2 3 4 5 6 7 8 9 0 1 2 3 4 5 6 7 8 9 0 1 2 3 4 Interleaved 2 of 5 12345678901231…
-
Page 304: Codabar
Sample Bar Codes — continued Code 32 Codabar Code 93 Code 11 QuickScan Lite QW2100…
-
Page 305: Gs1 Databar (Rss)
GS1 DataBar (RSS) GS1 DataBar (RSS) GS1 DataBar variants must be enabled to read the bar codes below (see DataBar (RSS) on page 295 NOTE 10293847560192837465019283746029478450366523 (GS1 DataBar Expanded Stacked) 1234890hjio9900mnb (GS1 DataBar Expanded) 08672345650916 (GS1 DataBar Limited) GS1 DataBar-14 55432198673467 (GS1 DataBar Omnidirectional Truncated) 90876523412674…
-
Page 306
NOTES QuickScan Lite QW2100… -
Page 307: Appendix E Keypad
Appendix E Keypad Use the bar codes in this appendix to enter numbers as you would select digits/characters from a keypad. Product Reference Guide…
-
Page 308
QuickScan Lite QW2100… -
Page 309
Product Reference Guide… -
Page 310
NOTES QuickScan Lite QW2100… -
Page 311: Appendix F Scancode Tables
Appendix F Scancode Tables Control Character Emulation Control character emulation selects from different scancode tables as listed in this appendix. Each of the control character sets below are detailed by interface type in the tables. These apply to Wedge and USB Keyboard platforms. Control Character 00 —…
-
Page 312: Interface Type Pc At Ps/2 Or Usb-Keyboard
Interface Type PC AT PS/2 or USB-Keyboard Table 1. Scancode Set When Control Character is 00 or 01 NULL C(S)+@ C(S)+A C(S)+B C(S)+C C(S)+E C(S)+F C(S)+G C(S)+H C(S)+J C(S)+K C(S)+L Enter C(S)+N C(S)+O C(S)+P C(S)+Q C(S)+R C(S)+S C(S)+T C(S)+U C(S)+V C(S)+W C(S)+X C(S)+Y…
-
Page 313
Interface Type PC AT PS/2 or USB-Keyboard — cont. Table 2. Scancode Set When Control Character is 02 Ar Ar Al Al Cl Cl Cr Cr S+ Tab Enter Enter Pg Up Keypd … -
Page 314: Interface Type Pc At Ps/2 Alt Mode Or Usb-Keyboard Alt Mode
Interface type PC AT PS/2 Alt Mode or USB-Keyboard Alt Mode Table 3. Scancode Set When Control Character is 00 or 01 Alt+000 Alt+001 Alt+002 Alt+003 Alt+004 Alt+005 Alt+006 Alt+007 Alt+008 Alt+010 Alt+011 Alt+012 Alt+014 Alt+015 Enter Alt+016 Alt+017 Alt+018 Alt+019 Alt+020 Alt+021…
-
Page 315
Interface type PC AT PS/2 Alt Mode or USB-Keyboard Alt Mode — cont. Table 4. Scancode Set When Control Character is 02 Ar Al Cl Cr S+ Tab Enter Enter Pg Up Keypd … -
Page 316: Digital Interface
Digital Interface Table 5. Scancode Set When Control Character is 00 or 01 NULL C(S)+@ C(S)+A C(S)+B C(S)+C C(S)+E C(S)+F C(S)+G C(S)+H C(S)+J C(S)+K C(S)+L Enter C(S)+N C(S)+O C(S)+P C(S)+Q C(S)+R C(S)+S C(S)+T C(S)+U C(S)+V C(S)+W C(S)+X C(S)+Y C(S)+Z C(S)+\ C(S)+^ C(S)+_ Space…
-
Page 317
Digital Interface — cont. Table 6. Scancode Set When Control Character is 02 Cl Cl S+ Tab Enter Enter Keypd Space “ & ‘ < > Product Reference Guide… -
Page 318: Ibm Xt
IBM XT Table 7. Scancode Set When Control Character is 00 or 01 NULL C(S)+@ C(S)+A C(S)+B C(S)+C C(S)+E C(S)+F C(S)+G C(S)+H C(S)+J C(S)+K C(S)+L Enter C(S)+N C(S)+O C(S)+P C(S)+Q C(S)+R C(S)+S C(S)+T C(S)+U C(S)+V C(S)+W C(S)+X C(S)+Y C(S)+Z C(S)+\ C(S)+^ C(S)+_ Space…
-
Page 319
IBM XT — cont. Table 8. Scancode Set When Control Character is 02 Ar Ar Al Al Cl Cl Cr Cr S+ Tab Enter Enter Pg Up Keypd Home Space “ & ‘ < > ‘ Product Reference Guide… -
Page 320: Microsoft Windows Codepage 1252
Microsoft Windows Codepage 1252 Windows-1252 is a character encoding of the Latin alphabet, used by default in the legacy com- ponents of Microsoft Windows in English and some other Western languages. QuickScan Lite QW2100…
-
Page 321: Index
Index Pitch Volume bar codes Good Read, Beeper – RS-232 Good Read, Beeper Pitch – baud rate Good Read, Beeper Volume – RS-232 parameters Green Spot parity 231, 232, 234, barcodes cancel numeric barcodes Handheld Scanner RS-232 parameters parity Beeper Pitch, Good Read Indications Volume, Good Read…
-
Page 322
Print Contrast Minimum Product Specifications XON/XOFF Programming Barcodes Read, Beeper – Good Read, Beeper Pitch – Good Read, Beeper Volume – Good Request to Send Roll (Tilt) Tolerance RS-232 interface selection RS-232 Serial Connection sample bar codes code 128 code 39 interleaved 2 of 5 select digits/characters Serial Output… -
Page 323: Ascii Chart
ASCII Chart ASCII ASCII ASCII ASCII Char. Char. Char. Char. ‘ “ & ’ < >…
-
Page 324
Telephone: 49 (0) 61 51/93 58-0 Telephone: (65) 6435-1311 germany.scanning@datalogic.com singapore.scanning@datalogic.com India Iberia Datalogic Scanning India Datalogic Scanning SAS Sucursal en España Telephone: 91- 22 — 64504739 Telephone: 34 91 746 28 60 india.scanning@datalogic.com spain.scanning@datalogic.com Italy United Kingdom Datalogic Scanning SpA Datalogic Scanning LTD Telephone: [39] (0) 39/62903.1…
 symbology. EAN 8 Enable/Disable When disabled, the reader will not read EAN 8/JAN 8 bar codes. $C8BEN00 EAN 8 = Disable $C8BEN01 DEFAULT EAN 8 = Enable EAN 8 Check Character Transmission…
Настройка сканера штрих-кода происходит быстро и легко, путём считывания служебных штрих кодов со страниц мануала, достаточно следовать пунктам. Но тем не менее она часто вызывает ряд вопросов как у обычных пользователей, решивших автоматизировать свой магазин, так и у некоторых системных администраторов.
Рассмотрим пример по настройке сканера штрих-кода Datalogic Quickscan Lite QW2100. Данная модель наиболее распространена, она представляет собой идеальное соотношение цена/качество. Со сканером в комплекте идёт так же подставка.
Итак, вы купили сканер и хотите подключить его к своей 1С Предприятие 8: Управление торговлей 11, для того чтобы заносить позиции в накладную сканируя товар.
По сути, сканер – это вводное устройство как клавиатура, только он вводит числовой код который получает расшифровкой полос штрих-кода. Можно считать код и сканер будет вводить его в блокнот или в ворд, в общем куда угодно. Но для того чтобы заполнять позиции товарной накладной в 1С нужно чтобы сканер мог перед считыванием эмулировать нажатие клавиши «F7», а после считывания штрих кода нажатие клавиши «Enter». То есть префикс и суффикс.
Для этого качаем мануал по сканерам Datalogic отсюда.
На странице 68 находятся служебные штрихкоды по активации установки префикса и суффикса.
Сами префиксы и суффиксы вводятся в виде кода ASCII, выбранного по таблице для конкретного случая.
Сам процесс описан на странице 260 манула.
- Сканируем штрих код ENTER/EXIT PROGRAMMING MODE для входа в режим программирования.
- Сканируем штрих код Set Global Pefix
- Сканируем последовательно цифры и буквы, которые подобрали по таблице ASCII для соответствующего символа. (Для F7 это 8B)
- Сканируем штрих код ENTER/EXIT PROGRAMMING MODE для выхода из режима программирования.
Всё. Префикс настроен. Суффикс настраивается аналогично, только на втором шаге сканируется код Set Global Suffix.
Таким образом, к ряду чисел кода можно добавлять ещё различные служебные команды или знаки типа $.
Если у Вас после прочтения данной статьи всё же не получилось настроить сканер, то это не проблема – позвоните нам и наш мастер приедет к вам и всё сделает.
Сканеры штрих-кода других производителей настраиваются аналогично, так же у некоторых (например, Intermec) разработаны специальные программы для настройки, которые её значительно облегчают!
Добавить комментарий
Нажимая кнопку отправить, вы даете согласие на обработку персональных данных
Подключение и настройка сканера ШК Datalogic DLS QS Lite QW2100 к программе ОПСУРТ Вы приобрели сканер штрих кода Datalogic DLS QS Lite QW2100, открыли, распаковали и подключили к своему ПК или ноутбуку. Запустили программу, зашли в документ продажи и отсканировали свой товар. Программа или не нашла товар или нашла товар, добавила его продажу, но строка для поиска товара не очистилась. Это означает, что сканер настроен в режиме USB-HID, то есть он работает как обычная клавиатура. Это на первый взгляд — мелочь, но она доставит Вам много неудобств (например, после каждого сканирования надо будет очищать строку поиска). Для удобной работы в программе ОПСУРТ, необходимо настроить сканер в режим работы через виртуальный com-порт.
Пошаговая инструкция настройки сканера:
- Подключаем сканер ШК с ПК.
- Он определяется как стандартное устройство ввода или USB/HID клавиатура. Для проверки можете открыть любой текстовый редактор, например, БЛОКНОТ. И попробуйте просканировать Ваш товар. В итоге Вы должны увидеть в блокноте цифры штрихкода. Если все так и есть, то сканер определился в системе. Переходим к следующему пункту.
- Необходимо скачать файл настроек. необходимо разархивировать и распечатать скачанный файл
- Сканируем ШК из распечатанного файла
- Отключаем сканер от ПК
- Устанавливаем драйвер (скачать для 32-bit или скачать для 64-bit)
- Распаковываем скачанный архив и устанавливаем драйвер
- Подключаем сканер к ПК
- Сканер устанавливается как устройство «com-порт» и ему будет присвоен номер com-порта, например com4(необходимо запомнить номер порта). Если этого не произошло, и появляется окно с требованием установить драйвер, то следует выбрать ручную установку драйвера и указать путь к файлу драйвера.
Теперь сканер настроен и можно переходить к настройке его в программе ОПСУРТ
- Перезапускаем программу ОПСУРТ (если она была запущена)
- Войдите в настройки сканера ШК, нажав на кнопку с изображением сканера штрих кода
- Должно появится окно настройки сканера ШК. Здесь установите флажок «Устройство используется» и выберите используемый устройством COM-порт(тот который запомнили ранее)
Решаем любые проблемы с техникой.
Сервисный центр «ПОРТ»
-
Авторизованный сервисный центр для 22 производителей
-
Услуги по монтажу, настройке, ремонту всего спектра оборудования
-
Аккредитованные специалисты
-
Выезд по городу
-
25 лет на рынке
-
Доставка оборудования в сервисный центр
-
Contents
-
Table of Contents
-
Troubleshooting
-
Bookmarks
Quick Links
TM
QuickScan
Lite QW2100
General Purpose Corded
Handheld Linear Imager Bar Code Reader
Quick Reference Guide
Related Manuals for Datalogic QuickScan Lite QW2100
Summary of Contents for Datalogic QuickScan Lite QW2100
-
Page 1
QuickScan Lite QW2100 General Purpose Corded Handheld Linear Imager Bar Code Reader Quick Reference Guide… -
Page 2
An Unpublished Work — All rights reserved. No part of the contents of this docu- mentation or the procedures described therein may be reproduced or transmitted in any form or by any means without prior written permission of Datalogic ADC, Inc. or its subsidiaries or affiliates («Datalogic» or «Datalogic ADC»). Owners of Datalogic products are hereby granted a non-exclusive, revocable license to reproduce and transmit this documentation for the purchaser’ s own internal business purposes. -
Page 3
Agreement. If you do not intend to be bound to the terms of this Agreement, Datalogic is not willing to license the Software to you, you may not use the Datalogic Product or the Software, and you must contact the party from whom you acquired the Datalogic Product for instructions. -
Page 4
Inc., Legal Department, 959 Terry Street, Eugene, OR 97402. 7.2 In the defense or settlement of any such claim, Datalogic may, at its option, 1) procure for End User the right to continue using the Datalogic Product, 2) modify the Datalogic Product so that it… -
Page 5
Computer Software clause at DFARS 252.227-7013(c)(1)(ii), whichever is applicable. 9.2 If End User is using the Datalogic Product outside of the United States, End User must comply with the applicable local laws of the country in which the Datalogic Product is used, with U.S. -
Page 6
Software Product Policy Datalogic reserves the right to ship its products with the latest version of software/firmware available. This provides our cus- tomers with the very latest in Datalogic software technology. The only exception to this policy is when the buyer has a signed… -
Page 7
Hands Free Stand/Holder Figure 1. Adjusting the Stand Quick Reference Guide… -
Page 8
Connect/Disconnect Cable Connect Host Interface Keyboard Wedge Interface RS-232 Interface USB Interface QuickScan Lite QW2100… -
Page 9
Aim and Scan Aim and Scan 012345 012345 65° 65° Quick Reference Guide… -
Page 10
Parts of the Reader 1. LED 3. Scan Window 2. Cable Release Hole 4. Trigger QuickScan Lite QW2100… -
Page 11: Programming Bar Codes
Programming Bar Codes Programming Bar Codes For your convenience, this guide includes the programming bar codes required to configure the reader for use with different in- terface (terminal/host) types. See the Product Reference Guide (PRG) for more complete in- formation about programming and configurable features. You can download the latest version of the PRG and any other avail- able publications for the reader from the website listed on the back cover of this manual.
-
Page 12
RS-232 Interface To use an RS-232 interface, scan the bar code for the desired RS-232 host type. Select RS-232 Standard Select RS-232 Wincor Nixdorf Select RS-232 OPOS (for use with OPOS/UPOS/JavaPOS) QuickScan Lite QW2100… -
Page 13
USB and defaults to the USB Keyboard interface. Select USB-COM-STD (simulates RS-232 standard interface) Select USB Keyboard (with standard key encoding) Select USB Alternate Keyboard (with alternate key encoding) Select USB OEM Download the correct USB Com driver from www.datalogic.com. Quick Reference Guide… -
Page 14
Keyboard Wedge Interface To use a Keyboard Wedge interface, scan the bar code for the desired keyboard type. Select KBD-AT (AT, PS/2 25-286, 30-286, 50, 50Z, 60, 70, 80, 90 & 95 w/Standard Key Encoding) Select KBD-AT-NK (IBM AT PS2 with standard key encoding but without external kbd.) Select KBD-AT-ALT (AT, PS/2 25-286, 30-286, 50, 50Z, 60, 70, 80, 90 &… -
Page 15: Scanning Modes
Scanning Modes Scanning Modes If the interface type is changed, scanner configu- ration may be automatically reset to a different Scanning Mode. NOTE The reader can operate in one of several scanning modes: When the trigger is pulled, scanning is activated Trigger Single —…
-
Page 16
, except that a trigger pull is required to activate the decod- Mode Scan Mode = Trigger Single Scan Mode = Trigger Hold Multiple Scan Mode = Trigger Pulse Multiple Scan Mode = Flashing Scan Mode = Always On ® Scan Mode = Autosense Stand Mode Scan Mode = Trigger Object Sense… -
Page 17: Troubleshooting
Troubleshooting Troubleshooting Problem Possible Cause Possible Solutions Check system power. Nothing happens when No power to the Ensure power supply is the trigger is pulled. reader. connected. Interface or power Ensure all cable connec- cables are loose. tions are secure. Ensure reader is pro- grammed to read the Reader not pro-…
-
Page 18
LED and Beeper Indications The reader’s beeper sounds and its LED illuminates to indicate various functions or errors on the reader. A “Green Spot” also lights to indicate a good read. The tables below list these indi- cations. One exception to the behaviors listed in the tables is that the reader’s functions are programmable, and may or may not be turned on. -
Page 19: Ergonomic Recommendations
Datalogic could void the user’s authority to operate the equipment. Power Supply Use only a power supply approved by Datalogic for this prod- uct and model. Models require either a Listed class II or class III with a Limited Power Source(LPS) which supplies power di- rectly to the reader.
-
Page 20
Radio Frequency Interference Requirements This equipment has been tested and found to comply with the limits for a Class B digital de- Tested to comply with FCC Standards vice, pursuant to Part 15 of the FCC rules. FOR HOME OR OFFICE USE These limits are designed to provide reason- able protection against harmful interference in a residential in- stallation. -
Page 21: Reader Labeling
Reader Labeling Warranty Datalogic warrants to Customer that Datalogic’s products will be free from defects in materi- als and workmanship for a period of 3 years from product shipment. Datalogic ADC Limited Factory Warranty Warranty Coverage Datalogic ADC (“Datalogic”) hardware products are warranted against defects in material and workmanship under normal and proper use.
-
Page 22
DAMAGES. Risk of Loss Customer shall bear risk of loss or damage for product in transit to Datalogic. Da- talogic shall assume risk of loss or damage for product in Datalogic’s possession. In the absence of specific written instructions for the return of product to Custom- er, Datalogic will select the carrier, but Datalogic shall not thereby assume any liability in connection with the return shipment. -
Page 23
German Informationen zur Entsorgung von Elektro- und Elektronik- Alt- geräten (WEEE) erhalten Sie auf der Webseite www.datalogic.com. Spanish Si desea información acerca de los procedimientos para el desecho de los residuos del equipo eléctrico y electrónico (WEEE), visite la página Web www.datalogic.com. -
Page 24
China RoHS QuickScan Lite QW2100… -
Page 25
China RoHS — Power Supply China RoHS — Power Supply Quick Reference Guide… -
Page 26
Cleaning When needed, gently clean the scan window using a lens cloth or lint-free cleaning tissues dampened with a nonabrasive, mild, water-based glass cleaner. The other surfaces can also be cleaned using the same cleaning agents. Do not allow fluids to flow into the internal parts of the scanner. -
Page 27
959 Terry St. Eugene, OR 97402 USA La presente dichiarazione di conformità è rilasciata sotto la responsabilità esclusiva di Datalogic ADC, Inc. per: This Declaration of Conformity is issued under the sole responsibility of Datalogic ADC, Inc. for: Cette déclaration de conformité est établie sous la seule responsabilité de Datalogic ADC, Inc: Diese Konformitätserklärung wird unter der alleinigen Verantwortung des Datalogic ADC, Inc. -
Page 28
© 2011-2014 Datalogic ADC, Inc. • All rights reserved. • Datalogic and the Datalogic logo are registered trademarks of Datalogic S.p.A. in many countries, including the U.S.A. and the E.U. Datalogic ADC, Inc. 959 Terry Street Eugene |OR 97402…
инструкцияDatalogic QuickScan Lite QW2100

TM
Lite QW2100
General Purpose Corded Handheld
Linear Imager Bar Code Reader
Product Reference Guide
Посмотреть инструкция для Datalogic QuickScan Lite QW2100 бесплатно. Руководство относится к категории Сканеры штрих-кода, 9 человек(а) дали ему среднюю оценку 8.8. Руководство доступно на следующих языках: английский. У вас есть вопрос о Datalogic QuickScan Lite QW2100 или вам нужна помощь? Задайте свой вопрос здесь
- Chapter 1. Introduction
- About this Guide ………….1
- Manual Overview …………1
- Manual Conventions ……2
- References …………………….2
- Technical Support ………..3
- Datalogic Website Support
- Reseller Technical Support
- Telephone Technical Support
- Chapter 2. Getting Started
- About the Reader …………5
- Unpacking …………………….5
- Setting Up the Reader …6
- Install the Interface Cable
- Hands Free Stand ..7
- Programming ………8
- Using the Programming Bar Codes
- Select the Interface Type
- Configure Interface Settings
- Configure Other Features
- Software Version Transmission
- Resetting the Product Configuration to Defaults
- Chapter 3. Interfaces
- Interface Selection ……. 11
- Configuring the Interface
- Global Interface Features
- Host Commands — Obey/Ignore
- USB Suspend Mode
- Chapter 4. General Features
- Double Read Timeout
- Label Gone Timeout … 19
- Power Save Mode …….. 20
- Sleep Mode Timeout .. 21
- LED and Beeper Indicators
- Power On Alert …. 22
- Good Read: When to Indicate
- Good Read Beep Type
- Good Read Beep Frequency
- Good Read Beep Length
- Illumination Control
- Good Read Beep Volume
- Good Read LED Duration
- Scanning Features ……. 30
- Scan Mode ………… 30
- Stand Mode Triggered Timeout
- Scanning Active Time
- Stand Mode Flash
- Flash On Time …… 34
- Flash Off Time …….34
- Stand Mode Sensitivity ………………………………………………………………………….35
- Green Spot Duration …36
- Chapter 5. RS-232 ONLY Interface
- Introduction ……………….37
- RS-232 Standard Factory Settings
- Baud Rate ……………………37
- Data Bits ………………………39
- Stop Bits ………………………39
- Parity ……………………………40
- Handshaking Control ..41
- Chapter 6. RS-232/USB-Com Interfaces
- Introduction ……………….43
- Standard Factory Settings
- Intercharacter Delay ….44
- Beep On ASCII BEL ……..45
- Beep On Not on File …..45
- ACK NAK Options ……….46
- ACK Character ……47
- NAK Character ……47
- ACK NAK Timeout Value
- ACK NAK Retry Count
- ACK NAK Error Handling
- Indicate Transmission Failure
- Disable Character ………51
- Enable Character ………..52
- Chapter 7. Keyboard Interface
- Introduction ……………….53
- Standard Factory Settings
- Scancode Tables ………..53
- Country Mode …………….54
- Caps Lock State ………….57
- Numlock ………………………58
- Keyboard Numeric Keypad
- Keyboard Send Control Characters
- Wedge Quiet Interval ..60
- Intercharacter Delay ….61
- Intercode Delay ………….62
- USB Keyboard Speed …63
- Chapter 8. USB-OEM Interface
- Introduction ……………….65
- Standard Factory Settings
- USB-OEM Device Usage
- USB-OEM Interface Options
- Chapter 9. Data Editing
- Data Editing Overview
- Please Keep In Mind… .68
- Global Prefix/Suffix ……68
- Global AIM ID ……………..69
- GS1-128 AIM ID ………….69
- Label ID ……………………….70
- Label ID: Pre-loaded Sets
- Label ID: Set Individually Per Symbology
- Label ID Control …71
- Label ID Symbology Selection
- Set Global Mid Label ID Character(s)
- Case Conversion ……….. 81
- Character Conversion . 82
- Chapter 10. Symbologies
- Introduction ………………. 83
- Symbologies …….. 83
- Standard Factory Settings for Symbologies
- Disable All Symbologies
- Coupon Control ………… 84
- UPC-A …………………………. 85
- UPC-A Enable/Disable
- UPC-A Check Character Transmission
- Expand UPC-A to EAN-13
- UPC-A Number System Character Transmission
- In-Store Minimum Reads
- UPC-E ………………………….. 88
- UPC-E Enable/Disable
- UPC-E Check Character Transmission
- Expand UPC-E to EAN-13
- Expand UPC-E to UPC-A
- UPC-E Number System Character Transmission
- UPC-E Minimum Reads
- EAN 13 ………………………… 91
- EAN 13 Enable/Disable
- EAN 13 Check Character Transmission
- EAN-13 Flag 1 Character
- EAN-13 ISBN Conversion
- ISSN Enable/Disable
- EAN 13 Minimum Reads
- EAN 8 ………………………….. 94
- EAN 8 Enable/Disable
- EAN 8 Check Character Transmission
- Expand EAN 8 to EAN 13
- EAN 8 Both Guards Substitution
- EAN 8 Guard Insertion
- EAN 8 Guard Substitution
- EAN 8 Minimum Segment Length Block
- EAN 8 Minimum Reads
- EAN 8 Stitch Exact Label Halves
- EAN 8 Stitch Unlike Label Halves
- EAN Two Label ………… 101
- EAN Two Label Enable/Disable
- EAN Two Label Combined Transmission
- EAN Two Label Minimum Reads
- UPC/EAN Global Settings
- UPC/EAN Decoding Level
- UPC/EAN Correlation
- UPC/EAN Price Weight Check
- UPC-A Minimum Reads
- UPC/EAN Guard Insertion
- UPC/EAN Stitch Exact Label Halves
- UPC/EAN Stitch Unlike Label Halves
- UPC/EAN Minimum Segment Length
- Add-Ons …………………… 111
- Optional Add-ons
- Optional Add-On Timer
- P2 Add-Ons Minimum Reads
- P5 Add-Ons Minimum Reads
- GS1-128 Add-Ons Minimum Reads
- GS1 DataBarTM
- GS1 DataBar Omnidirectional Enable/Disable
- GS1 DataBar Omnidirectional GS1-128 Emulation
- GS1 DataBar Omnidirectional Minimum Reads
- GS1 DataBarTM
- GS1 DataBar Expanded Enable/Disable
- GS1 DataBar Expanded GS1-128 Emulation
- GS1 DataBar Expanded Minimum Reads
- GS1 DataBar Expanded Length Control
- GS1 DataBar Expanded Set Length 1
- GS1 DataBar Expanded Set Length 2
- GS1 DataBarTM
- GS1 DataBar Limited Enable/Disable
- GS1 DataBar Limited GS1-128 Emulation
- GS1 DataBar Limited Minimum Reads
- Code 39 ……………………. 127
- Code 39 Enable/Disable
- Code 39 Check Character Calculation
- Code 39 Check Character Transmission
- Code 39 Start/Stop Character Transmission
- Code 39 Full ASCII
- Code 39 Quiet Zones
- Code 39 Minimum Reads
- Code 39 Decoding Level
- Code 39 Length Control
- Code 39 Set Length 1
- Code 39 Set Length 2
- Code 39 Interdigit Ratio
- Code 39 Character Correlation
- Code 39 Stitching
- Code 32 (Italian Pharmaceutical)
- Code 32 Enable/Disable
- Code 32 Feature Setting Exceptions
- Code 32 Check Character Transmission
- Code 32 Start/Stop Character Transmission
- Code 39 CIP (French Pharmaceutical)
- Code 39 CIP Enable/Disable
- Code 128 ………………….. 142
- Code 128 Enable/Disable
- Expand Code 128 to Code 39
- Code 128 Check Character Transmission
- Code 128 Function Character Transmission
- Code 128 Sub-Code Change Transmission
- Code 128 Quiet Zones
- Code 128 Minimum Reads
- Code 128 Decoding Level
- Code 128 Length Control
- Code 128 Set Length 1
- Code 128 Set Length 2
- Code 128 Character Correlation
- Code 128 Stitching
- GS1-128 ……………………. 152
- GS1-128 Enable
- Interleaved 2 of 5 (I 2 of 5)
- I 2 of 5 Enable/Disable
- I 2 of 5 Check Character Calculation
- I 2 of 5 Check Character Transmission
- I 2 of 5 Minimum Reads
- I 2 of 5 Decoding Level
- I 2 of 5 Length Control
- I 2 of 5 Set Length 1
- I 2 of 5 Set Length 2
- I 2 of 5 Character Correlation
- I 2 of 5 Zero Pattern
- I 2 of 5 Stitching
- Interleaved 2 of 5 CIP HR
- Interleaved 2 of 5 CIP HR Enable/Disable
- Datalogic 2 of 5 ……….. 163
- Datalogic 2 of 5 Enable/Disable
- Datalogic 2 of 5 Check Character Calculation
- Datalogic 2 of 5 Check Character Transmission
- Datalogic 2 of 5 Minimum Reads
- Datalogic 2 of 5 Decoding Level
- Datalogic 2 of 5 Length Control
- Datalogic 2 of 5 Set Length 1
- Datalogic 2 of 5 Set Length 2
- Datalogic 2 of 5 Interdigit Maximum Ratio
- Datalogic 2 of 5 Character Correlation
- Datalogic 2 of 5 Stitching
- Codabar ……………………. 172
- Codabar Enable/Disable
- Codabar Check Character Calculation
- Codabar Check Character Transmission
- Codabar Start/Stop Character Transmission
- Codabar Start/Stop Character Set
- Codabar Start/Stop Character Match
- Codabar Quiet Zones
- Codabar Minimum Reads
- Codabar Decoding Level
- Codabar Length Control
- Codabar Set Length 1
- Codabar Set Length 2
- Codabar Interdigit Ratio
- Codabar Character Correlation
- Codabar Stitching
- ABC Codabar ……………. 185
- ABC Codabar Enable/Disable
- ABC Codabar Concatenation Mode
- ABC Codabar Dynamic Concatenation Timeout
- ABC Codabar Force Concatenation
- Code 11 …………………….. 187
- Code 11 Enable/Disable
- Code 11 Check Character Calculation
- Code 11 Check Character Transmission
- Code 11 Minimum Reads
- Code 11 Length Control
- Code 11 Set Length 1
- Code 11 Set Length 2
- Code 11 Interdigit Ratio
- Code 11 Decoding Level
- Code 11 Character Correlation
- Code 11 Stitching
- Standard 2 of 5 ………… 197
- Standard 2 of 5 Enable/Disable
- Standard 2 of 5 Check Character Calculation
- Standard 2 of 5 Check Character Transmission
- Standard 2 of 5 Minimum Reads
- Standard 2 of 5 Decoding Level
- Standard 2 of 5 Length Control
- Standard 2 of 5 Set Length 1
- Standard 2 of 5 Set Length 2
- Standard 2 of 5 Character Correlation
- Standard 2 of 5 Stitching
- Industrial 2 of 5 ……….. 203
- Industrial 2 of 5 Enable/Disable
- Industrial 2 of 5 Check Character Calculation
- Industrial 2 of 5 Check Character Transmission
- Industrial 2 of 5 Length Control
- Industrial 2 of 5 Set Length 1
- Industrial 2 of 5 Set Length 2
- Industrial 2 of 5 Minimum Reads
- Industrial 2 of 5 Stitching
- Industrial 2 of 5 Character Correlation
- IATA ………………………….. 209
- IATA Enable/Disable
- IATA Check Character Transmission
- ISBT 128 ……………………. 210
- ISBT 128 Concatenation
- ISBT 128 Concatenation Mode
- ISBT 128 Dynamic Concatenation Timeout
- ISBT 128 Force Concatenation
- ISBT 128 Advanced Concatenation Options
- MSI ……………………………. 213
- MSI Enable/Disable
- MSI Check Character Calculation
- MSI Check Character Transmission
- MSI Length Control
- MSI Set Length 1
- MSI Set Length 2
- MSI Minimum Reads
- MSI Decoding Level
- Code 93 ……………………. 219
- Code 93 Enable/Disable
- Code 93 Check Character Calculation
- Code 93 Check Character Transmission
- Code 93 Length Control
- Code 93 Set Length 1
- Code 93 Set Length 2
- Code 93 Minimum Reads
- Code 93 Decoding Level
- Code 93 Quiet Zones
- Code 93 Stitching
- Code 93 Character Correlation
- Codablock F …………….. 227
- Codablock F Enable/Disable
- Codablock F EAN Enable/Disable
- Codablock F AIM Check
- Codablock F Length Control
- Codablock F Set Length 1
- Codablock F Set Length 2
- Code 4 ………………………. 231
- Code 4 Enable/Disable
- Code 4 Check Character Transmission
- Code 4 Hex to Decimal Conversion
- Code 5 ………………………. 232
- Code 5 Enable/Disable
- Code 5 Check Character Transmission
- Code 5 Hex to Decimal Conversion
- Code 4 and Code 5 Common Configuration Items
- Code 4 and 5 Decoding Level
- Code 4 and Code 5 Minimum Reads
- Follett 2 of 5 …………….. 236
- Follett 2 of 5 Enable/Disable
- BC412 ……………………….. 236
- BC412 Enable/Disable
- BC412 Check Character Calculation
- BC412 Minimum Reads
- BC412 Decoding Level
- BC412 Length Control
- BC412 Set Length 1
- BC412 Set Length 2
- Chapter 11. References
- Label Gone Timeout .244
- Good Read LED Duration
- Scan Mode ……………….. 246
- Scanning Active Time
- Flash On Time ………….. 248
- Flash Off Time ………….. 249
- Intercharacter Delay .250
- ACK Character …………. 251
- NAK Character …………. 252
- ACK NAK Timeout Value
- ACK NAK Retry Count
- Disable Character ……. 255
- Enable Character …….. 256
- Wedge Quiet Interval
- Intercharacter Delay .258
- Intercode Delay ………. 259
- Global Prefix/Suffix …. 260
- Example: Setting a Prefix
- Global AIM ID …………… 261
- Label ID: Pre-loaded Sets
- Label ID: Set Individually Per Symbology
- Character Conversion
- Decoding Levels ……… 267
- Set Length 1 …………….. 268
- Set Length 2 …………….. 269
- Appendix A. Technical Specifications
- Standard Cable Pinouts
- Appendix B. Standard Defaults
- Default Exceptions …. 285
- Appendix C. LED and Beeper Indications
- LED and Beeper Indications
- Error Codes ………………. 291
- Appendix D. Sample Bar Codes
- Interleaved 2 of 5 …293
- Codabar ……………….. 294
- Code 11 ……………….. 294
- GS1 DataBar (RSS) …… 295
- Appendix E. Keypad
- Appendix F. Scancode Tables
- Control Character Emulation
- Interface Type PC AT PS/2 or USB-Keyboard
- Interface type PC AT PS/2 Alt Mode or USB-Keyboard Alt Mode
- Digital Interface ………. 306
- IBM XT ………………………. 308
- Microsoft Windows Codepage 1252
- Index
- Chapter 1, Introduction
- Chapter 2, Getting Started
- Chapter 9, Data Editing
- Chapter 4, General Features
- Chapter 7, Keyboard Interface
- Chapter 5, RS-232 ONLY Interface
- Chapter 8, USB-OEM Interface
- Chapter 10, Symbologies
- Chapter 3, Interfaces
- Chapter 6, RS-232/USB-Com Interfaces
- Chapter 11, References
- Figure 2.
- Figure 2.
- Figure 4. The stand can optionally be attached to a
- Interfaces on page 11
- RS-232 ONLY Interface, starting on page 37
- Keyboard Interface, starting on page 53
- USB-OEM Interface, starting on page 65
- RS-232/USB-Com Interfaces, starting on page 43
- tion to Defaults on page 10, require only the scan of thatsingle label to enact the change.
- on page 264
- Code 93
- Interleaved 2 of 5 (I 2 of 5)
- Interleaved 2 of 5 CIP HR
- EAN 13
- Datalogic 2 of 5
- EAN 8
- GS1 DataBarTM Omnidirectional
- GS1 DataBarTM Expanded
- Code 11
- GS1 DataBarTM Limited
- Standard 2 of 5
- Code 39
- Industrial 2 of 5
- Code 32 (Italian Pharmaceutical)
- Code 128
- ISBT 128
- GS1-128
- Code 4
- Code 5
- Follett 2 of 5
- BC412
- EAN 13
- Code 39 CIP (French Pharmaceutical)
- Set Length 2 on page 269
- GS1 DataBarTM Expanded — cont.
- GS1 DataBar Expanded Length Con-
- . Length 2 is the maximum label length if in
- Set Length 2 on page 269
- Code 39 — cont.
- Code 39 Length Control. Length 2 is the
- Code 39 — cont.
- Code 39 Quiet Zones on page 131
- Code 39 Minimum Reads on page 132
- Code 39 Decoding Level on page 133
- Code 39 Interdigit Ratio on page 137
- Code 39 Character Correlation on page 139
- Code 39 Stitching on page 139
- Code 32 (Italian Pharmaceutical) — cont.
- Set Length 2 on page 269
- Code 128 — cont.
- Code 128 Length Control. Length 2 is
- Code 128 — cont.
- Set Length 2 on page 269
- Interleaved 2 of 5 (I 2 of 5) — cont.
- I 2 of 5 Length Control. Length 2 is the
- Interleaved 2 of 5 (I 2 of 5) — cont.
- Set Length 2 on page 269
- Datalogic 2 of 5 — cont.
- Datalogic 2 of 5 Length Control.
- Set Length 2 on page 269
- Codabar Length Control. Length 2 is
- Set Length 2 on page 269
- Code 11 — cont.
- Code 11 Length Control. Length 2 is the
- Code 11 — cont.
- Set Length 2 on page 269
- Standard 2 of 5 — cont.
- Standard 2 of 5 Length Control. Length
- Set Length 2 on page 269
- Industrial 2 of 5 — cont.
- Industrial 2 of 5 Length Control. Length
- Set Length 2 on page 269
- MSI Length Control. Length 2 is the
- Set Length 2 on page 269
- Code 93 — cont.
- Code 93 Length Control. Length 2 is the
- Code 93 — cont.
- Set Length 2 on page 269
- Codablock F Length Control. Length 2
- Set Length 2 on page 269
- BC412 — cont.
- BC412 Length Control. Length 2 is the
- Table 4
- Table 9
- Table 6
- Table 13
- Table 2
- Control on page 71
- 297. f you make a mistake
- GS1-128 AIM ID
- Expand UPC-A to EAN-13
- Expand UPC-E to EAN-13
- EAN 13 Enable/Disable
- EAN 13 Check Character Transmission
- EAN-13 Flag 1 Character
- EAN 8 Both Guards Substitution
- EAN-13 ISBN Conversion
- EAN 13 Minimum Reads
- EAN 8 Enable/Disable
- EAN 8 Check Character Transmission
- Expand EAN 8 to EAN 13
- EAN 8 Minimum Reads
- EAN 8 Guard Insertion
- EAN 8 Guard Substitution
- EAN 8 Minimum Segment Length Block
- EAN 8 Stitch Exact Label Halves
- GS1-128 Add-Ons Minimum Reads
- GS1 DataBar Omnidirectional Enable/
- GS1 DataBar Expanded Enable/Disable
- GS1 DataBar Limited Enable/Disable
- Code 39 Enable/Disable
- Code 39 Stitching
- Code 32 Enable/Disable
- Code 39 CIP Enable/Disable
- Code 128 Enable/Disable
- GS1-128 Enable
- I 2 of 5 Enable/Disable
- Interleaved 2 of 5 CIP HR Enable/Disable
- Datalogic 2 of 5 Enable/Disable
- Code 11 Enable/Disable
- Standard 2 of 5 Enable/Disable
- Industrial 2 of 5 Enable/Disable
- Industrial 2 of 5 Length Control
- ISBT 128 Concatenation
- Code 93 Enable/Disable
- BC412 Enable/Disable
- Code 93 Decoding Level
- Code 4 Enable/Disable
- Code 5 Enable/Disable
- Code 4 and 5 Decoding Level
- Follett 2 of 5 Enable/Disable
- Table 3
Главная
| Datalogic | |
| QuickScan Lite QW2100 | QW2120-BKK1-10 | |
| Сканер штрих-кода | |
| 32017020344, 4016138960518, 4016138960525, 4054318470976, 5712505145807, 5712505163245 | |
| английский | |
| Руководство пользователя (PDF) |
Сканирование
| Тип сенсора | Лазерная |
| Поддерживаемые линейные (1D) штрих-коды | EAN 5, EAN-13, EAN-8, GS1-128 (UCC/EAN-128) |
| Поддерживаемые двухмерные штрих-коды | Не поддерживается |
| Скорость чтения (макс) | 400 считываний/с |
| Длина волны | 650 nm |
| Угол крена при считывании | -45 — 45 ° |
| Угол тангажа при считывании | -65 — 65 ° |
| Угол рыскания при считывании | -70 — 70 ° |
| Тип | Переносной считыватель штрих-кода |
Порты и интерфейсы
| Технология подключения | Проводная |
| Стандартные интерфейсы | USB |
Энергопитание
| Тип источника питания | Постоянный ток |
| Входное напряжение | 5 V |
| Потребляемая мощность | 340 mA |
Производительность
| Цвет товара | Черный |
| Материал корпуса | — |
| International Protection (IP) код | IP42 |
Вес и размеры
| Ширина | 170 mm |
| Глубина | 65 mm |
| Высота | 70 mm |
| Вес | 119 g |
Условия эксплуатации
| Диапазон температур при эксплуатации | 0 — 50 °C |
| Диапазон температур при хранении | -40 — 70 °C |
| Диапазон относительной влажности при эксплуатации | 5 — 95 % |
Данные об упаковке
Логистические данные
| Код гармонизированной системы описания (HS) | 84716070 |
показать больше
Не можете найти ответ на свой вопрос в руководстве? Вы можете найти ответ на свой вопрос ниже, в разделе часто задаваемых вопросов о Datalogic QuickScan Lite QW2100.
Какой вес Datalogic QuickScan Lite QW2100?
Какая высота Datalogic QuickScan Lite QW2100?
Какая ширина Datalogic QuickScan Lite QW2100?
Какая толщина Datalogic QuickScan Lite QW2100?
Инструкция Datalogic QuickScan Lite QW2100 доступно в русский?
Не нашли свой вопрос? Задайте свой вопрос здесь
-
manualzz.com
- Computers & electronics
- Print & Scan
- Bar code readers
Инструкции и Руководства для Datalogic QuickScan I Lite QW2100.
Мы нашли 35
инструкции доступные для бесплатного скачивания:
Инструкция по применению, Руководство пользователя, Справочное руководство, Техническая спецификация

Datalogic QuickScan I Lite QW2100 Техническая спецификация
Бренд:
Datalogic
Размер:
218 KB
Страниц:
2
Язык(и):
Русский
Открыть в новой вкладке

Datalogic Memor X3 Handheld Computer Руководство пользователя
Бренд:
Datalogic
Размер:
302 KB
Страниц:
4
Язык(и):
Русский
Открыть в новой вкладке

Datalogic Memor X3 Handheld Computer Руководство пользователя
Бренд:
Datalogic
Размер:
2 MB
Страниц:
2
Язык(и):
Русский
Открыть в новой вкладке
Datalogic QuickScan I Lite QW2100 Data Sheet
Бренд:
Datalogic
Размер:
331 KB
Страниц:
2
Язык(и):
Открыть в новой вкладке
Datalogic QuickScan I Lite QW2100 Data Sheet
Бренд:
Datalogic
Размер:
266 KB
Страниц:
2
Язык(и):
Английский, Японский, zh
Открыть в новой вкладке

Datalogic QuickScan I Lite QW2100 Datenblatt
Бренд:
Datalogic
Категория:
Bar code reader’s accessories
Размер:
212 KB
Страниц:
2
Язык(и):
Немецкий
Открыть в новой вкладке
Datalogic QuickScan I Lite QW2100 Data Sheet
Бренд:
Datalogic
Категория:
Bar code readers
Размер:
200 KB
Страниц:
2
Язык(и):
Английский
Открыть в новой вкладке
Datalogic QuickScan I Lite QW2100 Ficha de datos
Бренд:
Datalogic
Категория:
Bar code reader’s accessories
Размер:
201 KB
Страниц:
2
Язык(и):
Испанский
Открыть в новой вкладке

Datalogic QuickScan I Lite QW2100 Scheda dati
Бренд:
Datalogic
Категория:
Bar code readers
Размер:
198 KB
Страниц:
2
Язык(и):
Итальянский
Открыть в новой вкладке

Datalogic QuickScan I Lite QW2100 Ficha de dados
Бренд:
Datalogic
Категория:
Bar code reader’s accessories
Размер:
204 KB
Страниц:
2
Язык(и):
Португальский
Открыть в новой вкладке

Datalogic QuickScan I Lite QW2100 Data Sheet
Бренд:
Datalogic
Размер:
548 KB
Страниц:
2
Язык(и):
Английский, Корейский
Открыть в новой вкладке

Datalogic Skorpio X3 Handheld Computer Guide
Бренд:
Datalogic
Размер:
211 KB
Страниц:
2
Язык(и):
Английский
Открыть в новой вкладке

Datalogic Memor X3 Handheld Computer 사용자 설명서
Бренд:
Datalogic
Размер:
308 KB
Страниц:
2
Язык(и):
Корейский
Открыть в новой вкладке

Datalogic Memor X3 Handheld Computer ユーザーガイド
Бренд:
Datalogic
Размер:
345 KB
Страниц:
2
Язык(и):
Японский, zh
Открыть в новой вкладке
Datalogic Memor X3 Handheld Computer Guía del usuario
Бренд:
Datalogic
Размер:
279 KB
Страниц:
4
Язык(и):
Испанский
Открыть в новой вкладке

Datalogic Memor X3 Handheld Computer instrukcja
Бренд:
Datalogic
Размер:
267 KB
Страниц:
2
Язык(и):
Польский
Открыть в новой вкладке

Datalogic Memor X3 Handheld Computer ユーザーガイド
Бренд:
Datalogic
Размер:
2 MB
Страниц:
8
Язык(и):
Японский, zh
Открыть в новой вкладке

Datalogic Memor X3 Handheld Computer 사용자 설명서
Бренд:
Datalogic
Размер:
2 MB
Страниц:
8
Язык(и):
Корейский
Открыть в новой вкладке
Datalogic Memor X3 Handheld Computer Guida utente
Бренд:
Datalogic
Размер:
1 MB
Страниц:
8
Язык(и):
Итальянский
Открыть в новой вкладке

Datalogic Memor X3 Handheld Computer Guia de usuario
Бренд:
Datalogic
Размер:
2 MB
Страниц:
2
Язык(и):
Португальский
Открыть в новой вкладке

Datalogic Memor X3 Handheld Computer instrukcja
Бренд:
Datalogic
Размер:
1 MB
Страниц:
8
Язык(и):
Польский
Открыть в новой вкладке

Datalogic Skorpio X3 Handheld Computer Guide
Бренд:
Datalogic
Размер:
1 MB
Страниц:
8
Язык(и):
Английский
Открыть в новой вкладке
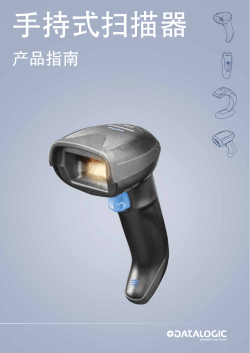
Datalogic FBC9080 Fieldbus Converter Accessory ユーザーガイド
Бренд:
Datalogic
Размер:
579 KB
Страниц:
8
Язык(и):
Японский, zh
Открыть в новой вкладке

Datalogic QuickScan L QD2300 Guide
Бренд:
Datalogic
Категория:
Bar code readers
Размер:
672 KB
Страниц:
4
Язык(и):
Английский, Японский
Открыть в новой вкладке
Datalogic QuickScan L QD2300 Guide
Бренд:
Datalogic
Категория:
Bar code readers
Размер:
718 KB
Страниц:
8
Язык(и):
Английский
Открыть в новой вкладке

Datalogic TL80 Guide
Бренд:
Datalogic
Размер:
4 MB
Страниц:
32
Язык(и):
Английский
Открыть в новой вкладке
Datalogic QuickScan I Lite QW2100 Product Reference Guide
Бренд:
Datalogic
Категория:
Bar code readers
Размер:
9 MB
Страниц:
324
Язык(и):
Английский
Открыть в новой вкладке
Datalogic QuickScan I Lite QW2100 Quick Reference Guide
Бренд:
Datalogic
Категория:
Bar code readers
Размер:
1 MB
Страниц:
28
Язык(и):
Английский
Открыть в новой вкладке
Datalogic QuickScan I Lite QW2100 Quick Reference Guide
Бренд:
Datalogic
Категория:
Bar code readers
Размер:
2 MB
Страниц:
52
Язык(и):
Английский, Японский, zh
Открыть в новой вкладке
Datalogic QuickScan I Lite QW2100 Guide de référence
Бренд:
Datalogic
Размер:
1 MB
Страниц:
28
Язык(и):
Французский
Открыть в новой вкладке

Datalogic QuickScan I Lite QW2100 Quick Reference Guide
Бренд:
Datalogic
Размер:
1 MB
Страниц:
28
Язык(и):
Английский, Турецкий
Открыть в новой вкладке
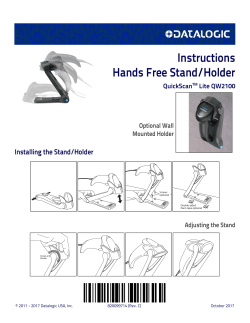
Datalogic QuickScan I Lite QW2100 Owner’s Manual
Бренд:
Datalogic
Размер:
656 KB
Страниц:
2
Язык(и):
Английский
Открыть в новой вкладке

Datalogic QuickScan I Lite QW2100 Bedienungsanleitung
Бренд:
Datalogic
Размер:
872 KB
Страниц:
2
Язык(и):
Немецкий, Испанский, Французский, Итальянский
Открыть в новой вкладке
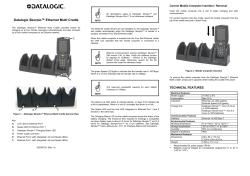
Datalogic Scanning Skorpio Scanner User manual
Бренд:
Datalogic
Категория:
Battery chargers
Размер:
643 KB
Страниц:
2
Язык(и):
Английский
Открыть в новой вкладке

Datalogic Memor X3, Memor1, Memor10, Memor20 Troubleshooting Manual
Бренд:
Datalogic
Размер:
1 MB
Страниц:
10
Язык(и):
Английский
Открыть в новой вкладке
Подключение и настройка сканера ШК Datalogic DLS QS Lite QW2100 к программе ОПСУРТ Вы приобрели сканер штрих кода Datalogic DLS QS Lite QW2100, открыли, распаковали и подключили к своему ПК или ноутбуку. Запустили программу, зашли в документ продажи и отсканировали свой товар. Программа или не нашла товар или нашла товар, добавила его продажу, но строка для поиска товара не очистилась. Это означает, что сканер настроен в режиме USB-HID, то есть он работает как обычная клавиатура. Это на первый взгляд — мелочь, но она доставит Вам много неудобств (например, после каждого сканирования надо будет очищать строку поиска). Для удобной работы в программе ОПСУРТ, необходимо настроить сканер в режим работы через виртуальный com-порт.
Пошаговая инструкция настройки сканера:
- Подключаем сканер ШК с ПК.
- Он определяется как стандартное устройство ввода или USB/HID клавиатура. Для проверки можете открыть любой текстовый редактор, например, БЛОКНОТ. И попробуйте просканировать Ваш товар. В итоге Вы должны увидеть в блокноте цифры штрихкода. Если все так и есть, то сканер определился в системе. Переходим к следующему пункту.
- Необходимо скачать файл настроек. необходимо разархивировать и распечатать скачанный файл
- Сканируем ШК из распечатанного файла
- Отключаем сканер от ПК
- Устанавливаем драйвер (скачать для 32-bit или скачать для 64-bit)
- Распаковываем скачанный архив и устанавливаем драйвер
- Подключаем сканер к ПК
- Сканер устанавливается как устройство «com-порт» и ему будет присвоен номер com-порта, например com4(необходимо запомнить номер порта). Если этого не произошло, и появляется окно с требованием установить драйвер, то следует выбрать ручную установку драйвера и указать путь к файлу драйвера.
Теперь сканер настроен и можно переходить к настройке его в программе ОПСУРТ
- Перезапускаем программу ОПСУРТ (если она была запущена)
- Войдите в настройки сканера ШК, нажав на кнопку с изображением сканера штрих кода
- Должно появится окно настройки сканера ШК. Здесь установите флажок «Устройство используется» и выберите используемый устройством COM-порт(тот который запомнили ранее)
Преимущества сервиса Port
Авторизованный сервисный центр для 22 производителей
Услуги по монтажу, настройке, ремонту всего спектра оборудования
Аккредитованные специалисты
Доставка оборудования в сервисный центр
БОЛЬШЕ О СЕРВИСНОМ ЦЕНТРЕ
Обязательная гарантия на услуги
Наша компания является авторизованным сервисным центром, поэтому мы всегда следим за качеством своего обслуживания.Воспользовавшись нашими услугами вы получаете:
Штат специалистов, готовый ответить на вопросы
Бесплатный выезд специалиста
Актуальную документацию по обслуживанию оборудования
БОЛЬШЕ О СЕРВИСНОМ ЦЕНТРЕ
Вам могут быть интересны: