Dyson V11 Outsize Manual
In the box
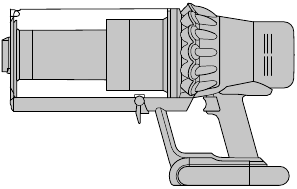
Vacuum cleaner main body
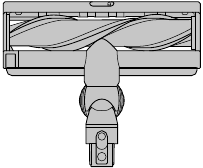
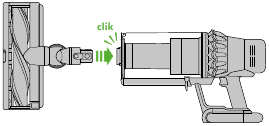
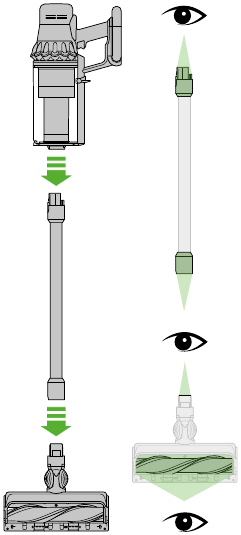
Extra-wide High Torque XL cleaner head
12-inch wide High Torque XL cleaner head with Dyson DLS™ (Dynamic Load Sensor) system. Covers more floor with each sweep, for faster room cleaning.
Dock
Charger
Charges your vacuum with or without the dock.
Wand
Some tools may not be included. You can buy additional tools at Dyson.com
Combination tool
Two tools in one – brush and wide nozzle. For simple switching between tasks.
Crevice tool
Designed for precise cleaning around edges and narrow gaps.
Mini motorized tool
The motorized brush bar tackles hair and ground-in dirt in tight spaces, like your stairs or car.
Soft roller cleaner head
Engineered with soft woven nylon and anti-static carbon fibre, for hard floors.
Wand clip
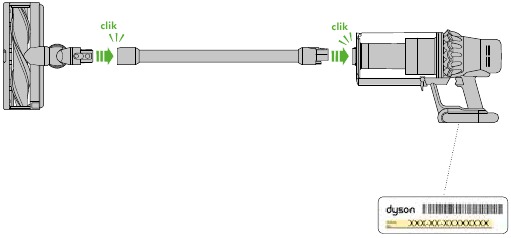
Assembling your machine
You can register your machine using the serial number found on the bottom of your machine.
Getting started
Fully charge your machine before using for the first time.
Power modes
Your machine has three power modes for different tasks. Change power modes quickly using a single button.
Maximum run time for longer cleans all around your home.
The optimum balance of power and run time. Attach your High Torque XL cleaner head to activate Auto mode. Dyson DLS™ technology automatically changes motor speed between floor types.
Intensive cleaning for ground-in dirt.
Caring for your floors
Check that the underside of the cleaner head or tool is clean and free from any objects that may cause damage.
Before vacuuming your flooring, rugs, and carpets, check the manufacturer’s recommended cleaning instructions.
The brush bar on your machine can damage certain carpet types and floors. Some carpets will fuzz if a rotating brush bar is used when vacuuming. If this happens, we recommend vacuuming without the motorised floor tool and consulting with your flooring manufacturer.
The LCD screen
Settings menu
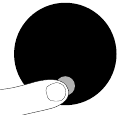
Control the settings on your machine using the button. To enter the settings menu, press and hold the button until the menu screen appears. Tap to scroll through the options available.
Change language
To change the language on your screen, press the button and hold until the language list appears. Release the button.
Tap the button to scroll through the language list to your preferred language. Press and hold the button until the countdown ends.
A green tick will appear on the screen to show your language selection is complete.
To cancel your selection, release the button during the countdown.
Change alert settings
You can turn the alert motor pulse off. Your motor will no longer pulse but alert information will continue to be displayed on the LCD screen when your machine needs your attention.
Turning off Alerts will not turn off the blockage alert pulsing. This is to ensure you clear any blockages, preventing damage to your machine.
Tap to scroll through the settings menu. Select the ‘Alerts’ option.
Scroll to select on or off. Hold the button until the countdown ends and a tick appears on the screen. To cancel your selection, release the button during the countdown.
To exit the settings menu. Tap to scroll through the selection menu. Select ‘Exit menu’.
Run time countdown
When the battery needs charging, your machine will pulse three times and a low run time icon will appear on the screen.
When your battery is empty, a red warning icon will appear English English on the screen.
Battery health
To get the best performance and life from your battery, use Eco or Med mode.
Alerts
When the battery needs charging, your machine will pulse three times and a red warning icon will appear on the screen.
The alerts you might see are:
Filter – the filter isn’t fitted correctly, or needs cleaning.
Blockage – your machine has a blockage that needs removing.
Charging your machine
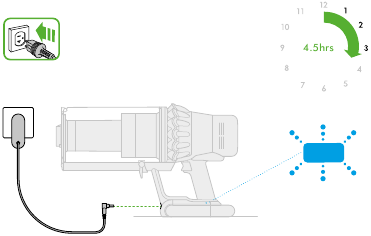
It’s important to fully charge your new machine before using it for the first time, and after every clean. This is because the battery and monitoring system’s algorithm ‘learns’ over time, and fully charging your machine helps it to more accurately calculate and display remaining run time.
Connect to charger either directly or in the dock.
The blue LEDs on either side of the battery will flash during charging.
When the battery is fully charged, both LEDs will light for 5 seconds.
Your battery is fully charged when the display shows 100%.
Your machine won’t operate if the ambient temperature is below 10°C (50°F). This is designed to protect both the motor and battery.
Changing your click-in battery
Where you have additional batteries, we recommend that you alternate the batteries to maintain even performance.
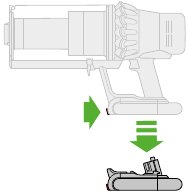
To remove a battery
Hold your hand under the battery to support it.
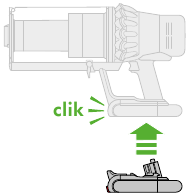
Press the red battery release button and slide the battery off the handle.
Place the battery on charge.
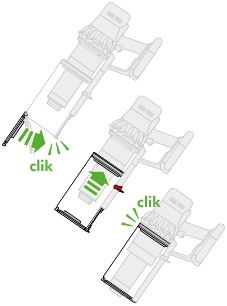
To install a battery
Slide the battery onto the handle until it clicks securely in place.
Emptying your bin
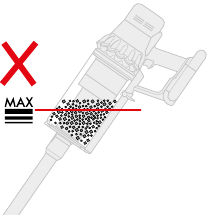
Empty as soon as the dirt reaches the MAX level – don’t overfill. Using the machine when the dirt is above the MAX line may cause the dirt to reach the filter and more frequent maintenance will be required.
Be careful not to pull the power trigger while the clear bin is open for emptying.
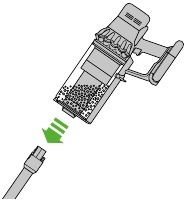
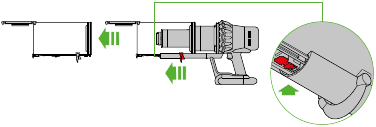
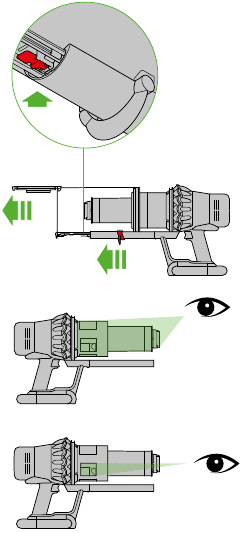
- Press the red wand release button and pull the wand away from the bin.
- To release the dirt:
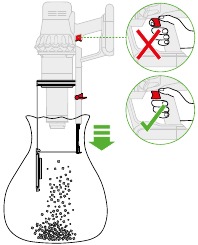
Hold the machine over the bin in a downwards position.
Firmly push the red bin release button. The bin will slide down, cleaning the shroud as it goes and the bin base will open.
The bin base won’t open if the red bin release button isn’t pushed down all the way. - To minimise dust/allergen contact when emptying, cover the clear bin tightly in a dust proof bag while you empty. Remove the clear bin carefully from the bag. Seal the bag tightly and dispose.
Be careful not to pull the power trigger while the clear bin is open for emptying.
To close the clear bin:
Push the bin base upwards until the clear bin and bin base click into place.
Cleaning your bin
If it is necessary to clean your bin, empty the bin as shown in the ‘Emptying your bin’ section.
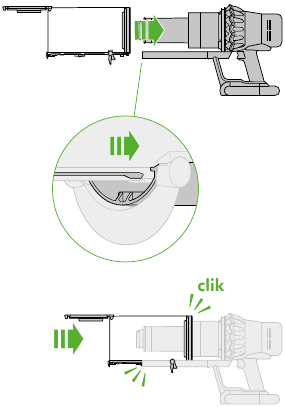
Press the red button located on the bin runner to release the bin and slide the bin off the runner.
Clean the bin with a damp cloth only.
Make sure that the bin and seals are completely dry before replacing.
To refit the bin, insert the spine on to the bin runner.
Close the bin by pushing the bin base upwards until the bin and bin base click into place.
The bin isn’t dishwasher safe and the use of detergents, polishes or air fresheners to clean the bin isn’t recommended as this may damage your machine.
Washing your filter
To always get the best performance from your machine, it is important to regularly clean the filters and check for blockages.
The LCD display will alert you when the filter unit needs washing. We recommend that you wash your filter at least once a month or when your machine alerts you.
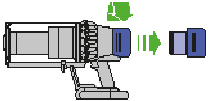
- Remove the filter unit by twisting it anti-clockwise. Gently pull it away from the machine.
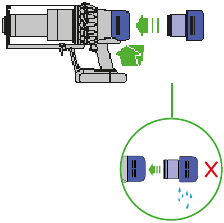
Tap the filter unit gently, to remove any excess dust and debris before washing it. - Wash the filter unit in cold water only.
Wash the pleated paper element of the filter unit first; hold the filter unit under a cold water tap with the foam element downwards and run cold water over the pleated paper. - Wash the foam element of the filter unit next; hold the filter unit under a cold water tap with the foam element downwards so that dirty water does not contaminate the pleated paper element. Run cold water over the inside and outside of the foam element and squeeze the foam gently to expel the dirt.
Repeat washing both parts of the filter unit until the water runs clear.
Gently shake the filter unit to remove any excess water and leave to drain with the foam element end facing up.
Leave the filter unit to dry completely in a dry environment with good airflow, for a minimum of 24 hours. - Check that the filter unit is completely dry.
To refit, position the filter unit in place on the main body and twist clockwise until it clicks into place.
The filter unit may require more frequent washing if vacuuming fine dust or if used mostly in Boost mode.
Don’t put any part of your machine in a dishwasher, washing machine, tumble dryer, oven, microwave or near a naked flame.
Washing your High Torque XL cleaner head
To maintain optimum performance, check and wash your brush bar regularly.
Make sure your machine is disconnected from the charger and take care not to touch the trigger.
- Don’t put your brush bar in a dishwasher, washing machine, tumble dryer, oven, microwave or near a naked flame.
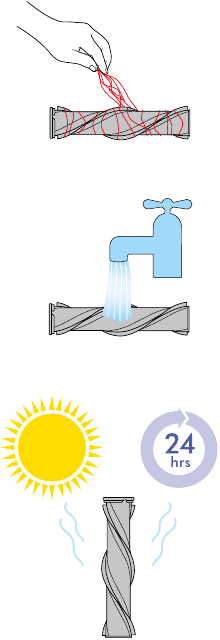
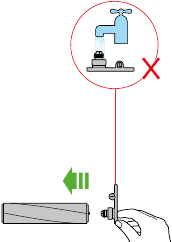
Only use cold water to wash your brush bar and don’t use any detergents.
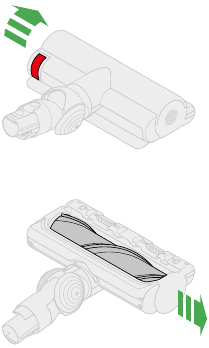
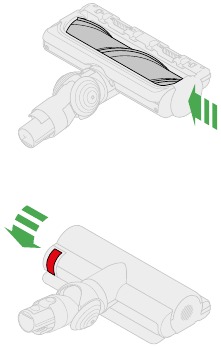
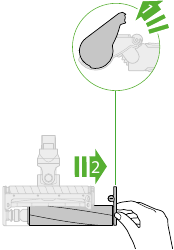
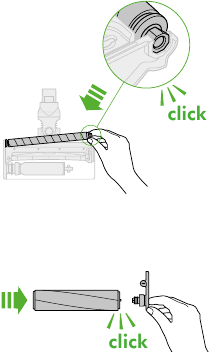
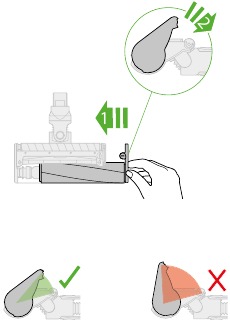
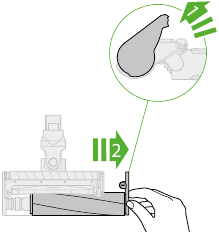
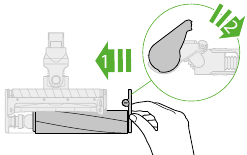
Lift the red catch on the cleaner head to release the brush bar.
Slide the brush bar out of the cleaner head.
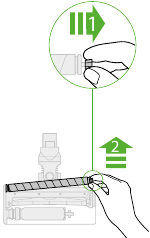
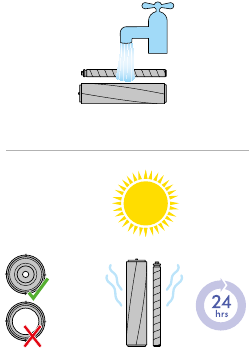
Twist the end cap and remove it from the brush bar. Don’t wash the end cap. - Hold your brush bar under cold tap water and gently rub to remove any lint or dirt.
Stand the brush bar upright and leave to dry completely. Make sure your brush bar is completely dry before refitting. - The cleaner head housing is not washable and should only be wiped over with a damp lint-free cloth.
Washing your Soft roller cleaner head
Crevice tool
Combination tool
Don’t put any part of your machine in a dishwasher or use detergents, polishes or air fresheners.
Wash with cold tap water.
Make sure your tool is completely dry before using.
Your mini-motorised tool is not washable. Wipe over with a damp lint-free cloth.
Using your High Torque XL cleaner head
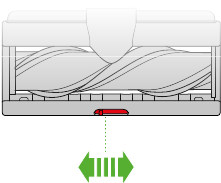
Your High Torque XL cleaner head has a slider control to adjust the suction of the cleaner head.
To select the suction required, move the suction control slider on top of the cleaner head.
+
Maximum suction for ground in dust and debris
For vacuuming durable floor coverings, hard floors and heavily soiled carpets and rugs.
▲
Suction for dust and debris
For vacuuming lightly-soiled carpets, rugs and hard flooring. For vacuuming large debris such as peanuts or rice.
–
Suction for deep pile carpets and delicate flooring
For vacuuming deep pile carpets or rugs and flooring where you experience greater resistance. For vacuuming lightly soiled floors, and delicate flooring such as vinyl, parquet and lino.
Looking for blockages
Your machine is fitted with an automatic cut-out. If any part becomes blocked, the machine may automatically cut out.
The motor will pulse and the LCD screen will indicate that there is a blockage.
Be careful not to pull the power trigger while looking for blockages.
Make sure any blockages are clear and all parts are refitted before using your machine.
Beware of sharp objects when checking for blockages.
Clearing blockages is not covered by your guarantee.
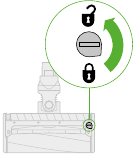
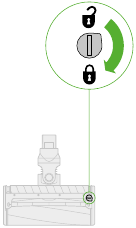
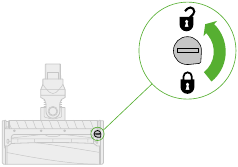
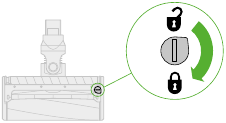
If you can’t clear an obstruction from the cleaner head, you may need to remove the brush bar. Use a coin to unlock the fastener, slide the brush bar out of the cleaner head and remove the obstruction. Replace the brush bar and securely tighten the fastener.
Make sure it is fixed firmly before using your machine.
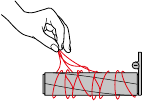
Your machine has carbon fibre brushes. Take care if coming into contact with them, as they may cause minor skin irritation. Wash your hands after handling the brushes.
Soft roller cleaner head maintenance – clearing blockages
Documents / Resources
Download manual
Here you can download full pdf version of manual, it may contain additional safety instructions, warranty information, FCC rules, etc.
Download Dyson V11 Outsize Manual
Пылесос V11
ДОК
Установка листовки и зарядное устройство, док-станция для станции Распаковать •
вода, газ (нет трубопроводов, обеспечивающих и стыковку станции для размещения объекта Select •
место монтажа непосредственно за воздуховодами или проводами, электрическими кабелями, воздухом или
.leaflet Установка по инструкции Следуйте •
. поместить во вложения щелчок •
.станция стыковки в приборе Место •
зарядить) необходимо, если (на выключателе. подать электричество в зарядное устройство. •
. аккумулятор
.Используйте сначала перед полной зарядкой, если вам понадобится прибор Ваш •
/ Применимые нормы и правила в соответствии с установленной станцией должна быть стыковочной.
. (применяются местные и государственные законы (стандарты
при установке материалов и очков, защитной одежды использовать рекомендуется Dyson
.station стыковка
Vacuuming
.station стыковка с прибором Удалить •
посторонние предметы из свободного и чистого — это инструмент или очиститель головки с нижней стороны, который Проверьте •
Причина повреждения может быть
Рекомендуемый производителем чек, ковры и коврики, пол пылесосить.
.инструкции по очистке
ковры Некоторые. полы и типы ковров могут быть повреждены щеткой на стержне.
рекомендуем мы, бывает это если. При использовании пылесоса щетка вращается, если пух будет
.Производитель настил ваш с консультацией и механизированным электроприводом инструмента без пылесоса.
ползунок управления всасыванием — крутящий момент очистителя головки Высокий
.очиститель головки всасывания Регулировка для ползунка управления a имеет крутящий момент очистителя головки Высокий Ваш
.head очиститель верхней части ползунка управления всасыванием движения, требуется всасывание выберите Чтобы
(+) мусор и пыль в земле для всасывания Максимум
. полы твердые и коврики, ковры сильно загрязнены пылесосом Для •
(▲) мусор и пыль для всасывания
. Полы жесткие и коврики, ковровые покрытия пылесосить ежедневно Для •
. рис или арахис как мусор большой пылесосить Для •
(-) полы нежные и ковры с глубоким ворсом для всасывания
Испытайте, что на полах и коврах или коврах ворс глубокий пылесос Для •
сопротивление больше
паркет
mpty •
.emptying for open is bin clear the while trigger ‘ON’ pull to not Осторожно •
. Поместите палец в сторону, вытягивая и кнопку освобождения, красное нажатие на палочку Снимите •
: грязь выпуск К •
.положите вниз a в мусорном ведре вместе с устройством Hold–
.кнопка для освобождения бункера, красная кнопка, плотно прижать —
. Делает это как кожух для очистки, нижний слайд будет собирать —
.open, тогда будет базовая корзина.
. Полностью нажатая кнопка не является красной. Если открыть, не будет основания мусорного ведра
стойкая пыль a в плотно закрытом контейнере очистить корпус, опорожнить при контакте с аллергеном / пылью минимизировать To
Уборка
: bin очистить до необходимого, если
. раздел «мусорное ведро очистить опорожнение» в инструкциях: Следуйте •
вынуть из мусорного ведра задвижка и мусорный бак спусковой крючок в бегунок расположенная на кнопке красная кнопка Нажмите •
.раннер
. только ткань damp a с корзиной очистить Очистить •
.замените до полного высыхания уплотнения и очистите мусорное ведро. Убедитесь, что •
: bin очистить переоборудование В •
.runner bin, чтобы на корешке Вставка–
нажмите на базовый контейнер и очистите его до тех пор, пока базовый контейнер не поднимется вверх.
. поместить в
освежители воздуха или полироли, моющие средства и безопасная посудомоечная машина не является мусорной корзиной.
.Прибор может повредить это, как рекомендовано, а не очистить мусор
Документы / Ресурсы
Рекомендации
На чтение 1 мин
Это подробное руководство и инструкция на русском языке, беспроводного вертикального пылесоса Dyson V11, ознакомится можно на второй странице, pdf файла, который Вы можете скачать внизу. Здесь Вы найдете ответы на такие вопросы как: важные инструкции по технике безопасности, обозначение на дисплее, опустошение прозрачного контейнера, поиск засоров, очистка фильтра, обслуживание насадки с большим крутящим моментом и мягкого валика, промывка и устранение от засоров.
Скачать инструкцию по эксплуатации беспроводного пылесоса Dyson V11
Ссылка для скачивания инструкция dyson v11
Перейти к контенту
Русские электронные инструкции по эксплуатации
Постоянно обновляемый большой каталог документации по эксплуатации и использованию современных устройств и оборудования на русском языке. Бесплатное скачивание файлов.
Поиск:
Главная
♥ В закладки
Просмотр инструкции в pdf
Инструкция по эксплуатации пылесосов Dyson Cyclone V11 Absolute.
Скачать инструкцию к пылесосу Dyson Cyclone V11 Absolute (24,50 МБ)
Инструкции по эксплуатации пылесосов Dyson
« Инструкция к пылесосу Dyson Ball Allergy (CY27 Allergy)
» Инструкция к пылесосу Dyson DC62 Animal Pro
Вам также может быть интересно
Инструкция к пылесосу Dyson V11 Complete
Инструкция к фену Dyson Supersonic HD03, медный с набором чехлов
Инструкция к пылесосу Dyson DC52 Allergy
Инструкция к пылесосу Dyson DC62 Animal Pro
Инструкция к пылесосу Dyson V6 Slim Origin
Инструкция к пылесосу Dyson DC41C Allergy Musclehead Parquet
Инструкция к пылесосу Dyson DC26 Allergy
Инструкция к пылесосу Dyson DC52 Allergy Parquet
Добавить комментарий
Имя *
Email *
Сайт
Комментарий


Сохранить моё имя, email и адрес сайта в этом браузере для последующих моих комментариев.
- Добавить инструкцию
- Заказать инструкцию
- Политика конфиденциальности

clik
clik clik
100%
5%
English
Ελληνικ
Espanol
Čeština
中文
한국어
English EnglishEnglish
Eco
Auto
Boost
Eco
Auto Med
100%
5%
EnglishΕλληνικEspanolČeština
中文
한국어
English EnglishEnglish
Eco
Auto
Boost
Eco
Auto Med
100%
5%
EnglishΕλληνικEspanolČeština
中文
한국어
English EnglishEnglish
Eco
Auto
Med
100%
5%
EnglishΕλληνικEspanolČeština
中文
한국어
English EnglishEnglish
Eco
Med
100%
5%
EnglishΕλληνικEspanolČeština
中文
한국어
English EnglishEnglish
Eco
SV14
Operating manual
Bedienungsanleitung
Manual de instrucciones
Assembly
Zusammenbau
Montaje
Assemblage
Montaggio
Assemblage
Montaż
Сборка
Montaža
Quick start
Kurzanleitung
Inicio rápido
Démarrage rapide
Guida rapida
Snelle start
Szybkie uruchomienie
Краткое руководство
Hitri začetek
Power modes
Your appliance has three power modes for different tasks.
Change cleaning modes quickly using a single button.
Eco: Maximum run time, for longer cleans.
Auto/Med: The optimum balance to clean all floors.
Attach your High torque cleaner head to activate Auto
mode, which automatically adapts power between carpets
and hard floors.
Boost: Intensive cleaning for ground-in dirt.
Leistungsstufen
Ihr Gerät verfügt über drei Leistungsstufen für
unterschiedliche Aufgaben. Über eine einzige Taste
wechseln Sie rasch zwischen Reinigungsmodi.
Eco: Maximale Betriebsdauer für eine längere Reinigung.
Auto/Med: Das optimale Gleichgewicht für alle Böden.
Stecken Sie die Elektrobürste mit Direktantrieb auf, um
den Automatikmodus zu aktivieren, der die Leistung
automatisch an Teppiche und Hartböden anpasst.
Boost: Intensive Reinigung von tiefsitzendem Staub
und Schmutz.
Modos de potencia
El aparato tiene tres modos de potencia para distintas
tareas. Cambie de modo de limpieza de forma rápida
pulsando un solo botón.
Eco: Tiempo de funcionamiento máximo para limpiezas
más largas.
Auto/Medio: El equilibrio perfecto para limpiar todo tipo
de suelos.
Ponga el cabezal de limpieza Direct Drive para
activar el modo Automático, que adapta la potencia
automáticamente para alfombras y suelos duros.
Boost: Limpieza en profundidad para la suciedad
más difícil.
Modes de puissance
Votre appareil possède trois modes de puissance pour
effectuer différentes tâches. Changez de mode de
nettoyage rapidement à l’aide d’un seul bouton.
Éco: Durée de fonctionnement maximale, pour des
nettoyages plus longs.
Auto/Inter: Le parfait équilibre pour nettoyer tous les sols.
Raccordez votre brosse motorisée pour activer le mode
automatique, qui adapte automatiquement la puissance
entre les tapis et les sols durs.
Boost: Pour les nettoyages intensifs et la poussière incrustée.
Modalità di accensione
L’apparecchio ha tre modalità di accensione per funzioni
diverse. Tramite un unico tasto è possibile cambiare
rapidamente la modalità di pulizia.
Eco: Durata massima, per pulire più a lungo.
Auto/Med: L’equilibrio perfetto per pulire
qualsiasi pavimento.
Collegare la spazzola Torque Head per attivare la modalità
automatica, che consente di adattare automaticamente la
potenza passando dai tappeti alle superfici rigide.
Boost: Pulizia intensa per sporco ostinato.
Vermogensmodi
Uw apparaat heeft drie vermogensmodi voor verschillende
taken. Wijzig snel de reinigingsmodus met gebruik van een
enkele knop.
Eco: Maximale looptijd, voor langere reinigingen.
Auto/Med: De optimale balans voor het reinigen van alle
typen vloeren.
Bevestig uw hoge torque vloerzuigmond voor het
activeren van de Automatische modus, wat het vermogen
automatisch aanpast tussen tapijten en harde vloeren.
Boost: intensieve reiniging voor extra vuile plekken.
Tryby mocy
Urządzenie ma trzy tryby mocy dostosowane do różnych
zadań. Tryb czyszczenia można zmienić szybko za pomocą
jednego przycisku.
Eco: Maksymalny czas pracy, do dłuższego sprzątania.
Auto/Med: Optymalny balans do czyszczenia wszystkich
rodzajów podłóg.
Wystarczy zamocować elektroszczotkę Torque Drive, by
uruchomić tryb automatyczny, w którym poziom mocy
sam dostosuje się rodzaju powierzchni – dywanu lub
twardej podłogi.
Boost: Intensywne czyszczenie uporczywego brudu.
Режимы работы
Устройство может работать в трех режимах в
зависимости от выполняемой задачи. Режимы быстро
переключаются одной кнопкой.
Эко: максимальное время работы, дольше чистка.
Авто/средний: оптимальный баланс для чистки пола
любого типа.
Подключите насадку с высоким крутящим моментом
для активации авторежима, в котором автоматически
осуществляется адаптация мощности между
ковровыми и твердыми напольными покрытиями.
Турбо: интенсивная очистка сложных загрязнений.
Načini porabe energije
Naprava ima tri načine porabe energije za različna
opravila. Način čiščenja lahko hitro spremenite s samo
enim gumbom.
Eko: Najdaljši čas delovanja, primeren za daljša čiščenja.
Auto/Sred: Optimalno ravnovesje za čiščenje vseh
talnih površin.
Namestite čistilno glavo z visokim navorom, da vklopite
samodejni način, ki samodejno prilagaja moč delovanja
med čiščenjem preprog oziroma gladkih površin.
Boost: Intenzivno čiščenje za trdovratno umazanijo.
Manuel d’utilisation
Manuale d’uso
Gebruikershandleiding
Instrukcja obsługi
Руководство по эксплуатации
Priročnik za uporabo
Charging
Your appliance will need to be fully charged before
first use.
Aufladen
Das Gerät muss vor dem ersten Gebrauch vollständig
geladen werden.
Carga
El dispositivo deberá estar totalmente cargado antes de
usarlo por primera vez.
Chargement
Votre appareil doit être complètement chargé avant la
première utilisation.
Carica
Prima del primo utilizzo, la ricarica dell’apparecchio
dovrà essere completa.
Opladen
Uw apparaat moet voor het eerste gebruik volledig
worden opgeladen.
Ładowanie
Przed pierwszym użyciem urządzenie musi być w
pełni naładowane.
Зарядка
Перед первым использованием устройство
необходимо полностью зарядить.
Polnjenje
Pred prvo uporabo mora biti naprava
popolnoma napolnjena.
Scan with your phone or QR reader to get the most out
of your machine.
Requires Apple iOS 11 or later, a compatible Android
device or a QR reader.
Scannen Sie den Code mit Ihrem Mobiltelefon oder
einem QR Scanner, um das Beste aus Ihrem Gerät
herauszuholen.
Erfordert mindestens Apple iOS 11, ein kompatibles
Android Gerät oder einen QR Scanner.
Scanee con su teléfono o su lector QR para sacar el
máximo partido a su máquina
Requiere Apple iOS 11 o versiones posteriores, un
dispositivo Android compatible o un lector QR.
Veuillez scanner avec votre téléphone ou votre lecteur
de QR codes pour tirer le meilleur parti de votre
appareil.
Nécessite iOS Apple 11 ou plus récent, un appareil
Android compatible ou un lecteur de QR codes.
Scan with your phone or QR reader to get the most out
of your machine.
Requires Apple iOS 11 or later, a compatible Android
device or a QR reader.
Scan met de camera van uw telefoon of QR-lezer om
het meeste uit uw machine te halen.
Vereist Apple iOS 11 of later, een vergelijkbaar Android
apparaat of een QR lezer.
Zeskanuj telefonem lub czytnikiem kodów QR, aby w
pełni wykorzystać możliwości Twojego urządzenia.
Wymaga systemu iOS 11 lub późniejszego,
kompatybilnego urządzenia z systemem Android lub
czytnika kodów QR.
Используйте камеру вашего телефона или
сканер QR-кодов для получения дополнительной
информации по вашему продукту.
Требуется устройство с операционной системой
Apple iOS 11 или более поздними версиями,
Android-совместимое устройство или сканер
QR-кодов.
Skenirajte s telefonom ali bralnikom QR, da kar
najbolje izkoristite svojo napravo.
Zahteva Apple iOS 11 ali novejšo različico, združljivo
napravo Android ali bralnik QR.
13.11.2018 12:58 — C97400_SV14_OPMAN_EU_X248F—V11-ABSOLUTE—OPMAN-97400.indd_15_4c0s


