- Manuals
- Brands
- D-Link Manuals
- Switch
- xStack DGS-3120-24SC
Manuals and User Guides for D-Link xStack DGS-3120-24SC. We have 3 D-Link xStack DGS-3120-24SC manuals available for free PDF download: Hardware Installation Manual
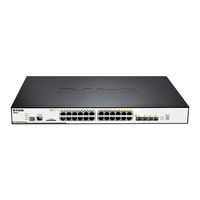
D-Link xStack DGS-3120-24SC Hardware Installation Manual (71 pages)
XStack DGS-3120 Series Layer 3 Managed Gigabit Switch
Brand: D-Link
|
Category: Switch
|
Size: 2.81 MB
Table of Contents
-
Table of Contents
3
-
Intended Readers
5
-
Typographical Conventions
5
-
Notes, Notices, and Cautions
5
-
Safety Instructions
6
-
Safety Cautions
6
-
-
General Precautions for Rack-Mountable Products
7
-
Protecting against Electrostatic Discharge
8
-
Chapter 1 Introduction
9
-
Switch Description
9
-
Features
10
-
Ports
12
-
Front Panel Components
13
-
LED Indicators
14
-
-
Rear Panel Description
17
-
Side Panel Description
18
-
-
Chapter 2 Installation
19
-
Package Contents
19
-
Installation Guidelines
19
-
Installing the Switch Without a Rack
20
-
Attaching Brackets to a Switch for Rack Mounting
20
-
Mounting the Switch in a Standard 19″ Rack
21
-
-
Power on (AC Power)
21
-
Power Failure (AC Power)
21
-
-
Connecting DC Power to the DGS-3120-24SC-DC
22
-
Installing SFP Ports
23
-
Connecting to a Redundant Power Supply
24
-
Installing the RPS into a Rack-Mount Chassis
25
-
Dps-700
25
-
Dps-800
26
-
Dps-900
27
-
-
-
Chapter 3 Connecting the Switch
29
-
Switch to End Node
29
-
Switch to Switch
30
-
Connecting to Network Backbone or Server
31
-
-
Chapter 4 Introduction to Switch Management
32
-
Management Options
32
-
Connecting the Console Port
32
-
First Time Connecting to the Switch
34
-
Password Protection
34
-
IP Address Assignment
35
-
SNMP Settings
35
-
Traps
36
-
Mibs
36
-
Management Information Base
36
-
-
-
Chapter 5 Web-Based Switch Configuration
37
-
Introduction
37
-
Logging Onto the Web Manager
37
-
Web-Based User Interface
38
-
Areas of the User Interface
38
-
-
Web Pages
39
-
-
Appendix A — Technical Specifications
40
-
General
40
-
Physical and Environmental
41
-
Performance
41
-
LED Indicators
42
-
Port Functions
44
-
-
Appendix B — Cables and Connectors
46
-
Ethernet Cable
46
-
Console Cable
47
-
Redundant Power Supply (RPS) Cable
48
-
-
Appendix C — Module Specs and Cable Lengths
51
-
Product Registration
54
-
Tech Support
55
-
Technical Support
56
-
Assistance Technique
57
-
Pomoc Techniczna
58
-
Registration Card
70
-
All Countries and Regions Excluding Usa
70
-
Advertisement
D-Link xStack DGS-3120-24SC Hardware Installation Manual (71 pages)
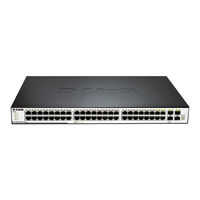
xStack DGS-3120 Series Layer 2 Managed Stackable Ethernet Switch
Brand: D-Link
|
Category: Switch
|
Size: 2.81 MB
Table of Contents
-
Table of Contents
3
-
Intended Readers
5
-
Typographical Conventions
5
-
Notes, Notices, and Cautions
5
-
Safety Instructions
6
-
Safety Cautions
6
-
-
General Precautions for Rack-Mountable Products
7
-
Protecting against Electrostatic Discharge
8
-
Chapter 1 Introduction
9
-
Switch Description
9
-
Features
10
-
Ports
11
-
Front Panel Components
13
-
LED Indicators
14
-
-
Rear Panel Description
17
-
Side Panel Description
18
-
-
Chapter 2 Installation
19
-
Package Contents
19
-
Installation Guidelines
19
-
Installing the Switch Without a Rack
20
-
Attaching Brackets to a Switch for Rack Mounting
20
-
Mounting the Switch in a Standard 19″ Rack
21
-
-
Power on (AC Power)
21
-
Power Failure (AC Power)
21
-
-
Connecting DC Power to the DGS-3120-24SC-DC
22
-
Installing SFP Ports
23
-
Connecting to a Redundant Power Supply
24
-
Installing the RPS into a Rack-Mount Chassis
25
-
Dps-700
25
-
Dps-800
26
-
Dps-900
27
-
-
-
Chapter 3 Connecting the Switch
29
-
Switch to End Node
29
-
Switch to Switch
30
-
Connecting to Network Backbone or Server
31
-
-
Chapter 4 Introduction to Switch Management
32
-
Management Options
32
-
Connecting the Console Port
32
-
First Time Connecting to the Switch
34
-
Password Protection
34
-
IP Address Assignment
35
-
SNMP Settings
35
-
Traps
36
-
Mibs
36
-
Management Information Base
36
-
-
-
Chapter 5 Web-Based Switch Configuration
37
-
Introduction
37
-
Logging Onto the Web Manager
37
-
Web-Based User Interface
38
-
Areas of the User Interface
38
-
-
Web Pages
39
-
-
Appendix A — Technical Specifications
40
-
General
40
-
Physical and Environmental
41
-
Performance
41
-
LED Indicators
42
-
Port Functions
44
-
-
Appendix B — Cables and Connectors
46
-
Ethernet Cable
46
-
Console Cable
47
-
Redundant Power Supply (RPS) Cable
48
-
-
Appendix C — Module Specs and Cable Lengths
51
-
Product Registration
54
-
Tech Support
55
-
Technical Support
56
-
Assistance Technique
57
-
Pomoc Techniczna
58
-
Registration Card
70
-
All Countries and Regions Excluding Usa
70
-
D-Link xStack DGS-3120-24SC Hardware Installation Manual (52 pages)
xStack DGS-3120 Series Layer2 Managet Stackable Gigabit Switch
Brand: D-Link
|
Category: Switch
|
Size: 2.11 MB
Table of Contents
-
Table of Contents
3
-
Intended Readers
5
-
Typographical Conventions
5
-
Notes, Notices, and Cautions
5
-
Safety Instructions
6
-
Safety Cautions
6
-
-
General Precautions for Rack-Mountable Products
7
-
Protecting against Electrostatic Discharge
8
-
Chapter 1 Introduction
9
-
Switch Description
9
-
Features
10
-
Ports
12
-
Front Panel Components
13
-
-
LED Indicators
14
-
Rear Panel Description
16
-
Side Panel Description
17
-
-
-
Chapter 2 Installation
18
-
Package Contents
18
-
Installation Guidelines
18
-
Installing the Switch Without a Rack
19
-
Attaching Brackets to a Switch for Rack Mounting
19
-
Mounting the Switch in a Standard 19″ Rack
20
-
-
Power on (AC Power)
20
-
Power Failure (AC Power)
20
-
-
Connecting DC Power to the DGS-3120-24SC-DC
21
-
Installing SFP Ports
21
-
Connect to a Redundant Power Supply
23
-
External Redundant Power System
24
-
Dps-700
24
-
Dps-800
26
-
Dps-900
27
-
-
-
Chapter 3 Connecting the Switch
29
-
Switch to End Node
29
-
Switch to Switch
30
-
Connecting to Network Backbone or Server
31
-
-
Chapter 4 Introduction to Switch Management
32
-
Management Options
32
-
Connecting the Console Port
32
-
First Time Connecting to the Switch
34
-
Password Protection
34
-
IP Address Assignment
35
-
SNMP Settings
35
-
Traps
36
-
Mibs
36
-
Management Information Base
36
-
-
-
Chapter 5 Web-Based Switch Configuration
37
-
Introduction
37
-
Logging Onto the Web Manager
37
-
Web-Based User Interface
38
-
Areas of the User Interface
38
-
-
Web Pages
38
-
-
Appendix Section
40
-
Appendix A — Technical Specifications
40
-
General
40
-
Physical and Environmental
40
-
Performance
41
-
LED Indicators
42
-
Port Functions
44
-
-
Appendix B — Cables and Connectors
46
-
Ethernet Cable
46
-
Console Cable
47
-
Redundant Power Supply (RPS) Cable
48
-
-
Appendix C — Module Specs and Cable Lengths
50
-
-
Warranties
51
-
Technical Support Information
52
Advertisement
Advertisement
Related Products
-
D-Link xStack DGS-3120-24TC
-
D-Link DGS-3120-48PC-EI
-
D-Link DGS-3120-48PC-SI
-
D-Link xStack DGS-3120-48TC
-
D-Link xStack DGS-3120-24PC
-
D-Link xStack DGS-3120-48PC
-
D-Link DGS-3120-24PC-EI
-
D-Link DGS-3120-24PC-SI
-
D-Link xStack DGS-3120 Series
-
D-Link xStack DGS-3120-24SC-DC
D-Link Categories
![]()
Network Router
Wireless Router
![]()
Switch
Adapter
![]()
Security Camera
More D-Link Manuals
![]()

xStack® DGS-3120 Series Layer 3 Managed Gigabit Ethernet Switch CLI Reference Guide
|
Table of Contents |
||
|
Chapter 1 |
Using Command Line Interface………………………………………………………………………………… |
1 |
|
Chapter 2 |
Basic Command List ………………………………………………………………………………………………. |
8 |
|
Chapter 3 |
802.1Q VLAN Command List…………………………………………………………………………………. |
23 |
|
Chapter 4 |
802.1X Command List…………………………………………………………………………………………… |
38 |
|
Chapter 5 |
Access Authentication Control Command List………………………………………………………….. |
62 |
|
Chapter 6 |
Access Control List (ACL) Command List………………………………………………………………. |
103 |
|
Chapter 7 |
Access Control List (ACL) Egress Command List (RI and EI Mode Only) ………………….. |
123 |
|
Chapter 8 |
Address Resolution Protocol (ARP) Command List…………………………………………………. |
142 |
|
Chapter 9 |
ARP Spoofing Prevention Command List ………………………………………………………………. |
147 |
|
Chapter 10 |
Asymmetric VLAN Command List…………………………………………………………………………. |
149 |
|
Chapter 11 |
Auto-Configuration Command List………………………………………………………………………… |
151 |
|
Chapter 12 |
Basic Commands Command List………………………………………………………………………….. |
153 |
|
Chapter 13 |
BPDU Attack Protection Command List…………………………………………………………………. |
170 |
|
Chapter 14 |
Cable Diagnostics Command List…………………………………………………………………………. |
175 |
|
Chapter 15 |
Command Logging Command List………………………………………………………………………… |
178 |
|
Chapter 16 |
Compound Authentication Command List ……………………………………………………………… |
181 |
|
Chapter 17 |
Configuration Command List………………………………………………………………………………… |
192 |
|
Chapter 18 |
Configuration Trap Command List ………………………………………………………………………… |
197 |
|
Chapter 19 |
Connectivity Fault Management (CFM) Command List (RI and EI Mode Only)…………… |
199 |
|
Chapter 20 Connectivity Fault Management (CFM) Extension Command List (RI and EI Mode Only) |
||
|
…………………………………………………………………………………………………………………………. |
227 |
|
|
Chapter 21 |
CPU Interface Filtering Command List ………………………………………………………………….. |
231 |
|
Chapter 22 |
Debug Software Command List ……………………………………………………………………………. |
242 |
|
Chapter 23 |
Denial-of-Service (DoS) Attack Prevention Command List ………………………………………. |
284 |
|
Chapter 24 |
DHCP Local Relay Command List………………………………………………………………………… |
288 |
|
Chapter 25 |
DHCP Relay Command List…………………………………………………………………………………. |
292 |
|
Chapter 26 |
DHCP Server Command List (RI Mode Only)…………………………………………………………. |
311 |
|
Chapter 27 |
DHCP Server Screening Command List………………………………………………………………… |
330 |
|
Chapter 28 |
DHCPv6 Relay Command List……………………………………………………………………………… |
334 |
|
Chapter 29 |
Digital Diagnostic Monitoring (DDM) Command List (RI and EI Mode Only)……………….. |
340 |
|
Chapter 30 |
Distance Vector Multicast Routing Protocol (DVMRP) Command List (RI Mode Only) … |
347 |
|
Chapter 31 |
D-Link License management System (DLMS) Command List ………………………………….. |
354 |
|
Chapter 32 |
D-Link Unidirectional Link Detection (DULD) Command List (RI and EI Mode Only) …… |
356 |
|
Chapter 33 |
Energy Efficient Ethernet (EEE) Command List (Hardware Bx Only)…………………………. |
358 |
|
Chapter 34 |
Ethernet Ring Protection Switching (ERPS) Command List (RI and EI Mode Only)…….. |
360 |
|
Chapter 35 |
FDB Command List…………………………………………………………………………………………….. |
370 |
|
Chapter 36 |
Filter Command List ……………………………………………………………………………………………. |
380 |
|
I |

|
xStack® DGS-3120 Series Layer 3 Managed Gigabit Ethernet Switch CLI Reference Guide |
|
|
Chapter 37 Flash File System (FFS) Command List ………………………………………………………………… |
383 |
|
Chapter 38 Gratuitous ARP Command List …………………………………………………………………………….. |
394 |
|
Chapter 39 Internet Group Management Protocol (IGMP) Command List (RI Mode Only) ……………. |
400 |
|
Chapter 40 IGMP Proxy Command List (RI Mode Only) …………………………………………………………… |
408 |
|
Chapter 41 IGMP Snooping Command List…………………………………………………………………………….. |
413 |
|
Chapter 42 IP-MAC-Port Binding (IMPB) Command List (RI and EI Mode Only) …………………………. |
437 |
|
Chapter 43 IP Multicast (IPMC) Command List (RI Mode Only) ………………………………………………… |
460 |
|
Chapter 44 IP Route Filter Command List (RI Mode Only) ……………………………………………………….. |
462 |
|
Chapter 45 IP Tunnel Command List (RI Mode Only) ………………………………………………………………. |
469 |
|
Chapter 46 IPv6 Neighbor Discover Command List …………………………………………………………………. |
477 |
|
Chapter 47 IPv6 Route Command List …………………………………………………………………………………… |
484 |
|
Chapter 48 Japanese Web-Based Access Control (JWAC) Command List ………………………………… |
487 |
|
Chapter 49 Jumbo Frame Command List……………………………………………………………………………….. |
511 |
|
Chapter 50 Layer 2 Protocol Tunneling (L2PT) Command List………………………………………………….. |
513 |
|
Chapter 51 Link Aggregation Command List …………………………………………………………………………… |
517 |
|
Chapter 52 Link Layer Discovery Protocol (LLDP) Command List……………………………………………… |
524 |
|
Chapter 53 Loopback Detection (LBD) Command List……………………………………………………………… |
550 |
|
Chapter 54 Loopback Interface Command List (RI Mode Only)…………………………………………………. |
556 |
|
Chapter 55 MAC Notification Command List …………………………………………………………………………… |
559 |
|
Chapter 56 MAC-based Access Control Command List……………………………………………………………. |
564 |
|
Chapter 57 MAC-based VLAN Command List…………………………………………………………………………. |
581 |
|
Chapter 58 MD5 Configuration Command List (RI Mode Only) …………………………………………………. |
584 |
|
Chapter 59 Mirror Command List…………………………………………………………………………………………… |
587 |
|
Chapter 60 Multicast Listener Discovery Protocol (MLD) Command List (RI Mode Only) ……………… |
592 |
|
Chapter 61 MLD Proxy Command List (RI Mode Only)…………………………………………………………….. |
595 |
|
Chapter 62 MLD Snooping Command List ……………………………………………………………………………… |
600 |
|
Chapter 63 MSTP debug enhancement Command List ……………………………………………………………. |
620 |
|
Chapter 64 Multicast Filter Command List………………………………………………………………………………. |
627 |
|
Chapter 65 Multicast VLAN Command List …………………………………………………………………………….. |
638 |
|
Chapter 66 Network Load Balancing (NLB) Command List ………………………………………………………. |
652 |
|
Chapter 67 Network Monitoring Command List ……………………………………………………………………….. |
658 |
|
Chapter 68 OAM Command List (RI and EI Mode Only)…………………………………………………………… |
665 |
|
Chapter 69 Open Shortest Path First (OSPF) Version 2 Command List (RI Mode Only) ………………. |
673 |
|
Chapter 70 OSPF Version 3 Command List (RI Mode Only) …………………………………………………….. |
694 |
|
Chapter 71 Password Recovery Command List………………………………………………………………………. |
713 |
|
Chapter 72 Peripherals Command List…………………………………………………………………………………… |
716 |
|
Chapter 73 Ping Command List…………………………………………………………………………………………….. |
722 |
|
Chapter 74 Policy Route Command List (RI Mode Only) ………………………………………………………….. |
725 |
|
Chapter 75 Port Security Command List ………………………………………………………………………………… |
728 |
|
II |

xStack® DGS-3120 Series Layer 3 Managed Gigabit Ethernet Switch CLI Reference Guide
|
Chapter 76 |
Power over Ethernet (PoE) Command List (DGS — 3120 — 24PC and DGS — 3120 — 48PC |
|
|
Only) |
…………………………………………………………………………………………………………………………. |
736 |
|
Chapter 77 |
Power Saving Command List ……………………………………………………………………………….. |
742 |
|
Chapter 78 |
PPPoE Circuit ID Insertions Command List (RI and EI Mode Only) …………………………… |
748 |
|
Chapter 79 |
Protocol Independent Multicast (PIM) Command List (RI Mode Only) ……………………….. |
752 |
|
Chapter 80 …………………………………………………………… |
PIM for IPv6 Command List (RI Mode Only) |
770 |
|
Chapter 81 ……………………………………………………………………………… |
Protocol VLAN Command List |
789 |
|
Chapter 82 …………………………………………………………… |
QinQ Command List (RI and EI Mode Only) |
795 |
|
Chapter 83 ………………………………………………………………… |
Quality of Service (QoS) Command List |
803 |
|
Chapter 84 ……………………………………….. |
Remote Switched Port ANalyzer (RSPAN) Command List |
820 |
|
Chapter 85 …………………………… |
Routing Information Protocol (RIP) Command List (RI Mode Only) |
826 |
|
Chapter 86 ……………………………………………………………………. |
RIPng Command List (RI Mode Only) |
831 |
|
Chapter 87 ………………………………………………………………………………………… |
Routing Command List |
837 |
|
Chapter 88 …………………………………………………………………………… |
RPC PortMapper Command List |
853 |
|
Chapter 89 …………………………………………………………………………. |
Safeguard Engine Command List |
855 |
|
Chapter 90 …………………………………………………………………… |
SD Card Management Command List |
857 |
|
Chapter 91 ……………………………………………………………………….. |
Secure Shell (SSH) Command List |
864 |
|
Chapter 92 ………………………………………………………….. |
Secure Sockets Layer (SSL) Command List |
875 |
|
Chapter 93 ………………………………………………………… |
Spanning Tree Protocol (STP) Command List |
882 |
|
Chapter 94 ………………………………………………………………………… |
Surveillance VLAN Command List |
895 |
|
Chapter 95 ………………………………………………………….. |
sFlow Command List (RI and EI Mode Only) |
901 |
|
Chapter 96 ………………………………………………………………… |
Show Technical Support Command List |
913 |
|
Chapter 97 …………………………………………….. |
Simple Mail Transfer Protocol (SMTP) Command List |
916 |
|
Chapter 98 ……………………………….. |
Simple Network Management Protocol (SNMP) Command List |
921 |
|
Chapter 99 ………………………………………………………………….. |
Single IP Management Command List |
950 |
|
Chapter 100 ……………………………………………………… |
Stacking Command List (EI and SI Mode Only) |
960 |
|
Chapter 101 ……………………………………………… |
Static Multicast Route Command List (RI Mode Only) |
968 |
|
Chapter 102 …………………………………………………… |
Syslog and Trap Source — interface Command List |
971 |
|
Chapter 103 ………………………………………………………………………………….. |
System Log Command List |
975 |
|
Chapter 104 ……………………………………………………………………………. |
System Severity Command List |
987 |
|
Chapter 105 …………………………………………………………………………………. |
Telnet Client Command List |
989 |
|
Chapter 106 ………………………………………………………………………………….. |
TFTP Client Command List |
990 |
|
Chapter 107 ……………………………………………………………………………. |
Time and SNTP Command List |
995 |
|
Chapter 108 ……………………………………………………………………………….. |
Trace Route Command List |
1003 |
|
Chapter 109 …………………………………………………………………………….. |
Traffic Control Command List |
1006 |
|
Chapter 110 ……………………………………………………………………. |
Traffic Segmentation Command List |
1012 |
|
Chapter 111 ………………………………………………………………………………. |
Trusted Host Command List |
1014 |
|
Chapter 112 ………………………………………………………………………………… |
UDP Helper Command List |
1018 |
|
Chapter 113 …………… |
Virtual Router Redundancy Protocol (VRRP) Command List (RI Mode Only) |
1023 |
|
Chapter 114 ……………………………………………………………………………. |
VLAN Trunking Command List |
1030 |
|
III |

xStack® DGS-3120 Series Layer 3 Managed Gigabit Ethernet Switch CLI Reference Guide
|
Chapter 115 |
Voice VLAN Command List………………………………………………………………………………… |
1035 |
|
Chapter 116 |
Web-Based Access Control (WAC) Command List ……………………………………………….. |
1046 |
|
Chapter 117 |
Weighted Random Early Detection (WRED) Command List …………………………………… |
1061 |
|
Appendix A |
Password Recovery Procedure…………………………………………………………………………… |
1068 |
|
Appendix B |
System Log Entries …………………………………………………………………………………………… |
1070 |
|
Appendix C |
Trap Log Entries……………………………………………………………………………………………….. |
1084 |
|
Appendix D |
RADIUS Attributes Assignment…………………………………………………………………………… |
1102 |
|
Appendix E |
IETF RADIUS Attributes Support ………………………………………………………………………… |
1106 |
IV

xStack® DGS-3120 Series Layer 3 Managed Gigabit Ethernet Switch CLI Reference Guide
Chapter 1 Using Command Line
Interface
The Switch can be managed through the Switch’s serial port, Telnet, SNMP or the Web-based management agent. The Command Line Interface (CLI) can be used to configure and manage the Switch via the serial port or Telnet interfaces.
This manual provides a reference for all of the commands contained in the CLI. Every command will be introduced in terms of purpose, format, description, parameters, and examples. Configuration and management of the Switch via the Web-based management agent are discussed in the Web UI Reference Guide. For detailed information on installing hardware please also refer to the Hardware Installation Guide.
1-1 Accessing the Switch via the Serial Port
The Switch’s serial port’s default settings are as follows:
•115200 baud
•no parity
•8 data bits
•1 stop bit
A computer running a terminal emulation program capable of emulating a VT-100 terminal and a serial port configured as above are then connected to the Switch’s Console port via an included RS-232 to RJ-45 convertor cable.
With the serial port properly connected to a management computer, the following screen should be visible.
DGS-3120-24TC Gigabit Ethernet Switch
Command Line Interface
Firmware: Build 3.10.512
Copyright(C) 2014 D-Link Corporation. All rights reserved.
UserName:
PassWord:
DGS-3120-24TC:admin#
There is no initial username or password. Just press the Enter key twice to display the CLI input cursor − DGS-3120-24TC:admin# . This is the command line where all commands are input.
1-2 Setting the Switch’s IP Address
Each Switch must be assigned its own IP Address, which is used for communication with an SNMP network manager or other TCP/IP application (for example BOOTP, TFTP). The Switch’s
1

xStack® DGS-3120 Series Layer 3 Managed Gigabit Ethernet Switch CLI Reference Guide
default IP address is 10.90.90.90. You can change the default Switch IP address to meet the specification of your networking address scheme.
The Switch is also assigned a unique MAC address by the factory. This MAC address cannot be changed, and can be found on the initial boot console screen – shown below.
——————————————————————————-
|
Power On Self |
Test …………………………………. |
100 |
% |
|
MAC Address |
: 10-BF-48-D0-E0-E0 |
||
|
H/W Version |
: B1 |
||
|
Please Wait, Loading V3.10.512 Runtime Image ………….. |
100 |
% |
|
|
UART init …………………………………………. |
100 |
% |
|
|
Starting runtime image |
|||
|
Device Discovery …………………………………… |
| |
The Switch’s MAC address can also be found in the Web management program on the Switch Information (Basic Settings) window on the Configuration menu.
The IP address for the Switch must be set before it can be managed with the Web-based manager. The Switch IP address can be automatically set using BOOTP or DHCP protocols, in which case the actual address assigned to the Switch must be known.
Starting at the command line prompt, enter the commands config ipif System ipaddress xxx.xxx.xxx.xxx/yyy.yyy.yyy.yyy. Where the x’s represent the IP address to be assigned to the IP interface named System and the y’s represent the corresponding subnet mask.
Alternatively, you can enter config ipif System ipaddress xxx.xxx.xxx.xxx/z. Where the x’s represent the IP address to be assigned to the IP interface named System and the z represents the corresponding number of subnets in CIDR notation.
The IP interface named System on the Switch can be assigned an IP address and subnet mask which can then be used to connect a management station to the Switch’s Telnet or Web-based management agent.
DGS-3120-24TC:admin# config ipif System ipaddress 10.24.22.100/255.0.0.0
Command: config ipif System ipaddress 10.24.22.100/8
Success.
DGS-3120-24TC:admin#
In the above example, the Switch was assigned an IP address of 10.24.22.100 with a subnet mask of 255.0.0.0. The system message Success indicates that the command was executed successfully. The Switch can now be configured and managed via Telnet, SNMP MIB browser and the CLI or via the Web-based management agent using the above IP address to connect to the Switch.
2
xStack® DGS-3120 Series Layer 3 Managed Gigabit Ethernet Switch CLI Reference Guide
There are a number of helpful features included in the CLI. Entering the ? command will display a list of all of the top-level commands.
..
?
cable_diag ports cd
cfm linktrace cfm lock md cfm loopback change drive clear
clear address_binding dhcp_snoop binding_entry ports clear address_binding nd_snoop binding_entry ports clear arptable
clear attack_log clear cfm pkt_cnt clear counters clear dhcp binding
clear dhcp conflict_ip clear ethernet_oam ports clear fdb
clear igmp_snooping statistics counter clear jwac auth_state
clear log
CTRL+C ESC q Quit SPACE n Next Page ENTER Next Entry a All
When entering a command without its required parameters, the CLI will prompt you with a Next possible completions: message.
DGS-3120-24TC:admin#config account
Command: config account Next possible completions: <username 15>
DGS-3120-24TC:admin#
In this case, the command config account was entered with the parameter <username 15>. The CLI will then prompt to enter the <username 15> with the message, Next possible completions:. Every command in the CLI has this feature, and complex commands have several layers of parameter prompting.
In addition, after typing any given command plus one space, users can see all of the next possible sub-commands, in sequential order, by repeatedly pressing the Tab key.
To re-enter the previous command at the command prompt, press the up arrow cursor key. The previous command will appear at the command prompt.
3

xStack® DGS-3120 Series Layer 3 Managed Gigabit Ethernet Switch CLI Reference Guide
DGS-3120-24TC:admin#config account
Command: config account Next possible completions: <username 15>
DGS-3120-24TC:admin#config account
In the above example, the command config account was entered without the required parameter
<username 15>, the CLI returned the Next possible completions: <username 15> prompt. The up arrow cursor control key was pressed to re-enter the previous command (config account) at the command prompt. Now the appropriate username can be entered and the config account command re-executed.
All commands in the CLI function in this way. In addition, the syntax of the help prompts are the same as presented in this manual − angle brackets < > indicate a numerical value or character string, braces { } indicate optional parameters or a choice of parameters, and brackets [ ] indicate required parameters.
If a command is entered that is unrecognized by the CLI, the top-level commands will be displayed under the Available commands: prompt.
|
DGS-3120-24TC:admin#the |
|||
|
Available commands: |
|||
|
.. |
? |
cable_diag |
cd |
|
cfm |
change |
clear |
config |
|
copy |
create |
debug |
del |
|
delete |
dir |
disable |
download |
|
enable |
erase |
execute |
format |
|
install |
login |
logout |
md |
|
move |
no |
ping |
ping6 |
|
rd |
reboot |
reconfig |
rename |
|
reset |
save |
show |
smtp |
|
telnet |
traceroute |
traceroute6 |
upload |
DGS-3120-24TC:admin#
The top-level commands consist of commands such as show or config. Most of these commands require one or more parameters to narrow the top-level command. This is equivalent to show what? or config what? Where the what? is the next parameter.
For example, entering the show command with no additional parameters, the CLI will then display all of the possible next parameters.
|
DGS-3120-24TC:admin#show |
|||||
|
Command: show |
|||||
|
Next possible completions: |
|||||
|
802.1p |
802.1x |
aaa |
access_profile |
||
|
account |
accounting |
acct_client |
address_binding |
||
|
arp_spoofing_prevention |
arpentry |
asymmetric_vlan |
|||
|
attack_log |
auth_client |
auth_diagnostics |
|||
|
auth_session_statistics |
auth_statistics |
authen |
|||
4

xStack® DGS-3120 Series Layer 3 Managed Gigabit Ethernet Switch CLI Reference Guide
|
authen_enable |
authen_login |
authen_policy |
authentication |
|
authorization |
autoconfig |
backup |
bandwidth_control |
|
boot_file |
bpdu_protection |
cfm |
command |
|
command_history |
community_encryption |
config |
|
|
cpu |
cpu_filter |
current_config |
ddm |
|
device_status |
dhcp |
dhcp_local_relay |
dhcp_relay |
|
dhcp_server |
dhcpv6_relay |
dlms |
dos_prevention |
|
dot1v_protocol_group |
dscp |
duld |
|
|
dvmrp |
ecmp |
eee |
|
|
egress_access_profile |
egress_flow_meter |
environment |
|
|
erps |
error |
ethernet_oam |
execute_config |
|
fdb |
filter |
flow_meter |
gratuitous_arp |
|
greeting_message |
gvrp |
hol_prevention |
igmp |
|
igmp_proxy |
igmp_snooping |
ip |
ip_tunnel |
|
ipfdb |
ipif |
ipif_ipv6_link_local_auto |
|
|
ipmc |
ipmroute |
iproute |
ipv6 |
|
ipv6route |
jumbo_frame |
jwac |
l2protocol_tunnel |
|
lacp_port |
led |
limited_multicast_addr |
|
|
link_aggregation |
lldp |
lldp_med |
log |
|
log_save_timing |
log_software_module |
loopback |
|
|
loopdetect |
mac_based_access_control |
||
|
mac_based_access_control_local |
mac_based_vlan |
mac_notification |
|
|
max_mcast_group |
mcast_filter_profile |
md5 |
|
|
mirror |
mld |
mld_proxy |
mld_snooping |
|
multicast |
multicast_fdb |
nlb |
ospf |
|
ospfv3 |
packet |
password_recovery |
per_queue |
|
pim |
pim-ssm |
pim6 |
policy_route |
|
port |
port_group |
port_security |
|
|
port_security_entry |
port_vlan |
ports |
|
|
power_saving |
pppoe |
private_vlan |
pvid |
|
qinq |
radius |
rip |
ripng |
|
rmon |
route |
route_map |
router_ports |
|
rspan |
safeguard_engine |
scheduling |
|
|
scheduling_mechanism |
serial_port |
session |
|
|
sflow |
sim |
smtp |
snmp |
|
sntp |
ssh |
ssl |
stack_device |
|
stack_information |
stacking_mode |
storage_media_info |
|
|
stp |
surveillance_vlan |
switch |
syslog |
|
system_severity |
tech_support |
terminal |
time |
|
time_range |
traffic |
traffic_segmentation |
|
|
trap |
trusted_host |
udp_helper |
utilization |
|
vlan |
vlan_translation |
vlan_trunk |
voice_vlan |
|
vrrp |
wac |
wred |
|
|
DGS-3120-24TC:admin# |
In the above example, all of the possible next parameters for the show command are displayed. At the next command prompt, the up arrow was used to re-enter the show command, followed by the account parameter. The CLI then displays the user accounts configured on the Switch.
5
![]()
xStack® DGS-3120 Series Layer 3 Managed Gigabit Ethernet Switch CLI Reference Guide
|
1-3 |
Command Syntax Symbols |
|
|
Syntax |
Description |
|
|
angle brackets < > |
Encloses a variable or value. Users must specify the variable or value. |
|
|
For example, in the syntax |
||
|
config command_history <value 1-40> |
||
|
users must enter how many entries for <value 1-40> when entering the |
||
|
command. DO NOT TYPE THE ANGLE BRACKETS. |
||
|
square brackets [ ] |
Encloses a required value or list of required arguments. Only one value or |
|
|
argument must be specified. For example, in the syntax |
||
|
create account [admin | operator | power_user | user] <username 15> |
||
|
{encrypt [plain_text | sha_1] <password>} |
||
|
users must specify either the admin, operator, power_user or user-level |
||
|
account when entering the command. DO NOT TYPE THE SQUARE |
||
|
BRACKETS. |
||
|
vertical bar | |
Separates mutually exclusive items in a list. For example, in the syntax |
|
|
reset {[config | system]} {force_agree} |
||
|
users must specify either the community or trap receiver in the command. |
||
|
DO NOT TYPE THE VERTICAL BAR. |
||
|
braces { } |
Encloses an optional value or a list of optional arguments. One or more |
|
|
values or arguments can be specified. For example, in the syntax |
||
|
reset {[config | system]} {force_agree} |
||
|
users may choose configure or system in the command. DO NOT TYPE |
||
|
THE BRACES. |
||
|
parentheses ( ) |
Indicates at least one or more of the values or arguments in the preceding |
|
|
syntax enclosed by braces must be specified. For example, in the syntax |
||
|
config bpdu_protection ports [<portlist> | all] {state [enable | disable] | |
||
|
mode [drop | block | shutdown]}(1) |
||
|
users have the option to specify hops or time or both of them. The «(1)» |
||
|
following the set of braces indicates at least one argument or value within |
||
|
the braces must be specified. DO NOT TYPE THE PARENTHESES. |
||
|
ipif <ipif_name 12> |
12 means the maximum length of the IP interface name. |
|
|
metric <value 1-31> |
1-31 means the legal range of the metric value. |
|
|
1-4 |
Line Editing Keys |
|||
|
Keys |
Description |
|||
|
Delete |
Delete character under cursor and shift remainder of line to left. |
|||
|
Backspace |
Delete character to left of cursor and shift remainder of line to left. |
|||
|
CTRL+R |
Toggle on and off. When toggled on, inserts text and shifts previous |
|||
|
text to right. |
||||
|
6 |

xStack® DGS-3120 Series Layer 3 Managed Gigabit Ethernet Switch CLI Reference Guide
|
Left Arrow |
Move cursor to left. |
|
Right Arrow |
Move cursor to right |
|
Tab |
Help user to select appropriate token. |
|
P or p |
Display the previous page. |
|
N, n or Space |
Display the next page. |
|
CTRL+C |
Escape from displayed pages. |
|
ESC |
Escape from displayed pages. |
|
Q or q |
Escape from displayed pages. |
|
R or r |
refresh the displayed pages |
|
A or a |
Display the remaining pages. (The screen display will not pause again.) |
|
Enter |
Display the next line. |
The screen display pauses when the show command output reaches the end of the page.
In the above example, all of the possible next parameters for the show command are displayed. At the next command prompt, the up arrow was used to re-enter the show command, followed by the account parameter. The CLI then displays the user accounts configured on the Switch.
7

xStack® DGS-3120 Series Layer 3 Managed Gigabit Ethernet Switch CLI Reference Guide
Chapter 2 Basic Command List
show session
show serial_port
config serial_port {baud_rate [9600 | 19200 | 38400 | 115200] | auto_logout [never | 2_minutes |
5_minutes | 10_minutes | 15_minutes]}
enable clipaging
disable clipaging
login
logout
?
clear
show command_history
config command_history <value 1-40>
config greeting_message {default}
show greeting_message
config command_prompt [<string 16> | username | default]
config terminal width [default | <value 80-200>]
show terminal width
config ports [<portlist> | all] {medium_type [fiber | copper]} {speed [auto {capability_advertised
{10_half | 10_full | 100_half | 100_full | 1000_full}} | 10_half | 10_full | 100_half | 100_full | 1000_full {[master | slave]}] | auto_negotiation [restart_an | remote_fault_advertised [disable | offline | link_fault | auto_negotiation_error]] | flow_control [enable | disable] | learning [enable | disable] | state [enable | disable] | mdix [auto | normal | cross] | [description <desc 1-32> | clear_description] | auto_speed_downgrade [enable | disable]}
show ports {<portlist>} {[description | err_disabled | auto_negotiation | details | media_type]}
2-1 show session
Description
This command is used to display a list of currently users which are login to CLI sessions.
Format show session
Parameters
None.
Restrictions
Only Administrator and Operator-level users can issue this command.
Example
To disable the password encryption:
8
xStack® DGS-3120 Series Layer 3 Managed Gigabit Ethernet Switch CLI Reference Guide
DGS-3120-24TC:admin#show session
Command: show session
|
ID |
Live Time |
From |
Level User |
|
— |
———— |
————————————— |
—— ————— |
|
8 |
00:04:17.870 |
Serial Port |
admin Anonymous |
Total Entries: 1
CTRL+C ESC q Quit SPACE n Next Page p Previous Page r Refresh
2-2 show serial_port
Description
This command is used to display the current serial port settings.
Format
show serial_port
Parameters
None.
Restrictions
None.
Example
To display the serial port setting:
DGS-3120-24TC:admin# show serial_port
Command: show serial_port
|
Baud Rate |
: |
9600 |
|
Data Bits |
: |
8 |
|
Parity Bits |
: |
None |
|
Stop Bits |
: |
1 |
|
Auto-Logout |
: |
10 minutes |
DGS-3120-24TC:admin#
2-3 config serial_port
Description
This command is used to configure the serial bit rate that will be used to communicate with the management host and the auto logout time for idle connections.
9
xStack® DGS-3120 Series Layer 3 Managed Gigabit Ethernet Switch CLI Reference Guide
Format
config serial_port {baud_rate [9600 | 19200 | 38400 | 115200] | auto_logout [never | 2_minutes | 5_minutes | 10_minutes | 15_minutes]}
Parameters
baud_rate — (Optional) The serial bit rate that will be used to communicate with the management host. The default baud rate is 115200.
9600 — Specify the serial bit rate to be 9600. 19200 — Specify the serial bit rate to be 19200. 38400 — Specify the serial bit rate to be 38400. 115200 — Specify the serial bit rate to be 115200.
auto_logout — (Optional) The auto logout time out setting: never — Never timeout.
2_minutes — When idle over 2 minutes, the device will auto logout. 5_minutes — When idle over 5 minutes, the device will auto logout. 10_minutes — When idle over 10 minutes, the device will auto logout. 15_minutes — When idle over 15 minutes, the device will auto logout.
Restrictions
Only Administrator and Operator-level users can issue this command.
Example
To configure baud rate:
DGS-3120-24TC:admin# config serial_port baud_rate 9600
Command: config serial_port baud_rate 9600
Success.
DGS-3120-24TC:admin#
2-4 enable clipaging
Description
This command is used to enable the pausing of the screen display when the show command output reaches the end of the page. For those show commands that provide the display refresh function, the display will not be refreshed when clipaging is disabled. The default setting is enabled.
Format
enable clipaging
Parameters
None.
10
xStack® DGS-3120 Series Layer 3 Managed Gigabit Ethernet Switch CLI Reference Guide
Restrictions
Only Administrator and Operator-level users can issue this command.
Example
To enable pausing of the screen display when show command output reaches the end of the page:
DGS-3120-24TC:admin# enable clipaging
Command: enable clipaging
Success.
DGS-3120-24TC:admin#
2-5 disable clipaging
Description
This command is used to disable the pausing of the screen display when the show command output reaches the end of the page. The default setting is enabled.
Format
disable clipaging
Parameters
None.
Restrictions
Only Administrator and Operator-level users can issue this command.
Example
To disable pausing of the screen display when show command output reaches the end of the page:
DGS-3120-24TC:admin# disable clipaging
Command: disable clipaging
Success.
DGS-3120-24TC:admin#
2-6 login
Description
This command is used to allow user login to the Switch.
11
xStack® DGS-3120 Series Layer 3 Managed Gigabit Ethernet Switch CLI Reference Guide
Format login
Parameters
None.
Restrictions
None.
Example
To login the Switch with a user name dlink:
DGS-3120-24TC:admin# login
Command: login
UserName:dlink
PassWord:****
DGS-3120-24TC:admin#
2-7 logout
Description
This command is used to logout the facility.
Format logout
Parameters
None.
Restrictions
None.
Example
To logout current user:
12

xStack® DGS-3120 Series Layer 3 Managed Gigabit Ethernet Switch CLI Reference Guide
DGS-3120-24TC:admin# logout
Command: logout
**********
* Logout *
**********
Press any key to login…
DGS-3120-24TC Gigabit Ethernet Switch
Command Line Interface
Firmware: Build 3.10.512
Copyright(C) 2014 D-Link Corporation. All rights reserved.
UserName:
2-8 ?
Description
This command is used to display the usage description for all commands in the cuurent login account level or the specific one.
Format
?
Parameters
None.
Restrictions
None.
Example
To get “ping” command usage, descriptions:
DGS-3120-24TC:admin#? ping
Command: ? ping
Command: ping
Usage: <ipaddr> { times <value 1-255> | timeout <sec 1-99>} Description: Used to test the connectivity between network devices.
DGS-3120-24TC:admin#
13
xStack® DGS-3120 Series Layer 3 Managed Gigabit Ethernet Switch CLI Reference Guide
2-9 clear
Description
The command is used to clear screen.
Format clear
Parameters
None.
Restrictions
None.
Example
To clear screen:
DGS-3120-24TC:admin# clear
Command: clear
DGS-3120-24TC:admin#
2-10 show command_history
Description
The command is used to display command history.
Format
show command_history
Parameters
None.
Restrictions
None.
Example
To display command history:
14
xStack® DGS-3120 Series Layer 3 Managed Gigabit Ethernet Switch CLI Reference Guide
DGS-3120-24TC:admin#show command_history
Command: show command_history
?ping login
show serial_port show session
?config bpdu_protection ports
?reset
?create account
?create ipif
show the
?
DGS-3120-24TC:admin#
2-11 config command_history
Description
This command is used to configure the number of commands that the Switch can recall. The Switch “remembers” upto the last 40 commands you entered.
Format
config command_history <value 1-40>
Parameters
<value 1-40> — Enter the number of commands that the Switch can recall. This value must be between 1 and 40.
Restrictions
None.
Example
To configure the number of command history:
DGS-3120-24TC:admin# config command_history 25
Command: config command_history 25
Success.
DGS-3120-24TC:admin#
2-12 config greeting_message
Description
This command is used to configure the greeting message (or banner).
15
![]()
xStack® DGS-3120 Series Layer 3 Managed Gigabit Ethernet Switch CLI Reference Guide
Format
config greeting_message {default}
Parameters
default — (Optional) Adding this parameter to the “config greeting_message” command will return the greeting message (banner) to its original factory default entry.
Restrictions
Only Administrator and Operator-level users can issue this command.
Example
To edit the banner:
DGS-3120-24TC:admin#config greeting_message
Command: config greeting_message
Greeting Messages Editor
===============================================================================
=
DGS-3120-24TC Gigabit Ethernet Switch
Command Line Interface
Firmware: Build 3.10.512
Copyright(C) 2014 D-Link Corporation. All rights reserved.
===============================================================================
=
|
<Function Key> |
<Control Key> |
||
|
Ctrl+C |
Quit without save |
left/right/ |
|
|
Ctrl+W |
Save and quit |
up/down |
Move cursor |
|
Ctrl+D |
Delete line |
||
|
Ctrl+X |
Erase all setting |
||
|
Ctrl+L |
Reload original setting |
——————————————————————————-
—
2-13 show greeting_message
Description
The command is used to display greeting message.
Format
show greeting_message
16

xStack® DGS-3120 Series Layer 3 Managed Gigabit Ethernet Switch CLI Reference Guide
Parameters
None.
Restrictions
Only Administrator and Operator-level users can issue this command.
Example
To display greeting message:
DGS-3120-24TC:admin#show greeting_ message
Command: show greeting_message
===============================================================================
=
DGS-3120-24TC Gigabit Ethernet Switch
Command Line Interface
Firmware: Build 3.10.512
Copyright(C) 2014 D-Link Corporation. All rights reserved.
===============================================================================
=
DGS-3120-24TC:admin#
2-14 config command_prompt
Description
This command is used to modify the command prompt.
The current command prompt consists of four parts: “product name” + “:” + ”user level” + ”#” (e.g. “DGS-3120-24TC:admin#”). This command is used to modify the first part (1. “product name”) with
17
xStack® DGS-3120 Series Layer 3 Managed Gigabit Ethernet Switch CLI Reference Guide
a string consisting of a maximum of 16 characters, or to be replaced with the users’ login user name.
When users issue the “reset” command, the current command prompt will remain in tact. Yet, issuing the “reset system” will return the command prompt to its original factory default value.
Format
config command_prompt [<string 16> | username | default]
Parameters
<string 16> — Enter the new command prompt string of no more than 16 characters.
username — Enter this command to set the login username as the command prompt.
default — Enter this command to return the command prompt to its original factory default value.
Restrictions
Only Administrator and Operator-level users can issue this command.
Example
To edit the command prompt:
DGS-3120-24TC:admin#config command_prompt Prompt#
Command: config command_prompt Prompt#
Success.
Prompt#:admin#
2-15 config terminal width
Description
The command is used to set current terminal width. The usage is described as below:
1.Users login and configure the terminal width to 120, this configuration take effect on this login section. If users implement “save” command, the configuration is saved. After users log out and log in again, the terminal width is 120.
2.If user did not save the configuration, another user login, the terminal width is default value.
3.If at the same time, two CLI sessions are running, once section configure to 120 width and save it, the other section will not be effected, unless it log out and then log in.
Format
config terminal width [default | <value 80-200>]
18
xStack® DGS-3120 Series Layer 3 Managed Gigabit Ethernet Switch CLI Reference Guide
Parameters
default — The default setting of terminal width. The default value is 80.
<value 80-200> — The terminal width which will be configured. The width is between 80 and 200 characters.
Restrictions
None.
Example
To configure the current terminal width:
DGS-3120-24TC:admin# config terminal width 120
Command: config terminal width 120
Success.
DGS-3120-24TC:admin#
2-16 show terminal width
Description
The command is used to display the configuration of current terminal width.
Format
show terminal width
Parameters
None.
Restrictions
None.
Example
To display the configuration of current terminal width:
DGS-3120-24TC:admin#show terminal width
Command: show terminal width
|
Global terminal width |
: |
80 |
|
Current terminal width |
: |
80 |
DGS-3120-24TC:admin#
19

xStack® DGS-3120 Series Layer 3 Managed Gigabit Ethernet Switch CLI Reference Guide
2-17 config ports
Description
This command is used to configure the Switch’s port settings.
Format
config ports [<portlist> | all] {medium_type [fiber | copper]} {speed [auto {capability_advertised {10_half | 10_full | 100_half | 100_full | 1000_full}} | 10_half | 10_full | 100_half | 100_full | 1000_full {[master | slave]}] | auto_negotiation [restart_an | remote_fault_advertised [disable | offline | link_fault | auto_negotiation_error]] | flow_control [enable | disable] | learning [enable | disable] | state [enable | disable] | mdix [auto | normal | cross] | [description <desc 1-32> | clear_description] | auto_speed_downgrade [enable | disable]}
Parameters
<portlist> — Enter a list of ports used here.
all — Specify that all the ports will be used for this configuration.
medium_type — (Optional) Specify the medium type while the configure ports are combo ports fiber — Specify that the medium type will be set to fiber.
copper — Specify that the medium type will be set to copper.
speed — (Optional) Specify the port speed of the specified ports . auto — Set port speed to auto negotiation.
capability_advertised — (Optional) Specify that the capability will be advertised. 10_half — (Optional) Set port speed to 10_half.
10_full — (Optional) Set port speed to 10_full. 100_half — (Optional) Set port speed to 100_half. 100_full — (Optional) Set port speed to 100_full. 1000_full — (Optional) Set port speed to 1000_full.
10_half — Set port speed to 10_half. 10_full — Set port speed to 10_full. 100_half — Set port speed to 100_half. 100_full — Set port speed to 100_full.
1000_full — Set port speed to 1000_full. While set port speed to 1000_full. User should specify master or slave mode for 1000BASE-T interface, and leave the 1000_full without any master or slave setting for other interface.
master — Specify that the port(s) will be set to master. slave — Specify that the port(s) will be set to slave.
auto_negotiation — Specify to configure the auto-negotiation method. restart_an — Specify to restart auto-negotiation process.
remote_fault_advertised – Specify that the fault conditions will be remotely advertised when the next auto-negotiation process takes place.
disable — Remote fault advertisement is disabled.
offline — Local devices that were powered off or removed from the active configuration will be advertised at the next auto-negotiation.
link_fault — Local devices that disconnected due to link failure will be advertised at the next auto-negotiation.
auto_negotiation_error — The resolution that precludes operation between local devices and link partners will be advertised at the next auto-negotiation.
flow_control — (Optional) You can turn on or turn off flow control on one or more ports. By set flow_control to enable or disable.
enable — Specify that the flow control option will be enabled. disable — Specify that the flow control option will be disabled.
learning — (Optional) You can turn on or turn off MAC address learning on one or more ports. enable — Specify that the learning option will be enabled.
20

xStack® DGS-3120 Series Layer 3 Managed Gigabit Ethernet Switch CLI Reference Guide
disable — Specify that the learning option will be disabled.
state — (Optional) Enables or disables the specified port. If the specificed ports are in errordisabled status , configure their state to enable will recover these ports from disabled to enable state.
enable — Specify that the port state will be enabled. disable — Specify that the port state will be disabled.
mdix — (Optional) The MDIX mode can be specified as auto, normal, and cross. If set to the normal state, the port is in the MDIX mode and can be connected to PC NIC using a straight cable. If set to cross state, the port is in mdi mode, and can be connected to a port (in mdix mode) on another switch thru a straight cable.
auto — Specify that the MDIX mode for the port will be set to auto. normal — Specify that the MDIX mode for the port will be set to normal. cross — Specify that the MDIX mode for the port will be set to cross.
description — (Optional) Specify the description of the port interface.
<desc 1-32> — Enter the port interface description here. This value can be up to 32 characters long.
clear_description — (Optional) Specify that the description field will be cleared.
auto_speed_downgrade — (Optional) Specify whether to automatically downgrade the advertised speed when a link cannot be established at the available speed.
enable — Enable the automatically downgrading advertised speed. disable — Disable the automatically downgrading advertised speed.
Restrictions
Only Administrator and Operator-level users can issue this command.
Example
To configure the ports:
DGS-3120-24TC:admin#config ports all medium_type copper speed auto
Command: config ports all medium_type copper speed auto
Success.
DGS-3120-24TC:admin#
2-18 show ports
Description
This command is used to display the current configurations of a range of ports.
Format
show ports {<portlist>} {[description | err_disabled | auto_negotiation | details | media_type]}
Parameters
<portlist> — (Optional) Enter the list of ports to be configured here.
description — (Optional) Indicates if port description will be included in the display.
err_disabled — (Optional) Displays ports that were disabled because of an error condidtion.
auto_negotiation — (Optional) Displays detailed auto-negotiation information.
details — (Optional) Displays the port details.
media_type — (Optional) Displays port transceiver type.
21
xStack® DGS-3120 Series Layer 3 Managed Gigabit Ethernet Switch CLI Reference Guide
Restrictions
None.
Example
To display the port details:
DGS-3120-24TC:admin#show ports details
Command: show ports details
|
Port : 1:1 |
||||
|
——————— |
||||
|
Port Status |
: Link Down |
|||
|
Description |
: |
|||
|
HardWare Type |
: Gigabits Ethernet |
|||
|
MAC Address |
: |
00-01-02-03-04-10 |
||
|
Bandwidth |
: |
1000000Kbit |
||
|
Auto-Negotiation |
: |
Enabled |
||
|
Duplex Mode |
: |
Full Duplex |
||
|
Flow Control |
: |
Disabled |
||
|
MDI |
: |
Auto |
||
|
Address Learning |
: |
Enabled |
||
|
Last Clear of Counter |
: |
0 hours 10 mins ago |
||
|
BPDU Hardware Filtering Mode: |
Disabled |
|||
|
Queuing Strategy |
: |
FIFO |
||
|
TX Load |
: |
0/100, |
0 bits/sec, |
0 |
|
packets/sec |
||||
|
RX Load |
: |
0/100, |
0 bits/sec, |
0 |
|
packets/sec |
CTRL+C ESC q Quit SPACE n Next Page p Previous Page r Refresh
22

xStack® DGS-3120 Series Layer 3 Managed Gigabit Ethernet Switch CLI Reference Guide
Chapter 3 802.1Q VLAN Command List
create vlan <vlan_name 32> tag <vlanid 2-4094> {type [1q_vlan | private_vlan]} {advertisement}
create vlan vlanid <vidlist> {type [1q_vlan | private_vlan]} {advertisement}
delete vlan <vlan_name 32>
delete vlan vlanid <vidlist>
config vlan <vlan_name 32> {[add [tagged | untagged | forbidden] | delete] <portlist> | advertisement [enable | disable]}(1)
config vlan vlanid <vidlist> {[add [tagged | untagged | forbidden] | delete] <portlist> | advertisement [enable | disable] | name <vlan_name 32>}(1)
config port_vlan [<portlist> | all] {gvrp_state [enable | disable] | ingress_checking [enable | disable] | acceptable_frame [tagged_only | admit_all] | pvid <vlanid 1-4094>}(1)
show vlan {<vlan_name 32>}
show vlan ports {<portlist>}
show vlan vlanid <vidlist>
show port_vlan {<portlist>}
enable pvid auto_assign
disable pvid auto_assign
show pvid auto_assign
config gvrp [timer [join | leave | leaveall] < value 100-100000> | nni_bpdu_addr [dot1d | dot1ad]]
show gvrp
enable gvrp
disable gvrp
config private_vlan [<vlan_name 32> | vid <vlanid 2-4094>] [add [isolated | community] | remove]
[<vlan_name 32> | vlanid <vidlist>]
show private_vlan {[<vlan_name 32> | vlanid<vidlist>]}
3-1 create vlan
Description
This command is used to create a VLAN on the Switch. The VLAN ID must be always specified for creating a VLAN.
Format
create vlan <vlan_name 32> tag <vlanid 2-4094> {type [1q_vlan | private_vlan]} {advertisement}
Parameters
<vlan_name 32> — Enter the VLAN name to be created. The VLAN name can be up to 32 characters long.
tag — The VLAN ID of the VLAN to be created.
<vlanid 2-4094> — Enter the VLAN ID here. The VLAN ID value must be between 2 and 4094.
type — (Optional) Specify the type of VLAN here.
1q_vlan — (Optional) Specify that the type of VLAN used is based on the 802.1Q standard. private_vlan – (Optional) Specify that the private VLAN type will be used.
advertisement — (Optional) Specify the VLAN as being able to be advertised out.
23
xStack® DGS-3120 Series Layer 3 Managed Gigabit Ethernet Switch CLI Reference Guide
Restrictions
Only Administrator, Operator and Power-User level users can issue this command.
Example
To create a VLAN with name “v2” and VLAN ID 2:
DGS-3120-24TC:admin# create vlan v2 tag 2 type 1q_vlan advertisement
Command: create vlan v2 tag 2 type 1q_vlan advertisement
Success.
DGS-3120-24TC:admin#
3-2 create vlan vlanid
Description
This command is used to create more than one VLANs at a time. A unique VLAN name (e.g. VLAN10) will be automatically assigned by the system. The automatic assignment of VLAN name is based on the following rule: “VLAN”+ID. For example, for VLAN ID 100, the VLAN name will be VLAN100. If this VLAN name is conflict with the name of an existing VLAN, then it will be renamed based on the following rule: “VLAN”+ID+”ALT”+ collision count. For example, if this conflict is the second collision, then the name will be VLAN100ALT2.
Format
create vlan vlanid <vidlist> {type [1q_vlan | private_vlan]} {advertisement}
Parameters
vlanid — The VLAN ID list to be created.
<vidlist> — Enter the VLAN ID list here.
type — (Optional) Specify the type of VLAN to be created.
1q_vlan — (Optional) Specify that the VLAN created will be a 1Q VLAN. private_vlan – (Optional) Specify that the private VLAN type will be used.
advertisement — (Optional) Specify the VLAN as being able to be advertised out.
Restrictions
Only Administrator, Operator and Power-User level users can issue this command.
Example
To create some VLANs using VLAN ID:
DGS-3120-24TC:admin# create vlan vlanid 10-30
Command: create vlan vlanid 10-30
Success.
DGS-3120-24TC:admin#
24

xStack® DGS-3120 Series Layer 3 Managed Gigabit Ethernet Switch CLI Reference Guide
3-3 delete vlan
Description
This command is used to delete a previously configured VLAN by the name on the Switch.
Format
delete vlan <vlan_name 32>
Parameters
vlan — The VLAN name of the VLAN to be deleted.
<vlan_name 32> — Enter the VLAN name here. This name can be up to 32 characters long.
Restrictions
Only Administrator, Operator and Power-User level users can issue this command.
Example
To remove a vlan v1:
DGS-3120-24TC:admin# delete vlan v1
Command: delete vlan v1
Success.
DGS-3120-24TC:admin#
3-4 delete vlan vlanid
Description
This command is used to delete one or a number of previously configured VLAN by VID list.
Format
delete vlan vlanid <vidlist>
Parameters
vlanid — The VLAN ID list to be deleted.
<vidlist> — Enter the VLAN ID list here.
Restrictions
Only Administrator, Operator and Power-User level users can issue this command.
25
![]()
xStack® DGS-3120 Series Layer 3 Managed Gigabit Ethernet Switch CLI Reference Guide
Example
To remove VLANs from 10-30:
DGS-3120-24TC:admin# delete vlan vlanid 10-30
Command: delete vlan vlanid 10-30
Success.
DGS-3120-24TC:admin#
3-5 config vlan
Description
This command is used to configure a VLAN based on the name.
Format
config vlan <vlan_name 32> {[add [tagged | untagged | forbidden] | delete] <portlist> | advertisement [enable | disable]}(1)
Parameters
<vlan_name 32> — Enter the VLAN name you want to add ports to. This name can be up to 32 characters long.
add — (Optional) Specify to add tagged, untagged or forbidden ports to the VLAN. tagged — Specify the additional ports as tagged.
untagged — Specify the additional ports as untagged. forbidden — Specify the additional ports as forbidden.
delete — (Optional) Specify to delete ports from the VLAN.
<portlist> — (Optional) Enter the list of ports used for the configuration here.
advertisement — (Optional) Specify the GVRP state of this VLAN. enable — Specify to enable advertisement for this VLAN. disable — Specify to disable advertisement for this VLAN.
Restrictions
Only Administrator, Operator and Power-User level users can issue this command.
Example
To add 4 through 8 of unit 2 as tagged ports to the VLAN v1:
DGS-3120-24TC:admin# config vlan v1 add tagged 2:4-2:8
Command: config vlan v1 add tagged 2:4-2:8
Success.
DGS-3120-24TC:admin#
26

xStack® DGS-3120 Series Layer 3 Managed Gigabit Ethernet Switch CLI Reference Guide
3-6 config vlan vlanid
Description
This command allows you to configure multiple VLANs at one time. But conflicts will be generated if you configure the name of multiple VLANs at one time.
Format
config vlan vlanid <vidlist> {[add [tagged | untagged | forbidden] | delete] <portlist> | advertisement [enable | disable] | name <vlan_name 32>}(1)
Parameters
<vidlist> — Enter a list of VLAN IDs to configure.
add — (Optional) Specify to add tagged, untagged or forbidden ports to the VLAN. tagged — Specify the additional ports as tagged.
untagged — Specify the additional ports as untagged. forbidden — Specify the additional ports as forbidden.
delete — (Optional) Specify to delete ports from the VLAN.
<portlist> — (Optional) Enter the list of ports used for the configuration here.
advertisement — (Optional) Specify the GVRP state of this VLAN. enable — Specify to enable advertisement for this VLAN. disable — Specify to disable advertisement for this VLAN.
name — (Optional) The new name of the VLAN.
<vlan_name 32> — Enter the VLAN name here. This name can be up to 32 characters long.
Restrictions
Only Administrator, Operator and Power-User level users can issue this command.
Example
To add 4 through 8 of unit 2 as tagged ports to the VLAN ID from 10-20:
DGS-3120-24TC:admin# config vlan vlanid 10-20 add tagged 2:4-2:8
Command: config vlan vlanid 10-20 add tagged 2:4-2:8
Success.
DGS-3120-24TC:admin#
3-7 config port_vlan
Description
This command is used to set the ingress checking status, the sending and receiving GVRP information.
Format
config port_vlan [<portlist> | all] {gvrp_state [enable | disable] | ingress_checking [enable | disable] | acceptable_frame [tagged_only | admit_all] | pvid <vlanid 1-4094>}(1)
27

xStack® DGS-3120 Series Layer 3 Managed Gigabit Ethernet Switch CLI Reference Guide
Parameters
<portlist> — A range of ports for which you want ingress checking. The port list is specified by listing the lowest switch number and the beginning port number on that switch, separated by a colon. Then highest switch number, and the highest port number of the range (also separated by a colon) are specified. The beginning and end of the port list range are separated by a dash. For example, 1:3 would specify switch number 1, port 3. 2:4 specifies switch number 2, port 4. 1:3-2:4 specifies all of the ports between switch 1, port 3 and switch 2, port 4 − in numerical order.
all — Specify that all the port will be used for this configuration.
gvrp_state — (Optional) Enabled or disables GVRP for the ports specified in the port list. enable — Specify that GVRP for the specified ports will be enabled.
disable — Specify that GVRP for the specified ports will be disabled.
ingress_checking — (Optional) Enables or disables ingress checking for the specified portlist. enable — Specify that ingress checking will be enabled for the specified portlist.
disable — Specify that ingress checking will be disabled for the specified portlist.
acceptable_frame — (Optional) The type of frame will be accepted by the port. There are two types:
tagged_only — Only tagged packets can be accepted by this port. admit_all — All packets can be accepted.
pvid — (Optional) Specify the PVID of the ports.
<vlanid 1-4094> — Enter the VLAN ID here. The VLAN ID value must be between 1 and 4094.
Restrictions
Only Administrator and Operator-level users can issue this command.
Example
To sets the ingress checking status, the sending and receiving GVRP information:
DGS-3120-24TC:admin# config port_vlan 1:1-1:5 gvrp_state enable ingress_checking enable acceptable_frame tagged_only pvid 2
Command: config port_vlan 1:1-1:5 gvrp_state enable ingress_checking enable acceptable_frame tagged_only pvid 2
Success
DGS-3120-24TC:admin#
3-8 show vlan
Description
This command is used to display the vlan information including of parameters setting and operational value.
Format
show vlan {<vlan_name 32>}
Parameters
<vlan_name 32> — (Optional) Enter the VLAN name to be displayed. The VLAN name can be up to 32 characters long.
28

xStack® DGS-3120 Series Layer 3 Managed Gigabit Ethernet Switch CLI Reference Guide
Restrictions
None.
Example
To display VLAN settings:
DGS-3120-24TC:admin#show vlan
Command: show vlan
|
VLAN Trunk State |
: Disabled |
|||
|
VLAN Trunk Member Ports |
: |
|||
|
VID |
: 1 |
VLAN Name |
: default |
|
|
VLAN Type |
: Static |
Advertisement : Enabled |
||
|
Member Ports |
: 1:1-1:24 |
|||
|
Static Ports |
: 1:1-1:24 |
|||
|
Current Tagged Ports |
: |
|||
|
Current Untagged Ports: 1:1-1:24 |
||||
|
Static Tagged Ports |
: |
|||
|
Static Untagged |
Ports : 1:1-1:24 |
|||
|
Forbidden Ports |
: |
|||
|
Total Static VLAN Entries: 1 |
||||
|
Total GVRP VLAN |
Entries: 0 |
DGS-3120-24TC:admin#
3-9 show vlan ports
Description
This command is used to display the vlan information per ports.
Format
show vlan ports {<portlist>}
Parameters
<portlist> — (Optional) Enter the list of ports for which the VLAN information will be displayed.
Restrictions
None.
Example
To display the VLAN configuration for port 6 of unit 1:
29

xStack® DGS-3120 Series Layer 3 Managed Gigabit Ethernet Switch CLI Reference Guide
|
DGS-3120-24TC:admin#show vlan ports 1:6 |
|||||
|
Command: show |
vlan ports 1:6 |
||||
|
Port |
VID |
Untagged |
Tagged |
Dynamic |
Forbidden |
|
—— |
—- |
——— |
—— |
——- |
——— |
|
1:6 |
1 |
X |
— |
— |
— |
DGS-3120-24TC:admin#
3-10 show vlan vlanid
Description
This command is used to display the vlan information using the VLAN ID.
Format
show vlan vlanid <vidlist>
Parameters
<vidlist> — Enter the VLAN ID to be displayed.
Restrictions
None.
Example
To display the VLAN configuration for VLAN ID 1:
DGS-3120-24TC:admin# show vlan vlanid 1
Command: show vlan vlanid 1
|
VID |
: 1 |
VLAN Name |
: default |
||
|
VLAN Type |
: Static |
Advertisement : Enabled |
|||
|
Member |
Ports |
: 1:1-1:24 |
|||
|
Static |
Ports |
: 1:1-1:24 |
|||
|
Current Tagged Ports |
: |
||||
|
Current Untagged Ports: 1:1-1:24 |
|||||
|
Static |
Tagged Ports |
: |
|||
|
Static |
Untagged |
Ports : 1:1-1:24 |
|||
|
Forbidden Ports |
: |
||||
|
Total |
Entries : 1 |
||||
|
DGS-3120-24TC:admin# |
30

xStack® DGS-3120 Series Layer 3 Managed Gigabit Ethernet Switch CLI Reference Guide
3-11 show port_vlan
Description
This command is used to display the ports’ VLAN attributes on the Switch.
Format
show port_vlan {<portlist>}
Parameters
<portlist> — (Optional) Specify a range of ports to be displayed.
If no parameter specified, system will display all ports gvrp information.
Restrictions
None.
Example
To display 802.1Q port setting:
DGS-3120-24TC:admin# show port_vlan
Command: show port_vlan
|
Port |
PVID |
GVRP |
Ingress Checking |
Acceptable Frame Type |
|
——- |
—- |
——— |
—————- |
————————— |
|
1:1 |
1 |
Disabled |
Enabled |
All Frames |
|
1:2 |
1 |
Disabled |
Enabled |
All Frames |
|
1:3 |
1 |
Disabled |
Enabled |
All Frames |
|
1:4 |
1 |
Disabled |
Enabled |
All Frames |
|
1:5 |
1 |
Disabled |
Enabled |
All Frames |
|
1:6 |
1 |
Disabled |
Enabled |
All Frames |
|
1:7 |
1 |
Disabled |
Enabled |
All Frames |
|
1:8 |
1 |
Disabled |
Enabled |
All Frames |
|
1:9 |
1 |
Disabled |
Enabled |
All Frames |
|
1:10 |
1 |
Disabled |
Enabled |
All Frames |
|
1:11 |
1 |
Disabled |
Enabled |
All Frames |
|
1:12 |
1 |
Disabled |
Enabled |
All Frames |
|
1:13 |
1 |
Disabled |
Enabled |
All Frames |
|
1:14 |
1 |
Disabled |
Enabled |
All Frames |
|
1:15 |
1 |
Disabled |
Enabled |
All Frames |
|
1:16 |
1 |
Disabled |
Enabled |
All Frames |
|
1:17 |
1 |
Disabled |
Enabled |
All Frames |
|
1:18 |
1 |
Disabled |
Enabled |
All Frames |
|
1:19 |
1 |
Disabled |
Enabled |
All Frames |
|
1:20 |
1 |
Disabled |
Enabled |
All Frames |
CTRL+C ESC q Quit SPACE n Next Page ENTER Next Entry a All
31

xStack® DGS-3120 Series Layer 3 Managed Gigabit Ethernet Switch CLI Reference Guide
3-12 enable pvid auto assign
Description
This command is used to enable the auto-assignment of PVID.
If “Auto-assign PVID” is enabled, PVID will be possibly changed by PVID or VLAN configuration. When user configures a port to VLAN X’s untagged membership, this port’s PVID will be updated with VLAN X. In the form of VLAN list command, PVID is updated with last item of VLAN list. When user removes a port from the untagged membership of the PVID’s VLAN, the port’s PVID will be assigned with “default VLAN”.
The default setting is enabled.
Format
enable pvid auto_assign
Parameters
None.
Restrictions
Only Administrator, Operator and Power-User level users can issue this command.
Example
To enable the auto-assign PVID:
DGS-3120-24TC:admin# enable pvid auto_assign
Command: enable pvid auto_assign
Success.
DGS-3120-24TC:admin#
3-13 disable pvid auto assign
Description
This command is used to disable auto assignment of PVID.
Format
disable pvid auto_assign
Parameters
None.
32

xStack® DGS-3120 Series Layer 3 Managed Gigabit Ethernet Switch CLI Reference Guide
Restrictions
Only Administrator, Operator and Power-User level users can issue this command.
Example
To disable the auto-assign PVID:
DGS-3120-24TC:admin# disable pvid auto_assign
Command: disable pvid auto_assign
Success.
DGS-3120-24TC:admin#
3-14 show pvid auto_assign
Description
This command is used to display the PVID auto-assignment state.
Format
show pvid auto_assign
Parameters
None.
Restrictions
None.
Example
To display PVID auto-assignment state:
DGS-3120-24TC:admin#show pvid auto_assign
Command: show pvid auto_assign
PVID Auto-assignment: Enabled
DGS-3120-24TC:admin#
3-15 config gvrp
Description
The config gvrp timer command set the GVRP timer’s value. The default value for Join time is 200 milliseconds; for Leave time is 600 milliseconds; for LeaveAll time is 10000 milliseconds.
33

xStack® DGS-3120 Series Layer 3 Managed Gigabit Ethernet Switch CLI Reference Guide
Format
config gvrp [timer [join | leave | leaveall] < value 100-100000> | nni_bpdu_addr [dot1d | dot1ad]]
Parameters
timer — Specify that the GVRP timer parameter will be configured.
join — (Optional) Specify the Join time will be set.
leave — (Optional) Specify the Leave time will be set.
leaveall — (Optional) Specify the LeaveAll time will be set.
<value 100-100000> — Enter the time used here. This value must be between 100 and 100000.
nni_bpdu_addr — Used to determine the BPDU protocol address for GVRP in service provide site. It can use 802.1d GVRP address, 802.1ad service provider GVRP address or a user defined multicast address.
dot1d — Specify that the NNI BPDU protocol address value will be set to Dot1d. dot1ad — Specify that the NNI BPDU protocol address value will be set to Dot1ad.
Restrictions
Only Administrator, Operator and Power-User level users can issue this command.
Example
To set the Join time to 200 milliseconds:
DGS-3120-24TC:admin# config gvrp timer join 200
Command: config gvrp timer join 200
Success.
DGS-3120-24TC:admin#
3-16 show gvrp
Description
This command is used to display the GVRP global setting.
Format show gvrp
Parameters
None.
Restrictions
None.
34

xStack® DGS-3120 Series Layer 3 Managed Gigabit Ethernet Switch CLI Reference Guide
Example
To display the global setting of GVRP:
DGS-3120-24TC:admin#show gvrp
Command: show gvrp
|
Global GVRP |
: Disabled |
||
|
Join Time |
: 200 |
Milliseconds |
|
|
Leave Time |
: |
600 |
Milliseconds |
|
LeaveAll Time |
: |
10000 Milliseconds |
NNI BPDU Address: dot1d
DGS-3120-24TC:admin#
3-17 enable gvrp
Description
This command is used to enable the Generic VLAN Registration Protocol (GVRP).
Format enable gvrp
Parameters
None.
Restrictions
Only Administrator, Operator and Power-User level users can issue this command.
Example
To enable the generic VLAN Registration Protocol (GVRP):
DGS-3120-24TC:admin# enable gvrp
Command: enable gvrp
Success.
DGS-3120-24TC:admin#
3-18 disable gvrp
Description
This command is used to disable the Generic VLAN Registration Protocol (GVRP).
Format disable gvrp
35
![]()
xStack® DGS-3120 Series Layer 3 Managed Gigabit Ethernet Switch CLI Reference Guide
Parameters
None.
Restrictions
Only Administrator, Operator and Power-User level users can issue this command.
Example
To disable the Generic VLAN Registration Protocol (GVRP):
DGS-3120-24TC:admin# disable gvrp
Command: disable gvrp
Success.
DGS-3120-24TC:admin#
3-19 config private_vlan
Description
This command is used to add or remove a secondary VLAN from a private VLAN.
Format
config private_vlan [<vlan_name 32> | vid <vlanid 2-4094>] [add [isolated | community] | remove] [<vlan_name 32> | vlanid <vidlist>]
Parameters
<vlan_name 32> — Specify the name of the private VLAN.
vid — Specify the VLAN ID of the private VLAN.
<vlanid 2-4094> — Enter the VLAN ID used here. This value must be between 2 and 4094.
add — Specify that a secondary VLAN will be added to the private VLAN. isolated — Specify the secondary VLAN as isolated VLAN. community — Specify the secondary VLAN as community VLAN.
remove — Specify that a secondary VLAN will be removed from the private VLAN.
<vlan_name 32> — Specify the secondary VLAN name used. This name can be up to 32 characters long.
vlanid — A range of secondary VLAN to add or remove to the private VLAN.
<vidlist> — Enter the secondary VLAN ID used here.
Restrictions
Only Administrator and Operator-level users can issue this command.
Example
To associate secondary vlan to private vlan p1:
36

xStack® DGS-3120 Series Layer 3 Managed Gigabit Ethernet Switch CLI Reference Guide
DGS-3120-24TC:admin# config private_vlan p1 add community vlanid 2-5
Command: config private_vlan p1 add community vlanid 2-5
Success.
DGS-3120-24TC:admin#
3-20 show private vlan
Description
This command is used to show the private VLAN information.
Format
show private_vlan {[<vlan_name 32> | vlanid<vidlist>]}
Parameters
<vlan_name 32> — (Optional) Specify the name of the private VLAN or its secondary VLAN. This name can be up to 32 characters long.
vlanid — (Optional) Specify the VLAN ID of the private VLAN or its secondary VLAN.
<vidlist> — Enter the VLAN ID used here.
Restrictions
None.
Example
To display private VLAN settings:
|
DGS-3120-24TC:admin# |
show private_vlan |
|
|
Command: show private_vlan |
||
|
Private VLAN 100 |
||
|
—————— |
||
|
Promiscuous Ports: 1:1 |
||
|
Trunk Ports |
: 1:2 |
|
|
Isolated Ports |
: 1:3-1:5 |
Isolated VLAN : 20 |
|
Community Ports |
: 1:6–1:8 |
Community VLAN: 30 |
|
Community Ports: : 1:9–1:10 |
Community VLAN: 40 |
|
|
Private VLAN 200 |
||
|
—————— |
||
|
Promiscuous Ports: 1:11 |
||
|
Trunk Ports |
: 1:12 |
|
|
Isolated Ports |
: 1:13-1:15 |
Isolated VLAN : 20 |
|
Community Ports |
: 1:16–1:18 |
Community VLAN: 30 |
|
DGS-3120-24TC:admin# |
37

xStack® DGS-3120 Series Layer 3 Managed Gigabit Ethernet Switch CLI Reference Guide
Chapter 4 802.1X Command List
enable 802.1x
disable 802.1x
create 802.1x user <username 15>
delete 802.1x user <username 15>
show 802.1x user
config 802.1x auth_protocol [local | radius_eap]
config 802.1x fwd_pdu system [enable | disable]
config 802.1x fwd_pdu ports [<portlist> | all] [enable | disable]
config 802.1x authorization attributes radius [enable | disable]
show 802.1x {[auth_state | auth_configuration] ports {<portlist>}}
config 802.1x capability ports [<portlist> | all] [authenticator | none]
config 802.1x max_users [<value 1–448> | no_limit]
config 802.1x auth_parameter ports [<portlist> | all] [default | {direction [both | in] | port_control
[force_unauth | auto | force_auth] | quiet_period <sec 0-65535> | tx_period <sec 1-65535> | supp_timeout <sec 1-65535> | server_timeout <sec 1-65535> | max_req <value 1-10> | reauth_period <sec 1-65535> | max_users [<value 1-448> | no_limit] | enable_reauth [enable | disable]}(1)]
config 802.1x auth_mode [port_based | mac_based]
config 802.1x init [port_based ports [<portlist> | all] | mac_based ports [<portlist> | all]
{mac_address <macaddr>}]
config 802.1x reauth [port_based ports [<portlist> | all] | mac_based ports [<portlist> | all]
{mac_address <macaddr>}]
create 802.1x guest_vlan <vlan_name 32>
delete 802.1x guest_vlan <vlan_name 32>
config 802.1x guest_vlan ports [<portlist> | all] state [enable | disable]
show 802.1x guest_vlan
config radius add <server_index 1-3> [<server_ip> | <ipv6addr>] [key <password 32> | encryption_key <password 56>] [default | {auth_port <udp_port_number 1-65535 > | acct_port <udp_port_number 1-65535 > | timeout <sec 1-255> | retransmit<int 1-20>}(1)]
config radius delete <server_index 1-3>
config radius <server_index 1-3> {ipaddress [<server_ip> | <ipv6addr>] | [key <password 32> | encryption_key <password 56>] | auth_port [<udp_port_number 1-65535 > | default] | acct_port [<udp_port_number 1-65535> | default] | timeout [<sec 1-255> | default] | retransmit [<int 1-20> | default]}(1)
show radius
show auth_statistics {ports <portlist>}
show auth_diagnostics {ports <portlist>}
show auth_session_statistics {ports <portlist>}
show auth_client
show acct_client
4-1 enable 802.1x
Description
This command is used to enable the 802.1X function.
Format enable 802.1x
38

xStack® DGS-3120 Series Layer 3 Managed Gigabit Ethernet Switch CLI Reference Guide
Parameters
None.
Restrictions
Only Administrator, Operator and Power-User level users can issue this command.
Example
Used to enable the 802.1X function:
DGS-3120-24TC:admin# enable 802.1x
Command: enable 802.1x
Success.
DGS-3120-24TC:admin#
4-2 disable 802.1x
Description
This command is used to disable the 802.1X function.
Format disable 802.1x
Parameters
None.
Restrictions
Only Administrator, Operator and Power-User level users can issue this command.
Example
To disable the 802.1X function:
DGS-3120-24TC:admin# disable 802.1x
Command: disable 802.1x
Success.
DGS-3120-24TC:admin#
4-3 create 802.1x user
Description
This command is used to create an 802.1X user.
39

xStack® DGS-3120 Series Layer 3 Managed Gigabit Ethernet Switch CLI Reference Guide
Format
create 802.1x user <username 15>
Parameters
<username 15> — Enter the username to be added. This value can be up to 15 characters long.
Restrictions
Only Administrator, Operator and Power-User level users can issue this command.
Example
To create a 802.1x user “test”:
DGS-3120-24TC:admin#create 802.1x user test
Command: create 802.1x user test
Enter a case-sensitive new password:****
Enter the new password again for confirmation:****
Success.
DGS-3120-24TC:admin#
4-4 delete 802.1x user
Description
This command is used to delete an 802.1X user.
Format
delete 802.1x user <username 15>
Parameters
<username 15> — Enter the username to be deleted. This value can be up to 15 characters long.
Restrictions
Only Administrator, Operator and Power-User level users can issue this command.
Example
To delete user “test”:
40

xStack® DGS-3120 Series Layer 3 Managed Gigabit Ethernet Switch CLI Reference Guide
DGS-3120-24TC:admin#delete 802.1x user test
Command: delete 802.1x user test
Success.
DGS-3120-24TC:admin#
4-5 show 802.1x user
Description
This command is used to display the 802.1X user.
Format
show 802.1x user
Parameters
None.
Restrictions
None.
Example
To display the 802.1X user information:
|
DGS-3120-24TC:admin#show 802.1x user |
||
|
Command: show 802.1x user |
||
|
Current Accounts: |
||
|
Username |
Password |
|
|
————— |
————— |
|
|
test |
test |
|
|
Total Entries:1 |
||
|
DGS-3120-24TC:admin# |
||
|
4-6 |
config 802.1x auth_protocol |
|
Description |
This command is used to configure the 802.1X authentication protocol.
Format
config 802.1x auth_protocol [local | radius_eap]
41

xStack® DGS-3120 Series Layer 3 Managed Gigabit Ethernet Switch CLI Reference Guide
Parameters
local — Specify the authentication protocol as local.
radius_eap — Specify the authentication protocol as RADIUS EAP.
Restrictions
Only Administrator, Operator and Power-User level users can issue this command.
Example
To configure the 802.1X authentication protocol to RADIUS EAP:
DGS-3120-24TC:admin# config 802.1x auth_protocol radius_eap
Command: config 802.1x auth_protocol radius_eap
Success.
DGS-3120-24TC:admin#
4-7 config 802.1x fwd_pdu system
Description
This command is used to globally control the forwarding of EAPOL PDU. When 802.1X functionality is disabled globally or for a port, and if 802.1X fwd_pdu is enabled both globally and for the port, a received EAPOL packet on the port will be flooded in the same VLAN to those ports for which 802.1X fwd_pdu is enabled and 802.1X is disabled (globally or just for the port). The default state is disabled.
Format
config 802.1x fwd_pdu system [enable | disable]
Parameters
enable — Enable the forwarding of EAPOL PDU.
disable — Disable the forwarding of EAPOL PDU.
Restrictions
Only Administrator, Operator and Power-User level users can issue this command.
Example
To configure forwarding of EAPOL PDU system state enable:
42

xStack® DGS-3120 Series Layer 3 Managed Gigabit Ethernet Switch CLI Reference Guide
DGS-3120-24TC:admin# config 802.1x fwd_pdu system enable
Command: config 802.1x fwd_pdu system enable
Success.
DGS-3120-24TC:admin#
4-8 config 802.1x fwd_pdu ports
Description
This command is used to control the forwarding of EAPOL PDU. When 802.1X functionality is disabled globally or for a port, and if 802.1X fwd_pdu is enabled both globally and for the port, a received EAPOL packet on the port will be flooded in the same VLAN to those ports for which 802.1X fwd_pdu is enabled and 802.1X is disabled (globally or just for the port). The default state is disabled.
Format
config 802.1x fwd_pdu ports [<portlist> | all] [enable | disable]
Parameters
<portlist> — Enter the list of ports used for the configuration.
all — Specify that all the ports will be used.
enable — Enable forwarding EAPOL PDU receive on the ports.
disable — Disable forwarding EAPOL PDU receive on the ports.
Restrictions
Only Administrator, Operator and Power-User level users can issue this command.
Example
To configure 802.1X fwd_pdu for ports:
DGS-3120-24TC:admin#config 802.1x fwd_pdu ports 1:1-1:2 enable
Command: config 802.1x fwd_pdu ports 1:1-1:2 enable
Success.
DGS-3120-24TC:admin#
4-9 config 802.1x authorization attributes
Description
This command is used to enable or disable acception of authorized configuration.
When the authorization is enabled for 802.1X’s RADIUS authentication, the authorized attributes (for example VLAN, 802.1p default priority, and ACL) assigned by the RADUIS server will be accepted if the global authorization status is enabled.
43

xStack® DGS-3120 Series Layer 3 Managed Gigabit Ethernet Switch CLI Reference Guide
Format
config 802.1x authorization attributes radius [enable | disable]
Parameters
radius — If specified to enable, the authorization attributes (for example VLAN, 802.1p default priority, and ACL) assigned by the RADUIS server will be accepted if the global authorization status is enabled. The default state is enabled.
enable — Specify to enable the authorization attributes. disable — Specify to disable the authorization attributes.
Restrictions
Only Administrator, Operator and Power-User level users can issue this command.
Example
The following example will disable to accept the authorized data assigned from the RADIUS server:
DGS-3120-24TC:admin#config 802.1x authorization attributes radius disable
Command: config 802.1x authorization attributes radius disable
Success.
DGS-3120-24TC:admin#
4-10 show 802.1x
Description
This command is used to display the 802.1X state or configurations.
Format
show 802.1x {[auth_state | auth_configuration] ports {<portlist>}}
Parameters
auth_state — (Optional) Used to display 802.1X authentication state machine of some or all ports
auth_configuration — (Optional) Used to display 802.1X configurations of some or all ports.
port — (Optional) Specify a range of ports to be displayed. If no port is specified, all ports will be displayed.
<portlist> — Enter the list of ports used for the configuration here.
If no parameter is specified, the 802.1X system configurations will be displayed.
Restrictions
None.
Example
To display the 802.1X port level configurations:
44

xStack® DGS-3120 Series Layer 3 Managed Gigabit Ethernet Switch CLI Reference Guide
DGS-3120-24TC:admin#show 802.1x auth_configuration ports 1:1
Command: show 802.1x auth_configuration ports 1:1
|
Port Number |
: 1:1 |
|
|
Capability |
: None |
|
|
AdminCrlDir |
: Both |
|
|
OpenCrlDir |
: Both |
|
|
Port Control |
: Auto |
|
|
QuietPeriod |
: 60 |
sec |
|
TxPeriod |
: 30 |
sec |
|
SuppTimeout |
: 30 |
sec |
|
ServerTimeout |
: 30 |
sec |
|
MaxReq |
: 2 |
times |
|
ReAuthPeriod |
: 3600 |
sec |
|
ReAuthenticate |
: Disabled |
Forward EAPOL PDU On Port : Enabled
Max User On Port : 16
CTRL+C ESC q Quit SPACE n Next Page p Previous Page r Refresh
4-11 config 802.1x capability
Description
This command is used to configure the port capability.
Format
config 802.1x capability ports [<portlist> | all] [authenticator | none]
Parameters
ports — Specify a range of ports to be configured.
<portlist> — Enter the list of ports used for the configuration here. all — Specify all ports to be configured.
authenticator — Specifies the port that will enforce authentication before allowing access to services that are accessible from that port. This port will adopt the authenticator role.
none — Disable authentication on the specified ports.
Restrictions
Only Administrator, Operator and Power-User level users can issue this command.
45
 Loading…
Product Highlights:
Flexible Choices
•
24, 48 10/100/1000Mbps and 16 SFP
•
4 or 8 combo Gigabit copper/SFP uplinks
for connections either in cabinets or
metropolitan areas.
•
Selectable software images provide
sophisticated feature set for your
environment.
•
802.3af and 802.3at Power Over Ethernet
support
1
High Bandwidth Physical/Virtual Stacking
•
2 dedicated stacking ports per switch
•
Up to 40 Gbps Full-Duplex Stacking
Bandwidth
•
Up to 6 units (288 Gigabit ports) per stack
•
Linear or Fault Tolerant Ring Stacking
Topology
•
Virtual Stacking of up to 32 units
•
Embedded D-Link SIM for integration of all
the xStack switches
Reliability
•
Redundant Power Supply (RPS) support
•
802.1D/802.1w/802.1s Spanning Tree
•
Loopback Detection (LBD)
•
Ethernet Ring Protection Switching (ERPS)
Security
•
Multi-Layer Access Control List (ACL)
•
IP-MAC-Port Binding (IMPB)
•
D-Link Safeguard Engine
•
DHCP Server Screening
•
BPDU Attack Protection
•
ARP Spoofing Prevention
Triple Play
•
IGMP/MLD Snooping
•
IGMP Snooping Multicast (ISM) VLAN
•
Port/Flow- based bandwidth control
•
Granular Bandwidth Control Down to 64Kbps
IPv6 Features
•
IPv6 Neighbor Discovery (ND)
•
IPv6 Management
•
IPv4/v6 Dual Stack
•
IPv6 Ready Logo Phase 2
DGS-3120 Series
xStack L2 Managed Stackable Gigabit Switches
Switching
|
DGS-3120 Series
dlink
1
For DGS-3120-24PC/48PC models only.
The DGS-3120 xStack Series are enhanced
L2 access stackable switches designed to
connect end-users in a secure business
network. These switches support physical
stacking, multicast and enhanced security,
making them an ideal Gigabit access layer
solution. The DGS-3120-24TC/48TC provides
20 or 44 10/100/1000 Mbps Gigabit Ethernet
ports and 4 combo 1000BASE-T/SFP Gigabit
Ethernet ports. The DGS-3120-24PC/48PC
provides 24 or 48 10/100/1000 Mbps
PoE Gigabit Ethernet ports and 4 combo
1000BASE-T/SFP Gigabit Ethernet ports. The
DGS-3120-24SC provides 16 SFP Gigabit
Ethernet ports and 8 combo 1000BASE-T/SFP
Gigabit ports. Each 10/100/1000 Mbps port
of DGS-3120-24PC/48PC supports 802.3af
and 802.3at Power over Ethernet standard.
The default power budget is 370 Watts and
can be expanded to 740 Watts with the
DPS-700 RPS. The switches are also equipped
with an SD Card slot, allowing the user to
boot images and upload configuration files
directly from an SD Card. Furthermore, syslog
files can also be conveniently saved to a card.
Standard and Enhanced Images
The DGS-3120 Series is embedded with two
different software images — Standard Image
(SI) and Enhanced Image (EI). The Standard
Image provides sophisticated features for
businesses. It includes advanced Quality of
Service (QoS), traffic shaping, L2 multicasting
and robust security features. The Enhanced
Image supports ERPS, Double VLAN (Q-in-Q),
Ethernet OAM, Static Route, IMPB, sFlow,
IPv6 features which are suitable for the next
generation IPv6 networks or triple play
applications in Metro Ethernet.
Enhanced Network Reliability
The DGS-3120 Series targets businesses
and customers who require a high level
of network security and maximum uptime.
All the models in DGS-3120 Series support
an external redundant power supply so
that continued operation can be assured.
They also include other features, such as 802.1D
Spanning Tree (STP), 802.1w Rapid Spanning
Tree (RSTP) and 802.1s Multiple Spanning
Tree (MSTP), Loopback Detection (LBD),
and Broadcast Storm Control, that enhance
network resilience. The G.8032 Ethernet
Ring Protection Switching (ERPS) function
minimises the recovery time to 50 ms. For load
sharing and redundancy backup in switch
cascading/server attachment configuration,
the DGS-3120 Series provides dynamic
802.3ad Link Aggregation Port Trunking.
Comprehensive Security
The DGS-3120 Series provides users with
the latest security features such as Multi-
layer and Packet Content Access Control
Lists (ACL), Storm Control, and IP-MAC-
Port Binding (IMPB) with DHCP Snooping.
The IP-MAC-Port Binding feature allows
administrators to bind a source IP address
with an associated MAC and also define
the port number to enhance user access
control. With the DHCP Snooping feature, the
switch automatically learns IP/MAC pairs by
snooping DHCP packets and saving them to
the IMPB white list. In addition, the D-Link
Safeguard Engine™ identifies and prioritises
“CPU interested” packets to prevent malicious
traffic from interrupting normal network
flows, and to protect switch operation.
Identity Driven Network Policies
The DGS-3120 Series supports authentication
mechanisms such as 802.1X, Web-based
Access Control (WAC), and MAC-based Access
Control (MAC) for strict access control and easy
deployment. After authentication, individual
policies such as VLAN membership, QoS
policies, and ACL rules can be assigned to each
host. In addition, the switch also supports
Microsoft® NAP (Network Access Protection).
NAP is a policy enforcement technology that
allows customers to protect network assets
from unhealthy computers by enforcing
compliance with network health policies.