In the world of 3D printing, for a better 3d printing experience, there will be an important step, which is the use of slicing software. For beginners, slicing software may be a little difficult to operate, but don’t worry, there will be detailed steps here. After reading these steps, you can print the model you want easily.
First, you need to install the 3d printing slicing software on your computer as the following.
1.1 Double click Creality Slicer_1.2.3.msi
1.2 Choose“Next” to continue
1.3 Choose the installation path “Default Path” (C:\Program Files(x86)\Creality Slicer) and choose “Next” to continue
1.4 Click“Install” to install the software
1.5 Waiting some time, choose “Finish” to over the installation
Second, when you have installed the 3d printing slice software, you need set language and choose the 3d printer model as the following.
2.1 Running Creality slicer
2.2 Select language→next
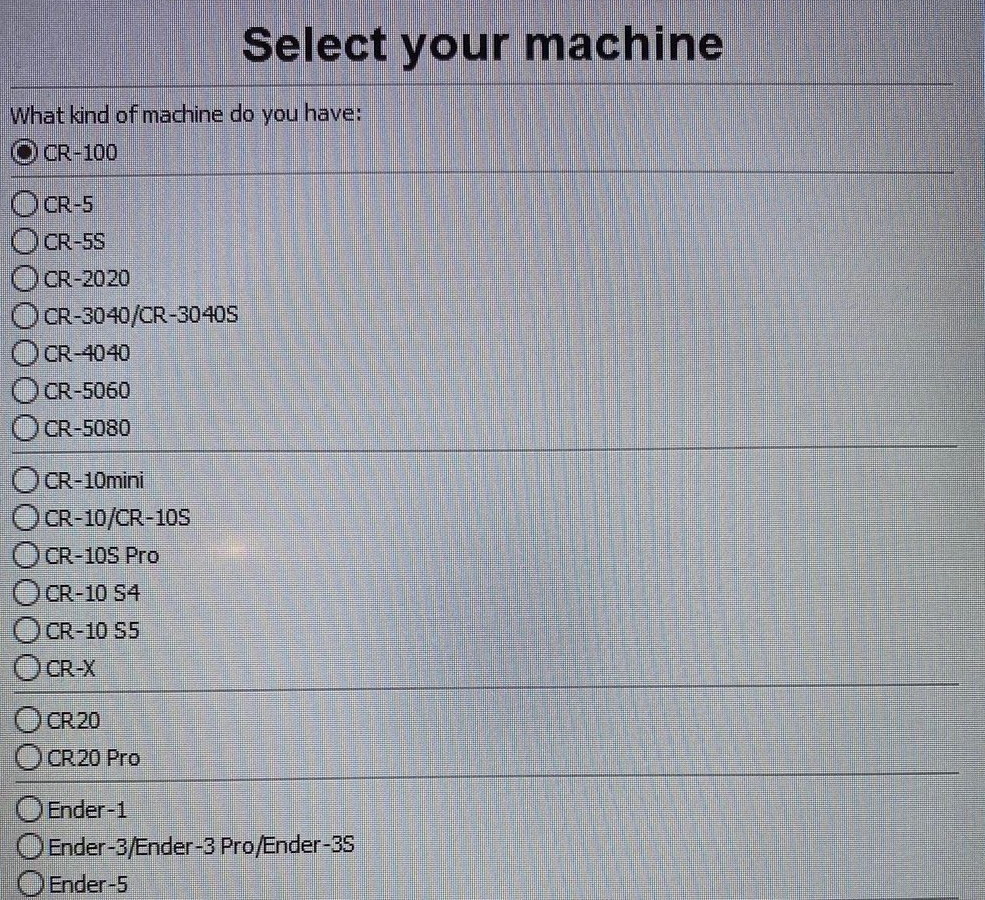
2.3 Choose 3d Printer model name(you ordered)→Next
2.4 Finish the setting.
Third, this is the printing mode you need to understand.
The Creality 3d printer software has a built-in fast print mode and full configuration mode. The default mode is the fast print, if it is necessary, you can switch to the full configuration mode.
About the first 3d printing mode, you need to have a clear understanding of the material, profile, and others.
Material:
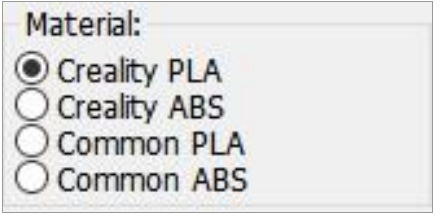
The Creality PLA and Creality ABS are our Creality material to support better 3d printing, the models will be more excellent. Creality offers two sets for PLA and ABS, one from us, one from other companies. Creality can ensure it is normal to print. Since different materials from different companies, the result of 3d printing will be a little different. You can choose the full configuration mode for specific settings.
Profile:
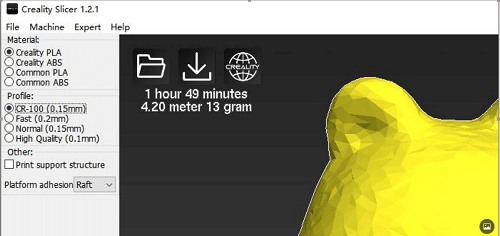
1. CR-100 (0.15mm), it is optimized for CR-100 3D printers to improve print speed while achieving better print accuracy. At the same time, CR-100 printers can achieve higher printing accuracy by choosing the “High Quality (0.1mm)” mode.
2. Fast (0.2mm), this mode is suitable for large-size simple models. It will greatly shorten the printing time, such as printing the cubes.
3.Normal (0.15mm), this mode is suitable for printing most models and is the best balance between 3d printing speed and accuracy.
4. High Quality (0.1mm), these modes sacrifices print speed to provide better print accuracy. If you want to improve the printing efficiency, you can also try to use the relevant settings of the CR-100.
Others:
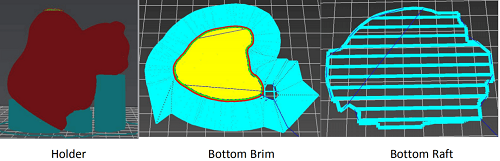
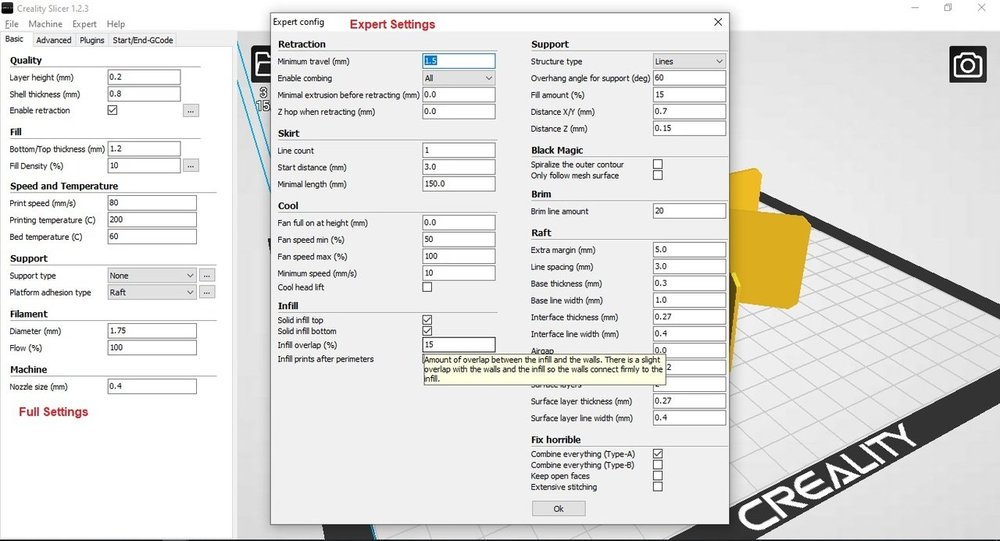
1. Printing the holder: It defaults to support the lower surface of the model with an inclination of more than 45 ° so that the model is not easy to collapse and has a better shape structure. You can adjust the angle of the model in the full configuration mode.
2.Bottom Brim: A few rounds will be printed on the outside of the bottom of the model to provide better adhesion for the model.
3.Bottom Raft: A raft will be printed on the underside of the model, to provide a flat print surface for the model even when the platform is slightly tilted.
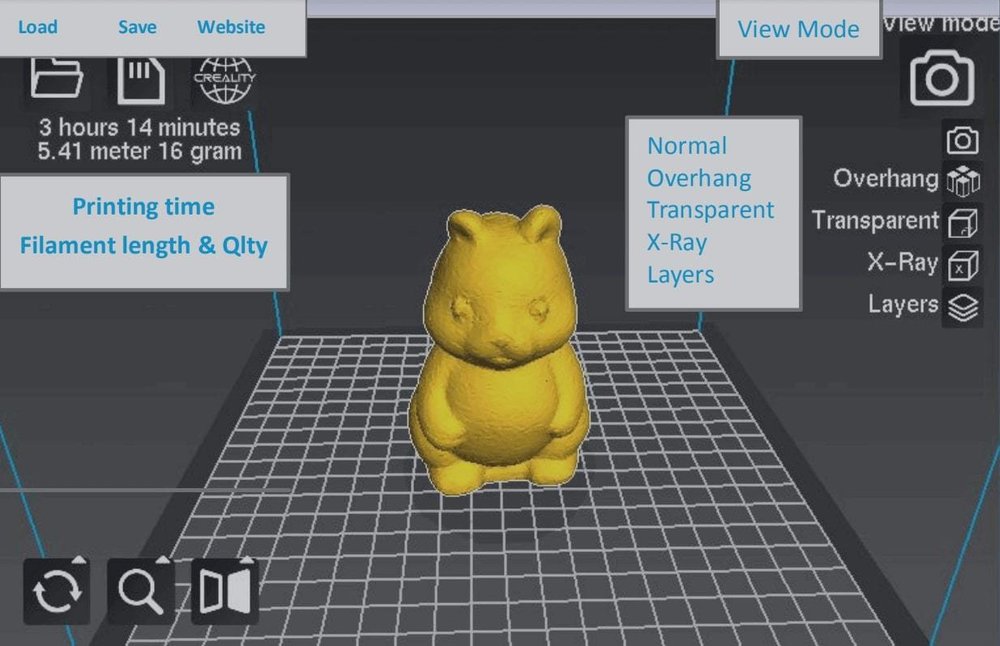
Fourth, this is the command in the window.

About view mode:
Normal: Used to view the overall outward and modify the model.
Overhang: Used to view the dangling position of the model, the red display part is left floating.
The transparent: The model is in a translucent state.
X-Ray: The surface of the model parallel to the platform is dark, others are translucent.
Layers: Display the slice of the model and the nozzle movement. Different type, the movement path will be a different color:
Red: The outer surface of the model.
Yellow: Grid filled.
Emerald: The outer surface of the 2~n layers.
Dark green: Auxiliary structure such as support.
Blue: Empty.
In “Layers”, we can drag the right progress bar to view the print path of different layers. Click below to view the switch to display only the current layer or display the current layer path.
Note:
When the model is gray, the model size is larger than the platform size, and the slice will not be sliced normally. The model scale needs to be adjusted to be smaller than the size of the platform.
About rotate, scale, mirror:
Rotate: Select the circle and drag, so that you can turn the model.
Scale: Changing the number you can change the size of the model.
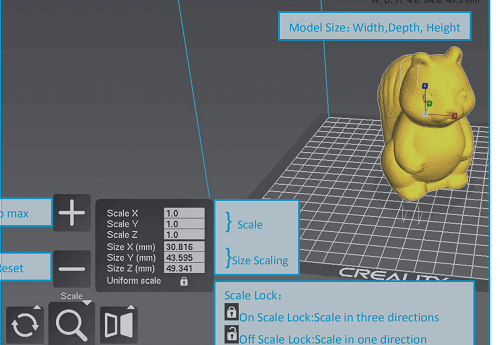
Mirror: mirror X, mirror Y, mirror Z.
The Function of Right Mouse Button
Center on platform
Delete object
Multiply object
Split object into parts,
Delete all objects,
Reload all objects,
Reset all objects positions,
Reset all objects transformations
Fifth, this is the 3d printing way you need to know.
1. Memory Card Offline Printing
Offline printing is one way to use the storage card for printing, do not need a computer, it is easy to use and operate, we advise users to choose offline printing.
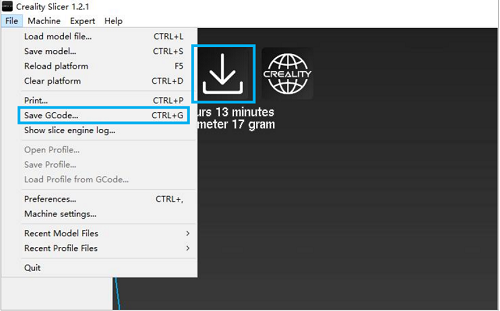
Click “Save toolpath” or Choose“File”→Save GCode.
Note:The name of the file should be alphabet and numbers, It can not be a special symbol, or the printer won’t work.
Select the path in the pop-up window and write the file name. It is important that the file name must be alphabet or numbers, not special symbols.
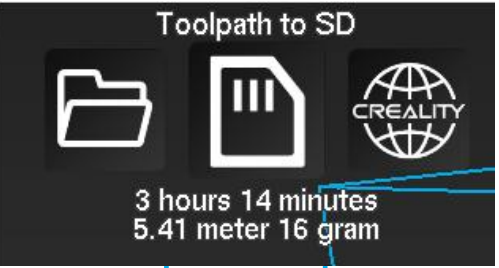
Insert the storage card, and copy the file to the storage card.
Note: If you have inserted the storage card, it will show “Toolpath to SD”, click it will be kept to the storage card.
On line 3d Printing
Online 3d printing needs to connect the computer to the 3D printer by data cable. The 3d printer cannot be powered off in the printing process, and the computer cannot sleep or go screen saver, or the data transmission will be a failure, it is inconvenient to use, we do not advise users to choose this way.
It is recommended to turn off the anti-virus software before installing the driver to prevent the accidental and cause the installation to fail.
1、Connecting the computer to the printer by USB cable.
2、Set up the Creality Slicer as follows.
2.1 Choose“File”→“Preferences”, Choose “Pronterface UI” and click“OK”.
2.2 Choose“File”→“Machine Settings”, and select the max number at the serial port, “Baudrate” is 115200.
2.3 Load the model, this icon shows that we have contacted the computer. Click, it will be s one new Pop-ups window.
We can click on the gray ring on the window to control the motion of the XYZE axis. «0.1, 1, 10, 100» are each amount of motion. The text box in the lower right corner can be input G code to control. If you are not familiar with it, please do not change anything. Click “Print” to start 3d printing. Please be careful during printing to avoid 3d printing failure.
Note: If you cannot connect properly, please install the corresponding driver or download the third-party driver software.
Sixth, 2.4 Printing Durable color models
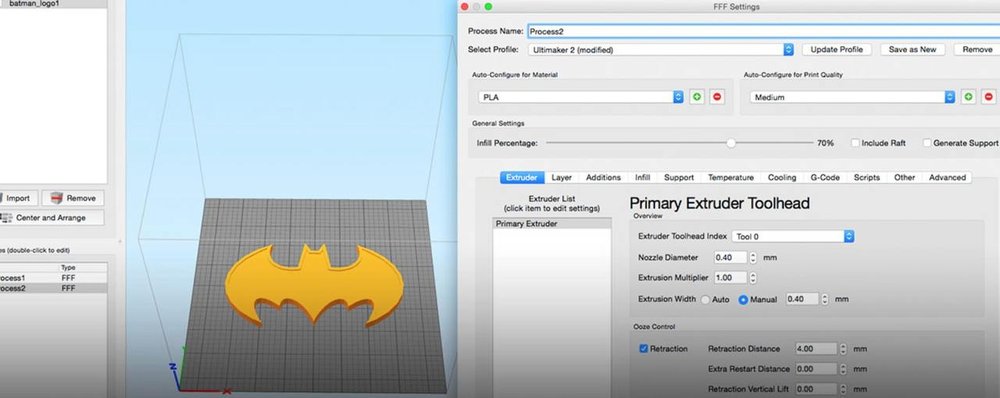
6.1 In the beginning, make sure that the printer you buy supports two-color printing.
6.2 Open or drag different parts of the two-color model you want to print into the software.
6.3 Right-click the model and select «Multiply Object», After the software prompts the slicing to complete, you can start printing.
Seventh, make Lithophane
1. Open or drag a photo to the software.
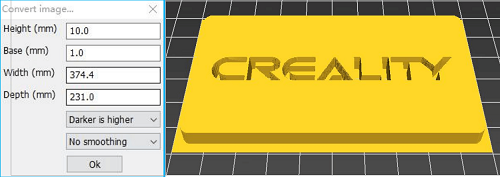
2. Input the appropriate parameters, that we can start to print after the slicing is complete.
There are some special models shared from our customers, which are made by Creality 3D Printers, If you are interested in sharing us with your amazing models and 3d printing stories, you can send us by email below.
How to use Creality Slicing Software

Grilled Giardiniera-Stuffed Steak Sandwich
This rolled flank steak is inspired by the Italian beef sandwich, a Chicago delicacy typically consisting of chopped thin slices of roast beef stuffed…
Provided by Food Network Kitchen

Mapo Potato
Let’s be clear: Nothing surpasses the hearty deliciousness of a traditional mapo tofu. But for those days when you find yourself without soft tofu in the…
Provided by Hetty McKinnon

Chili
This is a spicy, smoky and hearty pot of chili. It’s the kind of chili you need after a long day skiing — or hibernating. To create a rich and thick sauce,…
Provided by Ali Slagle
Banket
This recipe is from my mother. It is the one she taught me with a slight tweak. In my home on the holidays one way to show someone or a family they were…
Provided by Jena Lewis

Moroccan Nachos
This Moroccan twist on the much-loved appetizer features kefta, a ground beef (or lamb) mixture seasoned with parsley, cilantro, mint, paprika and cumin,…
Provided by Nargisse Benkabbou
Peanut Butter Brownie Cups
I’m not a chocolate fan (atleast not the kind made in the U.S.), but I LOVE peanut butter and chocolate and this hit the spot. I found the recipe in 2007…
Provided by AmyZoe
Banana Cream Pudding
This fabulous version of the favorite Southern dessert boosts the banana flavor by infusing it into the homemade vanilla pudding, in addition to the traditional…
Provided by Martha Stewart
Lemon Russian Tea Cakes
I love lemon desserts,these are a simple cookie I can make quickly. The recipe is based on the pecan Russian tea cakes.I don’t like lemon extract,instead…
Provided by Stephanie L. @nurseladycooks
Easy Churros with Mexican Chocolate Sauce
Forgo the traditional frying — and mixing up the batter! — for this Latin American treat. Instead, bake store-bought puff pastry for churros that are…
Provided by Martha Stewart
Easy Lasagna
Everyone loves lasagna. It’s perfect for feeding a big crowd and a hit at potlucks. But most people reserve it for a weekend cooking project since it can…
Provided by Food Network Kitchen
Grilled Vegetables Korean-Style
Who doesn’t love grilled vegetables — the sauce just takes them over the top.
Provided by Daily Inspiration S @DailyInspiration
Outrageous Chocolate Cookies
From Martha Stewart. I’m putting this here for safe keeping. This is a chocolate cookie with chocolate chunks. Yum! Do not over cook this cookie since…
Provided by C. Taylor
CERTO® Citrus Jelly
A blend of freshly squeezed orange and lemon juices puts the citrusy deliciousness in this CERTO Citrus Jelly.
Provided by My Food and Family
Previous
Next
CREALITY PRINT: ALL YOU NEED TO KNOW ABOUT THE FDM SLICER

WebAug 21, 2022 Creality Print: All You Need to Know About the FDM Slicer. by Ian Mitchell. Published Aug 21, 2022. Creality Print is the company’s latest entry into the field of 3D slicers for its FDM printers. Read all …
From all3dp.com
Aug 21, 2022 Creality Print: All You Need to Know About the FDM Slicer. by Ian Mitchell. Published Aug 21, 2022. Creality Print is the company’s latest entry into the field of 3D slicers for its FDM printers. Read all …»>
See details
THE BEST CREALITY SLICER SETTINGS / PROFILE
WebAug 19, 2021 The Best Creality Slicer Settings / Profile | All3DP. This article is free for you and free from outside influence. To keep things this way, we finance it through advertising and shopping links. If you …
From all3dp.com
Aug 19, 2021 The Best Creality Slicer Settings / Profile | All3DP. This article is free for you and free from outside influence. To keep things this way, we finance it through advertising and shopping links. If you …»>
See details
CREALITY ENDER 3 SLIC3R SETTINGS
WebConfigure your slicing settings 4. Generate G-code 5. Save the G-code file 6. Print! That’s it! Configuring slic3r settings: There are many settings that can be configured in Slic3r. These settings control everything from the …
From crealitylovers.com
Configure your slicing settings 4. Generate G-code 5. Save the G-code file 6. Print! That’s it! Configuring slic3r settings: There are many settings that can be configured in Slic3r. These settings control everything from the …»>
See details
HOW TO USE CREALITY SLICING SOFTWARE
WebAug 11, 2020 After reading these steps, you can print the model you want easily. First, you need to install the 3d printing slicing software on your computer as the following. 1.1 Double click Creality Slicer_1.2.3.msi. …
From creality.com
Aug 11, 2020 After reading these steps, you can print the model you want easily. First, you need to install the 3d printing slicing software on your computer as the following. 1.1 Double click Creality Slicer_1.2.3.msi. …»>
See details
THE BEST 3D PRINTER SETTINGS FOR PERFECT PRINTS
WebJul 7, 2022 The Best 3D Printer Settings for Perfect Prints. by Jackson O’Connell. Updated Jul 7, 2022. 3D slicer settings are the defining factor for successful 3D prints. Learn about the 10 most important 3D printer …
From all3dp.com
Jul 7, 2022 The Best 3D Printer Settings for Perfect Prints. by Jackson O’Connell. Updated Jul 7, 2022. 3D slicer settings are the defining factor for successful 3D prints. Learn about the 10 most important 3D printer …»>
See details
IN CREALITY SLICER, WHICH SETTINGS SHOULD BE ADJUSTED TO REDUCE THE …
WebJul 12, 2022 Creality’s slicer is forked from Ultimakers Cura slicer and afterwards further developed as a minimalistic slicer. If the options are similar, you can look at Cura slicer support options.. The amount of …
From 3dprinting.stackexchange.com
Jul 12, 2022 Creality‘s slicer is forked from Ultimakers Cura slicer and afterwards further developed as a minimalistic slicer. If the options are similar, you can look at Cura slicer support options.. The amount of …»>
See details
CREALITY SLICER: AN OVERVIEW
WebNov 28, 2022 Creality Slicer: An Overview | All3DP. Source: Lauren Fuentes via All3DP. This article is free for you and free from outside influence. To keep things this way, we …
From all3dp.com
Nov 28, 2022 Creality Slicer: An Overview | All3DP. Source: Lauren Fuentes via All3DP. This article is free for you and free from outside influence. To keep things this way, we …»>
See details
CURA VS CREALITY SLICER: WHICH IS BEST FOR YOU?
WebApr 5, 2023 Creality Slicer is best seen as a simplified and streamlined version of Cura that’s easier for beginners to use and understand. Cura, on the other hand, has a …
From 3dsourced.com
Apr 5, 2023 Creality Slicer is best seen as a simplified and streamlined version of Cura that’s easier for beginners to use and understand. Cura, on the other hand, has a …»>
See details
CREALITY SLICER USER MANUAL_EN.PDF
WebPage 3 of 22 — 1 — NOTES Dear Consumers: Thank you for choosing and using our printer. For your convenience, please read this manual carefully before use and follow the …
From docs.google.com
Page 3 of 22 — 1 — NOTES Dear Consumers: Thank you for choosing and using our printer. For your convenience, please read this manual carefully before use and follow the …»>
See details
GET STARTED WITH CREALITY SLICER (FOR NEW PRINTER OWNERS)
WebJan 3, 2022 Hello, 3D Printing friends! Today we’re going to learn the basics of Creality Slicer, from installation, to adding a printer, slicing a model, and printing i…
From youtube.com
Jan 3, 2022 Hello, 3D Printing friends! Today we’re going to learn the basics of Creality Slicer, from installation, to adding a printer, slicing a model, and printing i…»>
See details
HOW TO USE CREALITY 3D SLICER
WebOct 29, 2020 creality cr-10 v2 https://amzn.to/37UC4bNcreality ender3 v2https://amzn.to/2TyAfZS
From youtube.com
Oct 29, 2020 creality cr-10 v2 https://amzn.to/37UC4bNcreality ender3 v2https://amzn.to/2TyAfZS»>
See details
CREALITY SONIC PAD SETUP GUIDE, REVIEW, SLICER SETTINGS AND …
WebMay 11, 2023 In this video I will walk you through the set up of the Creality Sonic Pad on a Creality Ender 5 S1. However, the installation should be the same on the Crea…
From youtube.com
May 11, 2023 In this video I will walk you through the set up of the Creality Sonic Pad on a Creality Ender 5 S1. However, the installation should be the same on the Crea…»>
See details
CREALITY SLICER: THE BEST SLICERS FOR CREALITY 3D PRINTERS
WebJul 18, 2022 Creality Slicer: The Best Slicers for Creality 3D Printers. by Brian Obudho, Pranav Gharge, Jackson O’Connell. Updated Jul 18, 2022. Creality 3D printers ship with …
From all3dp.com
Jul 18, 2022 Creality Slicer: The Best Slicers for Creality 3D Printers. by Brian Obudho, Pranav Gharge, Jackson O’Connell. Updated Jul 18, 2022. Creality 3D printers ship with …»>
See details
SLICER SETTINGS : R/CREALITY
WebHonestly it can vary greatly depending on what filament youre using and what you’re printing. Ive been at this for a few months and I still feel like I’m fumbling around in the …
From reddit.com
PETG CHEATSHEET: CHOOSING THE BEST SLICER SETTINGS
WebNov 9, 2022 PETG benefits from a hot nozzle and a warm build plate to get the best results. Keep your heated bed between 70°C and 80°C when printing with PETG, and …
From makeuseof.com
Nov 9, 2022 PETG benefits from a hot nozzle and a warm build plate to get the best results. Keep your heated bed between 70°C and 80°C when printing with PETG, and …»>
See details
3D PRINTER SLICER SOFTWARE& FIRMWARE DOWNLOAD — CREALITY 3D
Web3D Printing Solutions Manuals and Slicer Software & Firmware. All Creality softwares are in here. Download Center Models. Discover More CREALITY. Check more here.
From creality.com
3D Printing Solutions Manuals and Slicer Software & Firmware. All Creality softwares are in here. Download Center Models. Discover More CREALITY. Check more here.»>
See details
SLICER SETTINGS AND PROFILES WITH CURA — SONIC PAD …
WebApr 13, 2023 In this video I’m going to show you how to configure your slicer settings to get the most out your 3d prints when using the Creality Sonic Pad.You may have a…
From youtube.com
Apr 13, 2023 In this video I’m going to show you how to configure your slicer settings to get the most out your 3d prints when using the Creality Sonic Pad.You may have a…»>
See details
CREALITY ENDER-3 S1 GUIDE: BEST CURA SETTINGS & PROFILE
WebMay 13, 2023 Beginning The Ender 3 S1 Direct Drive 3D Printer is the successor of the popular Ender 3 V2 from Creality. It is packed with proven features that significantly …
From blog.geekbuying.com
May 13, 2023 Beginning The Ender 3 S1 Direct Drive 3D Printer is the successor of the popular Ender 3 V2 from Creality. It is packed with proven features that significantly …»>
See details
CREALITY SLICER SETTINGS FOR 3D PRINTING – RGB DISPLAYS
WebIn this article, we share which settings I use as a regular Creality slicer user. Whether you’re a beginner or an experienced 3D printer user, the Creality slicer settings can be …
From rgbdisplays.com
In this article, we share which settings I use as a regular Creality slicer user. Whether you’re a beginner or an experienced 3D printer user, the Creality slicer settings can be …»>
See details
CREALITY SLICER — CHANGE THE DEFAULT SETTINGS : R/ENDER3
WebThe «creality» slicer is just Cura with a different skin. All you have to do is export the profile, and then import it in Cura. I see no way to export the profile in the Creality slicer. I see …
From reddit.com
WHAT ARE GOOD SETTINGS FOR CREALITY SLICER SOFTWARE FOR SMOOTH …
WebPreferences>Configure (or Configure Creality)>Profiles>Import. If you’re using the Creality specific version of Cura then you need to download the 4.8 profiles as that is the most …
From reddit.com
OPTIMIZED PRINT SETTINGS TO IMPROVE YOUR PRINT QUALITY
WebLet’s look at the example we did for the FDM print test. 1. CR-6 SE print effect before and after print setting adjustment with cloud slicer. Profile: Dynamic (0.10mm) print effect. …
From crealitycloud.com
Let’s look at the example we did for the FDM print test. 1. CR-6 SE print effect before and after print setting adjustment with cloud slicer. Profile: Dynamic (0.10mm) print effect. …»>
See details
CREALITY SLICER: SAVING SETTINGS : R/CREALITY
WebBut if I open it as a project, then all of the slicer settings are updated with the settings that were stored in the .3mf file when I saved it. I think the issue is that the basic .3mf format, …
From reddit.com
Creality Slicer — это запатентованный слайсер от известного производителя 3d принтеров Creality.
Большинство производителей 3D-принтеров стараются создать собственное программное обеспечение для слайсинга моделей. Например это Cura от Ultimaker или PrusaSlicer от Prusa Printers, которые являются наиболее популярными вариантами и в некоторых случаях могут использоваться для других марок 3d принтеров.
Creality Slicer основан на устаревшей версии Cura (версия 1.2.3), которая была модифицирована для создания собственного программного обеспечения (по аналогии, как PrusaSlicer родился из Slic3r). Хотя он может показаться более упрощенным, но разработан специально для работы с 3d принтерами Creality.
Помните, что если вы хотите обновить Creality Slicer, вам нужно будет сделать это вручную, скачать его можно на странице загрузки Creality.
В этой статье мы рассмотрим Creality Slicer, от системных требований до возможных альтернатив.
Системные Требования Creality Slicer
Creality Slicer работает только на Windows. Для Mac рекомендуют Cura.
Как правило слайсеры, очень легки в освоении и не требует много временных затрат.
Минимальные требования к железу:
- Свободное место: 512 МБ ОЗУ, 200 МБ доступно на диске
- Процессор: Pentium 4, хотя Intel Core 2 или выше
Особенности и функции Creality Slicer
При первом запуске программы вам будет предложено выбрать, какой у вас 3d принтер Creality. Однако он не поставляется с предустановленными настройками для 3d принтеров других производителей, поэтому вам придется вводить их в ручную, например в Cura есть профили для широкого диапазона принтеров.
Обзор пользовательского интерфейса Creality Slicer
По умолчанию в программе активированы параметры быстрой печати. В них вы можете выбирать такие параметры, как материал, качество, наличие поддержек и т.д.
Однако в опции «Эксперт» в панели инструментов можно изменить более широкий спектр настроек, к которым вы также можете получить доступ, нажав ctrl + E.
Доступ к экспертным настройкам
При доступе к полным настройкам вы найдете почти все, что вам нужно: заполнение, температуру для сопла и платформы и т.д.
Однако Cura имеет больше гибкости.
Редактор G-кода Creality Slicer

Персонализируйте начальный и конечный G-код в Creality Slicer
Creality Slicer также поставляется с очень полезной опцией — просмотр и изменения G-кода вашего отпечатка. Это идеально подходит для случаев, когда вы хотите сделать калибровочные распечатки, чтобы узнать, как различные настройки влияют на результаты, без необходимости вручную редактировать G-код или запускать новую печать для каждого изменения.
Несколько 3d принтеров в Creality Slicer
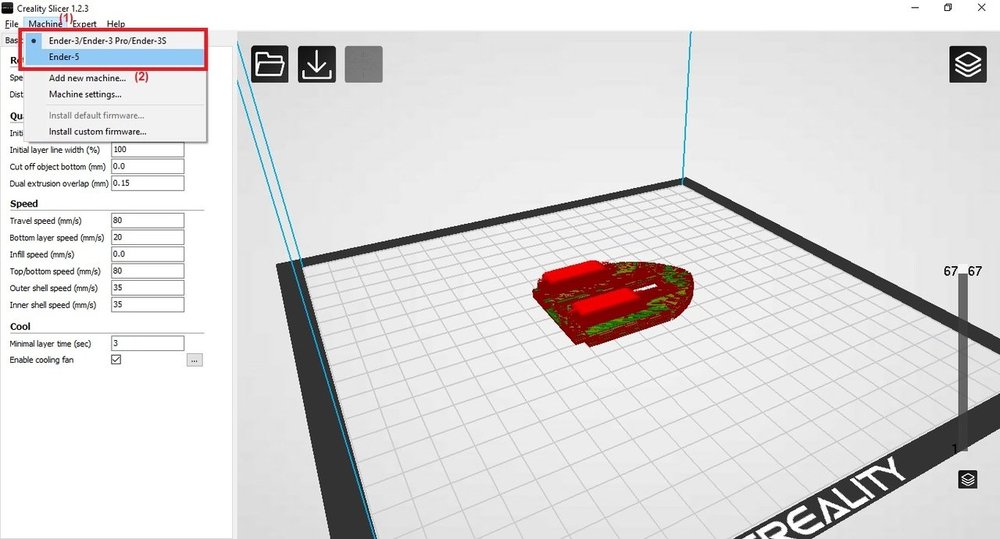
Быстрое переключение между машинами
Если вы хотите добавить дополнительную машину, выполните следующие действия:
- Перейдите в «Машина» и выберите «Добавить новую машину» (см. Красную цифру «2» на изображении выше).
- Вы должны увидеть тот же начальный экран, который вы видели при первом запуске программы.
- После выбора машины программа откроется снова и нужно будет добавить новую машину.
Если у вас более одного 3d принтера, переключение между машинами происходит плавно:
- Перейдите к Machine (см. Красную цифру «1» на изображении выше) на панели инструментов.
- Выберите машину, с которой хотите работать и настройки изменятся.
Пользовательский опыт
Как уже упоминалось ранее, Creality Slicer имеет меньше параметров, чем Cura. По этой причине многие пользователи, которые только начинают работать со слайсерами, находят его проще в использовании, чем Cura.
В целом, на 3d принтерах Creality некоторые пользователи сообщают о лучшем качестве печати при работе с Creality Slicer по сравнению с Cura. Есть также люди, которые выбрали Creality Slicer вместо Cura, потому что настройки их принтера в Cura кажутся несоответствующими и они не могут добиться хороших отпечатков на них.
Пользователям нравится и то, что интерфейс Creality Slicer выглядит аутентично и не имеет такого количества кнопок, как Cura, которые могут быть ненужными и отвлекающими.
Поддержка и сообщество Creality Slicer
Официальной поддержки Creality Slicer не так много, хотя Creality выпустила официальное руководство пользователя . Вы также можете задать вопросы через форму для бесплатной консультации. Кроме того, у Creality есть блог, в котором они демонстрируют статьи о новых функциях, новых машинах, советы по улучшению качества печати и так далее.
Есть также много неофициальных сообществ печати, где вы можете получить информацию и попросить совета, особенно на Reddit. Подразделы 3D Printing News , Ender3 и Creality популярны и активны. Там вы можете найти производителей, которые постоянно помогают друг другу добиваться лучших отпечатков.
Альтернативы
Как мы уже упоминали, альтернатив для Creality Slicer достаточно, прочитать о них вы можете в нашей статье о лучших слайсерах для принтеров.
Магазин-мастерская в Питере временно не работает.
Предположим, что вы уже прошли квест по сборке принтера, и уже не терпится что-нибудь напечатать. Рассказываем, как приступить к печати на Creality Ender-3 V2, и на какие настройки обратить внимание, чтобы использовать возможности своего 3D-принтера на полную катушку.
Перед распечаткой на 3D принтере модель надо подготовить и разбить на слои. Обычно 3D модели распространяются в формате STL — это своеобразный JPEG в мире моделирования. Трёхмерный объект в формате STL состоит из множества полигонов — треугольников, координаты которых описаны в файле.
Однако принтеры не способны самостоятельно обрабатывать STL-файлы. Сперва выбранную модель надо преобразовать в G-код — специальные команды для принтера, которые сообщают, куда перемещать головку и с какой скоростью выдавливать пластик в процессе печати. Для преобразования произвольной 3D-модели в G-код существуют специальные программы — слайсеры.
Мы покажем, как выглядит эта операция на примере 3D-принтера Creality Ender-3 V2. Обработаем в слайсере Cura популярную модель кораблика 3DBenchy.
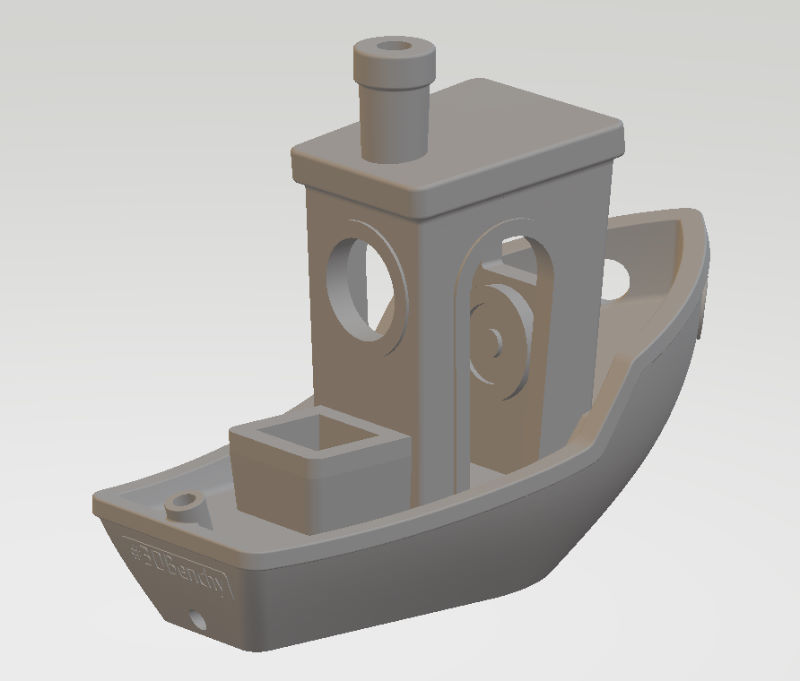
Эта модель сделана специально, чтобы определять недостатки печати на 3D-принтерах и калибровать настройки. Можно скачать любую 3D-модель в формате STL со специализированных сайтов.
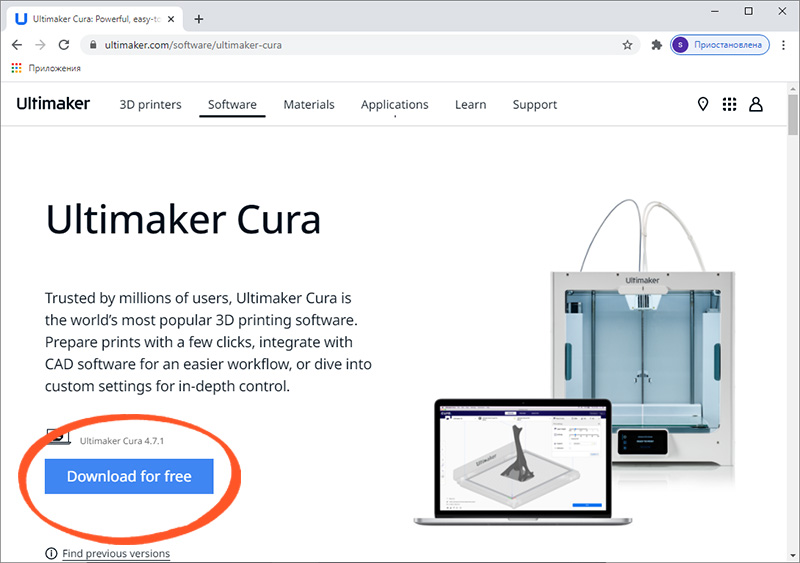
Скачивание слайсера
Для преобразования моделей в G-код подходит любая программа-слайсер. В данном примере мы будем использовать слайсер Cura — наиболее функциональную из бесплатных программ. Скачайте слайсер с официального сайта и запустите установку.
Пропустите приветственные экраны и примите условия использования.

Настройка принтера в слайсере
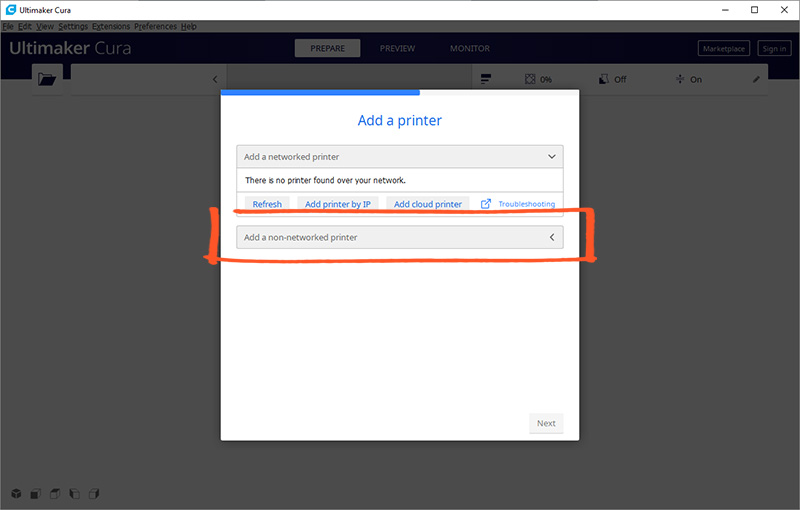
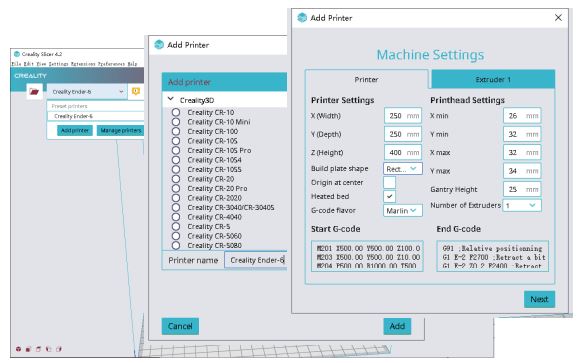
Добавьте принтер в программу с помощью кнопки «Add a non-networked printer».
Выберите из списка «Creality Ender-3». Это предыдущая модель, у которой идентичные характеристики.
В поле «Printer name» можно ввести любое имя принтера. Оно нужно, чтобы различать между собой несколько принтеров или несколько профилей настроек одного принтера. Назовите его «Creality Ender-3 V2».
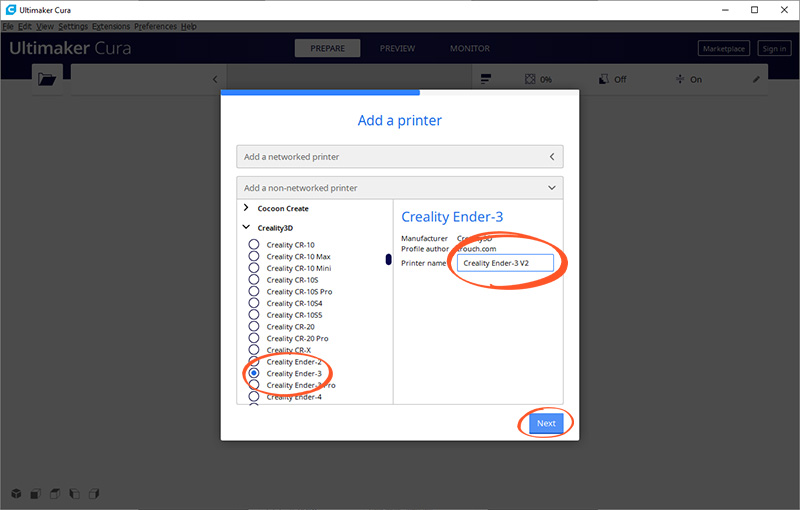
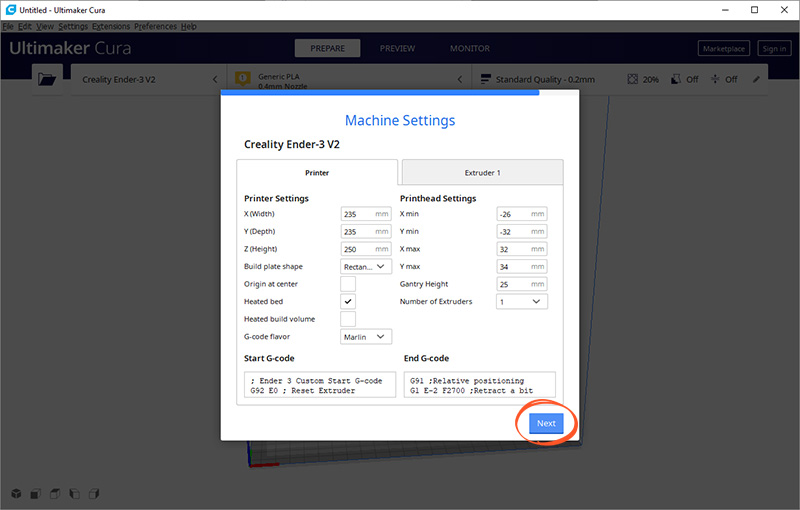
Все настройки у принтера совпадают с Ender-3, поэтому на данном экране ничего менять не надо. Нажмите кнопку «Next».
Изменение языка программы
Для удобства сразу изменим язык программы. Зайдите в настройки с помощью кнопки «Preferences» → «Configure Cura…»

Выберите русский язык в выпадающем меню «Language».
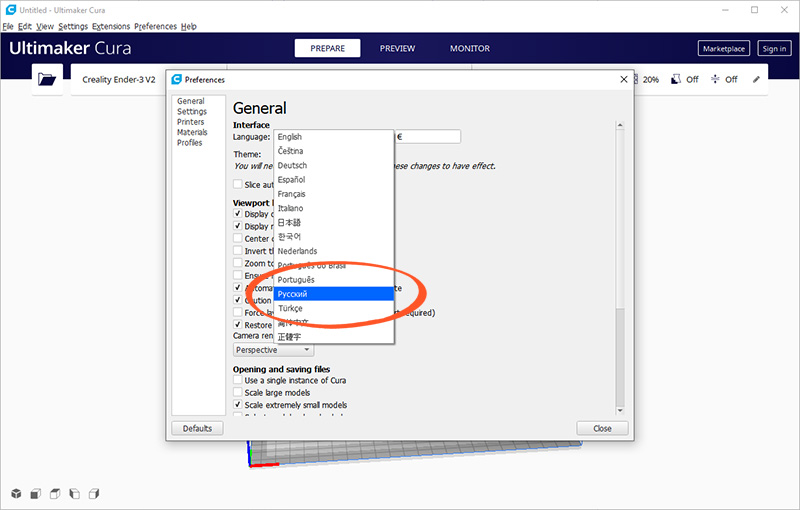
Язык интерфейса поменяется только после перезагрузки программы. Закройте Cura и откройте заново — вас встретят русскоязычные менюшки.
Добавление модели в слайсер
Нажмите на кнопку с иконкой папки и выберите скачанный файл 3D-модели.


Настройка параметров печати
Всё управление программой вынесено в верхнюю панель с тремя кнопками.
Выбор принтера
В левом верхнем углу отображается имя вашего принтера. Мы добавили только одну модель, поэтому в этом пункте должен быть Creality Ender-3 V2.

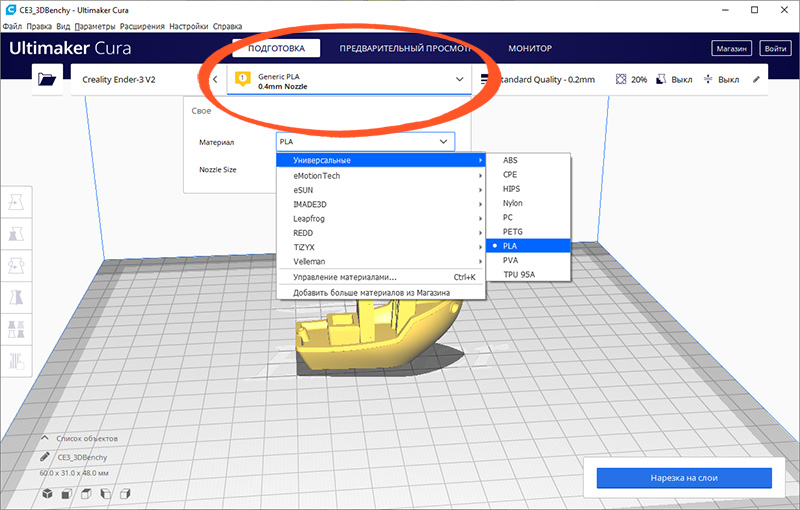
Выбор пластика и сопла на принтере
Ваш принтер Creality Ender-3 V2 позволяет печатать различными видами пластика и использовать сопла с разным диаметром. Проконтролируйте, что в программе выбрано штатное сопло 0,4 мм, которое установлено в принтере с завода.
Раскройте шторку выбора пластика и сопла. В разделе «Материал» выберите ваш пластик. Мы печатаем PLA-пластиком, поэтому выбрали «PLA» в разделе «Универсальные».
Выбор настроек слайсинга
По клику на длинную кнопку справа раскрывается список с основными настройками слайсинга. Разработчики Cura постарались сделать программу понятнее, поэтому встроили в неё подсказки. При наведении курсора на неизвестный параметр появится подсказка, которая поможет понять, за какую настройку он отвечает и на что влияет.

Кнопка «Своё» открывает подробные настройки со множеством параметров. Оставьте все профессиональные параметры по умолчанию. Нам вполне хватит базовых настроек.

Верхний ползунок «Профили» отвечает за высоту одного слоя. Чем толще каждый слой, тем быстрее печатается модель. В то же время, при уменьшении толщины слоя достигается более аккуратное качество печати.
Выставим высоту слоя 0,16 мм. Это золотая середина между скоростью и качеством.

Второй ползунок «Заполнение» отвечает за внутреннюю часть модели. Принтер может напечатать только стенки модели, а внутренний объём оставить пустым. Это сильно снизит расход пластика, но негативно повлияет на прочность модели. Чтобы готовая пластиковая деталь не развалилась в руках, её внутренности не остаются пустыми, а заполняются сеточкой. Полученные рёбра повышают жёсткость модели.
Чтобы соблюсти баланс между прочностью модели и расходом пластика, выставьте заполнение на 20%.

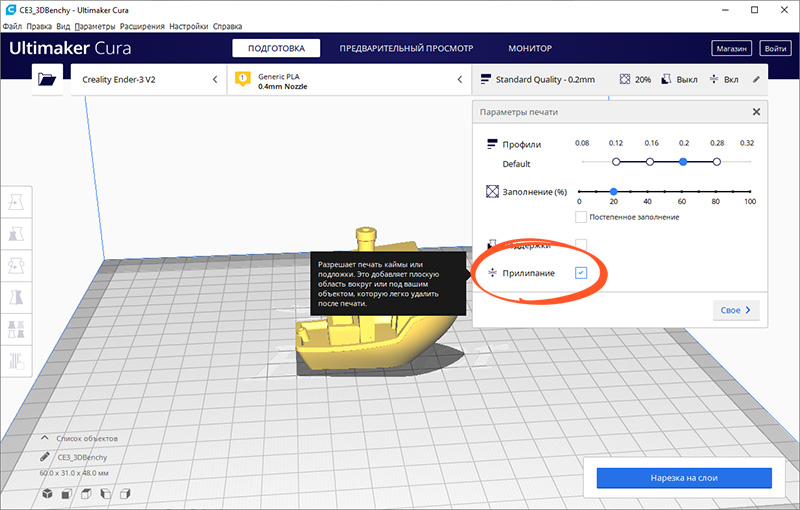
Также в меню настроек слайсинга находятся два дополнительных параметра: поддержки и прилипание.
Если деталь имеет выступающие части, которые нависают над столом, то принтер не сможет их напечатать — они попросту упадут. Чтобы этого не произошло, активируйте галочкой параметр «Поддержки». Под нависающими частями будут печататься столбики, которые поддержат деталь.
В нашей тестовой модели кораблика таких частей нет, поэтому параметр «Поддержки» активировать не надо. Но если вы печатаете собственную модель — не забывайте про опоры.

Параметр «Прилипание» улучшает адгезию. Это сила сцепления между деталью и столом. Если адгезия недостаточная, деталь может оторваться в процессе печати. Принтер будет печатать вокруг модели юбочку, которая увеличит площадь соприкосновения со столом. После печати её можно будет срезать, но она не позволит модели оторваться от стола посреди процесса.
Активируйте этот параметр, так как дно у кораблика довольно мелкое, и дополнительная поверхность для более прочной адгезии ему будет очень кстати.
Предварительный просмотр
Нажмите кнопку «Нарезка на слои». После этого слайсер просчитает траекторию головки и сгенерирует G-код.
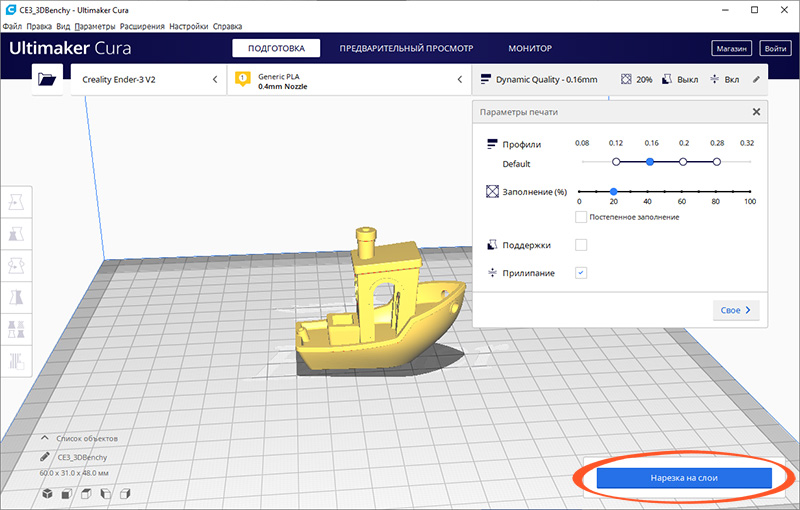
Перейдите на вкладку «Предварительный просмотр», где будет видно построенные слои модели. Предпросмотр помогает проверить ваши настройки печати и понять, как будет печататься модель.


Экспорт G-кода
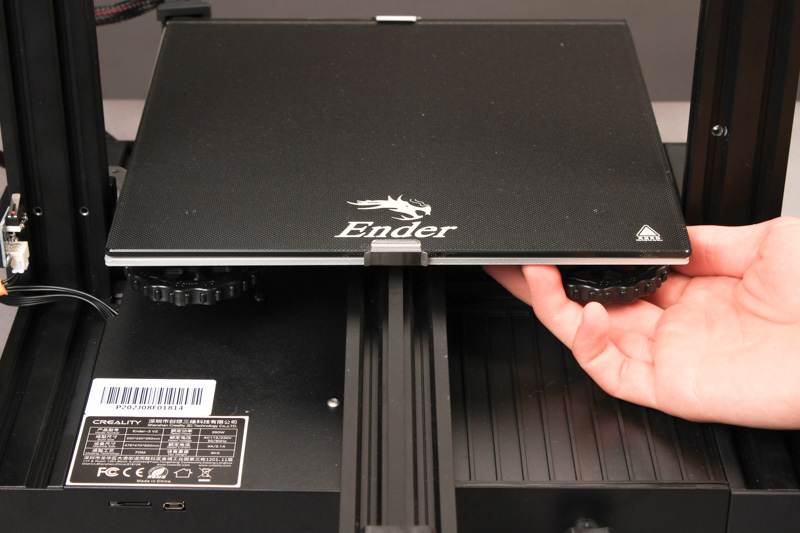
Чтобы записать готовый файл, легче всего подключить к компьютеру карту памяти microSD через переходник из комплекта принтера. Слайсер сразу же обнаружит съёмное устройство и предложит сохранить файл на него. Сохраните G-код на карту памяти или с помощью раскрывающегося списка сохраните в файл, а затем вручную скопируйте на карту.

Калибровка стола
Первоначальную настройку мы уже выполнили при сборке принтера, однако со временем стол может сбиться. Если модель плохо прилипает или, наоборот, первый слой получается излишне тонким и экструдер начинает щёлкать, то стол необходимо перекалибровать с помощью четырёх угловых винтов.
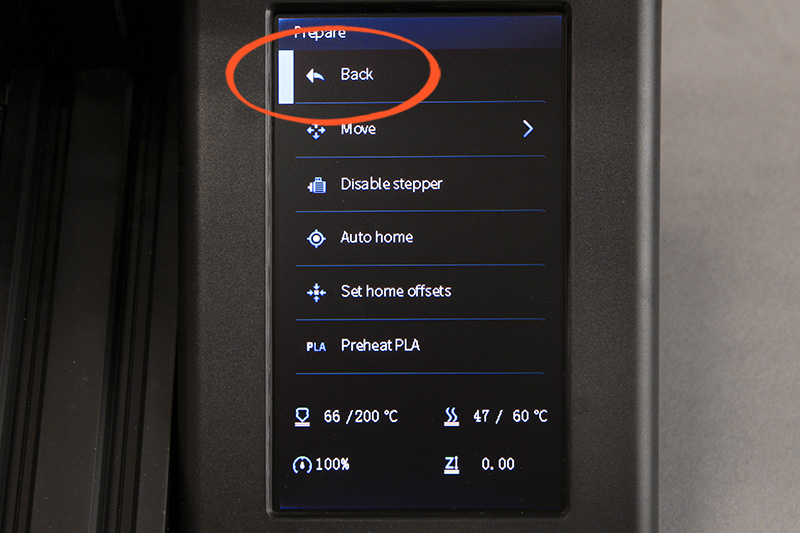
С помощью энкодера на экране войдите в пункт «Prepare».

Выберите пункт «Auto home». Принтер поставит сопло в нулевое положение.

После этого отключите моторы командой «Disable stepper».

Положите лист бумаги между соплом и столом. Подрегулируйте винт. Сопло должно царапать, но не рвать лист.

Сдвиньте рукой печатающую головку и стол. Повторите данную операцию в каждом углу стола, чтобы задать самое ровное положение в горизонтальной плоскости.
Смена пластика
Перед тестовой печатью мы уже заправили катушку пластика, однако рано или поздно вам придётся его сменить. Например, если вы захотите печатать другим цветом или попробовать другой тип пластика. Для этого сначала понадобится удалить остатки старого пластика. Сменим пластик на другой, либо удалим остатки старого.
Нить пластика при печати плавится в сопле. Если сопло холодное, то пластик приплавится к соплу, и достать его не получится. Нагрейте сопло до температуры плавления пластика. Для этого надо зайти в пункт «Prepare».

Выберите пункт «Preheat PLA». Сопло начнёт разогреваться.

С помощью кнопки «Back» выйдете в основное меню.
Убедитесь, что сопло разогрелось до заданной температуры.

С помощью индикаторного колеса выкрутите нитку с пластиком из тефлоновой трубки и экструдера.

Обрежьте конец у нового пластика. Чтобы пластик попал в фитинг, а не застрял в экструдере, удобнее резать конец пластика под наклоном. Печать начнётся не сразу. Принтеру сперва необходимо нагреть стол и сопло до рабочей температуры.

Заправьте конец катушки в экструдер и с помощью индикаторного колеса протолкните пластик до сопла.


Пластик должен потечь из сопла.

Печать с карты памяти
Перед печатью надо задуматься об адгезии. На стекле есть специальное покрытие, которое улучшает сцепление между первым слоем пластика и столом, однако у больших моделей могут загибаться края. Для улучшения адгезии можно тонко помазать стол клеем-карандашом или побрызгать лаком для волос.
Вставьте карту памяти в нижнюю панель принтера.

Зайдите в меню «Print».

Выберите файл с корабликом, который мы подготовили в слайсере.

Печать начнётся не сразу. Принтеру сперва необходимо нагреть стол и сопло до рабочей температуры. Подождите, пока набирается температура.

Во время печати можно подрегулировать температуру сопла, скорость печати и несколько других параметров. Мы всё настроили в слайсере, поэтому менять ничего не надо.
В заключение
Мы показали вам самый короткий путь до начала использования 3D-принтера Creality Ender-3 V2 сразу после сборки. Это послужит вам шпаргалкой для печати произвольных 3D моделей и экспериментов с разными типами пластика. Дерзайте!
Полезные ссылки
- Всё для 3D-печати в каталоге Амперки
- Где скачать бесплатные 3D-модели
- Информация о материале
- Обновлено: 14.09.2022, 17:43
- Опубликовано: 14.09.2022, 13:52
- Автор: DeniS
Программное обеспечение для 3D принтера Creality Ender 6
Ender-6-Marlin2.0.1-HW-V4.3.1-SW-V1.0.4.9-Endstop скачать можно здесь
https:// cdn.shoplazza.com/8c3e772efb19ed75674963ec64fb268d.zip
Ender-6-Marlin2.0.1-HW-V4.3.1-SW-V1.0.4.9-BLTouch скачать можно здесь
https:// img.staticdj.com/c5a2cfe43e0432632637ca39f068532f.zip
Creality Slicer-4.8.2-build-252-win64 скачать можно здесь
https:// img.staticdj.com/d6d3338f45df95d0cf950f258734aa48.zip
Creality_Print-v3.11.1.1-win64-Release скачать можно здесь
https:// img.staticdj.com/1716c0a83103ac49ed4568fa7ed36f5a.zip
Исходники Ender-3 V2 Firmware скачать можно здесь https:// github.com/CrealityOfficial/Ender-3V2
1. Установка программного обеспечения Creality Slicer. Дважды кликните на значке скачанного ПО Creality Slicer
2. Откройте ПО Creality. Дважды кликните на значке установленного ПО Creality Creality Slicer
3. Выберите Язык -> Next -> Select your machine (Выберите модель принтера) -> Next -> Finish
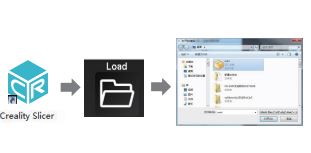
4. Откройте Creality Slicer -> Load (Read File) -> Select file