- Manuals
- Brands
- Corel Manuals
- Software
- PaintShop Pro X4
- User manual
-
Contents
-
Table of Contents
-
Bookmarks
Quick Links
Related Manuals for Corel PaintShop Pro X4
Summary of Contents for Corel PaintShop Pro X4
-
Page 3: Table Of Contents
About Corel ……..
-
Page 4
Removing digital noise ……76 Corel PaintShop Pro X4 User Guide… -
Page 5
Adjusting color balance ……77 Adjusting brightness, contrast, and clarity ….79 Controlling depth of field . -
Page 6
Index……..175 Corel PaintShop Pro X4 User Guide… -
Page 7: Welcome To Corel Paintshop Pro X4
What’s in this user guide? This user guide contains the information that you need to become familiar with the Corel PaintShop Pro workspaces and to get started with basic tasks and creative possibilities. It is designed to accompany the more comprehensive Help, which is available from within the program, as well as other learning resources.
-
Page 8: What’s New In Corel Paintshop Pro X4
What’s new in Corel PaintShop Pro X4 Corel PaintShop Pro X4 combines speed and performance improvements with a range of new pro-level tools and features that let you explore your passion for photography. We’ve been listening to your suggestions and following the latest photography trends so we can bring you an application that does what you want, and helps you discover something new.
-
Page 9
Enhanced! Camera RAW Lab The Camera RAW Lab now has a larger preview area and an improved histogram that makes it easier to assess your adjustments. New highlight recovery options can help reconstruct detail in overexposed Welcome to Corel PaintShop Pro X4… -
Page 10
Enhanced! Tabbed workspaces The application has been redesigned so you can move easily between photo workflows. Click the tabs at the top of the Corel PaintShop Pro window to switch workspaces. The Manage workspace gives you all the power to review and organize your photos. It also lets you access multi-photo processing options. -
Page 11: Installing And Uninstalling Corel Programs
Installing and uninstalling Corel programs The Installer makes it easy to install Corel® programs and components. Before installing • Close all open programs. Note that antivirus software and firewall applications may affect installation. • Ensure that you are logged in to your computer as Administrator or as a user with local administrative rights.
-
Page 12: Starting And Exiting The Program
Starting and exiting the program You can start Corel PaintShop Pro from the Windows taskbar or your desktop icon, and exit the program from the File menu. To start Corel PaintShop Pro • On the Windows taskbar, click Start All Programs …
-
Page 13: Updating The Program
About Corel Corel is one of the world’s top software companies with more than 100 million active users in over 75 countries. We develop software that helps people express their ideas and share their stories in more exciting, creative and persuasive ways.
-
Page 14
Our award-winning product portfolio includes some of the world’s most widely recognized and popular software brands, including CorelDRAW® Graphics Suite, Corel® Painter™, Corel DESIGNER® Technical Suite, Corel® PaintShop™ Pro, Corel® VideoStudio®, Corel® WinDVD®, Corel® WordPerfect® Office, WinZip® and Corel® Digital Studio™. Corel PaintShop Pro X4 User Guide… -
Page 15: The Digital Workflow
The digital workflow The digital workflow outlined below can help you understand how to best use Corel PaintShop Pro. It suggests a sequence for working with your digital images. Whether you want to organize, retouch, print or share, you can use the workflow described below as a guide.
-
Page 16
For more information, see “Getting photos into Corel PaintShop Pro” on page 35. Manage your photos Digital photography gives you the freedom to experiment. The result is a large number of digital files, so photographers understand the need to manage those files by reviewing, culling, and identifying photos as early in the process as possible. -
Page 17
For more information, see “Reviewing, organizing, and finding photos” on page 41. Adjust photos quickly The challenge for many photographers is finding the time to edit photos, so the Adjust workspace lets you move from photo to photo quickly and puts commonly-used editing tools at your finger tips. -
Page 18
• “Adjusting images” on page 65 • “Retouching and restoring images” on page 83 • “Working with selections” on page 157 • “Working with layers” on page 147 • “Applying effects” on page 129 Corel PaintShop Pro X4 User Guide… -
Page 19
Many DSLR (digital single-lens reflex) camera owners are expanding their knowledge and looking for creative options. HDR (high dynamic range) features in Corel PaintShop Pro help you take advantage of bracketing features on your camera. You can also combine multiple photos with Photo Blend. -
Page 20
• “Taking photos for HDR processing” on page 108 • “Combining photos by using HDR Exposure Merge” on page 109 • “Merging batches of photos into HDR images” on page 116 • “Combining photos with Photo Blend” on page 118 Corel PaintShop Pro X4 User Guide… -
Page 21: Learning How To Use Corel Paintshop Pro
Learning how to use Corel PaintShop Pro You can learn how to use Corel PaintShop Pro in various ways: by accessing the Help and videos, by using the Learning Center palette, or by exploring the Corel Guide and by visiting the Corel website (www.corel.com), where you can access tips, tutorials, and…
-
Page 22
A tip containing suggestions for performing the image to set the the preceding steps. It may source point for the Clone present alternatives to the tool. steps, or other benefits and uses of the procedure. Corel PaintShop Pro X4 User Guide… -
Page 23: Using The Help System
Using the Help system The Help that is available from within the program is the most comprehensive source of information for Corel PaintShop Pro. The Help system provides two ways to find information. You can choose a topic from the Contents page, or use the Search page to search for specific words and phrases.
-
Page 24: Using The Learning Center Palette
Using the Learning Center palette The Learning Center palette contains helpful information about Corel PaintShop Pro tasks, commands, and tools to help first-time users as well as experienced users get their work done faster. The Home page of the Learning Center palette provides a task-based workflow, which begins with getting your photos into the program.
-
Page 25: Using The Corel Guide
Some tasks and commands are not available unless an image is open. Using the Corel Guide The Corel Guide provides the most up-to-date information and content for your program. You can find tips and tricks, download new content for your projects, explore new ways to share your photos, and access the latest updates for your program.
-
Page 26: Using Web-Based Resources
Knowledgebase and newsgroups, submit questions to Technical Support, provide feedback, or look for software updates • Check for Updates — checks the Corel Update Service to see if there are updates to your copy of Corel PaintShop Pro You can also visit www.corel.com, and click the Support link to access the Support page.
-
Page 27: Workspace Tour
Workspace tour Corel PaintShop Pro includes three main workspaces that let you organize and edit your images: Manage, Adjust, and Edit. This section presents the following topics: • Exploring the workspaces • Switching between workspaces • Using palettes • Using toolbars •…
-
Page 28
The Manage workspace When you open Corel PaintShop Pro, the Manage workspace appears as your default workspace. Navigation palette Preview area Info palette Organizer palette Organizer toolbar Thumbnails The Manage workspace in Preview mode The Manage workspace consists of the following components: •… -
Page 29
• Info palette — displays information about the selected image. It consists of a camera-style display of the settings used to take the photo and a tabbed area that lets you add information, such as tags and ratings, and access a full list of EXIF or IPTC data. •… -
Page 30
The Edit workspace lets you access in-depth editing features. It includes menus, tools, and palettes that you can use to create and edit images. In addition to photo editing, it lets you perform painting and drawing tasks. Corel PaintShop Pro X4 User Guide… -
Page 31
Tool Options palette Menu bar Image window Standard toolbar Learning Center palette Tools toolbar Status bar A photo displayed in the Edit workspace The Edit workspace includes the following components: • Menu bar — displays commands for performing tasks. For example, the Effects menu contains commands for applying effects to images. -
Page 32: Switching Between Workspaces
“Displaying and editing photo information” on page 56. Switching between workspaces Corel PaintShop Pro lets you switch between different workspaces quickly and easily so that you can accomplish your photo managing and editing tasks in the most efficient manner.
-
Page 33
Palette Description Navigation palette Lets you find and organize photos Info palette Displays information about the selected image. It consists of a camera-style display of the settings used to take the photo and a tabbed area that lets you add General information, such as tags and ratings, and access a full list of EXIF or IPTC data. -
Page 34
• Drag the corner or edge of a palette. You can also resize a docked palette by clicking the Minimize palette or Maximize palette button in the upper-right corner of the palette’s title bar. Corel PaintShop Pro X4 User Guide… -
Page 35: Using Toolbars
Using toolbars All three workspaces contain toolbars with buttons that are useful for performing common tasks. When you position the pointer over a button, its name appears in a tooltip, and the status bar displays additional information about the command. In addition, in the Edit workspace, the Learning Center provides advice on using the tool.
-
Page 36: Using Tools
Edit workspace, see “Using toolbars” on page 29. The following table briefly describes each tool on the Tools toolbar of the Edit workspace. Some of these tools are also available in the Adjust workspace. Corel PaintShop Pro X4 User Guide…
-
Page 37
Tool Description Lets you control which part of the image is visible in the image window Zooms in when you click, or zooms out when Zoom you right-click. You can drag to define an area for zooming. Moves, rotates, and reshapes raster layers, and Pick selects and modifies vector objects Moves a raster layer or a vector layer on the… -
Page 38
Sharpens pixels as you drag, or softens pixels as Sharpen you drag with the right mouse button Creates an embossed effect by suppressing color Emboss and tracing edges as you drag Corel PaintShop Pro X4 User Guide… -
Page 39
Tool Description Makes colors more vivid as you drag, or less vivid Saturation Up/ as you drag with the right mouse button Down Shifts pixel hue values up as you drag, or shifts Hue Up/Down them down as you drag with the right mouse button Recolors pixels while retaining detail Change to Target… -
Page 40
Simulates applying oil paint with a knife (instead Palette Knife of a brush) on an Art Media layer Smears whatever pigment you’ve applied to an Smear Art Media layer Erases whatever pigment you’ve applied to an Art Eraser Art Media layer Corel PaintShop Pro X4 User Guide… -
Page 41: Getting Started
Getting started You can bring your images into Corel PaintShop Pro in various ways: you can import photos that you have transferred to your computer, scan images directly into the application, capture images from the computer screen; or you can create an image.
-
Page 42: Opening And Closing Images
Manage workspace. You can associate specific file formats with Corel PaintShop Pro, such as JPEG, TIF, or PNG, so that these files will open in Corel PaintShop Pro when you double-click them. For more information about setting file format associations and supported file types, see “Setting file format associations”…
-
Page 43
To open an image Edit workspace Choose File Open. In the Look in drop-list, choose the folder where the file is stored. Click the name of the file that you want to open. If you want to open multiple files, hold down Ctrl, and click the filenames. -
Page 44: Saving Images
The PspImage file format of Corel PaintShop Pro supports layers, alpha channels, and other features used in creating images. It is recommended that you save and edit your images as PspImage files.
-
Page 45
To save a new image Edit workspace Choose File Save. The Save As dialog box appears. From the Save in drop-list, choose the folder in which you want to save the file. In the File name field, type a name for the file. In the Save as type drop-list, choose a file format. -
Page 46: Deleting Images
Standard toolbar. Deleting images You can delete image files by using the Organizer palette. To delete an image Edit workspace • Right-click a thumbnail in the Organizer palette, and choose Delete from the context menu. Corel PaintShop Pro X4 User Guide…
-
Page 47: Reviewing, Organizing, And Finding Photos
• Using Quick Review to review photos • Working with trays Setting up the Manage workspace When you start up Corel PaintShop Pro for the first time, the Manage workspace appears as your main workspace with the following four components: Navigation palette, Preview area,…
-
Page 48
For more information, see “Setting Manage workspace preferences” in the Help. Navigation palette Preview area Info palette Organizer palette Organizer toolbar Thumbnails Manage workspace in Preview mode Corel PaintShop Pro X4 User Guide… -
Page 49
Preview Navigation Organizer area palette toolbar Thumbnails Info palette Manage workspace in Thumbnail mode To switch between preview and thumbnail modes • In the top-right corner of the Manage workspace, click one of the following buttons: • Preview mode — displays a large preview area of a single image •… -
Page 50: Browsing Folders For Photos
Organizer palette. When you browse to a folder, you are essentially importing the content of the folder into Corel PaintShop Pro. For more information, see “Getting photos into Corel PaintShop Pro” on page 35.
-
Page 51: Finding Images On Your Computer
In the Smart Collections tree, click the All Photos icon Finding images on your computer When you import photos into Corel PaintShop Pro by navigating to them from the Navigation palette, they are cataloged automatically. Cataloged images can be searched for quickly (real-time filtering) and easily from the Search box.
-
Page 52
In the Find photos that match drop-list, select one of the following options: • All — searches for images that match all of the specified rules • Any — searches for images that match any of the specified rules Corel PaintShop Pro X4 User Guide… -
Page 53: Working With Saved Searches
From the first drop-list on the left, select a search option. From the next drop-list, select an option to refine the search further. The options that appear in the drop-list depend on the search option that you chose in the previous drop-list. In the text field, type or choose a search term.
-
Page 54
You can also assign one or more tags to the selected thumbnails by typing the text in the Tags box on the General page of the Info palette, and clicking the Add Tag button the right of the text field. Corel PaintShop Pro X4 User Guide… -
Page 55: Viewing Photos By Tags
To remove keyword tags from one or more images Manage workspace In the Organizer palette, select one or more thumbnails. In the Info palette, click the General tab to view the tag information. In the list that appears below the Tags box, click one or more tags that you want to remove, and click the Delete Tag button that appears to the right of the tag name.
-
Page 56: Using The Calendar To Find Images
Ctrl, and click the dates. When you click a date or a range, the Organizer palette displays thumbnails of the photos that match the date criteria. Click Close to close the Calendar Search dialog box. Corel PaintShop Pro X4 User Guide…
-
Page 57: Working With Thumbnails In The Manage Workspace
Working with thumbnails in the Manage workspace The Manage workspace makes it easy for you to preview and organize photos by using thumbnails. For a larger view of photos, use Preview mode, zoom in and out on thumbnails, or use Quick Review to view photos in full-screen mode. You can also sort and rotate photos by using thumbnails, or delete and rename the files.
-
Page 58
If the Manage workspace is not in Preview mode, click the Preview mode button in the top-right corner of the Manage workspace. In the Organizer palette, click a video thumbnail. Click the Play button below the Preview area. Corel PaintShop Pro X4 User Guide… -
Page 59
Example of a video thumbnail You can extract a frame from a video and save it as an image by clicking the Pause button to stop the video on the frame that you want to save, and clicking the Capture button To rotate one or more images in the Organizer palette Manage workspace Select one or more thumbnails. -
Page 60: Capturing And Applying Edits To Multiple Photos
You can capture and apply edits to most file types, but edits to RAW files can be applied only to other RAW files. You can undo the edits you apply to one or more photos. Corel PaintShop Pro X4 User Guide…
-
Page 61
To capture edits Manage workspace After editing an image in the Adjust workspace or Edit workspace, or the Camera RAW Lab, save the changes, and return to the Manage workspace. Select the thumbnail of the photo that you edited. A pencil icon or RAW icon appears in the bottom-left corner of thumbnails to indicate that the image has been edited. -
Page 62: Displaying And Editing Photo Information
For example, you can search by caption text. At the top of the Info palette there is a camera-style display that helps you quickly review the camera settings were used for the selected photo. Corel PaintShop Pro X4 User Guide…
-
Page 63
White Balance Symbols Custom Flash Daylight Overcast Fluorescent Shade Tungsten Partial metering Auto-white balance Metering Symbols Custom metering Spot metering Averaged metering Multi-spot metering Center-weighted metering Pattern metering To assign a rating to one or more images Manage workspace Select one or more thumbnails. In the Info palette, click a star, starting from left to right, to set a Rating. -
Page 64: E-Mailing And Sharing Photos From The Manage Workspace
You can e-mail and share your photos from the Manage workspace, or any other workspace, by accessing the Share menu on the Organizer toolbar. For more information, see “E-mailing photos” on page 169 and “Uploading photos to a sharing site” on page 170. Corel PaintShop Pro X4 User Guide…
-
Page 65: Using Quick Review To Review Photos
Using Quick Review to review photos You can use Quick Review to review images in full-screen mode. For example, after downloading photos from your camera, you can use Quick Review to quickly review all photos, delete the ones you don’t want, rotate photos, and apply star ratings.
-
Page 66: Working With Trays
In the Organizer palette, select the tray that you want to remove. Note: Removing a tray does not delete the photos in the tray. Click the More Options button on the Organizer toolbar, and click Remove Tray. The custom tray, “My Tray”, cannot be removed. Corel PaintShop Pro X4 User Guide…
-
Page 67: Working With Camera Raw Photos
The Camera RAW Lab in Corel PaintShop Pro acts like a digital darkroom and lets you apply a personal touch to your RAW files. After processing a RAW image, you can leave it as a read-only RAW file, or export it to a JPEG, GIF, or PNG file so you can edit it.
-
Page 68: Using The Camera Raw Lab
To find supported RAW file formats Go to www.corel.com. On the corel.com Web page, click Support. On the Support page, click Knowledgebase. In the Search Text box, type PaintShop RAW support list. A list of related Knowledgebase articles is displayed.
-
Page 69
Image settings for RAW images are saved to a database. Changes to the file name or file location can be tracked in the database only if you make the changes in Corel PaintShop Pro. Working with camera RAW photos… -
Page 70: Applying Edits To Multiple Raw Photos
Applying edits to multiple RAW photos With Corel PaintShop Pro, you can copy the edits you made to a photo in the Camera RAW Lab, and quickly apply the same edits to a batch of photos. For more information about applying edits to multiple photos, see “Capturing and applying edits to multiple photos”…
-
Page 71: Adjusting Images
Adjusting images When you view your photos in Corel PaintShop Pro, you may notice problems that you want to correct. In some photos, the problems are obvious, such as when the subject is too dark. In other photos, you may sense the need for improvement but not know what to fix. With Corel PaintShop Pro, you can correct specific aspects of a photo or allow the program to make basic photo adjustments.
-
Page 72: Rotating Images
You can rotate an image in Corel PaintShop Pro. You can also rotate an image to any angle by specifying a degree of rotation or by rotating it interactively on the canvas.
-
Page 73: Cropping Images
You can remove unwanted portions of an image to create stronger compositions or to draw attention to another area of the image. Corel PaintShop Pro helps you crop by providing presets to common image sizes, such as 4 × 6 inches or 10 × 15 centimeters.
-
Page 74
Presets drop-list on the floating toolbar for the Crop tool, or from the drop-list on the Tool Options palette. When you’re ready to crop the image, click the Apply button on the Tool Options palette or on the floating toolbar for the Crop tool. Corel PaintShop Pro X4 User Guide… -
Page 75
You can also Apply the crop by using your Double-click inside the crop mouse or keyboard rectangle, or press Enter. Set the size of the crop rectangle Specify the values in the Width, on the Tool Options palette Height, and Units controls. Constrain the crop area to its Mark the Maintain aspect ratio current proportions… -
Page 76: Straightening Images
Straightening images You can easily straighten crooked images by aligning a straightening bar with an image feature. Corel PaintShop Pro rotates the image so that this straightening bar is perfectly horizontal and vertical. This feature is especially useful when an image has a strong vertical or horizontal feature, such as a building or horizon.
-
Page 77: Correcting Photographic Perspective
A straightening bar with end handles appears on the image. Drag each handle of the straightening bar to align it with the part of the image that you want to straighten. On the Tool Options palette, choose one of the following options from the Mode drop-list: •…
-
Page 78
Note: Marking the Crop image check box deletes the areas of the image that fall outside the rectangle. Drag each handle to the corner of the object that should be rectangular. Click the Apply button You can also apply the command by double-clicking the image. Corel PaintShop Pro X4 User Guide… -
Page 79: Making Basic Photo Corrections Automatically
To reset the perspective correction box to the original rectangle, click Cancel on the Tool Options palette. Making basic photo corrections automatically If you are not sure what adjustments to make to a photo, you can apply either the One Step Photo Fix command or the Smart Photo Fix command and see if you like the results.
-
Page 80
“To use advanced options of Smart Photo Fix” in the Help. To apply basic corrections with One Step Photo Fix Edit workspace • Choose Adjust One Step Photo Fix. After a brief pause, several basic corrections are applied to your photo. Corel PaintShop Pro X4 User Guide… -
Page 81
The corrections applied are identical to what would be applied by accepting the suggested settings of the Smart Photo Fix feature. If you are not satisfied with the changes made to your photo, choose Then, choose Edit Undo. Adjust Smart , and adjust the available settings. -
Page 82: Removing Digital Noise
For example, when you zoom in on a photo of a clear blue sky, you may see tiny specks of orange, red, purple, green, or other colors. Corel PaintShop Pro gives you two fast, powerful commands for removing noise from your photos: One Step Noise Removal and Digital Noise Removal.
-
Page 83: Adjusting Color Balance
The image on the left looks grainy because of digital camera noise. The image on the right appears smoother and less grainy after the noise has been removed. You can automatically apply noise correction to your photo with the One Step Noise Removal command. You can also control more precisely how the same corrections are applied by using the more comprehensive Digital Noise Removal command.
-
Page 84
Mark the Smart White Balance check box. This allows Corel PaintShop Pro to evaluate and make minor corrections to the image automatically. Drag the temperature slider to the left for cooler colors (more blue), or to the right for warmer colors (more orange). -
Page 85: Adjusting Brightness, Contrast, And Clarity
Click OK. Adjusting brightness, contrast, and clarity Corel PaintShop Pro lets you adjust the brightness, contrast, and clarity in your photos. Contrast is the difference between the photo’s lightest and darkest pixels. Clarity lets you adjust the level of detail in the image by analyzing contrast within localized areas.
-
Page 86
Click OK. You can use the zoom control in the dialog box to set your view of the image in the Before and After panes. Corel PaintShop Pro X4 User Guide… -
Page 87: Controlling Depth Of Field
Controlling depth of field You can control the depth of field to create an area of focus that draws attention to the subject in your photo. For example, in a photo of a person surrounded by a field of flowers, you can defocus (blur) the surrounding flowers while retaining a clear focus on the person.
-
Page 88
Circular Freehand Rectangular Raster Selection Make your selection slightly larger than the area you want to keep in focus, and then fine-tune the edge of the selection by using the Focus range slider. Corel PaintShop Pro X4 User Guide… -
Page 89: Retouching And Restoring Images
Retouching and restoring images Corel PaintShop Pro provides you with many ways to retouch your images. Whether you want to remove a small scratch, erase the entire background, or simply correct red-eye, you’ll find the tools you need. This section presents the following topics: •…
-
Page 90: Removing Red-Eye
Red-eye in photos is a common problem. When light from the camera’s flash reflects off the retina of a photo subject, a red-eye effect is captured in the photo. Corel PaintShop Pro has two methods of removing red-eye from a color photo.
-
Page 91: Applying Cosmetic Changes
Applying cosmetic changes You can quickly improve the appearance of the subjects in your photos by performing the following cosmetic changes: • removing blemishes — by using the Blemish Fixer mode of the Makeover tool • whitening teeth — by using the Toothbrush mode of the Makeover tool •…
-
Page 92
Higher settings produce more intense whitening but may also produce an unnatural appearance. Click directly over the teeth. If the teeth are separated or partially obscured, you may need to apply this tool to each tooth individually. Corel PaintShop Pro X4 User Guide… -
Page 93
The Toothbrush mode of the Makeover tool works only with color photos. To apply whitening eye drops Edit workspace On the Tools toolbar, choose the Makeover tool On the Tool Options palette, choose the Eye Drop mode. Type or set a value in the Strength control. Higher values whiten more of the eye area but may spread the whitening beyond the affected area of the eye. -
Page 94
Edit workspace Choose Adjust Skin Smoothing. In the Skin Smoothing dialog box, adjust the Amount slider. Moving the slider to the right applies more smoothing; moving the slider to the left applies less smoothing. Corel PaintShop Pro X4 User Guide… -
Page 95: Removing Scratches
The Skin Smoothing command smooths skin tones and diminishes the appearance of wrinkles and blemishes quickly. The Skin Smoothing command automatically detects and smooths skin tones without affecting eyes or lips. However, if other areas in your photo are affected because they are similar in color to the skin tone, you can use a selection to isolate the area you want to smooth.
-
Page 96
Release the mouse button. The enclosed area is replaced with the surrounding pixels. You can also Move the selection box starting Before releasing the mouse point in 1-pixel increments button, press an Arrow key. Corel PaintShop Pro X4 User Guide… -
Page 97: Removing Flaws And Objects
You can also Increase or decrease the width of Before releasing the mouse the selection box in 1-pixel button, press Page up or Page increments down. Use surrounding pixels to fill the Before releasing the mouse area perpendicular to the edge of button, press Shift.
-
Page 98
On the Tool Options palette, choose the brush tip, size, opacity, and other settings. If you want the Clone Brush tool to reset the source point each time you resume painting, mark the Aligned mode check box. You Corel PaintShop Pro X4 User Guide… -
Page 99
can continue dragging over the target area to fill in the source image. Unmark the check box if you want every stroke to copy the same data from the original source point. If you want to clone data from all layers merged together, mark the Use all layers check box. -
Page 100: Erasing Image Areas
When you use the Eraser tool on a raster layer, all pixels in the tool’s path become transparent. A gray-and-white checkerboard pattern indicates transparent areas. You can quickly remove the background from an image by using the Background Eraser tool. Corel PaintShop Pro X4 User Guide…
-
Page 101
You can use the Background Eraser tool to erase pixels selectively. For example, in a photo of a mountain range, you can erase the sky, or you can isolate an object from the surrounding image area. For information about the settings available for the Background Eraser tool, see “Erasing image areas”… -
Page 102: Cutting Out Image Areas
You can use the Object Extractor to cut out an image area from the surrounding background. You can then edit the cutout separately from the background, display it against a different background, or combine it with other images. Corel PaintShop Pro X4 User Guide…
-
Page 103
Object Extractor workflow: (1) Outline the edges of the image area; (2) add a fill; (3) preview the cutout, and touch it up if necessary; (4) bring the cutout into the image window; (5) place the cutout against a different background image (optional). -
Page 104
Type or set a value in the Brush or eraser nib size box. Zoom in and out Type or set a value in the Zoom box. Display an image at its actual size Click the Zoom Image to 100% button Corel PaintShop Pro X4 User Guide… -
Page 105: Recoloring Image Areas For A Realistic Effect
You can also Display an image in the entire Click the Fit Image to Window preview area button Pan to another area of the image Using the Pan tool drag the image until the area you want to see is visible. The background layer is automatically promoted to a raster layer when you use the Object Extractor command.
-
Page 106
Position the Color Changer pointer over the color you want to change in the image, and then click to recolor with the Foreground/Stroke color, or right-click to recolor with the current Background/Fill color. Click Apply to set the color change on the object. Corel PaintShop Pro X4 User Guide… -
Page 107
You can also Use a color from the current Choose the Dropper tool click the image color you want in the image, and then choose the Color Changer tool to reactivate it. Instantly change the color you Before clicking Apply, click a color on want to apply the Materials palette. -
Page 108: Adding Borders
For multilayer images, Corel PaintShop Pro prompts you to flatten the image before adding the border; however, you can also add a border without flattening the image by changing the canvas size. For more information, see “Resizing the canvas”…
-
Page 109: Scaling Photos By Using Smart Carver
Click the Color box to choose a color for the border. Click OK. You can change the units of measurement for the border by choosing an option from the drop-list in the Original Dimensions group box. Scaling photos by using Smart Carver Smart Carver lets you make a photo narrower, wider, shorter, or longer without distorting the content.
-
Page 110
Pan to view hidden areas of the Click the Pan button and drag photo in the preview area. Hide the brushstrokes in the Mark the Hide Mask check box. preview area Reset the photo to its original Click Reset. state Corel PaintShop Pro X4 User Guide… -
Page 111
To scale a photo by using Smart Carver Edit workspace Choose Image Smart Carver. The Smart Carver dialog box opens. In the Smart Carving area, perform one or more tasks from the following table, and click OK. You can view the scaling results in the preview area. Do the following Set a photo width Type or set a value in the Width… -
Page 112
Remove brush Reduce the photo height by Click the Auto-contract vertically automatically removing the areas button to remove red-painted to which you have applied the areas. Remove brush Corel PaintShop Pro X4 User Guide… -
Page 113: Merging Exposures And Content
Merging exposures and content When you combine two or more photos, you can achieve some impressive results. What can you do? • Use HDR (high dynamic range) Exposure Merge to create a perfectly exposed image. • Seamlessly replace unwanted areas (cars, people, birds that flew into your frame) with the correct background.
-
Page 114: Taking Photos For Hdr Processing
The photos along the top were taken with different exposure levels, then they were combined to create a single beautifully exposed image. Taking photos for HDR processing If you are new to HDR processing, the information below can help you get started. Corel PaintShop Pro X4 User Guide…
-
Page 115: Combining Photos By Using Hdr Exposure Merge
What camera features work well with HDR? You can use automatic exposure bracketing if your camera offers it or use the aperture priority mode and adjust the shutter speed to achieve different exposures. Avoid aperture changes because the depth of field may shift enough to cause blurring in some of the photos.
-
Page 116
• Fine-Tune — Refine your image with noise-reduction, sharpening options, and other familiar tools from the Adjust workspace. When you’re done, you can save to a standard file format and close Exposure Merge. Corel PaintShop Pro X4 User Guide… -
Page 117
Please see the topics below for more detailed information about each step. Step 1: Merge Merge settings include: • Camera response curve profile — applies a curve adjustment to the image, based on the known characteristics of the sensor in your camera •… -
Page 118
In the Alignment area, choose an alignment type from the Method drop-list. If you want to crop any edges that don’t overlap, mark the Auto crop check box. Click Align. You will not see the alignment in the preview area immediately. Corel PaintShop Pro X4 User Guide… -
Page 119
To check the alignment of photos taken without a tripod, click the Process button, review the alignment, and click Back to return to the Step 1 pane. To try a different alignment option, in the Alignment area, click the Reset button, and choose an alignment method. -
Page 120
Drag the Temperature slider to warm or cool the colors in the image. • Drag Contrast, Highlights, Midtones, and Shadows sliders to adjust the overall tone and contrast. Corel PaintShop Pro X4 User Guide… -
Page 121
• Drag the Vibrancy slider to saturate or desaturate the colors. • From the Detail drop-list, choose Natural detail or Creative detail, and drag the respective sliders to adjust the amount of local detail. To save your HDR image for further editing, click Create HDR file, navigate to the folder you want, type a file name, and click Save. -
Page 122: Merging Batches Of Photos Into Hdr Images
Batch Merge organizes photos into sets, based on the time between photos (within a defined timeframe) or a defined number of photos per set. To merge batches of photos into HDR images In the Manage workspace, click File HDR Batch Merge. Corel PaintShop Pro X4 User Guide…
-
Page 123
Click Add files, navigate to the folder you want, select the files, and click Open. The photos are sorted into groups of three by default. Click the folder icon beside the Save processed files in box, and browse to the folder where you want to save the processed files. Choose a file type from the Save as drop-list. -
Page 124: Combining Photos With Photo Blend
Use the same camera settings for all the photos. Photo Tip: Use the manual setting on your camera, so you can ensure that the photos have the same size, aperture, shutter speed, and ISO. Corel PaintShop Pro X4 User Guide…
-
Page 125
To use Photo Blend In the Manage workspace, select the set of photos that you want to blend. Click File Photo Blend. In the Alignment area, click Align. If you want to crop unaligned edges along the borders of the photos, mark Auto crop. -
Page 126
For best results, in the tray of the Step 1 window, click the thumbnail of the image that will change the least, and click the lock button to use the selected image as background. To unlock the background, click the lock button again. Corel PaintShop Pro X4 User Guide… -
Page 127: Working With Colors And Materials
“Working with colors and materials” in the Help. Using the Materials palette Corel PaintShop Pro lets you paint, draw, and fill with a variety of styles and materials. • A style is a color, gradient, or pattern.
-
Page 128
• Swatches tab — displays swatches, which are materials you can save to use again. • Foreground and Stroke and Background and Fill Properties boxes — display the current foreground and background materials, Corel PaintShop Pro X4 User Guide… -
Page 129
which consist of the style (color, gradient, or pattern) and optional texture. You can click either box to display the Material Properties dialog box, in which you can set material options. • Foreground and Background Color boxes — display the current foreground and background color and let you set colors regardless of current material •… -
Page 130: Choosing Colors By Using The Color Picker
Choosing colors by using the Color Picker When you edit images in Corel PaintShop Pro, you often need to choose a color before painting, drawing, or filling, making manual color corrections, or choosing a background for a new raster image.
-
Page 131
• HTML color code lets you enter HTML color values. • The Color Picker lets you select a color from the active image. By default, Corel PaintShop Pro displays decimal (base 10) numbers in the Color Picker. You can also display hexadecimal (base 16) numbers —… -
Page 132
You can access recently used colors by right-clicking the Color box on the Materials palette. In the Recent Colors dialog box, click Other to display the Material Properties dialog box. Corel PaintShop Pro X4 User Guide… -
Page 133: Choosing Colors From An Image Or The Desktop
Choosing colors from an image or the desktop You can choose a foreground or background color from any open image, or from any color within Corel PaintShop Pro (such as a color on a toolbar). This feature is useful when you want to use the color of a specific icon, or when you want to match the Windows desktop colors.
-
Page 134
Ctrl, and click a different part of the desktop. When positioned over areas that can be sampled, a small window follows the pointer and indicates the RGB value of the color you are sampling. Corel PaintShop Pro X4 User Guide… -
Page 135: Applying Effects
• Adding picture frames to images • Using the Picture Tube tool • Warping images For a complete list of the effects available in Corel PaintShop Pro, see “Applying effects” in the Help. Choosing effects You can choose effects by using the Effects menus or the Effect Browser.
-
Page 136
You can use the Effect Browser when you want to preview multiple effects before applying them to your image. The Effect Browser displays the presets that come with Corel PaintShop Pro as well as any that you create. To display the thumbnail previews that you see in the Effect Browser, Corel PaintShop Pro applies an effect’s default preset and any presets… -
Page 137
The preset is saved as a script in the file format for Corel PaintShop Pro (PspScript). The Effect Browser displays thumbnails that let you preview and choose effects. To choose an effect from the Effects menu… -
Page 138
• To preview an effect category, click a subfolder of the Effects folder (for example, 3D Effects, Artistic Effects, or Photo Effects). Corel PaintShop Pro scans the selected folder and creates thumbnails of the image with each effect applied to it. -
Page 139: Applying Photo Effects
You can also Modify the selected preset Click Modify, and adjust the settings in the dialog box for the effect. Note: This button is unavailable for effects that cannot be adjusted. Resize the thumbnail preview Choose File Preferences General Program Preferences, and click Display and Caching along the left side.
-
Page 140
Film and Filters Corel PaintShop Pro lets you experiment with effects that are inspired by different types of camera film and filters. For information about applying film and filter effects, see “Applying film and filter effects to photos” on page 139. -
Page 141
Selective Focus You can create a quick miniature effect (also known as a tilt-shift effect) so that the scene in a photo resembles a miniature model or toy. The illusion is created by adjusting the depth of field, usually across a specified horizon line, and increasing the saturation of the photo. -
Page 142
Type or set a value in the Amount to age control to determine the strength of the effect. To apply a miniature effect by using Selective Focus Edit workspace Choose Effects Photo Effects Selective Focus. Corel PaintShop Pro X4 User Guide… -
Page 143
The Selective Focus dialog box appears. You can maximize the dialog box to increase the size of the Before and After panes of the preview area. In the Area of focus, click one of the following tools: • Planar Selection Tool —… -
Page 144
• Diffuse glow — adds a luminescent brightening effect and softens details in the entire photo • Feather edge — determines the softness of the transition between the area in focus and the edge effect Corel PaintShop Pro X4 User Guide… -
Page 145: Creating Vintage-Style Photos With The Time Machine
Applying film and filter effects to photos Whether you are a novice or an experienced photographer, you can experiment in Corel PaintShop Pro with effects that are inspired by different types of camera film and filters. Applying effects…
-
Page 146
Creative Filters simulate the effect achieved when you use color filters on the lens of your camera. Although the color is applied across the entire photo, Corel PaintShop Pro maintains the luminance of the image, to achieve a color toning effect. You can use a preset color or choose a custom color. -
Page 147: Adding Picture Frames To Images
To apply film and filter effects to a photo Edit workspace Choose Effects Photo Effects Film and Filters In the Film and Filters dialog box, perform one or more tasks from the following table, and click OK. Do the following Apply a Film Look Choose a style from the Film looks drop-list.
-
Page 148
• Flip frame — reverses the frame along its horizontal axis • Mirror frame — reverses the frame along its vertical axis • Rotate frame right — lets you rotate the frame clockwise when the image is taller than it is wide Click OK. Corel PaintShop Pro X4 User Guide… -
Page 149: Using The Picture Tube Tool
Picture tubes may have any number of cells. As you paint with the Picture Tube tool, Corel PaintShop Pro paints one image from the picture tube after another. Many picture tubes create discrete images (such as zoo animals), and others create the effect of a continuous image (such as grass).
-
Page 150: Warping Images
You can twirl areas of images, contract or expand parts of images, and create many interesting effects. The effect of the Warp Brush is often time-dependent, which means that the Corel PaintShop Pro X4 User Guide…
-
Page 151
longer you hold the brush over an area, the more the brush produces the effect. The Warp Brush tool can be used to create caricatures. You can also warp images by using a grid. When you use the Mesh Warp tool, a grid or mesh is placed on the image. The grid intersections have mesh points, or nodes, that you drag to create deformations. -
Page 152
Type or set a value in the Strength control to determine the strength of the warping effect. Full strength is 100%; minimum strength is 1%. Choose settings for the Edge mode, Draft quality, and Final apply controls. Drag in the image. Corel PaintShop Pro X4 User Guide… -
Page 153: Working With Layers
“Working with layers” in the Help. Understanding layers When you create or import an image in Corel PaintShop Pro, the image has a single layer. Depending on the type of image you create or import, the single layer is labeled as Background, Raster, Vector, or Art…
-
Page 154
Layers palette. Make color and tonal Use adjustment layers instead of changing corrections the image directly. For more information about using adjustment layers, see ”Using adjustment layers” in the Help. Corel PaintShop Pro X4 User Guide… -
Page 155
Do the following Add text or graphics Create text and graphics, such as lines and shapes, on vector layers to make them easier to edit. For more information about adding text, see “Working with text” on page 165. For more information about vector graphics, see “Drawing and editing vector objects”… -
Page 156: Using The Layers Palette
You can change the stacking order of layers on the Layers palette, depending on the layer types. Active layer settings Layer type Layer name indicator (customizable) Layer visibility toggle Layer thumbnail New layer drop-list The Layers palette Corel PaintShop Pro X4 User Guide…
-
Page 157
You can create layer groups to organize the Layers palette. You can also link layers or groups so that they move together when you use the Move tool in the image. By default, a thumbnail view of the layer’s contents appears to the left of the layer name. -
Page 158: Creating Layers
• New Raster Layer • New Vector Layer • New Art Media Layer • New Layer Group • New Mask Layer • New Adjustment Layer Adjust the available controls for the layer properties. Corel PaintShop Pro X4 User Guide…
-
Page 159: Renaming Layers
(Vector layers are the only non raster-based layers). When you add a new raster-based layer to an image of another color depth, such as a 256-color indexed image, Corel PaintShop Pro automatically converts it to 16 million colors. Renaming layers As you add layers to an image, you may find it convenient to rename them so that they are easy to identify on the Layers palette.
-
Page 160: Viewing Layers
Choose Layers View None. You can also show all layers by right-clicking a layer and choosing View All or hide all layers by right-clicking a layer and choosing View None. Corel PaintShop Pro X4 User Guide…
-
Page 161: Changing The Order Of Layers In An Image
Changing the order of layers in an image The order of layers within an image is critical to the appearance of the image. To rearrange layers in the image, you can easily change the stacking order of layers in the Layers palette. If a layer or a layer group has components, such as vector objects or grouped layers, all of the components move with the layer or layer group when its position in the stacking order is changed.
-
Page 162
On the Layers palette, select the layer or layer group. Drag the Opacity slider to the desired percentage. You can also set layer opacity by double-clicking the layer, changing the Opacity setting in the Layer Properties dialog box, and clicking OK. Corel PaintShop Pro X4 User Guide… -
Page 163: Working With Selections
Working with selections Selecting the parts of images to edit is an important step in your workflow. By creating a selection, you can edit an area while leaving the rest of the image unchanged. You can use drawing or painting tools to modify selected areas of your image.
-
Page 164
• Point to Point — lets you draw straight lines between points to create a selection with straight edges • Smart Edge — automatically finds the edges of irregularly shaped areas when you click along the edges Corel PaintShop Pro X4 User Guide… -
Page 165
• Magic Wand tool — makes a selection based on the color, hue, brightness, or opacity of an object. This tool is designed to select an area that has distinctly different pixels than those in other areas of an image — for example, a pink rose surrounded by green leaves. -
Page 166
Make a Freehand selection Drag to select an image area. Make an Edge Seeker selection Click precisely along the edge of the area you want to select, and double- click or right-click to complete the selection. Corel PaintShop Pro X4 User Guide… -
Page 167
Do the following Make a Smart Edge selection Click along the edge of the area that you want to select, ensuring that the rectangular cursor encloses the edge. Double-click or right-click to complete the selection. Make a Point to Point selection Click around the area you want to select, and double-click or right-click to complete the selection. -
Page 168: Modifying Selections
Freehand Selection tool. After you create a selection, you can add to it. For more information about modifying color-based selections and removing specs and holes, see “Modifying selections” in the Help. Corel PaintShop Pro X4 User Guide…
-
Page 169: Inverting And Clearing Selections
To add to or subtract from a selection Edit workspace On the Tools toolbar, choose a selection tool (Selection Freehand , or Magic Wand tool). Choose settings for the tool on the Tool Options palette. Perform a task from the following table. Do the following Add to a selection From the Mode drop-list, choose…
-
Page 170
To clear a selection Edit workspace • Choose Selections Select None. You can also clear a selection by right-clicking in the image outside the selection marquee or by pressing Ctrl + D. Corel PaintShop Pro X4 User Guide… -
Page 171: Working With Text
Working with text Corel PaintShop Pro lets you add text to images and create interesting text effects. This section presents the following topics: • Applying text • Formatting text Applying text Corel PaintShop Pro lets you apply different types of text to your images.
-
Page 172
Note: The Units drop-list offers two options — Points (for print output) and Pixels (for Web output). In the image window, click where you want the text to appear, type the text, and click the Apply button on the Tool Options palette. Corel PaintShop Pro X4 User Guide… -
Page 173: Formatting Text
Ctrl + A to select the entire text. Formatting text The text formatting options in Corel PaintShop Pro let you control the appearance of text. You can set these options when you create vector, Working with text…
-
Page 174
Apply bold formatting to text Click the Bold button Apply italic formatting to text Click the Italic button Underline the text Click the Underline button Apply a line through text Click the Strikethrough button Corel PaintShop Pro X4 User Guide… -
Page 175: E-Mailing And Sharing Photos
E-mailing and sharing photos Corel PaintShop Pro gives you options for e-mailing your photos or sharing them on a sharing site. This section presents the following topics: • E-mailing photos • Uploading photos to a sharing site E-mailing photos You can e-mail photos directly from any Corel PaintShop Pro workspace.
-
Page 176: Uploading Photos To A Sharing Site
If you are unable to log in from a corporate network, you may need to modify the Proxy Server settings on your computer. Check with your Network Administrator to get the Proxy Server information for your corporate network. Corel PaintShop Pro X4 User Guide…
-
Page 177: Printing
“Printing” in the Help. Printing images Corel PaintShop Pro offers many ways to print images. You can print from the Manage workspace, Edit workspace, or Adjust workspace. You can use a template, or use a custom layout to meet specific size and layout requirements.
-
Page 178
Corel PaintShop Pro template, or you can create your own custom template from a page layout that you create. Creating your own layouts gives you the flexibility to print images to any size and lets you create a custom page for projects such as scrapbooks. -
Page 179
• Custom offset — lets you enter values in the Left offset and Top offset boxes Click the Options tab. In the Print Output group box, choose one of the following options: • Color • Greyscale • CMYK separations If you choose the CMYK separations option, you can print CMYK labels on each color plate or page by marking the CMYK plate labels check box in the Print Marks group box. -
Page 180
Fill Template with Image button Click File Print. You can remove an image from a template by selecting the image and pressing Delete. You can also open images by choosing File Open Image. Corel PaintShop Pro X4 User Guide… -
Page 181: Index
Index blemishes, removing bold text formatting Adjust workspace borders, adding to images adjusting images automatically bracketing in one step brightening shadows with Smart Photo Fix brightness and contrast Airbrush tool adjusting angles, straightening Brush Variance palette attaching Burn tool photos to e-mails automating basic photo corrections Calendar, finding images…
-
Page 182
Crayon tool background using the Color Picker Crop tool combining cropping batches of HDR photos straightened images images customer support photo content cutting photos with Exposure Merge objects from background community sites Corel PaintShop Pro X4 User Guide… -
Page 183
effects applying darkening browsing photos automatically choosing from Effects deleting images menu choosing in Effect Browser details, adjusting Clarity creating dialog boxes modifying preset displaying Help for Photo digital photos resetting values getting saving settings removing noise types of. See name of specific effect digital workflow Ellipse tool… -
Page 184
Manage browsing for images workspace viewing all cataloged Fill Light/Clarity fonts filling changing attributes cropped edges foreground properties for swapping with film effects background applying formatting Film Looks text applying Corel PaintShop Pro X4 User Guide… -
Page 185
frames HTML codes picture specifying colors with Freehand Selection tool Hue Up/Down tool creating selections with Freehand selections Full-screen viewing image information advanced captions creation date graphics in the Open dialog box adding to layers Info palette rating Info palette HDR (high dynamic range) information, image Batch Merge… -
Page 186
Lighten/Darken tool Materials palette displaying or hiding lightening photos See brightening photos menu bar lines merging photos applying through text Mesh Warp tool erasing straight from backgrounds Mixer palette erasing straight montages Move tool Corel PaintShop Pro X4 User Guide… -
Page 187
moving Organizer palette layers e-mailing photos from organizing images Overview palette Navigation palette new features newsgroups Paint Brush tool noise painting removing with picture tubes removing quickly paintings Palette Knife tool palettes Object Extractor displaying Object Remover tool hiding resizing objects types of cutting from background… -
Page 188
Manage supported file formats workspace using the Camera RAW Lab print layout templates rearranging printing images with layers print layouts Rectangle tool printing Red Eye tool Corel PaintShop Pro X4 User Guide… -
Page 189
red-eye, removing with Red Eye tool saturation renaming increasing or decreasing files Saturation Up/Down tool layers saving resizing effect settings palettes images resources scaling learning photos with Smart Carver restoring Scratch Remover tool erased pixels to background scratches, removing erased pixels to images Script Output palette images searching for images… -
Page 190
Smear tool swapping foreground and background smoothing skin tone swatches choosing colors Smudge tool Symmetric Shape tool Soften tool sorting image thumbnails special effects tags See effects assigning to images spraying images creating Corel PaintShop Pro X4 User Guide… -
Page 191
Text tool Thinify effect thumbnails underlining text browsing for folders displaying in preview area uninstalling applications playing videos from updating Corel products rotating uploading photos to sharing sorting services viewing for folders zooming in and out tilt-shift vector layers… -
Page 192
Vignette Warp Brush tool warping image areas images Web-based resources accessing workflow workspaces Adjust deleting current images Edit Manage switching between Zoom tool zooming image thumbnails Corel PaintShop Pro X4 User Guide… -
Page 193
THOSE ARISING BY LAW, STATUTE, USAGE OF TRADE, COURSE OF DEALING OR OTHERWISE. THE ENTIRE RISK AS TO THE RESULTS OF THE INFORMATION PROVIDED OR ITS USE IS ASSUMED BY YOU. COREL SHALL HAVE NO LIABILITY TO YOU OR ANY OTHER PERSON OR ENTITY FOR ANY INDIRECT, INCIDENTAL,…
![]()
ПейнтШо® Про 2022
Часто задаваемые вопросы

- Руководство пользователя
Воспользуйтесь пошаговыми инструкциями по установке программного обеспечения и выполнению наиболее популярных рабочих процессов. - Учебный центр PaintShop Pro
Превратите свое видение в реальность с помощью находчивой библиотеки, наполненной учебными ресурсами. Исследуйте Центр открытий, практические руководства, учебные пособия, сочетания клавиш и многое другое! - Пользовательский форум
Общайтесь с другими пользователями онлайн, чтобы задавать вопросы и получать советы и рекомендации. - Редактирование фотографий Webинарс
Эта коллекция webПрограмма inars создана для того, чтобы познакомить вас с различными инструментами и функциями программного обеспечения, чтобы вы могли делать больше с PaintShop Pro, PhotoMirage и A erShot. - Справка
Существует множество информации, доступной вам во время использования продукта. Чтобы получить справку по делу, над которым вы сейчас работаете, нажмите F1. Использовать Помощь меню для доступа к различным справочным ресурсам.
 Установка
Каковы системные требования?
- Windows 10 (рекомендуется версия 1903 или более поздняя с последним пакетом обновлений (64-разрядные версии)
- Для виртуализации: Microsoft Windows Server 2012 R2, Windows Server 2016, Windows Server 2019.
- Intel Celeron серии G или AMD Phenom II и выше
(Рекомендуется серия Intel i5 или AMD Ryzen и выше для поддержки функций искусственного интеллекта) - 4 ГБ оперативной памяти (рекомендуется 8 ГБ для поддержки функций искусственного интеллекта)
- Требуется 3 ГБ свободного места на жестком диске (рекомендуется 4 ГБ)
- Разрешение экрана 1366 x 768 (рекомендуется разрешение экрана 1920 x 1080 при 100 DPI).
Поддерживается разрешение до 250 точек на дюйм при соответствующем разрешении дисплея. - Видеоадаптер, совместимый с DirectX 10 или выше, с последней версией драйвера
(Для ускорения графического процессора рекомендуется совместимая с DirectX 12 дискретная карта VGA) - Internet Explorer версии 11 или выше с последними обновлениями
- Требуется подключение к Интернету для онлайн-функций и обучающих видеороликов
Мне нужен серийный ключ?
Да, для установки PaintShop Pro 2022 требуется серийный ключ.
- Если вы приобрели коробочную версию, ваш серийный ключ будет находиться на диске с программным обеспечением внутри коробки.
- Если вы приобрели цифровую загрузку с Amazon, ваш серийный ключ будет в Ваша библиотека программного обеспечения в вашей учетной записи Amazon.
Как установить PaintShop Pro 2022?
- Если вы приобрели цифровую версию, загрузите продукт из своей библиотеки программного обеспечения Amazon. Если вы приобрели коробочную версию, вставьте диск с программным обеспечением в DVD-привод, и мастер установки должен запуститься автоматически.
- Дважды щелкните Corel PaintShop Pro 2022. file начать установку.
- Следуйте инструкциям на экране.
- Чтобы зарегистрировать продукт, вам будет предложено войти в систему или создать учетную запись Corel. Введите серийный ключ, чтобы завершить процесс регистрации.
- Если вы приобрели версию Ultimate, вам нужно будет выбрать, установить и ввести серийные ключи для других приложений по одному. Обратите внимание, что серийный ключ не требуется для Highlight Reel, MultiCam Capture Lite и рабочего пространства Sea-to-Sky. Ваша покупка также включает эксклюзивный стартовый пакет Amazon ParticleShop из 5 кистей*. Пожалуйста, ознакомьтесь с инструкциями по установке в Эксклюзивно для Амазонки раздел ниже.
Примечание: Для установки и обновления продукта требуется подключение к Интернету. Ваша система может запрашивать ваше разрешение на различных этапах процесса установки. Предоставьте разрешения по запросу, чтобы установка могла быть завершена.
*Доступно только с PaintShop Pro 2022 Ultimate
На сколько устройств можно установить эту программу?
У вас есть разрешение на установку и использование одной (1) копии этого программного обеспечения на одном (1) компьютере или электронном устройстве в любой момент времени, как указано в Лицензионном соглашении с конечным пользователем. Его можно установить на второй автономный компьютер или ноутбук для неодновременного использования. Пожалуйста, посетите Corel EULA для получения дополнительной информации.
Доступен ли PaintShop Pro 2022 для Mac?
PaintShop Pro 2022 является родным для Windows и в настоящее время не поддерживается для установки в операционных системах Mac.
Как мне зарегистрировать свой продукт?
Регистрация вашего продукта обеспечивает вам своевременный доступ к обновлениям продукта, бесплатным загрузкам, учебным пособиям и советам, специальным предложениям и многому другому. Вам нужно будет войти в систему или создать учетную запись Corel. Введите серийный ключ, чтобы завершить процесс регистрации.
- После установки программы вам будет предложено зарегистрироваться на сайте.
- Войти www.corel.com/support/register на web
Как проверить, является ли моя система 64-битной?
Щелкните правой кнопкой мыши Мой компьютер и Предложения. Он будет указан в Тип системы.
Поддерживает ли PaintShop Pro 2022 32-разрядную версию?
Собственная 32-разрядная версия Windows больше не поддерживается. Для поддержки 32-битных драйверов вы можете использовать более ранние версии PaintShop Pro.
Требуется ли активное подключение к Интернету для использования продукта?
Для установки продукта, регистрации, обновлений продукта и некоторых функций требуется подключение к Интернету. Программу запускать не требуется.

 Эксклюзивно для Amazon*
*Доступно только с PaintShop Pro 2022 Ultimate
Что такое эксклюзивное предложение Amazon?
Создавайте потрясающие улучшения изображений с помощью этого эксклюзивного стартового пакета Amazon ParticleShop из 5 кистей (стоимостью 39.99 долларов США). Включает в себя 5 кистей: Художественная кисть, Вздымающаяся, Смешанная, Тепловой след и Натуральная.
- Испытайте плавные мазки живых кистей Particle
- Художественно улучшайте фотографии, иллюстрации и картины, получая впечатляющие реалистичные результаты.
- Использование с чувствительным к давлению планшетом, сенсорным экраном или мышью
Как установить стартовый пакет ParticleShop 5-Brush?
После установки PaintShop Pro 2022 Ultimate следуйте приведенным ниже инструкциям, чтобы установить стартовый пакет ParticleShop 5-Brush Starter Pack, входящий в комплект поставки.
- Если вы приобрели коробочную версию, программное обеспечение будет включено на установочный диск. Если вы приобрели цифровую загрузку, перейдите туда, где вы загрузили заархивированный file.
- Дважды щелкните набор кистей ParticleShop. file начать установку.
- Следуйте инструкциям на экране. Введите серийный ключ при появлении запроса.
Как получить доступ к кистям ParticleShop?
В верхнем меню выберите Эффекты > Магазин частиц для запуска программного обеспечения. Улучшив изображение с помощью кистей, нажмите Save. чтобы вернуться в PaintShop Pro.
Где я могу получить дополнительную информацию о ParticleShop?
Посетить Справочный центр ParticleShop чтобы найти ответы на часто задаваемые вопросы и получить доступ к видеоурокам.
Примечание: Обратите внимание, что не все компоненты доступны во всех версиях программного обеспечения.

 Контрольный список перед запуском
Перед тем, как начать:![]() Убедитесь, что ваш компьютер соответствует минимальным рекомендуемым системным требованиям для оптимальной производительности.
Убедитесь, что ваш компьютер соответствует минимальным рекомендуемым системным требованиям для оптимальной производительности.![]() Обеспечьте хорошее подключение к Интернету и зарегистрируйте программное обеспечение.
Обеспечьте хорошее подключение к Интернету и зарегистрируйте программное обеспечение.![]() Убедитесь, что ваши драйверы обновлены.
Убедитесь, что ваши драйверы обновлены.![]() Убедитесь, что установлены последние обновления программного обеспечения.
Убедитесь, что установлены последние обновления программного обеспечения.
 Общие вопросы
В чем разница между версией Pro и Ultimate?
Основное программное обеспечение одинаково в обеих версиях. Тем не менее, версия Ultimate поставляется с бонусным пакетом программного обеспечения премиум-класса стоимостью примерно 260 долларов США. В него входят Painter Essentials 8, A erShot 3, PhotoMirage Express, Highlight Reel, MultiCam Capture Lite, Sea-to-Sky Workspace и эксклюзивная коллекция Corel Creative Collection.
Что file форматы совместимы?
Поддерживаемые форматы импорта
- AI, BMP, CAL, CALS, CGM, CLP, CUR, CUT, DCX, DIB, EMF, EPS, GIF, HDP, IFF, IMG, J2C, J2K, JIF, JP2, JPC, JPE, JPEG, JPG, JPS, JPX, MAC, MPO, MRW, MSP, PBM, PCD*, PCT, PCX, PDF, PGM, PIC, PICT, PNG, PNS, PPM, PS, PSD, PSP (изображение PSP files), RAS, RAW, RIF, RLE, SCT, SVG, SVGZ, TGA, TIF, UFO, WBM, WBMP, WDP, WEBП, ВМФ, ВПГ**
- RAW file поддержка более 800 моделей камер, включая следующие file расширения: 3FR, ARW, CR2, CRW, DCR, DNG, K25, KDC, NEF, NRW, ORF, PEF, RAF, RW2, SR2, SRF, X3F
Поддерживаемые форматы экспорта
- BMP, CAL, CALS, CLP, CUT, DCX, DIB, EMF, EPS, AI, PS, GIF, GIF, HDP, WDP, IFF, IMG, JP2, J2C, J2K, JPC, JPX, JPG, JIF, JPE, JPEG, MAC, MSP, PBM, PCX, PGM, PIC, PPM, PNG, PSD, PSP (PSPIMAGE FILES), RAS, RAW, RIF, RIFF, RLE, SCT, CT, JPS, PNS, TGA, TGA, TIF, TIFF, WBMP, WBM, WEBП, ВМФ
*Поддерживается только в 32-битной версии PSP.
**WPG (только WordPerfect Vector) не поддерживается в 64-разрядной версии. WordPerfect Bitmap поддерживается в 64-разрядной версии.
Форматы кистей
- Кисть PaintShop Pro (.pspbrush)
- Кисть Adobe Photoshop (.abr)
- Яск Браш (.jbr)
Могу ли я производить цветоделение для трафаретной печати?
Да, вы можете создавать цветоделения, которые можно печатать на принтерах CMYK, распечатывая страницы цветоделения. При печати цветоделения CMYK PaintShop Pro печатает отдельную страницу в градациях серого для каждого основного цвета. Затем вы можете использовать эти страницы в качестве «цветных пластин» при работе с типографией. Для печати цветоделения CMYK выполните следующие действия.
- Выберите File > Печать. Появится диалоговое окно Печать.
- Нажмите Опции меню.
- В поле группы «Вывод на печать» выберите CMYK-разделения.
- Нажмите Распечатать.

 Решение Проблем
Как изменить язык по умолчанию?
При установке PaintShop Pro 2022 вы можете выбрать дополнительные языки, на которые вы хотите установить приложение. Очень важно, чтобы вы выбрали предпочитаемые дополнительные языки, иначе продукт будет установлен только на английском языке. PaintShop Pro 2022 также поддерживает французский, испанский, итальянский, немецкий, голландский, русский, традиционный китайский и японский языки.
Вы можете изменить язык, отображаемый в PaintShop Pro 2022. Этот параметр может быть полезен для международных или многоязычных пользователей или для пользователей, совместно использующих рабочую станцию в международной корпоративной среде.
Чтобы переключить язык приложения:
- Выберите File > Настройки > Переключить язык.
- Затем выберите предпочтительный язык > Нажмите ОК.
- Появится окно сообщения, которое уведомляет о перезапуске приложения, нажмите «ОК». Выбранный язык отображается после перезапуска приложения.
Дополнительный вопрос?
Все еще не можете найти ответ, который вы ищете? Наши специалисты по продуктам будут рады помочь вам. Обратитесь в службу поддержки клиентов Corel, используя контактную информацию, указанную ниже.
Как отключить всплывающую рекламу в PaintShop Pro?
Чтобы отключить всплывающую рекламу, запустите программное обеспечение и перейдите к Справка > Настройки сообщений.
Снимите один или оба первых двух параметра для сообщений и обновлений, связанных с продуктом, по вашему усмотрению. В раскрывающемся списке уведомлений в трее выберите Не показывать мне сообщения в трее для этого приложения.
Как изменить или исправить установку PaintShop Pro?
Восстановление установки полезно, когда вы сталкиваетесь с проблемами при использовании приложения или когда вы подозреваете, что установка повреждена. Измените текущую установку, если хотите добавить или удалить компоненты.
- Закройте все приложения.
- На панели управления Windows нажмите Удаление программ.
- Двойной клик Пейнтшоп Про 2022 на Удалить или изменить программу стр.
- Включите Изменить или Исправить в появившемся мастере и следуйте инструкциям.

![]() Поддержка и ресурсы
Поддержка и ресурсы
Как связаться со службой поддержки?
Если вам нужна помощь, обратитесь в службу поддержки клиентов Corel, используя контактную информацию, указанную ниже.![]() Поддержка Corel
Поддержка Corel![]() corelhelp@corel.com
corelhelp@corel.com![]() 1-877-582-6735
1-877-582-6735
Где я могу получить дополнительную информацию и поддержку?
Ответы на распространенные вопросы о продукте можно найти в этом документе часто задаваемых вопросов. Если вы не можете найти ответы на свои вопросы, ознакомьтесь с этими дополнительными ресурсами, чтобы узнать больше:
![]()
© Корпорация Corel, 2021 г. Все права защищены.
Документы / Ресурсы
Рекомендации

corel.com/support/register
Обновлено 6 января 2022 г. by Питер Вуд
PaintShop Pro (PSP) это простая, быстрая и комплексная программа для редактирования изображений и фотографий, разработанная Corel. Не знаете PaintShop Pro? Вы можете узнать, что такое PaintShop Pro и как использовать его для редактирования фотографий на компьютере, здесь.

- Часть 1: Что такое PaintShop Pro
- Часть 2: Основные возможности PaintShop Pro
- Часть 3: Как загрузить PaintShop Pro
- Часть 4: Как использовать PaintShop Pro
- Часть 5: Лучшая альтернатива PaintShop Pro Mac
Часть 1: Что такое PaintShop Pro
PaintShop Pro долгое время был самой известной недорогой альтернативой Photoshop, поскольку он предлагает удивительный набор инструментов для редактирования фотографий, от базовой коррекции фотографий до рисования и редактирования на основе слоев и манипулирования объектами с учетом содержимого. Это программа для Windows с удобным интерфейсом. И PaintShop Pro X9 — последняя версия. PSP позволяет пользователям исправлять фотографии с помощью таких инструментов, как Удаление красных глаз, Color Changer, Makeover Tools, Smart Photo Fix и многое другое. Пользователи также могут легко создавать и публиковать творческие проекты с помощью Project Creator и интеграции с социальными сетями.

Часть 2: Основные возможности PaintShop Pro
1. Предлагайте точные выделения, слои, кисти и инструменты редактирования изображений с учетом содержимого;
2. Креативный графический дизайн с текстом, кистями, текстурами и инструментами для рисования и рисования;
3. Экономящие время инструменты для редактирования фотографий, такие как кадрирование, выпрямление, клонирование, ретушь и удаление эффекта красных глаз;
4. Редактировать фотографии в формате RAW и сэкономьте время с пакетной обработкой;
5. Мгновенно улучшайте с помощью автоматической коррекции фотографий;
6. Жить скриншот записывать прямо с экрана;
7. Предлагайте шаблоны проектов, которые экономят время;
8. Элементы управления градиентной заливкой;
9. Поддержка текстовых предустановок, улучшенный стилус и графический планшет;
10. Поддержите Windows 11/10/8/7 с последним пакетом обновления (64-разрядная или 32-разрядная версии).

PaintShop Pro Обзор
Плюсы:
Возможности Photoshop по более низкой цене;
Мощные инструменты редактирования и эффектов;
Распознавание лица.
Минусы:
Некоторые операции выполняются медленно;
Интерфейс может быть загроможден;
Неэффективное удаление хроматической аберрации.
Часть 3: Как загрузить PaintShop Pro
Вы можете загрузить последнюю версию PaintShop Pro с официального сайта Corel: paintshoppro.com. В настоящее время PaintShop Pro имеет версию для Windows (Windows 11/10/8/7). Вы можете получить пробную версию этого программного обеспечения для редактирования фотографий. PaintShop Pro поддерживает Изображение RAW редактирование с помощью камеры RAW, включая Canon, Casio, Contax, Leica, Kodak и т. д. Вы можете проверить список на ее веб-сайте.
Часть 4: Как использовать PaintShop Pro
Здесь вы можете посмотреть этот видеоурок, чтобы узнать, как использовать программу для редактирования фотографий PaintShop Pro:
Часть 5: Лучшая альтернатива PaintShop Pro Mac
Если вы ищете простую программу для редактирования фотографий, отличную от PaintShop Pro на Mac, вы можете использовать WidsMob Retoucher для редактирования фотографий с сохранением деталей изображения. Это также позволяет вам минимизировать зернистость изображения, Артефакты JPEG, и другие недостатки. Программа профессионально занимается с шумом яркости и шумом цветности. Не стесняйтесь фотографировать в высоком ISO или в условиях низкой освещенности.
Win Скачать Mac Скачать
- Устранение некоторых дефектов портретных изображений, таких как уменьшение веснушек, отбеливать зубы, и гладкая кожа;
- Предоставьте десятки профилей камеры, чтобы заново открыть для себя потрясающие волшебные эффекты пленки;
- Поддержка добавления художественные фотоэффекты с непрозрачностью цвета, чтобы сделать фотографию особенной.


User Guide
Copyright Information
Copyright © 2004 by Jasc Software, Inc. All rights reserved. No portion of the contents of this publication may be reproduced or transmitted in any form or by any means without the express written permission of Jasc Software, Inc.
Trademark Information
Animation Shop, ImageCommander, Media Center Plus, Paint Shop and the Jasc orbit logo are trademarks of Jasc Software, Inc. Jasc, Paint Shop Pro, and The Power to Create are registered trademarks of Jasc Software, Inc. Acrobat, PostScript, Photoshop, Photoshop Elements are either registered trademarks or trademarks of Adobe Systems Incorporated. The Postscript language is copyrighted by Adobe Systems Incorporated. Macintosh is a registered trademark of Apple Computer, Inc. Autodesk is a registered trademark of Autodesk, Inc. MacPaint is a product and trademark of Claris Corporation. GIF is a service mark property and Graphic Interchange Format is copyright property of CompuServe Inc. CorelDRAW, Ventura Publisher, WordPerfect are either registered trademarks or trademarks of Corel Corporation. GEM, GEM Paint are either registered trademarks or trademarks of Digital Research Inc. Digimarc is a registered trademark of
Digimarc Corporation. Deluxe Paint is a registered trademark of Electronic Arts. Kodak Photo CD is registered trademark of Eastman Kodak Company. OS/2, Lotus 1-2-3 are registered trademarks of International Business Machines Corporation. Dr. Halo is a registered trademark of Media Cybernetics. Micrografx Draw is registered trademark of Micrografx, Inc. Microsoft, Windows, Microsoft Paint, Microsoft Word, Video For Windows are either registered trademarks or trademarks of Microsoft Corporation. CT is a registered trademark of Scitex Corporation. ZSoft Paintbrush is a registered trademark of ZSoft Corporation. Portions copyright © 2003 Access Softek. Portions copyright © 2004 Bengt, Inc. Portions copyright © 2 001-2003 Python Software Foundation. All rights reserved.
All other trademarks or registered trademarks are the property of their respective owners.
We have done our best to ensure that the material found in this publication is both useful and accurate. However, please be aware that errors may exist in this publication, and that neither the authors nor Jasc Software, Inc. make any guarantees concerning the accuracy of the information found here or in the use to which it may be put.
Printed in the United States of America
First Printing 2004

i
Contents
|
Chapter 1 Getting Started . . . . . . . . . . . . . . . . . . . . . . . |
1 |
What’s New in Version 9 . . . . . . . . . . . . . . . . . . . . . . . . . . . . . . . 2
System Requirements . . . . . . . . . . . . . . . . . . . . . . . . . . . . . . . . . . 6
Installing the Software . . . . . . . . . . . . . . . . . . . . . . . . . . . . . . . . . 6
Learning Paint Shop Pro. . . . . . . . . . . . . . . . . . . . . . . . . . . . . . . . 7
|
Chapter 2 Getting to Know The Program . . . . . . . . . . . |
9 |
Starting and Exiting Paint Shop Pro . . . . . . . . . . . . . . . . . . . . . . 10
Exploring the User Interface . . . . . . . . . . . . . . . . . . . . . . . . . . . 10
Using Shortcut and Function Keys . . . . . . . . . . . . . . . . . . . . . . . 11
Using Toolbars and Palettes . . . . . . . . . . . . . . . . . . . . . . . . . . . . 12
Working with Dialogs . . . . . . . . . . . . . . . . . . . . . . . . . . . . . . . . 19
Viewing Images . . . . . . . . . . . . . . . . . . . . . . . . . . . . . . . . . . . . . 22
Viewing Image Information . . . . . . . . . . . . . . . . . . . . . . . . . . . . 28
|
Chapter 3 Getting Images into Paint Shop Pro . . . . . . |
29 |
Importing Images from Digital Cameras and Scanners. . . . . . . . 30
Opening Existing Images . . . . . . . . . . . . . . . . . . . . . . . . . . . . . . 33
Creating Images . . . . . . . . . . . . . . . . . . . . . . . . . . . . . . . . . . . . . 35
Capturing Images from the Computer Screen . . . . . . . . . . . . . . . 41
Opening Frames from Animation Shop . . . . . . . . . . . . . . . . . . . 43
Using the Paint Shop Pro Browser . . . . . . . . . . . . . . . . . . . . . . . 44
Saving Image Files . . . . . . . . . . . . . . . . . . . . . . . . . . . . . . . . . . . 49
Closing Image Files . . . . . . . . . . . . . . . . . . . . . . . . . . . . . . . . . . 52

ii Contents
Chapter 4 Customizing Paint Shop Pro . . . . . . . . . . . . 53
Using Custom Workspaces . . . . . . . . . . . . . . . . . . . . . . . . . . . . . 54
Customizing Toolbars and Menus . . . . . . . . . . . . . . . . . . . . . . . . 56
Setting General Program Preferences . . . . . . . . . . . . . . . . . . . . . 59
Setting Autosave Preferences . . . . . . . . . . . . . . . . . . . . . . . . . . . 67
Setting File Locations . . . . . . . . . . . . . . . . . . . . . . . . . . . . . . . . . 67
Setting File Format Preferences . . . . . . . . . . . . . . . . . . . . . . . . . 73
Setting File Format Associations. . . . . . . . . . . . . . . . . . . . . . . . . 79
Resetting Application Preferences . . . . . . . . . . . . . . . . . . . . . . . 80
Assigning and Viewing Shortcut Keys . . . . . . . . . . . . . . . . . . . . 81
Adjusting Monitor Display Options . . . . . . . . . . . . . . . . . . . . . . 84
Chapter 5 Improving Photographs . . . . . . . . . . . . . . . . 87
Basic Steps in Improving Photographs . . . . . . . . . . . . . . . . . . . . 88
Using the Digital Camera Noise Removal Filter . . . . . . . . . . . . . 89
Using the Chromatic Aberration Removal Filter . . . . . . . . . . . . . 92
Using the Fill Flash Filter . . . . . . . . . . . . . . . . . . . . . . . . . . . . . . 95
Using the Backlighting Filter . . . . . . . . . . . . . . . . . . . . . . . . . . . 96
How to Approach Color, Contrast, and Saturation Adjustments . 96
Fixing Photos in One Step. . . . . . . . . . . . . . . . . . . . . . . . . . . . . . 97
Correcting Image Distortions . . . . . . . . . . . . . . . . . . . . . . . . . . . 97
Improving Colors . . . . . . . . . . . . . . . . . . . . . . . . . . . . . . . . . . . 100
Improving Contrast . . . . . . . . . . . . . . . . . . . . . . . . . . . . . . . . . . 106
Improving Image Clarity . . . . . . . . . . . . . . . . . . . . . . . . . . . . . . 107
Improving Saturation . . . . . . . . . . . . . . . . . . . . . . . . . . . . . . . . 109
Removing Image Defects and Noise . . . . . . . . . . . . . . . . . . . . . 110
Removing Source Defects . . . . . . . . . . . . . . . . . . . . . . . . . . . . . 114
Retouching Photographs . . . . . . . . . . . . . . . . . . . . . . . . . . . . . . 117
Chapter 6 Making Color and Tonal Corrections . . . . . 125
Key Points to Know Before Making Corrections . . . . . . . . . . . 126
How Corrections Relate to Color Depth . . . . . . . . . . . . . . . . . . 127
Adjusting the Color Balance . . . . . . . . . . . . . . . . . . . . . . . . . . . 128
Adjusting Brightness and Contrast . . . . . . . . . . . . . . . . . . . . . . 134
Replacing Colors. . . . . . . . . . . . . . . . . . . . . . . . . . . . . . . . . . . . 140
Reducing or Removing Colors . . . . . . . . . . . . . . . . . . . . . . . . . 142
Using the Histogram to Analyze Images . . . . . . . . . . . . . . . . . . 145

Contents iii
|
Chapter 7 Editing Images . . . . . . . . . . . . . . . . . . . . . |
151 |
Adding Borders . . . . . . . . . . . . . . . . . . . . . . . . . . . . . . . . . . . . 152
Changing the Canvas Size . . . . . . . . . . . . . . . . . . . . . . . . . . . . 152
Combining Two Images . . . . . . . . . . . . . . . . . . . . . . . . . . . . . . 153
Correcting Image Perspective. . . . . . . . . . . . . . . . . . . . . . . . . . 155
Cropping Images . . . . . . . . . . . . . . . . . . . . . . . . . . . . . . . . . . . 157
Cutting, Copying, and Pasting . . . . . . . . . . . . . . . . . . . . . . . . . 160
Deleting Images . . . . . . . . . . . . . . . . . . . . . . . . . . . . . . . . . . . . 164
Flipping and Mirroring Images. . . . . . . . . . . . . . . . . . . . . . . . . 164
Repeating Commands. . . . . . . . . . . . . . . . . . . . . . . . . . . . . . . . 165
Resizing Images . . . . . . . . . . . . . . . . . . . . . . . . . . . . . . . . . . . . 166
Rotating Images . . . . . . . . . . . . . . . . . . . . . . . . . . . . . . . . . . . . 168
Scaling and Transforming Images . . . . . . . . . . . . . . . . . . . . . . 171
Using Rulers, Grids, and Guides . . . . . . . . . . . . . . . . . . . . . . . 173
Using Undo/Redo . . . . . . . . . . . . . . . . . . . . . . . . . . . . . . . . . . . 177
Warping Images Using the Mesh Warp Tool . . . . . . . . . . . . . . 178
Using the History Palette . . . . . . . . . . . . . . . . . . . . . . . . . . . . . 181
|
Chapter 8 Making Selections in Images . . . . . . . . . . |
191 |
Using the Selection Tools. . . . . . . . . . . . . . . . . . . . . . . . . . . . . 192 Using Edit Selection . . . . . . . . . . . . . . . . . . . . . . . . . . . . . . . . . 201 Adjusting Selection Borders . . . . . . . . . . . . . . . . . . . . . . . . . . . 202 Converting a Selection into a Layer . . . . . . . . . . . . . . . . . . . . . 204 Creating Custom Patterns from Selections . . . . . . . . . . . . . . . . 205 Modifying Selections . . . . . . . . . . . . . . . . . . . . . . . . . . . . . . . . 205 Clipping a Selection to the Canvas . . . . . . . . . . . . . . . . . . . . . . 212 Moving Selections within an Image . . . . . . . . . . . . . . . . . . . . . 213 Saving and Loading Selections. . . . . . . . . . . . . . . . . . . . . . . . . 214 Working with Standard and Floating Selections . . . . . . . . . . . . 218
|
Chapter 9 Applying Effects . . . . . . . . . . . . . . . . . . . . |
219 |
Choosing Effects . . . . . . . . . . . . . . . . . . . . . . . . . . . . . . . . . . . 220
Using Effects Dialogs. . . . . . . . . . . . . . . . . . . . . . . . . . . . . . . . 220
Adding Noise . . . . . . . . . . . . . . . . . . . . . . . . . . . . . . . . . . . . . . 225
Adding Picture Frames . . . . . . . . . . . . . . . . . . . . . . . . . . . . . . . 226
Creating Your Own Effects . . . . . . . . . . . . . . . . . . . . . . . . . . . 228
Using the Displacement Map Effect . . . . . . . . . . . . . . . . . . . . . 228
Using the Radial Blur Effect . . . . . . . . . . . . . . . . . . . . . . . . . . 230
Mathematically Combining Two Images . . . . . . . . . . . . . . . . . 231

iv Contents
Chapter 10 Working with Colors and Materials . . . . . . 233
Basics of Using the Materials Palette . . . . . . . . . . . . . . . . . . . . 234
Using the Materials Palette . . . . . . . . . . . . . . . . . . . . . . . . . . . . 236
Choosing Colors . . . . . . . . . . . . . . . . . . . . . . . . . . . . . . . . . . . . 239
Choosing Gradients . . . . . . . . . . . . . . . . . . . . . . . . . . . . . . . . . . 244
Choosing Patterns . . . . . . . . . . . . . . . . . . . . . . . . . . . . . . . . . . . 246
Choosing Textures . . . . . . . . . . . . . . . . . . . . . . . . . . . . . . . . . . 247
Working with Swatches . . . . . . . . . . . . . . . . . . . . . . . . . . . . . . 249
Editing Gradients . . . . . . . . . . . . . . . . . . . . . . . . . . . . . . . . . . . 251
Understanding Color and Color Models . . . . . . . . . . . . . . . . . . 256
How Monitor and Print Colors Differ . . . . . . . . . . . . . . . . . . . . 258
Working with Color Channels . . . . . . . . . . . . . . . . . . . . . . . . . . 259
Understanding Color Depth. . . . . . . . . . . . . . . . . . . . . . . . . . . . 260
Working with Image Palettes . . . . . . . . . . . . . . . . . . . . . . . . . . 269
Making a Palette Color Transparent . . . . . . . . . . . . . . . . . . . . . 272
Chapter 11 Raster Painting . . . . . . . . . . . . . . . . . . . . . 275
Setting Brush and Paint Options . . . . . . . . . . . . . . . . . . . . . . . . 276
Painting with the Paint Brush or Airbrush. . . . . . . . . . . . . . . . . 278
Creating Brush Tips . . . . . . . . . . . . . . . . . . . . . . . . . . . . . . . . . 280
Using the Brush Variance Palette . . . . . . . . . . . . . . . . . . . . . . . 282
Filling Areas with Colors, Gradients, Patterns, or Textures . . . 284
Warping Images With the Warp Brush . . . . . . . . . . . . . . . . . . . 286
Erasing Parts of an Image . . . . . . . . . . . . . . . . . . . . . . . . . . . . . 287
Cloning Parts of Images . . . . . . . . . . . . . . . . . . . . . . . . . . . . . . 290
Painting with Picture Tubes . . . . . . . . . . . . . . . . . . . . . . . . . . . 290
Replacing Colors. . . . . . . . . . . . . . . . . . . . . . . . . . . . . . . . . . . . 293
Retouching Images . . . . . . . . . . . . . . . . . . . . . . . . . . . . . . . . . . 294

Contents v
|
Chapter 12 Art Media Tools . . . . . . . . . . . . . . . . . . . . |
297 |
Art Media Layers . . . . . . . . . . . . . . . . . . . . . . . . . . . . . . . . . . . 298 Using the Mixer Palette . . . . . . . . . . . . . . . . . . . . . . . . . . . . . . 299 Using the Art Media Brushes . . . . . . . . . . . . . . . . . . . . . . . . . . 305 Using the Oil Brush . . . . . . . . . . . . . . . . . . . . . . . . . . . . . . . . . 308 Using the Chalk Tool . . . . . . . . . . . . . . . . . . . . . . . . . . . . . . . . 310 Using the Pastel Tool . . . . . . . . . . . . . . . . . . . . . . . . . . . . . . . . 311 Using the Crayon Tool . . . . . . . . . . . . . . . . . . . . . . . . . . . . . . . 312 Using the Colored Pencil Tool . . . . . . . . . . . . . . . . . . . . . . . . . 313 Using the Marker Tool . . . . . . . . . . . . . . . . . . . . . . . . . . . . . . . 314 Using the Palette Knife Tool . . . . . . . . . . . . . . . . . . . . . . . . . . 315 Using the Smear Tool . . . . . . . . . . . . . . . . . . . . . . . . . . . . . . . . 316 Using the Art Eraser Tool. . . . . . . . . . . . . . . . . . . . . . . . . . . . . 317
|
Chapter 13 Drawing and Editing Objects . . . . . . . . . . |
319 |
Drawing Objects. . . . . . . . . . . . . . . . . . . . . . . . . . . . . . . . . . . . 320 Drawing Lines with the Pen Tool . . . . . . . . . . . . . . . . . . . . . . . 321 Drawing Bezier Curves with the Pen Tool . . . . . . . . . . . . . . . . 325 Drawing Freehand Curves with the Pen Tool . . . . . . . . . . . . . . 326 Using the Rectangle Tool . . . . . . . . . . . . . . . . . . . . . . . . . . . . . 328 Using the Ellipse Tool . . . . . . . . . . . . . . . . . . . . . . . . . . . . . . . 329 Using the Symmetric Shape Tool . . . . . . . . . . . . . . . . . . . . . . . 330 Using the Preset Shape Tool. . . . . . . . . . . . . . . . . . . . . . . . . . . 331 Creating Custom Line Styles . . . . . . . . . . . . . . . . . . . . . . . . . . 334 Editing Vector Object Properties . . . . . . . . . . . . . . . . . . . . . . . 336 Adding and Closing Contours . . . . . . . . . . . . . . . . . . . . . . . . . 338 Aligning and Arranging Vector Objects . . . . . . . . . . . . . . . . . . 343 Resizing and Reshaping Vector Objects . . . . . . . . . . . . . . . . . . 347 Editing Paths and Contours . . . . . . . . . . . . . . . . . . . . . . . . . . . 349 Editing Nodes. . . . . . . . . . . . . . . . . . . . . . . . . . . . . . . . . . . . . . 351
|
Chapter 14 Working with Layers . . . . . . . . . . . . . . . . . |
359 |
About Layers . . . . . . . . . . . . . . . . . . . . . . . . . . . . . . . . . . . . . . 360 Adding New Layers to Images . . . . . . . . . . . . . . . . . . . . . . . . . 366 Editing Layer Properties. . . . . . . . . . . . . . . . . . . . . . . . . . . . . . 368 Modifying Layers . . . . . . . . . . . . . . . . . . . . . . . . . . . . . . . . . . . 378 Using Adjustment Layers . . . . . . . . . . . . . . . . . . . . . . . . . . . . . 382 Using the Layers palette . . . . . . . . . . . . . . . . . . . . . . . . . . . . . . 385

vi Contents
Chapter 15 Working with Masks . . . . . . . . . . . . . . . . . 389
About Masks . . . . . . . . . . . . . . . . . . . . . . . . . . . . . . . . . . . . . . . 390
Creating Masks . . . . . . . . . . . . . . . . . . . . . . . . . . . . . . . . . . . . . 391
Deleting Masks . . . . . . . . . . . . . . . . . . . . . . . . . . . . . . . . . . . . . 396
Editing Masks . . . . . . . . . . . . . . . . . . . . . . . . . . . . . . . . . . . . . . 397
Loading Masks . . . . . . . . . . . . . . . . . . . . . . . . . . . . . . . . . . . . . 399
Saving Masks . . . . . . . . . . . . . . . . . . . . . . . . . . . . . . . . . . . . . . 402
Chapter 16 Working with Text . . . . . . . . . . . . . . . . . . . 405
Creating Text . . . . . . . . . . . . . . . . . . . . . . . . . . . . . . . . . . . . . . 406
Formatting Text . . . . . . . . . . . . . . . . . . . . . . . . . . . . . . . . . . . . 410
Editing Text . . . . . . . . . . . . . . . . . . . . . . . . . . . . . . . . . . . . . . . 411
Moving Text . . . . . . . . . . . . . . . . . . . . . . . . . . . . . . . . . . . . . . . 412
Applying Effects to Text . . . . . . . . . . . . . . . . . . . . . . . . . . . . . . 413
Converting Text to Curves . . . . . . . . . . . . . . . . . . . . . . . . . . . . 413
Creating Text on Object Paths. . . . . . . . . . . . . . . . . . . . . . . . . . 414
Creating Text with Image Patterns . . . . . . . . . . . . . . . . . . . . . . 418
Scaling and Transforming Text . . . . . . . . . . . . . . . . . . . . . . . . . 418
Chapter 17 Automating Tasks . . . . . . . . . . . . . . . . . . . 419
Using and Creating Presets . . . . . . . . . . . . . . . . . . . . . . . . . . . . 420
Processing Multiple Files . . . . . . . . . . . . . . . . . . . . . . . . . . . . . 422
Renaming Multiple Files . . . . . . . . . . . . . . . . . . . . . . . . . . . . . . 424
Scripting Basics . . . . . . . . . . . . . . . . . . . . . . . . . . . . . . . . . . . . 425
Running a Saved Script . . . . . . . . . . . . . . . . . . . . . . . . . . . . . . . 427
Stopping or Undoing a Script . . . . . . . . . . . . . . . . . . . . . . . . . . 427
About Restricted Script Mode . . . . . . . . . . . . . . . . . . . . . . . . . . 428
Recording and Saving a Script . . . . . . . . . . . . . . . . . . . . . . . . . 429
Editing Scripts. . . . . . . . . . . . . . . . . . . . . . . . . . . . . . . . . . . . . . 430
Binding Scripts to Icons . . . . . . . . . . . . . . . . . . . . . . . . . . . . . . 433

Contents vii
|
Chapter 18 Printing Images . . . . . . . . . . . . . . . . . . . . |
435 |
About Printing . . . . . . . . . . . . . . . . . . . . . . . . . . . . . . . . . . . . . 436
About Printing Options . . . . . . . . . . . . . . . . . . . . . . . . . . . . . . 437
Printing Multiple Images on a Page . . . . . . . . . . . . . . . . . . . . . 439
Printing a Single Image . . . . . . . . . . . . . . . . . . . . . . . . . . . . . . 446
Printing Images from the Browser . . . . . . . . . . . . . . . . . . . . . . 446
Printing Images Using a Template . . . . . . . . . . . . . . . . . . . . . . 448
Placing Text Captions on the Layout . . . . . . . . . . . . . . . . . . . . 451
Printing with CMYK Color Separations . . . . . . . . . . . . . . . . . . 452
Saving Images for Printing . . . . . . . . . . . . . . . . . . . . . . . . . . . . 456
Chapter 19 Sharing and Creating Images for the Web 457
Sending Images via E-Mail . . . . . . . . . . . . . . . . . . . . . . . . . . . 458
Uploading Images to a Photo Sharing Service . . . . . . . . . . . . . 458
Saving Images for the Web . . . . . . . . . . . . . . . . . . . . . . . . . . . 459
Saving Images for Use In Animation Shop. . . . . . . . . . . . . . . . 470
Previewing Images in a Web Browser . . . . . . . . . . . . . . . . . . . 470
Creating Image Rollovers . . . . . . . . . . . . . . . . . . . . . . . . . . . . . 471
Mapping Images . . . . . . . . . . . . . . . . . . . . . . . . . . . . . . . . . . . . 472
Slicing Images . . . . . . . . . . . . . . . . . . . . . . . . . . . . . . . . . . . . . 476
Using Digital Watermarks . . . . . . . . . . . . . . . . . . . . . . . . . . . . 480

viii Contents
![]()
1
C H A P T E R 1
Getting Started
Contents
Paint Shop Pro sets the standard for affordable, professional image editing. Version 9 builds on Paint Shop Pro’s legacy of creative innovation with a new set of art media tools, professional photo correction filters, and precision graphic design capabilities to offer users limitless creativity. You can greatly reduce time spent on production tasks with Paint Shop Pro’s streamlined production tools. Edit photos, create graphics, draw, paint, and animate, all within a highly customizable workspace environment. Paint Shop Pro 9 provides advanced tools for advanced imaginations.
What’s New in Version 9 . . . . . . . . . . . . . . . . . . . . . . . . . . . . . . . 2 System Requirements . . . . . . . . . . . . . . . . . . . . . . . . . . . . . . . . . 6 Installing the Software . . . . . . . . . . . . . . . . . . . . . . . . . . . . . . . . . 6 Learning Paint Shop Pro . . . . . . . . . . . . . . . . . . . . . . . . . . . . . . . 7

2 Chapter 1: Getting Started
What’s New in Version 9
Briefly described below are the new features in Paint Shop Pro 9 that will enhance your ability to work with digital photographs, create and enhance artwork and graphics, and boost your productivity.
User Interface Enhancements
Although similar to the version 8 interface, Paint Shop Pro 9 has been updated to include the following.
The History palette lists each command you apply to the active image. The most recent action appears at the top of the list. The History palette gives you the ability to quickly undo and redo actions applied to the current image. In addition to its basic Undo and Redo To Here functions, the History Palette also offers the ability to save selected actions as the Quickscript, which you can then apply to other open images. Refer to Chapter 7 for more information.
The Mixer palette offers a more natural, intuitive way for artists to create and pick colors. Working in conjunction with the new Art Media brush tools and the new Art media layer, the Mixer palette provides artists with the best way to digitally simulate real-world painting. Refer to Chapter 12 for more information.
What was labeled the Layers palette in previous versions is now called the Layers palette.
What was labeled the Material palette in version 8 is now called the Materials palette. Additionally, the Materials palette now contains the Frame tab, offering a new (and for some users a more intuitive) method of choosing colors. Refer to Chapter 10 for more information.
Open images can optionally be displayed in a tabbed format across the top of the workspace. To make an image active, click the desired tab. When many images are open, use the forward and backward buttons to scroll among the tabs. Refer to Chapter 2 for more information.
The docking behavior of palettes has been modified. Palettes can be set to slide open and closed from a tab along the right side, roll up at a user-selected speed, or roll up into the nearest quadrant of the workspace. Refer to Chapter 2 for more information.

Chapter 1: Getting Started 3
The Customize dialog now contains a new tab called Scripts. This tab lets you easily bind a script to one of 50 icons. The icon can then be dragged onto a toolbar or into a menu. Refer to Chapter 17 for more information.
The General Program Preferences dialog has new options for the Crop tool’s shading area, as well as the number of steps to save for the History palette. Additionally the main workspace rightclick context menu now contains the command to access this dialog in a single click. Refer to Chapter 4 for more information.
In the Adjust menu, the three Automatic correction commands (Color Balance, Contrast Enhancement, and Saturation Enhancement) have been pulled out of their former submenus and now reside as standalone items. Additionally, the Adjust menu contains a Photo Fix item loaded with helpful commands geared toward quickly correcting common problems with digital photos.
New Art Media Tools
Working in conjunction with the new Mixer palette, the new Art Media tools let you create digital artwork that closely mimics real-world media, pigments, paints, and artist’s tools. The Oil Brush creates realistic paint strokes, while the Chalk, Pastel, Crayon, Colored Pencil, and Marker tools are used for making dry-pigment works of art. Refer to Chapter 12 for more information.

4 Chapter 1: Getting Started
Image Browser Updates
The Image Browser now contains two tabs, Find and Info, in the left side of the Browser window. The Find tab contains the familiar Windows Explorer-like navigation view, and the Info tab displays image information, creator data, and EXIF data. Additionally, with the Browser active you can choose File > Sort and use the Sorting dialog to sort images by EXIF data. Refer to Chapter 3 for more information.
Raw Camera Image Support
You can now open Raw (unprocessed) images from high-end digital cameras in Paint Shop Pro. Additionally, a new File Format Preferences tab contains an option for displaying a dialog that allows for further Raw image editing before the image opens in Paint Shop Pro. Refer to Chapter 4 for more information.
New Digital Photo Correction Filters
Four new filters provide innovative methods of correcting common problems with digital photos:
The Digital Camera Noise Removal filter scans your photo and removes image noise often inherent to digital cameras while intelligently preserving normal image textures. You can even customize noise removal by defining specific regions or color ranges to focus on or ignore, and then save settings as a Preset that can be applied to photos taken from the same camera.
The Chromatic Aberration Removal filter helps eliminate the colored glow that often appears in digital photos, especially in an image’s high contrast images.
The Fill Flash filter corrects underexposed, shadowy areas of your photos.
The Backlighting filter corrects the opposite problem by compensating for overexposed areas surrounding the photo’s subject.
Refer to Chapter 5 for more information on these filters.
New Effects
Two new powerful and interesting effects include:

Chapter 1: Getting Started 5
The Displacement Map effect lets you create two or threedimensional surface effects using a different, underlying image as the basis for the effect.
The Radial Blur effect lets you add interesting and fun spin, twist, and zoom effects to an image.
Refer to Chapter 9 for more information on these effects.
Vector Drawing Tool Updates
Creating vector shapes has never been easier or more powerful.
The Pen tool’s functionality has been simplified to offer a clearer, more intuitive way to create and edit curves and lines.
Three new tools, Rectangle, Ellipse, and Symmetric Shape, provide all the controls you need to create buttons, banners, polygons, any kind of rectangle or ellipse or custom shape.
The Preset Shape tool provides you with a variety of arrows, flowers, gears, and other miscellaneous shapes.
Refer to Chapter 13 for more information.
Text Tool Updates
The Text tool now provides a vertical text layout option, updates to the text on a path feature, as well as new anti-aliasing rendering options that generate cleaner text at smaller font sizes. Refer to Chapter 16 for more information.
Crop Tool Updates
The Crop tool now provides the option of shading the area outside the crop box. This option can be set in the Transparency and Shading tab of the General Program Preferences dialog. Refer to Chapter 7 for more information.
Print Layout Feature Updates
The Print Layout feature now lets you draw a text box on the layout to easily add custom captions or titles to your printed pages. Additionally, you can create elliptical cells and apply edits to multiple cells simultaneously. Refer to Chapter 18 for more information.

6 Chapter 1: Getting Started
System Requirements
Before installing Paint Shop Pro, make sure that your computer meets the minimum system requirements, or matches/exceeds the recommended configuration:
Minimum System Requirements
Windows® 98SE / 2000 (SP4)/ ME / XP
300 MHz processor or faster
256 MB RAM
500 MB free disk space
16-bit display adapter at 800 x 600 resolution
Microsoft Internet Explorer 6.0 or later
Recommended System Configuration
Windows XP
1.0 GHz processor or faster
512 MB RAM
500 MB free disk space
32-bit display adapter at 1024 x 768 resolution
Microsoft Internet Explorer 6.0 or later
Installing the Software
Before installing Paint Shop Pro, close any programs or applications that you have running on your computer.
To install the software:
1Insert the Paint Shop Pro CD in your CD-ROM drive. The installation program starts automatically.
Note: If the installation program does not start automatically, use Windows Explorer or double-click the My Computer icon, navigate to the contents of the Paint Shop Pro CD, and doubleclick the file Autorun.exe.
2Follow the prompts to install the program.

Chapter 1: Getting Started 7
Learning Paint Shop Pro
Learn Paint Shop Pro in a variety of ways: in addition to reading this User Guide, we encourage you to use the Help system, follow the Quick Guides in the Learning Center palette, and visit our Web site for even more learning resources.
Using the Quick Guides to Learn
Common Tasks
Quick Guides are short, fast tutorials that guide you through new tasks and projects using your own image. Perform each step yourself, or have the program show you where to find the tools needed to complete the task.
To use Quick Guides:
1Choose View > Palettes > Learning Center or press F10 to open the Learning Center window.
2Click the title of a Quick Guide to view the selected topic.
Using the Help System
When you start up the Paint Shop Pro Help system (by choosing Help > Help Topics, or by pressing the F1 key) it will open to the Welcome to Paint Shop Pro page. The left side of the Help window contains the Contents tab (listing all the main Help pages), the Index tab, the Search tab, and the Favorites tab. The right side of the Help window displays the currently selected Help topic.
Most command dialogs have a Help button located along the bottom of the dialog. Click that button to open a Help topic associated with the dialog.
Context-Sensitive Help Tool
To display Help about a particular user interface item, such as a tool or button or menu item, use the Context Help button as follows:
1Choose Help > Context Help. The cursor shape changes to: 
2Drag the cursor over the item you want to display Help for, and then click the mouse. The Help file will open and display the Help topic associated with what you clicked.

8 Chapter 1: Getting Started
Using the Jasc Software Learning
Center
The Jasc Software Learning Center shows you how to use Paint Shop Pro’s features to create amazing photograph enhancements and sophisticated graphics. Jasc and third-party tutorials walk you through the steps for everything from restoring old photographs to creating metallic text.
To access the Jasc Software Learning Center, use your internet browser to got to www.Jasc.com, and then click the Support link. In addition to Learning Center tutorials, you’ll also find Knowledge Base articles and other helpful materials.
Using Web-Based Resources
On the Help menu of Paint Shop Pro, you can access a number of Web site pages dedicated to support issues. In the Help menu select one of the following Web site links:
Online Support and Resources Access the Jasc Customer Care Center to search for answers in our Knowledge Base, submit questions to Technical Support, or give us feedback.
Register Product Online Register your copy of Paint Shop Pro online.
Check for Updates Check the Jasc.com Web site for updates to Paint Shop Pro.
Contact Information Send an e-mail message to Technical Support.
Getting in Touch with Other Paint Shop Pro Users
Millions of people use and love Paint Shop Pro. There are many independent (non-Jasc) Paint Shop Pro communities where users share tips and tricks, ask questions, and get answers about Paint Shop Pro. There are Web sites, newsgroups, and chatrooms devoted to Paint Shop Pro. As a starting point, search online for “Paint Shop Pro.”
Popular newsgroups include forums.jasc.com as well as the Usenet newsgroup, comp.graphics.apps.paint-shop-pro. You can access newsgroups using your favorite news reader such as Microsoft Outlook Express, or an on-line news reader such as Google Groups.

9
|
C H A P T E R |
2 |
|||
|
Getting to Know The Program |
||||
|
The Paint Shop Pro workspace includes menus, tools, toolbars, and |
||||
|
palettes that you use to create and edit images. Becoming familiar |
||||
|
with this workspace will help you accomplish your photo editing, |
||||
|
painting, and drawing tasks. |
||||
|
Contents |
Exploring the User Interface . . . . . . . . . . . . . . . . . . . . . . . . . . . . |
10 |
||
|
Starting and Exiting Paint Shop Pro . . . . . . . . . . . . . . . . . . . . . . |
10 |
|||
|
Using Shortcut and Function Keys . . . . . . . . . . . . . . . . . . . . . . . |
11 |
|||
|
Using Toolbars and Palettes . . . . . . . . . . . . . . . . . . . . . . . . . . . |
12 |
|||
|
Working with Dialogs . . . . . . . . . . . . . . . . . . . . . . . . . . . . . . . . . |
19 |
|||
|
Viewing Images . . . . . . . . . . . . . . . . . . . . . . . . . . . . . . . . . . . . . |
22 |
|||
|
Viewing Image Information . . . . . . . . . . . . . . . . . . . . . . . . . . . . . |
28 |

10 Chapter 2: Getting to Know The Program
Starting and Exiting Paint Shop Pro
To start Paint Shop Pro:
If you chose to place the Paint Shop Pro icon on your desktop during installation, you can start the program by double-clicking this icon.
If you chose not to place the Paint Shop Pro icon on your desktop, start the program by clicking the Start button and choosing All Programs > Jasc Software > Jasc Paint shop Pro 9.
The first time you start Paint Shop Pro, the program displays the File Format Associations dialog. This dialog lets you assign file formats to the program so that your computer always uses Paint Shop Pro to open files in those formats. You can change associations at any time by choosing the File > Preferences > File Format Associations menu commands. For more information, see “Setting File Format Associations” on page 79.
To exit paint Shop Pro:
Exit Paint Shop Pro using one of the following methods:
Choose File > Exit; or
Click the Close button  in the upper right-hand corner of the main window’s title bar; or
Click the Paint Shop Pro icon  in the upper left-hand corner of the main window title bar and choose Close from its menu.
Note: Note: If there are unsaved images open in the workspace, you’ll be prompted to save them before closing the program.
Exploring the User Interface
When you open Paint Shop Pro, it displays the main program window. This window is your work area. It contains the commands and tools used to create, edit, print, and export your images.
The Paint Shop Pro workspace includes the following components:
Menu bar The menu bar displays commands for performing tasks. Menus are organized by topic. For example, the Effects menu contains commands for applying effects to images.
![]()
Chapter 2: Getting to Know The Program 11
Toolbars The toolbars display buttons for common commands. See “Using Toolbars” on page 14.
Palettes The palettes display information and help you select tools, modify options, manage layers, select colors, and perform other editing tasks. See “Using Palettes” on page 15.
Status bar The Status bar displays text about the selected tool or menu command as well as image information, including the dimensions and color depth. See “Viewing Image Information” on page 28.
Browser Displays thumbnail previews of image files. You can open, delete, copy, and perform other file commands in the Browser. For more information, see “Using the Paint Shop Pro Browser” on
page 44.
Print Layout window Displays a window on which you can arrange and size multiple images, add text captions, apply templates, and then print the images. For more information, see “Printing a Single Image” on page 446.
Using Shortcut and Function Keys
Customizing Shortcut Keys
If you don’t like the assigned function keys, you can customize the function keys to suit your needs. See “Assigning and Viewing Shortcut Keys” on
page 81.
To view all assigned keys, including custom shortcuts, choose
Help > Keyboard Map.
To work quickly and easily in Paint Shop Pro, learn the shortcut and function keys for common tasks. Key combinations like Ctrl + Z (Undo) and Ctrl + C (Copy) become second nature as you work, and they save time over using the mouse.
Here are the ways you can use shortcut and function keys in Paint Shop Pro:
Use shortcut keys to execute menu commands, display palettes, edit nodes on vector objects, and execute Browser commands. All menu commands list their shortcut keys on the menu. Shortcut keys for palettes are listed on the View > Palettes menu.
Use shortcut keys to select tools. Move the cursor over a tool to display a ToolTip with its shortcut key in parentheses.
Use function keys to display a menu by pressing Alt plus the underlined letter of the menu name (for example, press Alt + F for the File menu). Then, press the underlined letter of a menu command or scroll through menus using the arrow keys. Press ESC to return to your image without executing a command.
To display all default shortcut keys, choose Help > Keyboard Map.

12 Chapter 2: Getting to Know The Program
Using Toolbars and Palettes
One aspect of customizing your workspace involves the ability to dock, float, resize, and move the toolbars and palettes. The sections below describe how to work with palettes and toolbars.
To allow for palette docking:
1Choose View > Docking Options. The Palettes tab of the Preferences dialog appears.
2In the Allow docking of section, mark the palettes you want to be able to dock.
Note: Even if a palette is set for docking, by holding down Ctrl and then dragging the palette you can place it anywhere in the workspace.
Pushpin Button in a Toolbar or Palette Title Bar
Be aware of the pushpin button  in the toolbar/palette’s title bar as it relates to floating and docking:
When the toolbar/palette is floating:
When the pushpin is pointing down, the toolbar/palette will remain fully displayed when you move the cursor away from it.
When the pushpin is pointing to the left  , the toolbar/palette will roll up so that only its title bar is visible.
When the palette is docked:
(For palettes only) When the pushpin button is pointing down, the palette will remain fully displayed in its docked position when you move the cursor away from it.
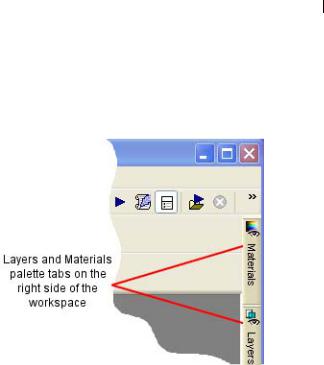
Chapter 2: Getting to Know The Program 13
(For palettes only) When the pushpin is pointing to the left, the palette will slide into the workspace side. You’ll then see a tab with the palette name. To display the palette again, move the cursor over the tab.
The Animate Auto Hide and Quadrant Rollup
Options
The way in which floating palettes roll up can be modified by two settings in the Options tab of the Customize dialog. (Choose View > Customize to display this dialog.)
To set the speed in which floating palettes roll up, mark the Animate Auto Hide check box, and then drag the Speed slider to the desired setting.
To have the title bar of rolled up floating palettes move into the nearest workspace quadrant, mark the Quadrant Rollup check box. (The Quadrant Rollup check box is marked by default.) When this box is not marked, floating palettes will roll up and their title bar will not move.
To dock a toolbar or palette:
Double-click its title bar; or
Drag its title bar to one edge of the workspace. The toolbar or palette snaps into place.
To float a toolbar:
Double-click its handle; or

14 Chapter 2: Getting to Know The Program
Status bar
The Status bar displays text about the selected tool or menu command, as well as image information including the dimensions, color depth, and cursor position. For more information, see “Viewing Image Information” on page 28.
Place the cursor over the handle (you’ll get the four-sided mover icon) and drag the handle to move the toolbar away from the workspace edge. Note: The handle size and position will vary depending on the toolbar’s size and whether it is vertical or horizontal.
To move an undocked toolbar or palette:
Drag its title bar to a new position.
To resize a toolbar or palette:
Click and drag the sides or corners of a toolbar or palette to change its size.
To display all toolbars and palettes:
Press Ctrl + Shift + T.
Note: To hide a specific palette, click the Close button on its title bar.
Using Toolbars
The toolbars display buttons for the most common tasks. Position the cursor over a button to display a ToolTip with its name. The Status bar displays more information about the command.
Display or hide toolbars, or arrange them on the workspace. Dock a toolbar to snap it into place at an edge of a workspace, or to float it to move it anywhere on the screen.
Paint Shop Pro contains these toolbars:
Standard toolbar Displays the most common commands, such as saving images, undoing a command, and cutting items. Paint Shop Pro automatically displays this toolbar when you first run the program.
Tools toolbar Crop, paint, draw, type, and perform other image editing tasks. See “Using the Tools” on page 17.
Browser toolbar Displays commands for using the Paint Shop Pro Browser.
Effects toolbar Displays commands for applying effects to your images.

Customizing toolbars
You can add and remove buttons from toolbars and create your own toolbars. For more information, see “Customizing Toolbars and Menus” on page 56.
Flyout menu displaying toolbars
Chapter 2: Getting to Know The Program 15
Photo toolbar Displays commands for enhancing photos.
Script toolbar Displays commands for creating and running scripts.
Web toolbar Displays commands for creating and saving images for the Web.
To execute a toolbar command:
Click the command button. If the button is greyed out, it is not available.
To display or hide a toolbar:
Do either of the following:
Choose View > Toolbars and choose the toolbar from the menu.
Right-click any toolbar or palette, choose Toolbars, and then choose the toolbar from the context menu.
Note: To hide a specific toolbar or the palette, click the close button on its title bar.
Using Palettes
Use palettes to choose tools and tool options, select colors, and manage layers. Display or hide palettes, or arrange them on the workspace. Dock a palette to snap it into place at an edge of a workspace, or to float it to move it anywhere on the screen.
Paint Shop Pro contains these palettes:
Materials palette Select colors and materials for painting, drawing, filling, and retouching. Refer to Chapter 10 for more information.
Tool Options palette Modify options for the currently selected tool. See “Setting Tool Options” on page 17.
Layers palette View, organize, and edit image layers. See “About Layers” on page 360.
History palette Lists the actions taken on the current image, allows you to undo and redo adjacent or non-adjacent actions, and allows you to create Quickscripts. Refer to Chapter 7 for more information.
Mixer palette Place and mix pigments for use with the Art Media tools, allowing you to create realistic oil paint strokes, as well as chalk, colored pencil, and marker strokes. Refer to Chapter 7 for more information.
Learning Center palette Displays tutorials for common tasks. See “Using the Quick Guides to Learn Common Tasks” on page 7.

16 Chapter 2: Getting to Know The Program
|
Histogram palette Displays a graph of the distribution of red, green, |
|
|
blue, greyscale, hue, saturation, and lightness values in an image. |
|
|
Analyze the distribution of detail in the shadows, midtones, and |
|
|
highlights to decide how to make corrections. See “Using the |
|
|
Histogram to Analyze Images” on page 145. |
|
|
Overview palette Displays a thumbnail view of the active image, as |
|
|
well as information about the image. See “Using the Overview |
|
|
Palette” on page 18. |
|
|
Script Output palette Displays actions you take and the results of |
|
|
running scripts. See “About the Script Output Palette” on page 427. |
|
|
Brush Variance palette Sets additional brush options. This palette is |
|
|
particularly useful if you have a 4D mouse or a pressure-sensitive |
|
|
tablet. For example, you can vary the opacity of a brush stroke by |
|
|
applying pressure with the stylus. You can use some options with a |
|
|
mouse. |
|
|
To display or hide a palette: |
|
|
Flyout menu displaying pallets |
Do one of the following: |
|
Choose View > Palette and choose the palette name. |
|
|
Type the palette’s shortcut key (listed to the right of the name). |
|
|
Right-click any palette and choose the palette name from the |
|
|
context menu. |
|
|
To set the docking preference of palettes: |
|
|
Choose File > Preferences > General Program Preferences and click |
|
|
the Palettes tab of the dialog. In the Allow docking of group box, |
|
|
mark the check boxes of the palettes you want Paint Shop Pro to |
|
|
dock automatically when you drag them to the edge of the |
|
|
workspace. |
|
|
Note |
|
|
You can also open the Palettes tab of the Paint shop Pro 9 |
|
|
Preferences dialog by choosing View > Docking Options. |
|
|
To resize a palette: |
|
|
Click and drag a corner or an edge, or use the Minimize and Maximize |
|
|
buttons in the upper right corner. |
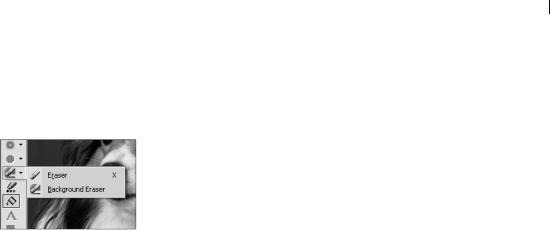
Flyout menu displaying tools
Why some tools are inactive (greyed out)
Some tools work only on raster or vector layers. For example, the Paint Brush and Clone Brush work only on raster layers; the Object Selection tool works only on vector layers.
For information on raster and vector layers, see “About Layers” on page 360.
Chapter 2: Getting to Know The Program 17
Using the Tools
Use the Paint Shop Pro tools to perform actions such as crop, paint, draw, add text, and perform other image editing and creative tasks. Select a tool by clicking its button on the Tools toolbar. Some tools (for example Crop, Move, and Text) reside in their own space on the Tools toolbar. Most other tools, however, are grouped with other tools that perform similar tasks. A group of tools is denoted by a small arrow on the right side; click the arrow to reveal the other tools.
To view information about a tool, hold the cursor over it. A tool tip displays the tool name and shortcut key, and the Status bar (located along the bottom of the main Paint Shop Pro window) displays hints for using the tool.
To use a tool:
1Click its button on the Tools toolbar. For tools that share a flyout with other tools, click the down-arrow next to the tool and select the tool.
2Specify options using the Tool Options palette. See “Setting Tool Options” below.
3Use the tool on the image.
For information on moving, hiding, and displaying the Tools toolbar, see “Using Toolbars” on page 14.
Resetting Tool Options to Default Values
To reset the Tool Options palette to the default values, click the Presets drop-list and then click the Reset to default button  .
.
Setting Tool Options
After you select a tool from the Tools toolbar, set its options in the Tool Options palette. Options include such settings as brush size and shape for painting tools and line width for drawing tools. By default, the palette is below the Standard toolbar. The palette displays options grouped into bands, which you can minimize and drag within the palette. To display a minimized band, click its handle or right-facing arrow.
Set the options before you use the tool. You cannot edit settings in the Tool Options palette for brush strokes or objects you have already created.
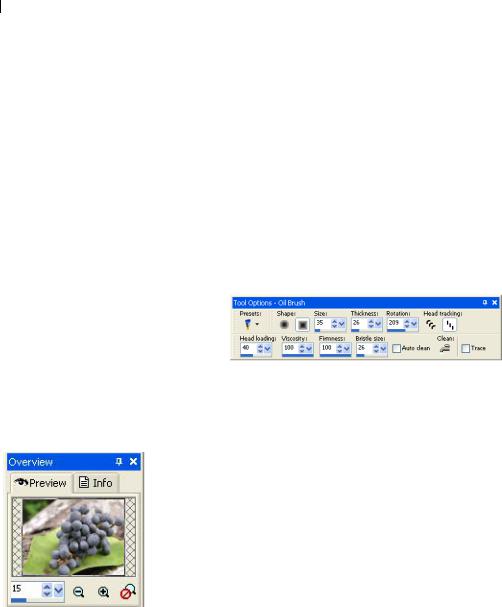
18 Chapter 2: Getting to Know The Program
Although the items in the Tool Options palette depend upon the active tool, here are features common to all or some of the tools:
Presets Scripts that load specific settings for a tool. For more information, refer to Chapter 17.
Arrow button  When more tool options are available than there is room to show them, click these buttons to reveal the additional options.
Apply button  Some tools (Crop, for example) have this button. Click it to apply the changes you have made or execute the action.
Here is an example of an un-docked Tool Options palette for the Oil
Brush tool:
Using the Overview Palette
Display the Overview palette to preview the entire active image or to The Overview palette view image information. The Overview palette displays a rectangle
over the part of the image visible in the image window. To show other areas of the image, click and drag this rectangle.
The Overview palette contains two tabs:
Preview Displays the image preview. The image updates after you complete an action. Transparent areas of the image appear as white.
Info Displays image status information including height and width, color depth, memory used, cursor position, rotation, and other information.

Context menu for the Layers palette
Chapter 2: Getting to Know The Program 19
Using Context Menus
Context menus provide quick access to commands specific to the active tool, selection, or palette.
Note
For a complete list of Context menus, choose View > Customize to open the Customize dialog. Click the Menu tab, and select a context menu from the Select context menu drop-down list.
To use a context menu:
1Position the cursor over an image, an empty area of a palette, a layer name on the Layers palette, a thumbnail in the Browser, or a toolbar.
2Right-click to display the context menu.
3Choose a command from the menu.
Working with Dialogs
Dialogs are windows that open when you choose certain Paint Shop The Average dialog Pro commands. Use them to select and preview command options.
All dialogs remember where you last positioned them on the screen and re-open in the same location.
Most dialogs have the following features in common:
Preview windows Zoom and navigate to see before and after views of changes.
Presets Saved settings, or scripts, that you can use to make quick changes to images. Use the presets that come with Paint Shop Pro or create your own. For more information on creating and using presets, refer to chapter 17.
Numeric edit controls The controls that you use to select a value.
Color boxes The box you click to select a color.
Randomize parameters button A button you click to try out random settings in the dialog.
Resize Handle A handle in the lower right corner of the dialog used to change the size of the dialog.
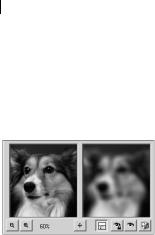
20 Chapter 2: Getting to Know The Program
The preview windows
Size the dialog
In each Paint Shop Pro dialog with preview windows, you can size the dialog by clicking and dragging a corner. Expand a dialog when you want the preview windows to be large enough to see detailed changes. You can also doubleclick the dialog title bar to maximize the dialog.
Exceptions to panning in the left preview window
In a few dialogs, the left preview window is used for making selections (such as selecting a red eye in the Red Eye Removal dialog). In these dialogs, the cursor does not change to a hand over the left preview window. Use the right preview window for panning instead.
Using Preview Windows
Most dialogs that correct images, apply effects, or modify selections have two preview windows that show the image before and after changes are applied. Use the window controls to zoom the preview in or out, pan it, or proof changes on the actual image.
You can show or hide the preview windows. When you hide previews, use the main image window to proof changes.
To display or hide preview windows:
Click the Show/Hide Previews button  .
.
To zoom the image preview:
Click the Zoom In  or Zoom Out
  buttons. The zoom percentage displays next to the Zoom buttons.
To pan the image:
Do either of the following:
Move the cursor over either preview window (the cursor changes to a hand), and then click and drag the image.
Click and hold the Navigate button  , and then center the selection rectangle over the part of the image you want to display.
To proof changes in the main image window:
Click the Proof button  . All settings in the dialog are applied to the main image window. Each time you change settings, click the Proof button to view the changes in the main image window.
To set automatic proofing:
Click the Autoproof button  .
.
Paint Shop Pro automatically applies all dialog settings to the main image window each time you change a setting.
![]()
Chapter 2: Getting to Know The Program 21
Using Preset Settings
Presets are saved settings, or scripts, that you can use to make quick Presets in a dialog changes to images. Use the presets that come with Paint Shop Pro or
create your own. For more information on creating and using presets, refer to Chapter 17.
Numeric edit controls
Spin controls
Edit box 
Using sliders to select values
Editing Numerical Values
To edit numbers in Paint Shop Pro dialogs, you use the Jasc numeric edit controls, which provide an easy way to edit numbers and change settings.
To edit numbers:
Do one of the following:
To enter a specific value, click the edit box, use the Delete or Backspace key to delete the number as needed, and then type a new value. You can also double-click the number to highlight it, and then type a new value.
Note: If you type a value in the edit box that is out of range for the control, the box turns red.
To increase or decrease the number by one, click the up or down arrow of the spin controls.
To choose an approximate value, click once at a position on the meter bar.
To choose from the range of possible settings, click and hold the mouse button down on the meter bar or the slider button, drag to select a desired setting, and release the mouse.
The color box in the New Image dialog.
Using Color Boxes
In some dialogs, a color box displays the currently selected color. When you move the cursor over the color box, the cursor changes to a dropper and displays the RGB values. Click the color box to select another color:
Left-click the color box to select from the Color dialog.
Right-click the color box to select from recently used colors.

22 Chapter 2: Getting to Know The Program
Randomizing Parameters
Many correction and effect dialogs have a Randomize parameters button. Click this button to update all dialog settings with random values. To try out a variety of settings, click the button multiple times.
To randomize settings within a dialog:
Click the Randomize parameters button  .
.
Resizing a Dialog
All dialogs contain a Resize Handle  in the lower right corner of the dialog. Click and drag the handle to resize the dialog.
Viewing Images
An image window
Does the image have a watermark?
If the image has an embedded watermark, a copyright symbol is displayed in front of its name. For more information on watermarks, see “Using Digital Watermarks” on page 480.
The image window displays your image. You can move or size the image window or open the same image in multiple image windows (for example, to see the image at different magnifications).
The title bar at the top of the image window shows the file name and the magnification percentage. An asterisk after the filename indicates the image has been modified since you last saved it.
To see a thumbnail of the entire image, display the Overview palette.
To move an image window:
Click and drag the title bar to move an image to a new position in the workspace.
To resize an image window:
Click an edge or a corner of the image window and drag it to a new position.
If the image is larger than the window, use the scrollbars to view another area of the image.
To minimize or maximize an image window:
To minimize an image window so that only its title bar appears, click the Minimize button located in the upper right corner of the image’s title bar. Click the Restore button to display the image window at its previous size.

Save time by saving workspaces
Did you know that you can save entire workspaces, not just images? The workspace includes open images, their magnifications and screen positions, as well as the positions of palettes, toolbars, and windows.
For more information, see “Using Custom Workspaces” on page 54.
Chapter 2: Getting to Know The Program 23
To maximize an image window that it fills the Paint Shop Pro workspace, click the Maximize button located in the upper right corner of the image’s title bar.
To close an image window:
Click the Close button located in the upper right corner of the image’s title bar. If you have unsaved changes to the image, you’ll be prompted to save the changes.
To open multiple views of the same image:
Choose Window > New Window or press Shift + W.
A new window opens with another view of the active image. When you make changes in one window, the other is updated.
To make a copy of the active image:
Choose Window > Duplicate or press Shift + D.
A copy of the active image opens and can be edited independent from the original image.
To arrange multiple windows:
Do either of the following:
Choose Window > Cascade to display windows stacked and cascading from the upper left to the lower right of the workspace.
Choose Window > Tile Vertically or Window > Tile Horizontally to display windows side by side vertically or horizontally. Windows are resized to fit within the workspace.
To close an image window:
Do either of the following:
To close an active window, choose File > Close or click the Close button  on the title bar of the image.
To close all windows, choose Window > Close All.
If there are any unsaved changes in the images, you will be prompted to save the files.

24 Chapter 2: Getting to Know The Program
To see a list of all open images:
At the bottom of the Window menu the file names for all open images appear. The file names are listed in the order they were opened in Paint Shop Pro.
Tabbed Image Windows
Paint Shop Pro 9 gives you the option of displaying open images in a tabbed format.
To set this option, choose Window > Tabbed Documents. To turn off this feature and go back to the floating image windows, choose this option again.
When this option is on, the active image covers the entire workspace, and its bolded file name appears in a tab across the top of the workspace. Each open image has a separate tab. To view another image, click its tab. To access an image tab not in the current view, click the  and
and  buttons.
To close an image in tabbed format, click the Close button  .
.
Note: When the Tabbed Document option is on, the concept of minimizing and maximizing the image window no longer applies.

Chapter 2: Getting to Know The Program 25
Zooming in and out
Automatic resizing
By default, when you zoom in or out the image window is automatically resized to fit the image. To change this preference setting, see “View Preferences” on page 60.
Navigating the View Area
When an image is too large to fit within its window, scroll bars appear on the bottom and right sides of the image.
To view another area of the image:
Do one of the following:
On the Tools toolbar, choose the Pan tool  , and then click and drag in the image.
Click and drag the horizontal or vertical scroll bar.
Press the arrow keys to move the image by small increments.
Display the Overview palette (choose View > Palettes > Overview), and then drag the preview rectangle to a new position.
To fit the window to the image:
Choose Window > Fit to Image or press Ctrl + W.
Magnifying and Reducing the View
Magnify the view of an image (zoom in) to view and edit image details or reduce the view (zoom out) to see the overall image. The title bar of the image window displays the zoom percentage.
To zoom in:
Do one of the following:
Zoom with the mouse wheel, roll the optional wheel on your mouse to zoom in or out quickly.
On the Tools toolbar choose the Zoom tool  (if necessary, click the down-arrow next to the Pan tool), and then left-click the area
you want to magnify. The view magnifies to the next preset percentage with each click, up to the maximum magnification of 5000%.
Choose the Zoom tool or the Pan tool, and then in the Tool Options palette select a zoom percentage or click the Zoom In or
Zoom In More buttons.
Choose View > Zoom > Zoom In to magnify the view to the next preset percentage.
Choose View > Zoom > Zoom In More to magnify the view by five preset percentages.

26 Chapter 2: Getting to Know The Program
To zoom out:
Do one of the following:
On the Tools toolbar, select the Zoom tool  (if necessary, click the down-arrow next to the Pan tool) and then right-click the area
you want to reduce. The view reduces to the previous preset percentage with each click, down to a minimum magnification of 1%.
Choose the Zoom tool or the Pan tool, and then in the Tool Options palette select a zoom percentage or click the Zoom Out or Zoom Out More buttons.
Choose View > Zoom > Zoom Out to reduce the view to the next preset percentage.
Choose View > Zoom > Zoom Out More to reduce the view by five preset percentages.
To magnify a specific area:
1Choose View > Magnifier. This puts the cursor in magnifier mode.
2Place the cursor over the part of the image you want to magnify. The selected area is displayed at the highest percentage that will fit within the window.
3To turn off magnifier mode, choose View > Magnifier again.

Chapter 2: Getting to Know The Program 27
Previewing on the full screen
Editing using the full screen
Previewing and Editing Using the
Full Screen
Use the Full Screen Preview command to preview an image without any of the menus, toolbars, or palettes visible.
Use the Full Screen Edit command to expand the entire workspace, giving you the largest possible space for displaying and editing images. The palettes and toolbars are visible but the menus, Paint Shop Pro title bar, and Status bar are hidden.
To preview an image on the full screen:
1Choose View > Full Screen Preview or press Ctrl + Shift +A. The workspace disappears and the image displays at its current magnification.
2To return to the Paint Shop Pro workspace, press any key.
To edit using the full screen:
1Choose View > Full Screen Edit or press Shift + A. The menu bar and status bar disappear.
To select from a menu when using the full screen, move the cursor to the top of the screen and left-click. The menus appear as you move the mouse along the top.
2To return the window to its previous size, press Shift + A.

28 Chapter 2: Getting to Know The Program
Viewing Image Information
As you work with an image, you may want to view information about it. There are several ways to do this, as described in the sections below.
To view general image information:
Look at the Status bar (along the bottom of the main Paint Shop Pro window) to see the cursor position, image height and width in pixels, and the color depth.
Display the Info tab of the Overview palette to view information about the image. Choose View > Palettes > Overview, and then click the Info tab. The information displayed depends on what tool is selected.
To view image color information:
Choose Image > Count Image Colors to display the number of unique colors in the image.
To view detailed image information:
1Choose Image > Image Information, or press Shift + I.
2Do one of the following:
Click the Image Information tab to view the file name and format, image dimensions, resolution, and color depth, modification status, number of layers and alpha channels, and the amount of RAM and disk space used for the image as well as its selections, masks, alpha channels, and undo storage.
Click the Creator Information tab to view or edit the image title, artist name, copyright, description, date created, and date modified.
Click the Watermark Information tab to view and enter information on Digimarc watermarking.
Click the EXIF Information tab to view information for images taken with digital cameras. In the Section group box, mark the check boxes for the information you want to display: Input Device, Artist, Date, Image, Shot Conditions, and GPS.

29
C H A P T E R 3
Getting Images into Paint Shop Pro
|
You can get images into Paint Shop Pro in a variety of ways: import |
||
|
images (from a digital camera, card reader, or scanner), capture |
||
|
images from the computer screen, duplicate an existing image or |
||
|
layer, or create a new image. |
||
|
Contents |
Opening Existing Images . . . . . . . . . . . . . . . . . . . . . . . . . . . . . . |
33 |
|
Importing Images from Digital Cameras and Scanners . . . . . . . . . |
30 |
|
|
Creating Images . . . . . . . . . . . . . . . . . . . . . . . . . . . . . . . . . . . . |
35 |
|
|
Capturing Images from the Computer Screen . . . . . . . . . . . . . . . |
41 |
|
|
Opening Frames from Animation Shop . . . . . . . . . . . . . . . . . . . . |
43 |
|
|
Using the Paint Shop Pro Browser . . . . . . . . . . . . . . . . . . . . . . . |
44 |
|
|
Saving Image Files . . . . . . . . . . . . . . . . . . . . . . . . . . . . . . . . . . |
49 |
|
|
Closing Image Files . . . . . . . . . . . . . . . . . . . . . . . . . . . . . . . . . . |
52 |

30 Chapter 3: Getting Images into Paint Shop Pro
Importing Images from Digital Cameras and
Scanners
Running scanning software
In addition to running the scanning software from Paint Shop Pro, you can also run the software from the Windows Start menu. After you perform the scan, you then need to run Paint Shop Pro.
With Paint Shop Pro you can access and manage your images while they are in your digital camera. You can also load the images directly into Paint Shop Pro.
Before you can view and download images from a digital camera, card reader, or scanner you must install the special software (called drivers) that enables your computer to connect to the camera, card reader, or scanner. You must install this software before connecting the camera, card reader, or scanner to the computer. Refer to the documentation supplied with your camera, card reader, or scanner for more information about this software.
Determine which type of connection your camera, card reader, or scanner uses:
WIA The default for WIA compatible computers running the Windows XP and ME operating systems. Your camera, card reader, or scanner must support WIA.
Mounted Drive The default for non-WIA computers, and the most common type of connection. Some cameras and scanners, and most card readers are viewed as an additional disk drive when they are connected to the USB port of your computer.
TWAIN Most cameras and scanners are TWAIN-compliant. Use this setting if your camera, scanner, or card reader is TWAINcompliant.
![]()
Chapter 3: Getting Images into Paint Shop Pro 31
Viewing EXIF Data
EXIF stands for Exchangeable Image File Format. If your camera supports this standard, it will record the time & date the image was taken, exposure information (ISO, shutter, aperture) and other camera details in the header of each image file. To view EXIF data, choose
Image > Image Information to open the Current Image Information dialog, and then click the EXIF Information tab.
Downloading Images Using
Windows XP, ME and a USB Cable
Paint Shop Pro supports the WIA connection protocol. If your computer has the Windows XP or ME operating system, your camera or scanner uses the WIA connection system, and you connect your camera or scanner to the computer using a USB cable, then Paint Shop Pro and Windows XP or ME will automatically detect when you have connected your camera to your computer.
To download from a WIA camera or scanner with Windows XP or ME:
1Connect the camera, card reader, or scanner to the computer using the USB cable.
2Choose File > Import > From Scanner or Camera to download the images to your computer.
Downloading Images From a Mounted
Drive
Some cameras, card readers, and scanners display as a separate drive (assigned a drive letter) on your computer. For example, your camera may display as My Computer\Removable Disk (G:).
To download from a camera, card reader, or scanner that appears as a mounted drive:
1Choose File > Open to open the Open dialog. Or choose File > Browse and use the browser to locate the images on the mounted drive.
2Navigate to the drive for your camera, card reader, or scanner.
3Locate the images that you want to download in a folder or subfolder of that drive.
4Select the images that you want to download and click Open to open the images in Paint Shop Pro.

32 Chapter 3: Getting Images into Paint Shop Pro
Importing Images Using the TWAIN
Interface
What does your image need?
Here are some edits your digital photograph may need:
Crop the image. Cropping reduces the amount of memory the image uses and eliminates extra areas of color, which may allow you to make better color corrections.
Correct colors or retouch parts of the image.
To import images using the TWAIN interface:
1Choose File > Import > TWAIN > Select Source. The Select Source dialog lists the TWAIN-compliant devices connected to your computer.
Note: You only need to select the source the first time you connect to the camera, card reader, or scanner.
2Click the name of the device, then click Select.
3Choose File > Import > TWAIN > Acquire to run the device’s software.
4Do one of the following:
For scanners, perform the scan using the device’s software. (Refer to the scanner manufacturer’s documentation for details.)
For digital cameras, an Import dialog displays. Select the images that you want to download, and then click Download.
When the device and software finish processing the image, the image is sent to Paint Shop Pro and placed in an image window. The software remains open so you can continue to acquire images or close the software.
5Click the Paint Shop Pro icon in the Windows task bar to display Paint Shop Pro and your image.
6Choose File > Save As to save the image.

Chapter 3: Getting Images into Paint Shop Pro 33
Opening Existing Images
From open to browse
While opening a file from the Open dialog, you may decide you want to preview all files in a folder. Click the Browse button to open the Browser.
You can open images in a variety of file formats. The list of formats you can open in Paint Shop Pro appears in the Open dialog.
You can select which formats Paint Shop Pro displays as available to open.
You can open a file using the Open dialog or the Browser or by choosing a recently used file from the File > Recent Files menu. With the Open dialog, you can view a preview of each image file that you select. With the Browser, you can view previews of all image files within a folder. When you open a file via the Browser, the Browser window stays open until you close it.
To open an image file using the Open dialog:
1Do one of the following:
Choose File > Open.
Click the Open button  .
.
Press Ctrl + O.
2In the Look in drop-down list, select the folder where the file is stored.
3Click the name of the file you want to open. To select multiple files, press Ctrl and click each name.
4To view information or a preview of the image, choose an option:
Details Click this button to open a pop-up that displays information about the selected image. Click OK to close this popup.
Show preview Mark this check box to display the selected image in the preview area. If you have selected multiple files, no preview is displayed; use the Browse window instead.
5Click Open.
To open an image file using the Browser:
1Do one of the following:
Choose File > Browse; or
Click the Browse button  ; or
; or
Press Ctrl + B.

34 Chapter 3: Getting Images into Paint Shop Pro
Explore the Browser
For more information on using the Browser, see “Using the Paint Shop Pro Browser” on page 44.
The Browse window opens. Note that the Paint Shop Pro menu bar displays commands specific to when the Browse window is active. The Browse menu is active until you open a new file or click an open image.
2In the left side of the Browse window you’ll see the Find and Info tabs. Use the Find tab like you would Windows Explorer to navigate and then select the folder that contains the file you want to open. Use the Info tab to display image information on a selected image. The right side of the Browse window displays thumbnails of image files located in the selected folder.
3Select files using one of these methods:
Click a thumbnail image; or
To select non-adjacent files, hold down Ctrl and click each file; or
To select adjacent files, click the first file, hold down Shift, and click the last file.
Note: To deselect a file, press Ctrl and click its thumbnail.
4Open the selected file(s) using one of these methods:
Double-click a single file’s thumbnail or Ctrl + double-click one thumbnail when multiple files are selected; or
Select a file or multiple files and then drag them onto a blank part of the work space; or
Press Enter; or
Right-click and select Open from the context menu; or
Choose Image File > Open.
After the file or files open, you can close the Browse window by clicking its Close button. You may also want to leave the Browse window open in the workspace.
To open a recently used file:
Choose File > Recent Files and then choose the file name.
By default, the Recent Files menu lists four recently used files. You can include up to 10 files. For more information, refer to the Miscellaneous Preferences details in Chapter 4.

Chapter 3: Getting Images into Paint Shop Pro 35
Creating Images
About Raster and Vector Graphics
Computer graphics are of two types: raster (also called bitmap) or vector. With Paint Shop Pro, you create both raster and vector images, as well as images with Art Media content. You can also create an image with both raster and vector layers (or Art Media layers). It’s important to understand the differences between the two data types.
Raster Images
Raster images are composed of individual elements, called pixels, arranged in a grid. Each pixel has a specific location and color. If you magnify raster data, you can see the individual pixels as squares of colors.
An object in a raster image is defined by its pixels. For example, the front door in an image of a house is made up of a mosaic of pixels at certain locations in the image. In bitmap images you edit pixels rather than objects or shapes.
Raster images can display subtle changes in tones and colors, so they are most often used for images like photographs and digital artwork. Raster images contain a fixed number of pixels, so when you magnify the image you are magnifying the display size of the pixels. As a result, raster images can display jagged rather than smooth edges if magnified on screen or printed at a large magnification.
Vector Graphics
Vector graphics or images use geometric characteristics—lines, curves, and their locations—to define objects. For example, a door in a graphic of a house is made up of a rectangle with a certain width and height at a specific location and filled with a certain color. In vector images you edit objects or shapes rather than pixels.
Vector graphics do not lose clarity or detail when scaled to any size or printed at any resolution. They work well for technical illustrations or corporate logos.

36 Chapter 3: Getting Images into Paint Shop Pro
Choosing Raster or Vector
In Paint Shop Pro, you create and edit raster and vector data on separate layers. With some tools you create raster data (like brush strokes with the Paint tool) and with other tools (like the Text and Preset Shapes tools) you can choose whether you want to create raster or vector data.
In general, use vector objects when you’ll need to edit the object as an element separate from other parts of the image. For example, if you add a star to an image, you may want to change its size, color or location. This is easier if the star is a vector object. You can create raster data on separate layers so you can easily edit or move them.
To apply tools or commands to vector objects that work only on raster data (such as the painting tools or the effects commands), you can create a raster selection of a vector object. Then, paste the selection to a new raster layer.
About Image Size, Resolution, and Color
Depth
Before you create a new image, think about how you will use it. For example, will you display the image on a Web site, send it as an e- mail attachment, or print it? How you use the image helps you determine the image’s size, resolution, and color depth. All three elements also contribute to the file size of the image.
Image Size The physical dimensions of the image. In Paint Shop Pro you define image height and width in pixels, inches, centimeters, or millimeters.
For printed images for which you know the size you need, use inches, centimeters, or millimeters. By starting with the final image dimensions, you can produce an image that will fit the page.
For printed images that you will import into another software package (such as a word processor) and resize as needed, use whichever unit is easiest for you.
For images to be displayed on screen, use pixels.
You can resize an image after you have created it, but doing so may result in loss of image data. For more information, refer to the Resizing Images details in Chapter 7.

Chapter 3: Getting Images into Paint Shop Pro 37
Image Resolution The number of pixels per inch (ppi) or pixels per centimeter in images. It is important to select an appropriate resolution. Too low a resolution causes pixelation, or large pixels that produce coarse output. Too high a resolution adds to an image’s memory requirements without producing a proportional increase in its quality.
Typical image resolutions are as follows:
For images displayed on Web pages, use 72 or 96 ppi.
For images printed to a high-quality printer, set the image resolution to one-half to one-quarter of the actual printer resolution. For example, for a laser printer with a resolution of 600 dots per inch (dpi), use an image resolution of 150 to 300 ppi.
Color Depth The number of colors that a pixel can display. Each pixel’s color information is stored in a certain number of computer bits—from 1 bit to 24 bits. In a 1-bit image, each pixel can display only one of two colors (black or white). In a 24-bit image, each pixel can display one of 16 million colors. Images with a color depth of 16 million colors look best because they contain the most colors, but they also require the most memory to store and edit. Not all computer monitors can display 16 million colors, so some file formats limit the number of supported colors. For example, GIF images, a popular format for the Web, contain up to 256 colors (8-bit depth).
Many of Paint Shop Pro’s effect and correction commands work on 16 million color images only. Therefore, its best to create most images using 16 million colors. When you have finished working on the image, you can decrease its color depth and save it in another format.
For more information, see “Understanding Color Depth” on page 260.

38 Chapter 3: Getting Images into Paint Shop Pro
Creating an Image
You can create a new image by creating a blank image or by using another image as a starting point.
For information on using other images, see “Creating New Images from Existing Images” on page 39.
When you create a new blank image, you select the image size and resolution, along with the color depth and background color and material. It’s important to choose a size and resolution that fits with your desired output type and output quality. For more information, see “About Image Size, Resolution, and Color Depth” on page 36.
To create a new image:
1Do one of the following to open the New Image dialog:
Choose File > New; or
Press Ctrl + N; or
Click the New Image button  on the toolbar.
2Choose the image dimensions:
To select a preset size for the new image, in the Presets droplist choose a standard size for print materials (such as 4” x 6” or letter) or computer screens (such as 640 x 480 pixels).
The Presets list defaults to the Last Used option, which specifies the settings that were used the last time you created a new image.
To create an image using specific dimensions, in the Image Dimensions group box, set the following options:
Units The units of the dimensions (pixels, inches, centimeters, or millimeters).
Width The width of the new image.
Height The height of the new image.
Resolution The resolution of the new image. Specify the resolution units (pixels/inch or pixels/cm) in the drop-down list.
3In the Image Characteristics group box, select from these options:

Chapter 3: Getting Images into Paint Shop Pro 39
Raster Background, Vector Background, or Art Media Background The type of the bottommost layer. Choose a raster background for most photographic applications. Choose a vector layer if you are creating vector graphics. Choose an Art Media layer if you are creating an image with the Art Media tools.
Color Click in the Color box and set the background color or material.
For raster images, click the color box to select from the Material dialog (for 16 million color images) or the image palette (for images of all other color depths). To choose a transparent background (for greyscale or 16 million color images only), mark the Transparent check box. For more information on choosing colors or materials, refer to Chapter 10.
For vector images, you only need to choose the color depth. Vector images start with a transparent vector layer.
Note: The Memory Required field displays the amount of memory required for the image. Your computer should have at least two to three times this amount of RAM. To reduce the memory requirement, reduce the resolution or the dimensions of the image.
Canvas texture This is available only when Art Media Background is selected. Select a canvas texture from the droplist, and then a fill color for the texture. (Uncheck the Enable fill color option if you do not want a fill the chosen texture with a color.) Art Media tool strokes applied to the texture will take on the properties (bumpy, smooth, etc.) of the texture you choose.
4 Click OK. The new image opens in the work space.
Creating New Images from Existing Images
You can use a copy of an existing image or a layer to create a new image. You can also create an image from any graphic data copied to the Windows clipboard from Paint Shop Pro.
To duplicate an entire image:
1Open the image you want to duplicate.
2Choose Window > Duplicate or press Shift + D. A new window containing the image opens in the work space.

40 Chapter 3: Getting Images into Paint Shop Pro
To create a new image from a layer of another image:
1On the Layers palette, click the layer you want to copy.
2Choose Edit > Copy.
Note: If you use the Cut or Copy commands, the current selection or layer is placed on the clipboard.
3Choose Edit > Paste > As New Image. A new image window opens in the work space. The layer you copied is now the background of the new image.
To create a new image from a layered image:
1On the Layers palette, click a layer.
2Choose Edit > Copy Merged.
Note: All layers are merged into one layer and placed on the clipboard.
3Choose Edit > Paste > As New Image. A new image window opens in the work space. The new image contains all layers merged into one raster layer.
To create a new image from clipboard data:
1Cut or copy a selection or layer of an image, or an item from another program.
2Choose Edit > Paste > As New Image. The clipboard data is pasted as a new image. If this command is greyed out, then the data you have copied to the clipboard cannot be pasted as a Paint Shop Pro image.
Note: A dialog may appear requesting additional information such as width and height of the new image window. You can change your preferences so that Paint Shop Pro does not prompt for size and options when you paste data. Refer to the preferences information in Chapter 4.
 Loading…