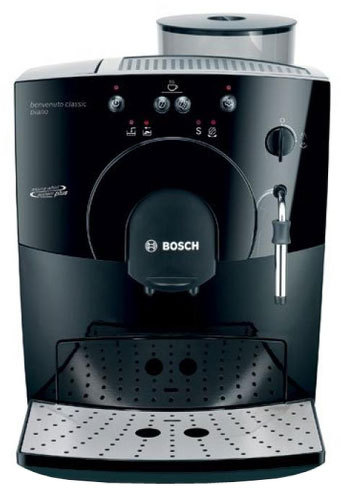
Bosch TCA5309 Series Benvenuto Classic Manual
Safety instructions
Please read these instructions carefully and keep for future reference!
This fully automatic espresso machine is designed for preparation of small amounts of coffee for domestic use or for use in non-commercial, householdlike environments, such as staff kitchens in shops, offices, agricultural and other small businesses or for use by guests at bed-and-breakfast establishments, small hotels and similar residential facilities.
Risk of electric shock!
Connect and operate the appliance only in accordance with the specifications on the rating label.
Do not use if either the power cord or the appliance is damaged.
Use indoors at room temperature only.
This appliance is not intended for use by persons (including children) with reduced physical, sensory or mental capabilities, or lack of experience and knowledge, unless they have been given supervision or instruction concerning use of the appliance by a person responsible for their safety.
Keep children away from the appliance. Children should be supervised to ensure that they do not play with the appliance. In the event of malfunction, unplug the appliance immediately.
To avoid potential hazards, repairs such as replacing a damaged cord should only be performed by our service personnel.
Never immerse the appliance or power cord in water.
Do not reach into the grinding unit.
Use the appliance only in frost free rooms.
Risk of scalding!
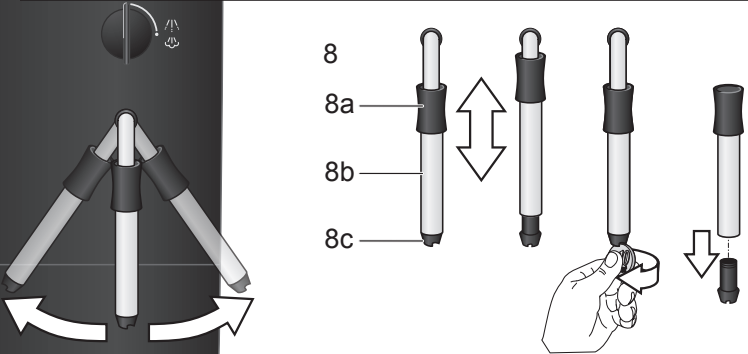
The nozzle for hot water and steam 8 gets very hot. Hold the nozzle 8 by the plastic part only, not by the metal parts. When steam or hot water is released, the nozzle 8 may initially sputter.
Overview
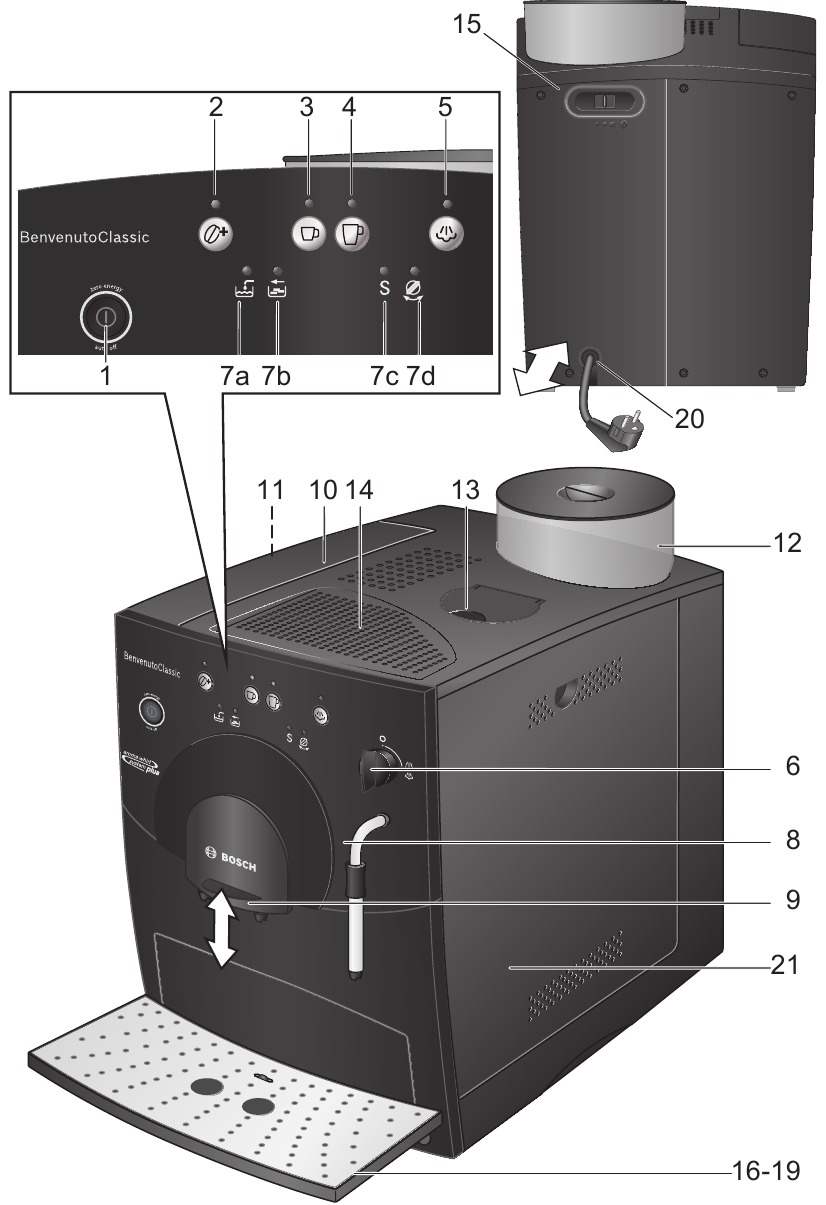
- Power switch (on/off) auto off
- Coffee strength button
- Coffee dispensing button
- Coffee dispensing button
- Steam generation button
- Hot water / steam dial
- LED display
- Add water
- Empty tray
- Run service programme S
- Turn dial
- Add water
- Nozzle (for hot water / steam)
- Plastic mounting
- Sleeve
- Nozzle tip
- Height- adjustable coffee outlet
- Lid for water tank
- Removable water tank
- Bean container with aroma cover
- Cleaning tablet duct
- Cup shelf (warming function)
- Sliding switch for adjusting grind
- Grate
- Coffee grounds tray
- Residual water tray
- Float
- Cord storage compartment
- Doors to brewing unit
- Brewing unit
- Button (red)
- Handle
Before using for the first time
General
Fill the water tank with fresh, uncarbonated water only, and if possible, use only beans for fully automatic coffee and espresso machines. Do not use coffee beans that have been glazed, caramelized or treated with other additives containing sugar, since they will block the grinding unit. This appliance can be adjusted for use with different water hardness values (see «Set ting the water hardness»).
Switching on the appliance
- Place the appliance on a flat, water resistant surface.
- Pull enough of the power cord out of the storage compartment and plug it into the electrical socket.
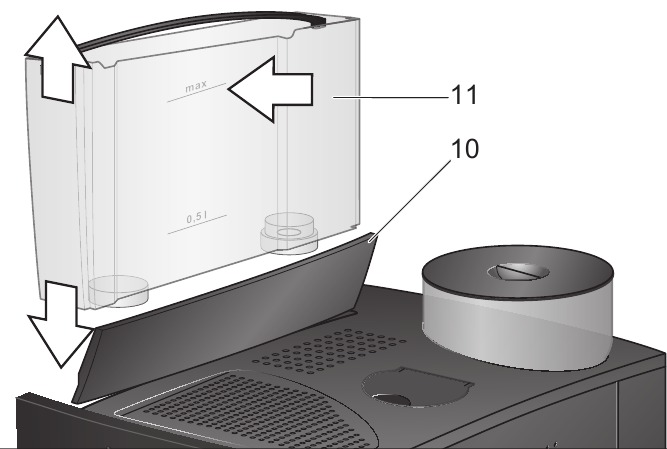
- Remove and rinse the water tank 11 and fill it with fresh cold water. Do not fill above the «max» mark.
- Replace the water tank 11 and push it firmly down into place.
- Fill the bean container with coffee beans.
- Make sure that the hot water / steam dial 6 is at «O«.
- Press the power switch 1 auto off to switch on the appliance.
Filling the system
When switched on for the first time, the water pipes in the appliance must be filled.
The appliance is ready for use as soon as both LEDs light up.
Controls
Power switch auto off
The auto off power switch can be used to turn the power supply on or off. After switching on the power supply, the appliance heats up, rinses and is then ready for use. The dispensing buttons 3 

If the appliance is not manually switched off, it will switch off automatically after approx. 10 minutes after the last dispens ing operation and then rinse. The pre set switch off time can be changed (see section «Automatic Switch Off auto off»). The appliance will not rinse if:
- there was no coffee drawn after switching on the machine.
- steam was drawn shortly before switching off the machine.
- only hot water or steam were drawn.
Coffee strength button
By pressing the button 


Dispensing button Small coffee
With this button, a small cup (approx. 40ml) of coffee can be dispensed.
- Press the button 3
. The LED will start to flash. The coffee is ground, brewed and poured into the cup. Both LEDs light up as soon as the process is finished.
The beverage size can be changed (see section «Changing volume dispensed»).
Dispensing button Large coffee
With this button, a large cup F Large coffee (approx. 125ml) of coffee can be dispensed.
- Press the button 4
. The LED will start to flash. The coffee is ground, brewed and poured into the cup. Both LEDs light up as soon as the process is finished.
The beverage size can be changed (see section «Changing volume dispensed»)
Steam generation button
The steam button 
Steam dispensing dial
Hot water or steam can be dispensed by turning the dial to 


LED display
The various LEDs indicate the following:
 on on |
The water tank is empty and needs to be filled |
 on on |
Trays full: Empty and replace them |
 flashing flashing |
Trays missing: Reinsert them |
| S on | Run the service programme (see «Service programme») |
| S flashing | Service programme in operation |
 on on |
Turn dial to  |
 flashing flashing |
Turn dial to «O« |
Settings and displays
Setting the water hardness
It is important that the water hardness be set correctly, so that the appliance indicates accurately when the descaling programme should be run. The factory setting is a water hardness of 4.
You can check the water hardness by asking your local water supplier.
| Degree | Water hardness | |
| German (°dH) | French (°fH) | |
| 1 | 1 7 | 1 13 |
| 2 | 8 15 | 14 27 |
| 3 | 16 23 | 28 42 |
| 4 | 24 30 | 43 54 |
The appliance must be ready for use.
If a water filter (optional extra Order No. 461732) is used, the water hardness should be set to 1.
Note: If no button is pressed within 90 s econds, the appliance switches to stand by mode without saving the new settings. In this case, the previous water hardness setting is retained.
The appliance must be rinsed when a filter is first used and after changing the filter.
- Fill the tank with water up to the «0,5 l» mark.
- Place a suitable container (approx. «0,5 l») under the nozzle 8.
- Set the dial 6 to
.
- When water stops coming out of the nozzle 8, set the dial back to «O«.
- Fill the water tank and the water pipes
(see «Switching on the appliance / Filling the system»).
Adjusting the grinding unit
Sliding switch 15 adjusts the degree of grinding, from coarse to fine.
Adjust the grinding unit only while it is running! Otherwise the appliance may be damaged.
Tip: For dark roast coffee beans, choose a coarser grind; for light roast beans, select a finer grind.
Automatic switch-off auto off
The pre set automatic switch off time of approx. 10 minutes can be changed.
- To do this, press and hold the dispensing button 3
and the button 5
at the same time for at least 5 seconds. The LEDs that light up, 7a, b, c and d (
,
, S,
), represent the switch off time set.
By pressing the button 5the switch-off time can be selected: the switch LED 7a (
) lights up
= Appliance switches off after approx. 10 minutes.
LED 7a and 7b (,
)
= Appliance switches off after approx. 30 minutes.
LED 7a, 7b and 7c (,
, S ) light up
= Appliance switches off after approx. 1 hour.
LED 7a, 7b, 7c and 7d (,
, S,
)
= Appliance switches off after approx. 4 hours.
Pressing button 2saves the s election.
Setting the temperature
This fully automatic coffee machine allows the user to change the temperature of the coffee.
- To do this, press and hold the dispensing buttons 3
and 4
at the same time for at least 5 seconds. The LEDs that light up, 7a, b and c (
,
, S ), represent the temperature set. By pressing the button 5
, the temperature can now be selected:
LED 7a () lights up
= Low temperature
LED 7a and 7b (,
) light up
= Medium temperature.
LED 7a, 7b and 7c (,
, S ) light up
= High temperature.
Pressing button 2 
Float
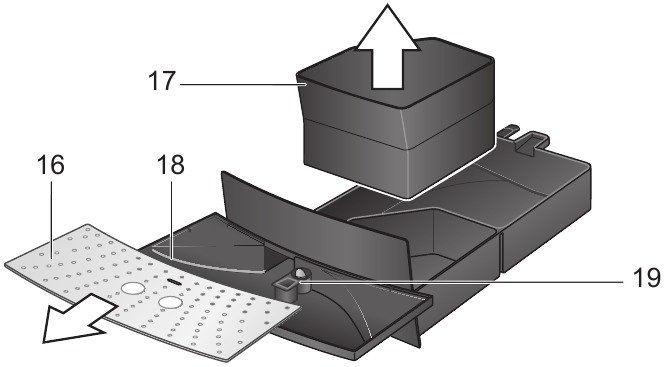
The float 19 in the water tray 18 showswhen the tray needs emptying.
- If the float 19 is clearly visible, empty the water tray 18.
Using coffee beans
This fully automatic espresso / coffee machine grinds beans freshly for each brew. If possible, use only beans for fully automatic coffee and espresso machines.
Deep freeze or store in a cool place in sealed, airtight containers. Coffee beans can be ground while frozen.
Fill the water tank with fresh water every day. The tank must always contain sufficient water for operating the appliance. Do not allow it to become empty.
Tip: Pre warm cups, especially small, thick espresso cups, by placing on the cup shelf 14 or rinsing with hot water.
The appliance must be ready for use.
It is possible to dispense the same amount of coffee a second time.
Note: The second cup is brewed using the previously ground coffee.
Changing volume dispensed
The pre set quantities for dispensing button 3 

Reset: The appliance must be ready for use.
The standard factory settings have now been reactivated.
Preparing hot water
The appliance must be ready for use.
This function allows water to be heated for a cup of tea, for example.
The nozzle gets very hot. Do not touch the metal parts.
- Place an appropriate cup under the nozzle 8.
- Push the sleeve on the nozzle 8 all the way down.
- Turn the dial 6 to
.
Risk of scalding
When the dial is set to 
- End the process by turning the dial 6 back to «O«.
Steam for foaming milk
The appliance must be ready for use. You can foam the milk first and add the coffee on top, or foam the milk separately and pour it into the coffee.
The nozzle gets very hot. Do not touch the metal parts.
- Push the sleeve on the nozzle 8 all the way down.
- Fill the cup approximately 1/3 full of milk.
- Press the steam button
. The LED will start to flash.
The appliance will heat up for approx. 20 seconds.
- Immerse the nozzle 8 deep into the milk, but do not let it touch the bottom of the cup.
- As soon as the LED J lights up, turn the rotary button 6 to
.
Risk of scalding
When the dial 6 is set to 
Note: When the nozzle 8 has cooled down, clean immediately. Dried residue is difficult to remove.
Tip: If possible, use cold low fat (1,5% fat) milk.
Steam for heating drinks
The nozzle gets very hot. Do not touch the metal parts.
The appliance must be ready for use.
- Push the sleeve on the nozzle 8 all the way up.
- Press the steam button
. The LED will start to flash.
The appliance will now heat up for approx. 20 seconds.
Risk of scalding
When the dial 6 is set to 
- End the process by turning the dial 6 back to «O».
To generate more steam, press the steam butto

Note: When the nozzle 8 has cooled down, clean immediately. Dried residue is difficult to remove.
Maintenance and daily cleaning
Risk of electric shock!
Unplug the appliance before cleaning it.
Never immerse the appliance in water.
Do not use a steam cleaner.
- Wipe the outside of the appliance with a damp cloth. Do not use scouring agents.
- Always remove any limescale, coffee, milk or descaling fluid residue immedi ately. Such residue can cause corrosion.
- Wash all removable parts by hand only.
- Rinse out the water tank 11 with water only.
- Remove, empty and clean the trays for coffee grounds 17 and residual water 18.
- Wipe out the inside of the appliance (tray holders).
- Open the door to the brewing unit 21 and remove any coffee residues. Close the door.
Note: If the appliance is cold when switched on, or if it is switched off after dispensing coffee, it rinses automatically; in other words the system cleans itself.
Nozzle for hot water / steam
- Unscrew the nozzle 8 from the steam pipe.
- Dismantle all parts.
- Clean with a caustic cleaning solution and a soft brush. Clean the tip of the nozzle 8c with a blunt needle.
- Thoroughly rinse and dry all parts.
Brewing unit
The brewing unit can be removed for cleaning.
- Switch off the appliance using the power switch 1 auto off.
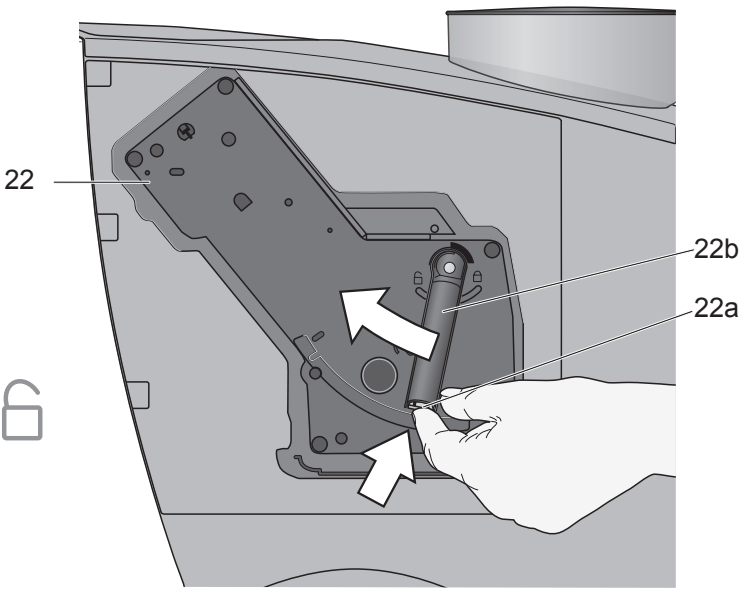
- Open the door 21 to the brewing unit 22.
- Hold the red button 22a down and push the handle 22b up until you hear it engage.
- Grasp the brewing unit 22 by the handle, remove carefully, and rinse under running water. Do not use cleaning agents. Do not place in the dishwasher.
- Vacuum the inside of the appliance, or clean it with a damp cloth.
- Reinsert the brewing unit 22 all the way into the appliance.
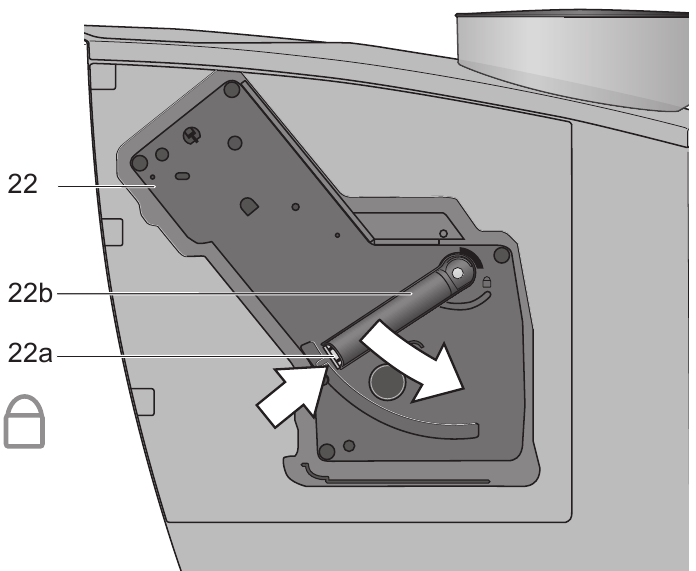
- Hold the red button 22a down and push the handle 22b down as far as it goes, until you hear it engage. The brewing unit is now secure.
- Close the door of the brewing unit.
Service programme
Combined cleaning and descaling process
If the S LED lights up while the appliance is on, the service programme must be run immediately to clean and descale the appli ance. If the service programme is not run as instructed, the appliance may be damaged.
Specially developed descaling (Order No. 310967) and cleaning agents (Order No. 310575) can be obtained from our customer service department.
Each time you run the service programme, follow the instructions for using the cleaning and descaling agents.
Never interrupt the service programme!
Do not drink the liquids!
Never use vinegar or vinegar based products!
Never put descaling tablets or other des caling materials into the duct for cleaning tablets! The S LED flashes while the service pro gramme is running (approx. 40 minutes).
If there is a filter in the water tank, it must be removed before the service programme is run.
Starting the service programme
The appliance must be ready for use.
The S LED starts to flash and the appliance rinses the coffee dispenser through twice.
- Empty and reinsert the grounds tray 17.
The LEDs for button 

- Place one cleaning tablet in the duct 13.
- Fill the water tank with lukewarm water, add descaling agent and dissolve com pletely (total liquid 0,5 litres)
or
pour prepared descaling mixture into the water tank (total liquid 0,5 litres). - Press the steam button
process begins. Duration approx. 10 min . The descaling utes. The descaling solution flows into the water tray 18.
The 
- Place a suitable container (approx. 0,5 litres) under the nozzle 8.
- Set the dial 6 to
. The descaling process begins. Duration approx. 5 min utes. The descaling solution flows into the container.
The 
- Empty and reinsert the grounds tray 17.
The steam button LED 
- Empty and clean the water tank 11, fill with fresh water up to the «max» mark and reinsert.
- Place a suitable container (approx.0,5 litres) under the nozzle 8.
- Press the steam button
. The cleaning process begins. Water flows into the container.
The 
- Turn the dial 6 to «O». The cleaning process begins. Duration approx. 10 minutes. Liquid flows into the coffee grounds tray 17 inside the appliance, then out through the coffee outlet.
The 
- Empty, clean and reinsert the trays 17 and 18.
The appliance starts to heat up and is ready for use once the LEDs for dispensing buttons 3 

If the service programme is interrupted, e.g. due to a power cut, it is vital that the appliance be rinsed before it is used again.
The appliance must be ready for use.
The 

- Rinse the water tank 11 thoroughly and fill with fresh water.
- Press the steam button
is rinsed and liquid flows into the tray.
The 
- Hold a cup under the nozzle 8 and turn the dial 6 to
. Water runs into the cup.
The 
- Turn the dial 6 back to «O».
The appliance rinses and is ready for use again.
Anti-freeze
In order to avoid damage through cold during transportation and storage, the appli ance must be emptied completely first.
The appliance must be ready for use.
Disposal
This appliance is labelled in accordance with the European Directive 2002/96/EG relating to waste electrical and electronic equipment – WEEE. The directive provides the framework for the EU wide take back and disposal of end of life appliances.
Please ask your specialist retailer about current disposal facilities.
Guarantee
The guarantee conditions for this appliance are as defined by our representative in the country in which it is sold. Details regarding these conditions can be obtained from the dealer from whom the appliance was pur chased. The bill of sale or receipt must be produced when making any claim under the terms of this guarantee.
Right of modification reserved.
Troubleshooting
| Problem | Possible cause | Solution |
| No hot water or steam discharge. | Nozzle 8 is blocked. | Clean nozzle 8. |
| Foam insufficient or too runny. | Sleeve b on nozzle 8 not in correct position. | Push down sleeve b on nozzle 8. |
| Milk not suitable for foaming. | Use cold low fat (1,5% fat) milk. | |
| Coffee dispensing slows to a trickle. | Coffee is ground too fine. | Adjust the grinding unit to a coarser setting. |
| Coffee not dispensed. | Water tank not filled or not correctly positioned. | Fill water tank and make sure it is in the right posi tion. If necessary, fill water pipes (see «Switching on the appliance»). |
| Coffee has no «crema» (creamy foam). | Unsuitable type of coffee. Beans no longer fresh. | Change type of coffee used. Use fresh beans. |
| Degree of grinding inappro priate for beans. | Optimize degree of grinding. | |
| Grinding unit does not grind the beans. | Beans are not falling into the grinding unit (beans too oily). | Gently tap the bean container. |
| Grinding unit makes a loud noise. | Foreign objects in the grind ing unit (e.g. grit, which can be found even in superior types of coffee). | Call the hotline. |
LED S and button  flash alternately. flash alternately. |
The brewing unit 22 is missing, or is not properly inserted or secured. | Insert and secure the brewing unit 22. |
| If you are unable to solve the problem, please call the hotline. You will find the telephone numbers at the back of these instructions. |
Documents / Resources
Download manual
Here you can download full pdf version of manual, it may contain additional safety instructions, warranty information, FCC rules, etc.
Download Bosch TCA5309 Series Benvenuto Classic Manual
Читайте наши статьи

Эксплуатация кофемашины в зимний период
Что происходит с кофемашиной при длительном нахождении в помещении с низкой температурой? Перевозили кофемашину в багажнике — что теперь от неё ожидать?

Скидка на ремонт кофемашины
Получите 20% скидку на ремонт или обслуживание вашей кофемашины, а также при заказе кофе «Coffee-Everyday» у нас.

Уход за кофемашиной: рекомендации и советы
Как увеличить срок экслуатации вашей кофемашины или кофеварки? Как влияет качество воды на долговечность системы? Как правильно определить момент обсуживания?
- Форум о кофемашинах — ремонт, обслуживание, использование кофемашин, выбор кофе и кофемашины
рейтинг кофемашин » Bosch
| Обзор кофемашины | |||||||||||||||||||||||||||||||||||||||||||||||||||||||||||||||||||||||||
Кофемашина Bosch TCA 5201 benvenuto classic piano Характеристики и функции
Настройки
Техническое обслуживание и уход
Основные компоненты
Технические условия
Другое
Дизайн и цена
ОписаниеПолностью автоматическая кофемашина Bosch TCA 5201 benvenuto |
|
| Руководство пользователя, инструкция схемы для Кофемашина Bosch TCA 5201 benvenuto classic piano | |||
| Имя файла | Тип файла | Размер файла | |
|
|
Инструкция для кофемашины Bosch TCA 5201 benvenuto classic piano |
|
3058.1 KB |
|
|
Коды ошибок кофемашин Bosch |
|
35.4 KB |
|
|
Схема кофемашины Bosch TCA5201 |
|
397.7 KB |
| Вопросы для голосования | Пользователи | Специалисты | |
| Качество приготовления кофе |
|
|
Для оценки этой машины, пожалуйста, авторизуйтесь. Впервые на сайте? Зарегистрируйтесь сейчас, бесплатно! |
| Внешний вид, дизайн |
|
|
|
| Сервисное обслуживание и уход |
|
|
|
| Надежность и ремонтопригодность кофемашины |
|
|
|
| Рекомендуете купить? |
|
|
|
| Цена кофемашины |
|
|
| |
Тема:
Re: Кофемашина Bosch TCA 5201 benvenuto classic piano |
|
Expert Administrator Сообщений: 5631 Авторитет:+80/-0 |
Отличное соотношения качества приготовления кофе, качества самой кофемашины и цены. Сообщить модератору |
|
zvet Сообщений: 167 |
Re: Кофемашина Bosch TCA 5201 benvenuto classic piano Бош практически всегда на высоте. Отличная кофемашина. Пользовался больше года — доволен. Сообщить модератору |
| Новый отзыв |
Опубликовано в Bosch
Bosch TCA 5201 Benvenuto Classic Piano позволяет пользователю на свой вкус настроить степень помола кофейного зерна, сделать выбор крепости напитка. Микропроцессор кофемашины запомнит установленный размер порции, а также укажет на необходимость запуска сервисной программы – комбинированного процесса чистки и удаления накипи (декальцинации).
Если при включении автоматической кофеварки Бош Пиано горит светодиодный индикатор «S», необходимо незамедлительно провести удаление накипи и чистку. Будьте внимательны – в случае отклонения от регламента, приведенного в инструкции, возможно повреждение кофемашины.
Ссылка для скачивания/чтения инструкции по эксплуатации кофемашины Bosch TCA 5201 Benvenuto Classic Piano на русском языке:
Инструкция для Bosch TCA 5201 Piano




 .
.  .
.
 at the
  ,
,  ,
, 
 the switch-


 ,
,  ,
,
 ) lights up
 ) light up
 ,
,  , S ) light up


 (manually at the outlet)