24.08.2021
Новые G-Shock в индустриальном стиле – GA-2200
Casio GA-2200 — продолжение развития 2000-ой линейки GA.
G-Shock GA-2200 — это новая модель с легким корпусом, усиленным углеродным …
20.04.2021
GSW-H1000 – первые смарт-часы G-Shock от Casio
После долгих ожиданий Casio выпустила умные часы G-Shock с Wear OS от Google.
GSW-H1000 — это первые умные часы G-Shock, которые …
03.04.2021
G-Shock GST-B400 – самые тонкие G-Steel
Casio анонсировала выпуск модели GST-B400.
Часы имеют самый тонкий профиль (12,9 мм) из всех представленных моделей в линейке G-Steel. …
15.09.2020
Первые Gravitymaster c квадро-сенсором Quad Sensor – G-Shock GR-B200
CASIO представила новую авиационную модель линейки Master of G.
G-Shock GR-B200 обладают характерным внешний видом, вдохновленным ручкой …
Требуется руководство для вашей Casio Baby-G MSG-C100-2AER Наручные часы? Ниже вы можете просмотреть и загрузить бесплатно руководство в формате PDF. Кроме того, приведены часто задаваемые вопросы, рейтинг изделия и отзывы пользователей, что позволит оптимально использовать ваше изделие. Если это не то руководство, которое вы искали, – свяжитесь с нами.
Ваше устройство неисправно, и в руководстве отсутствует решение? Перейдите в Repair Café для получения бесплатных ремонтных услуг.
Руководство

Рейтинг
Сообщите нам, что вы думаете о Casio Baby-G MSG-C100-2AER Наручные часы, оставив оценку продукта. Хотите поделиться вашими впечатлениями от данного изделия или задать вопрос? Вы можете оставить комментарий в нижней части страницы.
Довольны ли вы данным изделием Casio?
Да Нет
Будьте первым, кто оценит это изделие
0 голоса
Часто задаваемые вопросы
Наша служба поддержки выполняет поиск полезной информации по изделиям и отвечает на часто задаваемые вопросы. Если вы заметили неточность в наших часто задаваемых вопросах, сообщите нам об этом с помощью нашей контактной формы.
Мои механические часы быстро бегают, что мне делать? Проверенный
Это может быть вызвано воздействием магнитного поля. Ее можно решить с помощью процесса размагничивания, выполняемого профессиональным часовщиком.
Это было полезно (662)
Аккумулятор в моем устройстве окислился, могу ли я его безопасно использовать? Проверенный
Ja, устройство все еще можно безопасно использовать. Во-первых снимаем оксидизд АКБ. Никогда не используйте для этого голые руки. Затем протрите батарейный отсек ватным тампоном, смоченным уксусом или лимонным соком. Дайте ему высохнуть и вставьте новые батарейки.
Это было полезно (652)
Что означают AM и PM? Проверенный
AM означает Ante Meridiem и указывает на то, что время еще до полудня. PM расшифровывается как Post Meridiem и указывает на то, что время прошло после полудня.
Это было полезно (569)
Что такое хронограф? Проверенный
Хронограф дословно означает «писатель времени». Этим термином называют наручные и другие виды часов, которые не только показывают который час, но и могут измерить определенный промежуток времени, как секундомер.
Это было полезно (518)
Что такое кварцевый механизм? Проверенный
Наручные и другие виды часов с кварцевым механизмом работают на батарейке. Батарейка посылает электрический ток через кристаллы кварца, заставляя их вибрировать. Эти вибрации приводят часовой механизм в действие. Поскольку кварц вибрирует с фиксированной частотой, часы с кварцевым механизмом чрезвычайно точны.
Это было полезно (350)
Что такое GMT? Проверенный
GMT означает среднее время по Гринвичу (иногда его называют UTC, что означает всемирное координированное время). Это время для долготы 0, которая проходит через Гринвич недалеко от Лондона.
Это было полезно (349)
Под стеклом моих часов Casio появилась влага. Что мне делать? Проверенный
Casio утверждают, что если влага появляется после экстремального изменения температуры и впоследствии относительно быстро исчезает, то в этом нет ничего плохого. Если влага не исчезает, необходимо как можно скорее отремонтировать часы.
Это было полезно (49)
CASIO G-SHOCK GA-2100 — Analog-Digatal Watch Manual
INTRODUCTION
Congratulations upon your selection of this CASIO watch.
To ensure that this watch provides you with the years of service for which it is designed, carefully read and follow the instructions in this manual, especially the information under «Operating Precautions» and «User Maintenance».
About This Manual
- Depending on the model of your watch, display text appears either as dark figures on a light background, or light figures on a dark background. All sample displays in this manual are shown using dark figures on a light background.
- Button operations are indicated using the letters shown in the illustration.
- Note that the product illustrations in this manual are intended for reference only, and so the actual product may appear somewhat different than depicted by an illustration.
Things to check before using the watch
- Check the Home City and the daylight saving time (DST) setting.
Use the procedure under «To configure Home City settings» to configure your Home City and daylight saving time settings.
- Proper World Time Mode data depends on correct Home City, time, and date settings in the Timekeeping Mode. Make sure you configure these settings correctly.
- Set the current time.
See «Adjusting the Digital Time and Date Settings».
The watch is now ready for use.
Mode Reference Guide
The mode you should select depends on what you want to do.
| To do this: | Enter this mode: |
|
Timekeeping Mode |
| View the current time in one of 48 cities (31 time zones) around the globe | World Time Mode |
| Use the stopwatch to measure elapsed time | Stopwatch Mode |
| Use the countdown timer | Countdown Timer Mode |
| Set an alarm time | Alarm Mode |
Selecting a Mode
- Press C to cycle between the modes as shown below.
-
To return to the Timekeeping Mode from any other mode, hold down C for at least two seconds.
General Functions (All Modes)
The functions and operations described in this section can be used in all modes.
Auto Return
If you do not perform any operation for about two or three minutes while configuring settings (setting flashing on the digital display) in any mode, the watch will exit the setting operation and return to normal display.
Scrolling
The B and D are used on the setting mode to scroll through data on the display. In most cases, holding down these buttons during a scroll operation scrolls through the data at high speed.
Moving the Hands Out of the Way for Better Viewing
You can use the procedure below to temporarily move the hour and minute hands out of the way to better view what is on the display.
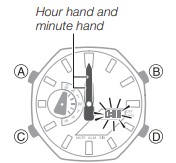
- Press B and C at the same time. This will cause the hour and minute hands to move to a location where they do not block your view of the digital display.
Example: When the current time is 8:30 - Pressing B and C at the same time again will cause the hands to return to their normal positions (normal timekeeping).
Note
- Watch button functions are the same regardless of whether the hands are moved out of the way or at their normal positions.
-
Changing to another mode will cause the hands to move back to their normal positions.
-
The hands also will move back to their normal positions automatically if no operation is performed for about one hour.
Timekeeping
Use the Timekeeping Mode to set and view the current time and date.
- To view the Home City name (English), press A.
Configuring Home City settings
There are two Home City settings: actually selecting the Home City, and selecting either standard time or daylight saving time (DST).
To configure Home City settings
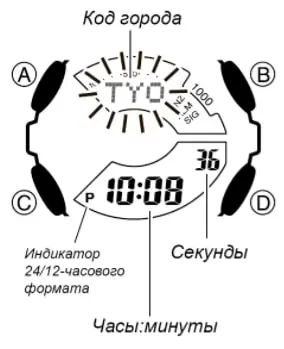
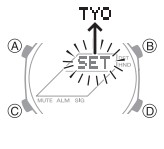
- In the Timekeeping Mode, hold down A until the flashing SET indicator disappears from the display and the currently selected city code appears on the display.
- This indicates the Home City setting mode.
- Use D (+) and B (–) to scroll through city codes until the one you want is displayed.
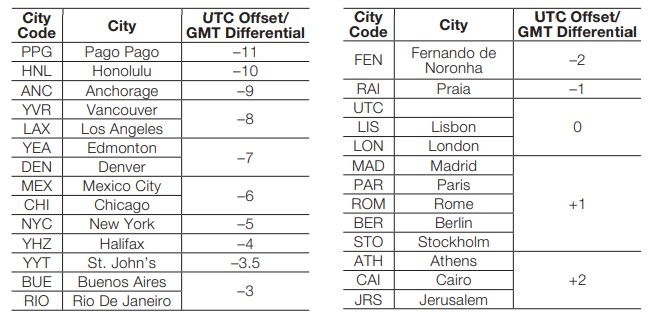
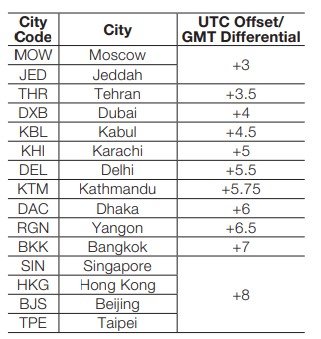
- For details about city codes, see the «City Code Table» at the back of this manual.
- After the setting is the way you want, press A to return to the Timekeeping Mode.
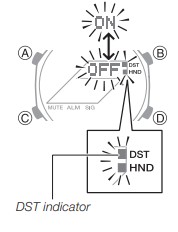
To change the Daylight Saving Time (summer time) setting
- In the Timekeeping Mode, hold down A until the flashing SET indicator disappears from the display and the currently selected city code appears on the display.
- Press C to display the DST setting mode.
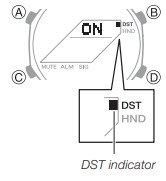
- Press D or B to toggle between Daylight Saving Time (ON) and Standard Time (OFF).
- Note that you cannot switch between daylight saving time and standard time while UTC is selected as your Home City.
- After the setting is the way you want, press A to return to the Timekeeping Mode.
- The DST indicator appears to indicate that Daylight Saving Time is turned on.
Adjusting the Digital Time and Date Settings
Use the procedure below to adjust the digital time and date settings.
To configure the digital time and date settings
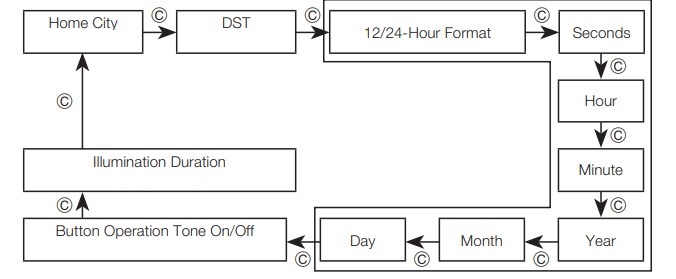
- In the Timekeeping Mode, hold down A until the flashing SET indicator disappears from the display and the currently selected city code appears on the display.
- Press C to move the flashing in the sequence shown below to select the other settings.
- When the timekeeping setting you want to change is flashing, perform the operation described below.
| Screen | To do this: | Do this: |
 |
Toggle between 12-hour (12H) and 24-hour (24H) timekeeping | Use D and B. |
 |
Reset the seconds to 00 | Press D. |
 |
Change the hour or minute | Use D (+) and B (–) to change these settings. |
 |
Change the year | |
 |
Change the month or day |
- Press A to exit the setting mode.
Note
- Resetting the seconds to 00 while the current count is in the range of 30 to 59 causes the minutes to be increased by 1.
- The watch’s built-in full automatic calendar makes allowances for different month lengths and leap years. Once you set the date, there should be no reason to change it except after you have the watch’s battery replaced.
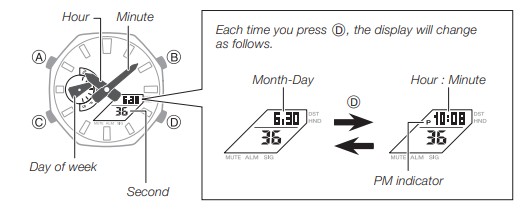
- While 12-hour format is selected for timekeeping, a P indicator will appear for times from noon to 11:59 p.m. No indicator appears for times from midnight to 11:59 a.m. With 24-hour format, time is displayed from 0:00 to 23:59, without any P indicator.
- The day of the week changes automatically when the date changes.
Checking the Current Time in a Different Time Zone
You can use the World Time Mode to view the current time in one of 31 time zones (48 cities) around the globe.
The city that is currently selected in the World Time
Mode is called the «World Time City».
- The hour and minute hands indicate information for the currently selected Home City.
- When you enter the World Time Mode, the currently selected city code and city name (English) scroll once across the digital display. After that, the current time in the World Time City is displayed.
- You can view the city code by pressing A.
To enter the World Time Mode
Use C to select the World Time Mode.
To view the time in another time zone
In the World Time Mode, use D to change the city code.
To specify standard time or daylight saving time (DST) for a city
- In the World Time Mode, use D to display the city code (time zone) whose Standard Time/Daylight Saving Time setting you want to change.
- Hold down A for at least two seconds.
- This toggles the city code you selected in step 1 between Daylight Saving Time (DST indicator displayed) and standard time (DST indicator not displayed).
- Note that you cannot switch between standard time/ daylight saving time (DST) while UTC is selected as the World Time City.
- The standard time/daylight saving time (DST) setting affects only the currently displayed city. Other cities are not affected.
Using the Stopwatch
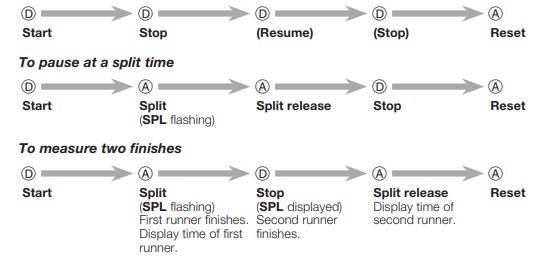
The stopwatch measures elapsed time, split times, and two finishes.
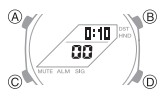
The stopwatch measures elapsed time in units of 1/100 seconds for the first hour, and in 1-second units after that for up to 24 hours total. After that, elapsed time reverts to zero and then stops.
To enter the Stopwatch Mode
Use C to select the Stopwatch Mode.
To perform an elapsed time operation
- Elapsed time is shown in 1/100-second units for the first hour of the measurement. After the first hour, elapsed time is shown in one-second units.
Note
- An ongoing elapsed time measurement operation will continue internally even if you change to another mode. However, if you exit the Stopwatch Mode while a split time is displayed, the split time will not be displayed when you return to the Stopwatch Mode.
Countdown Timer
The countdown timer start time can be set in 1-second
increments up to a maximum of 24 hours. An alarm sounds when the countdown reaches zero.
To enter the Countdown Timer Mode
Use C to select the Countdown Timer Mode.
To configure the countdown timer
- If a countdown timer operation is in progress, press D to pause it and then press A to reset the timer to its start time.
- If a countdown timer operation is paused, press A to reset the timer to its start time.
- Hold down A until the flashing SET indicator disappears from the display and the hour digits start to flash. Release A after the digits start to flash.
- Each press of C cause the flashing to move between settings in the following sequence: Hours Minutes
- The flashing value is the one that is currently selected for setting.
- Use D (+) and B (–) to change the currently flashing value.
- Press A to exit the setting mode.
To perform a countdown timer operation
To stop the alarm
Press any button.
Using the Alarm
You can set five independent daily alarms. When a daily alarm is turned on, an alarm tone will sound for about 10 seconds each day when the time in the Timekeeping Mode reaches the preset alarm time.
You can also turn on an Hourly Time Signal, which will cause the watch to beep twice every hour on the hour.
To enter the Alarm Mode
Use C to select the Alarm Mode.
- Alarm screens are numbered AL1 through AL5. The Hourly Time Signal screen is indicated by SIG.
- When you enter the Alarm Mode, the data you were viewing when you last exited the mode appears first.
- If you do not perform any operation for about two or three minutes in the Alarm Mode, the watch will automatically return to the Timekeeping Mode.
To set an alarm time
- In the Alarm Mode, use D to display the alarm whose settings you want to change.
- Hold down A until the flashing SET indicator disappears from the display and the alarm time hour digits start to flash. Release A after the digits start to flash.
- ALM appears on the display, indicating that alarm setting is enabled.
- Press C to move the flashing between the hour and the minute digits.
- The selected digits are those that are flashing.
- Use D (+) and B (–) to change the hour and minute settings.
- When setting the alarm time using the 12-hour format, take care to set the time correctly as a.m. (no indicator) or p.m. (P indicator).
- Press A to exit the setting mode.
To test the alarm
In the Alarm Mode, hold down D to sound the alarm.
To turn an alarm and the Hourly Time Signal on and off
In the Alarm Mode, use D to select an alarm or the hourly time signal.
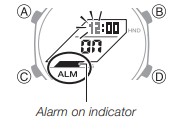
- When the alarm you want or the Hourly Time Signal is displayed, press A to toggle it between on (ON displayed) and off (– – displayed).
- The alarm on indicator (when any alarm is on) and the Hourly Time Signal on indicator (when the Hourly Time Signal is on) are shown on the display in all modes.
To stop the alarm
Press any button.
Illumination
The display of the watch is illuminated for easy reading in the dark.
To turn on illumination
Press B in any mode to illuminate the display.
- You can use the procedure below to select either 1.5 seconds or three seconds as the illumination duration.
Note
-
The LED light will turn off automatically if the alarm starts to sound.
-
The LED light is disabled after holding down A to display a setting screen, or while the hands are moving at high speed.
To change the illumination duration
- In the Timekeeping Mode, hold down A until the flashing SET indicator disappears from the display and the currently selected city code appears on the display.
- Press C ten times to display the illumination duration setting screen.
- The current illumination duration setting (1 or 3) will be flashing in the display.
- Press D or B to toggle the illumination duration between three seconds (3 displayed) and 1.5 seconds (1 displayed).
- Press A to exit the setting mode.
Adjusting Hand Positions
The watch hands can go out of alignment with the time on the digital display if it is exposed to strong magnetism or impact. If this happens, you should adjust the hand positions.
- In the Timekeeping Mode, hold down A for at least five seconds until SUB starts to flash. Release A after SUB flashes.
- This enters the day of the week hand adjustment mode.
- If the day of the week hand is not pointed at the [SU] position, use D and B to move it there.
- Holding down either button moves the hands at high speed.
- Press C.
- This causes 0:00 to flash to indicate the hour and minute hand adjustment mode.
- If the hour and minute hands are not at 12 o’clock, use D (+) and B (–) to adjust them until they are.
- Press A to return to the Timekeeping Mode.
Check to make sure that the time indicated by the hands matches the time on the digital display. If the times don’t match, perform the correction procedure above again.
Button Operation Tone
You can turn the button operation tone on or off as desired.
-
Even if you turn off the button operation tone, alarms, the Hourly Time Signal, and other beepers all operate normally.
To turn the button operation tone on and off
- In the Timekeeping Mode, hold down A until the flashing SET indicator disappears from the display and the currently selected city code appears on the display.
- Press C nine times to display the button operation tone On/Off screen.
The screen will show either KEYor MUTE.
- Press D or B to toggle the button operation tone setting between enabled (KEY
) and disabled (MUTE).
- Press A to exit the setting mode.
Note
- The mute indicator is displayed in all modes when the button operation tone is disabled.
Troubleshooting
Hand Movement and Indications
- The time indicated by the hands is different from the digital time.
This could indicate that the watch has been exposed to strong magnetism or impact, which has caused problems with proper hand alignment. Adjust the watch’s hand home position alignment.
Time Setting
- The current time setting is off by hours.
Your Home City setting may be wrong. Check your Home City setting and correct it, if necessary. - The current time setting is off by one hour.
You may need to change your Home City’s standard time/daylight saving time (DST) setting. Use the procedure under «Adjusting the Digital Time and Date Settings» to change the standard time/daylight saving time (DST) setting.
World Time Mode
- The time for my World Time City is off in the World Time Mode.
This could be due to incorrect switching between standard time and daylight saving time. See «To specify standard time or daylight saving time (DST) for a city» for more information.
Main Indicators
| Number | Name |
| 1 | Split indicator |
| 2 | PM indicator |
| 3 | Hands shifted indicator |
| 4 | DST indicator |
| 5 | Mute indicator |
| 6 | Alarm on indicator |
| 7 | Hourly time signal on indicator |
Specifications
Accuracy at normal temperature:
- ± 15 seconds a month
Digital Timekeeping:
- Hour, minutes, seconds, p.m. (P), month, day
- Time format: 12-hour and 24-hour
- Calendar system: Full Auto-calendar pre-programmed from the year 2000 to 2099
- Other: Home City code (can be assigned one of 48 city codes); Standard Time/Daylight Saving Time (summer time)
Analog Timekeeping:
- Hour, minutes (hand moves every 20 seconds), day of the week
World Time:
- 48 cities (31 time zones) and Coordinated Universal Time (UTC)
- Other: Daylight Saving Time/Standard Time
Stopwatch:
- Measuring unit: 1/100 seconds (first hour); 1 second (after first hour)
- Measuring capacity: 23:59’59»
- Measuring modes: Elapsed time, split time, two finishes
Countdown Timer:
- Measuring unit: 1 second
- Countdown range: 24 hours
- Countdown start time setting range: 1 second to 24 hours (1-second increments)
Alarms:
- 5 Daily alarms; Hourly time signal
Illumination:
- Double LED (light-emitting diode); Selectable illumination duration (approximately 1.5 seconds or 3 seconds)
Other:
- Button operation tone on/off; Moving the Hands to View the Digital Display
Battery:
- Two silver oxide batteries (Type: SR726W)
- Approximate battery operating time: 3 years under the following conditions:
- Alarm: 10 seconds/day
- 1 illumination operation (1.5 seconds) per day
Frequent use of illumination runs down the battery.
Specifications are subject to change without notice.
Operating Precautions
Water Resistance
- The information below applies to watches with WATER RESIST or WATER RESISTANT marked on the back cover.
| Water Resistance Under Daily Use | Enhanced Water Resistance Under Daily Use | ||||
| 5 Atmospheres | 10 Atmospheres | 20 Atmospheres | |||
| Marking | On watch front or on back cover | No BAR mark | 5BAR | 10BAR | 20BAR |
| Example of Daily Use | Hand washing, rain | Yes | Yes | Yes | Yes |
| Water-related work, swimming | No | Yes | Yes | Yes | |
| Windsurfing | No | No | Yes | Yes | |
| Skin diving | No | No | Yes | Yes |
- Do not use your watch for scuba diving or other types of diving that requires air tanks.
- Watches that do not have WATER RESIST or WATER RESISTANT marked on the back cover are not protected against the effects of sweat. Avoid using such a watch under conditions where it will be exposed to large amounts of sweat or moisture, or to direct splashing with water.
- Even if a watch is water resistant, note the usage precautions described below. Such types of use reduce water resistance performance and can cause fogging of the glass.
- Do not operate the crown or buttons while your watch is submersed in water or wet.
- Avoid wearing your watch while in the bath.
- Do not wear your watch while in a heated swimming pool, sauna, or any other high temperature/high humidity environment.
- Do not wear your watch while washing your hands or face, while doing housework, or while performing any other task that involves soaps or detergents. x After submersion in seawater, use plain water to rinse all salt and dirt from your watch.
- To maintain water resistance, have the gaskets of your watch replaced periodically (about once every two or three years).
-
A trained technician will inspect your watch for proper water resistance whenever you have its battery replaced. Battery replacement requires the use of special tools. Always request battery replacement from your original retailer or from an authorized CASIO service center.
-
Some water-resistant watches come with fashionable leather bands. Avoid swimming, washing, or any other activity that causes direct exposure of a leather band to water.
-
The inside surface of the watch glass may fog when the watch is exposed to a sudden drop in temperature. No problem is indicated if the fogging clears up relatively quickly. Sudden and extreme temperature changes (such as coming into an air conditioned room in the summer and standing close to an air conditioner outlet, or leaving a heated room in the winter and allowing your watch to come into contact with snow) can cause it to take longer for glass fogging to clear up. If glass fogging does not clear up or if you notice moisture inside of the glass, immediately stop using your watch and take it to your original retailer or to an authorized CASIO service center.
-
Your water-resistant watch has been tested in accordance with International Organization for Standardization regulations.
Band
- Tightening the band too tightly can cause you to sweat and make it difficult for air to pass under the band, which can lead to skin irritation. Do not fasten the band too tightly. There should be enough room between the band and your wrist so you can insert your finger.
- Deterioration, rust, and other conditions can cause the band to break or come off of your watch, which in turn can cause band pins to fly out of position or to fall out. This creates the risk of your watch falling from your wrist and becoming lost, and also creates the risk of personal injury. Always take good care of your band and keep it clean.
- Immediately stop using a band if you even notice any of the following: loss of band flexibility, band cracks, band discoloration, band looseness, band connecting pin flying or falling out, or any other abnormality. Take your watch to your original retailer or to a CASIO service center for inspection and repair (for which you will be charged) or to have the band replaced (for which you will be charged).
Temperature
- Never leave your watch on the dashboard of a car, near a heater, or in any other location that is subject to very high temperatures. Do not leave your watch where it will be exposed to very low temperatures. Temperature extremes can cause your watch to lose or gain time, to stop, or otherwise malfunction.
- Leaving your watch in an area hotter than +60°C (140°F) for long periods can lead to problems with its LCD. The LCD may become difficult to read at temperatures lower than 0°C (32°F) and greater than +40°C (104°F).
Impact
- Your watch is designed to withstand impact incurred during normal daily use and during light activity such as playing catch, tennis, etc. Dropping your watch or otherwise subjecting it to strong impact, however, can lead to malfunction. Note that watches with shock-resistant designs (G-SHOCK, BABY-G, G-MS) can be worn while operating a chain saw or engaging in other activities that generate strong vibration, or while engaging in strenuous sports activities (motocross, etc.)
Magnetism
- The hands of analog and combination (analog-digital) watches are moved by a motor that uses magnetic force. When such a watch is close to a device (audio speakers, magnetic necklace, cell phone, etc.) that emits strong magnetism, the magnetism can cause timekeeping to slow down, speed up, or stop, resulting in the incorrect time being displayed.
- Very strong magnetism (from medical equipment, etc.) should be avoided because it can cause malfunction of your watch and damage to electronic components.
Electrostatic Charge
- Exposure to very strong electrostatic charge can cause your watch to display the wrong time. Very strong electrostatic charge even can damage electronic components.
- Electrostatic charge can cause the display to go blank momentarily or cause a rainbow effect on the display.
Chemicals
- Do not allow your watch to come into contact with thinner, gasoline, solvents, oils, or fats, or with any cleaners, adhesives, paints, medicines, or cosmetics that contain such ingredients. Doing so can cause discoloration of or damage to the resin case, resin band, leather, and other parts.
Storage
- If you do not plan to use your watch for a long time, thoroughly wipe it free of all dirt, sweat, and moisture, and store it in a cool, dry place.
Resin Components
- Allowing your watch to remain in contact with other items or storing it together with other items for long periods while it is wet can cause color on resin components to transfer to the other items, or the color of the other items to transfer to the resin components of your watch. Be sure to dry off your watch thoroughly before storing it and make sure it is not in contact with other items.
- Leaving your watch where it is exposed to direct sunlight (ultraviolet rays) for long periods or failure to clean dirt from your watch for long periods can cause it to become discolored.
- Friction caused by certain conditions (strong external force, sustained rubbing, impact, etc.) can cause discoloration of painted components.
- If there are printed figures on the band, strong rubbing of the printed area can cause discoloration.
- Leaving your watch wet for long periods can cause fluorescent color to fade. Wipe the watch dry as soon as possible after it becomes wet.
- Semi-transparent resin parts can become discolored due to sweat and dirt, and if exposed to high temperatures and humidity for long periods.
- Daily use and long-term storage of your watch can lead to deterioration, breaking, or bending of resin components. The extent of such damage depends on usage conditions and storage conditions.
Leather Band
- Allowing your watch to remain in contact with other items or storing it together with other items for long periods while it is wet can cause the color of the leather band to transfer to the other items or the color of the other items to transfer to the leather band. Be sure to dry off your watch thoroughly with a soft cloth before storing it and make sure it is not in contact with other items.
- Leaving a leather band where it is exposed to direct sunlight (ultraviolet rays) for long periods or failure to clean dirt from a leather band for long periods can cause it to become discolored.
Exposing a leather band to rubbing or dirt can cause color transfer and discoloration.
Metal Components
- Failure to clean dirt from metal components can lead to formation of rust, even if components are stainless steel or plated. If metal components exposed to sweat or water, wipe thoroughly with a soft, absorbent cloth and then place the watch in a well-ventilated location to dry.
- Use a soft toothbrush or similar tool to scrub the metal with a weak solution of water and a mild neutral detergent, or with soapy water. Next, rinse with water to remove all remaining detergent and then wipe dry with a soft absorbent cloth. When washing metal components, wrap the watch case with kitchen plastic wrap so it does not come into contact with the detergent or soap.
Bacteria and Odor Resistant Band
- The bacteria and odor resistant band protects against odor generated by the formation of bacteria from sweat, which ensures comfort and hygiene. In order to ensure maximum bacteria and odor resistance, keep the band clean. Use an absorbent soft cloth to thoroughly wipe the band clean of dirt, sweat, and moisture. A bacteria and odor resistant band suppresses the formation of organisms and bacteria. It does not protect against rash due to allergic reaction, etc.
Liquid Crystal Display
- Display figures may be difficult to read when viewed from an angle.
Note that CASIO COMPUTER CO., LTD. assumes no responsibility for any damage or loss suffered by you or any third party arising through the use of your watch or its malfunction.
User Maintenance
Caring for Your Watch
Remember that you wear your watch next to your skin, just like a piece of clothing.
To ensure your watch performs at the level for which it is designed, keep it clean by frequently wiping with a soft cloth to keep your watch and band free of dirt, sweat, water and other foreign matter.
- Whenever your watch is exposed to sea water or mud, rinse it off with clean fresh water.
- For a metal band or a resin band with metal parts, use a soft toothbrush or similar tool to scrub the band with a weak solution of water and a mild neutral detergent, or with soapy water. Next, rinse with water to remove all remaining detergent and then wipe dry with a soft absorbent cloth. When washing the band, wrap the watch case with kitchen plastic wrap so it does not come into contact with the detergent or soap.
-
For a resin band, wash with water and then wipe dry with a soft cloth. Note that sometimes a smudge like pattern may appear on the surface of a resin band. This will not have any effect on your skin or clothing. Wipe with a cloth to remove the smudge pattern.
-
Clean water and sweat from a leather band by wiping with a soft cloth.
-
Not operating a watch crown, buttons, or rotary bezel could lead to later problems with their operation. Periodically rotate the crown and rotary bezel, and press buttons to maintain proper operation.
Dangers of Poor Watch Care
Rust
- Though the metal steel used for your watch is highly rust-resistant, rust can form if your watch is not cleaned after it becomes dirty.
- Dirt on your watch can make it impossible for oxygen to come into contact with the metal, which can lead to breakdown of the oxidization layer on the metal surface and the formation of rust.
- Rust can cause sharp areas on metal components and can cause band pins to fly out of position or to fall out. If you ever notice any abnormality immediately stop using your watch and take it to your original retailer or to an authorized CASIO service center
- Even if the surface of the metal appears clean, sweat and rust in crevasses can soil the sleeves of clothing, cause skin irritation, and even interfere with watch performance.
Premature Wear
- Leaving sweat or water on a resin band or bezel, or storing your watch an area subject to high moisture can lead to premature wear, cuts, and breaks.
Skin Irritation
- Individuals with sensitive skin or in poor physical condition may experience skin irritation when wearing a watch. Such individuals should keep their leather band or resin band particularly clean. Should you ever experience a rash or other skin irritation, immediately remove your watch and contact a skin care professional.
Battery Replacement
- Leave battery replacement up to your original retailer or authorized CASIO service center.
- Have the batteries replaced only with the type specified in the User’s Guide. Use of a different battery type can cause malfunction. x When replacing the batteries, also request a check for proper water resistance.
- Ornamental resin components may become worn, cracked, or bent over time when subjected to normal daily use. Note that if cracking or any other abnormality indicating possible damage is noticed in a watch submitted for battery replacement, your watch will be returned with an explanation of the abnormality, without the requested servicing being performed.
Initial Batteries
- The batteries that come loaded in your watch when you purchase it are used for function and performance testing at the factory.
- Test batteries may go dead quicker than the normally rated battery life as noted in the User’s Guide. Note that you will be charged for replacement of these batteries, even if replacement is required within your watch’s warranty period.
Low Battery Power
- Low battery power is indicated by large timekeeping error, by dim display contents, or by a blank display.
- Operation while battery power is low can result in malfunction. Replace the batteries as soon as possible.
City Code Table
- This table shows the city codes of this watch (As of January 2019).
- The rules governing global times (GMT differential and UTC offset) and summer time are determined by each individual country.
CASIO COMPUTER CO., LTD.
6-2, Hon-machi 1-chome
Shibuya-ku, Tokyo 151-8543, Japan
Documents / Resources
Download manual
Here you can download full pdf version of manual, it may contain additional safety instructions, warranty information, FCC rules, etc.
Download CASIO G-SHOCK GA-2100 — Analog-Digatal Watch Manual
12.01.2023
36143
СОДЕРЖАНИЕ:
- Кнопочная система управления часами Casio G-SHOCK
- Как настроить время на часах Casio G-SHOCK
- Как настроить дату на часах Casio G-SHOCK
- Как настроить дополнительные функции
- Настраиваем G-SHOCK на примере популярных моделей
- Инструкция при покупке часов в Kronostime
Casio G-SHOCK – одни из самых популярных моделей часов, ежедневно приобретаемых по всему миру. Однако у многих пользователей после их приобретения могут возникнуть сложности с настройкой. Команда Kronostime создала подробную инструкцию, как настроить время, дату и другие функции на G-SHOCK’ах, а чтоб вам было еще легче, мы сделали это на примере конкретных моделей.
Кнопочная система управления часами Casio G-SHOCK
Casio всегда старались создавать максимально удобные и эргономичные модели наручных часов. Поэтому неудивительно, что они отдали предпочтение кнопочной системе управления – она проста в использовании, очень надежна и до сих пор не теряет своей актуальности.
Кнопки на часах бывают двух видов:
- Выступающие;
- «Утопленные».
Отметим, что кнопочная система управления имеет ряд преимуществ над, к примеру, сенсорной – крупными кнопками часов Casio G-SHOCK удобно пользоваться даже в перчатках (например, зимой).
Как настроить время на часах Casio G-SHOCK
Большая часть самых популярных моделей G-SHOCK’ов оснащается четырьмя главными торцевыми кнопками (более сложные часы имеют пять или даже шесть кнопок):
- Mode – слева снизу;
- Adjust – слева сверху;
- Reverse – справа сверху;
- Forward – справа снизу.
Главная кнопка на часах – это кнопка «Mode», она отвечает за переключение между следующими режимами:
- Секундомер;
- Будильники;
- Календарь;
- Другие дополнительные функции.
Переключение с одного режима на другой сопровождается звуковым сигналом.
Если перед вами модель, сочетающая аналоговый и цифровой циферблат, убедитесь, что значение времени на них совпадает. Если оно разное – зажмите кнопку «Forward» («Вперед») – таким образом стрелки переместятся в положение 00:00.
В случае, если погрешность времени между циферблатами минимальна, попробуйте скорректировать ее, поочередно нажимая кнопки «Forward» и «Reverse» («Вперед» и «Назад»). После этого, для более точной синхронизации, нажмите кнопку «Adjust» («Настройка») и переходите к установке времени:
- Зажмите кнопку «Adjust» и держите до тех пор, пока светодиод не начнет мигать;
- С помощью кнопки «Reverse» выберите нужный часовой пояс;
- С помощью кнопки «Mode» выберите зимний или летний режим времени. Если вам не нужно автоматическое переключение между режимами, отключите его, нажав кнопку «Forward».
- Затем, нажимая кнопку «Mode», выберите режим отображения времени: в 12-ти или 24-х часовом формате. Для того, чтоб переключиться с одного формата на другой, нажмите кнопку «Forward».
- Снова зажимаем кнопку «Mode» и переходим к режиму установки часов, секунд и минут, а затем с помощью кнопки «Forward» устанавливаем нужные цифры.
Как только вы настроили время на часах G-SHOCK, еще раз нажмите кнопку «Adjust» для сохранения всех настроек.
Как настроить дату на часах Casio G-SHOCK
Дата на часах Casio G-SHOCK настраивается по тому же принципу, как и время:
- Последний режим при еще одном нажатии «Mode» (после того, как вы установили время) — это календарь;
- Нажимаем «Mode», переходим к режиму установки года, месяца и дня, а затем с помощью кнопки «Forward» устанавливаем нужные цифры.
Как только вы настроили дату на часах G-SHOCK, снова нажмите кнопку «Adjust» для сохранения всех настроек.
Как настроить дополнительные функции
Чтобы настроить на G-SHOCK’ах дополнительные параметры вроде будильника или таймера, используйте следующие кнопки:
- Зажмите кнопку «Forward», чтоб отобразить таймер и секундомер;
- Зажмите кнопку «Reverse», чтоб включить автоматическую подсветку;
- Зажмите кнопку «Mode», чтобы отобразить будильник (при необходимости нажмите на нее несколько раз, чтоб дойти до нужного режима). Затем для ввода времени срабатывания будильника нажмите кнопку «Reverse» — индикатор начнет мигать, установите нужное время кнопкой «Mode» и сохраните настройки нажатием кнопки «Reverse». Отключить будильник можно нажатием той же кнопки — «Reverse».
Данные советы универсальны и подходят для настройки большинства моделей G-SHOCK. Для настройки специфических редких функций, а также при возникновении сложностей лучшим вариантом будет обратиться за помощью к официальной инструкции.
Настраиваем G-SHOCK на примере популярных моделей
Для начала, определитесь, какая именно модель G-SHOCK’ов у вас на руке. В данном блоке мы приведем пример настройки необходимых функций на примере наиболее популярных моделей GA-100 и GA-110. Если среди них нет вашей модели, но внешние параметры часов в целом сходятся – попробуйте воспользоваться универсальной инструкцией.
Настройка модели Casio G-Shock GA-100CF-1A :
- Убедитесь, что часы находятся в режиме текущего времени — в этом режиме на дисплее отображается время или дата и день недели, а индикатор режима часов указывает на «Time»;
- Зажмите кнопку «Adjust», дождитесь мигания индикатора. На цифровом дисплее начнет мигать код города, для которого настроено текущее время;
- Нажмите кнопку «Mode» для выбора нужного параметра для настройки;
- Если вы настраиваете секунды (изображение секунд мигает), нажмите кнопку «Mode» для сброса значения счетчика секунд к 00;
- Для изменения значений, зажимайте кнопку «Forward» для их увеличения и кнопку «Reverse» для уменьшения;
- После окончания настройки нажмите кнопку «Adjust» для их сохранения;
- День недели устанавливается автоматически в соответствии с датой.
Значение времени можно установить в диапазоне от 2000г. до 2099г. Для того, чтоб менять значения с большей скоростью, удерживайте кнопки в зажатом состоянии.
Если вы решите прекратить настройку, не нажимайте кнопки в течение нескольких минут и часы автоматически перейдут в режим текущего времени.
Настройка модели Casio G-Shock GA-110-1B :
- Зажмите кнопку «Adjust», дождитесь мигания индикатора. На цифровом дисплее начнет мигать код города, для которого настроено текущее время;
- Нажмите кнопку «Mode» для выбора нужного параметра для настройки;
- Если вы настраиваете секунды (изображение секунд мигает), нажмите кнопку «Mode» для сброса значения счетчика секунд к 00;
- Для изменения значений, зажимайте кнопку «Forward» для их увеличения и кнопку «Reverse» для уменьшения;
- После окончания настройки нажмите кнопку «Adjust» для их сохранения;
- День недели устанавливается автоматически в соответствии с датой.
Важно! Иногда, как мы уже упоминали выше, аналоговое время может не совпадать с цифровым. Это происходит по разным причинам: сильное магнитное воздействие на часы, очень сильный удар и так далее. В таком случае время на данных моделях корректируется вручную следующим образом:
- Нажмите и удерживайте кнопку «Forward» до появления индикатора “H-SET” в верхнем левом дисплее и индикатора «Sub» в правом верхнем дисплее;
- Проверьте положение стрелки скорости – она должна указывать на значение 50 (находиться в положении 12 часов);
- Если стрелка не там, нажмите кнопку «Forward» для перемещения стрелки в нужное положение;
- Нажмите кнопку «Mode»;
- Проверьте, находятся ли стрелки и минуты в положении 12 часов;
- Если нет, нажимайте кнопки «Forward» и «Reverse» для перемещения стрелок в нужное положение;
- Нажмите кнопку «Adjust» для сохранения настроек;
Часовая и минутная стрелки должны перейти в положение значения установленного времени, а стрелка скорости – в положение 0.
Важно! Для всех моделей действует следующее условие: если вы нажмете кнопку «Forward», когда счетчик находится между 30 и 59, то значение счетчика установится на положении 00, а к счетчику минут прибавится единица. Если же значение счетчика секунд будет между 00 и 29, то изменение счетчика минут не произойдет.
Инструкция при покупке часов в Kronostime
Компания Casio любит и ценит своих покупателей, а команда Kronostime – заботится о своих клиентах, поэтому каждый из вас при покупке наручных часов Casio G-SHOCK получает инструкцию по их эксплуатации. Очень важно, что мы предоставляем инструкции почти на всех языках мира, в том числе и на русском, что позволит вам не только правильно настроить свои часы, но и основательно ознакомиться с их характеристиками и функциями.
Часы
Руководства пользователей
Архив руководств к часам
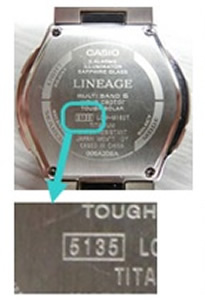
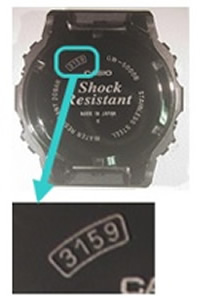
Введите 4-значный (или 3-значный) номер модуля, указанный в прямоугольной рамке в центре или на линии окружности на задней панели часов, затем нажмите Поиск.
Центр на задней панели
Линия окружности на задней панели












 or MUTE.


%20(1)%20(1).webp)


.webp)


%20(1)%20(2).webp)
